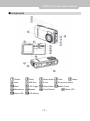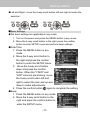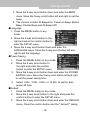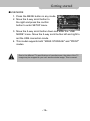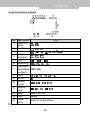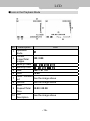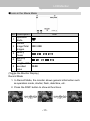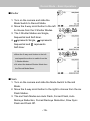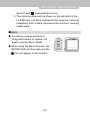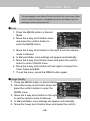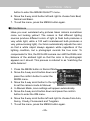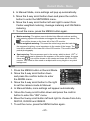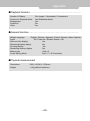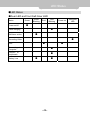
1
User's Manual Table of Contents Attention Safety Precautions……………………………………………………………4 Before You Start………………………………………………………………4 Camera Maintenance………………………………………………………...5 Getting to Know Your Camera Package Contents……………………………………………………………6 Components…………………………………………………………………..7 Before Taking Pictures Attaching the Strap…………………………………………………………...8 Loading Batteries……………………………………………………………..8 Internal Memory and External Memory…………………………………….8 Getting Started Power On/Off…………………………………………………………………10 Mode Switch………………………………………………………………….10 How to Use the 5-way Scroll Button……………………………………….10 Basic Settings……………………………………………………………..…11 Date/Time……………………………………………………………………11 Beep…………………………………………………………………………11 Language……………………………………………………………………12 Power Saving………………………………………………………….…...12 Default Settings…………………………………………………………….12 Format………………………………………………………………………13 TV-Out………………………………………………………………………13 USB………………………………………………………………………….14 LCD Monitor Icons in the Record Mode………………………………………………….15 Icons in the Playback Mode……………………………………………….16 Icons in the Movie Mode……………………………………………………17 Toggle the Monitor Display…………………………………………………17 Record Mode – Basic Operations -1 - Table of Contents Basic Operations…………………………………………………………….18 Shutter………………………………………………………………………..19 Flash………………………………………………………………………….19 Digital Zoom………………………………………………………………….20 Macro…………………………………………………………………………21 Record Mode – Menu Auto / Manual………………………………………………………………..22 Self timer……………………………………………………………………..22 Size……………………………………………………………………………23 Scene…………………………………………………………………………23 Color…………………………………………………………………………..24 Image Quality………………………………………………………………...24 White Balance………………………………………………………………..25 EV Compensation…………………………………………………………...26 Metering………………………………………………………………………26 Sensitivity…………………………………………………………………….27 Playback Mode - Basic Operations Select Image…………………………………………………………………28 Display Still Images……………………………………………………….28 Playback Videos…………………………………………………………..29 Playback Mode – Menu Delete Images……………………………………………………………….30 Delete One………………………………………………………………...30 Delete All…………………………………………………………………..30 Protect Images……………………………………………………………….30 Slideshow Playback…………………………………………………………31 Copy files to memory card………………………………………………….31 DPOF…………………………………………………………………………32 Movie Mode - Basic Operations Record / Stop…………………………………………………………………34 -2 - Table of Contents Macro…………………………………………………………………………34 Image Quality………………………………………………………………..34 Connecting to the Computer Installing the Camera Driver………………………………………………..35 Installing the Software Application…………………………………………37 Connecting Your Camera to Computer……………………………………41 Connecting Your Camera to Printer Connecting Your Camera to Printer…………………………………..41 Appendix…………………………………………………………………...…42 LED Status……………………………………………………………………44 -3 - Attention Thank you for choosing DXG. Please read through this manual carefully before using the camera and follow the instructions to avoid damaging the camera. Safety Precautions z The Software CD packaged with this camera is designed for a PC only. Playing it on a stereo or CD audio player may damage the CD. z This camera is a precision electronic device. Do not attempt to service this camera yourself, as opening or removing the cover may expose you to dangerous voltage points or other risks. zTo reduce the risk of fire, do not store this product under direct sunlight. Before You Start z Take some test shots prior to formal recording Before using this camera for an important occasion, such as a wedding ceremony or overseas trip, first test the camera to ensure that it functions properly. DXG is not responsible for any incidental losses (such as the costs of photography or the loss of income from photography) incurred as the result of this product malfuctioning, and no compensation will be provided. z Copyright information All pictures taken with this digital camera must be in accordance with copyright law. When "No Photography" restrictions are in place, it is illegal to record any live performance, improvisation or exhibit, even for personal use. Any transfer of pictures or memory card data must be conducted under the constraints of copyright law. z Notes on the LCD (Liquid Crystal Display) monitor Be extra careful with the LCD monitor. If it is damaged and begins to leak, do the following: 1. If the liquid touches the skin: wipe the skin dry with a cloth and rinse immediately with plenty of water. -4 - Attention 2. If the liquid comes in contact with eyes: rinse immediately with plenty of water for at least 15 minutes and seek medical advice as soon as possible. 3. If the liquid is accidentally swallowed: rinse the mouth with water, drink plenty of water and induce vomiting. Seek medical advice as soon as possible. Camera Maintenance z This product consists of intricate electrical parts. To ensure the highest possible performance, do not drop or hit the camera. z Avoid using or storing the camera in the following locations: 1. Damp or dusty places. 2. In sealed vehicles, in direct sunlight, or in any areas with extremely high temperatures. 3. Turbulent or high-vibration environments. 4. Areas with smoke, oil fumes or steam. 5. Locations subject to strong magnetic fields. 6. Rainy or snowy environments. z Do not open the battery cover when the power is on. z If water has entered the camera, turn the power OFF and remove the batteries immediately. z How to maintain the camera: 1. If the lens, LCD monitor or viewfinder surface is dirty, use a lens brush or soft cloth to wipe it clean. Do not touch the lens with your fingers. 2. To avoid scratching the lens, LCD monitor or viewfinder surface, do not use any hard or abrasive object to touch the camera. 3. Do not use any detergents or volatile solutions to clean the camera. This may harm the camera and/or paint. Use a soft cloth only. -5 - Getting to know your camera Package Contents The following items are included in the DXG- 409 package: .……………………………………………………………………………… ■ Digital Camera ■ User's Manual …………………………………………………………………………………… ■ “AAA” Batteries x 2 ■ Camera Bag …………………………………………………………………………………… ■ Software CD ■ 3-in-1 USB Cable …………………………………………………………………………………… ■ Wrist Strap ………………………………………………………………………………………………………… -6 - Getting to know your camera Components Shutter Power Mode Switch Flash Lens USB Port Zoom 5-way scroll button Menu LCD Toggle Strap Holder Battery Cover Microphone Speaker Tripod Socket Macro LED LCD Monitor -7 - Macro Status LED Before Taking Pictures Attaching the Strap Attach the camera strap as follows: 1. Insert the thin end of the strap into the strap holder. 2. Pass the other end of the strap through the loop. 3. Pull the strap taut. Loading Batteries z Open the battery cover, make sure the battery direction is correct, load the batteries into the battery compartment, and close the cover. Internal Memory and External Memory (SD CARD) z This camera has 16 MB of built-in flash memory to provide users a temporary space for storing data if the external memory card is full (actually, a small amount of memory is used by the internal firmware so not all of the 16 MB is available for use.) If a memory card is loaded in the camera, all actions (e.g. formatting the memory card, saving images, playing video and transferring images, etc.) will use the memory card. If you want to use the internal memory, remove the external memory card and all actions will interface to the internal memory. z While using a memory card, make sure the write-protect tab is off so that the files can be saved successfully. When a memory card is write-protected, the files on the card will be protected and the camera cannot write to the card. -8 - Before Taking Pictures Contact pins Protected Unprotected z Turn off the camera before opening the battery / memory card cover. First, make sure the memory card is oriented in the right direction, then gently insert the memory card until it reaches the bottom of the compartment. Close the cover. z If the memory card is inserted backwards or upside down, it will not go in. Do not force it, or it might damage the memory card. zTo remove the memory card, first turn off the camera. Then press the memory card in gently and the card will pop out. y The memory card applicable to this camera is SD or MMC (4MB~512MB). y If the memory card is inserted the wrong way, it will not go in. Do not force it or the memory card may become damaged. y If the camera cannot access the memory card, try wiping the metal interface of the card with a soft cloth and reloading the card again. y Before inserting the memory card, make sure the card is unprotected. ( Otherwise, after the card is loaded, a symbol will be displayed on the LCD -9 - Getting started Power On/Off zTurning the camera On/Off Press the Power button to turn on the camera. Press and hold the Power button for one second to turn off the camera. zThis camera is equipped with a power saving function. When the camera stays idle for a preset period, it automatically powers down to save battery power. (Please refer to "Power Saving" on page 12.) Mode Switch zThere are three modes provided by this camera: [Record Mode] for taking still images, [Movie Mode] for recording video and [Playback Mode] for reviewing captured photos and videos (including sounds). zSlide the Mode Switch from left to right to switch to "Playback Mode", "Movie Mode" and "Record Mode" sequentially. Using the 5-way Scroll Button zConfirm - press the 5-way scroll button to confirm the selection. zUp and Down – move the 5-way scroll button up and down to locate the selection. - 10- Getting started zLeft and Right - move the 5-way scroll button left and right to locate the selection. Basic Settings zThe basic settings are applicable in any mode. 1. Turn on the power and press the MENU button in any mode. 2. Move the 5-way scroll button to the right, press the confirm button to enter SETUP menu and perform basic settings. zDate/Time 1. Press the MENU button in any mode. 2. Move the 5-way scroll button to the right and press the confirm button to enter the SETUP menu. 3. Move the 5-way scroll button down and press the confirm button. When the "Y/M/D" and "H/M" columns are blinking, move the 5-way scroll button left and right to select the item and up and down to make adjustments. 4. Press the confirm button again to complete the setting. zBeep 1. Press the MENU button in any mode. 2. Move the 5-way scroll button to the right and press the confirm button to enter the SETUP menu. - 11 - Getting started 3. Move the 5-way scroll button down and enter the BEEP menu. Move the 5-way scroll button left and right to set the beep. 4. The choices include: All Beeps On, Power-on Beep, Button Beep, Shutter Beep and All Beeps Off. zLanguage 1. Press the MENU button in any mode. 2. Move the 5-way scroll button to the right and press the confirm button to enter the SETUP menu. 3. Move the 5-way scroll button down and enter the LANGUAGE menu. Move the 5-way scroll button left and right to set the language. zPower Saving 1. Press the MENU button in any mode. 2. Move the 5-way scroll button to the right and press the confirm Getting Started button to enter the SETUP menu. 3. Move the 5-way scroll button down and enter the POWER SAVING menu. Move the 5-way scroll button left and right to set the power saving time. 4. Select 1 Min., 3 Min., 5 Min. or 10 Min. to set the auto power-off time. zDefault 1. Press the MENU button in any mode. 2. Move the 5-way scroll button to the right and press the confirm button to enter the SETUP menu. 3. Move the 5-way scroll button down and enter the DEFAULT menu. Press the confirm button and the " default?" dialog - 12- Getting started box will appear. zFormat 1. Press the MENU button in any mode. 2. Move the 5-way scroll button to the right and press the confirm button to enter the SETUP menu. 3. Move the 5-way scroll button down and enter the FORMAT menu. Press the confirm button and the "Format?" dialog box appears. Select "Yes" to start formatting. Select "No" to cancel. zTV-Out 1. Press the MENU button in any mode. 2. Move the 5-way scroll button to the right and press the confirm button to enter the SETUP menu. 3. Move the 5-way scroll button down and enter the TV menu. Move the 5-way scroll button left and right to set the appropriate video output mode. - 13- Getting started zUSB MODE 1. Press the MENU button in any mode. 2. Move the 5-way scroll button to the right and press the confirm button to enter SETUP menu. 3. Move the 5-way scroll button down and enter the “USB MODE” menu. Move the 5-way scroll button left and right to set the USB connection mode. 4. This model supports both "MASS STORAGE" and "PRINT" modes. Due to the different TV specifications of manufacturers, the sides of the TV image may be cropped so you can’t see the whole image. This is normal. - 14- LCD Monitor Icons in the Record Mode No. Description Operation 1 Mode 2 Shutter 3 Scene Image 4 resolution 5 Color 6 Sensitivity Recorded/ 7 Recordable numbers 8 Flash 9 Macro Battery 10 Power Memory 11 Card 12 Date 13 Time Digital 14 Zoom Icon 000 / 000 2001 / 01 / 01 12:58 See the image above - 15- LCD Icons in the Playback Mode No. 1 2 3 4 5 6 7 8 9 10 Description Operation Mode Current Image/Total Images Battery Power Memory Card Date Time Zoom in/Zoom out Volume Time Elapsed/Total Time Icon Description Icon 000 / 000 2001 / 01 / 01 12:58 See the image above See the image above 00:00 / 00:00 See the image above - 16- LCD Monitor Icons in the Movie Mode No. Description Operation 1 Mode Current 2 Image/Total 000 / 000 Images Battery 3 Power Memory 4 Card Length of the 00:00 5 recorded video Icon (Toggle the Monitor Display) Record Mode 1. In Record Mode, the monitor shows general information such as operation mode, shutter, flash, date/time, etc. 2. Press the DISP. button to show all functions. - 17- Record Mode – Basic Operations Basic Operations 1. Turn on the camera and slide the Mode Switch to the Record Mode. 2. View the scene on the LCD monitor and press the shutter button. yHold the camera firmly while you are taking pictures, if you do not, the pictures taken will be blurred. Hold the camera as shown in the figure to keep the camera steady while taking pictures. For best results, use both hands and brace your elbows lightly against your body. yKeep your fingers away from the camera lens, flash microphone and speaker. yIf you are taking a landscape photograph at night, a tripod is commended. - 18- Record Mode – Basic Operations Shutter 1. Turn on the camera and slide the Mode Switch to Record Mode. 2. Move the 5-way scroll button to the left to choose from the 3 Shutter Modes. 3. The 3 Shutter Modes are Single, Sequential and Self-timer. 4. represents Single, Sequential and represents represents Self-timer. yMove the 5-way scroll button to the left and repeat the action to switch from the 3 Shutter Modes. yOr select the desired Shutter Mode from the Record Mode Menu. Flash 1. Turn on the camera and slide the Mode Switch to Record Mode. 2. Move the 5-way scroll button to the right to choose from the six Flash Modes. 3. The six Flash Modes are Auto Flash, Forced Flash, Auto Red-eye Reduction, Forced Red-eye Reduction, Slow Sync Flash and Flash Off. - 19- Record Mode – Basic Operations 4. represents Auto Flash, represents Forced Flash, represents Auto Red-eye Reduction, Red-eye Reduction, represents Forced represents Slow Sync Flash and represents Flash Off. z Auto Flash: the camera will automatically determine whether the flash is necessary. z Forced Flash: the flash will always be used regardless the surrounding brightness. z Auto Flash + Red-eye Reduction: the camera will automatically determine whether the flash is necessary and flash twice to reduce the red-eye effect. z Forced Flash + Red-eye Reduction: the flash will always be used regardless the surrounding brightness and flash twice to reduce the red-eye effect. z Slow Sync Flash: use Slow Sync Flash in dim surroundings where the shutter speed is slow. This emphasizes the subject and brightens the surroundings. Digital Zoom z This camera has a 4X digital zoom. z The digital zoom uses digital image technology to enlarge the images. z There are 16 levels for digital zooming. z Operations 1. Turn on the camera and slide the Mode Switch to Record Mode. 2. Click and to adjust the zooming. - 20- represents Record Mode – Basic Operations Zoom In and represents Zoom Out. 3. The zooming status will be shown on the right side of the LCD Monitor. Full block represents the maximum zooming (telephoto) and no block represents the minimum zooming (wide-angle). Macro z For taking close-up pictures of things like flowers or insects, it is best to use the Macro Mode. z When using the Macro function, the MACRO LED will illuminate and the icon will appear on the monitor. - 21- Record Mode - Menu Auto / Manual 1. Press the MENU button in Record Mode. 2. Move the 5-way scroll button down and press the confirm button to enter the MODE menu. 3. Move the 5-way scroll button left and right to set the camera mode to Auto or Manual. 4. In Auto Mode, there will be no further settings required. In Manual Mode, additional settings will appear automatically. 5. To exit the menu, press the MENU button again. Self timer 1. Press the MENU button in Record Mode. 2. Move the 5-way scroll button down and press the confirm button to enter the MODE menu. 3. Move the 5-way scroll button to the right to set the camera mode to Manual. 4. In Manual Mode, more settings will appear automatically. 5. Move the 5-way scroll button down to enter the Self Timer Mode. 6. Move five-way scroll botton right or left to select countdown time of self-time setting. 7. To exit the menu, press the MENU button again. - 22- Record Mode - Menu Size 1. Press the MENU button in Record Mode. 2. Move the 5-way scroll button down and press the confirm button to enter the MODE menu. 3. Move the 5-way scroll button to the right to set the camera mode to Manual. 4. In Manual Mode, more settings will appear automatically. 5. Move the 5-way scroll button down and press the confirm button to enter the “Size” menu. 6. Move the 5-way scroll button left and right to choose from 6-megapixel, 4-megapixel and 2-megapixels. 7. To exit the menu, press the MENU button again. Scene 1. Press the MENU button in Record Mode. 2. Move the 5-way scroll button down andpress the confirm button to enter MODE menu. 3. Move the 5-way scroll button to the right to set the camera mode to Manual. 4. In Manual Mode, more settings will appear automatically. 5. Move the 5-way scroll button down and press the confirm button to enter the SCENE menu. 6. Move the 5-way scroll button left and right to choose from Auto, Sunny, Portrait, Landscape, Party, Night Portrait, Night Landscape and Backlight. 7. To exit the menu, press the MENU button again. - 23- Record Mode - Menu The photography mode (Macro/Portrait) will affect the focus range. Make sure you select the proper photography mode for the distance you are shooting to avoid a blurred picture. Color 1. Press the MENU button in Record Mode. 2. Move the 5-way scroll button down and press the confirm button to enter the MODE menu. 3. Move the 5-way scroll button to the right to set the camera mode to Manual. 4. In Manual Mode, more settings will appear automatically. 5. Move the 5-way scroll button down and press the confirm button to enter COLOR menu. 6. Move the 5-way scroll button left and right to choose from Color, Sepia and B/W. 7. To exit the menu, press the MENU button again. Image Quality 1. Press the MENU button in Record Mode. 2. Move the 5-way scroll button down and press the confirm button to enter the MODE menu. 3. Move the 5-way scroll button to the right to set the camera mode to Manual. 4. In Manual Mode, more settings will appear automatically. 5. Move the 5-way scroll button down and press the confirm - 24- Record Mode - Menu button to enter the IMAGE QUALITY menu. 6. Move the 5-way scroll button left and right to choose from Best, Normal and Basic. 7. To exit the menu, press the MENU button again. White Balance Have you ever wondered why pictures taken indoors sometimes come out looking yellow? The reason is that different lighting sources produce different colors of light (a flash bulb produces a very white light, while a 100 watt incandescent bulb produces a very yellow-looking light). Our brain automatically adjusts the color so that a white object always appears white regardless of the lighting condition, but a photograph records the true color. To compensate for this, the DXG-409 camera can shift the RGB color balance of the ambient light so that the color in the photograph appears as it should. This process is referred to as “matching the white balance”. 1. Press the MENU button in Record Mode. 2. Move the 5-way scroll button down and press the confirm button to enter the MODE menu. 3. Move the 5-way scroll button to the right to set the camera mode to Manual. 4. In Manual Mode, more settings will appear automatically. 5. Move the 5-way scroll button down and press the confirm button to enter the WB menu. 6. Move the 5-way scroll button left and right to choose from Auto, Sunny, Cloudy, Fluorescent and Tungsten. 7. To exit the menu, press the MENU button again. - 25- Record Mode - Menu There are 5 White Balance settings available in the Record mode: Auto: Automatically adjusts the white balance and is applicable to general-purpose photography. Sunny: Applicable to outdoor (bright day) photography. Cloudy: For outdoor photography with cloudy or shady skies. Tungsten: For use indoors with incandescent lighting. Fluorescent: For use indoors with fluorescent lighting. EV Compensation 1. Press the MENU button in Record Mode. 2. Move the 5-way scroll button down and press the confirm button to enter the MODE menu. 3. Move the 5-way scroll button to the right to set the camera mode to Manual. 4. In Manual Mode, more settings will pop up automatically. 5. Move the 5-way scroll button down and press the confirm button to enter the EV menu. 6. Move the 5-way scroll button left and right to choose from the 13 levels of EV Compensation from -2.0 to +2.0. 7. To exit the menu, press the MENU button again. Metering 1. Press the MENU button in Record Mode. 2. Move the 5-way scroll button down and press the confirm button to enter the MODE menu. 3. Move the 5-way scroll button to the right to set the camera mode to Manual. - 26- Record Mode - Menu 4. In Manual Mode, more settings will pop up automatically. 5. Move the 5-way scroll button down and press the confirm button to enter the METERING menu. 6. Move the 5-way scroll button left and right to select from Center-weighted metering, Average metering and 256 Matrix metering. 7. To exit the menu, press the MENU button again. • • Matrix metering: The picture area is divided into different sections and the light metering system will evaluate and suggest the best exposure values. The icon will be shown on the lower left of the LCD monitor. Center-weighted metering: This uses the entire image area but calculates the exposure by giving more importance to the center of the image. The icon will be shown on the lower left of the LCD monitor. This mode is best for portrait photography. • Spot metering: This measures a spot in the center, which is about 1/25th of the viewfinders area to determine the exposure of the entire image. A square frame and icon will be shown on the center and lower left of the LCD monitor. This mode is often used on subjects with a very bright or very dark background. ISO 1. Press the MENU button in Record Mode. 2. Move the 5-way scroll button down and press the confirm button to enter the MODE menu. 3. Move the 5-way scroll button to the right to set the camera mode to Manual. 4. In Manual Mode, more settings will appear automatically. 5. Move the 5-way scroll button down and press the confirm button to enter the “ISO” menu. 6. Move the 5-way scroll button left and right to choose from Auto, ISO100, ISO200 and ISO400. 7. To exit the menu, press the MENU button again. - 27- Playback Mode - Basic Operations Select Image z Slide the Mode Switch to Playback Mode to view the recorded images or videos. z In Playback Mode, move the 5-way scroll button left and right to select an image (Previous/Next). Move the 5-way scroll button to the left to view the previous image and right to view the next image. Display Still Images z When the LCD Monitor shows an image without displaying time or volume, it is displaying a still image. z Click to enlarge the image and to return the image to its original size. z To view 4 thumbnails or 9 thumbnails, press size mode. Click in the original to return the image to its original size. - 28- Playback Mode - Basic Operations Playback Videos z When the LCD Monitor shows Time Elapsed/Total Time and Volume, it is playing a video. z Press the confirm button to start playing the video and press again to stop. z Move the 5-way scroll button up for turning up volume, or move the 5-way scroll button down for turning down volume, - 29- Playback Mode - Menu Delete Images z Delete One 1. Turn on the camera, slide the Mode Switch to Playback Mode and press the MENU button. 2. Move the 5-way scroll button down and press the confirm button to enter the DELETE IMAGE menu. 3. Move the 5-way scroll button left and right to select Delete One or Delete All. 4. To delete one image, select . 5. The "Delete?" dialog box appears. 6. Select Yes and press the confirm button to delete one image. Select Cancel and return to main screen. 7. To exit the Playback Mode menu, press the MENU button. Protect Images 1. Press the MENU button in Playback Mode. 2. Move the 5-way scroll button down and press the confirm button to enter the PROTECT IMAGE menu. 3. Move the 5-way scroll button left and right to choose from Protect One, Protect All, Cancel One and Cancel All. - 30- Playback Mode - Menu 4. To exit the menu, press the MENU button again. Slideshow Playback 1. Press the MENU button in Playback Mode. 2. Move the 5-way scroll button down and press the confirm button to enter SLIDESHOW menu. 3. Move the 5-way scroll button left and right to choose the interval time from 1 to 10 seconds. 4. Press the confirm button to start the slideshow. 5. To exit the menu, press the MENU button again. Copying Files to Memory Card 1. Press the MENU button in any mode. 2. Move the 5-way scroll button to the right and press the confirm button to enter the SETUP menu. Move the 5-way scroll button down and enter the "Copy to card" menu. Press the confirm button and the "Copy to card" dialog box will appear. 3. Select "Yes" to reset numbering. It resets next time when the memory card is empty. Select "No" to cancel. - 31- Playback Mode - Menu DPOF 1. Press the MENU button in Playback Mode. 2. Move the 5-way scroll button down and press the confirm button to enter the DPOF menu. 3. Move the 5-way scroll button left and right to choose from DPOF One and DPOF All. zDPOF One 1. Select DPOF One and press the confirm button to enter DPOF One menu. 2. Move the 5-way scroll button down to select Previous/Next, No. of Images and Show Date/Time. 3. Move the 5-way scroll button left and right to select Previous/Next. 4. Move the 5-way scroll button left and right to select No. of Images. 5. Move the 5-way scroll button left and right to open or close the Show Date/Time setting. - 32- Playback Mode - Menu zDPOF All 1. Select DPOF All and press the confirm button to enter DPOF All menu. 2. Move the 5-way scroll button down to select No. of Images and Show Date/Time. 3. Move the 5-way scroll button left and right to select No. of Images. 4. Move the 5-way scroll button left and right to open or close the Show Date/Time setting. - 33- Movie Mode - Basic Operations Record / Stop 1. Turn on the camera and slide the Mode Switch to Movie Mode. 2. Press the Shutter button to start recording video. 3. Press and hold the Shutter button for 1 sec to stop the recording. Macro z For taking close-up pictures of things like flowers or insects, it is best to use the Macro Mode. z When using the Macro function, the MACRO LED will illuminate and the icon will appear on the monitor. Image Quality 1. Press the MENU button in Movie Mode. 2. Move the 5-way scroll button down and press the confirm button to enter the IMAGE QUALITY menu. 3. Move the 5-way scroll button left and right to choose from Best, Normal and Basic. - 34- Connecting to the Computer Installing the Camera Driver You can use the "Mass Storage" and "PC Camera" functions of the camera in the PC. To install the proper camera driver, perform the following: 1. Insert the Software CD supplied by the package into the CD-ROM drive. 2. The Auto-run program will be executed and the welcome screen will appear the following message: (If your CD-ROM drive doesn't support the auto-run function, please double click on the "My Computer" icon on the desktop. Then double click the CD-ROM drive icon and click the "Driversetup\Setup.exe" file in the root directory.) 3. Please select the desired language of setup program you want to install. 4. Please click on the "Driver > Install", the following screen will appear: 5. Select the desired language, and then press "OK". - 35- Connecting to the Computer 6. Entering the application setup screen, press "Next" to continue. 7. After the installation is completed,the following screen will appear,press "Finish" to complete application installation. - 36- Connecting to the Computer Installing the Software Application .NewSoft application installation (In case of MP38) 1. Insert the Software CD supplied by the package into the CD-ROM drive. 2. The Auto-run program will be executed and the welcome screen will appear the following message: (If your CD-ROM drive doesn't support the auto-run function, please double click on the "My Computer" icon on the desktop. Then double click the CD-ROM drive icon and click the "MP38\Setup.exe" file in the root directory.) 3. Please select the desired language of setup program you want to install. 4. Please click on the "New Soft Video works > Install", the following screen will appear: 5. Select the desired language, and then press "OK". - 37- Connecting to the Computer 6. Press "Yes" to accept the conditions of Legal Disclaimer and continue the installation. 7. Please select the area of language,then press "Next" to continue. 8. Entering the application setup screen, press "Next" to continue. - 38- Connecting to the Computer 9. Press "Yes" to accept the conditions of Software License Agreement and continue the installation. 10. Please follow the installation wizard to select the folder location. 11. Please select the program folder name. - 39- Connecting to the Computer 12. After the installation is completed, the following screen will appear. Press "Finish" to complete the application installation. 13. After the Multimedia Software is completed, the following screen will appear, press "Ok" to continue. 14. Entering DirectX9 setup screen, press "Ok" after the content is confirmed. - 40- Connecting Your Camera to Printer Connecting Your Camera to Computer 1. Move the 5-way scroll button to the right, press the confirm button to enter the SETUP menu and then move the 5-way scroll button down and enter the USB menu. Set the USB Mode to Mass Storage . 2. Connect the USB cable to your camera and PC. 3. Once connected, the portable drive will be detected and shown on the PC screen. Copy the files in the camera to your PC to browse the pictures or play videos from your PC. If a memory card is in the camera, all functions will be memory card related. If you want to use the internal memory, just remove the external memory card. Connecting Your Camera to Printer 1. Move the 5-way scroll button to the right, press the confirm button to enter the SETUP menu and then move the 5-way scroll button down to enter the USB menu. Set the USB Mode to direct print . 2. Connect the USB cable to your camera and printer. 3. A dialogue box will appear on the LCD monitor. 4. Select Yes to start printing or No to return to the direct print main screen. z In the print direct option, disconnect the USB cable if it is connected to other devices (not printer). Then turn the camera on again. z In the print direct option, the default printing quantity is one page. However, in the DPOF option, the default print quantity is zero pages. z In the print direct option, if the option of printing the recorded date stamp is not supported by the printer, the option will turn red and cannot be changed. z If the following message appears on the LCD monitor, there might be a problem with the printer. Three possible problems are listed below: 1.The printer is out of paper 2.The cartridge has run out 3.The paper size is invalid z If you encounter other printer problems, please contact the manufacturer of your printer or an authorized service center for assistance. - 41- 附錄 Appendix Appendix zLens……………………………………………………………………… Digital Zoom Aperture Focus (f=) Macro 4X F/3.0 f=7.36 10-12cm zCamera………………………………………………………………….. Image Sensor Flash EV compensation White Balance ISO Sensitivity Metering Mode Shutter Speed Image Effect Record Mode Self-timer 1/2.5” 4 megapixel CCD Auto / Forced Flash / Red-eye Reduction / Forced Flash + Red-eye Reduction / Slow Sync Flash / Off +2.0~-2.0EV Auto / Sunny / Cloudy / Tungsten / Fluorescent Auto / 100 / 200 / 400 Center-weighted metering / Spot metering / Average metering 1/1000 sec. ~ 2 sec. Color / Sepia / Black and White Auto / Manual/ Macro / Self-timer / Continuous / Scene 2~10 Sec. zLCD Monitor…………………………………………………………… Size Pixels 1.5"TFT Display 502x240 (0.12 mega pixels) zMemory storage………………………………………………………… Internal memory External memory medium Storage format Printing Format 16MB SD/MMC card (supports 16~512 MB) Still image: JPEG Video: MJPEG DPOF/DPS - 42- Appendix zPlayback function………………………………………………………. Number of Display Continuous Playback Mode Enlargement Protection Video One image / 4 thumbnails / 9 thumbnails Yes (Slideshow Mode) Yes Yes Yes zGeneral function……………………………………………………… Multiple language English, Chinese, Japanese, French, German, Italian, Spanish. Audio All / Power On / Shutter / Button / Off Date and time display Yes Remaining battery display Yes Zooming display Yes Remaining memory display Yes Battery type AAA x 2 Power Saving Mode Yes (1 / 3 / 5/10 minutes) zPhysical measurement Dimensions Weight 95(L) x 50(W) x 27(H)mm <84g (without batteries) - 43- LED Status LED Status zRear LED and front Self-timer LED Status Power on/off Green Green Blinking Red Power-on z z z Recording Video z Error Connecting to Computer Connect to peripherals Battery Low Self-timer LED z Flash charging Self-timer active Red Blinking z z z z z - 44-