1
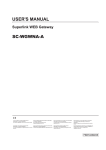
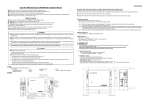
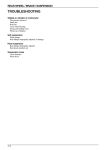
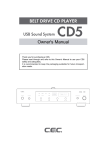
BELT DRIVE CD TRANSPORT
TL3N
Owner's Manual
CD TRANSPORT TL3N
Contents
● Introduction … ………………………………………………………………… 2
● Features ………………………………………………………………………… 2
● Important Safety Instructions ………………………………………………… 3
● Handling Precautions … ……………………………………………………… 5
● Compact Disc Handling………………………………………………………… 7
● Accessories … ………………………………………………………………… 9
● Front Panel Functions ……………………………………………………… 10
● Inside the CD Door … ……………………………………………………… 11
● Rear Panel Functions … …………………………………………………… 12
● "SuperLink" Digital Signal Transmission System … …………………… 13
● Connections … ……………………………………………………………… 13
● Playback … …………………………………………………………………… 15
● Remote Control Unit ………………………………………………………… 16
● Programmed Playback… …………………………………………………… 18
● Tips and Hints… ……………………………………………………………… 20
● Maintenance…………………………………………………………………… 21
● Troubleshooting… …………………………………………………………… 22
Introduction
● Specifications… ……………………………………………………………… 23
Thank you for purchasing the TL3N.
Please read through and refer to this Owner's Manual to use your TL3N
safely and adequately. It is recommended that you keep the unit's packaging
Features
available for future transportation needs.
● TL3N is a CD transport that uses CEC's Proprietary belt drive mechanism
to minimize the vibration and electromagnetic noise from the motors,
enabling the precise reproduction of music signals.
● TL3N's double belt drive system, which drives both the spindle and the
pickup with belts, minimizes noise contamination and provides delicate and
accurate music reproduction.
● The top-loading design allows the use of a stabilizer for maximum disc
stability.
● TL3N features multiple digital outputs, including CEC's proprietary
"SuperLink" system. SuperLink connection with CEC's D/A converters, using
high-quality BNC cables, ensures a perfect synchronized operation with the
converter.
● In addition, a word clock input is equipped. Connecting an external clock
generator to TL3N as well as the D/A converter the system works with zerojitter.
TL3N User's Manual
CAUTION
RISK OF ELECTRIC SHOCK!
DO NOT OPEN!
CAUTION: TO REDUCE THE RISK OF ELECTRIC SHOCK,
DO NOT REMOVE THE COVER OR REAR PANEL. IT DOES
NOT CONTAIN ANY USER-SERVICEABLE PARTS. REFER
SERVICING TO QUALIFIED SERVICE PERSONNEL.
The lightning flash with arrowhead symbol, within an
equilateral triangle, is intended to alertthe user to potential
electric shock hazards within the product’s enclosure.
The exclamation point within an equilateral triangle is
intended to notify the user to the presence of important
operating and maintenance (servicing) instructions in the
accompanying documentation.
WARNING: TO PREVENT FIRE OR SHOCK HAZARD, DO NOT
EXPOSE THIS APPLIANCE TO RAIN OR MOISTURE.
1) Read these instructions.
2) Keep these instructions.
3) Heed all warnings.
4) Follow all instructions.
5) Do not use the TL3N near water.
6) Clean only with a dry cloth.
7) Do not block any ventilation openings. Install in accordance with the
manufacturer’s instructions.
8) Do not install the TL3N near any heat sources such as radiators, heat
registers, stoves, or other apparatus (including amplifiers) that produce heat.
9) (For USA, Canada: ) Do not defeat the safety purpose of the polarized or
grounding-type plug. A polarized plug has two blades, with one blade wider
than the other. A grounding type plug has two blades and a third grounding
prong. The wide blade or the third prong is provided for your safety. If the
CD TRANSPORT TL3N
provided plug does not fit your outlet, consult an electrician for replacement
of the obsolete outlet. (For European Countries: ) Do not defeat the safety
purpose of the grounding-type plug. This plug has two poles and a third
grounding hole. The third hole is provided for your safety. If the provided plug
does not fi t your outlet, consult an electrician for replacement of the obsolete
outlet.
10) Protect the TL3N’s power cord from being walked on or pinched,
especially around the plugs, convenience receptacles, and where it exits the
TL3N’s casing.
11) Only use attachments/accessories specified by the manufacturer.
12) Only use the TL3N with a cart, stand, tripod,
bracket, or table specified by the manufacturer or sold
with the unit. If using a cart, exercise caution when
moving the cart/ unit combination to avoid injury from it
tipping over.
13) Unplug the TL3N during lightning storms or when leaving it unused for
extended periods of time.
14) Refer all servicing to qualified service personnel. Servicing is required
when the TL3N itself, its power-supply cord, or plug has been damaged in
any way, when liquids have been spilled onto the TL3N, when foreign objects
have fallen into the TL3N, when the TL3N has been exposed to rain or
moisture, when the TL3N does not operate normally, or when the TL3N has
been dropped.
CAUTION:
● DO NOT EXPOSE THE TL3N TO DRIPS OR SPLASHES.
● DO NOT PLACE ANY OBJECTS FILLED WITH LIQUIDS, SUCH AS
VASES, ON THE TL3N.
● DO NOT INSTALL THE TL3N IN A CONFINED SPACE, SUCH AS WITHIN
A BOOKCASE OR SIMILAR PIECE OF FURNITURE.
● PLUG THE AC POWER CORD INTO AN EASILY ACCESSIBLE AC
WALL OUTLET, SO IT CAN BE QUICKLY UNPLUGGED IN CASE OF
EMERGENCY.
● DO NOT REMOVE THE PROTECTIVE HOUSING WITH A
SCREWDRIVER.
● USE OF CONTROLS OR ADJUSTMENTS OR PERFORMANCE OF
TL3N User's Manual
PROCEDURES OTHER THAN THOSE SPECIFIED HEREIN MAY RESULT
IN HAZARDOUS RADIATION EXPOSURE.
● I F T H E T L 3 N S E E M S TO B E M A L F U N C T I O N I N G , C O N TA C T
A QUALIFIED SERVICE STATION. DISCONTINUE USE OF ANY
MALFUCTIONING UNIT.
For CANADA
AC POWER CORD CONNECTION
CAUTION:
TO PREVENT ELECTRIC SHOCK, MATCH THE BLADE WIDTH
OF THE PLUG TO THE SLOT WIDTH. THE PLUG MUST BE
FULLY INSERTED TO THE SLOT.
Handling Precautions
❶ Connecting Other Devices
Unplug the TL3N’s AC power cord from the outlet before connecting or
disconnecting other devices. Exercise caution when handling the AC power
cord. When disconnecting the AC cord from a socket, make sure you pull the
plug, and not the cord itself.
❷ Turning Power On/Off
Your system components should be turned on/off in the following order to
avoid generating noise from your speakers and damaging the speakers
themselves or other devices:
Turning power on: Turn on the TL3N’s power first, before turning on the DA
converter or amplifier connected to the TL3N.
Turning power off: Turn off the amplifier’s power first, before turning off the
TL3N.
❸ Optical Semiconductor Laser Pickup
The optical pickup is one of the important components that determine the
performance of a CD player. Never touch the optical lens of the pickup with
your fi ngers, etc. Close the CD door to keep the lens clean when not in use.
❹ CD Stabilizer
Only use the provided CD stabilizer with the TL3N. Commercially available
stabilizers may cause the unit to malfunction.
❺ Handle With Care
Avoid exerting excessive force on the cabinet, the switch, the knob, the CD
CD TRANSPORT TL3N
door and the CD-turntable on the TL3N.
❻ Installation
Use of an audio rack is recommended to maximize the sound quality and
performance of the TL3N. Installation and use of the TL3N in the locations
described below may cause deterioration in sound quality or malfunction:
● Locations exposed to direct sunlight, such as windowsills, and other
exceptionally warm locations, such as near heating appliances (surrounding
temperature higher than 35 °C), or exceptionally cold locations (surrounding
temperature lower than 10 °C), may prevent the TL3N from functioning
adequately.
● Damp locations exceeding 90% humidity may cause the TL3N’s metal
parts to rust, causing the unit to malfunction.
● Dusty locations may cause the TL3N to malfunction. The accumulation
of dust inside the CD door may lower the performance of music signal
reading. It may also cause contact failure of the switches, and/or noise.
● Otherwise, avoid installing the TL3N close to other transformers and
electrical motors, so as to prevent the pickup of induction hum. Also, avoid
mounting the unit on surfaces that may be affected by vibration.
❼ Avoid lightning strikes
Disconnect the AC power cord from the AC outlet when there is a
thunderstorm in your vicinity.
❽ Condensation When the TL3N is brought into a warm room when the
exterior temperature is cold, or when the room temperature rises sharply
from using a heater, condensation may form both inside and outside the
unit, hampering its performance. If this happens, leave the TL3N unused
in the room for 1 to 2 hours (depending on the amount of condensation),
so as to bring the unit’s temperature closer to the room temperature. The
condensation should go away gradually.
❾ Listening etiquette
When adjusting the sound volume level, make sure you do not disturb other
people and your neighborhood.
TL3N User's Manual
Compact Disc Handling
● Since a compact disc can be played or recorded only on one side, discs
should always be placed on the turntable with the label side up.
● When taking a compact disc from its case, lift it out by holding the edge of
the disc while pressing down on the center button of the case.
● Handle compact discs with care so as not to scratch their surfaces.
Scratches, fingerprints or soiling may cause reading errors during playback.
● If a compact disc’s surface becomes soiled, wipe it directly away from the
disc’s center with a soft, dry cloth. Try to keep the discs clean at all times.
● Never use chemicals such as record sprays, anti-static sprays, benzene
or thinner to clean a disc. These may corrode the surface of a disc.
● Do not place discs in any locations subject to high temperatures and high
humidity, or that receive direct sunlight. Keep discs away from radiators
and electrical heaters. CD-R and CD/RW discs are especially sensitive to
ultraviolet rays, so keep them out of direct sunlight.
● To avoid dust and scratching or warping of discs that could cause reading
errors, replace discs in their cases after use.
CD TRANSPORT TL3N
● Do not attach any labels on a disc surfaces. Do not use discs that have
Scotch tape, labels, excessive label glue exposed on the surface. These may
cause the TL3N to malfunction.
● Do not use cracked discs or irregularly shaped discs (octagonal, heartshaped, or any other special shapes). These may cause the unit to
malfunction.
CD -R/RW DISC
● The TL3N is able to playback CD-R/RW discs recorded in audio CD format
and finalized. Some CD-R/RW discs may be unplayable due to the quality of
the CD-R/ RW disc and/or the quality of the recording.
● Do not attach stickers or protective seals on discs and do not use any
protective coating sprays. If you wish to label a disc, only write on the label
side using soft-tipped insoluble pens. Never use ballpoint pens or hard-tipped
pens.
NONSTANDARD DISC
● Copy-protected discs and nonstandard discs may not be playable with this
player. If you experience any problems with non-standard discs, contact the
manufacturer of the disc first.
TL3N User's Manual
Accessories
TL3N should contain the following:
❶ TL3N unit
❷ Stabilizer
❸ AC Power Cord
❹ Remote Control unit
❺ Two AAA batteries for the remote control unit
❻ Owner's Manual
NOTE: Keep the packaging available for future transportation needs.
The AC power cord is for use with the TL3N exclusively, and should not be
used for other devices.
10
BE
LT
TL
RT
DR
3N
PO
IV
E
CD
S
AN
TR
SP
LT
OR
T
BE
DR
CD
.
TD
., LPAN
CO JA
C IN
CE ADE
M
3N
TL
LT
BE
D
TL
E
IV
AN
TR
VE
RI
CD
明
RT
説
O
SP
扱
3N
N
A
TR
取
書
❻
❺
❹
❸
PO
WE
R
❷
❶
CD TRANSPORT TL3N
Front Panel Functions
❺
❶
❷
❹
❸
❻
❼
❽
❶ POWER Button
Press the POWER button to turn the power ON or OFF. The switch will light
up with a blue color while power is ON. When the TL3N is turned on, the
display will blink “0 0:00” and the unit will check its tray for a compact disc.
Approximately 5 seconds later, the display will change to indicate the total
number of tracks and the total playing time. If there is no disc on the tray, the
display will indicate “no dISC”.
❷ Remote Sensor
The remote sensor, which receives signals from the remote control unit, is
located to the left of the display. Aim for this sensor when using the remote
control unit. The remote control may malfunction if there are any obstacles
between the remote control unit and the remote sensor.
A B
C
❸ Display Panel
After reading a table of contents
(disc information) the display panel
indicates the total number of tracks
D
E
F
and total playback time, and during
playback the track number being
played and elapsed time are displayed.
A. Playback ▷ indicator: lights up during playback
B. Pause
indicator: blinks during pause mode
C. Time display: indicates the elapsed time/remaining time for the track being
played, total remaining time or total elapsed time
D. Programming indicator: lights up during program mode
E. Track number display: indicates the track being played
10
TL3N User's Manual
F. Repeat indicator: lights up when repeat mode is enabled
❹ Word Clock Indicator
The LED will light up when TL3N works with the clock coming from an
external clock generator connected with the TL3N word clock input.
❺ CD Door
Open the CD door sliding backward by hand when placing a compact disc on
the tray.
❻ Track Skip
Buttons
Press the Skip forward
or backward
button to jump to the next or
previous track from the track being played (or displayed).
Note: Pressing the skip backward
button during playback, playback will
return to the beginning of the track being played. Press the skip backward
button twice repeatedly to jump to the previous track.
❼ Stop
Button
Press the STOP button to stop playback.
❽ PLAY/PAUSE / Button
Press the button to start or to temporarily stop playback.
Inside the CD Door
❶ The TL3N’s stabilizer is heavy,
❶
with a diameter of 7cm and
weighing 330g. Hold the edge
steadily when you place it on
❸
or remove it from the turntable.
Dropping the stabilizer may
❷
damage it and decrease playback
accuracy, so handle with care.
❷ Turntable
Place a compact disc on the
turntable, and place the stabilizer on top of the disc. The stabilizer can be left
on the turntable when not in use, even when no disc is in place.
❸ Optical Laser Pickup
The optical laser pickup reads signals from the compact disc. To keep it clean
never touch the pickup with your fingers, etc.
11
CD TRANSPORT TL3N
Rear Panel Functions
❷
❶
❸
❹
❺
❻
❶ Word Clock Input
44.1kHz word clock input jack with a BNC type connector. Connect to an
external clock generator using a BNC (75Ω) cable. When TL3N works with
the external clock the blue LED at the right side of the display panel lights up.
❷ SUPERLINK
CEC’s proprietary “SUPERLINK” digital input/output for use with a CEC’s
compatible D/A converter. There are four BNC type terminals named “MCK”,
“BCK”, “LRCK” and “DATA”. Four BNC (75Ω) cables are required.
SUPERLINK works with the first priority even when an external word clock
signal is coming in.
❸ AES/EBU
Connect to a digital audio device with a AES/EBU(XLR) input by using a XLR
110Ω cable. (Pinning: 1=GND, 2=Hot, 3=Cold)
❹ COAXIAL
Standard digital (SPDIF) signal output jack with a RCA type connector.
Connect to a digital audio device with a coaxial RCA input by using a RCA (75
Ω) cable.
❺ TOS LINK (Optical)
Connect to a digital audio device with a TOS LINK Optical Digital input by
using an optical cable.
When any optical cable is not connected the cap should be returned to the
TOS LINK terminal.
❻ AC LINE
Connect the supplied AC power cord to the AC LINE inlet.
12
TL3N User's Manual
"SUPERLINK" Digital Signal Transmission System
SUPERLINK is CEC’s proprietary digital signal transmission system that
transports music signals and synchronization(clock) signals with separate
cables. The SPDIF(Sony Philips Digital Inter Face) and AES/EBU(Audio
Engineering Society/European Broadcasting Union) systems, commonly
used in coaxial digital outputs and optical outputs, transmit both the music
and clock signals through the same cable, and thus are prone to jitter effects
caused by the signals interfering with each other. CEC’s SUPERLINK
system transmits these signals separately with multiple cables, requiring no
encoding/decoding process for data transmission. It minimizes deterioration
of the music signal during transmission by using the clock signals from the
D/A converter’s master clock generator to achieve complete synchronization.
Each transmission path delivers/receives the following signals.
MCK(Master Clock): The CD transport receives the master clock signal
from the D/A converter through this line, and functions as a slave to the
DA converter, enabling completely synchronized transportation of audio
data.
BCK(Bit Clock): Sends bitclock signals, required for digital data bit
identification(e.g. sampling frequency) or signal readout, from the CD
transport to the D/A converter.
LRCK(L/R Clock): Sends left/right identification clock signals from the CD
transport to the D/A converter.
DATA: Sends audio data from the CD transport to the DA converter.
Connection
●SUPERLINK Connection
Connect the TL3N’s SUPERLINK terminals(MCK,
BCK, LRCK, DATA) to the corresponding terminals
on a D/A converter with four 75Ω BNC cables.
13
CD TRANSPORT TL3N
●AES/EBU Connection
Connect to the AES/EBU terminal of the D/A
converter with a 110Ω XLR cable.
2.0
●COAXIAL Connection
Connect to the COAXIAL terminal of the D/A converter
with a 75Ω COAXIAL (RCA) cable.
2.0
●TOS LINK Connection
Connect to the TOS LINK terminal of the D/A converter
with an optical cable.
2.0
●WORD CLOCK Connection
Connect to the BNC terminal of the clock
generator with a 75Ω BNC cable.
Clock Generator
14
TL3N User's Manual
Playback
● Normal Playback
❶ Press the POWER button to turn the power on.
❷ Open the CD door sliding backward by hand. When the door is open the
display panel indicates “OPEn”.
❸ Place a disc on the turntable, and place the supplied stabilizer gently on
top of the disc.
Flat side
NOTE: Make sure you place the
disc on the turntable with the label
Stabilizer
Pad side
Disc
side facing up, and place the
stabilizer on the disc before closing
the CD door. The TL3N may be
Label side
unable to read the disc unless you
place the stabilizer correctly. Use
only the provided CD stabilizer.
Do not use commercially available
stabilizers.
❹ Close the CD door sliding forward by hand. The TL3N should automatically
start spinning the disc to read its information, and the total number of tracks
and the total playing time should appear on the display. If you leave the TL3N
as it is without pressing the PLAY/PAUSE
/
button, the display will
change after approximately 10 seconds to show information for the first track
on the disc.
10 seconds later
❺ Press the PLAY/PAUSE
/
button to start playback. The playback▷
indicator and track number should be shown on the display, followed by the
elapsed time for the track being played.
● Skipping Track
Press the Skip forward
or backward
button to jump to the next or
previous track from the track being played (or displayed).
Note: Pressing the skip backward
button during playback, playback will
return to the beginning of the track being played. Press the backward
15
CD TRANSPORT TL3N
button twice repeatedly to jump to the previous track.
● Pausing Playback
Press the PLAY/PAUSE
/
button to stop playback temporarily. Press this
button again to resume playback.
● Stopping Playback
Press the STOP
button to stop playback.
NOTE: Playback will be stopped automatically if you open
the CD door without pressing this button, but it will take a few
seconds for the turntable to stop spinning. Do not touch the
stabilizer or the disc until they stop completely. Touching the
stabilizer or disc while they are still turning may damage or cause the unit to
malfunction.
● Removing a Disc
Slide the CD Door open with your hand, and remove the stabilizer first by
holding its edge. Then remove the disc, replace the stabilizer on the turntable
and slide the CD Door closed with your hand.
NOTE: Do not leave discs on the turntable when the TL3N is not in use. The
stabilizer can be kept on the turntable when unused.
Remote Control Unit
●Key Functions
❶ to ❿ buttons can be used for TL3N and the other buttons for D/A converter
model DA3N.
❶
❷
❺
❿
❹
❸
❻
❻
❼
❶ Numeric Keys
Use these keys to select tracks directly during playback, or when entering a
programmed playback order. To select ex.24-track press +10 twice and then 4.
❷ REPEAT Button
Press this button to repeatedly playback all the tracks on a disc. When repeat
❽
❽
mode is on, the display will show the repeat
❾
❾
again to cancel repeat mode.
indicator. Press this button
❸ PROGRAM Button
Press this button to enable programmed playback. You can program up to 32
tracks to playback in the order of your choice.
*Refer to “PROGRAMMED PLAYBACK” on page 18 for details.
16
TL3N User's Manual
❹ CHECK Button
Press this button to check the order of the tracks in your current programmed
setting. *Refer to “PROGRAMMED PLAYBACK” on page 18 for details.
❺ CLEAR Button
Press this button to clear your current programmed setting. *Refer to
“PROGRAMMED PLAYBACK” on page 18 for details.
❻ Track Skip Backward
/ Track Skip Forward
Buttons
Jump to the previous or next track from the track being played (or displayed).
❼ PLAY/PAUSE
/
Button
Press this button to start playback or to pause playback temporarily.
❽ Search Backward
/ Search Forward
Buttons
Press and hold these buttons to quickly search through the track being
played.
searches through the track backwards,
searches forwards.
NOTE: There are no Search buttons on the front panel of the TL3N.
❾ Stop
Button
Press this button to stop playback.
❿ DISP (Display) Button
Press this button to cycle the TL3N’s display through its various modes. Each
press of the DISP button cycles the display in the following order: track
number/elapsed track time (default display)
time
total remaining time
track number/remaining track
total elapsed time
back to track number/
elapsed track time (default display).
e
r
r
e
NOTE: Total remaining time and total elapsed time will not be displayed
when program mode and/or repeat mode are active.
● Precautions on Using the Remote Control Unit
❶ When operating the remote control, point it towards the remote sensor on
the TL3N’s front panel. Make sure nothing is blocking the front panel where
the remote sensor is located.
17
CD TRANSPORT TL3N
❷ Avoid exposing the remote sensor on the front panel to direct sunlight or
other light sources, as such exposure can cause malfunction.
❸ The remote control unit may malfunction when its batteries are running
low. Change the batteries to new ones of the same type if this seems to be
the case.
● Battery Installation
Remove the cover of the battery compartment.
Insert the supplied two AAA batteries into the
compartment. Make sure that the batteries are
inserted with their positive (+) and negative (-)
poles positioned correctly, and put the cover
back on.
● Battery Replacement
If the distance at which the remote control unit can be used to operate the
TL3N seems to be decreasing, replace both batteries with new ones.
● Battery Precautions
❶ Never use different types of batteries together. Both rechargeable and nonrechargeable batteries can be used, but the two should not be used together.
❷ If you will not be using the remote control unit for an extended period of
time (more than a month), remove the batteries to prevent leakage.
❸ If the batteries leak, use a cloth to wipe away the liquid inside the battery
compartment and replace the batteries with new ones.
❹ Do not heat or disassemble batteries, and never dispose of old batteries
by throwing them in a fire. Dispose of batteries following laws in the local
area
Programmed Playback
● Programming
You can program up to 32 tracks in a customized playback order, by using
the remote control unit while playback is stopped.
❶ Press the PROGRAM button on the remote control unit to activate the
program mode. “PRGM” is displayed, and “1” as temporary track number
blinks and “1” as the first playback order is displayed.
Track number Playback order
18
TL3N User's Manual
❷ Select a track number by pressing the numeric keys on the remote control
unit. The selected track will be added to the program. For example: Press
key-5 to add the 5th track to the 1st playback order, then press key-3 to add
the 3rd track to the 2nd playback order. Repeat this process to program
additional tracks.
Note:
※ In case that a number beyond the last track number on a disc is selected
the last track may be added alternatively.
※ After the 1st playback track is added you can select an addition track by
pressing skip buttons as well. The selected track number blinks. Then press
the PROGRAM button to add the track to the program. In this way press
the PROG. button to add the track every after blinking a track number by
pressing skip buttons.
❸ Press the STOP button to complete the programming phase. The 1st
playback track number is displayed. If 32 tracks are programmed “FULL” is
displayed as well.
● Playback in Program Mode
Press the PLAY/PAUSE
/
button while the “PRGM” indicator is shown
on the display to play the programmed tracks.
NOTE: To return to the normal playback mode, press the PROGRAM button
while playback is stopped. The “PRGM” indicator will disappear from the
display. *To return to the program mode, press the PROGRAM button again.
● Checking, Adding, Changing and Clearing Programmed Tracks
You can check, add, change and clear the programmed tracks under the
program mode while playback is stopped.
19
CD TRANSPORT TL3N
❶ Check the Playback Order for the Programmed Tracks
Press the CHECK button repeatedly to show the playback order for the
programmed tracks. The display changes to “- -” when you reach the next to
the last track in the program.
Pressing the CHECK button again here will display the first track in the
playback order.
NOTE: If you press the STOP
button, the display will jump back to the first
track in the programmed order.
❷ Adding Tracks to the Program
To add one track to the current program, press the STOP button and select
the track number with the numeric keys. The new track will be added to the
end of the current playback order. Repeat this process to add more tracks to
the program. Press the STOP
button to complete the track-adding phase.
❸ Changing Tracks in the Program
To change one track in your programmed playback order, press the CHECK
button repeatedly until the track number in question is displayed, then select
a new track number. The new track will overwrite the existing track. Repeat
this process to change more tracks. Press the STOP
button to finish the
track-changing phase.
❹ Clearing Programmed Tracks
All tracks: To clear the entire program, hold down the CLEAR button for
more than 2 seconds.
One track: To clear one track from the program, press the CHECK button
repeatedly until the track number in question is displayed, then press the
CLEAR button. Repeat this step (CHECK then CLEAR) to remove more
tracks from the program.
※ The entire program will be cleared automatically when you open the CD
Tips and Hints
Door or turn the power off.
❶ Should you ever open the CD Door without pressing the STOP button, do
not touch the stabilizer and the disc until the turntable has stopped spinning
completely. Touching them while they are still spinning may cause stress on
the spinning mechanism and lead to malfunction.
20
TL3N User's Manual
❷ The supplied stabilizer is very heavy and should be handled with care.
Dropping it on the floor etc. by accident may cause reading errors. The
stabilizer is a fragile and expensive part, and should be handled with care.
❸ SUPERLINK Mode
When using SUPERLINK mode, the TL3N uses the clock signals from the D/
A converter. If, during playback, you switch the input selector on the D/A
converter to or from the SUPERLINK input, this will also switch the clock
signal source, and cause the TL3N to stop the playback. Press the PLAY/
PAUSE
/ button again to resume playback. We recommend switching the
input on the D/A converter before starting playback.
❹ Belt and Spindle Replacement
The TL3N uses a belt drive mechanism. The belt will gradually deteriorate
over time. Possible symptoms resulting from this are; failure to read TOC,
sound skipping, etc. You will need to have the belt replaced in such cases.
We recommend replacing the belt at least once every 5 years. Likewise, the
spindle will also gradually deteriorate over time. We recommend an overhaul
at least once every 8 years. Please contact your dealer or an authorized CEC
service center.
❺ To prevent vibrations from the surroundings and maximize the sound
quality and performance, this unit should be set on an audio rack or a firm
board.
Maintenance
● If the surface of the TL3N case becomes soiled, wipe with a soft cloth or
use diluted neutral cleaning liquid. Be sure to remove any fluid completely.
Do not use thinner, benzene, alcohol, chemical cloths or bleaching agents as
these may damage the surface of the TL3N case. Also avoid using aerosol
insecticides near the unit.
● If dust accumulates on the turntable, remove it with stick tape (e.g. Scotch
tape). Make sure not to touch the optical pickup lens with your fingers.
● TL3N requires no periodic maintenance except the belt and spindle
replacement mentioned above, and contains no user-serviceable parts.
Contact your dealer or an authorized CEC service center for inspection and
repairs in case of malfunction.
21
CD TRANSPORT TL3N
Troubleshooting
If you suspect a malfunction in the unit, please check the following chart
before calling your dealer.
● No power
Check the connection at the both ends of the AC power cord.
Make sure there is power at the wall outlet.
Turning the power on/off repeatedly may cause this. Wait for 5
seconds before turning the power on again.
● No playback
Check that the disc is placed with its label facing up.
Check that the CD door is closed completely.
If the disc is soiled, clean the surface of the disc.
● No sound
Check the connection to the D/A converter.
Check the position of the input selector on the amplifier.
● Sound skipping
Place the player on a stable rack to prevent the effects of vibration.
If the disc is soiled, clean the surface of the disc.
Do not use scratched, damaged or warped discs.
● Interference on the tuner
The tuner is too close to the TL3N. Install the TL3N away from it or
turn off the tuner’s power.
● Unresponsive to remote control
Point the remote control towards the remote sensor on the front
panel.
Remove any objects blocking the sensor.
Use the remote control unit at a shorter distance from the TL3N.
Replace the batteries in the remote control unit with new ones.
22
TL3N User's Manual
Specifications
Playable Discs
Audio CDs and finalized Audio CD-R/
RWs
Spindle Drive System
Belt-Drive
Pickup Drive System
Belt-Drive
CD Stabilizer
Diameter 70mm, Weight 330g (Brass)
Superlink x 1(BNC x 4): 2.5Vp-p/75Ω
Digital Output
AES/EBU x 1(Hot=2): 2.5Vp-p/110Ω
COAXIAL x 1: 0.5Vp-p/75Ω
TOS x 1: -21 ~ -15dBm EIAJ
Word Clock Input
Power Supply
Power Consumption
Dimensions
Weight
BNC x 1: 44.1kHz
AC120/230V, 50/60Hz (Specified on
rear panel)
7W
approx. 435(W) x 320(D) x 109(H)
mm(incl. leg, knob & terminal)
approx. 11kg
CD Stabilizer, AC Power Cord, Remote
Accessories
Control Unit, Two AAA type Batteries,
Owner's Manual
Color
Silver / Black (limited version only)
NOTES:
● TL3N contains a microcomputer that can malfunction due to the external
noise or interference. If this seems to be the case, turn the unit off and wait
for a short while before turning it back on and trying again.
● Design and specifications are subject to change without notice.
23
CEC Co., Ltd., Japan
1206-C