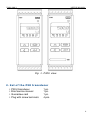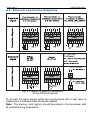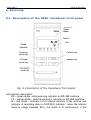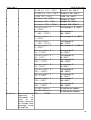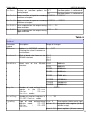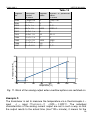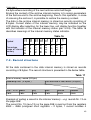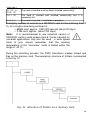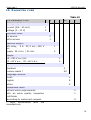
1
TRANSDUCER OF TEMPERATURE AND STANDARD SIGNALS P30U TYPE User’s manual P30U-09A/1 USERS MANUAL Contents 1. Application ..................................................................................................................................... 3 2. Set of the P30 transducer .............................................................................................................. 4 3. Basic requirements, operational safety .......................................................................................... 5 4. Installation ...................................................................................................................................... 5 4.1. Fixing the P30U transducer ........................................................................................... .....5 4.2. External connection diagrams ............................................................................................ 7 5. Servicing ........................................................................................................................................ 8 5.1. Description of the P30U transducer front panel .................................................................. 8 5.2. Messages after switching on the power .............................................................................. 9 5.3. Key functions: ..................................................................................................................... 9 5.4. Programming the transducer parameters ......................................................................... 11 5.4.1. Method of changing the selected parameter value ................................................ 14 5.4.2. Changing the floating point values......................................................................... 15 5.4.3. Programmable transducer parameters .................................................................. 15 5.4.4. Mathematical functions .......................................................................................... 24 5.4.5. Individual characteristics of input ........................................................................... 25 5.4.6. Individual characteristics of output......................................................................... 27 5.4.7. Overflow options of analog output ......................................................................... 27 5.4.8. Alarm types ............................................................................................................ 30 5.4.9. Display format........................................................................................................ 31 5.4.10. Standard parameters ........................................................................................... 33 5.4.11. Defining your own unit ................................................................................................. 35 5.4.12. RS-485 Master mode .......................................................................................... 36 5.4.13. RS-485 Monitor mode ......................................................................................... 38 6. Software updating ........................................................................................................................ 40 7. Internal archive ............................................................................................................................ 42 7.1. Memory structure .............................................................................................................. 42 7.2. Record structure ............................................................................................................... 43 7.4. Getting archive data.......................................................................................................... 46 8. Memory card (option) ................................................................................................................... 47 8.1 Archive file structure ......................................................................................................... 49 9. RS-485 interface .......................................................................................................................... 50 9.1. Connecting a serial interface ............................................................................................ 50 9.2. Description of MODBUS protocol implementation ............................................................ 52 9.3 Description of the functions applied ................................................................................... 52 9.4 Register map ..................................................................................................................... 54 9.5 Read and write registers .................................................................................................... 56 9.6 Read registers ................................................................................................................... 68 10. Accessories ................................................................................................................................ 72 11. Technical data ............................................................................................................................ 73 12. Execution code .......................................................................................................................... 78 2 P30U-09A/1 USERS MANUAL 1. Application The P30U programmable transducer is designed to convert temperature, resistance, voltage, standard voltage and current signals into a standard DC voltage or DC current signal. The output signal is galvanically isolated from the input signal and the power supply. The transducer display is a 2x8 LCD. Features of the P30U transducer: conversion of the measured value into any output signal on the basis of the individual liner characteristics, conversion of the measured value by means of one of five implemented mathematical functions, conversion of the measured value on the basis of 21-point individual characteristics, one or two relay alarms with a closing contact working in 6 modes, additional 24V DC 30mA power supply switched on/off by a program (option) indication of exceeding the alarm values set, programming the alarm and analog outputs with a reaction to the selected input value (main input or RTC clock), real time clock with a clock power supply backup function in case of a transducer power supply loss, recording the signal input in programmed time periods in the internal memory and on an SD/SDHC card (option), archive internal memory with the capacity of 534336 records, automatic decimal point setting, view of parameters set, locking entered parameters by a password, supporting RS-485 interface with the MODBUS protocol in RTU mode, programming the measurement averaging time, supporting SD/SDHC cards – FAT and FAT32 file system is supported, RS-485 Master mode – an option to poll a single device, RS-485 Monitor mode – an option to monitor transmission on RS-485 interface and react to the value of the selected register. 3 P30U-09A/1 USERS MANUAL Fig. 1. P30U view. 2. Set of the P30 transducer P30U transducer Brief service manual Guarantee card Plug with screw terminals 1 pc. 1 pc. 1 pc. 4 pcs. 4 P30U-09A/1 USERS MANUAL 3. Basic requirements, operational safety The transducer meets the requirements of EN 61010-1 in terms of operational safety. Remarks concerning the operator safety: Installation and electric connections should be carried out by a person holding licenses to perform electric device installation. Connection correctness should be checked before switching the transducer on. The transducer is designed to be installed and used in industrial electromagnetic environment. The system inside the building should be provided with a circuit breaker or an automatic circuit breaker placed nearby the device, being easily accessible for the operator and appropriately marked. Removal of the transducer housing during the contractual warranty period may cause its invalidation. 4. Installation 4.1. Fixing the P30U transducer The P30U transducers are designed to be installed on a 35 mm rail acc. to PN-EN 60715. Overall dimensions and method of fixing are shown in the Fig. 2. 5 P30U-09A/1 USERS MANUAL Lock Fig. 2. Overall dimensions and method of fixing P30 transducers 6 P30U-09A/1 USERS MANUAL 4.2. External connection diagrams Fig. 3. Diagram of electric connections of the P30U transducer To connect the input signals within the environments with a high level of interference, a shielded cable should be applied. Note: The memory card (option) should be placed in the transducer with its contacts facing downwards. 7 P30U-09A/1 USERS MANUAL 5. Servicing 5.1. Description of the P30U transducer front panel Power diode Result Unit Diode indicator Increase value key Cancel key Change value key Accept key SD/SDHC card slot Fig. 4. Description of the transducer front panel Led indicator description: RX – green diode –data receiving indicator on RS-485 interface, TX – yellow diode – data transmission indicator on RS-485 interface, M – red diode – indicator of full internal memory of the archive and indicator of recording data on SD/SDHC indicator - when the internal memory usage exceeds 95%, the diode is lit continuously, if the 8 P30U-09A/1 USERS MANUAL transducer uses the installed memory card, then when recording the data on the card, the diode blinks till the end of writing the data to the file. A1 – red diode – indicator of switching on the first alarm A2 – red diode– indicator of switching on the second alarm or 24V DC power supply Power supply indicator – green diode 5.2. Messages after switching on the power After connecting the external signals and switching the power on, which is indicated by the green diode (power supply indicator), the transducer displays the type, current program version and serial number. After about three seconds the transducer is automatically switched to working mode, in which it measures and converts signal to an analog output signal. It displays the value being displayed in the upper line of the display, and the additional information in the lower line of the display (par. 5.4.9). The transmission state on the RS-485 interface, internal memory usage and alarm states are shown on the diode indicator. 5.3. Key functions: - accept key entry into the programming mode (hold for about 3 seconds), navigating through the menu – selection of the level, entry into the parameter change value mode, accepting the modified parameter value, changing the content displayed in the lower line of the display. - increase value key displaying the maximum value, entry into the parameter group level, navigating through the selected level, modification of the selected parameter value – increasing the value. - change digit key 9 P30U-09A/1 USERS MANUAL displaying the minimum value. entry into the parameter group level, navigating through the selected level, modification of the selected parameter value – moving to the next digit. - cancel key entry into the transducer parameter view menu (hold for about 3 seconds), exit from the transducer parameter view menu, changing the content displayed in the lower line of the display, parameter change resignation, ultimate leaving the programming mode (hold for about 3 seconds). Pressing the combination of keys and holding them for about 3 seconds erases the alarm indication. This operation works only, when the backup function is activated. Pressing the combination of erases the minimum value. Pressing the combination of erases the maximum value. Pressing the combination of keys uninstalls the SD/SDHC card, keys enabling its safe removal. Pressing the combination of makes that the archive from internal memory is copied to the SD/SDHC card. Pressing and holding down key enables entry into the programming matrix. The programming matrix may be protected by a security code. 10 P30U-09A/1 USERS MANUAL Fig. 5. Operation algorithm of the P30U transducer 5.4. Programming the transducer parameters Pressing key and holding it down for about 3 seconds enables entry into the programming matrix. If the entry is protected by a password, then the message informing that password must be entered will be displayed. If an incorrect password is entered, the message Incorrect code will be displayed. Entering a correct password enables entry into the programming matrix. The Fig. 6 shows the transition matrix in the programming mode. Selecting the menu level and navigation through the parameters of the specific sublevel is done by means of or key. The parameter symbol is displayed in the upper line of the display, 11 P30U-09A/1 USERS MANUAL while the parameter is displayed in the lower line of the display. In order to enter edition of the specific parameter, press key. To exit from the edition and specific parameter, key should be used. To exit from the key should be pressed and programming matrix for measurement, held down. In case the transducer is left in the parameter programming mode, after 30 seconds the programming mode will be left automatically, and the device will be switched to display the displayed value. Sett Input AvgT ings ime Inpu t Measur Averag ed ing Param value eters type time of measu of main red input value Compe Comp ns. .Val Sett Point X1 ings No Ind. Char First Numbe point Param r of of the eters points individ of the of the ual individ individu charact ual al eristicP charact charact oint x. eristic eristic Y1 Sett Decim Unit ings alP Disp lay Displa Minimu yed Displa m unit y decimal param point eters of display ed value Over Lo No.of Math Err Fun Compe Manual Admissi Operati nsation compe ble on of type nsation number mathe value of matical incorre functio ct n on request the s for measur the ed input value RS485 Master …. First point of the individ ual charact eristic. Point y. Over Hi X21 Y21 Last point of the individu al charact eristic Last point of the individu al charact eristic Bckli Bckl. Disp. Dec.P ght Int. Reg. 2 Minimu Lower Upper Backlig Backlig Numbe m decimal thresho thresh ht time ht r of point ld of old of of intensit register Of the display display display y of display second range range ed in LCD display display the ed lower value line of the display 12 P30U-09A/1 USERS MANUAL Sett Param Type ings .A1 A1 Alar m 1 Type of Type Param input of eters quantit alarm of y of 1 alarm alarm 1 1 OverL Over oA1 HiA1 DlyOn DlyOf OnLo A1 fA1 ckA1 SgKee pA1 Lower thresho ld of alarm 1 Delay of switchi ng on the alarm 1 Support of alarm 1 indicati on Sett Param Type ings .A2 A2 Alar m 2 Type of Type Param input of eters quantit alarm of y of 2 alarm alarm 2 2 OverL Over oA2 HiA2 DlyOn DlyOf OnLo A2 fA2 ckA2 SgKee pA2 Lower thresho ld of alarm 2 Upper thresh old of alarm 2 Delay of switchi ng on the alarm 2 Support of alarm 2 Fig. Sett Param AnIn ings .An Lo Outp ut Type of Lower input Output quantit thresh param y for old of eters the the analog input output AnIn Hi AnOu t Lo AnOut OvrSe OvrI Hi rv n Lo OvrIn OvrOut OvrOut Hi Lo Hi Upper thresho ld of the input Lower thresh old of the output Upper thresho ld of the output Upper overflo w of input Sett Addre Prot ings ss ocol Modb us Kind of Device frame RSaddres 485 s interfa ce param eters BaudR Reg. ate No No.of TypeR Inte Reg. eg rval AnswT ime Baud rate Numbe r of read out register s (Master mode) Maxima l time of reply (Master mode Upper thresh old of alarm 1 Regist er addres s to be read out (Maste r mode) Delay of switchi ng off the alarm 1 Delay of switchi ng off the alarm 2 Overflo w options turning on Type of read out register (Master mode) Delay of reswitc hing on the alarm 1 Delay of reswitc hing on the alarm 2 Lower overflo w of input Read out interval (Maste r mode) Value expecte d on the output during lower overflow of input Value expecte d on the output during upper overflow of input 13 P30U-09A/1 USERS MANUAL Sett Arch. Para ings Val m.Ar Arch ive Selecti Type Archivi on of of ng archive value param d which eters volume will s turn on conditi onal archivi ng Ar.M ode Sett ParFa Secu rity ings ct Serv ice Write Enter Servic standar the e d passw param parame ord eters ters Over LoAr OverH Ar.Ti Ar.E iAr me rase Rec.T Param oSD .SD Archivi Lower ng type thresh old of archivi ng Upper Archivi Erasin thresho ng time g of ld of internal archivin archive g Manual copying of internal archive to the SD/SD HC card Time Date AutoT DispT Lang ime est uage Setting the actual time Setting the Automa Test of the actual tic date change LCD of time display and summe diodes r/winter and inversel y Fulfillme nt percenta ge of internal archive, which will turn on automati c record on the SD/SDH C card Selecti on of menu langua ge Fig. 6. Programming matrix 5.4.1. Method of changing the selected parameter value In order to increase the selected parameter value, press key. Pressing the key once increases the value by 1. Increasing the value when the digit 9 is displayed, sets 0 on this digit. The digit is changed, once key is pressed. Pressing key while editing the most important digit enables edition of the digit character – the character is changed by means of key. In order to accept the parameter set, press key. Then the parameter will be saved. Pressing key when changing the parameter value will cancel saving operation. 14 P30U-09A/1 USERS MANUAL 5.4.2. Changing the floating point values This change is performed at two stages (switching to the next stage follows pressing key). Setting the dot position (00000., 0000.0, 000.00, 00.000, 0.0000); key moves the dot to the left, and moves the dot to the right. Pressing key when changing the parameter value will cancel saving operation. Setting the value from the range -19999…99999 is similar as for the integers. 5.4.3. Programmable transducer parameters The below table shows the programmed parameters and their value range. Table 1 Settings Input Parameter symbol Input Description Range of changes Type of connected signal. the Symbol on the display input Voltage -10..10V Voltage -10V … 10V Voltage -24..24V Voltage -24V … 24V Current -20..20mA Current -20mA … 20mA Resist. 400Ω Resistance 0 … 400Ω Resistance 2000Ω Resistance 0...2000Ω Resistance 5500Ω Resistance 0...5500Ω Pt100 -200..850°C Pt100 -200...850 ºC Pt250 -200..600°C Pt250 -200...600 ºC Pt250 -200..850°C Pt250 -200...850 ºC Pt500 -200..180°C Pt500 -200...180 ºC Pt500 -200..850°C Pt500 -200...850 ºC Pt1000 -200..250°C Pt1000 -200...250 ºC Pt1000 -200..850°C Pt1000 -200...850 ºC Ni100 -60..180°C Ni100 -60...180 ºC Ni1000 -60..150°C Ni1000 -60...150 ºC 15 P30U-09A/1 USERS MANUAL Ni100-LG -60..180°C Ni100-LG -60...180 ºC Ni1000-LG -60..180°C Ni1000-LG -60...180 ºC AvgTime Cu100 50..180°C Cu100 -50...180 ºC Voltage -5..20mV Voltagee -5...20mV Voltage -75..75mV Voltagee -75...75mV Voltage -200..200mV Voltagee -200...200mV Thermocouple J 0..400°C Thermocouple J 0...400ºC Thermocouple J -200..1200°C Thermocouple J 200...1200ºC Thermocouple K 0..400°C Thermocouple K 0...400ºC Thermocouple K -200..1370°C Thermocouple K 200...1370ºC Thermocouple S 0..600°C Thermocouple S 0...600ºC Thermocouple S 50..1760°C Thermocouple S 50...1760ºC Thermocouple N 20..420°C Thermocouple N 20...420ºC Thermocouple N 200..1250°C Thermocouple N 200...1250ºC Thermocouple E 40..260°C Thermocouple E 40...260ºC Thermocouple E 200..1000°C Thermocouple E 200...1000ºC Thermocouple R 50..1760°C Thermocouple R 50...1760ºC Thermocouple T 200..400°C Thermocouple T 200...400ºC Thermocouple B 400..1800°C Thermocouple B 400...1800ºC RS-485 Master RS-485 Master Modbus RS-485 Monitor RS-485 Monitor Modbus Measurement time 200 ... 20000 expressed in milliseconds. The result on the display represents the average value calculated during the AvgTime. 16 P30U-09A/1 USERS MANUAL Compens. Selection of Automat. - automatic compensation compensation and Manual - manual compensation measured value. It refers only to the work in the temperature or resistance measurement mode. For the resistance sensors it determines resistance of the cables connecting the transducer with a sensor, and for the thermoelectric sensors it indicates the temperature of free ends of a thermocouple. Comp.Val Manual -99999 ... 99999 compensation value. For the resistance sensors it is the cable resistance value, for the thermoelectric sensors it is the terminal temperature value. No.ofErr 0...10 Admissible number of incorrect requests of the transducer working in the RS-485 Master mode. Math Fun Operation of Off mathematical x2 function on the Æx measured value Mathematical functions are off. 1/x Inverse of the measured value 1/x2 Inverse square of the measured value 1/Æx Inverse square measured value Square of the measured value Square root of the measured value root of the 17 P30U-09A/1 USERS MANUAL Table 2 Settings Ind.Char Parameter Description symbol Range of changes Point No Number of points of the individual 1...21 characteristic. Number of segments is the number of points reduced by one. X1 Value of the measured value for -99999...99999 which we will expect Yn (n - point number). Y1 Expected value for Xn. -99999...99999 Table 3 Settings Display Parameter symbol DecimalP Unit Description Range of changes Minimum position of the point 0.0000 when displaying the displayed 00.000 value – display format. 000.00 0000.0 00000 -0 -1 -2 -3 -4 kVAh pc. V A mV kV MVAh Hz kHz Ω imp rps m/s l/s mA kΩ rpm kA W kW MW var kvar Mvar VA kVA o rpm mm/min m/min l/min m3/min pc./h m/h km/h m3/h Displayed unit. C F K % %RH pH kg bar m o 18 P30U-09A/1 USERS MANUAL Over Lo MVA l kWh s MWh h kVarh m3 MVarh rev. Lower threshold of display range. -99999...99999 Over Hi Upper threshold of display range. -99999...99999 Bcklight Backlight time of display. kg/h l/h Own, defined by the user On - switched on permanently Off - switched off permanently 1 - switched on for X seconds 2 ... 60 Bckl.Int. Backlight intensity of LCD display 10% backlight of LCD display 10% of maximum backlight 20% backlight of LCD display 20% of maximum backlight ... 100% - backlight of LCD display 100% of maximum backlight Disp.Reg. Number of register displayed in 0...65535 the lower line of the display Dec.P 2 The minimal position of the point 0.0000 - 0 by displaying the second 00.000 - 1 displayed value - display format. 000.00 - 2 0000.0 - 3 00000 - 4 Table 4 Settings Alarm 1,Alarm 2 Parameter Description symbol Range of changes Param.A1 Type of input quantity controlling Disp.Val Param.A2 the alarm Time 2nd val Type A1 Type A2 Alarm type. Fig.9 shows graphical n-on illustration of the alarm types. n-off displayed value time second displayed value normal (change from 0 to 1). normal (change from 1 to 0). on switched on off switched off 19 P30U-09A/1 OverLoA1 OverLoA2 OverHiA1 OverHiA2 DlyOnA1 DlyOnA2 DlyOffA1 DlyOffA2 OnLockA1 OnLockA2 USERS MANUAL h_on manual switched on; up to the time of change of alarm type the alarm output is permanently switched on. h_off manual switched off; up to the time of change of alarm type the alarm output is permanently switched off. Lower threshold of alarm -99999...99999 Upper threshold of alarm -99999...99999 Delay of switching on the alarm (s) 0...900 Delay of switching off the alarm (s) 0...900 Delay of reswitching on the alarm 0...900 (s) SgKeepA1 Support of alarm 1 indication SgKeepA2 Off no indication of occurrence of switching on the alarm On indication, by blinking led diodes A1, A2, of occurrence of switching on the alarm is switched on Table 5 Settings Output Parameter Description symbol Range of changes Param.A1 Type of input quantity controlling the Disp.Val displayed value analog output Time time 2nd val second displayed value AnIn Lo Individual characteristic of analog -99999...99999 output - Lower threshold of input AnIn Hi Individual characteristic of analog -99999...99999 output - Upper threshold of input AnOut Lo Individual characteristic of analog -24...24 output - Lower threshold of output AnOut Hi Individual characteristic of analog -24...24 output - upper threshold of output 20 P30U-09A/1 OvrServ USERS MANUAL Turning on overflow options for Off analog output On Overflow options is switched off Overflow options is switched on OvrIn Lo Lower overflow of input for including -99999...99999 overflows of output OvrIn Hi Upper overflow of input for including -99999...99999 overflows of output OvrOutLo Value expected on the output during -24...24 lower overflow OvrOutHi Value expected on the output during -24...24 upper overflow Table 6 Settings Modbus Parameter symbol Description Range of changes Address Address in MODBUS network. 0...247 Entering the value 0 switches of the interface. Protocol Kind of baud rate frame of the r8n2 r8e1 RS-485 interface r8o1 r8n1 Baud rate of the RS-485 4800 interface 9600 BaudRate Reg.No 4800 bit/s 9600 bit/s 19200 19200 bit/s 38400 38400 bit/s 57600 57600 bit/s 115200 115200 bit/s 230400 230400 bit/s 256000 256000 bit/s Number of read out/monitored 0 ... 65536 register in the RS-485 Master / RS-485 Monitor modes No.ofReg. Number of read out registers in 0 ... 50 RS-485 Master mode TypeReg Type of read out/monitored char 8 registers mode RS-485 uchar 8 Master / RS-485 Monitor short 16 char register (8 bits and a sign) unsigned char register (8 bits without a sign) short register (16 bits and a 21 P30U-09A/1 USERS MANUAL sign) ushort16 unsigned short register (16 bits without a sign) long 32 slong register (32 bits without a sign) ulong 32 unsigned long register (32 bits without a sign) flt 32 Register type float (32 bits, floating point and a sign) sflt2x16 swapped float register, value stored in two sixteen-bit registers (sequence of bytes 3,2,1,0) flt 2x16 float register, value stored in two sixteen-bit registers (sequence of bytes 1,0,3,2) lng 2x16 Register type long, value stored in two sixteen-bit registers (sequence of bytes 1,0,3,2) slng2x16 Register type swapped long, value stored in two sixteen-bit registers (sequence of bytes 3,2,1,0) ulng2x16 Register type unsigned long, value stored in two sixteen-bit registers without a character (sequence of bytes 1,0,3,2) uSln2x16 Register type swapped unsigned, value stored in two sixteen-bit registers without a character (sequence of bytes 3,2,1,0) Interval Read out interval of the device 1...36000 in the RS-485 Master mode [0.1s] AnswTime Maximal time of reply of the 10...5000 device in the RS-485 Master mode [ms] 22 P30U-09A/1 USERS MANUAL Table 7 Settings Archive Parameter symbol Description Range of changes Arch.Val Disp.Val only displayed value Selection of archived values Note: change of the register +2nd measured value and value erases archive in the val. second displayed value internal memory !!! Queried All queried registers Param.Ar Type of input value controlling Disp.Val displayed value archiving conditional Time time Ar.Mode Condition to switch on archiving. Fig.9 shows graphical illustration of types of conditions of switching on archiving (similarly to the alarm types). n-on normal (change from 0 to 1). n-off normal (change from 1 to 0). on switched on off switched off h_on manual switched on; up to the time of change of alarm type, alarm output is permanently switched one h_off manual switched off; up to the time of change of alarm type, alarm output is permanently switched off. OverLoAr Lower threshold of archiving -99999...99999 OverHiAr Upper threshold of archiving -99999...99999 Ar.Time Period archiving (s) 1...3600 Ar.Erase Erasing of internal archive Yes erasing of internal archive No do nothing Rec.ToSD Manual copying of internal Yes archive to the SD/SDHC card No Param.SD the copying the internal archive to the SD/SDHC card do nothing Fulfillment percentage of internal 5 ... 100 archive, which will turn on automatic record on the SD/SDHC card 23 P30U-09A/1 USERS MANUAL Table 8 Settings Service Parameter Description symbol ParFact Range of changes Write standard parameters. Setting No the value Yes enters standard Yes parameters into the transducer. Values of standard parameters are shown in the table 13. do nothing enters standard setpoints. Security Entering new password. Entering -99999...99999 the value 0 switches the password off. Time Setting the actual time. Entering 00:00...23:59 incorrect time cancels entering the time. The entered value will not be taken. Date Setting the date - month+day. 01-01-10...31-12-99 Entering incorrect date cancels entering the date. The entered value will not be taken. AutoTime Automatic change of time summer/winter and inversely - No Yes without automatic change of time with automatic change of time DispTest Test of the LCD display and No indication diodes Yes do nothing Language Selecting the current language Polish menu English selection of Polish language Deutsch starts the test selection of English language selection of German language Francais selection of French language 5.4.4. Mathematical functions The P30U transducer is able to convert the measured value by applying one of five implemented mathematical functions: Square of the measured value; Root of the measured value; Inverse of the measured value; 24 P30U-09A/1 USERS MANUAL Inverse square of the measured value; Inverse square root of the measured value. Switching on and selection of a mathematical function is possible from the menu level in the Input → Math Fun. group and via the RS-485 interface. The method of impact of the mathematical function on the transducer work is presented in the Fig. 7. 5.4.5. Individual characteristics of input P30 transducers perform the function of conversion of the measured value to any value due to implemented function of individual characteristics of the input. The individual characteristics rescale the input signal being measured according to the characteristics set. The impact of the individual characteristics on the transducer work is presented in the Fig. 7. Fig. 7. Individual characteristics work The user may enter twenty functions at the maximum by entering the points determining the intervals and the expected values for the next points. Programming the individual characteristics is to determine the number of 25 P30U-09A/1 USERS MANUAL the points to linearize the input function. You should remember that the number of linearizing functions is by one lower than the number of the points. Next you should program the next points by adding the measured value Xn and the expected value corresponding to it which is to be displayed (Yn). Graphic interpretation of the individual characteristics is presented in the Fig. 8. Displayed value Input function Linearized function Measured value Fig. 8. Individual characteristics of the input When approximating the function you should remember that for approximation of the curves which significantly deviate from the liner characteristics, the larger number of linerizing segments, the smaller error related to linearization. If the measured values are smaller than X1, then the conversions are performed on the basis on the first straight line calculated on the basis of the points (X1,Y1) and (X2,Y2). However, for the values larger than Xn (where n – is the last declared measured value), the value to be displayed will be calculated on the basis of the last determined liner function. Note: All the entered points of the measured value (Yn) must be arranged in ascending order, so that there is the relationship: X1<X2<X3…<Xn If the above condition is not met, the function of the individual characteristics will be automatically switched off (it will not be performed) and a diagnostic flag will be set in the status register. 26 P30U-09A/1 USERS MANUAL 5.4.6. Individual characteristics of output Value at the analog output The P30U transducer makes it possible to convert the displayed value into the output signal on the basis of the individual liner characteristics of the analog output. On the basis of the coordinates of two points entered by the user the transducer determines (from the system of equations) coefficients of the individual characteristics, a and b. Y1out = a ⋅ X 1in + b Y 2out = a ⋅ X 2in + b Any displacement of the characteristic where X1 in and X2 in – the displayed value, expected value on the analog output Any inclination of the characteristic Displayed value Y1 out and Y2 out – Fig. 9. Individual characteristics of the analog output 5.4.7. Overflow options of analog output In the P30U transducer the user may additionally configure behavior of the analog output after the occurrence of an excess of the displayed value. By default the overflow options are switched off – then, when the displayed value is exceeded the output is still controlled proportionally to the displayed value beyond the basic range of the output. After switching on the overflow options the user may define the value to control the output after occurrence of upper or lower excess of the displayed value. Example 1: The transducer is set to measure the temperature via a thermocouple J – input :Thermoc.J -200..1200°C. The individual characteristics of the analog current output are set as follows: 27 P30U-09A/1 USERS MANUAL Table 9 Register No. Parameter symbol Register Symbol of parameter in menu value value in menu 4040 Param.An 0 Disp.Val 4041 OvrServ 0 Off 7610 AnIn Lo 0 0.0 7611 AnIn Hi 1000 1000.0 7612 AnOut Lo 4 4 7613 AnOut Hi 20 20.0 The Fig. 10 shows the way of reaction of the analog output when overflow options of the analog output are switched off – standard work of the analog output. 25 23,2 20 Analog output [mA] Wyjście analogowe [mA] 20 15 10 4 5 0,8 0 -200 0 200 400 600 Temperatura [ C] 800 1000 1200 o Temperature [ C] Fig. 10. Work of the analog output when overflow options are switched off If the overflow options of the transducer analog output are switched on in the same case (the parameters are set according to the table 10), then the reaction of the analog output will look like as shown in the Fig. 11. 28 P30 U-09 A/1 USERS MANUAL Table 10 Register No. Parameter symbol in menu Register value Symbol of parameter value in menu 4040 Param.An 0 Disp.Val 4041 OvrServ 1 On 7610 AnIn Lo 0 0.0 7611 AnIn Hi 1000 1000.0 7612 AnOut Lo 4 4 7613 AnOut Hi 20 20.0 7664 OvrIn Lo 0 0 7665 OvrIn Hi 1000 1000 7666 OvrOutLo 1,5 1,5 7667 OvrOutHi 3,5 3,5 25 Analog output [mA] Wyjście analogowe [mA] 20 20 15 10 5 4 1,5 3,5 3,5 1,5 0 -200 0 200 400 600 Temperatura [ C]o 800 1000 1200 Temperature [ C] Fig. 11. Work of the analog output when overflow options are switched on Example 2: The transducer is set to measure the temperature via a thermocouple J – input J – input :Thermoc.J -200..1200°C. The individual characteristics of the analog current output are set in such a way so that the output reacts to the actual time (hour*100+ minute), it means for the 29 P30 U-09 A/1 USERS MANUAL time 00:00 the expected value is 4 mA, for the time 23:59 the expected value is 20mA : Table 11 Register No. Parameter symbol in menu Register value Symbol of parameter value in menu 4040 Param.An 0 Time 4041 OvrServ 1 Off 7610 AnIn Lo 0 0.0 7611 AnIn Hi 2359 2359 7612 AnOut Lo 4 4 7613 AnOut Hi 20 20.0 5.4.8. Alarm types The P30U transducer is equipped with two alarm outputs with a normally open contact or with one output with a normally open contact and one 24V DC power supply output (depending on the version code). Each alarm (24V DC power supply output should be treated similarly to the alarm) may work in one of six modes. The Fig. 12 shows the work of the alarm in the following modes: n-on, n-off, on, off. Two remaining modes: h-on and h-off stand, respectively, for always switched on and always switched off. Those modes are intended for manual simulation of the alarm states. In case of the transducer with 24V DC output, the mode of the second alarm should be set to h-on, then the output of the additional power supply will be permanently switched one. 30 P30 U-09 A/1 USERS MANUAL a) n-on c) off Alarm alarmu output Wyjście Wyjście Alarm alarmu output 1 1 właczone on właczone on 0 właczone on 0 off wyłaczone AL_L wyłaczone off AL_H wielkość wyświetlana AL _L Displayed value b) n-off wielkość wyświetlana Displayed value d) on Alarm alarmu output Wyjście Wyjście Alarm alarmu output 1 1 właczone on właczone on 0 off wyłaczone AL_L AL _H AL_H wielkość wyświetlana Displayed value 0 wyłaczone off AL _L wyłaczone off AL _H wielkość wyświetlana Displayed value Fig. 12. Alarm types: a) n-on; b) n-off; c) on; d) off AL_L - Lower threshold of alarm AL_H – Upper threshold of alarm Note: In case of n-on, n-off, on, off alarms, entering PrL>PrH will switch the alarm off. 5.4.9. Display format The P30U transducer is equipped with backlight LCD display consisting of two lines, with 8 characters in each. The upper line of the display is used to show the value displayed in floating-point format (5 digits) and to display pictograms of the SD/SDHC card status, or after pressing or keys, to display pictograms of the maximum or minimum value. 31 P30 U-09 A/1 USERS MANUAL Table 12 Symbol Displaying mode Meaning constant SD/SDHC card is installed and ready to work blinking SD/SDHC is uninstalled and ready to be removed blinking SD/SDHC writing blinking SD/SDHC card is full constant Displaying the maximum value constant Displaying the minimum value card is protected against The P30U transducer automatically adjusts the format (accuracy) of displaying to the value of the displayed parameter. To use this function to the maximum, you should select from the menu Settings Display → DecimalP → 0.0000 or enter the value “0” into the register 4021, then the transducer will be displaying the displayed value with the maximum possible accuracy. You should remember that displaying with higher resolution is not always desired, as it may deteriorate stability of indications. If exceeding the measurement ranges it is indicated by displaying special characters in the upper line of the LCD display: − vvvvvv – lower overflow of the input signal range − - upper overflow of the input signal range The lower line of the display of the P30U transducer is multi-functional. After pressing or key, the functions of the lower line of the display are switched in cycles: unit (selected from the defined units or your own unit (par. 5.4.11) ) including the internal memory usage indicator ( par. 7.1. Table 16.) time in HH:MM:SS format date in DD:MM:YY format bar graph showing percentage control of the analog output second displayed value - value of any transducer register 32 P30 U-09 A/1 USERS MANUAL projected on a floating-point number – number of the register to be displayed should be entered into the register 4024 (if you want to display the float register value stored in the 16-bit registers, e.g.. register 7000, you should enter the number of the corresponding 32bit register - > 7500.) Fig.13 . Diagram of switching information displayed in the lower line of the display. The function selected for the lower line of the display is stored in memery after a power supply loss. 5.4.10. Standard parameters The table 13 shows standard settings of the P30U transducer. Those setpoints may be restored by means of the transducer menu by selecting the option Settings Service → ParFact → Yes or via the RS-485 interface after entering the value “1” into the register 4055. Input Table 13 Parameter symbol Standard value Input Therm. J 0..400oC AvgTime Compens. Comp.Val Il.Dop.B Math Fun 1000 Automat. 0 2 Off 33 Display Ind.Char P30 U-09 A/1 USERS MANUAL Point No X1 Y1 ... Xn 1 100 100 Yn (n-1)*100 DecimalP Unit Over Lo Over Hi Bcklight Bckl.Int. Disp.Reg 0.0000 mA -99999 99999 On 70,00% 7509 Output Archive Dec.P 2 Param.A1 Type A1 OverLoA1 OverHiA2 DlyOnA1 DlyOffA1 OnLockA1 SgKeepA1 Param.An AnIn Lo AnIn Hi AnOut Lo AnOut Hi OvrServ OvrIn Lo OvrIn Hi OvrOutLo OvrOutHi Address Mod bus Protocol BaudRate (n-1)*100 Param.A2 Type A2 OverLoA2 OverHiA2 DlyOnA2 DlyOffA2 OnLockA2 SgKeepA2 0.0000 Disp.Val n-on 0 20 0 0 0 On Disp.Val 0 20 0 20 Off 0 20 0 0 1 r8n2 9600 34 Service Archive P30 U-09 A/1 USERS MANUAL Reg.No No.ofReg. TypeReg Interval AnswTime Arch.Val Param.Ar Ar.Mode 7510 1 flt 32 10 1000 Disp.Val Disp.Val h_off OverLoAr OverHiAr Ar.Time Ar.Erase Rec.ToSD Param.SD ParFact Security Time 0 0 10 No No 99.9 No 00000 Not identified Date Not identified AutoTime DispTest Language No No Polish (for version P30U-XXXXXXPX) English (for version P30U-XXXXXXEX) 5.4.11. Defining your own unit In the transducers of the P30 family, apart from the defined standard units, it is possible to define your own unit to be displayed in the lower line of the LCD display. The maximum size of the unit field is 5 characters, each character consists of 8 lines which makes 5x8 = 40 fields (registers) that define the unit. The standard solution is that own unit was defined in the transducers in the form of the LUMEL sign. In order to display your own unit, you should enter the value “57” into the register 4020 or choose the unit from the transducer menu. To define your own unit you should use the registers from the range 4400 … 4440. The definition method is shown on the below illustration. 35 P30 U-09 A/1 USERS MANUAL Line No. 1 of the character Character Character Character Character Character No. 1 of the No. 2 of the No. 3 of the No. 4 of the No. 5 of the unit unit unit unit unit Line No. 1 of the Fig.14 . Field intended for the unit in the lower line of the LCD display. Register 4400+(n-1)*8 4401+(n-1)*8 4402+(n-1)*8 4403+(n-1)*8 4404+(n-1)*8 4405+(n-1)*8 4406+(n-1)*8 4407+(n-1)*8 Value Character No. n 0x1F 1 1 1 1 1 0x10 1 0x14 1 1 0x14 1 1 0x14 1 1 0x17 1 1 1 1 0x10 1 0x1F 1 1 1 1 1 Fig.15 . Method of coding your own unit on a single field of the display. 5.4.12. RS-485 Master mode The P30U transducer is equipped with the RS-485 Master mode, which when selected makes that the device may poll one slave device connected to it. Both devices must have the same communication parameters. The RS-485 Master mode is switched on by selecting the appropriate type of input from menu: Input → RS-485 Master or by entering the value “34” into the register 4000. In the master mode the following parameters should be configured in the Modbus menu: 36 P30 U-09 A/1 USERS MANUAL Table 14 Item Modbus 1 Address Address of the device being read out 2 Protocol Transmission mode on the connection 3 BaudRate Baud rate 4 Reg.No 5 No.ofReg. 6 TypeReg 7 Interval Read out interval [x100 ms] 8 AnswTime Maximal time of reply [ms] Number of the first read out register Number of read out registers Type of read out registers The parameters (4 - 6) may also be configured by RS-485 (registers 40484052) before the RS-485 Master mode is selected. After selecting the RS-485 Master mode it is impossible for other Master device to poll the transducer. In the transducer Input menu there is the parameter No.ofErr, which is to define the admissible number of incorrect responses to the transducer request (number of repeated requests before an error is displayed). That parameter is also modified by RS-485 (register 4005) before the RS-485 Master mode is selected. The first register being polled is always treated as the value displayed in the RS-485 Master mode. If the request refers to a larger number of registers (parameter No.ofReg. > 1 ), then it is possible to display, in the lower line of the display, the value of other register than the first one being polled, because all the polled registers are copied to the block of registers from the range 8000...8049. For example, when we want to display additionally the value of the second register being polled, we should set the value “8001” in the menu of the parameter Display → Disp.Reg. (the first value being polled is in the register 8000 and it is treated as the main displayed value) or enter the value “8001” into the register 4024. In order to make the transducer RS-485 interface work again in the Slave mode, you should select other type of the input than RS-485 Master and RS-485 Monitor from the device menu. 37 P30 U-09 A/1 USERS MANUAL Supply Fig.16 . Example of using a P30U transducer in the RS-485 Master mode to read and register relative humidity from a P18 transducer. 5.4.13. RS-485 Monitor mode The P30U transducer is equipped with the RS-485 Monitor mode, which when selected makes that the device may listen to traffic in the RS-485 network and react to specific register of responses of the selected device. The P30U transducer must have the same communication parameters as the device being listened to. The RS-485 Monitor mode is switched on by selecting the appropriate input type of from menu: Input → RS-485 Monitor or by entering the value “35” into the register 4000. In the RS485 Monitor mode the following parameters should be configured in the Modbus menu: 38 P30 U-09 A/1 USERS MANUAL Table 15 Item Modbus 1 Address Address of the device being monitored 2 Protocol Transmission mode on the connection 3 BaudRate Baud rate 4 Reg.No Number of the register being monitored 5 TypeReg Type of the register being monitored 6 AnswTime Maximal time of reply of the device being monitored [ms] The parameters (4 - 6) may also be configured by RS-485 (registers 40484052) before the RS-485 Monitor mode is selected. After selecting the RS-485 Monitor mode it is impossible for other Master device to poll the transducer. Similarly as in the RS-485 Master mode the registers being listened to are copied to the register area from the range 8000...8049. The first register being listened to is copied to the register 8000 and it is treated as the main displayed value. If the parameter No.ofReg. > 1, then the values of the following registers being listened to reach the following registers from the range 8000...8049. For example, when we want to display additionally the value of the third register being listened to, we should set the value “8002” in the menu of the parameter Display → Disp.Reg. or enter the value “8002” into the register 4024. In order to make the transducer RS-485 interface work again in the Slave mode, you should choose other type of input than RS-485 Master and RS-485 Monitor from the device menu. 39 P30 U-09 A/1 USERS MANUAL 6. Software updating Function that facilitates updating software from a PC computer with the LPCon software has been implemented in the P30U transducers. Free LPCon software and updating files are available at www.lumel.com.pl. In order to update software the RS-485 converter on USB, such as PD10 converter must be connected to the computer. Fig.17b. View of the program to update the transducer software. Note! After updating the software, standard transducer setpoints should be set, therefore it is recommended to save the transducer parameters before performing the updating process with the LPCon software. After starting the LPCon program you should set the serial port, speed, mode and address of the transducer in the Options. Then you should select the P30U transducer from the menu of the Device and click the Read-out icon to read out all the parameters set (needed to be restored in the future). After selecting, from the Updating menu, the option Device software updating the Lumel Updater (LU) – Fig. 17 b window will be 40 P30 U-09 A/1 USERS MANUAL opened. Press the Connect key. The information window Messages includes information on the updating process progress. If the port is correctly opened, the message Port opened will be displayed. Entry into the updating mode in the transducer is performed in two ways: remotely via LU (on the basis of the settings in LPCon – address, mode, speed, COM port) or by switching on the transducer power supply with pressed key. In the case of entry into updating mode using the keyboard, is updated on a standard communication parameters, naudrate 9600 kb/s, 8N2 mode. When all the diodes light up and the message “Connect UPDATER is displayed in the upper line of the display, it indicates readiness of the transducer to communicate with a PC computer. If the transducer starts to communicate with the LUMEL UPDATER program, the message Device found: P30U and the version of the main program and of the bootloader program of the connected device will be displayed in the LU program, while the message ”Device is ready" will appear on the transducer display. Next, by pressing “ ... ” key you should retrieve the file with new software version in the LUMEL UPDATER program. If the file is correctly opened, the message File opened will appear in the window of the LU program. Press the Send key. During the updating process indication diodes light up in sequence and percentage updating progress is displayed in the lower line of the display. After successful updating process the transducer is switched to normal work, and the message Done and updating duration appear in the information window. Current software version may also be checked by reading the transducer welcome messages after switching on the power supply. Note: Updating the software is only possible when the transducer and a PC computer are connected directly (no other Master devices on the RS-485 interface). Note: Switching on the power supply during the software updating process may result in an unrepairable damage to the transducer! 41 P30 U-09 A/1 USERS MANUAL 7. Internal archive P30 transducers are standard equipped with internal memory intended to store the data recorded by the transducer. The standard parameter recorded by the transducer is the displayed value, it means the measured value, possibly converted on the basis of mathematical functions and the individual input characteristics. It is also possible to record additionally the second displayed value after selecting Archive → Arch.Val → +2 value from the menu or all quired values in Master RS-485 mode or Monitor RS-485 after selecting Archive → Arch.Val → Queried from menu. Note: Changing the Archive → Arch.Val parameter value in the menu erases the archive in the internal memory!!! The transducer memory enables to store 534336 records. The memory is a kind of a ring buffer. When the memory is full, the oldest data is overwritten. The internal archive may be read, copied and erased. 7.1. Memory structure The transducer internal memory is divided into 8192 pages. 66 records of the archive data may be stored on each page. The records on the page always begin from the page beginning and occupy the entire space of the page. Each memory page contains 528 bytes. This memory is divided into two areas: the first 8096 memory pages are intended for primary archive memory, while the last 96 pages are intended for a reserve archive used during copying the archive to an SD/SDHC card (the total memory size is 8096*528B + 96*528B = 4275312 Bytes). The beginning of the archive data is defined by the number of the page on which there is the first record of the archive and by the initial byte which defines from which page byte the first record begins. The end of the archive is defined similarly by the number of the page on which there is the last record of the page on which there is the last record of the page and 42 P30U-09A/1 USERS MANUAL the byte where recording of the next archive record will begin. Erasing the content of the archive internal memory is to assign parameters of the archive end to the archive beginning. Due to this operation, in case of scanning the archive it, is possible to restore the memory content. The data in the archive internal memory is stored as records consisting of 8 bytes. Current status of the internal memory may be indicated on the LCD display after selecting, for the lower line, unit display function together with the indicator of the internal memory status (par. 5.4.9). The table 16 describes meanings of the internal memory status indicator. Table 16 0...12.5% 12.5...25% 25...37.5% 37.5...50% 50...62.5% 62.5...75% 75...87.5% Percentage usage of internal memory 87.5...100% Symbol 7.2. Record structure All the data contained in the data internal memory is stored as records consisting of 8 bytes. The record structure is presented in the below table. Table 17 Internal memory record (8 Bytes) Recording time (4 Bytes ) Data archived in float format (4 Bytes ) Year - 2010 Month Day Hour Minute Second 6 bits 5 bits 5 bits 6 bits 6 bits 4 bits Example of coding a record in the internal memory – e.g. record No. 13 on the page 559: The record No. 13 (rec=13) on the page 559 is read out from the registers 4553 – 4556 (unsigned short registers – 2 bytes, 1 record includes 4 43 P30U-09A/1 USERS MANUAL unsigned short registers) after entering the value 559 into the register 4500. The initial register containing the beginning of the record is found in the relationship: R0 = 4501 + rec*4 = 4553. Table 18 Register HEX value 4553 0x0170 4554 0xBB95 4555 0xE87C 4556 0xB942 rec. = 0x0170BB95E87CB942 Datum = 0xE87CB942 → (float) → 92.743958; Table 19 Recording time = 0x0170BB95 → b1011100001011101110010101 Year 2010 + Month Day Hour Minute Second 6 bits 4 bits 5 bits 5 bits 6 bits 6 bits 0 0 0 0 0 0 0 1 0 1 1 1 0 0 0 0 1 0 1 1 1 0 1 1 1 0 0 1 0 1 0 1 0 + 2010 5 24 11 46 21 10-05-24 11:46 a) n-on c) off Archiving Archiwizacja Archiving Archiwizacja 1 1 on włączona włączona on 0 włączona on 0 off wyłączona Ar_L off wyłączona Ar_H Displayed wielkość wyświetlana value Ar_L Ar_H Displayed wielkość wyświetlana value 44 P30U-09A/1 USERS MANUAL b) d) Archiwizacja Archiving Archiving Archiwizacja 1 1 on on włączona on włączona 0 0 wyłączona off off wyłączona Ar_L Ar_L Ar_H Displayed wielkość wyświetlana value wyłączona off Ar_H Displayed wielkość wyświetlana value Fig. 18. Conditional archiving types Ar_L - Lower threshold of archiving → OverLoAr → Register 7608 Ar_H – Upper threshold of archiving → OverHiAr → Register 7609 Example 1. The transducer is configured for measurement of temperature - input Pt100 -200..850°C. Conditional archiving of both displayed values triggered by the displayed value level: Table 20 Designati Registe Parameter on r No. symbol in the in menu Fig. Register Parameter value symbol in menu 4064 Arch.Val 0 Disp.Val 4065 Param.Ar 0 Disp.Val 4066 Ar.Mode 2 on Ar_L 7608 OverLoAr 50 35.0 Ar_H 7609 OverHiAr 60 45.0 4067 Ar.Time 10 10 4068 Ar.Erase 0 Nie 4069 Rec.ToSD 0 Nie 7614 Param.SD 99,9 99,9 value 45 P30U-09A/1 USERS MANUAL Measured value wartość mierzona Archiving archiwizacja 55 1 Ar_H Archiwizacja 45 40 35 Archiving Measured value wartość wyświetlana 50 Ar_L 30 25 20 0 10 20 30 40 50 60 70 80 90 czas [s] [s] Time Fig.19 . Example of on type conditional archiving, configured as per the example from the table 20 (Archiving “1” means that archiving is switched on). 7.4. Getting archive data Getting the archive data from the internal memory is performed through a memory card (option) or through the RS interface -485. Getting the archive data is to get consecutive memory pages containing records with data. Getting single pages from the internal memory is supported by the LPCon software. If the specific transducer version supports SD/SDHC cards, then the archive data may be automatically copied to a memory card (it is the fastest method to get the archive data). To do so, you should insert an SD/SDHC card into the transducer slot (contacts facing downwards) and is displayed in make sure that the card is installed correctly (card icon the upper left corner of the display). You should also set the value of the percentage usage of the archive, for which the data will be automatically copied to the card – register 7614 or from the menu: Archive → Param.SD. For example, if the value “20.0” is entered into the register 46 P30U-09A/1 USERS MANUAL 7614, then the data will be gathered in the transducer internal memory until the internal memory is used in 20%, then the archive will be automatically copied to an SD/SDHC card. If the value of the percentage usage is higher – e.g. 99%, then the data will be saved on an SD/SDHC card with lower frequency, but the saving process will last longer. Saving the data on a card is indicated by a progress bar – a progress bar graph displayed in the lower line of the LCD display. When saving the data on a card, you should not remove the SD/SDHC card from the transducer, as it may cause damage to the data or reset the device. It is possible to stop the saving process and reject the card after uninstalling the card (par. 5.3). It is also possible to make the device start the procedure of copying data to a SD/SDHC card at any time after pressing the combination of: keys. 8. Memory card (option) P30 transducers support memory cards in the SD and SDHC standard. FAT and FAT32 system is supported. In case, when the memory card has not been formatted, you should format it in a card reader by means of a PC computer. When the P30U transducer works, it creates folders and files containing the archive data. Before inserting a card in the transducer you should check, if the card is not protected against writing. Never remove the memory card from the transducer until it is uninstalled (see the point 5.3.) – the card may be uninstalled by means of the keyboard by pressing keys. Removing an installed card may cause damage to the data saved on the card. The memory card status is described in the transducer registers (point 9.5). Just after inserting a card the card status, in the form of messages, will be displayed for about 3 seconds on the display, as presented in the below table: Table 21 Message Description RemoveSD The card is inserted, but it has not been installed (uninstalled ). Damaged SD The card is inserted, but the installation attempt has failed. UnlockSD The card is inserted, it is correctly installed, but it is protected against writing. Once the writing protection is detected the card is automatically uninstalled. 47 P30U-09A/1 USERS MANUAL SD OK or SDHC OK Full SD The card is inserted, and has been installed successfully. Instal. The card is inserted – installation in progress The card is inserted and installed successfully, but it is completely full. Exemplary number of records on a SD/SDHC card for the archiving time of 1s, for a single value being archived is: 64MB card: approx. 1,900,000 records (about 22 days) 2 GB card: approx. (about 700 days) Note: It is recommended to use industrial version of SD/SDHC cards in write speed class 6. Cards intended for universal applications may also be used - in write speed class 6 (you should remember that the working temperature of the “consumer” cards is limited within the range 0...40°C). During the recording process, the P30U transducer creates folders and files on the memory card. The exemplary structure of folders is presented in the Fig. 21. Fig. 21. Structure of folders on a memory card. 48 P30U-09A/1 USERS MANUAL Apart from the Archives folder, also the System folder is created on the card in which the start.txt file is stored to save the date and hour of installation of the memory card (also when starting the device after the power supply has been lost). The data on the card is stored in the files placed in the folders corresponding to the name of the device and the serial number – see Fig. 21. While the names of the files correspond to the recording date, and its format is XXXX_YY.DAT, where XXXX → year , YY → month. Thus, single files contain data archived during one month. 8.1 Archive file structure The files containing the data are made of columns, where the consecutive data columns are separated from one another by a tab character. The first line of the file contains the column heading. The data records are arranged in sequence in lines, and the fields of the specific record are separated from one another by a tab character. View of the exemplary file is presented in the Fig. 22. Fig. 22. Exemplary file with data 49 P30U-09A/1 USERS MANUAL The consecutive fields contained in a line describing a record have the following meanings: date – date of recording the data, “-” character is the date separator, time – hour, minute, second of the recorded data, “ : ” character is the time separator, value1 – archived displayed value of the transducer, the decimal separator depends on the language version set of the transducer menu – for the Polish menu the separator is “ , ”, for the remaining language versions the separator is “ . ”, the values are written in the engineering format, value2 – the second archived displayed value of the transducer, the decimal separator depends on the language version set of the transducer menu – for the Polish menu the separator is “ , ”, for the remaining language versions the separator is “ . ”, the values are written in the engineering format. 9. RS-485 interface The digital programmable P30U transducers are equipped with a serial connection in the RS485 standard to communicate in computer systems and with other Master devices. Asynchronous character communication protocol MODBUS has been implemented on the serial connection. The transmission protocol describes the methods of exchanging information between devices via a serial port. 9.1. Connecting a serial interface RS-485 standard allows direct connection of up to 32 devices on a single serial connection with the length of up to 1200 m (with the baud rate 9600 b/s). In order to connect larger number of devices, it is necessary to use additional intermediate-and-separating systems such as PD51 made by LUMEL S.A. 50 P30U-09A/1 USERS MANUAL Route of the interface line is presented in the Fig. 3. In order to obtain correct transmission, it is necessary to connect the lines A and B in parallel to their equivalents in other devices. Connection should be made with a shielded cable. The cable shield should be connected to the protective terminal as close to the transducer as possible (the shield is to be connected to the protective terminal at one point only). GND line is intended for additional protection of the interface line in case of long connections. Then you should connect the GND signals of all the devices on the RS-485 bus. In order to get connected with a computer you must have the RS-485 interface card or an appropriate converter such as PD51 or PD10. The method of connecting the devices is presented in the Fig. 23. Fig.23. Method of connecting the RS-485 interface. Designation of the transmission lines for the card in a PC computer depends on the card manufacturer. 51 P30U-09A/1 USERS MANUAL 9.2. Description of MODBUS protocol implementation The implemented protocol is in conformity with the specification PI-MBUS300 Rev G of Modicon. Specification of the parameters of the serial connection of the P30 transducers in the MODBUS protocol: Transducer address 1..247. Baud rate: 4800, 9600, 19200, 38400, 57600, 115200, 230400, 256000 [b/s]. Work mode: RTU with a frame in the format: 8n2, 8e1, 8o1, 8n1. Maximum response time: 100 ms (the response time may get longer up to 500ms when saving the data on a SD/SDHC card). Configuration of the parameters of the serial connection is to determine the baud rate, device address and information unit format - protocol. Note: Each transducer connected to a transmission network must: Have a unique address, different from the addresses of other devices connected in the network. Have exactly the same baud rate and information unit format. 9.3 Description of the functions applied The following MODBUS functions are implemented in P30 transducers: 03 (03h) – readout a register group. 04 (04h) - readout a input register group 06 (06h) – recording a single register 16 (10h) – recording a register group. 17 (11h) – identification of the slave device. Reading-out n-registers (code 03h) Example 1. Reading-out 2 registers starting with the register with the float(32 bits) 1DB0h (7600) address, (register values 10, 100.) Request: Table 22 Device address Function 01 03 Register address Number of registers Hi Lo Hi Lo 1D B0 00 02 Control sum CRC C3 80 52 P30U-09A/1 USERS MANUAL Response: Table 23 Device address Function Number bytes Value from the register 1DB0 (7600) Value from the register Control 1DB1 (7601) sum CRC LSB MSB LSB MSB 01 03 08 41 20 00 00 42 C8 00 00 E4 6F Recording a single register (code 06h) Example 2. Recording the value 543 (0x021F) in the register 4001 (0x0FA1) Request: Table 24 Device address Function 01 6 Register address Register value Hi Lo Hi Lo 0F A1 2 1F Control sum CRC 9B 94 Response: Table 25 Device address Function 01 6 Register address Register value Hi Lo Hi Lo 0F A1 2 1F Control sum CRC 9B 94 Recording to n-registers (code 10h) Example 3. Recording 2 registers starting with the register with the 1DB0h (7600) address Recorded values 20, 200. Request: Table 26 Device Addres Addr address Func s of ess tion reg.Hi of reg.L o Num ber of reg. Hi Num ber of reg. Lo Num Value for the reg. Value for the reg. Contr ber 1DB0 (7600) 1DB1 (7601) ol of sum MSB LSB MSB LSB byte CRC s 01 00 02 08 10 1D B0 41 A0 00 00 43 48 00 00 C9 E2 53 P30U-09A/1 USERS MANUAL Response: Table 27 Device address Function 01 10 Register address Number of registers Hi Lo Hi Lo 1D B0 00 02 Control sum CRC 46 43 Report identifying the device (code 11h) Example 4. Device identification Request: Table 28 Address device Function Control sum 01 11 C0 2C Response: Table 29 Address Function Number Identifier Device Field depending on the of bytes status device software version (eg. 0.70) Control sum (CRC) 01 11 C0EC 08 C1 FF 50 33 30 55 20 30 2E 37 30 9.4 Register map In the P30U transducer the data is stored in 16- and 32-bit registers. The process variables and parameters of the instrument are stored in the address space of the registers in such way that they depend on the variable type. The bits in the 16-bit registers are numbered from the least significant to the most significant (b0 … b15). The 32-bit registers (4 Bytes) contain floating-point numbers in IEEE-754 standard. Sequence of bytes: B3 B2 B1 B0 – the most significant byte is sent as the first one. 16-bits register representing 32-bits values on the next two registers are duplicated in another address area of the arrangement of bytes address: B0 B1 B2 B3 (Table 30). Register map of the P30U transducer is presented below. 54 P30U-09A/1 USERS MANUAL Note: All the addresses given are physical addresses. In some computer programs logical addressing is applied, then the addresses should be increased by 1. Table 30 Address range Value type Description 4000 - 4127 integer (16 bits ) Value stored in a 16-bit register. 4300 - 4320 integer (16 bits ) Value stored in a 16-bit register. 4400 - 4440 integer (16 bits ) Value stored in a 16-bit register. 4500 - 4765 integer (16 bits ) Value stored in a 16-bit register. 6000 -6038 float (32 bits) Value stored in two consecutive 16-bit registers. Those registers contain the same data as the 32-bit registers from the 7500 area. Those are read only registers. Sequence of byte (1-0-3-2) 6200-6326 float (32 bits) Value stored in two consecutive 16-bit registers. Those registers contain the same data as the 32-bit registers from the 7600 area. Those registers may be read and written. Sequence of byte (1-0-3-2) 7000 -7038 float (32 bits) Value stored in two consecutive 16-bit registers. Those registers contain the same data as the 32-bit registers from the 7500 area. Those are read only registers. Sequence of byte (3-2-1-0) 7200-7326 float (32 bits) Value stored in two consecutive 16-bit registers. Those registers contain the same data as the 32-bit registers from the 7600 area. Those registers may be read and written. Sequence of byte (3-2-1-0) 7500-7519 float (32 bits) Value stored in a 32-bit register. Those are read only registers. Sequence of byte (3-2-1-0) 7600-7668 float (32 bits) Value stored in a 32-bit register. Those registers may be read and written. Sequence of byte (3-2-1-0) 8000-8049 float (32 bits) Value stored in a 32-bit register. Those registers may be read and written. Sequence of byte (3-2-1-0) 8100-8199 float (32 bits) Value stored in two consecutive 16-bit registers. Those registers contain the same data as the 32-bit registers from the 8000 area. Those are read only registers. Sequence of byte (3-2-1-0) 8200-8199 float (32 bits) Value stored in two consecutive 16-bit registers. Those registers contain the same data as the 32-bit registers from the 8000 area. Those are read only registers. Sequence of byte (1-0-3-2) 55 P30U-09A/1 USERS MANUAL 9.5 Read and write registers Table 31 The value Symbol is placed in 16bit registe rs 4000 Input type Write (w) Range / readout (r) w/r 0...35 Description Input type Val ue 0 reserved 1 Voltage -10…10V 2 Voltage -24…24V 3 Current -20...20mA 4 Resistance 0...400Ω 5 Resistance 0...2000Ω 6 Resistance 0...5500Ω 7 Pt100 -200...850 ºC 8 Pt250 -200...600 ºC 9 Pt250 -200...850 ºC 10 Pt500 -200...180 ºC 11 Pt500 -200...850 ºC 12 Pt1000 -200...250 ºC 13 Pt1000 -200...850 ºC 14 Ni100 -60...180 ºC 15 Ni1000 -60...180 ºC 16 Ni100-LG -60...180 ºC 17 Ni1000-LG -60...180 ºC 18 Cu100 -50...180 ºC 19 Voltage -5...20mV 20 Voltage -75...75mV 21 Voltage -200...200mV 22 Thermocouple J 0...420ºC 23 Thermocouple J -200...1200ºC 56 P30U-09A/1 USERS MANUAL 24 Thermocouple K 0...400ºC 25 Thermocouple K -200...1370ºC 26 Thermocouple S 0...1760ºC 27 Thermocouple N -20...420ºC 28 Thermocouple N -200...1300ºC 29 Thermocouple E -40...260ºC 30 Thermocouple E -200...1000ºC 31 Thermocouple R 32 Thermocouple T -100...400ºC 33 Thermocouple B 400...1800ºC 34 RS-485 Master 35 RS-485 Monitor 0...1760ºC 4001 Measurement time w/r 200...20000 Averaging time of the measured values [ms] 4002 Point No w/r 1...21 Number of points of the individual characteristic. For the value of 1 individual characteristic is switched off. Sections of individual characteristic are defined by individual parameters Xn and Yn, where n - number of point. 4003 Compensation w/r 0...1 Select the type of compensation: - Terminals temperature for thermocouple inputs - Resistance of wires for resistance inputs Value Description 1 The automatic compensation 0 The manual compensation (compensation value should be entered in the register of 7668) 4004 w/r 0...1 Deleting minimum and maximum value 4005 w/r 0...10 Permissible number of wrong answers in the mode of RS-485 Master w/r 0...5 Value Description 0 Mathematical functions switched off 1 Square of the measured value 2 Square root of the measured value 3 Inversion of the measured value 4 Square of inverse of the measured value 5 Square root of measured value 4006 4007... Math.Fun w/r inverse of the RESERVED 57 P30U-09A/1 USERS MANUAL ...4016 4017 4018 4019 Dec.P 2 Intensity w/r 0...1 Deleting of status registers w/r 0...4 The minimal position of the decimal point when is displayed the second displayed values (displayed value on the LCD lower line). w/r 1...10 Value Description 0 0.0000 1 00.000 2 000.00 3 0000.0 4 00000 Value Description 1 Intensity of LCD Display backlight intensity - 10% of maximum illumination 4019 ... 10 4020 unit w/r 0...57 Intensity of LCD Display backlight intensity - 100% of maximum illumination Displayed unit Valu Unit e Value Unit Value Unit 0 20 kVAh 40 pcs 1 V 21 MVAh 41 imp 2 A 22 Hz 42 rps 3 mV 23 kHz 43 m/s 4 kV 24 Ω 44 l/s 5 mA 25 kΩ 45 6 kA 26 rev min rpm 7 W 27 8 kW 28 K 48 mm/mi n m/min 9 MW 29 % 49 l/min 10 var 30 %RH 50 m3/min 11 kvar 31 ph 51 pcs/h 12 Mvar 32 kg 52 m/h 13 VA 33 bar 53 km/h o C 46 o F 47 / 58 P30U-09A/1 4021 4022 DecimalP Backlight 4023 4024 4027 w/r w/r 0...4 0….61 w/r Disp.Reg. 4025 4026 USERS MANUAL Param.A1 Type A1 14 kVA 34 m 54 m3/h 15 MVA 35 l 55 kg/h 16 kWh 35 s 56 l/h 17 MWh 37 h 57 Self, userdefined 3 18 kWarh 38 m 19 MWarh 39 Rev. The minimal position of the decimal point when is displayed the displaying values Value Description 0 0.0000 1 00.000 2 000.00 3 0000.0 4 00000 LCD backlight Value Description 0 Switched off 1...60 Switched on for time 1...60 s 61 Switched on for good RESERVED w/r 0....65535 Number of register displayed on the lower line (wanting to see the registry value of float type, which is placed in 16-bit register, enter the number of corresponding 32 – bit register) w/r 0...1 Deleting backup alarms on LED diodes (A1, A2) w/r 0...1 The input size controlling an alarm 1 Value Description 0 Measuring input 1 Clock 2 The second displayed value Alarm type 1 (Description – fig.12) Value Description 0 n-on 1 n-off 2 on 3 off 4 h_on 5 h_off 59 P30U-09A/1 USERS MANUAL 4028 DlyOnA1 w/r 0...900 Delay time of switching on the alarm 1 (s) 4029 DlyoffA1 w/r 0...900 Delay time of switching off the alarm 1 (s) 4030 OnLockA1 w/r 0...900 Delay time of re-switching on the alarm 1 (s) 4031 SgKeepA1 w/r 0...1 Support of the alarm 1 signaling (flashing LED) 4032 4033 4034 w/r Param.A2 w/r Value Description 0 Support is switched off 1 Support is switched on RESERVED 0...1 Type A2 The input size of the control alarm 2 Value Description 0 Measuring input 1 Clock 2 The second displayed value The alarm type 2 (Description – Fig. 12) Value Description 0 n-on 1 n-off 2 on 3 off 4 h_on 5 h_off 4035 DlyOnA2 w/r 0...900 Delay time of switching on the alarm 2 (s) 4036 DlyOffA2 w/r 0...900 Delay time of switching off the alarm 2 (s) 4037 OpoPonA2 w/r 0...900 Delay time of re-switching on the alarm 2 (s) 4038 OnLockA1 w/r 0...1 Support of the alarm 2 signaling (flashing LED) 4039 4040 4041 w/r Param.An OvrServ w/r w/r Value Description 0 Support is switched off 1 Support is switched on RESERVED 0..1 0...1 The input size control analog output Value Description 0 Measuring input 1 Clock 2 The second displayed value Overflow options of analog output Value Description 60 P30U-09A/1 4042 USERS MANUAL w/r 0 Switched off 1 Switched on RESERVED 4043 Address w/r 0...247 Converter address for interface RS-485. Entering a value of 0 switches off the interface. 4044 Protokol w/r 0...3 Transfer Mode RS-485 interface 4045 BaudRate 4046... ...4047 w/r 0...7 w/r 0 RTU 8N2 1 RTU 8E1 2 RTU 8O1 3 RTU 8N1 Baude rate of the RS-485 interface Value Description 0 4800 bit/s 1 9600 bit/s 2 19200 bit/s 3 38400 bit/s 4 57600 bit/s 5 115200 bit/s 6 230400 bit/s 7 256000 bit/s RESERVED 4048 AnswTime w/r 10...5000 The maximal response time of the device in mode Master RS-485, RS-485 Monitor [ms] 4049 TypeReg w/r 0...8 Type of polled / monitored registers in either Master RS-485, RS-485 Monitor char 8 Registers char type (8 bit with sign) uchar 8 Registers unsigned char type (8 bit without sign) short Registers short type (16 bit with sign) 16 ushort Registers unsigned short type (16 bit 16 without sign) long 32 Registers slong type (32 bit without sign) ulong 32 Registers unsigned long type (32 bit without sign) flt 32 Registers float type (32 bity, variable point with sign) 61 P30U-09A/1 USERS MANUAL sflt2x Registers swapped float type, value 16 placed in two registers 16-bit (3,2,1,0 byte order) flt 2x16 Registers float type, value placed in two registers 16-bit (1,0,3,2 byte order) lng 2x16 Register long type, value placed in two 16-bit registers (1,0,3,2 byte order) slng2x Register swapped long type, value 16 placed in two 16-bit registers (3,2,1,0 byte order) ulng2x Register usigned long type, value 16 placed in two 16-bit registers without sign) (1,0,3,2 byte order) uSln2x Register swapped unsigned long type, 16 value placed in two 16-bit registers without sign (3,2,1,0 byte order) 4050 Polled reg. 4051 Number polled 4052 Interv. 4053 4054 4055 4056 Language ParFact Security w/r 0...65535 Polled / monitored register number in modes of Master RS-485, RS-485 Monitor 0...50 Number of polled registers in the mode Master RS-485 w/r 1...36000 Polling interval Device in the mode of Master RS-485 w/r 0...1 Update the transmission parameters. Applies the settings entered in RS-485 interface. w/r 0...3 Menu language of converter: of w/r w/r w/r 0...1 0...9999 Value Description 0 Polish 1 English 2 German 3 French Recording of standard parameters Value Description 0 No change 1 Setting of standard parameters Password for editing parameters Value Description 0 No change ... Entrance to edit of parameters 62 P30U-09A/1 USERS MANUAL preceded by inquiry for a password 4057 Time w/r 0...2359 The current time - hour, minute This parameter appears in the format ggmm, where: gg - means hours, mm - means minutes. Introduction of the wrong hours will set 23, while introduction a false value will set the 59. After the entered register is reseted 4055 (seconds) 4058 w/r 0...60 The current time - seconds 4059 o 0...100 The current time - hundredths of a second w/r 101...1231 Current date in the format of month * 100 + day 4061 w/r 2001...2099 Current year in YYYY format . 4062 w/r 0...1 4060 Date 4063... 4064 4065 4066 w/r Arch.Val Param.Ar Ar.Mode w/r w/r w/r Automatic change of summer / winter time and vice versa Value Description 0 Switched off 1 Switched on RESERVED 0...1 0...1 0...5 Selection of the values archived Note: changing of registry value erases the archive in the internal memory!!! Value Description 0 Displayed value 1 Displayed value displayed value 2 All quired registers in Master RS-485 or Monitor RS-485 mode The control archiving size of +the triggering Value Description 0 Displayed value 1 Clock (period of time) second conditional Archiving type (Description – Fig.18) Value Description 0 n-on 1 n-off 2 on 3 off 4 h_on 5 h_off 63 P30U-09A/1 USERS MANUAL 4067 Ar.Time w/r 1...3600 Period of archiving in seconds 4068 Ar. Erase w/r 0...1 Erasing of the internal archive 4069 Rec.ToSD w/r 0...1 Record internal archive to the SD / SDHC card: 4070... ...4127 w/r Value Description 0 No action 1 Start rewriting the internal archive to the SD / SDHC RESERVED Table 32 Value is stored in 16-bit registers (1 ≤ n ≤ 5) Writing (w) /reading (r) 4400+8*(n-1) Range Description w/r 0...31 Filling the character n of the line 1 of your own unit (see Fig.15) 4401+8*(n-1) w/r 0...31 Filling the character n of the line 2 of your own unit (see Fig.15) 4402+8*(n-1) w/r 0...31 Filling the character n of the line 3 of your own unit (see Fig.15) 4403+8*(n-1) w/r 0...31 Filling the character n of the line 4 of your own unit (see Fig.15) 4404+8*(n-1) w/r 0...31 Filling the character n of the line 5 of your own unit (see Fig.15) 4405+8*(n-1) w/r 0...31 Filling the character n of the line 6 of your own unit (see Fig.15) 4406+8*(n-1) w/r 0...31 Filling the character n of the line 7 of your own unit (see Fig.15) 4407+8*(n-1) w/r 0...31 Filling the character n of the line 8 of your own unit (see Fig.15) 64 P30U-09A/1 USERS MANUAL Table 33 Value is stored in 16-bit registers Writing (w) Range /readin g (r) 4500 w/r 0...8096 Number of the memory page to which we want to get access. Writing the page number 4501 r 0...65535 Two first data bytes from the page indicated by the 4500 register. 4502 r 0...65535 Two consecutive bytes --- --- --- --- 4764 r 0...65535 Two last bytes of the memory page (526 and 527 byte) Description Table 34 Value is stored in two consecutive 16-bit registers. Those registers contain the same data as 32-bit registers from the 7500 area Value is stored in 32-bit registers Symbol Writin g (w) /readi ng (r) Range 7200...7203 7600...7601 /6200...6203 7204/6204 7602 Description RESERVED Over Lo Over Hi w/r -99999...99999 Lower threshold of display narrowing w/r -99999...99999 Upper threshold of display narrowing OverLo w/r A1 OverHi w/r A1 -99999...99999 Lower threshold of alarm 1 -99999...99999 Upper threshold of alarm 1 7212/6212 7606 OverLo w/r A2 -99999...99999 Lower threshold of alarm 2 7214/6214 7607 OverHi w/r A2 -99999...99999 Upper threshold of alarm 2 7216/6216 7608 OverLo w/r Ar -99999...99999 Lower threshold of archiving 7206/6206 7603 7208/6208 7604 7210/6210 7605 65 P30U-09A/1 USERS MANUAL 7218/6218 7609 OverHi w/r Ar -99999...99999 Upper threshold of archiving 7220/6220 7610 AnIn Lo w/r -99999...99999 Individual characteristics of analog output- Lower threshold of displayed value 7222/6222 7611 AnIn Hi w/r -99999...99999 Individual characteristics of analog output- upper threshold of displayed value 7224/6224 7612 AnOut Lo w/r -24...24 Individual characteristics of analog output- Lower threshold of output value 7226/6226 7613 AnOut Hi w/r -24...24 Individual characteristics of analog output- upper threshold output value 7228/6228 7614 Param. w/r SD 5 … 100 Fulfillment percentage of internal archive, which will turn on automatic record on the SD/SDHC card 7230...7242 7615...7621 /6230...6242 RESERVED 7244/6244 7622 X1 w/r -99999...99999 Individual characteristics (measured value). Point No. 1. 7246/6246 7623 Y1 w/r -99999...99999 Value expected for point No. 1. 7248/6248 7624 X2 w/r -99999...99999 Point No. 2 of individual characteristics. 7250/6250 7625 Y2 w/r -99999...99999 Value expected for point No. 2. 7252/6252 7626 X3 w/r -99999...99999 Point No. 3 of individual characteristics. 7254/6254 7627 Y3 w/r -99999...99999 Value expected for point No. 3. 7256/6256 7628 X4 w/r -99999...99999 Point No. 4 of individual characteristics. 7258/6258 7629 Y4 w/r -99999...99999 Value expected for point No. 4. 7260/6260 7630 X5 w/r -99999...99999 Point No. 5 of individual characteristics. 7262/6262 7631 Y5 w/r -99999...99999 Value expected for point No. 5. 7264/6264 7632 X6 w/r -99999...99999 Point No. 6 of individual characteristics. 7266/6266 7633 Y6 w/r -99999...99999 Value expected for point No. 6. 7268/6268 7634 X7 w/r -99999...99999 Point No. 7 of individual characteristics. 7270/6270 7635 Y7 w/r -99999...99999 Value expected for point No. 7. 7272/6272 7636 X8 w/r -99999...99999 Point No. 8 of individual characteristics. 7274/6274 7637 Y8 w/r -99999...99999 Value expected for point No. 8. 7276/6276 7638 X9 w/r -99999...99999 Point No. 9 of individual characteristics. 7278/6278 7639 Y9 w/r -99999...99999 Value expected for point No. 9. 7280/6280 7640 X10 w/r -99999...99999 Point No. 10 characteristics. 7282/6282 7641 Y10 w/r -99999...99999 Value expected for point No. 10. 7284/6284 7642 X11 w/r -99999...99999 Point No. 11 characteristics. 7286/6286 7643 Y11 w/r -99999...99999 Value expected for point No. 11. 7288/6288 7644 X12 w/r -99999...99999 Point No. 12 of of of point individual individual individual 66 P30U-09A/1 USERS MANUAL characteristics. 7290/6290 7645 Y12 w/r -99999...99999 Value expected for point No. 12. 7292/6292 7646 X13 w/r -99999...99999 Point No. 13 characteristics. 7294/6294 7647 Y13 w/r -99999...99999 Value expected for point No. 13. 7296/6296 7648 X14 w/r -99999...99999 Point No. 14 characteristics. 7298/6298 7649 Y14 w/r -99999...99999 Value expected for point No. 14. 7300/6300 7650 X15 w/r -99999...99999 Point No. 15 characteristics. 7302/6302 7651 Y15 w/r -99999...99999 Value expected for point No. 15. 7304/6304 7652 X16 w/r -99999...99999 Point No. 16 characteristics. 7306/6306 7653 Y16 w/r -99999...99999 Value expected for point No. 16. 7308/6308 7654 X17 w/r -99999...99999 Point No. 17 characteristics. 7310/6310 7655 Y17 w/r -99999...99999 Value expected for point No. 17. 7312/6312 7656 X18 w/r -99999...99999 Point No. 18 characteristics. 7314/6314 7657 Y18 w/r -99999...99999 Value expected for point No. 18. 7316/6316 7658 X19 w/r -99999...99999 Point No. 19 characteristics. 7318/6318 7659 Y19 w/r -99999...99999 Value expected for point No. 19. 7320/6320 7660 X20 w/r -99999...99999 Point No. 20 characteristics. 7322/6322 7661 Y20 w/r -99999...99999 Value expected for point No. 20. 7324/6324 7662 X21 w/r -99999...99999 Point No. 21 characteristics. 7326/6326 7663 Y21 w/r -99999...99999 Value expected for point No. 21. 7328/6328 7664 OvrIn Lo w/r -99999...99999 Lower overflow of input 7330/6330 7665 OvrIn w/r Hi OvrOut w/r Lo -99999...99999 Upper overflow of input -24...24 Value expected on the output during lower overflow of input 7334/6334 7667 OvrOut w/r Hi -24...24 Value expected on the output during upper overflow of input 7336/6336 7668 Comp.V w/r al -99999...99999 Value of compensation of temperature of terminals or of resistance of cables (depending on the selected type of input) in case of selecting the transducer work with manual compensation 7332/6332 7666 of of of of of of of of of individual individual individual individual individual individual individual individual individual 67 P30U-09A/1 USERS MANUAL 9.6 Read registers Table 35 Value is stored in 16-bit registers Writin Range g (w) /readin g (r) 4300 r 0...9999 Software version * 100 4301 r 0...65535 Status No. 1 of the transducer. It describes current status of the transducer. The next bits represent the specific event. A bit set to 1 means that an event has occurred. Events may be erased only. Description Bit15 31 Loss of calibration parameters Bit14 30 RTC clock – loss of setpoints – battery failure Bit13 29 Clock – changing time summer/winter Bit12 28 No communication with the data memory Bit11 27 Incorrect setpoints Bit10 26 Standard setpoints have been restored 4302 r 0...65535 Bit9 25 Exceeding measurement range Bit8 24 Internal archive memory communication error Bit7 23 Archive parameter error Bit6 22 Measurement transducer error Bit5 21 Usage of the internal archive 100% Bit4 20 The need to restore the default settings after software update Bit3 19 Incorrect configuration characteristics Bit2 18 not used Bit1 17 not used Bit0 16 not used of the individual Status No. 2 of the transducer. It describes current status of the transducer. The next bits represent the specific event. A bit set to 1 means that an event has occurred. Events may be erased only. Bit15 not used Bit14 not used Bit13 not used Bit12 not used Bit11 not used 68 P30U-09A/1 4303 4304 4305 r r o USERS MANUAL 0...5 Bit10 not used Bit9 not used Bit8 not used Bit7 not used Bit6 Overflow options of analog output are switched on Bit5 LED2 – Indication alarm No. 2. Bit4 LED1 – Indication alarm No. 1. Bit3 not used Bit2 not used Bit1 Status of the transducer of the alarm number 2. Bit0 Status of the transducer of the alarm number 1. Memory card status Value Description 0 No card 1 The card is inserted, but it has not been installed (uninstalled ).. 2 The card is inserted, but the installation attempt has failed. 3 The card is inserted, it is correctly installed, but it is protected against writing. Once the writing protection is detected the card is automatically uninstalled. 4 The card is inserted, and has been installed successfully. 5 The card is inserted and installed successfully, but it is completely full. 6 Card installation in progress Production status 1 Bit15 ... Bit8 not used Bit7 … Bit4 Calibrating number ( 0... 15) Bit3 … Bit0 4 more significant bits of the serial number (bits 19…16 of the serial number) Production status 2 Bit15 … Bit0 16 less significant bits of the serial number (serial number consists of 19 bits and is built as follows: bits 19...14 – year (0...63) bits 13...10 – month (0...12) bits 9...0 – consecutive number (1...9999) 69 P30U-09A/1 USERS MANUAL RESERVED 4306 r 4307 r 0...8192 Memory page describing the archive beginning 4308 r 0...8192 Memory page describing the archive end 4309 r 0...527 Byte describing the archive beginning. The value in the register describes from which byte of the archive beginning page the archive begins. 4310 r 0...527 Byte describing the archive end. The value in the register indicates the next byte under which the archive record will be written. 4311... ...4322 RESERVED Table 36 Value is stored in two consecutive 16-bit registers. Those registers contain the same data as 32-bit registers from the 7500 area Value is Name stored in 32-bit registers Writi Unit ng (w) /read ing (r) Name value 7000/6000 7500 Identifier r - Constant value identifying the device The value 193 stands for the P30U transducer . 7002/6002 7501 Status r - Register describing the actual status of the transducer. 7004/6004 7502 Control r % Register describing the control of the analog output. 7006/6006 7503 Minimum r - Minimum value of the value being displayed. 7008/6008 7504 Maximum r - Maximum value of the value being displayed. 7010/6010 7505 Displayed value r - Value being displayed 7012/6012 7506 Actual time r - Actual time 7014/6014 7507 Date - year r YYYY Actual date - year 7016/6016 7508 Month, day r MMDD Actual date – month, day 70 P30U-09A/1 USERS MANUAL 7018/6018 7509 Usage of the archive r % Actual status of usage of the archive internal memory 7020/6020 7510 Measured value r - Value being measured not converted by individual characteristics 7022/6022 7511 Temperatur e of terminals r ºC Temperature of the transducer terminals for measurements of temperature by means of thermocouples 7024/6024 7512 Second displayed value r Value displayed in the lower line of the LCD display - value of any transducer register (see description of the reg. 4024, Table 30 ) 7026/6026 7513 r Free memory on a SD/SDHC card (kB), value ”-1” means that there is no correctly installed card 7028/6028 7514 r Total capacity of an SD/SDHC card (kB), value ”-1” means that there is no correctly installed card 7024...7049 7515... /6024...6049 ...7524 r - RESERVED Table 37 Value is Value is stored in two stored in consecutive 32-bit 16-bit registers registers. Those registers contain the same data as 32-bit registers from the 8000 area Name Writin Unit g (w) /readi ng (r) Name value 8100/8200 8000 r Value of the first register read out by the transducer working in RS-485 Master or RS-485 Monitor mode 8102/8202 8001 r Value of the 2nd register read out by the transducer working in RS-485 Master or RS-485 Monitor mode 8104/8204 8002 r Value of the 3rd read out by the transducer working in RS-485 Master or RS-485 Monitor mode 71 P30U-09A/1 USERS MANUAL 8106...8196 8003... /8206...8296 ...8049 8198/8298 8049 Value of the n-th read out by the transducer working in RS-485 Master or RS-485 Monitor mode r Value of the 50th read out by the transducer working in RS-485 Master or RS-485 Monitor mode 10. Accessories For the transducers in P30U-X1XXXXXX versions that support SD/SDHC cards you may order an additional industrial SD card with the capacity adapted to the user’s needs according to the below table. It is disadvised to use the “consumer” cards due to significant deviations of their parameters and their short durability. Table 38 Item Order code Capacity 1 0923-611-193 1 GB 2 0923-611-194 2 GB 72 P30U-09A/1 USERS MANUAL 11. Technical data Inputs: Table 39 Multiplicity of Measur narrowing ement the scope class (from the west. class) Nominal measuring range Maximum measurement range Voltage 10 V -10 … 10V -12...12 V 5 Voltage 24 V -24 … 24V -28...28 V 10 -20 … 20 mA -24 … 24 mA 10 0 … 400 Ω 0 … 420 Ω 4 Resistance 2000 Ω 0 … 2000 Ω 0 … 2050 Ω 2 Resistance 5500 Ω 0 … 5500 Ω 0 … 5550 Ω 2 Pt100 -200 … 850 ºC -205 … 855 ºC 5 Pt250 -200 … 600 ºC -205 … 605 ºC 4 -200 …850 ºC -205 … 855 ºC 3 -200 … 180 ºC -205 … 185 ºC 3 -200 … 850 ºC -205 … 855 ºC 3 -200 … 250 ºC -205 … 255 ºC 4 -200 … 850 ºC -205 … 855 ºC 2 Ni100 -60 … 180 ºC -65 … 185 ºC 1 Ni1000-LG -60 … 150 ºC -65 … 155 ºC 2 Ni100-LG -60 … 180 ºC -65 … 185 ºC 1 Ni1000-LG -60 … 180 ºC -65 … 185 ºC 2 Cu100 -50 … 180 ºC -55 … 185 ºC 1 -5 … 20 mV -6 … 21 mV 1 -75 … 75 mV -80 … 80 mV 4 -200 … 200 mV -210 … 210 mV 4 0 … 400 ºC -20 … 420 ºC 1 Input type Current Resistance 400 Ω Pt500 Pt1000 Voltage mV Thermocouple J type Thermocouple K type Thermocouple S type -200 … 1200 ºC -220 … 1210 ºC 0 … 400 ºC -20 … 420 ºC -200 … 1370 ºC -280 … 1382 ºC 0 … 1760 ºC -55 … 1775 ºC 0,1 2 1 2 2 0,5 73 P30U-09A/1 Thermocouple N type Thermocouple E type Thermocouple R type Thermocouple T type Thermocouple B type Master RS-485 Monitor RS-485 USERS MANUAL -20 … 420 ºC -50 … 450 ºC -200 … 1300 ºC -240 … 1350 ºC -40… 260 ºC -50 … 280 ºC -200 … 1000 ºC -210 … 1010 ºC 1 1 1 0,1 2 0 … 1760 ºC -55 … 1765 ºC 2 0,5 -200 … 400 ºC -210 ... 410 ºC 1 0,1 400 … 1800 ºC 390 ...1820 ºC 1 0,5 In the RS-485 Master mode, converter can poll a device with Modbus protocol implemented by the RS-485 interface. In this mode, you cannot poll the transducer by the master device. In of the RS-485 Monitor mode, converter can monitor the traffic on the RS-485 line and reacts (takes a measured value) on the value of response frame specified slave device. The transmitter can respond to a single registers. In this mode, you cannot poll transducer by the master device Outputs: − analog, programmable, galvanically isolated (0/4...20 mA, load resistance ≤ 500 Ω ) or voltage (0...10 V, load resistance ≥ 500 Ω), − analog output class 0,1; − conversion time < 200 ms − transducer type – 1 or 2 transducers; voltage free contacts – closing – maximum rated load 5 A 30 V DC, 250 V AC − digital – interface RS-485: − transmission protocol: modbus RTU − address: 1...247 − mode: 8N2, 8E1, 8O1, 8N1 − response time: 100 ms 1 − auxiliary power supply (option) 24 ±2 V DC / 30 mA. − clock accuracy 1s/24h Power consumption <5 VA 74 P30U-09A/1 Weight USERS MANUAL <0.25 kg Dimensions 120 x 45 x 100 mm Fixing rail 35 mm as per PN-EN 60715 Degree of protection provided by the housing from the housing side (version not supporting SD/SDHC cards) IP40 from the housing side (version supporting SD/SDHC cards) IP30 from the housing terminal side IP20 Display Transducer preliminary warm-up time text LCD display, 2x8 characters with LED backlight 15 min Recording Recording in the 4MB internal memory ( max. 534336 records) - recording with a time stamp, for versions supporting SD/SDHC cards it is possible to save automatically the internal archive on SD/SDHC memory cards, 1 the response time may get longer up to 500ms when saving the data on a SD/SDHC card Reference conditions and nominal operational conditions − power supply voltage 85..253 V DC/AC(40..400 Hz) or 20..40 V AC(40..400 Hz), 20...60 V DC − ambient temperature -25..23..+55 oC − storing temperature -30..+70 oC − humidity 25..95 % (condensations are not acceptable) − working position arbitrary 75 P30U-09A/1 USERS MANUAL Additional errors: − due to temperature variations: for the analog outputs 50% of the class / 10 K for measurement inputs 75% of the class / 10 K − due to automatic compensation of the reference junction temperature ≤ 1°C − due to automatic compensation of the cable resistance for thermoresistors ≤ 0.2°C − due to automatic compensation of the cables for resistance measurement ≤ 0,05Ω − Input parameters − resistance of the voltage input [V]: > 1 MΩ − resistance of the current input [mA]: 12 ±1 Ω% − intensity of the current flowing through a thermometric resistor < 0.2 mA − resistance of cables connecting a thermometric resistor with the transducer: <10 Ω Long-term overload capability − thermocouples, thermoresistors − voltage, current and resistance 1.1 Xn 1.3 Xn Short-term overload capability − voltage input 3 Un − current input = 10 In − Standards met by the transducer Electromagnetic compatibility: − Resistance to interference as per EN 61000-6-2 − Emission of interference as per EN 61000-6-4 − Safety requirements: according to the standard EN 61010-1 − isolation between circuits: basic, − installation category III, 76 P30U-09A/1 USERS MANUAL − pollution grade 2, − maximum working voltage work in relation to the earth: 300 V for the power supply circuit and 50 V for the remaining circuits − asl <2000 m 77 P30U-09A/1 USERS MANUAL 12. Execution code Table 40 The transducer P30U X X X X XX X X Analog output: current (0/4...20 mA) 1 voltage (0...10 V) 2 SD/SDHC card: no service 0 witht service 1 Addition output: NO relay, a.c. 5 A 30 V d.c., 250 V supply 24 V d.c. / 30 mA. 1 2 Supply 85...253 V a.c./d.c. 1 20...40 V a.c. , 20...60 V d.c. 2 Version: standard 0 custom-made * XX Language version: Polish P English E other X Acceptance tests: without extra requirements 0 with an extra quality inspection certificate 1 according to customer’s request * after consultation manufacturer with X the 78 P30U-09A/1 USERS MANUAL Coding example: P30U-112100P1 stands for a transducer in a standard version with a an analog current output, supporting SD/SDHC cards, with a 24 V/30 mA power supply output, power supply 85...235 V AC/DC, in Polish language version with a Quality Control certificate. ACCESORIES: SD CARD Capacity Ordering Code 1 GB 0923-611-193 2 GB 0923-611-194 79 P30U-09A/1 LUMEL S.A. ul. Słubicka 1, 65-127 Zielona Góra, Poland Tel.: (48-68) 45 75 100 Fax: (48-68) 45 75 508 e-mail:[email protected] http://www.lumel.com.pl Export Department: Tel.: (48-68) 45 75 302 Fax: (48-68) 32 54 091 e-mail: [email protected]