1
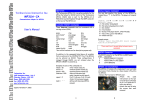
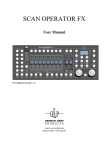
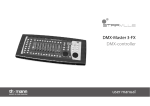
www.decaled.com
LED Setup Controller
XB-R1
USER’S MANUAL
User’s Manual
1
Product Description
Thanks for your purchase of this XB-R1 product.
This is a professional LED Setup Controller with some useful functions. “Setup No Answer”, “Setup With
Answer”, and “DMX Controller” function modes are available. And semiautomatic/automatic setup
functions are optional for you. User can set desired LED effects and the “Glide Effect” through this
controller. The XB-R1 offers built-in chargeable battery for user’s convenient operation, and it can also
supply power to its connected LED unit (must be DC 24V) via a 3&5-Pin female connector. To optimize the
performance of this product, please read the instructions carefully to familiarize you with the basic
operations.
2
Notice Information
)
When unpacking, please check the unit is not damaged. If something wrong happens to this
product, contact the local dealer immediately.
)
All rights reserved. No part of this manual included with this product can be reproduced or
transmitted in any form, by any means or for any purpose, without authorized permission.
Warning
Keep the unit dry, do not expose it to water or high levels of humid.
Do not open this unit, there is no user serviceable part inside.
The back side of the unit may feel warm during your operation, that is caused
by the built-in battery and it doesn’t matter.
Any repairs must be done by qualified personnel.
x Please do not allow children to play with this product.
x
x
x
x
x
3
Product View
1. LCD Display: To display relevant menus, settings or function modes.
2. Multi-Selector: Rotate or press this multi-selector to select desired menus, function modes or to
confirm and save your settings.
3. Power Input: To input main power via this socket.
4.
DMX OUT:
3-pin & 5-pin female XLR sockets.
2
User’s Manual
4
Operation Guide
This unit has a 4h20 characters LCD window, it is convenient for user to operate this unit.
User can rotate the multi-selector gently to enter relevant function modes or to achieve desired
settings. Rotating the multi-selector clockwise can select further menu or increase relevant value,
while rotating the multi-selector anti-clockwise can select the previous menu or decrease relevant
value. Pressing the multi-selector can enter the selected menu or confirm your setting.
This unit can be powered by the built-in chargeable battery or a DC 9-24V adapter. The battery is
charged automatically when using an adapter for power supply. Charging the battery fully needs 3-5
hours or so, and the battery can supply the unit for almost 6-8 hours.
*NOTE: For your convenient control of the connected LED product, user should firstly set
relevant “Unit Number” and “Unit Group” for the connected LED product in the “Setup With
Answer” function mode. If the connected LED units are no more than 1000 pcs, we recommend
you to set the Unit Numbers in the same Group for convenient application (See the “Setup
With Answer” operation guide for details).
Turn on the power switch at the backside of this unit, the XB-R1 will be powered on and the LCD will
show you the first display:
Setup Controller For
LED Series Product
REV1.50
Copy Right @2005 >
Press the multi-selector to enter the next display page, LCD will show you the main menu of function
modes as below:
< Setup No Answer
>
Setup With Answer >
DMX Controller
>
LCD Backlight:xxxx >
User can rotate the multi-selector to select desired item, then press the multi-selector to enter your
selected function mode. User can also move the flashing cursor to the top-left corner, and then press
the multi-selector to return to the previous display page.
3
User’s Manual
4.1 Setup No Answer
If you select the “Setup No Answer” function mode, then press the multi-selector, the LCD will show
you as below:
< Cancel
Name: xxx…
>
Unit Group: xxx
>
Confirm >
ĕķ
ĕĸ
ĕĹ
ĕĺ
(I)
ķʳ
ĸʳ
Ĺʳ
ĺʳ
To return to the previous display page.
To select relevant Unit Name.
To set relevant Unit Group parameter (1~100).
Confirm your set and enter to the further display page.
The LED units include X-Ball II/III-21/42, X-Ball-120, Cover Light, X-Stick, X-Cube, X-Square,
X-Donut, X-Truss-9, Phone-3G-45/50/100, CL-DC-8,CL-DPCB-8, X-Chip-Driver, X-Chip-DRV-TU,
DB-100, DEMO BOX and X-Bar Series(144~2000), X-Driver-48.
x If you select the above “Confirm” item and press the multi-selector, LCD will show you like this:
< Unit Number: XXX >
Work Mode: RGB >
Glide Effect: XXX >
ĘAddress Set: XXX >
Confirm to send
Selective Copy
Copy to all
>
>
>
(II)
Unit Number: 1~999, Address Set: 1~512, the Work Modes varies with the different LED units
(RGB, C&B, COLOR, …, AUTO, MANUAL, etc.) The AUTO and MANUAL modes are for Master
control, and the other modes are for Slave control.
This Mode is only available for the one-way output device.
Glide Effect function can be set as “Yes”(enabled) or “No”(disabled). If this function is enabled,
the lighting intensity of the controlled LEDs will change gradually from the present level to the
desired level that you have set. If this function is disabled, the lighting intensity will change
immediately from the present level to your desired level. (When quick lighting effect is needed,
this Glide effect function should be deselected.)
x If you move the flashing cursor to the top-left corner and press the multi-selector, LCD will show
you as below:
When the cursor is at this position,
pressing the multi-selector will return
to the above display page(I).
< Confirm
LED Unit Setup Quit
Data will be lost!
Cancel >
4
When the cursor is at this position,
pressing the multi-selector will return
to the above display page(II).
User’s Manual
*For your reference, we respectively take the RGB, AUTO and MANUAL modes for example:
(1) RGB Work Mode:
In RGB Work Mode, user can rotate the multi-selector clockwise or counterclockwise to select
relevant items (Unit Number: 1~999, Glide Effect: Yes/No, Address Set: 1~512). Press the multiselector to enter your selected item, and then rotate the multi-selector to set desired value and then
press it to confirm your setting.
ĖWork Mode: RGB
Glide Effect: XXX
Address Set: XXX
Confirm to send
Unit Number Mode
LED Unit Setup
Data Sendingʽ
Please Wait…
>
>
>
>
Select the “Confirm” item and press the multi-selector, LCD will show you the above display.
(The being-controlled LEDs will briefly flash for several seconds during data sending.)
(2) AUTO Work Mode:
x If you set the Work Mode as “AUTO”, the LCD-display will immediately show you as below:
< Unit Number :
>
XXX
Work Mode: AUTO >
Auto Program: XXX >
ĘAuto Speed: XXX >
Auto Fadetime:XXX%
Confirm to send
Selective Copy
Copy to all
>
>
>
>
User can rotate the multi-selector clockwise or counterclockwise to select relevant item, and then use
the multi-selector to adjust or confirm your setting.
In the AUTO Work Mode, relevant parameters are as below:
Preset Programs: Programs 1-10 and Program “AUTO” (a sequence of these 10 programs.)
Auto Speed: 1~100.
Auto Fadetime: 0%~100%.
Unit Number Mode
LED Unit Setup
Data Sendingʽ
Please Wait…
ĖAuto Program: xxx >
Auto Speed: xxx >
Auto Fadetime:xxx% >
Confirm to send
>
Select the “Confirm” item and press the multi-selector, LCD will show you the above display.
(When adjusting relevant parameters, the being-controlled LEDs will respond sensitively.
The LEDs will briefly flash for several seconds during data sending.)
5
User’s Manual
(3) MANUAL Work Mode:
x If you set the Work Mode as “MANUAL”, the LCD-display will immediately show you as below:
< Unit Number:
XXX
>
Work Mode:MANUAL >
BLUE Dimmer: XXX% >
ĘRED Dimmer: XXX% >
Green Dimmer:XXX% >
Confirm to send
>
Selective Copy
>
Copy to all
>
You can rotate the multi-selector clockwise or counterclockwise to select relevant item, then use the
multi-selector to adjust or confirm your setting.
In the MANUAL Work Mode, relevant parameters are as below:
BLUE Dimmer: 0%-100%
RED Dimmer:
0%-100%
GREEN Dimmer: 0%-100%
ĖBLUE Dimmer: XXX%>
RED Dimmer: XXX%>
Green Dimmer:XXX%>
Confirm to send
>
Unit Number Mode
LED Unit Setup
Data Sendingʽ
Please Wait…
Select the “Confirm” item and press the multi-selector, LCD will show you the above display.
(When adjusting relevant parameters, the being-controlled LEDs will respond sensitively.
The LEDs will briefly flash for several seconds during data sending.)
*User can call up Semiautomatic Setup No Answer function by rotating the multi-selector and
selecting the “Selective Copy”, then press the multi-selector, the LCD will show you as below:
< Unit Number: XXX >
Work Mode: RGB >
Glide Effect: XXX >
ĘAddress Set: XXX >
Confirm to send
Selective Copy
Copy to all
< Unit Group: XXX >
Unit Number:XXX >
Total Channel:XXX >
Addr: XXX Confirm >
>
>
>
Unit Group:1~100; Unit Number:1~999; Total Channel:1~48.
ķ It is necessary to set the first LED properly in Setup No Answer Menu before entering.
ĸ DMX Addresses of LEDs depend on work modes.
Ĺ DMX Addresses are channel total of LEDs after confirmation. And Unit Number would increase
once automatically, user can select the next LED by changing Unit Number and Unit Group.
6
User’s Manual
< Unit Group: XXX >
Unit Number:XXX >
Total Channel:XXX >
Addr: XXX Confirm >
Unit Number Mode
LED Unit Setup
Data Sendingʽ
Please Wait…
Select the “Confirm” item and press the multi-selector, LCD will show you the above display.
(When adjusting relevant parameters, the being-controlled LEDs will respond sensitively.
The LEDs will briefly flash for several seconds during data sending.)
*User can call up Automatic Setup No Answer function by rotating the multi-selector and selecting
the “Copy to all”, then press the multi-selector, the LCD will show you as below:
< Unit Number: XXX >
Work Mode: RGB >
Glide Effect: XXX >
ĘAddress Set: XXX >
Confirm to send
Selective Copy
Copy to all
< Unit Group: XXX >
Unit Number:XXX >
Total Channel:XXX >
Addr: XXX Confirm >
>
>
>
Unit Group:1~100; Unit Number:1~999; Total Channel:1~48.
ķ This function is only asked when parameters of all LEDs have been set up properly.
ĸ It is necessary to set the first LED properly in Setup No Answer Menu before entering.
Ĺ DMX Addresses of LEDs depend on work modes.
Ļʳ DMX Addresses are channel total of LEDs after confirmation. And Unit Number would increase
once automatically, user can select the next LED by changing Unit Number and Unit Group. The
DMX address is beginning from 1 when passing 512.
< Unit Group: XXX >
Unit Number:XXX >
Total Channel:XXX >
Addr: XXX Confirm >
Unit Number Mode
LED Unit Setup
Data Sendingʽ
Please Wait…
Select the “Confirm” item and press the multi-selector, LCD will show you the above display.
(When adjusting relevant parameters, the being-controlled LEDs will respond sensitively.
The LEDs will briefly flash for several seconds during data sending.)
7
User’s Manual
4.2 Setup With Answer
< Setup No Answer
>
Setup With Answer >
DMX Controller
>
LCD Backlight:xxxx >
Display page (I)
If you select the “Setup With Answer” function mode, then press the multi-selector, the LCD-display
will show you as below:
Scanning LED Unit
Please Wait…
If there is no LED unit connected to this XB-R1 setup controller, LCD will show you like this:
<
Scan Complete.
No LED Unit In Line
Please Check!
If there is any LED unit connected effectively to this XB-R1 controller, after the Scanning, LCD will show
you like this:
< ID: XXXXXXXXXXX…
The content of this ID item
is unchangeable.
Unit Group: XXX
Unit Number: XXX
ĘWork Mode: RGB
Glide Effect: XXX
Address Set: XXX
Confirm to send
Selective Copy
Copy to all
>
>
>
>
Display page (II)
>
>
>
>
>
Note: Unit Group is from 1 to 100, Unit Number is from 1 to 999, Address Set is from 1 to 512,
the Work Modes varies with the different LED units (RGB, C&B, COLOR, …, AUTO, MANUAL,
etc.) The AUTO and MANUAL modes are for Master control, and the other modes are for Slave
control. Glide Effect function can be set as “Yes”(enabled) or “No”(disabled).
ķ This mode is not available for the one-way output device.
ĸ Each LED unit owns the only one ID used to select. And Unit group is used to set a group
LED Unit, Unit number to one of a group unit. Commonly, the unit group of LEDs controlled by
one way DMX is the same. And Unit Number can be set according to user’s needs in Setup No
Answer Mode.
Ĺ It is necessary to scan LED Units for all parameters before entering the Setup With Answer.
And the scanning time depends on numbers of units. User should try again according a hint
menu when some errors occur.
8
User’s Manual
If you move the cursor to the top-left corner and press the multi-selector, LCD will show you:
When the cursor is at this position,
pressing the multi-selector will return
to the above display page(I).
< Confirm
LED Unit Setup Quit
Data will be lost!
Cancel >
When the cursor is at this position,
pressing the multi-selector will return
to the above display page(II).
*For your reference, we respectively take the RGB, AUTO and MANUAL modes for example:
(1) RGB Work Mode:
In RGB, C&B or COLOR Work Mode, user can rotate the multi-selector clockwise or anticlockwise
to select relevant items (Unit Group: 1~100, Unit Number: 1~999, Glide Effect: Yes/No, Address Set:
1~512). And then press the multi-selector to confirm your setting.
ĖWork Mode: RGB >
Setup With Answer
LED Unit Setup
Data Sendingʽ
Please Wait…
Glide Effect: XXX >
Address Set: XXX >
Confirm to send
>
Select the “Confirm” item and press the multi-selector, LCD will show you the above display.
(When adjusting relevant parameters, the being-controlled LEDs will respond sensitively.
The LEDs will briefly flash for several seconds during data sending.)
(2) AUTO Work Mode:
If you set the Work Mode as “AUTO”, the LCD-display will immediately show you as below:
< ID: XXX…
>
Unit Group: XXX
>
Unit Number: XXX
>
ĘWork Mode: AUTO >
ĖAuto Program: xxx >
Auto Speed: xxx >
Auto Fadetime:xxx% >
Confirm to send
>
You can rotate the multi-selector clockwise or anticlockwise to select relevant item, then use the
multi-selector to adjust or confirm your setting.
In the AUTO Work Mode, relevant parameters are as below:
Unit Group: 1-100
Unit Number: 1-999
Preset Programs: Programs 1-10 and Program “AUTO” (a sequence of these 10 programs.)
Auto Speed: 1-100.
Auto Fadetime: 0%-100%.
9
User’s Manual
ĖAuto Program: xxx >
Auto Speed: xxx >
Auto Fadetime:xxx% >
Confirm to send
>
Setup With Answer
LED Unit Setup
Data Sendingʽ
Please Wait…
Select the “Confirm” item and press the multi-selector, LCD will show you the above display.
(When adjusting relevant parameters, the being-controlled LEDs will respond sensitively.
The LEDs will briefly flash for several seconds during data sending.)
(3) MANUAL Work Mode:
x If you set the Work Mode as “MANUAL”, the LCD-display will immediately show you as below:
< ID: XXX…
>
Unit Group:
XXX
>
Unit Number: XXX >
ĘWork Mode:MANUAL >
ĖBLUE Dimmer:
XXX% >
RED Dimmer: XXX%>
Green Dimmer: XXX%>
Confirm to send
>
You can rotate the multi-selector clockwise or anticlockwise to select relevant item, then use the
multi-selector to set or confirm your setting.
In the MANUAL Work Mode, relevant parameters are as below:
Unit Group: 1-100.
Unit Number: 1~999
BLUE Dimmer: 0%-100%
RED Dimmer:
0%-100%
GREEN Dimmer: 0%-100%
ĖBLUE Dimmer: XXX%>
RED Dimmer: XXX%>
Green Dimmer:XXX%>
Confirm to send
>
Setup With Answer
LED Unit Setup
Data Sendingʽ
Please Wait…
Select the “Confirm” item and press the multi-selector, LCD will show you the above display.
(When adjusting relevant parameters, the being-controlled LEDs will respond sensitively.
The LEDs will briefly flash for several seconds during data sending.)
10
User’s Manual
*User can call up Semiautomatic Setup With Answer function by rotating the multi-selector and
selecting the “Selective Copy”, then press the multi-selector, the LCD will show you as below:
< ID: XXXXXXXXXXX…
Page(I)
Unit Group: XXX
Unit Number: XXX
ĘWork Mode: RGB
>
>
>
>
< ID: XXXXXXXXXXX…
Total Channel:XXX
Group:XXX NO.XXX
Addr: XXX
>
>
>
Glide Effect: XXX
Address Set: XXX
Confirm to send
Selective Copy
Copy to all
>
>
>
>
Page(II)
>
>
Unit Group:1~100; Unit Number:1~999; Total Channel:1~48.
ķ It is necessary to set the first LED properly in Setup With Answer Menu before entering.
ĸ DMX Addresses of LEDs depend on work modes.
Ĺ Work Mode settings for all LEDs Unit should be compatible. If or not, the work mode is not
compatible for one LED unit, it will return to the previous page automatically.
ĺ After confirmation, DMX address are the total of LEDs channels. And Unit Number will also
increase one automatically. If the unit number over 999, unit number is beginning from 1 and
increase one. And user can select the next desires LED unit according to ID, but can not select the
same LED Unit twice.
Ļ User can set more LEDs Unit without connecting all LEDs at the same time in this function. In this
menu, user may have to take out the current LED Unit and connect the desired one, and the setting
can be continued by confirming and backing to this menu. the LCD will show you as below:
When the cursor is at this position,
pressing the multi-selector will return
to the above display page(I).
< Confirm
Selective Copy Mode
Please Connect LED!
Cancel >
When the cursor is at this position,
pressing the multi-selector will return
to the above main display page.
*User can call up Automatic Setup With Answer function by rotating the multi-selector and selecting
the “Copy to all”, then press the multi-selector, the LCD will show you as below:
< ID: XXXXXXXXXXX…
Unit Group: XXX
Unit Number: XXX
ĘWork Mode: RGB
Glide Effect: XXX
Address Set: XXX
Confirm to send
Selective Copy
Copy to all
>
>
>
>
< ID: XXXXXXXXXXX…
Total Channel:XXX
Group:XXX NO.XXX
Addr: XXX
>
>
>
>
>
11
>
>
>
>
User’s Manual
Unit Group:1~100; Unit Number:1~999; Total Channel:1~48.
ķʳ It is necessary to set the first LED properly in Setup With Answer Menu before entering.
ĸ DMX Addresses of LEDs depend on work modes.
Ĺ Work Mode settings for all LEDs Unit should be compatible. If not, it will return to the previous
menu automatically.
ĺ After the first LED unit confirmation and scanning all units, Unit Number will also increase one
automatically, and DMX address are the total of LEDs channels. If the unit number over 999, unit
number is beginning from 1. Finishing all settings of LED Units, it will return to the menu of Setup
With Answer automatically. And this function is used to set LED unit first, then connect.
4.3 DMX Controller
< Setup No Answer
>
Setup With Answer >
DMX Controller
>
LCD Backlight:xxxx >
Page(I)
If you select the “DMX Controller” function mode, then press the multi-selector, the LCD-display will
show you as below:
> DMX Mode Select
Single Channel
>
512 Channel
>
Auto Chase
>
Page(II)
Note: In DMX Controller function, Single Channel Mode, 512 Channel Mode and Auto Chase
Mode are available.
*For your reference, we respectively take the Single Channel Mode, 512 Channel Mode and Auto
Chase Mode for example:
(1) Single Channel Mode:
In Single Channel Mode, user can rotate the multi-selector clockwise or anticlockwise to select
relevant items (Mode: MANUAL, AUTO ON/OFF, AUTO FADE; DMX Channel: 1~512; Time/50mS:
1~200; Intensity: 0~255.) And then press the multi-selector to confirm your setting.
> DMX Mode Select
Single Channel
>
512 Channel
>
Auto Chase
>
< Mode: MANUAL >
Channel: XXX >
Time/50mS: XXX >
Intensity: XXX >
Note: In Manual Mode, user can adjust the output intensity up to the need. And in other modes, the
output intensity will vary automatically at the range of 0~255.
12
User’s Manual
(2) 512 Channel Mode:
If you set the Mode as “512 Channel Mode”, the LCD-display will immediately show you as below:
> DMX Mode Select
Single Channel
>
512 Channel
>
Auto Chase
>
> Channel:[XXX-XXX]
000 000 000 000 000
000 000 000 000 000
000 000 000 000 000
Note: In 512 Mode, user can rotate the multi-selector clockwise or anticlockwise to change the
cursor and channel numbers. And LCD can only show up to 15 channels each time.
(3) Auto Chase Mode:
If you set the Mode as “Auto Chase Mode”, the LCD-display will immediately show you as below:
> DMX Mode Select
Single Channel
>
512 Channel
>
Auto Chase
>
> Chase Active Setup
Start Channel:XXX >
End Channel: XXX >
Confirm >
ĕķ
ĕĸ
ĕĹ
ķ To set the Chase Start Channel.
ĸ To set the Chase End Channel.
Ĺʳ To confirm your set and enter the Auto Chase Mode.
*User can set the chase start/end channel by rotating the multi-selector, and select the above “Confirm”
item and press the multi-selector, LCD will show you like this:
> Group of LEDs:XX
Jumps:
XX
Step /50mS:XXX
Intensity: XXX
>
>
>
>
ĕķ
ĕĸ
ĕĹ
ĕĺ
ķ To confirm DMX sequential channels numbers(1~48) when chasing the intensity output.
ĸ DMX channels is increased by changing jumps(1~48) when chasing. And channel output is
beginning from the DMX start channel.
Ĺ To set up fade time for step(1~200).
ĺ To adjust the intensity(0~255).
4.4 LCD Backlight
Rotate the multi-selector and select the “LCD Backlight” function mode, then press the multi-selector,
LCD will show you like this:
< Setup No Answer
>
Setup With Answer >
DMX Controller
>
LCD Backlight:xxxx >
13
User’s Manual
At this moment, user can rotate the multi-selector gently to select desired LCD Backlight mode: AUTO,
ON or OFF (Then press the multi-selector to confirm).
<Note>
6
AUTO: if there is no any present operation upon the multi-selector within almost 10
seconds, the backlight will go out automatically (Pressing or rotating the multiselector will make the backlight lit again).
ON:
the backlight always lights up unless the unit is powered off.
OFF:
the backlight always keeps in its “off” state (no backlight always).
Specifications
Model No. …....………………………………………………………………………………………XB-R1
Power supply …………………………………………………………………………..DC 9-24V, 500mA
Output ………………………………………………………………..3-pin & 5-pin female XLR sockets
LCD-display…………………………………………………………..……….….…….. 4h20 characters
Dimensions……………………….……………………………………………………. 200h160h55mm
Weight…………………………………………………………………………….………………….. 1.2 kg
Please note:
Specifications and improvements in the design of this product and this manual are subject to
change without any prior notice.
14