1
CREATING GREAT EBOOKS USING JUTOH
A complete guide to making ebooks for Kindle, iPad, Nook, Kobo and more, from new project to
publication
by Julian Smart
Published by Anthemion
© Julian Smart 2015
Edition 2.10
All rights reserved. You are welcome to redistribute this book in its original form.
The author acknowledges the trademarked status and trademark owners of various products referenced
in this work.
This book was created using Jutoh.
The author acknowledges the trademarked status and trademark owners of various products referenced
in this work, which have been used without permission. The publication/use of these trademarks is not
authorized, associated with, or sponsored by the trademark owners.
Table of Contents
From the Horse’s Mouth........................................................................................................................xi
Preface.....................................................................................................................................................xii
Bring on the revolution......................................................................................................................xii
About the author..........................................................................................................................xiii
How this book is structured..............................................................................................................xiii
Conventions and terms used in this book...........................................................................................xv
Chapter 1: Introduction to Ebooks and Jutoh......................................................................................1
Ebook formats......................................................................................................................................1
What is Jutoh?......................................................................................................................................2
What kinds of book can be created with Jutoh?...................................................................................3
The book creation lifecycle..................................................................................................................3
How to get content into Jutoh...............................................................................................................4
Tools to use with Jutoh.........................................................................................................................5
Summary..............................................................................................................................................6
Chapter 2: Getting Started......................................................................................................................7
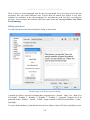
Creating a new project..........................................................................................................................7
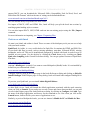
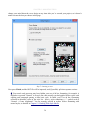
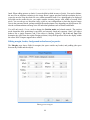
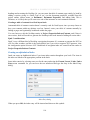
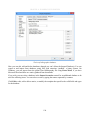
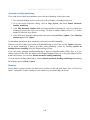
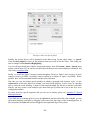
Step 1. Metadata.............................................................................................................................7
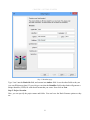
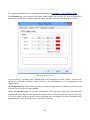
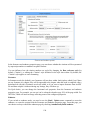
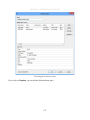
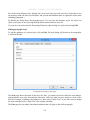
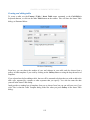
Step 2. Project Location..................................................................................................................8
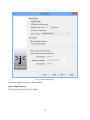
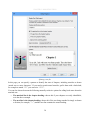
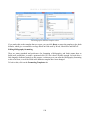
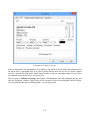
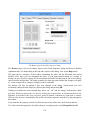
Step 3. Layout Choice.....................................................................................................................9
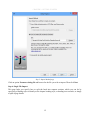
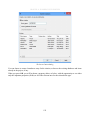
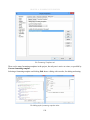
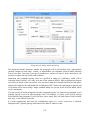
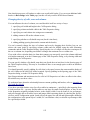
Step 4. Import Options..................................................................................................................10
Step 5. Import Method..................................................................................................................11
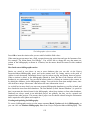
Step 6. Single File Import.............................................................................................................12
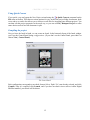
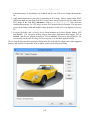
Step 7. Cover Design....................................................................................................................13
Using Quick Convert..........................................................................................................................15
Compiling the project.........................................................................................................................15
Summary............................................................................................................................................16
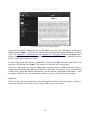
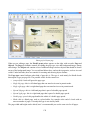
Chapter 3: The Jutoh User Interface...................................................................................................17
Menu bar and toolbar (1)....................................................................................................................17
Organizer (2)......................................................................................................................................18
Control Panel (3)................................................................................................................................19
Document area (4)..............................................................................................................................20
Log and error windows (5).................................................................................................................21
Formatting Palette (6).........................................................................................................................21
Getting help........................................................................................................................................21
Project properties dialog.....................................................................................................................24
i
Customising the user interface...........................................................................................................24
Summary............................................................................................................................................25
Chapter 4: Working With Projects......................................................................................................26
Overview............................................................................................................................................26
Creating and deleting documents.......................................................................................................27
Moving documents.............................................................................................................................27
Managing project files........................................................................................................................28
Where is my project?..........................................................................................................................28
Document types..................................................................................................................................28
Source code document..................................................................................................................30
Summary............................................................................................................................................30
Chapter 5. Importing Files....................................................................................................................31
What can Jutoh import?......................................................................................................................31
Microsoft Word XML (DOCX) and OpenDocument Text (ODT)..............................................31
Plain text.......................................................................................................................................37
HTML...........................................................................................................................................40
Epub..............................................................................................................................................41
Importing into an existing project......................................................................................................41
Reimporting........................................................................................................................................41
Summary............................................................................................................................................41
Chapter 6: Editing and Formatting Content.......................................................................................42
Why divide a book into sections?.......................................................................................................42
Basic content editing..........................................................................................................................43
Formatting text...................................................................................................................................45
Formatting paragraphs........................................................................................................................46
Special symbols..................................................................................................................................46
Pictures...............................................................................................................................................47
Page breaks.........................................................................................................................................48
Non-breaking spaces and hyphens.....................................................................................................48
Horizontal rules..................................................................................................................................49
Bookmarks..........................................................................................................................................49
Links...................................................................................................................................................49
Footnotes............................................................................................................................................50
Index entries.......................................................................................................................................50
Comments...........................................................................................................................................51
The basics of formatting using named styles.....................................................................................51
Using the formatting palette to apply styles.......................................................................................53
Applying styles using shortcuts and favourites..................................................................................55
Using fonts.........................................................................................................................................55
Line and paragraph spacing................................................................................................................56
Indentation..........................................................................................................................................56
Alignment...........................................................................................................................................56
Headings.............................................................................................................................................57
Lists....................................................................................................................................................57
ii
Adding keywords...............................................................................................................................59
Editing document properties..............................................................................................................59
Previewing your work........................................................................................................................61
Summary............................................................................................................................................61
Chapter 7: Editing Your Book’s Metadata.........................................................................................63
The metadata panel.............................................................................................................................63
Metadata elements..............................................................................................................................65
Viewing the generated metadata........................................................................................................67
Specifying metadata defaults..............................................................................................................68
Summary............................................................................................................................................68
Chapter 8: Creating Your Cover Design.............................................................................................69
Cover design basics............................................................................................................................69
Using an existing design.....................................................................................................................70
Using the cover designer....................................................................................................................71
Object size and position................................................................................................................72
Object background........................................................................................................................72
Text...............................................................................................................................................72
Exporting your design........................................................................................................................72
Specifying a cover for Kindle............................................................................................................73
The cover page versus the cover image..............................................................................................73
Specifying the cover image format.....................................................................................................74
Using multiple cover designs.............................................................................................................74
Cover display on different devices.....................................................................................................74
Summary............................................................................................................................................74
Chapter 9: Understanding Configurations..........................................................................................75
Configuration basics...........................................................................................................................75
Editing configurations..................................................................................................................75
Using configurations.....................................................................................................................76
Configuration categories....................................................................................................................78
Locations.......................................................................................................................................78
Formats.........................................................................................................................................79
Cover Design................................................................................................................................79
Options..........................................................................................................................................80
Styles.............................................................................................................................................81
String Tables.................................................................................................................................82
HTML Formatting........................................................................................................................82
Text Formatting............................................................................................................................85
Images and Media.........................................................................................................................86
Advanced Formatting...................................................................................................................88
Chapter Separators........................................................................................................................88
Fonts and Colour...........................................................................................................................88
Mobile...........................................................................................................................................89
Fixed Layout.................................................................................................................................89
Speech...........................................................................................................................................90
iii
Navigation.....................................................................................................................................90
Conditional Sections.....................................................................................................................91
Commands....................................................................................................................................92
Comments.....................................................................................................................................92
General..........................................................................................................................................92
Summary............................................................................................................................................93
Chapter 10: Working With Pictures....................................................................................................94
Inserting and editing pictures.............................................................................................................94
Editing basic picture properties..........................................................................................................95
Editing size properties........................................................................................................................97
Editing margin, border, background and advanced properties...........................................................99
Adding captions to images...............................................................................................................101
Special considerations for iBooks....................................................................................................101
Inserting SVG pictures.....................................................................................................................101
Importing pictures from DOCX, ODT and HTML..........................................................................103
Image export to ebooks....................................................................................................................103
Exporting images to files..................................................................................................................104
Working with large images..............................................................................................................105
Using media objects to insert images...............................................................................................105
Summary..........................................................................................................................................105
Chapter 11: Working With Indexes...................................................................................................106
Creating an advanced table of content..............................................................................................106
Editing table of contents properties............................................................................................113
Adding multiple tables................................................................................................................114
How tables are output to OpenDocument...................................................................................115
Specifying and stripping link styling..........................................................................................115
Creating a table of contents manually.........................................................................................115
Creating a table of contents for a fixed layout book...................................................................116
Epub 3 considerations.................................................................................................................116
Creating an alphabetical index.........................................................................................................116
Configuration..............................................................................................................................117
Importing index entries...............................................................................................................118
Creating footnotes and endnotes......................................................................................................119
Configuration..............................................................................................................................119
Footnotes.....................................................................................................................................120
Endnotes.....................................................................................................................................120
Importing footnotes....................................................................................................................121
Creating a bibliography....................................................................................................................121
Creating citations and a bibliography.........................................................................................121
How Jutoh stores bibliographic entries.......................................................................................123
Creating and updating the bibliography......................................................................................123
Changing bibliographic settings.................................................................................................124
Managing bibliographic databases..............................................................................................125
Editing bibliography formatting.................................................................................................128
Exporting to OpenDocument............................................................................................................130
iv
Summary..........................................................................................................................................130
Chapter 12: Working With Style Sheets............................................................................................131
Introduction......................................................................................................................................131
Kinds of style....................................................................................................................................131
Editing style sheets...........................................................................................................................132
Editing paragraph styles.............................................................................................................133
Editing character styles...............................................................................................................136
Editing list styles.........................................................................................................................137
Editing box styles.......................................................................................................................139
Creating new styles.....................................................................................................................139
Applying named styles.....................................................................................................................140
Automatic styles...............................................................................................................................141
CSS dimensions................................................................................................................................141
CSS customisation............................................................................................................................142
Special style names..........................................................................................................................143
Importing and exporting style sheets................................................................................................143
Finding and replacing styles.............................................................................................................143
Style substitutions.............................................................................................................................144
Using styles to change ebook content..............................................................................................144
Automatic heading numbering.........................................................................................................146
Summary..........................................................................................................................................146
Chapter 13: Working With String Tables.........................................................................................147
Introduction......................................................................................................................................147
Troubleshooting string tables...........................................................................................................148
Summary..........................................................................................................................................149
Chapter 14: Working With Tables.....................................................................................................150
Introduction......................................................................................................................................150
Creating and editing tables...............................................................................................................151
Editing tables....................................................................................................................................152
Changing the size of cells, rows and columns..................................................................................155
About table borders..........................................................................................................................156
Importing tables................................................................................................................................156
Table compatibility in ebook readers...............................................................................................156
Editing the template gallery..............................................................................................................157
Summary..........................................................................................................................................158
Chapter 15: Working With Boxes......................................................................................................159
Introduction......................................................................................................................................159
Creating and editing boxes...............................................................................................................160
Importing boxes................................................................................................................................161
Using box styles...............................................................................................................................161
Text box compatibility in ebook readers..........................................................................................162
Summary..........................................................................................................................................163
Chapter 16: Working With Tag Objects...........................................................................................164
v
Introduction......................................................................................................................................164
Inserting tag objects..........................................................................................................................164
Anatomy of a tag object...................................................................................................................165
Code generation................................................................................................................................165
Custom tag objects...........................................................................................................................166
Summary..........................................................................................................................................166
Chapter 17: Adding Narration to Your Book...................................................................................167
Introduction......................................................................................................................................167
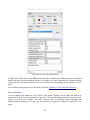
Step 1. Mark up your document with spans and identifiers.............................................................167
Step 2. Add your narration audio files to Jutoh................................................................................168
Step 3. Create a label file..................................................................................................................169
Step 4. Import the label track...........................................................................................................171
Step 5. Specify a character style for highlighting narrated content..................................................172
Step 6. Compile the book.................................................................................................................172
Summary..........................................................................................................................................172
Chapter 18: Creating Fixed Layout Books........................................................................................173
The fixed layout sample...................................................................................................................173
What is a fixed layout book?............................................................................................................173
Starting from an existing file format..........................................................................................174
What are the disadvantages of using fixed layout?..........................................................................174
What formats and features are supported by Jutoh?.........................................................................175
Creating a fixed layout project.........................................................................................................176
Editing pages....................................................................................................................................177
Adding image and text objects.........................................................................................................179
Clipboard operations........................................................................................................................179
Selection and keyboard navigation...................................................................................................180
Aligning objects...............................................................................................................................180
Adding borders.................................................................................................................................182
Pre-rendering objects........................................................................................................................182
Font size and dimension units..........................................................................................................182
Embedding fonts...............................................................................................................................183
Table of contents..............................................................................................................................183
Cover................................................................................................................................................184
Generating and testing your ebook...................................................................................................184
Changing fixed layout configuration settings...................................................................................184
Formatting for Kindle.......................................................................................................................185
Magnified regions in KF8...........................................................................................................186
Recommended settings for KF8.................................................................................................187
Formatting for iBooks/Kobo............................................................................................................187
Using a regular reflowable project as a fixed layout book...............................................................188
Faking fixed layout using a reflowable project................................................................................188
Further reading.................................................................................................................................189
Summary..........................................................................................................................................189
Chapter 19: Adding Interactivity To Your Book..............................................................................190
vi
Introduction......................................................................................................................................190
Form objects.....................................................................................................................................190
Using form objects...........................................................................................................................191
Summary..........................................................................................................................................192
Chapter 20: Making Your Books Accessible.....................................................................................193
Introduction......................................................................................................................................193
Epub 3 and Jutoh..............................................................................................................................193
Editing your project for accessibility...............................................................................................195
How the style mapping works..........................................................................................................196
Using speech in your books..............................................................................................................197
Devices and software supporting Epub 3.........................................................................................197
Further reading.................................................................................................................................198
Summary..........................................................................................................................................198
Chapter 21: Working With Text-To-Speech.....................................................................................199
Introduction......................................................................................................................................199
How does Jutoh support text-to-speech?..........................................................................................199
Configurations and speech profiles..................................................................................................201
Speech markup.................................................................................................................................202
Previewing speech............................................................................................................................205
Lexicons...........................................................................................................................................206
Speech archives................................................................................................................................207
Techniques for effective speech markup..........................................................................................209
1. Use the ‘Say as’ property........................................................................................................209
2. Use Alias, Phoneme, lexicons and custom pronunciations....................................................209
3. Use paragraph and character styles.........................................................................................209
4. Use Pause objects and punctuation.........................................................................................210
5. Use conditional formatting.....................................................................................................210
6. Use alternative text and table title/description........................................................................210
Summary..........................................................................................................................................210
Chapter 22: Formatting For Print.....................................................................................................211
Introduction......................................................................................................................................211
Using the Print on Demand Wizard.................................................................................................211
Setting configuration options...........................................................................................................212
Specifying page layout.....................................................................................................................212
Special style names..........................................................................................................................213
Using headers and footers................................................................................................................214
Setting the outline style....................................................................................................................214
Creating a table of contents..............................................................................................................215
How page styles work in LibreOffice/OpenOffice..........................................................................215
Importing from ODT and DOCX.....................................................................................................216
Summary..........................................................................................................................................216
Chapter 23: Conditional Formatting.................................................................................................217
Introduction......................................................................................................................................217
Tagging whole section and media documents..................................................................................217
vii
Tagging chunks of content...............................................................................................................221
Specifying string variables in your content......................................................................................222
Specifying conditional paragraph styles...........................................................................................222
Managing multiple configurations...................................................................................................222
Summary..........................................................................................................................................223
Chapter 24: Advanced Topics.............................................................................................................224
Embedding fonts...............................................................................................................................224
Embedding media.............................................................................................................................225
Embedding a PDF............................................................................................................................226
Setting a background image.............................................................................................................227
Understanding encodings.................................................................................................................227
Guide types.......................................................................................................................................228
How to format drop caps..................................................................................................................229
How to format small caps.................................................................................................................229
How to add an ISBN to your books.................................................................................................230
Removing underlining from links in HTML-based formats............................................................231
Jutoh and Epub 3..............................................................................................................................232
Summary..........................................................................................................................................232
Chapter 25: Troubleshooting Your Book..........................................................................................233
What errors can occur?.....................................................................................................................233
Syntax errors.....................................................................................................................................233
Structural errors................................................................................................................................237
Formatting errors..............................................................................................................................239
Content errors...................................................................................................................................243
Platform errors..................................................................................................................................243
Smashwords errors......................................................................................................................243
Kindle errors...............................................................................................................................244
iBooks errors...............................................................................................................................244
Lulu errors..................................................................................................................................244
Import/export errors.........................................................................................................................244
Import errors...............................................................................................................................244
Export errors...............................................................................................................................245
Expectation errors.............................................................................................................................245
Third-party troubleshooting tools.....................................................................................................246
When all else fails............................................................................................................................247
Summary..........................................................................................................................................247
Chapter 26: Understanding Ebook Formats and Platforms............................................................248
Formats.............................................................................................................................................248
Epub............................................................................................................................................248
Mobipocket.................................................................................................................................248
Adobe Portable Document Format (PDF)..................................................................................249
OpenDocument Text (ODT).......................................................................................................249
MP3.............................................................................................................................................250
Platforms..........................................................................................................................................251
viii
Amazon Kindle...........................................................................................................................251
iBooks.........................................................................................................................................253
Barnes & Noble Nook................................................................................................................254
Kobo...........................................................................................................................................255
Diesel eBook Store.....................................................................................................................255
Lulu.............................................................................................................................................255
Smashwords................................................................................................................................256
Your own web site......................................................................................................................256
Caveats about using multiple distribution platforms..................................................................257
Summary..........................................................................................................................................257
Chapter 27: Marketing Your Book....................................................................................................258
Step 1: Describe your book..............................................................................................................258
Step 2: Be able to talk confidently about it......................................................................................259
Step 3: Find your Special Subject – be an expert or an enthusiast...................................................260
Step 4: Build a platform...................................................................................................................260
Further tips.......................................................................................................................................262
Essential reading...............................................................................................................................262
Summary..........................................................................................................................................262
Glossary.................................................................................................................................................264
Appendix A: Installing Jutoh..............................................................................................................268
Installing on Windows......................................................................................................................268
Installing on Mac OS X....................................................................................................................269
Installing on Linux...........................................................................................................................270
How to use Jutoh with an external drive..........................................................................................271
Overview.....................................................................................................................................271
Using a mobile drive for data.....................................................................................................272
Using a mobile drive for settings................................................................................................272
Running Jutoh from a mobile drive............................................................................................273
Launching Jutoh on Windows....................................................................................................273
Launching Jutoh on Linux..........................................................................................................273
Launching Jutoh on Mac............................................................................................................273
Appendix B: Configuring Jutoh.........................................................................................................274
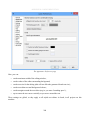
Viewer applications..........................................................................................................................274
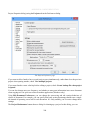
Conversion and checking applications.............................................................................................276
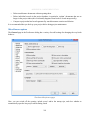
Text-to-speech configuration............................................................................................................277
CereVoice...................................................................................................................................278
Cepstral.......................................................................................................................................278
eSpeak.........................................................................................................................................278
LAME MP3 Encoder..................................................................................................................279
Customising shortcuts and favourites...............................................................................................279
Favourites...................................................................................................................................282
Customising toolbars........................................................................................................................284
Customising auto-replace.................................................................................................................285
Appearance options..........................................................................................................................287
ix
Desktop options................................................................................................................................289
Project options..................................................................................................................................289
Miscellaneous options......................................................................................................................291
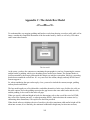
Appendix C: The Jutoh Box Model....................................................................................................293
Appendix D: The Bibliographic Formatting Language...................................................................295
Introduction......................................................................................................................................295
An example template........................................................................................................................295
Constructs.........................................................................................................................................297
Using variables.................................................................................................................................298
How to edit and use formatting templates........................................................................................299
Appendix E: Speech Markup Reference............................................................................................301
Property reference............................................................................................................................301
Unsupported SSML features............................................................................................................305
Appendix F: Speech Profile Reference...............................................................................................307
Formats.............................................................................................................................................307
Speech archive..................................................................................................................................307
Speech properties.............................................................................................................................308
Options.............................................................................................................................................308
Lexicons...........................................................................................................................................309
Speech enhancements.......................................................................................................................309
Appendix G: Alphabet Description Reference..................................................................................311
About alphabet descriptions.............................................................................................................311
Alphabet syntax................................................................................................................................311
Change Log...........................................................................................................................................313
x
From the Horse’s Mouth
“We hit the Google trail in search of e-book enlightenment. If it wasn’t for Jutoh, we’d still be in the dark.”
– Australian Financial Review, July 27th, 2010 (“Jutoh writes a new chapter in the manual of e-publishing”)
“Jutoh is a remarkable program. In a complex field it offers a simple-to-use interface with generous options and
faultless performance. It accepts a wide variety of input files and can create MOBI, EPUB and other standard ebook
formats. It compiles and checks projects and links to preview software. It also allows for extensive metadata entry.
All this in a neat and tidy presentation. When the only other options seemed to be an expensive and unnecessary
outlay on something like Adobe In-Design, this came out of the blue and has answered all our prayers. I love it.”
– Ellis Delmonte, Hawkwood Books, Lincoln
“I just wanted to say your software is bloody genius. The Smashwords conversion went brilliantly... Jutoh has been
a God-send and the learning curve will really pay off in the future. Having come across many many forums where
new digital authors are having a painful birth in converting to the digital platform, Jutoh is something that many of
them don’t know about. Your software will make a difference. My book is now live on the Amazon and
Smashword sites. It reaches Apple in two weeks. Your software helped make that happen.”
– Will B.
“Jutoh is way ahead of any of the ebook editors – and I have tried a number of them, even Adobe’s InDesign.”
– Dan R.
“I just wanted to write and thank you a thousand times over for coming up with Jutoh... I can’t begin to tell you
how much simple it has made my life. Create once and send out everywhere in all formats is a Godsend, and I have
been able to supplement my own titles with those of others, through my publishing company. I learned a lot about
proper formatting for eBooks, taking into consideration the various formats, from ePub to ODT and even plain text.
I dreaded the thought of manually going through each one, only to have to wade through the inevitable feedback, in
order to fix everything by trial and error. In a single evening, I was able to submit to both B&N and Smashwords,
with flying colors, no less! Thank you for putting such a wonderful product together.”
– Dallas T.
“Thanks again for all the help. Jutoh is by far the best epublishing tool I’ve used so far!”
– Blaise M.
“Simply put, Jutoh is the best conversion tool out there. The user interface is very friendly, there are many extras
built-in, and the documentation is thorough. Jutoh can take a very large book with many images and successfully
convert to multiple ebook formats that pass the epub validation checks. Anyone who has a book in MS Word can
save it to OpenOffice (which is free, and has a built-in PDF capability amongst other features) and import it to
Jutoh. I have found the Jutoh developer to be extremely accessible, responsive and eager to receive feedback. This
is a high-end, professional piece of software that is practically a give-away!”
– Kathy M.
“I wanted to thank you so much for the Jutoh tool! It’s been wonderful! I was so pleased with how it worked in
creating a mobipocket Kindle edition of a book I’ve been writing.”
– Joshua D.
“Thank you for another quick, thorough response! Your customer service is amazing.”
– Kristine K.
xi
Preface
Bring on the revolution
The publishing world is currently in turmoil largely thanks to the freedoms and opportunities that
ebooks bring. Simultaneously freeing consumers from the physical realities of print and paper, and
freeing authors from the gatekeeper mentality that has held back much good content (as well as less
literary output, to be sure), the ebook phenomenon has just hit the mainstream now that ebook reader
gadgets have become practical and affordable. Kindles, Kobos and a huge variety of tablets have
become popular Christmas presents and each year will see more choice on offer.
To join the revolution, authors and publishers need to provide ebooks in essentially two popular
formats – Epub and Mobipocket (Kindle). (Other formats, such as PDF, are sometimes used for
creating ebooks but PDFs play less well on reader hardware and cannot be reformatted to adapt to
reader constraints. While Jutoh can help with creating PDFs, we will concentrate on the two standard
ebooks formats.) To some extent, creating an Epub or a Kindle file is a black art. You’ll find blogs and
forums full of advice on using obscure XML and HTML markup. You’ll read about the hoops people
are jumping through to get this or that formatting correct on iBooks or Kindle or Nook. You may see
advice on editing XML to create a table of contents before adding it to an Epub zip file. For the
uninitiated trawling through this information, the prospect of creating an ebook can look frankly
terrifying.
Fortunately, with Jutoh it doesn’t have to be that way. You don’t have to deal with OPF files or HTML,
unless your requirements are very complex; you can simply use a friendly editor tool that optimizes its
output to take into account the whims of a variety of ebook reader software and hardware. Instead of
hiring someone to convert your book, you can save money by using Jutoh to do it yourself –
empowering you the author, in the spirit of the ebook revolution. (If you’re a publisher or consultant
helping an author create ebooks, then you’ll appreciate the time-saving qualities of Jutoh just as much.)
This book is here to help you learn and get the most out of Jutoh, bringing together wisdom that you
might otherwise have to glean from around the web. Sometimes even Jutoh can’t entirely smooth over
differences between formats, publisher requirements, and ebook reader behaviour, and these areas are
documented as much as possible to save you frustration.
If you are a Jutoh user, this guide will be an adjunct to the software (version 2.10 and above) and the
built-in user manual, which contains more detail, for example on each dialog presented by Jutoh. You
can also type keywords into the Search Help control in the Jutoh toolbar. If you are thinking about
using Jutoh, or are using a different method to create your ebooks, I hope you’ll still find some useful
tips in these pages. Happy authoring!
xii
Julian Smart, October 2015
About the author
Dr Julian Smart is technical director of Edinburgh-based Anthemion Software. He is the founder of the
wxWidgets project, a popular construction kit for applications that run on a variety of computer
platforms. Julian is the creator of Jutoh, and, with his novelist wife Harriet Smart, the Writer’s Café
toolkit for writers, as well as the DialogBlocks and HelpBlocks tools for programmers.
How this book is structured
In Chapter 1: Introduction to Ebooks and Jutoh, we start off with a gentle amble around the concept
of the ebook and how Jutoh relates to it. You’ll get an overview of the steps involved in overall ebook
creation, with reference to those steps that Jutoh helps with.
In Chapter 2: Getting Started, we run through a simple example of creating a project and compiling
an ebook. We’ll keep it very brief so you can see that Jutoh makes the simple things simple to achieve.
In Chapter 3: The Jutoh User Interface, we’ll take a look at the main elements of the Jutoh window,
so you’ll know your way around. We also look at how you can customise the interface, for example
defining new keyboard shortcuts and a ‘favourites’ menu.
In Chapter 4: Working With Projects, we describe what a project consists of, how to add documents
to a project, and other aspects of controlling your Jutoh project.
In Chapter 5: Importing Files, we describe in detail the types of file that can be imported and how to
tell Jutoh to split it into sections.
In Chapter 6: Editing and Formatting Content, you will learn all about the Jutoh editor and how to
use it to edit and format text and pictures.
In Chapter 7: Editing Your Book’s Metadata, we look at ‘metadata’, the information that describes
your book to the ebook reader.
In Chapter 8: Editing Your Cover Design, we put Jutoh’s built-in cover designer under the
microscope. If you will only be using previously prepared artwork for your book(s), you can skip this
chapter.
In Chapter 9: Understanding Configurations, the important concept of ‘configuration’ is explained
and each configuration property is explained in detail.
In Chapter 10: Working With Pictures, we describe various aspects of importing pictures and
specifying how they will appear in the generated book.
In Chapter 11: Working With Indexes, we explain how Jutoh can help you build a table of contents,
and also an alphabetical index, footnotes or endnotes, and a bibliography.
In Chapter 12: Working With Style Sheets, you’ll learn all about styles and style sheets, which are
important in formatting your document consistently.
In Chapter 13: Working With String Tables, we describe a trick for customising your books by
using keywords in your content that are substituted by values that can depend on the current
configuration.
xiii
In Chapter 14: Working With Tables, we describe how to create and manipulate tables.
In Chapter 15: Working With Boxes, we describe how to use text boxes to highlight or group
content.
In Chapter 16: Working With Tag Objects, we describe how you can use use extra markup to
enhance your book. If your needs are simple, you can skip this chapter.
In Chapter 17: Adding Narration To Your Book, we see how audio files can be synchronised with
your content to create narrated books.
In Chapter 18: Creating Fixed Layout Books, we describe the details of creating fixed layout books,
particularly useful for children’s picture books or books containing a lot of pictures.
In Chapter 19: Adding Interactivity To Your Book, we look at the use of form objects for adding
interaction in conjunction with JavaScript code.
In Chapter 20: Making Your Books Accessible, we see how you can make your book more
accessible to disabled readers when creating Epub 3 files.
In Chapter 21: Working with Text-To-Speech, we describe how you can mark up content to produce
more accurate audio files using the text-to-speech facilities in Jutoh.
In Chapter 22: Formatting for Print, we explain how you can create print-ready OpenDocument files
using Jutoh.
In Chapter 23: Conditional Formatting, we explain how you can use Jutoh’s facilities for creating
different ebook output depending on format, distributor or other criteria, without needing to maintain
different versions of your project.
In Chapter 24: Advanced Topics, we look at a variety of advanced topics, such as character
encodings, embedding font and media, guide types, and more.
In Chapter 25: Troubleshooting Your Book, we explain the ways in which you can check and
improve your book after compiling it. If you find problems with your book, this chapter is your first
port of call.
In Chapter 26: Understanding Ebook Formats and Platform, we describe some of the nuances of
ebook formats and distribution platforms that you should be aware of.
In Chapter 27: Marketing Your Book, we take a look at various ways in which you can get your
book to a wider audience.
The Glossary may be useful for getting used to various terms used within this guide and the software
itself.
In Appendix A: Installing Jutoh, we look at how to install Jutoh on various operating systems.
In Appendix B: Configuring Jutoh, we describe how to configure various aspects of Jutoh, in
particular useful third-party applications such as Kindlegen and EpubCheck.
In Appendix C: The Jutoh Box Model, we describe how content, padding, margins and border all
relate to one another.
In Appendix D: The Bibliographic Formatting Language, we describe the XML-based language for
xiv
customising how a bibliography is formatted.
In Appendix E: Speech Markup Reference, we list the available speech properties and their usage.
In Appendix F: Speech Profile Reference, we list the options available in a speech profile for altering
the way text-to-speech works for particular configurations.
In Appendix G: Alphabet Description Reference, we describe the XML-based language for
describing lexicon alphabets for use in the lexicon editor.
Conventions and terms used in this book
•
The convention Menu | Command, such as View | Preferences, indicates a menu and the
command on that menu.
•
The notation Ctrl+S refers to holding down the control key while pressing the ‘S’ key. On Mac,
you can interpret this as Command+S.
•
Where we refer to right-clicking, if you’re on a Mac, this action will be performed by controlclicking since there’s only one mouse button.
•
The terms compiling, building and generating an ebook all refer to the same act of creating an
ebook from the information in your project.
•
A context menu is the menu you get when right-clicking (or control-clicking on a Mac), or
pressing the context menu button on a Windows keyboard.
•
Document is a general term for each separate item that can appear in a Jutoh project outline,
whether it’s a chapter of your book, an embedded font, an audio file, or any other supported
document type.
•
Book section refers to a specific kind of document in which you can edit text and graphics; it can
contain a chapter, a title page, a table of contents or any individual part of a book. This may
sometimes be abbreviated to section.
•
A dialog is a window that opens in response to some command or condition; usually (but not
always) it needs to be dismissed before you can continue working in the main window. Dialogs
usually have a Help button that will give more detailed information than this guide can cover.
•
Screenshots are taken on Windows, but the functionality is identical on Linux and Mac even if it
looks slightly different.
xv
Chapter 1: Introduction to Ebooks and Jutoh
In this chapter we explore ebook formats, and explain how Jutoh fits into the process of getting your
book onto virtual shelves. We’ll take a look at how you get your content into Jutoh, and other tools that
you can use alongside Jutoh.
Ebook formats
There are three major ebook formats in use today:
1. Epub, an open standard supported by all non-Kindle reader devices.
2. Mobipocket, a proprietary format specific to the Amazon Kindle but also supported on other
devices.
3. PDF (Portable Document Format), an Adobe proprietary format supported by most devices.
There are other formats, including plain text and HTML, but the Big Three above are the important
ones.
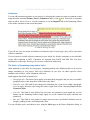
Epub 2 is the industry standard with wide adoption, and is flexible enough for most ebook purposes.
It’s basically a zip archive containing the content in XHTML form, plus ‘metadata’ that describes the
content and provides navigation information. An Epub reader (such as Apple’s iBooks) tries to format
the book in a standard way, but inevitably there are differences between implementations.
Most Epub ereaders handle Epub 2; the more advanced Epub 3 format does not have wide adoption yet,
but there is software such as AZARDI and Readium that can read Epub 3. Jutoh supports a number of
Epub 3 features, such as narration and interactivity via JavaScript.
Amazon bought and adopted the Mobipocket format for their Kindle devices. Mobipocket is like a cutdown version of Epub: in fact the Kindlegen application used to compile a Mobipocket book uses all
the same files that you see in an Epub 2 book, distilling them to a proprietary format. However, the way
a Mobipocket reader interprets the book is different from an Epub reader, with limitations on
formatting that have to be borne in mind by the author, or worked around by the authoring software.
Amazon’s new ‘KF8’ format eliminates many of these limitations, and Jutoh smooths over most of the
differences between the two formats.
PDF has always had a strong showing in ebooks on the desktop, because it can faithfully render the
layout you see in publications such as brochures, with a direct translation from a conventional word
processor file. However it is less satisfactory on mobile devices, because PDFs cannot generally be
‘reflowed’ to take advantage of small screens and requests for different type size. So on a small screen
1
CHAPTER 1: INTRODUCTION TO EBOOKS AND JUTOH
you end up having to zoom in and out and pan around the document. Clearly this is not a good general
solution for reading books, unless you have a device with a particularly large screen, and even then you
will have trouble adjusting the type size without content either disappearing off the screen or leaving
blank areas. We will not say much more about PDF in this book, but suffice it to say that if you need to
support PDF, Jutoh can help you create these files by generating ODT which you can load into
OpenOffice.org or LibreOffice and from there, export to PDF.
Since Jutoh can handle all major ebook formats, it means that you can distribute your books for Apple
iBooks on iPhone/iPod Touch/iPad, Amazon Kindle, any Android device, Kobo, Barnes & Noble
Nook, and many other devices as well as for any PC or Mac.
What is Jutoh?
Jutoh is an editor for creating your ebooks; you can create a book from scratch in Jutoh, or you can
import an existing book. As we’ve seen, Jutoh can generate the major ebook formats. Unlike most
word processors, Jutoh divides ebook content into sections, which is more naturally suited to the way
ebooks work. Jutoh is a bit like a word processor in that it supports content formatting, but it is geared
towards generating a variety of ebook formats, with various tools to help with this task. You can add
images to your documents, and (experimentally) sound and video where supported by the ebook reader.
For clarity, here are some things that Jutoh is not:
•
Jutoh is not just a converter. Although you can import from several different file formats, it’s an
editor so you can write content and apply formatting within Jutoh.
•
Jutoh is not an HTML editor. You can pass some raw HTML and CSS through to the finished
book if you wish, but Jutoh is in control of most of the HTML generation and so you can’t edit
all of the generated HTML from within Jutoh. (However the publisher’s version of Jutoh, Jutoh
Plus, does have an HTML template facility to allow you to take over some or all of the HTML
generation, and the ability to insert JavaScript files into the book. See
www.jutoh.com/jutohplus.htm for more details.)
•
Jutoh is not a full-blown page layout program. Don’t expect to do multiple columns or absolute
positioning of images; Jutoh is optimized for the relatively simple needs of most ebooks which
are generally read on small devices with little space for elaborate formatting. Having said that,
Jutoh does support text boxes, tables and objects that float to the left or right of text; and some
tricks are available if you need to go beyond Jutoh’s formatting capabilities.
Jutoh helps you create a cover page for your book with the simple cover designer, which can substitute
information from the metadata (title, author and so on) into the design. Create a design from scratch, or
start from one of the templates provided by Jutoh.
Jutoh has facilities for compiling a table of contents and index, and can compile references either at the
end of a section or in a separate section. You can of course create links between pages, and links to
external web sites.
In addition, Jutoh contains tools to help collate research that doesn’t belong in your finished book – for
example text and image scraps – and has its own desktop where you can put ‘sticky’ notes, shortcuts to
applications and documents, and even little image slideshows.
2
CHAPTER 1: INTRODUCTION TO EBOOKS AND JUTOH
Jutoh works on Windows, Mac OS X and Linux (one licence is good for any or all platforms, which is
handy if you have a variety of machines), and it can be run from a USB drive. All information for a
given Jutoh project is stored within a single file with extension ‘jutoh’ which makes for easy transfer
and backup.
What kinds of book can be created with Jutoh?
Jutoh is good for most book types, including:
•
novels;
•
short story collections;
•
biography;
•
self-help books;
•
articles;
•
manuals;
•
photographic books;
•
textbooks with simple layout requirements.
You can insert images into Jutoh, which can be photographic or artistic or could be used for symbols
and decorative touches. Jutoh’s table support can be handy for scientific books; mathematic or other
formulae aren’t supported but can be achieved by inserting pictures. As we said earlier, don’t expect
the layout of a complex word processor document to be reproduced exactly, as if exporting to PDF.
Jutoh has experimental support for audio and video but these file types are not yet recognised by a wide
variety of reader hardware and software and so should be approached with caution.
If you are feeling adventurous, you can explore Jutoh’s ‘form objects’ which allow addition of input
controls for adding interactivity, in conjunction with JavaScript code. Jutoh also supports
synchronisation of narration with book content. These features are supported by only a few ereaders at
present.
The book creation lifecycle
These are roughly the steps involved in creating and distributing an ebook.
1. Create a project, importing an existing file if you have one.
2. Edit the book content, metadata and cover.
3. Choose a configuration (approximately equivalent to the format) and compile the ebook.
4. Check the file for errors, for example using using EpubCheck.
5. If there are errors shown by step 4, go to step 2.
6. Preview the file manually. If there are errors, go to step 2.
3
CHAPTER 1: INTRODUCTION TO EBOOKS AND JUTOH
7. Upload to one or more web sites.
8. Publicise.
9. Bask in the adulation of your readers.
Steps 1 to 5 are supported directly by Jutoh. As you can see, there are elements of both file conversion
and editing in Jutoh. If you’re really lucky, you could import a file and find there’s nothing to do
except generate the ebook. Or you can create a project from scratch, and do all your editing in Jutoh
(which is what I’m doing for this book). More usually, you’ll import some work you have already
done, and massage the book in Jutoh until you’re happy with it, going around the loop between items 2
and 6. You’re likely to want to improve the presentation of the book by tweaking the formatting,
creating a table of contents, and so on.
Because Jutoh runs on Windows, Mac, and Linux, you can use most desktop or notebook machines for
your editing and even switch between them, since the Jutoh file format is portable (and a single Jutoh
licence is good for any operating systems you may be using). Jutoh can run from a mobile drive; you
can read more about that in the Appendix and in the user manual.
A question people often ask is: “Can Jutoh create an encrypted ebook?” The short answer is No, but in
fact this would be a useless feature. The sites that you will be uploading your book to requires
unencrypted content, and it’s the ebook vendor site (such as Kindle, Smashwords or iBooks) that will
be doing any encrypting. Unless you’re a big publishing company with a deal with Adobe, for example,
you won’t be able to do any official encryption that can be recognised by any ebook readers. If you’re
distributing the book yourself, probably the best policy is to make a virtue of the lack of encryption:
customers tend to hate DRM (Digital Rights Management) and it restricts their freedom to use the book
on different devices. So, just put a paragraph on the title page asking them politely not to copy the book
in an unauthorised way. Any piracy that does happen may well boost your sales by increasing the buzz
around your book. However, you can easily stop any person from freely downloading your commercial
book from your own site, by signing up with a vendor service that serves a link to your book only after
payment has been received.
How to get content into Jutoh
You can can create a blank project, add book section sections, and type away. Or, you can import
existing content. This is best done when you first create the project. You can import a folder containing
multiple text and HTML documents, one file per book section, or you can import a single file
containing one of these formats: plain text, DOCX, ODT, HTML, or Epub.
Note that Jutoh has a different internal representation from any of the formats it can import, and so it
won’t preserve the document formatting 100%. This varies according to format. With HTML and Epub
import, Jutoh will read just a basic level of CSS styling and you may need to do further style and
content editing after import, depending on the complexity of the original CSS and HTML.
The preferred import format is DOCX (Microsoft Word XML) or ODT (Open Document Text). You
can convert a variety of word processing formats (such as DOC) to DOCX or ODT simply by opening
them in OpenOffice.org (a free download) and saving as DOCX or ODT. Most style information from
the DOCX or ODT document will be preserved. If you have an older version of Word that doesn’t
4
CHAPTER 1: INTRODUCTION TO EBOOKS AND JUTOH
support DOCX, you can download the “Microsoft Office Compatibility Pack for Word, Excel, and
PowerPoint File Formats” which at the time of writing can be downloaded from:
www.microsoft.com/en-us/download/details.aspx?id=3.
This will add the ability to open and save DOCX files.
For import of DOCX, ODT and HTML files, Jutoh will help you split the book into sections by
matching against heading styles or content.
You can also import DOCX, ODT, HTML and text into an existing project using the File | Import
command.
For more information on importing, see Chapter 5: Importing Files.
Tools to use with Jutoh
No man is an island, and neither is Jutoh. These are some of the third-party tools you can use to help
with your book creation.
EpubCheck, by Adobe, is a very useful checker for Epub files. It examines the HTML and XML files
in your book and flags up errors, such as missing mandatory meta-data, ill-formed HTML, missing
bookmarks, and so on. This tool is installed and configured by default with Jutoh; it needs Java to be
installed on your system. Use the checker by clicking the Check button or by switching on Check
Epub after compiling in the General Preferences dialog. You can get updated versions of EpubCheck
from here:
code.google.com/p/epubcheck/
Amazon’s Kindlegen is essential if you want to create Mobipocket (Kindle) books. It’s not installed by
default but you can download it from:
www.amazon.com/kindlepublishing
Configure Jutoh by going to the Helpers page in the Jutoh Preferences dialog and clicking on Help Me
Install Kindlegen in the Helpers page or Setup dialog. Jutoh will install and configure Kindlegen for
you.
To preview your Epub book, you can install Adobe Digital Editions:
www.adobe.com/products/digitaleditions/
or other Epub viewer. Jutoh will launch the default application associated with the epub extension
when you click on Launch. If you need to use several viewers and choose between them, you can add
viewers in the Helpers page of the Jutoh Preferences dialog, by clicking on Configure, then Add. Type
the name of the helper application, and browse for the command to use. Now when you click on the
Launch button, Jutoh will offer you a menu of applications to use.
Similarly, to preview Mobipocket books, you can use Amazon’s Kindle for PC and Kindle for Mac:
www.amazon.com/gp/kindle/pc
www.amazon.com/gp/kindle/mac
5
CHAPTER 1: INTRODUCTION TO EBOOKS AND JUTOH
Formatting on this software can be different from on other devices, such as the Kindle device and
iPhone/iPod Touch. Instead (or as well), you can use Kindle Previewer for Windows or Mac. This lets
you select a number of different Kindle devices to test. However don’t rely on it; always do some
testing on hardware if you can. Also, Kindle Previewer only responds to command-line arguments on
Windows so cannot be used as a Jutoh helper application on Mac – you need to open the file from the
Previewer application. Hopefully that will be fixed in future release. On Windows, you can use the
Setup Wizard (available from the View menu) to download and install Kindle Previewer as well as
Kindlegen.
OpenOffice.org is a free download from:
www.openoffice.org
It’s useful for converting Word and other word processor files to DOCX or ODT for import into Jutoh.
If you plan to create ODT files with Jutoh, as well, you can use OpenOffice.org to convert your books
to PDF, Word and other files. And of course, you may grow to enjoy it as a regular word processor
instead of using one that costs a lot of money!
Summary
We have learned a little about ebook formats, what Jutoh is, the steps involved in getting a book to the
point of distribution, what files Jutoh can import, and what other tools can be used alongside Jutoh.
Next, we dive into an example of creating a project and creating an ebook.
6
Chapter 2: Getting Started
In this chapter we’ll demonstrate how easy it is to go from an existing file to a new Jutoh project and a
generated ebook. We’ll assume that you’ve installed Jutoh – see Appendix A: Installing Jutoh for
details.
Creating a new project
In this tutorial we’ll be importing an ODT file called ‘Lena.odt’ – you can substitute it with your own
file. Jutoh will accept OpenDocument (ODT), Word (DOCX), HTML, text and Epub files (DOCX and
ODT are recommended for best results). If you want to create a project from scratch instead, just
choose From scratch in Step 5 below.
Run Jutoh and click the New button on the toolbar (or type Ctrl+N or click on File | New Project).
You will be shown a wizard that will take you through file import. Here are the steps for importing it,
one step per wizard page.
Step 1. Metadata
This page is for entering information about your book.
7
CHAPTER 2: GETTING STARTED
Step 1: Metadata page
Type ‘Lena’ into the Book title field, and a name into Author field. Leave the other fields as they are
(you can fill them out later). If you wish you can clear the Identifier field so that Jutoh will generate a
unique identifier (UUID) for each ebook format that you create. Now click on Next.
Step 2. Project Location
Here, you can specify the project name and folder. You can leave the Book Formats options as they
are.
8
CHAPTER 2: GETTING STARTED
Step 2: Project Location page
Enter “Lena” into Your project name. If you wish you can change the location in Project folder. You
can use an existing Jutoh project as a template if you wish, but you can leave the Use template option
unchecked for this example. Press Next.
Step 3. Layout Choice
This page lets you choose between a reflowable ebook and a fixed layout ebook. Most of the time you
will choose Normal reflowable book.
9
CHAPTER 2: GETTING STARTED
Step 3: Layout Choice page
Leave these options as they are, and press Next.
Step 4. Import Options
This page is for specifying various details about the import. You don’t need to change the defaults for
this example.
10
CHAPTER 2: GETTING STARTED
Step 4: Import Options page
Leave these options as they are, and press Next.
Step 5. Import Method
This page lets you specify a file to import.
11
CHAPTER 2: GETTING STARTED
Step 5: Import Method page
Click on option From an existing file and browse for the file you wish to import. Then click Next.
Step 6. Single File Import
This page helps you specify how to split the book into separate sections, which you can do by
specifying a heading style to identify as the chapter heading style, or heading text to match, or simply
to split at page breaks.
12
CHAPTER 2: GETTING STARTED
Step 6: Single File Import page
As you can see from the preview window listing the headings in the story, Jutoh has correctly guessed
the paragraph style to use for splitting the story into sections, so in this case all you need to do is press
Next. Don’t worry if your book is not correctly split at this point – you can split it manually using the
menu command Edit | Split Document.
Step 7. Cover Design
The last page in the wizard lets you choose a cover design.
13
CHAPTER 2: GETTING STARTED
Step 7: Cover Design page
You can use the default design, or click on Templates to choose another template. You can change it
later. Just press Finish to complete the import.
Jutoh will now create several sections, which are shown on the left in the Projects outline window.
You can click on each section name and edit the text if you wish.
If you have made changes to the imported file, or wish to see if Jutoh can make a better job of splitting
the book up by making different selections, you can save time by using the menu command File |
Reimport Project which preserves your previous selections.
14
CHAPTER 2: GETTING STARTED
Using Quick Convert
If you prefer, you can bypass the New Project wizard using the
Quick Convert command on the
File menu or toolbar. This chooses various options for you, such as the project folder, book name, book
cover and so on, and it also allows you to choose several files for importing into different projects. You
can then edit the project properties in the usual way, or you can use File | Reimport Project to refine
some choices such as how the document is split.
Compiling the project
Now we have the book in Jutoh, we can create an ebook. In the bottom-left part of the Jutoh window
you’ll see the Control Panel listing configurations. (If you don’t see the Control Panel, press Alt+7 or
choose View | Control Panel).
The Control Panel
Each configuration corresponds to an ebook format. Select ‘Epub’ if it’s not already selected, and click
Compile. After it’s compiled, click Launch, and if you have an ebook viewer such as Adobe Digital
Editions installed, your ebook will be shown.
15
CHAPTER 2: GETTING STARTED
Viewing the ebook in Adobe Digital Editions
If you want to compile a Mobipocket file for the Kindle store, select the ‘Mobipocket’ configuration
and again press Compile. (You need to have downloaded, installed and configured kindlegen for this to
work – see Appendix A: Installing Jutoh and Appendix B: Configuring Jutoh) Press Launch, and if
you have installed a Mobipocket viewer application such as Kindle for PC or Mac, or Kindle Previewer
for PC, it will launch to show your ebook.
You can verify that the files have been generated by clicking on the Files tab in the Control Panel. You
can select a file and then click Folder if you want to see where the file is on your disk.
Note that it’s important to use separate configurations to generate books in different formats, because a
configuration has settings that optimizes the book for each format. For example, if you are distributing
to both iTunes (Epub) and Amazon (Mobipocket), use the supplied configurations individually – don’t
set multiple formats for the same configuration unless you are very sure of what you are doing.
Summary
Ta-da! You have imported content from a file and compiled an ebook. In the next chapter, we’ll have a
closer look at Jutoh’s user interface so you can get to know your way around it.
16
Chapter 3: The Jutoh User Interface
In the last chapter, you learned how to import a file and compile it, without getting bogged down too
much in the details of the Jutoh tools. Now we’re going to take a closer look at the Jutoh main window
where you will do most of your ebook work.
The Jutoh main window
Menu bar and toolbar (1)
As with most applications, Jutoh has a menu bar under the window title, containing all the commands
you need to make things happen. The menus are File, Edit, Format, Tools, Document, Book, View,
and Help and the groups are fairly self-explanatory. Run your mouse along the menu bar and explore
these commands; as you hover over a command, a summary will be displayed in the status bar at the
17
CHAPTER 3: THE JUTOH USER INTERFACE
bottom of the window.
Under the menu bar, the toolbar contains a selection of these commands for convenience. You can
change the commands on this toolbar by by right-clicking on it and selecting Customise, or selecting
View | Customise Toolbars. These are the buttons available by default:
•
New: creates a new project, showing the New Project Wizard for importing content or
creating an empty project.
•
Open: opens an existing project.
•
Save: saves any changes in the current project.
•
Edit: edits the Project Properties, including metadata, styles, covers and configurations.
We’ll come to this later.
•
Cover: edits the ebook cover design.
•
Compile: compiles the ebook using the currently selected configuration.
•
Check: checks an Epub using EpubCheck, listing any errors it finds in the ebook.
•
Launch: launches the ebook in the application that your operating system associates with it
(or a custom application that you define: see Appendix B: Configuring Jutoh).
•
Previous: goes to the previous document in your book.
•
Next: goes to the next document in your book.
•
Documents: shows a menu of document types to add to the project. Normally you’ll just
add Book Section documents, for example for each chapter and the title page.
•
Home: goes to the Jutoh desktop, containing shortcuts to various features and documents.
•
Options: shows the Preferences dialog.
•
Help: shows or hides the help window containing the Jutoh manual.
•
Search Help: type text and press return to search in the Jutoh manual and
knowledge base. This is your first port of call when you get stuck.
Organizer (2)
The Organizer shows all the documents in your project, in the Projects tab. A document corresponds
to a chapter or section such as a title page. You can click on each document to view and edit it. You can
view multiple projects in the Organizer if you wish, though you will have to enable this first via the
Preferences dialog. Documents can be dragged, to change the position in the book, and a context menu
is available if you right-click over a document. We’ll go into this in more detail in Chapter 4: Working
18
CHAPTER 3: THE JUTOH USER INTERFACE
with Projects.
Next to the Projects tab are two more tabs: Favourites, and Explorer. The Favourites tool shows a list
of favourite projects for quick access; you can add to or remove from this list. The Explorer tool lets
you browse your disks and open projects, delete them or add to Favourites.
Control Panel (3)
The Control Panel has a Build tab which shows the current configuration (loosely, the current format to
be generated), with buttons for compiling, checking and launching the book. Typically, you will:
•
Select a configuration for a particular format, such as Epub;
•
Click Compile to build the ebook;
•
Click Check to check the ebook for errors (Epub only);
•
Click Launch to view the ebook in an appropriate application, such as Adobe Digital Editions.
The control panel also shows the cover of the current project, which can be clicked to edit the design.
Next to the configuration list is an edit button which will show the configuration editor – giving you the
ability to change various things about the way the book is generated. We will cover configurations in
Chapter 9: Understanding Configurations.
The Control Panel
Next to the Build tab, the Files tab shows all the ebook files that have currently been generated for this
project, regardless of format. You can view the folder containing a selected file, view the file with the
appropriate helper application, or (for Epubs) examine the structure of the generated book.
19
CHAPTER 3: THE JUTOH USER INTERFACE
Document area (4)
The bulk of the window is taken up by the document area, where you can view and edit the documents
(sections) in your book. At the bottom you’ll see a row of tabs, one for each document that you’re
currently editing, and also one for the Jutoh Desktop. The Desktop contains a Welcome window and
shortcuts for various Jutoh features and documentation, and it’s also a place you can add ‘sticky’ notes
(as shown below), pictures, and even picture slideshows. Click on the Jutoh logo button at the bottomleft for available Desktop commands.
The Jutoh Desktop
At the top of the document area you’ll see the title for the currently-selected document. You can click
on it to edit the title of the section as it appears in the outline, and in the generated book contents.
The editor behaves in most respects like other editors and word processors you will have used, with
some differences and simplifications. Formatting operations can be performed from the Formatting
Palette (6), the Format menu, and the context menu (shown using right-click, or control-click on the
Mac). Navigation around the document follows the usual pattern, for example using the control key
combined with the left and right arrows to move a word at a time, and holding down shift to select text
while navigating. Text editing and formatting operations can be undone and redone in the usual way.
However, don’t expect the editor to be exactly like ones you have used, since it has been written from
scratch especially to work on a number of different platforms.
20
CHAPTER 3: THE JUTOH USER INTERFACE
Log and error windows (5)
The log and error windows display messages when compiling projects. You can show them with the
menu commands View | Log Window and View | Error Window, and there is also the option of
showing them automatically when you compile an ebook. You can close these windows again using the
X in the top-right corner.
The error window is shown when either Jutoh finds errors during a compile, or you perform an Epub
check on a generated Epub book. If there are no errors, a green ‘tick’ will be shown. If there are errors,
they are listed, and you can double-click on each to show the position of the error either within the
original source, or within the HTML of the Epub book, depending on the type of error. From this you
will be able to work out what you need to change in your project.
Formatting Palette (6)
The Formatting Palette is shown when you use the menu command Format | Formatting Palette, or
Alt+P. It contains tabs for a range of formatting functions:
•
Tools shows toolbar buttons and other controls for changing styling in your document.
•
Styles shows the available paragraph, character, list and box styles. You can double-click on a
style to apply it to the document, and right-click (or click More) to edit the style or create a new
one. It also displays the styles for the content at the current editor position.
•
Objects lists the tag objects (for example, ‘span’ and ‘input’) and other objects (such as images,
text boxes and tables) that you can insert into the document.
•
Inspector shows aspects of your document, such as all the bookmarks, or all the images.
•
Favourites shows favourite shortcuts for styles or menu commands. For more information, see
Appendix B: Configuring Jutoh.
Getting help
There are various ways to get help in Jutoh.
The help window containing the Jutoh manual is shown when you click on the Help button on the
toolbar, or type Ctrl+H, or use the menu command Help | Contents. Use the same command to close
it again. The help window shows in the main window – if you want to close it, maximize it to take up
the whole main window area, or unpin it to show it as a separate window, use the buttons at the topright of the help window (circled in red in the picture below). If you’ve maximized it, you can use the
same button to restore it back to its normal size. You can drag an unpinned help window back to the
main window by moving it until a blue rectangle appears near the edge of the main window, and then
dropping it. The help window itself has controls for showing or hiding the help contents, changing the
text size, and navigating around the help.
21
CHAPTER 3: THE JUTOH USER INTERFACE
Maximized help within the Jutoh window, highlighting the window management buttons
Jutoh has a fast search facility, which you can access from the main toolbar or from under the help
window itself. Here’s a screenshot of the help facility showing a help topic, a list of matching topics,
and the controls to limit the topics that Jutoh searches. You can close any of these windows to see more
of the help topic.
22
CHAPTER 3: THE JUTOH USER INTERFACE
Jutoh help search controls
Most Jutoh dialogs have a Help button which shows the relevant help in a further dialog, and not in the
main help window, so you don’t have to return from the dialog to see the help.
Also, you can use the F1 key to get help on the control that currently has the focus; on Windows, you
will often see a little question-mark icon at the top of a dialog. You can click that, and then on a
control, to see a tip explaining the purpose of the control.
23
CHAPTER 3: THE JUTOH USER INTERFACE
On the main window (only), you can use the Help | Describe Window command and then click on a
window to show a tip with explanation about the window, with a link to click for more information.
Project properties dialog
You’ll be using this dialog a lot, because it allows you to edit all sorts of project information, including
metadata (the description of the book), formatting styles, the cover design, and (using configurations)
behaviour specific to each format that you wish to generate. You can show this dialog using the Edit
button on the toolbar, or the View | Project Properties menu command, or the Alt+Enter keyboard
shortcut.
Project Properties dialog
Customising the user interface
These are the main options for tailoring Jutoh to your preferred way of working.
•
Close windows – use the X button to close panels such as the Organizer, Control Panel or Log
24
CHAPTER 3: THE JUTOH USER INTERFACE
Window. Show them again from commands on the View menu.
•
Rearrange tabs windows – drag a tab to the left, top, right or bottom of the window associated
with the tab, to split the tabbed area and see more information at once. These changes won’t be
restored on restarting Jutoh.
•
Add or remove toolbar buttons – right-click on a toolbar to get the customise dialog, or use
View | Customise Toolbars.
•
Add or change keyboard shortcuts for menu commands, formatting styles, and symbols – use
View | Customise Shortcuts. This interface is also used for adding menu items to the optional
Favourites menu on the formatting toolbar – check Favourite for each shortcut item to be
included in the menu.
•
Change settings in the Preferences dialog (click the Options button on the toolbar, or View |
Preferences on Windows and Linux, or Preferences on the application menu on Mac). You can
choose whether to show a tip on startup, change the display language, set the width and
surrounding colour of the edit window, and various other options that change the display and
behaviour.
•
Show Jutoh full-screen. If you are short of screen space or simply want to temporarily reduce
clutter, you can use F11 or the View | Full Screen command to remove the title bar, menu bar
and main toolbar. Press F11 again to restore normal viewing.
For more information on customising Jutoh to suit your preferences, see Appendix B: Configuring
Jutoh.
Summary
In this chapter, we’ve seen more detail about the various parts of Jutoh that allow you to work with
your projects. Next, we will help you achieve mastery over your projects, including how to manage the
individual documents that they contain.
25
Chapter 4: Working With Projects
In this chapter, we’ll get to grips with how projects and documents within them are managed. It’s worth
reading so you have a model of how Jutoh will handle your material and what you are able to do within
a project. When using Jutoh, if you find the way documents work confusing, you might want to come
back and re-read this chapter.
Overview
A Jutoh project contains a hierarchy of documents, some of which will be used to create your ebook. A
document is a piece of information such as a book section, a text note, a picture, a shortcut to a file on
your local disk, or a web link. Why might you add documents that are not part of your book, I hear you
asking? Well, you may have textual or pictorial research that you want to store with the project, or
perhaps you want to keep a note of what ebook sites you have uploaded the book to, and when.
However, you don’t have to use any other kind of document apart from the book section. The different
document types are listed towards the end of the chapter.
The project is shown in the project outline window within the Organizer:
The Project Outline Window
Each document is displayed by clicking on its title in the project outline. Depending on your current
settings, the document will be shown in a new tab or an existing tab in the document area. You can
change this in Preferences under Project/Document Preferences, and determine which document
types will be shown in separate tabs. You may prefer to reuse a tab per document to avoid having to
manage a lot of tabs.
26
CHAPTER 4: WORKING WITH PROJECTS
You can drag a tab to an edge of the document area to split the tabs and show multiple documents
simultaneously. Drag the tab back next to another tab to go back to viewing one document at a time.
You can close a tab using the X button. This only closes the view of the document, and doesn’t delete
it. If you right-click over a tab, you will see a menu with tab-management commands such as Close
Other Tabs. This is very useful if you have a large number of tabs open.
Note that under the special Content folder, you should only create Book Section documents. Any
other sort of document will be ignored, including folders.
Creating and deleting documents
If you import an existing document, Jutoh will already contain one or more book section documents.
However you may wish to create further documents, or you may wish to create a project from scratch
consisting of several chapters.
When you create a document, where it goes depends on what document is currently selected. If you
have selected a folder, it will be added as a child of the folder. Otherwise it will be created as a sibling
of the selected folder.
You can use one of the following methods for creating a new document:
1. Click items on the Document menu.
2. Use a keyboard shortcut, such as Ctrl+Alt+B to create a book section.
3. Click on the document button on the toolbar and choose an item from the drop-down menu. The
document button looks like this:
Most frequently, you’ll be choosing Book Section from the
menu.
4. Right-click in the project hierarchy and select New Document from the menu. Now choose
your document type and title in the New Document dialog that shows.
5. Auto-paste by copying some data in another application, twice in quick succession (Windows
only).
Now click on the title of the new document and enter the new page title.
You can delete a document by selecting in the project outline, and hitting the Delete key or rightclicking and selecting Delete. Note that this operation cannot be undone.
Moving documents
You can move a document in the project outline by dragging it to a new position using the left mouse
button. If you drop the document onto a folder, the document will be placed inside the folder.
Otherwise, the document will be inserted in front of the drop target. You can veto insertion into a folder
by holding down the control key as you drag, and you can force adding the document as a child by
holding down the shift key.
If you need finer control of where you move documents, you can use the cut and paste method. Rightclick over the document you wish to move in the project hierarchy, and select Cut from the popup
27
CHAPTER 4: WORKING WITH PROJECTS
menu. Now go to where you wish to move the document, right-click again, and select Paste Before
This Scrap, Paste After This Document or Paste As Child of this Document.
Managing project files
Each project file contains all the data needed for generating the ebook, including all book sections,
style sheets, the cover design, configurations and project-wide options. You can save and open project
files as you would any word processor file, and you can open multiple projects simultaneously within
Jutoh if you enable the View multiple projects option in Preferences (the Project tab). This will
allow you to copy and paste between projects.
As well as using the Open toolbar or file menu command, you can double-click in the list of
Favourites (a tab next to the Projects tab). Or you can browse for the required project using the
Explorer tool (next to Favourites). You can also use the File | Recent Projects menu. Yet another
method is to double-click on the file in your operating system’s file manager, and more techie users
might want to invoke Jutoh from the command line passing the project file name.
If you make a project edit, such as adding a new document or editing project properties, an asterisk will
appear next to the project name in the title bar until the project is saved. If you edit an actual document
such as a book section, an asterisk will appear next to the document title in the title bar. To save both
document changes and any project changes, use the Save button, File | Save command, or type Ctrl+S.
By default, Jutoh will create a backup file (a file with jutohbak appended to the name) before opening
the file, so if there is a problem, you can revert to the backup. Jutoh also regularly auto-saves any data
that hasn’t yet been manually saved so if there is a computer crash it can restore the data the next time
you open the project. This auto-save data is stored within the original project file. However, computer
software and hardware can and does go wrong, so don’t forget to back up your files frequently,
preferably to multiple locations. You can use Jutoh’s own simple archiving and backup facility if you
wish (see File | Manage Backups and the description in the manual) but this is not automated.
If you find your project file getting a bit big, especially after a lot of editing and deletions, you can try
compacting it. In Preferences, click on Project, then on Project Maintenance. Click on the Records
tab, then Delete Orphans. Click on the Project tab, and then on Compact Project. All Jutoh data is
kept in database tables and as data is changed, added and deleted, the database can become fragmented,
so occasional compacting is necessary, like defragmenting a hard disk.
Where is my project?
If you have opened the project using a method that didn’t require you to specify the whole file (for
example, File | Recent Projects) you might not know the location of your project. To find out, just
click on the Edit button (Book | Project Properties) and then click on the Info tab. This tells you the
name of the project, the folder, and what version of Jutoh was used to last save it. You can click on
Show Folder to show the containing folder using your operating system’s file explorer.
Document types
The following document types may be created in Jutoh. Only create book section or fixed layout page
documents under the special Content folder; but you can create any kind of document elsewhere in
28
CHAPTER 4: WORKING WITH PROJECTS
your project.
Book section document
A book section document represents a part of an ebook: for example, a chapter, a title page, or a table
of contents. A book section document is similar to a text document, allowing styled text editing, but has
its own property editor dialog with options relating to Epub generation and inclusion within an ebook
depending on format.
Fixed layout page document
A fixed layout page document represents a page (or double-page spread) in a fixed layout project.
Text document
A text document lets the user type a text note. This is useful for storing information that shouldn’t be in
the book itself, such as planning notes for your book, or a list of corrections to be applied, or maybe to
keep track of the sites to which the book has been submitted. Typically you’ll add these under the
Scraps folder.
Folder document
The folder document allows you to group your documents as you wish. For example you might have a
Web Links folder, and a My Photos folder. Note that while folder documents are particularly suited to
containing further documents, in fact any document may contain children. Don’t create folder
documents under your book Content folder – this may only contain book section documents.
Image document
Use these to store images that won’t appear in the book, perhaps for research purposes. You can create
an image document from an image on the clipboard, with Edit | Paste New Scrap (Ctrl+Alt+V). Or
you can create a new image document and then paste the image into it with Ctrl+V or Edit | Paste.
You can also resize the image and use a different format from the default format (PNG) using the
image properties. Note that Jutoh normally saves images in full color, so it is best to use the
compressed JPEG format for large images. JPEG images are saved at 90% quality, but try not to load
and save JPEG images repeatedly or the image will degrade.
Web link document
A web link document contains a web address (or URL), and an optional description. These won’t form
part of the book.
Shortcut document
A shortcut document contains the location of a document or application on your computer. Again, these
won’t form part of the book – they are for your reference only.
Font document
A font document contains a TTF or OTF font for embedding in an ebook. The font data is stored within
29
CHAPTER 4: WORKING WITH PROJECTS
the project file and copied to the book when compiling. Embedding fonts is beyond the scope of this
document, but you can find details in the Jutoh manual. It is recommended that you don’t embed fonts
and that you only use basic fonts such as Times New Roman, which is guaranteed to be supported on
all ebook readers.
Media document
A media document contains an audio, video or image file for use in a media object. Embedding media
objects is beyond the scope of this document (not least because few ebook platforms support embedded
media). If you are determined to embed media (for example, if only targeting iBooks Epub books) you
can find details in the Jutoh manual, and also a brief description in Chapter 24: Advanced Topics.
Source code document
A source code document stores HTML, JavaScript or CSS code. The file is stored within the project
file and copied to the book when compiling. Most users won’t need this kind of document since Jutoh
generates code from sections in your book, but sometimes it’s helpful to include additional code, for
example to update documents dynamically via JavaScript to implement a built-in quiz. At the time of
writing, only iBooks allows this, but it will become more prevalent with the widespread adoption of
Epub 3.
So that most users are not exposed to more complexity than necessary, source code documents can only
be created and edited in Jutoh Plus. Standard Jutoh can still open, save and compile projects containing
source code documents. For more information, please see the Jutoh Plus guide at
www.jutoh.com/jutohplus.htm.
Summary
In this chapter you have learned how projects and documents work. It was probably filed in the ‘boring
but important’ drawer in your brain. Next, we look at how you can get your existing work into Jutoh.
30
Chapter 5. Importing Files
In Chapter 2: Getting Started, we briefly showed how to import an existing file into Jutoh. In this
chapter we will cover this aspect in more detail, including what the best import format is and why.
What can Jutoh import?
Jutoh can import from several different kinds of file, but with varying quality depending on the format.
These are the supported formats:
•
Microsoft Word XML (DOCX): this has been Microsoft Word’s native file format for some
years, but older versions of Word can still be made to open and save DOCX – see the
Introduction for more information.
•
OpenDocument Text (ODT): this is the native file format of the free OpenDocument.org
Writer and LibreOffice Writer word processors.
•
Plain text: Jutoh can import from a plain text file or folder full of text files, though there will be
no fancy formatting initially, since there is none in the original text.
•
HTML: Jutoh can import in a limited way from HTML; some formatting will be lost, although
of course most can be put back by applying styles within Jutoh.
•
Epub: Jutoh can import from an existing Epub file, with the same HTML restrictions as
mentioned above.
Although Jutoh can import from these formats after a blank project has been created, it’s usually best to
import within the New Project Wizard because the wizard helps you split the file into sections.
Because Jutoh’s representation is different from each of the native file formats, it’s inevitable that some
information will be lost in translation, for example fancy Word table borders, but you should rarely find
that this is a problem.
Let’s look at the input formats in more detail, and how to import from each format in the Jutoh New
Project Wizard.
Microsoft Word XML (DOCX) and OpenDocument Text (ODT)
The majority of users, especially on Windows and Mac, will probably have their manuscript in
Microsoft Word format. If you’re using Linux, you’re more likely to have an ODT file. ODT format
originally started as SXW (the native format of StarOffice which became OpenOffice.org). Now it’s a
recognised international standard and supported in other word processors including recent versions of
31
CHAPTER 5. IMPORTING FILES
Microsoft Word. If your word processor doesn’t support ODT, then you can download a copy of
OpenOffice.org for free and use it to convert from what your word processor outputs, to ODT. You
might save from your word processor in RTF, for example, before loading it into OpenOffice.org and
saving as ODT.
Jutoh recognises the styles, footnotes, index entries and bookmarks in an ODT or DOCX file and
therefore these are the best formats to use for getting your existing book into Jutoh.
These are the steps to take when importing a DOCX or ODT file. First, use File | New Project or the
New toolbar button to create a new project.
Steps 1-3: enter metadata, a project location and layout choice as per Chapter 2: Getting Started.
Step 4: you can leave the import and style options as they are. However, you may wish to adjust the
Resize images to max option if you want pictures to be resized differently than the default (or not
resized at all – resizing can be done at book generation time). Also, page breaks will be removed from
the imported file by default, since book sections imply page breaks. Change Remove any page breaks
if you need to retain page breaks.
32
CHAPTER 5. IMPORTING FILES
Step 4: import and style options
Step 5: in the Import Method page, click on From an existing file containing all sections and specify
the ODT file to import from.
33
CHAPTER 5. IMPORTING FILES
Step 5: specifying the import method and file
Step 6: in the Single File Import page, tell Jutoh how to split the file into book sections, which is
important for an ebook. You can split the file using one of three methods:
1. By style: specify the heading paragraph styles that indicates the start of a section. Specify an
asterisk to match against multiple styles, and separate multiple heading style patterns by the pipe
character (‘|’).
2. By pattern: specify a pattern to match against heading text. For example, you might label each
chapter with the prefix “Chapter”. Again, use an asterisk to indicate multiple characters to
match, for example “Chapter *”.
3. Using page breaks: Jutoh will use page breaks to split the document.
34
CHAPTER 5. IMPORTING FILES
Jutoh will show a preview of some of the section headings it has found based on your current split
settings. It will make an initial guess. If you cannot persuade Jutoh to find suitable split points, you can
split your book sections manually later. Or, you might decide it’s easier to edit the original ODT file to
let Jutoh find split points. In this case, you can click on Back and then Next again to have Jutoh reread
the changed ODT file.
You can also adjust a few other options, such as removing unused styles (the default), and discarding
empty paragraphs (also the default). But the defaults are usually best.
Step 6: splitting the document
Step 7: in the final page, you can choose a cover design, either one of Jutoh’s templates or an existing
image file. Click on Templates to see the selection of designs available, or click Design to edit the
design using the cover designer (see Chapter 8: Creating Your Cover Design). You can of course
35
CHAPTER 5. IMPORTING FILES
change your mind about the cover design at any time after you’ve created your project, so it doesn’t
matter too much what you choose in this page.
Step 7: choosing a cover
Now press Finish, and the ODT file will be imported, and (if possible) split into separate sections.
Your usual word processor may have hidden your use of ad hoc formatting; for example, it
might have reported “Normal” in its style list when actually you had applied ad hoc styles such
centring and paragraph spacing to that basic style. In Jutoh, you’ll see ad hoc formatting
reflected in automatic styles in the style list – that is, styles containing a ‘+’ symbol such as
“Normal + Centre Alignment”. You are strongly advised to replace ad hoc formatting with
named styles, as detailed in Chapter 12: Working With Style Sheets.
36
CHAPTER 5. IMPORTING FILES
If not all images are imported from your ODT file, it may be because they are in a nonstandard format called SVM. Jutoh (and most other applications) are unable to convert these, but
if you save your original file as an HTML file from your word processor, writing GIF files, then
when importing from ODT Jutoh will try to substitute any missing SVM image files with the
GIF files. Another solution is to insert the original images from files instead of pasting from the
clipboard; or copying and pasting the missing images into Jutoh manually.
Plain text
Plain text can contain no formatting, and also generally doesn’t contain an indication of what ‘character
encoding’ it has been written in, which is the key for an application to interpret how the data is
converted to actual characters. The encoding is therefore specified by the user when importing. In
general, UTF-8 is the best encoding to use when saving from a word processor since it can handle any
language.
If you specify a folder of text files, each file will be used for a separate Jutoh section. If you specify a
single text file, Jutoh will take you to a wizard page that lets you choose criteria for splitting up the file.
You may wish to edit your original text file to make it easier for Jutoh to split it into sections – for
example, labelling each chapter “Chapter...”, or adding a separator between chapters, such as “---”.
The steps for importing text are mostly the same as for ODT above, the main difference being the
Single Text File Import page that appears after you have chosen your text file.
37
CHAPTER 5. IMPORTING FILES
Splitting a text file
In this page you can specify a pattern to identify the start of chapters, including asterisks to denote
‘match zero or more characters’. If you need to match actual asterisks, prefix them with a backslash;
for example to match “***” you can write “\*\*\*”.
You can also choose between the following mutually-exclusive options for telling Jutoh more about the
matched text:
•
The matched line is the chapter heading: choose this if your chapters are easily identifiable,
as in the above example.
•
The next line is the chapter heading: choose this if the text being matched is simply to denote
a division (for example, “---”) and the next line contains the actual heading.
38
CHAPTER 5. IMPORTING FILES
•
There is no chapter heading: choose this if there is no chapter heading, just sections separated
by some matchable text.
Check Remove lines matching pattern if you don’t want to keep section separators, such as “---”.
Don’t check this if you’re matching against chapter headings.
Specify the Import encoding to match the encoding of the text file, as used by the tool that created the
text file originally. Usually UTF-8 is the best format to use.
If you want to change the styles that Jutoh applies to the imported text (for initial paragraph,
subsequent paragraphs, and section headings), you can change them in the Import and Style wizard
page (see Step 3 above).
If you have a number of text files, one per chapter, you can select the folder instead of a single file, and
you will be presented with the File Conversion Options page:
39
CHAPTER 5. IMPORTING FILES
Multiple-file conversion options
You can specify whether to take the title from the first line of each file, and the file encoding. You
don’t have to tell Jutoh how to split the content because it’ll simply create one section per found file.
HTML
Jutoh can import from a single HTML file, or a folder of several. As with plain text import, Jutoh will
allocate a section per HTML file if importing from a folder; if importing from a single file, the same
options will be presented as per DOCX or ODT import, allowing you to specify a pattern to use for
recognising individual sections.
As already mentioned, HTML does not preserve all formatting, because it can only do a basic job of
converting CSS (HTML styles) to Jutoh styles. CSS works very differently from Jutoh styles, so there
can never be an exact conversion. You can either clean up the content and styles after import, or you
40
CHAPTER 5. IMPORTING FILES
can clear the option Import basic CSS from HTML/Epub and specify the styles for the first and
subsequent paragraphs after each heading. This way, you can use import as a kind of cleanup
mechanism, to convert complex HTML to a simple Jutoh project (and then back to
HTML/Epub/Mobipocket).
Jutoh will attempt to read any images in the HTML. Footnotes and alphabetical indexes will be
imported as standard HTML implemented using links since HTML does not define these explicitly. If
you need these to be preserved, use DOCX or ODT import.
Where an HTML link defines both an anchor and a reference in the same “a” tag, a bookmark symbol
is generated just before the linked content, since Jutoh can’t handle both simultaneously. This will be
generated as an empty bookmark followed by the linked content.
Epub
You can specify an Epub as a single file in the New Project Wizard. Since Epub files contain HTML,
the same import restrictions apply as for HTML. However Jutoh will be able to recreate the structure of
the Epub accurately, and will use the metadata it finds in the Epub.
Importing into an existing project
You can still import from text, HTML, DOCX, ODT and Epub at any time after initially creating your
project, using the File | Import command. However, you will not be assisted in splitting up your
imported file; you will need to do it manually, for example with Edit | Split Document, except for
Epub files which will use the found structure and will give you the option to import the whole Epub
under a new folder – useful for merging several volumes into one book.
Reimporting
Jutoh makes it easy to duplicate an initial import operation, for example if you changed the original file
or decided to use different settings. Use the File | Reimport Project command to show the New
Project Wizard using the same default settings as you used originally, deleting the current project
content before importing the file again.
Summary
In this chapter you have learned how to import your existing work. Next, we delve into the details of
editing and formatting content.
41
Chapter 6: Editing and Formatting Content
Jutoh is not just a way of converting existing files to ebooks: one of its major strengths is the ability to
edit and tweak your book before creating the ebook in the desired format(s). In this chapter we’ll learn
how to edit and format your book’s text and graphics.
Why divide a book into sections?
First, a quick word about why Jutoh projects, and ebooks in general, are divided into sections. A
section can be a chapter, a title page, a table of contents, and so on. Most ebooks are comprised of
sections rather than being one enormous chunk like a Word document. One reason for this is because
some ebook readers, with their restricted memory, simply can’t cope with large chunks of text; or if
they can, slow down when loading and paging through such a book. Another reason is that it is is easy
to compile a table of contents for a book that’s divided into sections (though Jutoh can also look inside
sections for headings if required). Via section properties, you can tell the ebook reader that a section is
a table of contents or other kind of section, which you couldn’t do if it was buried inside one huge
section. Finally, you’ll find it easier and faster to navigate and edit a book divided into sections.
If Jutoh didn’t split up your book when importing, you can do it manually, one split at a time. Place the
cursor on the paragraph you wish to be at the start of a new document, and use the command Edit |
Split Document. If you change your mind, you can’t undo this with Edit | Undo, but you can join this
document with the next one using Edit | Join Document. If the new document was inserted at the
wrong place, you can drag it into the correct position.
You can edit the title of a particular section by clicking on the title above the editor, as shown in the
illustration below, or using the Rename command on the project outline’s context menu (right-click to
see it). This title will be used in the automatic table of contents.
42
CHAPTER 6: EDITING AND FORMATTING CONTENT
The clickable section title
Basic content editing
When you click on a book section in the project outline, or create a new book section with Document |
Add Book Section Document, you are presented with the Jutoh editor. You can use this just to review
the content in your book, or you can edit the text, graphics and formatting. Many of the editing
keystrokes will be familiar from other editors, though there will be some differences. Here are the more
important keyboard and mouse operations:
•
Use the arrows to navigate a character or line at a time. Hold down the control key to move a
word at a time.
•
Use Page Up and Page Down to move up and down a page at a time. Home and End move to
the beginning and end of the line respectively; hold down the control key (command key on
Mac) to move to the start or end of the whole section.
•
Use Shift+Enter to insert a line break character within a paragraph. Use this sparingly, if at all,
since it can be confusing to edit paragraphs containing line breaks.
•
Hold down shift with a navigation key to select content; you can use Ctrl+A to select all text in
a section.
•
Use double-click to select a word, and drag the mouse to select a region of text. Several separate
areas of selection are not supported.
•
In addition to the toolbar buttons and menu commands, you can use Ctrl+C to copy text, and
Ctrl+V to paste text. To move text, you can use Ctrl+X to cut and Ctrl+V to paste.
•
Use Edit | Paste Unformatted Text to strip formatting out of the text you are pasting, useful if
the original formatting is not applicable to the current context.
43
CHAPTER 6: EDITING AND FORMATTING CONTENT
•
Use Ctrl+Z to undo an operation, and Ctrl+Y to redo it.
•
Use the drop-down style control on the editor toolbar to apply paragraph styles – more on that
later.
•
Click on objects such as images to edit their properties, or use the properties command such as
Image, Box, or Table on the context (right-click) menu.
Some editing commands are also available on the context menu, which appears when you right-click
over the editor (control-click on a Mac).
You can change the size of the text for editing purposes (not the actual book text size) by clicking on
the
tool on the toolbar and then selecting Larger or Smaller, or you can go to the Appearance panel
in the Preferences dialog and change the text size in Font for text documents. In this panel, you can
also change the default text foreground and background colours and the maximum size of the editor
window.
You can use the tools in the Formatting Palette for applying styling and inserting objects:
The Tools page in the Formatting Palette
The tool buttons are equivalent to commands on the Format menu.
44
CHAPTER 6: EDITING AND FORMATTING CONTENT
Formatting text
If possible, text formatting such as font family, size, colour, bold and so on should be defined using
named styles (see later in the chapter) and not on an ad hoc basis, sometimes called ‘direct formatting’.
However, sometimes it’s convenient to change the formatting directly, for simple styling. You can
select a span of text and use toolbar buttons or the Format | Character command which gives you
size, colour, weight, style and other options, as shown below:
The font dialog
If there are currently no formatting attributes defined for the span of text you have selected, or there are
no common attributes for the whole span, you will see that all controls have an ‘undefined’ appearance,
as in the screenshot. This means that the text will inherit whatever attributes are defined in the
paragraph. If you choose a particular attribute, such as font name, then only that attribute will be
applied when you press OK. If your span of text has a particular attribute, such as colour, you can clear
that attribute by clearing the checkbox or choosing “(none)” or clearing the control value, depending on
the attribute in question.
If you want to remove all formatting for a span of text, then you can use Format | Text | Reset Text
Formatting instead of the font dialog. You can select the text whose formatting is to be cleared, or you
can click within the formatted text and Jutoh will remove the surrounding formatting. If there is no
45
CHAPTER 6: EDITING AND FORMATTING CONTENT
character formatting at this position, Jutoh will remove the paragraph’s direct formatting.
Formatting paragraphs
As per spans of text, paragraphs should be formatted using named styles if possible, which we’ll cover
below. But if you need to apply direct formatting, you can use the command Format | Paragraph.
The paragraph formatting dialog
The paragraph formatting dialog contains a Font page as per the character formatting dialog, because a
paragraph style specifies a font, which character formatting can override.
The Indents & Spacing page will be the one most frequently used when formatting paragraphs. You
can change some of these properties more directly using tools in the Formatting Palette. The alignment
and spacing values are discussed shortly.
Special symbols
Jutoh supports most left-to-right languages using Unicode, and you can insert special symbols in
several ways:
•
Use the Format | Insert | Symbols | Symbol (Shift+Ctrl+Y) command to show the symbol
46
CHAPTER 6: EDITING AND FORMATTING CONTENT
selector dialog containing all the Unicode symbols (see the screenshot below).
•
Using View | Auto-Replace Preferences, define symbols that will be inserted when you type a
particular piece of text followed by space or paragraph return. For example, by default typing
three dashes followed by a space will cause Jutoh to insert an em-dash (—). For more
information, see Appendix B: Configuring Jutoh.
•
Define a symbol as a keyboard shortcut and/or favourite, using View | Customise Shortcuts. A
favourite is a style, command or symbol that is defined as a shortcut and also has its Favourite
option checked. It will then appear on the
Favourites toolbar button. (If this button is
switched off, you will need to enable it using toolbar customisation.) For more information, see
Appendix B: Configuring Jutoh.
The symbol selector dialog
Note that not all ebook readers support non-English Unicode character sets using their default fonts. To
show, say, Romanian diacritics in Adobe Digital Editions, you need to embed a suitable Unicode font
(for example, DejaVuSans), and specify a font substitution in your configuration the embedded font is
used. For more on embedding fonts, see Chapter 24: Advanced Topics.
Pictures
You can insert pictures into your document with Format | Insert | Picture (Shift+Ctrl+C), or simply
by pasting a picture from the clipboard. If you use the insert method, the picture will be stored in the
original file format; if you paste from the clipboard, the picture is stored as a PNG. By default Jutoh
will convert pictures to JPEG when you actually generate the ebook, so you don’t generally need to
47
CHAPTER 6: EDITING AND FORMATTING CONTENT
worry about inserting a format that’s compatible with Epub or Mobipocket at time of insertion.
If you insert a picture that’s very large (in dimensions, not file size), Jutoh will resize it at the time of
insertion. You can switch this off, and change the maximum size, using the Resize images to max
setting in Import Preferences.
A picture is normally shown and edited in Jutoh as simply a character in a paragraph. Typically, a large
picture will have its own paragraph. You can adjust properties by clicking on the picture: you can set
the relative or absolute picture size or maximum size, whether the image will float to the left or right of
other content, margins, alternative text and more.
We’ll go into more detail about images and how Jutoh optimizes them for ebooks in Chapter 10:
Working With Pictures.
Page breaks
The ebook reader software will cause page breaks to appear between sections (such as chapters), so you
don’t need to insert a break at the start of each section. If you need page breaks to appear within a
section before a particular a paragraph, put the cursor on that paragraph and use Format | Insert | Page
Break (Shift+Ctrl+E). To remove a page break, use the same command again. A dotted line will
appear before the paragraph indicating the location of the break. How page breaks are interpreted
visually is up to each ebook reader.
Non-breaking spaces and hyphens
You can insert non-breaking spaces and hyphens with Format | Insert | Symbols | Non-Breaking
Space (Shift+Ctrl+Space) and Format | Insert | Symbols | Non-Breaking Hyphen (Shift+Ctrl+-).
The non-breaking space is inserted as a Unicode character (160) but since some fonts can’t display the
non-breaking hyphen character (8209), this is inserted as an object. If you enable the configuration
option Convert non-breaking hyphen to hyphen, Jutoh will generate HTML with a regular hyphen and a
span that prevents breaking, to be compatible with more Epub viewers. This is unnecessary for
Mobipocket.
Some Epub viewers do not support a non-breaking horizontal bar, which is essential punctuation for
Spanish. So if you are writing Spanish, you may wish to enable the configuration option Convert
horizontal bar to em dash. This converts the horizontal bar (Unicode 8213) to an em dash (Unicode
8212) and adds a non-breaking span. For the non-breaking behaviour to work, the bar and non-space
character to the left or right of the bar must be formatted in the same (or no) character style. (Note that
when we talk about conversion, we are referring to the final generation of the ebook from the Jutoh
content, not file import. So you can retain the horizontal bar in your Jutoh content and decide at any
time whether or not to have it appear as an em dash in your book, without any permanent replacement
of the original symbol).
You can also set the configuration option Styles suppressing hyphenation. This is a pattern matching all
styles that should suppress hyphenation; the default value is ‘Heading*’, thus suppressing hyphenation
for all headings. You can separate multiple patterns with the pipe (‘|’) character.
48
CHAPTER 6: EDITING AND FORMATTING CONTENT
Horizontal rules
To add a horizontal rule, for example to indicate a division between scenes within a narrative, use
Format | Insert | Horizontal Rule (Shift+Ctrl+B). You will see an object like this:
You can click on object to change properties such as width and colour. These properties won’t be
reflected within the Jutoh editor, but will be output to the Epub or Mobipocket book.
Bookmarks
You can mark text or a picture with a named bookmark so that a link can point back to it. Use Format |
Insert | Links | Bookmark and give the bookmark a unique name, consisting only of alphanumeric
characters and underscores. If you select content first, the bookmark will be associated with that
content. No extra formatting will be shown, but the cursor will change as you move over it and you will
be able to click on it to show the bookmark dialog. If you don’t select content first, a bookmark object
will be placed at the cursor, like this:
Note that you don’t need a bookmark for a link to point to a whole section, only if you need to be able
to refer to a specific point within a section.
Another type of bookmark is the object identifier. This is the ‘Id’ property in the Advanced page of the
property dialog for paragraphs, text fragments and most objects. You can set the identifier for a
paragraph using Format | Paragraph, and the identifier for a text fragment with Format | Character.
However a more reliable method of setting the identifier for a text fragment (since styling can break a
span of text into separate pieces) is to bracket the text with the ‘span’ tag object: see Chapter 16:
Working With Tag Objects and Chapter 17: Adding Narration To Your Book.
A convenient way to show all the bookmarks in your current book section is to use the Inspector tab in
the Formatting Palette, and select Bookmarks from the drop-down list. You can then click on a
bookmark in the list to highlight that bookmark in the editor.
Links
To insert a link within the book, use Format | Insert | Links | Link to Page (Shift+Ctrl+G). You will
be shown a document browser – select a section document and, if you wish, a bookmark within that
section. To edit or remove the link, just click on the linked text.
To insert a URL (an external web site address), use Format | Insert | Links | URL (Shift+Ctrl+W)
and type the address.
When you create a page link or URL, the dialog will give you the option of applying a style to the
linked text. This style is mainly for editing convenience so you can easily see the links; ebook readers
will provide their own styling for links. In order not to clash with the default link styling, when
generating the ebook Jutoh will remove attributes (such as colour and underline) if they are also present
49
CHAPTER 6: EDITING AND FORMATTING CONTENT
in the ‘URL’ character style, but you can change this behaviour per configuration.
Automatic bookmarks have the prefix auto_bookmark and may be changed by the Table of Contents
Wizard. If you want to make sure that a heading retains a constant bookmark that you can link to
manually, change the bookmark to one without the auto_bookmark prefix.
You can control-click on a page link (or alt-click, on Mac) to display the document that is the target of
the link, with the bookmarked content selected.
When inserting a URL (not a page link), you normally simply specify the URL address, such as
http://www.something.com. However if you want more control (in HTML-based formats only), you
can include the entire contents of the ‘a’ tag and Jutoh will output the whole thing. The key is to
include the ‘href=’ attribute within the URL. For example:
href="http://www.something.com" onclick="return
popitup('http://www.something.com')"
In non-HTML formats, Jutoh will extract the actual URL automatically.
Footnotes
You can insert a footnote using Format | Insert | Links | Footnote (Shift+Ctrl+N), and you will be
able to edit the footnote text in a separate dialog. A footnote is represented by this symbol within the
text:
Footnotes can either be shown at the end of the section containing the footnote, or as a separate
endnotes section. The way footnotes are presented in the generated ebook is determined by settings
within the Footnotes & Endnotes tab in the Project Preferences dialog, under Indexes.
Note that a footnote is always styled with the designated footnote paragraph style setting, overriding
paragraph styles you use within the footnote editor, unless you choose otherwise in footnote settings.
For more information on footnotes, please see Chapter 11: Working With Indexes.
Index entries
If you mark your book with index entries, Jutoh can generate an alphabetical index section. Use
Format | Insert | Links | Index Entry (Shift+Ctrl+I) and enter the index entry name and, if
necessary, one or two subcategories. This symbol will be inserted into the text:
The way the the index is presented is determined by settings within the Index tab in the Project
Preferences dialog, under Indexes.
For more information about indexes, please see Chapter 11: Working With Indexes.
50
CHAPTER 6: EDITING AND FORMATTING CONTENT
Comments
You can add comments anywhere in your project, by selecting the content you want to comment on and
using the menu command Format | Insert | Comment (Ctrl+;) or the
tool. Then click on comment
object to edit it, hover over it to view the comment, or use the Inspector tab of the Formatting Palette
to list all the comments in the current document.
A comment showing its tooltip
If you fill out your user name and initials in Preferences (the General page), they will be associated
with new comments.
You can choose to include selected comments in your ebook; by default, comments are not included,
except when exporting to ODT. Comments are imported from DOCX and ODT files. For more
information, see the topic Working with comments in the Jutoh online help.
The basics of formatting using named styles
Jutoh maintains a style sheet for each project, containing named style definitions that can be used to
change formatting in your project. Each style definition (or just style, for short) specifies visual
attributes such as italics, colour, alignment, and so on.
Jutoh supports four kinds of named style:
•
Paragraph style. This kind of style applies to an individual paragraph, and you can see available
paragraph styles in the drop-down control above the editor.
•
Character style. This kind of style changes the formatting for a span of text within a paragraph.
You can apply character styles using the context (right-click) menu, choosing Styles and then
Character Styles.
•
List style. This kind of style defines how list items are formatted at each depth; the two list
buttons on the formatting toolbar simply apply two of the standard list styles (bulleted and
numbered).
•
Box style. This kind of style applies to images and text boxes, and defines attributes such as
margins, padding, border, and background colour.
You can edit these styles, and add new ones, using the Styles page in the Project Properties dialog; or
51
CHAPTER 6: EDITING AND FORMATTING CONTENT
you can use Format | Edit Styles. Style changes will be applied to any open documents as soon as you
close the dialog.
Whatever the formatting you apply, Jutoh must always be able to relate it to a named style. So if you
use ad hoc styling, such as applying centred alignment using the toolbar, Jutoh will create a new
automatic style (or find a suitable existing one), for example ‘Normal + Centre Alignment’. These
automatic styles are maintained with each book section document and you can’t edit or delete them
manually.
I cannot emphasize enough how important it is to use named styles, not ad hoc styles or automatic
styles, wherever possible. This will make it far easier to maintain a consistent format for your book,
since then when you need to change the presentation you may only need to change the named styles,
and not every relevant paragraph. Also, it makes it easier Jutoh to perform tasks such as table of
contents creation because it can search for specific paragraph styles. Having said that, it’s probably not
worth maintaining and applying separate styles for occasional use of bold or italics.
When Jutoh creates a new project for you, it creates a default style sheet with such styles as ‘Body Text
First Indent’, ‘Heading 1’ and ‘TOC Entry 1’. Some of these styles (such as ‘URL’) are used by
features in Jutoh, in the case of ‘URL’ for applying a link style in various situations, for example in a
generated table of contents or for a page link. So it’s best not to delete the standard styles unless you
really know what you’re doing.
The following lists the styles that are added by Jutoh. The asterisked styles should not be deleted, and
the other styles can be replaced by custom styles in various dialogs – but you may wish to play it safe
and not delete any of them. By default, certain standard styles will be restored when opening a project.
You can turn this behaviour off via Options in Project Properties, by clearing Restore missing
standard styles.
•
Body Text
•
Body Text First Indent
•
Bullet List 1 *
•
Citation
•
Centre
•
Comment
•
Drop Caps
•
Endnotes Group
•
Endnotes Heading
•
Headers
•
Footers
•
Footnote
•
Heading 1...6
52
CHAPTER 6: EDITING AND FORMATTING CONTENT
•
HTML *
•
HTML Text *
•
Index Entry 1...3
•
Index Group Heading
•
Index Heading
•
Normal *
•
Numbered List 1
•
Preformatted
•
Right
•
Small Caps
•
TOC Entry 1...6
•
TOC Heading
•
URL *
Since you can have multiple style sheets in a project, the style sheet that’s being used and edited at any
given moment is the one that’s specified in the Style sheet property of the currently selected
configuration. You don’t need to concern yourself with that if you will only be using the default style
sheet, but it’s worth bearing in mind in case the Style sheet property is changed accidentally.
When you’re starting a project, think about what styles you’re likely to need, and if necessary create
them. A bit of foresight here will save you time later compared with simply applying ad hoc styles.
Using the formatting palette to apply styles
The formatting palette provides a convenient way to understand, apply and modify the styles in your
project. The palette shows a list of styles to the right of your document, similar to the Styles and
Formatting pane in Microsoft Word. In this picture below, the ‘Heading 1’ style is being shown, and
there’s a description of the details of the style at the bottom:
53
CHAPTER 6: EDITING AND FORMATTING CONTENT
The formatting palette and context/‘More’ menu
You can show or hide the formatting palette using the command Format | Formatting Palette or
Alt+P; then click on the Styles tab. There are four other tabs in the palette. The Tools tab shows all the
available tools that are also shown on the horizontal toolbar; Objects lists the objects that can be
inserted, such as bookmarks, tag objects and tables; Inspector shows selected kinds of content in the
current document, such as bookmarks and images; and Favourites shows any styles, commands or
symbols that you may have marked as favourites in the shortcut editor (see the next topic).
The formatting palette will only be presented when a document of the appropriate type is being edited;
it will also disappear temporarily if you are using the built-in help window, to reduce clutter.
The style that’s highlighted in the list is either the one where your cursor is currently positioned, or the
54
CHAPTER 6: EDITING AND FORMATTING CONTENT
style you have selected in the list with the mouse or keyboard. You can single-click on the styles
without worrying about changing your project accidentally; this lets you browse the styles and read
descriptions of them in the pane under the list.
To apply a style, double-click on the style name. A menu appears when you click on More or rightclick over the style list (or press the context menu button on your keyboard, if there is one). This menu
contains commands for editing the current style, clearing formatting in the current paragraph, showing
and hiding the style description pane, managing your styles (showing the Project Properties dialog with
the Styles page selected), and creating new styles.
The Clear Formatting menu command works like Reset Text Formatting in the Format menu, if
you have selected some text: character styling within the selection will be removed. It’ll also reset
character styling surrounding the cursor if you haven’t selected anything. However if there is no
selection and no character styling under the cursor, it will remove ad hoc (direct) formatting from the
paragraph. So, for example, ‘Body Text + Centre’ will become just ‘Body Text’. If you select multiple
paragraphs, Jutoh will remove both ad hoc paragraph and character styling.
You can choose what kind of styles appear in the list, using the drop-down control next to the More
button. By default it shows paragraph styles, but you can also show character styles, list styles, box
styles, or all styles.
Applying styles using shortcuts and favourites
Especially if you have a lot of reformatting work to do, you’ll appreciate a quick way to apply styles.
Press Ctrl+. and then Enter to start editing shortcuts for the styles in your project. Scroll down the list
of shortcuts until you get to the styles section; then edit each relevant style and choose a primary
shortcut (direct) or secondary shortcut (prefixed with Ctrl+.). You can also check Favourite to have it
appear in the Favourites menu, as described above under Special symbols. For more about this, see
Appendix B: Configuring Jutoh.
Using fonts
Ebook readers tend to have a limited range of fonts, so if possible, use as few fonts as possible. You’re
on safe ground if you use ‘Times New Roman’, ‘Arial’ or ‘Helvetica’, and ‘Courier New’. If you must
use different fonts, specify them in the named paragraph style and not on an ad hoc basis.
You cannot use fonts that happen to be on your system and expect them to turn up on someone’s ebook
reader. If you have unusual font requirements, the only thing you can do is embed a font. For this you
need to have a copyright-free font, such as fonts from the DejaVu family. Embed it by adding an
Embedded Font Document and specify a font substitution in your Epub configuration, such as Times
New Roman: DejaVuSans. For more details, see Chapter 24: Advanced Topics.
If your system doesn’t have a particular font that’s used in the project, then when the project is opened,
Jutoh will use a special global string table called Font Substitutions to try to find an equivalent font that
is available. If you use fonts not specified in this table, you can add more substitutions: go to
Preferences, click Strings, select the Font Substitutions table, and add more strings or edit existing
ones to add references to the other fonts. You can also change or disable the table that Jutoh uses via
the setting Preferences/Advanced/Font substitution table.
55
CHAPTER 6: EDITING AND FORMATTING CONTENT
If you’re using Linux, you can get the standard Microsoft fonts so that your project files are compatible
when switching between operating systems. On Ubuntu, you can find the ‘Restricted extras’ package in
the Software Centre, or use this command in a terminal window:
sudo apt-get install ubuntu-restricted-extras
Keep your main content, apart from headings, footnotes, captions etc., at 12pt – this is the point size
that Jutoh regards as the ‘default’ size, and which can therefore be left unspecified in the generated
ebook. The reader software, and user, will choose the best size. Any font above or below 12pt will be
sized relative to the default font, using the HTML ‘em’ unit. The scaling factor to convert a point size
in Jutoh to an em size in HTML can be adjusted in the Options panel in Project Properties, should you
wish to tweak the way text size is calculated.
Line and paragraph spacing
Line spacing is the space between lines within a paragraph; paragraph spacing comes in two parts:
spacing before a paragraph, and spacing after a paragraph.
To edit spacing for a named style, go to the Styles page in Project Properties (Edit on the main
toolbar). Select a style, click Edit and then click on Indents & Spacing.
Paragraph spacing is specified in tenths of a millimetre, which is converted to ‘ems’ for Epub and
HTML (see Options in Project Properties for the scaling value). Note that Mobipocket doesn’t register
spacing that’s less than 25 tenths of a mm – so if spacing isn’t what you expected, go back and check
the values.
Line spacing is specified in multiples of single line spacing, for example 1.2.
Don’t be tempted to simply leave a blank paragraph to get inter-paragraph spacing; some reader
software may ignore this and it will be very hard to change your project if you decide to use less or no
inter-paragraph spacing. The exception to this is the title page and other cases where you need more
than the usual spacing; but even here it’s best to use a special style for each kind of vertical space, so
you only need one blank paragraph at a time.
Indentation
First and subsequent line indentation for the left margin can be specified in a style, again under Indents
& Spacing in the style editor. So a hanging indent can be achieved by specifying, say, 0 for the firstline indent, and 60 for the normal indent, where the values are in tenths of a millimetre.
You can also specify the right indent, though it’s rare to need to do that. Again, the value is specified in
tenths of a millimetre.
Don’t use tabs for indentation! Tabs are ignored in HTML-based formats.
Alignment
Paragraph alignment (left, right, centred, justified) can be specified in the Indents & Spacing tab in the
style editor, or via the Format menu and toolbar commands. You can choose left alignment or
56
CHAPTER 6: EDITING AND FORMATTING CONTENT
justification for the majority of your content, but note that that Kindle is the only major platform that
respects the alignment as specified in the book; other ereaders have a global justification setting that
affects all books.
For list items, it can be better to force left-alignment since a short list item looks terrible when justified.
Note that if you justify text, it won’t show as justified in the Jutoh editor. However it will be justified
when viewed in an ebook reader where supported.
Headings
If you use heading styles of the form ‘Heading 1’ then Jutoh will output the styles with the HTML
heading tag (such as ‘h1’). To use a different prefix, or to stop Jutoh from emitting ‘h...’ tags, edit the
Heading style prefix configuration property.
For finer control of how heading styles map to HTML levels, see Chapter 20: Making Your Books
Accessible.
Lists
List styles are the only way to achieve bulleted or numbered paragraphs; you shouldn’t try to apply
bullets to an individual paragraph, although the Bullets page of the paragraph style editor is retained in
case you imported a bulleted paragraph and need to reset the attributes.
List styles work on the principle that lists can potentially be nested, with different bullet or numbering
styles depending on the level (depth) of the list. When you are editing a list, pressing the Tab or
Shift+Tab keys will increase or decrease the level of the current paragraph in the list. It is dependent
on the particular ebook reader whether the particular bullet or numbering style will be honoured, so you
may see a different style in the ebook than in Jutoh.
The Bulleted List and
Numbered List buttons in the toolbar apply the styles called “Bullet List 1”
and “Numbered List 1” respectively. To apply a different list style, use the Format | Bullets and
Numbering menu command, which will give you a choice of list styles to apply, along with the option
to renumber the list.
57
CHAPTER 6: EDITING AND FORMATTING CONTENT
The Bullets and Numbering dialog
You can renumber a list without choosing a style, using the Format | Renumber command, and you
can remove list styling from one or more paragraphs by clicking on a bullet or numbering toolbar
button.
Non-contiguous list numbering is possible by repeated use of Format | Renumber, specifying the start
number, but not all ereaders support this and it can cause EpubCheck errors, so use with caution and be
sure that your ebook distributor doesn’t reject the file due to failing EpubCheck.
For any given paragraph in a list, both the paragraph style and list style are used. Since the current
paragraph indent is added to the list style indent, choose a non-indented paragraph style for your lists to
avoid a double indentation. Jutoh will warn you if you have used a paragraph style with indentation
within a list. If you need to, create a special non-indented paragraph style for use within lists.
You can have multiple paragraphs per list by placing the editor cursor just behind the bullet or number,
and hitting the backspace key. This will turn the item into a ‘continuation’ paragraph without a bullet or
number but with the same indentation as a regular list item. Note that for Mobipocket output, this is
simulated by putting line breaks between list paragraphs since genuine multiple list item paragraphs are
not possible in KF7 format. Jutoh will make an attempt to convert indented paragraphs in DOCX
documents to continuation paragraphs according to the context, but if this is tripped up by complex
formatting you will need to correct it within Jutoh by applying a list style and then ‘deleting’ the
bullets.
Another way of creating list-like formatting but without using list styles is to use an indented paragraph
style with a non-indented heading for the item heading. For example:
58
CHAPTER 6: EDITING AND FORMATTING CONTENT
Apples
Apples are roundish in shape, and crunchy.
They come in a variety of, well, varieties, with Granny Smith being one of the most popular.
Bananas
Unlike apples, bananas are long, bendy and squishy.
They have their own convenient wrapper utilising a zip-like mechanism, and all too soon they turn
black.
For more on list styles, see Chapter 12: Working With Style Sheets.
Adding keywords
You can add keywords to your text, and if the configuration property Replace strings in content is
enabled, keywords will be replaced by values in the compiled book. Keywords can come from string
tables that you create, and also from your project metadata. The following metadata keywords are
predefined:
%TITLE%, %ID%, %LANGUAGE%, %AUTHOR%, %CONTRIBUTORS%, %PUBLISHER%,
%URL%, %SUBJECT%, %DESCRIPTION%, %DATE%, %RIGHTS%, %COVERAGE%, %TYPE
%, %FORMAT%, %SOURCE%, %RELATION%
This can be a useful facility if you wish to provide different editions with only slightly differing
content, or to allow quick editing of text used throughout the book, or to abbreviate a long piece of text
such as an HTML fragment. Keyword names are case-sensitive and each keyword must be formatted
with a single or no style. You can read more about string tables in Chapter 13: Working With String
Tables.
Editing document properties
Although this isn’t directly related to formatting, it’s important to know how to edit properties
associated with each book section document. To show the Book Section Properties dialog, you can do
any one of these:
1. Right-click (or control-click on Mac) over the title of the book in the project outline and click on
Properties.
2. Choose the Document | Document Properties menu command.
3. Press Shift+Alt+Enter.
4. In the Project Properties dialog, click Document and then Edit Document Properties.
59
CHAPTER 6: EDITING AND FORMATTING CONTENT
The Book Section Properties dialog
Here, you can edit the title of the document, the guide type (see Chapter 24: Advanced Topics for
information on guide types), an optional HTML file name, tags, whether to show the document in the
table of contents, NavMap and spine (Epub/Mobipocket only), whether to include the section for a
particular file format, and notes for this document.
You can add tags to allow for conditional inclusion of exclusion of the section in your ebook: for more
on that, see Chapter 23: Conditional Formatting.
You can also see the word count for this document and the whole project (by clicking on Compute),
and you can see the unique identifier of this document (not editable).
For more advanced use, there are tabs for extra CSS for this document, JavaScript code, timings for
synchronising narration with content, and further properties for specifying an Epub type (for Epub 3
ebooks), JavaScript event handlers, and more.
60
CHAPTER 6: EDITING AND FORMATTING CONTENT
Previewing your work
You can view your entire ebook by pressing Compile and then Launch to show the book in the default
viewer application. However, this can be slow if you just want to see the results of a small change. So
instead, you can use Book | Preview Section (Alt+/), and Jutoh will show the HTML of the current
book section in your web browser, having written the HTML and relevant resources to a temporary
folder (see the screenshot below). This won’t be exactly as the book will appear in various ereaders, but
it will be close. Use a separate browser window sized appropriately and placed in front of your regular
browser window, so the preview doesn’t interfere with your normal web browsing.
Previewing a Jutoh book section using Chrome
For further previewing and testing suggestions, search for KB0118 (‘How can I test my Epub and
Kindle books?’) in Jutoh help.
Summary
Now you’ll have a good idea of what’s possible with content editing and formatting, and how to
accelerate your typing and styling using shortcuts and favourites. You can read more about styles in
Chapter 12: Working With Style Sheets. It’s worth repeating an essential point: create and use named
styles wherever possible, and don’t use ad hoc formatting. When you come to tweak your book
formatting, you’ll be glad if took this advice and planned ahead, rather than having to make potentially
thousands of changes in your document.
Next, we’ll look at editing the project’s metadata – the information describing the book.
61
CHAPTER 6: EDITING AND FORMATTING CONTENT
62
Chapter 7: Editing Your Book’s Metadata
Each project must have a minimal amount of metadata, which describes the project to the reading
software to display if appropriate. It is required for Epub and Mobipocket formats. This chapter
explains what metadata you should provide, and how to do it.
The metadata panel
When you create a project, you will be prompted for a small amount of the possible metadata that can
be provided. You can edit more metadata via the Metadata tab of the Project Properties dialog (click
on the Edit toolbar button).
63
CHAPTER 7: EDITING YOUR BOOK’S METADATA
The metadata panel in Project Properties
A metadata field is called an element, in XML parlance. In most cases, there is one value per element.
You can just type the value into the appropriate text field. For example, there is only title. However, in
some cases, it’s possible and desirable to provide multiple values per element (for example, multiple
contributors); or to add a special attribute within the element, to make the meaning of the value clearer.
To achieve either of these, click on the ‘...’ details button next to a category to show the element editor.
Let’s say we want to add an ISBN identifier. Click on the details button (‘...’) next to Identifier, and in
the element editor dialog, click on the first Add button to add a new element value. This shows a menu
of possible element templates; click on ISBN. This adds a new element with ‘opf:scheme’ set to
‘ISBN’. You can type the ISBN number into the ‘Value’ property, and the XML that Jutoh will write to
the metadata will be shown in the preview. In the following example of the element editor in action,
we’ve deleted the original element so there’s only one kind of identifier in this book, the ISBN.
64
CHAPTER 7: EDITING YOUR BOOK’S METADATA
The Element Editor dialog
Some attributes have a convenient list of options; at present these are:
•
‘opf:scheme’ in the Identifier element;
•
‘opf:role’ in the Author element;
•
‘Value’ in the Language element.
Metadata elements
These are the most common metadata elements. Only the title is obligatory in Jutoh – other fields that
are mandatory for Epub and Mobipocket and that are not filled in, will be generated.
Book title
The book title.
Language
The language the book is written in, such as ‘en’ for English or ‘fr’ for French. If left unspecified, the
65
CHAPTER 7: EDITING YOUR BOOK’S METADATA
default value is ‘en’. You can select from a list of languages if you click on the details button and click
on the ‘Value’ attribute.
It is important to specify the correct language, as otherwise ebooks can be rejected by some
distributors, and the wrong dictionary may be used on the ebook reader.
Identifier
The identifier for the book, which can be arbitrary (if the ‘opf:scheme’ attribute is not specified), or it
can be an ISBN; other kinds of identifier can also be used. Use the element editor to add different kinds
of identifier. If left unspecified, the default value will be the title of the book.
You can use a keyword intead of an actual identifier, such as ‘%IBSN%’. Then use string tables to fill
in the value according to the current configuration. This is described further in Chapter 24: Advanced
Topics.
Another way to achieve per-configuration ISBNs is simply to leave the Identifier field blank in the
project metadata, and use the Identifier configuration option instead. By default, this configuration
option is filled in with a different UUID (globally unique identifier) for each configuration. It’s
prefixed with ‘urn:uuid:’ so that the identifier scheme is known. You can also enter an ISBN instead,
prefixed with ‘urn:isbn:’. However, this technique isn’t quite as flexible as the string table method,
because you can’t use a keyword in the actual content (such as the front matter).
Author
Type your name here; you can specify multiple authors via the element editor. This becomes the
‘creator’ element in the metadata, and you can specify the creator roles using the element editor if you
want to add creators other than author. If not specified, there will be no creator element in the metadata.
For descriptions of attributes that give more information about the type of author, see:
www.loc.gov/marc/relators/relaterm.html
Date
Specify the date in the format YYYY-MM-DD, or YYYY-MM, or just YYYY (ISO 8601 standard). If
not specified, the date of generation will be used. You can add an optional ‘opf:event’ attribute which
can be one of ‘creation’, ‘publication’ and ‘modification’.
Contributors
You can have zero or more contributors. By default, Jutoh lists itself as a contributor. You can switch
this behaviour off in your configurations. For descriptions of attributes that give more information
about the type of contributor, see:
www.loc.gov/marc/relators/relaterm.html
Publisher
An optional field with the publisher’s name.
Web site
66
CHAPTER 7: EDITING YOUR BOOK’S METADATA
An optional field; this doesn’t have a direct equivalent in Epub metadata and uses a ‘relation’ element
since the web site is notionally a related publication.
Subject
The subject of the book. If this is not specified, ‘General Fiction’ is used. There is no standard list of
possible subjects, though your publisher might have some guidance.
Description
A description of the book.
Rights
An optional statement of the book rights.
Type
The optional book category (as defined by a particular publisher).
Source
Optional information about a resource from which the book was derived.
Coverage
An optional description of the extent or scope of the book’s coverage.
Format
An optional book media type, such as a MIME media type.
Relation
An optional identifier of an auxiliary resource or related publication and its relationship to this
publication.
Custom metadata
If any elements you require aren’t catered for in the metadata panel, you can add custom ones by
clicking the Edit Custom Metadata button at the bottom of the panel. You can add elements and then
edit their values and edit multiple element values as with regular metadata. Unless you have advanced
needs, you are unlikely to need this facility.
Viewing the generated metadata
If you want to see the actual metadata that Jutoh generates, which may differ slightly from the metadata
you specify directly, you can generate an Epub file and use F6 or Book | Examine and click on the file
content.opf. The metadata is contained between the metadata start and end tags.
67
CHAPTER 7: EDITING YOUR BOOK’S METADATA
Specifying metadata defaults
It can be annoying to type in the same metadata for each project, so Jutoh allows you to set the default
for the most important metadata values, in the Advanced panel of the Preferences dialog under
Metadata defaults.
Summary
We’ve seen how to describe your book to the ebook reading software, and your readers. Next we deal
with another important aspect for communicating what your book’s about – the cover design.
68
Chapter 8: Creating Your Cover Design
An attractive cover design is important for catching the reader’s eye as he or she scans through a web
site or virtual shelves. Jutoh can help you create a cover from scratch using its built-in editor; or if you
have an existing design, then Jutoh can use that. This chapter covers everything you need to know
about using cover designs in Jutoh.
Cover design basics
The cover design does not appear as a section in your project under the ‘Contents’ folder; instead you
edit it in Project Properties. A preview of the cover design will appear in the Build tab of the Control
Panel. To edit the cover design, simply click on the cover image in the Control Panel, or click on the
Edit toolbar button and then on the Cover tab, or click on the Cover toolbar button.
69
CHAPTER 8: CREATING YOUR COVER DESIGN
The Cover page in the Project Properties dialog
A good size for a cover image is 600 pixels wide by 800 pixels high, though on today’s pixel-packing
devices, you might like to use a higher resolution. You can also look at the recommendations of the
particular site or publishing platform you are using.
Because ebook covers are often shown as a small thumbnail on ebook sites, you need to make them
readable when reduced to a small size; so simplicity is a virtue for ebook covers.
Using an existing design
If you have an existing image you wish to use, you can specify this in the New Project Wizard by
selecting Use existing file in the Cover page and browsing for an image file.
Or, after you have created the project, start editing the cover within Project Properties and click Create
From Image File. You can then choose a file to use.
70
CHAPTER 8: CREATING YOUR COVER DESIGN
Using the cover designer
In the Cover tab in Project Properties, click on Edit Cover Design. This will show cover designer
dialog, shown below. A design comprises a list of rectangular objects, which are drawn from the top
one first to the bottom one last, and so later objects will partially obscure earlier objects. The first
object is always called “Background” and defines the overall size and the background colour or texture.
The Cover Designer dialog
Typically a design might have four other objects: one for making a ‘label’ area against the background,
and three more for placing the title, author name and publisher name.
Add a new object with Add Text, Add Image or Add Box. They all add an object, but set up the initial
values in different ways for convenience. You can Rename or Delete the selected object, and change
the selected object’s order in the list with the up and down arrows.
You can save the current design as a template file to use for subsequent designs, using Save, and you
can browse and apply other templates by clicking on Templates. Click on Reset to clear all objects
apart from the background, and Preview shows the design at the actual pixel size.
The following topics describe the three tabbed editor pages, which are used to specify how the selected
object is displayed.
71
CHAPTER 8: CREATING YOUR COVER DESIGN
Object size and position
In this page, adjust the size and position of an object using the up-down controls or by entering values
manually. The X and Y positions can be absolute (relative to a parent object specified in the Relative
to field), or a percentage of the parent, or centred with respect to the parent). The width and height can
be absolute or a percentage of the parent. If no parent is specified, the object dimensions are relative to
the background object, where applicable.
Object background
The object background page determines how the background texture is drawn.
The Style field takes one of a number of values:
•
Transparent – the object is not drawn. This can be useful if the object is meant as a placeholder to be the parent object for other objects (for example, if the object represents the ‘label’
area of the book containing text).
•
Colour – the object is drawn as a solid colour.
•
Image – the specified image is drawn at the top-left of the object rectangle, without tiling or
scaling.
•
Centred image – the specified image is drawn centred within the object rectangle.
•
Tiled image – the specified image is tiled to fill the object rectangle.
•
Stretched image – the specified image is stretched to fill the object rectangle.
The Texture field shows either a solid colour or a specified image, depending on the Style setting.
Click this field to choose a new colour or image, or you can paste an image into the field by clicking on
the Paste button.
The Scale field can be used to adjust the scaling of the image.
Border style can be ‘None’, ‘Single’, ‘Double’ or or ‘Triple’. A double border uses the two border
colours specified underneath the style field, while the triple border style uses the first border colour, the
object background colour, and then the second border colour (using Border 2 Width for both the inner
and the third border widths).
Text
Type text in the field provided if you wish to add text to this object. Click on Insert Keyword to see a
choice of keywords that will be replaced when the cover design is regenerated. The keywords are taken
from the metadata, and also from the currently selected global and project-specific string tables
selected in the current configuration, if any.
You can also specify the font and the text colour.
Exporting your design
If you need a copy of your cover design, for example to upload to iTunes, you can export it to one of
several popular image formats via File | Export | Cover Design using the Cover Design Export dialog.
72
CHAPTER 8: CREATING YOUR COVER DESIGN
Export Cover Design dialog
This will use the cover design indicated by the current configuration. You can select a different width
and height from the values used in the book, and your design will be scaled to this size. You can also
use Copy To Clipboard to paste the image into another application.
Specifying a cover for Kindle
When uploading your ebook to Amazon, you don’t actually need to have the cover in your .mobi file,
because you also upload a separate cover, higher-resolution cover to the KDP site. So if you wish, you
can set the Cover design configuration option to ‘(none)’, and ignore the Kindlegen warning about the
lack of a cover.
The cover page versus the cover image
If a design is specified, the image will always be included in the book. However, Jutoh can also
generate an XHTML page that embeds the image. This is controlled by the configuration property
Generate cover page. It is recommended that you enable this in your Epub configuration (unless
uploading the Epub to Amazon without first converting to Mobipocket), and disable this in your
Mobipocket configuration to avoid showing two covers.
If you check Exclude cover from reading order in your configuration, the cover page may not be shown
as part of the book – for example, in iBooks, the cover will only appear on the bookshelf. If you want
the reader to be presented with the cover page, clear this option. Don’t clear this for Mobipocket files,
however. Note that Calibre has an unusual interpretation of exclusion from reading order and shows
such sections at the end of the book.
You can specify the Cover page background colour in your configuration to fill in the area around the
image with colour.
73
CHAPTER 8: CREATING YOUR COVER DESIGN
Specifying the cover image format
Normally the cover image will be output as a JPEG file compressed at 90%, but if your cover contains
line art, you might prefer to set the configuration property Cover image format to ‘PNG’. This will
result in a larger but higher quality file.
A cover design can contain a variety of text and graphics that is scaled, combined and rendered to a
bitmap before the image file is created. If you want to provide your own cover image and make sure
that no extra processing is done to the image, you can set Cover image format to ‘Original’. Then the
image you imported from a file will be the exact image that is used as the cover. For this to work, there
must be only one object in the cover design.
Using multiple cover designs
Typically you will have one cover design per project. However, Jutoh lets you define any number of
cover designs. You might wish to experiment with several alternatives, or you might use different
covers to target different ebook vendors. In that case, you’d have several configurations, with a
different cover name assigned to the Cover design property in each configuration. You can manage
your cover designs in the Cover tab of Project Properties; they are listed in the drop-down control.
Initially you will have just one cover design, called ‘Default Cover’. You can add, delete and rename
designs using the buttons under the drop-down list.
Cover display on different devices
On Kindle, the book will start at the first main page and you’ll have to page back to see the cover.
There is nothing that can be done to change this behaviour. On iBooks, you’ll see the cover in the
virtual bookshelf, and the first page shown will be the cover unless you have specified an alternative
first page by using a document guide type. Other ereaders may or may not show the cover as the first
page.
Summary
You now know how to add a cover to your project, from an existing design or from scratch using the
built-in cover designer. Next, we’ll tackle the topic of configurations – the mechanism Jutoh uses to
allow you maximum control over each individual file format or ebook platform that you’re targeting.
74
Chapter 9: Understanding Configurations
Ebook publishers often have slightly different requirements, even if the same format is used. You may
also wish to tailor Jutoh’s output for your own reasons. Jutoh’s configuration feature lets you change
the way that ebooks are generated, so that you can tweak the output for one format or ebook platform
without affecting others. You may not need to worry about configurations for a bit but once in a while
you may come across the need to change configurations or even add new ones; so it’s worth at least
scanning this chapter so you know where to look.
Configuration basics
At first glance, ‘configuration’ seems like a fancy name for ‘format’. In the Build tab of the Control
Panel, before compiling, you select the appropriate configuration such as ‘Epub’ or ‘Mobipocket’, each
of which is generally named after the format it targets.
However, configurations are much more than that. They contain a whole host of user-editable options
that will be used for that configuration; and you can add as many configurations as you like. So, for
example, you might like to have two Epub configurations, called ‘iBooks Epub’ and ‘Barnes & Noble
Epub’, with slightly different behaviour for each.
A configuration can specify which cover design or style sheet to use – so you can have alternate
versions of your book with different cover designs or formatting, without having to maintain different
versions of the book.
Or you could have different configurations for generating images with different sizes, tailored for use
on different kinds of reader device.
When you create a Jutoh project, Jutoh’s New Project Wizard presents you with the option to create an
initial set of configurations, one per format supported. Generally you can leave the defaults as they are
unless you know you definitely won’t need some of them. Later, you can add, change and delete
configurations.
Important note: although you can enable different formats in the same configuration, don’t be tempted
to do this for generating, say, Epub and Mobipocket files from the configuration. Jutoh optimizes these
formats differently, so you need to use independent configurations.
Editing configurations
To edit a configuration, you can click on
Edit on the toolbar to show the Project Properties, and
then click on Configurations. Or, you can click on the Edit button next to the drop-down list of
configurations in the Control Panel; this will show you the currently-selected configuration.
75
CHAPTER 9: UNDERSTANDING CONFIGURATIONS
The Configurations page in the Project Properties dialog
Configuration properties are presented in a scrolling list, with names on the left and editable values on
the right. Click on a property to see its description, displayed under the list. You can double-click on
some properties (such as Notes) to show a larger text editor. To make it easier to find properties, you
can type all or part of the property name in the search box at the bottom of the window; use the left and
right arrows to cycle through the matches, selecting each matching property in turn. You can press the
Return key to give the keyboard focus back to the property editor.
You can add a new configuration by clicking on
Add – you will be given the option of basing the
new configuration on an existing one (the values will be copied to the new configuration) or creating a
configuration with defaults appropriate to the selected ebook format. You can delete the selected
configuration with
Delete, and change its name with
Rename. If you want to apply the same
configuration settings to a different project, you can
Save selected configurations to a file and then
Load them in the other project. Use the up and down arrows to reorder configurations in the list.
Using configurations
You can select the current configuration in the control panel to the left of the Jutoh editor. This
76
CHAPTER 9: UNDERSTANDING CONFIGURATIONS
configuration will be used to determine paths and other settings for Compile, Check and Launch
commands.
To compile a book using the current configuration, click on the Compile button on the Control Panel,
or click on the
Compile button on the toolbar, or use Book | Compile menu command, or use the
F7 keyboard shortcut. If you prefer, you can compile using multiple configurations in one go, using the
Book | Batch Compile command; a choice of configurations to use is presented, as shown below.
Batch Compile dialog
Note that if you use the File | Export menu command to quickly export your book to a specified
format, any formats specified in the currently selected configuration are temporarily overridden. All the
other settings in the current configuration will be used for the export, so normally it’s best to select the
best configuration for the job and press Compile.
While we’re talking about compiling, it’s worth pointing out that you can use the Update Special Book
Sections dialog instead of updating the table of contents, index, or endnotes individually from their
respective dialogs.
77
CHAPTER 9: UNDERSTANDING CONFIGURATIONS
Update Special Book Sections dialog
If any of these special sections are out of date since the last compile (for example, you added headings,
index entries or footnotes), you can show this dialog using Book | Update or F9, and click Update to
update all checked special sections. Note that you can also elect to automatically update these sections
when you compile (via controls in the Project Properties dialog), so you can be sure they are always
up-to-date.
Configuration categories
Let’s look at the property categories in detail.
Locations
This category contains location-related properties. Usually you don’t need to edit these.
•
Book folder: used to specify the folder in which the ebook for this configuration will be
generated. The folder containing the project will be substituted for the keyword %FOLDER%,
which is the default value.
•
Book file name: this is %FILENAME% by default; you might want to change the name if you
have multiple configurations for the same format. Note that an appropriate extension will be
appended so you don’t have to include that in your file name value. For example, if your project
is
called
MyBooks,
you
could
use
‘%FILENAME%_ibooks’
to
specify
‘MyProject_ibooks.epub’.
•
Preview file name: this is only used for the HTML format where there may be multiple files
generated, and indicates which file should be used when previewing (launching) the generated
book.
Metadata
This category contains just one property, Identifier.
•
Identifier: the unique identifier for your book. If the Identifier metadata field is left empty, the
78
CHAPTER 9: UNDERSTANDING CONFIGURATIONS
identifier for the current configuration is used. Note that initially, Jutoh generates a different
UUID for each configuration.
Formats
Each configuration should have at least one format checked. You can have multiple formats checked,
but this is not usually desirable. The one case where you might like to do that is in your Mobipocket
configurations; if you also check Epub you will be able to check and view the source for your
Mobipocket books.
These are the supported formats:
•
Generate Epub: generates Epub 2 output, or Epub 3 if Epub version is set to 3.
•
Generate Mobipocket: generates Mobipocket output, suitable for Amazon Kindle devices and
software.
•
Generate ODT: generates OpenDocument Text, a word processor format that can be converted
to many other formats such as Word, using for example the free OpenOffice.org suite. Note that
Word itself tends to create more compact .doc files than does OpenOffice.org, so you might
want to re-save the file using Word if file size is an issue.
•
Generate text: generates a single plain text file with no graphics.
•
Generate HTB: generates a wxWidgets Help file, a simple zipped, HTML-based format.
•
Generate MP3: generates MP3 files if you select a suitable voice engine and install the LAME
MP3 encoder in Preferences (MP3).
•
Generate HTML: generates a series of XHTML files. Book navigation controls can be enabled
via properties in the “Navigation” category below.
Cover Design
This category gives you control over the way Jutoh generates the cover design and cover page for your
book.
•
Cover design: specifies the cover design to be used in this configuration.
•
Cover page background colour: specifies an optional background colour for the XHTML page
that contains the cover (Epub only). This RGB value should contain six hexadecimal digits, two
digits per colour. To edit the colour, double click on the property name or click on the ‘...’
button. You might like to provide a background colour chosen from the cover image for filling
in the area around the image.
•
Generate cover page: check to generate an XHTML cover page for the book. Not recommended
for Mobipocket.
•
Expand cover to fit page: check to have the cover expand to the page height (the default).
•
Include cover in NavMap: check to include the cover in the navigation map – not recommended.
•
Exclude cover from reading order: check to hide the cover from the linear reading order
79
CHAPTER 9: UNDERSTANDING CONFIGURATIONS
(linear=no in the spine) – recommended. If this option is checked, the cover page may not be
shown as part of the book – for example, in iBooks, the cover will only appear on the bookshelf.
If you want the reader to be presented with the cover page first instead of the title page, clear
this option. Don’t clear this for Mobipocket files, however. Note that Calibre has an unusual
interpretation of exclusion from reading order and shows such sections at the end of the book.
•
Cover image format: specifies the image format for the cover design. If ‘Original’ is specified,
and the cover design has only one image object (for example, it was created from an existing
cover image file), then the original file is used without change.
•
Cover image width: specifies the cover image width in pixels, or -1 to use the default cover
design width.
Options
This category contains miscellaneous options controlling how Jutoh generates ebook output.
•
Generate title page: check to generate a title page for the book. It’s usually better to create your
own by hand.
•
Generate table of contents: check to generate a table of contents page for the book, either
automatically (it will not be visible in the project) or manually whenever you run the TOC
wizard (it will be visible in the project).
•
Generate NCX: check to generate a NavMap (NCX). This should only be disabled for Epub 3
files, where it is optional.
•
Force simple NavMap: check to force Jutoh to generate a simple NavMap based on section
titles, regardless of other settings. Any custom HTML table of contents page will not be
affected. This option is useful for Lulu, which has trouble with NavMaps that contain
bookmarks.
•
Generate page list: check to generate an NCX page list for Epub 2 or nav page list for Epub 3,
using page objects embedded in the book. This will work with iBooks.
•
Generate Adobe page map: check to generate an Adobe page map file for Epub 2 books, using
page objects embedded in the book. Note that EpubCheck will not pass an Epub 2 file with the
Adobe page map extension.
•
Generate cross-reference page numbers: check to output page numbers in cross-references,
instead of ‘here’.
•
Generate guide: check to generate a guide section in the OPF file – recommended.
•
Generate title tag: check to generate a title tag for each HTML file.
•
Optimize for iBooks: various optimizations are applied. In particular, dummy spans are added to
centered paragraphs in order to fix centering in full justification mode. Use Generate font names
to determine whether the specified-fonts option will be switched on in the iBooks XML file, or
whether font names will be suppressed. This option will cause a file called
com.apple.ibooks.display-options.xml to be added to the Epub file, under the folder
80
CHAPTER 9: UNDERSTANDING CONFIGURATIONS
META-INF.
If you submit the Epub to Lulu, this may cause an “unmanifested file” error, so clear
this option for Lulu submissions.
•
Generate iBooks XML: if this option and Optimize for iBooks are both checked, generates the
file com.apple.ibooks.display-options.xml when necessary.
•
Optimize for Mobipocket: anchors are inserted before paragraphs to prevent style loss on
navigation (as recommended by Amazon guidelines), and no paragraph tags are used within a
list item.
•
Mobipocket anchor optimization: if cleared, and Optimize for Mobipocket is checked, anchors
are no longer inserted before paragraphs. You might want to clear this if you have long
paragraphs containing footnotes, for example, and want to achieve accurate navigation
regardless of any styling side-effects that can be caused by bookmarks within paragraphs on the
Kindle platform.
•
Credit Jutoh: adds Jutoh as a book producer in the Epub/Mobipocket metadata.
•
Start page guide type: specifies the guide type that will be substituted for %STARTPAGE% in a
section’s guide type to indicate the first reading page. For iBooks, it is ‘other.reader-start-page’,
and for Mobipocket, it is ‘text’.
•
Visible URLs: specifies whether the URL will be added to the text, for printable documents. If
‘None’, no URLs will be added. If ‘Always’, the URL will always be added. If ‘Intelligent’,
Jutoh will check whether the URL is already in the linked text.
•
Epub version: Specifies the Epub version to generate.
Styles
This category controls style-related options. More about styles can be found in Chapter 12: Working
With Style Sheets.
•
Style sheet: specifies the style sheet to be used in this configuration.
•
Paragraphs to exclude: the comma-separated paragraph styles whose paragraphs should be
excluded from the book. You can use * to mean all characters, for example ‘Only*’ will cause
all paragraphs with a style name beginning ‘Only’ to be excluded, except for those specified in
Paragraphs to include. For examples, see Chapter 12: Working With Style Sheets.
•
Paragraphs to include: the comma-separated paragraph styles whose paragraphs will be exempt
from exclusions. You can use * to mean all characters. For example, if this property has the
value of ‘Only Epub’, paragraphs styles with ‘Only Epub’ will be retained, but (assuming
‘Only*’ in Paragraphs to exclude), all other paragraphs whose style name begins with ‘Only’
will be removed. Thus you can include or exclude paragraphs in your document depending on
the configuration. For examples, see Chapter 12: Working With Style Sheets.
•
First paragraph style: the style to use for first paragraphs after a heading when importing into
an existing project from plain text, HTML or Epub.
•
Normal paragraph style: the style to use for normal paragraphs when importing into an existing
81
CHAPTER 9: UNDERSTANDING CONFIGURATIONS
project from plain text, HTML or Epub.
•
Chapter heading paragraph style: the style to use for chapter headings when importing into an
existing project from plain text. Only relevant if you have Take title from first line of text files
switched on in Project Properties/Options.
•
Character style substitutions: semicolon-separated character style substitutions, for example
‘Drop Caps: Drop Caps Epub; Emphasis: Red Emphasis’. This allows you to adjust styles per
configuration without needing to use a different sheet.
•
Paragraph style substitutions: semicolon-separated paragraph styles substitutions, for example
‘Normal: Normal Justified; Centred: Centred Bold’. This allows you to adjust styles per
configuration without needing to use a different sheet.
•
Heading style prefix: a prefix for determining whether a style is a heading for the purposes of
HTML generation. The default is ‘Heading’. Clearing this field will prevent Jutoh from
generating <h> tags. Note that from Jutoh 1.67, the generated CSS overrides heading formatting
(if Heading style prefix specifies a valid prefix for existing heading styles) and so heading styles
should be displayed as specified in Jutoh, and not according to ereader heading defaults.
•
Styles suppressing hyphenation: a pattern matching all styles that should suppress hyphenation.
Multiple patterns containing wildcards (‘*’ and ‘?’) can be separated by the pipe character (‘|’).
For example, ‘Heading*|Book Title’. This works for Epub only, and generates the extra CSS
adobe-hyphenate: none; hyphens: none;.
•
Styles suppressing page break before: a pattern matching all styles that should suppress a
preceding page break. Multiple patterns containing wildcards (‘*’ and ‘?’) can be separated by
the pipe character (‘|’).
•
Styles suppressing page break after: a pattern matching all styles that should suppress a
following page break. Multiple patterns containing wildcards (‘*’ and ‘?’) can be separated by
the pipe character (‘|’).
String Tables
Jutoh’s string tables feature allows customisation of metadata, cover design text and book content perconfiguration, by substituting one string for another. This category controls how the configuration uses
existing string tables. For more information, see Chapter 13: Working With String Tables.
•
Project string table: specifies the project string table to be used in this configuration, if any.
Project strings override global strings.
•
Global string table: specifies the global string table to be used in this configuration. Project
strings override global strings.
•
Replace strings in content: check to replace strings in book content as well as metadata and
cover designs.
HTML Formatting
This category contains various options used for HTML-based formats.
82
CHAPTER 9: UNDERSTANDING CONFIGURATIONS
•
HTML version: specifies how HTML code will be generated. If this value is ‘(auto)’, the value
will be deduced from other settings.
•
Use XHTML: specifies whether XHTML or HTML will be generated. If this value is ‘(auto)’,
the value will be deduced from other settings.
•
Relaxed HTML: if checked, some HTML 5 (Epub 3) tags will be permitted in HTML 4 (Epub
2), such as wbr. Note that this is likely to cause EpubCheck to fail.
•
HTML left margin: sets a global left margin for Epub and HTML formats (not Mobipocket).
Examples: 3%, 10mm, 0.2in, 20px. To remove the margin, clear the value.
•
HTML right margin: sets a global right margin for Epub and HTML formats (not Mobipocket).
Examples: 3%, 10mm, 0.2in, 20px. To remove the margin, clear the value.
•
HTML top margin: sets a global top margin for Epub and HTML formats (not Mobipocket).
Examples: 3%, 10mm, 0.2in, 20px. To remove the margin, clear the value.
•
HTML bottom margin: sets a global bottom margin for Epub and HTML formats (not
Mobipocket). Examples: 3%, 10mm, 0.2in, 20px. To remove the margin, clear the value.
•
Styles for indent fix: specifies the styles whose left indent should be converted to a first-line
indent, to fix the lack of full left indent support on Mobipocket (only). By default this is
‘TOC*’. To stop any such conversion, clear this setting. You can use star (*) to match multiple
characters in the style name.
•
Use relative dimensions: Jutoh can use the relative unit em to specify dimensions such as
indentation and paragraph spacing, or it can use mm. If this option is checked, em is used and
this allows better scaling when the text size is changed by your book audience.
•
Dimension units: choose the units to use for non-font dimensions such as margin and size. Some
platforms require pixel units for fixed layout books. If you specify ‘Default’, Jutoh will decide
what units to use.
•
Font size units: choose the units to use for font sizes. Some platforms require pixel units for
fixed layout books. If you specify ‘Default’, Jutoh will decide what units to use.
•
Font size adjustment: specify an increment in points to add to all font sizes. You might use this
to generate large print books.
•
Font pixel scale: when fonts are specified in pixels, the size shown in Jutoh can differ from
pixel size as rendered in HTML. This scale factor helps to compensate for this difference.
•
RTL direction: sets all paragraph styles to have right-to-left text direction.
•
URL attribute removal style: specifies the character style containing URL attributes to remove,
so that only the default link attributes specified by the book reader software (or in custom CSS)
will be used. For example, if you specify ‘URL’ in this property containing blue and underlining
attributes, then blue underlined links will have both attributes removed in the final book.
However if a link was styled with red, then the red colour will be retained, and just any
underlining removed. If this property is set to ‘(none)’ or left empty, then no attribute removal
will be done.
83
CHAPTER 9: UNDERSTANDING CONFIGURATIONS
•
Use heading text size: if enabled, text sizes will be written for styles that match Heading style
prefix. Clear this to use the ebook viewer’s default heading sizes.
•
Preserve spacing after page break: if enabled, an invisible separator will be generated to
preserve spacing after a page break that is usually lost. See also KB0173.
•
Abbreviate style names: if enabled, style names in the HTML and CSS files will be abbreviated
instead of being derived from the original style names.
•
Optimize style sheet: if enabled, Jutoh will remove unused styles from the CSS style sheet.
•
Emulate small caps: if enabled, Jutoh emits actual capitals and a smaller font size, for viewers
such as ADE that ignore the font-variant attribute. On by default.
•
Superscript CSS: custom CSS for implementing superscript.
•
Subscript CSS: custom CSS for implementing subscript.
•
Convert horizontal bar to em dash: converts Unicode 8213 (horizontal bar) to Unicode 8212
(em dash) and adds a non-breaking span. Some Epub viewers, such as Adobe Digital Editions,
do not support horizontal bar, and it is essential punctuation for Spanish. For the non-breaking
behaviour to work, the bar and non-space character to the left or right of the bar must be
formatted in the same (or no) character style.
•
Convert non-breaking hyphen to hyphen: converts Unicode 8209 (non-breaking hyphen) to an
ordinary hyphen and adds a non-breaking span. Some Epub viewers do not support a nonbreaking hyphen. For the non-breaking behaviour to work, the hyphen and non-space character
to the left or right of the hyphen must be formatted in the same (or no) character style.
•
Add thin spaces around punctuation: inserts non-breaking thin spaces around punctuation to
conform with typographical convention for French books. If there is white space already in
position, it is replaced by the thin space, but existing white space is not necessary.
•
Thin space entity: the HTML code to use for a thin space. By default, it is  . Not all
fonts support this entity; you can sometimes work around it for Epub files by embedding a font
that supports it. Some but not all Kindle devices will render it correctly. Or, you can use an
image instead, although this can slow down rendering considerably. This code will insert an
image (you should also add a media document with a suitable small, white bitmap):
<img width=4 style="width:4px;" src="media/emptybitmap4x1.png" alt=""/>
•
Orphan control for single-letter words: inserts non-breaking spaces after single-letter words to
avoid orphan words at the end of lines.
•
Character substitutions: semicolon-separated pairs of decimal Unicode substitutions. For
example the value ‘8239:160;8201:160’ would convert two kinds of thin space to non-breaking
spaces.
•
Use div tag: determines whether the div tag is used instead of p.
•
Extra metadata: extra meta elements for the metadata section of the Epub or Mobipocket OPF
file.
84
CHAPTER 9: UNDERSTANDING CONFIGURATIONS
•
Widow control: a widow is the last line of a paragraph appearing alone at the top of a page. This
option specifies the minimum number of lines of a paragraph that appear at the top of a page.
Use ‘Default’ to use the ebook defaults, ‘None’ to switch off widow behaviour, or a number for
the minimum number of lines.
•
Orphan control: an orphan is the first line of a paragraph that appears on its own at the bottom
of a page. This option specifies the minimum number of lines of a paragraph that must appear at
the bottom of a page. Use ‘Default’ to use the ebook defaults, ‘None’ to switch off orphan
behaviour, or a number for the minimum number of lines.
•
Namespaces: specifies the XHTML namespaces. Specify ‘auto’ to have Jutoh use the
namespaces appropriate to the current Epub version.
•
Epub package prefix: specifies the value of the prefix attribute for the OPF package element.
•
Epub metadata namespaces: specifies the Epub metadata namespaces.
•
Table headers and footers: check to emit headers and footers if specified in individual tables.
Most readers cannot make use of this option.
•
Emulate boxes using tables: check to emulate boxes by using one-cell tables, for platforms such
as Kindle for iOS that do not support boxes.
•
Use minimum size for cells: check to use min-width and min-height instead of width and height
in table cells, for better ADE compatibility. If absolute sizes are used, content can overspill cell
boundaries in ADE.
•
Maximum table rows for inline-block: the maximum number of table rows before Jutoh no
longer uses the ‘display:inline-block’ attribute for the table. While this attribute is useful for
centering tables in Adobe Digital Editions, it stops Adobe Digital Editions rendering long tables.
Set to zero to never use inline-block.
•
Maximum box words for inline-block: the maximum number of words in a text box before Jutoh
no longer uses the ‘display:inline-block’ attribute for the box. While this attribute is useful for
centering boxes in Adobe Digital Editions, it stops Adobe Digital Editions rendering long boxes.
Set to zero to never use inline-block.
•
Omit box height: check to omit the height value from text boxes, since specifying the height can
cause content overflow.
•
Popup footnotes: check to show footnotes in a popup window.
•
Hide footnotes: check to hide footnotes by using ‘aside’ tags. The ‘Popup footnotes’ option
must be checked.
Text Formatting
This category contains options for plain text and ODT (OpenDocument Text) output.
•
Wrap paragraphs: check to wrap paragraphs at the maximum number of characters per line, for
text output only.
85
CHAPTER 9: UNDERSTANDING CONFIGURATIONS
•
Add blank lines: check to add blank lines between paragraphs, for text output only.
•
Characters per line: the maximum character per line if wrapping, for text output only.
•
Left margin: the left page margin in mm, for ODT output only.
•
Right margin: the right page margin in mm, for ODT output only.
•
Top margin: the top page margin in mm, for ODT output only.
•
Bottom margin: the bottom page margin in mm, for ODT output only.
•
Paper size: the paper size, for ODT output only. The default is A4.
•
Custom paper width: the custom paper width, for ODT output only. Specify mm (the default),
cm or in. If custom width and height are both specified, the values will override the Paper size
selection.
•
Custom paper height: the custom paper height, for ODT output only. Specify mm (the default),
cm or in. If custom width and height are both specified, the values will override the Paper size
selection.
•
Mirror margins: check to mirror page margins, for example when creating a gutter for print on
demand. For ODT output only.
•
Dots per inch: the assumed number of dots per inch for images, used if no absolute dimensions
are specified. For ODT output only. The default is 96.
•
Add blank paragraphs for Word: if checked, Jutoh will add blank paragraphs before page breaks
for Microsoft Word compatibility. Without it, justification is poor before page breaks. For ODT
output only.
Images and Media
This category contains options allowing you to control various aspects of image (picture) output. For
more about images, see Chapter 10: Working With Pictures.
•
Maximum image width: the maximum image width to use in your book. Specify -1 for no
scaling. Note that this physically scales the image before it is written to the ebook, rather than
simply setting the max-width CSS property. In contrast, Limit images to viewer size sets the
max-width and max-height properties so scaling is done dynamically.
•
Maximum image height: the maximum image height to use in your book. Specify -1 for no
scaling. As with Maximum image width, this physically scales the image.
•
Maximum image width units: units for the maximum image width and height – pixels or
percentage.
•
Maximum image optimization width: maximum image width to optimize; -1 for no optimization.
Optimization improves quality for smaller images, but takes longer.
•
Limit images to viewer size: whether to limit images to the maximum width and height of the
viewer (Epub format only). Images smaller than the viewer size will show at their original size.
86
CHAPTER 9: UNDERSTANDING CONFIGURATIONS
The setting works by adding max-width:100% and max-height:100% styles, unless overridden
by individual image settings. Note that some viewers, such as Nook, Aldiko and ADE,
erroneously expand images that have their maximum width or height set. The fix is to specify
the width (and/or height) in pixels or other units in the image properties. For example, if the
image is 300x500, specify 300px in the Width field.
•
Replace absolute widths: if enabled, absolute widths in cm are replaced with percentage widths
more suited to ebook displays. This applies to images, boxes and tables. The current paper size
and left and right margins, or the parent box dimensions, are used to calculate an appropriate
percentage.
•
Maximum percentage width: the maximum permissable percentage width relative to the display
when using the Replace absolute widths option. Some viewers may not accept 100% without
part of the object being off-screen.
•
Flatten images: whether to flatten (remove alpha channel from) any images containing alpha
transparency.
•
Convert images to JPEG: whether to convert non-JPEG images to JPEG for reduced file size.
Specify ‘None’ to leave the images in their original format, ‘All’ to convert all non-JPEG
images, and ‘All except GIF’ to leave GIF files alone but convert the others. You can override
conversion per image by checking Preserve original format in the Image Properties dialog.
•
Image quality: the image quality when converting to JPEG, expressed as a percentage. Higher
quality means larger file size; a good value for general use is 80%.
•
Generate media objects: if enabled, any video and audio media files, and the tags that reference
them, will be written to the book (XHTML formats only).
•
Use specified image names: if enabled, names entered in the Image Properties dialog will be
used to form image file names. It will be up to the user to specify unique filenames except
where the same image is being used. Epub and Mobipocket only.
•
Use SVG images: check to use SVG vector image alternatives where specified for each image.
The SVG image should be added as a media object, and Generate media objects should be
enabled. XHTML formats only.
•
Drawing object formats: choose which formats will be used for drawing objects in this
configuration. You can specify the formats to be used for all drawing objects, or you can specify
by object tag; for example ‘math:bitmap,mathml;drawing:svg;default:bitmap’.
•
SVG drawing method: choose the SVG code generation method for drawing objects, where not
specified for the drawing object. One of ‘inline’, ‘img’, ‘object’ and ‘embed’.
•
Strip MathML namespace prefixes: check to remove namespace prefixes from MathML since
some renderers have trouble with them.
•
MathJax script: specify a MathJax script to include if targeting a renderer that does not
implement native MathML support.
87
CHAPTER 9: UNDERSTANDING CONFIGURATIONS
Advanced Formatting
This category contains options for controlling the way special formatting is output – whether to use
special fields for the word processor to use, or by generating the content explicitly.
•
Special index formatting: check to output index entries as special items, if supported by the
target format. If this option is cleared, links and an index page will be output explicitly.
Smashwords ODT requires this to be switched off.
•
Special footnote formatting: check to output footnotes and endnotes as special items, if
supported by the target format. If this option is cleared, linked footnotes or endnotes will be
output explicitly. Smashwords ODT requires this to be switched off.
•
Special table of contents formatting: check to replace the document marked with the ‘toc’ guide
type with a special ‘tableofcontents’ field in ODT export. This will ensure that the ODT table of
contents has page numbers and not just links. Smashwords ODT requires this to be switched off.
•
Special bibliography formatting: check to output special citation fields, rather than expanding
citations into text. Smashwords ODT requires this to be switched off.
•
Special cross-reference formatting: check to output special cross-reference fields, rather than
expanding cross-references into text. Smashwords ODT requires this to be switched off.
•
Use outline levels: check to output outline levels if specified in your heading styles. Currently
applies to ODT output only, where checking this option allows a table of contents to appear in
PDF files generated by OpenOffice.org Writer or LibreOffice Writer.
•
Use page styles: check to output page styles, if defined. ODT only.
Chapter Separators
This category controls the output of textual separators between sections. By default there are no
separators.
•
Add chapter separators: check to output an extra paragraph at the end of each chapter, to
visually separate one chapter from the next.
•
Chapter separator text: the text to add at the end of a chapter.
•
Chapter separator style: the paragraph style of the text to add at the end of a chapter.
Fonts and Colour
This category contains options related to font handling.
•
Embed fonts: check to embed any fonts listed under Resources.
•
Font substitutions: semicolon-separated font substitutions, for example ‘Times New Roman:
Deja Vu Serif, Times New Roman; Arial: Deja Vu Sans’. This allows you to use embedded
fonts in place of the font specified in your book, and you can use a list of comma-separated
names for fallbacks. This only works for XHTML-based formats, and not on all ebook
platforms.
88
CHAPTER 9: UNDERSTANDING CONFIGURATIONS
•
Generate font names: clear this to use the reader default font name. If checked, enables the
specified fonts in iBooks (specified-fonts option in com.apple.ibooks.display-options.xml).
•
Generate generic font names: clear this to avoid generating generic font names for HTMLbased formats. The generic names are serif, sans-serif, cursive, fantasy, monospace. If you
disable both this and Generate font names, no font-family attribute will be written to the CSS.
•
Generate colour: clear this to avoid generating any colour style information.
Mobile
This category contains options for tailoring the way HTML pages are displayed in mobile devices.
•
Enable viewport: enables viewport meta tag for mobile browsing (HTML and Epub formats
only).
•
Viewport content: the content of the viewport meta tag for mobile browsing (HTML and Epub
formats only). The default value is ‘initial-scale=1.0, maximum-scale=1.0, user-scalable=no,
width=device-width’ which keeps the formatting appropriate to the width of the device.
Fixed Layout
This category contains options relating to fixed layout ebooks. Currently, fixed layout books are
supported on iBooks, Kindle and Epub 3. For more information, see Chapter 18: Creating Fixed Layout
Books.
•
Enable fixed layout: this should always be enabled for fixed layout books.
•
Allow reflowable and fixed layout: check this if your book contains reflowable and fixed layout
content. The mainstream platforms (iBooks, Kobo, Kindle) don’t allow mixing types of content,
but Epub 3 allows it.
•
Orientation lock: whether the book will be locked in portrait or landscape mode. This doesn’t
refer to the actual aspect ratio of an individual page: this is entirely up to you.
•
Pages per spread: how many pages (HTML files) will be created per double-page spread. This
may differ from the way you created your pages – Jutoh will split or merge pages accordingly.
•
Synthesize spreads: whether left and right pages should be ‘stuck together’ to form a seamless
spread, or whether the pages should be shown as being separate (even if next to each other). If
not ‘Default’, this setting overrides individual page settings.
•
Page width: the overall width of the book. This may be different from your individual page
sizes if the Pages per spread setting indicates that Jutoh should split or merge pages.
•
Page height: the overall height of the book. Currently Jutoh doesn’t split or merge pages in the
vertical direction so this should always be the same as your page heights.
•
Book type: this is only used for Kindle and need not be set; if you select ‘comic’, it enables
automatic zooming facilities on some Kindles and changes the rendering of double-page
spreads. There may be rendering side-effects when specifying a book type, so test the book
carefully. Please see the notes below regarding setting KF8 options.
89
CHAPTER 9: UNDERSTANDING CONFIGURATIONS
•
Open to spread: if checked, the book will open directly to a full-page spread. This is only
applicable to iBooks.
•
Show binding: if enabled, a binding crease will be shown in the middle of a double-page spread,
in iBooks only.
•
Write page image as background: if checked, the page background will be written using the
background-image CSS property, which for KF8 will disable default zooming but will also
prevent the background from being shown independently from the rest of the content when
clicking/double-tapping on the background.
•
Pre-render objects: if set to ‘Default’, any text or image objects that have Pre-render this
object checked in their region properties (or inherited page or project properties) will be
rendered to the background image instead of being written to the ebook as a separate object. If
this option is ‘Always’, all objects will be pre-rendered, and if ‘Never’, no objects are prerendered.
•
Font pixel scale: this option is in the HTML Formatting group rather than Fixed Layout, but it is
useful for making the text size in ebooks closer to the size as shown in Jutoh. Try a value of 0.85
if the ebook text is too large. It is only used when font sizes are expressed in pixels. If your font
sizes are in points, you can scale the text size in ebooks by setting the Custom DPI in Project
Preferences/Options.
•
Auto region magnification: for KF8 output only, this option enables Jutoh’s automatic
generation of magnification regions for backgrounds, text objects and image objects. For more
on this, see below. You may wish to switch this off if targeting e-ink Kindle devices since it can
cause interruption of normal page navigation.
Speech
This category contains an option for determining which speech profile is used for this configuration.
There is always at least one speech profile, which all configurations initially use.
•
Speech profile: the speech profile to use, containing further options. Edit speech profiles in the
Speech tab on the Formatting Palette.
Navigation
This category contains options for tailoring the way navigation is supported in HTML pages (for the
HTML format only). HTML templates specified here will be inserted into the HTML pages.
Navigation controls can be placed at either the start or end of the page, or both. For each header or
footer, there are three templates, to account for the fact that the presence of Next and Previous links
will change according to whether you are currently viewing the first page, the last page, or the pages inbetween. The default HTML templates give reasonable navigation between pages using text links; you
could provide more fancy navigation, perhaps using images that you copy to the folder of HTML files
after generation by Jutoh.
In the HTML templates, you can use these keywords: %TOCFILE%, %TOCTITLE%,
%PREVIOUSFILE%, %PREVIOUSTITLE%, %NEXTFILE%, %NEXTTITLE%, %FIRSTFILE%,
%FIRSTTITLE%, %LASTFILE%, %LASTTITLE%, %THISFILE%, %THISTITLE%. They will be
90
CHAPTER 9: UNDERSTANDING CONFIGURATIONS
replaced by the associated HTML file names and section titles.
•
Enable HTML header: enables navigation controls at the top of each HTML page.
•
Enable HTML footer: enables navigation controls at the bottom of each HTML page.
•
HTML header first page template: specifies the HTML to be placed in the header, for the first
page in the book.
•
HTML header middle pages template: specifies the HTML to be placed in the header, for all but
the first and last pages in the book.
•
HTML header last page template: specifies the HTML to be placed in the header, for the last
page in the book.
•
HTML footer first page template: specifies the HTML to be placed in the footer, for the first
page in the book.
•
HTML footer middle pages template: specifies the HTML to be placed in the footer, for all but
the first and last pages in the book.
•
HTML footer last page template: specifies the HTML to be placed in the footer, for the last page
in the book.
Conditional Sections
This category lets you include or exclude sections from the final ebook. Note that if you use these
properties to change the way sections are included in your book, you will need to regenerate the table
of contents, alphabetical index, and endnotes for each configuration since these will also change
according to configuration.
The last two options act on condition objects that bracket conditional content. Condition objects
contain a list of tags that are matched against these options to include or exclude the content.
•
Include sections matching tags: enter a comma-delimited set of tags which match against tags
specified in the Properties dialog for each section. For a given section, if any of the tags
specified here are mentioned in its own tags, or this property is empty, the section will be
included in the book.
•
Exclude sections matching tags: enter a comma-delimited set of tags which match against tags
specified in the Properties dialog for each section. For a given section, if any of the tags
specified here are mentioned in its own tags, the section will be excluded from the book.
•
Include media documents matching tags: comma-delimited tags matching tags of media
documents that should be included. If no tags are specified, all media documents match.
•
Exclude media documents matching tags: comma-delimited tags matching tags of media
documents that should not be included. If no tags are specified, all media documents match.
•
Include content matching tags: comma-delimited tags matching conditional content that should
be included. If no tags are specified, all conditional content matches.
•
Exclude content matching tags: comma-delimited tags matching conditional content that should
91
CHAPTER 9: UNDERSTANDING CONFIGURATIONS
not be included. If no tags are specified, all conditional content matches.
•
Permit links to absent content: check to silently remove links to absent conditional content, for
example if making a book sample. Off by default, in order to warn about missing links.
Commands
Sometimes you may wish to execute an external command before or after the compilation of your
book. These properties allow you to specify such commands. Note that if executing a command using
an interpreter such as Java or Python, you must specify the interpreter command in addition to the
script to be executed.
Here’s an example command that runs the Kindlestrip program:
c:\python27\python.exe c:\apps\kindlestrip1.35\kindlestrip.py "%FOLDER%\
%FILENAME%.%EXT%" "%FOLDER%\%FILENAME%_new.%EXT%"
•
Pre-compile command: a command to execute before compilation. You can use the keywords
%FOLDER%, %FILENAME%, %EXT% and %APPDIR%.
•
Pre-compile command: a command to execute after compilation. You can use the keywords
%FOLDER%, %FILENAME%, %EXT% and %APPDIR%.
•
Upload book: check to upload the file to a device, folder or email account after compilation
using applicable device profiles (edited via Preferences/Device Profiles).
•
Device profiles: a comma-separated list of profile names to use for uploading the file. You can
use star (*) to match multiple characters in the profile name. By default, any applicable device
profiles will be used. You can edit device profiles via Preferences/Device Profiles.
Comments
These options control how comments are included in your ebooks.
•
Comments to include: a pattern for including comments in the compiled book. Use wildcards to
match against text, author and tags. Separate alternate values with commas. Examples: *
(include all notes), none (include no notes), author:JS (match author JS), author:JS,AB;tags:todo
(match where the author is JS or AB and the todo tag is present).
•
Comment style: the character style to be used for comments.
•
Comment content style: the character style to be used for marked up content referenced by
comments.
•
Special comment formatting: check to output comments in the native format where supported
(currently ODT only). If this option is cleared, comments will be output as for other formats,
interspered with the text and subject to the Comments to include option.
General
These are the remaining options.
•
Notes: a place to write notes about this configuration, which will be displayed when you click
92
CHAPTER 9: UNDERSTANDING CONFIGURATIONS
on the configuration.
•
Use as preview configuration: if checked, this configuration will be used to generate the HTML
for Section Preview, regardless of the configuration currently selected.
Summary
We’ve looked at configurations in some depth, and you should now know where to look when you
wish to change the way Jutoh generates a particular ebook. Next, we go into the details of inserting,
sizing and converting the pictures in your book.
93
Chapter 10: Working With Pictures
In addition to text, Jutoh supports pictures (also referred to as ‘images’ within the Jutoh user interface).
Jutoh has a variety of methods to convert and resize pictures; this chapter tells you all you need to
know.
Inserting and editing pictures
To show pictures in your book, you can paste them into a page, or choose Format | Insert | Picture
(Shift+Ctrl+C). Inserting the picture will show a browser that displays thumbnails of all the pictures in
a folder.
The picture browser dialog
If the inserted or pasted image width is larger than the one specified in Resize images to max, in
94
CHAPTER 10: WORKING WITH PICTURES
Import Preferences, the image will be resized before insertion into the project.
You can use these formats in Jutoh:
•
PNG – good for high-quality artwork that should not be compressed. PNGs tend to take up a bit
more space than JPEGs, sometimes a lot more space depending on how the image was saved.
•
JPEG – a ‘lossy’ format good for keeping file size down, and best for photographs. Not so good
for diagrams or images containing text, since compression artefacts can be visible.
•
GIF – an older format similar to PNG. Jutoh cannot flatten this format (remove transparency)
except by converting to JPEG.
•
TIFF – a popular general-purpose file format that usually produces larger files than JPEG.
By default, Jutoh will convert non-JPEG image files to JPEG when compiling an ebook – see Image
export to ebooks below for more details. In the case of TIFF images, you need Jutoh to convert them to
JPEG since Epub and Mobipocket do not support TIFF.
A pasted image will always be inserted as a PNG. If you want to insert an image as a particular type,
such as JPEG, you can use Format | Insert | Picture to insert it as a file, instead.
Note that separate image documents in your project (created via Document | Add Image Document or
the toolbar new document command) are not included in your ebooks. These documents are purely to
help you organize pictures that might or might not be pasted into the book at some point.
Editing basic picture properties
To edit picture properties, click on the picture or right-click (control-click on Mac) and choose Picture.
The tabbed dialog illustrated below will be shown.
95
CHAPTER 10: WORKING WITH PICTURES
Editing picture properties
If the Name field has a value, it will be used to form the file name of the picture, and if several pictures
have the same name, only the first will be output to the ebook. This means that you can repeat pictures
without them taking extra space in the ebook file. However, if you find that pictures are repeated
erroneously, you can disable this behaviour by clearing the configuration option Use specified image
file names.
The Box style field can be used to assign a named style for specifying borders, margins and other box
attributes without having to redo individual attributes for each image. If you specify a box style, and
also change attributes individually, an automatic style will be generated based on the original style.
Alternative text is used to provide brief descriptive text that can be used in the absence of the ability to
see the image.
SVG alternative is used to provide an SVG vector image instead of the bitmap image, and is discussed
further below.
If you check Preserve original format, Jutoh will ignore configuration settings and always write the
picture in the original format. This can be useful for making exceptions when most pictures are fine as
compressed JPEGs, but some pictures don’t look good when compressed, such as line art or charts.
96
CHAPTER 10: WORKING WITH PICTURES
The controls under File operations allow you to export, import, paste and edit pictures without
changing other properties. Edit will launch an external editor that has been set up using Configure
Editors in Preferences/Helpers. Undo will undo import and paste operations performed within the
dialog, but you cannot undo these operations once you close the dialog.
Editing size properties
Clicking on the Size tab shows this page:
Editing picture size properties
The first control in this page is Floating mode. Normally, a picture takes up a character position and
will flow with the rest of the content. However, if you set Floating mode to ‘Left’ or ‘Right’, the
picture will be shown next to other content. This behaviour can be shown within the Jutoh editor; it can
be disabled to make it easier to see where in the content the image has actually been inserted. Use View
| Preview Floating Objects (Alt+F10) to toggle this mode on and off.
The screenshot below shows a picture with a border and background colour floating to the right of
other text. It impinges on both the paragraph it’s associated with, and the next paragraph (depending on
the size of display). The picture has been set to have a width of 50% of the display width: set a
97
CHAPTER 10: WORKING WITH PICTURES
proportional width for a floating object, to be sure that there will be sufficient space for it to float.
A picture floating to the right of text
Kindle KF7 doesn’t support floating pictures, but KF8 does, and so do all ereaders that use Epub, so
floating pictures should work on all recent devices.
Next, we have Width and Height, which you can specify in pixels, cm or percentage, or not at all (the
ereader will use the physical picture size to decide how big it should be on the screen). Minimum and
maximum size can also be specified; it’s a good idea to specify a maximum size as a percentage to stop
the picture exceeding the device display size. Percentage size is relative to the containing object: a text
box, a table cell, else the overall display size.
You can specify just a width or just a height, and the ebook reader will keep the original aspect ratio.
Image size specified in the individual image properties (as distinct from the resizing done by Jutoh as
described below) is respected by some viewers and not others. In particular, early Kindle devices will
ignore the specified pixel width and height and will use the original resolution, scaled to fit if
necessary, whereas newer versions of Kindle hardware and software take pixel, cm and percentage size
specifications into account. However, KF8 still ignores the maximum width and height values, instead
making sure the pictures don’t exceed the display size. Most Epub viewers recognise pixel, cm and
percentage size specification.
See also the advice below on using the Replace absolute widths configuration option to turn absolute
widths into percentages at book compile time (not permanently).
Users sometimes ask what DPI (dots per inch) a picture should be saved in before inserting it into
98
CHAPTER 10: WORKING WITH PICTURES
Jutoh. When adding pictures to Jutoh, it’s more helpful to think in terms of pixels. You need to balance
the need for an adequate resolution so the image doesn’t appear pixelated on high-resolution devices,
versus the need to keep the ebook file size within reasonable limits. For a photograph to be displayed
full-width on the ereader device, you might consider inserting images with widths of around 1000
pixels. You can always use Maximum image width in your configurations to limit the physical image
sizes in the generated ebook, perhaps setting different maximum sizes depending on ebook format. See
also the recommendations on image sizes for individual platforms such as iBooks and Kindle.
You will only rarely, if ever, need to change the Position mode and related controls. The position
mode determines how positioning is specified, and currently Jutoh only supports ‘Static’ (the object
behaves like a single character) and, if the object is floating, ‘Relative’ (the Left and Top fields
determine the offset from the regular floating position). Only the Top offset affects the display within
the editor. DOCX import supports these offsets.
Editing margin, border, background and advanced properties
The Margins page shows fields for margins (the space outside any border) and padding (the space
between any border and the object).
Editing picture margins
99
CHAPTER 10: WORKING WITH PICTURES
To visualise the difference between margins and padding, see Appendix C: The Jutoh Box Model.
In the Borders page, you can specify the border width in pixels, cm or points. The style of the border is
restricted to solid, dotted or dashed within the editor, but other selections may show in the ereader.
Editing the picture border
You can specify a rounded corner, although this is only supported on some ereaders. You can also
specify an extra border called the outline, but this is not recommended as it is not supported in all
export formats.
The Background page simply allows specification of the background colour (which will only show for
a picture if you also specify some padding).
Finally, the Advanced page lets you enter an identifier, CSS class name, Epub type, JavaScript event
handlers and other properties that only more complex books are likely to need. Note that if you specify
a CSS class name, image properties such as maximum size and margin will not be included in the
generated code as they are assumed to be specified by the class.
100
CHAPTER 10: WORKING WITH PICTURES
Adding captions to images
You can add captions as normal paragraphs above or below an image. You can manually add the
caption and apply a suitable paragraph style, or, if you wish to automatically number your images, you
can use the command Format | Insert | Caption. This lets you enter the caption text and choose what
kind of object you are captioning (such as a picture or table). Jutoh will then insert the caption text and
a ‘sequence’ field that automatically increments the caption number. Finally, Jutoh will apply a suitable
paragraph style.
You may find that page breaks appear between the image and the caption, which is not ideal. For
Kindle books, it seems that nothing can be done about it for now, but for most other ereaders, you can
get Jutoh to glue them together using a non-breaking ‘div’ tag.
To do this, apply a named style to your captions, using different style names depending on whether the
caption is above or below the image. Now show the Project Properties dialog and click on
Accessibility. Check Add figure and caption tags, and type style patterns for captions below images
and captions above images. You can leave one of them blank if all your captions are in the same
position. Ensure Avoid page breaks within figures is checked.
If you need to add a caption to a floating image, or the caption needs to be restricted to the exact width
of the image, or you have multiple images per caption, create a text box with a percentage or absolute
width. Add the image, setting the width to 100%, and then add the caption.
Note that these tips also apply to table captioning.
Special considerations for iBooks
A problem that many people find with images in iBooks Epub files is that iBooks ignores width and
height specifications in images, and fits images to the page instead. This can be bad because you may
wish to include high-resolution images which will look good on high-resolution devices such as retinadisplay iPads, while keeping the image to a particular size. The workaround for this is to use a parent
‘div’ tag that takes the image’s size, and have the image expand to the size of the parent. This
optimization is applied when Optimize for iBooks is checked in your configuration. An image that is on
its own in a paragraph (without any other content), and has its size dimensions specified in its
properties, is generated using a ‘div’ tag that takes the dimensions of the image, and dimensions are
removed from the image itself.
So, to support a variety of device resolutions, it’s a good idea to specify high-resolution images and
specifiy the desired size (just one of the dimensions will do). Currently this won’t work if you have
multiple images or other content in a paragraph.
Inserting SVG pictures
The SVG format is used for scalable vector graphics, and in some cases can provide better quality than
bitmaps. Not all ebook software and hardware support SVG but it’s an increasingly popular format.
There are three ways of getting SVG pictures into your ebooks:
1. Add a media document to your project, containing an SVG image. Insert a reference to the
media object with Format | Insert | Media Object. Choose the image you previously added as
101
CHAPTER 10: WORKING WITH PICTURES
a media document. A placeholder icon is added, and you can click on it to change the properties.
Or:
2. Add a media document to your project, containing an SVG image. Insert a regular image (PNG,
JPEG) that duplicates the look of the SVG image. In the image properties, type the name of the
SVG image in the field SVG alternative, such as media/mypicture.svg. Now check the
configuration property Use SVG images to write SVG images instead of bitmaps. You may need
to specify the image width and height in image properties for the SVG to be displayed correctly.
Or:
3. For more flexibility, add a drawing object which maintains up to three formats: bitmap, SVG
and MathML. You can paste drawing objects from other applications that support SVG or
MathML, and they are created on import if SVG or MathML is present in the original file. For
more details, see the topic Working with drawing objects in the Jutoh application help.
This is what the drawing object properties dialog looks like, with tabs for editing each of the supported
formats, and controls for operations such as import, export, previewing and editing:
102
CHAPTER 10: WORKING WITH PICTURES
The drawing object properties dialog
With the second and third options, you can use configurations to control whether SVG or bitmap
images are exported, so this allows you to maintain different configurations for creating ebooks with
either SVGs or bitmap images for different sites or devices.
Importing pictures from DOCX, ODT and HTML
You can control some aspects of picture import when they are part of documents imported via the New
Project wizard. In the Import Preferences pane in the Preferences dialog, or in the Import Options page
in the New Project Wizard, you can choose whether to import images or not, and whether to resize
them and to what size.
If you want to specify the image size later, you can clear the Respect specified image size option. This
will force images to be imported either at the width you specify, or at the maximum resolution they
have in the original file. Then you can specify the maximum image width and height in your
configurations for later resizing (see Image export to ebooks below).
Some types of picture cannot be imported from ODT documents (in particular SVM, the StarView
Metafile format). These pictures should be pasted or inserted by hand after import. Or, export an
HTML file using OpenOffice or LibreOffice, to the same folder that contains the ODT and with the
same root name as the original file. For example, thing.odt should be exported as thing.html. GIF files
will be written to the folder, and Jutoh will use these images when importing from ODT.
Pictures pasted from the clipboard into a DOCX file are stored as Windows Metafiles. These can be
imported by Jutoh on Windows, although picture size may be slightly different from the original. On
Linux and Mac OS X, metafiles are ignored, so you have several options:
1. perform the document import on a Windows machine and copy the .jutoh file afterwards to your
Linux or Mac machine;
2. in your original DOCX file, replace pasted images with images inserted from PNG or JPEG files
and then perform the import; or
3. paste or insert the missing images into your Jutoh project.
Image export to ebooks
By default, Jutoh will convert non-JPEG images to the more space-efficient JPEG format. You can
switch this off via the Convert images to JPEG configuration setting. You can also choose the
compression ratio when converting, using the Image quality configuration property – the higher the
value, the better the quality. 80% is usually a good value.
You can also control the maximum image width and height, using the Maximum image width and
Maximum image height properties. If one or both values are specified, Jutoh will resize each image on
export if one or both of its dimensions exceed the specified maximum. In this way, you can easily
create multiple books with images optimized for different screen sizes.
An additional option – Maximum image optimization width – applies an optimization for images whose
103
CHAPTER 10: WORKING WITH PICTURES
width is the same or smaller, by simply doubling the size before rescaling back down. This improves
image quality at the expense of longer compile times, so you might like to have a configuration with
this set to -1 for ‘preview compiles’ if you have a lot of images.
The above options determine the maximum image size at the time the image is written to the ebook.
However, often you will not know in advance what size is best for the device that is being used. Kindle
viewers will automatically scale images to fit, but for Epubs, you might like to check Limit images to
viewer size – this generates CSS that limits the image size to the maximum width or height of the
current viewer. This will only work if you have one image on a line, since two images side-by-side will
get a combined 200% of the viewer width or height. You can override the maximum width and height
on a per-image basis by specifying these values in the image properties dialog. If your image is too big
for the device display, it could break across two pages – this can cause the Epub to be rejected by
iTunes, so make sure Limit images to viewer size is checked if your book contains large images.
If you have specified absolute sizes for images in centimetres – quite likely after importing from a
word processor file – you may find the images are too large for small ereader displays, or they are not
in the proportion originally intended relative to the display width. It can be better to use percentages,
and you can apply this to all images (and boxes and table objects too) when exporting ebooks by
checking the Replace absolute widths configuration option. Jutoh will use the paper size and left and
right margins defined in the configuration (or the parent object’s width, if it’s an absolute value) to
calculate a percentage width for a given object width.
If your PNG images contain alpha transparency, by default Jutoh will ‘flatten’ them, that is, remove the
transparency and give the images a white background. You can suppress this by clearing the Flatten
images configuration option. If you do not flatten images, they may end up as black boxes in your
ebook. Note that GIF images cannot be flattened, unless converting to JPEG.
If you find your images look a little blurry (particularly if you’re using images for symbols or
equations), switch conversion to JPEG off in your configuration(s), or use GIFs and set Convert
images to JPEG to ‘All except GIF’. Or, you can leave JPEG conversion on, but for selected images
such as symbols and diagrams, check the Preserve original format option in each image’s properties.
As mentioned above, if you have multiple instances of the same image in your project, you can indicate
to Jutoh which images should only be exported once by choosing a unique name for the Name field in
the image properties dialog; the first image with a given name will be exported, and subsequent
occurrences will use the same image. The name will also be used as the root of the image file name.
Don’t use non-ASCII characters, such as Chinese characters, for file names or EpubCheck and/or
Kindlegen will fail.
Exporting images to files
If you need to extract all images from your book, in their original format and size, you can use the File
| Export | Images command. It will prompt you for a folder that will contain the files. If you need to
get hold of the files that have been converted to JPEGs and resized as part of the book compilation
process, then you can unzip the Epub file using an archive tool, renaming the extension to zip first if
necessary.
104
CHAPTER 10: WORKING WITH PICTURES
Working with large images
If your project contains a lot of large images that slow Jutoh down and cause extreme computer
resource usage, you can switch images off temporarily, or you can tell Jutoh to load images on demand.
These options are in Project Preferences/Advanced and are Enable images and Load images on
demand. You need to change these options before you load the relevant project.
Using media objects to insert images
Instead of inserting images directly, you can insert media documents and then add media objects that
refer to them. For more on this, see Embedding media.
Summary
We’ve seen how to insert pictures and adjust the way they are saved in your compiled ebooks. Next, we
look at further refinements for your books, namely getting Jutoh to help create various kinds of index
section.
105
Chapter 11: Working With Indexes
Jutoh can help you with four kinds of index – table of contents, alphabetical index, endnotes (or
footnotes at the end of each section), and bibliography. For a simple book, you don’t have to know how
to use these, and Jutoh will generate a simple table of contents automatically by default.
Creating an advanced table of content
In an Epub 2 book, there is always a NavMap (navigation map) which tells your ebook reader to list the
sections in your document. Optionally, you can create a page listing the contents of the book – more
like the contents you’ll see in a book. It’s just a regular page with hyperlinks to your book sections. In
Jutoh we’ll call these ‘NavMap’ and ‘table of contents’ respectively. The following screenshot of
Adobe Digital Editions illustrates the difference between a NavMap (on the left) and a table of contents
(on the right):
Adobe Digital Editions showing a NavMap and table of contents
Ebook readers will present the NavMap in different ways, and some may label it the ‘table of contents’.
The main point is that in an Epub you have to have a NavMap, but a separate table of contents page is
optional.
Mobipocket files also have a NavMap, but in Kindle hardware it’s not actually shown. On Kindle for
PC and Mac, you can show the NavMap using Show Document Navigation, and on Kindle Previewer
106
CHAPTER 11: WORKING WITH INDEXES
this is available via NCX View, as follows:
Kindle Previewer showing the NCX View (NavMap)
When creating an Epub file, Jutoh always creates a NavMap (by default, from the titles of your book
sections). Jutoh can also create a basic table of contents page simply by checking the Generate table of
contents property in the current configuration (Project Properties/Configurations). The extra page will
appear in your book, but will not be visible in your Jutoh project.
Jutoh supports an additional, advanced method of building a NavMap and table of contents. In this
mode, you maintain an explicit list of contents entries, with help from Jutoh. The entries appear in the
Contents page of the Project Properties dialog (under Indexes/Contents), and are also editable in the
Table of Contents Wizard. Use this wizard (with the command Book | Build Table of Contents) to
switch to advanced mode and specify how contents entries will be gathered from headings in your
documents.
Why would you want to use this advanced method instead of the default table of contents generated by
Jutoh? Well, you get more control of styling and of which entries will appear in the contents, and you
can generate a table of contents that’s several levels deep (the default method only gives you one level).
So for most projects it’s worth the extra effort.
Here’s how the contents entries appear in Project Properties, after running the Table of Contents
Wizard at least once:
107
CHAPTER 11: WORKING WITH INDEXES
The Table of Contents page of the Project Properties dialog
Let’s have a look at the Table of Contents Wizard, invoked by pressing Run Table of Contents
Wizard in the Project Properties dialog or from Book | Build Table of Contents. Here’s the first page:
108
CHAPTER 11: WORKING WITH INDEXES
Table of Contents Wizard: first page
To create an advanced table of contents with both a NavMap and a separate table of contents page,
check Create contents with Jutoh’s help, and also Recreate contents by scanning documents, and
Create a contents page. In the next wizard page, we specify the settings that Jutoh will used when
finding headings in the document.
109
CHAPTER 11: WORKING WITH INDEXES
Table of Contents Wizard: generation preferences page
Let’s explain the options presented here.
Table title specifies the text of the title that will be inserted in the table of contents.
Table title style lets you choose the paragraph style that will be used to format the table of contents
title.
Link style specifies the character style that will be used to format the linked entries in the table.
Max heading level lets you choose the maximum number of levels that will appear in the NavMap and
table of contents.
If you check Overwrite existing text (the default), the whole table of contents page will be replaced
when regenerating it. Usually this is what you want, but you might want to clear this option if you have
entered extra text that you want to keep and you want to manually edit out the old entries later.
Add at least one entry per section determines whether Jutoh will add an entry for a section even if it
didn’t match any headings. Usually it’s best to keep this option checked.
Use document depth, not level can be checked if you want to bypass matching headings, and instead
generate one link per section and use the hierarchy of your project to determine how the NavMap and
table of contents is built. You can create or move book section documents under other ones to create a
hierarchy; if you are not using Use document depth, an actual hierarchy isn’t necessary since headings
110
CHAPTER 11: WORKING WITH INDEXES
give an implicit hierarchy, but it’s an option that you have.
Editing level shows the current level we’re editing, affecting the next two fields. There will be as many
levels available here as we specified in Max heading level.
Style for formatting this level is the paragraph style that will be applied to the entry at this level
(depth) of the contents page.
Finally, Matching heading style for this level tells Jutoh that when this style matches within the
project, we will treat this paragraph as a heading at this level. You can match against multiple styles by
specifying asterisk (‘*’) for ‘match multiple letters’, and you can specify multiple patterns by
separating them with the pipe character (‘|’).
In the example, we’re allowing Jutoh to look at three headings levels, and for the first level, we’re
going to search for the ‘Heading 1’ style and format each table of contents entry with ‘TOC Entry 1’.
Click on the Editing level control to change the level number and specify the heading styles that will
be used for the other two levels.
When you click on Next, Jutoh will build the table of contents and show the results in the next page,
for you to edit or accept as-is:
Table of Contents Wizard: entries page
111
CHAPTER 11: WORKING WITH INDEXES
If you find that Jutoh hasn’t found the headings you thought it would, click Back, edit the options, and
try again. You might need cancel the wizard and apply styles to your content, for example if you don’t
have consistent heading styles. You also need to make sure that Jutoh will find headings without
skipping levels; Jutoh will complain if there are such jumps. For example, going from level 1 to level 3
is not allowed, although you don’t have to ‘unwind’ the headings similarly; you can happily jump from
level 3 back to level 1. It probably indicates a problem with your document if you have, say, a
‘Heading 1’ followed by a ‘Heading 3’. While this may achieve the look you want, you also need to
think about a proper structure for your document.
When you click Next, the final page will be shown with an option to automatically build the table of
contents whenever generating the Epub or Mobipocket – you can leave it unchecked if you can
remember to use Update whenever a heading has changed in your project.
Table of Contents Wizard: final page
Click on Finish to quit the table of contents wizard.
Note that to make best use of the advanced table of contents facility, you need to use consistent heading
styles in your document, so Jutoh can work out the heading levels (in the structure implicit in your
document) and add bookmarks to them. For example, you might use ‘Heading 1’, ‘Heading 2’,
‘Heading 3’ and so on.
112
CHAPTER 11: WORKING WITH INDEXES
If you haven’t opted to add a table of contents page, Jutoh will still use the found entries to create the
NavMap. To revert to ‘simple mode’ again, run the wizard and the entries will be deleted, telling Jutoh
to generate a basic contents page (if specified).
If an explicit table of contents page is found in the project (by searching for the title ‘Table of
Contents’ or by finding a document whose Guide Type is set to ‘toc’ in its document properties) then
Jutoh will suppress the basic contents page to avoid duplication.
Note that if you are using basic contents creation, the entries are formatted with ‘TOC Entry 1’ (if
available) and the contents heading is formatted in ‘TOC Heading’ (if available).
Editing table of contents properties
To edit the detailed properties of your table of contents when you’re not using the table of contents
wizard, show the Project Properties dialog, click on Indexes, then click on Contents. Now click on
Edit on the top row of buttons and you will see the Table of Contents Properties dialog:
113
CHAPTER 11: WORKING WITH INDEXES
The Table of Contents Properties dialog
Most of the settings are as per the table of contents wizard, but some give additional control for
multiple tables (see Adding multiple tables below).
Adding multiple tables
Jutoh allows you to add further tables, for example tables of figures, or the contents for a part of the
overall book.
Click on Add
at the top of the Contents tab, and give a unique identifier for this table. You can
change the title used for the table page, and setting the Table type field indicates to Jutoh that you
would like a table of contents, an index of illustrations, an index of tables, or a custom index. Jutoh will
change some of the fields to more appropriate defaults when you change the table type, but they all
114
CHAPTER 11: WORKING WITH INDEXES
work the same way: by scanning paragraph styles for items to include in the table. For an index of
illustrations, for example, you can get Jutoh to match against caption styles, say with the matching style
value “Picture Caption*”.
Set a range to scan if you’re interested in a particular set of pages. If you already have a section that
you want to use for the new table, you can click Set next to Table section ID to specify the document
to use.
Switch between tables with the drop-down list at the top of the Contents tab. When you click on Run
Table of Contents Wizard, it will use the currently selected table. If you haven’t specified a document
to use for the table, one will be created, which you can move to the desired place in the project later.
To edit properties of your table, such as the title, the range of pages, and styles, click on Edit
.
How tables are output to OpenDocument
In most formats, tables are output as they appear in the Jutoh project. For OpenDocument (ODT)
output, however, Jutoh tries to output a special index that gathers items from the document
dynamically. This means that if you edit the ODT document, updating the document fields ensures
your indexes are updated as intended. It also means that you get proper page numbers in the indexes in
your ODT or exported PDF document, and not just links.
Jutoh will look for the guide types “toc” (table of contents), “loi” (list of illustrations) and “lot” (list of
tables). If it finds one of these, it generates a table-of-contents field that refers to the relevant table, and
ignores the actual text in that document. The table-of-contents field in turn generates the appropriate
code in the ODT file. You won’t see this field, since it’s generated as an intermediate step. If you are
creating a custom index, and therefore don’t set a guide type, the value of Table section ID will be
used to indicate that the document is a special index.
You can suppress this special index generation by clearing the Special table of contents formatting
configuration option.
Specifying and stripping link styling
Links from the contents page will be formatted using the character style specified by Link style in the
Table of Contents Wizard Preferences page. By default, this is the style called ‘URL’, that Jutoh adds
to your style sheet by default. This makes the links look good in Jutoh, but if your book reader uses
different colours for links by default, you may have a colour clash. So, you can have Jutoh strip out the
URL styling when generating the ebooks by specifying the value of URL attribute removal style in
your configuration. It’ll only strip out attributes that are the same in the style to you specify in the
configuration, and the actual link, which means you can have specific colours and other attributes in
your content without them also being removed. The same logic applies to indexes and footnotes.
Creating a table of contents manually
If Jutoh’s automatic contents-building facility isn’t for you, you can construct the NavMap and table of
contents page manually. Build your NavMap in Project Preferences under Indexes/Contents, by
creating individual entries and linking them to bookmarks (or overall sections). Now you have a choice
of how to create the table of contents page. You can run the Table of Contents Wizard, clearing
Recreate contents by scanning documents so it only regenerates the contents page without scanning
115
CHAPTER 11: WORKING WITH INDEXES
headings and recreating the NavMap. Or, you can create the table of contents page entirely by hand by
adding a section, giving it a Guide Type of ‘toc’ (see the document properties, available from the
project outline context menu, or Document | Document Properties) and adding links. This is
laborious, so it’s likely that you’ll want to use one of the automatic or semi-automatic methods.
Creating a table of contents for a fixed layout book
Automated table of contents creation doesn’t currently work for fixed layout, since you may choose to
have your contents within an arbitrary text box. Instead, create your table of contents manually by
linking to pages and (optionally) bookmarks within the pages.
You can, however, edit the NavMap entries in Project Properties/Indexes/Contents, and if there is
one or more, Jutoh will use this to generate the NavMap in the book instead of adding all section titles.
Epub 3 considerations
Epub 3 uses a different kind of NavMap: a navigation document. It’s common to generate the NCX as
well, for older ereaders, and this is the Jutoh default, but if you wish to suppress NCX generate, clear
the configuration option Generate NCX. Both kinds of navigation index are created from the entries in
Project Properties/Indexes/Contents.
Creating an alphabetical index
Jutoh can create an alphabetical index if you insert index entries throughout your book. The items in
the index are linked to the appropriate position in the book.
Insert index entries by selecting some text for the entry and using the Format | Insert | Links | Index
Entry menu command. Or, you can leave the text unselected and type the entry in the Index Entry
dialog.
Index Entry dialog
When you press OK, the index entry will be inserted and shown as this symbol:
116
CHAPTER 11: WORKING WITH INDEXES
To edit the entry, simply click on the symbol.
You can create a multi-level index by filling in the Key 1 and Key 2 fields. These represent a category
and a sub-category, and will be written with suitable indentation in the index section. For example, if
you fill in the Entry, Key 1 and Key 2 fields with ‘Cat’, ‘Animal’ and ‘Mammal’ respectively, you
would get Animal, Mammal, Cat in the index. The Entry field is always the final (most specific) item.
The index section is not created until you instruct Jutoh to do so, via the Index Properties page, or the
Book | Update command.
In the following screen shot, two index entries have been added: Cat and Dog, each with Animal and
Mammal keys. The items are linked back to their original position in the document; if there are
multiple locations for the same index entry, linked numbers are shown instead following each entry.
Two index entries
If you need to add a ‘see’ or ‘see also’ entry, you can choose one of these options from the Type
dropdown control, and then type text into the See entry. It will be placed by the relevant entry in the
index, according to the entry and key fields. This kind of index entry doesn’t have to live anywhere in
particular but is easy to lose, so consider inserting all ‘see’ and ‘see also’ entries into the same page.
Configuration
You can edit various aspects of index presentation in the Index Properties page. Click on Edit on the
toolbar or Book | Project Properties, or type Alt+Enter, then click on Indexes, then Index, and finally
on the Options tab.
117
CHAPTER 11: WORKING WITH INDEXES
Index options
Settings include the title of the section and how items are to be formatted. Using the Link format field,
you can choose whether items will be bracketed. You can customise separators between the entry text
and the link, and between links. With the Only use linked numbers option, you can determine whether
an item with a single link will have clickable entry text (off), or a more consistent look using a single
linked number (on).
You can specify that the index should be recreated every time the book is compiled (check
Automatically build index) so you don’t have to remember to rebuild the index after editing.
You can edit the index itself in the Entries tab: you can change the text of items, remove them, and
reorder them. These edits will only be retained if you answer No after clicking the Generate Index
Now button. If you update the index from the Update Special Book Sections dialog, the index will be
rebuilt from scratch from the entries in the book content, losing any edits in the Entries tab.
Importing index entries
Index entries are imported from ODT and DOCX documents. However, no special formatting (such as
italics) can be applied to parts of entries or keys – they are simple text strings all formatted with the
same style.
118
CHAPTER 11: WORKING WITH INDEXES
Creating footnotes and endnotes
A Jutoh book can have either footnotes at the end of each chapter (the default), or a separate endnotes
section. Footnotes are always automatically created when the book is compiled, but the endnotes
section must be explicitly updated or told to update itself automatically before each compilation.
You can insert footnotes or endnotes using the Format | Insert | Links | Footnote menu command.
Type the note text in the editor dialog, press OK, and this note symbol will appear in the text:
To edit the note, just click on the symbol. You may wish to resize the editor to see more items on the
toolbar. Since you cannot use menubar commands from the footnote editor dialog, you can instead use
the context (popup) menu to format text – this is shown with right-click on Windows and Linux, or
control-click on Mac.
Note that currently, Jutoh applies the ‘Footnote’ style to all footnotes when appended to a section or
collated in the Endnotes section, unless Always apply style is cleared in index properties.
Configuration
You can configure the way footnotes and endnotes are presented via the Footnotes and Endnotes page
in Project Properties. Click on Edit on the toolbar or Book | Project Properties, or type Alt+Enter,
then click on Indexes and finally on Footnotes and Endnotes.
119
CHAPTER 11: WORKING WITH INDEXES
Footnote and endnotes options
In the footnotes and endnotes properties page, you can choose whether the citations will be represented
by superscript numbers or numbers in square brackets.
You can influence how the citation numbers are styled by changing the Base reference style (by
default, ‘Citation’), or editing the ‘Citation’ style definition in the style sheet editor. By default, the
‘Citation’ style applies no extra formatting.
Footnotes
In footnotes mode (the default), your footnotes will not show within Jutoh (unless edited), but if there
are any footnotes in a chapter, they will be appended to the chapter when the book is compiled, after a
horizontal rule (divider). Footnotes are always added, so if you were to import footnotes from an ODT
file and then compile it without altering any settings, they will show up.
For Epub books, you can change the horizontal rule properties from the footnotes and endnotes
properties page. For example, you can set it to be coloured red and occupy 30% of the page width. For
ODT files, Jutoh will insert an image reflecting some of the configured properties.
Endnotes
If you switch to endnotes mode, you need to use the Book | Update menu command to create the
endnotes, or create the section from the Footnotes and Endnotes properties page. From this page, you
can choose to always rebuild the endnotes page by checking Automatically build endnotes.
120
CHAPTER 11: WORKING WITH INDEXES
In the properties page, you can choose the endnotes title and styles for the title, per-chapter heading,
and whether the numbering will be global (continuous numbering) or whether it should restart for each
chapter. Note that a chapter should be a separate section, or numbering won’t start for each chapter.
Normally, whether the numbering is global or starts again for each chapter, the chapter headings will be
shown. You can suppress chapter headings by leaving the Group style blank.
Importing footnotes
Footnotes are imported from ODT files, but not from HTML files since there is no representation for
footnotes in HTML and it’s impossible to distinguish them from regular linked text. So if importing
from HTML, you will need to copy the footnote text into new Jutoh footnotes. There is an option in the
Jutoh Document Cleanup dialog (from the Book menu) for recognising InDesign footnotes and
converting them to Jutoh, so if you are importing from InDesign HTML, it’s worth trying this.
Creating a bibliography
Jutoh has tools to manage bibliographic entries and create a bibliography or references section from
them.
If you import a document from a DOCX or ODT file and it contains embedded citations, Jutoh will
import them as special citation objects. You can then click on these objects and edit the individual
fields.
By default, if you import a document with a bibliography, Jutoh will use the imported citation and
bibliography text without any special processing. The imported citation text, such as ‘Smart, 2005’,
will be imported into the Custom citation field for each citation object, and will be output as-is. The
bibliography section will also be imported and compiled as-is. This allows you to reproduce as exactly
as possible the imported document. Alternatively, you can use Jutoh’s facilities to format citations and
also replace the bibliography section. Let’s look at this in more detail.
Creating citations and a bibliography
You can create a new citation by using the command Format | Insert | Links | Citation, or by doubleclicking on the bibliographical reference object in the Objects palette. You will then see the Insert
Citation dialog:
121
CHAPTER 11: WORKING WITH INDEXES
The Insert Citation dialog
You can choose to create a brand new entry for the citation, or browse the existing databases and items
already in the project, if any.
When you press OK, you will be shown a property editor, as below, with the opportunity to see either
only the important properties (fields) or all of the relevant ones for the selected item type.
122
CHAPTER 11: WORKING WITH INDEXES
The bibliographic reference editor
Press OK to insert the citation after you are satisfied with the field values.
When entering person names into a field, separate them using semicolons and type the forenames first.
For example: “Dr Julian Smart; Fred Bloggs”. You will be able to change the way that names are
written to the bibliography or shown in a citation, but the names should be entered in this standard
format.
How Jutoh stores bibliographic entries
Entries are stored in two places: in one or more databases that you can edit via the Project
Properties/Indexes/Bibliography panel, and in the content itself. By storing entries at the point of
citation in each document, information doesn’t get lost when copying and pasting between projects.
When a citation is edited, or the bibliography updated in Jutoh, the data in the citations and in the
database(s) are synchronised. You can edit the entries either by clicking on citations in the content, or
by editing the databases via the bibliography settings. You can cite the same item multiple times, since
each item has a unique ‘Short name’ that ensures the same information is used.
As we shall see in more detail, you can create as many bibliographic databases as you like in Jutoh, and
have Jutoh take items from these databases. The first database (called ‘Internal Database’) is special in
that it represents the desired items for the bibliography, taken from citations or from other databases.
Databases are always stored in an individual project, not globally, but they can be exported and
imported into other projects. This ensures that a project can be shared without losing the information
that is required to edit, update and compile it.
Creating and updating the bibliography
To create a bibliography section, use the menu command Book | Update and check Bibliography; or
you can click on Generate Bibliography Now from Project Properties/Indexes/Bibliography. This
123
CHAPTER 11: WORKING WITH INDEXES
scans through all the citations in your project, optionally sorts them, and formats them into a
Bibliography section which Jutoh will create if there is not one already (with the ‘bibliography’ guide
type). If there is an existing bibliography section, imported from a file, you may wish to delete it first
assuming you’re happy for Jutoh to handle the formatting.
If you add, delete or edit an item, or change the bibliography settings, you will need to update the
bibliography again as above, before compiling the book.
Changing bibliographic settings
There are many ways in which you can change how Jutoh formats the bibliography. Go to Project
Properties/Indexes and click on the Bibliography tab. The Options sub-tab is the first to be shown:
The Bibliography Options panel
Here you can change the bibliography section title and its style. You can specify whether the items are
sorted and if so, using which fields.
You can specify that all items should be output, and not just the cited ones – Jutoh will use any
databases specified as sources in the Entries tab.
You can specify the paragraph style applied to each entry in the bibliography, and also whether entries
should be formatted as a list.
124
CHAPTER 11: WORKING WITH INDEXES
The citation options are pertinent to the display of citation items as referenced throughout the content,
rather than formatting for the bibliography section. You can specify the citation character style. By
default, the ‘Citation’ style doesn’t apply any formatting, but you can edit the style to have your own
formatting such as superscript, or you can specify a different style.
For the citation format text, specify text containing field keywords such as %SHORT NAME%,
%YEAR% and the special keyword %NUMBER% for the position in the bibliography. You can also
add an optional prefix and suffix for the citation, for example brackets. If the citation shows authors,
specify a separator to use for multiple authors.
When specifying author fields in the formatting description, you can append an operation to the name
in order to change the way the names are formatted, for example %AUTHOR.SURNAMES%. Here are
the keywords you can use:
•
SURNAME: the surname of the first person.
•
SURNAMES: the surnames of all people, separated by the value of the person separator field.
•
FORENAMES: the forenames of the first person.
•
SURNAMEFIRST: the full name of the first person, surname first.
•
SURNAMELAST: the full name of the first person, surname last.
•
SURNAMESFIRST: the full names of all people, surname first.
•
SURNAMESLAST: the full names of all people, surname last.
If you have imported citations from a file and want to use the citation text already present, you can
check Use custom citation text where present. If this is cleared, Jutoh will only use its own
formatting as specified here. Or you may wish to remove all the imported citation text using Remove
All so that you can use Jutoh’s citation formatting most of the time but occasionally override it via the
‘Custom citation’ property.
A handy option is Merge adjacent citations, which if checked tells Jutoh to merge citations instead of
showing them separately. So this way you can have [Smart, 2011; Bloggs, 2012] instead of [Smart,
2011][Bloggs, 2012] if citations are next to each other. You will only see this in the compiled book,
and not in the editor.
Managing bibliographic databases
As mentioned above, Jutoh always maintains an ‘Internal Database’ of items collated from the project’s
citations and other databases to put into the bibliography. You can create further databases from which
citations can be selected or which can be added in their entirety to the bibliography. To manage these,
go to the Entries tab of the Bibliography page.
125
CHAPTER 11: WORKING WITH INDEXES
The list of bibliographic databases
Here you can edit, add and delete databases (though you can’t delete the Internal Database). You can
export to and import from databases using files with extension ‘jutohbib’, a binary format. On
Windows, you can import from the global Word bibliography file using From Word, if you have
Microsoft Word and there are entries gathered from documents.
If you wish, you can select a database in the Source for entries control for an additional database to be
used for collecting items. You can select several by typing the names separated by commas.
Click Edit to edit, add or delete entries, or modify the template that specifies the valid fields and types
for the database.
126
CHAPTER 11: WORKING WITH INDEXES
The bibliographic database editor
If you click on Template, you can edit the fields and item types:
127
CHAPTER 11: WORKING WITH INDEXES
The bibliographic database template editor
If you make edits to the template that you regret, you can click Reset to return the template to the Jutoh
defaults, which give a reasonable coverage based on fields used by Word, LibreOffice and BibTeX.
Editing bibliography formatting
There are many standards and preferences for formatting a bibliography, and Jutoh cannot hope to
build in all possibilities, or make a point-and-click GUI for it that is flexible enough. So Jutoh uses a
little language dedicated entirely to this purpose, so that any user can tailor the bibliography formatting
to his or her taste, even if the fields in the database template have been changed.
To look at this, click on the Formatting Templates tab:
128
CHAPTER 11: WORKING WITH INDEXES
The Formatting Templates tab
There can be many formatting templates in the project, but only one is active at a time, as specified by
Current formatting template.
Selecting a formatting template and clicking Edit shows a dialog with two tabs, for editing and testing:
The bibliographic formatting template editor
129
CHAPTER 11: WORKING WITH INDEXES
We have chosen to express the language in a simple XML format. Don’t be intimidated by this: it’s
really very simple and there’s not much to learn. Plus most of the time you will be making small
changes to the existing specification, if you even need to make changes at all. To make your life more
pleasant, there’s a little test facility where you can immediately see the results of your changes and
check for errors. We think this compares favourably with the way other applications handle this aspect
– there’s a balance between simplicity and expressiveness, and it’s easy to share formatting templates
with other users.
To learn more about the formatting language, please see Appendix D: The Bibliographic Formatting
Language.
Exporting to OpenDocument
When you export a document containing citations to an ODT file, and the configuration option Special
bibliography formatting is checked, Jutoh will write the full citation information for later editing in
OpenOffice or LibreOffice. It will also replace the Jutoh-generated bibliography section with an ODT
bibliography field. If the option is cleared, Jutoh will generate the citation text and bibliography section
without any special ODT fields. This allows you to use Jutoh bibliography formatting and more
complex citations, but if you intend to edit citations within OpenOffice or LibreOffice, and change the
bibliography style in these applications, then you might want to check the option.
Note that Jutoh cannot translate the XML formatting template to the ODT bibliography style, which is
much less expressive. So if Special bibliography formatting is checked, you may need to customise the
bibliography style in the word processor. All in all, if you just need to export to a print format without
much further editing, it’s better to keep the option cleared and let Jutoh do the citation and bibliography
formatting.
Summary
We’ve seen how to build a variety of special index sections in Jutoh. We’ve mentioned styles and style
sheets from time to time throughout this guide; now we’ll devote a chapter to them as styles are
important in Jutoh.
130
Chapter 12: Working With Style Sheets
In this chapter we explain how to work with styles – important for formatting your books consistently,
and also important for such features as automated table of contents creation.
Introduction
Style sheets are important in controlling the appearance of a book when converted to the supported
formats. Style sheets contain styles for paragraphs (paragraph styles), spans of text (character styles),
lists (list styles), and boxes and pictures (box styles) . You can have more than one style sheet, and
switch between them by changing the Style sheet property in a configuration, or by having multiple
configurations specifying different style sheets. Most users will probably stick with one style sheet.
If your document appearance isn’t as you wish, instead of editing the formatting within the editor, first
try editing the style sheet, since this will affect the whole document if named styles have been applied
consistently. For example, suppose that the first paragraph in each section uses the style ‘Body Text’,
which is not indented. You may wish the first paragraph of each section to be indented; so you could
either change the style for each such paragraph, or you could adjust the definition for ‘Body Text’ to
match the indentation of ‘Body Text First Indent’.
For Epub and Mobipocket formats, Jutoh generates a Cascading Style Sheet (CSS) that contains
equivalent definitions for the Jutoh style sheets.
Kinds of style
Jutoh supports four kinds of named style:
•
Paragraph style. This kind of style applies to an individual paragraph, and you can see available
paragraph styles in the drop-down control above the editor.
•
Character style. This kind of style changes the formatting for a span of text within a paragraph.
You can apply character styles using the context (right-click) menu, choosing Styles and then
Character Styles. There’s no drop-down control for character styles, but to see the named style
at the current text position, you can use the Formatting Palette.
•
List style. This kind of style defines how list items are formatted at each depth; the two list
buttons on the formatting toolbar simply apply two of the standard list styles (bulleted and
numbered).
•
Box style. This kind of style defines size, border, margin and other attributes that used by boxlike objects such as text boxes and images.
131
CHAPTER 12: WORKING WITH STYLE SHEETS
There is always a named paragraph style for any given paragraph, but a given span of text may not
necessarily have any named character style. If more than one named style applies to text, their
attributes are combined, in the order paragraph, list, and character (with each style overriding the
previous). You can remove the character style from a span of text and choosing Format | Text | Reset
Text Formatting.
Editing style sheets
You edit style sheets in the Project Properties dialog, as shown here:
The Styles page in the Project Properties dialog
A default style sheet is provided, including these paragraph styles: ‘Normal’, ‘Body Text’, ‘Body Text
First Indent’, ‘Heading 1’, ‘Heading 2’, ‘Heading 3’, ‘Heading 4’, ‘Comment’ (stripped out of all
generated books), ‘Headers’, ‘Footers’, ‘HTML’ (output verbatim to HTML-based formats), ‘Centre’,
and ‘Right’.
You can edit the attributes (visual characteristics such as indent or font) of all styles, and add your own.
132
CHAPTER 12: WORKING WITH STYLE SHEETS
Be careful when deleting styles, though, since your book may not work correctly if styles that it uses
are missing (Jutoh will warn you about this, and you can then add them back or replace the styles in the
offending paragraphs.)
By default, the dialog shows the paragraph styles. You can view the character styles, list styles, box
styles, or all styles at once by using the drop-down control under the style list.
You can also edit styles from the Formatting Palette by right-clicking on a style and selecting Edit.
Editing paragraph styles
To edit the attributes of a selected style, click on Edit. The style dialog will be shown; for paragraphs,
it will look like this.
Paragraph style dialog: Style page
The Style page shows the name of the style, the ‘base’ (or parent) style from which the style inherits,
and an optional ‘next style’ that indicates what style will be set when you press return on a style of this
kind. For example, a heading style might have a next style of ‘Body Text’ so you don’t have to change
the style manually back to ‘Body Text’ after writing a heading.
The Font page lets you adjust font-related attributes that will apply to the whole paragraph.
133
CHAPTER 12: WORKING WITH STYLE SHEETS
Paragraph style dialog: Font page
In the example above, no font attributes are actually set, but the the style will inherit any attributes from
the parent style. A paragraph style or at least its parent needs to have the size set (12 means ‘normal
text size’) and also the font name, which should usually be kept to something simple such as Times
New Roman, Arial (or Helvetica), or Courier New.
The next page is Indents & Spacing, which deals with indentation, line and paragraph spacing, and
also text alignment, whether a page break will be inserted in front of the paragraph, and the outline
level (an optional indication of heading depth – you can ignore this).
134
CHAPTER 12: WORKING WITH STYLE SHEETS
Paragraph style dialog: Indents & Spacing
The alignment buttons determine whether the paragraph will be left-justified only, right-justified,
justified (straight on both sides), centred, or indeterminate (no alignment specified unless inherited
from a base style). Note that if you specify justified text, Jutoh won’t show it in the editor but it will
usually be respected by the ebook reader software.
Indentation and paragraph spacing values are specified in tenths of a millimetre, which will be
converted either to relative ‘em’ units, or to mm, when written to HTML, Epub or Mobipocket formats
(see below for details of the conversion). You can specify both the left indent and first line left indent,
and also the indent for the right-hand-side. In Mobipocket KF7 format, the right indent is ignored, and
a left indent will be shown using a single, standard indent size (except for the first-line indent, which
can be customised).
You can specify the before-paragraph and after-paragraph spacing. For normal text paragraphs, you’ll
probably specify at most an after-paragraph value. For headings, it’s likely you’ll specify spacing
before and after the paragraph. If you leave these values empty, they will either inherit values from the
base style, or will effectively be zero.
It’s worth remembering that when the configuration option Use relative dimensions is checked,
Mobipocket KF7 ignores spacing values that are less than 25 tenths of a mm.
135
CHAPTER 12: WORKING WITH STYLE SHEETS
Line spacing – the spacing between lines within a paragraph, not between paragraphs – is specified as
‘none’ (takes a default or inherited value), single spacing, or in 0.1 increments up to 2 times the normal
line spacing.
You can ignore the Bullets and Tabs pages as far as ordinary paragraphs are concerned, since bullets
are only defined as part of a list style, and tabs are not supported in Jutoh (or most ebook formats).
In the Advanced page, you can also specify whether to give this style custom CSS that will be used
directly instead of using the Jutoh-generated CSS (for HTML, Epub and Mobipocket formats only).
This gives you more control over how the content will appear on the rare occasions that Jutohgenerated styling is inadequate. Remember that if you check Use custom CSS, any changes that you
make to the style attributes using the style dialog will have no effect in the generated ebook because
Jutoh is no longer in control of the CSS for this style.
The style editor Advanced page
CSS customisation is described in detail later in this chapter.
Editing character styles
To edit a character style, first view all character styles by selecting ‘Character styles’ in the drop-down
box under the style list, then select a style, and click Edit. The character style editor has a Style page,
136
CHAPTER 12: WORKING WITH STYLE SHEETS
similar to the paragraph style editor but without the Next style field, and a Font page. No other
attributes apply to character styles.
Editing list styles
To edit a list style, first view all list styles by selecting ‘List styles’ in the drop-down box under the
style list, then select a style, and click Edit. The list style editor has Style, Font, Indents & Spacing,
and List Style pages.
List Style page
List styles work on the principle that lists can potentially be nested, with different bullet or numbering
styles depending on the level (depth) of the list. When you are editing an actual list in the Jutoh editor,
pressing the Tab or Shift+Tab keys will increase or decrease the level of the current paragraph in the
list.
On the List Style page, click on List level to edit a different level (up to 10), and then adjust the
137
CHAPTER 12: WORKING WITH STYLE SHEETS
attributes to be shown for that level. The attributes listed on the Spacing sub-page will be merged with
the attributes on the Indents & Spacing page.
Various bullet styles can be defined, but it’s best to keep it as simple as possible because not all book
formats and readers allow complex bullets. For bulleted lists, it’s best to keep with a Standard bullet
style and then select from the pre-defined bullet types in the Standard bullet name dropdown. Even
this may be ignored by the ebook reader if it chooses to use its own bullets.
In the Spacing sub-page, define indentation appropriate for the current level.
List Style Editor spacing sub-page
The first line left indent defines the distance between the left margin and the bullet, while the left
indent defines the distance between the left margin and the start of the list item text. These values may
be ignored, depending on format and ebook reader.
List styles are the only way to achieve bulleted or numbered paragraphs (you can’t define bullets per
138
CHAPTER 12: WORKING WITH STYLE SHEETS
paragraph).
Note that the bulleted and numbered list buttons in the toolbar are hard-wired to apply the styles called
‘Bullet List 1’ and ‘Numbered List 1’. So if you delete either of these styles, the relevant button will no
longer work. To apply a different list style, use the Format | Bullets and Numbering menu command,
which will give you a choice of list styles to apply, along with the option to renumber the list.
For some Epub and Kindle devices, you can specify a custom bullet image for lists. This is how:
1. Add a media document with a bitmap, e.g. ‘media/bullet1.png’.
2. Edit or create a list style, and in the List Style tab, click on Bitmap for the bullet style and enter
or select the media document path under Standard bullet name, e.g. ‘media/bullet1.png’.
3. Format a list item with this style.
Unlike regular images inserted into Jutoh, resource images are not converted to JPEG automatically, so
the type you add is the type that will be output to the ebook. Therefore you need to use types that are
known to work with the targeted ereader; these are usually PNG, GIF and JPEG.
You will need to experiment with bullet bitmap size since they render at different sizes on different
ereaders, but you could try around 14x14 pixels.
Editing box styles
You can edit size, floating mode, margins, and border attributes for box styles; for more information,
see the description of the picture property dialog in Chapter 10: Working With Pictures.
Creating new styles
To create a new style, click on New and choose from paragraph, character, list style or box style.
139
CHAPTER 12: WORKING WITH STYLE SHEETS
New style dialog
Enter the name, optional description, any custom CSS, and a style to use as a template. Note that the
value of Copy from in this dialog will only be used to set up initial attributes for the new style, and
will not be the value of the ‘base’ (parent) style in the new style.
Applying named styles
There are various methods for applying named paragraph styles to text in your document:
•
Select a paragraph and choose a style from the drop-down style control in the editor toolbar;
•
select a paragraph, click Format | Styles, choose a style and click OK;
•
right-click (or control-click on Mac), choose Styles in the context menu, and click on a style
name.
•
use custom keyboard shortcuts and Favourites, as explained in Appendix B: Configuring Jutoh.
You can also apply named character styles to ranges of text:
•
Select some text, click Format | Styles, choose Character Styles, choose a style and click OK;
•
right-click (or control-click on Mac), choose Styles | Character Styles in the context menu, and
click on a style name.
•
use custom keyboard shortcuts and Favourites, as explained in Appendix B: Configuring Jutoh.
140
CHAPTER 12: WORKING WITH STYLE SHEETS
Note that when a character style is applied via the context menu, it is merged with the attributes in the
selected text, forming a new automatic style (see below), unless there are no attributes in the selected
text, in which case the original character style name will be retained. So if it’s important that the
specific character style name is retained in your book, first reset the existing character styling for the
selected text using Format | Text | Reset Formatting.
Automatic styles
If you apply direct or ad hoc styling – that is, apply attributes such as bold, centring, paragraph spacing,
and so on directly without choosing a named style with those attributes – then Jutoh will construct an
automatic style with those attributes. You can tell an automatic style by the presence of ‘+’ symbols in
the name, for example ‘Normal + Centre Alignment’. Automatic styles are stored in each section
document, not in the editable style sheet, so they won’t be visible except in the drop-down style
control.
If you import from a DOCX (Word) or ODT (OpenDocument Text) file, you may find a lot of your
content is unexpectedly formatted with automatic styles. If this is the case, your original document also
had automatic styles but your word processor hid this by showing only the basic style name in the dropdown style control.
It’s becoming a familiar refrain in this book, but avoid use of automatic styles whenever possible.
When you need to apply formatting, consider if you can create a named style for this purpose, such as
‘Centred Picture’ or ‘Picture Caption’. If you change your mind about the details of formatting later,
you can then simply edit the named style rather than dozens, hundreds or even thousands of
occurrences of the formatting throughout your document. You’ll end up with a much better and more
easily-edited document if you take the trouble to create and use named styles. Also, if you use a
rational naming scheme for headings, you’ll find it much easier to persuade Jutoh to create an advanced
table of contents. And finally, with named styles, Jutoh won’t have to generate so many automatic
styles in the generated ebook, which could reduce its efficiency and increase file size.
CSS dimensions
When exporting to ebook formats other than Epub and Mobipocket, paragraph dimensions for
indentation, left margin, right margin, line spacing and paragraph spacing are specified in absolute
dimensions (tenths of a mm). When exporting to epub and Mobipocket, Jutoh will convert these
dimensions to em, which is a unit based on the current text size, or to mm, depending on the value of
the Use relative dimensions configuration option. You can adjust the scale factor used for the
conversion using the Options page in the Project Properties dialog.
Note that when marking up individual spans of text with either a character style containing a text size,
or an ad hoc text size, the text size will be generated as an absolute point size, not in ems. This is
because if it were in ems, the relative size would combine with the paragraph relative text size. So,
please avoid using text size in ad hoc styles – define text size in paragraph styles where possible.
Otherwise you will see inconsistent text size when scaling the ebook. You can eliminate non-paragraph
styling by selecting text and then choosing Format | Text | Reset Text Formatting.
141
CHAPTER 12: WORKING WITH STYLE SHEETS
CSS customisation
If you find that Jutoh’s CSS style creation is inadequate for any reason, you can tell Jutoh what CSS
style to use instead of the current definition, via the Advanced page in the style editor. These will be
used only for HTML, Epub and Mobipocket file generation. The CSS customisation fields are
illustrated in the style editor dialog shown above.
You can see the current CSS definition as it will be output to Epub and Mobipocket. Check Use
custom CSS and edit the definition if you want to use an alternative definition. Remember that if you
subsequently make changes to the style through the usual dialogs, it won’t change your CSS definition
until you clear the Use custom CSS option.
Note that if you customise style definitions, or use the HTML style, be sure to click Check after
generating an Epub file in case you have introduced HTML errors. When you check a project, Jutoh
invokes Adobe’s EpubCheck tool to examine the Epub structure and content. You need to have Java
installed for EpubCheck to work.
If you need further CSS customisation, you can edit the sheet properties by clicking the
Properties button and checking Use custom CSS.
Style Sheet
Style Sheet Properties dialog
Add any CSS definitions you like in the field, and they will be added to the beginning of the CSS file
that Jutoh generates, as well as the individual style definitions generated by Jutoh or specified explicitly
by the user.
142
CHAPTER 12: WORKING WITH STYLE SHEETS
Special style names
In some cases, Jutoh will use the name of a style to influence the e-book output.
•
‘Heading 1’, ‘Heading 2’ and so on are output to HTML as h1, h2, etc. You can change the
value of the Heading style prefix configuration property to a different prefix, or clear it to
prevent Jutoh generating HTML heading styles. Since the ebook reader will apply its default
heading styling to paragraphs marked as headings, you may find precise control of heading
appearance easier to achieve if you switch this off in your configuration.
•
The ‘HTML’ paragraph style outputs the content of the paragraph directly to the HTML file
without processing.
•
The ‘HTML Text’ character style outputs the spanned text directly to the HTML file without
processing.
•
The word ‘Preformatted’ in a style indicates that HTML should use the pre tag.
Importing and exporting style sheets
When creating a new project, or editing an existing one, you can import style sheets that were
previously saved with a .stylesheet extension. In the Styles page of the project properties dialog,
import style styles with
Import, and save selected style sheets (one or more) with
Save. When
importing, stylesheets will replace any existing style sheets of the same name.
Please note that these are not CSS style sheets – they are Jutoh-specific binary files. You will be
warned if you attempt to import a regular .css file.
Finding and replacing styles
You can search for paragraphs with particular named styles, and replace them with other styles, using
the Find and Replace dialog, available from Edit | Find (Ctrl+F).
143
CHAPTER 12: WORKING WITH STYLE SHEETS
The Find and Replace dialog
Click on More >> if the extra options aren’t currenly shown. Then click Add and choose a paragraph
style, for each of the Find and Replace with criteria.
You can use asterisks in the style to find, so for example the string ‘Body Text*’ will match against
‘Body Text’, ‘Body Text First Indent’, and also automatic styles derived from ‘Body Text’ styles, such
as ‘Body Text + Centre Alignment’.
Style substitutions
You can replaces styles on a per-configuration basis by using the Paragraph style substitutions
configuration property. For example, a value of ‘Normal: Normal Justified’ will temporarily replace all
instances of ‘Normal’ with ‘Normal Justified’ when the book is compiled. This can be useful to apply
minor tweaks without the need to maintain different style sheets for different configurations.
Using styles to change ebook content
In each configuration there are two properties that let you use styles to include or exclude content.
In Paragraphs to exclude, you can specify the comma-separated paragraph styles whose paragraphs
should be excluded from the book. You can use ‘*’ to mean all characters, for example ‘Only*’ will
cause all paragraphs with a style name beginning ‘Only’ to be excluded, except for those specified in
144
CHAPTER 12: WORKING WITH STYLE SHEETS
Paragraphs to include.
In Paragraphs to include, you can specify the comma-separated paragraph styles whose paragraphs
will be exempt from exclusions. You can use ‘*’ to mean all characters. For example, if this property
has the value of ‘Only Epub’, paragraphs styles with ‘Only Epub’ will be retained, but (assuming
‘Only*’ in Paragraphs to exclude), all other paragraphs whose style name begins with ‘Only’ will be
removed. Thus you can include or exclude paragraphs in your document depending on the
configuration.
When a new project is created, Jutoh sets up some paragraph styles for each format prefixed ‘Only’, for
example ‘Only Epub’, which you can use together with the configuration properties. Of course, you
may need several styles per configuration for different formatting, for example ‘Only Epub Centred’. If
you use ‘*’ in your properties, you can specify variants so you don’t have to mention every single style
to include or exclude.
Here’s another example. Say we are going to create a Smashwords OpenDocument file which says
‘Published by Acme at Smashwords’, but all other formats will just say ‘Published by Acme’. We
create two paragraph styles, one called ‘Only Smashwords OpenDocument’ and another called ‘NonSmashwords Formats’. In our title page, we have the two paragraphs:
Published by Acme at Smashwords
Published by Acme
The first is formatted with ‘Only Smashwords OpenDocument’, and the second with ‘NonSmashwords Formats’. In our ‘Smashwords OpenDocument’ configuration, we set these properties:
Paragraphs to exclude: Only*,Non-Smashwords Formats*
Paragraphs to include: Only Smashwords OpenDocument*
In all other configurations, we keep the default properties, for example for ‘Epub’:
Paragraphs to exclude: Only*
Paragraphs to include: Only Epub
Now when we compile the ‘Smashwords OpenDocument’ configuration, all ‘Only*’ styles will be
excluded except for ‘Only Smashwords OpenDocument’, and ‘Non-Smashwords Formats’ will also be
excluded. When we compile another configuration, such as ‘Epub’, the ‘Non-Smashwords Formats’
paragraphs will be included by default (it doesn’t need to be mentioned explicitly). Since we are using
wildcards (‘*’), it doesn’t matter if we apply ad hoc formatting to the paragraphs in question, since the
wildcards will match the rest of the style name.
Another way to exclude content from your book depending on configuration is to add a style
substitution in the Paragraph style substitutions property. If you added ‘Epub Only:Comment’ to this
property, paragraphs formatted with ‘Epub Only’ will be omitted from the final ebook, since
paragraphs with the ‘Comment’ style are removed.
145
CHAPTER 12: WORKING WITH STYLE SHEETS
Automatic heading numbering
If you wish to have Jutoh insert numbers or text in front of headings, follow these steps.
1. Use consistent heading styles in your book such as Heading 1, Heading 2 and so on.
2. Go to the Project Properties dialog, click on Page Layout, and check Enable automatic
heading numbering.
3. Click Edit Document Outline Style and assign number formatting for each level. Make the
heading style match the styles you are using. To show an outline number such as 1.2.3, set the
number of sublevels to be shown.
4. Close the Project Properties dialog and use the menu command Book | Update. Check Heading
numbering and click Update.
Your headings should now show numbering, which can’t be edited manually.
Whenever you have edited your books such that numbering is out of date, use the Update command.
Or, to ensure numbering is always up-to-date when generating a book, by checking Update all
headings before compiling in Project Properties/Page Layout.
If you only want automatic heading numbering to appear in OpenDocument (ODT) files, or if you
simply want to tell the ODT file where to find chapter headings when you’re using the chapter field in
headers and footers, you can clear Enable automatic heading numbering.
You can remove heading numbering by clearing Enable automatic heading numbering and updating
the headings again via Book | Update.
Summary
In this chapter you have learnt a lot about styles and how to edit and apply them. Next, we’ll look at
Jutoh’s ‘string table’ feature which gives you another way of customising your books.
146
Chapter 13: Working With String Tables
The string table feature gives you extra flexibility in customising your book, by defining how keywords
will be replaced by text at compile-time, for all versions of your book or per-configuration.
Introduction
Sometimes you may wish to change text that Jutoh generates, for example the heading ‘Table of
Contents’ if generating a table of contents. You may also wish to define strings that can be used as
keywords in cover designs, or change the way metadata is presented. This is where string tables come
in. You can define several global string tables, independent of any project; and you can also define one
or more project-specific string tables. Then in your configuration, you can select the global string table
and/or project string table that should be used, and if there is a value corresponding to the string name,
that value will be used instead of the original name.
For example, in Preferences, you could add a global table ‘English’, then add a string with name ‘Table
of Contents’ with value ‘Contents’. Then select the ‘English’ string table for the Global string table
property in all your configurations. The word ‘Contents’ will now be used instead of ‘Table of
Contents’ in your generated book.
Jutoh knows to check the string tables for certain keywords when generating documents or parts of an
ebook, so the ‘Table of Contents’ substitution will be done when generating a table of contents title as
well as in your own content. Other examples include ‘Cover Page’, ‘Guide’, ‘Contributions by’, and
‘Published by’.
Continuing with the example, you can also use the keyword %Table of Contents% in your cover
designs, and the word ‘Contents’ will be substituted.
You can also include keywords in your metadata and, if the Replace strings in content configuration
property is checked, in your book content, and they will be expanded before inclusion in your
generated ebook. Note that string replacement in content only works for strings within the same
paragraph formatted in the same character style.
Here’s another example: say you wanted the Smashwords edition of your book to contain different
information from the other versions of your book. In the picture below, a string table called
‘Smashword Strings’ has been added to the project properties, to be used to tailor the content of the
book according to the Smashwords publishing platform:
147
CHAPTER 13: WORKING WITH STRING TABLES
The Strings page of the Project Properties dialog
The Project string table property of the Smashwords configuration will be set to ‘Smashwords Strings’
and the keywords %Copyright%, %Edition% and %Title% can be used in the book text, so that the
Smashwords edition of the book contains the appropriate strings. A string table would be defined for
each configuration, or perhaps one fallback table ‘General Strings’ would be used for non-Smashwords
editions.
Troubleshooting string tables
If keywords are not being substituted, check that these requirements are met:
•
Each keyword name in the content must be formatted with either no style, or a single style.
•
Keyword names are case-sensitive.
•
Each keyword must be enclosed in % symbols.
•
You must set the project and/or global table names in your configuration.
148
CHAPTER 13: WORKING WITH STRING TABLES
•
You must check the configuration property Replace strings in content.
Summary
You may never use string tables, but now you know the feature is there and what it’s for, you have an
extra tool in case you need to do global or per-configuration customisation of the text within your
ebook. Next, we look at how you can use tables in your book.
149
Chapter 14: Working With Tables
This chapter describes how to create and edit tables in Jutoh for presenting tabular data.
Introduction
You can create tables within Jutoh, or import them from HTML/Epub, DOCX and ODT, and include
them in your generated ODT, Epub and Kindle files. Supported features include:
•
border and cell background colour;
•
several border line styles;
•
column and row spanning;
•
an editable gallery of table templates;
•
arbitrary content in cells including graphics and nested tables;
•
multiple cell property editor and table property editor.
Don’t expect to use all of the advanced table features in your favourite word processor, such as
shading, fancy border styles, and vertical text. But you can still create a wide range of table
appearances, and Jutoh’s table tools should be more than sufficient for all but the most demanding user.
Simple examples of tables in Jutoh
150
CHAPTER 14: WORKING WITH TABLES
Creating and editing tables
To create a table, use the Format | Table | Insert Table menu command, or the Ctrl+Shift+A
keyboard shortcut, or click on the New Table button on the toolbar. This will show the Insert Table
dialog, as illustrated below.
The Insert Table dialog
From here, you can choose the number of rows and columns in your table, and also choose from a
gallery of table templates if you wish by clicking on the Gallery button or using the drop-down list of
templates.
If you selected text before adding a table, the text will be assumed to be data that you wish to add to the
table cells, separated by commas or other separator that you specify. You can also enter the data
yourself in the Insert Table dialog.
Jutoh provides a standard set of templates from you to choose from, but you can add your own if you
wish. This is what the Table Template dialog looks like when you press Gallery in the Insert Table
dialog:
151
CHAPTER 14: WORKING WITH TABLES
The Table Template dialog
If you press Customise, as has been done in the example, the dialog will show the regions that
comprise the table template, which can be edited by adjusting colour, spacing, and so on. Click Region
Box Formatting to adjust box attributes such as size, line colour and spacing for the selected region,
and click on Region Paragraph Formatting to choose font and paragraph formatting attributes for
that region. Click Table Box Formatting to edit table-wide properties such as overall size. Changes
will be reflected in the preview.
You can also choose to omit some properties of the table template, such as cell colour, by clearing
items in the Filter list.
Editing tables
To edit your table, use the following:
•
the Table Properties dialog via Format | Table | Table Properties or the Table command on
the editor context menu;
•
the Cell Properties dialog via Format | Table | Cell Properties or the Cell command on the
editor context menu;
152
CHAPTER 14: WORKING WITH TABLES
•
the various editing commands on the Format | Table menu or the Table Formatting menu on
the editor context menu.
From the Format | Table menu, you can add and delete rows and columns, merge and split cells,
change row and column dimensions, and change vertical alignment in cells.
The table formatting menu
You can often save time by selecting a group of cells for paragraph or cell formatting operations. If you
select a group of cells before invoking the Table Properties dialog, this group of cells will be edited
instead of the overall table. Similarly, selecting several cells before invoking the Cell Properties dialog
will format the selected cells.
You cannot select rows, columns or the whole table with one click, as you can with some word
processors. However you can use the mouse to drag a selection of multiple cells, and you can use the
Format | Table | Select Row/Column commands.
Here is an example of using the Table Properties dialog:
153
CHAPTER 14: WORKING WITH TABLES
The Borders page of the Table Properties dialog
The Borders page is the most complex aspect of the Table Properties dialog and deserves detailed
explanation here. For further help on this and other aspects of the dialog, click on the Help button.
This page shows a summary of the borders surrounding the table, and the horizontal and vertical
dividers. Since these can vary throughout the table, it is an approximation based on a sample of
borders, but you can select a group of cells and change the borders for that group if you need to change
specific borders and dividers. The dialog reminds you what rows and columns any changes will apply
to – in the example above, changes will apply to the overall table.
The borders will only be applied if they were changed in the dialog, which means you can’t
accidentally change the table simply by showing the dialog and pressing OK.
Clicking on a border line cycles through three states: ‘on’, ‘off’, and ‘no change’ (indicated by a thick
grey line). When you choose the ‘on’ state by clicking one or more times, it will take on the new line
properties as specified in the Line properties group of controls. Alternatively, right-click or controlclick on a line to have it immediately take on the current line properties instead of cycling through the
three states.
If you want the line property controls to reflect the state of one of the lines, shift-click on that line.
To set the current line properties for all lines that are currently present, use Set Properties for All.
154
CHAPTER 14: WORKING WITH TABLES
Note that this page uses cell borders to achieve an overall table border. You can set an additional table
border via Box settings in the Table page, but this will only work for HTML-based formats.
Changing the size of cells, rows and columns
You can influence the size of columns, rows and the table itself in a variety of ways:
1. specifying cell width and height in the Cell Properties dialog;
2. specifying column and table width in the Table Properties dialog;
3. specifying row and column size using menu commands;
4. adding content to fill out the column or row;
5. specifying whether a cell should wrap text (break it into lines);
6. adding padding (spacing between the content and the border).
You can’t currently change the sizes of columns and rows by dragging their dividers, but you can
achieve the same result by specifying column widths and row heights using the table formatting
commands and the Table Properties dialog. Specifying the size of a single cell may have an impact on
the row or column size, depending on whether it changes the maximum row or column size.
If you wish cells to calculate their size from their content, you can specify zero in the column width and
row height commands, or in the Columns page of the Table Properties dialog, or by clearing width and
height settings in Cell Properties.
You can specify whether cells should wrap their text (break the text into lines) in the Spacing page of
the Table Properties dialog. This may be overridden if there is not enough space to show an unbroken
line of text.
You should generally specify padding for cells, that is, the space between the content and the border of
the cell. Otherwise the table will looked cramped. Specify padding in the Spacing page of the Table
Properties dialog, or in the Cell Properties dialog.
Specifying minimum and maximum sizes for cells in Cell Properties won’t have an effect in the editor,
but ereaders may use these values.
To understand more about the relationship between content, padding and borders, refer to Appendix C:
The Jutoh Box Model.
If you have specified absolute sizes for cells or tables in centimetres – quite likely after importing from
a word processor file – you may find the tables are too large for small ereader displays, or they are not
in the proportion originally intended relative to the display width. It can be better to use percentages,
and you can apply this to all tables, boxes and images when exporting ebooks by checking the Replace
absolute widths configuration option. Jutoh will use the paper size and left and right margins defined in
the configuration (or the parent object’s width, if it’s an absolute value) to calculate a percentage width
for a given object width.
155
CHAPTER 14: WORKING WITH TABLES
About table borders
When creating a table with borders, you may wonder if you need to add every border of every cell,
given that the side of one cell can act as the side of an adjacent cell. You can actually do either – supply
all borders, or just the ones necessary to give the desired effect. Jutoh’s Table Properties dialog works
on the assumption that the minimum possible number of borders will be applied. The crucial setting is
Collapse borders in the Table Properties dialog: if checked, the borders will be merged so you will
only see one border for any given cell edge, not two adjacent borders. HTML-based formats and ODT
all understand collapsed borders.
You can edit borders using the Table Properties dialog, which lets you specify borders for the whole
table or a group of cells; or you can edit them for an individual cell via the Cell Properties dialog (click
on Cell on the context menu).
Another issue that can be slightly confusing is that a table can have an overall border in addition to cell
borders. This means that you have two ways of specifying the overall border: using cells, or the table
box properties. However, only HTML-based formats know about the extra table border – not ODT or
DOCX – so it’s best to use cell borders to form the table border. This is what the Table Properties
dialog does.
You can specify a rounded corner for the overall table border, but even in HTML this won’t work if
you use collapsed borders, and it probably won’t work in many ereaders.
If your table border doesn’t show up in the ebook, try increasing the width. On iBooks, widths below
1pt are invisible.
Importing tables
Tables can be imported from DOCX, ODT and HTML/Epub. Most aspects will be retained, but these
will not:
•
Shading and images in cell backgrounds (solid colours are supported);
•
vertical text;
•
double borders or border line styles other than solid, dotted, and dashed;
•
custom image borders;
•
banding in conditional table formatting where the bands are more than one row or column in
size (DOCX);
•
horizontal and vertical inner borders in conditional table formatting (DOCX).
In summary, unless your table formatting is particularly fancy, import should be fine.
Table compatibility in ebook readers
Tables should work well in most ereaders. Older Kindle ereaders supporting only KF7 (‘Kindle DX’
mode in Kindle Previewer) will not show border styles other than solid, and all borders are either on or
off – there is no choice of which cell borders are shown. Jutoh includes both KF7 and KF8 formatting
156
CHAPTER 14: WORKING WITH TABLES
for Kindle files, so most Kindles will show full table formatting.
Kindle for iOS is less capable when rendering tables than other KF8 Kindle apps and devices. Cell
widths cannot be specified as percentages, and the table width attribute is not recognised. However, it
does recognise the min-width attribute, so when generating Mobipocket files, Jutoh adds a min-width
attribute to the table.
Adobe Digital Editions doesn’t handle absolute cell size very well, so cell size is converted to CSS
minimum size properties unless a minimum size has been explicitly set. This should still work across
all ereaders; but you can switch it off via the Use minimum size for cells onfiguration option.
Repeated table headers and footers are not supported by most readers, and Adobe Digital Editions does
not rearrange the headers and footers from the standard HTML syntax (defined at the start of the table)
to be at the actual top and bottom of the table. On the other hand, for Jutoh’s HTML output, Firefox
and Internet Explorer printing does the right thing and places headers and footers on each page.
Because of the lack of support for headers and footers in ereaders, they are switched off by default in
all configurations. You can switch them on using the Table headers and footers configuration option.
Adobe Digital Editions has a unique problem when rendering large tables. In order to support centred
tables in ADE, the CSS attribute ‘display:inline-block’ must be used. However, tables with this
attribute do not span multiple pages – the part of the table that isn’t displayed on the first page will
simply be lost. To work around this conundrum, set the configuration property Maximum table rows
for inline-block to the number of rows above which you consider a table to be large and in danger of
being rendered across page boundaries. The default is zero. Tables larger than this size will omit the
‘display:inline-block’ attribute to favour correct rendering across pages over centring. Centring should
work correctly on most other ereaders without the need for this attribute, since we also use ‘marginleft:auto;margin-right:auto’ to implement centring.
Note that using inline-block can cause tables to be rendered incorrectly on some ereaders (with the
overall table border becoming separated from the cells). Also, if you have the configuration option
Maximum table rows for inline-block set to a non-zero value, the generated HTML table may have an
extra paragraph tag around it in order to support centring on some platforms. Set the option to zero to
ensure that a table that is alone in a paragraph is not enclosed within outer paragraph tags, which can
cause problems in some situations, including unexpected text sizes. Use Maximum table rows for
inline-block with extreme caution!
As noted above, ODT files, and DOCX files converted from ODT, do not support an extra, overall
border so if word processor compatibility is required, you will need to form the table border using
individual cell borders. The Table Properties dialog helps you do this, since the Borders page applies
only cell borders.
Editing the template gallery
As we’ve seen, inserting a table or using Format | Table | Apply Template lets you choose from a
gallery of templates, using the Table Gallery dialog. Jutoh adds a standard set of templates by default;
you can add your own or delete existing ones using the advanced menu options in the gallery dialog
(click on the ‘...’ button).
157
CHAPTER 14: WORKING WITH TABLES
The default table gallery is stored in a file in the standard application data area, but you can open and
save gallery files in arbitrary locations if you wish. This could be useful for sharing templates with
other users.
A template is defined as a series of formatting commands, each command dealing with a range of cells.
You can’t add an existing table from your document to a gallery, but it’s not too hard to use the Table
Template Editor dialog to define new templates, and it’s more flexible than a simple reproduction of an
existing table. Having defined the formatting commands, the user will be able to customise them as
regions in the gallery dialog, for example choosing a different colour for a “Header” region. For more
information on creating templates, click on Help in the Table Template Editor dialog.
Summary
You should now have a good idea of how to create and edit tables. Next, we look at how you can use
text boxes in your book.
158
Chapter 15: Working With Boxes
This chapter shows you how to create and use boxes, and how to manage differences in box layout
between platforms.
Introduction
Text boxes allow you to enclose text and other content within a rectangular area, optionally with a
background colour and border. Normally boxes act as a single character within the rest of your
document, but you can set the floating mode to be left or right as for images, to allow text to flow to the
right or left. This won’t show in the editor, but will be shown in the generated ebook if the ereader
supports it.
To understand the way margins, padding and borders work when showing a box, refer to Appendix C:
The Jutoh Box Model.
Here’s a selection of boxes from the project Formatting Sample provided with Jutoh:
Sample boxes in Jutoh
159
CHAPTER 15: WORKING WITH BOXES
Creating and editing boxes
There are several ways to create boxes interactively:
•
using the menu command Format | Insert | Text Box;
•
using the context menu command Insert | Text Box;
•
double-clicking on a box style in the Formatting Palette with no existing box selected.
If any content is selected before you create the box, it will be moved inside the box.
When you click inside the box, you can edit content as usual, and editing and formatting commands
will apply to the contents of the box.
You can edit the box properties with the Box command on the context menu. This shows a formatting
dialog with various pages, namely Box, Size, Margins, Borders, Background and Advanced.
The Box Properties dialog showing the Borders page
In the Box page, you can define a style (see below) and also whether the box is treated as an ‘aside’
(outside the main flow of the text) for the purposes of Epub 3.
You can define borders with a small range of styles (solid, dotted and dashed), a width, and colour.
160
CHAPTER 15: WORKING WITH BOXES
You can also define a rounded corner radius, but rounded corners are not supported on many ereaders.
For example, Adobe Digital Editions, Nook and Bluefire Reader do not support them. However they
are supported on Kindle (KF8), Kobo and iBooks. If rounded corners are specified, the whole border
will have just one style and width: individual differences between sides will be ignored.
To delete a box, click outside the box and delete it as you would a single character. If you want to
preserve the contents of the box, you will need to cut and paste it elsewhere before deleting the box.
By default, boxes size to their content (and any padding), but you can set a specific width and/or height
using the box properties dialog. Currently, you can’t resize a box interactively.
If you have specified absolute sizes for boxes in centimetres – quite likely after importing from a word
processor file – you may find the boxes are too large for small ereader displays, or they are not in the
proportion originally intended relative to the display width. It can be better to use percentages, and you
can apply this to all tables, boxes and images when exporting ebooks by checking the Replace absolute
widths configuration option. Jutoh will use the paper size and left and right margins defined in the
configuration (or the parent object’s width, if it’s an absolute value) to calculate a percentage width for
a given object width.
Although you can specify vertical alignment for a box in Jutoh, and the content will be shown
vertically aligned in Jutoh, currently this won’t be reflected in any exported formats due to restrictions
in the expressiveness of those formats. In a future release this limitation may be worked around;
meanwhile, if you really need vertical alignment, you could use a one-cell table, or use the option
Emulate boxes using tables. Note that if you don’t specify the box height, and specify a padding around
the content, you can achieve the look of vertical centre alignment, since the box will be sized
symmetrically around the content.
If a box doesn’t appear to have a border in the generated ebook, when it does within Jutoh, try
increasing the thickness of the border.
If you set the Floating mode for a box to Right or Left, make sure that the text box will fit on small
displays. Otherwise the ereader may choose not to make it float. You could specify a percentage width,
such as 50%, to ensure that the box will fit.
Importing boxes
Text boxes will be imported from DOCX, ODT and HTML files.
In DOCX import, in addition to import of ‘true’ text boxes, any paragraph that has a border will be
interpreted as a text box.
For text box import to work in HTML, the box must have a border.
Using box styles
You can create box styles just as you would create paragraph and other styles, but with a different set
of pages for editing box attributes. Box styles can be used with text boxes and images, but not tables.
If you select a box style in the box properties dialog, or apply one using the Formatting Palette, the box
will reflect any changes in the box style. For example if you defined a ‘Warning’ box style and applied
161
CHAPTER 15: WORKING WITH BOXES
it several times in your project, you could decide to change the border and background colour in the
box style, and it would automatically be reflected in the boxes that use the style, assuming that the
changed attributes weren’t overidden by the individual boxes. Images that have box styles are similarly
updated.
Currently, you can’t specify within a box style what paragraph styles should be applied to box content.
To apply a box style to a text box or image using the Formatting Palette, show the available box styles
by selecting Box styles or All styles in the drop-down control. Then select the image or box, and
double-click on the box style in the palette.
If the current editing position is inside a text box, but nothing is selected, the style will be applied to the
text box.
If the current editing position is not inside a text box, and nothing is selected, double-clicking the box
style will create a new box with this style. You can also force text box creation instead of style
application by holding down the control key (or on Mac, command key) while double-clicking.
TIP: If the content of your box is formatted strangely, check the paragraph style for the paragraph
containing the box. Set the style for the paragraph to something innocuous such as ‘Normal’ so the box
doesn’t pick up unwanted attributes.
Text box compatibility in ebook readers
Text boxes should work well in most ereaders. Older Kindle ereaders supporting only KF7 (‘Kindle
DX’ mode in Kindle Previewer) will not show boxes unless you use the configuration option Emulate
boxes using tables, since KF7 implements tables better than it does boxes.
Adobe Digital Editions has a unique problem when rendering large boxes, as it also does with tables. In
order to support centred boxes in ADE, the CSS attribute ‘display:inline-block’ must be used.
However, boxes with this attribute do not span multiple pages – the part of the box that isn’t displayed
on the first page will simply be lost. To work around this conundrum, set the configuration property
Maximum box words for inline-block to the number of words above which you consider a text box to be
large and in danger of being rendered across page boundaries. The default is 200 words. Boxes larger
than this size will omit the ‘display:inline-block’ attribute to favour correct rendering across pages over
centring. Centring should work correctly on most other ereaders without the need for this attribute,
since we also use ‘margin-left:auto;margin-right:auto’ to implement centring.
A problem with the case when ‘display:inline-block’ is not used, is that a text box will not
automatically shrink to fit its content. If you do not care about ADE compatibility, you can set Box
word threshold for inline-block to a large number so that it always uses ‘display:inline-block’.
Otherwise, you can make sure that when a text box needs to be narrower than the surrounding text, you
give it an explicit width, such as 50%.
Note that if you have the configuration option Maximum box words for inline-block set to a non-zero
value, the generated HTML box may have an extra paragraph tag around it in order to support centring
and shrink to fit. Set the option to zero to ensure that a box that is alone in a paragraph is not enclosed
within an outer paragraph, which can cause problems in some situations, including unexpected text
sizes.
162
CHAPTER 15: WORKING WITH BOXES
By default, text boxes are stripped of their height value when creating an ebook. This prevents the
overflow of content from a box that is too small for its text; when you import text boxes from word
processor documents, they will often specify the box height, but this is not optimal for generated
ebooks where the text size and font may vary from how the document was originally created. You can
switch this behaviour off by clearing the configuration option Omit box height.
Summary
You now know all about Jutoh text boxes. The next chapter describes tag objects for advanced markup;
you can skip this if your needs are relatively simple.
163
Chapter 16: Working With Tag Objects
This chapter describes the use of ‘tag objects’, which allow you to add markup that you can’t achieve
with styles. You can skip this chapter if your ebook creation needs are simple.
Introduction
Jutoh 2 introduces the notion of tag objects, for advanced markup such as grouping content into
sections, indication of voice gender for spans of text, marking emphasised text, and so on. Tag objects
normally have a close relationship with an equivalent HTML tag, but this may not always be the case.
A tag object always has a start and an end; Jutoh will check whether the tags match up when compiling
a book. Here’s an example of using an ‘em’ tag to mark an emphasised word without explicitly using
italic formatting:
An example of em (emphasis) tag
This guide doesn’t go into details of how exactly to use individual tags. However you can find out quite
quickly by searching online for the syntax of particular tags, attributes and CSS properties.
Even if you don’t add any tag objects yourself, if you use Jutoh’s accessibility features, Jutoh may be
inserting tag objects during code generation, and when looking at the generated HTML code, it may be
helpful to bear in mind this process.
Inserting tag objects
You can insert a tag object either using the Object Palette, or by using the command Format | Insert |
Object (Shift+Ctrl+P) which shows the Object Selection dialog from which you can select a tag
object (as well other kinds of object such as text boxes and tables). If you have selected content first,
the tags will be placed around the selection. Right-click (or control-click on Mac OS X) to show a
menu for inserting just a start or end tag.
Tag objects that relate to a block of content (for example the ‘section’ tag) should be placed in their
own paragraph if possible. The containing paragraph will be ignored when the code is generated. Or,
place the start tag at the start of a paragraph, and the end tag at the end of another paragraph.
You can copy and delete object tags just like ordinary text.
164
CHAPTER 16: WORKING WITH TAG OBJECTS
This is what the Object Palette looks like:
The Object Palette
You can type in the Search field to find a tag object, and press return to insert the selected object into
the editor. Or just double-click on an object; or right-click (control-click on Mac) and choose Insert,
Insert Start Tag, or Insert End Tag.
Anatomy of a tag object
A tag object consists of a tag name, a set of attributes, and a set of CSS-like ‘advanced’ properties that
are not dealt with via formatting dialogs. Like other objects, paragraphs, and text fragments, a tag
object can have an identifier, Epub type and custom attributes, amongst others. CSS properties such as
Voice family are output inline to the ‘style’ attribute; or you can define regular and advanced properties
in a Jutoh style so that they are defined in a CSS style instead of inline.
Currently, only a few extra CSS properties are listed in the Advanced tab. These will be added in
future releases, but meanwhile you can use Custom properties to add arbitrary CSS properties. Be
aware, though, that Jutoh will not know which Epub version these custom properties are valid for, so
will output them to both Epub 2 and Epub 3 files unless the tag object itself is valid for Epub 3 only.
Code generation
Tag objects will only have an effect on the generated book if:
165
CHAPTER 16: WORKING WITH TAG OBJECTS
1. The format is HTML-based, such as HTML, Epub and Mobipocket, and
2. the tag and its properties and attributes are compatible with current settings, in particular the Epub
version setting.
So unless you use custom attributes and properties that are not checked by Jutoh, you don’t have to
worry about Jutoh generating inappropriate code, even if the document is optimized for Epub 3 using
HTML5 tags.
If you use tag objects, it is easier to make mistakes than when using straightforward editing and
formatting functionality. So be sure to use Jutoh’s Check functionality to invoke EpubCheck and
confirm that the HTML/Epub is valid.
Custom tag objects
You can create custom tag objects per project that appear in the object palette and which are aliases for
other tag objects, potentially with different default attributes and properties. For example, you might
prefer to mark text with a ‘female’ tag that has a preset Voice family property, rather than create a
‘span’ tag and manually set Voice family to ‘young female’.
To do this, right-click over a tag object and choose Make Custom Tag from the popup menu. If this
command is not available, it means that the chosen object is not a tag object.
Say we wanted to create a new tag ‘female’, with which we will mark up certain content to be spoken
in a female voice. Customise the ‘span’ tag; enter the name ‘female’, click on OK and then in the
Advanced tab of the Object Properties dialog, enter ‘young female’ into the Voice family property.
Now click on OK.
The ‘female’ tag now appears in the object palette. Select some text in your document, and doubleclick on the ‘female’ object. Tags will appear around the selected text. If you click on the start tag, you
can confirm that in the Advanced tab of the properties dialog, the Voice family property contains the
value you entered as a default value. When writing to an Epub 3 file, the custom tag will be written as a
‘span’ tag with appropriate properties.
Note that custom tag definitions are associated with the project, so you will need to use a template
containing the definitions if you wish to create multiple files with the same custom tag definitions. This
ensures that custom tag definitions do not get lost when projects are transferred to other computers.
Summary
Now you have an idea of how to manipulate tag objects, you can use this knowledge when marking up
a document for narration synchronisation – the subject of the next chapter.
166
Chapter 17: Adding Narration to Your Book
This chapter describes how Jutoh can help you add audio narration to one or more documents in your
book, using Epub 3 media overlay (SMIL) files.
Introduction
Synchronised audio narration, where content is highlighted as the audio track progresses, is appropriate
for some kinds of books, in particular young children’s picture books. An audio track may also enhance
accessibility for disabled readers.
At present, narration works with iBooks and Kobo for fixed layout books only; some Epub 3 readers
such as Readium will also handle narration for reflowable books.
You will need to set your configuration option Epub version to 3.
Here’s a procedure for adding narration (you may choose to use different tools or ordering):
1. Mark up your document with spans and identifiers.
2. Add your audio files to the Jutoh project.
3. Create a label file in the audio editor Audacity to mark up clip timings that correspond to span
identifiers.
4. In Jutoh document properties, import the labels file to a ‘timing set’.
5. Specify a character style for highlighting narrated content.
6. Compile the project.
These tasks are described further below.
Step 1. Mark up your document with spans and identifiers
Jutoh will need to match each segment of text with a clip in an audio file. So first you need to mark up
your document with ‘span’ tags, either manually using the Object Palette, or automatically using the
command Book | Bulk Bookmark Management. This can add spans around words and sentences,
complete with generated identifiers. You can manually fix spans that haven’t been placed correctly.
Use the Inspector Palette to view all the identifiers in the document (both object ‘Ids’ and bookmarks).
This is particularly useful when you’re using paragraph identifiers, which are not visible in the editor.
The screenshot below shows marked-up content for the first few paragraphs of Moby Dick, with the
167
CHAPTER 17: ADDING NARRATION TO YOUR BOOK
identifiers and their context listed in the Inspector. To show span tag identifiers next to each tag as in
the screenshot, right-click over ‘span’ in the Object Palette, click on Edit Object in the menu, and set
the Display mode setting to Show all valid properties.
Marked-up content and the Inspector showing bookmarks
Step 2. Add your narration audio files to Jutoh
For each audio file – you can have several per document if you wish – create a media document from
the Documents toolbar button and specify the audio file. Typically the file will be in MP4 format. Note
that if the audio file changes, you will need to import the file again: Jutoh doesn’t automatically use the
changed file. An example media document within Jutoh is shown below.
168
CHAPTER 17: ADDING NARRATION TO YOUR BOOK
An audio file as a media document in Jutoh
Step 3. Create a label file
Audacity is a widely-used audio editor program available for Windows, Linux and Mac. (Fun fact:
Audacity uses the wxWidgets GUI library also used for Jutoh; wxWidgets was created by Jutoh’s
author.) Audacity is recommended by Apple for creating label files for media overlays, in case that
gives you extra confidence. Here’s a screenshot of Audacity with an audio track and label track:
169
CHAPTER 17: ADDING NARRATION TO YOUR BOOK
Audacity with an audio track and label track
Run Audacity, and open the narration audio track. If the audio file is in a format not supported by
Audacity, you may need to convert it to (for example) WAV or MP3 first. You can use software such
as FFmpeg to do this, or you can use an online file converter.
Now add a label track in Audacity using Tracks | Add New | Label Track. Use View | Zoom In
(Ctrl+1) as many times as you need to view enough detail. At high zoom levels, you will be able to see
roughly where word, phrase and sentence boundaries are by the appearance of the wave form.
To add a label, define the clip start and end positions using a drag movement or more precise dragging
of the start and end positions. You can use Audacity’s snap-to-nearest-label option to make it easier to
create consecutive audio segments. Press Play to see if you have got the clip position right. When you
have, use Tracks | Add Label at Selection (Ctrl+B) and start typing. For each span identifier in your
Jutoh document, add a label with the same name in the Audacity label track. When doing this, you can
refer to Jutoh’s Inspector Palette with its list of bookmarks (including span identifiers) and their
context.
When you have finished marking up the clips, save the label track as a text file using File | Export
Labels. You can have several label tracks for a document if you wish.
170
CHAPTER 17: ADDING NARRATION TO YOUR BOOK
Step 4. Import the label track
The Jutoh book section properties dialog has a Media page within which you can define ‘timing sets’
for narration synchronisation. A timing set is simply a list of start and end times (clips), each with a
label. The label will identify which part of the content the clip applies to. As noted above, you can have
as many timing sets as you wish for each document, since you might have several audio files for the
document, and corresponding label files. A timing set in Jutoh corresponds to an Audacity label file,
but we give it a neutral name ‘timing set’ since you may define your timings in a different way, such as
adding each one manually (though this would be laborious!)
Here’s a screenshot of the Media page with a timing set defined:
The media page of the Book Section properties dialog
When you add a timing set by clicking on Add next to the drop-down list of timing sets, you can
specify the Audacity label track file name, and the associated audio resource within the Jutoh project
that you have added (or will add) to the project.
Jutoh will import the timings when you create the timing set, and also if you edit the timing set. You
171
CHAPTER 17: ADDING NARRATION TO YOUR BOOK
can click the Reimport Timings button to reimport the label files for all the timing sets in the
document. Currently you can’t do this per project, only per section document.
Step 5. Specify a character style for highlighting narrated content
Edit your project properties and in the Accessibility page, click on the Speech tab. In the field for
Character style for narration highlighting, specify a character style that will be used to highlight the
text that is currently being narrated. You can leave this blank to use the ereader default.
Step 6. Compile the book
When the ebook is compiled, Jutoh will create a SMIL file for each document that reflects both the
structure of the document and the identifiers that specify the timing for that content. You can look at
the generated files by using Book | Examine and clicking on the .smil file(s).
You can test the book using Readium add-on for the Chrome browser, or on iBooks or a Kobo device
or app if you have created a fixed-layout book. On some systems, you can click on or touch a region of
content to start reading immediately from that point.
Summary
We’ve seen how we can add audio files and synchronise them with book content, with a little help from
the third-party audio editor Audacity. For iBooks, we can only use narration in fixed layout books: so
let’s look at that next.
172
Chapter 18: Creating Fixed Layout Books
This chapter shows you how to create fixed layout books using the new ‘Fixed Layout’ document type,
and various configuration settings that are specific to this kind of book.
The fixed layout sample
You can use the supplied sample, ‘Birds.jutoh’ (available via the Help | Browse Samples command) in
conjunction with this chapter. The sample shows a book fixed in landscape orientation, with image and
text objects laid onto an image background. The pages are edited as double-page spreads rather than
left and right pages. Some of the graphics are pre-rendered onto the page background when compiling,
to allow transparency. It compiles as an iBooks fixed layout book, and as a Kindle KF8 fixed layout
book with automatic magnification panels for text and images.
What is a fixed layout book?
This is a book with a fixed number of pages whose content doesn’t reflow. It’s a format suited to
magazines, children’s picture books, comics, ‘coffee-table’ books, amongst others. In contrast, most
novels, biographies and other books with mostly text content should usually not be fixed layout books.
Much of the content will be pre-rendered in bitmap images, but text should, if possible, be specified as
actual text rendered by the ebook reader and not as images, to increase quality and reduce file size. In
some cases, fixed layout books will be interactive via the provision of custom JavaScript code and
dynamic content modification.
Reflowable books can easily match the different orientation of ebook readers with little or no effort on
the book author’s part, but a few more choices must be made by the author in the case of fixed layout
books. Here are some of the questions to be answered:
•
What will my page size be?
•
Should I create individual left and right pages, or single double-page spreads?
•
Will the user be able to change the device orientation to read in either portrait or landscape, or
will the book be fixed to either portrait or landscape?
•
Can my separate left and right pages be joined together (‘synthesized’) to form a seamless
double-page spread?
Some of these questions must be answered before work starts (for example, page size) but others can be
changed in your configurations – with different settings in different configurations, to suit the target
device or publishing platform. Jutoh will apply the current configuration settings with reference to the
173
CHAPTER 18: CREATING FIXED LAYOUT BOOKS
individual page settings, and compensate where necessary and possible.
Note that there is no fixed page size or aspect ratio that an ereader requires. If you have the luxury of
targeting the aspect ratio (width and height) of a particular device, great, but displays come in so many
shapes and sizes that you shouldn’t worry about it too much – choose the aspect ratio that suits your
book, and the device will do the best it can.
Also, since pages are scaled by the device, the physical page size you choose isn’t critical. However,
the larger the page size you work with, the greater the accuracy and the less chance there is for
imprecise conversions (for example, conversion of font point sizes to pixels). You can still provide
page background and other images that have more detail than the physical size shown in Jutoh. Extra
resolution can be used for zooming, but also be aware of size and performance constraints when using
large images.
You cannot mix fixed layout documents and reflowable book section documents: a project must
contain one or the other, or the result will be unpredictable.
Typically, because fixed layout books tend to be more graphical than reflowable books, you will need
other tools in addition to Jutoh; at minimum, a simple bitmap editing tool for resizing, cropping and so
on.
Starting from an existing file format
If your existing book was designed using an application such as Adobe InDesign or Adobe Illustrator,
you will not be able to import it into Jutoh directly, but you can export a page as a bitmap and paste
that into Jutoh one page at a time. Then, optionally, copy paste text and further images from your
original file into Jutoh as text and image objects that overlay the page background. If you are starting
from scratch, you can prepare your pages with Jutoh in mind, again pasting or inserting images and text
from your design tool of choice.
What are the disadvantages of using fixed layout?
It’s worth emphasizing some of the issues you might find with fixed layout, which might influence you
in your choice between reflowable and fixed layout.
•
Text may not appear exactly as shown in Jutoh. Even when font sizes are expressed in pixels,
HTML-based systems simply render text differently and according to their own rules. So,
especially if you have a lot of relatively small text, it may take less or more space than expected,
leaving extra white space or causing overlapping. You can mitigate this to some extent by
embedding fonts and choosing a suitable Font pixel scale value in your configuration. When
using small amounts of large text, this will not be such an issue, and of course you can prerender text into the book images if the text is sufficiently large not to have significant quality
problems.
•
Text cannot reflow between pages or boxes. All text will be restricted to its own box, so certain
kinds of book may be difficult to implement.
•
It’s harder work to create a fixed layout book, not only because each page requires precision, but
because there are several different fixed layout standards, and you have to make sure that your
174
CHAPTER 18: CREATING FIXED LAYOUT BOOKS
book is optimized for each one – this can usually be accomplished via Jutoh configuration
settings, but it’s definitely more time-consuming to keep all requirements in mind, and test on
different devices.
•
How good a fixed layout book looks on a particular device is much more variable than for a
reflowable book, given the different device sizes, aspect ratios and resolutions. With a
reflowable book, the user can crank up the text size or change the font, but with fixed layout,
parts of pages must be zoomed on small devices, and for some devices there isn’t an automatic
zoom facility anyway. Some ereaders can zoom images in reflowable books to full-screen – an
advantage that may be lost with fixed layout books.
•
You are restricting your audience, since not all devices can cope with fixed layout. However,
this may not be a problem if you’re targeting a particular device or class of devices. Note that
Barnes & Nobles Nook fixed layout format is not supported by Jutoh and in fact is a proprietary
format that cannot be used without a non-disclosure agreement with Barnes & Noble. This will
probably be replaced by Epub 3 soon, but meanwhile, if you wish to allow Nook users to read
your books, you will need to make a reflowable version for them. Kobo uses the iBooks format,
but not all ebook redistributors will allow you to upload fixed layout Epubs. Check first!
•
Using specific fonts isn’t so important in a reflowable book, but in a fixed layout book, you are
likely to want to embed specific fonts, both for aesthetic reasons and also to preserve the layout
as much as possible. Since embedding fonts in an ebook requires legal rights to do so, this may
require a rethink about what fonts you can use compared with an existing print book.
•
Fixed layout books may have a large file size, especially if you pre-render text in large
background images. If you have a lot of pages, you may hit file size restrictions sooner than for
a reflowable book.
•
Fixed layout books cannot be imported from an existing file format such as ODT or DOCX.
They can be exported to ODT, with some restrictions: please see the help topic Creating fixed
layout books in the Jutoh application help for details.
Consider whether you really need fixed layout; will it benefit the readers? For example, a guide book
may look snazzy in fixed layout format, but a tourist trying to zoom in on areas of text on a phone or
small tablet may get frustrated.
What formats and features are supported by Jutoh?
These features are supported:
•
iBooks Epub output (also used by Kobo);
•
Kindle KF8 output;
•
Epub 3;
•
text and image objects, positioned using absolute coordinates;
•
automatic generation of magnification panels in KF8 for text objects, image objects, and
background images;
175
CHAPTER 18: CREATING FIXED LAYOUT BOOKS
•
the option of pre-rendering text and images to support transparency and other requirements.
These features are not supported:
•
HTML templates;
•
the ability to show magnified objects that are different from the source objects (for example,
showing a hidden object in response to touching an area in the page);
•
the ‘read aloud’ feature sometimes used in children’s books;
•
percentage units for Kindle;
•
relative positioning of images and boxes.
In addition, the usual limitations of Jutoh formatting apply to text boxes, such as no columns, tables
and further text boxes without resorting to raw HTML.
Creating a fixed layout project
When you run the New Project Wizard in Jutoh 2, you will see a new ‘layout choice’ page, offering a
choice between a regular reflowable book (as before), and a fixed layout book:
The layout choice page of the new project wizard
If you choose Fixed layout book, you will not be able to import from an existing document but Jutoh
will create some empty pages for the new book. Select the kind of layout you will be using from the
Book style dropdown, as follows:
•
Portrait and landscape: your book will be viewable in both orientations, showing a single page
portrait mode, and showing two pages at a time in landscape mode.
•
Portrait only: only the portrait orientation will be allowed.
176
CHAPTER 18: CREATING FIXED LAYOUT BOOKS
•
Landscape only, two pages per spread: only landscape orientation will be allowed, but each
Jutoh document will be half of the final landscape page.
•
Landscape only, double-page spread: only landscape orientation will be allowed, and each
Jutoh document will show as the full landscape page.
For books that have independent left and right pages, the first option is recommended. The choice you
make here can be changed later in the Options page of the Project Properties dialog. The main effect of
the book style choice is to allow Jutoh to do two things: firstly, to set the Orientation lock configuration
property whenever a configuration is created; and secondly, to initialize the page type for each Jutoh
fixed layout document. The page type will be used to determine whether the page is on the left or right,
amongst other things, as we shall see later.
The page size can be any size you want, but you may wish to choose a size that’s targeted at a
particular device’s aspect ratio. Devices with different aspect ratios will still show the book, but with
more unused display. Most devices will scale the book to the largest size that fits the display so the
absolute size is not as crucial as the aspect ratio. In most cases you will probably choose Portrait and
landscape. Click on Browse to choose from some predefined sizes; you can also add your own for use
later. Specify a margin if you are going to add text and image objects to your pages and you want to
have them snap to within a margin. You can change these settings later per-project, and per-page.
Finally, choose how many pages to create initially. You can add more later.
Click Next to move to the Cover wizard page, then Finish to create the project.
Editing pages
When you first click on a page in the project, you will see a blank page. The first thing is to assign the
image you want to show as the background to the whole page. It can be a higher resolution than the
page size – in this case, it will allow scaling and zooming without so much loss of detail.
The following picture illustrates a typical session:
177
CHAPTER 18: CREATING FIXED LAYOUT BOOKS
Editing a fixed layout page
When you are editing a page, the Fixed Layout palette appears on the right, with two tabs: Page and
Objects. The Page tab contains controls for editing the page type, size and background image, among
other things. The Objects tab contains a list of additional images and text objects that should be shown
on top of the background image. You can add and delete these, and set their properties, such as size and
colour. Under both tabs, there are controls for zooming and showing object outlines.
The Page type control indicates what kind of page this is. The type is used mainly for Kindle books
that outputs a type per page file. The possible values for this control are:
•
(unspecified): Jutoh will guess the page type.
•
Single left page: this is a left-hand page that can stand on its own in portrait mode.
•
Single right page: this is a right-hand page that can stand on its own in portrait mode.
•
Spread left page: this is a left-hand page that is part of a double page spread.
•
Spread right page: this is a right-hand page that is part of a double page spread.
•
Double page spread: this page handles the whole of a double page spread.
•
Blank: this is a blank page, used as a place-holder, for example at the end of a book with an
uneven number of pages. Currently this type is not used by Jutoh.
The page width and height can be edited, but it’s recommended you use the same size for all pages.
178
CHAPTER 18: CREATING FIXED LAYOUT BOOKS
The Tools menu gives you access to various useful commands such as alignment, copy and paste, and
more. The same menu is shown when you right-click over the page background. Use the << and >>
buttons to quickly navigate between fixed layout pages.
Set the background image with the Set Background Image button. The resolution and file name will
be described, along with a hint about whether the image and page sizes match and whether the aspect
ratio is appropriate for the page size. As we mentioned, do set a higher-resolution image than the page
dimensions, to increase quality. The background image will also be scaled to fit the page size.
You can set margins for the page if you wish, and check Snap to margins if you want objects to be
constrained within the margins when positioning them.
You can also set the notional grid size and check Snap to grid to make object positioning easier.
Adding image and text objects
With some books, you can simply provide a single image per page; but ebook distributors generally
recommend that as much content as possible is provided as actual text layered on top of the page
image. Also, if you add image objects that float above the page image, Jutoh can provide zooming. For
example, in a photography book, the reader can double-tap on an image on the page to view it in more
detail.
To add an object, click on Objects and then New Text or New Image. You will be prompted for a
name for the object; this allows you to keep track of them in the object list, where you can move them
up and down in order to specify their positions in the z-order (how they are layered).
Double-click to edit inside a text object. When you are editing text, the Formatting Palette will be
displayed (you may need to press Alt+P if the palette is not displayed). It will be hidden automatically
when you are not editing text. Text objects can contain most of what a regular, reflowable Jutoh page
can contain, including images but currently excluding currently footnotes.
You can give a text or image object borders, a background colour, margins and more by clicking on
Properties next to the object list (or by using the Properties command on the context menu, or by altleft-clicking on the object). Reposition the box by dragging it or editing its properties, and resize it by
dragging the bottom-right corner or (again) editing its properties. You can also set the position and size
directly using the controls in the Objects tab.
If you have light-coloured text, you can change the editing background colour to a more suitable one
with the Editor bg control in the Page tab. This can be changed per page.
Clipboard operations
You can paste text and image objects from text and bitmaps on the clipboard by using the Paste
command or Ctrl+V. When an image is pasted (or inserted from a file), the box that surrounds the
image is scaled proportionately to how much ‘extra’ resolution there is in the background image
compared with the actual page size. This means that if you are working with a background image at a
certain resolution, and cutting out images to paste onto your page, they will appear at the correct
relative size.
179
CHAPTER 18: CREATING FIXED LAYOUT BOOKS
You can paste background images from the clipboard using Paste Background Image from the
context/tool menu. The original resolution will be retained, and the image will be scaled to fit the page.
Images pasted from the clipboard are always saved in PNG format internally, and not JPEG, so that
they don’t lose any detail.
You can paste the background image to the clipboard for editing and re-pasting back to the page, using
Copy Background Image. Similarly, you can paste image objects to the clipboard using Copy.
Selection and keyboard navigation
The ‘focused’ object has a dotted outline. There can only be one focused object, which will receive
keyboard input such as Return to edit its properties, but there can be multiple selected objects, for
example by dragging a rectangle around several shapes, or by control-clicking on several objects.
Selected objects have a dotted outline, but also have a checkbox in the top-left corner.
You can manipulate objects via the keyboard by first clicking on the canvas background to give it the
keyboard focus, and then using:
•
Tab to cycle forwards through the objects;
•
Shift+Tab to cycle backwards through the objects;
•
Shift+Return to edit the object’s properties;
•
Return to start editing a text object;
•
Delete to delete the selected shape(s) or focused shape.
•
Left, right, up and down arrows to move the the shape by a pixel, or 10 pixels if you hold
down the shift key.
Aligning objects
A book often looks best when there is a good margin around the content. You can set the left, top, right
and bottom margin sizes in pixels using controls on the Page tab. If you also check Snap to margins,
when you move objects they will be limited to the area inside the margins.
You can align objects relative to the page or other objects. For example to align object B with respect
to object A, click first A, then B, right-click (or control-click on the Mac), or click on the Tools button,
and choose Align | Left. The first-clicked object will be the reference object, with respect to which the
other selections will be aligned.
180
CHAPTER 18: CREATING FIXED LAYOUT BOOKS
The Tools/context menu
If you only select a single object, it will be aligned with respect to the page if possible (applicable
horizontal or vertical alignment). These are the available alignment commands:
•
Left: align the left side of an object with the left side of the reference object;
•
Right: align the right side of an object with the right side of the reference object;
•
Centre Horizontally: horizontally align the centre of an object with the centre of the reference
object, or the centre of the page;
•
Same Width: give an object the same width as the reference object;
•
Top: align the top of an object with the top of the reference object;
•
Bottom: align the bottom of an object with the bottom of the reference object;
•
Centre Vertically: vertically align the centre of an object with the centre of the reference object;
•
Same Height: give an object the same height as the reference object;
•
Same Size: give an object the same size as the reference object.
In addition to snapping to margins, you can snap positions to a notional grid (Snap to grid) whose
granularity you can control with the Size field. You can also check Show grid to show the gridlines.
181
CHAPTER 18: CREATING FIXED LAYOUT BOOKS
Adding borders
You can add borders when editing the properties of each object. These borders will be created using
HTML and CSS; if you wish to add a border permanently to an image, you can right-click on an image
and choose Add Border. A dialog will be shown for you to choose an outer border and an optional
inner border. You also have the option to add a larger border to take into account the scaling of the
image, if the image resolution is greater than the size of the object on the page.
Pre-rendering objects
Pre-rendering can be done for none, all, or some text and image objects in your project. Pre-rendered
objects will be drawn onto the background image and will no longer have their own independent
existence in the ebook. Pre-rendered objects cannot be magnified on Kindle. You can override perobject settings with the Pre-render objects configuration option, for example if one ebook platform
requires background-image-only pages and another platform benefits from independent objects.
Here are some reasons why you might wish to check Pre-render this object in your object region
properties:
•
An image has transparency, which is not supported by most ereaders. Pre-rendering the object
will allow transparency to work, and is appropriate for decorative images.
•
An image does not need to be magnified, and merging it with the background may reduce file
size, especially if the original image was provided at a high resolution.
•
A text object needs to be rendered precisely in advance, and it’s hard to predict final text layout
when using actual text.
•
The book must be delivered with text in special fonts, but those fonts cannot be embedded in the
file for copyright or other reasons.
The quality of rendering depends on the resolution of the background image and (if it’s an image
object) the object’s original image resolution. For example, if the background image resolution is much
greater than the page size, text will be rendered at a relatively high quality because it will be scaled up
and drawn onto a large background image.
Note that images are currently not pre-rendered with any specified borders or margins; text objects are
rendered without full justification and are subject to the visual restrictions of the editor, so any CSS
customisation won’t show. Any hyperlinks will not work. Also, if there is no background image, no
pre-rendering is done and pre-rendered objects will not show on the page at all.
Font size and dimension units
Currently, position and size of pages and objects should be expressed in pixels. (To clarify, dimensions
within text boxes can have different units, such as percentage image widths, but the actual top-level
object position and size must be in pixels.) You can use the configuration options Font size units and
Dimension units to specify whether the font sizes and dimensions should be written to HTML as points,
pixels, cm or em. The iBooks author’s guide recommends using pixels, but for Kindle, you must use
em if you want panel magnification to work for text. You can also specify font sizes in pixels in styles
182
CHAPTER 18: CREATING FIXED LAYOUT BOOKS
and ad hoc formatting.
Conversion to pixels requires a value for dots per inch; by default the current display DPI is used, since
this corresponds best with what’s displayed on your screen. However, for consistency between
platforms, you can also specify the DPI value to use in the Options page of Project Properties, with
Use custom DPI for conversions. If using pixel fonts (and specifying pixels in Font size units), you
can use the Font pixel scale configuration option to adjust the text size shown in Jutoh to a value closer
to that used in the ebook. Different ebook renderers will render fonts in slightly different ways, so this
value may need to be adjusted separately for different configurations.
In future, Jutoh may convert appropriate units of top-level object dimensions to percentages for Kindle
configurations as recommended by the Amazon publishing guidelines. However, pixels currently work
fine, and all pixel dimensions are scaled relative to the overall page size.
Embedding fonts
It’s highly likely that if you include text boxes in your project, you will want to embed a font in order
to maintain the look of your project. Embedding fonts is covered in the Advanced Topics chapter, but
as a quick reminder:
•
Check the configuration options: Embed fonts, Generate font names, Generate generic font
names.
•
Add Embedded Font Documents in your project. If there are several font files per family (for
example, for italic and bold variants), make sure the font name in each font document is the
same, and adjust the style and weight settings to suitable values. The ereader will use this
information to render the correct font according to the text formatting.
•
If you can add the fonts to your system, do so, and make sure the font name in your Font
Documents match those in the document. If for some reason they don’t match, use the Font
substitutions configuration option to map the font names in your project to the names used in
your embedded fonts.
Embedded fonts are supported by all systems that support fixed layout books, notably iBooks, KF8 and
Epub 3.
If you don’t wish to embed fonts, consider pre-rendering text objects (see the above topic).
Table of contents
If you have a table of contents, it will need to be created as a fixed layout document, with one or more
text boxes manually linked to the other pages in the usual way. Don’t forget to assign the table of
contents page the ‘toc’ guide type, in the document properties. Unfortunately automatic table of
contents creation doesn’t work for fixed layout books, but you can customise the NavMap by adding
entries in Project Properties/Indexes/Contents.
A text box containing hyperlinks must have its region properties set so that it doesn’t show any
magnified panel on Kindle. Otherwise, nested links are generated and the ereader may crash.
183
CHAPTER 18: CREATING FIXED LAYOUT BOOKS
Cover
If you enable the configuration option Generate cover page, Jutoh will generate a cover HTML page
using the page size given in the configuration. Alternatively, you can set Cover design to ‘(none)’ and
create your own cover page as the first page in the project. Set the guide type in the document
properties to ‘cover’.
As mentioned later, specifying a cover can cause duplicate covers to appear on Kindle: this is a Kindle
rather than a Jutoh issue.
Generating and testing your ebook
As usual, you now just need to choose a suitable configuration (Epub or Mobipocket) and press
Compile to create your iBooks Epub or Amazon Kindle book. You can test Kindle books with Kindle
for PC or the Kindle Previewer; some Previewer modes don’t currently display all aspects of fixed
layout books, and in some cases layout is better on the device than the Previewer. For example, images
with a percentage width inside a text box can be shown full size on Previewer, and correctly on
devices.
Currently Adobe Digital Editions doesn’t handle fixed-layout ebooks. You can try the Azardi viewer or
Readium, an app for the Chrome browser. You can also preview a fixed layout page in a web browser
with Book | Preview Section.
Changing fixed layout configuration settings
While the ‘book style’ that you chose in the New Project Wizard or changed in Project Properties is a
rough indicator of the layout of your book, it is only used as a hint when creating new pages or new
configurations. When Jutoh generates a book, it actually looks at the configuration settings to
determine how it will create the necessary HTML and other files.
The relevant settings are listed below. Remember, you can search for settings using the search box at
the bottom of the configuration page (click on the box, or use Ctrl+F, and start typing).
•
Enable fixed layout: this should always be enabled for fixed layout books.
•
Allow reflowable and fixed layout: check this if your book contains reflowable and fixed layout
content. The mainstream platforms (iBooks, Kobo, Kindle) don’t allow mixing types of content,
but Epub 3 allows it.
•
Orientation lock: whether the book will be locked in portrait or landscape mode. This doesn’t
refer to the actual aspect ratio of an individual page: this is entirely up to you.
•
Pages per spread: how many pages (HTML files) will be created per double-page spread. This
may differ from the way you created your pages – Jutoh will split or merge pages accordingly.
•
Synthesize spreads: whether left and right pages should be ‘stuck together’ to form a seamless
spread, or whether the pages should be shown as being separate (even if next to each other). If
not ‘Default’, this setting overrides individual page settings.
•
Page width: the overall width of the book. This may be different from your individual page
184
CHAPTER 18: CREATING FIXED LAYOUT BOOKS
sizes if the Pages per spread setting indicates that Jutoh should split or merge pages.
•
Page height: the overall height of the book. Currently Jutoh doesn’t split or merge pages in the
vertical direction so this should always be the same as your page heights.
•
Book type: this is only used for Kindle and need not be set; if you select ‘comic’, it enables
automatic zooming facilities on some Kindles and changes the rendering of double-page
spreads. There may be rendering side-effects when specifying a book type, so test the book
carefully. Please see the notes below regarding setting KF8 options.
•
Open to spread: if checked, the book will open directly to a full-page spread. This is only
applicable to iBooks.
•
Show binding: if enabled, a binding crease will be shown in the middle of a double-page spread,
in iBooks only.
•
Write page image as background: if checked, the page background will be written using the
background-image CSS property, which for KF8 will disable default zooming but will also
prevent the background from being shown independently from the rest of the content when
clicking/double-tapping on the background.
•
Pre-render objects: if set to ‘Default’, any text or image objects that have Pre-render this
object checked in their region properties (or inherited page or project properties) will be
rendered to the background image instead of being written to the ebook as a separate object. If
this option is ‘Always’, all objects will be pre-rendered, and if ‘Never’, no objects are prerendered.
•
Font pixel scale: this option is in the HTML Formatting group rather than Fixed Layout, but it is
useful for making the text size in ebooks closer to the size as shown in Jutoh. Try a value of 0.85
if the ebook text is too large. It is only used when font sizes are expressed in pixels. If your font
sizes are in points, you can scale the text size in ebooks by setting the Custom DPI in Project
Preferences/Options.
•
Auto region magnification: for KF8 output only, this option enables Jutoh’s automatic
generation of magnification regions for backgrounds, text objects and image objects. For more
on this, see below. You may wish to switch this off if targeting e-ink Kindle devices since it can
cause interruption of normal page navigation. It also disables the ability to switch between
single pages in portrait mode, and double-page spreads in landscape mode.
Formatting for Kindle
Kindle fixed layout books have specific rules relating pages-per-spread and orientation: if you fix your
orientation to ‘Landscape’, then Pages per spread must be ‘One’. If you’ve created each left and page
individually, then this may seem to be a problem, but Jutoh will merge the left and right pages if your
configuration settings are consistent with each other, and will warn you if they aren’t. The only wrinkle
is that you don’t have the option to show the pages separately: they will be immediately adjacent to
each other. However, if you want there to be a gap, just choose ‘(none)’ for Orientation lock and then
the individual page types will indicate whether the pages are synthesized (joined) or not.
185
CHAPTER 18: CREATING FIXED LAYOUT BOOKS
It is possible to have a Kindle book presented in single pages when in portrait orientation, and
presented in paired, double-page-spread format when rotated to landscape orientation. To achieve this,
don’t set the orientation lock, and specify two pages per spread. But for this to work, the configuration
option Auto region magnification must be off, or Kindle will only ever display a single page in portrait
and landscape modes.
You can have different settings for different configurations; so you can make Jutoh split or merge
pages when using one configuration, and do something different for another configuration. You can
also add new configurations for the same format, for example to create several styles of Kindle layout.
If you do this, don’t forget to change the Book file name setting for each configuration or files for
different configurations will overwrite each other.
You may find that Kindlegen complains about the image file size, if you have very large images. This
can be a problem if your image files are larger than the viewport, and especially if Jutoh is stitching
two images together to make a spread. You can get Jutoh to resize the images when generating the
book, by specifying Maximum image width/height in your configuration. You can choose a size that
eliminates the error message. This currently only works if not splitting or merging pages. Also be
aware of the 650MB overall file size imposed on Amazon KDP uploads.
You can specify a cover image with the same aspect ratio as your page size, but for the HTML cover
page, it may be better to switch off Generate cover page in your configuration and make your own
cover page, setting the guide type to “cover” via the document’s properties.
The Kindle publishing guideliness recommend adding an HTML cover page (whether automatically via
Jutoh or explicitly), but at present it will result in two covers being shown - the image, and the page. So
you may decide to switch off HTML cover page generation to avoid that.
Note that there are some problems when displaying fixed layout books on the Kindle Paperwhite (and
possibly other e-ink Kindle devices):
•
Image objects may be displayed at the wrong size if using magnified regions. Workarounds
include switching off region magnification via the configuration option Auto region
magnification (or per-object), or pre-rendering the images to the background.
•
Images within text objects may not centre correctly. To work around this, you can insert the
image into a centred 1 row by 1 column table.
Magnified regions in KF8
KF8 supports a technique called ‘panel magnification’ for zooming into parts of a page. Jutoh can
generate magnified panels for text objects and image objects if you check the Auto region
magnification configuration option. When you touch a text object, it will be shown in a larger box at
150% magnification; similarly, an image object will be shown at 200% (by default). You can edit
visual characteristics such as the magnified panel’s border width and colour, and zoom factor, using the
Region tab of the object properties dialog. Or, you can edit these characteristics for a whole page using
the Regions tab of the document properties dialog, or for the whole project if you use the Regions tab
of the Project Properties dialog. You can make page or object properties override the higher-level
properties.
To make an image show full-screen, give it a large zoom factor such as 500%, and it will be limited to
186
CHAPTER 18: CREATING FIXED LAYOUT BOOKS
the available space.
If you are not seeing any magnification for a large image, it’s probably because the image is
constrained by the display size.
If a page has no separate image or text objects, Jutoh will generate five magnification regions for the
background image: top-left, top-right, bottom-left, bottom-right, and centre. The whole page will be
zoomed when one of these regions is touched.
Note that Kindle Previewer does not always display magnified regions properly; sometimes it will give
up altogether after a few zooms, until Previewer is restarted.
On the Kindle Paperwhite, double-tapping an object starts magnification, and single-tapping cycles
through all the magnified regions until you double-tap again.
IMPORTANT: if you enable Auto region magnification, Kindle will not show a single page in portrait
mode, and a double-page spread in landscape mode (which can work if you don’t lock the orientation
in your configuration and you specify two pages per spread). With region magnification set, Kindle
will simply show single pages in both orientations. Also, links within text objects that are subject to
magnification won’t work. So treat this option with caution.
Recommended settings for KF8
Unless you are forcing landscape mode:
•
Set Book type in your configuration to ‘comic’. This way, double pages will work in landscape
mode on LCD Kindles, and on e-ink Kindles the book will be fixed to portrait with no option for
landscape (which can be illegible in landscape anyway due to the low resolution). When book
type is set to ‘none’, the Kindle Keyboard renders fixed layout books terribly – they are fixed to
landscape (rotated), but only one page is shown at a time!
•
Also clear the Auto region magnification configuration option or the Kindle Keyboard will cycle
through the regions when paging.
Note that these recommendations are for the current state of Kindle apps and Kindle Keyboard
hardware as of May 2013; changes from Amazon may render the advice obsolete. Behaviour of fixed
layout books with different combinations of settings can be a little unpredictable from one device to the
next, as you can see from one author’s tabulation of the permutations. Do test your book on as many
devices as possible.
Formatting for iBooks/Kobo
iBooks Epub files need two pages per spread, and unlike Kindle, can never be a single page (or file) per
double-page spread. So you need to set Pages per spread to ‘Two’ if your actual Jutoh project contains
double-page spreads implemented in a single page, forcing Jutoh to split the pages.
Apple specifies that there should always be a cover, which appears on the right-hand of the first spread,
meaning that left pages are even-numbered and right pages are odd-numbered. You can use the cover
generated by Jutoh, which will be optimized for absolute layout and the configuration page size, or you
can switch automatic cover generation off (set Cover design to ‘(none)’ and clear Generate cover page)
187
CHAPTER 18: CREATING FIXED LAYOUT BOOKS
and add it as the first page of your project. In this case, don’t forget to set the ‘toc’ guide type in the
document’s properties, and also set the page type to ‘Single right page’.
Even if your double-page spreads make sense when read as individual pages, iBooks does not currently
support viewing single pages in portrait orientation: the whole spread is shown.
If you don’t like the default simulated crease down the middle of the double-page spread, you can
switch this off by clearing the Show binder configuration option.
Using a regular reflowable project as a fixed layout book
If you are using reflowable book section documents, and have a single image per page, you can make
this into a fixed layout book without using fixed layout page documents. Enable the Fixed layout
configuration option, and also set the pixel size of your images in Page width and Page height. Switch
off Generate table of contents in your configuration to prevent a reflowable page being included.
Jutoh will now mark the book as fixed layout, and the single image per page will be used to fill the
page.
This can be especially convenient if you wish to import from a document containing a lot of images, or
a set of HTML files.
This technique may not work on iBooks.
Faking fixed layout using a reflowable project
You may wish to take advantage of the wider distribution of reflowable books compared with fixed
layout. Some aggregators (redistributors) may not accept fixed layout books; and Amazon may refuse
to serve fixed layout books to Kindle for iPad (for unknown reasons since iPad for iOS is perfectly
capable of displaying them).
To fake a fixed layout book using only reflowable layout, for each book section document insert a
single image containing an image of the page at a high resolution (around 2000 pixels wide). Apply the
Centre paragraph style to centre the image, and set the image width to 100% (click on the image to
show its properties, then on the Size tab, set the width value to 100 and the units to percent).
You can specify that only landscape orientation will be used by setting Orientation lock to Landscape.
Your reader will then be forced to turn the device into the landscape position.
Note that in this method, we output a reflowable book. In the previous topic, we use a regular
reflowable document but output the book as fixed layout. The ebook readers will use different
rendering mechanisms but the end result will be similar.
An advantage of this approach compared with the previous one is that you can still include linked
tables of contents and other linked content as text pages.
When reading a book prepared in this way, the user may need to adjust the settings to show one page at
a time. On Kindle for iOS, tap on the Aa button and click on the single-page icon at the bottom of the
menu.
188
CHAPTER 18: CREATING FIXED LAYOUT BOOKS
Further reading
These resources may be useful in conjunction with this guide:
Kindle Publishing Guidelines:
http://kindlegen.s3.amazonaws.com/AmazonKindlePublishingGuidelines.pdf
Kindle fixed layout templates:
https://kdp.amazon.com/community/thread.jspa?threadID=9978&start=255&tstart=0
Tutorials on both Kindle and iBooks fixed layout:
http://authoradventures.blogspot.co.uk/p/tutorials
MobileRead.com page on fixed layout Epub:
http://wiki.mobileread.com/wiki/Fixed_layout_ePub
Summary
This chapter has described the details of creating fixed layout pages in Jutoh as well as the pros and
cons of fixed versus reflowable layout. In the next chapter, we see how simple interaction can be added
via Jutoh, if you have (or have access to) JavaScript skills.
189
Chapter 19: Adding Interactivity To Your Book
This chapter describes the facilities available in Jutoh for adding interactivity to ebooks. You will need
to have JavaScript skills to make use of these features, and currently not many ebook platforms support
JavaScript.
Introduction
Jutoh supports interactivity in Epub 3 books via form objects that you can insert into your document
without writing HTML, and the ability to add JavaScript code via the document properties. The form
objects have identifiers and callbacks which provide the links to the JavaScript code.
These are examples of interactive content you might have in your book:
•
a multiple choice quiz;
•
a calculator illustrating scientific principles;
•
an animation demonstrating an important point in the text;
•
retrieval of up-to-date information from a remote database.
Epub 3 supports HTML5 and JavaScript; currently only iBooks and some Epub 3 readers such as
AZARDI and Readium support a decent subset of Epub 3. The Kindle platform doesn’t yet allow
arbitrary JavaScript, but is sure to in the future.
Jutoh Plus users can also edit multiple JavaScript files within Jutoh and control the HTML for a
document more fully.
Form objects
Via the Object Palette, Jutoh supports the following objects that you can use to input or display data:
•
button: a button you can use to submit form data or take some other action.
•
canvas: an area for drawing graphics.
•
form: wrap your form objects in a form tag in order to submit data to a JavaScript event handler
or remote server (if permitted). Using a form is not necessary for interactivity.
•
input: this implements many types of input field depending on the value of its Input type
attribute.
•
meter: a gauge control for representing an amount.
190
CHAPTER 19: ADDING INTERACTIVITY TO YOUR BOOK
•
output: a place for output, where you can specify which input objects contribute to the output.
•
progress: a progress bar.
•
select: a control that gives the user a choice of values.
•
textarea: a text field.
The screenshot below shows some of the available controls, taken from the Epub 3 sample project:
A selection of form objects
The form objects aren’t ‘live’ within Jutoh but give a rough representation of their eventual appearance
given their current attribute settings.
Click on an object to edit its attributes. Where appropriate, you can edit visual attributes such as the
object’s size, margins and so on via the pages in the Object Properties dialog. Attributes edited in this
way will be generated ‘inline’ in the style attribute, so you can instead specify a Jutoh style (or
alternatively a CSS class) that will apply to the object.
The most interesting attributes are in the Advanced page of the dialog; here you can edit object-specific
properties such as List options, and specify JavaScript event handlers such as for onclick.
Using form objects
It is beyond the scope of this manual to give a tutorial on JavaScript and HTML5, but briefly, you can
add identifiers and event handlers to your form objects, and then write JavaScript to handle the events,
191
CHAPTER 19: ADDING INTERACTIVITY TO YOUR BOOK
writing results to controls such as ‘output’ or simply to a paragraph or span in the document.
JavaScript code can be defined inline within the JavaScript tab of the document properties dialog, or in
Jutoh Plus it can be specified as a resource created as a code document.
You can test your code by compiling with the HTML configuration, with the Epub version
configuration option set to 3. Launch will show the HTML in the default web browser.
Or, you can use the command Book | Preview Section, which will show only the current section in the
web browser: this is good for quickly testing changes.
You can search online for Epub 3/JavaScript examples and tutorials. The supplied project “Epub 3
Sample” has very simple JavaScript code that outputs the identifier of the clicked form object, using
the onclick event handler.
Summary
We’ve seen how advanced properties in Jutoh objects, plus the ability to include JavaScript files and
code, can let you make pages interactive for those platforms that support it. In the next chapter, we
describe how you can add extra structure to make your Epub 3 books easier for disabled readers to
navigate.
192
Chapter 20: Making Your Books Accessible
In this chapter, we discuss how your books can be made more accessible to disabled readers by
targeting the Epub 3 format. Since the most commonly used ereader hardware and software do not
support accessibility features, this chapter may not yet be relevant to you. For an alternative way to
make your documents accessible, see Chapter 21: Working With Text-To-Speech.
Introduction
If you intend to create books that are accessible to disabled readers, you need to understand how to use
Jutoh to add extra information to your book. Jutoh has features that can help automate the insertion of
accessibility information, and the remaining manual settings are quite straightforward. However, for
best results, you will need to do some reading around the subject to understand the principles of
accessibility.
At present, a reasonable level of accessibility (as illustrated by the features listed in this topic) is only
supported by Epub 3, the DAISY digital talking book (DTB) standard, and annotated PDF. Of these
formats, only Epub 3 is supported by Jutoh. Epub 3 is taking longer to become mainstream than
expected, but iBooks supports an Epub 3 subset and some countries have adopted Epub 3 rapidly due to
its support for their languages; and many large publishers are using Epub 3 internally. As a replacement
for the DAISY DTB standard, Epub 3 is in a transitional period and DTB is likely to be around for a
long time to come. Despite these caveats, it seems highly likely that Epub 3 will be adopted more
widely in future. Plus, some of the features that promote accessibility (such as sections, figures, and
asides) are in fact HTML5 constructs – a standard in wide use today.
Note that Jutoh doesn’t currently cover all conceivable aspects of accessibility. But we hope that the
current functionality is a big step in the right direction, and we will be listening to feedback in order to
improve it.
Some accessibility features can still be useful for Epub 2 and Mobipocket generation – the caption
detection will insert non-breaking ‘div’ tags around the object and caption in Epub 2 mode so that they
stay together (not currently supported by Kindle). You can use the style mapping facility to map styles
to phrase tags such as ‘em’ and ‘strong’ in Epub 2, Epub 3 and Mobipocket.
Epub 3 and Jutoh
Epub 3 uses HTML5 and some additional Epub-specific constructs to provide semantic markup that
ereaders can use to orientate users with a range of abilities.
Given that time available for editing documents is usually in short supply, Jutoh tries to automate as
193
CHAPTER 20: MAKING YOUR BOOKS ACCESSIBLE
much as possible, in particular relying on using a well-planned and consistently used set of styles in
your project. If this doesn’t describe your project, please take the time to create named paragraph styles
for headings, images, captions, and so on, and apply them to your book. Some forethought should save
a lot of time in the long run.
Here are the accessibility features that Jutoh currently supports.
1. Epub type
The ‘epub:type’ attribute (‘Epub type’ in Jutoh) can be associated with many elements, including
the document body, section tags, links, headings, and so on. A range of values allows meaning to be
assigned to elements. Jutoh allows editing the Epub type in the Advanced tab of various property
dialogs, and also in the document properties. Multiple space-separated types can be specified.
2. Section tags
Use of the ‘section’ tag gives hierarchy (and an Epub type) to components of a book chapter,
allowing easier navigation. Section tags often (but not always) contain a single heading. Jutoh can
insert section tags based on a mapping from headings that you can edit in the Accessibility page of
Project Properties.
3. Navigation document
The navigation document is a compulsory part of an Epub 3 file containing a table of contents and
landmarks section; Jutoh generates this automatically from the navigation map and document guide
types.
4. Speech and narration support
Epub 3 defines properties such as ‘-epub-voice-family’ (‘Voice family’ in Jutoh), to allow passages
of text to use a distinct voice. Some of these are supported via the advanced properties tab in style
definitions, paragraphs, text spans and objects. In order to apply these and other properties to spans
or blocks of content, Jutoh supports the insertion of tag objects via the Object Palette.
In addition, Jutoh can generate a SMIL file for each section document, without media or timings, so
that TTS systems can help the blind user navigate the content.
Jutoh supports the synchronisation of speech with the content either by provision of existing SMIL
files, or by importing Audacity label files which are matched against identifiers in the content to
produce a SMIL file with timings.
5. Phrase tags
You can insert phrase tags such as ‘em’ and ‘strong’ as objects around text; or you can get Jutoh to
automatically insert the tags based on character styles that you use in your document. Again, this is
achieved using the style mapping edited in the Accessibility page of Project Properties. It works for
Epub 2, Epub 3 and Mobipocket generation.
6. Figures and captions
194
CHAPTER 20: MAKING YOUR BOOKS ACCESSIBLE
Wrapping images and tables up in ‘figure’ tags containing captions ensures that the ereader knows
which text is associated with which figures. Jutoh can insert these tags if you enable the option in
the Accessibility page of Project Properties. You can specify styles you have used for captions, and
Jutoh will look for figures near the caption (currently, only a single image or table above the
caption). In addition, Jutoh will optionally insert image ‘alt’ (alternative) text and table descriptions
using an HTML5 ‘details’ tag that displays extra an description when clicking on a button next to
the caption. Obviously, for the best results, enter descriptions into all your images and tables. For
images that are purely for decoration, set the Epub type to ‘presentation’, so that Jutoh knows to
ignore them for the purposes of captioning.
If your configuration specifies Epub version 2, then ‘div’ tags are added instead of ‘figure’ tags.
7. Table headers
The sighted user can easily distinguish a table heading from the rest of the table if it has been
formatted in an appropriate way; to help disabled readers, make it plain which are header rows in
table properties by specifying the number of rows that are part of the header, in the Repeat header
control. If several rows are part of the header, and there are spanned columns, Jutoh will generate
code to indicate to the other table cells which all the appropriate header cells are.
If you have header cells that outside the main header rows, you can mark them as such individually
using the Cell headers control in the table properties dialog.
8. The ‘aside’ tag
It’s important for a disabled person to know what parts of the content are part of the main flow, and
which are not. The HTML5 ‘aside’ tag caters for this, and for text boxes, Jutoh lets you indicate in
the box properties dialog whether it is an ‘aside’ or a normal block. You can configure footnotes to
use asides by checking the configuration options Popup footnotes and Hide footnotes. You an also
insert ‘aside’ tag objects manually if you wish.
Editing your project for accessibility
To make best use of Jutoh’s accessibility features, you need to have a well-defined set of styles that
you apply consistently.
•
Have one heading style for chapters, another for appendices, and so on, so Jutoh can apply a
different Epub type for each kind. Several heading styles can still use the same outline level.
•
A consistent caption style will help Jutoh group images and tables, and their captions, within
figure tags.
•
Create character styles for strong and emphasised text, and other phrase tags listed in the Tag
drop-down control in the Style Mapping dialog, so Jutoh can insert the appropriate tags instead
of just visual formatting.
Other things you can do:
•
Ensure images that aren’t purely decorative have alternative text. Mark images that are
decorative with the role attribute value ‘presentation’, so that Jutoh won’t try to place it in a
195
CHAPTER 20: MAKING YOUR BOOKS ACCESSIBLE
figure and speech systems can ignore it. Replace table images with actual tables if possible.
•
Ensure tables have a description, and the number of header rows marked so that Jutoh can link
table cells with the appropriate header cells.
•
In each document’s properties, set the Epub type. Effectively this will be the type of the first
level (outer section) of that document, so if the document-wide type is present, Jutoh will only
add section tags for the second and subsequent levels, if there are any.
•
Set the Epub type for content (paragraphs, spans of text, objects) wherever appropriate.
•
Set the project’s language in the metadata.
•
Mark changes in language with span tags, setting the ‘Language’ attribute.
If appropriate, mark changes in voice with span tags, setting the ‘Voice family’ attribute.
For logical sections that do not contain headings, insert section tags manually.
How the style mapping works
The purpose of inserting sections is to assign more meaning than a simple heading confers. For
example, you might have two titles, ‘Chapter 1’ and ‘Acknowledgements’ both using the style
‘Heading 1’. If the configuration option Heading style prefix is set to ‘Heading’ (the default), then at
least the paragraph will be generated using the h1 tag. However, it still doesn’t give much information
about the type of section that this heading introduces.
What we would really like to do is enclose the heading (and the text below it) in a section, and assign
the type ‘chapter’ to the section within the Chapter 1 document, and the type ‘acknowledgments’
within the Acknowledgements document.
For example:
<section epub:type="chapter">
<h1 epub:type="title">Chapter 1</h1>
...
</section>
Similarly, subsections should also have their own sections, whether or not they have an explanatory
type (unfortunately Epub types don’t have enough expressivity for all possible subsections, but adding
sections is still useful even without the type.)
When creating an Epub 3 file, Jutoh scans the mapping for style patterns that match paragraph styles. If
there is a match, Jutoh will insert a section tag in front of the heading paragraph, and will close the tag
either when a subsection with a greater level is encountered, or the document ends. At the same time,
the mapping item can assign the heading level, an Epub type for the section, and an optional Epub type
for the heading itself (such as ‘title’).
A caveat for this is that if you have defined an Epub type for the whole document, in the document
properties dialog, then Jutoh will not create a section that defines the same type as the top-level section,
since it will assume that the type (added to the HTML body tag) defines an overall section for the
196
CHAPTER 20: MAKING YOUR BOOKS ACCESSIBLE
document.
You can define any number of mapping items for the same heading level, so it is a more powerful way
of indicating headings than the simple Heading style prefix configuration option, and overrides it.
Similarly, for phrase tag mappings, character styles are matched against entries in the mapping and the
appropriate tags inserted. For ‘em’ and ‘strong’ tags, any italic and bold attributes are removed. Also be
aware that any advanced properties or advanced attributes such as identifier or Epub type will be
removed as well (for ‘em’ and ‘strong’ tags only).
Using speech in your books
Jutoh can help generate SMIL media overlay files both with and without associated media files and
timings. Unfortunately, the largest ebook vendor – Amazon – doesn’t yet support SMIL files, but this
may change.
In the Accessibility page in Project Properties, click on the Speech tab and check Generate overlays
for TTS. Now Jutoh will create a SMIL file for each section document describing the document at the
paragraph level, if other document-specific settings do not take precedence. Even without an associated
sound track, this provides useful information to suitably aware ereaders.
To add narration to your book, which also makes use of media overlays, see Adding narration to your
book.
You can add lexicons to your project to help text-to-speech systems pronounce difficult words or
phrases. In the Accessibilities/Speech tab, under Lexicons, click Add and then in the Lexicon dialog,
choose either PLS resource or String tables.
If you choose PLS resource, you can specify a .pls file that you have added (or will add) to the project
as a media resource or code document. It needs to be a path relative to the other content files, for
example lexicons/lexicon_en.pls.
If you choose to use string tables, specify a global and/or project string table that contains string names
and values corresponding to the word or phrase in question, and phonetic description, respectively.
You may add as many lexicons as you wish. They will be referenced by all documents in the project
without further intervention. The language specified for the lexicon will be used if it matches the
reader’s localisation preferences.
You can also use the SSML attributes ssml:ph (‘Phoneme’ in Jutoh) and ssml:alphabet (‘Alphabet’ in
Jutoh) to define pronunciation for a particular content element.
Not many systems yet support the extra speech markup. However, by including it now in your books,
they will automatically get the enhanced features when the state of Epub 3 technology advances.
Devices and software supporting Epub 3
Apple’s iBooks supports Epub 3, and iOS devices have good general accessibility support. However
it’s not clear how much of the extra Epub 3 markup is used in support of accessibility.
AZARDI is software for Windows and Mac that can read Epub 3 files. However, at present, it does not
197
CHAPTER 20: MAKING YOUR BOOKS ACCESSIBLE
have accessibility features.
Gitden Reader is available for Android and iOS, and is a highly conformant Epub 2 and Epub 3 reader.
The Readium Chrome extension supports Epub 2 and 3.
Further reading
Epub 3 Accessibility Guidelines from IDPF:
http://www.idpf.org/accessibility/guidelines/
Accessible Epub 3:
http://shop.oreilly.com/product/0636920025283.do
Summary
This chapter has taken a brief look at how your documents can be made more accessible for future
deployment, even if the required Epub 3 support in ereaders is quite rare at the moment. Next, we see
how you can use Jutoh’s facilities for creating high-quality text-to-speech documents – an alternative
way to make your documents accessible.
198
Chapter 21: Working With Text-To-Speech
This chapter describes how you can use various features to improve the quality of text-to-speech output
in Jutoh, whether played immediately to help with proof-reading, or with the goal of creating audio
files. We will also describe how to create ‘speech archives’ so your customers can generate their own
audio files.
Introduction
Artificial speech generation has come on a long way since the early robotic-sounding voices, and
technologies such as CereVoice come close to producing natural-sounding speech. So while text-tospeech doesn’t threaten the conventional audio book, text-to-speech can be useful for creating
accessible documents and for proof-reading. Spoken documents are preferred by the majority of blind
people over the more time-consuming Braille alternative. Jutoh has facilities for marking up text to
improve pronunciation, insert pauses, switch voices and more, and it can use a variety of text-to-speech
engines.
For how to create accesible Epub 3 files which have the potential for speech output, see Chapter 21:
Making Your Books Accessible. The following will describe direct speech output using Jutoh, rather
than Epub 3 output, although there is some overlap in features, such as lexicons and some aspects of
markup.
Do take a look at the sample project Patient Advice Speech Sample.jutoh since it may help you
understand concepts covered here.
How does Jutoh support text-to-speech?
If you edit Jutoh’s preferences (click Options in the toolbar) and choose the Speech page, there is a
drop-down list of speech engines that are supported by Jutoh. These differ according to the operating
system you are using.
199
CHAPTER 21: WORKING WITH TEXT-TO-SPEECH
Jutoh’s speech preferences
Jutoh directly accesses some speech engines through their Application Programming Interface
(Microsoft SAPI, Apple Speech Manager) and for other speech engines, it invokes an external process
(eSpeak, Cepstral, CereVoice). When narrating text in the editor or generating speech audio files, Jutoh
converts the project content to files in the format required by the currently selected speech engine. For
Microsoft SAPI, SAPI XML files are created, and for CereVoice and Cepstral, SSML files are created.
For Apple Speech Manager, text with embedded commands is created.
The Microsoft SAPI and Apple speech engines come with built-in voices, but you can buy more if you
wish. The third-party speech engines eSpeak, CereVoice, and Cepstral can be accessed either by the
operating system’s speech engine interface (SAPI or Apple Speech Manager) or using their own
system, usually based on SSML and generally providing more flexibility than the operating system’s
facilities. For example, with some engines you can specify a ‘pitch contour’ for a sentence or phrase
when using SSML, but not when using SAPI. On the other hand, with a system like SAPI, you can
switch between different voices and different underlying speech engines in the same document – you
could start off using Microsoft Hazel, then switch to CereVoice Heather for a paragraph.
200
CHAPTER 21: WORKING WITH TEXT-TO-SPEECH
Strictly speaking, although SAPI and Apple Speech Manager are listed as speech engines, they just
offer a general way to access underlying speech engines. When you select a voice in SAPI, you’re
really selecting an engine-plus-voice, whether it’s Microsoft’s engine, or the CereVoice engine, or the
Cepstral engine.
Voice data can sometimes be shared between methods of accessing speech engines. For example, if
you buy CereVoice voices for use with SAPI, you can also use them for the proprietary, SSML-based
CereVoice engine. When you configure CereVoice properties via the speech preferences page, it will
search for installed SAPI voices and their licences and add them to its list of known voices.
For more information on setting up Jutoh for text-to-speech generation, please see Appendix B:
Configuring Jutoh.
Next, let’s look at the concepts of configurations and speech profiles, which control various aspects of
speech creation.
Configurations and speech profiles
As we’ve seen elsewhere in this book, configurations determine what formats to generate (and much
else besides). Audio files are created by a configuration whose option Generate MP3 is checked. By
default, Jutoh creates a configuration called ‘MP3’ but you can create one or more yourself from the
Project Properties/Configurations panel.
A speech profile is similar to a configuration, in that it controls settings that can be different per
configuration: for example you can have configurations (with associated speech profiles) for creating
speech with different speech engines, different voices, different speeds, different content, and so on.
Speech profiles exist because it would clutter up configurations too much to include all speech-related
settings. So instead, you select which speech profile you want to use in the Speech profile configuration
option. You might only have one speech profile for all configurations – the default profile – or you
could have different speech profiles for different configurations.
Engine, voice, speed and similar properties initially use the global settings (set in Preferences/Speech)
as mentioned in the previous section; you can override them per-profile. There are also options for
enhancing the text for clarity, such as whether to include a spoken prefix in front of list items and table
rows and columns.
Speech profiles are edited in the Speech tab of the Formatting Palette, so you need to have a document
open to edit the profiles. If there are several profiles, the one currently associated with the current
configuration will be marked with an asterisk. Double-click on a profile to make it the assigned profile
for the current configuration. Here’s a screenshot of the Profiles tab showing the default speech profile:
201
CHAPTER 21: WORKING WITH TEXT-TO-SPEECH
The Profiles tab in the Formatting Palette
To add more profiles, click on the More button and then on Add. From the More menu you can delete
profiles and move them up and down in the list; and there are menu commands for setting the global
speech and MP3 generation settings which are used when the corresponding profile settings are set to
(auto).
The available profile properties are described in detail in Appendix F: Speech Profile Reference.
Speech markup
You can annotate the content in your project so that regular formats such as Epub and Kindle are
untouched, but text-to-speech generation is improved. You can add pronunciations for specific words,
pauses, pitch and voice changes, and more. Because there are different speech standards and
implementations, markup may or may not be respected in a particular context of engine and voice
usage.
202
CHAPTER 21: WORKING WITH TEXT-TO-SPEECH
Markup is achieved using the speech and pause objects, or ‘tags’ in HTML terminology. The principles
of tags are described in Chapter 16: Working With Tag Objects. Speech objects have start and end tags,
while pause has one tag. These objects have speech properties; you can set one property value, or
several, as required. The speech properties are documented in Appendix E.
Here’s an example of markup:
Speech markup with a tooltip showing
In this example, the speech object has a single property, Voice emphasis, set to ‘strong’. A tooltip
appears when you hover over the object, showing the property values.
To create markup, click on the Speech tab in the Formatting Palette, and then click on the Objects
sub-tab. Now select some text in your project, and then click Speech Object. A property editor will be
shown, and you can edit properties such as Speak as and Alias. Often, available values are shown when
you click on the property value and then on the arrow that appears. When you press OK, you will see
the start and end objects enclosing the previously selected text.
You can also add a pause with Pause Object, and a new lexicon word with Pronunciation based on
the selected word in the editor. If you have lexicon documents in your project, you will be offered a
choice of lexicons, or it will give you the chance to create a new lexicon document.
To edit an existing object, click on the object, or you can navigate betwen objects using Previous and
Next in the Speech palette, and press Edit to edit the current object. To see all the speech objects in
your document or project, go to the Inspector tab in the Formatting Palette and choose Elements.
Here’s a screenshot showing the Objects tab, showing the properties of the object at the current caret
position:
203
CHAPTER 21: WORKING WITH TEXT-TO-SPEECH
The Objects tab in the Speech palette
Initially, the speech objects will be displayed in the editor using just the object name, i.e. speech.
Check Verbose display to show all the properties that have been set for the object. This setting can
also be changed via Preferences/Highlighting.
You can add speech and pause objects, and pronunciations, from the Format | Insert | Speech menu
and the context menu. So you can also use the keyboard shortcuts associated with these commands, and
if necessary customise them.
Ideally, we would use Epub 3 property syntax throughout. However, Epub 3 does not have as much
expressive power as SSML, so property values conform to a mixture of Epub 3 and SSML. Where
possible, these will be translated into the currently selected format.
Note that you can also define speech markup in ordinary paragraph and character styles, via the
Advanced tab of the style editor. For example, you could set the property Content before in a heading
style to insert the word ‘Heading’ in front of each chapter heading. For this not to interfere with other
formats, you may wish to create multiple style sheets and specify which one to use in the Style sheet
configuration options.
For more about the speech properties that you can use in markup, please see Appendix E: Speech
Markup Reference.
If you find you are wanting quick access to the Speech tab and also other tabs such as Styles, you can
show them alongside each other by dragging a tab to one of the four edges of the formatting palette. In
this screenshot, the Styles tab has been dragged to the right-hand edge of the palette.
204
CHAPTER 21: WORKING WITH TEXT-TO-SPEECH
Showing two tabs simultaneously
Previewing speech
Using the tools in the Speech palette shown in the screenshots above, you can play (i.e. immediately
read speech for the cursor position), pause, stop, and preview speech, view the source code, and
generate the audio files. (Pause is not supported in speech engines that are invoked as an external
process, such as Cepstral and eSpeak.) You can use the command View | Speech | Speak Selection
(Ctrl+Alt+K) as a quick way to start and stop playing speech.
When playing speech, you can check the speech profile option Highlight text to highlight sentences as
they are read. The text will be scrolled to the current position being read. This currently works for SAPI
on Windows only. Note that if using this option, the undo history will be cleared before and after
narration, although you can still edit the text as it is being spoken.
Playing and previewing occurs for the selected text, or if there is no selection, from the current text
cursor position. The preview option generates a WAV file and invokes an external audio player, so you
can preview a chapter or part of a chapter and navigate to different points using the audio player.
You can configure the audio player that will be shown, by going to Preferences/Helpers, selecting
‘WAV files’, clicking Configure Viewers, and adding a player that is installed on your system. To
205
CHAPTER 21: WORKING WITH TEXT-TO-SPEECH
avoid showing a menu that includes the default system audio player, clear Show this command for the
Default viewer.
NOTE: When previewing a selection with the Preview button, or playing an MP3 file, it is
recommended that on Windows you use a simple audio player such as Media Player Classic and not
Windows Media Player, since WMP can hold on to the file even if you close it, causing an inability to
generate the audio file a second time.
You can configure a suitable for viewer for displaying XML SSML or SAPI files when pressing the
Source button, by repeating the above configuration but for ‘XML files’. You could use a text editor,
or special XML viewer. A useful little XML viewer available for free on Windows is ‘XML Viewer’
by MindFusion.
Lexicons
Sometimes speech engines need help in pronouncing difficult words. You can create lexicons
containing pronunciations, using the lexicon document feature. Create a new lexicon document by
clicking on the Documents toolbar button and then Add Lexicon Document. You can add new lexicon
entries using the New button in the lexicon document, or via the menu command New | Pronunciation
in the Objects tab of the Speech palette.
Lexicons allow you to use phonetic alphabets, or ‘aliases’ (sounds-like). Unless you’re a wizard at
phonetics, you’ll probably just want to use aliases to clarify pronunciations or expand abbrevations.
Note that different speech engines and voices will pronounce words differently, just to make life more
interesting. If you need to support different phonetic alphabets, you can specify multiple alphabets and
phonemes for each entry in your lexicon, and then select the alphabets that will be used for the current
speech profile via the Lexicon alphabets profile property.
You can also specify pronunciations where difficult words occur, by marking up content with Alias and
Phoneme properties as described above.
Specify which lexicons will be used in your speech profile using tags in the lexicon documents and in
the speech profile. Jutoh will generate the required lexicons as PLS files, or, if you check Inline
pronunciations, Jutoh will use the lexicons to replace text before the speech is generated, so that
separate lexicon files are not required. Please note that for text-to-speech, currently Jutoh only
supports inline pronunciations, and does not load generated lexicon files.
By default, all lexicons will be used. Let’s expand on the ability to specify which lexicons to use for a
given configuration. For example, say you have a lexicon you wish to use in the configuration ‘Verbose
MP3’, but not in the configuration ‘MP3’. ‘Verbose MP3’ will expand abbreviations. Select your
‘Verbose MP3’ configuration, and create a new speech profile using the Speech palette, called
‘Verbose Speech Profile’. Double-click this profile to associate it with the current configuration. In
‘Verbose Speech Profile’, set the Lexicon tags property to the word ‘verbose’ (a made-up tag name). In
your lexicon, or lexicons, add the ‘verbose’ tag in the lexicon properties dialog. Now all lexicons
matching this tag will be used, meaning that the configuration ‘Verbose MP3’ will use these lexicons.
If you have lexicons in PLS format and you don’t want to import them into a lexicon document for
interactive editing, you can add them as media resource documents or source documents. A source
206
CHAPTER 21: WORKING WITH TEXT-TO-SPEECH
document allows you to edit the XML in situ, although it’s more error-prone that using a lexicon
document which automatically generates the XML. You can specify the PLS documents to use in
Project Preferences/Accessibility/Speech. This allows you to specify alphabets and languages for the
PLS lexicons in a way you can’t when simply adding a PLS resource – this information can then be
used when generating Epub 3 files. You can also specify string tables to be used for generating PLS
lexicons, although this method has been superceded by the lexicon document facility.
There’s yet another way pronunciations can be specified – using the global custom pronunciations list.
Go to Preferences/Speech, and click Edit Custom Pronunciations. Now you can add natural
language aliases for words. Unlike with normal lexicons, you can specify that a word should match a
substring in the book text: place an asterisk (‘*’) in front of the word to be found. This is useful for
replacing, say, ‘.co.uk’ with ‘dot co dot UK’ within domain names. Note that custom pronunciations
reside on the user’s PC and are not saved with a project. However, they will still work for portable
speech archives (see below) since the pronunciations are processed before saving the project
documents to the archive.
Speech archives
A speech archive is used to recreate speech using a text-to-speech system without needing the original
content creator to generate a set of sound files. This has the following advantages:
1. A licence to distribute speech created using proprietary voices is not required, since the end-user
is responsible for creating the files.
2. The file is much smaller than a set of audio files.
3. The end-user can choose different voices, text-to-speech engines, speed and MP3 quality to suit
his or her needs.
4. Compared with a solution using Epub 3 or other format and software to render speech from it,
there is more flexibility in speech markup leading to potentially higher quality speech.
5. Almost everyone has access to equipment that can play audio, whereas Epub 3 and digital
talking book files require specialised software or hardware.
The free demo version of Jutoh can be used by anyone to create audio from a speech archive.
Let’s also consider the disadvantages compared with using an Epub 3 or Digital Talking Book solution:
1. The user cannot navigate an audio file in a flexible manner compared with Epub 3 or DTB.
2. Jutoh is required to generate the audio file and so a speech archive can’t be used directly on a
mobile device (but after speech generation, the files can of course be transferred to a portable
device).
In the absence of greater availability of hardware and software that reads a digital book directly, the
advantages of the speech archive may outweigh the disadvantages. You can of course also generate an
Epub 2 or Epub 3 file which can be read directly by some hardware and software.
A speech archive can contain one of the following formats: binary document, SSML, SAPI, Apple
Speech Manager text or plain text. Binary (or ‘portable’) documents give the most flexibility since any
207
CHAPTER 21: WORKING WITH TEXT-TO-SPEECH
of the other formats or speech engines can be used to generate speech, whereas with engine-specific
formats, the user is restricted to using a compatible operating system and engine. By default, Jutoh
generates portable speech archives.
To generate a speech archive, check Generate speech archive in your speech profile.
To test the speech archive you have just generated, go to the Files tab of the Jutoh Control Panel, find
the SPARCH entry and double-click it. (You can also open the .sparch file via File | Open.) The
Speech Archive dialog will be shown, as shown below.
The speech archive dialog
To use this dialog, adjust the engine, voice, and other parameters as required, and press Generate to
create MP3 files for all selected book chapters. They will be generated in the background; if you wish,
you can close the dialog and watch the status bar to see when file creation has finished. The folder
containing the generated files will be shown when the file creation has finished.
208
CHAPTER 21: WORKING WITH TEXT-TO-SPEECH
Techniques for effective speech markup
Here are six techniques you can use to improve speech quality. For details of speech properties, please
see Appendix E: Speech Markup Reference. Be sure to check out the sample file Patient Advice Speech
Sample.jutoh, which demonstrates all of these techniques.
1. Use the ‘Say as’ property
The Say as property gives hints to the speech engine about whether to pronounce enclosed text as
individual characters, or a telephone number, or a date, and so on. Although speech engines differ in
their native support of this property, by default Jutoh emulates it for the values characters (spell out the
letters), digits (spell out the digits) and telephone (spell out the digits and create suitable pauses
between groups of numbers). Jutoh will emit suitable text to feed to the speech engine, saving you the
bother of creating an Alias with equivalent spoken text.
2. Use Alias, Phoneme, lexicons and custom pronunciations
Sometimes it’s useful to simply tell the speech engine what natural language to say in place of the
actual text in the book, for example to expand an abbreviation, correct a difficult pronunciation, or
expand the pronunciation of a date or time. You can do this with the Alias property in an object that
encloses the relevant text; or to apply it automatically wherever the text occurs, use an entry in a
lexicon document. Similarly, you can specify the pronunciation phonetically with Phoneme in the text
or using a lexicon entry. This requires some knowledge of phonetic alphabets so most people will
probably prefer to use aliases, either via markup or lexicon entries.
There is another mechanism that can be useful – custom pronunciations, accessed via
Preferences/Speech. This is a list of words and replacement text, similar to aliases, but with the added
benefit that if you place an asterisk (‘*’) in front of the word to find, the word will match text anywhere
inside a word and not just the whole word. As an example, this allows you to replace ‘.co.uk’ with ‘dot
co dot uk’ within web domains.
3. Use paragraph and character styles
Normally, you will use speech and pause objects to refine speech behaviour, changing the properties in
the objects as required. But there’s another method – apply the properties to paragraph and character
styles. Then the speech markup won’t be immediately obvious in the editor, but you can save a lot of
time if you can improve speech just by editing styles that are used throughout the project.
One example would be clarifying chapter headings. If the chapters aren’t prefixed by a chapter number,
or an obvious indication that they are headings besides the visual style, then you could edit the
‘Heading 1’ style and in the Advanced tab, set the property Content before to ‘Chapter: ’ This will be
inserted in front of all paragraphs styled with ‘Heading 1’, giving a better hint to the listener that this is
the start of a new chapter. (An alternative approach in this case is to enable automatic numbering for
headings, in Project Properties/Fields & Numbering.)
Note that the Content before and Content after properties apply to all configurations, not just speech.
So to avoid changing the heading content for all possible formats, you would need to use different style
sheets for different formats. To do this, duplicate the default style sheet, change the ‘Heading 1’ style
for your second style sheet, and set the ‘MP3’ configuration to use the new style sheet via the Style
209
CHAPTER 21: WORKING WITH TEXT-TO-SPEECH
sheet configuration option.
Another example: say you have a character style that you use for telephone numbers. Edit this character
style, and set Say as to telephone. Now all telephone numbers marked with this style will be spoken
with individual digits and pauses between number groups.
4. Use Pause objects and punctuation
Punctuation affects how content is read, and adding commas and semicolons can break phrases into
more manageable chunks. Parentheses can also result in a change of intonation. Punctuation can be
added in the Alias property as well as regular content. If you don’t want to change the content’s
punctuation, you can add pause objects, for example to give more breathing space after a heading. As
described above, you can add the pause to a paragraph style rather than an actual object, and the
paragraphs will automatically gain a pause (after the heading, before, or both, depending on the Pause
property value).
5. Use conditional formatting
You can bracket pieces of content in condition objects, as described in Chapter 23: Conditional
Formatting, so that content will appear in one format, and not another. You could use this to add extra
spoken content, or remove some content for a particular configuration that is intended to be a more
brief version of the document. Since audio files are harder to navigate and you can’t instantly grasp the
document structure using visual cues as you can with a conventional document, it’s a good idea to
briefly describe what the listener is about to hear.
6. Use alternative text and table title/description
If you provide alternative text for an image using the image properties editor, it will be spoken in place
of the image, giving at least some idea of what surrounding text may be referring to. Similarly, a table’s
title and description may help clarify the layout of the table before the data is read and prepare the
listener for it.
Summary
In this chapter we have learned how to improve text-to-speech creation and make speech archives that
other people can use to create their own audio files. Next, we will investigate the ways in which you
can prepare your books for PDF file creation, including for print-on-demand.
210
Chapter 22: Formatting For Print
This chapter describes how you can optimise your books so that it can generate files suitable for print
as well digital consumption.
Introduction
Jutoh can help create printed books via its export of OpenDocument Text (ODT) files. An ODT file can
be used with other software to create a PDF file, perhaps to send to a print-on-demand service such as
Lulu or Amazon’s CreateSpace.
You can use a program such as LibreOffice to open the ODT file and save as a Word file or export to
PDF. Creating a PDF from Jutoh can be as quick as selecting the OpenDocument configuration,
pressing Compile, pressing Launch, updating the fields in LibreOffice, then exporting to PDF.
Note: conversion of page layout when saving to DOCX from LibreOffice doesn’t work well, so save as
DOC instead, and if necessary use Word to save to DOCX. Also, although recent versions of Microsoft
Word will read ODT files, it has problems with lists, headers and footers, and table of contents fields,
so you are advised to open the ODT in LibreOffice and then save as Word if necessary. See KB0128 in
the Jutoh help for tips on converting ODT to Word.
The remainder of this topic will explain how to tailor ODT export to your needs. For extra information
about what options to specify when exporting fixed layout books to ODT, see the topic Exporting fixed
layout books to ODT in the Jutoh help.
Using the Print on Demand Wizard
You might like to try the Print on demand wizard via the menu command Book | Help with Print on
Demand, to help you set up your project for print output. It takes you through most of the steps
detailed below for manual page style creation, and it can also import page settings from DOCX and
ODT templates. All the settings in the wizard can also be edited manually elsewhere in Jutoh.
Suitable template files can be downloaded from sites such as CreateSpace and Lulu. If they are in Word
DOC format, they will need to be saved as DOCX or ODT files before import into Jutoh.
What the wizard doesn’t help you with is the creation of suitable content. You may need to insert
sections for print, that won’t appear in an ebook. Fortunately, you can do this using conditional content,
dependent on the configuration you’re currently compiling with.
Take a look at the file Print Book Sample.jutoh that comes with Jutoh. It uses conditional sections to
output suitable print-only sections (such as the half-title page). Sections that should start on a right211
CHAPTER 22: FORMATTING FOR PRINT
hand page do so by virtue of setting Layout to Right Only in page styles.
For more on conditional formatting for POD, see KB0123: How do I use Jutoh with print on demand
services? in the Jutoh help.
Setting configuration options
You can specify the overall paper size using the Paper size option; if none of the provided paper sizes
is suitable, type values in mm into Custom paper width and Custom paper height to override the Paper
size selection.
Specify the margin between the content and the edge of the paper in mm with Left margin, Right
margin, Top margin and Bottom margin.
Check Mirror margins if you need a larger gutter for binding the book, having set the margins
according to advice given by your print-on-demand service. Mirroring the margins will set the left
margin value as the inner margin, and the right margin value as the outer margin.
As we shall see below, these settings can all be overridden via individual page style settings.
Usually, Jutoh will export special formatting such as a table of contents, index entries and footnotes in
the appropriate native ODT format. But sometimes ebook distributors can’t handle the special
formatting, so you can switch these off with the configuration options Special index formatting, Special
footnote formatting, and Special table of contents formatting.
In addition you can clear the option Use outline levels to remove references to outline levels in heading
styles. Normally outline levels are useful as hints for ereaders such as Adobe Digital Editions to display
headings as a table of contents; but again this can confuse some distributors such as Smashwords.
Special formatting and outline levels are all disabled by default for the ‘Smashwords OpenDocument’
configuration to prevent errors when submitting documents to their Meatgrinder conversion software.
When exporting to ODT and opening in LibreOffice or OpenOffice, you may find that there are some
extra blank paragraphs which may also result in blank pages. If this happens, and you don’t intend to
open the file in Microsoft Word, clear the configuration option Add blank paragraphs for Word.
The reason for this option being on by default is that Word messes up formatting if you don’t have a
blank paragraph before a page break. This can manifest itself in erroneous justification in the last line
of a paragraph. If you only intend to open the document in LibreOffice or OpenOffice (for example, for
PDF output) then it’s safe to clear the option.
Specifying page layout
Setting the paper size and margins is all very well, but what if you want more page layout detail, such
as headers and footers in particular parts of the book, showing page numbers and other information?
There are three ways to set page layout, as specified in the Page Layout tab of the Project Properties
dialog:
1. Basic page layout: the same page layout applies throughout the book.
2. Manual page layout: Jutoh leaves all page layout to individual book section properties.
212
CHAPTER 22: FORMATTING FOR PRINT
3. Automatic page layout (the default): Jutoh creates headers and footers, and optional page
numbering, at the start of the main book content.
The first method won’t add any headers or footers or page numbering; only the most basic layout will
be specified (paper size, margins, and whether to mirror margins). These document-wide settings will
also be output as the default page style for the other two methods, unless a page style called ‘Standard’
has been defined, in which case ‘Standard’ will be used as the default page style.
The second method, manual page layout, is the most flexible. You can specify page layout styles per
section document, in the Page tab of the Book Section Properties dialog. This method is set when you
run the Print on demand wizard with Book | Help with Print on Demand.
The third method lets you leave it to Jutoh to decide where numbering begins (after the table of
contents or the section with a ‘text’ guide type), or you can specify a particular section. You can choose
from a small number of header and footer options: the book title, current book chapter or page number.
The ‘Headers’ and ‘Footers’ paragraph styles will be used to format any header or footer you specify
here.
When using manual page layout and assigning page styles to sections, you don’t specify the properties
directly, but instead create and edit a project-wide page style, which you can do from the Page tab.
Then, you can assign the same page style to multiple sections. You can choose whether to start
numbering at this section, but you must also set a page style.
The page style properties contain paper size and margins (as before) which override the configuration
options. Or, you can choose to use the configuration options for these values.
As well as the Layout option to mirror margins, you can specify only left or only right pages, in which
case the other page will be blank. So, if you want a section to start on the right hand page, specify
Right for Layout, and specify a Next Style to use for the pages after the first one in the section. When
exporting a PDF from the ODT file in LibreOffice or OpenDocument, don’t forget to check the option
Export automatically inserted blank pages in the word processor’s PDF Export dialog.
You can specify a numbering style, such as arabic or roman, and the start number if not overridden by
the text section properties.
Finally, you can specify the header and footer properties as described below.
You can add, edit and delete page styles from the Page tab of document properties dialog, or from the
Page Style Management dialog that can be invoked from the Page Layout tab of the Project Properties
dialog. From here, you can export and import page styles using files with a .jutohpagestyles extension.
You can also import page styles directly from another project using the Book | Import From Project
command.
Special style names
If you have a page style called ‘Standard’, it will be used as the default style when no page style has
been specified for a section. If ‘Standard’ isn’t defined, the default style will take its values from the
configuration.
213
CHAPTER 22: FORMATTING FOR PRINT
If you have a page style called ‘Cover’, it will be used for the cover. To ensure the page style doesn’t
repeat for subsequent pages, set the next style field to ‘Standard’. However, don’t do this for sections
with more than one page unless you only want the first page to use the specified page style.
Using headers and footers
You can specify very limited headers and footers in automatic page layout mode; but for more control,
you can edit header and footer content, and their formatting, in a page style. These headers or footers
will continue until the next page style (if any), and you can also specify different headers and footers
for the first page in a section, or for the left and right pages (but see the note below about restrictions
for the first-page content option).
In the Page Layout Style Properties dialog, click on the Header or Footer tab and specify whether the
header or footer should be included in this style. You can then change further properties such as auto-fit
height, same content on first page, and same content on left and right pages. You can also click on
More Properties to specify height, margins, border and background colour if required.
There are three kinds of header or footer you can edit: main (labelled Header or Footer), first page and
left page. Choose which to edit, and then click Edit Header or Edit Footer. If you don’t want different
first page or left page headers, you only have to edit the main header or footer.
In the header or footer editor, you can use the usual formatting, and you can insert fields such as pagenum and chapter, via Insert | Field in the context menu (right-click for the menu, or control-click on
Mac). If you insert a chapter field using chapter numbering, you will also need to edit the outline style,
described below, so that the chapter title is formatted as required.
IMPORTANT: using different headers and footers for the same page style in order to achieve a
different first page only works for LibreOffice; in other words, OpenOffice does not have a Same
content on first page option. Both LibreOffice and OpenOffice also have the restriction that a page
style for one section must have a different name from the page style for the previous section, or the
word processor will only consider there to be one ‘first page’ in the whole sequence of chapters, not for
each chapter.
To work around that, create two styles: one for the first page in the chapter, and another for the other
pages in the chapter. In your first-page style, set the Next style field to the name of the other style.
Now select the first-page style as the Style name in the section properties Page tab. You can check
Repeat page for subsequent sections to avoid having to set the style for all chapters.
If you want to create a Word DOC or DOCX file, you may need to fix headers and footers in Word
after importing the ODT file. For more information, please see KB0128 in the Jutoh help.
Setting the outline style
The outline style is ODT-specific and defines default document-wide outline information. Each outline
level (1-10) specifies a paragraph style for a chapter heading (by default, Heading 1, Heading 2 and so
on) and various formatting options for a numbered heading, including a prefix for the number (e.g.
Chapter) and a suffix for the number (e.g. a space).
There is only one outline style, called ‘Outline’, and you can edit it from the Page tab of the Book
214
CHAPTER 22: FORMATTING FOR PRINT
Section Properties dialog.
The formatting options will affect how the chapter title appears at the start of a chapter and also any
chapter field that you put in a header or footer.
Creating a table of contents
If you have created an advanced table of contents, in other words one which is present as a section in
your project instead of generated only when the ebook is compiled, Jutoh will replace it with one that is
more suited to printable documents. The table of contents will contain page numbers as well as
hyperlinks. Any page style you specify for this page will still be respected: for example you might want
to add a footer with page numbers displayed as roman numerals. For more details, see Chapter 11:
Working With Indexes.
Note: if your table of contents does not contain all the levels you expect after you have updated fields
in LibreOffice/OpenOffice, the heading style outline levels may be incorrect.
Edit each of your heading styles in Jutoh, and for Heading 1 (or whatever your heading 1 style name
is), make sure ‘Outline level’ is set to 1; for Heading 2, make sure it’s set to 2, and so on. Alternatively,
clear the configuration option Use outline levels so heading styles are not output with their own outline
levels, but the default Outline style is used instead (as defined in Project Properties/Fields &
Numbering/Edit Document Outline Style).
How page styles work in LibreOffice/OpenOffice
This is a quick explanation to help you edit page styles within your word processor of choice once you
have exported your project to ODT.
Jutoh generates two kinds of style for each page style: a master page style, and a page layout style. The
master page style has a reference to the page layout style. In a word processor, these styles aren’t
visibly separate, but the master page style contains the actual headers and footers, while the page layout
style contains formatting information.
If you look at the list of styles in your word processor, there are buttons for different kinds of style.
Click on the page styles icon and you can see the styles that are predefined (or generated by Jutoh).
‘Default Style’ is called ‘Standard’ internally and in Jutoh. You can right-click over a style and press
Modify to change the page style properties.
To associate a page style with a particular portion of your document in OpenOffice/LibreOffice, you
can insert a page break with an associated page style (Insert | Manual Break). Or, you can put the
cursor at the first paragraph in a new page, right-click and select Paragraph, then select the Text Flow
tab and you will see With page style and a page style name, which you can change. So you can see
from this that a page style is associated with a portion of a document by being associated with the
paragraph style of the first paragraph (or table) after a page break.
When you edit a header or footer in the word processor, you are editing the header or footer for the
particular page style that is active at present. For example, if you associated a ‘Chapter Style’ page
style with the heading for Chapter 1, then Chapter 2 would also have this page style and editing a
footnote for Chapter 2 would also change it for Chapter 1.
215
CHAPTER 22: FORMATTING FOR PRINT
Importing from ODT and DOCX
If you import from an ODT or DOCX document, page styles will be created for your sections. If you
have multiple page styles in your original document, select splitting by page break when you import, to
be sure that Jutoh will set the page styles for the right sections.
Importing from DOCX will always create a page style for the first section as the default style, whereas
importing from ODT will create a "Standard" page style that provides defaults, but is not explicitly
associated with a section. Both import methods should create similar results when exporting to ODT.
Summary
This chapter has shown how you can author print documents with Jutoh, as well as ebooks. Next, we
see how you can use Jutoh’s facilities for conditional formatting: creating different ebook content that
changes according to criteria in different configurations.
216
Chapter 23: Conditional Formatting
This chapter describes how you can use Jutoh’s facilities for creating different ebook output depending
on format, distributor or other criteria, without needing to maintain different versions of your project.
Introduction
It’s common to want to create different versions of your book for different distributors, formats or
purposes. You may need different book identifiers, or different text describing where to buy the book,
or perhaps you’d like to create a small sample for your web site that can be easily recreated when you
update the book. Or you may need to add extra pages, blank or otherwise, for a print book. Or perhaps
you need to include different audio or video media for different formats.
With Jutoh, you can do all this without needing to split your project into different copies, which can
become a time-consuming, confusing mess. There are several ways of creating conditional content,
suitable for different tasks or kinds of content, but they all depend on the fact that you can have
multiple configurations, even for the same format. You might have a ‘Epub Sample’ configuration that
creates an ebook containing the first couple of chapters of your book. So to create your sample, you just
select ‘Epub Sample’ and press Compile. The different values of options in your configurations will
determine how the book is created.
These are the different methods available to you for changing the book without editing content each
time:
•
Tagging section and media documents;
•
Tagging chunks of content;
•
Specifying string variables in your content;
•
Specifying paragraph styles to include or omit.
Let’s look at each of these.
Tagging whole section and media documents
To include or exclude whole section documents, you can specify tags (arbitrary names) in each
document, and then tell your configurations whether to include or exclude documents matching these
tags.
Let’s say you wanted to be able to create a sample book in Epub format. Create a new configuration
217
CHAPTER 23: CONDITIONAL FORMATTING
called ‘Epub Sample’ using the ‘+’ button on the Configurations panel in Project Properties. To get
there, press Edit next to the configuration drop-down in the Jutoh Control Panel (bottom left of the
Jutoh window). Type ‘Epub Sample’ for the new configuration name, and select a configuration to base
this one on, or just press OK to be prompted for a format which will be used to create appropriate
configuration defaults.
Creating a new configuration
Once the configuration has been created, search for Exclude sections matching tags in the search field
at the bottom of the dialog. Type ‘notsample’ as the value for this option, to indicate that chapters that
are not part of the sample should be excluded from this version of the book. Press OK to close the
Project Properties dialog.
218
CHAPTER 23: CONDITIONAL FORMATTING
Specifying sections to exclude in the new configuration
Next, for each section document you want to omit from the sample, open the document properties
dialog using right click or control click over the project outline, or using the menu command
Document | Document Properties (Shift+Alt+Enter). Type ‘notsample’ into the Tags field.
219
CHAPTER 23: CONDITIONAL FORMATTING
Entering a tag into the book section properties
Now when you compile the ‘Epub Sample’ configuration, only the desired sections (those not matching
‘notsample’) will be included. The other configurations will still compile the whole book because if the
Include/Exclude sections matching tags options are left blank, all sections are included.
Your table of contents will still work in the sample despite the absence of some documents, because
Jutoh won’t complain about broken links to documents that are deliberately excluded, and will simply
omit the page links – so the reader will be able to see the list of chapters in the full book. Actually, this
is not quite true – by default, Jutoh will warn about the missing links, but you can switch the warnings
off by checking the configuration option Permit links to absent content (a.k.a “I know what I’m doing,
please shut up about it” mode).
You can add multiple media documents with the same or different file names and specify different tags
for them, which are mentioned in Include media documents matching tags and/or Exclude media
documents matching tags. The appropriate media files will be written to the book. If the files have
different names, you will also need to create multiple versions of the media object that references the
media, using the ‘condition’ object (see below).
220
CHAPTER 23: CONDITIONAL FORMATTING
Tagging chunks of content
To include or exclude parts of a document, you can use the ‘condition’ object. Select the relevant text,
then in the Objects tab in the Formatting Palette, double-click on ‘condition’. Type a tag name into the
Tags field. If you want, you can add notes so you can remember why you’re making this text
conditional. Your text will now be bracketed by the opening and closing markers of the ‘condition’
object. This is shown in the screenshot below; by hovering over the opening condition object, you will
see the tag(s) defined for this condition; or you can click on the object to edit the tags.
Condition tags marking up two blocks of content
Now you can mention the tag in Include content matching tags and/or Exclude content matching tags in
your configurations. For example, if you only want some text to appear in your Smashwords book, use
the tag ‘smashwords’ and add it to Include content matching tags in your Smashwords configuration.
Sometimes you might wish to exclude all conditional content except for particular tags, rather than
specifying all the tags that are not relevant for the configuration. This avoids you having to go back and
add tags to exclude for lots of configurations, after you’ve added more tags in the project. To do this,
use the value ‘*’ (asterisk) for Exclude content matching tags, and specify the tags you wish to include
(if any) in Include content matching tags. Similarly, you can use an asterisk in Include content
221
CHAPTER 23: CONDITIONAL FORMATTING
matching tags to indicate that all tags should match, except for the exclusions.
You can mark up as much content as you like within a section document: from a single letter to
multiple paragraphs. You can also move the markers around with cut and paste, or delete them both to
remove the condition. You can nest conditions within each other, but don’t overlap different spans of
conditional text.
Specifying string variables in your content
You can specify variables in your content to be filled in when the configuration is compiled. For
example, you could have two versions of your book where a character has a different name in each.
Just use, say, %HERO% within the content, and have different configurations that reference different
string tables where the value of HERO is either Joe Bloggs or Bob Smith.
What are string tables? Each project can have zero or many string tables, consisting of name/value
pairs. So you could create two string tables in the ‘String tables’ panel of your Project Properties
dialog, one called HeroJoe and one called HeroBob. HeroJoe has a string called HERO with a value of
Joe Bloggs, and HeroBob has a string called HERO with a value of Bob Smith.
There are two more things you need to do to make this work. In each of your configurations, you need
to reference the correct string table. So in your configuration ‘Hero Joe Epub’ you can set the option
Project string table to HeroJoe, and in your configuration ‘Hero Bob Epub’ you can set the option
Project string table to HeroBob. Also, check Replace strings in content in both configurations or Jutoh
will not bother looking for variables to replace.
You can use this mechanism to have different ISBN numbers in different configurations. If you have a
variable %ISBN% in your project metadata, it will take its value from the relevant string table when
you compile the project. Alternatively, you can also use the Identifier configuration option to do the
same thing, and leave the Identifier metadata field blank, but the disadvantage of that approach is that
you can’t mention the ISBN in your document content (for example, your title page) since there is no
variable to use.
There’s another way of inserting string table values into your project – you can insert a get variable
field, and specify a source (such as project-table to use whatever the configuration specifies) and
variable name. For more on this, please see the Working with fields topic in the Jutoh application help,
or type “get variable” into Search Help in the toolbar.
Specifying conditional paragraph styles
The idea here is to specify in each configuration which paragraph styles should be used to omit or keep
text styled with them. This method predates the ‘condition’ method and is not recommended for new
projects as it makes it difficult to specify arbitrary styles for your conditional text. Plus it’s not obvious
at a glance which text is conditional, and can’t be used for arbitrary conditional text within a paragraph.
You can read more about it in the topic Using styles to change ebook content in Chapter 12.
Managing multiple configurations
You can have as many configurations as you like, even with the same format specified. However, you
222
CHAPTER 23: CONDITIONAL FORMATTING
will probably want to change the Book file name configuration option to ensure that your ebook file
names are unique and don’t overwrite each other. So you might set the values %FILENAME
%_GooglePlay, %FILENAME%_Lulu, and so on. %FILENAME% will be replaced with the project
filename and the correct extension will be appended.
Summary
This chapter has shown you how to make your ebook content adapt to the criteria specified in your
configurations. The next chapter is a rag-bag of advanced topics such as font embedding and setting a
background image.
223
Chapter 24: Advanced Topics
This chapter describes a variety of advanced topics that the newcomer to Jutoh can most likely ignore.
Embedding fonts
Jutoh lets you embed fonts into Epub books. You might wish to do this to ensure that non-Western
characters are rendered correctly, especially for viewing in Adobe Digital Editions, which fails to
render non-European languages without embedding; or you may just wish to give your ebook a
different look. However embedded fonts are not supported by all ebook readers, and there may be
copyright issues; so you should only embed fonts if absolutely necessary.
An example of a Unicode font that you can freely embed in your ebook is DejaVu, available from:
dejavu-fonts.org/wiki/Main_Page
If you wish to create a Greek Epub, you can use the free Gentium font, available from:
scripts.sil.org/cms/scripts/page.php?site_id=nrsi&id=gentium
To embed a font, follow these three steps.
1. Add a font. Use the Documents toolbar button or Document | Add Embedded Font
Document menu command. Select a font file when prompted. A copy of this font will be added
to the project and you can change the font family name and other parameters. Change the font
family name to match the font name used in your ebook styles, if applicable.
2. Enable embedding in your configuration. In your Epub configuration(s), available from the
Configurations tab on the Project Properties dialog, scroll down to the Fonts group and check
Embed fonts if not already checked. Note that if Embed fonts is enabled, as well as Optimize for
iBooks, Jutoh will generate a file called com.apple.ibooks.display-options.xml with
specified-fonts set to true. This enables font embedding for iBooks.
3. Specify font substitutions. If the font is installed on the computer and is therefore available
from Jutoh’s dialogs, and is specified in your book, then you’re done. But if the font you want to
use is not specified in your document, you must specify a font substitution in the Font
substitutions property in your configuration. For example, ‘Times New Roman: DejaVu Sans,
Times New Roman’. This will use DejaVu Sans, Times New Roman for the font family
wherever Times New Roman is found in style definitions and content. The ebook reader will fall
back on Times New Roman if it can’t find the embedded font DejaVu Sans. You can specify
multiple font substitutions by separating them with semicolons.
224
CHAPTER 24: ADVANCED TOPICS
Or, as a convenience, you can use Format | Insert | Embedded Fonts which will take you through a
wizard for the above steps, allowing you to select multiple fonts that may belong to the same family.
If you have multiple font files for a single font family, for example regular, bold and bold italic
variants, you can use the same font family name in all of these font documents (for example, DejaVu
Serif) and specify the italic style and weight properties in each font document, as in the following:
Font document
Jutoh will generate the appropriate CSS so that the viewer can use the correct font file for each
combination of italic style and weight.
If font embedding isn’t working at first, check that the font family specified in the font document is
identical to the font name you use within styles, or within your font substitutions. Otherwise the
ereader will not be able to find the correct font to use.
Even if you have the option Generate font names switched off, embedded fonts will still be named
explicitly in generated styles. This allows the book to use default fonts except where they are
embedded, to allow the ereader user to still configure the fonts for the majority of the book (where
fonts are not named).
Embedding media
Jutoh lets you embed audio and video into Epub and Mobipocket books. This is only supported in some
225
CHAPTER 24: ADVANCED TOPICS
readers (for example, iBooks), and Amazon may not accept Mobipocket containing multimedia (and
media in locally-transferred Mobipocket files may be blocked).
For video in iBooks, Apple recommends that you use H.264 compression at VGA resolution. The
poster image should be 150x300 pixels. Audio should be stereo, AAC/MP4, 256kps, encoded using
iTunes.
Amazon’s guidelines for formatting Kindle books, with information about audio and video formats, is
available at:
kindlegen.s3.amazonaws.com/AmazonKindlePublishingGuidelines.pdf
To embed a media object, follow these three steps.
1. Add a media document. Use the Documents toolbar button or Document | Add Media
Document menu command. Select a media file when prompted. A copy of this file will be
added to the project (it may take a long time if the file is large) and you can change the file
name to be used and other parameters.
2. Insert a media object into your content. Use the Insert | Media Object command on the
Format menu or the context menu, and when prompted, choose the file name from the list of
media objects currently in this project. Enter other parameters if you wish, such as a title, and
fallback text to show if the reader does not support the audio or video tags. You can preview
your file in Kindle Previewer, setting the device to (for example) iPhone or iPad, to see the
effect of adding media.
3. Ensure media objects are switched on in your configuration. Under the Images and Media
group in your configuration, check that Generate media objects is enabled. If you switch this
off, no media files will be included in the book and the media tags will not be included in the
XHTML.
You can also use media documents and objects to insert images. The image won’t show up in the editor
when you insert a media object that references the media document, but there is an advantage – you
could add several media documents with the same name, at different resolutions, and use
configurations to selectively include and omit media documents from the generated ebook. You do this
by specifying tags in your media document, (for example, ‘hires’, ‘lores’) and then specifying tags in
the configuration options Include media documents matching tags and Exclude media documents
matching tags. This technique is also useful for very large images that take a long time to load into the
editor when inserted directly.
Embedding a PDF
Currently embedding a PDF into your book works in iBooks only.
1. Add the PDF and PNG files to the project as media objects (Document | Add Media
Document).
2. Add
this
to
your
content,
in
its
own
paragraph:
<p><a href="media/subwaymap.pdf"><img src="media/map.png" alt="img"/></a></p>
substituting your own file names.
226
CHAPTER 24: ADVANCED TOPICS
3. Apply the ‘HTML’ style to the above paragraph.
EpubCheck will complain about the syntax, which you can ignore.
Setting a background image
The following method works for some Epub viewers, including Adobe Digital Editions.
1. Insert a new image into the Resources section of your Jutoh project using Document | Add
Media Document and selecting an image.
2. Ensure that Generate media objects is enabled in your configuration.
3. Right-click on the section(s) you want to have a background image, select Properties, and insert
the following into the Extra CSS field:
body {
background-image: url(media/image.png);
background-repeat: repeat;
margin: 0 0 0 0;
}
where media/image.png is the path specified in the
media object. Alternatively, if you want it
on all pages, you could add this once to the the style sheet (click on the Edit button at the top of
the Styles page in Project Properties, check Custom CSS and paste the code).
Understanding encodings
When importing text files, Jutoh needs to know what the encoding of your files is, since otherwise the
files are just streams of bits that could represent anything. A ‘standard’ ASCII file only represent the
basic symbols, whereas files encoded in Unicode can represent most symbols in use on the planet.
Jutoh’s favoured Unicode encoding is UTF-8, in which plain text is encoded with one character per
symbol (and so is readable in any text editor) and more complex symbols are represented by two or
more characters.
When you save text from a word processor, you need to make sure it’s going to write using the
encoding that you’ve specified in the New Project Wizard or Project Properties. For example, when
saving a document as plain text from Microsoft Word, Word will show you a further dialog. Click on
Other encoding and select ‘Unicode (UTF-8)’. Don’t check Insert line breaks, since you want each
paragraph to be one line.
If you forget to save in the right encoding, you may be able to fix it, as follows. When you get an Jutoh
error indicating an encoding problem (or the file doesn’t show properly in the finished book or the
editor), open the file in an encoding-savvy application such as Programmer’s Notepad. It should autodetect the encoding, which you can check by typing Alt+Enter to see the document’s properties. Now
select the whole document and copy it to the clipboard. Create a new file, change the encoding to UTF8 in the document’s properties, and paste the text into it. Save this over the original file – it’s now in
the correct encoding.
If you can’t change the encoding of the original file, you can specify it in the Import Options section of
the New Project Wizard, or the Options page of Project Properties if you’re importing a file after initial
project creation. Also, if you are importing HTML or Epub and the encoding is missing from one or
227
CHAPTER 24: ADVANCED TOPICS
more HTML files, Jutoh will use this setting – it will also warn you about the missing encoding so you
can go back and specify it. For example, if the file was created on Windows without specifying UTF-8,
you could try the value ‘Windows Western European’.
Guide types
Each document in a book can have a ‘guide type’ which is written to the guide section of the Epub or
Mobipocket file, and indicates the role of the document. You can set the guide type by right-clicking on
the document in the outline, selecting Properties to show the Document Properties dialog, and then
changing the Guide type selection.
These are the possible guide types:
•
acknowledgements
•
bibliography
•
colophon
•
copyright-page
•
cover
•
dedication
•
epigraph
•
epilogue
•
foreword
•
glossary
•
index
•
loi – list of illustrations
•
lot – list of tables
•
notes
•
other.back-cover
•
other.intro
•
other.ms-firstpage – the place to start reading. Kindle only, deprecated in favour of ‘text’.
•
other.reader-start-page – the place to start reading. iBooks only.
•
preface
•
start – the place to start reading. Kindle only, deprecated in favour of ‘text’.
•
text – the first chapter of main body of text; it should not be used more than once
•
title-page
228
CHAPTER 24: ADVANCED TOPICS
•
toc – table of contents
When Jutoh generates a section without it being present in the project outline (for example, the cover
page and simple table of contents page), it will set the appropriate guide type.
If you use the keyword %STARTPAGE% for the guide type, it will be replaced by the appropriate type
for Mobipocket or Epub, as specified by the current value of the configuration option Start page guide
type. However, this has become unnecessary since all ereaders now recognise (or quietly ignore) the
‘text’ guide type.
How to format drop caps
Jutoh doesn’t support drop caps directly, but you can use CSS to achieve it (at least in Epub, with
slightly less success on Mobipocket). There’s some information about the general principles here
(external link).
In recent versions of Jutoh, a ‘Drop Caps’ character style is created automatically in the default style
sheet, which you may wish to adjust to your preferences.
If Jutoh has not already added a ‘Drop Caps’ character style, go to Project Properties/Styles, click New
Style, choose Character Style. Enter the name ‘Drop Caps’. Press OK. Still in the Styles panel, in the
drop-down under the styles list, choose Character styles. Select ‘Drop Caps’, click Edit, go to the
Font tab and choose a large font, say 20pt, and choose Bold under Font weight. This is just to show a
large bold font in the editor; this exact formatting won’t show in the ebook. Press OK to dismiss the
‘Drop Caps’ editor and now click on Properties to show the Drop Caps property dialog. Check Use
custom CSS and paste in this text:
.C_Drop_Caps {
overflow: hidden;
line-height: 90%;
height: 0.75em;
font-size: 280%;
margin-right: 0.075em;
float:left;
}
This should replace the existing text – if you used a different name for the Drop Caps style, make sure
it’s reflected in the name after the dot in the CSS.
Now press OK, OK again and in the editor, select the first letter of your paragraph and apply ‘Drop
Caps’ to it. You can do this with right-click (or control click on Mac), Styles, scroll to the bottom of
the menu, click on Character Styles, choose ‘Drop Caps’.
Now when you compile the Epub and show it in, say, Adobe Digital Editions, you should see
something approximating a drop caps. In Kindle it’ll be shown as a large letter, just not dropped. You
may need to tweak the CSS to work better with your choice of font sizes.
How to format small caps
Small capitals can be applied to a named style or directly to text via the Font tab of the style editor. For
229
CHAPTER 24: ADVANCED TOPICS
convenience, you could add a character style called ‘Small Caps’ that just has this attribute defined.
When generating Epub and Mobipocket ebooks, Jutoh can generate small caps either by using the
official font-variant CSS attribute, or by emulating it by emitting capital letters and shrinking the text.
Adobe Digital Editions and some other ereaders do not support font-variant, but all ereaders will do a
reasonable job using small caps emulation, so by default emulation is used. To use font-variant instead,
clear the Emulate small caps configuration option. For those ereaders that support it (for example,
Kindle readers, iBooks, and the Azardi software), font-variant is a superior method since it renders real
capitals larger than the lower case letters. However, if you’re targeting multiple ereaders, emulation is
safer.
If you wish to add small caps to the first few words of your chapters, there’s a handy option in the
Document Cleanup dialog (accessed from the Book menu) to do just that. Before using it, you’ll need
to create a ‘Small Caps’ character style.
How to add an ISBN to your books
Some platforms require you to supply an ISBN for your ebooks. For example, to get your books into
the premium Smashwords catalogue, you need an ISBN for each ebook. This needs to be separate for
each book edition – paperbacks, hardbacks and distinct ebook editions for different platforms all need
separate ISBNs. You can buy a set of ISBNs from the relevant agency (in the UK, it’s Nielsen), or you
can see if your ebook publisher such as Smashwords can supply ISBNs.
Having got your ISBN, where do you put it? Go to the metadata in Project Properties (just click on the
Edit button on the toolbar) and click on the ‘...’ button next to the Identifier field. Click Add to add a
new value to this element, and choose Add ISBN. Enter the ISBN (just the number, including dashes)
into the Value field. Now delete the original value, ‘Element 1’.
OK, so you have different ISBNs for different ebook editions – but you want to publish your ebook to
different platforms, with different ISBNs, without having to edit separate Jutoh files for each edition.
The way to accomplish this is via string tables. String tables allow you to set up substitution tables;
since we can specify a different table for each configuration (Mobipocket, Epub and so on), we can put
a variable called, say, %ISBN% into the ISBN value field, and substitute a different ISBN value from
the different tables, depending on the current configuration.
Let’s assume that you are using two configurations, Mobipocket and Epub. The Mobipocket book is
going to the Kindle store, and the Epub book is going to the iTunes store.
1. Click Edit on the toolbar, then the Strings tab. Click the ‘+’ button to add a new string table,
and call it Kindle.
2. Click Add and enter ‘ISBN’ to add a new string whose name is ISBN.
3. Click on the value field (second column) and enter the ISBN for the Kindle store.
4. Repeat the above, adding a new string table called iBooks and adding the second ISBN value.
5. Click OK to dismiss the Project Properties.
6. Click Edit on the toolbar again, then the Configurations tab.
230
CHAPTER 24: ADVANCED TOPICS
7. Click on the Mobipocket configuration, and scroll down to the String Tables group.
8. Select ‘Kindle’ in the Project string table property.
9. Click on the Epub configuration, and scroll down to the String Tables group.
10. Select iBooks in the Project string table property.
11. Click on the Metadata tab and enter %ISBN% into the Identifier field.
12. Press OK.
Now when you select a configuration, a different string table will be used and the %ISBN% variable
will be filled in with the value of ‘ISBN’ in the appropriate string table.
If you have different editions of your book with the same format (for example, a Mobipocket file you
put on your web site, and one that you upload to Kindle), you can just add another configuration
(taking care to set the format property correctly) and a string table to go with it. So you can have as
many configurations as you have sites that you upload to.
You can use the string table to change other things in your metadata and (if you check the Replace
strings in content configuration property) your book pages.
For more information on string tables, see Chapter 14: Working with String Tables.
Removing underlining from links in HTML-based formats
There is no provision in Jutoh for specifying this level of detail, so it needs to be done using custom
CSS. You can add CSS either globally if you want no underscores throughout, or per section. To add it
globally, go to the Styles page on the Project Properties dialog and click on Edit Properties
at the
top of the dialog. Check Use custom CSS and paste in the CSS code.
Let’s say we want to make the link colour red, and remove underlining. You can use the following
code:
a:link { color: red; text-decoration: none; }
a:visited { color: red; text-decoration: none; }
a:hover { color: red; text-decoration: none; }
a:active { color: red; text-decoration: none; }
Alternatively, if you want the colour to be the same as the surrounding text, but keep underlining, you
could use:
a:link { color: inherit; text-decoration: underline; }
a:visited { color: inherit; text-decoration: underline; }
a:hover { color: inherit; text-decoration: underline; }
a:active { color: inherit; text-decoration: underline; }
To apply CSS to an individual section only, right-click over a section in the project outline, select
Properties, and then check Extra CSS. Paste in the above page and press OK.
You might notice that when you look at the HTML generated by Jutoh for links, the style you applied
231
CHAPTER 24: ADVANCED TOPICS
to the link has been removed. This is because if the configuration property option URL attribute
removal style has a style value, the attributes in the style will be removed from the link before it is
written to the HTML file. This avoids clashes between the styles specified in the editor and defaults
used by the ereader – such clashes can make links look untidy, especially if the Jutoh and ereader URL
colours are slightly different. It’s better that the ereader shows links in the default syle than in a
mixture. You can reapply the intended attributes using CSS properties, as above.
Jutoh and Epub 3
There is support for some Epub 3 features – you can switch Epub 3 support on by setting the Epub
version configuration property to 3. The adaptations to Epub 3 are currently as follows:
•
The new-style table of contents file is generated, while the old NCX file is included for
backwards compatibility;
•
Epub 2 guide types are converted to Epub 3 equivalents where possible;
•
if documents contain guide types, a ‘landmarks’ table of contents is generated;
•
metadata is generated using the new Epub 3 syntax, with mandatory date metadata;
•
XHTML files have the correct preamble;
•
JavaScript code can be embedded (also in ‘Epub 2.5’, i.e. iBooks);
•
Eub 3 document structure can be added: see Chapter 20: Making Your Books Accessible.
•
narration audio files can be synchronised with content: See Chapter 17: Adding Narration To
Your Book.
Jutoh is distributed with EpubCheck 3, which means it can check both Epub 2 and Epub 3 files if you
have Java installed.
Summary
This chapter has described a variety of features that advanced books might need. For other
miscellaneous topics, you may also find it useful to search Jutoh’s help by typing into the Search Help
field in the Jutoh toolbar.
Next, we look at various strategies to cope with errors that might occur in your book.
232
Chapter 25: Troubleshooting Your Book
Once you’ve compiled your book, you need to check it and fix any formatting or other errors that might
be present. This chapter explains why you need to do this, what errors are likely to crop up, and how to
fix them. You can supplement the information in this chapter by typing keywords into the Search Help
field in the Jutoh toolbar, to search the application help and the Jutoh ‘knowledge base’.
What errors can occur?
If you’re lucky, your ebook will be perfect the first time you compile it. In the real world, however, it
may contain flaws. These are the seven categories of error or imperfection that we can identify:
•
Syntax errors: in particular, bad generated XHTML.
•
Structural errors: for example, bad page links, chapters that are too long for ebook readers to
cope with, and missing sections such as table of contents or cover.
•
Formatting errors: poor or inconsistent formatting.
•
Content errors: spelling and grammar mistakes, poor writing, factual errors and so on.
•
Platform errors: formatting or content that is fine on the face of it, but falls foul of a particular
publishing platform’s guidelines or bugs.
•
Import/export errors: problems with importing existing files into Jutoh, and exporting to other
applications.
•
Expectation errors: when Jutoh isn’t designed to do what you’re trying to do.
The optional third-party Epub checker can highlight syntax and structural errors, while Jutoh itself
checks for some structural errors during book compilation.
Let’s deal with each of these categories in turn.
Syntax errors
Let’s focus on the Epub format to begin with. When you click on Compile in Jutoh, and you have an
Epub configuration selected, an Epub file is created that contains a variety of XML and XHTML files.
Jutoh takes great care that the files are well-formed, but occasionally errors may be introduced. For
example, you might delete a bookmark needed for a link, or you might enter bad metadata such a date
in the wrong format. Or, if you have inserted verbatim XHTML into your book using the special
“HTML” style, the error could be badly-formed XHTML syntax such as a missing angled bracket.
233
CHAPTER 25: TROUBLESHOOTING YOUR BOOK
This is where Epub checking comes in. You can use the Check button in the Control Panel, or the
Book | Check menu command, or the F8 key, or the Check toolbar button:
The Check toolbar button
Click it to run the third-party EpubCheck tool (written by Adobe, in the Java language) which is
bundled with Jutoh.
It’s recommended that you enable automatic checking after each Epub compile, by going to
Preferences, and in the General Preferences page, enable the Check Epub after compiling
option. This will save you from forgetting to check the file, and will also combine the Epub
errors together with errors that Jutoh itself spots.
Assuming Java has been installed, checking will either give a clean bill of health, or will show errors
that have been identified in the Epub. These errors are listed in the Error Window at the bottom of
Jutoh, the same window that Jutoh will use for general errors that it finds during compilation:
The Error Window
If you click on an error, you can see part of a tip underneath the list. To see more, click on the
information button
next to the message. For example:
234
CHAPTER 25: TROUBLESHOOTING YOUR BOOK
The Book Error Details dialog
As you can see, there is an error from EpubCheck, followed by a tip from Jutoh that explains more
about how that error has arisen and how you might fix it.
To see exactly where the error is in the Epub file, click on the Debug button or double-click on an error
message. You’ll see the Book Viewer window:
235
CHAPTER 25: TROUBLESHOOTING YOUR BOOK
The Jutoh Book Viewer
This is a separate window (but still part of the Jutoh application) that displays the hierarchy of files
inside your Epub, with a viewer for the XHTML and other files. The errors and tips are displayed at the
bottom, and by clicking on each error, you can see the context of the problem and the relevant tip.
Incidentally, you don’t have to have errors in your book to examine your Epub file. At any time, so
long as the Epub file exists, you can use the Book | Examine menu command (F6) to browse the Epub
file. You can also use the File | Examine Epub command to examine an arbitrary Epub file that’s on
your disk, even if it wasn’t created by Jutoh.
Now, you can’t actually edit the XML and XHTML source directly. You need to deduce the source of
the error (such as a missing bookmark) and correct it in the Jutoh project, before running another
check. The reason for this is that some information is lost when generating the Epub, and it wouldn’t be
possible for Jutoh to precisely reconstruct that information from the generated and hand-edited XML
and XHTML. But you should be able to get used to tracking down problems by examining the Epub
files, for the small number of occasions that errors make it into the Epub and weren’t identified by
earlier Jutoh error messages that lead you directly to the context. If you see errors from both Jutoh and
EpubCheck, look at the Jutoh errors first since they show you where in the text they occur; fixing these
may also fix the Epub errors.
236
CHAPTER 25: TROUBLESHOOTING YOUR BOOK
These are some of the more common errors that can be flagged up by EpubCheck.
•
Bad URL syntax (‘use of non-registered URI schema’). If you find something like <a
href="doc:17">My Page</a> in the Epub, it means Jutoh couldn’t find the referenced page – it
might have been deleted. So you can go back to the editor, and fix this link. In fact, Jutoh will
also give you its own, more specific error message about this and will allow you to pinpoint the
paragraph containing the bad link, so normally you can fix it without reference to the XHTML.
Fix the earlier bad link error, and the XHTML problem will go away.
•
Bad date (‘date value ... is not valid’). If you enter a date in the metadata that is not in the
correct format, EpubCheck will warn you, giving details of what’s allowed.
•
Unfinished element. This can happen if you miss out important metadata, such as the book title.
•
File name contains non-ascii characters. Don’t put Unicode characters, for example Chinese
characters, in an image file name (as specified in the Image Properties dialog).
You can apply Epub checking to Mobipocket configurations, since Jutoh generates Epub-like files
before converting them to Mobipocket, but you will need to check Generate Epub in your Mobipocket
configurations. Note that the generated Epub will initially have the same file name as that generated by
your Epub configuration, so to avoid a clash, you may want to change the Book file name property in
your Mobipocket configuration, to perhaps %FILENAME%_Mobipocket.
Note that checking a Mobipocket file can result in a lot of spurious ‘a’ tag (bookmark) errors because
Jutoh optimizes the location of bookmarks in Mobipocket configurations in a way that EpubCheck
doesn’t like. You can ignore these spurious errors. To labour the point, if both Epub and Mobipocket
options are enabled within a configuration, then the Epub file generated by this configuration will be
Mobipocket-oriented and therefore should only be used for checking purposes, and not delivered to
customers.
The chances are high that if your Epub configuration passes the EpubCheck test, then files generated
by your Mobipocket configuration will also be good, from a syntactic point of view at least. Also, Jutoh
will catch most common errors, and the Kindlegen compiler will catch further fatal errors. So you may
be content to use EpubCheck for your Epub configuration only.
Structural errors
Structural errors are overall problems with the project, some of which may be flagged by Jutoh at the
end of the compile.
Here are some common structural errors.
•
Missing bookmark (‘fragment identifier is not defined’). The first thing to try is simply
regenerating the table of contents if you have used the advanced table of contents mode. Quite
often, editing text can disrupt bookmarks, so try pressing F9 to update the table of contents and
then compile and check again. So say you find the error is in XHTML containing the text <a
href="section-0003.html#auto_bookmark_table_of_contents_1">Chapter 1</a>, you
can look in Chapter 1 and see why the bookmark auto_bookmark_table_of_contents_1
doesn’t exist. In this case, regenerating the table of contents will put back this automatically237
CHAPTER 25: TROUBLESHOOTING YOUR BOOK
generated bookmark.
•
Bookmark names change. If you’re using advanced table of contents generation, Jutoh will
generate bookmarks such as auto_bookmark_table_of_contents_14. If you link to a
bookmark, and then Jutoh renumbers it in a later table of contents recreation, your links may be
wrong. To avoid this, edit the bookmark and rename it to something without the auto prefix.
Jutoh will now use this bookmark instead of an automatic bookmark next time it regenerates the
table of contents.
•
Missing or displaced cover. If the cover for your Epub appears as an icon but not within the
book, consider clearing the configuration option Exclude cover from reading order. The option
suppresses the cover from appearing within the book content, to avoid the cover appearing
twice, but on some platforms you may wish the cover to appear first instead of the title page.
Note that Calibre has an unusual interpretation of exclusion from reading order and shows such
sections at the end of the book; again, clearing the Exclude cover from reading order option will
prevent this from happening. If your cover is still missing, it may be that the Cover design
configuration option is not set to the correct cover design name.
•
Missing Table of Contents. See whether the configuration property Use guide is checked in
your configuration – if it’s not checked, some of the ‘Goto’ commands in a Kindle book won’t
work.
•
Section too long. Jutoh may complain about a section being more than 300Kb in length; this
means that some Epub readers will fail to display the book correctly because they can’t cope
with large sections. You will need to break this section up, perhaps by creating a hierarchy of
subsections under one chapter.
•
Unresolved URL. Jutoh complains about missing page link targets, which might happen if you
link to a page that you later delete. When compiling ODT files, will also complain if you have a
page link that does not reference a bookmark, since this is required for linear documents such as
ODT files that are not composed of individual XHTML sections.
•
Unresolved footnote or index entry. These errors are flagged by Jutoh after a compile, and
usually mean that you forgot to use Book | Update to update the endnotes section or index
section after adding index entries.
•
Headings used improperly. This is part-formatting, part-structural – however if you don’t
apply heading styles in a rational way (for example if you follow a ‘Heading 1’ with a ‘Heading
4’ instead of a ‘Heading 2’) then it will be hard for Jutoh to construct an advanced table of
contents and navigation map that reflects the implicit structure of your book.
•
An item in the navigation map doesn’t navigate to correct item on Kindle. Check in Project
Properties/Indexes/Table of Contents that the link in question is pointing to a bookmark, and not
just the relevant HTML file. Without bookmarks, the navmap can malfunction.
•
An item in the table of contents points to the wrong part of a section. If there is an image at
the beginning of a section, Jutoh may not be able to correctly place an automatic bookmark.
Insert a bookmark manually before the image so Jutoh can use that, and rebuild the table of
contents.
238
CHAPTER 25: TROUBLESHOOTING YOUR BOOK
•
Start page not working. You can specify the section that the ereader will initially open by
setting the guide type to ‘text’ in the relevant section document properties. However, on Kindle,
this can sometimes malfunction. If you send a .mobi file via email to your Kindle instead of
directly via USB or via your own web site, and sometimes when you download a sample, the
start page that you have set may not work. The reasons for this are unclear but it may be that
Amazon are converting the file to a lowest-common-denominator format such as KF7, that does
not support the ‘text’ guide type. The start page should still work for the full book from the
Amazon web site or if you copy the book to the device directly.
Formatting errors
Some formatting problems are merely subjective aesthetic issues, and some will cause actual problems
in your book.
I’m going to emphasize one particular issue before I list potential formatting problems, because
this is crucial and sometimes hard to get across. The most common formatting mistake is using
ad hoc styles throughout the document instead of planning ahead and creating styles for
particular formatting needs, such as “Centred Picture”. Ad hoc (‘direct’) styling – applying
different attributes such bold, centre, font size and so on directly to your text without selecting
a named style – makes it very hard to change formatting throughout your document later, it
introduces amateurish-looking inconsistencies in the project, and it generally makes editing the
book difficult. So, please plan ahead and have a set of named paragraph styles you use for each
formatting situation, for example headings, pictures with captions, pictures without captions,
emphasized paragraphs, first paragraph after a heading, subsequent paragraphs, book title
text, and so on.
Here are some of the issues you might have surrounding formatting.
•
Missing paragraph or character styles. Jutoh will tell you during book compilation if you
have paragraphs or objects that use styles that are not in your style sheet. You might have
deleted the original styles from your style sheet, for example, or you may have copied and
pasted styles using an earlier version of Jutoh that didn’t copy the styles. If named styles are
missing, you can choose another style from the drop-down style list in the editor, or you can
recreate the style in the style sheet, in Project Properties. If automatic styles are missing, you
can normally trigger their recreation by reapplying the styles either to the existing content, or to
some dummy content that you subsequently delete.
•
Overuse of ad hoc/automatic styles. Yes, I’m about to repeat the point I made above, in case
you missed it! Jutoh won’t warn you about this, but if you have used a lot of ad hoc formatting
either in the file you imported, or within Jutoh, you may find it very hard to get consistent
formatting and to change the formatting later. Ad hoc styling leads to automatic styles
(generated style names containing ‘+’ symbols) which have long names and make it hard to
understand and improve document formatting. Create and use named styles whenever possible.
In particular, use consistent heading styles that reflect the structure of your document –
‘Heading 1’, ‘Heading 2’ and so on – so that Jutoh can deduce a table of contents. You can use
custom shortcuts and favourites or the Formatting Palette to make this quick and painless.
239
CHAPTER 25: TROUBLESHOOTING YOUR BOOK
•
Indentation doesn’t work. Don’t use spaces for indents, since they will be ignored; use named
paragraph styles with indentation. Apply styles with the drop-down style control on the editor
toolbar, or with Format | Styles, or via the context menu. For example, use the ‘Body Text First
Indent’ style in the style sheet that Jutoh creates. Also, Mobipocket KF7 has poor indentation
support (no right indent, and fixed indentation size) so it may simply be a limitation of the
format.
•
Paragraph spacing doesn’t work. Mobipocket KF7 doesn’t recognise spacing dimensions of
less than 25 tenths of millimetre when the configuration option Use relative scaling is checked,
so check the numbers in the style dialog, or clear Use relative scaling in your Mobipocket
configuration. Also, check that the paragraph in question has a named (not automatic) style and
then examine its style definition in Project Properties. It may have a base style that is providing
some of the attributes, if those properties are not defined in the actual style. Another problem
might be that you are using blank lines to space paragraphs out. Don’t do that! Use named styles
with the appropriate after-paragraph and before-paragraph spacing. Occasional use of blank
lines is permitted though, especially on the title page.
•
Unexpected page break in large paragraphs. Some readers don’t cope elegantly with large
paragraphs and break them early, leaving large amounts of space before the end of the page.
This is related to ‘widows and orphans’ handling. You can try a combination of breaking up
large paragraphs, and adding this custom CSS to the Jutoh project: body { widows:1;
orphans:1; } (all on one line or on multiple lines, it doesn’t matter which). See Chapter 13:
Working With Style Sheets (‘CSS customisation’) for how to add custom CSS to the style sheet
file that Jutoh generates.
•
Justification problems. In your paragraph styles, you can define left alignment, rightalignment, full justification, centering, or indeterminate alignment (leave it up to the reading
software). Jutoh won’t display full justification in the editor, but it will appear in the ebook.
Note that leaving alignment indeterminate may cause justification in some readers (such as
Mobipocket) but ragged-left on others (such as Adobe Digital Editions).
•
Paragraphs aren’t centred. iBooks has a bug (or feature?) that means centring can be ignored.
You can fix this by checking Optimize for iBooks in your Epub configuration (it generates a
span tag for each paragraph that causes centring to work).
•
Multiple paragraphs per list item are all numbered or bulleted. You can create
‘continuation paragraphs’ by placing the text cursor to the right of a bullet, and pressing
Backspace. The bullet will disappear and the paragraph will be a continuation of the previous
item.
•
Fonts don’t appear as expected. Ebook reader software has a limited range of fonts, and if you
format your book with fonts that happen to be on your system, don’t expect this to be reflected
in your book. Use a small range of fonts instead, such as Times New Roman, Courier New, and
Arial or Helvetica. The ebook reader software will usually substitute something appropriate.
Although you can embed fonts in your project, not all readers support it and you also need to
make sure you have the legal right to distribute the font. If you change a font in Jutoh and then
on loading, the font has reverted back to a previous font name, it is probably because Jutoh tries
to use fonts that are likely to be present on your platform – so, for example, Helvetica may be
240
CHAPTER 25: TROUBLESHOOTING YOUR BOOK
changed to Arial when opening the project on Windows. If you want, you can specify a font
substitution in your configuration using the Font substitutions property in order to use a
particular font name in the finished ebook.
•
Garbage characters appear. Some readers do not cope well with non-Western European
languages, or need special consideration. First try setting the Language metadata field in
Project Properties to the language used in the book, such as ‘hu’ for Hungarian. If that doesn’t
work, you may need to consider embedding a Unicode font. See Embedding Fonts for more
information. It’s also worth doing a quick search online for whether the reader software or
hardware supports the language you’re writing in.
•
Text size and fonts are inconsistent. Sometimes you may have hidden text formatting, where
spans of text, or whole paragraphs, are formatted with ad hoc or named character styles in
addition to the named paragraph style. So several paragraphs appear to have the same named
style, and yet look different from one another. Often you can solve formatting problems like this
by selecting the text and applying Format | Text | Reset Formatting to remove all formatting
(except links).
•
Paragraphs with the same indent or margin show different dimensions in the ebook. If the
font sizes of the paragraph styles differ, because Jutoh uses relative units (em) to define
margins, the same margin or other size can show up differently in the Epub or Mobipocket. Ems
are relative to the paragraph style font, even if overridden by a character style. You can solve
the problem by either applying a consistent paragraph style or styles with the same underlying
font size, or in your Epub configuration, clearing the option Use relative dimensions and
recompiling.
•
Invisible text on a black background. If text disappears when you select white on black in
your ebook reader, it means your text colour has been hard-coded to black. You can eliminate
all of these occurrences using Document Cleanup (see below).
•
Images are blurry. If you need most images to be compressed JPEGs, but you need some of
them to be uncompressed to eliminate JPEG artefacts (for example, in line drawings or
symbols), then insert GIFs from files and change Convert images to JPEG to ‘All except GIF’.
Also, blurriness can be caused by scaling up from a small image, especially on a high resolution
device such as an iPad. You can improve matters by pasting a higher-resolution image into
Jutoh and specifying an absolute or percentage width in the image properties.
Jutoh has a way to help clean up project formatting documents – it’s the menu command Book |
Document Cleanup, which will show you the following dialog:
241
CHAPTER 25: TROUBLESHOOTING YOUR BOOK
The Document Cleanup dialog
This will give you the option of removing erroneous spaces, ad hoc (automatic-style) font and size
styling within spans of text, empty paragraphs, line breaks, and automatically-generated or unused
bookmarks. It can also replace missing styles with specified ones, and convert blank lines to proper
style-based spacing. Use this feature with caution since it can make a lot of changes to your project –
back up your project first.
Another handy way of correcting styles is to use style find and replace, via the Edit | Find command,
to do mass replacement of one style with another throughout your project.
You might want to use the Formatting Palette: show or hide it using the Format | Formatting Palette
command or Alt+P. It gives you a list of styles to apply and makes it easy to see just what style has
been applied at the current cursor position. It also has a tab listing all the favourite commands, styles
and symbols that you have defined. For more on this, see Chapter 6: Editing and Formatting Content.
242
CHAPTER 25: TROUBLESHOOTING YOUR BOOK
Content errors
Obviously there is a limit to what Jutoh can do about general content problems (writing style, typos,
inaccuracies, and so on). However, there are a few features that can help:
•
Use the spelling checker (Edit | Check Spelling).
•
Print out a ‘linear’ version of your book to make proofreading easier. This is where Jutoh’s
ability to write to ODT and (via OpenOffice.org) PDF comes in handy.
•
If you own an ebook reader, create an ebook in that format for convenient reading even if it’s
not the format you’re actually aiming for. For example, you may be creating an Epub book, but
you can create a Mobipocket file for a Kindle reader if you have one.
•
Add text notes under the ‘Scraps’ folder to record or plan edits.
Finally, it’s worth remembering that other people will usually be able to spot mistakes in your book
much more easily than you can, so enlist the help of further pairs of eyes if you can.
Platform errors
Some publishing platforms have requirements over and above the usual ones, and can be picky about
some style and content issues. We’ll look at several of the main platforms.
Smashwords errors
More general information about Smashwords can be found in Chapter 16: Understanding Ebook
Formats and Platforms, so here we will confine ourselves to some of the errors that Smashwords might
alert you to.
•
Paragraph separation error. Smashwords doesn’t like you to have both paragraph spacing,
and a first-line indent, so you can either modify the style you use, or (if you would like to
maintain your current styles for non-Smashwords configurations), add a paragraph substitution
in your configuration. For example, in the Paragraph style substitutions property for your
‘Smashwords ODT’ configuration, type the string ‘Body Text First Indent: Body Text’ (without
quotations, of course). This will cause the Smashwords ODT file (only) to use non-indented
paragraphs, assuming you have these styles defined and are using them.
•
Misidentified publisher error. Check that your title page is as Smashwords wants it, in
particular that you are using the same publisher name as defined in your Smashwords account.
For example, ‘Published by Anthemion at Smashwords’.
•
Copyright page error. You need to specify a copyright line in your title or copyright page,
such as ‘Copyright Julian Smart 2011’.
•
Can’t create a NavMap (NCX). Meatgrinder will look either for section headings starting with
‘Chapter’, or a linked table of contents. You can create an advanced table of contents using
Jutoh and Meatgrinder will happily use that for its own table of contents and NavMap.
•
EpubCheck failure. This may be a genuine error, but sometimes the whole Meatgrinder
conversion process fails even when Jutoh is capable of creating perfect Epub files directly. You
243
CHAPTER 25: TROUBLESHOOTING YOUR BOOK
may have to wait until Smashwords fixes the bug, though you can try removing any complex
formatting – lists seem to be a particular problem. Sometimes the bug is with EpubCheck itself.
Unfortunately, without an EpubCheck pass, you won’t be able to submit your book to the
Premium Catalog, which includes distribution by Apple.
•
File too large. There is a Smashwords file limit of 5MB at the time of writing, so if your ebook
is too large, consider reducing the quality of your images, or even deleting some. If your images
are originally in a format other than JPEG (or were pasted from the clipboard), you can use the
Image quality setting in your configuration, but if you inserted JPEG images, you will need to
replace each image.
Kindle errors
•
Hyperlinks within the same section don’t work. This seems to be a quirk of the Kindle
Paperwhite. If you are using footnotes, ensure you enable Endnotes mode in Project
Properties/Indexes/Footnotes & Endnotes, so the link and target are in different documents.
iBooks errors
When you submit your Epub for iBooks to the iTunes site, you may find the book is rejected even
though the file doesn’t cause problems with other retailers. See also Chapter 16: Understanding Ebook
Formats and Platforms.
•
Images break across one or more pages. Make sure your images never exceed the size of the
device display by checking the configuration option Limit images to viewer size.
•
EpubCheck failure. Most errors that cause rejection from iTunes will be identified by running
EpubCheck, which you can do by clicking on Check within Jutoh.
Lulu errors
•
“Contains unmanifested files” error. If you check Optimize for iBooks in your Epub
configuration (the default setting), it includes the file com.apple.ibooks.displayoptions.xml in the folder META-INF inside the Epub. So try clearing this setting in your
configuration, to remove this file. Also check that iTunesMetadata.plist hasn’t been added
by iTunes – if so, compile the file again.
•
Errors
similar
to
“ERROR:
Unable
to
locate
element
with
id
auto_bookmark_table_of_contents_1” in OPS/toc.ncx. Check Force simple NavMap in your
configuration, to generate a NavMap with no bookmarks that Lulu can cope with.
Import/export errors
Import errors
You may sometimes get unexpected results when importing into Jutoh. Here are some potential issues.
•
Imperfect styles. Jutoh does its best to convert CSS (HTML styles) to Jutoh styles, but the two
systems are very different and it cannot do a perfect job. So if you import from HTML, you may
need to edit the styles, or replace them. Alternatively you can clear the option Import basic
CSS from HTML/Epub, and have Jutoh use a small number of styles for headings and
244
CHAPTER 25: TROUBLESHOOTING YOUR BOOK
paragraphs.
•
Unexpected automatic styles. When importing from DOCX or ODT, you may be surprised to
find a lot of automatic styles in your document where they did not appear to be automatic when
edited in your word processor. This is because the word processor may hide the fact you have
applied ad hoc styling, and show you the ‘base’ style; Jutoh simply shows the automatic style
names, and this can reveal an inconsistently formatted document. Ad hoc and inconsistent styles
can also give rise to frustration when splitting the file in the New Project Wizard and creating an
advanced table of contents, because it’s hard to specify how Jutoh will search for headings when
they are formatted differently throughout the document. Some of this can be smoothed over by
using wildcards (‘*’) to match against variants of a base style, but it’s always better to start with
a clean, consistent document.
•
Missing images. If images don’t make it from your DOCX or ODT file, Jutoh may not have
been able to handle this particular image type. You will need to paste or insert the images
separately. If you are importing from HTML, the images may not have been in the correct path
as specified within the HTML. When importing from ODT, also export an HTML file using
OpenOffice or LibreOffice, to the same folder that contains the ODT and with the same root
name as the original file. For example, thing.odt should be exported as thing.html. GIF files will
be written to the folder, and Jutoh will use these images when importing from ODT.
•
Poor list formatting. Due to the differences between the way lists are represented in different
formats, sometimes lists are less than perfect after import, for example containing erroneous
bullet symbols or inconsistent indenting. Try selecting the list and re-applying a list style using
the toolbar list buttons or Format | Bullets and Numbering. Also, try to ensure that the list
items are formatted with a paragraph style with no indent, and delete any blank lines between
list items.
Export errors
This is not really about Jutoh errors, so much as things that can go wrong in a chain of conversion
starting with Jutoh output.
If you generate an ODT and wish to convert to, say, a Microsoft Word file, you can use OpenOffice.org
or LibreOffice (an offshoot of OpenOffice.org) to convert it. However, the results can vary in quality
depending on which version of the word processor you use, and what version of Word you choose to
export to. If you have a copy of Word, you can experiment with what combination works best. In
particular, if there are problems with list bullets, you can adjust the bullet font and Unicode symbol
used for each kind of bullet, from the Options page on Jutoh’s Project Properties dialog.
It’s worth checking through a file exported by Jutoh and then converted to a different format before
submitting to a distribution site such as Smashwords, to fix any errors such as the above. The majority
of ebooks probably won’t encounter them anyway, particularly fiction books.
Expectation errors
While not exactly an error, this class of problem still causes head-scratching and support questions. If
you come to Jutoh (and ebooks in general) with expectations of PDF-like complex layout, you will
245
CHAPTER 25: TROUBLESHOOTING YOUR BOOK
probably think there’s something wrong with the application when it refuses to import this kind of file.
Because Epub and Mobipocket files are reflowable, they don’t tend to use absolute positioning and
complex layouts. Likewise, Jutoh can’t import such files with much fidelity. If you have a book with
elaborate layout, you will need to think about redesigning it to make use of simpler cues such as small
images (such as ), indentation, colour, spacing, and pictures laid out simply.
If you want custom web-like features, this isn’t possible in Jutoh and indeed most ebook readers
wouldn’t support it anyway. (Having said that, Jutoh Plus allows you edit HTML and JavaScript to
create interactive ebooks if you have the necessary programming skills.)
It’s been my experience that users often want Jutoh to work in the particular way that their own
favourite word processor works; customising shortcuts can help a bit there, but Jutoh is a specialist
ebook creation tool and inevitably it works slightly differently than other applications. Your
expectations, background, and the kind of book you will be creating with Jutoh can lead to quite
different experiences with Jutoh but with a little use you should soon find it intuitive.
Third-party troubleshooting tools
We’ve mentioned the Epub checker, which will give you the assurance that you don’t have syntax
errors in your books.
For previewing your Epub and Mobipocket files, you can download Adobe Digital Editions and Kindle
for PC or Mac. They will become the default viewers when you click on Launch in Jutoh.
If you’re going to be creating Mobipocket books, another essential tool in your armoury is Kindle
Previewer, which you can download for Windows and Mac from Amazon’s site. On Windows, you can
get Jutoh to download and install Previewer automatically using Jutoh’s Setup Wizard available from
the View menu. Previewer shows your book in an emulator for Kindle devices and also for the Kindle
app running on the iPhone and iPad. There can be small differences in the display and navigation
behaviour compared with Kindle for PC or Mac, plus you get to see what your book will look like on a
much smaller screen, which might influence formatting decisions. On Windows, you can configure
Kindle Previewer as a helper application (see Appendix B: Configuring Jutoh) so that when you click
on Launch you have a choice of Default (Kindle for PC/Mac, if you have installed it) or Kindle
Previewer. (Unfortunately this won’t work on Mac because Amazon haven’t yet implemented file
name passing on this platform – but we can take credit for persuading Amazon to at least add it for the
Windows version!)
You can install Nook and Kobo desktop applications to preview your Epubs though they don’t cooperate well with Jutoh and you’ll have to open books directly in these tools. In my view they’re pigs
to use for local files, and are geared towards getting you to part with money for books in their
catalogues. So you may be content to use Adobe Digital Editions to preview your work.
If you are distributing your book on Smashwords, the Meatgrinder application that runs when you
submit the book may give you some information about the quality of formatting in your book.
Finally, of course, you can get a variety of ebook reader hardware as they’re getting ever cheaper, and
test your files on these.
When using external reader applications alongside Jutoh, such as Kindle for PC, be aware
246
CHAPTER 25: TROUBLESHOOTING YOUR BOOK
that if the book is open in that application, Jutoh may not be able to create it again until you quit
the book or close the application. Also, you should delete the book from the application’s library
before launching it again because quite often you can end up looking at the old version of the
book and wondering why nothing seems to have changed.
When all else fails
Don’t forget to use the Search Help field in the Jutoh toolbar to search for keywords. This searches the
application help and also a ‘knowledge base’ with over a hundred short articles that answer specific
questions without having to wade through all of the documentation. If you still can’t figure out what is
going wrong with your book, do contact us (see the Support page for contact details), preferably
sending your Jutoh project or a suitable sample and a detailed description of the problem. You never
know, it might be a bug in Jutoh; in any case, we want to help you fix your problem if nothing in this
chapter has helped. You can also join the anthemion-writingtools mailing list and raise the issue there.
Don’t suffer in silence!
Summary
This chapter has armed you with the knowledge and tools to correct errors that you may encounter as
you create your books. In the next chapter, we describe specific ebook formats and distribution
platforms.
247
Chapter 26: Understanding Ebook Formats and Platforms
In the Introduction, we looked briefly at the ebook formats that Jutoh supports (either directly, such as
Epub, or indirectly, such as PDF). In this chapter, we’ll go into more detail about these formats, and
also describe the major distribution platforms that you may wish to use for selling your ebooks.
Formats
Epub
Epub is a free and open standard for reflowable ebooks, maintained by the International Digital
Publishing Forum (IDPF). The most popular version of the standard is version 2, as used by all current
Epub-based reader hardware and software, and a specification of version 3 is now available but
implementations are not widely used in the real world. Version 3 adds more flexibility for absolute
positioning, addition of sound and video, and web-like custom features using Javascript. Jutoh
currently targets Epub version 2 and a subset of version 3 features.
An Epub file is basically a zip archive containing HTML content, metadata describing the book, and a
navigation map describing the structure of the book. An Epub can be encrypted, but this depends on
cooperation between a particular platform platform (such as iBooks) and the corresponding reader
software. When you submit an ebook generated by Jutoh to an established publishing platform, the
platform will deal with encryption issues.
Note that even though Epub is a standard, there are always quirks in the way ebook reader software and
hardware implement the standard. Jutoh tries to smooth over these differences; for example, Jutoh’s
iBooks optimization feature fixes problems with iBooks failing to honour centre alignment and image
sizing.
Mobipocket
Mobipocket is a format purchased by Amazon to be used by Amazon’s Kindle hardware and software;
now Amazon are the odd man out in being the only ebook player using a non-Epub format. However,
Mobipocket is based on Epub and Amazon’s Kindlegen application (formerly Mobigen) takes a set of
Epub-like files (including the OPF file) as input to generate Mobipocket as output.
The older variant of Mobipocket is called KF7, and the newer, more capable variant is called KF8. KF8
can handle fixed layout books and richer formatting. Most older Kindle devices can be upgraded to use
KF8, but certain early devices are restricted to KF7. Jutoh generates HTML that is optimized for both
KF7 and KF8, and then calls Kindlegen to create the Mobipocket file.
Mobipocket files have the .prc or .mobi extension.
248
CHAPTER 26: UNDERSTANDING EBOOK FORMATS AND PLATFORMS
We will talk more about the Kindle platform later in the chapter.
Adobe Portable Document Format (PDF)
PDF is a popular format for complex, fixed-layout documents, but is not ideal for devices with small
screens and the ability to choose text size, which requires the ability to reflow the document. Jutoh can
create OpenDocument Text (ODT) files which can then be turned into PDF, for example using the File
| Export as PDF command in OpenOffice.org Writer or LibreOffice Writer. You can view the PDF in
Adobe Acrobat Reader or Adobe Digital Editions (ADE). On Windows, you can force the document to
be viewed in ADE by using Open With... in Windows Explorer’s context menu, or you can drag the
document to ADE.
When displayed in Adobe Digital Editions, a PDF containing bookmarks will show a table of contents
in the left-hand pane. Jutoh will generate styles with the required outline information if they are
specified in the named styles, and then OpenOffice.org Writer or LibreOffice Writer will be able to
save the bookmarks for the headings in the document. For this to work, you will need to make sure that
‘Heading 1’ has its outline set to 1, ‘Heading 2’ has an outline of 2, and so on. (And of course you will
need to be using these styles in your project!) The outline setting can be found on the Indents &
Spacing tab of the Jutoh style editor dialog. You can switch off outline output using the Use outline
levels configuration property, for example if your document doesn’t use heading styles consistently and
it would create a poor table of contents in Adobe Digital Editions. If your Jutoh styles don’t have
outlines, you can achieve the same effect by using the Tools | Outline Numbering command in
Open/LibreOffice to set numbering for your heading styles.
Jutoh outputs appropriate metadata to ODT files so that when you export to PDF, the title and author
will appear in the left-hand pane in Adobe Digital Editions. If your cover design is on the first page of
your ODT file, it will be used for the thumbnail in Adobe Digital Editions.
See also the next topic for creating headers and footers and a hyperlinked table of contents with page
numbers for your PDF file.
OpenDocument Text (ODT)
OpenDocument Text is a word processor format that can be converted to many other formats such as
Word and PDF, using for example the free OpenOffice.org suite, or LibreOffice which is an offshoot of
the OpenOffice.org project. Note that Word itself tends to create more compact .doc files than does
OpenOffice.org or LibreOffice, so you might want to re-save the file using Word if file size is an issue.
Before creating an ODT file, you might like to change the Paper size and margins in your
configuration. You can also use the Mirror margins setting if you are creating a printed book, for
example via Amazon’s CreateSpace service.
In addition to document-wide paper size and margins, Jutoh lets you adjust page styles for each section
in your book, adding headers and footers with page numbers if necessary. If you have an advanced
table of contents in your project, this will be converted to an ODT table of contents field with both
hyperlinks and page numbers. For more information, please see the topic Creating OpenDocument files
for print and PDFin the built-in help, under Jutoh User Guide.
If you wish to to add headers, footers and page numbers manually to an ODT file generated by Jutoh,
instead of using Jutoh’s page styles, follow these steps in LibreOffice (OpenOffice.org doesn’t
249
CHAPTER 26: UNDERSTANDING EBOOK FORMATS AND PLATFORMS
currently support the Format | Title Page command):
1. Open the file in LibreOffice Writer.
2. Mark the title page using Format | Title Page; enter 2 into Number of title pages (to skip the
cover and title page) and choose Convert existing pages to title pages. Check Reset Page
Numbering after title pages. Press OK.
3. Choose Format | Choose Footer | Default. Click on the first available footer and choose Insert
| Fields | Page Number.
4. Select the page number field and centre it.
You can also add a header if you wish, perhaps containing the title of the book.
To manually add a table of contents with page numbers and not just links, follow these steps in
OpenOffice.org Writer or LibreOffice Writer:
1. Delete the Jutoh-generated table of contents.
2. Click on Format | Indexes and Tables | Indexes and Tables to show the Insert Index/Table
dialog.
3. We need to associate heading styles used in the document with levels in the table of contents,
similar to how Jutoh works when searching for headings to put in the table of contents. Check
Additional Styles, and click the ‘...’ button. Assuming you are using ‘Heading 1’, ‘Heading 2’
and so on for headings in your document, click on each of these in the list and click on the >>
button to position each at the appropriate point in the table: ‘Heading 1’ at position 1, ‘Heading
2’ at position 2, and so on. Press OK but don’t dismiss the Insert Index/Table dialog yet.
4. Now we need to make the entries hyperlinked. Click on the Entries tab and in the Structure
area, click in the box just before the E# button, then click Hyperlink. Click in the box just after
the E and click on Hyperlink. This creates LS and LE marks (Link Start and Link End). Click
All to apply this to all entries, and then click OK to dismiss the dialog.
5. Right-click over the special ‘Table of Contents’ field that has been inserted in the document and
choose Update Index/Table and you should find that a table of contents with page numbers
appears.
All this will be done automatically if you already have a table of contents in your project marked with
the ‘toc’ guide type.
MP3
Jutoh can output audio books in the form of MP3 files, using the operating system’s built-in text-tospeech engine or one of several other engines such as eSpeak. Obviously this is not going to be as good
as a human reading the book, but it can be helpful in some circumstances, such as listening to a book
when commuting. Also note that when using some voices, the generated MP3 files can’t be distributed
commercially without permission from the original voice license-holder.
Creation of MP3 files requires an MP3 encoder; Jutoh uses the LAME encoder, as described in
Appendix A: Installing Jutoh.
250
CHAPTER 26: UNDERSTANDING EBOOK FORMATS AND PLATFORMS
Platforms
Amazon Kindle
Kindle books account for the majority of all ebooks sold, so it’s obviously important to be in the Kindle
store. Fortunately, Amazon makes this very easy for the independent author or small publisher using
their publishing tools, in the USA and UK (check for support in other countries). You can upload your
Jutoh-generated Mobipocket file, and Amazon will encrypt it for you if you wish. One of the great
things about supporting the Kindle platform is that your books can be read on most smartphones,
tablets, PCs, and Macs as well as on Amazon’s Kindle hardware.
To create files suitable for processing by Kindlegen, Jutoh generates HTML, CSS and other files that
are nearly identical to the ones used for Epub creation. However, the original Mobipocket format (KF7)
is not quite as flexible as Epub and there are restrictions as well as features unique to Mobipocket.
Jutoh proves the configuration option Optimize for Mobipocket which does the following:
•
Within lists, there are no paragraph classes, only list item classes, since adding paragraph tags in
lists breaks KF7 rendering.
•
Multiple paragraphs in a list item are faked using line breaks.
•
Link anchors are inserted before paragraphs, not within them, because a Mobipocket bug can
cause styling loss if navigation causes only part of the paragraph to be visible.
Jutoh optimizes code so the book will look as good as possible on both older KF7 devices and newer
devices supporting KF8. Where generated CSS code is different for each platform, Jutoh uses ‘media
queries’ so the appropriate code is used on each platform. Jutoh may perform other tweaks in future
releases. The Optimize for Mobipocket option is switched on by default for the initial Mobipocket
configuration.
Although Jutoh takes care of most of the low-level Mobipocket/Kindle technical details, you may also
wish to read Amazon’s guidelines for advice on presentation, image size, and so on:
s3.amazonaws.com/kindlegen/AmazonKindlePublishingGuidelines.pdf
It is possible to upload Epub files to Amazon instead of converting to Mobipocket first, but if you do,
you may miss out on Jutoh’s Mobipocket optimizations, giving poor results on some devices. Also, it’s
better to preview the Mobipocket file on your machine than to rely on Amazon’s conversion before
previewing with ‘Look Inside’.
Paragraph spacing in Mobipocket
You may be wondering why there is no inter-paragraph spacing in your Mobipocket file on KF7
devices, even though you specified it in Jutoh.
When the configuration option Use relative dimensions is checked, Mobipocket rounds paragraph
spacing (before or after) to the nearest ‘em’ unit, so for example 1.4em becomes 1em and 1.5em
becomes 2em. In fact you specify spacing in tenths of a mm within Jutoh, which are then converted to
em by multiplying by 0.02, so 25 tenths of a mm become 0.5em. From this you can see that 25 is the
minimum value you should use to add spacing in a Mobipocket file, since anything less will be rounded
to zero. To ensure that your Mobipocket configuration is using absolute dimensions (mm), clear the
251
CHAPTER 26: UNDERSTANDING EBOOK FORMATS AND PLATFORMS
option Use relative dimensions. Note that this may cause poor spacing in some implementations of the
Kindle ‘Look Inside’ feature.
KF7 does not honour line spacing, although this can be changed by the book end-user on some readers.
KF7 may also omit inter-paragraph spacing if there is a left indent.
Lists in Mobipocket
KF7 doesn’t support list type specification, so ordered lists can only have arabic numbering. Also,
paragraph style specification will only work for the outer list level due to the paragraph tag not
honouring paragraph margins. To work around this, Jutoh places the vertical margins (before and after
paragraph spacing) on the list item tags for the first level only. Specifying the margins for nested items
would cause space to be accumulated after closing list item tags.
Mobipocket lists don’t honour custom indentation specification so the defaults will be used.
Setting the start page
By default, the Kindle reader will choose a suitable page to associate with the Beginning menu item or
button in the reader. However you can change this by changing the document guide type to ‘text’. To
do this, right-click on a document in the project outline to show the Book Section Properties dialog.
Select ‘text’ from the Guide type dropdown list. You can also use the keyword %STARTPAGE%, in
which case Jutoh will substitute the value of the property Start page guide type in the current
configuration. This allows you to use a start page appropriate to the target device depending on
configuration. Press OK and compile the book again.
Indenting table of contents items
You may find that the table of contents page isn’t indenting items as you expect, when viewing the
Mobipocket version of your ebook. This is because Mobipocket (KF7) implements first-line indent, but
not full left indent (or hanging indents). The solution is to edit the paragraph styles for table of contents
entries, such as ‘TOC Entry 2’, and give them first-line indents instead of full left indents. Go to
Project Properties/Styles and in Indents & Spacing, set Left to 0 and Left (first line) to a non-zero
indent value such as 120.
The downside of this is that long items that wrap will not be fully indented, but in most cases the items
will fit and will appear indented.
Alternatively, you can adjust the Mobipocket configuration option Styles for indent fix, which converts
matching paragraph styles to first-line indent instead of full left indent. The default setting is ‘TOC*’
which applies this change to all table of contents entry styles. You can clear this entry if you do not
want to adjust any styles.
Multimedia and JavaScript in Kindle books
Although the Amazon Publishing Guidelines describe how to embed audio and video, it seems that
they will currently not accept books containing multimedia and any existing books containing audio or
video were submitted during an experimental beta phase. Locally downloaded Kindle books will have
their multimedia blocked. This may change in future.
At the time of writing, JavaScript is not supported in Kindle books submitted via KDP.
252
CHAPTER 26: UNDERSTANDING EBOOK FORMATS AND PLATFORMS
Kindle book covers
When submitting a .mobi file to Amazon KDP, you are also required to submit a high-resolution
version of your cover separately; so strictly speaking, you don’t need a cover in your .mobi file. You
can set the Cover design configuration setting to ‘(none’). However when previewing it’s nice to see a
cover and there is no harm in leaving a low-resolution cover in your .mobi file when you upload it.
You may be surprised that Kindle books don’t open on the cover. This is an Amazon decision and it’s
not possible to force books to do this.
Checking your Kindle ebook
For automated checking, you can can check the Generate Epub option in your Mobipocket
configuration so that Check can work on the Epub equivalent of the Mobipocket file (the formats share
files and most formatting). Some Mobipocket-specific HTML will be included in this Epub so you may
need to ignore a few of the errors, in particular those flagging up incorrectly positioned ‘a’ tags
(bookmarks). If you are also generate Epub files, be sure to change the name of your file using the
Book file name option in your ‘Mobipocket’ configuration, otherwise you will overwrite the file
generated by the ‘Epub’ configuration, which will have different optimizations.
We recommend that you review your Kindle book in both Kindle for PC/Mac and Kindle Previewer.
Kindle Previewer lets you set the current simulated device type. For checking how books will look on
iOS, unfortunately you need an iOS device. However, checking on other simulated devices is usually
good enough. See KB0118 in Jutoh help (‘How can I test my Epub and Kindle books?’) for more
details.
iBooks
Apple’s Epub-based iBooks platform is administered through iTunes. Unfortunately, only the USA is
supported at the time of writing, unless you are already set up to do business in the USA. Fortunately,
you can use Smashwords and other aggregators to target iTunes, from any country. If you’re creating
fixed layout books, first check that these will be accepted by an aggregator – quite often they’re not.
Epub files for iBooks need a little tweaking to perform well on iOS. Edit your Epub configuration(s)
and check the Optimize for iBooks property. Jutoh will then apply a few small changes the next time
the book is generated. These are:
•
Font names are removed from styles (unless Generate font names is enabled).
•
Dummy span tags are added to centered paragraphs, since otherwise the centering is lost in full
justification mode.
•
An image that is on its own in a paragraph, and has its size dimensions specified in its
properties, is generated using a div that takes the dimensions of the image, and dimensions are
removed from the image itself. This is because iBooks ignores width and height specifications
in images, and using a parent div is a widely used workaround.
•
If either Generate font names or Embed fonts is enabled, at the same time as Optimize for
iBooks, Jutoh will generate a file called com.apple.ibooks.display-options.xml with
specified-fonts set to true. This will tell iBooks to respect the fonts that are specified in the
253
CHAPTER 26: UNDERSTANDING EBOOK FORMATS AND PLATFORMS
book; otherwise iBooks will choose standard fonts.
Please note that if the configuration option Exclude cover from reading order is checked, the cover
image does not appear in the actual iBooks reader, only in the iBooks bookshelf.
Here are some of the recommendations Apple gives for creating Epub files for iBooks.
•
Use guide types such as ‘toc’, ‘title-page’, ‘preface’, ‘other.back-cover’ and so on – use the
Book Section Properties dialog, available by right-clicking on a document in the project outline
and choosing Properties, or by using the Document | Document Properties, Shift+Alt+Enter,
or Alt+Click.
•
The first page displayed will be determined from the guide type in this order of preference: text,
acknowledgements, dedication, epigraph, foreword, preface, other.intro. Override this with the
other.reader-start-page guide type. You can also use the keyword %STARTPAGE%, in which
case Jutoh will substitute the value of the property Start page guide type in the current
configuration. This allows you to use a start page appropriate to the target device depending on
configuration.
•
For cover art, use TIF, JPEG, or PNG image using RGB colours and at least 600 pixels on the
larger axis. So at least, say, 400x600. Don’t include pricing or a reference to the physical edition
on the cover.
•
Limit embedded images to 2 million pixels, and don’t use text in images if at all possible.
For further information, see the file iBookstoreAssetGuide.pdf available if you have an iTunes
Connect account.
Barnes & Noble Nook
Barnes & Noble uses the Epub format for their range of Nook devices and apps; you can get your
books on their site via Smashwords, or directly from their ‘PubIt!’ publication site at
pubit.barnesandnoble.com. The PubIt! site contains formatting and submission guidelines. Nook
readers are popular in the USA and came to the UK in late 2012. These are some of the guidelines
mentioned on the PubIt! site:
•
The page margins should be set at 30 pixels on the top and sides, with 20 pixels on the bottom.
In Jutoh, these can be set in your configuration (for example, HTML left margin).
•
Embedded fonts are allowed, but discouraged due to the extra size and licensing issues.
•
A Title Page is mandatory.
•
The Copyright page should show the ebook ISBN.
•
Cover image sizes range between 500x600 to 600x730.
When generating for Nook, switch off Generate iBooks XML in your Epub configuration or the file
may be rejected.
The Nook doesn’t honour the ‘text’ guide type and so it is not possible to specify the first page when
the reader first opens the book.
254
CHAPTER 26: UNDERSTANDING EBOOK FORMATS AND PLATFORMS
Your ebook cover – when viewed inside the book – will have margins around it; this is due to the fact
that the Nook controls the margins (although you switch between several sizes in the Nook settings).
The Barnes & Noble ‘Nook Kids’ fixed layout format is very non-standard, requires a non-disclosure
agreement from Barnes & Noble, and is unlikely to be supported by Jutoh; but regular reflowable
Epubs are fine on the Nook.
To test your files using the Nook Android app, use a file manager app to copy the Epub file to the
Nook/My Documents folder on the memory card. The book will then appear when you next run the
Nook app. On the PC version of Nook, go to My Stuff and then Add Item, and add your book.
Kobo
Kobo uses the Epub format; again, you can get your books on their site via Smashwords, or directly via
the Kobo Writing Life site. Kobo has free apps for most smartphones, tablets and desktop operating
systems, and sells its own ebook readers.
At the time of writing there are no known issues with Kobo’s Epub implementation that require special
consideration. Conveniently, Kobo uses the same fixed layout Epub file format as used by Apple’s
iBooks.
When generating for Nook, switch off Generate iBooks XML in your Epub configuration or the file
may be rejected. It’s not clear whether the XML file can be included in iBooks-compatible fixed layout
Kobo books.
It’s difficult to test ebooks with the desktop Kobo reader applications (on Mac or PC) since they don’t
accept arbitrary files on your hard disk. However, the Android Kobo application has an option for
importing local content, so once you have the file on your Android device (for example using file
transfer, Dropbox, web site, or email), you can then view it using Kobo.
Diesel eBook Store
Diesel uses a variety of formats, including Mobipocket and Epub; you can get your books on their site
via Smashwords. At the time of writing there are no known issues with Diesel’s Epub implementation
that require special consideration.
Lulu
Lulu uses the Epub format and combines the advantages of print-on-demand with ebook publishing.
There are a couple of considerations that we are currently aware of:
•
You need to have more than one chapter in the book, or Lulu will complain about the table of
contents.
•
You should switch off Optimize for iBooks or Generate iBooks XML so that Lulu doesn’t
complain about ‘unmanifested files’ – in iBooks mode, Jutoh adds the file
com.apple.ibooks.display-options.xml in the folder META-INF inside the Epub. So try
clearing this setting in your configuration, to remove this file. Also check that
iTunesMetadata.plist hasn’t been added by iTunes – if so, compile the file again.
•
The author metadata needs to be output to Epub with opf:role set to ‘aut’, and the date metadata
255
CHAPTER 26: UNDERSTANDING EBOOK FORMATS AND PLATFORMS
needs to have opf:event set to ‘publication’, or Lulu will compain. This is done automatically if
they are not already set, but you can adjust these values using the ‘...’ buttons next to each item
of metadata.
Smashwords
Smashwords is very popular with authors, especially as it has distribution deals with other major ebook
platforms in addition to selling them directly from the Smashwords site in multiple formats. So if you
want to be listed on sites that you can’t upload to on your own, and/or want to save yourself the hassle
of submitting to multiple sites, this is great.
You submit a file in Microsoft Word format, so you need to do that extra conversion step in
OpenOffice.org Writer or Microsoft Word after generating an OpenDocument file destined for
Smashwords. Note that Microsoft Word creates a more compact file.
Smashwords will take your Word file and pass it through their ‘Meatgrinder’ program to convert it into
the various formats supported by Smashwords (Epub, Mobipocket, HTML, PDF and more). The
conversion is pretty good most of the time, but you may find that the output is not quite as good as if
you generated the file directly using a program such as Jutoh.
When you create a Jutoh project, a ‘Smashwords OpenDocument’ configuration is added in addition to
‘OpenDocument’. The only difference between these is that the Smashwords variant has the Special
index formatting and Special footnote formatting properties disabled, since Meatgrinder doesn’t like the
special formatting associated with these options. So instead of using special fields, Jutoh will generate
the index and footnote text in full.
There are two methods for helping Meatgrinder create a NavMap from the word processor document:
1. Create a linked table of contents page, which Jutoh will do automatically, or you can build your
own. Don’t use Word or OpenOffice’s automatic table of contents generation facility since
Meatgrinder doesn’t like field codes.
2. Start each section with the word ‘Chapter’.
Please see the Smashwords Style Guide at www.smashwords.com; Jutoh will help you conform to
them but some aspects you will have to take care of yourself, such as careful use of text size, sparing
use of empty space and consistent heading style usage. Much of what the Smashwords Style Guide
says can be used when working with Jutoh, such as advice on use of indentation, paragraph spacing,
images, and so on.
Recently, Smashwords has started allowing authors to upload Epub files. However, this is only used for
delivery of the Epub format and you still need to upload Word files for the other formats.
See also Chapter 25: Troubleshooting Your Book for tips on dealing with Smashwords submission
problems.
Your own web site
Of course, there’s nothing to stop you uploading Jutoh-generated files to your own web site using an
FTP client such as FileZilla. If you’re making them available for free, there’s not much else to do
except upload the files in different formats and add links to your web site. Or, you could simply link to
256
CHAPTER 26: UNDERSTANDING EBOOK FORMATS AND PLATFORMS
the files on other platforms such as the Kindle store or Smashwords.
If you want to make your books commercially available, you could use a service such as Plimus, which
will serve files up to your users after payment. The files won’t be encrypted, but you can add a
paragraph to the title page to request that people do not redistribute the file; this should discourage
some piracy. A little bit of piracy may actually be a good thing in spreading the word about your books,
and in my opinion, there will always be a majority of law-abiding citizens prepared to pay! Besides,
determined pirates will crack encryption or scan or retype books. And offering unencrypted books can
be a selling point, since customers generally hate encryption and Digital Rights Management since it
restricts how the product can be read and stored. If you’re determined to encrypt your books, simply
use a store such as Kindle, Smashwords or iBooks.
Caveats about using multiple distribution platforms
You might think it was obvious that the more platforms you sell to, the better. However, there are some
wrinkles. If one platform sells your book at a lower price than another, then you can find the other
platform price-matching; so you effectively trigger a price war with yourself, hurting your margins.
(On the other hand, if you want to sell a book for the smallest possible price on Amazon, you might use
this to your advantage: have it available for free on other platforms, so Amazon price-matches.)
Also, if you use Smashwords to target Kindle, for example, you can’t then sell the identical edition on
Amazon directly. Why would you want to do that? Well, Smashwords doesn’t always produce as good
an ebook file as if you created it directly with a tool such as Jutoh, so you might want to handle some
sites yourself, and have Smashwords distribute to the remaining ones.
If you want to take advantage of Amazon’s free ebook promotions, you need to sell it exclusively on
Amazon – an annoying restriction, but the promotions can be very worthwhile for visibility and
collecting reviews.
Summary
In this chapter, we’ve explored the differences between the major ebooks formats, and we’ve looked at
the most significant distribution platforms, and their pros and cons. Next, we’ll try to give some general
advice on how you might market your ebooks.
257
Chapter 27: Marketing Your Book
by Harriet Smart
Your book exists. You have toiled over it – now you need people to know about it. Easier said than
done. There are a lot of people shouting and waving their books out there. How are people going to
know about you and what you have written?
Step 1: Describe your book
Of course you know what your book is about. But can you describe the contents briefly and in an
understandable and enticing way? Look at the blurbs on the back of printed books or the descriptions
on Amazon and see how it is done.
Here’s one for a Young Adult novel by Michael Pryor:
“Aubrey Fitzwilliam is the son of a prominent ex-prime minister. He’s also brilliant at magic, but he’s stuck at
military school. At least he has his best friend, George, there to back him up. George would follow Aubrey
anywhere – and with Aubrey’s talent for thinking up daring schemes that will get them both in trouble, that’s no
easy thing to do. At a royal hunting party, the boys discover a golem, a magical creature built to perform one task:
to kill Prince Albert. Aubrey and George are hailed as heroes for foiling the murder attempt – but who sent the
golem, and why? Aubrey is far too curious to let the authorities handle this one, and he and George start
investigating...”
Here is one for Phil Rickman’s latest novel, The Bones of Avalon:
“It is 1560, and Elizabeth Tudor has been on the throne for a year. Dr John Dee, at 32 already acclaimed throughout
Europe, is her astrologer and consultant in the hidden arts... a controversial appointment in these days of
superstition and religious strife. Now the mild, bookish Dee has been sent to Glastonbury to find the missing bones
of King Arthur, whose legacy was always so important to the Tudor line. With him – hardly the safest companion –
is his friend and former student, Robert Dudley, a risk-taker, a wild card... and possibly the Queen’s secret lover.
The famously mystical town is still mourning the gruesome execution of its Abbot, Richard Whiting. But why was
the Abbot really killed? What is the secret held by the monks since the Abbey was founded by Joseph of
Arimathea, uncle of Christ and guardian of the Holy Grail? The mission takes Dee to the tangled roots of English
magic, into unexpected violence, necromantic darkness, the breathless stirring of first love... and the cold heart of a
complex plot against Elizabeth.”
This is the Amazon description for a very famous self-help book:
“THE 7 HABITS OF HIGHLY EFFECTIVE PEOPLE is recognised as one of the most influential books ever
written. In this seminal work, Stephen R. Covey presents a holistic, integrated, principle-centred approach for
solving personal and professional problems. With penetrating insights and pointed anecdotes, Covey reveals a stepby-step pathway for living with fairness, integrity, honesty and human dignity – principles that give us the security
258
CHAPTER 27: MARKETING YOUR BOOK
to adapt to change, and the wisdom and power to take advantage of the opportunities that change creates.
Translated into thirty-four languages and with phenomenal sales, THE 7 HABITS OF HIGHLY EFFECTIVE
PEOPLE has been the key to the success of legions of business leaders and individuals the world over.”
And finally the description of a new biography of Georgette Heyer by Jennifer Kloester.
“Georgette Heyer remains an enduring international bestseller, read and loved by four generations of readers and
extolled by today’s bestselling authors. Despite her enormous popularity she never gave an interview or appeared in
public. Georgette Heyer wrote her first novel,The Black Moth, when she was seventeen in order to amuse her
convalescent brother. It was published in 1921 to instant success and ninety years later it has never been out of
print. A phenomenon even in her own lifetime, to this day she is the undisputed queen of regency romance. During
ten years of research into Georgette Heyer’s life and writing, Jennifer Kloester has had unlimited access to Heyer’s
notebooks and private papers and the Heyer family records, and exclusive access to several untapped archives of
Heyer’s early letters. Engaging, authoritative and meticulously researched, Georgette Heyer: Biography of a
Bestseller offers a comprehensive insight into the life and writing of a remarkable and ferociously private woman.”
All of these are between 150 and 190 words long and yet they all manage to say an awful lot about the
book. They are little masterpieces of copywriting and you should strive to create a little masterpiece for
your own book. It is not easy, but it is worth taking the time to do – because then you will have a
ready-made and persuasive description of your book readily to hand.
When writing, try to remember what the reader is looking for and emphasise those elements. In the
case of a novel you want to suggest to them that this a good story with intriguing characters and lots of
possibility for drama. You will notice that both the novel descriptions contain questions – the central
meat of a drama is a question. Will the prince be able to save the princess? Will the heroine be able to
overcome the obstacles and find the man of her dreams? Make sure you draw attention to the sexiest,
shiniest parts of your novel: the glamorous setting, the dreadful things at stake or the potential for deep
emotional involvement.
Non-fiction descriptions are a little more utilitarian but they are still in the business of making an offer
the reader can’t refuse. They emphasise the authority of the writer and the unique angle that the book
offers on a topic that is of general importance and interest. Notice how words like “offers” or “reveals”
are used to suggest that the book is treasure-chest of useful and and authentic information.
One way to look at such descriptions is to imagine them as a slice from the beautiful cake that is your
book. You are not telling them all the ingredients or how you laboured to mix them up, but merely
presenting the overall effect. You want them to eat the whole cake, of course, so give them a slice that
makes them hungry for more, in no more than 200 words.
Step 2: Be able to talk confidently about it
Writing your book description and studying other book descriptions is a very good way to see what it is
that makes people interested in books, what excites them. You will have a much clearer idea of what
your book is and who might be interested and indeed what is special about your book. The next thing to
do is to refine that description even further – into a sentence or two you can use when you meet people
and they ask about your book. The latest evidence suggests that word of mouth is one of the most
important drivers of ebook sales. Word of mouth begins with a conversation, be it virtual or in real life.
When people ask you what your book is about, you need to have an answer ready. Even better, have
several answers ready to suit the sort of person you are talking to.
259
CHAPTER 27: MARKETING YOUR BOOK
Never apologise for your book – be bold and talk it up. Share the passion you felt in writing it. Don’t
say “Oh, it’s just a romance novel” say “It’s a love story inspired by a set of old letters I found in a
thrift shop. It made me cry when I was writing it.” Don’t say: “It’s a rehash of some research I did on
stress” – but “It’s a book about how you can manage your stress levels.”
Now I am not saying this is easy. It isn’t. Writers are naturally shy and retiring and like to hide behind
a wall of comforting text. But to get people to know your book exists you have to have a pithy
description at your finger tips.
Practice saying in private and aloud, “My book is about...” Refine what you say. Evolve it into a neat
phrase that you can say as easily as your name.
Books and blogs on pitching and log-lines for the screenwriting industry have lots of helpful hints on
expressing the idea of a thing in a succinct and appealing way.
Step 3: Find your Special Subject – be an expert or an enthusiast
The next question to ask yourself is: what is your area of unique knowledge and how is it connected to
the book you have written?
Why is a special subject important? It gives you a voice: it is an excuse to speak, be it on an online
forum, a blog, in the local newsletter, even to the person at the bus stop. You are no longer just
someone with a book to sell. You are instead an interesting person who happens to have written a book
which might be equally interesting.
How do you find your special subject? If you have written a collection of gluten-free bread recipes
because you have a gluten allergy then it is easy to see you are well qualified to take gluten-free
cooking as your special subject. Historical novelists have a head start here as they are usually deeply
involved in historical research and have a burning interest in the past – that’s what drove them become
historical novelist in the first place. They are often de facto experts.
However, sometimes it can be difficult to find your specialist subject. Perhaps you are writing
contemporary fiction or a memoir and it doesn’t seem at all clear. Your subject seems too general.
Don’t despair – ask yourself some more questions and try to tease out your special subject.
For example, look at the setting – does your work have a regional flavour? Is your romance set in
France? Why did you choose France? Is it because you live there and know it well or because you love
the very idea of France, all that style and elegance. If the first, think: “Living in France – all you need
to know – notes from an expat” or if you don’t know France that well except through research and
imagination, you can go the “I Heart France” route, and explore the style and culture of the country.
Chances are that people who also love France in the same way may be interested in reading your
wonderfully romantic love story set in their favourite country.
Both of these approaches give you plenty of angles for blogging, participating in relevant forums and
generally getting the word out there.
Step 4: Build a platform
Get yourself known online. Gather a tribe. The word is that traditional publishers are making it a
260
CHAPTER 27: MARKETING YOUR BOOK
stipulation that newly signed authors already have a blog or are at least prepared to start one. Others are
suggesting that their existing authors get onto Twitter. For an indie author an online presence of some
description is even more essential.
The good news is that nowadays you don’t need an elaborate or expensive website with flashing
graphics. In fact I would advise strongly against a static, classic web page that is difficult to maintain
and update. What you need is a simple dynamic site where you can talk about your special subject and
hopefully create some interest about your writing. Fortunately there are lots of free, very easy to use
blogging platforms that make the process a whole lot less painful than it used to be.
These are the big three:
•
www.wordpress.com
•
www.blogger.com
•
www.tumblr.com
The secret to successful blogging is to have frequently updated, quality content. It is hard work and it
takes some time to pay off but it is also good writing practice. Preparation helps a lot so focus on your
special subject and brainstorm out a list of topics for future blog posts. If there is something in the news
that links to your special subject seize the moment and blog about it. Make sure each post you create is
well tagged so that people can find it easily. And keep everything as fresh and interesting as possible –
post videos, pictures and make podcasts just to keep everything lively. Have a blog roll of other blogs
that connect to your special subject and engage and comment on those blogs. You will find this drives
people back to your blog if your comments are relevant and not overly self-promotional. Make sure
you have clear links to your books on the site so that if you have written a good piece, people can find
out more about you and your writing easily – but again the key is to make the blog more about the
content than the promotion. You can also create an author’s page on Facebook and invite your friends
to become fans. There it is all about engagement with users.
Now you have a blog. Where do you find readers?
One place to look is on the book-lover forums – for example Kindle Boards, Amazon reader forums.
Again the message here is do not over-promote – become part of the community. Share your own
enthusiasm and participate in the conversations that are taking place. People are very turned off by
relentless self-promotion. It pays to be discreet.
And then we have Twitter. Twitter gets a lot of flak. Its very name seems to suggest triviality but in fact
it is a very useful tool in building an online presence. It is easy to find like-minded people supplying
you with support and lots of information, especially about indie publishing and marketing. It is also a
great book promotion tool if used correctly. Once again the advice is: be subtle. Do not go on and on
about your book. Try to be interesting and supply interesting information related to your special
subject. Find the people who are interested in your special subject and follow them.
There is still a role for traditional media in marketing your book, be it a local newspaper or a special
interest magazine. They are looking for stories, but once again be creative. Find a hook and an angle
that is fresh. Create a story from your special subject rather than pitching a piece about an indiepublished novel.
261
CHAPTER 27: MARKETING YOUR BOOK
Another area worth exploring is, can you do an event? Is there a tie-in with a local event that you can
devise and pitch to the organisers? Would local societies be interested in hearing about your special
subject? They may become willing readers if you give a good performance.
This is barely scratching the surface of what you can do. Often these things don’t cost money but they
do cost time and imagination. Think laterally and be creative. Allow time to do the job properly and
don’t be discouraged if it takes time. Overnight best sellers are black swans – exceptional events. But
there is a lot you can do to help your beloved book along the way.
Further tips
Since ebooks don’t always have a page count that will be displayed alongside your book description,
you might like to include one in your description so that people know they will be getting value for
money. Use the book word count in the Document Properties dialog and divide by a reasonable wordper-page figure, say 600.
To avoid separating your book from the description(s) you write, you can store your book
description, and perhaps a publicity plan, in a text document under the ‘Scraps’ folder in your project.
This information won’t be included in your book.
You should consider getting an ISBN number for your book – this is necessary if you want to get on
the premium Smashwords catalogue, for example. You can buy a block of ISBNs yourself or obtain
some from Smashwords or other book distribution site.
Consider getting a small number of your books printed using low-cost print on demand and perhaps
a service that will undertake cover design as well as organising printing. You can then use it as a sales
tool, sending them to journalists and bloggers, selling them at events, and even donating them to your
libraries to raise your profile.
Consider promotional give-aways. Giving your book away can be a very effective tool for getting
publicity and reviews. On Amazon, you can give your book away for a few days, so long as your book
isn’t for sale via a different retailer. Often a free book will rise to the top of the free book charts for a
particular genre, giving it visibility that it may never have had before.
Make a little money from promoting Jutoh! You can sign up as an affiliate at www.bluesnap.com,
and take a percentage for every copy of Jutoh that is sold as a result of visiting your site.
Essential reading
Marketing Your Book: An Author’s Guide, by Alison Baverstock
The Smashwords Book Marketing Guide, by Mark Coker
This book, Chapter 26: Understanding Ebook Formats and Platforms
Summary
We’ve covered some common-sense approaches to publicising yourself and your books. If you have
further ideas, do write in and tell us so we can include them in a future edition of this book.
262
CHAPTER 27: MARKETING YOUR BOOK
We’ve also come to the end of the book – I hope you enjoyed it; if so, do pass the book around to your
friends and colleagues. If you don’t already have a copy of Jutoh, why not visit www.jutoh.com and
give the demo a whirl. We support Windows, Mac and Linux, and one purchase is good for all
platforms so you don’t have to worry about migrating to another operating system later. We’re also
quick to respond to technical support requests, and even if you haven’t yet bought a copy of Jutoh,
we’re happy to discuss your needs.
We wish you the best of luck in the exciting world of ebook publishing!
263
Glossary
Ad hoc styling
This is the application of a combination of individual attributes such as bold, centering and so on,
to an existing span of text or paragraph without defining those attributes as part of a named style.
The result of using ad hoc styling is the creation of automatic styles (uniquely-named styles) and,
when used widely, problems in maintaining consistency or applying certain Jutoh features such as
table of content creation that search for specific named styles. Minimize ad hoc styling by editing
and applying existing named styles, and creating new ones. Ad hoc styling can also be referred to
as ‘local’ or ‘direct’ styling.
Application
You can ‘appy’ styles to paragraphs, and text spans, and lists. This means giving your content
some formatting attributes, such as centering or bold. It is best to apply named styles from the
style sheet.
Asset
An ‘asset’ in Jutoh terminology is a fragment of HTML used either as a template to help Jutoh
write a book section HTML file, or as some other part that is inserted into the template. Assets are
associated both with individual documents, and with the project as a whole. A document’s assets
can be edited using Format | Asset Editor, and the project assets via the Assets page in the
Project Properties dialog. Most users will not need to edit assets. See the Jutoh Plus guide for more
details.
Automatic style
An automatic style is a named character or paragraph style that Jutoh imports or generates when
ad hoc styling is applied to a span of text or a paragraph. An automatic style contains one or more
‘+’ symbols. These styles are not usually shown in the style sheet because they are quietly
maintained with each document in the project. You should minimize your use of automatic styles
because it makes maintaining document consistency harder.
Character style
Named character styles are applied to spans of text within a paragraph. For example, the “URL”
style is defined by default, and applies blue and underlining to text. You can view and edit
character styles using Project Properties | Edit and clicking on Styles. Then click on Character
styles in the drop-down box under the list of styles.
264
GLOSSARY
You can apply character styles by right-clicking on selected text, then choosing Styles | Character
Styles in the context (popup) menu. You can also use keyboard shortcuts and the Favourites menu
– see Customising the user interface.
Compiling
The process of creating (generating, building) an ebook from a Jutoh project.
Configuration
A configuration, in Jutoh terminology, is a group of properties that together determine how an
ebook will be generated, including file format, maximum image size, style sheet to use, cover
design to use, and so on. Initially, Jutoh has one configuration per format; however, you can create
as many configurations as you wish. For example, you might have a general “Epub” configuration,
and also an “iBooks Epub” configuration which contains iBooks-specific copyright information
and cover design.
Context menu
A menu that is shown by right-clicking over a window (Windows and Linux) or control-clicking
(on the Mac). A context menu can also be shown by pressing the context key if available on your
keyboard. Notable context menus are those associated with the project outline, the content editor,
and the formatting palette.
Dialog
A dialog is a window that appears after invoking a particular command; for example, the Project
Properties dialog, or the Preferences dialog. Most, but not all, dialogs have to be dismissed before
you can work with your project.
Document
A Jutoh project is comprised of documents; mostly you will be working with ‘book section
documents’, perhaps one per chapter, one for the title page, another for acknowledgements, and so
on. There are other kinds of document, such as the embedded font document, text document,
image document, URL document and more, but most users will only create book section
documents. If you have imported an existing file, Jutoh may have created all the documents you
need. Otherwise, you can add more with the Documents toolbar button or commands on the
Document menu. All documents in a project are stored in the same Jutoh project file.
Epub file
This is the industry-standard, open file format for ‘flowable’ ebooks; it uses XHTML for the
content. EPUB is defined in detail at idpf.org. Version 2 of the standard is currently the most used,
but version 3 is gradually being implemented. Jutoh can generate Epub 2, and some features of
Epub 3. All ebook readers apart from Amazon’s Kindle can read Epub 2 files. Epub readers
usually have quirks of their own, and so some optimization of Epub can be required for each
platform.
Favourite
There are two kinds of favourite in Jutoh – the dominant meaning used in the documentation is
265
GLOSSARY
favourite style, command or symbol, that can appear on the Favourites
toolbar button or in the
Favourites tab of the Formatting Palette. These are defined using the command View | Customize
Shortcuts. The other, less used, meaning is a favourite project file as listed on the Favourites tab
on the Organizer palette. When you open a project, it is added to these favourites for quick access
later.
Keyboard shortcut
A key combination for applying a command or style, or inserting a symbol. There are two kinds of
shortcut in Jutoh – primary shortcut (such as Ctrl+B) and secondary shortcut (such as Ctrl+.
Ctrl+T). A secondary shortcut allows a greater number of shortcuts to be defined by using the
Ctrl+. prefix.
Fixed layout ebook
A fixed layout ebook has a set number of pages and each page has a layout that cannot be altered
by adjusting font size or other variables, in contrast with a reflowable ebook. A fixed layout book
will be scaled to fit the display, and there may be flexibility about whether double-page spreads or
single pages are displayed depending on device orientation. This style suits certain kinds of book
such as children’s picture books, photography books, and comics. The main variants of fixed
layout file format are Epub 3, Kindle KF8, and iBooks. Jutoh supports the creation of fixed layout
books.
Metadata
The description of the book, such as title, author, publication date, and so on. Metadata is edited in
the first tab of the Project Properties dialog.
Mobipocket file
This is the native file format for Amazon’s Kindle books, and uses the MOBI or PRC file
extension. Mobipocket files are created either using Mobipocket Creator, or (in Jutoh’s case) using
Amazon’s ‘kindlegen’ application, which takes a subset of the Epub format as input. The
Mobipocket KF7 file format is not as capable as Epub, but Kindle is the single most popular ebook
platform by some margin. The KF8 format supercedes the less capable KF7 format and is
equivalent to Epub 2 in most respects.
ODT file
Short for OpenDocument Text file, this is the native format of OpenOffice.org which is a free
download and can be used as a converter between Jutoh and other popular word processor file
formats. Recent versions of Microsoft Word can also open ODT files. Jutoh’s recommended file
import format is ODT, and Jutoh supports ODT book export.
Paragraph style
Named paragraph styles are applied to whole paragraphs, and are important in enforcing
consistency throughout a project. For example, the Normal style is defined by default. You can
view and edit paragraph styles using Book | Project Properties or Edit on the toolbar and
clicking on Styles. You can apply paragraph styles using the drop-down list in the formatting
toolbar, or by right-clicking on selected text, then choosing Styles styles in the context (popup)
266
GLOSSARY
menu.
Reflowable ebook
A reflowable ebook does not have a fixed number of pages since pagination is dependent on
display size and user customisations, such as font size and device orientation. Jutoh can create
both reflowable and fixed layout ebooks.
Style sheet
Usually used to describe the Jutoh style sheet, a collection of paragraph, character and list style
definitions. A Jutoh project can have multiple style sheets. Jutoh style sheets are only indirectly
related to CSS sheets, and you cannot import from a CSS sheet. However you can export Jutoh
style sheets for import into other projects.
267
Appendix A: Installing Jutoh
This appendix describes how to install Jutoh and associated third-party software on the main supported
platforms. For further configuration, including for text-to-speech, please see Appendix B: Configuring
Jutoh.
Note that you can check for updates and install new versions using Check for Updates on the Help
menu.
Installing on Windows
Jutoh
Download the setup file from www.jutoh.com/download.htm, and run the installation program. This
will create a program group called Anthemion Jutoh x.y (or other name if you have chosen a different
name). This folder can be accessed via the Start menu under Programs. The folder contains shortcuts
to the program, ReadMe, and Uninstall program.
You can uninstall Jutoh either by double-clicking the Uninstall Jutoh icon in the Jutoh group, or by
invoking the Windows Control Panel, double-clicking on Add/Remove Programs, and then choosing
the Anthemion Jutoh item.
There is also a PortableApps version which you can download instead of using the setup file. The
PortableApps installer uses a version of Jutoh that is not tied to the registry and so can be easily run off
an external drive. (Jutoh also has its own way of running from external drives so if you have installed
the regular version of Jutoh, you can use the Mobile Preferences dialog invoked via View | Mobile
Preferences to install Jutoh onto an external drive.)
Kindlegen
You will need to download and install Amazon’s Kindlegen if you wish to create Mobipocket (Kindle)
files.
In the Jutoh Preferences dialog under Helpers, or in the Setup Wizard, click on Help Me Install
Kindlegen. Then, as per the instructions for Windows above, click on Download and Install to get
Jutoh to perform the whole process automatically.
268
APPENDIX A: INSTALLING JUTOH
Kindlegen Installation dialog
If Download and Install doesn’t work for any reason, download the zip file manually, click Browse to
set the location of the zip file, and click Install. If you wish to install Kindlegen manually instead,
perform the following installation steps.
Download the zip file from www.amazon.com/kindlepublishing and unarchive it into a suitable folder,
such as c:\Kindlegen. Then set the path of the kindlegen program in the Helpers page of the
Preferences dialog. An example path might be c:\Kindlegen\kindlegen.exe.
If Kindlegen isn’t working within Jutoh, first check that the path in the Helpers dialog refers to a file
that exists. If that’s not the problem, perhaps Java isn’t installed. Go to www.java.com and download
and install Java.
Installing on Mac OS X
Jutoh
Download the Mac version of Jutoh from from www.jutoh.com/download.htm, and open the Jutohx.y.img file. The disk image will be mounted automatically, and you can then copy the Jutoh folder to
a suitable place on your hard disk such as the Applications folder. You can drag the Jutoh icon to the
dock for quick access.
You can uninstall Jutoh by simply dragging its folder to the trash can.
269
APPENDIX A: INSTALLING JUTOH
The first time you run Jutoh, you may need to control-click and select Open, to stop Mac OS X trying
to protect you from an unknown program. For details, please see www.jutoh.com/macinstall.htm.
Kindlegen
You will need to download and install Amazon’s Kindlegen if you wish to create Mobipocket (Kindle)
files.
In the Jutoh Preferences dialog under Helpers, or in the Setup Wizard, click on Help Me Install
Kindlegen. Then, as per the instructions for Windows above, click on Download and Install to get
Jutoh to perform the whole process automatically.
To install Kindlegen manually, download it from www.amazon.com/kindlepublishing; at the time of
writing it is bundled as a zip file, which you can unarchive to any suitable folder such as
/Applications/Kindlegen. Then set the path of the kindlegen program in Jutoh’s Preferences
dialog, under Helpers. For example, the path might be /Applications/Kindlegen/kindlegen.
If Kindlegen isn’t working within Jutoh, first check that the path in the Helpers dialog refers to a file
that exists. If that’s not the problem, perhaps Java isn’t installed. You can check this by opening a
terminal window and typing java. If there’s an error message that indicates that the command is not
found, go to www.java.com and download and install Java.
Installing on Linux
Jutoh
Download a suitable file from from www.jutoh.com/download.htm. There are versions for several
methods of installation (tarball, Debian package and RPM), and also 32-bit and 64-bit variants.
If you are using a Debian or Ubuntu-derived version of Linux, you can use the .deb archive. If you are
using Fedora, Mandriva, SuSE Linux, PCLinuxOS, you can use the .rpm archive.
To install the generic tarball version, unarchive Jutoh-x.y-i386.tar.gz to a temporary location, such
as /tmp. Then run the script installjutoh and follow the instructions. This will copy the application
files and launch script jutoh2 to locations of your choice. If you want to install it system-wide, log in
as root first or use sudo. So you would type something like:
cd /tmp
tar xvfz ~/Downloads/Jutoh-2.10-i386.tar.gz
sudo ./installjutoh
To install the .deb version, use a command like this:
sudo dpkg -i jutoh_2.10-i386.deb
To install the .rpm version, use a command like this:
sudo rpm -i jutoh-2.10_i386.rpm
Now you should be able to run Jutoh with an icon installed in the desktop environment’s menu, or by
running jutoh2 from a terminal.
270
APPENDIX A: INSTALLING JUTOH
You can uninstall Jutoh by running uninstalljutohx.yz if you used the tarball installation, or dpkg
-r jutoh2 for the Debian installation, or rpm -e jutoh2 for the RPM installation.
If you need to invoke Jutoh directly (without using the launcher script), either launch them from the
appropriate application directory or set the environment variable JUTOHDIR to the respective
application directory.
On rare occasions, Jutoh may crash on startup if there is a conflict with the current KDE or Gnome
desktop theme. Changing the theme should make the problem go away.
Kindlegen
You will need to download and install Amazon’s Kindlegen if you wish to create Mobipocket (Kindle)
files.
In the Jutoh Preferences dialog under Helpers, or in the Setup Wizard, click on Help Me Install
Kindlegen. Then, as per the instructions for Windows above, click on Download and Install to get
Jutoh to perform the whole process automatically.
To install Kindlegen manually, download it from www.amazon.com/kindlepublishing; at the time of
writing it is bundled as a gzipped tar file, which you can unarchive to any suitable folder such as
~/Kindlegen. For example:
mkdir ~/Kindlegen
cd ~/Kindlegen
tar xvfz ~/Downloads/kindlegen_linux_2.6_i386_v1.2.tar.gz
Then set the path of the kindlegen program in Jutoh’s Preferences dialog, under Helpers. For example,
the path might be /home/fredbloggs/Kindlegen/kindlegen.
If Kindlegen isn’t working within Jutoh, first check that the path in the Helpers dialog refers to a file
that exists. If that’s not the problem, perhaps Java isn’t installed. You can check this by opening a
terminal window and typing java. If there’s an error message that indicates that the command is not
found, go to www.java.com and download and install Java.
How to use Jutoh with an external drive
Overview
Jutoh helps you access your data on a mobile drive such as a USB flash memory drive. You can also
run Jutoh from a mobile drive, so that all Jutoh settings are stored on the drive and not on the computer.
This is convenient if you will be writing on multiple machines – perhaps home and work – and you
don’t want to install Jutoh permanently on any one machine.
Note: mobile drives are easily lost and they can fail, so please remember to back up your files regularly
to another disk.
These are the different combinations that are possible:
1. Not mobile: running Jutoh from your computer as normal, storing files on your hard drive.
Application settings, such as templates, icons, window sizes, and registration information, are
271
APPENDIX A: INSTALLING JUTOH
also stored on your computer.
2. Data mobile: running Jutoh from your computer as normal, but storing your project files on a
mobile drive. Application settings are stored on your computer.
3. Settings mobile: running Jutoh from your computer, but storing Jutoh’s settings on a mobile
drive.
4. Fully mobile: running Jutoh from the mobile drive, and storing your files and applications
settings on the mobile drive.
In scenarios (2), (3) and (4), you can use your data on different computers and different types of
computer. You can be working on a Mac one day, a Linux machine the next, and Windows the day
after that. (Of course, you can still do this with (1) but it will be more awkward to copy files between
machines.)
With scenario (4) – ‘fully mobile’ – you can store the Jutoh application and its data files on the mobile
drive, as well as your own projects. Jutoh can install itself onto the mobile drive, for Windows, Linux
and Mac operation, and no components of Jutoh will need to be stored on the computer’s hard drive.
In the next section, we’ll see how to use a mobile drive for storing just your data.
Using a mobile drive for data
Jutoh can use the current mobile drive when loading project files.
To have Jutoh prompt you for a drive name when starting, go to the Mobile Preferences dialog, select
or type a mobile drive name, and check Store your data on the external drive. If you want the drive
name to be stored between sessions, check Remember between sessions, but it is recommended that
you don’t check this in case the drive letter or name changes (especially when using different
computers).
Jutoh stores documents in the Documents folder on the mobile drive, by default.
You may be wondering how Jutoh opens recently edited files, if the drive name and even the operating
system changes between Jutoh sessions. Jutoh does this by saving the last known external drive when it
quits, so when it runs again, it can convert the old file names to new ones if it turns out that they were
relative to the external drive.
Using a mobile drive for settings
If you use the mobile drive for storing settings, you can keep important information mobile such as
your registration key, auto-replace customisation, cover design templates, and other data that Jutoh
makes use of. This is independent of your own project files.
Go to the Mobile Preferences dialog, and in the Portable Settings section, check Store all settings on
an external drive. You will be asked to restart the program. When Jutoh runs again, you will be
prompted for a drive, and any new settings will be stored on that drive. Your registration information
will be copied to the drive, but no other settings will be copied. The new settings will be stored in
folder Application Data/Jutoh on the external drive. If you wish to copy previous setings, see Jutoh
files for where to find the old settings.
272
APPENDIX A: INSTALLING JUTOH
Running Jutoh from a mobile drive
The most portable method of using Jutoh is to install the software on the mobile drive. If you do this,
all settings will also be stored on the drive, as described in the previous section.
To install Jutoh to a mobile drive, go to the Mobile Preferences dialog and click Install Jutoh on
External Drive. You will be presented with the Mobile Installation Wizard which will take you
through the necessary steps. You can install Jutoh from the web, from the version you’re currently
running, or from zip files you downloaded earlier.
You can install Jutoh for different operating systems, and they will all share the same application data
files. The Windows version of the software is installed to Applications/Jutoh/Windows/Jutoh
x.yz, and other platforms are installed to similar paths but with an appropriate platform name in place
of Windows.
Launching Jutoh on Windows
If you installed the Windows version from a Windows computer, a shortcut will appear on the mobile
drive top-level folder. You can double-click that from Explorer to get started.
Launching Jutoh on Linux
The Linux version has a launcher script called jutoh-linux which uses a relative path to the actual
binary, so when using it your current directory should be the drive itself.
You may find that you don’t have execute permission on the external drive, particularly if the drive is
formatted with a Windows file system such as FAT32. In this case, you need to mount the drive with
different options, and you can do that by editing the file /etc/fstab as root. You should add a line that
tells the system to use special options. Here’s an example:
/dev/sdb1 /media/usbdisk vfat
rw,shortname=mixed,uid=1000,gid=1000,user,auto,exec 0 0
To find out the device name and mount point (the first two entries in this file), insert your drive and
when automounted, type mount in a terminal window. You should see an entry for the external drive.
The exec option causes all files on the drive to be seen as executable, and auto causes the drive to be
mounted automatically when the device is inserted.
Launching Jutoh on Mac
On Mac, there is no alias, so you need to navigate to the Applications/Jutoh/Mac/Jutoh x.yz
folder and launch it from there.
273
Appendix B: Configuring Jutoh
There are many ways to configure Jutoh to suit your use of it, whether it’s telling Jutoh how to launch
helper applications, or changing behaviour such as automatically checking Epub files after creation.
We’ll describe the most important configuration options here, and you can find more by exploring the
pages of the Preferences dialog.
Viewer applications
A ‘viewer application’ is simply third-party software that can display an ebook file that Jutoh creates.
Examples include Adobe Digital Editions, Kindle for PC, and Kindle Previewer. If an application
knows how to open a file that’s passed to it, then Jutoh can run the application passing it the ebook file
name, and the file will be shown in the helper application. You can set Jutoh up to know about as many
viewer applications per file type (such as Epub) as you like. If you do this, Jutoh will show you a menu
of available applications when you click on Launch after compiling an ebook. You can configure the
applications using the Helpers page in the Preferences dialog, shown below:
274
APPENDIX B: CONFIGURING JUTOH
Configuring commands for Epub
Here, we selected Epub files (epub) and clicked on Configure. To add a new application, click on Add
and enter the application name and full command path. The Default application is always present and
means, run the application currently associated with this file type by the operating system. If only one
application is defined for a file type, then a menu will not be shown when launching the application for
that file type.
The following screenshot illustrates what happens when a Mobipocket helper for Kindle Previewer has
been defined for Kindle Previewer, and the user clicks on Launch. The default viewer is Kindle for
PC, so the user has a choice between running Kindle for PC or Kindle Previewer for the current
Mobipocket configuration.
275
APPENDIX B: CONFIGURING JUTOH
Clicking Launch with several viewer applications defined
Note that this mechanism relies on applications accepting file names on the command line; most do,
but a few don’t, such as the Nook viewer, and in these cases you will need to use the application’s user
interface to view the book. (You’ll be glad to know that we persuaded Amazon to add command-line
file name handling to Kindle Previewer – if only on Windows!)
Conversion and checking applications
Jutoh uses a number of third-party applications to help it create and check books. The two Epub
checker commands are already configured, but if you wish to create Mobipocket files, you will need to
configure Kindlegen. These commands are specified in the Helpers page of the Preferences dialog.
276
APPENDIX B: CONFIGURING JUTOH
Configuring Jutoh helper applications
When configuring the Java checker applications, you can use $APPDIR$ to denote the folder in which
the Jutoh application is found. You need to specify a full Java command, such as:
java -jar "$APPDIR$\epubcheck-1.1\epubcheck-1.1.jar"
For the Kindlegen compiler, specify the full path of the Kindlegen executable on Windows and Mac,
and just kindlegen on Linux. If you’re not sure how to install or configure Kindlegen, you can click
on Help Me Install Kindlegen in the Preferences dialog under Helpers, or in the Setup Wizard. The
Kindlegen Installation dialog will help you either download and install Kindlegen, or install Kindlegen
from a manually downloaded Kindlegen archive. On Windows, the Setup Wizard will also help you
download, install and configure Kindle Previewer for Jutoh – which is much easier than doing it by
hand!
Text-to-speech configuration
If you wish to generate speech files using Jutoh, or have Jutoh read the current document, you can
277
APPENDIX B: CONFIGURING JUTOH
select a text-to-speech engine in the Speech page of the Preferences dialog. Normally you choose
Microsoft SAPI on Windows and the Apple Speech Manager on Mac, but you can also choose the
CereVoice or Cepstral engines if you have appropriate voices installed, and eSpeak is another option.
On Linux, only CereVoice, Cepstral and eSpeak are available. In the Speech page, you can choose and
test the voice to use.
CereVoice
CereVoice is a high-quality TTS system from CereProc in Edinburgh, coincidentally also Jutoh’s home
city. On Windows and Mac, you can use SAPI or the Apple Speech Manager to access CereVoice. On
Linux (and on Windows and Mac as an optional alternative), you will need to download the CereVoice
command-line program for Jutoh to use. Download one of the CereVoice archives on the Jutoh
download page, and unpack it to a convenient location on your hard drive. Now go to the Jutoh
Preferences dialog, click Speech, and choose the CereVoice speech engine. Click Properties, and
specify the location of the cerevoice executable on your system.
When using the external CereVoice program, Jutoh should automatically find any installed SAPI or
Apple Speech Manager voices when you click the Properties button. Or, you can manually add voices
and their licences from the CereVoice properties dialog. To use CereVoice on Linux, you will need to
have access to a Windows or Mac box to purchase and install the voices and then copy them to your
Linux box. On Windows, you might find CereVoice files in a location such as C:\Program Files
(x86)\CereProc\CereVoice
Heather
3.2.0.
On
Mac,
they
may
be
in
/Library/Speech/Voices/CereVoice xyz/Contents/Resources/voice.
If you need a version of Jutoh with CereVoice SDK integration as an alternative to the SAPI/Apple
Speech Manager/command-line CereVoice methods, please get in touch.
Cepstral
You can use Cepstral voices through SAPI or Apple Speech Manager, or you can download the
installer for the external program to use with Jutoh. The program comes with a demo voice which will
need to be unlocked by purchasing a licence. After installation, go to Jutoh’s Speech Preferences, select
Cepstral, and click Properties. Then specify the path of the swift program in the Cepstral installation
folder.
eSpeak
eSpeak is a fairly rudimentary text-to-speech system, but it’s free so it’s useful if you don’t have an
alternative. On Windows, if you wish to encode MP3 files with eSpeak instead of using the built-in
SAPI voices, you can download the installer from espeak.sourceforge.net/download.html and run it.
Then configure Jutoh for using eSpeak in the Speech tab of the Jutoh Preferences dialog. Select the
eSpeak engine, and click Properties. You will need to specify the full path of the espeak.exe
executable.
On Mac, to use eSpeak instead of using the built-in Apple Speech Manager voices, you can download
the zip file from espeak.sourceforge.net/download.html. Once you’ve unzipped the files, you need to
copy the espeak-data files to either your home directory, or to /usr/share. So assuming you
downloaded the zip file to, say, /tmp, you might then do this in a terminal window:
278
APPENDIX B: CONFIGURING JUTOH
cd /tmp
unzip espeak-1.37.zip
cp -r espeak-1.37 /Applications/espeak-1.37
cp -r espeak-1.37/espeak-data ~/espeak-data
# Clean up
rm -f -r espeak-1.37
rm espeak-1.37.zip
Now you can configure Jutoh in Speech Preferences to use the binary file /Applications/espeak1.37/speak.
If you wish to use eSpeak on Linux, you can download a zip file from
espeak.sourceforge.net/download.html and unzip it as above. Then configure Jutoh for using eSpeak in
the Speech tab of the Jutoh Preferences dialog.
LAME MP3 Encoder
If you wish to encode MP3 files, you will also need the LAME MP3 encoder.
On Windows, download it from lame.sourceforge.net/links.php#Binaries and set the full path of the
LAME executable (lame.exe) in the MP3 tab of the Jutoh Preferences dialog.
On Mac, you can get a package file containing LAME for Mac from the Thalictrum web site, at
www.thalictrum.com/index.php?pageid=2.
Run the .pkg file that appears on the desktop. The lame command will now be available, and you need
to set /usr/local/bin/lame as the executable in the Jutoh MP3 Preferences page.
On Linux, you can get and install LAME using your favourite package management software. For
example:
sudo apt-get install lame
Or, you can get a binary or the source code from lame.sourceforge.net.
After installing, the lame command will now be available, and you just need to set lame (no full path
required) as the executable in the Jutoh MP3 Preferences page.
Customising shortcuts and favourites
Shortcuts and favourites give you quick ways to to execute commands, apply styles and insert symbols.
This can save you from a lot of tedious mousing and clicking, especially when tidying up formatting in
a long document.
Shortcuts
Jutoh allows you to customise the keyboard shortcuts used for:
1. applying commands that you can find in the menubar;
2. applying named paragraph and character styles to the current paragraph or selection; and
3. inserting symbols or text into the active editor.
279
APPENDIX B: CONFIGURING JUTOH
Jutoh defines two kinds of shorcut: primary and secondary.
A primary shortcut is a shortcut that you type directly, such as Ctrl+O to open a project file.
Because primary shortcuts are in short supply, you can also define secondary shortcuts that are
prefixed with a primary shortcut. Jutoh defines Ctrl+Period to be the prefix for secondary shortcuts.
So, for example, if you defined the secondary style shortcut Ctrl+1 for “Heading 1”, you would type
Ctrl+Period Ctrl+1 to apply that style.
When you type the prefix shortcut, Jutoh shows a little window called the Secondary Shortcut Window.
The Secondary Shortcut Window
Now you can type a secondary shortcut and the window will disappear after the command is executed;
or you can click on Edit Shortcuts to customise shortcuts. This will show the Shortcut Customisation
dialog, from which you can view existing shortcuts, edit individual ones, or reset all shortcuts to their
default values.
280
APPENDIX B: CONFIGURING JUTOH
The Shortcut Customisation dialog
When you edit shortcuts, you’ll see all the named paragraph and character styles for the currentlyselected project (excluding automatic styles). If you make changes to the shortcuts for these styles, they
will be saved with the project. In contrast, command and symbol shortcuts are global.
All available commands and styles (whether they have associated shortcuts or not) appear in the
shortcut customisation dialog, so you don’t need to add these. However you need to add any symbol
shortcuts that you need with the Add button. By default, there are no symbol shortcuts defined.
When you click on Add or Edit, the Edit Shortcut dialog is shown, as pictured below:
281
APPENDIX B: CONFIGURING JUTOH
The Shortcut Editor dialog
You can specify the primary and/or secondary shortcut key combinations, and whether the shortcut
should appear on the Favourites menu (see below). If the shortcut is a symbol shortcut, for inserting
one or more text characters, you can also type the text in the Symbol field, or select it from a grid of
Unicode symbols by clicking Insert Symbol.
Global shortcuts are saved to the file shortcuts.dat in the application settings folder (see Jutoh Files for
details), so another way of resetting command shortcuts is to delete this file before running Jutoh.
Favourites
Another way to save time is to enable the Favourites button on the editor toolbar (right-click on the
toolbar and select Customise, or use the View | Customise Toolbars command and select the Text
Section toolbar).
Now click on the Favourites
button; you will be asked if you want to edit the favourites. If you
answer Yes, you will be shown the shortcut editor. Select a command, style or symbol that you want to
be on your list of favourites, and check the Favourite control. Press OK to dismiss all dialogs and click
on Favourites . You will now be shown a menu containing the commands, styles and symbols you
chose, as follows:
282
APPENDIX B: CONFIGURING JUTOH
The Favourites menu
In this example, you can see that we have a command (Batch Compile), a character style (Code Span),
several paragraph styles, and a symbol shortcut (Em Dash). Any primary shortcuts are displayed next
to the item names.
You can also view and use favourite shortcuts in the Favourites tab of the Formatting Palette:
283
APPENDIX B: CONFIGURING JUTOH
The Favourites tab in the Formatting Palette
Customising toolbars
Most of the toolbars in Jutoh can be customised; that is, tools can be switched on or off, and in the case
of the main toolbar, the text labels can be switched on or off. You can use View | Customise Toolbars
to view the Customise Toolbar dialog:
284
APPENDIX B: CONFIGURING JUTOH
The Customise Toolbars dialog
Select the toolbar to customise using the drop-down Toolbar control. Then click on the checkbox next
to each tool name to enable or disable that tool. You can’t change the ordering of tools; separators will
be removed automatically if a whole group of tools is disabled.
Another way of showing the Customise Toolbars dialog is to right-click on a toolbar and select
Customise from the context menu. It will select the appropriate toolbar.
Customising auto-replace
Auto-replace allows you to type text and have it replaced by a different symbol or sequence of
symbols. To edit auto-replace items, use the View | Auto-Replace Preferences command. The AutoReplace Preferences dialog has two tabs: one called Replace with general textual replacement options,
and one called Custom Quotes.
285
APPENDIX B: CONFIGURING JUTOH
The Auto-Replace Preferences dialog
To add an auto-replace item, click Add and enter the Replace and With text. Click on the “...” button
to use a symbol selection dialog that shows all the possible Unicode characters.
Auto-replace works when you have entered the target text and then a space (or punctuation followed by
a space). Jutoh will search back and see whether the text matches any in its list, and if so, replaces it
with the appropriate text. For example, typing (c) will insert the symbol ©.
Replacing quotation marks is a special case and has its own tab:
286
APPENDIX B: CONFIGURING JUTOH
The Custom Quotes tab
This dialog specifies how single quotation marks and double quotation marks are replaced when you
type the standard quotation marks with the keyboard. Jutoh recognises whether the mark is at the start
or end of the text. Click on the buttons to select the symbol that will be used in each case, using the
symbol selection dialog. You can use the Reset buttons to revert the values to their original settings.
Appearance options
You can adjust various settings relating to Jutoh’s appearance using the Appearance page in the
Preferences dialog:
287
APPENDIX B: CONFIGURING JUTOH
The Appearance Preferences page
Here, you can:
•
set the maximum width of the editing window;
•
set the colour of the editor surrounding background;
•
set the text size for the editing (this will not affect the generated ebook text size);
•
set the text editor text and background colours;
•
set the margins around the text editor (to give you more ‘breathing space’);
•
opt to centre the text cursor vertically as you move around the text.
These settings are global, so they apply to all styled text editors in Jutoh, in all projects on this
machine.
288
APPENDIX B: CONFIGURING JUTOH
Desktop options
The Jutoh desktop (accessed via the Desktop tab near the bottom of the Jutoh window) is a handy place
to store third-party tool shortcuts, links to documents, and ‘sticky’ notes. You might not use it all, but if
you do, you can tailor various aspects about it from the Desktop page in the Preferences dialog:
The Desktop Preferences page
You can change the desktop background, the logo displayed on it, the font and colour used for ‘sticky’
notes, and various other settings. You can also change the settings back to the original defaults.
There is a Tool tab in this page that lets you add and remove tools that will be placed on the desktop
(and also on the Tools menu on the Jutoh menubar). For more details, click on the Help button on the
Preferences dialog..
Project options
You can change behaviour relating to project handling (not per-project settings: that’s the job of the
289
APPENDIX B: CONFIGURING JUTOH
Project Properties dialog) using the Projects tab in the Preferences dialog.
The Projects Preferences page
If you want to allow Jutoh to have several projects open simultaneously, rather than close the previous
project when opening another, check View multiple projects.
If you want Jutoh to create a backup before editing a project, check Create backup file when project
is opened.
You can also change auto-save frequency, and whether to auto-paste information into a new document
when copying twice in quick succession in another application (Windows-only).
Using Edit Document Preferences, you can change the auto-saving and tab creation behaviour of
classes of document. For example, you can specify that book section documents should reuse a single
tab instead of spawning a new tab for each document. It’s fairly unlikely you’ll want to change these
settings.
The Project Maintenance button shows a dialog for cleaning up a project. In this dialog, you can:
290
APPENDIX B: CONFIGURING JUTOH
•
Delete troublesome documents without opening them.
•
Delete individual records in the project database, in particular ‘orphan’ documents that are no
longer in the project index (this occasionally happens when Jutoh is closed unexpectedly).
•
Compact a project that has been fragmented by much document creation and deletion.
It is recommended that you back up your project before doing project maintenance.
Miscellaneous options
The General page in the Preferences dialog has a variety of useful settings for changing the way Jutoh
behaves:
The General Preferences pages
Here, you can switch off the opening ‘splash screen’ and/or the startup tips, and elect whether to
automatically open the last project when starting Jutoh.
291
APPENDIX B: CONFIGURING JUTOH
There are further controls for showing tooltips, enabling the Jutoh Desktop, and whether to add projects
to the Favourites window automatically. The Verbosity control lets you choose how much text gets
written to the Log window, and Show log window automatically specifies whether to show the Log
window as soon as you start compiling a project – handy if you want to hide the Log window when
you’re editing.
An option you may well want to enable is Check Epub after compiling, so you can guarantee you’ve
always checked your Epubs with EpubCheck without having to remember to press Check.
You can specify the default document folder, and finally you can choose the user interface display
language – currently just English, but this will be expanded in future as people contribute translations.
292
Appendix C: The Jutoh Box Model
To understand the way margins, padding and borders work when showing a text box, table, table cell or
image, consider this simplified illustration of the box model used by Jutoh, as well as by CSS and to
some extent other formats.
The box model
At the centre, you have the content area containing the paragraphs in your box. Separating the content
and the border is padding, which gives breathing space around your content. The optional border is
itself surrounded by the margin, and outside the margin you may have an outline, which is a secondary
border drawn around the overall box. It’s very rare to use the outline, though, and only HTML-based
formats support it.
So, when considering the space taken up by a box, you need to include the content, margin, padding
and any border and outline.
The box model applies to cells within tables, and tables themselves. In the case of tables, the cells are
the table content, and so the padding represents the gap between the outer table border and the cells,
and the padding is also used for the inter-cell gaps.
When you specify width and height in Jutoh, the dimensions refer to the overall box size. In HTML,
they refer to the content part only, so when generating HTML, Jutoh calculates the content size by
subtracting other dimensions, if an explicit size has been provided.
When ebook software calculates the size of an object, the object maximum width and/or height will be
taken into account, if set. Similarly, the minimum width/and or height may be taken into account,
293
APPENDIX C: THE JUTOH BOX MODEL
although minimum size is not currently used for layout within the Jutoh editor. The ebook layout
algorithm may choose to ignore or adjust sizes where necessary, so you may see slightly different
results on different devices.
Note that Kindle KF8 currently ignores maximum size.
294
Appendix D: The Bibliographic Formatting Language
This topic describes the XML-based language that Jutoh uses to format bibliographic items.
Introduction
There are many standards for formatting bibliography and reference sections, and organisations and
publishers may dictate their own house style. In addition, bibliographic references have differing fields
according to the type of reference, and formatting must also cope with missing field values and other
quirks.
So, a built-in style or a simplistic template created by a point and click user interface cannot suffice.
Instead, bibliography formatting in Jutoh is specified using an XML-based language called Xi (XML
Interpreter). This simple language is totally dedicated to Jutoh bibliographic formatting and is
supported by a test facility in the formatting template dialog. It’s easy to export and import these
templates, so users who become queasy at the thought of editing XML can outsource the task (if
needed at all).
The commands in a formatting template are executed for every item in the bibliography. It can access
all the fields in the bibliography, as well as some other variables that may be needed such as the item
number (Number) and whether the bibliography is being formatted as a list (FormatAsList). The
template can also set variables, either to communicate with Jutoh or for its own convenience. The
template writes out fields and other necessary text using the write command, conditional on whether
fields are set, or on the values of variables.
An example template
Here’s an example of a formatting template, so you can get used to the overall feel:
<?xml version="1.0" encoding="UTF-8"?>
<xi version="1.0.0.0">
<!-- Use the new variable Id so we can change it easily -->
<set name="Id" value-of="Number"/>
<set name="PersonSeparator" value=" and "/>
<!-- A catch-all formatting clause -->
<write if-variable-neq="FormatAsList" value="1">
<variable name="Id"/>
<text value=". "/>
</write>
295
APPENDIX D: THE BIBLIOGRAPHIC FORMATTING LANGUAGE
<write if-variable-set="Title" attributes="emphasis">
<variable name="Title"/>
</write>
<write if-variable-set="Book">
<text value=", "/>
<variable name="Book"/>
</write>
<write if-variable-set="Author">
<text value=", "/>
<variable name="Author.surnamesfirst" attributes="strong"/>
</write>
<write if-variable-set="Corporate author">
<text value=", "/>
<variable name="Corporate author" attributes="strong"/>
</write>
<write if-variable-set="Year">
<text value=", "/>
<variable name="Year"/>
</write>
<write if-variable-set="City">
<text value=", "/>
<variable name="City"/>
</write>
<write if-variable-set="URL">
<text value=", "/>
<variable name="URL" url-name="URL"/>
</write>
<write>
<text value="."/>
</write>
<finish/>
</xi>
If written in English, the first few commands of this would be: set a new Id variable with the value of
the Number variable. Set the separator for writing names to “ and ”. If the bibliography is not being
formatted as a list, write the value of Id followed by a period and a space. If the Title variable is set,
write its value in an italic font. If the Book variable is set, write a comma and then the value. If the
Author variable is set, write a comma and then the names as “Surname1, Forenames1 and Surname2,
Forenames2”, in a bold font.
XML syntax is fairly simple: there are tags enclosed with angle brackets, such as write and set, which
must be terminated with another tag containing the same name preceded by a slash, or by selfterminating the same tag with a slash. If you miss out a tag terminator, you will get an error message.
Tags can be nested, where appropriate.
296
APPENDIX D: THE BIBLIOGRAPHIC FORMATTING LANGUAGE
Tags can have attributes, in the form name="value", and you can add comments between <!-- ... -->
tags. And that’s about it for the basic XML syntax. Jutoh’s formatting language is all couched in this
syntax.
Constructs
These are the constructs you can use in Xi.
if
You can use if to test for a condition and then execute alternate commands. You can add two or three
elements between the start and end if tags: cond (a condition), then (a sequence of commands), and
optionally else for an alternative sequence of commands if the test fails.
For example:
<if>
<cond>
<and>
<variable-eq name="FormatAsList" value="1"/>
<variable-eq name="Type" value="Article"/>
</and>
</cond>
<then>
<write><text value="An article in a list"/></write>
</then>
<else>
<write><text value="Not an article or not a list"/></write>
</else>
</if>
The condition here contains an and which takes two boolean expressions; you can also use or, not, eq,
neq, variable-eq, variable-neq, and variable. The latter takes a name attribute and returns a value that
you can use in a condition.
There are attributes in the write command that are more succinct equivalents to using if, but sometimes
if is needed when a whole block of commands is conditional.
finish
This command is used to terminate the template immediately and avoid further unnecessary tests. It is
not essential to use this.
set
This command sets a variable to a text value or the value of a different variable, for example:
<set name="Id" value-of="Number"/>
<set name="PersonSeparator" value=" and "/>
The first set command sets a new variable Id to the value of the Number variable, which contains the
position of the current item in the bibliography list.
297
APPENDIX D: THE BIBLIOGRAPHIC FORMATTING LANGUAGE
The second set command sets the value a variable which is used to tell Jutoh how to separate a list of
names, for example if there are multiple authors.
write
This command writes text or variable values to the bibliography. Two further tags can be nested within
write: text and variable. The text tag takes a value attribute with the text to write, and variable takes a
name attribute for the variable whose value should be written.
The write command can take the following attributes.
if-variable-set: if the value of the specified field is empty, the write command is not executed.
if-variable-eq: if the value of the specified field is the same as the value attribute, the write command is
executed.
if-variable-neq: if the value of the specified field is not the same as the value attribute, the write
command is executed.
attributes: a comma-separated list of attributes to give the content written by this command. The
attributes can be a combination of strong, emphasis, underline, caps, smallcaps, superscript, and
subscript. Jutoh will add a suitable style to the currently active style sheet.
style: the name of a character style to assign to the content written by this command. The style should
exist already.
Note that you can also use attributes and style with individual text and variable tags that you place
within the write command.
Using variables
The following variables are available:
•
All fields in the current bibliography item, with a first upper case letter and remaining lower
case letters.
•
Number: the position of the item in the bibliography.
•
FormatAsList: "1" if the project is formatting the items as a true list, and "0" otherwise.
•
PersonSeparator: the text to insert between person names. By default this is a semicolon, but
you can set it in the template.
You can also set arbitrary variables.
Fields that contain person names can be referenced in various ways by appending a dot and a keyword
to the name:
•
Field name.surname: the surname of the first person.
•
Field name.surnames: the surnames of all people, separated by the value of PersonSeparator.
•
Field name.forenames: the forenames of the first person.
298
APPENDIX D: THE BIBLIOGRAPHIC FORMATTING LANGUAGE
•
Field name.surnamefirst: the full name of the first person, surname first.
•
Field name.surnamelast: the full name of the first person, surname last.
•
Field name.surnamesfirst: the full names of all people, surname first.
•
Field name.surnameslast: the full names of all people, surname last.
The following fields are available in the standard Jutoh database template. Not all of them will be used
for a given source type.
Abbreviated case number, Address, Album title, Annotation, Artist, Author, Book author, Book title,
Broadcaster, Broadcast title, Case number, Chapter, City, Compiler, Composer, Conductor, Conference
name, Corporate author, Counsel, Country/Region, Court, Custom citation, Day, Day accessed,
Department, Director, DOI, Edition, Editor, Institution, Internet site title, Interviewee, Interviewer,
Inventor, Issue, Journal, Medium, Month, Month accessed, Note, Number of volumes, Organisation,
Pages, Patent number, Patent type, Performer, Producer, Production company, Publisher, Publication
title, Publication type, Recording number, Reporter, Report type, Series, Short name, Short title,
Standard number, State/Province, Station, Theater, Title, Translator, Type, University, URL, User
defined 1, User defined 2, User defined 3, User defined 4, User defined 5, Version, Volume, Writer,
Year, Year accessed.
These are the source types (set using the Type field).
Art, Article, Article in conference proceedings, Book, Book excerpt, Brochure, Case, Conference
proceedings, Dissertation, Electronic source, Email, Film, In collection, Interview, Journal,
Miscellaneous, Patent, Performance, Research report, Sound recording, Technical documentation,
Thesis, Unpublished, Web site.
How to edit and use formatting templates
Each project can have one or more formatting templates; however only one can be active at a time. You
can create, edit, delete, import and export formatting templates from the Formatting Templates tab
under Project Properties/Indexes/Bibliography. It’s easy to test a template in the Formatting Template
dialog – edit the test data and press Test to see the formatted item.
299
APPENDIX D: THE BIBLIOGRAPHIC FORMATTING LANGUAGE
The bibliographic formatting template editor
Update the bibliography via Book | Update to reapply the template to the bibliography section.
300
Appendix E: Speech Markup Reference
This topic describes the properties you can use to enhance text-to-speech through markup in content
using speech, span, div, pause or other objects, or via advanced paragraph or style properties.
Property reference
To understand which properties can be used with a given speech engine, check the description of the
selected speech engine in Preferences/Speech. This will indicate whether SSML is supported; SAPI
XML is supported when you select Microsoft SAPI, and Apple Speech Manager text is supported when
you select Apple Speech Manager. Note that not all SSML properties are supported by all voices and
SSML speech engines.
Most of the time you will be marking up text within a paragraph, and not across paragraphs. If you
wish a single object to span several paragraphs, ensure that the start and end objects are on lines of their
own. This will ensure that Jutoh can emit correct, and not overlapping, markup.
Alias
Supported for: SSML, SAPI, Apple, text
Provides an alternative natural language pronunciation, equivalent to the SSML ‘sub’ element.
Non-SSML implementations are provided by simply substituting the provided text. The specified
property value is natural language text that is used instead of the text enclosed by the speech
object. To specify a phonetic pronunciation, use the Phoneme property.
Note that this property cannot be supported for Epub 3 because there is no corresponding property
or attribute in the Epub 3 specification, and replacing the text in advance of rendering it would
remove content that is valid for a visual document.
Alphabet
Supported for: Epub 3, SSML, SAPI, Apple
This specifies the alphabet used in the Phoneme property; examples are x-microsoft-sapi, x-sampa,
ipa. Note that when generating for SAPI, the only legitimate value is x-microsoft-sapi. For the
Apple Speech manager, the alphabet must be apple. You can also use a comma-separated list of
alphabets as explained in the Phoneme description.
Content after
Supported for: All formats
301
APPENDIX E: SPEECH MARKUP REFERENCE
Inserts text after the content at this point. Note that this affects all formats, including Epub, Kindle
and ODT; to make it format-specific when used in styles, create muliple style sheets with different
style properties and specify the style sheet to use in the configuration option Style sheet.
Content before
Supported for: All formats
Inserts text in front of the content at this point. Note that this affects all formats, including Epub,
Kindle and ODT; to make it format-specific when used in styles, create muliple style sheets with
different style properties and specify the style sheet to use in the configuration option Style sheet.
Cue
Supported for: Epub 3, SSML
Provides the ability to uniquely identify elements with an aural sound. For example,
“url('audio/bong.mp3')”. The value consists of either one item or two space-separated items;
supply an extra value ‘null’ to avoid repetition of the value after the element.
Language
Supported for: Epub 3, SSML, SAPI
An optional language abbreviation, such as en or en-GB, to give a hint to the speech system about
what language is in use for the content enclosed in the object.
Pause
Supported for: Epub 3, SSML, SAPI, Apple
The amount of pause in milliseconds that occurs before and after the element that it is applied to.
For example, “50ms” (50ms before and after) or “50ms 0ms” (50ms before and no pause after).
Use null to specify that one of the values should be absent. You can use a pause object for this, or
a speech or span object, or you can use it in a style.
Phoneme
Supported for: Epub 3, SSML, SAPI, Apple
Specifies a phonetic pronounciation that should be used instead of the text contained within the
object. You must also provide a value for the Alphabet property. Note that for SAPI, the Alphabet
property must be x-microsoft-sapi, or the Phoneme property will be ignored (except when using
CereVoice: see below). To use a natural language equivalent of the content, such as the expansion
of an abbreviation, use the Alias property.
In order to cater for different alphabets in the same object, you can use a comma-separated list of
phonemes in the Phoneme property, and a corresponding list of alphabets in the Alphabet
property. Then, specify the valid alphabets in the Lexicon alphabets speech profile property as a
comma-separated list – these can contain wildcards (‘*’, ‘?’) to match multiple alphabets. Jutoh
will filter out the invalid alphabets for this configuration and speech profile. For text-to-speech
output, Jutoh will also take into account the current speech engine to filter out further invalid
302
APPENDIX E: SPEECH MARKUP REFERENCE
alphabets. The first of the remaining alphabets (if any) will be used.
CereVoice: when using CereVoice with SAPI, you can specify either x-microsoft-sapi as the
alphabet, or a name that includes the word ‘cerevoice’. In this case, instead of using the ‘pron’ tag,
the ‘lex’ tag will be generated with CereVoice phonemes.
Rest
Supported for: Epub, SSML, SAPI, Apple
Controls the pause that occurs between any aural cues and the rendering of the associated element.
For example, “25ms 0ms”. Use null to specify that one of the values should be absent. You can
use a pause object for this, or a speech or span object, or you can use it in a style.
Say as
Supported for: SSML, SAPI, Apple (partial)
This property uses SSML conventions to specify how the content of the element is spoken. It is
more powerful than the Speak as property, which can be used for Epub 3.
Unfortunately, this feature is supported only patchily by speech synthesisers. Most seem to ignore
the markup and attempt to parse the text, which may or may not yield a correct result. So you
cannot rely on the correct pronunciation of dates and other values. If in doubt, use the Alias
property to substitute text that will be spoken correctly, for example “20 15” instead of “2015”.
You can use Say as format and Say as detail with this property. Values include number, cardinal,
ordinal, characters, spell-out, digits, fraction, unit, date, time, telephone, address, vxml:boolean,
vxml:date, vxml:currency, and vxml:phone. See also www.w3.org/TR/speech-synthesis11 for
details.
When outputting to SAPI, most SAPI context ids are handled by converting SSML values, except
for the context ids web_url, e-mail_address, and number_decimal.
When outputting to the Apple Speech Manager, only the values digits and characters can be used.
Say as detail
Supported for: SSML, SAPI
This property is used with Say as.
If Say as is number, this property’s value can be one of ordinal, cardinal, and telephone. If Say as
is date, this property’s value can be one of mdy, dmy, ymd, md, dm, ym, my, d, m, and y. If Say
as is time, this property’s value can be one of hms24 and hms12. If Say as is characters, this
property’s value can be one of glyphs and characters.
Say as format
Supported for: SSML
This property is used with Say as. The value is specific to the speech synthesizer.
Sentence
303
APPENDIX E: SPEECH MARKUP REFERENCE
Supported for: SSML
This marks the content as containing a sentence, with a suitable pause at the end of the sentence.
This is not generally needed since punctuation is interpreted as signifying a pause, but
occasionally you may need to disambiguate content with unusual or missing punctuation. To
support more platforms, you can use a pause instead of marking content as a sentence.
Speak as
Supported for: Epub 3, SSML (partial), SAPI (partial)
Possible values are normal, spell-out, digits, literal-punctuation, and no-punctuation. For SSML,
only spell-out and digits are supported. For SAPI, only spell-out and digits are supported, and they
both translate to the spell element.
Vocal gesture
Supported for: SSML, SAPI
This provides gestures such as laughs, coughs and ‘hmm’ sounds. The available values are shown
in the drop-down list when you edit the value. There must be content contained within this
element, which is replaced by the gesture. This property is currently only supported by CereVoice.
Voice emphasis
Supported for: SSML, SAPI, Apple
Manipulates the strength of emphasis, using a combination of pitch and timing changes, loudness
and other acoustic features. The value can be one of normal, none, reduced, moderate, and strong.
Using none prevents the synthesizer from emphasising words that it might normally emphasise.
The value normal leaves the output unaffected. For SAPI, there is just one strength of emphasis.
Voice emotion
Supported for: SSML, SAPI
This provides a small variation in the content prosody and emphasis, currently for CereVoice
voices only. Values are happy, sad, calm and cross.
Voice family
Supported for: Epub 3, SSML, SAPI
This attribute uses Epub 3 syntax to specify a change of voice. You can provide three spaceseparated values in the form “age gender number” or just age or gender. The age may be child,
young, or old, and the gender can be male, female or neutral. The number represents an index into
available matching voices. Alternatively, you can use a specific voice name in single quotes, such
as 'Heather'.
When supplying a specific voice name, you can use wildcards, for example '*Heather*'. This will
be matched against the available voices for the current speech engine, so that there is a better
chance of matching the voice you want even if you switch speech engines. Even if you don’t
supply wildcards, Jutoh will still try to find a voice using substring matching if none of the
304
APPENDIX E: SPEECH MARKUP REFERENCE
available voices matches the exact specified name.
Not all text-to-speech implementations support specification of age and gender.
You can also change the overall voice via the speech profile.
Voice pitch
Supported for: SSML, SAPI
The value for this property can be one of x-low, low, medium, high, and x-high.
For SSML, this can also be an absolute or relative value (preceded with - or +) with a Hz or %
suffix. SAPI will use a rough equivalent of a relative or absolute percentage, but the Hz form is
ignored.
Voice pitch contour
Supported for: SSML
A set of targets at specified time positions in the speech output, conforming to the SSML
definition of pitch contour in the prosody element. Each target is a pair (time position,pitch).
Example: (0%,+20Hz) (10%,+30%) (40%,+10Hz). In SSML, the pitch values can use absolute or
relative Hz, but this is not supported by the Jutoh pitch contour editor.
Voice rate
Supported for: SSML, SAPI
Manipulates the rate of generated synthetic speech in terms of words per minute. Specify a
keyword from normal, x-slow, slow, medium, fast, x-fast, or a percentage, where 100% is the
normal rate.
Voice variant
Supported for: SSML
This is supported by CereVoice only. It selects a different version of the synthesis for the
contained content, generating a usel tag. The value is an integer; a value of 0 represents the
original version. If you find the wrong pronunciation is being used, then if you are using the
CereVoice speech engine generating SSML, you can often correct by using a suitable value such
as 1 or 2.
Voice volume
Supported for: SSML, SAPI
The volume value can be one of normal, default, silent, x-soft, soft, medium, loud, x-loud. For
SSML (only), you can also supply a relative dB value.
Unsupported SSML features
The following SSML 1.1 elements are not currently supported by Jutoh: audio, desc, lookup, token, w.
In addition, not all of the finer details of SSML elements are supported. Please ask if you need further
305
APPENDIX E: SPEECH MARKUP REFERENCE
SSML support.
306
Appendix F: Speech Profile Reference
A speech profile is a collection of properties related to generating speech audio via a text-to-speech
engine; there is always one default profile, and you can create further profiles and associate them with
configurations via the Speech profile configuration option.
Speech profiles determine the operation of immediate narration, previewing of editor content, and
creation of audio files.
Formats
These properties specify the output and intermediate source formats to be used.
Generate speech WAV files
Enables or disables WAV audio file generation for speech output.
Generate speech MP3 files
Enables or disables MP3 audio file generation for speech output.
Speech MP3 bit rate
The MP3 bit rate in kbs. 128kbs is the default bit rate, but for speech audio you can reduce it to
48kbs without significant loss of quality and your files will be smaller. A value of (auto) uses the
value specified in Preferences.
Speech source format
The format that Jutoh submits to the text-to-speech system. A value of (auto) uses the best method
for the chosen speech engine.
Keep source files
Keeps the generated source files after audio file generation.
Speech archive
These properties control if and how speech archives should be generated. Speech archives allow
customers to create speech audio on their own computers.
Generate speech archive
Generates a speech archive (.sparch) file for distributing the speech source files.
307
APPENDIX F: SPEECH PROFILE REFERENCE
Generate portable archive
If checked, creates an archive that can be used to generate speech on any platform supported by
Jutoh. If this option is cleared, only the selected speech format will be generated, and the speech
archive may be platform-dependent.
Speech properties
These properties control important aspects of speech output such as the text-to-speech engine to be
used and the initial voice.
Speech engine
The speech engine to use. A value of (auto) uses the value specified in Preferences.
Speech voice
The voice to use. A value of (auto) uses the value specified in Preferences.
Speech voice variant
The voice variant. A value of (auto) uses the value specified in Preferences.
Speech speed
The speech speed expressed as a percentage. A value of (auto) uses the value specified in
Preferences.
Speech volume
The speech volume expressed as a percentage. A value of (auto) uses the value specified in
Preferences.
Speech pitch
The speech pitch expressed as a percentage. A value of (auto) uses the value specified in
Preferences.
Options
These properties control various behaviours, such as highlighting text during narration of editor
content.
Highlight text
Highlights text as it is being read, where supported by the speech engine. Note that the editor undo
history is cleared before and after narration if highlighting is enabled.
Highlight background colour
The highlight background colour.
Paragraph pause duration
The after-paragraph pause duration in milliseconds. This is for SAPI only since it does not have a
308
APPENDIX F: SPEECH PROFILE REFERENCE
paragraph construct. The default is 500.
Emulation
Specifies which XML tags to emulate by transforming text, to work around weaknesses in speech
engines. Specify (all) to perform all relevant emulation, (none) to perform no emulation, or a
comma-separated list of keywords. Available keywords are say-as, say-as.characters, say-as.digits,
say-as.telephone.
Lexicons
These properties relate to how lexicons are used during speech output.
Lexicon tags
Comma-delimited tags to match lexicons that should be included. If no tags are specified, all
lexicons match.
Lexicon alphabets
Comma-delimited alphabet(s) to use in generated lexicons or inline pronunciations. Use wildcards
if needed.
Inline pronunciations
Replaces words in the speech source files from lexicons, using specified phonemes or aliases
(‘sounds-like’ pronunciations). This can be done in addition to generating lexicons if necessary.
Please note that for text-to-speech, currently Jutoh only supports inline pronunciations, and does
not load generated lexicon files.
PLS lexicons
Saves lexicons in PLS lexicon format when generating SSML or Epub 3.
CereVoice lexicon
Saves lexicons in CereVoice lexicon format when generating SSML.
CereVoice abbreviations
Saves lexicons in CereVoice abbreviations format when generating SSML.
Speech enhancements
These properties control how extra text is inserted into the audio in order to clarify the content.
Bullet list item prefix
Text to insert in front of unordered list items.
Numbered list item prefix
Text to insert in front of numbered list items.
Use image alt text
309
APPENDIX F: SPEECH PROFILE REFERENCE
Inserts image alternative text.
Use table descriptions
Inserts table descriptions.
Table row prefix
Text to insert in front of table rows. If this is specified, the table row number will also be read.
This will be suppressed if the table’s Role property is set to ‘presentation’.
Table column prefix
Text to insert in front of table columns. If this is specified, the table column number will also be
read. This will be suppressed if the table’s Role property is set to ‘presentation’.
310
Appendix G: Alphabet Description Reference
This topic describes the XML-based language that Jutoh uses to specify lexicon alphabets.
About alphabet descriptions
The lexicon editor makes use of alphabet descriptions, so that the phonetic vocabulary can be shown in
the lexicon entry dialog; it is also used to translate phonemes between alphabets. This appendix
describes the syntax of these decriptions. To add your own alphabet descriptions, place the XML files
in the Alphabets folder under the Jutoh application data folder where Jutoh keeps its other settings. On
Windows, this might be in c:\Users\<user name>\AppData\Roaming\Jutoh 2\Alphabets.
Alphabets are read when first editing a lexicon in the current Jutoh session.
To add alphabets for selection in the user interface without adding a whole XML description file, edit
the setting Preferences/Advanced/Lexicon alphabets.
Please note that this an experimental feature and there are few (and incomplete) alphabet descriptions
as yet. Please contact us if you would like to help improve this feature.
Alphabet syntax
An alphabet file consists of an alphabet top-level element, containing phone elements that describe
each phone of an alphabet. This is an example of part of an alphabet file:
<?xml version="1.0" encoding="utf-8"?>
<alphabet version="1.0" xml:lang="en-GB" name="Microsoft SAPI American English"
abbreviation="x-microsoft-sapi" description=""
vendor="Microsoft" phone-separator=" " syllable-separator="-" wordseparator="&" supports-equivalents="">
<phone value=" " example-word="" example-pronunciation="" description="Phone
separator" equivalents=""/>
<phone value="-" example-word="" example-pronunciation=""
description="Syllable separator" equivalents=""/>
</alphabet>
The attributes are defined as follows.
version is the alphabet file format version, usually 1.0.
xml:lang describes the language the alphabet is relevant for.
name is a long name for the alphabet.
311
APPENDIX G: ALPHABET DESCRIPTION REFERENCE
abbreviation is the abbreviated alphabet name, such as x-sampa or x-microsoft-sapi.
description is text describing the alphabet or phone.
vendor is the alphabet vendor (if any).
phone-separator is the text used to separate phones.
syllable-separator is the text used to separate syllables.
word-separator is the text used to separate words.
supports-equivalent is a comma-separated list of alphabets that this alphabet can translate to. Each
phone element will also have to have an equivalents attribute, defined as below.
equivalents is a comma-separated list of alphabet:phone pairs, indicating the equivalent phone for the
given alphabet.
value is the phone representation.
example-word is a comma-separated list of example words.
example-pronunciation is a comma-separated list of pronunciations in the alphabet’s phones,
corresponding to example-word.
312
Change Log
Version 2.10, October 26th 2015 (for Jutoh 2.37)
•
Added clarification about manual TOC creation for fixed layout books.
Version 2.9, October 22nd 2015 (for Jutoh 2.36)
•
Documented the configuration options Font size adjustment, Superscript CSS, Subscript CSS,
Speech profile, Generate NCX, Use page styles, Epub package prefix, Epub metadata
namespaces.
•
Removed references to the deprecated editor toolbar in Chapter 3.
•
Added chapters on text-to-speech and print, plus the appendix Speech Markup Reference, the
appendix Speech Profile Reference, and the appendix Alphabet Description Reference.
•
Replaced the decoration under headings, and made second level headings blue.
•
Removed speech configuration information from the installation appendix and added it to the
configuration appendix. Added information about configuring for CereVoice.
Version 2.8, June 10th 2015 (for Jutoh 2.33-2.34)
•
Updated the documentation for adding a configuration to reflect the new Add Configuration
dialog.
•
Added description of a couple of Kindle Paperwhite problems in the Fixed Layout chapter,
under Formatting for Kindle.
•
Documented configuration options Generate page list, Generate Adobe page map, Generate
cross-reference page numbers, Preserve spacing after page break.
•
Removed this out of date comment from the description of Use relative dimensions description:
“However, Mobipocket doesn’t allow precise specification of dimensions when using em, so it’s
recommended to clear this option for Mobipocket and enable it for Epub and HTML formats.”
•
Removed this out of date comment from the CSS section in the style chapter: “Since
Mobipocket KF7 doesn’t handle em units very well, it’s recommended that you clear Use
relative dimensions in your Mobipocket configuration (it is disabled by default for new
projects).”
Version 2.7, April 16th 2015 (for Jutoh 2.29)
313
CHANGE LOG
•
Added a subsection on automating heading numbering to the styles chapter.
•
Added topics Using a regular reflowable project as a fixed layout book and Faking fixed layout
using a reflowable project in the fixed layout chapter.
•
Updated the reference to fixed layout projects not being exportable to ODT, since now this is
possible.
•
Added configuration options Upload book, Device profiles, Special cross-reference formatting,
Permit links to absent content.
Version 2.6, January 31st 2014
•
Added a description of the bibliography tools to Chapter 11, and added Appendix D on the
bibliographic formatting language.
•
Added the new configuration option Special bibliography formatting.
Version 2.5, December 24th 2014
•
Added the new configuration option Omit box height, and referenced it in the Working With
Boxes chapter.
•
Added the new configuration Relaxed HTML.
•
Added a note about the lack of portrait/landscape adaptation in Kindle.
Version 2.4, October 3rd 2014
•
Added new configuration options Add blank paragraphs for Word, Show binding, Include
content matching tags, Exclude content matching tags.
•
Added new Chapter 21: Conditional Formatting and renamed the chapters following this.
Version 2.3, June 24th 2014
•
Added new configuration options Drawing object formats, SVG drawing method, Strip MathML
namespace prefixes, MathJax script, Use as preview configuration.
Version 2.2, May 26th 2014
•
Added new configuration option Force simple NavMap to resolve Lulu errors.
•
Added new configuration option Special table of contents formatting.
•
Added remarks about using Jutoh’s page styles in Understanding Ebook Formats and
Platforms, new in Jutoh 2.14.
•
Documented Quick Convert in Chapter 2.
Version 2.1, April 18th 2014
•
Added new configuration options HTML version and Use XHTML.
•
Updated notes on Maximum table rows for inline-block to reflect the possibility of incorrect
table rendering.
314
CHANGE LOG
•
Added Comments group of configuration options.
•
Added Replace absolute widths and Maximum percentage width configuration options.
•
Mentioned Replace absolute widths in the pictures, boxes and tables chapters.
•
Added a section on editing comments to Chapter 6.
Version 2.0, March 4th 2014
•
Added chapters on tables, boxes, narration, interactivity, accessibility, tag objects and the Jutoh
box model.
•
Added new configuration options Font pixel scale, Table headers and footers, Emulate boxes
using tables, Use minimum size for cells, Maximum table rows for inline-block, Maximum box
words for inline-block, Mirror margins, and fixed layout options.
•
Updated other chapters for Jutoh 2.
Version 1.8, February 25th 2014
•
Added new configuration options Cover image width, Identifier and Mirror pages.
•
Replaced screenshot for Table of Contents properties and wizard pages and added screenshots
for index and footnote options.
•
Updated the section on creating Kindle books.
Version 1.7, July 24th 2013
•
Added new configuration options Mobipocket anchor optimization, Pre-compile command,
Post-compile command.
Version 1.6, May 15th 2013
•
Added new configuration options Styles suppressing page break before, Styles suppressing page
break after, Character substitutions, Character style substitutions, Orphan control for singleletter words, Emulate small caps, Dimension units, Font size units, Generate colour, Generate
iBooks XML, Widow control, Orphan control, Namespaces.
•
Removed references to the obsolete preflight checker, which has been removed from Jutoh since
version 1.67.
Version 1.5, January 18th 2013
•
Added a description of the formatting palette to the Editing and Formatting Content chapter.
•
Added a description of how to fix the “unmanifested content” Lulu error, to the Troubleshooting
chapter.
•
Updated screenshots to reflect UI changes.
•
Mentioned Jutoh Plus in the Introduction, in relation to custom HTML provision.
•
Updated the Glossary.
315
CHANGE LOG
•
Elaborated on ‘viewer applications’ in Configuring Jutoh.
•
Documented the new configuration options Generate colour, Generate generic font names,
Character substitutions, Orphan control for single-letter words, Custom paper width, Custom
paper height, Dots per inch, Extra metadata, Include media documents matching tags, Exclude
media documents matching tags.
•
Added some more tips to the troubleshooting chapter.
Version 1.4, August 22nd 2012
•
Added notes about using SVG images to Working with Pictures.
•
Added references to DOCX import where ODT import is mentioned.
•
Added a troubleshooting tip for black text on a black background.
•
Added a description of the font dialog in Editing and Formatting Content.
•
Added a description of ‘continuation’ list paragraphs in Editing and Formatting Content.
•
Added iBooks section to Troubleshooting Your Book.
•
Added a description for the new configuration option Cover image format.
Version 1.3, July 18th 2012
•
Documented the Insert Non-Breaking Hyphen and Insert Non-Breaking Space commands in
the Editing and Formatting Content chapter.
•
Documented the new configuration options Convert non-breaking hyphen to hyphen, Enable
fixed layout, Page width, Page height, Add thin spaces around punctuation, and Thin space
entity.
•
Extended the section on fonts in Editing and Formatting Content, documenting the Font
Substitution string table.
•
Enhanced the section on embedding fonts in Advanced Topics.
•
Added a section Creating fixed layout ebooks in Advanced Topics.
•
Mentioned the new template facility in the Getting Started and Importing Files chapters.
•
Fixed an incorrect reference to the View menu when mentioning Check for Updates in
Appendix A.
Version 1.2, March 15th 2012
•
Documented the Import basic CSS from HTML/Epub option in the New Project Wizard.
•
Updated the mentions of KF8.
•
Added a description of the new Type and See fields in the index entry dialog.
•
Added descriptions for the new configuration options Epub version, Orientation lock, Optimize
style sheet, Abbreviate style names, Use heading text size, Visible URLs, Use outline levels,
316
CHANGE LOG
Styles suppressing hyphenation, HTML top margin, HTML bottom margin, and Convert
horizontal bar to em dash.
•
Documented the search box and reordering buttons in the Configurations page.
•
Changed erroneous 200Kb section size limit to 300Kb.
•
Clarified the effect of width and height settings for various formats.
•
Expanded the section on creating PDF documents.
•
Corrected typos kindly pointed out by Jim Kerwin.
Version 1.1, November 8th 2011
•
Removed text asserting that hanging indent is not supported in Mobipocket, since this is fixed in
Jutoh 1.39.
•
Fixed text describing how to insert page numbers in OpenOffice.org/LibreOffice, noting that the
Format | Title Page command is only available in LibreOffice.
•
Documented the configuration option Use relative dimensions, new in Jutoh 1.39.
Version 1.0, October 26th 2011
•
First edition.
317