1
LizardTech
Express Server 9
User Manual
Copyright © 2009–2014 Celartem Inc. d.b.a. LizardTech®. All rights reserved. Information in this
document is subject to change without notice. The software described in this document is furnished under a license agreement or nondisclosure agreement. The software may be used or
copied only in accordance with the terms of those agreements. No part of this publication may be
reproduced, stored in a retrieval system, or transmitted in any form or any means electronic or
mechanical, including photocopying and recording for any purpose other than the purchaser's personal use without the written permission of LizardTech.
LizardTech, MrSID, GeoExpress and Express Server are registered trademarks in the United
States and the LizardTech, GeoExpress, Express Server, ExpressView and GeoViewer logos are
trademarks, and all are the property of Celartem Inc. d.b.a. LizardTech. Unauthorized use is prohibited.
LizardTech acknowledges and thanks the many individuals and organizations whose efforts have
made our products possible. A full list of copyright, trademark and credit information is available
in the document "Copyrights, Trademarks and Credits" installed automatically with your product.
LizardTech
1008 Western Avenue, Suite 200
Seattle, Washington, USA 98104
206.652.5211
www.lizardtech.com
- ii -
Preface
Preface
The Express Server User Manual is written for geographic information system (GIS)
professionals that want to distribute geospatial imagery with Express Server. This guide assumes
that you have basic knowledge of GIS, including mosaics, coordinate reference systems, and
multispectral imagery. This guide describes how to install, configure, and administer Express
Server.
- iii -
Table of Contents
Preface
iii
Table of Contents
v
Chapter 1: Introduction
1
Product Overview
1
Express Server Architecture
1
How Express Server Works
3
New Features
5
Chapter 2: Installation and Upgrade
7
Installation and Upgrade Overview
7
System Requirements
7
Permission Requirements
9
Web Server Prerequisites
10
Installation
12
Licensing
16
Upgrade
17
Chapter 3: The Express Server Manager
21
Express Server Manager Overview
21
Accessing the Express Server Manager
21
Browser Requirements
22
User Interface
22
Chapter 4: Configuring Express Server
25
Configuring Express Server Overview
25
Configuring the Firewall
25
Configuring HTTPS
25
Setting Basic Express Server Settings
29
Configuring the Caches
35
Configuring the WMS Top Layer
41
Configuring WMS Service
43
Restoring an Archived Configuration
45
-v-
Chapter 5: Creating and Maintaining Catalogs
Creating and Maintaining Catalogs Overview
47
Setting Global Catalog Properties and Defaults
47
Setting a Catalog's Basic Properties
49
Setting a Catalog's Advanced Properties
53
Setting a Catalog's WMS Properties
58
Adding Images to an Existing Catalog
63
Serving Different Band Combinations from the Same Images
63
Working with Geospatial PDFs
64
Adding and Configuring Catalog Groups
65
Hiding a Catalog
66
Removing a Catalog
67
Removing Imagery from a Catalog
68
Chapter 6: Viewing Express Server Imagery
69
Viewing Express Server Imagery Overview
69
Viewing Images with ExpressZip
69
Viewing Images with a JavaScript Viewer
70
Viewing Images with ExpressView Browser Plug-in
70
Viewing Images with DHTML and JavaScript
72
Viewing Images with a WMS Flash Viewer
73
Viewing Images with a WMS Ajax Viewer
73
Chapter 7: Common Tasks
- vi -
47
75
Common Tasks Overview
75
Setting User Account Preferences
75
Starting and Stopping the Express Server
76
Starting and Stopping the Web Server Service
76
Starting and Stopping the Admin Backend Service
77
Starting and Stopping the Tomcat Service
77
Starting and Stopping the JPIP Service
78
Adding a WMS Layer
79
Updating a Spatial Index
79
Finding the EPSG Code for an Image
79
Adding Custom Coordinate Reference Systems
80
Publishing Express Server WMS Catalogs as ArcGIS Server Layers
83
Configuring Multiple Express Servers
89
Clearing the Configuration Archive
93
Configuring Express Server Authentication
93
Chapter 8: JPIP
99
JPIP Overview
99
Viewing JPIP Imagery
99
Configuring the JPIP Server
102
Setting JPIP Network Configuration Properties
102
Setting JPIP Network Performance Properties
103
Setting JPIP Client Connection Properties
104
Setting General JPIP Properties
107
Chapter 9: Web API Functions
111
Web API Functions Overview
111
Hierarchical Query Format
111
ows
112
browse
112
getimage
114
getthumb
125
getitem
126
calcrgn
127
getstyle
130
getwatermark
130
Chapter 10: Reference
133
Reference Overview
133
IP Addresses and Ports
133
Supported File Formats
134
Directory and File Locations
134
OGC WMS Support
136
Runtime Environment
137
Special Catalog Properties
138
The Catalog Configuration Schema
138
Command Line Tools
143
- vii -
Hand-Editing Configuration Files
149
Performing Common Tasks in XML and on the Command Line
202
Chapter 11: Troubleshooting
Troubleshooting Overview
213
Verifying Correct Installation of Express Server
213
Cannot Access Express Server From Another Machine
214
Express Server Not Running
215
Issues Creating Image Catalogs
215
Failed to Export Pixels Error
216
Catalogs Not Showing Up
216
Running a Test Web Server
217
Resetting a Forgotten Password
218
Accessing and Using Log Files
218
Memory and Optimal Performance
221
Blurry Images
223
Images Display a Black Background
224
Speckled Images
225
Mosaicked NITF Images
229
Slow PDFs
230
Unsupported Browser Version
230
Finding the Express Server Version Number
230
Technical Support
231
Chapter 12: Appendix
235
About LizardTech
235
Other LizardTech Products
235
Express Server and Patents
237
Express Server Feature History
237
Glossary
240
Index
- viii -
213
255
Chapter 1: Introduction
Product Overview
1
Express Server Architecture
1
How Express Server Works
3
New Features
5
Product Overview
Express Server is a server application for distributing raster imagery. Use Express Server to distribute high-resolution aerial photographs, satellite imagery, and other digital content via the Web
Map Service (WMS).
The following list describes some of the features of Express Server:
l
Configure and administer Express Server from any web browser with a simple graphical
user interface.
l
Access Express Server imagery from all platforms and devices via the widely-supported
WMS standard.
l
Distribute multiple image formats, including MrSID, JPEG 2000, NITF, and Geospatial
PDF.
l
Distribute multispectral imagery.
l
Distribute imagery with the JPEG 2000 Interactive Protocol (JPIP).
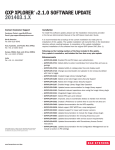
Express Server Architecture
The Express Server architecture consists of the following components:
l
Clients
l
The web server
l
LizardTech services
l
The image server
l
Image data
-1-
LizardTech Express Server 9 User Manual
Clients
You can access Express Server imagery from any Web Map Service (WMS) client. WMS is a
widely-supported standard that you can use to view imagery from web browsers, from desktop
GIS applications, from the ExpressZip web application included with Express Server, and more.
If you installed the optional JPIP component, then you can also access imagery from
JPIP clients.
Web Server
Express Server works in conjunction with an existing web server installation to distribute imagery.
Before you install Express Server, you must install either the Microsoft IIS web server on Windows or the Apache web server on Linux. On Windows, the IIS web server runs as a service called
the World Wide Web Publishing service. On Linux, Apache runs as a daemon called httpd.
LizardTech Services
The following list describes the LizardTech services created during the installation of Express
Server:
l
Express Server Admin Backend Service. The Admin Backend service, or the Express
Server Agent, processes requests from the Express Server Manager to start or stop the
web server and perform licensing tasks. On Linux, the service runs as a daemon called
ltagentd.
l
Express Server Tomcat Service. The Tomcat service runs the Express Server web
applications, including Express Server Manager for managing Express Server and
ExpressZip for image-export. On Linux, the service runs as a daemon called lttomd.
l
JPIP Service. The JPIP service is an optional service that you can add during the Express
Server installation.The JPIP service processes requests from JPIP clients. On Linux, the
service runs as a daemon called ltjpipd.
Image Server
The image server is the core of the Express Server installation that processes all image requests.
When you connect to Express Server via WMS, the image server receives the image request and
renders the image.
-2-
Chapter 1: Introduction
On Linux, the image server runs as a daemon known as ltcsd. On Windows, the image server
runs as an application pool in IIS called LTESAppPool and does not require a dedicated service.
Image Data
You can store the image data that you want to distribute with Express Server on a local or network
file system. Ensure that the image server and the LizardTech services have the correct permissions to access the image data, then use the Express Server Manager to configure the images
that you want to distribute. For more information on permissions, see Permissions for Running
Express Server on page 9.
How Express Server Works
Express Server's APIs represent an integration between the underlying Express Server engine
and a supported Web Server, such as Apache or IIS. In addition to supporting its own web API,
Express Server supports the OGC Web Map Service API (version 1.1.1) and, through the optional
and separately installed JPIP Server, the JPEG 2000 Interactive Protocol, or JPIP, a protocol for
progressively streaming imagery from a client to a server to support image use in bandwidth-constrained environments (for more information see Configuring the JPIP Server on page 102).
Express Server publishes collections of images, organized as "catalogs." The Express Server
administrator defines all the catalogs in the Express Server Manager, a web-based administration
interface. Generally, a catalog "points to" a directory on the server which contains images.
Each catalog contains folders and "items". These items are the images.
Because some images may be very very large, Express Server allows you to extract subsets of an
image at various resolutions. In addition, Express Server can produce thumbnails of each image,
in various sizes, and publish metadata contained in that image as XML. This means that a single
image asset can serve for any number of croppings, scaled versions and scene subsets.
Express Server Features
Express Server outputs PNG (.png) and GIF (.gif) in addition to TIFF (.tif and .tiff), Windows Bitmap (.bmp) and JPEG (.jpg and .jpeg). MrSID (.sid), JPEG 2000 (.jp2), Geospatial PDF (.pdf)
and NITF (.ntf) are supported as source file formats.
In addition to supporting its own web API, Express Server supports the OGC Web Map Service
API (version 1.1.1). You can integrate Express Server image repositories with WMS-compliant
-3-
LizardTech Express Server 9 User Manual
geospatial data stores anywhere in the world. Integrate with diverse architectures and geospatial
data while leveraging the world's best raster delivery technology. Also, in order to support WMS
features, catalogs are by default automatically indexed for spatial query.
Some Express Server Features and How You Can Benefit from Them
Feature
Benefit
Multiresolution Input Formats
Support for industry standards MrSID and NITF and
l
Satisfy more image requests faster
l
Eliminate costly pyramiding
l
Give users precisely the scene they
ISO standard JPEG 2000.
Scene Extraction
On-the-fly extraction of only the pixels the user needs
want and nothing they don't
Reprojection
l
Streamline your workflow
l
Easily integrate with other applic-
On-the-fly reprojection and mosaicking
WMS Support
Support for OGC's Web Map Service (WMS) stand-
ations
ard
l
Increase interoperability
Esri ArcMap Support
l
Speed up your ArcIMS raster delivery
Automatic generation of AXL files and support for con-
l
Your image users can work with famil-
necting ArcMap client directly to Express Server
iar tools
GML Support
l
Support for Geography Markup Language (GML)
Distribute more complete geographic
data while reaping the benefits of
metadata in JPEG 2000 (JP2) files via GMLJP2 func-
JPEG 2000 wavelet-based encoding
tionality
Sample Web Applications
New and updated sample applications that
l
you can modify, including the robust ExpressZip web
Get started showing off your imagery
right out of the box
application for image export.
Mirroring
l
Ensure scalability and performance l
Distribute and view imagery in band-
Support for running multiple Express Servers JPIP
Streaming JPEG 2000 imagery
-4-
width-constrained environments
Chapter 1: Introduction
New Features
Version 9 of Express Server includes the following new features and enhancements:
ExpressZip Web Application
ExpressZip is a sample web application that you can use to view and export Express Server
imagery. You can select multiple layers, select the area that you want to export, and configure output options.
You can use ExpressZip with HTTPS and HTTP. To use ExpressZip, navigate to one of the following URLs:
https://<Express_Server_Host>:8443/ExpressZip
http://<Express_Server_Host>:8080/ExpressZip
Painless Upgrades
The Express Server installer now preserves any existing configuration of Express Server, including the configuration of each image catalog. After you install another version of Express Server,
open the Express Server Manager and click Upgrade on the Status page to migrate image catalogs from the previous version of Express Server to the new installation. The upgrade functionality
only supports upgrading from version 8 of Express Server.
Concurrent Processing
Express Server creates multiple threads to process image requests more quickly. The number of
threads that you can run at one time depends on the number of cores in your machine's processor.
You can set a maximum number of threads on the Settings page of the Express Server Manager.
Configurable Working Directory
The working directory is the location where Express Server stores information about image catalogs, including indexes, catalog overviews, the configuration archive, and catalog configuration
files. Depending on the size and number of your image catalogs, the working directory may
require several gigabytes of space. To alleviate space constraints, you may specify another directory to use for the working directory. For example, you may choose to store the working directory on an external drive.
-5-
LizardTech Express Server 9 User Manual
NOTE: To see a list of fixes and other information on the current version of Express
Server, see the Readme.
-6-
Chapter 2: Installation and Upgrade
Installation and Upgrade Overview
7
System Requirements
7
Permission Requirements
9
Web Server Prerequisites
10
Installation
12
Licensing
16
Upgrade
17
Installation and Upgrade Overview
You can install Express Server on 64-bit versions of Linux and Windows operating systems. Additionally, the Express Server 9 installer includes an automated upgrade process for upgrading from
Express Server 8.
To set up Express Server, complete the following tasks:
l
Verify system requirements and permissions requirements.
l
Verify web server prerequisites for Windows installations.
l
Run the Express Server installer.
l
Enter a license code for Express Server.
l
Optionally, run the automated upgrade process.
System Requirements
Hardware Requirements
For optimal performance, verify that your system meets the following recommended hardware
requirements:
l
3 GHz quad core processor
l
8 GB RAM (16 GB recommended)
l
500 MB of disk space for installation plus additional space for images
l
Gigabit Ethernet or fiber-optic connection recommended for remote imagery
-7-
LizardTech Express Server 9 User Manual
Operating System Requirements
Express Server supports 64-bit operating systems only. You can install Express Server on the following operating systems:
Windows
l
Windows Server 2003 Service Pack 2
l
Windows Server 2008 R2 Service Pack 1
l
Windows Server 2012
Linux
l
Red Hat Enterprise Server 5
l
Red Hat Enterprise Server 6
NOTE: On Linux systems Express Server must have write access to the /tmp directory.
Web Server Requirements
Express Server works in conjunction with an existing web server installation to distribute imagery.
You can use Express Server with the following web servers:
Windows
l
IIS 6.0 (Windows Server 2003)
l
IIS 7.5 with ISAPI Extensions (Windows Server 2008 R2)
l
IIS 8.0 with ISAPI Extensions (Windows Server 2012)
Linux
l
Apache Web Server 2.0.x
l
Apache Web Server 2.2.x
l
Apache Web Server 2.4.x
Software Requirements
To run, Express Server requires a 64-bit version of the Java Runtime Environment. Express
Server supports version 1.7 of the Java Runtime Environment or later.
-8-
Chapter 2: Installation and Upgrade
Optionally, install the LizardTech Plugin for ArcGIS to integrate with the following versions of
ArcGIS:
l
ArcGIS 8.x
l
ArcGIS 9.x
When you install the LizardTech Plugin for ArcGIS, you can add Express Server imagery to
ArcMap documents, and you can distribute Express Server imagery with the ArcGIS Image
Server.
Permission Requirements
Before you install Express Server, ensure that you have the permissions required to run and
install Express Server.
Permissions for Installing Express Server
To install Express Server, you must have root permissions on Linux and administrator permissions on Windows.
Permissions for Running Express Server
To run Express Server, you must configure permissions for your web server service and for LizardTech services.
The user that runs each service must have:
l
Read permissions to all Express Server directories.
l
Read permissions for the image directories that you want to host on Express Server. If the
image directories that you want to access are on a network, you may have to add the users
that run the LizardTech Express Server Tomcat service and the IIS Web Server service to
the list of domain users.
NOTE: If you want to use LizardTech GeoExpress software to save imagery directly to Express Server catalogs, then each user must also have write permissions for the image directories.
l
Read, write, and delete permissions for the working directory. The working directory is the
location where Express Server stores information about image catalogs, including
-9-
LizardTech Express Server 9 User Manual
indexes, catalog overviews, the configuration archive, and catalog configuration files. For
more information about the working directory, see The Working Directory on page 30. The
following directory is the default working directory:
<Express Server Installation Directory>/Express Server/ImageSe
rver/var/data
The following list describes the services and users that need the above permissions.
l
LizardTech Express Server Tomcat service or daemon. Grant permissions to the
user that runs the Tomcat service or daemon. On Windows, the Tomcat service runs on
the NetworkService account by default. You can view the account that runs the Tomcat service in the Windows Services utility. On Linux, the Tomcat daemon, also known as
lttomd runs on the account specified during the installation of Express Server.
l
LizardTech Express Server Admin Backend service or daemon. Grant permissions
to the user that runs the Admin Backend service or daemon. On Windows, the service runs
on the Local System account by default. You can view the account that runs the Admin
Backend service in the Windows Services utility. On Linux, the Admin Backend daemon,
also known as ltagentd, runs as root so that you can start and stop the web server from
the Express Server Manager.
l
IIS Web Server service. For Windows only, grant permissions to user that runs the IIS
service. By default, the IIS service runs on the anonymous IUSR account. You can view
the account that runs the IIS service in the IIS Manager. Additionally, the IIS service runs
an Express Server-specific application pool called LTESAppPool as the Net-
workService user. On Linux, the Apache service does not access imagery directly and
therefore does not require special permissions.
NOTE: For most standard installations of Apache and IIS, the correct permissions are
configured for each user and service by default.
Web Server Prerequisites
If the server where you want to install Express Server runs IIS 7 or IIS 8, ensure that
ISAPI extensions have been installed. If the server where you want to install Express Server runs
Apache or another version of IIS, skip to Installation on page 12.
- 10 -
Chapter 2: Installation and Upgrade
ISAPI Extensions for IIS
ISAPI extensions make it possible for server applications like Express Server to access additional
IIS functionality. To verify that ISAPI extensions are enabled for IIS, complete the following
steps:
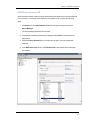
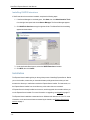
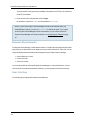
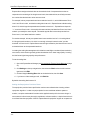
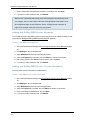
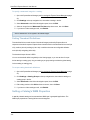
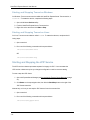
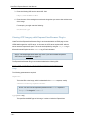
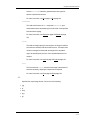
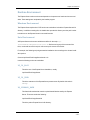
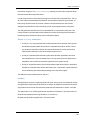
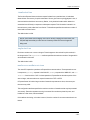
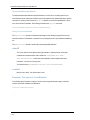
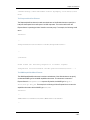
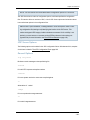
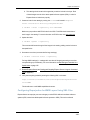
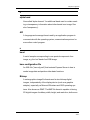
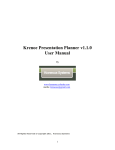
1. Click Start, then click Administrative Tools from the right-hand panel and choose
Server Manager.
The Server Manager appears as shown below.
2. If another pane besides the Roles pane is displayed, select Roles in the left-hand navigation pane.
3. Expand the Roles Summary box in the large pane at right if it has not already been
expanded.
4. In the Web Server (IIS) section, click Role Services to see whether ISAPI extensions
are installed.
- 11 -
LizardTech Express Server 9 User Manual
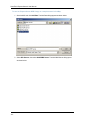
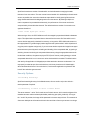
Installing ISAPI Extensions
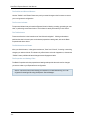
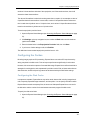
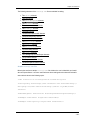
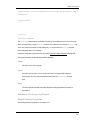
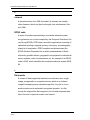
If ISAPI extensions have not been installed, complete the following steps:
1. If the Server Manager is not already open, click Start, then click Administrative Tools
from the right-hand panel and choose Server Manager. The Server Manager appears.
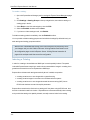
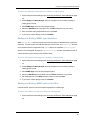
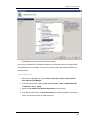
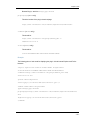
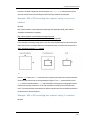
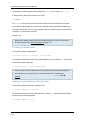
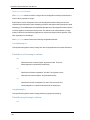
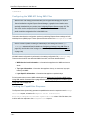
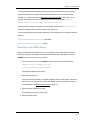
2. Click Add Role Services among the right-hand links. The Select Role Services dialog
appears as shown below.
3. Under Application Development, select the ISAPI Extensions checkbox.
4. Click Next, then click Install.
Installation
The Express Server installer guides you through the process of installing Express Server. Before
you run the installer, ensure that you have administrator privileges and ensure that you have
access to the directory or media that contains the Express Server installer. For best results, run
the Express Server installer from a local directory or disc rather than over a network.
If Express Server is already installed on the server, read the upgrade documentation before you
run the Express Server installer. For more information on upgrading, see Upgrade on page 17.
The Express Server installation creates services on Windows and daemons on Linux. For more
information on the services and daemons created by the installer, see Express Server Archi-
tecture on page 1.
- 12 -
Chapter 2: Installation and Upgrade
Installing on Windows
To install Express Server on Windows, complete the following steps:
1. Log on to the machine where you want to install Express Server with administrator privileges.
2. Navigate to the directory where you downloaded the installer or insert an Express Server
installation DVD into your DVD drive.
If you downloaded the installer from an FTP site, the installer is saved as an ISO file. To
open the ISO file, perform one of the following steps:
l
Burn the ISO file to a DVD.
l
Use an ISO reader to mount the file to a virtual drive.
3. Run the AutoRun.exe program.
The Product Selection window opens. For more information on the Product Selection
window and the programs that you can install, see The Product Selection Window on
page 14.
4. Click Express Server.
The Express Server Installation Wizard opens in a separate window.
5. The installation wizard prompts you to complete the following tasks:
l
Accept the License Agreement.
l
Select the directory where you want to install Express Server. By default, Express
Server is installed in the following directory:
C:\LizardTech\Express Server
l
Select the type of installation that you want to perform. To install the optional
JPIP component, select the Custom installation type. For more information on the
JPIP Server, see JPIP Overview on page 99.
l
Enter the ports that you want Express Server to use. For the HTTPS port, enter an
available port on the server that you can use to access Express Server web applications, including the Express Server Manager and ExpressZip. For the Agent
Communication port, enter an available port that Express Server can use intern-
- 13 -
LizardTech Express Server 9 User Manual
ally to communicate between the Administrator Backend service and the Tomcat
service (the service that runs the Express Server Manager and ExpressZip).
l
Restart the web server service.
6. Click Finish to exit the installer and open the Express Server Manager in a web browser.
For more information on the Express Server Manager, see The Express Server Manager
on page 21.
7. In the Product Selection window, click any other products that you want to install and follow the installation instructions.
8. Close the Product Selection window.
The Product Selection Window
When you run the Express Server installer on Windows, the Product Selection window opens.
You can use the Product Selection window to install the following products:
l
Express Server. The complete version of LizardTech's server software for distributing
high-resolution imagery via the Web Map Service (WMS).
l
GeoExpress Trial. A trial version of LizardTech's image compression and manipulation
software. GeoExpress supports a broad range of file formats, including the industry standard MrSID format and the ISO standard JPEG 2000 format.
l
LiDAR Compressor Trial. A trial version of LizardTech's compression software for
LiDAR data.
l
Express Server Plug-in for ArcIMS. An ArcIMS plug-in that you can use to integrate
Express Server with ArcIMS.
l
ExpressView Browser Plug-in. A browser plug-in that you can use to view MrSID,
JPEG 2000, and JPIP files. For browser requirements and other information, see the
ExpressView User Manual.
l
LizardTech Plug-in for ArcGIS. An ArcGIS plug-in that you can use to add
Express Server imagery to ArcMap documents and to distribute Express Server imagery
with ArcGIS Image Server.
Installing on Linux
To install Express Server on Linux, complete the following steps:
1. Log on to the machine where you want to install Express Server with root privileges.
2. Open a terminal and navigate to the directory where you downloaded the installer or insert
- 14 -
Chapter 2: Installation and Upgrade
an Express Server installation DVD into your DVD drive.
If you downloaded the installer from an FTP site, the installer is saved as an ISO file. You
may have to mount the ISO file to a local directory.
NOTE: Ensure that the directory from which you install Express Server does not
contain spaces or special characters.
3. Navigate to the Linux64 directory.
4. Run the installation shell script.
For example, you might run the following command:
./install.sh
5. The installer prompts you to complete the following tasks:
l
Accept the License Agreement.
l
Enter whether you want to install the JPIP component. For more information on
the JPIP Server, see JPIP Overview on page 99.
l
Enter the directory where you want to install Express Server. By default,
Express Server is installed in the following directory:
/opt/LizardTech
l
Enter the name of a user that Express Server can use to run LizardTech services.
l
Enter whether you want the Express Server to integrate with an existing installation
of Apache. If you allow the installer to integrate with Apache, the installer modifies
the Apache configuration file, httpd.conf, to point to the Express Server configuration file for Apache. For more information on integrating with Apache, see
Configuring Apache on page 16.
l
Enter the location of the Java Runtime Environment.
l
Enter the server name of the machine where you are installing Express Server.
l
Enter the ports that you want Express Server to use. For the HTTPS port, enter an
available port on the server that you can use to access Express Server web applications, including the Express Server Manager and ExpressZip. For the RMI Port
port, enter an available port that Express Server can use internally to communicate
- 15 -
LizardTech Express Server 9 User Manual
between the Administrator Backend service and the Tomcat service (the service
that runs the Express Server Manager and ExpressZip).
l
Restart the web server service.
Configuring Apache
You can run the Express Server installer to configure Apache automatically, or you can configure
Apache manually. When you configure Apache, you include an additional configuration file for
Express Server in your Apache configuration. The configuration file varies depending on the version of Apache that you have installed. To browse the configuration files, navigate to the following
location: <Express Server Installation Directory>/ImageServer/etc/apache/
To configure Apache manually, complete the following steps: 1. Open the Apache configuration file, httpd.conf, in an editor. By default, the configuration file is stored in the following location:
/etc/httpd/conf/httpd.conf
2. Add the following line to the end of the configuration file:
Include /opt/LizardTech/ImageServer/etc/apache/mod_csd_apache<
version>.conf
Replace <version> with the version number of your Apache installation. For example,
you might enter the following line:
Include /opt/LizardTech/ImageServer/etc/apache/mod_csd_apache2
2.conf
Licensing
You can try Express Server for 30 days without a license. At any time before or after the trial
period expires, you may activate a license code that converts your trial version into the licensed
version.
To determine the licensing status of your Express Server installation:
1. Open the Express Server Manager (see Accessing the Express Server Manager on page
21).
- 16 -
Chapter 2: Installation and Upgrade
2. Click Status on the top navigation bar. The licensing status is listed on this page as "Trial
License", "Expired Trial" or "Licensed".
NOTE: If the status is reported as "Unknown" the Express Server is not running. See
Troubleshooting on page 213.
To request a license code, complete the following steps:
1. Open the Express Server Manager in a web browser. For more information, see Accessing the Express Server Manager on page 21.
2. Click Status on the toolbar.
3. In the Licensing section, click Details. The License Details dialog appears.
4. Make a note of the locking code.
5. Navigate to the following URL to contact LizardTech Customer Support:
https://www.lizardtech.com/support/product-activation/
6. Fill out the form and enter the locking code in the Locking Code field.
7. Click Submit.
LizardTech Customer Support will send you a license code within one business day.
Upgrade
The Express Server 9 installer includes an automated upgrade process for upgrading from
Express Server 8.
To upgrade from versions of Express Server prior to version 8, you must uninstall the previous version of Express Server, run the installer, and re-create your image catalogs in the Express Server
Manager. You may want to save your license and configuration files for reference.
Upgrading from Express Server 8
You can upgrade from Express Server 8 on Linux and Windows.
IMPORTANT: If you have custom projection systems defined, create a backup of the
custom projection systems file before you run the installer. By default, the file is stored
in the following location: <Installation
- 17 -
LizardTech Express Server 9 User Manual
Directory>/ImageServer/etc/gdal/esri_extra.wkt
If you made changes to the keystore file for Tomcat, including configuring a custom
SSL certificate, create a backup of the keystore file before you run the installer. By
default, the keystore file is stored in the following location: <Installation Directory>/ImageServer/etc/.keystore
Upgrading on Windows
To upgrade from Express Server 8 on Windows, complete the following steps:
1. Run the Express Server 9 installer. The Express Server installer detects the current installation and prompts you to uninstall Express Server. The uninstall process saves the existing Express Server 8 configuration, including the license file and the configuration of each
image catalog.
2. Run the Express Server 9 installer again to install Express Server 9. For more information,
see Installation on page 12.
3. If you created a backup of the custom projection systems file, restore the backup to the following location:
<Installation Directory>/ImageServer/etc/gdal/esri_extra.wkt
4. Open the Express Server Manager in a web browser. For more information, see Accessing the Express Server Manager on page 21.
5. Click Status on the toolbar.
6. Click Upgrade from Express Server 8.
7. By default, the Express Server Manager looks for an existing configuration of Express
Server in the default installation directory for Express Server 8. If version 8 of Express
Server was not installed in the default directory, click Browse to select the Express Server
8 installation directory.
8. Click Upgrade.
The Express Server Manager imports the saved configuration of Express Server and creates indexes and overviews for the images in each saved image catalog.
- 18 -
Chapter 2: Installation and Upgrade
NOTE: Depending on the size and number of image catalogs in the saved configuration, the upgrade process may take several hours.
9. Click Publish in the top navigation bar for the changes to take effect.
Upgrading on Linux
To upgrade from Express Server 8 on Linux, complete the following steps:
1. Run the Express Server 9 installer. The Express Server installer saves the existing
Express Server 8 configuration, including the license file and the configuration of each
image catalog. For more information, see Installation on page 12.
2. If you created a backup of the custom projection systems file, restore the backup to the following location:
<Installation Directory>/ImageServer/etc/gdal/esri_extra.wkt
3. Open the Express Server Manager in a web browser. For more information, see Accessing the Express Server Manager on page 21.
4. Click Status on the toolbar.
5. Click Upgrade from Express Server 8.
6. By default, the Express Server Manager looks for an existing configuration of Express
Server in the default installation directory for Express Server 8. If version 8 of Express
Server was not installed in the default directory, click Browse to select the Express Server
8 installation directory.
7. Click Upgrade.
The Express Server Manager imports the saved configuration of Express Server and creates indexes and overviews for the images in each saved image catalog.
NOTE: Depending on the size and number of image catalogs in the saved configuration, the upgrade process may take several hours.
8. Click Publish in the top navigation bar for the changes to take effect.
Upgrading from Prior Versions of Express Server
To upgrade from versions of Express Server prior to version 8, complete the following steps:
- 19 -
LizardTech Express Server 9 User Manual
1. Create a backup of your existing image catalogs for reference. By default the Express
Server catalog configuration is stored in the following location:
<Installation Directory>/ImageServer/etc/cat-cfg.xml
NOTE: Express Server versions prior to 8 used a catalog configuration file that is
not compatible with later versions of Express Server. You can use this file as a
reference, but you cannot restore the catalog configuration file.
2. Uninstall Express Server.
l
On Windows, open the Control Panel, click Add or Remove Programs, and
select LizardTech Express Server.
l
On Linux, run the uninstall.sh script stored in the following location:
<Installation Directory>/installrecords/
3. Run the installer for Express Server 9. For more information, see Installation on page 12.
4. Re-create your image catalogs in the Express Server Manager. For more information on
creating image catalogs, see Creating and Maintaining Catalogs on page 47.
- 20 -
Chapter 3: The Express Server Manager
Chapter 3: The Express Server Manager
Express Server Manager Overview
21
Accessing the Express Server Manager
21
Browser Requirements
22
User Interface
22
Express Server Manager Overview
Express Server includes a web-based graphical user interface called the Express Server Manager. Use the Express Server Manager to complete the following tasks:
l
Create and edit image catalogs.
l
Configure Express Server settings.
l
Restart the web server.
l
Download log files for Express Server.
l
Add an Express Server license.
l
Upgrade from Express Server 8.
Accessing the Express Server Manager
By default, you can access the Express Server Manager via HTTPS and HTTP. Both are protocols for communication over a network, however, HTTPS adds encryption for an increased layer
of security. Use HTTPS whenever possible.
1. Open a web browser.
2. Navigate to one of the following URLs:
l
For HTTPS:
https://<server name>:<https port>/ExpressServerAdmin
l
For HTTP:
http://<server name>:<http port>/ExpressServerAdmin
- 21 -
LizardTech Express Server 9 User Manual
The port number is configured during installation. By default, the HTTPS port is 8443 and
the HTTP port is 8080.
3. Enter the user name and password and click Login.
By default the username is admin and the password is ChangeMe.
NOTE: If you access Express Server Manager from the same machine where you
installed Express Server, you can use localhost as the server name. If you cannot
access Express Server Manager with the server name, or if you cannot access the
Express Server Manager from another machine, see Configuring the Firewall on page
25.
Browser Requirements
The Express Server Manager is a web-based interface. To display the entire Express Server Manager interface, the web browser must display a minimum screen resolution of 1024 x 768. The following list displays the web browsers that are supported by the Express Server Manager:
l
Internet Explorer 9 or later
l
Firefox 25 or later
l
Chrome 31 or later
You may also be able to access the Express Server Manager on other web browsers, or on previous versions of the above web browsers. However, you may experience limited functionality.
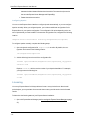
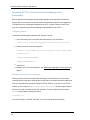
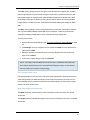
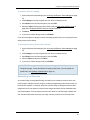
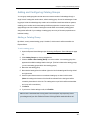
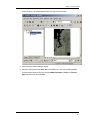
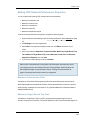
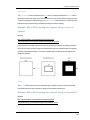
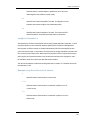
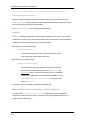
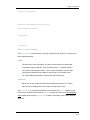
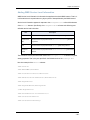
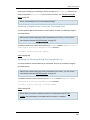
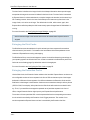
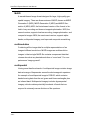
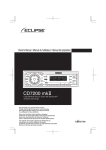
User Interface
The following figure displays the Express Server Manager:
- 22 -
Chapter 3: The Express Server Manager
The Toolbar
The toolbar displays tools for adding catalogs, enabling or disabling catalogs, updating spatial
indexes, and deleting catalogs.
The Catalogs List
The catalogs list enables you to view and edit the properties of catalogs or catalog groups.
The Top Navigation Bar
The top navigation bar enables you to move from one page of the Express Server Manager to
another
- 23 -
LizardTech Express Server 9 User Manual
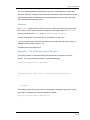
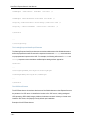
The Publish and Discard Buttons
Use the "Publish" and "Discard" buttons to push your saved changes to the live server or restore
your running server's configuration.
The Process Indicator
The process indicator lets you know that Express Server is indexing a catalog, generating an overview, or performing some other function. This indicator is usually active after you click "Save".
The Tab Selectors
These are referred to in the instructions as "the left-hand navigation". Clicking a tab selector
switches the view in the main pane to the desired properties or settings tab, such as the Basic
Properties tab shown above.
The Edit/Save/Cancel Button
After you click this button, it changes to two buttons, "Save" and "Cancel", for saving or canceling
changes you make to this tab. This button only affects items on the tab it appears on, whereas the
"Publish" button publishes all saved changes across all pages and tabs.
The Properties and Settings Tabs
The Basic Properties and other properties and settings tabs provide the work area for changes
you want to make to your Express Server configuration.
NOTE: The red color in the URL field of your browser is a certificate warning. It is safe
to ignore this warning while using the Express Server Manager .
- 24 -
Chapter 4: Configuring Express Server
Chapter 4: Configuring Express Server
Configuring Express Server Overview
25
Configuring the Firewall
25
Configuring HTTPS
25
Setting Basic Express Server Settings
29
Configuring the Caches
35
Configuring the WMS Top Layer
41
Configuring WMS Service
43
Restoring an Archived Configuration
45
Configuring Express Server Overview
In order to use the components of Express Server you must first configure them. This section tells
you how to configure Express Server's web API, Web Map Service (WMS) API and JPIP Server
component. You don't have to configure any components that you won't be using.
Configuring the Firewall
For users to connect to the Express Server Manager, the firewall on the machine that hosts the
Express Server must be configured to accept incoming connections. Ensure that the HTTP and
HTTPS ports for the Express Server Manager are not being blocked by the firewall.
By default, the HTTPS port is 8443 and the HTTP port is 8080.
Configuring HTTPS
By default, the Express Server Manager and ExpressZip applications run on HTTPS and HTTP.
However, the internal communication between the LizardTech Express Server Tomcat service
and the image server uses HTTP. If the web server has been configured to refuse
HTTP connections, you can configure the Express Server to use HTTPS exclusively.
- 25 -
LizardTech Express Server 9 User Manual
Disabling HTTP for the Express Server Manager and
ExpressZip
Both the Express Server Manager and ExpressZip applications are hosted by the LizardTech
Express Server Tomcat service, which is a web server and servlet container for web applications.
To disable users from accessing the applications via HTTP, configure Tomcat to use HTTPS
only, then configure the Express Server Manager and ExpressZip to use HTTPS.
Configuring Tomcat
Complete the following steps to disable HTTP access for Tomcat:
1. Open the following file in a text editor with administrator or root permissions:
<Installation Directory>\ImageServer\Tomcat\conf\server.xml
2. Delete or comment out the following lines:
<Connector port="8080" protocol="org.apache.coyote.http11.Http
11NioProtocol"
connectionTimeout="20000"
redirectPort="8443" />
3. Save the file.
4. Restart Tomcat. For more information, see Starting and Stopping the Tomcat Service on
page 77.
Configuring the Express Server Manager
When you perform a task in the Express Server Manager, the Tomcat service communicates
internally with the image server. Because the communication is internal and therefore assumed to
be secure, Express Server uses HTTP instead of HTTPS. However, if you want to use HTTPS
instead, you can modify the ExpressServerAdmin.properties file and configure Express
Server to use a copy of the web server's SSL certificate. The SSL certificate must be saved in
base64 encoding with the following file name:
ca-bundle.crt
For more information on the SSL certificate, refer to your web server's documentation.
- 26 -
Chapter 4: Configuring Express Server
TIP: Most web browser provide a utility for exporting the certificate used by a web page
to base64 encoding. If you cannot export a copy of the certificate from the web server,
you may navigate to the web page for your server and attempt to export the certificate
with the browser.
To use HTTPS only, complete the following steps:
1. Open the following file in a text editor with administrator or root permissions:
<Installation Directory>\ImageServer\Tomcat\conf\ExpressServer
Admin.properties
2. Edit the value of the esapibase line to use HTTPS. For example, you might enter the following line:
esapibase=https://localhost/lizardtech/iserv/ows
3. Edit the value of the sslstrictness property or add it to the file.
The sslstrictness property accepts the following values:
l
strict. Tomcat communicates with the image server via HTTPS and only
accepts SSL certificates that have been signed by a trusted certificate authority.
l
noverify. Tomcat communicates with the image server via HTTPS and accepts
both self-signed certificates and certificates that have been signed by a trusted certificate authority.
l
none. Tomcat communicates with the image server via HTTP.
For example, you might enter the following line:
sslstrictness=noverify
4. Save the file.
5. Place a copy of the SSL certificate used by the web server for HTTPS in the following location:
<Installation Directory>\ImageServer\etc\
NOTE: For Express Server to read the certificate, the certificate must be named
ca-bundle.crt and saved in base64 encoding.
- 27 -
LizardTech Express Server 9 User Manual
6. Restart Tomcat. For more information, see Starting and Stopping the Tomcat Service on
page 77.
Configuring ExpressZip
The ExpressZip application is a client that connects to the Express Server. If you have configured
the web server to use HTTPS only, you can modify the ExpressZip.properties file and configure Express Server to use a copy of the web server's SSL certificate. The SSL certificate must
be saved in base64 encoding. For more information on the SSL certificate, refer to your web
server's documentation.
TIP: Most web browser provide a utility for exporting the certificate used by a web page
to base64 encoding. If you cannot export a copy of the certificate from the web server,
you may navigate to the web page for your server and attempt to export the certificate
with the browser.
To use HTTPS only for ExpressZip, complete the following steps:
1. Open the following file in a text editor with administrator or root permissions:
<Installation Directory>\ImageServer\Tomcat\conf\ExpressZip.pr
operties
2. Edit the value of the wmshost line to use https. For example, you might enter the following line:
wmshost=https://local-express-server/lizardtech/iserv/ows
3. Edit the value of the sslstrictness property or add it if it does not exist. The
sslstrictness property accepts the following values:
l
strict. ExpressZip connects to the Express Server WMS host via HTTPS and
only accepts SSL certificates that have been signed by a trusted certificate authority.
l
noverify. ExpressZip connects to the Express Server WMS host via HTTPS and
accepts both self-signed certificates and certificates that have been signed by a
trusted certificate authority.
l
- 28 -
none. ExpressZip connects to the Express Server via HTTP.
Chapter 4: Configuring Express Server
For example, you might enter the following line:
sslstrictness=none
4. Save the file.
5. Place a copy of the SSL certificate used by the web server for HTTPS in the following directory:
<Installation Directory>\ImageServer\etc\
NOTE: For Express Server to read the certificate, the certificate must be named
ca-bundle.crt and saved in base64 encoding.
6. Restart Tomcat. For more information, see Starting and Stopping the Tomcat Service on
page 77.
Setting Basic Express Server Settings
You can change the following Express Server settings on the Settings page of the Express
Server Manager:
l
default catalog folder
l
working directory
l
log level
l
resampler algorithms
Click Edit to edit the basic server settings, then click Save when you have finished making
changes. To apply the saved settings, click Publish.
The Default Catalog Folder
The default catalog folder is the location where Express Server puts images that you upload to create a new catalog, along with other associated files. The LizardTech factory default location is
C:\LizardTech\Express Server <version>\ImageServer\var\catalogs\, but you can specify a new
default location for newly created catalog folders if you wish.
NOTE: When you upload imagery to create a new catalog, the location specified here
will be what you see in that catalog's Catalog Folder field on its Basic properties tab
unless and until a new location is specified there.
- 29 -
LizardTech Express Server 9 User Manual
Setting the Default Catalog Folder
To specify the default catalog folder:
1. Open the Express Server Manager (see Accessing the Express Server Manager on page
21).
2. Click Settings on the top navigation bar, then select the Basic tab on the left-hand navigation and click Edit.
3. Click the Browse button next to the Default Catalog Folder setting to search for a location. The Select Default Catalog Folder dialog opens.
4. When you find the desired folder, click it once to select it, then click Add.
5. Click Save.
6. If you have no further settings to edit, click Publish.
The Working Directory
The working directory is the location where Express Server stores information about image catalogs, including indexes, catalog overviews, the configuration archive, and catalog configuration
files. Depending on the size and number of your image catalogs, the working directory may
require several gigabytes of space. To alleviate space constraints, you may specify another directory to use for the working directory. For example, you may choose to store the working directory on an external drive.
By default, Express Server uses the following directory as the working directory:
<Express Server Installation Directory>/Express Server/ImageServer/
var/data
If you change the working directory, existing indexes and catalog configuration files are moved to
the new directory. However, the configuration archive which contains past versions of the Express
Server configuration remains in the former working directory. Because the configuration archive
contains relative paths, the archive cannot be moved to another working directory. For more
information on the configuration archive, and to clear the configuration archive, see Clearing the
Configuration Archive on page 93.
Setting the Working Directory
Before you set another working directory, you must ensure that Express Server can access the directory. The following services and daemons require read, write, and delete permissions for the
- 30 -
Chapter 4: Configuring Express Server
directory that you want to set as the working directory:
l
LizardTech Express Server Tomcat service or daemon. Grant permissions to the
user that runs the Tomcat service or daemon. On Windows, the Tomcat service runs on
the NetworkService account by default. You can view the account that runs the Tomcat service in the Windows Services utility. On Linux, the Tomcat daemon runs on the
account specified during the installation of Express Server.
l
LizardTech Express Server Admin Backend service or daemon. Grant permissions
to the user that runs the Admin Backend service or daemon. On Windows, the service runs
on the Local System account by default. You can view the account that runs the Admin
Backend service in the Windows Services utility. On Linux, the Admin Backend daemon,
also known as ltcsd, runs on the account specified during the installation of Express
Server.
l
IIS Web Server service. For Windows only, grant permissions to user that runs the IIS
service. By default, the IIS service runs on the anonymous IUSR account. You can view
the account that runs the IIS service in the IIS Manager.
To set another working directory, complete the following steps:
1. Open the Express Server Manager (see Accessing the Express Server Manager on page
21).
2. Click Settings on the top navigation bar, then select the Basic tab on the left-hand navigation and click Edit.
3. Click the Browse button next to the Working Directory setting to search for a location.
The Select Working Directory dialog appears.
4. Navigate to the directory that you want use as the working directory and click Add.
5. Click Save.
6. If you have no further settings to edit, click Publish.
Log Levels
The log level represents the minimum level of information written to Express Server's error and
access logs.
There are eight levels:
0. Emergencies
1. Alerts
- 31 -
LizardTech Express Server 9 User Manual
2. Critical Conditions
3. Errors
4. Warnings
5. Notices
6. Informational Messages
7. Debug Messages
8. All
If the log level is set at "3 - Errors", then logging will include emergencies, alerts, critical conditions and errors. If the log level is set at "1 - Alerts", then logging will include only emergencies
and alerts.
The log files are stored in <Express Server installation
directory>/ImageServer/var/log.
Setting the Log Level
1. Open the Express Server Manager (see Accessing the Express Server Manager on page
21).
2. Click Settings on the top navigation bar, then select the Basic tab on the left-hand navigation and click Edit.
3. Choose a level from the Log level drop-down menu, then click Save.
4. If you have no further settings to edit, click Publish.
IMPORTANT: Remember that clicking Save in the workspace only temporarily saves
your changes until you click Publish or Discard. Clicking Publish sends all edits on all
the configuration pages to the live Express Server. Clicking Discard overwrites all
pages of the workspace with the current live configuration.
By default the log level is set at "5 - Notices", a level that includes emergencies, alerts, critical conditions, errors, warnings and notices.
Resampler Algorithms
The resampler algorithms are used in interpolating or "resampling" pixels when reprojecting an
image and when scaling an image from source to output dimensions.
The options are the same for both scaling and reprojecting:
- 32 -
Chapter 4: Configuring Express Server
l
Nearest neighbor – this is the fastest algorithm in terms of CPU time, but it yields the
poorest quality.
l
Bilinear – "bilinear interpolation" takes more CPU time than Nearest neighbor but yields
better quality.
l
Bicubic – "bicubic interpolation" is the most CPU-intensive algorithm but produces the
best result for reprojection.
By default Express Server uses bilinear interpolation (Bilinear) both for scaling and for reprojection. Bilinear is a good balance of speed and quality that serves most imagery fairly well. In
cases where image quality or speed is less important you may wish to change this to one of the
other algorithms.
Setting the Scaling Algorithm
1. Open the Express Server Manager (see Accessing the Express Server Manager on page
21).
2. Click Settings on the top navigation bar, then select the Basic tab on the left-hand navigation and click Edit.
3. Choose an algorithm from the Scaling Algorithm drop-down menu, then click Save.
4. If you have no further settings to edit, click Publish.
Setting the Reprojection Algorithm
1. Open the Express Server Manager (see Accessing the Express Server Manager on page
21).
2. Click Settings on the top navigation bar, then select the Basic tab on the left-hand navigation and click Edit.
3. Choose an algorithm from the Reprojection Algorithm drop-down menu, then click
Save.
4. If you have no further settings to edit, click Publish.
Setting the Scaling Bias
In a MrSID or JPEG 2000 image, Zoom Level 0 (Zero) is full scale and has the highest resolution,
and higher-numbered zoom levels represent lower resolution, on up to the tiny thumbnail or icon
level. The scaling bias is a bias toward the next-higher-numbered (lower-resolution) zoom level in
determining which zoom level to scale pixel data from.
- 33 -
LizardTech Express Server 9 User Manual
Express Server assigns a decimal value to the resolution level of a requested scene that corresponds to the numbering of the image's zoom levels, then adds the bias, and finally truncates
the number after the decimal to arrive at a zoom level.
For example, let's say a requested scene has a resolution level of 1.6, which falls between Zoom
Level 1 and Zoom Level 2, and that the scaling bias is set at 0.5. Express Server adds the scaling
bias of 0.5, which brings the requested scene's resolution level to 2.1. Express Server drops the
".1" to arrive at Zoom Level 2. It then pulls the lower resolution pixel data from Zoom Level 2 and
scales it up to satisfy the scene request. This scaled-up pixel data is not as sharp as that from
Zoom Level 1, but it takes less time to retrieve.
For another example, let's say a requested scene has a resolution level of 2.4. A scaling bias of
0.5 brings the total number to 2.9, which is not enough to bump this scene's value "over the
threshold" to Zoom Level 3. Express Server uses the higher resolution pixel data of Zoom Level 2
and scales it down to the requested dimensions.
Increasing the scaling bias strengthens the inclination toward higher numbered (lower resolution)
zoom levels, which results in generally quicker decodes but also in lower image quality. Lowering
the bias favors higher image quality over performance.
To set the scaling bias:
1. Open the Express Server Manager (see Accessing the Express Server Manager on page
21).
2. Click Settings on the top navigation bar, then select the Basic tab on the left-hand navigation and click Edit.
3. Click and drag the Scaling Bias slider to the desired value, then click Save.
4. If you have no further settings to edit, click Publish.
By default the scaling bias is set at 0.5.
Setting the Reprojection Precision Factor
The reprojection precision factor specifies the maximum error allowed when choosing a faster
reprojection algorithm. In order to reproject pixels from one coordinate reference system to
another, a complex mathematical formula must be applied to each point in the source image. In
some cases, this formula may be roughly equivalent to a linear transform, a simple function that is
much faster than the reprojection function. Express Server's reprojection engine can compare the
- 34 -
Chapter 4: Configuring Express Server
results of a linear transform with that of the reprojection, and if the results are close, then it will
choose the faster linear transform.
The value of this attribute is a decimal number greater than or equal to 0. As examples, a value of
0 specifies that the linear transform is never used; a value of 0.25 specifies that the linear transform is used when it yields an error of 1/4 pixel or less; and a value of 2.0 specifies that the linear
transform is used when it yields an error of 2 pixels or less.
To set the reprojection precision factor:
1. Open the Express Server Manager (see Accessing the Express Server Manager on page
21).
2. Click Settings on the top navigation bar, then select the Basic tab on the left-hand navigation and click Edit.
3. Enter the desired value in the Reprojection Precision field, then click Save.
4. If you have no further settings to edit, click Publish.
The default and recommended reprojection precision factor is .333.
Configuring the Caches
Decoding imagery requires CPU processing. Express Server can reduce CPU requirements by
saving raw pixels in the disk cache. This can improve performance significantly for active sites.
However, this comes at the expense of increased disk usage. Express Server offers three distinct
strategies for caching pixels, each represented by a distinct cache. Each of these caches lives on
disk and its size, location and pruning interval are all determined by the Disk Cache settings.
Configuring the Disk Cache
In response to requests, Express Server may cache certain data to disk, including image thumbnails, frequently requested image extractions, and raw pixels. You can specify the folder in which
Express Server stores the temporary files, the amount of disk space Express Server can use for
the disk cache and the number of minutes between automatic purges of the disk cache.
To specify the disk cache folder:
1. Open the Express Server Manager (see Accessing the Express Server Manager on page
21).
- 35 -
LizardTech Express Server 9 User Manual
2. Click Settings on the top navigation bar, then select the Cache tab on the left-hand navigation and click Edit.
3. Click Browse to search for a location. The Select Default Cache Folder dialog opens.
4. When you find the desired folder, click it once to select it, then click Add.
5. Click Save.
6. If you have no further settings to edit, click Publish.
By factory default temporary files are stored in <Express Server installation dir-
ectory>/ImageServer/var/cache/iserv_images/
To set the prune interval:
1. Open the Express Server Manager (see Accessing the Express Server Manager on page
21).
2. Click Settings on the top navigation bar, then select the Cache tab on the left-hand navigation and click Edit.
3. Enter a number of minutes in the Prune Interval field, then click Save.
4. If you have no further settings to edit, click Publish.
The default interval is 360 minutes (6 hours).
To set the maximum cache size:
1. Open the Express Server Manager (see Accessing the Express Server Manager on page
21).
2. Click Settings on the top navigation bar, then select the Cache tab on the left-hand navigation and click Edit.
3. Enter a number (in megabytes) in the Maximum Cache Size field, then click Save.
4. If you have no further settings to edit, click Publish.
The default maximum cache size is 512 megabytes.
Specifying the Pixel Cache
There are three pixel cache options; Image, Index and Warp.
The Image caching strategy involves caching the pixels from images as they are decoded. This
strategy may be useful for sites that have many different images to serve and are not using the
spatial index or WMS features of Express Server. LizardTech recommends enabling this strategy
for non-WMS sites.
- 36 -
Chapter 4: Configuring Express Server
The Index caching strategy involves caching the pixels decoded from a spatial index. A spatial
index is a special type of Express Server catalog that dynamically combines a collection of spatially related images into a single mosaic. WMS GetMap requests use the spatial index. When
this strategy is employed, the pixels from the index are cached, rather than from the individual
images that are included in the index. LizardTech recommends enabling this strategy for WMS
sites.
The Warp caching strategy involves caching pixels after they have been reprojected or “warped”.
This only affects WMS GetMap requests that require reprojection. LizardTech recommends
enabling this strategy for WMS sites in which most requests require reprojection.
To specify a pixel cache:
1. Open the Express Server Manager (see Accessing the Express Server Manager on page
21).
2. Click Settings on the top navigation bar, then select the Cache tab on the left-hand navigation and click Edit.
3. Select the checkbox for the desired cache, make any adjustments to the cache's properties, then click Save.
4. If you have no further settings to edit, click Publish.
NOTE: The Image, Index and Warp caches can be used in combination with each other,
but to reduce the performance costs associated with filling the caches, we recommend
that you enable only one pixel caching strategy.
Fine Tuning the Pixel Cache
Four settings enable you to fine tune any of the pixel caching strategies to optimize performance.
These settings specify the width and height in pixels of each block saved in the cache, the minimum allowable ratio of requested scene pixels to decoded tile pixels, and the maximum image
resolution at which caching occurs.
Width and Height of Cached Blocks
The Width parameter indicates width in pixels of each block saved in the cache. The default
value is 200.
The Height parameter indicates the height in pixels of each block saved in the cache. The default
value is 200.
- 37 -
LizardTech Express Server 9 User Manual
Pixel Cache Utility
The pixel caches sort an image into tiles of fixed width and height. When Express Server receives
a request to decode an image (i.e. the getimage or GetMap requests), the pixel cache will decode
all the tiles that intersect with the specified scene. In most cases the area of all the tiles will be larger than the area of the requested scene. The result of this is that more pixels will be decoded
than are necessary to satisfy the given request, initially hurting the performance of the server.
However, because these tiles are then cached, subsequent requests will not have to decode any
pixels, improving performance of the server.
The Utility parameter specifies the minimum allowable ratio of scene pixels to tile pixels. If the
number of pixels in the requested scene divided by the number of pixels required to decode the
intersecting tiles is less than this value, then the tiles will be clipped. The valid range is 0.0 – 1.0.
Some examples:
A utility of 1.0 specifies that no extra pixels will ever be decoded, and only those tiles that fall completely within the bounds of a requested scene will be cached. This setting causes the least initial
overhead, but because fewer tiles are cached, performance improvements resulting from the
cache will take longer to accrue.
A utility of 0.0 indicates that all intersecting tiles will be decoded, regardless of the size of the
requested scene. This is the default value. This may cause some initial performance degradation,
but since all tiles are cached, performance will quickly improve.
A utility of .85 specifies that the pixel cache will always make sure that 85% of the pixels it
decodes for a particular scene will be used in that scene. If the number of pixels required to fill the
intersecting tiles exceeds that percentage, then they will be clipped.
The default and recommended value for the Utility parameter is 0.0.
Pixel Cache Maximum Magnification (Max Mag)
The Max Mag parameter specifies the maximum image resolution or "magnification" at which
caching occurs. All requests for scenes at magnifications higher than this value will not be cached;
all requests for scenes at or below this magnification will be cached. Decimal values greater than
0 and less than or equal to 1 are valid.
The default value is 1.0, indicating that decode requests at full resolution (1.0) will be cached, as
will all decode requests at lower magnifications (i.e. zoomed out).
- 38 -
Chapter 4: Configuring Express Server
Requests at magnifications greater than 1 will not be cached.
To fine tune the pixel cache
1. Open the Express Server Manager (see Accessing the Express Server Manager on page
21).
2. Click Settings on the top navigation bar, then select the Cache tab on the left-hand navigation and click Edit.
3. Enter or edit values for Width, Height, Utility and Max Mag, then click Save.
4. If you have no further settings to edit, click Publish.
Configuring the Image Manager
In order to enable maximum performance with minimal resource requirements, Express Server
employs certain strategies in its image handling. The Image Manager settings allow you to define
parameters used in these strategies.
Extraction Cache Trigger
The extraction cache trigger setting specifies the number of times a particular scene may be
requested before it is cached to disk. For example, if this value is set to 3 and the extraction list
size is 10, then a particular scene will be cached to disk if 3 out of the last 10 extraction requests
for that image were for that scene.
The extraction cache trigger is ignored if the extraction list size is 0 or missing.
The default extraction cache trigger value is 2.
Extraction List Size
The most CPU expensive operations on Express Server are extraction requests. If certain scenes
are extracted frequently, then caching them to disk may have a beneficial effect upon performance. Express Server keeps track of requested extraction scenes, and when it notices that
one or another scene is requested frequently, it will cache the result to disk for quick access later.
The extraction list size specifies the number of extraction requests Express Server monitors for
each image.
For example, if the value is 10, then Express Server will keep track of each image's last 10 extractions. If either this or the extraction cache trigger is set to 0 or missing, then Express Server will
not monitor scene extractions.
- 39 -
LizardTech Express Server 9 User Manual
The default extraction list size is 50.
Extraction Timeout
The extraction timeout specifies the maximum number of seconds that an extraction request will
wait in queue before it is discarded.
This value is ignored if the maximum concurrent extractions (max current extractions) is 0 or missing. If extraction timeout is missing, or is set to 0, then the pending extraction requests will wait
indefinitely.
The default value is 50.
Maximum Concurrent Extractions (Max Concurrent Extractions)
As noted above, the most CPU expensive operations are extractions. These operations occur in
response to getimage requests in the Web API, GetMap requests in the WMS API, and ltc-
sExtract functions in the C API. In these operations, Express Server decodes a portion of the
source image and reencodes to an output format such as TIFF or JPEG. If Express Server is hit
with a large number of extraction requests at one time, then server performance may suffer.
The max concurrent extractions property specifies the maximum number of extractions that may
be processed concurrently. Extraction requests occurring in excess of this number are placed in
queue, and handled on a first-come, first-served basis.
If the max concurrent extractions value is missing or is set to 0, then the number of concurrent
extractions is not limited.
The default max concurrent extractions value is 50.
Item Cache Size
The first time Express Server receives a request for data from a particular item, it loads data
about the item into memory for quick access later. Since a given item may be gigabytes in size, it
does not load the whole item into memory. Rather, it only loads information which allows it to
access the item efficiently in response to subsequent requests. This information is stored in an
internal memory cache called the "item cache". The item cache size specifies the maximum number of items held in the item cache.
The default value is 1000.
- 40 -
Chapter 4: Configuring Express Server
NOTE: JPEG 2000 source imagery uses a lot of memory. Setting this value lower (150200) will help ensure that you don't run out of memory when JP2 source images are
being used.
Image Cache Size
Each item contains one or more or images. These images are also cached for quick retrieval, in
the image cache. The image cache size specifies the maximum number of images which can be
stored in this cache.
The default value is 500.
Maximum Worker Threads
Express Server uses multiple threads to process image requests more quickly. By default,
Express Server creates the maximum number of threads possible equal to the number of cores in
the processor of the machine that hosts the Express Server. For example, an eight core processor
could run eight threads simultaneously. If you want to limit the processing power used by the
Express Server, you can limit the maximum number of threads created.
The default value is -1, which indicates that Express Server creates as many threads as possible
for optimum performance.
Setting Image Manager Properties
1. Open the Express Server Manager (see Accessing the Express Server Manager on page
21).
2. Click Settings on the top navigation bar, then select the Cache tab on the left-hand navigation and click Edit.
3. Enter or edit values as desired for Extraction Cache Trigger, Extraction List Size,
Extraction Timeout, Max Concurrent Extractions, Item Cache Size, Image Cache
Size, and Max Worker Threads.
4. Click Save.
5. If you have no further settings to edit, click Publish.
Configuring the WMS Top Layer
The WMS "top layer" is a virtual layer that contains all the other layers. Express Server supports
the inclusion of an optional top layer title, advertised coordinate reference systems (listed as
- 41 -
LizardTech Express Server 9 User Manual
EPSG codes), keywords and contact information for the service.
For more detailed information about each of the WMS properties see version 1.1.1 of the Web
Map Service Implementation Specification.
Setting WMS Top Layer Title and Advertised Projections
EPSG codes added here in Settings will be inherited by individual layers. You can also add
EPSG codes individually for any catalog or catalog group on the Catalog and Catalog Group
pages. Any per-catalog or per-group setting override these global setting for that catalog or catalog group (see Setting a Catalog's WMS Properties on page 58).
To set the WMS top layer title:
1. Open the Express Server Manager (see Accessing the Express Server Manager on page
21).
2. Click Settings on the top navigation bar, then select a catalog or catalog group in the list.
3. Select WMS on the left-hand navigation panel.
4. Select the Basic tab in the table, then click Edit at the bottom of your screen.
5. Enter or edit the title for the layer. If no title is entered the catalog name is used.
6. Click Save.
7. If you have no further settings to edit, click Publish.
IMPORTANT: Remember that clicking Save in the workspace only temporarily saves
your changes until you click Publish or Discard. Clicking Publish sends all edits on all
the configuration pages to the live Express Server. Clicking Discard overwrites all
pages of the workspace with the current live configuration.
To set advertised EPSG codes:
1. Open the Express Server Manager (see Accessing the Express Server Manager on page
21).
2. Click Settings on the top navigation bar, then select a catalog or catalog group in the list.
3. Select WMS on the left-hand navigation panel.
4. Select the Basic tab in the table, then click Edit at the bottom of your screen.
5. Edit existing entries or click Add and enter a new one, then click Save.
6. If you have no further settings to edit, click Publish.
- 42 -
Chapter 4: Configuring Express Server
Adding and Editing a WMS Top Layer Authority URL
Identifier elements can be used to list ID numbers or labels defined by a particular authority. For
example, the Global Change Master Directory (gcmd.gsfc.nasa.gov) defines a DIF_ID label for
every dataset. The authority name and explanatory URL are defined in a separate AuthorityURL
element, which may be defined once and inherited by subsidiary layers. Identifiers themselves are
not inherited.
To add or edit the authority URL:
1. Open the Express Server Manager (see Accessing the Express Server Manager on page
21).
2. Click Settings on the top navigation bar.
3. Select WMS Top Layer on the left-hand navigation panel.
4. Select the Authorities tab in the table, then click Edit at the bottom of your screen.
5. Edit existing entries or click Add and enter a new one, then click Save.
6. If you have no further settings to edit, click Publish.
Configuring WMS Service
WMS service level information is information that applies to the whole WMS instance. That is, it
is information that is not particular to any layer or piece of data published by the WMS instance.
Service level information appears in response to the GetCapabilities call as child elements
of the Service element. Specifically, the GetCapabilities call returns the following userdefinable service level information.
Setting Basic WMS Service Properties
The basic service level WMS properties are the title of the service, an abstract for the service, any
fees associated with it and any access constraints.
To set WMS basic service level properties:
1. Open the Express Server Manager (see Accessing the Express Server Manager on page
21).
2. Click Settings on the top navigation bar.
3. Select WMS Service on the left-hand navigation panel.
4. Select the Basic tab in the table, then click Edit at the bottom of your screen.
- 43 -
LizardTech Express Server 9 User Manual
5. Enter or edit the title and other basic information for the layer, then click Save.
6. If you have no further settings to edit, click Publish.
IMPORTANT: Remember that clicking Save in the workspace only temporarily saves
your changes until you click Publish or Discard. Clicking Publish sends all edits on all
the configuration pages to the live Express Server. Clicking Discard overwrites all
pages of the workspace with the current live configuration.
Adding and Editing WMS Service Keywords
You can add keywords to the WMS top layer the same way you do for an individual catalog or catalog group (see Adding and Editing WMS Layer Keywords on page 60).
To add or edit WMS service keywords:
1. Open the Express Server Manager (see Accessing the Express Server Manager on page
21).
2. Click Settings on the top navigation bar.
3. Select WMS Service on the left-hand navigation panel.
4. Select the Keyword tab in the table, then click Edit at the bottom of your screen.
5. Edit existing entries or click Add and enter a new one, then click Save.
6. If you have no further settings to edit, click Publish.
Adding and Editing WMS Service Contact Information
You may include contact information for a WMS service.
To add or edit WMS service contact information:
1. Open the Express Server Manager (see Accessing the Express Server Manager on page
21).
2. Click Settings on the top navigation bar.
3. Select WMS Service on the left-hand navigation panel.
4. Select the Contact tab in the table, then click Edit at the bottom of your screen.
5. Enter or edit values for desired fields, then click Save.
6. If you have no further settings to edit, click Publish.
- 44 -
Chapter 4: Configuring Express Server
Restoring an Archived Configuration
If you published changes to your Express Server configuration and wish you hadn't, you can
restore a previous configuration by selecting it from a list of time-stamped configurations displayed in the Express Server Manager.
To restore an archived configuration:
1. Open the Express Server Manager (see Accessing the Express Server Manager on page
21).
2. Click Status on the top navigation bar, then click one of the entries in the list of archived
configurations at the bottom of the page. The Confirm Restore Configuration dialog
appears.
3. Click Yes.
- 45 -
Chapter 5: Creating and Maintaining Catalogs
Chapter 5: Creating and Maintaining Catalogs
Creating and Maintaining Catalogs Overview
47
Setting Global Catalog Properties and Defaults
47
Setting a Catalog's Basic Properties
49
Setting a Catalog's Advanced Properties
53
Setting a Catalog's WMS Properties
58
Adding Images to an Existing Catalog
63
Serving Different Band Combinations from the Same Images
63
Working with Geospatial PDFs
64
Adding and Configuring Catalog Groups
65
Hiding a Catalog
66
Removing a Catalog
67
Removing Imagery from a Catalog
68
Creating and Maintaining Catalogs Overview
This section covers the main tasks associated with catalogs and catalog groups.
Setting Global Catalog Properties and Defaults
A number of catalog properties and defaults can be set globally on the Settings page. The following properties can also be set per catalog or catalog group:
l
download policy
l
tile browsing policy
l
size constraint
l
custom properties
l
buffer merge rule
l
thumbnail definitions
Two other parameters, Catalog Properties and Item Properties, are only configurable as global
defaults. These define the properties that will be returned in response to browse and calcrgn
- 47 -
LizardTech Express Server 9 User Manual
commands when no Properties parameter is present in the URL. For example, the default value
"Name,Description" causes all browse and calcrgn requests to return the Name and Description catalog and item properties.
To set catalog defaults:
1. Open the Express Server Manager (see Accessing the Express Server Manager on page
21).
2. Click Settings on the top navigation bar.
3. Select Catalog Defaults on the left-hand navigation panel, then click Edit at the bottom
of your screen.
4. Enter or edit values, then click Save (see Setting a Catalog's Advanced Properties on
page 53 for details about each property and default).
5. If you have no further settings to edit, click Publish.
IMPORTANT: Remember that clicking Save in the workspace only temporarily saves
your changes until you click Publish or Discard. Clicking Publish sends all edits on all
the configuration pages to the live Express Server. Clicking Discard overwrites all
pages of the workspace with the current live configuration.
Adding a Catalog
You can add a catalog to your Express Server from an existing folder on your web server.
NOTE: To add catalogs you must have read permissions to all Express Server folders
and subdirectories and all catalogs, and write permissions to <Express Server
installation directory>/ImageServer/var and its subfolders, as well as
both read and write access to the source files and catalog folders. For more information
see Permission Requirements on page 9.
If you intend to use your catalog as a WMS layer, make sure it is spatially indexed after you add it.
By default, Express Server attempts to spatially index all newly created catalogs by examining its
first three images; if these have the same EPSG code, Express Server indexes that catalog using
that EPSG code. If the first three images have different EPSG codes then Express Server does
not automatically spatially index the catalog. You may force Express Server to index the catalog
by specifying an EPSG code for it (see Specifying an EPSG Code on page 52). (Note: You
- 48 -
Chapter 5: Creating and Maintaining Catalogs
should only do this if you have made sure that all images in the folder have the same EPSG code,
otherwise your images may not line up correctly when they are viewed.)
To add a catalog from an existing folder on your server:
1. Open the Express Server Manager (see Accessing the Express Server Manager on page
21).
2. Click Catalogs on the top navigation bar.
3. Click the Create a catalog from an existing folder icon on the toolbar. The Select Catalog Folder dialog appears.
4. Navigate to the desired folder and click Add.
5. Select Basic on the left-hand navigation, then click Edit.
6. Name the catalog and set its other basic properties (see Setting a Catalog's Basic Properties on page 49).
Setting a Catalog's Basic Properties
After you have added a catalog you may specify properties that govern how that catalog will be
available for viewing. The basic properties of a catalog are:
l
name
l
catalog folder (this is a noneditable field)
l
enable status (whether or not the catalog should be available through Express Server)
l
index status (whether or not the catalog should be spatially indexed)
l
overview status (whether or not an overview should be created for the catalog)
l
EPSG code (the catalog's coordinate reference system)
l
band mapping
Restrictions on Catalog Names
Commas and spaces are not allowed as catalog names. You may use numbers and letters,
dashes and underscores.
Enabling a Catalog
Only enabled catalogs are available for delivery by Express Server. Both single catalogs and catalog groups can be enabled or disabled. You might disable a catalog if for any reason you do not
want it to be accessible.
- 49 -
LizardTech Express Server 9 User Manual
To enable a catalog:
1. Open the Express Server Manager (see Accessing the Express Server Manager on page
21).
2. Click Catalogs or Catalog Groups on the top navigation bar, then select a catalog or a
catalog group in the list.
3. Select Basic on the left-hand navigation, then click Edit.
4. Select the Enabled checkbox and click Save.
5. If you have no further settings to edit, click Publish.
To disable a catalog (make it unavailable), clear the Enabled checkbox.
You may enable or disable catalog groups as well as individual catalogs.By default all newly created catalogs and catalog groups are enabled.
IMPORTANT: Remember that clicking Save in the workspace only temporarily saves
your changes until you click Publish or Discard. Clicking Publish sends all edits on all
the configuration pages to the live Express Server. Clicking Discard overwrites all
pages of the workspace with the current live configuration.
Indexing a Catalog
In order for a catalog to be available as a WMS layer it must be spatially indexed. The spatial
index tells Express Server everything it needs to know to assemble the images in a catalog into a
georeferenced mosaic that can be requested as a WMS layer.
Express Server indexes each catalog automatically when it is added, except when:
l
a catalog contains one or more images with no georeferencing.
l
a catalog contains images in more than one coordinate reference system
l
a catalog contains one or more images whose well-known-text string (WKT) has an
EPSG code that does not match its explicit parameters
Express Server examines the first three in a catalog and if they share a single EPSG code, then
that is the code that is used for the index. If Express Server cannot automatically index a catalog
and you wish that catalog to be spatially indexed, manually create an index for the catalog.
- 50 -
Chapter 5: Creating and Maintaining Catalogs
To create an index for a catalog:
1. Open the Express Server Manager (see Accessing the Express Server Manager on page
21).
2. Click Catalogs on the top navigation bar, then select a catalog in the list.
3. Select Basic on the left-hand navigation, then click Edit.
4. Select the Index checkbox. Specify the EPSG code (see Specifying an EPSG Code on
page 52and Finding the EPSG Code for an Image on page 79).
5. Click Save.
6. If you have no further settings to edit, click Publish.
If you want the images in a catalog to remain individually georeferenced, you may specify that the
catalog should not be indexed.
To specify that a catalog should not be indexed:
1. Open the Express Server Manager (see Accessing the Express Server Manager on page
21).
2. Click Catalogs on the top navigation bar, then select a catalog in the list.
3. Select Basic on the left-hand navigation, then click Edit.
4. Clear the Index checkbox and click Save.
5. If you have no further settings to edit, click Publish.
IMPORTANT: If changes are made to an indexed catalog outside the Express Server
Configuration page, such as the addition of images to that folder, you must update the
spatial index (see Updating a Spatial Index on page 79).
Generating an Overview
An overview image is a single MrSID image encoded from low-resolution scenes of all the component images. Adding an overview image to a catalog will significantly improve performance for
low-resolution requests. For example, without an overview image, a catalog that contains 4000
images will have to have pixels from each of those images decoded to produce a 640x480 scene
of the entire dataset. This may require several minutes. When an overview image is added, however, the same request will access only one image, returning a result in a few seconds or less.
- 51 -
LizardTech Express Server 9 User Manual
To generate an overview:
1. Open the Express Server Manager (see Accessing the Express Server Manager on page
21).
2. Click Catalogs on the top navigation bar, then select a catalog in the list.
3. Select Basic on the left-hand navigation, then click Edit.
4. Select the Index checkbox if it is not already selected. The Overview checkbox becomes
available.
5. Select the Overview checkbox and click Save.
6. If you have no further settings to edit, click Publish.
Specifying an EPSG Code
All the images in a catalog must be in the same coordinate reference system in order for them to
be used as a spatially indexed catalog. Without a spatial index a catalog cannot be used as a
WMS layer.
Express Server automatically detects the EPSG code for the first three images of a catalog, and
if they are the same, assigns that EPSG code to spatial index for that catalog. If one or more of
those initial images does not have one, no EPSG code is assigned to the catalog, but you may
enter one manually. If, in attempting to create a spatial index, Express Server detects that the
EPSG code listed in a well-known-text string (WKT) does not match its explicit parameters, you
will be prompted to supply a valid EPSG code (for more information, see Finding the EPSG Code
for an Image on page 79).
To specify an EPSG code:
1. Open the Express Server Manager (see Accessing the Express Server Manager on page
21).
2. Click Catalogs on the top navigation bar, then select a catalog in the list.
3. Select Basic on the left-hand navigation, then click Edit.
4. Select the Index checkbox if it is not already selected. The "EPSG code" field becomes
available.
5. Enter a valid code in the EPSG code field, then click Save.
6. If you have no further settings to edit, click Publish.
- 52 -
Chapter 5: Creating and Maintaining Catalogs
Mapping Bands
For MG4 source images, you may choose which bands you want Express Server to deliver and
the order in which they are to appear in the image. Band mapping will be ignored for source
images of any other type.
For RGB output you may choose any three bands in any order. For grayscale output you may
choose any single band. If you select "Default", Express Server delivers the first band of an image
for grayscale and the first three bands in their original order for RGB output.
A catalog group cannot be band-mapped. Individual catalogs comprising a catalog group must be
band-mapped separately.
To map bands in a catalog:
1. Open the Express Server Manager (see Accessing the Express Server Manager on page
21).
2. Click Catalogs on the top navigation bar, then select a catalog in the list.
3. Select Basic on the left-hand navigation, then click Edit.
4. Select a radio button. If you selected Grayscale, enter the desired band number. If you
selected RGB, enter the desired band numbers in the desired order.
5. Click Save.
6. If you have no further settings to edit, click Publish.
NOTE: Band mapping is not supported for Spatial Express catalogs.
Setting a Catalog's Advanced Properties
The advanced properties of a catalog are:
l
download policy
l
tile browsing policy
l
using black no-data
l
size constraint
l
custom properties
l
buffer merge rule
l
watermark file name
l
thumbnail definitions
- 53 -
LizardTech Express Server 9 User Manual
Changing Download Policy
You can determine whether or not you want to allow users to download the file from which they
are viewing scenes in Express Server. This can be done globally on the Settings page, or you can
set policy for a particular catalog. Any per-catalog policy overrides the global setting for that catalog.
By default, files are not downloadable.
To remove the file-download restriction for a catalog:
1. Open the Express Server Manager (see Accessing the Express Server Manager on page
21).
2. Click Catalogs on the top navigation bar, then select a catalog in the list.
3. Select Advanced on the left-hand navigation panel, then click Edit.
4. Select the Allow item download checkbox, then click Save.
5. If you have no further settings to edit, click Publish.
IMPORTANT: Remember that clicking Save in the workspace only temporarily saves
your changes until you click Publish or Discard. Clicking Publish sends all edits on all
the configuration pages to the live Express Server. Clicking Discard overwrites all
pages of the workspace with the current live configuration.
Changing Tile Browsing Policy
You can determine whether or not users can browse the individual tiles making up a spatially
indexed catalog. This can be done globally on the Settings page, or you can set policy for a particular catalog. Any per-catalog policy overrides the global setting for that catalog.
By default, tile browsing is allowed.
To restrict tile browsing for a catalog:
1. Open the Express Server Manager (see Accessing the Express Server Manager on page
21).
2. Click Catalogs on the top navigation bar, then select a catalog in the list.
3. Select Advanced on the left-hand navigation panel, then click Edit.
4. Select the Disallow tile browsing checkbox, then click Save.
5. If you have no further settings to edit, click Publish.
- 54 -
Chapter 5: Creating and Maintaining Catalogs
Using Black No-Data
If you create an image catalog from imagery that does not have transparency values configured,
you may want to default to rendering black pixels as no-data. Black pixels in the image will display
as transparent.
To use black no-data:
1. Open the Express Server Manager (see Accessing the Express Server Manager on page
21).
2. Click Catalogs on the top navigation bar, then select a catalog in the list.
3. Select Advanced on the left-hand navigation panel, then click Edit.
4. Select the Use black no-data checkbox, then click Save.
5. If you have no further settings to edit, click Publish.
NOTE: To create image mosaics with transparency between image tiles, either select
the option to use black no-data or ensure that the tiles in the image mosaic have transparency configured.
Setting Size Constraint
The Size Constraint property limits the size of an image requested from Express Server. This is
useful for controlling server load and limit access to high-quality image data. Setting a size constraint can be done globally on the Settings page, or you can set a value for a particular catalog or
catalog group. Any per-catalog or per-group setting overrides the global setting for that catalog or
catalog group.
By default no limit is enforced.
To set a per-catalog size constraint:
1. Open the Express Server Manager (see Accessing the Express Server Manager on page
21).
2. Click Catalogs or Catalog Groups on the top navigation bar, then select a catalog or a
catalog group in the list.
3. Select Advanced on the left-hand navigation panel, then click Edit.
4. Enter width and height values in the Size Constraint fields, then click Save.
5. If you have no further settings to edit, click Publish.
- 55 -
LizardTech Express Server 9 User Manual
Adding Custom Properties to a Catalog
You can add custom properties globally on the Settings page or add them to individual catalogs.
Any per-catalog custom properties created override any global custom properties.
To add custom properties to an individual catalog:
1. Open the Express Server Manager (see Accessing the Express Server Manager on page
21).
2. Click Catalogs on the top navigation bar, then select a catalog in the list.
3. Select Advanced on the left-hand navigation panel, then click Edit.
4. Enter a name and a value and click Add. The property is added to the table.
5. Repeat to create additional properties, then click Save.
6. If you have no further settings to edit, click Publish.
Setting Buffer Merge Rule
When two images overlap in the creation of a mosaic for delivery, Express Server’s mosaicker
must choose between the top or bottom pixel. It might seem obvious that the top pixel should be
used if its value does not equal the no-data value, but because lossy compression may introduce
slight changes in the values of the no-data pixels, some extra care is required to avoid mistaking
these “drifted” no-data values for valid image data and thus to reduce tile boundary artifacts.
For example a black pixel, which has the sample values 0,0,0, may end up being 0,0,1 or 0,1,0
after compression, which will still look black to the eye but not to the mosaicker. The mosaicker, in
seeking out true black pixels to make transparent, treats this as valid image data instead and
writes it to the output image, introducing a near-black pixel instead of the correct one from the
other tile, an effect that when multiplied along a boundary or around the collar of an image is
called speckling.
The buffer merge rule is helpful here because it enables flexibility in what is otherwise a hard rule.
The rule specifies how the mosaicker determines which pixel to use as the output pixel. One rule
is better for images compressed losslessly and the other is better for images that have been compressed lossily.
The better rule for images that were lossily compressed is “Fuzzy”. The Fuzzy method establishes
a spherical zone of “fuzziness” around a given top pixel value (think of the R, G and B color values
as values on the X, Y and Z axes of a three-dimensional graph). If the pixel value falls within that
- 56 -
Chapter 5: Creating and Maintaining Catalogs
zone it is treated as the no-data value and will be transparent; that is, discarded in favor of the bottom pixel. This allows you to “rope in” those drifted no-data values. The Fuzzy rule requires the
specification of a Fuzziness value.
For losslessly compressed images there is no danger of mistaking the no-data, since the pixel values remain bit-for-bit identical to those of the source image and thus cannot have drifted. In this
case the buffer merge rule should be “Strict”. The top pixel is then always used unless it exactly
matches the no-data value.
You can set a buffer merge rule globally on the Settings page, or you can set the rule for individual catalogs or catalog groups. Any per-catalog or per-group rule overrides the global setting
for that catalog or catalog group.
By default the buffer merge rule is Fuzzy and the Fuzziness value is 3.
To change the buffer merge rule:
1. Open the Express Server Manager (see Accessing the Express Server Manager on page
21).
2. Click Catalogs or Catalog Groups on the top navigation bar, then select a catalog or a
catalog group in the list.
3. Select Advanced on the left-hand navigation panel, then click Edit.
4. Select the radio button for the rule you wish to activate.
5. Move the Fuzziness slider to specify a positive integer between 0 and 20, then click
Save.
6. If you have no further settings to edit, click Publish.
Specifying Watermark File Name
You can specify a MrSID image to be used as a watermark that is overlaid on top of all images in
a catalog. This can be done globally on the Settings page, or you can specify a watermark for a
particular catalog or catalog group. Any per-catalog or per-group setting overrides the global setting for that catalog or catalog group.
Any image used as a watermark must be located in the directory <Express Server installation directory>/ImageServer/etc/watermarks.
By default no watermark is specified.
- 57 -
LizardTech Express Server 9 User Manual
To specify a watermark image for a catalog:
1. Open the Express Server Manager (see Accessing the Express Server Manager on page
21).
2. Click Catalogs on the top navigation bar, then select a catalog in the list.
3. Select Advanced on the left-hand navigation panel, then click Edit.
4. Select an image from the Watermark File Name drop-down menu, then click Save.
5. If you have no further settings to edit, click Publish.
NOTE: Watermarks do not appear in thumbnail images.
Setting Thumbnail Definitions
Thumbnail definitions control the size of thumbnail images produced by Express Server in
response to thumbnail requests. Express Server has three built-in thumbnail definitions: small (32
x 32), medium (64 x 64) and large (128 x 128). In addition there are two configurable defaults:
main (80 x 50) and gallery (200 x 220).
The thumbnail output format is JPEG.
You can set thumbnail definitions globally on the Settings page, or you can set them for a particular catalog or catalog group. Any per-catalog or per-group setting overrides the global setting
for that catalog or catalog group.
To set per-catalog thumbnail definitions:
1. Open the Express Server Manager (see Accessing the Express Server Manager on page
21).
2. Click Catalogs or Catalog Groups on the top navigation bar, then select a catalog or a
catalog group in the list.
3. Select Advanced on the left-hand navigation panel, then click Edit.
4. Edit existing entries or click Add and enter a new one, then click Save.
5. If you have no further settings to edit, click Publish.
Setting a Catalog's WMS Properties
A spatially indexed catalog can be accessed as a WMS layer in geospatial applications. The
WMS layer properties of a catalog fall into several categories:
- 58 -
Chapter 5: Creating and Maintaining Catalogs
l
basic (WMS layer title and supported projections)
l
keywords
l
attribution
l
identifiers
l
feature list URLs
l
metadata URLs
l
scale hint
For more detailed information about each of these WMS properties see version 1.1.1 of the Web
Map Service Implementation Specification.
Setting WMS Layer Title
The WMS layer title will be used to identify the catalog as a layer in WMS requests. Spaces and
symbols are valid characters in titles.
To set the title for a catalog or catalog group:
1. Open the Express Server Manager (see Accessing the Express Server Manager on page
21).
2. Click Catalogs or Catalog Groups on the top navigation bar, then select a catalog or
catalog group in the list.
3. Select WMS Layer on the left-hand navigation panel.
4. Select the Basic tab in the table, then click Edit at the bottom of your screen.
5. Enter or edit the title, then click Save. If no title is entered the catalog name is used.
6. If you have no further settings to edit, click Publish.
IMPORTANT: Remember that clicking Save in the workspace only temporarily saves
your changes until you click Publish or Discard. Clicking Publish sends all edits on all
the configuration pages to the live Express Server. Clicking Discard overwrites all
pages of the workspace with the current live configuration.
Setting WMS Layer Supported Projections
In addition to its native coordinate reference system (CRS) or "projection", a layer may declare
other projections that it supports. These additional CRSs are listed as EPSG codes.You can add
EPSG codes globally in Settings, or you can add them individually for any catalog or catalog
- 59 -
LizardTech Express Server 9 User Manual
group. Any per-catalog or per-group setting overrides the global setting for that catalog or catalog
group (see Configuring the WMS Top Layer on page 41).
To set EPSG codes for a catalog or catalog group:
1. Open the Express Server Manager (see Accessing the Express Server Manager on page
21).
2. Click Catalogs or Catalog Groups on the top navigation bar, then select a catalog or
catalog group in the list.
3. Select WMS Layer on the left-hand navigation panel.
4. Select the Basic tab in the table, then click Edit at the bottom of your screen.
5. Edit existing entries or click Add and enter a new one, then click Save.
6. If you have no further settings to edit, click Publish.
Adding and Editing WMS Layer Keywords
Well-chosen keywords can help in the searching of catalogs. It is a good idea to add keywords to
any of your catalogs that you will be making available as WMS layers.
To add or edit keywords for a catalog or catalog group:
1. Open the Express Server Manager (see Accessing the Express Server Manager on page
21).
2. Click Catalogs or Catalog Groups on the top navigation bar, then select a catalog or
catalog group in the list.
3. Select WMS Layer on the left-hand navigation panel.
4. Select the Basic tab in the table, then click Edit at the bottom of your screen.
5. Edit existing entries or click Add and enter a new one, then click Save.
6. If you have no further settings to edit, click Publish.
Adding and Editing WMS Layer Attribution Information
The attribution properties indicate a WMS layer's source. They can include a descriptive title, the
provider's URL and a logo image URL. Client applications may display one or more of these
items. If the URL for a logo image is included you can specify the image's MIME type, width and
height.
- 60 -
Chapter 5: Creating and Maintaining Catalogs
To add or edit attribution information for a catalog or catalog group:
1. Open the Express Server Manager (see Accessing the Express Server Manager on page
21).
2. Click Catalogs or Catalog Groups on the top navigation bar, then select a catalog or
catalog group in the list.
3. Select WMS Layer on the left-hand navigation panel.
4. Select the Attribution tab in the table, then click Edit at the bottom of your screen.
5. Enter or edit title and logo specifications, then click Save.
6. If you have no further settings to edit, click Publish.
Adding and Editing WMS Layer Identifiers
WMS <Identifier> elements may be used to list ID numbers or labels defined by a particular
"authority". The text content of the Identifier element is the ID value. The " authority" attribute
of the Identifier element corresponds to the " name" attribute of a separate <AuthorityURL>
element. The AuthorityURL encloses an <OnlineResource> element which states the URL of
a document defining the meaning of the Identifier values.
To add or edit identifier information for a catalog or catalog group:
1. Open the Express Server Manager (see Accessing the Express Server Manager on page
21).
2. Click Catalogs or Catalog Groups on the top navigation bar, then select a catalog or
catalog group in the list.
3. Select WMS Layer on the left-hand navigation panel.
4. Select the Identifiers tab in the table, then click Edit at the bottom of your screen.
5. Edit existing entries or click Add and enter a new one, then click Save.
6. If you have no further settings to edit, click Publish.
Adding and Editing WMS Feature List URLs
A feature list URL points to a list of the features represented in a WMS layer.
To add or edit a feature list URL for a catalog or catalog group:
1. Open the Express Server Manager (see Accessing the Express Server Manager on page
21).
- 61 -
LizardTech Express Server 9 User Manual
2. Click Catalogs or Catalog Groups on the top navigation bar, then select a catalog or
catalog group in the list.
3. Select WMS Layer on the left-hand navigation panel.
4. Select the FeatureListURL tab in the table, then click Edit at the bottom of your screen.
5. Edit existing entries or click Add and enter a new one, then click Save.
6. If you have no further settings to edit, click Publish.
Adding and Editing WMS Layer Metadata URLs
Metadata URLs offer detailed, standardized metadata about the data underneath a particular
layer. The type attribute indicates the standard to which the metadata complies. The format element indicates how the metadata is structured.
To add or edit a metadata URL for a catalog or catalog group:
1. Open the Express Server Manager (see Accessing the Express Server Manager on page
21).
2. Click Catalogs or Catalog Groups on the top navigation bar, then select a catalog or
catalog group in the list.
3. Select WMS Layer on the left-hand navigation panel.
4. Select the MetadataURL tab in the table, then click Edit at the bottom of your screen.
5. Edit existing entries or click Add and enter a new one, then click Save.
6. If you have no further settings to edit, click Publish.
Adding and Editing a WMS Layer Scale Hint
Because WMS output is destined for output devices of arbitrary size and resolution, the usual
definition of scale as the ratio of map size to real-world size is not appropriate. The scale hint suggests minimum and maximum scales for which it is appropriate to display a WMS layer.
To add or edit a scale hint for a catalog or catalog group:
1. Open the Express Server Manager (see Accessing the Express Server Manager on page
21).
2. Click Catalogs or Catalog Groups on the top navigation bar, then select a catalog or
catalog group in the list.
3. Select WMS Layer on the left-hand navigation panel.
4. Select the ScaleHint tab in the table, then click Edit at the bottom of your screen.
- 62 -
Chapter 5: Creating and Maintaining Catalogs
5. Enter or edit max and min values, then click Save.
6. If you have no further settings to edit, click Publish.
Adding and Editing WMS Layer Authority URLs
Identifier elements can be used to list ID numbers or labels defined by a particular authority. For
example, the Global Change Master Directory (gcmd.gsfc.nasa.gov) defines a DIF_ID label for
every dataset. The authority name and explanatory URL are defined in a separate AuthorityURL
element, which may be defined once and inherited by subsidiary layers. Identifiers themselves are
not inherited.
To add or edit the authority URL:
1. Open the Express Server Manager (see Accessing the Express Server Manager on page
21).
2. Click Catalogs or Catalog Groups on the top navigation bar, then select a catalog or
catalog group in the list.
3. Select WMS Layer on the left-hand navigation panel.
4. Select the Authorities tab in the table, then click Edit at the bottom of your screen.
5. Edit existing entries or click Add and enter a new one, then click Save.
6. If you have no further settings to edit, click Publish.
Adding Images to an Existing Catalog
You can add images to existing catalogs simply by copying them into the desired folder.
After you add images to an existing catalog you must update the catalog' spatial index if it has
one (see Updating a Spatial Index on page 79).
Serving Different Band Combinations from the Same
Images
You can serve different combinations of bands from a single set of MG4 images by creating a new
Express Server catalog for each band or set of three bands that you would like to serve. There is
no need to copy the source imagery to a new folder. Simply create a new, uniquely named catalog
from the same folder (see Adding a Catalog on page 48) and map the bands as desired for each
one (see Mapping Bands on page 53).
- 63 -
LizardTech Express Server 9 User Manual
NOTE: If a catalog contains only non-MG4 files no band selection is applied.
Working with Geospatial PDFs
Express Server supports Geospatial PDFs as source imagery. Some things that it would be good
to keep in mind when using Geospatial PDFs are:
l
Express Server rasterizes and delivers all layers of Geospatial PDF catalogs.
l
If a Geospatial PDF has a border it is included .
l
Geospatial PDFs can take a long time to deliver across networks. It is recommended that
you optimize your Geospatial PDF catalogs (see below) so they will take less time for
users to view.
l
If you are going to work with Geospatial PDFs regularly, we recommend that you use the
64-bit version of Express Server.
Optimizing PDFs
Express Server supports Geospatial PDF as a source format. Delivery performance can suffer
when image data is served from PDFs, so Express Server enables you to optimize them for delivery. Because optimizing PDFs can take some time, Express Server does not do this automatically. However, you can optimize your PDFs any time.
To optimize PDFs:
1. Open the Express Server Manager (see Accessing the Express Server Manager on page
21).
2. Click Catalogs on the top navigation bar, then select a catalog in the list.
3. Select Basic on the left-hand navigation, then click Edit.
4. Click Optimize PDFs. An indexing process begins, during which time no edits may be
made. Note: You do not have to click "Save" in this case. If there are unsaved edits on
this tab, they are saved when you click the button.
5. If you have no further settings to edit, click Publish.
NOTE: If you add PDFs to a catalog whose other PDFs have already been optimized,
the new PDFs are not automatically optimized. If you wish the new files to be optimized
you must run the optimize process on that catalog again.
- 64 -
Chapter 5: Creating and Maintaining Catalogs
Adding and Configuring Catalog Groups
You can group catalogs together so that users can access a number of subcatalogs through a
single "virtual" catalog that contains them, called a catalog group. One of the advantages of catalog groups is that the subcatalogs they contain can have different coordinate reference systems,
enabling you to combine and access catalogs of different projections. Another is that you can
apply settings to an entire subset of catalogs at a stroke while not necessarily making global
changes that affect all of your catalogs.A catalog group can many of the same properties as an
individual catalog.
Adding a Catalog Group
By default, a newly created catalog group is "enabled", which means it will be accessible via
Express Server.
To add a catalog group:
1. Open the Express Server Manager (see Accessing the Express Server Manager on page
21).
2. Click Catalog Groups on the top navigation bar.
3. Click the Create a New Catalog Group icon on the toolbar. A new catalog group form
appears with available catalogs listed on the right. (This list includes other catalog groups;
you can nest catalog groups within other catalog groups.)
4. Name the new catalog group.
5. Move desired catalogs from the table at right to the list of subcatalogs at left using the left
and right arrows.
6. Use the up and down arrows to move selected catalogs up or down in the list order.
(Note: the catalog at the bottom of the list will be rendered first in viewing and will be
covered by those above it in the list. The catalog at the top of the list will be rendered last
and on top of the ones below.)
7. Click Save.
8. If you have no further settings to edit, click Publish.
IMPORTANT: Remember that clicking Save in the workspace only temporarily saves
your changes until you click Publish or Discard. Clicking Publish sends all edits on all
- 65 -
LizardTech Express Server 9 User Manual
the configuration pages to the live Express Server. Clicking Discard overwrites all
pages of the workspace with the current live configuration.
Editing a Catalog Group
You can add subcatalogs to or remove subcatalogs from a catalog group, or change their order.
To add, remove or reorder subcatalogs in a catalog group:
1. Open the Express Server Manager (see Accessing the Express Server Manager on page
21).
2. Click the Catalog Groups tab on the top navigation bar.
3. Use the left and right arrows to move catalogs into or out of the list of subcatalogs on the
left side.
4. Use the up and down arrows to move selected subcatalogs up or down in the list order.
(Note: the subcatalog at the bottom of the list will be rendered first in viewing and will be
covered by those above it in the list. The subcatalog at the top of the list will be rendered
last and on top of the ones below.)
5. Click Save.
6. If you have no further settings to edit, click Publish.
Setting Advanced and WMS Properties for a Catalog Group
The Advanced properties and the WMS properties for catalog groups are the same as for individual catalogs.
See Setting a Catalog's Advanced Properties on page 53 and Setting a Catalog's WMS Prop-
erties on page 58.
Hiding a Catalog
You may hide a catalog simply by adding a period (.) to the beginning of its name. Hidden catalogs do not appear in the list of catalogs returned by Express Server. However, unlike a catalog
that is disabled, a hidden catalog is visible if searched for by its "dotted" name.
NOTE: Hidden catalogs can be included in a catalog group, but again they will not show
up in the list. They must be requested by name.
- 66 -
Chapter 5: Creating and Maintaining Catalogs
To hide a catalog:
1. Open the Express Server Manager (see Accessing the Express Server Manager on page
21).
2. Click Catalogs or Catalog Groups on the top navigation bar, then select a catalog or a
catalog group in the list.
3. Select Basic on the left-hand navigation, then click Edit at the bottom of your screen.
4. In the Catalog Name field, enter a period (.) as the first character of the catalog name,
then click Save.
5. If you have no further settings to edit, click Publish.
IMPORTANT: Remember that clicking Save in the workspace only temporarily saves
your changes until you click Publish or Discard. Clicking Publish sends all edits on all
the configuration pages to the live Express Server. Clicking Discard overwrites all
pages of the workspace with the current live configuration.
To make a hidden catalog visible again, remove the period at the beginning of the catalog name.
See also Enabling a Catalog on page 49.
Removing a Catalog
To remove a catalog:
1. Open the Express Server Manager (see Accessing the Express Server Manager on page
21).
2. Click Catalogs or Catalog Groups on the top navigation bar, then select a catalog or a
catalog group in the list.
3. Click the Delete Selected Catalogs icon ( ) on the toolbar.
4. Confirm that you want to delete the catalog or group.
IMPORTANT: Remember that clicking Save in the workspace only temporarily saves
your changes until you click Publish or Discard. Clicking Publish sends all edits on all
the configuration pages to the live Express Server. Clicking Discard overwrites all
pages of the workspace with the current live configuration.
- 67 -
LizardTech Express Server 9 User Manual
Removing Imagery from a Catalog
If you are not using a spatial index, you can remove imagery from an existing catalog simply by
deleting the desired imagery from the proper folder.
If you are using a spatial index for the catalog, you must update the index (see Updating a Spatial
Index on page 79). This is the case if you are serving up the catalog as a WMS layer or using the
spatial index to do mosaicking on Express Server.
- 68 -
Chapter 6: Viewing Express Server Imagery
Chapter 6: Viewing Express Server
Imagery
Viewing Express Server Imagery Overview
69
Viewing Images with ExpressZip
69
Viewing Images with a JavaScript Viewer
70
Viewing Images with ExpressView Browser Plug-in
70
Viewing Images with DHTML and JavaScript
72
Viewing Images with a WMS Flash Viewer
73
Viewing Images with a WMS Ajax Viewer
73
Viewing Express Server Imagery Overview
You can access Express Server imagery from any Web Map Service (WMS) client.WMS is a
widely-supported standard that you can use to view imagery from desktop GIS applications, from
web browsers, from mobile applications, and more. You can connect to Express Server imagery
from within an application using the following URL:
http://<Express Server name>/lizardtech/iserv/ows
Additionally, you can use the sample applications and libraries included with Express Server to
view Express Server imagery directly from a web browser. The samples included with Express
Server are located in the following directory:
<Express Server Installation Directory>\ImageServer\docs\samples\
Viewing Images with ExpressZip
ExpressZip is an open-source web application that you can use to browse, view, and export
Express Server imagery. For more information on ExpressZip, see the ExpressZip Manual.
By default, you can access ExpressZip via HTTPS and HTTP. Both are protocols for communication over a network, however, HTTPS adds encryption for an increased layer of security.
To access ExpressZip, open a web browser and navigate to one of the following URLs:
- 69 -
LizardTech Express Server 9 User Manual
l
For HTTP:
http://<Express Server name>:8080/ExpressZip
l
For HTTPS:
https://<Express Server name>:<https port>/ExpressZip
The HTTPS port number is configured during installation. By default, the port number for
HTTPS is 8443 and the HTTP port number is 8080. For example, to access ExpressZip via
HTTPS, you might enter the following URL:
https://local-express-server:8443/ExpressZip
Viewing Images with a JavaScript Viewer
Express Server includes a third-party viewer called Leaflet in the following directory:
<Express Server installation directory>/ImageServer/docs/samples.
Leaflet is an open-source JavaScript library for creating rich, interactive web maps. You can use
Leaflet to view Express Server imagery via WMS.
For more information on Leaflet, including tutorials and extensive API documentation, visit the
Leaflet website at the following URL:
http://leafletjs.com/
Viewing Images with ExpressView Browser Plug-in
You can embed the LizardTech ExpressView Browser Plug-in in an HTML page to view imagery.
This can be accomplished by using the <object> tag in Microsoft Internet Explorer and the
<embed> tag in Firefox browsers.
The ExpressView Browser Plug-in can be downloaded at the following URL:
http://www.lizardtech.com/software/expressview/webinstall.
Usage
The following parameters are required:
- 70 -
Chapter 6: Viewing Express Server Imagery
imgSource
This is the URL to the image.
type (EMBED only)
This specifies the MIME type of the image. In order to invoke the ExpressView
Browser Plug-in, set this to image/x-mrsid-image
pluginspage (EMBED only)
This is the location of the plug-in download page:
http://www.lizardtech.com/software/expressview/webinstall.
codebase (OBJECT only)
This should be:
http://www.lizardtech.com/plugin/MrSID_BPI.cab#Version=5.0.0.0
classid (OBJECT only)
This should be:
CLSID:2513AB48-1AEF-4E55-8329-927FF97C9DCE
Example
The following piece of code works for displaying the plug-in in both Internet Explorer and Firefox
browsers:
<object
vspace="10"
name=""
width="600"
height="500"
classid="CLSID:2513AB48-1AEF-4E55-8329-927FF97C9DCE"
codebase="http://www.lizardtech.com/plugin/MrSID_BPI.cab#
Version=5.0.0.0">
- 71 -
LizardTech Express Server 9 User Manual
<param name="imgSource" value=
"http://localhost/lizardtech/iserv/getimage?cat=Geo&item=BLM_re
lief.sid" />
<embed width="600" height="500" type="image/x-mrsid-image"
pluginspage=
"http://www.lizardtech.com/software/expressview/webinstall"
imgSource=
"http://localhost/lizardtech/iserv/getimage?cat=Geo&item=BLM_re
lief.sid">
</embed>
</object>
TIP: The above example is for a MrSID image. To make it work with a JPEG 2000
image, modify the imgSource value to indicate the path to a file with a .jp2 extension.
Viewing Images with DHTML and JavaScript
This sample offers a simple way to view Express Server images using only DHTML and
JavaScript. It consists of the following two files:
l
l
samples/browser-view.html
styles/common/viewer-ops.js
Usage
The HTML page is initialized with the following call:
initViewerOps(14535,
10236,
'http://<ServerName>/lizardtech/iserv'
);
The arguments to this call are the source image width, source image height, and Express Server
URL.
An IMG element named " imgView" is used as a container to display the returned pixels.
- 72 -
Chapter 6: Viewing Express Server Imagery
Information about the image is stored in a FORM element named " viewForm". This includes the
catalog name, source image name, center point, zoom level, viewer width, viewer height, image
properties, and viewer background color. When the form is submitted, the source of imgView
changes to the submitted server request.
Navigation tools such as panning and zooming are achieved with hyperlinked text that calls into
the Express Server Web API through functions in viewer-ops.js. Clicking on the image with
the mouse zooms the image by one level and re-centers it at the click point.
Viewing Images with a WMS Flash Viewer
This example demonstrates how to view imagery served with WMS using an Adobe Flash-based
viewer called BeeldBlad, developed by the Dutch National Aerospace Laboratory (NLR).
Visit " http://gdsc.nlr.nl/gdsc/en/tools/beeldblad" to learn more about
BeeldBlad.
Viewing Images with a WMS Ajax Viewer
This sample utilizes the OpenLayers client to view WMS-served imagery. The web page includes
a small amount of JavaScript that is used to set up the Ajax-based viewer.
Visit " http://openlayers.org/" to learn more about the OpenLayers JavaScript API.
- 73 -
Chapter 7: Common Tasks
Chapter 7: Common Tasks
Common Tasks Overview
75
Setting User Account Preferences
75
Starting and Stopping the Express Server
76
Starting and Stopping the Web Server Service
76
Starting and Stopping the Admin Backend Service
77
Starting and Stopping the Tomcat Service
77
Starting and Stopping the JPIP Service
78
Adding a WMS Layer
79
Updating a Spatial Index
79
Finding the EPSG Code for an Image
79
Adding Custom Coordinate Reference Systems
80
Publishing Express Server WMS Catalogs as ArcGIS Server Layers
83
Configuring Multiple Express Servers
89
Clearing the Configuration Archive
93
Configuring Express Server Authentication
93
Common Tasks Overview
This section covers a number of tasks that you are likely to want to perform after your Express
Server software is installed and configured.
Setting User Account Preferences
The User Account settings enable you to change your login password.
To change your password:
1. Open the Express Server Manager (see Accessing the Express Server Manager on page
21).
2. Click Settings on the top navigation bar.
3. Select User Account on the left-hand navigation panel.
4. Enter your current password in the first field, then enter a new password in the other two.
5. Click Change Password.
- 75 -
LizardTech Express Server 9 User Manual
Starting and Stopping the Express Server
Express Server runs as a collection of services on Windows and daemons on Linux. To start or
stop the Express Server, you must start or stop all of the component services or daemons. You
can start and stop the following services:
l
The web server service or daemon. On Windows, this is the Worldwide Web Publishing service and on Linux this is the httpd daemon.
l
The LizardTech Express Server Admin Backend service or daemon.
l
The LizardTech Express Server Tomcat service or daemon.
l
The LizardTech JPIP service or daemon.
For more information on services and daemons, see Express Server Architecture on page 1.
You can view the status of each service and daemon on the Status page of the Express Server
Manager.
Starting and Stopping the Web Server Service
You can use the Express Server Manager to start and stop the IIS or Apache web server service.
When you start or stop the service on Linux, you also start or stop the ltcsd daemon. For more
information on the ltcsd daemon and why there is no corresponding service for Windows, see
Express Server Architecture on page 1.
To start or stop the web server service, complete the following steps:
1. Open the Express Server Manager (see Accessing the Express Server Manager on page
21).
2. Click Status on the top navigation bar.
3. Click the Start/Stop button to the right of the Web Server status line.
On Linux, if you start or stop the web server somewhere other than the Express Server Manager,
you must complete the following additional steps to start or stop the ltcsd daemon.
1. Open a terminal.
2. Enter one of the following commands with root permissions:
/etc/init.d/ltcsd start
- 76 -
Chapter 7: Common Tasks
OR
/etc/init.d/ltcsd stop
Starting and Stopping the Admin Backend Service
The LizardTech Express Server Admin Backend service or daemon handles communication
between the Express Server Manager and the web server. The Admin Backend service or daemon processes requests to start or stop the web server and performing licensing tasks.
Starting and Stopping Tomcat on Windows
On Windows, the Admin Backend service is called esadminagent. To restart the service, complete the following steps:
1. Open the Windows Services utility.
2. Find the LizardTech Express Server Admin Backend service.
3. Right-click on the service and click Start or Stop.
Starting and Stopping Tomcat on Linux
On Linux, Tomcat runs as a daemon called lttagentd. To restart the daemon, complete the following steps:
1. Open a terminal.
2. Run one of the following commands with root permissions:
/etc/init.d/lttagent start
OR
/etc/init.d/lttagent stop
Starting and Stopping the Tomcat Service
The Express Server Manager and ExpressZip applications are hosted by the LizardTech Express
Server Tomcat service. Tomcat is a web server and servlet container that hosts web applications.
- 77 -
LizardTech Express Server 9 User Manual
Starting and Stopping Tomcat on Windows
On Windows, Tomcat runs as a service called the LizardTech Express Server Tomcat service, or
lttomcat7. To restart the service, complete the following steps:
1. Open the Windows Services utility.
2. Find the LizardTech Express Server Tomcat service.
3. Right-click on the service and click Start or Stop.
Starting and Stopping Tomcat on Linux
On Linux, Tomcat runs as a daemon called lttomd. To restart the daemon, complete the following steps:
1. Open a terminal.
2. Run one of the following commands with root permissions:
/etc/init.d/lttomd start
OR
/etc/init.d/lttomd stop
Starting and Stopping the JPIP Service
The JPIP service or daemon processes requests for imagery via JPIP. You must restart the
JPIP service or daemon any time you change its configuration or add or remove a catalog.
To start or stop the JPIP Server:
1. Open the Express Server Manager (see Accessing the Express Server Manager on page
21).
2. Click Status on the top navigation bar, then click the Start/Stop button to the right of the
JPIP Server status line.
Alternatively, on Linux you can stop the JPIP daemon from the command line.
1. Open a terminal.
2. Run one of the following commands with root permissions:
/etc/init.d/ltjpipd start
- 78 -
Chapter 7: Common Tasks
OR
/etc/init.d/ltjpipd stop
Adding a WMS Layer
Any spatially indexed catalog can be viewed as a layer in any WMS-enabled GIS. A spatial index
is a special database that allows quick retrieval of images in response to geospatial queries. It
tells Express Server everything it needs to know to assemble the images in a catalog into a georeferenced mosaic that can be requested as a WMS layer. Thus, the addition of a WMS layer is
simply the addition of a spatially indexed catalog.
See Adding a Catalog on page 48 and Indexing a Catalog on page 50.
Updating a Spatial Index
Whenever you have added, removed, or modified the images in an indexed catalog you must
update its spatial index. If the catalog has an overview it is automatically updated when the index
is updated.
To update the spatial index for a catalog:
1. Open the Express Server Manager (see Accessing the Express Server Manager on page
21).
2. Click Catalogs on the to navigation bar, then select a catalog or multiple catalogs in the
list.
3. Click the Rebuild indexes for selected catalogs
4. If you have no further settings to edit, click Publish.
icon on the toolbar.
IMPORTANT: Remember that clicking Save in the workspace only temporarily saves
your changes until you click Publish or Discard. Clicking Publish sends all edits on all
the configuration pages to the live Express Server. Clicking Discard overwrites all
pages of the workspace with the current live configuration.
Finding the EPSG Code for an Image
To find the EPSG code for an image, run the command line tool mrsidgeoinfo, which is located by
default in <Express Server installation directory>\ImageServer\bin.
- 79 -
LizardTech Express Server 9 User Manual
Example:
mrsidgeoinfo -epsg <file name>
If an EPSG code is returned, use it (see Specifying an EPSG code) .
If no EPSG code is returned, then run
mrsidgeoinfo -wkt <file name>
The resulting well known text string (WKT) may be useful in finding the corresponding
EPSG code.
Adding Custom Coordinate Reference Systems
LizardTech Express Server can reproject imagery into an EPSG-defined coordinate reference system (CRS). The supported EPSG codes are a subset of those which were defined by the EPSG
database available at the time the product was released. You can add support for other CRSs,
such as custom projections or more recent additions to the EPSG database. To do this you must
obtain an OGC-compliant well known text (WKT) version of the CRS and add it to the esri_
extra.wkt file used by Express Server.
IMPORTANT: Improper editing of the esri_extra.wkt file can cause unexpected behavior. Please review your changes carefully and make a backup before you start.
Obtaining an OGC-Compliant WKT Version of the CRS
The WKT version of the CRS should be available from the source of the CRS. If an ESRI ".prj"
file is provided instead (as is often the case) the .prj file can be converted in LizardTech GeoExpress using the steps below.
To obtain an OGC-compliant WKT version of the CRS:
1. Add any image to the Images tab of the Job list in GeoExpress.
2. Choose Reproject from the Tools menu. The Reprojection Manager appears.
3. Click Select Coordinate Reference System. The Coordinate Reference System
Selector dialog appears.
4. Select the Use custom WKT checkbox.
5. Choose Add a new WKT from the Select WKT drop-down menu. The Edit User Defined
WKT dialog appears.
- 80 -
Chapter 7: Common Tasks
6. Click Browse to choose the .prj file you need to convert. If you don't see your file, select
ESRI CRS files (*.prj) in the Files of Type drop-down menu.
7. Click OK. The text box populates with the OGC-compliant WKT that you will add to the
esri_extra.wkt file.
8. Copy the WKT and paste it into a text editor for later use.
9. You may now close GeoExpress without saving the project.
If you don’t have access to GeoExpress or an authoritative conversion of your projection string
(from the source) you may be able to convert it "by inspection" as ESRI PRJ files are quite similar
to WKT files (see example below).
Adding the WKT to the esri_extra.wkt File
This text file is used internally by Express Server. Each line in the file follows the format
epsg code, wkt
containing an EPSG code with a definition of an OGC-compliant (but presumably non-standard)
CRS.
To add the WKT to the esri_extra.wkt file:
1. Using a text editor, open the esri_extra.wkt file (located by default in <Express Server
installation directory>/ImageServer/etc/gdal).
2. Add a new line for your custom EPSG code to the bottom of the file as follows:
a. Add the custom EPSG code and a comma
b. Append the WKT. Remove all the carriage return line feeds so that the WKT is all
one long string.
Example
Here we’ll add support for EPSG code 102763, which is not in the EPSG database and not supported by Express Server. It comes from the following custom ".prj" file:
PROJCS["NAD_1983_StatePlane_Kentucky_FIPS_1600_Feet",
GEOGCS["GCS_North_American_1983",DATUM["D_North_Am
erican_1983",SPHEROID["GRS_1980",6378137.0,298.257222
101]],PRIMEM["Greenwich",0.0],UNIT["Degree",0.017453292
5199433]],PROJECTION["Lambert_Conformal_Conic"],PARAM
ETER["False_Easting",4921250.0],PARAMETER["False_Northi
- 81 -
LizardTech Express Server 9 User Manual
ng",3280833.333333333],PARAMETER["Central_Meridian",-8
5.75],PARAMETER["Standard_Parallel_1",37.0833333333333
4],PARAMETER["Standard_Parallel_2",38.66666666666666],
PARAMETER["Latitude_Of_Origin",36.33333333333334],UNIT
["Foot_US",0.3048006096012192]]
Convert the .prj file to an OGC standard WKT using GeoExpress, which results in the following.
Note that the DATUM and PROJECTION values have been changed.
PROJCS["NAD_1983_StatePlane_Kentucky_FIPS_1600_Feet",
GEOGCS["GCS_North_American_1983",
DATUM["North_American_Datum_1983",
SPHEROID["GRS_1980",6378137.0,298.257222101]],
PRIMEM["Greenwich",0.0],
UNIT["Degree",0.0174532925199433]],
PROJECTION["Lambert_Conformal_Conic_2SP"],
PARAMETER["False_Easting",4921250.0],
PARAMETER["False_Northing",3280833.333333333],
PARAMETER["Central_Meridian",-85.75],
PARAMETER["Standard_Parallel_1",37.08333333333334],
PARAMETER["Standard_Parallel_2",38.66666666666666],
PARAMETER["Latitude_Of_Origin",36.33333333333334],
UNIT["Foot_US",0.3048006096012192]]
Add the new WKT to the esri_extra.wkt file, preceding it with the EPSG code and a comma.
While the text in the sample below has line breaks, the text in your esri_extra.wkt file should be on
one line with no breaks.
102763,PROJCS["NAD_1983_StatePlane_Kentucky_FIPS_1600
_Feet",GEOGCS["GCS_North_American_1983",DATUM["North_
American_Datum_1983",SPHEROID["GRS_1980",6378137.0,29
- 82 -
Chapter 7: Common Tasks
8.257222101]],PRIMEM["Greenwich",0.0],UNIT["Degree",0.017
4532925199433]],PROJECTION["Lambert_Conformal_Conic_2
SP"],PARAMETER["False_Easting",4921250.0],PARAMETER["Fa
lse_Northing",3280833.333333333],PARAMETER["Central_Meri
dian",-85.75],PARAMETER["Standard_Parallel_1",37.08333333
333334],PARAMETER["Standard_Parallel_2",38.666666666666
66],PARAMETER["Latitude_Of_Origin",36.33333333333334],U
NIT["Foot_US",0.3048006096012192]]
Express Server will now reproject to "EPSG:102763".
Publishing Express Server WMS Catalogs as ArcGIS
Server Layers
Express Server WMS catalogs can be published on an ArcGIS Server if you have ArcMap and
access to an Express Server. The advantage of this workflow is that the ArcGIS Server performance is improved when Express Server handles the raster layers via WMS.
To do this, you must connect to the LizardTech WMS server via ArcMAP and then save the catalog as an ArcMap document. ArcMap documents can later be published as layers on ArcGIS
Server providing you have the appropriate ESRI Server licensing to publish map services.
- 83 -
LizardTech Express Server 9 User Manual
To save an Express Server WMS image as a map document in ArcMap.
1. Start ArcMAP and click Add Data. The Add Data dialog appears as shown below.
2. Select GIS Servers, then select Add WMS Server. The Add WMS Server dialog opens
as shown below.
- 84 -
Chapter 7: Common Tasks
3. In the URL field, enter the LizardTech Express Server WMS address using the format
http://<your server>:<port>/lizardtech/iserv/ows? For example:
http://demo.lizardtech.com/lizardtech/iserv/ows?
You can verify the connectivity with the server or the WMS catalogs available by selecting
Get Layers, but this is not required. Note: If no port is specified, the default of port 80 is
assumed.
- 85 -
LizardTech Express Server 9 User Manual
4. Click OK. A new option appears in the Add Data dialog corresponding to the selected
Express Server, to which you are now connected.
5. Double-click the name of the newly added server. This displays the next level in the WMS
server hierarchy. Double-click again to access the next level and so on to the level of the
catalog you would like to add, as shown below.
6. Double-click that catalog or click Add (clicking Add at one of the intermediate levels may
- 86 -
Chapter 7: Common Tasks
result in an error). The catalog appears listed as a layer, as shown below.
7. (Optional) Apply post-processing if desired.
8. Select the catalog and choose Save As from the File menu. The Save As dialog appears,
as shown below. Name the file, then choose ArcMap Document (*.mxd) in the Save as
type drop-down menu and click Save.
- 87 -
LizardTech Express Server 9 User Manual
To publish an Express Server WMS image as a map document in ArcGIS Server:
1. After following the above procedure, place the newly created MXD file in a data directory
accessible by your ArcGIS Server.
2. Publish the ArcMAP document to your ArcGIS Server via ArcCatalog or via ArcGIS Server
Manager (see ESRI's documentation for these products). Your newly published ArcGIS
service now automatically extracts the raster layer from the Express Server WMS image,
- 88 -
Chapter 7: Common Tasks
as shown below.
Configuring Multiple Express Servers
Mirroring is a feature of Express Server that allows you to keep the catalog and spatial index configuration of multiple Express Servers on a network in sync. You may have any number of slave
servers.
IMPORTANT: All the Express Servers must be of the same version and running on the
same platform. Use the browse command (see browse on page 112) to verify that you
are not attempting to mirror servers of differing versions.
NOTE: To enable communication between Express Servers you must configure
IP restrictions on each Express Server. For more information on IP restrictions, see Configuring Express Server Authentication on page 93.
- 89 -
LizardTech Express Server 9 User Manual
Configuration
To configure your Express Servers for mirroring, select one to be the master Express Server. In
the base configuration file (iserv-cfg.xml) of the master, place the following code immediately after the ImageManager element:
<Mirrors>
<Secondary host="<hostname1>" port="<port>" ssl="none" />
<Secondary host="<hostname2>" port="<port>" ssl="none" />
</Mirrors>
When you configure Express Server for mirroring, you must set the following properties:
l
<hostname>. Enter the hostname of the secondary (or slave) Express Server. Each secondary element denotes another Express Server.
l
<port>. Enter the port number of the secondary Express Server. If you exclude the port
property from the secondary element, Express Server uses port 80 by default.
l
ssl. Enter none if the secondary Express Server uses HTTP. If the secondary Express
Server uses HTTPS, enter either noverify or strict. If you enter noverify, the
Express Server accepts both self-signed certificates and certificates signed by a trusted
certificate authority. If you enter strict, the Express Server only accepts certificates
signed by a trusted certificate authority.
IMPORTANT: For the master Express Server to accept communication from a secondary Express Server using HTTPS, it requires an SSL certificate. Obtain a copy of
the SSL certificate used by web server on the secondary Express Server, then place the
certificate in the following directory:
<Installation Directory>\ImageServer\etc\
For Express Server to read the certificate, the certificate must be named cabundle.crt and saved in base64 encoding. If there are multiple secondary Express
Servers, you must obtain a copy of each server's certificate. Then, use a text editor to
concatenate the certificates into one file named ca-bundle.crt. For more information on SSL certificates, refer to your web server's documentation.
- 90 -
Chapter 7: Common Tasks
TIP: Most web browser provide a utility for exporting the SSL certificate used by a web
page to base64 encoding. If you cannot export a copy of the certificate from the web
server, you may navigate to the web page for your server and attempt to export the certificate with the browser.
After you make changes to the base configuration file, save the file, and restart the LizardTech
Express Server Tomcat service or daemon. For more information on the base configuration file,
including the ImageManager element, see Basic Express Server Configuration Using XML
Files on page 150. For more information on restarting the Tomcat service or daemon, see Starting and Stopping the Tomcat Service on page 77.
The server administrator should specify only one Express Server to be the master, and only that
master Express Server may have a list of mirrors. When correctly setup, the Express Servers can
be mapped out as follows:
IMPORTANT: In a mirroring configuration, only the Express Server Manager of the master server should be used for catalog configuration.
Setting Up Shared Repositories for Your Imagery
Express Server does not synchronize actual image content. It synchronizes the catalog configuration, spatial indexes and spatial overviews. Image repositories can either be synchronized
independently or stored on a shared file system. In both cases, the Path elements of each catalog in the catalog configuration file (catalogs.xml) should reference an image repository that
will be common among all synchronized Express Servers. That is, the path to the repository must
be identical, whether the repository is synchronized or shared.
On Unix, you can reference shared repositories in the Path element using an NFS or samba
mount:
- 91 -
LizardTech Express Server 9 User Manual
<Path>/mnt/images/samples</Path>
On Windows use the UNC share method:
<Path>\\img-server\imageshare\samples</Path>
NOTE: For shared repositories to work properly the user must have permissions to the
network resource.
Mirroring and Unix Systems
On Unix systems the httpd and ltcsd processes must be running as the same user in order to
support mirroring. The user designated for running ltcsd is set during Express Server installation, but can be changed by setting the LT_IS_USER variable in the environment file at
<Express Server installation directory>/ImageServer/etc/env.sh. Alternatively, you can change the user designated for running Apache via the "User" directive in the
httpd.conf file (for more information about the httpd.conf file see Configuring Apache on
page 16).
Usage
Once mirroring is configured, publishing is automatic. Any time you publish changes to the master
server, the master server reloads its own catalogs.xml file (picking up the local changes), and
send its entire configuration set to each of its slaves.
Security
As Express Server piggy-backs on either IIS or Apache HTTP server, it is up the network administrator to configure the security settings of a web server to prevent malicious use of Express
Server's administrative functions. Consult your IIS or Apache documentation for more security
details.
NOTE: Express Server keeps an archived history of the configuration files that are overwritten by mirroring operations. These files include spatial indexes, overviews and databases. You should periodically delete unneeded archives (see Clearing the
Configuration Archive on page 93).
- 92 -
Chapter 7: Common Tasks
Clearing the Configuration Archive
Express Server keeps an archived history of configuration files. These files include spatial
indexes, overviews and databases and can be found in timestamped folders in your installation directory. A configuration file is archived each time you publish changes. This archive can grow large
over time and it is recommended that you periodically delete unneeded archives.
Express Server stores the configuration archive in the working directory. By default, the Express
Server working directory is in the following location:
<Express Server installation directory>/ImageServer/var/data
TIP: You can easily access and restore archived configurations using the Express
Server Manager (see Restoring an Archived Configuration on page 45).
Configuring Express Server Authentication
Express Server automatically imposes an IP restriction on the Express Server Manager so that it
can only be called from localhost (127.0.0.1). We recommend that this not be changed unless one
or both of the following scenarios obtains:
l
you are running multiple Express Servers ("mirroring")
l
you are uploading images from GeoExpress directly to Express Server and the two applications are not running on the same host
In either of these cases you will have to relax the IP restriction and specify additional "allowed"
hosts. You can set IP restrictions on either IIS or Apache. See your web server documentation for
complete information.
Adding a Host On IIS
Adding a host on IIS requires the presence of the IP and Domain Restrictions role service. If it is
not installed you must install it before you can add a restriction allowing the desired host to access
Express Server.
To install the IP and Domain Restrictions role service:
1. Click Start, then click Administrative Tools from the right-hand pane and choose Server
Manager. The Server Manager appears as shown below.
- 93 -
LizardTech Express Server 9 User Manual
2. If another pane besides the Roles pane is displayed, select Roles in the left-hand navigation pane.
3. Expand the Roles Summary box in the large pane at right if it is not already expanded.
4. Expand Role Services in the Web Server (IIS) box.
5. Click Add Role Services among the right-hand links.The Select Role Services dialog
appears.
6. Under Security, select the IP and Domain Restrictions checkbox as shown below, then
click Next, then click Install.
- 94 -
Chapter 7: Common Tasks
7. Click Close to dismiss the Select Role Services dialog.
Once you have installed the IP and Domain Restrictions, the Role Services box in the Server Manager should show them as installed. You may now continue to add a new host as described in the
procedure below.
To add a host on IIS:
1. With the Server Manager open, expand Roles > Web Server (IIS) > Internet Information Services (IIS) Manager.
2. In the Connections pane, expand <name of your server> > Sites > Default Web Site
> lizardtech > iserv > admin.
3. Double-click IP Address and Domain Restrictions in the main pane.
4. In the Actions pane at right, click Add Allow Entry.The Add Allow Restriction Rule dialog
opens. You should be looking at something like this:
- 95 -
LizardTech Express Server 9 User Manual
5. Enter a specific IP address or a range of IP addresses, then click OK and close the Server
Manager.
Adding a Host on Apache
On Apache, adding a host is simply a matter of editing an entry in the proper configuration file.
To add a host on Apache:
1. Open the appropriate configuration file located by default in <Express Server
installation directory>/ImageServer/etc/apache.
If you are running Linux with Apache 2.4, open "mod_csd_apache24.conf".
If you are running Linux with Apache 2.2, open "mod_csd_apache22.conf".
If you are running Linux with Apache 2.0, open "mod_csd_apache2.conf".
2. Find the Location element, which by default looks like this:
- 96 -
Chapter 7: Common Tasks
<Location /lizardtech/iserv/admin>
SetHandler csd_handler
Order deny,allow
Deny from all
Allow from 127.0.0.1
</Location>
3. Modify the Location element by adding IP addresses to the line "Allow from" using a space
to separate them as in the following example.
<Location /lizardtech/iserv/admin>
SetHandler csd_handler
Order deny,allow
Deny from all
Allow from 127.0.0.1 10.0.8.8 10.0.1.20
</Location>
4. Save the configuration file.
- 97 -
Chapter 8: JPIP
Chapter 8: JPIP
JPIP Overview
99
Viewing JPIP Imagery
99
Configuring the JPIP Server
102
Setting JPIP Network Configuration Properties
102
Setting JPIP Network Performance Properties
103
Setting JPIP Client Connection Properties
104
Setting General JPIP Properties
107
JPIP Overview
JPIP, or the JPEG 2000 Interactive Protocol, is a protocol for streaming JPEG 2000 images while
using as little bandwith as possible. JPIP is an optional component that you add during the installation of Express Server.
Viewing JPIP Imagery
To view JPEG 2000 images in JPIP-enabled applications, use the following URL:
http://<ServerName>:9013
NOTE: You cannot connect to JPIP streams using localhost. Enter the full name of
the server.
Viewing JPIP Imagery in GeoViewer
GeoViewer is LizardTech's free image viewing application. To download GeoViewer, visit the following URL:
http://www.lizardtech.com/downloads/category/#viewers
1. Run GeoViewer by clicking the desktop icon or by clicking the Start menu and clicking Programs > LizardTech > LizardTech GeoViewer.
2. Click File > Add layer > JPIP layer.
The Add JPIP Layer dialog box appears.
- 99 -
LizardTech Express Server 9 User Manual
3. Enter the following URL into the server URL field:
http://<ServerName>:9013
4. Enter the name of the catalog that contains the image that you want to view and the name
of the image.
For example, you might enter the following:
Geo/Seattle.jp2
Viewing JPIP Imagery with ExpressView Browser Plug-in
LizardTech's free ExpressView Browser Plug-in can be embedded in an HTML page to view
JPEG 2000 images from a JPIP server. In this case, the JPIP server requires a URL with the
server name and a precise file path. This can be accomplished by using the <object> tag in
Microsoft Internet Explorer and the <embed> tag in Firefox browsers.
NOTE: The sample application below only works if you have installed the optional
JPIP Server (see Installation on page 12).
The ExpressView Browser Plug-in can be downloaded at the following URL:
http://www.lizardtech.com/software/expressview/webinstall.
Usage
The following parameters are required:
imgSource
This is the URL to the image, which is advertised in the browse response, usually
<server>/<catalog>/<path>/<item>.
NOTE: The URL can be copied and pasted from the browse response if
"http://" is changed to "JPIP://".
type (EMBED only)
This specifies the MIME type of the image. In order to invoke the ExpressView
- 100 -
Chapter 8: JPIP
Browser Plug-in, set this to image/jpip-stream
pluginspage (EMBED only)
This is the location of the plug-in download page:
http://www.lizardtech.com/software/expressview/webinstall.
codebase (OBJECT only)
This should be:
http://www.lizardtech.com/plugin/MrSID_BPI.cab#Version=5.0.0.0
classid (OBJECT only)
This should be:
CLSID:2513AB48-1AEF-4E55-8329-927FF97C9DCE
Example
The following piece of code works for displaying the plug-in in both Internet Explorer and Firefox
browsers:
<object vspace="10" name="" width="600" height="500"
classid="CLSID:2513AB48-1AEF-4E55-8329-927FF97C9DCE"
codebase="http://www.lizardtech.com/plugin/MrSID_BPI.cab#
Version=5.0.0.0">
<param name="imgSource"
value="jpip://localhost:9013/Geo/Seattle.jp2" />
<embed width="600" height="500"
type="image/jpip-stream"
pluginspage="http://www.lizardtech.com/software/expressview/webinst
all"
imgSource="jpip://localhost:9013/Geo/Seattle.jp2">
</embed>
- 101 -
LizardTech Express Server 9 User Manual
</object>
Configuring the JPIP Server
You can configure the JPIP server in the Express Server Manager. Configure the JPIP server to
set network properties, client connection properties, and other general properties.
Setting JPIP Network Configuration Properties
Configure JPIP network configuration properties to set the port and listening address used by the
JPIP server.
To set JPIP network configuration properties, complete the following steps:
1. Open the Express Server Manager (see Accessing the Express Server Manager on page
21).
2. Click Settings on the top navigation bar.
3. Select JPIP on the left-hand navigation panel, then click Edit at the bottom of your
screen.
4. Enter or edit values for Port and Listening Address, then click Save.
5. If you have no further settings to edit, click Publish.
IMPORTANT: Remember that clicking Save in the workspace only temporarily saves
your changes until you click Publish or Discard. Clicking Publish sends all edits on all
the configuration pages to the live Express Server. Clicking Discard overwrites all
pages of the workspace with the current live configuration.
Port
By default, Express Server listens for connection requests on port 9013. To override this, you may
specify a different port number here.
Listening Address
You should not need to use this property unless you wish to serve images from a multihomed
host. By default, the JPIP Server uses the first valid IP address on which the computer is capable
of listening. IP addresses should be supplied in the familiar period-separated numeric format.
- 102 -
Chapter 8: JPIP
Setting JPIP Network Performance Properties
You can congifure the following JPIP network performance properties: l
Maximum transmission rate
l
Maximum round trip time
l
Minimum round trip time
l
Maximum chunk size
l
Maximum samples per request
To set JPIP network performance properties, complete the following steps:
1. Open the Express Server Manager (see Accessing the Express Server Manager on page
21).
2. Click Settings on the top navigation bar.
3. Select JPIP on the left-hand navigation panel, then click Edit at the bottom of your
screen.
4. Enter or edit values for Maximum Transmission Rate, Maximum Target Round Trip
Time, Minimum Target Round Trip Time, Maximum Chunk Size and Maximum
Samples Per Request, then click Save.
5. If you have no further settings to edit, click Publish.
IMPORTANT: Remember that clicking Save in the workspace only temporarily saves
your changes until you click Publish or Discard. Clicking Publish sends all edits on all
the configuration pages to the live Express Server. Clicking Discard overwrites all
pages of the workspace with the current live configuration.
Maximum Transmission Rate
The Maximum Transmission Rate property specifies the rate in kilobytes per second at which
JPEG 2000 packets are transmitted to the client. Data is transmitted at the maximum rate until
certain queuing constraints are encountered, if any. By default Maximum Transmission Rate is
999999.0 kBytes/second.
Maximum Target Round Trip Time
The Maximum Target Round Trip Time (RTT) property defines a desired upper limit for a
request's round trip time in seconds. The actual instantaneous RTT may be somewhat larger than
- 103 -
LizardTech Express Server 9 User Manual
this, depending upon network conditions. By default Maximum Target Round Trip Time is 2
seconds.
Minimum Target Round Trip Time
The Minimum Target Round Trip Time property defines a desired lower limit for a request's round
trip time in seconds. The actual instantaneous RTT may be smaller than this value, but Express
Server endeavors to queue sufficient messages onto the network so as to realize at least this
RTT. By default Minimum Target Round Trip Time is 0.5 seconds. Whenever the minimum target
RTT is lower than the maximum target RTT, Express Server attempts to hunt for the smallest target RTT that is consistent with these bounds and also maximizes network utilization.
Maximum Chunk Size
The Maximum Chunk Size property defines the maximum size in bytes of the image data chunks
shipped by Express Server. Flow control at the server or client is generally performed on chunk
boundaries, so smaller chunks may give you finer granularity for estimating network conditions, at
the expense of higher computational overhead, and some loss of transport efficiency.You may
not specify chunk sizes smaller than 128 bytes here. Values smaller than about 32 bytes could
cause some fundamental assumptions in the kdu_serve object to fail.
By default Maximum Chunk Size is 8192 bytes.
Maximum Samples Per Request
The Maximum Samples Per Request property defines the transmission limit of JPEG 2000
packet data (the viewport size limit) expressed as a number of samples. The formula used to
determine this value is "requestWidth x requestHeight x numBands rounded to the next power of
2". The number expresses the maximum number of component samples that the client can ask
for in one request. Setting this value lower may be desirable to prevent very large requests from
overloading network bandwidth. Setting this value higher may be desirable to allow single large
high-resolution requests.
By default, transmission of JPEG 2000 packet data to the client is limited to 16,777,216 samples,
allowing viewports larger than most monitor sizes.
Setting JPIP Client Connection Properties
You can set the following client connection properties:
- 104 -
Chapter 8: JPIP
l
Disconnection time
l
Maximum client connections
l
Maximum open sources
l
Initial timeout
l
Completion timeout
l
Cache
To set JPIP client connection properties:
1. Open the Express Server Manager (see Accessing the Express Server Manager on page
21).
2. Click Settings on the top navigation bar.
3. Select JPIP on the left-hand navigation panel, then click Edit at the bottom of your
screen.
4. Enter or edit values for Disconnection Time, Maximum Client Connections, Maximum Open Sources, and other client connection properties, then click Save.
5. If you have no further settings to edit, click Publish.
IMPORTANT: Remember that clicking Save in the workspace only temporarily saves
your changes until you click Publish or Discard. Clicking Publish sends all edits on all
the configuration pages to the live Express Server. Clicking Discard overwrites all
pages of the workspace with the current live configuration.
Disconnection Time
The Disconnection Time property defines the number of seconds a client may be continuously connected before being automatically disconnected. By default this value is 6000 seconds or 100
minutes.
Maximum Client Connections
The Maximum Client Connections property defines the maximum number of client connections to
be serviced at once. By default 1000 simultaneous client connections are permitted.
Maximum Open Sources
Express Server permits one open JPEG 2000 source file for each client connection. The Maximum Open Sources property can be used to reduce the number of source files allowed to be
- 105 -
LizardTech Express Server 9 User Manual
open simultaneously. Clients browsing the same image share a single open source file, which
leads to a number of efficiencies. New client connections will be refused if the total number of
open files would exceed the Maximum Open Sources limit, even if the total number of clients
does not exceed the limit specified in the Maximum Client Connections property. If the Maximum
Client Connections value is missing, the value specified by the Maximum Open Sources property
also becomes the maximum number of connected clients.
By default, the total number of open source files permitted is 6000.
Initial Timeout
The Initial Timeout property specifies the amount of time in seconds to allow for the handshaking
process used to establish persistent connection channels. Each time a TCP channel is accepted
by Express Server, it allows this amount of time for the client to pass in the connection message.
In the case of the initial HTTP connection, the client must send its HTTP GET request within the
timeout period. In the case of persistent TCP session channels, the client must send its initial
CONNECT message within the timeout period. The reason for timing these events is to guard
against malicious behavior in denial of service attacks.
By default the Initial Timeout is 60 seconds, but this might not be enough when operating over
very slow links.
Completion Timeout
The Completion Timeout property specifies the time within which the client must complete all persistent connections required by the relevant protocol, from the point at which it is sent the corresponding connection parameters. The server will not hold a session open indefinitely, since the
client might terminate leaving the resources unclaimed.
By default the Completion Timeout is 60 seconds.
Connection Threads
The Connection Threads property specifies the maximum number of threads that can be dedicated to managing the establishment of new connections. The new connections are handed off
to dedicated per-client threads as soon as possible, but connection threads are responsible for initially opening files and managing all tasks associated with delegating services to other servers. By
allowing multiple connection requests to be processed simultaneously, the performance of the
server need not be compromised by clients with slow channels.
- 106 -
Chapter 8: JPIP
By default the maximum number of connection management threads is 100.
Cache
The Cache property specifies the cache size per client attached to the same code-stream.
When serving a client, the JPEG 2000 source file is managed by a persistent Kakadu codestream
object. This object loads compressed data on demand from the source file. Data which is not in
use can also be temporarily unloaded from memory, so long as the JPEG 2000 code-stream contains appropriate PLT (packet length) marker segments and a packet order in which all packets of
any given precinct appear contiguously. If you are unsure whether a particular image has an appropriate structure to permit dynamic unloading and reloading of the compressed data, try opening it
with kdu_show and monitoring the compressed data memory using the appropriate status mode.
Under these conditions, the system employs a FIFO (first-in first-out) caching strategy to unload
compressed data which is not in use once a cache size threshold is exceeded. The default cache
size used by this application is 2 megabytes per client attached to the same code-stream. You
may specify an alternate per-client cache size here, which may be as low as 0. Kakadu applications should work well even if the cache size is 0, but the server application may become disk
bound if the cache size gets too small.
Setting General JPIP Properties
You can set the following general properties:
l
JPIP root
l
Ignore precinct relevance
l
JPEG 2000 box partitioning threshold
To set general JPIP properties:
1. Open the Express Server Manager (see Accessing the Express Server Manager on page
21).
2. Click Settings on the top navigation bar.
3. Select JPIP on the left-hand navigation panel, then click Edit at the bottom of your
screen.
4. Enter or edit values for JPIP Root and other general properties, then click Save.
5. If you have no further settings to edit, click Publish.
- 107 -
LizardTech Express Server 9 User Manual
IMPORTANT: Remember that clicking Save in the workspace only temporarily saves
your changes until you click Publish or Discard. Clicking Publish sends all edits on all
the configuration pages to the live Express Server. Clicking Discard overwrites all
pages of the workspace with the current live configuration.
JPIP Root
The JPIP Root property alerts the Express Server to the presence of a JPIP server. If present,
this property identifies the location of the JPIP server, making catalogued JPIP (streaming JPEG
2000) imagery visible to the browse command. Unless you choose not to install the JPIP server,
this element is set by default upon installation.
Ignore Precinct Relevance
The Ignore Relevence option, if enabled, forces Express Server to ignore the degree to which a
precinct overlaps with the spatial window requested by the client, serving up compressed data
from all precincts that have any relevance at all, layer by layer, with the lowest frequency subbands appearing first within each layer.
By contrast, the default behavior is to schedule precinct data in such a way that more information
is provided for those precincts which have a larger overlap with the window of interest. If the
source code-stream contains a COM marker segment which identifies the distortion-length slope
thresholds which were originally used to form the quality layers, and thus packets, this information
is used to schedule precinct data in a manner which is approximately optimal in the same rate-distortion sense as that used to form the original code-stream layers, taking into account the degree
to which each precinct is actually relevant to the window of interest.
JP2 Box Partitioning Threshold
The JP2 Box Partitioning Threshold property represents the maximum size for any JPEG 2000
box before that box is replaced by a placeholder in its containing data-bin, where the placeholder
identifies a separate data-bin that holds the box's contents. Selecting a large value for the
threshold allows all metadata to appear in metadata data-bin 0, with placeholders used only for
the contiguous codestream boxes. Selecting a small value tends to distribute the metadata over
numerous data-bins, each of which is delivered to the client only if its contents are deemed relevant to the client request.
By default the JP2 Box Partitioning Threshold is 32 bytes.
- 108 -
Chapter 8: JPIP
NOTE: This property has no affect on the partitioning of metadata into data-bins for target files whose representation has already been cached in a file having the suffix,
".cache". This is done whenever a target file is first opened by an instance of Express
Server so as to ensure the delivery of a consistent image every time the client requests
it. If you delete the cache file, Express Server generates a new target ID that prevents
the client from reusing any information it recovered during previous browsing sessions.
- 109 -
Chapter 9: Web API Functions
Chapter 9: Web API Functions
Web API Functions Overview
111
Hierarchical Query Format
111
ows
112
browse
112
getimage
114
getthumb
125
getitem
126
calcrgn
127
getstyle
130
getwatermark
130
Web API Functions Overview
Express Server exposes an API through a web server. This API is expressed via URLs conforming
to Common Gateway Interface (CGI) conventions. The general syntax is:
http://<server>/lizardtech/iserv/<function>?<argument1>=<value1>&<a
rgument2>=<value2>&...
Hierarchical Query Format
The getimage, getthumb, and getitem functions support an additional hierarchical query
format with the following syntax:
http://<server>/lizardtech/iserv/catalogs/<catalog name>/
<item identifier>/cmd/<function>/<argument1>/<value1>/<argument2>/<
value2>...
This form provides a browser-friendly way of overriding a browser's default response handling, and
enables a user-defined file name to be specified for downloaded files.
The following functions are available from the Express Server Web API.
l
ows
l
browse
- 111 -
LizardTech Express Server 9 User Manual
l
getimage
l
getthumb
l
getitem
l
calcrgn
l
getstyle
l
getwatermark
ows
The ows command is used to access OGC Web Services from the Express Server.
Syntax
The ows command may be invoked in several ways. The following returns the WMS capabilities
document:
ows?service=WMS&request=GetCapabilities
The following returns image data corresponding to the parameters of the GetMap call:
ows?service=WMS&request=GetMap&<parameters>
Example
The following gets the WMS capabilities offered by the specified server:
http://demo.lizardtech.com/lizardtech/iserv/ows?service=
WMS&request=GetCapabilities
browse
The browse command is used to retrieve information about the contents of an Express Server.
Syntax
The browse command may be invoked in several ways.
The following returns the catalogs published by the Express Server:
browse?
The following returns the contents of the specified catalog:
- 112 -
Chapter 9: Web API Functions
browse?cat=<catalog-name>
The following returns the contents of the specified folder within a catalog:
browse?cat=<catalog-name>&folder=<path>
The following returns detailed information about the specified item:
browse?cat=<catalog-name>&item=<itemid>
Parameters
The following parameters may be used with the browse command:
cat
The catalog name.
folder
The folder to browse.
item
The ID of the item to browse. The itemid is the folder path to the item plus the
item name (or iserv-catalog-index, which specifies the spatial index).
props
List of item and catalog properties to display in the results. The syntax is
props=item(<prop>,<prop>,…),cat(<prop>,<prop>,…)
NOTE: It is possible to specify which item and catalog props are returned
in catalogs.xml rather than specifying it in the URL for each query. See
"Configuring the Catalog".
style
The XSL style sheet to be used when formatting the data for display. Refers to a directory or file in <Express Server installation
directory>/ImageServer/docs/styles. If this value is missing, then the
- 113 -
LizardTech Express Server 9 User Manual
default stylesheet is assumed. An XML processing instruction will be inserted into
the response which specifies the URL of the stylesheet to use when displaying this
document. A special value of " none" specifies that no XSL stylesheet should be
used.
Examples
The following examples are "live" in that they contain real URLs that will access an Express
Server. Change the hostname to your host to see your own server's responses to these queries.
The following will return an XML document containing the list of catalogs on the server:
http://demo.lizardtech.com/lizardtech/iserv/browse?style=none
The following will return the same data, formatted with the "simple style." The style " simple"
refers to the stylesheet located in <Express Server installation
directory>/ImageServer/docs/styles/simple/default.xsl.
http://demo.lizardtech.com/lizardtech/iserv/browse?style=simple
The following will return the contents of the catalog "idaho", formatted in HTML using the default
style sheet:
http://demo.lizardtech.com/lizardtech/iserv/browse?cat=idaho
getimage
The getimage command extracts image data from resources hosted on the Express Server.
Syntax
The getimage command may be invoked in several ways.
The following extracts an image from the specified item, corresponding to the specified region,
and fitting within the specified dimensions:
getimage?cat=<catalog-name>&item=<item-id>&rgn=
<left,top,right,bottom>&width=<pixels>&height=<pixels>
The following extracts an image from the specified item, corresponding to the centerpoint and resolution level, and fitting the specified dimensions:
- 114 -
Chapter 9: Web API Functions
getimage?cat=<catalog-name>&item=<item-id>&cp=
<centerx,centery>&lev=<reslevel>&width=<pixels>&height=<pixels>
Parameters
The following parameters may be used with the getimage command:
cat
The catalog name.
item
The ID of the item to extract. The itemid is the folder path to the item plus the
item name (or iserv-catalog-index, which specifies the spatial index).
bg
This specifies the background color to be used in the image. This is expressed as a
hexadecimal sequence of 6 digits, in the order RRGGBB.
cp and lev
cp specifies the center point of the requested image extraction. This is specified in
resolution independent coordinates, unless the parameter geo=true is also
present, in which case it is expressed in geospatial coordinates. lev specifies the
resolution level at which to extract. Note: Usage of the cp and lev parameters precludes usage of rgn. That is, use either rgn, or cp and lev.
geo
Optional. If geo is present and set to "true", then the coordinates expressed in rgn
(or cp) are interpreted as geospatial coordinates. If not present or set to false, then
the coordinates are interpreted as resolution independent.
hei
The target height (in pixels) of the extracted image.
method
Specifies how the extracted region is to be computed and processed in order to
- 115 -
LizardTech Express Server 9 User Manual
satisfy the request. The method parameter may have one of the values described
below.
The default method is crop.
crop
The crop method returns an image that matches the requested
region exactly and is scaled to the natural level closest in dimensions to the specified bounds. Unless the requested dimensions
exactly match the natural levels of the source image, the returned
image will either be larger or smaller than the requested dimensions.
The aspect ratio matches the source image exactly.
To guarantee that the returned image will fit inside of the requested
dimensions, use the cropinside method.
For more information, see crop on page 119crop on page 119.
cropinside
This method is the same as crop except that cropinside guarantees that the entire requested region will fit inside the specified
bounds without changing the bounds.
For more information, see cropinside on page 120cropinside on
page 120.
fit
This method returns an image whose dimensions are exactly as
specified in the request. The requested region is scaled to the
closest natural level that will satisfy the dimensions, and may be
expanded or clipped to fit the bounds. Since it scales the image to
the closest natural level, the returned image may not contain the
entire requested region.
The aspect ratio matches the source image exactly.
- 116 -
Chapter 9: Web API Functions
Use the fitinside method to guarantee the entire region fits
within the specified dimensions.
For more information, see fit on page 121fit on page 121.
fitinside
This method is the same as fit except that fitinside guarantees that the entire requested region will fit inside of the specified
bounds without clipping.
For more information, see fitinside on page 123fitinside on page
123.
scale
The width and height specify a bounding-box; the image is scaled to
the maximum resolution that will fit within this box. The aspect ratio
remains unchanged, and the width and height of the requested
region are scaled equally until one of the requested dimensions is
reached.
For more information, see scale on page 123scale on page 123.
fill
This is the same as scale, except that the image is stretched to fit
both bounds exactly, adjusting the aspect ratio as required.
For more information, see fill on page 124fill on page 124.
oif
Specifies the output image format. Can be one of the following:
l
jpg
l
tif
l
bmp
l
png
l
gif
- 117 -
LizardTech Express Server 9 User Manual
rgn
The region of the source image to extract. This is specified in resolution independent coordinates, unless the parameter geo=true is also present, in which
case it is expressed in geospatial coordinates. Note: Usage of the rgn parameter
precludes usage of cp and lev. That is, use either rgn, or cp and lev.
transparent
Optional. If transparent is used and set to "true", Express Server returns an alpha
band for image types that support alpha bands, such as PNG. A value of "false"
ensures that no alpha band is returned.
txn
Performs an opaque query against the image.
wid
The target width (in pixels) of the extracted image.
Examples
The following examples are "live" in that they contain real URLs that will access an Express
Server. Change the hostname to your host to see your own server's responses to these queries.
The following returns the entirety of the specified image, at a natural scale that will fit within
400x400 dimensions:
http://demo.lizardtech.com/lizardtech/iserv/
getimage?cat=Geo&item=Seattle_toposkin_
DEM.sid&wid=400&hei=400&oif=jpg&rgn=0,0,1,1
The following returns the upper left quarter of the specified image, at a natural scale that will fit
within 400x400 dimensions:
http://demo.lizardtech.com/lizardtech/iserv/
getimage?cat=Geo&item=Seattle_toposkin_
DEM.sid&wid=400&hei=400&oif=jpg&rgn=0,0,.25,.25
- 118 -
Chapter 9: Web API Functions
The following returns the upper left quarter of the specified image, scaled so that either the width
or height fit the specified dimensions exactly:
http://demo.lizardtech.com/lizardtech/iserv/
getimage?cat=Geo&item=Seattle_toposkin_
DEM.sid&wid=400&hei=400&oif=jpg&rgn=0,0,.25,.25&method=scale
The following returns the specified geospatial region:
http://demo.lizardtech.com/lizardtech/iserv/
getimage?cat=Geo&item=Seattle_toposkin_
DEM.sid&wid=400&hei=400&geo=true&rgn=600000.000000,
5250000.000000,610000.000000,5240000.000000&method=fit
The following is the same query as the one above but expressed in the hierarchical query format:
http://demo.lizardtech.com/lizardtech/iserv/
catalogs/Geo/Seattle_toposkin_DEM.sid/cmd/getimage/
wid/400/hei/400/oif/jpg/rgn/0,0,.25,.25/method/scale
More About getimage method Values
crop
The crop method scales the returned image to the natural level that best matches the dimensions of the requested bounding box. It differs from the fit method mainly in that the selected
region will always be retained at the expense of the bounding box.
The crop method is the default.
The two examples below illustrate how results can differ with the crop method depending on
how the bounding box and natural levels relate to each other.
NOTE: In both examples, the entire image has been specified as the selected region,
though for simplification and clarity this is not shown in the code samples included here.
Example: 400 x 400 bounding box request using crop method
Request:
http://demo.lizardtech.com/lizardtech/iserv/getimage?cat
=Geo&item=BLM_relief.sid&wid=400&hei=400&method=crop
- 119 -
LizardTech Express Server 9 User Manual
In this example, the natural level closest to 400 x 400 has dimensions of 454 x 320. This region
(the whole image) is returned in its entirety, which results in an image whose dimensions are larger than those of the bounding box.
If you want to ensure that the returned image fits inside of the requested bounds, use the cro-
pinside method (cropinside on page 120).
Example: 300 x 300 bounding box request using crop method
Request:
http://demo.lizardtech.com/lizardtech/iserv/getimage?cat
=Geo&item=BLM_relief.sid&wid=300&hei=300&method=crop
In this second example, the closest natural level to the requested bounding box results in an
image that's only 227 x 160, which is smaller than the requested 300 x 300 bounding box.
cropinside
The cropinside method is identical to the crop method, except that whereas the crop
method returns the natural level whose dimensions best match those of the requested bounding
- 120 -
Chapter 9: Web API Functions
box even if the result is larger than the bounding box, the cropinside method returns the natural level closest in size to the bounding box while still fitting inside the bounding box.
Example: 400 x 400 bounding box request using cropinside
method
Request:
http://demo.lizardtech.com/lizardtech/iserv/getimage?cat=Geo&item=BLM_relief.sid&widd=400&hei=400&method=cropinside
http://demo.lizardtech.com/lizardtech/iserv/getimage?cat
=Geo&item=BLM_relief.sid&wid=400&hei=400&method=cropinside
In this example, the resulting image is 227 x 160. The entire requested region is returned and the
aspect ratio remains unchanged. Note that in this particular case, the result is the same as in the
300 x 300 request using the crop method.
fit
Like the crop method, the fit method returns an image that is scaled to the natural level whose
dimensions best match those of the requested bounding box. The fit method differs from the
crop method in that whereas the crop method treats the bounding box as a suggestion and the
natural level as a rigid requirement, the fit method treats the bounding box as the rigid requirement. The examples below demonstrate how different natural levels accommodate themselves to
the dimensions of the bounding box.
Example: 400 x 400 bounding box request using fit method
Request:
- 121 -
LizardTech Express Server 9 User Manual
http://demo.lizardtech.com/lizardtech/iserv/getimage?cat
=Geo&item=BLM_relief.sid&wid=400&hei=400&method=fit
As in the first example using the crop method, the natural level most closely matching the
requested 400 x 400 bounding box again measures 454 x 320. The image is both clipped (54
pixels total off of the width) and expanded (from 320 to 400 in height - note that since the selected
region is the entire image, there is no more "scene" to show and so the added height is "filled in"
with background).
To ensure that the entire requested region fits inside of the requested bounds, use the fitin-
side method.
Example: 300 x 300 bounding box request using fit method
Request:
http://demo.lizardtech.com/lizardtech/iserv/getimage?cat
=Geo&item=BLM_relief.sid&wid=300&hei=300&method=fit
In this second example, the natural level closest to the requested 300 x 300 bounding box measures 227 x 160. This results in the entire requested region being satisfied and expanded to fill the
rest of the bounding box.
- 122 -
Chapter 9: Web API Functions
fitinside
The fitinside method is identical to the fit method, except that whereas the fit method
returns the natural level whose dimensions best match those of the requested bounding box even
if it must be clipped to fit the bounding box, the fitinside method returns the natural level that
best fits the entire selected region inside the bounding box without clipping.
Example: 400 x 400 bounding box request using fitinside
method
Request:
http://demo.lizardtech.com/lizardtech/iserv/getimage?cat
=Geo&item=BLM_relief.sid&wid=400&hei=400&method=fitinside
In this example, the largest natural level that fit the bounding box without any clipping measures
227 x 160. Since the resulting image must measure 400 x 400, the requested region is expanded
to fill the requested bounding box. The entire requested region is returned and the aspect ratio
remains unchanged.
scale
The scale method returns the exact requested region, scaled uniformly in both the horizontal
and vertical directions until it reaches the edge of the requested bounding box.
Example: 400 x 400 bounding box request using scale method
Request:
http://demo.lizardtech.com/lizardtech/iserv/getimage?cat
=Geo&item=BLM_relief.sid&wid=400&hei=400&method=scale
- 123 -
LizardTech Express Server 9 User Manual
In this example, the resulting image is 400 x 282 pixels. The aspect ratio of the returned image
remains unchanged, and the dimensions of the returned image do not exceed the requested 400
x 400 bounding box.
fill
The fill method satisfies both the requested region and the requested bounding box by stretching the source image to exactly fill the bounding box.
Example: 400 x 400 bounding box request using fill method
Request:
http://demo.lizardtech.com/lizardtech/iserv/getimage?cat
=Geo&item=BLM_relief.sid&wid=400&hei=400&method=fill
In this example, the returned image is 400 x 400 and the entire requested region has been
stretched to fit inside. To satisfy the request, the aspect ratio has been modified, resulting in a
slightly distorted image.
- 124 -
Chapter 9: Web API Functions
getthumb
The getthumb command gets a thumbnail image of an item hosted by the Express Server.
Syntax
The getthumb command can be invoked in several ways.
The following returns a thumbnail from the specified item:
getthumb?cat=<catalog-name>&item=<item-id>
The following returns a thumbnail from the specified item using the specified thumbspec:
getthumb?cat=<catalog-name>&item=<item-id>&thumbspec=<thumbspec-nam
e>
Parameters
The following parameters may be used with the getthumb command:
cat
The catalog name.
item
The ID of the item. The itemid is the folder path to the item plus the item name
(or iserv-catalog-index, which specifies the spatial index).
thumbspec
Specifies which thumbspec to use. Thumbspecs are defined in the catalog configuration file. They specify the extraction parameters to use when generating a
thumbspec.
Examples
The following examples are "live" in that they contain real URLs that will access an Express
Server. Change the hostname to your host to see your own server's responses to these queries.
The following gets a thumbnail for the specified item:
- 125 -
LizardTech Express Server 9 User Manual
http://demo.lizardtech.com/lizardtech/iserv/
getthumb?cat=Geo&item=Seattle_toposkin_DEM.sid
The following gets a small thumbnail for the specified item:
http://demo.lizardtech.com/lizardtech/iserv/
getthumb?cat=Geo&item=Seattle_toposkin_DEM.sid&thumbspec=small
The following is the same query as the one above but expressed in the hierarchical query format:
http://demo.lizardtech.com/lizardtech/iserv/catalogs/
Geo/Seattle_toposkin_DEM.sid/cmd/getthumb/thumbspec/small
getitem
The getitem command downloads an item hosted by Express Server.
NOTE: This command is disabled unless explicitly enabled in the catalog configuration
file (catalogs.xml). See Changing Download Policy on page 54.
Syntax
The getitem command may be invoked in several ways.
The following downloads the specified item:
getitem?cat=<catalog-name>&item=<item-id>
Parameters
The following parameters may be used with the getitem command:
cat
The catalog name.
item
The ID of the item.
- 126 -
Chapter 9: Web API Functions
Example
The following downloads the entire item. The following item is live in that it contains a real URL
that will access an Express Server. Change the hostname to your host to see your own server's
responses to this query.
http://demo.lizardtech.com/lizardtech/
iserv/getitem?cat=Geo&item=camyard.sid
The following is the same query as the one above but expressed in the hierarchical query format:
http://demo.lizardtech.com/lizardtech/
iserv/catalogs/Geo/camyard.sid/cmd/getitem
calcrgn
The calcrgn command performs geometry calculations helpful for creating dynamic, zoomable
images in web pages.
Given the current region of an image and the width and height in which it is displayed, this function will interpret a command (zoomin, zoomout, or pan), and an offset, and will calculate the next
region.
Syntax
The calcrgn command may be invoked in several ways.
The following calculates the exact region of the image that will fill the specified dimensions
exactly:
calcrgn?cat=<catalog-name>&item=<itemid>&rgn=
<left,top,right,bottom>&wid=<pixels>&hei=<pixels>
The following calculates the exact region of the image that will fill the specified dimensions
exactly, given the current region and the specified command:
calcrgn?cat=<catalog-name>&item=<itemid>&rgn=
<left,top,right,bottom>&wid=<pixels>&hei=<pixels>&cmd=<command>
Parameters
The following parameters may be used with the calcrgn command:
- 127 -
LizardTech Express Server 9 User Manual
cat
The catalog name.
item
The ID of the item to browse. The itemid is the folder path to the item plus the
item name (or iserv-catalog-index, which specifies the spatial index).
rgn
The current region of the source image. This is specified in resolution independent
coordinates, unless the parameter geo=true is also present, in which case it is
expressed in geospatial coordinates.
geo
If present and set to "true", then the coordinates expressed in rgn are interpreted
as geospatial coordinates. If not present or set to false, then the coordinates are
interpreted as resolution independent.
cmd
A command to perform. May be empty, or one of the following values: pan,
zoomin, zoomout.
wid and hei
The width and height, in pixels, in which it is desired to fit the specified region.
x and y
These represent an offset, in pixels, from the upper left hand corner of the portion
of the image specified by rgn and wid and hei. These correspond to the coordinates sent up by web browsers in response to mouse clicks on an image.
props
List of item and catalog properties to display in the results. The syntax is
props=item(<prop>,<prop>,…),cat(<prop>,<prop>,…)
- 128 -
Chapter 9: Web API Functions
NOTE: It is possible to specify which item and catalog props are returned
in catalogs.xml rather than specifying it in the URL for each query.
See the catalog configuration section.
style
XSL style sheet to be used when formatting the data for display. Refers to a directory or file in <Express Server installation
directory>/ImageServer/docs/styles. If this value is missing, then the
default stylesheet is assumed. An XML processing instruction will be inserted into
the response which specifies the URL of the stylesheet to use when displaying this
document. A special value of " none" specifies that no XSL stylesheet should be
used.
Examples
The following examples are "live" in that they contain real URLs that will access an Express
Server. Change the hostname to your host to see your own server's responses to these queries.
The following will return an XML document containing the exact region of the image that will fit
best within the specified dimensions.
http://demo.lizardtech.com/lizardtech/iserv/
calcrgn?cat=Geo&item=BLM_relief.sid&wid=400&hei
=400&rgn=0,0,1,1&style=none
The following will get the same data, formatted with the stylesheet simple/view.xsl.
http://demo.lizardtech.com/lizardtech/iserv/
calcrgn?cat=Geo&item=BLM_relief.sid&wid=400&hei
=400&rgn=0,0,1,1&style=simple/view.xsl
The following returns the same as the above, with the addition of a "zoomin" command.
http://demo.lizardtech.com/lizardtech/iserv/
calcrgn?cat=Geo&item=BLM_relief.sid&wid=400&hei
=400&rgn=0,0,1,1&style=simple/view.xsl&cmd=zoomin
- 129 -
LizardTech Express Server 9 User Manual
getstyle
The getstyle command gets an XSL style sheet hosted by the Express Server
Syntax
The getstyle command may be invoked in the following way to return a specified style sheet:
getstyle?style=<style-name>
Parameters
The following parameters may be used with the getstyle command:
style
The stylesheet name. If the value of this parameter ends in ".xsl", then this parameter is interpreted as a path to a stylesheet stored on Express Server (relative to
the <Express Server installation directory>/ImageServer-
/docs/styles directory). If the stylesheet exists, then Express Server returns it
in its response. If the value does not end in ".xsl", then this parameter is interpreted
as a path to a folder in the styles directory. The Express Server looks in the folder
for a stylesheet called " default.xsl" and returns this document in its response.
Examples
The following examples are "live" in that they contain real URLs that will access an Express
Server. Change the hostname to your host to see your own server's responses to these queries.
The following gets the stylesheet simple/default.xsl:
http://demo.lizardtech.com/lizardtech/iserv/
getstyle?style=simple
The following gets the stylesheet simple/view.xsl:
http://demo.lizardtech.com/lizardtech/iserv/
getstyle?style=simple/view.xsl
getwatermark
The getwatermark command gets a watermark image hosted by the Express Server.
- 130 -
Chapter 9: Web API Functions
Syntax
The getwatermark command may be invoked as follows to return the watermark image, if any,
associated with the specified catalog:
getwatermark?cat=<catalog-name>
If the catalog has no watermark, then an HTTP error is returned.
Parameters
The following parameters may be used with the getwatermark command:
cat
The catalog name.
- 131 -
Chapter 10: Reference
Reference Overview
133
IP Addresses and Ports
133
Supported File Formats
134
Directory and File Locations
134
OGC WMS Support
136
Runtime Environment
137
Special Catalog Properties
138
The Catalog Configuration Schema
138
Command Line Tools
143
Hand-Editing Configuration Files
149
Performing Common Tasks in XML and on the Command Line
202
Reference Overview
This section contains information about Express Server's supported file formats, special catalog
properties and command line tools, as well as details about Web API functions.
IP Addresses and Ports
The following table lists the ports that the various components of the Express Server listen on:
Components and Associated Ports
Component
Express Server
Express Server daemon
Port
Listens on whatever port the web server is configured to listen on (usually
80)
By default listens on port 9011
Tomcat Server
By default listens on port 8443
Express Server Agent
By default listens on port 9003
JPIP Server
By default (if installed) listens on port 9013
- 133 -
LizardTech Express Server 9 User Manual
Supported File Formats
LizardTech ExpressServer supports the following input (source) and output file formats:
Input File Formats
l
MrSID (.sid )
l
JPEG 2000 (.jp2)
l
NITF 2.1 (.ntf)
l
Geospatial PDF
Output File Formats
l
PNG (.png)
l
GIF(.gif)
l
TIFF (.tif and .tiff)
l
BMP or “bitmap” (.bmp)
l
JPEG (.jpeg, .jpg)
NOTE: Express Server's PNG and TIFF outputs support WMS GetMap requests for an
alpha band.
Directory and File Locations
The following list describes the directories and files installed by the Express Server installation program in<Express Server installation directory>:
/ImageServer
This directory is the Express Server installation. The following table describes its subdirectories
and their contents:
Root Express Server Installation Directory
Directory
- 134 -
Description of Contents
bin
Utility programs used in conjunction with Express Server
docs
User documentation, stylesheets and sample web applications
etc
Configuration files and other data for use by Express Server
Chapter 10: Reference
Directory
lib
Description of Contents
DLLs/shared libraries required for Express Server to run
DLLs/shared libraries which implement certain Express Server functions.
The following is the provider module that provides access to file system catalogs:
lt_isFileProvider.dll (Windows)
liblt_isFileProvider.so (Unix)
The following are COM components that implement various image codecs, data access,
etc.:
lt_lib_sp_xxx.dll (Windows)
lt_lib_dt_xxx.dll (Windows)
modules
liblt_sp_xxx.so (Unix)
liblt_dt_xxx.so (Unix)
The following are scripts that register/unregister all the COM components with the
COM registry:
regall.bat (Windows)
unregall.bat (Windows)
regall.sh (Unix)
unregall.sh (Unix)
Tomcat
var
Libraries, configuration files, logs and other files required for Tomcat to run.
Runtime data used by Express Server, including log files, temporary files, and spatial index
data
/SampleImages
This directory contains the sample images.
- 135 -
LizardTech Express Server 9 User Manual
Other Files
The root install directory also includes the files License.pdf, README.pdf and Copy-
rights_Trademarks_and_Credits.pdf.
OGC WMS Support
Express Server supports version 1.1.1 of the OGC WMS specification.
WMS Feature Support
This release of Express Server supports the following WMS calls:
l
GetCapabilities
l
GetMap
This release of Express Server does NOT support the following features:
l
GetFeatureInfo
l
Style Layer Descriptors
WMS Service URLs
The base URL for accessing WMS functions from the Express Server is
http://<server>/lizardtech/iserv/ows?
Example: GetCapabilities
The following URL returns the capabilities of a WMS-enabled Express Server:
http://demo.lizardtech.com/lizardtech/iserv/ows?
service=WMS&request=GetCapabilities
Caching the Capabilities Response
The Express Server dynamically generates a capabilities document in response to each GetCap-
abilities request, unless the file <Express Server installation
directory>/ImageServer/var/wms.capabilities.xml exists. If this file exists, then
it will be sent as a response to the GetCapabilities request.
- 136 -
Chapter 10: Reference
Runtime Environment
The Express Server runtime environment depends on the presence of certain environment variables. These settings are completed by the installer program.
Windows Environment
The Express Server requires the PATH environment variable to include the Express Server's lib
directory. In addition to setting this, the installer also puts the bin directory onto the path in order
to be able to run the Express Server's command line tools.
Unix Environment
All Express Server environment variables are defined in the script /op-
t/LizardTech/ImageServer/etc/env.sh. Before running any of the command line
tools, one should source this script in order to set up the correct environment.
For example, the following script is generated at installation time according to the chosen installation options.
$ source /opt/LizardTech/ImageServer/etc/env.sh
It sets the following environment variables:
LT_IS_ROOT
This is the root of the Express Server installation, usually
/opt/LizardTech/ImageServer
LT_IS_USER
This is the username of the Express Server process owner. By default this value is
nobody.
LD_LIBRARY_PATH
This lists the directories that contain required shared libraries used by the Express
Server. This must contain the following:
/opt/LizardTech/ImageServer/lib
This is the path to Express Server's lib directory.
- 137 -
LizardTech Express Server 9 User Manual
PATH
This is not used by the Express Server daemon, but it is useful for running the command line tools. It should contain the following:
/opt/LizardTech/ImageServer/bin
This is the path to Express Server's bin directory.
Special Catalog Properties
Express Server recognizes a number of properties that can be edited in the catalog configuration
(catalogs.xml) file. You can see usage examples for some of the properties listed below in
Sample catalogs.xml File on page 163.
Computed Properties
Express Server computes some properties when it starts up. These are:
iserv-image-output-mimes
This is a comma separated list of all supported output image formats.
iserv-common-srs
This is a common SRS, if any, shared by all spatially enabled catalogs.
The Catalog Configuration Schema
Express Server's catalog configuration schema is included here for developer reference.
<?xml version="1.0" encoding="utf-8"?>
<xsd:schema jxb:version="2.0"
targetNamespace="http://www.lizardtech.com"
xmlns="http://www.lizardtech.com"
xmlns:xsd="http://www.w3.org/2001/XMLSchema"
xmlns:jxb="http://java.sun.com/xml/ns/jaxb"
xmlns:wms="http://www.opengis.net/wms"
elementFormDefault="qualified"
version="1.0.0" >
- 138 -
Chapter 10: Reference
<xsd:import namespace="http://www.opengis.net/wms" schemaLocatio
n="capabilities_1_3_0.xsd"/>
<xsd:element name="CatalogConfig">
<xsd:complexType>
<xsd:sequence>
<xsd:element name="Globals" type="Globals" minOccurs="
0" maxOccurs="1" />
<xsd:element name="Catalog" type="Catalog" minOccurs="
0" maxOccurs="unbounded" />
<xsd:element name="MultiCatalog" type="MultiCatalog" mi
nOccurs="0" maxOccurs="unbounded" />
</xsd:sequence>
</xsd:complexType>
</xsd:element>
<xsd:complexType name="Globals">
<xsd:sequence>
<xsd:element name="BufferMergeRule" type="BufferMergeRule"
minOccurs="0" />
<xsd:element name="Watermark" type="xsd:string" minOccurs=
"0" />
<xsd:element name="SizeConstraint" type="SizeConstraint" m
inOccurs="0" />
<xsd:element name="ThumbSpec" type="ThumbSpec" minOccurs="
0" maxOccurs="unbounded"/>
<xsd:element name="CatalogProps" type="xsd:string" minOccu
rs="0" />
<xsd:element name="ItemProps" type="xsd:string" minOccurs=
"0" />
<xsd:element name="JPIPRoot" type="xsd:string" minOccurs="
0" />
<xsd:element name="ResponseHostPort" type="xsd:string" min
Occurs="0" />
<xsd:element name="MaxWaveletSourceMP"
- 139 -
LizardTech Express Server 9 User Manual
type="xsd:unsignedInt" minOccurs="0" />
<xsd:element name="BrowseIndexOnly" type="xsd:boolean" min
Occurs="0" />
<xsd:element name="AllowItemDownload" type="xsd:boolean" m
inOccurs="0" />
<xsd:element name="WMSCapabilitiesMime" type="xsd:string"
minOccurs="0" />
<xsd:element name="Property" type="Property" minOccurs="0"
maxOccurs="unbounded" />
<xsd:element ref="wms:Layer" minOccurs="0" />
<xsd:element ref="wms:Service" minOccurs="0" />
</xsd:sequence>
</xsd:complexType>
<xsd:complexType name="Catalog">
<xsd:sequence>
<xsd:element name="Path" type="xsd:string" minOccurs="0"/>
<xsd:element name="BufferMergeRule" type="BufferMergeRule"
minOccurs="0" />
<xsd:element name="Watermark" type="xsd:string" minOccurs=
"0" />
<xsd:element name="SizeConstraint" type="SizeConstraint" m
inOccurs="0" />
<xsd:element name="ThumbSpec" type="ThumbSpec" minOccurs="
0" maxOccurs="unbounded"/>
<xsd:element name="Bands" type="xsd:string" minOccurs="0"
/>
<xsd:element name="MaxWaveletSourceMP" type="xsd:unsignedI
nt" minOccurs="0" />
<xsd:element name="BrowseIndexOnly" type="xsd:boolean" min
Occurs="0" />
<xsd:element name="AllowItemDownload" type="xsd:boolean" m
inOccurs="0" />
<xsd:element name="SpatialIndex" minOccurs="0">
- 140 -
Chapter 10: Reference
<xsd:complexType>
<xsd:sequence>
<xsd:element name="CRS" type="xsd:string" minOccu
rs="0" maxOccurs="1" />
<xsd:element name="Param" type="Param" minOccurs=
"0" maxOccurs="unbounded" />
</xsd:sequence>
<xsd:attribute name="classID" type="xsd:string" use=
"required" />
</xsd:complexType>
</xsd:element>
<xsd:element name="Property" type="Property" minOccurs="0"
maxOccurs="unbounded" />
<xsd:element ref="wms:Layer" minOccurs="0" />
</xsd:sequence>
<xsd:attribute name="name" type="xsd:string" use="required" /
>
<xsd:attribute name="enabled" type="xsd:boolean" default="tru
e" use="optional" />
</xsd:complexType>
<xsd:complexType name="MultiCatalog">
<xsd:sequence>
<xsd:element name="SubCatalog" type="xsd:string" maxOccurs
="unbounded" minOccurs="0"/>
<xsd:element name="BufferMergeRule" type="BufferMergeRule"
minOccurs="0" />
<xsd:element name="Watermark" type="xsd:string" minOccurs=
"0"/>
<xsd:element name="SizeConstraint" type="SizeConstraint" m
inOccurs="0"/>
<xsd:element name="ThumbSpec" type="ThumbSpec" minOccurs="
0" maxOccurs="unbounded"/>
<xsd:element name="Property" type="Property" minOccurs="0"
- 141 -
LizardTech Express Server 9 User Manual
maxOccurs="unbounded" />
<xsd:element ref="wms:Layer" minOccurs="0" />
</xsd:sequence>
<xsd:attribute name="name" type="xsd:string" use="required" /
>
<xsd:attribute name="enabled" type="xsd:boolean" default="tru
e"/>
</xsd:complexType>
<xsd:complexType name="Property">
<xsd:simpleContent>
<xsd:extension base="xsd:string">
<xsd:attribute name="name" type="xsd:string" use="requi
red"/>
<xsd:attribute name="lang" type="xsd:string" use="optio
nal"/>
</xsd:extension>
</xsd:simpleContent>
</xsd:complexType>
<xsd:complexType name="ThumbSpec">
<xsd:attribute name="name" type="xsd:string" use="required" /
>
<xsd:attribute name="height" type="xsd:unsignedInt" use="requ
ired" />
<xsd:attribute name="width" type="xsd:unsignedInt" use="requi
red" />
</xsd:complexType>
<xsd:complexType name="BufferMergeRule">
<xsd:attribute name="fuzziness" default="3" type="xsd:unsigne
dInt" />
<xsd:attribute name="method" default="pixelNonTransparentFuzz
y">
<xsd:simpleType>
<xsd:restriction base="xsd:string">
- 142 -
Chapter 10: Reference
<xsd:enumeration value="pixelNonTransparent" />
<xsd:enumeration value="pixelNonTransparentFuzzy" />
</xsd:restriction>
</xsd:simpleType>
</xsd:attribute>
</xsd:complexType>
<xsd:complexType name="SizeConstraint">
<xsd:attribute name="height" type="xsd:unsignedInt" use="requ
ired" />
<xsd:attribute name="width" type="xsd:unsignedInt" use="requi
red" />
</xsd:complexType>
<xsd:complexType name="Param">
<xsd:simpleContent>
<xsd:extension base="xsd:string">
<xsd:attribute name="name" type="xsd:string" />
</xsd:extension>
</xsd:simpleContent>
</xsd:complexType>
</xsd:schema>
Command Line Tools
Express Server includes several command line tools, located in <Express Server installation directory>/ImageServer/bin.
mrsidgeometa
The mrsidgeometa tool adds and removes user metadata from MrSID images. User metadata
stored in MrSID images is published by the Express Server as properties. For example, each of
the sample MrSID images included in the Express Server distribution includes values for the user
metadata tags Name and Description. These appear in the Express Server XML output as properties.
The mrsidgeometa command can be used to add, edit, and remove user metadata elements
from MrSID images.
- 143 -
LizardTech Express Server 9 User Manual
For example, the following adds a user metadata tag " Author" to the image sample.sid:
$ mrsidgeometa -f sample.sid -d Author="Joe Smith"
isindex
The isindex tool is used to create and maintain a Spatial Index associated with an Express
Server catalog. Catalogs that are configured with a Spatial Index are published as WMS layers.
This section describes the most common operations relating to a spatial index. For more detailed
information, run the following command:
$ isindex -help
IMPORTANT: Before running any of the command line tools on Unix, you must source
the run-time environment (Unix Environment on page 137).
Creating a Spatial Index
The syntax for creating a spatial index is:
$ isindex -create -c <catalog> -s <srs-name>
For example, the following command will create a spatial index for the catalog Foo , with the Spatial Reference System epsg:4326.
$ isindex -create -c Foo -s EPSG:4326
NOTE: In order to create a spatial index for an Express Server catalog, the catalog must
be configured to use a spatial index. For more information see "Configuring the
Catalog".
Adding to and Updating a Spatial Index
The syntax for updating all entries in a spatial index is
$ isindex -update -c <catalog>
For example, the following command will examine the catalog Foo, adding/removing/modifying
all entries in the index as appropriate.
$ isindex -update -c Foo
- 144 -
Chapter 10: Reference
Generating an Overview for a Spatial Index
The isindex tool includes the ability to generate an overview image. An overview image is a
single MrSID image encoded from low-resolution scenes of all the component images. Adding an
overview image to a catalog will significantly improve performance for low-resolution requests.
For example, without an overview image, a catalog that contains 4000 images will need to
decode pixels from each of those images to produce a 640x480 scene of the entire dataset. This
may require several minutes. When an overview image is added, however, the same request will
access only one image, returning a result in a few seconds or less.
Overview management is accomplished via the following syntax:
To generate or update the overview:
$ isindex -overview update -c <catalog> [-xres <ground-units>] [-yr
es <ground-units>]
If the optional xres or yres are supplied, then the overview will be encoded at that resolution.
Otherwise it will be encoded at 32 x the base resolution of the index.
NOTE: The time required to generate an overview varies with the number of images in a
spatial index. For extremely large catalogs this may take more than an hour.
NOTE: When you create or update an overview for a catalog that is part of a multicatalog, that multicatalog is unavailable until the overview is completed.
To remove the overview:
$ isindex -overview remove -c <catalog>
Listing the Contents of a Spatial Index
The syntax for listing the contents of a spatial index is:
$ isindex -list -c <catalog>
For example, the following command lists the contents of the Spatial Index for the catalog "Foo".
$ isindex -list -c Foo
Optimizing PDFs
- 145 -
LizardTech Express Server 9 User Manual
You can use isindex to optimize Geospatial PDFs for faster delivery.
The syntax for optimizing PDFs is:
$ isindex -ingest -c <catalog>
For example, the following command optimizes the images in the catalog "Foo".
$ isindex -ingest -c Foo
Optimized files are stored in <Express Server installation directory>/ImageServer/var/ingesteddata.
spindex
If Express Server or isindex hangs when you try to run it, it may have remained locked after a
previous use. In this case, using the spindex tool may recover the application in a clean
(unlocked) state.
NOTE: spindex must be run as root on Unix systems.
To run spindex:
Run the following commands from the root directory of the Express Server (by default the root directory is /opt/LizardTech/ImageServer).
$ source etc/env.sh
$ ./bin/spindex -recover -p var/catalog-data/<catalog name>/\{D090D
D8B-3D12-4631-9787-0DC2CACDC3EA\}
$ chown nobody:nobody var/catalog-data/<catalog name>/\{D090DD8B-3D
12-4631-9787-0DC2CACDC3EA\}/__db.*
NOTE: Because the -recover option recreates the log files in the spatial index, you
must change the ownership of those files back to the account they were assigned
before the operation. By default the account value is nobody.
- 146 -
Chapter 10: Reference
mrsidgeoinfo
The mrsidgeoinfo tool displays basic information about an image, such as width, height, etc. Various image formats are supported.
File Control Switches
mrsidgeoinfo File Control Switches
Switch
Value
Notes
Identifies the input file format. Accepted values are:
tif – TIFF 6.0
bil – (a BBB format) Band interleaved by line
bip – (a BBB format) Band interleaved by pixel
bsq – (a BBB format) Band sequential
doq – Digital Orthophoto Quadrangle (DOQ)
-inputformat/-if
doq_nc – DOQ (no clipping)
string
ras – Sun Raster
lan – ERDAS LAN
sid – MrSID
jpg – "old-style" JPEG (not JPEG
2000)
jp2 – JPEG 2000
bmp – Windows bitmap (BMP)
nitf – National Imagery Transmission Format 2.0 and 2.1 (NITF)
img – ERDAS Imagine
Identifies the input file as an AUX file of mosaic
-mosaic/-mos
images. Using the -mosaic switch creates a flat output file.
- 147 -
LizardTech Express Server 9 User Manual
Main Switches
Main mrsidgeoinfo Switches
Switch
Value
Notes
-metadata/-meta
Show metadata tags and values
-tiles/-tile
Show tile information (composite MG3 only)
-genProfile/-prof
string
Generate JP2 profile
-worldFile/-wf
Generate world file
-ignoreWorldFile/-ignorewf
Ignore georeferencing from world files
-tfwOverride/-tifw
Use .tfw file (for TIFF images only)
Show image dimensions at various resolution
-projectDims/-dims
levels
Display any well-known text string (WKT) inform-
-wkt
ation for the image
Display any area of interest (AOI) information for
-aoi
the image
-inputFile/-input
string
Name of input file (required)
Other Switches
Other mrsidgeoinfo Switches
Switch
- 148 -
Value
Notes
-h/-?
Show short usage message
-help
Show detailed usage message
-version/-v
Show version information
-credits
Show credits and copyrights
-quiet
Don't show informational message
-log
string
Write output to log file
-progress
string
Progress meter style. Acceptable values:
Chapter 10: Reference
Switch
Value
Notes
none
default
timer
Examples
In the following example, the command displays the basic image information for a MrSID image
named "image.sid":
mrsidgeoinfo image.sid
In the following example, the command line displays the basic image information and the
metadata for a TIFF image named "foo.tif":
mrsidgeoinfo –meta foo.tif
In the following example, the command line displays metadata information for an AUX file containing JPEG format images named "mosaic.txt":
mrsidgeoinfo –mos –if jpg mosaic.txt
Hand-Editing Configuration Files
IMPORTANT: We strongly recommend that you configure and manage your Express
Server installation using the Express Server Manager, a graphical user interface automatically installed with your product (see Configuring Express Server on page 25). The
files in this section are preserved for reference and as a convenience to those who
prefer to edit the configuration files in their XML form.
In order to use the components of Express Server you must first configure them. This is done by
means of editable XML documents called configuration files. These files are internally documented. That is, notes on how to edit them are embedded in comments within the XML documents themselves. Some elements may also be "commented out" and can be activated simply
by editing the comments.
This section offers information about configuring the Express Server's Web and Web Map Service
(WMS) APIs and the JPIP Server component using these configuration files.
- 149 -
LizardTech Express Server 9 User Manual
For information about configuring other components and functionality including mirroring (using
multiple Express Servers) and database interoperability, see the topics in Performing Common
Tasks in XML and on the Command Line on page 202.
You do not need to edit configuration files for any components that you will not be using.
Basic Express Server Configuration Using XML Files
The base configuration file, iserv-cfg.xml, controls certain operating characteristics of
Express Server, such as logging, location for temporary files, and internal cache sizes. By default
it is located in <Express Server installation directory>/ImageServer/etc.
This section includes a sample base configuration file and describes each of its editable elements.
The following elements of the configuration file are available for editing:
l
The Logging element
l
The DiskCache element
l
The ImagePixelCache, IndexPixelCache, and WarpPixelCache elements
l
The Algorithms element
l
The ImageManager element
l
The Mirrors element
l
The DefaultCatalogDirectory element
Sample iserv-cfg.xml File
Below is the text from a iserv-cfg.xml file similar to the one included with your installation of
Express Server. It includes many comments and can be a useful reference when reading about
the elements and attributes and their values in the following topics.
<?xml version="1.0" encoding="UTF-8" standalone="yes"?>
<IservConfig>
<Logging access="true" level="notice"/>
<DiskCache interval="360" root="" size="512"/>
<ImagePixelCache enabled="false" tileHeight="200" tileWidth="200" u
tility="0.0"/>
- 150 -
Chapter 10: Reference
<IndexPixelCache enabled="true" tileHeight="200" tileWidth="200" ut
ility="0.0"/>
<WarpPixelCache enabled="false" tileHeight="200" tileWidth="200" ut
ility="0.0"/>
<Algorithms scaleMagThreshold="0.5" scaleResample="BL" warpErrorThr
eshold="0.333" warpResample="BL"/>
<ImageManager extractionCacheTrigger="2" extractionListSize="50" ex
tractionTimeout="50" imgCacheSize="500" itemCacheSize="1000" maxCon
currentExtractions="50"/>
</IservConfig>
The Logging Element
The Logging element controls the amount of information written to Express Server's error and
access logs. These log files are stored in <Express Server installation
directory>/ImageServer/var/log. The Logging element contains the following editable attributes:
access
This attribute specifies whether or not entries are written to the access log. It may have one of the
following values:
true
Entries are written to the access log.
false
Entries are not written to the access log.
level
This attribute specifies the amount of information written to the error log. It may have one of the
following values:
emerg
Only emergency situations are written to the log. These are
- 151 -
LizardTech Express Server 9 User Manual
situations in which Express Server cannot operate.
alert
Includes emerg and situations that require immediate attention.
crit
Includes alert and above, and critical situations.
error
Includes all of the above, and errors encountered during Express
Server operation.
warn
Includes all of the above, and warnings.
notice
Includes all of the above, and conditions that are normal but significant.
info
Includes all of the above, in addition to informational messages.
debug
The most verbose setting, this includes all of the above and information useful for debugging problems.
The DiskCache Element
In response to requests, Express Server may cache certain files to disk. This includes image
thumbnails, frequently requested image extractions, and raw pixels. The DiskCache element
specifies the directory in which these temporary files are stored, and policies regarding their
removal.
The DiskCache element contains the following editable attributes:
- 152 -
Chapter 10: Reference
root
This specifies the directory path in which Express Server will store these temporary files. By
default it is <Express Server installation directory>/ImageServer-
/var/cache/iserv_images.
size
This indicates the amount of disk space, in megabytes, which Express Server can use for the disk
cache. The default value is 512.
interval
The disk cache is purged of old files or "pruned" periodically. This attribute indicates the number
of minutes in between these cache purges. By default the interval is 360 minutes.
In addition to these attributes, the DiskCache element can contain one or more subelements specifying which method to use in caching pixels. For more information see The ImagePixelCache,
IndexPixelCache, and WarpPixelCache Elements on page 153.
The ImagePixelCache, IndexPixelCache, and WarpPixelCache Elements
Decoding imagery requires CPU processing. Express Server can reduce these CPU requirements
by saving raw pixels in the disk cache. This can improve performance significantly for active sites.
However, this comes at the expense of increased disk usage.
Express Server offers three distinct strategies for caching pixels, each represented by a distinct
cache. Each of these caches lives on disk and its size, location and pruning interval are all determined by the DiskCache element, of which these are subelements.
l
ImagePixelCache
This strategy involves caching the pixels from images as they are decoded. This
strategy may be useful for sites that have many different images to serve, and are not
using the spatial index or WMS features of Express Server.
Recommendation: enable for non-WMS sites
l
IndexPixelCache
- 153 -
LizardTech Express Server 9 User Manual
This strategy involves caching the pixels decoded from a spatial index. A spatial index is
a special type of Express Server catalog that dynamically combines a collection of spatially related images into a single mosaic. WMS GetMap requests, and getimage?item=iserv-catalog-index are using the spatial index. When this strategy
is employed, the pixels from the index are cached, rather than from the individual images
that are included in the index.
Recommendation: enable for WMS sites
l
WarpPixelCache
This strategy involves caching pixels after they have been reprojected (warped). This
only affects WMS GetMap requests which require reprojection.
Recommendation: enable for WMS sites in which most requests require reprojection
Each of these elements, ImagePixelCache, IndexPixelCache, and WarpPixelCache,
supports the following editable attributes:
enabled
If "true", then this cache is enabled. Otherwise, this cache will not be used.
NOTE: The ImagePixelCache, IndexPixelCache, and WarpPixelCache can
be used in combination with one another, but to reduce the performance costs associated with filling the caches, it is recommended that you enable only one pixel caching
strategy.
tileWidth
This indicates width in pixels of each block saved in the cache. The default value is 200.
tileHeight
This indicates the height in pixels of each block saved in the cache. The default value is 200.
utility
The utility parameter specifies the minimum allowable ratio of scene pixels to tile pixels. The pixel
caches sort an image into tiles of fixed width and height. When Express Server receives a request
- 154 -
Chapter 10: Reference
to decode an image (i.e. the getimage or GetMap requests), the pixel cache will decode all the
tiles that intersect with the specified scene.
In most cases the area of all the tiles will be larger than the area of the requested scene. The result of this is that more pixels will be decoded than are necessary to satisfy the given request, initially hurting the performance of the server. However, because these tiles are then cached,
subsequent requests will not have to decode any pixels, improving performance of the server.
The utility parameter specifies the minimum allowable ratio of scene pixels to tile pixels. If the
number of pixels in the requested scene divided by the number of pixels required to decode the
intersecting tiles is less than this value, then the tiles will be clipped.
Some utility examples:
l
A utility of 1.0 (or more) specifies that no extra pixels will ever be decoded, and only those
tiles that fall completely within the bounds of a requested scene will be cached. This setting causes the least initial overhead, but because fewer tiles are cached, performance
improvements resulting from the cache will take longer to accrue.
l
A utility of 0 indicates that all intersecting tiles will be decoded, regardless of the size of
the requested scene. This is the default value. This may cause some initial performance
degradation, but since all tiles are cached, performance will quickly improve.
l
A utility of .85 specifies that the pixel cache will always make sure that 85% of the pixels it
decodes for a particular scene will be used in that scene. If the number of pixels required to
fill the intersecting tiles exceeds that percentage, then they will be clipped.
The default and recommended value for utility is 0.
maxMag
This specifies the maximum image magnification at which caching occurs. All requests for scenes
at magnifications higher than this value will not be cached; all requests for scenes at or below this
magnification will be cached. Decimal values greater than 0 and less than or equal to 1 are valid.
The default value is 1.0, indicating that decode requests at full resolution (1.0) will be cached, as
will all decode requests at lower magnifications (i.e. zoomed out).
Requests at magnifications greater than 1 will not be cached.
- 155 -
LizardTech Express Server 9 User Manual
The Algorithms Element
The Algorithms element is used to configure the various algorithms used by Express Server in
order to satisfy requests for images.
Express Server can be configured to use one of three algorithms when scaling a scene to the
requested output dimensions (scale resampling) and when scaling pixels during reprojection (warp
resampling). The scaleResample and warpResample attributes of the Algorithms element determine which algorithm will be used for each process. The default in both cases is bilinear. If image
quality is insufficient with the bilinear algorithm we recommend using the bicubic algorithm if possible, especially for multicatalogs.
The Algorithms element contains the following configurable attributes:
scaleResample
This specifies the algorithm used for scaling from source image dimensions to output dimensions.
Possible scaleResample values:
NN
Specifies that the "nearest neighbor" algorithm be used. This is the
fastest algorithm but yields the poorest quality.
BL
Specifies that "bilinear interpolation" be used. This algorithm is more
expensive than nearest neighbor, but yields better quality.
BC
Specifies that "bicubic interpolation" be used. This is the most CPUintensive algorithm, but produces the best result for reprojection.
warpResample
This specifies the algorithm used for scaling pixels during reprojection (warping).
Possible warpResample values:
NN
- 156 -
Chapter 10: Reference
Specifies that the "nearest neighbor" algorithm be used. This is the
fastest algorithm but yields the poorest quality.
BL
Specifies that "bilinear interpolation" be used. This algorithm is more
expensive than nearest neighbor, but yields better quality.
BC
Specifies that "bicubic interpolation" be used. This is the most CPUintensive algorithm, but produces the best result for reprojection.
warpErrorThreshold
This specifies the maximum error allowed when choosing a faster reprojection algorithm. In order
to reproject pixels from one coordinate reference system (CRS, sometimes called spatial reference system or SRS) to another, a complex mathematical formula must be applied to each
point in the source image. In some cases, this formula may be roughly equivalent to a linear transform, a simple function that is much faster than the reprojection function. Express Server's reprojection engine can compare the results of a linear transform with that of the reprojection, and if
the results are close, then it will choose the faster linear transform.
The value of this attribute is a decimal number greater than or equal to 0. The default and recommended value is .333.
Example warpErrorThreshold values:
0
Specifies that the linear transform is never used .
0.25
Specifies that the linear transform is used when it yields an error of
1/4 pixel or less.
2.0
Specifies that the linear transform is used when it yields an error of 2
pixels or less.
- 157 -
LizardTech Express Server 9 User Manual
scaleMagThreshold
In a MrSID or JPEG 2000 image, Zoom Level 0 (Zero) is full scale and has the highest resolution,
and higher-numbered zoom levels represent lower resolution, on up to the tiny thumbnail or icon
level. The scaleMagThreshold attribute is a bias toward the next-higher-numbered (lower-resolution) zoom level in determining which zoom level to scale pixel data from.
Express Server assigns a decimal value to the resolution level of a requested scene that corresponds to the numbering of the image's zoom levels, then adds the bias, and finally truncates
the number after the decimal to arrive at a zoom level.
For example, let's say a requested scene has a resolution level of 1.6, which falls between Zoom
Level 1 and Zoom Level 2. Express Server adds the default scaleMagThreshold value of 0.5,
which brings the requested scene's resolution level to 2.1. Express Server drops the ".1" to arrive
at Zoom Level 2. It then pulls the lower resolution pixel data from Zoom Level 2 and scales it up to
satisfy the scene request. This scaled-up pixel data is not as sharp as that from Zoom Level 1, but
it takes less time to retrieve.
For another example, let's say a requested scene has a resolution level of 2.4. The default
scaleMagThreshold value of 0.5 brings the total number to 2.9, which is not enough to bump this
scene's value "over the threshold" to Zoom Level 3. Express Server uses the higher resolution
pixel data of Zoom Level 2 and scales it down to the requested dimensions.
Increasing the scaleMagThreshold value strengthens the bias toward higher numbered (lower resolution) zoom levels, which results in generally quicker decodes but also in lower image quality.
Lowering its value favors higher image quality over performance.
Accepted values for scaleMagThreshold are decimals between 0 (zero) and 1, inclusive. By
default the value is 0.5.
The ImageManager Element
In order to enable maximum performance with minimal resource requirements, Express Server
employs certain strategies in its image handling. The ImageManager configuration element
allows you to define parameters used in these strategies.
The ImageManager element contains the following editable attributes:
- 158 -
Chapter 10: Reference
itemCacheSize
The first time Express Server receives a request for data from a particular item, it loads data
about the item into memory for quick access later. Since a given item may be gigabytes in size, it
does not load the whole item into memory. Rather, it only loads information which allows it to
access the item efficiently in response to subsequent requests. This information is stored in an
internal memory cache called the "Item Cache". This attribute specifies the maximum number of
items held in the Item Cache.
The default value is 1000.
NOTE: JPEG 2000 source imagery uses a lot of memory. Setting this value lower (150200) will help ensure that you don't run out of memory when JP2 source images are
being used.
imgCacheSize
Each item contains one or more or images. These images are also cached for quick retrieval, in
the image cache. The imgCacheSize attribute specifies the maximum number of images which
can be stored in this cache.
The default value is 500.
maxConcurrentExtractions
The most CPU expensive operations on Express Server are extractions. These operations occur
in response to getimage requests in the Web API, GetMap requests in the WMS API, and ltc-
sExtract functions in the C API. In these operations, Express Server decodes a portion of the
source image, and reencodes to an output format such as TIFF or JPEG.
If Express Server is hit with a large number of extraction requests at one time, then server performance may suffer.
This configuration attribute specifies the maximum number of extractions that may be processed
concurrently. Extraction requests occurring in excess of this number are placed in queue, and
handled on a first-come, first-served basis.
If this attribute is missing, or its value is set to 0, then the number of concurrent extractions is not
limited.
- 159 -
LizardTech Express Server 9 User Manual
The default value is 50.
extractionTimeout
Specifies the maximum number of seconds that an extraction request will wait in queue before it
is discarded.
This value is ignored if maxConcurrentExtractions is 0 or missing. If the attribute is missing, or is set to 0, then the pending extraction requests will wait indefinitely.
The default value is 50.
extractionListSize
As noted above, the most CPU expensive operations are extraction requests. If certain scenes
are extracted frequently, then caching them to disk may have a beneficial effect upon performance.
Express Server keeps track of requested extraction scenes, and when it notices that one or
another scene is requested frequently, it will cache the result to disk for quick access later. This
configuration attribute specifies the number of extraction requests Express Server monitors for
each image.
For example, if the value is 10, then Express Server will keep track of each image's last 10 extractions. If either this value or extractionCacheTrigger is set to 0 or missing, then Express
Server will not monitor scene extractions.
The default value is 50.
extractionCacheTrigger
This specifies the number of times a particular scene may be requested before it is cached to disk.
For example, if this value is set to 3 and the extractionListSize is 10, then a particular
scene will be cached to disk if 3 out of the last 10 extraction requests for that image were for that
scene.
This value is ignored if extractionListSize is 0 or missing.
The default value is 2.
- 160 -
Chapter 10: Reference
The Mirrors Element
The Mirrors element is used to specify "secondary" Express Servers to which a "master" Express
Server synchronizes its own catalog and spatial-index configuration. For detailed information
about how to set up "mirroring" with your Express Servers, see Configuring Multiple Express
Servers on page 89.
The Mirrors element may have any number of child Secondary elements.
The Secondary Element
Each Secondary element specifies a unique host. It has the following editable attributes:
host
This attribute specifies the name or IP address of the host to which the master mirrors its catalog
and spatial-index configuration.
port
This attribute specifies which port of the secondary host Express Server uses. This attribute is
optional. If absent, Port = 80 is assumed.
sslstrictness
This attribute specifies whether the secondary Express Server uses https. The sslstrictness
property accepts the following values:
l
strict. ExpressZip connects to the Express Server WMS host via HTTPS and only
accepts SSL certificates that have been signed by a trusted certificate authority.
l
noverify. ExpressZip connects to the Express Server WMS host via HTTPS and
accepts both self-signed certificates and certificates that have been signed by a trusted certificate authority.
l
none. ExpressZip connects to the Express Server via HTTP.
IMPORTANT: For the master Express Server to accept communication from a secondary Express Server using HTTPS, it requires an SSL certificate. Obtain a copy of
the SSL certificate used by web server on the secondary Express Server, then place the
certificate in the following directory:
<Installation Directory>\ImageServer\etc\
For Express Server to read the certificate, the certificate must be named ca-
- 161 -
LizardTech Express Server 9 User Manual
bundle.crt and saved in base64 encoding. If there are multiple secondary Express
Servers, you must obtain a copy of each server's certificate. Then, use a text editor to
concatenate the certificates into one file named ca-bundle.crt. For more information on SSL certificates, refer to your web server's documentation.
The DefaultCatalogDirectory Element
When you create a new catalog using the Express Server Management Console you may optionally specify a directory for the catalog. If you do not specify a directory, Express Server uses the
default directory <Express Server installation directory>/ImageServer/var/catalogs/. You can
change this default to a different directory by adding the DefaultCatalogDirectory element to the
iserv-cfg.xml.
The DefaultCatalogDirectory element contains the following editable attributes:
root
The root attribute specifies the directory.
Example
Following is an example of the DefaultCatalogDirectory element's usage:
<DefaultCatalogDirectory root="c:\catalogs\" />
Configuring Catalogs Using XML Files
The catalog configuration (catalogs.xml) file is used to configure the catalogs that are published via Express Server. Specifically it is used to define the following:
l
Catalogs
l
Catalog properties
l
Thumbspecs
In addition, it specifies which of these catalogs are spatially indexed and thus available via the
OGC Web Map Server (WMS) interface. For more information about modifying the catalog configuration file for WMS see Configuring the WMS API Using XML Files on page 184.
This section includes a sample catalog configuration file and describes each of its editable elements. Special catalog properties are described in the Reference section (for more information
see Special Catalog Properties on page 138).
- 162 -
Chapter 10: Reference
The following elements of the catalogs.xml file are available for editing:
l
The Catalog element
l
The Path element
l
The BufferMergeRule element
l
The Watermark element
l
The SizeConstraint element
l
The Thumbspec element
l
The Bands element
l
The MaxWaveletSourceMP element
l
The BrowseIndexOnly element
l
The AllowItemDownload element
l
The SpatialIndex element
l
The Property element
l
The MultiCatalog element
l
The SubCatalog element
l
The Globals element
l
The CatalogProps and ItemProps elements
l
The JPIPRoot element
l
The ResponseHostPort element
l
The WMSCapabilitiesMime element
Sample catalogs.xml File
Below is the text from a sample catalogs.xml file similar to the one included with your installation of Express Server. It can be a useful reference when reading about the elements and attributes and their values in the following topics.
<?xml version="1.0" encoding="UTF-8" standalone="yes"?>
<CatalogConfig xmlns="http://www.lizardtech.com" xmlns:wms="http://
www.opengis.net/wms" xmlns:xlink="http://www.w3.org/1999/xlink">
<Globals>
<BufferMergeRule fuzziness="3" method="pixelNonTransparentFuzzy"/>
<ThumbSpec name="main" height="50" width="80"/>
<ThumbSpec name="gallery" height="220" width="200"/>
- 163 -
LizardTech Express Server 9 User Manual
<CatalogProps>Name,Description</CatalogProps>
<ItemProps>Name,Description</ItemProps>
<JPIPRoot>http://STTL-DEV-GUPPY.seattle.mycompany.local:9013/</JPIP
Root>
<MaxWaveletSourceMP>1000</MaxWaveletSourceMP>
<BrowseIndexOnly>true</BrowseIndexOnly>
<WMSCapabilitiesMime>text/xml</WMSCapabilitiesMime>
<wms:Layer>
<wms:Title></wms:Title>
<wms:CRS>EPSG:4326</wms:CRS>
</wms:Layer>
</Globals>
<Catalog name="Geo" enabled="true">
<Path>C:\LizardTech\Express Server 9\SampleImages\geo</Path>
<SizeConstraint height="2500" width="2500"/>
<Property name="Description">
A sampling of MrSID images
from LizardTech's customers who work with geographic imagery.
</Property>
<Property name="ExportConstraint">2000,1500</Property>
</Catalog>
<Catalog name="MODIS" enabled="true">
<Path>C:\LizardTech\Express Server 9\SampleImages\bm2002</Path>
- 164 -
Chapter 10: Reference
<SpatialIndex classID="{D090DD8B-3D12-4631-9787-0DC2CACDC3EA}">
<CRS>EPSG:4326</CRS>
</SpatialIndex>
<Property name="Name">MODIS Data 2002</Property>
<Property name="Description">A composite of four months of MODIS ob
servations, with a spatial resolution of 1000m/pixel.</Property>
<Property name="Credits">NASA's Earth Observatory</Property>
<wms:Layer queryable="false" opaque="false" noSubsets="false">
<wms:Title>MODIS Data 2002</wms:Title>
<wms:KeywordList>
<wms:Keyword>bluemarble</wms:Keyword>
<wms:Keyword>MODIS</wms:Keyword>
<wms:Keyword>satellite</wms:Keyword>
</wms:KeywordList>
<wms:Attribution>
<wms:Title>Dataset provided by Reto Stockli, NASA Earth Observator
y, [email protected]</wms:Title>
<wms:OnlineResource xlink:type="simple" xlink:href="http://earthobs
ervatory.nasa.gov/Newsroom/BlueMarble/BlueMarble_2002.html"/>
</wms:Attribution>
</wms:Layer>
</Catalog>
<Catalog name="Missouri_RGB" enabled="true">
<Path>C:\LizardTech\Express Server 9\SampleImages\geoeye</Path>
- 165 -
LizardTech Express Server 9 User Manual
<Bands>1,2,3</Bands>
<SpatialIndex classID="{D090DD8B-3D12-4631-9787-0DC2CACDC3EA}">
<CRS>EPSG:2817</CRS>
</SpatialIndex>
<Property name="Name">GeoEye RGBView</Property>
<Property name="Description">This RGB-NIR satellite data has been c
ompressed into MG4 and reprojected into EPSG 2817 (NAD83(HARN) / Mi
ssouri West).
Here we display the R-G-B combination.
Note how the
Alpha band causes transparency at the corners</Property>
<Property name="Credits">Courtesy MJ Harden/GeoEye</Property>
<wms:Layer queryable="false" opaque="false" noSubsets="false">
<wms:Title>GeoEye Missouri - RGB</wms:Title>
<wms:KeywordList>
<wms:Keyword>Missouri</wms:Keyword>
<wms:Keyword>Geoeye</wms:Keyword>
<wms:Keyword>satellite</wms:Keyword>
</wms:KeywordList>
<wms:Attribution>
<wms:Title>Dataset provided courtesy MJ Harden/GeoEye</wms:Title>
</wms:Attribution>
</wms:Layer>
</Catalog>
<Catalog name="Missouri_NIR" enabled="true">
<Path>C:\LizardTech\Express Server 9\SampleImages\geoeye</Path>
- 166 -
Chapter 10: Reference
<Bands>4,2,3</Bands>
<BrowseIndexOnly>false</BrowseIndexOnly>
<SpatialIndex classID="{D090DD8B-3D12-4631-9787-0DC2CACDC3EA}">
<CRS>EPSG:4326</CRS>
</SpatialIndex>
<Property name="Name">GeoEye IR</Property>
<Property name="Description">This is the same dataset as "Missouri_
RGB" but renders the NIR-G-B combination</Property>
<Property name="Credits">Courtesy MJ Harden/GeoEye</Property>
<wms:Layer queryable="false" opaque="false" noSubsets="false">
<wms:Title>GeoEye Missouri - IR</wms:Title>
<wms:KeywordList>
<wms:Keyword>Missouri</wms:Keyword>
<wms:Keyword>Geoeye</wms:Keyword>
<wms:Keyword>IR</wms:Keyword>
<wms:Keyword>satellite</wms:Keyword>
</wms:KeywordList>
<wms:Attribution>
<wms:Title>Dataset provided courtesy MJ Harden/GeoEye</wms:Title>
</wms:Attribution>
</wms:Layer>
</Catalog>
</CatalogConfig>
- 167 -
LizardTech Express Server 9 User Manual
The Catalog Element
The Catalog element defines an Express Server catalog. It contains the following editable attributes:
name
This is the name of the catalog. The name is used to specify the catalog in requests
through the Web API.
If the name begins with a "." character, then this catalog is "hidden." That is, it
does not appear in the list of catalogs returned by Express Server. However, even
though it is not included in that list, it is still loaded and available for queries when
specified by name.
Commas and spaces are not allowed as catalog names. You may use numbers and
letters, dashes and underscores.
enabled
May be true or false, specifying whether the catalog is enabled or not. If set to
false, then the catalog will not be loaded. The default value is true.
In addition to these attributes, each Catalog element must contain a Path element.
A catalog can also contain any of the following optional child elements:
- 168 -
l
The BufferMergeRule element
l
The Watermark element
l
The SizeConstraint element
l
The Thumbspec element
l
The Bands element
l
The MaxWaveletSourceMP element
l
The BrowseIndexOnly element
l
The AllowItemDownload element
l
The SpatialIndex element
l
The Property element
Chapter 10: Reference
Examples: The Catalog Element
Simple catalog:
The following defines a catalog named " dc_sea" which contains the images stored in the C:\L-
izardTech\Express Server 9\SampleImages\dc_sea directory.
<Catalog name="dc_sea">
<Path>C:\LizardTech\Express Server 9\SampleImages\dc_sea</Path>
</Catalog>
Catalog with band selection specified:
In the following example, the catalog "Missouri_RGB" consists of the first three bands of any
images placed in that catalog:
<Catalog name="Missouri_RGB" enabled="true">
<Path>C:\testimages\waterfront\geoeye</Path>
<Bands>1,2,3</Bands>
</Catalog>
Hidden catalog:
This defines a catalog named " .waterfront" which contains the images stored in the
C:\testimages\waterfront directory. This catalog is "hidden" in that it is not present in
any catalog listings published by Express Server. It is enabled however (enabled="true"), so it can
be searched by name.
<Catalog name=".waterfront" enabled="true">
<Path>C:\testimages\waterfront</Path>
</Catalog>
The Path Element
The Path element specifies the location of a catalog. The following example specifies the location
of the catalog "geo":
- 169 -
LizardTech Express Server 9 User Manual
<Path>C:\LizardTech\Express Server 9\SampleImages\geo</Path>
The BufferMergeRule Element
When two images overlap the mosaicker must choose between the top or bottom pixel. The
BufferMergeRule element specifies how the mosaicker determines the output pixel. This element can be used to reduce tile boundary artifacts.
The BufferMergeRule has the following editable attributes:
method
The method attribute specifies which method is used to determine which pixel – top or bottom –
is copied to the output image.There are two possible values for this attribute, as described below.
The algorithms look at all the samples in the pixel for evaluation.
Best choice for uncompressed imagery:
pixelNonTransparent
This value uses the top pixel value if it does not equal the no-data
value, otherwise it uses the bottom pixel value.
Best choice for compressed imagery:
pixelNonTransparentFuzzy
This value uses the top pixel's value when the difference between
the top and the no-data values is greater than " fuzziness" (see
fuzziness below). This method is the best choice for compressed
imagery with overlapping tiles, such as DOQ quads. Note: If you set
method to pixelNonTransparentFuzzy you must also set a
value for fuzziness.
The default value for this attribute is pixelNonTransparentFuzzy.
More about the BufferMergeRule method options
The latter option, pixelNonTransparentFuzzy deals with the fact that compression
changes the no-data value in an image. For example, black may still appear black but it is no
longer numerically black (0,0,0).
- 170 -
Chapter 10: Reference
The "fuzzy" method establishes a spherical zone around the no-data value and if a pixel value
falls within that zone it is treated as the no-data value. A drawback of the fuzzy method is that the
edges between no-data and valid data are smoothed (averaged) such that a narrow, dim region
may appear between tiles (called "grout").
fuzziness
The fuzziness attribute defines a radius around the no-data value in determining which pixel –
top or bottom – will be copied to the output image when two images overlap. The fuzziness
attribute must be set when method is set to pixelNonTransparentFuzzy.
If the top value falls within the no-data sphere it is treated as a no-data value.
It is recommended that you experiment to arrive at the value that works best for your imagery. A
reasonable experimentation range is 1 to 5.
The default value for this attribute is 3.
Examples: The BufferMergeRule Element
The following results in no-data areas that properly allow pixels in the bottom tile to "show
through". This is a good example to follow for uncompressed imagery.
<Catalog enabled="true" name="Non">
...
...
<BufferMergeRule fuzziness="3" method="pixelNonTransparent"/>
...
...
</Catalog>
The following results in dimmer grout (if any) in compressed, overlapping imagery and no "peaking through" of the bottom tile. Follow this example for DOQQs.
<Catalog enabled="true" name="Fuzzy">
...
- 171 -
LizardTech Express Server 9 User Manual
...
<BufferMergeRule fuzziness="3" method="pixelNonTransparentFuzzy"/>
...
...
</Catalog>
The Watermark Element
The Watermark element designates a "watermark" image to be overlaid on top of all images in
the catalog. This watermark appears in response to getimage requests. A catalog may have 0
or 1 Watermark elements. The Watermark element contains the following editable attributes:
name
The name of the image file to be used as a watermark. This must correspond to a
file in <Express Server installation directory>/ImageServer-
/etc/watermarks.
NOTE: Watermarks do not appear in thumbnail images.
Example: The WatermarkElement
The following specifies that the image <Express Server installation
directory>/ImageServer/etc/watermarks/MrSIDLabel.sid shall appear as a
watermark on all images extracted from the catalog " foo."
<Catalog
name="foo">
...
<Watermark
...
- 172 -
name="MrSIDLabel.sid"/>
Chapter 10: Reference
</Catalog>
The SizeConstraint Element
The SizeConstraint element places a limit on the size of an image requested from Express
Server. This is useful to control server load and limit access to high-quality image data.
The SizeConstraint element contains the following editable attributes:
height
The maximum height allowed.
width
The maximum width allowed.
If the SizeConstraint element is missing from your catalogs.xml file, there is no constraint on the image size.
In the catalogs.xml file that comes installed with Express Server, the SizeConstraint element is present and has values of 2500 for both height and width.
Example: The SizeConstraintElement
The following would reject all requests for images larger than 2000x3000 pixels from the catalog
" foo".
<Catalog
name="foo">
...
<SizeConstraint
height="3000"
width="2000"
/>
...
</Catalog>
- 173 -
LizardTech Express Server 9 User Manual
The ThumbSpec Element
The ThumbSpec element specifies characteristics of thumbnail images produced by Express
Server.
A catalog may contain 0 or more ThumbSpec elements, each of which defines the parameters
for generating thumbnails of that type. Thumbspecs are used in the web API when requesting
thumbnails.
The ThumbSpec element contains the following editable attributes:
name
The name of the thumbspec. This is used in getthumb requests to specify which
thumbspec to use when generating the thumbnail.
width
The width of the bounding box of the thumbnail image.
height
The height of the bounding box of the thumbnail image.
NOTE: Express Server has three built-in thumbspecs: small (32x32), medium (64x64),
and large (128x128). Each of these outputs to JPEG format.
Examples: The ThumbSpec Element
http://myserver.com/lizardtech/iserv/getthumb?cat=Nevade&item=LV.si
d&thumbspec=small
http://myserver.com/lizardtech/iserv/getthumb?cat=Nevade&item=LV.si
d&thumbspec=large
http://myserver.com/lizardtech/iserv/getthumb?cat=Nevade&item=LV.si
d&thumbspec=200wide
- 174 -
Chapter 10: Reference
The Bands Element
The latest version of MrSID format, MrSID Generation 4 (MG4), supports multibanded or multispectral imagery. Accordingly, Express Server supports multispectral MrSID images as source
images. Express Server also supports multispectral source imagery in JPEG 2000 format. Selecting which bands to serve from multispectral images is called band mapping.
The user's browser or other client has no conception of band selection or band mapping. To serve
multispectral MrSID images, you must use the Bands element to specify the source bands that
Express Server should use to satisfy a request from a client.
The following specifies that the 4th, 2nd and 3rd source bands should be served as the Red,
Green and Blue output bands, respectively.
<Bands>4,2,3</Bands>
The MaxWaveletSourceMP Element
Very large MrSID images can be served more efficiently by server-side decodes rather than downloading wavelet coefficients (a.k.a. "streaming"). The value of this element places an upper limit
on the size of images that will allow access to their wavelet coefficients. For example, the following will have the effect that all images greater than 1000 megapixels in size will NOT allow
wavelet-based access. Images under that size will allow wavelet access if the underlying format
supports it:
<MaxWaveletSourceMP>1000</MaxWaveletSourceMP>
For the vast majority of MrSID images, it is beneficial to support streaming wavelet coefficients.
Therefore, care should be taken not to set this number too low. The example value of 1000 megapixels represents an image approximately 330,000 pixels square, or 300 GB uncompressed. This
is a reasonable value for most situations.
The BrowseIndexOnly Element
The BrowseIndexOnly element determines how a spatial index can be browsed. By default, a spatial index will not expose its individual images or "tiles" in response to a browse request. Rather,
the browse request will return information about the spatial index image (“iserv-catalog-
index”).The following enables tile browsing.
<BrowseIndexOnly>false</BrowseIndexOnly>
- 175 -
LizardTech Express Server 9 User Manual
The AllowItemDownload Element
The AllowItemDownload element specifies whether or not the file for a catalog (the file from
which Express Server extracts and delivers scenes) is available to be downloaded via the getitem
command. If missing or set to false, the getitem WebAPI command will be disabled. If set to
true, this command is enabled. The following will enable the getitem command:
<AllowItemDownload>true</AllowItemDownload>
The SpatialIndex Element
The SpatialIndex element indicates that all images in the catalog are georeferenced, and
should be indexed. This element is required for any catalogs that are to be published as WMS layers.
The SpatialIndex element contains the following editable attributes:
classID
This is the class ID of the spatial index implementation. Express Server comes with
a spatial index implementation with a class ID of {D090DD8B-3D12-4631-
9787-0DC2CACDC3EA}. Unless you have installed a custom spatial index implementation, you should not change this.
The default value is {D090DD8B-3D12-4631-9787-0DC2CACDC3EA}.
enabled
May be true or false. The default value is true.
Example: The SpatialIndexElement
The following specifies that the catalog "Tijuana" contains georeferenced images, should be
indexed, and made available as a WMS layer.
<Catalog name="Tijuana">
...
- 176 -
Chapter 10: Reference
<SpatialIndex classID="{D090DD8B-3D12-4631-9787-0DC2CACDC3EA}" enab
led="true">
</SpatialIndex>
...
</Catalog> The Property Element
The Property element defines a property of a catalog. Each catalog may have 0 or more properties, each defined by a single Property element. If this element occurs within a Catalog element, then it defines a property of that catalog only. If it occurs within the Globals element,
then the property exists for all catalogs.
Properties recognized by Express Server are listed in Special Catalog Properties on page 138.
The Property element has the following editable attributes:
name
This is the name of the property.
value
This is the property value. It may contain plain text or a complete XML fragment.
Alternatively, the value may be specified as text within the <Property> element
itself.
lang
This is an optional two letter code which identifies the language that the property is
expressed in.
Examples: The Property Element
Simple Catalog Properties
The following defines a property for the catalog "foo."
- 177 -
LizardTech Express Server 9 User Manual
<Catalog
name="foo">
...
<Property
name="Description"
value="A
sample
catalog"/>
...
</Catalog>
The following is equivalent to the previous example.
<Catalog name="foo">
...
<Property name="Description">A sample catalog</Property>
...
</Catalog>
A Simple Global Property
The following defines a property for all catalogs.
<Globals>
...
<Property name="Maintainer">Joe Smythe</Property>
...
</Globals>
An XML Property
The following defines a property whose value is an XML fragment.
- 178 -
Chapter 10: Reference
<Catalog
name="foo">
...
<Property name="wms-toplayer-Title">
<Title>TopLayer</Title>
</Property>
...
</Catalog>
The MultiCatalog Element
The MultiCatalog element defines a grouping of Express Server catalogs. It contains the following editable attributes:
name
This is the name of the multicatalog. The name is used to specify the multicatalog
in requests through the Web API. If the name begins with a "." character (period or
dot), then this multicatalog is "hidden." That is, it does not appear in the list of catalogs returned by Express Server. However, even though it is not included in that
list, it is still loaded and available for queries when specified by name.
enabled
May be true or false, specifying whether the multicatalog is enabled or not. If set to
false, then the multicatalog will not be loaded. The default value is true.
The MultiCatalog element can be treated in many ways like the Catalog element. It can
contain any of the same elements that the Catalog element can contain (see The Catalog Ele-
ment on page 168) except the SpatialIndex element. Specifically, these optional child elements are:
- 179 -
LizardTech Express Server 9 User Manual
l
BufferMergeRule
l
Watermark
l
SizeConstraint
l
ThumbSpec
l
Property
The SubCatalog Element
The SubCatalog element is a mandatory element of the MultiCatalog element. That is,
there must be at least one subcatalog in a multicatalog. If there is only one, the multicatalog
essentially acts as an alias, and you will have two identical catalogs with different names.
Like the Catalog element and the MultiCatalog element, the SubCatalog element must
have a name attribute and defaults to enabled. The name attribute of the SubCatalog element must be the exact name of the catalog that you wish to incorporate as a subcatalog. Furthermore, the catalog being listed as a subcatalog:
l
must be a valid catalog
l
must have a spatial index
l
must not be hidden
NOTE: Other multicatalogs can be included within the Subcatalog element.
Example: The MultiCatalog Element
<?xml version='1.0' encoding='utf-8' ?> <CatalogConfig>
<MultiCatalog name="multi">
<SubCatalog name="catalog1"/>
<SubCatalog name="catalog2"/>
<SubCatalog name="catalog3"/>
</MultiCatalog>
</CatalogConfig>
- 180 -
Chapter 10: Reference
NOTE: When you create or update an overview for a catalog that is part of a multicatalog, that multicatalog is unavailable until the overview is completed.
The SubCatalog Element
The SubCatalog element is used as a subelement of the MultiCatalog element to specify the catalogs that make up the multicatalog. The following specifies that the catalogs "Missouri_NIR" and
"MODIS" make up the multicatalog "GroupOne".
<MultiCatalog name="GroupOne" enabled="true">
<SubCatalog>Missouri_NIR</SubCatalog>
<SubCatalog>MODIS</SubCatalog>
</MultiCatalog>
NOTE: Multicatalogs can be included within multicatalogs.
The Globals Element
This section contains elements that apply to all catalogs. The elements that can be included are:
l
Property
l
Thumbspec
l
BufferMergeRule
l
Watermark
l
SizeConstraint
Example: The Globals Element
The following defines several properties and thumbspecs which apply to all catalogs.
<CatalogConfig>
...
<Globals>
- 181 -
LizardTech Express Server 9 User Manual
<ThumbSpec
name="main"
wid="80"
hei="50"
/>
<ThumbSpec name="wide200" wid="200" hei="100" />
<Property name="infoURL" value="http://www.info.com" />
<Property
name="infoName"
value="John
Brenner"
/>
</Globals>
...
</CatalogConfig>
The CatalogProps and ItemProps Elements
The CatalogProps and ItemProps elements are used as subelements of the Globals element to
define the properties that will be returned in response to browse and calcrgn commands when
no props parameter is present in the URL. For example, the following will cause all browse and
calcrgn requests to return the Name and Description catalog and item properties:
<Globals>
...
<CatalogProps>Name,Description</CatalogProps>
<ItemProps>Name,Description</ItemProps>
...
</Globals>
The JPIPRoot Element
The JPIPRoot element is used as a subelement of the Globals element to alert Express Server to
the presence of a JPIP server. It identifies the location of the JPIP server, making catalogued
JPIP (streaming JPEG 2000) imagery visible to the browse command. Unless you choose not to
install the JPIP server, this property is set by default upon installation.
Example of the JPIPRoot element:
- 182 -
Chapter 10: Reference
<JPIPRoot>http://STTL-DEV-GUPPY.seattle.mycompany.local:9013/</JPIP
Root>
The ResponseHostPort Element
The ResponseHostPort element is used as a subelement of the Globals element to specify the
host/port that Express Server will report in its XML responses. This can be useful when the
Express Server is operating behind a firewall or a reverse proxy. For example, the following would
return :
<Globals>
...
<ResponseHostPort>lizardtech.com:80</ResponseHostPort>
...
</Globals>
would return the following response to a browse? request:
<ImageServer host="lizardtech.com:80" path="lizardtech/iserv" ...>
The WMSCapabilitiesMime Element
The WMSCapabilitiesMime element is used as a subelement of the Globals element to specify
an alternate MIME type for the WMS capabilities document. This document is returned in
Express Server's GetCapabilities response. By default, the MIME type is applic-
ation/vnd.ogc.wms_xml. For example, the following will force Express Server to return its
capabilities document with the MIME type text/xml.
<Globals>
...
<WMSCababilitiesMime>text/xml</WMSCababilitiesMime>
...
- 183 -
LizardTech Express Server 9 User Manual
</Globals>
Configuring the WMS API Using XML Files
IMPORTANT: We strongly recommend that you configure and manage your Express
Server installation using the Express Server Manager, a graphical user interface automatically installed with your product (see Configuring Express Server on page 25). The
files in this section are preserved for reference and as a convenience to those who
prefer to edit the configuration files in their XML form.
This section describes the configuration options for publishing Express Server catalogs as OGC
Web Map Server (WMS) layers. These options affect the results in the GetCapabilities call.
NOTE: In order to publish a catalog as a WMS layer, the catalog must have a SpatialIndex element defined (for details see Configuring Catalogs Using XML Files on
page 162), and the data in the catalog must be indexed (for more information see isindex
on page 144).
All WMS related configuration is performed in the catalog configuration file (catalogs.xml).
There are three levels of user definable WMS information, which are described below:
l
WMS Service Level Information – Information that applies to the WMS service as a
whole
l
Top Layer Information – Information that applies to the top, or outermost, layer published by the WMS
l
Layer Specific Information – Information that applies to a particular layer
For information about common WMS-related tasks, see Adding and Configuring a WMS Layer
Using XML and the Command Line on page 208 and Configuring Reprojection for WMS Layers
Using XML Files on page 209.
Caching the Capabilities Response
The Express Server dynamically generates a capabilities document in response to each GetCap-
abilities request, unless the file <Express Server installation
directory>/ImageServer/var/wms.capabilities.xml exists. If this file exists, then
it will be sent as a response to the GetCapabilities request.
- 184 -
Chapter 10: Reference
Adding WMS Service Level Information
WMS Service Level information is information that applies to the whole WMS instance. That is, it
is information that is not particular to any layer or piece of data published by the WMS instance.
Service Level Information appears in response to the GetCapabilities call as child elements
of the Service element. Specifically, the GetCapabilities call returns the following userdefinable service level information.
Info
Description
Title
The value of this may be specified via the wms:Title global catalog element.
Contact Inform-
The value of this may be specified via the wms:ContactInformation global cata-
ation
log element.
Fees
The value of this may be specified via the wms:Fees global catalog element.
Access Con-
The value of this may be specified via the wms:AccessConstraints global catalog
straints
element.
The information used to produced these values in the GetCapabilities is derived from global
catalog properties. That is, they are specified in the Globals section of the catalogs.xml.
Here is an example of the Service element:
<wms:Service>
<wms:Name>WMS</wms:Name>
<wms:Title>ServiceTitle</wms:Title>
<wms:Abstract>ServiceAbstract</wms:Abstract>
<wms:KeywordList>
<wms:Keyword>MrSID</wms:Keyword>
</wms:KeywordList>
<wms:OnlineResource xlink:href=""/>
<wms:ContactInformation>
<wms:ContactPersonPrimary>
- 185 -
LizardTech Express Server 9 User Manual
<wms:ContactPerson>Guppy</wms:ContactPerson>
<wms:ContactOrganization>LizardTch</wms:ContactOrganization>
</wms:ContactPersonPrimary>
<wms:ContactPosition>Forward</wms:ContactPosition>
<wms:ContactAddress>
<wms:AddressType></wms:AddressType>
<wms:Address>10 Pike</wms:Address>
<wms:City>Seattle</wms:City>
<wms:StateOrProvince>Washington</wms:StateOrProvince>
<wms:PostCode>98104</wms:PostCode>
<wms:Country>USA</wms:Country>
</wms:ContactAddress>
</wms:ContactInformation>
<wms:Fees>Free</wms:Fees>
<wms:AccessConstraints>None</wms:AccessConstraints>
</wms:Service>
Adding Top Layer Information
Like the Service Level information, Top Layer information is defined via global catalog elements.
That is, it is specified in the Globals element of the catalog configuration file
(catalogs.xml). The following information may be defined for the top layer:
Info
Title
- 186 -
Description
This is the title of the top layer. The value of this may be specified via the wms:Layer global
catalog element.
Authority
This defines an external URL that is associated with the layer. The value of this may be spe-
URL
cified via the wms:Layer global catalog element.
Chapter 10: Reference
Here is an example of the Layer element:
<wms:Layer>
<wms:Title>Express Server Top Layer</wms:Title>
<wms:CRS>EPSG:4326</wms:CRS>
<wms:AuthorityURL name="ESAuthority">
<wms:OnlineResource xlink:href="http://sea-ra-bo114"/>
</wms:AuthorityURL>
</wms:Layer>
Adding Layer Specific Information
Layer specific information is defined by elements of the catalog which implements the layer. That
is, they are defined by individual elements, such as <wms:CRS>, that are child elements of the
Catalog element.
Here is an example of the WMS layer information for a catalog listed in the catalogs.xml:
<wms:Layer>
<wms:Title>GeoEye Missouri - RGB</wms:Title>
<wms:KeywordList>
<wms:Keyword>Missouri</wms:Keyword>
<wms:Keyword>Geoeye</wms:Keyword>
<wms:Keyword>satellite</wms:Keyword>
</wms:KeywordList>
<wms:CRS>EPSG:4326</wms:CRS>
<wms:CRS>EPSG:3857</wms:CRS>
<wms:Attribution>
<wms:Title>Dataset provided courtesy MJ Harden/GeoEye</wms:Title>
</wms:Attribution>
- 187 -
LizardTech Express Server 9 User Manual
<wms:AuthorityURL name="DIF_ID">
<wms:OnlineResource xlink:href="http://www.university.edu"/>
</wms:AuthorityURL>
<wms:Identifier authority="http://bar">foo</wms:Identifier>
<wms:MetadataURL type="FGCD">
<wms:Format>text/plain</wms:Format>
<wms:OnlineResource xlink:href="http://www.university.edu"/>
</wms:MetadataURL>
<wms:FeatureListURL>
<wms:Format>JPEG</wms:Format>
<wms:OnlineResource xlink:href="http://sea-serv-image/Images/logos/
LTlogo"/>
</wms:FeatureListURL>
<wms:MinScaleDenominator>1.0</wms:MinScaleDenominator>
<wms:MaxScaleDenominator>512.0</wms:MaxScaleDenominator>
</wms:Layer>
Configuring the JPIP Server Using XML Files
IMPORTANT: We strongly recommend that you configure and manage your Express
Server installation using the Express Server Manager, a graphical user interface automatically installed with your product (see Configuring Express Server on page 25). The
files in this section are preserved for reference and as a convenience to those who
prefer to edit the configuration files in their XML form.
The JPIP Server is an optional component not automatically installed as part of your regular
Express Server installation. You can choose to install the JPIP Server when you install Express
Server (see Installation on page 12).
- 188 -
Chapter 10: Reference
NOTE: The JPIP Server must be installed before configuration options for it can be set.
The JPIP Server has a number of configuration options, which are specified via configuration
files. This section offers an overview of JPIP, a list of JPIP Server options and information about
how to edit those options in the configuration files.
IMPORTANT: Upon installation, a catalog element is set in the Express Server's catalog configuration file (catalogs.xml) identifying the location of the JPIP server. This
makes catalogued JPIP imagery visible to the browse command. If this visibility is not
desired, you must remove or comment out the JPIPRoot element in the catalog configuration file (for more information see The JPIPRoot Element on page 182).
JPIP Server Options
The following options can be edited in the JPIP configuration files on Windows and Unix, samples
of which are included in The JPIP Configuration File on page 196.
General Options
-log <log file>
Redirects console messages to the specified log file.
-record
Print all HTTP requests and replies to stdout.
-version
Print core system version the server was compiled against.
-v
Abbreviation of `-version'
-usage
Print a comprehensive usage statement.
-u
Print a brief usage statement.
- 189 -
LizardTech Express Server 9 User Manual
-history <max history records>
Indicates the maximum number of client records which are maintained in memory for serving up
to the remote administrator application. Each record contains simple statistics concerning the
behavior of a recent client connection. The default limit is 100, but there is no harm in increasing
this considerably.
Network Configuration Options
-port <listen port number>
By default, the server listens for HTML connection requests on port 80. To override this, you may
specify a different port number here.
-address <listen IP address>
You should not need to use this command unless you wish to serve images from a multihomed
host. By default, the server uses the first valid IP address on which the machine is capable of
listening. IP addresses should be supplied in the familiar period-separated numeric format. To
use this command following installation of the JPIP server, edit the JPIP configuration File (see
The JPIP Configuration File on page 196).
-delegate <host>[:<port>][*<load share>]
Delegate the task of actually serving clients to one or more other servers, usually running on different machines. This argument may be supplied multiple times, once for each host to which service may be delegated. When multiple delegates are supplied, the load is distributed on the basis
of the optional load share specifier. The load share is a positive integer, which defaults to 4, if not
explicitly provided. Clients are delegated to the available hosts on a round-robin basis until each
host has received its load share, after which all the load share counters are initialized to the load
share value and round robin delegation continues from there.
Network Performance Options
-max_rate <max bytes/second>
By default, transmission of JPEG 2000 packet data to the client is limited to a maximum rate of 4
kBytes/second. A different maximum transmission rate (expressed in bytes/second) may be specified here. Data is transmitted at the maximum rate until certain queuing constraints are
encountered, if any.
- 190 -
Chapter 10: Reference
-max_rtt <max target RTT, in seconds>
Maximum value to be used as the server's target round trip time (RTT). The actual instantaneous
RTT may be somewhat larger than this, depending upon network conditions. The default value for
this argument is 2 seconds.
-min_rtt <min target RTT, in seconds>
Minimum value to be used as the server's target round trip time (RTT). The actual instantaneous
RTT may be smaller than this value, but the server endeavors to queue sufficient messages onto
the network so as to realize at least this RTT. The default value for this argument is 0.5 seconds.
Whenever the minimum target RTT is lower than the maximum target RTT, the server will
attempt to hunt for the smallest target RTT which is consistent with these bounds and also maximizes network utilization.
-max_chunk <max transfer chunk bytes>
By default, the maximum size of the image data chunks shipped by the server is 1024 bytes. Flow
control at the server or client is generally performed on chunk boundaries, so smaller chunks may
give you finer granularity for estimating network conditions, at the expense of higher computational overhead, and some loss of transport efficiency. In any event, you may not specify
chunk sizes smaller than 128 bytes here. Values smaller than about 32 bytes could cause some
fundamental assumptions in the kdu_serve object to fail.
-max_area <max samples in viewport>
By default, transmission of JPEG 2000 packet data to the client is limited to 16,777,216 samples,
allowing viewports larger than most monitor sizes. (The formula used to determine this value is
"requestWidth x requestHeight x numBands rounded to the next power of 2"). A different viewport
size limit may be specified here. The number expresses the maximum number of component
samples that the client can ask for in one request. Setting this value lower may be desirable to prevent very large requests from overloading network bandwidth. Setting this value higher may be
desirable to allow single large high-resolution requests.
Client Connections Options
-time <max connection seconds>
- 191 -
LizardTech Express Server 9 User Manual
By default, clients will be automatically disconnected after being continuously connected for a
period of 5 minutes. A different maximum connection time (expressed in seconds) may be specified here.
-clients <max client connections>
By default, the server permits two client connections to be serviced at once. This argument allows
the limit to be adjusted.
-sources <max open sources>
By default, the server permits one open JPEG 2000 source file for each client connection. This
argument may be used to reduce the number of allowed source files. Clients browsing the same
image share a single open source file, which leads to a number of efficiencies. New client connections will be refused, even if the total number of clients does not exceed the limit supplied
using the -clients option, if the total number of open files would exceed the limit. If the -clients
argument is missing, the value supplied to a -sources argument also becomes the maximum number of connected clients.
-initial_timeout <seconds>
Specifies the timeout value to use for the handshaking which is used to establish persistent connection channels. Each time a TCP channel is accepted by the server, it allows this amount of
time for the client to pass in the connection message. In the case of the initial HTTP connection,
the client must send its HTTP GET request within the timeout period. In the case of persistent
TCP session channels, the client must send its initial CONNECT message within the timeout
period. The reason for timing these events is to guard against malicious behavior in denial of service attacks. The default timeout is 5 seconds, but this might not be enough when operating over
very slow links.
-completion_timeout <seconds>
Specifies the time within which the client must complete all persistent connections required by the
relevant protocol, from the point at which it is sent the corresponding connection parameters. The
server will not hold a session open indefinitely, since the client might terminate leaving the
resources unclaimed. The default timeout value is 20 seconds.
-connection_threads
- 192 -
<max
threads
for
managing
new
connections>
Chapter 10: Reference
Specifies the maximum number of threads which can be dedicated to managing the establishment of new connections. The new connections are handed off to dedicated per-client threads
as soon as possible, but connection threads are responsible for initially opening files and managing all tasks associated with delegating services to other servers. By allowing multiple connection requests to be processed simultaneously, the performance of the server need not be
compromised by clients with slow channels. The default maximum number of connection management threads is 5.
-cache <cache bytes per client>
When serving a client, the JPEG 2000 source file is managed by a persistent Kakadu codestream
object. This object loads compressed data on demand from the source file. Data which is not in
use can also be temporarily unloaded from memory, so long as the JPEG 2000 code-stream contains appropriate PLT (packet length) marker segments and a packet order in which all packets of
any given precinct appear contiguously. If you are unsure whether a particular image has an appropriate structure to permit dynamic unloading and reloading of the compressed data, try opening it
with kdu_show and monitoring the compressed data memory using the appropriate status mode.
Under these conditions, the system employs a FIFO (first-in first-out) caching strategy to unload
compressed data which is not in use once a cache size threshold is exceeded. The default cache
size used by this application is 2 Megabytes per client attached to the same code-stream. You
may specify an alternate per-client cache size here, which may be as low as 0. Kakadu applications should work well even if the cache size is 0, but the server application may become disk
bound if the cache size gets too small.
Security Options
-wd <working directory>
Specifies the working directory for the Kakadu server; this can work in conjunction with the restrict parameter if required.
-cd <directory in which to store ".cache" files>
The server creates a ".cache" file for each source file that it serves, which contains a digest of the
metadata structure and the selected placeholder partitioning (see -phld_threshold). So long as
the ".cache" file persists, the image will be presented in the same way to clients. This means that
clients can reliably share information with each other and that a client may reconnect to an image
- 193 -
LizardTech Express Server 9 User Manual
at some later point (perhaps days or weeks) and fully reuse the information cached from previous
browsing sessions. Once the ".cache" file is created, it will not be changed when clients later connect to the same image. By default, the ".cache" file is written to the same directory as the original image file. The present argument allows you to specify an alternate directory for the
".cache" files. The cache file's path name is formed by appending the requested image file name,
including all relative path segments, to the supplied directory name. If the cache directory is specified with a relative path, that path is relative to the working directory, which may be explicitly specified via the -wd argument. This argument and the -wd argument are both most reliably used in
conjunction with the -restrict argument.
-restrict
Restrict access to images in the working directory
JP2/JPIP-Specific Options
-ignore_relevance
By supplying this flag, you force the server to ignore the degree to which a precinct overlaps with
the spatial window requested by the client, serving up compressed data from all precincts which
have any relevance at all, layer by layer, with the lowest frequency subbands appearing first within
each layer. By contrast, the default behavior is to schedule precinct data in such a way that more
information is provided for those precincts which have a larger overlap with the window of interest.
If the source code-stream contains a COM marker segment which identifies the distortion-length
slope thresholds which were originally used to form the quality layers, and hence packets, this
information is used to schedule precinct data in a manner which is approximately optimal in the
same rate-distortion sense as that used to form the original code-stream layers, taking into
account the degree to which each precinct is actually relevant to the window of interest.
-phld_threshold <JP2 box partitioning threshold>
The threshold represents the maximum size for any JP2 box before that box is replaced by a placeholder in its containing data-bin, where the placeholder identifies a separate data-bin which holds
the box's contents. Selecting a large value for the threshold allows all metadata to be appear in
metadata data-bin 0, with placeholders used only for the contiguous codestream boxes. Selecting
a small value tends to distribute the metadata over numerous data-bins, each of which is
delivered to the client only if its contents are deemed relevant to the client request. The default
value for the partitioning threshold is 32 bytes.
- 194 -
Chapter 10: Reference
Note carefully that this argument will have no affect on the partitioning of metadata into data-bins
for target files whose representation has already been cached in a file having the suffix, ".cache".
This is done whenever a target file is first opened by an instance of the server so as to ensure the
delivery of a consistent image every time the client requests it. If you delete the cache file, the
server will generate a new target ID which will prevent the client from reusing any information it
recovered during previous browsing sessions.
Other Options
-rss_root <uri-path>
Specifies a base URL for retrieving OrderID RSS feeds.
-rss_debug
Enables some debug-mode features for OrderID RSS feeds, and allows the server to stream
straight JP2/NITF files as well as XML feeds.
-catcfg
Used with the value auto to specify that the JPIP server runs in catalog mode rather than in absolute path mode. In catalog mode, the JPIP server reads the catalog configuration file (catalogs.xml) file to determine where a catalog is defined and then builds the path based on that
definition. Thus, you can enter a request URL composed of the catalog name and the item name.
For example:
jpip://<server>:<port>/<catalogName>/<itemName>.jp2
If this option is missing from the JPIP configuration file (jpiphost.exe.config), the absolute path to
the image must be specified in the request for the image. For example:
jpip://<server>:<port>/<full_path_to_file>.jp2
The HTTP protocol (http://) will also work in both modes.
By default the -catcfg switch appears in the JPIP configuration file with a value of auto. To use
absolute paths, delete this switch/value pair.
NOTE: In catalog mode, you must restart the JPIP server after adding a catalog.
- 195 -
LizardTech Express Server 9 User Manual
Default Settings
-initial_timeout
60
-completion_timeout
60
-time
6000
-max_chunk
4096
-max_rate
999999
-port
9002
-passwd
notTooCryptic
-wd
C:\jpipservice\wd
-log
C:\jpipservice\wd\kdu_serv.log
-cd
C:\jpipservice\cache
-rss_root
file:///c:/georss
The JPIP Configuration File
Configuring your JPIP server is done by editing the parameters of the configuration files included
with your installation. .
JPIP Configuration
The JPIP configuration file for both Windows and Unix is an XML file called jpiphost.exe.config.
By default it is installed in <Express Server installation directory>/ImageServer/bin.
Editing the Windows JPIP Configuration File
In the configuration file (see the sample Windows JPIP configuration file below), each switch is
listed on its own line followed by another line containing its value. For example, the switch for the
port option (-port) appears midway down the list of options, as highlighted below: <string>-max_rate</string>
<string>999999</string>
<string>-port</string>
- 196 -
Chapter 10: Reference
<string>9013</string>
<string>-catcfg</string>
<string>auto</string>
<string>-passwd</string>
<string>notTooCryptic</string>
This means that the port is set to 9013. To edit the options in this configuration file, consult the
list of options (see JPIP Server Options on page 189) for the valid values and ranges for each
parameter, locate the switch in the configuration file, and change the value.
NOTE: Most options are composed of a switch (identified by a minus sign) and immediately followed by a value, but there are a few switches, such as -rss_debug and report, that have no specified values – they either appear and are thus enabled or do not
appear and are thus disabled.
Sample JPIP Configuration File
Following is a JPIP configuration file very similar to the one that comes with your Express Server
and sets the parameters for your JPIP server.
<?xml version="1.0" encoding="utf-8" ?>
<configuration>
<configSections>
<sectionGroup name="applicationSettings" type="System.Configuration
.ApplicationSettingsGroup, System, Version=2.0.0.0, Culture=neutra
l, PublicKeyToken=b77a5c561934e089" >
<section name="jpiphost.jpipLib" type="System.Configuration.ClientS
ettingsSection, System, Version=2.0.0.0, Culture=neutral, PublicKey
Token=b77a5c561934e089" requirePermission="false" />
- 197 -
LizardTech Express Server 9 User Manual
</sectionGroup>
</configSections>
<applicationSettings>
<jpiphost.jpipLib>
<setting name="RunAdminCmdArgs" serializeAs="Xml">
<value>
<ArrayOfString xmlns:xsi="http://www.w3.org/2001/XMLSchema-instanc
e"
xmlns:xsd="http://www.w3.org/2001/XMLSchema">
<string>requiredDummyFirstArg</string>
<string>-host</string>
<string>_JSHOSTPORT_</string>
<string>-passwd</string>
<string>notTooCryptic</string>
<string>-shutdown</string>
</ArrayOfString>
- 198 -
Chapter 10: Reference
</value>
</setting>
<setting name="RunServerCmdArgs" serializeAs="Xml">
<value>
<ArrayOfString xmlns:xsi="http://www.w3.org/2001/XMLSchema-instanc
e"
xmlns:xsd="http://www.w3.org/2001/XMLSchema">
<string>requiredDummyFirstArg</string>
<string>-initial_timeout</string>
<string>60</string>
<string>-completion_timeout</string>
<string>60</string>
<string>-time</string>
<string>6000</string>
<string>-max_chunk</string>
- 199 -
LizardTech Express Server 9 User Manual
<string>8192</string>
<string>-max_rate</string>
<string>999999</string>
<string>-port</string>
<string>9013</string>
<string>-catcfg</string>
<string>auto</string>
<string>-passwd</string>
<string>notTooCryptic</string>
<string>-wd</string>
<string>_IS_ROOT_</string>
<string>-log</string>
<string>_IS_ROOT_\var\log\jpip.log</string>
<string>-cd</string>
<string>_IS_ROOT_\var\cache\jpip</string>
<string>-clients</string>
- 200 -
Chapter 10: Reference
<string>1000</string>
<string>-sources</string>
<string>6000</string>
<string>-connection_threads</string>
<string>100</string>
</ArrayOfString>
</value>
</setting>
<setting name="LogFilePath" serializeAs="String">
<value>_IS_ROOT_\var\log\jpipservice.log</value>
</setting>
</jpiphost.jpipLib>
</applicationSettings>
<system.diagnostics>
<trace autoflush="true" indentsize="4">
</trace>
</system.diagnostics>
- 201 -
LizardTech Express Server 9 User Manual
</configuration>
Performing Common Tasks in XML and on the Command Line
This section offers information about common tasks you may wish to perform after you have
installed Express Server and completed the configuration of the main components.
Starting and Stopping Express Server Using the Command
Line
You must restart Express Server any time you update a spatial index or generate an overview
(see Updating a Spatial Index Using the Command Line on page 205 and Updating an Overview
Using the Command Line on page 205).
For information on restarting the JPIP server, see Starting and Stopping the JPIP Server Using
the Computer Management Dialog or Command Line on page 210.
Windows Systems
On Windows, Express Server runs as a collection of services. To start or stop Express Server, you
must start or stop the following services:
l
The World Wide Web Publishing service (IIS)
l
The LizardTech Express Server Admin Backend service
l
The LizardTech Express Server Tomcat service
To stop the services from the command line, enter the following commands:
C:\> net stop w3svc
C:\> net stop esadminagent
C:\> net stop lttomcat7
To start the services from the command line, enter the following commands:
C:\> net start w3svc
C:\> net start esadminagent
C:\> net start lttomcat7
- 202 -
Chapter 10: Reference
Linux Systems
On Linux, Express Server runs as a daemon process. At installation time, startup scripts are
copied into the standard System V install script location, /etc/init.d, and are set to start and stop
at run level 3.
The Apache Web Server communicates with the Express Server process over a local network connection. Thus starting and stopping Express Server is a two-step job, involving both Express
Server and Apache.
To start Express Server from the command line, run the following commands:
$ /etc/init.d/ltcsd start
$ /etc/init.d/lttomd start
$ /etc/init.d/ltagentd start
$ <path-to-apache>/bin/apachectl start
To stop Express Server from the command line, run the following commands:
$ /etc/init.d/ltcsd stop
$ /etc/init.d/lttomd stop
$ /etc/init.d/ltagentd stop
$ <path-to-apache>/bin/apachectl stop
Adding a Catalog Using XML Files
This section describes the steps required to add a catalog to Express Server.
NOTE: To add catalogs you must have read permissions to all Express Server folders
and subdirectories and all catalogs, and write permissions to <Express Server
installation directory>/ImageServer/var and its subfolders, as well as
both read and write access to the source files and catalog folders. For more information
see Permission Requirements on page 9.
1. Open the file <Express Server installation directory>/ImageServer/etc/catalogs.xml in a text editor.
- 203 -
LizardTech Express Server 9 User Manual
2. Insert the following text just before the final </CatalogConfig> element, changing the
path to specify your catalog location:
<Catalog name="" enabled="true">
<Path>C:/LizardTech/Express Server 9/SampleImages/geo</Path>
</Catalog>
3. Fill in the name of the catalog. The name can be of your choosing, but it must contain only
URL-safe characters. For this reason, it is best to limit this to letters and digits.
4. Fill in the volume and root attributes with appropriate values. Together these make up the
full directory path to the images you wish to publish.
On Windows, the volume should be the drive letter followed by a colon and backslash (e.g.
C:\). On Unix, the volume should be " /".
The root attribute should be set to the directory path.
5. [optional] Create a spatial index for the catalog (see Creating a Spatial Index on page
144).
6. [optional] Generate an overview for the index (see Generating an Overview for a Spatial
Index on page 145).
7. Restart the Express Server (see Starting and Stopping Express Server Using the Command Line on page 202).
You should now be able to query the Express Server and access your newly created catalog. This
can be done via a browse request as follows (replace the word "server" with the name of your
server):
http://server/lizardtech/iserv/browse?cat=catalog1
Grouping Catalogs Together as a Multicatalog Using XML Files
A multicatalog is a grouping of catalogs. Creating a multicatalog enables you to access a number
of catalogs through a single "virtual" catalog that contains them.
- 204 -
Chapter 10: Reference
Creating and configuring a multicatalog is done by including the MultiCatalog element in the
catalog configuration (catalogs.xml) file. For more information, see The MultiCatalog Ele-
ment on page 179.
NOTE: A multicatalog must not contain hidden catalogs.
Updating a Spatial Index Using the Command Line
You must update a spatial index whenever you have added, removed, or modified the images in
an indexed catalog.
IMPORTANT: Before running any of the command line tools on Unix, you must source
the runtime environment (Unix Environment on page 137).
To update a spatial index, use the command line tool isindex, located in <Express Server
installation directory>/ImageServer/bin as follows:
$ isindex –catalog catalog1 –update
isindex on page 144
Updating an Overview Using the Command Line
You should update an overview whenever you have added, removed, or modified the images in
an indexed catalog.
IMPORTANT: Before running any of the command-line tools on Unix, you must source
the runtime environment (Unix Environment on page 137).
To update an overview, use the command line tool isindex, located in <Express Server
installation directory>/ImageServer/bin as follows:
$ isindex –catalog catalog1 –overview update
isindex on page 144
NOTE: When you create or update an overview for a catalog that is part of a multicatalog, that multicatalog is unavailable until the overview is completed.
- 205 -
LizardTech Express Server 9 User Manual
Specifying Band Combinations from Multispectral Images
Using XML Files
Specifying Bands to be Served
The latest version of MrSID format, MrSID Generation 4 (MG4), supports multibanded or multispectral imagery. Accordingly, Express Server supports multispectral MrSID images as source
images. Express Server also supports multispectral source imagery in JPEG 2000 format. Selecting which bands to serve from multispectral images is called band mapping.
The user's browser or other client has no conception of band selection or band mapping. To serve
multispectral MrSID images, you must specify the source bands that Express Server should use
to satisfy a request from a client. This is done by editing the file catalogs.xml, which by default is
located in <Express Server installation directory>/ImageServer/etc/.
Band mapping only applies to MG4 source files. If images of MG3, MG2 or other formats are
present in the catalog, band mapping will not be applied to them.
NOTE: Band mapping is not supported for Spatial Express catalogs.
To specify bands from multispectral images:
1. Open the catalogs.xml file.
2. Create a catalog for the image or images.
3. Add a Bands element to the catalog and specify either a single band number or three numbers in a comma-delineated list.
4. If the catalog is spatially indexed, update the spatial index.
5. If an overview exists for the spatial index, update the overview.
In the following example, the catalog "cuprite_123" consists of the first three bands of any images
placed in that catalog: (This happens to be Express Server's default behavior, so in this case the
Bands element does not actually have any effect).
<Catalog name="cuprite_123" enabled="true">
<Path>C:\TestImages\cuprite</Path>
<Bands>1,2,3</Bands>
...
- 206 -
Chapter 10: Reference
</Catalog>
Express Server identifies the first band as Band 1 (some applications start band numbering at 0
[zero] instead of 1).
If an image in a catalog cannot satisfy that catalog's band mapping a default band-mapping is
applied, in which Express Server uses the first three bands if the image is RGB or multispectral
and the first band if the image is grayscale.
NOTE: Multicatalogs cannot take the Bands element. Individual catalogs comprising a
mutlicatalog must each be band-mapped separately.
Serving Different Band Combinations from the Same Images
If you want to serve different bands from the same images, you must define a new catalog for
each band or set of three bands that you would like to serve. Give each catalog a new name and
specify different bands in the Bands element. Here are two more examples of catalogs created
using the same image directory as in the example above. The first specifies a single infrared band
(band 4 in this case), and the second specifies bands 5, 7, and 10.
<Catalog name="cuprite_infrared" enabled="true">
<Path>C:\TestImages\cuprite</Path>
<Bands>4</Bands>
...
</Catalog>
<Catalog name="cuprite_5_7_10" enabled="true">
<Path>C:\TestImages\cuprite</Path>
<Band>5,7,10</Bands>
...
</Catalog>
NOTE: If a catalog contains only non-MG4 files no band selection is applied.
- 207 -
LizardTech Express Server 9 User Manual
Changing Which Bands are Served from Multispectral Images
If you wish, you may edit existing catalogs in the catalogs.xml file to specify a different band or set
of three bands using the bands element.
IMPORTANT: Remember that if the catalog is spatially indexed you must update the
index after specifying different bands, and if an overview exists for that spatial index it
too will need to be regenerated to reflect the new band selection.
See also Updating a Spatial Index Using the Command Line on page 205 and Updating an Over-
view Using the Command Line on page 205.
Adding and Configuring a WMS Layer Using XML and the Command Line
This section describes the steps required to publish an Express Server catalog as a WMS Layer.
For information about the prerequisite basic WMS configuration see Configuring the WMS API
Using XML Files on page 184.
Express Server includes components that organize catalogs according to the geospatial location
of their images. This information is contained in a "spatial index", a special database that allows
quick retrieval of images in response to geospatial queries.
In order to publish an Express Server catalog as a WMS layer, you must create a spatial index for
the catalog. This is accomplished with the tool isindex, located in the <Express Server
installation directory>/ImageServer/bin directory. Whenever you add or remove
images from the catalog, you must run isindex again to update the index. For more information
see isindex on page 144.
IMPORTANT: Before running any of the command-line tools on Unix, you must source
the run-time environment (Unix Environment on page 137).
Here is a detailed explanation of the steps required to publish a WMS layer with Express Server.
1. Add a catalog
a. Follow the instructions to add a catalog (for information see Adding a Catalog
Using XML Files on page 203), but do not restart the server.
- 208 -
Chapter 10: Reference
b. This catalog should contain the images that you wish to include in the layer. Each
of these images must be in the same spatial reference system (SRS), in order for
Express Server to index them properly.
2. Create an index for the catalog by running the isindex tool located in <Express
Server installation directory>/ImageServer/bin:
$ isindex -create -c MyCatalog -srs EPSG:XXXX
Make sure you provide a valid EPSG code for the SRS. This SRS should match that of
each image in the catalog. For more information on EPSG codes, visit www.epsg.org.
3. Update the index:
$ isindex -update -c MyCatalog
This command will iterate through all the images in the catalog, adding entries for them to
the spatial index.
4. Generate an overview (recommended for large catalogs)
$ isindex -overview create -c MyCatalog
For large WMS catalogs (i.e. catalogs with more than 25 images) generating an overview
can speed things up considerably. For more information see Generating an Overview for a
Spatial Index on page 145.
5. Restart Express Server (see Starting and Stopping Express Server Using the Command
Line on page 202).
6. Verify that everything worked by entering the following URL in a browser:
http://<server>/lizardtech/iserv/ows?request=GetCapabilities&s
ervice=WMS
This should return a valid WMS capabilities document.
Configuring Reprojection for WMS Layers Using XML Files
Express Server can reproject your source imagery to other EPSG-defined coordinate reference
systems (CRS, sometimes called spatial reference systems or SRS). This can be achieved
- 209 -
LizardTech Express Server 9 User Manual
through elements added to the catalog configuration file (catalogs.xml). These elements can
either be set per catalog/layer or globally.
For example, let's say you have source imagery in UTM Zone 10N and want to support requests
for that layer in both its native CRS and also 4326 (Lat/Long). You can add the following line to
your catalogs.xml file:
<wms:CRS>EPSG:4326</wms:CRS>
If you add this element inside of a catalog, then only that catalog supports that output CRS for
that layer. If you add the element in the global section of the catalogs.xml file, then all
defined layers will support 4326 as an output CRS. You can also add more than one CRS by
using multiple instances of the element as follows:
<wms:CRS>EPSG:4326</wms:CRS>
<wms:CRS>EPSG:3857</wms:CRS>
Changing an Index's Spatial Reference System Using the Command Line
Occasionally it is necessary to modify the spatial reference system (SRS, often called coordinate
reference system or CRS) of an index. For example, this would be necessary if you entered the
wrong SRS when you created the catalog.
NOTE: Before running any of the command line tools on Unix, you must source the runtime environment (Unix Environment on page 137).
To change the SRS of an index, run the following command:
$ isindex -modify -c <catalog-name> -srs EPSG:XXXX
Make sure you provide a valid EPSG code for the SRS. This SRS should match that of each
image in the catalog. For more information on EPSG codes, visit www.epsg.org.
Starting and Stopping the JPIP Server Using the Computer Management Dialog or Command Line
You must restart the JPIP Server any time you change its configuration or add or remove a catalog.
- 210 -
Chapter 10: Reference
To start or stop the JPIP Server using the Computer Management dialog or the command line:
On Windows Systems:
1. Open Windows' Computer Management dialog and navigate to a Services and Applications dialog or Services Manager dialog (the exact name of the path to this dialog may
vary on different versions of Windows).
2. The JPIP Server runs as a service named "LizardTech JPIP Service". Select that name.
Depending on the current status of the JPIP Server, options become available to start,
stop or restart the service.
On Unix Systems:
/etc/init.d/ltjpipd start
/etc/init.d/ltjpipd stop
/etc/init.d/ltjpipd restart
- 211 -
Chapter 11: Troubleshooting
Troubleshooting Overview
213
Verifying Correct Installation of Express Server
213
Cannot Access Express Server From Another Machine
214
Express Server Not Running
215
Issues Creating Image Catalogs
215
Failed to Export Pixels Error
216
Catalogs Not Showing Up
216
Running a Test Web Server
217
Resetting a Forgotten Password
218
Accessing and Using Log Files
218
Memory and Optimal Performance
221
Blurry Images
223
Images Display a Black Background
224
Speckled Images
225
Mosaicked NITF Images
229
Slow PDFs
230
Unsupported Browser Version
230
Finding the Express Server Version Number
230
Technical Support
231
Troubleshooting Overview
This section tells you how to find information, solve various issues, and contact LizardTech Technical Support.
For troubleshooting installation issues, see Verifying Correct Installation of Express Server on
page 213
Verifying Correct Installation of Express Server
After you install Express Server, you may verify that it is running by consulting the Status page of
the Express Server Manager, an administrative graphical user interface.
- 213 -
LizardTech Express Server 9 User Manual
To verify correct installation via the Express Server Manager:
1. Open the Express Server Manager (see Accessing the Express Server Manager on page
21).
2. Click Status on the top navigation bar.
If you installed Express Server correctly the Status page of the Express Server Manager should
indicate that Express Server is running.
TIP: A quick way to verify that you have installed Express Server correctly is to enter
the following URL into a browser:
http://<ServerName>/lizardtech/iserv/browse?style=none
This URL should return an XML document with a list of Express Server catalogs. If it
does not, check the Status page as described above.
If Express Server is not running, make sure you have restarted your Web server. If the Web server
is stopped, click Start to start it. If the Express Server is still not running or if you have trouble
accessing the Express Server Manager, see Express Server Not Running on page 215.
On Unix, check to see that the Express Server daemon is running using the following command
line: $/etc/init.d/ltcsd status
See also: Catalogs Not Showing Up on page 216.
Cannot Access Express Server From Another Machine
If you can access the Express Server Manager from the machine where you installed Express
Server, but not from another machine, check the following common issues:
l
Ensure that both machines are connected to the same network. Alternatively, if the web
server that hosts the Express Server is accessible to the internet, ensure that you can connect to the web server.
l
Ensure that the firewall has been configured to accept connections on the Express
Server Manager port. For more information, see Configuring the Firewall on page 25.
- 214 -
Chapter 11: Troubleshooting
Express Server Not Running
On Windows, if the Express Server is not running or if you have trouble accessing the Express
Server Manager, ensure that the Tomcat service has permission to access the registry. The Tomcat service reads the registry to locate the Express Server installation directory. If you have
changed the user that runs the Tomcat service, the Tomcat service may not be able to read the
registry.
To ensure that the user that runs the Tomcat service can access the registry, complete the following steps:
1. Open the registry editor with administrator privileges.
2. Navigate to the following registry key:
HKEY_LOCAL_MACHINE/SOFTWARE/LizardTech
3. Right-click on the LizardTech registry key and click Permissions.
4. Look for the user that runs the Tomcat service in the list of users. Alternatively, look for the
user group to which the user belongs.
If you do not see user in the list, click Add and enter the name of the user.
5. In the list of users, select the user that runs the Tomcat service or select the user group to
which the user belongs.
6. In the list of permissions, select the Allow check box for read permission.
7. Click OK.
Issues Creating Image Catalogs
In the Express Server Manager, you may encounter the following error when you attempt to create an image catalog:
Location is not a readable Directory, Share, or Server.
Alternatively, you may not be able to select the image directory that you want to add to an image
catalog. The error occurs because one of the following does not have permission to access the
image directory:
- 215 -
LizardTech Express Server 9 User Manual
l
LizardTech Express Server Tomcat service or daemon
l
IIS Web Server service
Grant read permission for the directory that you want to access to the user that runs the LizardTech Express Server Tomcat service or daemon. On Windows, the Tomcat service runs on the
NetworkService account by default. You can view the account that runs the Tomcat service in
the Windows Services utility. On Linux, the Tomcat daemon runs on the account specified during
the installation of Express Server.
For Windows only, you also need to grant read permissions to the user that runs the LTESAp-
pPool for the IIS Web Server. By default, the LTESAppPool runs on the NetworkService
account. You can view the account that runs the LTESAppPool in the IIS Manager. Click Applic-
ation Pools in the Connections pane to view information about the LTESAppPool. On Linux,
the Apache service does not access imagery directly and therefore does not require special permissions.
IMPORTANT: If the image directories that you want to access are on a network, you
may have to add the users that run the LizardTech Express Server Tomcat service, the
IIS Web Server service, and on Windows the LTESAppPool user to the list of domain
users.
Failed to Export Pixels Error
If you create an image catalog or catalog group that is too big, you may encounter the following
error:
[error] [8004c3c3] failed to export pixels (integer overflow)
The error occurs because the image catalog or catalog group has a width or height that exceeds
the maximum size of two billion pixels. To resolve the issue, delete the catalog or catalog group,
distribute the imagery across multiple directories, and create multiple catalogs for the imagery.
Catalogs Not Showing Up
If your Express Server is running but you do not see your catalogs, make sure your copy of
Express Server is licensed. Licensing information is listed below the server status information. For
more information see Licensing on page 16.
- 216 -
Chapter 11: Troubleshooting
If your Express Server is running and your license is valid but you still cannot see your catalogs,
open and examine the Error log and other log files listed below the server and license status
information. For more information see Accessing and Using Log Files on page 218. You can
also open these log files manually. By default they are located in the directory <Express
Server installation directory>/ImageServer/var/log,
If problems with the catalog configuration file are reported, examine the file " catalogs.xml"
and look for missing brackets, bad path names or any other errors.
If errors creating image or item objects are reported, run the following script to diagnose potential
problems:
ImageServer/modules/regall.bat (Windows)
ImageServer/modules/regall.sh (Unix)
Running a Test Web Server
When you troubleshoot the Express Server, you may want to run a test web server to rule out
issues with web server configuration. Express Server bundles a light-weight test server called
testHttp that you can run from the command line.
1. From the command line, run the testHttp program located in the following directory:
<Express Server Installation Directory>/ImageServer/bin/testHttp
The program displays a list of options.
2. Enter 0 to start the server.
If the server starts successfully, the program displays the list of options again. If the server
returns an error, ensure that your runtime environment has been configured correctly. For
more information, see Runtime Environment on page 137.
3. Enter 2 to test an Express Server URL.
The program prompts you to enter a URL.
4. Enter the following URL:
- 217 -
LizardTech Express Server 9 User Manual
http://localhost:80/lizardtech/iserv/browse?style=none
The program returns a success or failure message.
Resetting a Forgotten Password
You can change your administrative password any time on the User Account tab of the Settings
page (see Setting User Account Preferences on page 75), but this is of little use if you have forgotten your existing password and cannot access the Express Server Manager. In this case you
can still reset your password oustide the Express Server Manager.
To reset a forgotten password:
1. Make sure either the JAVA_HOME or JRE_HOME environment variable is set.
2. Run the file "digest.bat" (found in <Express Server installation directory>/ImageServer/Tomcat/bin) as follows:
digest.bat -a SHA <password>
where <password> is a new password of your choosing.
3. Copy the resulting 40-character hashed output and past it into the file "tomcat-users.xml"
found in <Express Server installation directory>ImageServer/Tomcat/conf as the value of
the "password" property, as in the example below:
<?xml version='1.0' encoding='utf-8'?>
<tomcat-users>
<role rolename="admin-gui"/>
<role rolename="manager-gui"/>
<user username="admin" password="f3c57870608ka87f432e5912d4fg6
f8e322791ba" roles="manager-gui,admin-gui"/>
</tomcat-users>
Accessing and Using Log Files
Express Server uses six log files (including those of the optionally installed JPIP Server):
- 218 -
Chapter 11: Troubleshooting
l
Express Server Access Log
l
Express Server Error Log
l
Express Server JPIP Service Log
l
Express Server JPIP Log
l
Express Server Administration Log
l
Express Server Admin Backend Log
These files are important tools for monitoring Express Server activity and diagnosing problems.
The logs files are located in the directory <Express Server installation directory>/ImageServer/var/log, but you can easily access them via the Express Server Manager.
To access logs via the Express Server Manager:
1. Open the Express Server Manager (see Accessing the Express Server Manager on page
21).
2. Click Status on the top navigation bar, then click the name of a log in the "Download log
files" list.
Some Notes on the Express Server Access Log
The access log file is analogous to a web server access log. It contains a record of all web
requests handled by Express Server. For each request handled by Express Server, an entry is
appended to this file.
The format of the access log is
date [thread ID] server client [requestID] [size] url [status]
where
l
date is the date/time that the request was received
l
thread ID is the thread that performed the processing
l
server is the hostname/port of the server processing the request
l
client is the IP address of the client making the request
l
requestID is a numerical ID assigned to the request by Express Server
l
size is the size in bytes of the response
l
url is the actual request URL being processed
l
status is the status of the request – 0 indicates success, all else indicates failure
- 219 -
LizardTech Express Server 9 User Manual
Some Notes on the Express Server Error Log
The error log file contains error messages, warnings, informational statements, and debug information. You can specify the level of information written to this log file (see Setting Basic Express
Server Settings on page 29).
The format of the error log is
date [thread ID] [type] [status] message
where
l
date is the date/time that the message was generated
l
thread ID is the thread that performed the processing
l
type is the type of message, one of those in the following table
Error Log Message Types
Message
- 220 -
Notes
emerg
an emergency situation in which Express Server cannot operate
alert
an emergency situation in which Express Server cannot operate
criti
a critical failure
error
an error occurred and was handled
warni
a warning
notic
information that is normal, but also significant
infor
additional information that may be of interest
debug
information that may be helpful for debugging
l
status is the status of the request – 0 indicates success, all others indicate failure
l
message is a text message describing the condition
Chapter 11: Troubleshooting
Memory and Optimal Performance
There are a number of parameters you can fiddle with to optimize the performance of your
Express Server software. The best settings for you will depend on a variety of factors including
your operating system, the size of your imagery, how often the same scenes are requested, etc.,
but we've outlined some of the possibilities below. We encourage you to experiment with these
values until you get the best performance for your system and workflow.
Adjusting the Size of the Image Cache and Item Cache
The Image Cache and the Item Cache store information about opened images in RAM while
Express Server is running, and are cleared when Express Server is stopped. Their purpose is to
reduce the performance cost of initializing images. Initializing is a process in which Express
Server reads the headers and other structures containing information about the image, such as
datatype and color space, that tell Express Server how to handle the image. Caching this information in RAM means that subsequent requests for that image will be fulfilled more quickly than if
the image had to be initialized again each time.
The size of the Image Cache (i.e. the number of images that are already initialized and ready to
be opened at a moment's notice) is controlled in the Image Manager Settings panel of the Cache
tab on the Settings page. The default value is 500, which means that Express Server will always
keep the 500 most recently opened images initialized in RAM while it is running. After 500 images
are opened and the Image Cache is filled, the earliest images are discarded from the list to make
room for the newer ones.
Increasing the capacity of the Image Cache will enable more images to be kept in that initialized
state and thus reduce the time between the request for an image and its fulfillment, as long as
your system does not run out of RAM. Express Server runs on 64-bit systems, which means that
much more RAM is available than on 32-bit systems. If you are running Express Server on a 64bit system you should certainly take advantage of this increased memory capacity by increasing
the Image Cache and Item Cache values beyond their defaults. Allot as much RAM to caching as
your system can afford while making sure its size remains below that of the amount of RAM available. If you are running Express Server on a 32-bit system then this "sweet spot" will be a much
smaller cache size, and you may even have to decrease the size from the default values if performance is already suffering because of an oversized cache.
- 221 -
LizardTech Express Server 9 User Manual
The Item Cache is similar to the Image Cache in that it keeps information about opened images,
except that the images do not remain initialized in the Item Cache. The Item Cache is accessed
by Express Server for various tasks that do not require images to be decoded, such as returning a
list of catalog contents. Items in the Item Cache take up much less memory than those in the
Image Cache, so it can be much larger. The default value is 1000, which means, again, that
Express Server will always keep the 1000 most recently opened images listed in RAM while it is
running.
For more information see Configuring the Image Manager on page 39.
NOTE: Both the Image Cache and the Item Cache are cleared when Express Server is
stopped.
Enlarging the Disk Cache
The Disk Cache stores decoded pixels for quick retrieval upon later request and is sometimes
referred to as the "pixel cache". It is located on the hard disk and is therefore persistent across
instances of Express Server running and stopping.
The Disk Cache fills up over time as images are opened. It should be allowed to grow as large as
your operating system can afford to have it be. Its size is controlled in the Disk Cache panel of the
Cache tab on the Settings page. By default the value is 512 megabytes.
For more information see Configuring the Disk Cache on page 35.
Enlarging the Extraction Cache
Like the Disk Cache, the Extraction Cache resides on the hard disk. Express Server monitors a certain configurable number of scene requests in the form of URLs and stores copies of the images
delivered in fulfillment of those requests. One difference between the Extraction Cache and the
Disk Cache is that images in the Extraction Cache are scene extractions already in delivery format
(JPEG or PNG, for example), while pixels from the Disk Cache still need to be encoded for delivery. Thus, If your workflow encourages the repeated use of particular requests in the form of
URLs, a larger Extraction Cache might improve your Express Server's performance.
The number of times a particular URL must be requested before the corresponding scene extraction is cached is controlled by the Extraction Cache Trigger parameter. The number of consecutive requests that Express Server monitors is controlled by the Extraction List Size
- 222 -
Chapter 11: Troubleshooting
parameter, whose default value is 50. Both are set in the Image Manager Settings panel of the
Cache tab on the Settings page. The default value for Extraction Cache Trigger is 2, which means
that if two out of the last 50 URL requests were for a particular scene, that scene is cached in its
delivery format in the Extraction Cache.
Increasing the Extraction List Size will make Express Server monitor more requests, and decreasing the value of the Extraction Cache Trigger will cause more images to be stored to the Extraction Cache sooner.
For more information see Configuring the Image Manager on page 39.
NOTE: If the Extraction List Size is set to zero (0) or missing, then Express Server does
not monitor scene extractions and the Extraction Cache Trigger setting is ignored.
For more information about configuring the Extraction Cache, see The ImageManager Element
on page 158.
Flattening MG3 Composite Mosaics
If you are using composite mosaics in MrSID Generation 3 (MG3) format, flattening these mosaics may improve performance.
Blurry Images
If your Express Server is outputting scenes that appear blurry there are several things you can do
to try to correct the problem.
Flattening Nested Catalog Groups
Catalog groups nested inside other catalog groups can sometimes be blurry. If you have blurry
images in nested catalog groups, try reorganizing the catalogs so that no catalog group contains
another catalog group.
Flatten catalog groups by removing catalog groups from inside catalog groups in the Express
Server Manager (see Editing a Catalog Group on page 66).
For more information about catalog groups, see Adding and Configuring Catalog Groups on page
65.
NOTE: Catalog groups are referred to in the catalogs.xml file as "multicatalogs".
- 223 -
LizardTech Express Server 9 User Manual
Changing Resampling Algorithms
Express Server can be configured to use one of three algorithms when interpolating pixels during
reprojection and when scaling a scene to the requested output dimensions . If your images are
blurry and your resampling algorithms are set to "nearest neighbor" interpolation, try specifying
"bilinear", and if they are already set to bilinear, then push them to "bicubic". Bicubic interpolation
results in the highest image quality but is the most CPU intensive.
For more information see Setting Basic Express Server Settings on page 29.
Decreasing the Scaling Bias
In cases where MrSID or JPEG 2000 pixel data must be scaled up or down because the resolution
of the requested scene falls between two zoom levels, Express Server has a default bias toward
scaling up from lower resolution data and favoring performance over image quality. For better
image quality, try decreasing the value of this bias or eliminating it altogether.
For more information see Setting Basic Express Server Settings on page 29.
Avoiding Unnecessary Reprojection
If it's possible to set up your catalogs in such a way that your images are being reprojected as seldom as possible you'll have clearer results. We recommend making sure that your data is in the
coordinate reference system that your end users most often work in.
Images Display a Black Background
If your imagery displays a black background instead of a transparent background, verify that the
imagery has transparency values. For example, you can add an alpha band to the image to specify regions of transparency. Alternatively, if you cannot add transparency values to an image, you
can configure Express Server to use black pixels as transparent pixels.
To use black pixels as transparent pixels, complete the following steps:
1. Open the Express Server Manager (see Accessing the Express Server Manager on page
21).
2. Click Catalogs on the top navigation bar, then select a catalog in the list.
3. Select Advanced on the left-hand navigation panel, then click Edit.
- 224 -
Chapter 11: Troubleshooting
4. Select the Use black no-data checkbox, then click Save.
5. If you have no further settings to edit, click Publish.
Speckled Images
When two images overlap, such as in DOQQ imagery, artifacts called speckling can occur. If your
Express Server is outputting scenes that appear speckled there are several things you can do to
try to correct the problem.The illustration below demonstrates what speckling looks like.
Notice the large dark mottled patch in the right side of the image. This is an area of overlap in the
underlying image tiles comprising the mosaic. In this rectangle the values of some of the pixels
were changed by compression from true black (the nodata or transparency color) to a near-black.
The slight change causes these pixels to be mistaken for image data.
- 225 -
LizardTech Express Server 9 User Manual
Despeckling the Source Imagery
LizardTech's GeoExpress® software has tools for removing speckling, so if you have access to a
licensed copy of GeoExpress (version 7 or later), you can quickly and easily despeckle your MG2
and MG3 imagery so that the problem does not show up in your Express Server catalogs. For
more information visit http://www.lizardtech.com/products/geo/.
Using MG4 as Source Imagery
Alternatively, if you have the choice of using MrSID® Generation 4 (MG4) imagery, we recommend that you do so. The latest version of the MrSID format supports alpha bands, which enable
true transparency and eliminate speckling.
Editing BufferMergeRule Attributes
In Express Server, you can address speckling using the Buffer Merge Rule. The Buffer Merge
Rule determines how Express Server chooses which pixel to copy to the output file when overlapping occurs. By default, the Buffer Merge Rule takes the Fuzzy method and has a Fuzziness
value of 3.
First, you should make sure that the Buffer Merge Rule's method is still set to Fuzzy. This alone
may result in an improvement. Below are two images showing the difference in an image set compressed at 50:1. The view is zoomed in to the right edge of the speckled rectangle in the illustration above. In the first image, the Buffer Merge Rule's method is set to Strict; in the second, it
is set to Fuzzy with the default Fuzziness value of 3.
- 226 -
Chapter 11: Troubleshooting
- 227 -
LizardTech Express Server 9 User Manual
If you look closely at the second image, you can still see a thin solid line running through the
scene from top to bottom, as well as some remaining speckling to the left of that line. It will not be
possible to eliminate the line entirely, but by increasing the Fuzziness value, it will possible in this
case to remove all the speckling. Here is the same scene with a Fuzziness value of 10, in which all
the speckling is gone and only the line remains.
- 228 -
Chapter 11: Troubleshooting
For imagery encoded at very high compression ratios, such as 80:1, it may be necessary to
increase the Fuzziness value to 14 or 15. We encourage you to experiment with different values
until you find the values right for your imagery. At some point you will start to see other kinds of
artifacts appearing as you continue to increase the Fuzziness value, but you should be able to
eliminate the worst speckling long before you reach that point.
For information about setting the Buffer Merge Rule and its Fuzziness value, see Setting Buffer
Merge Rule on page 56.
Mosaicked NITF Images
When viewing mosaicked NITF images via WMS or the Express Server Web API, you will notice
that the tiles do not align perfectly. The reason for this is that the NITF IGEOLO positioning is not
precise enough to accurately place the tiles in the mosaic.
This can be corrected by using world files to position the NITF tiles.
- 229 -
LizardTech Express Server 9 User Manual
Slow PDFs
Delivery performance can suffer when image data is served from Geospatial PDFs. We recommend that you optimize your PDFs (see Optimizing PDFs on page 64) for more efficient distribution over networks.
Unsupported Browser Version
If you are using IE 8 or later and see the warning, "Unsupported Browser Version", make sure
your browser is not running in Compatibility View mode.
You can tell whether your browser is running in Compatibility View mode by looking for the Compatibility View icon inside the URL field at its right end, as shown below:
If the icon is colored (blue), Compatibility View is enabled. If it is gray, it is disabled.
You can disable Compatibility View by clicking the icon, or you can choose Compatibility View
from the Tools menu (when the option has a check next to it, choosing the option disables it).
If the icon is missing from the URL field, then choose Compatibility View Settings from the
Tools menu and clear the Display intranet sites in Compatibility View checkbox.
Finding the Express Server Version Number
Finding the Version Number Using the Graphical User Interface
Once Express Server is installed, you can use the Express Server Manager, a graphical user interface, to find the version number.
To find the version number using the Express Server Manager:
1. Open the Express Server Manager (see Accessing the Express Server Manager on page
21).
2. Click Status on the top navigation bar. When Express Server is running, the version number is reported on the Express Server status line.
- 230 -
Chapter 11: Troubleshooting
Finding the Version Number Using the Error Log
The Express Server version number is included as part of the message recorded in the error log
each time Express Server is started. The version number appears at the end of the string in parentheses, as in the following sample entry.
27/April/2011:11:02:36 [1] [notic] iserv engine started (version 9.
0.0.3531)
From this string you can see that the version running is Express Server 9, build number 3531.
For more information, see "Accessing and Using Log Files".
Finding the Version Number Using the Express Server browse
Web API Function
If the Express Server has not been shut down, you can also discover which version of the Express
Server you are running by using the Express Server browse Web API function.
Enter the following in your browser:
http://<ServerName>/lizardtech/iserv/browse?style=none
This returns an XML document. The version number appears in the second line, as shown in the
XML excerpt below.
<?xml version="1.0" encoding="UTF-8" standalone="no" ?>
- <ImageServer host="dr-ltm-lmfta:80" licensestate="valid" path="li
zardtech/iserv"
version="9.0.0.3531" xmlns:LizardTech="http://ww
w.lizardtech.com">
Technical Support
Most technical issues can be resolved using the various resources you have available. In addition
to the product documentation and the README file, LizardTech offers a knowledge base and
product updates on the LizardTech website.
Express Server Demonstration Website
http://demo.lizardtech.com
- 231 -
LizardTech Express Server 9 User Manual
Both users and administrators can visit the LizardTech Demonstration Website for Express Server
demos, code samples and useful information.
Knowledge Base
http://www.lizardtech.com/support/kb/
The LizardTech Knowledge Base contains articles about known technical issues and is frequently
updated.
Product Updates
http://www.lizardtech.com/products
Updated versions of LizardTech viewer tools are available for download at no cost.
Support Plans
http://www.lizardtech.com/purchase/other.php
Protect your investment in LizardTech software by participating in a LizartTech support plan. For
more details, please contact your regional LizardTech office.
Contacting Technical Support
http://www.lizardtech.com/support
To contact technical support, visit the website at the above URL and follow links to the LizardTech
Knowledge Base or the Product Activation page. A Contact Form is also provided for issues that
require further assistance.
In an emergency, call 1-206-902-2500 between the hours of 8 AM and 5 PM Pacific time.
IMPORTANT: Please have the following information available to assist in resolving
your problem:
l
Which version of Express Server you are running (see Finding the Express Server Version
Number on page 230).
- 232 -
l
Other LizardTech products you have installed and their version numbers
l
Which operating system you use
l
How much free hard drive space your computer has
l
How much RAM your computer has
Chapter 11: Troubleshooting
l
The type and size of file you are encoding
l
Copies of your configuration files
l
The task you were working on when the problem occurred
l
The command you typed prior to the problem, if applicable
l
The exact error message, if applicable
l
Whether you have restarted the computer and attempted to reproduce the problem
l
Whether you are using Apache or IIS
l
Any other information you feel is relevant
- 233 -
Chapter 12: Appendix
About LizardTech
235
Other LizardTech Products
235
Express Server and Patents
237
Express Server Feature History
237
Glossary
240
About LizardTech
Since 1992, LizardTech has delivered state-of-the-art software products for managing and distributing massive, high-resolution geospatial data such as aerial and satellite imagery and LiDAR
data. LizardTech pioneered the MrSID® technology, a powerful wavelet-based image encoder,
viewer, and file format. LizardTech has offices in Seattle, Denver, London and Tokyo and is a division of Celartem Technology Inc. For more information about LizardTech, visit www.l-
izardtech.com.
Other LizardTech Products
We at LizardTech are glad to have you as a customer. We’re confident that you will find LizardTech Express Server to be everything you need to cost-effectively deliver high-resolution
images to your users. While you’re “in the shop,” explore LizardTech’s other great products for
managing high-quality content.
ArcIMS Integration Toolkit
The ArcIMS Integration Toolkit enables you to eliminate the creation and maintenance of image
pyramids and provides a number of tools to facilitate collaboration across the organization, accelerate image delivery via ArcIMS, manage image repositories and dramatically reduce disk space
requirements. ArcIMS Integration enables you to use your Express Server to stream raster
images, freeing your ArcIMS server to serve up other data for GIS analysis. Because your geospatial images are maintained in the MrSID file format, they can be shared across the organization, among GIS and non-GIS professionals. Automatic cataloging enables images organized
into folders to be easily updated simply by adding new image files. ArcIMS Integration Toolkit is
included on your Express Server CD-ROM.
- 235 -
LizardTech Express Server 9 User Manual
Learn more about the ArcIMS Integration Toolkit at http://www.lizardtech.com/products/exp.
GeoViewer
Efficient Viewing and Exporting of MrSID and JPEG 2000 Layers
GeoViewer is LizardTech's free, standalone application for viewing geospatial imagery, vector
overlays and LiDAR data. GeoViewer enables you to combine, view and export visual layers from
varied sources, such as local repositories, Express Server catalogs, and WMS and JPIP servers.
GeoViewer supports a wide range of input formats and exports to GeoTIFF, PNG and JPEG. It's
the most efficient means of viewing MrSID and JPEG 2000 images.
For more information about GeoViewer, visit the following URL:
http://www.lizardtech.com/downloads/category/#viewers .
ExpressView Browser Plug-in
Fast and Easy Viewing of Large Images
ExpressView™ Browser Plug-in enables you to view, navigate and print MrSID and JPEG 2000
imagery in Internet Explorer or Firefox. Like GeoViewer, ExpressView enables you to save a portion of an image in a number of other image formats. ExpressView Browser Plug-in is quickly
downloaded, easily installed, and free for individual use. It's the most convenient way to view
MrSID and JPEG 2000 imagery over networks!
For more information about ExpressView Browser Plug-in, visit the following URL:
http://www.lizardtech.com/downloads/category/#viewers .
GeoExpress
The Industry’s Best Image Manipulation and Compression Software
With powerful tools for reprojecting, color balancing, and mosaicking, GeoExpress® software is
the industry’s choice for manipulating and compressing geospatial imagery to industry standard
formats. You can configure Express Server and Spatial Express® software directly from GeoExpress, which makes it the ideal command center for your storage and distribution workflows.
For more information about GeoExpress, visit the following URL:
www.lizardtech.com/products/geo/.
- 236 -
Chapter 12: Appendix
LiDAR Compressor
LiDAR Data Meets the MrSID Format
LizardTech LiDAR Compressor™ software enables you to turn giant point cloud datasets into efficient MrSID files that retain 100 percent of the raw data at just 25 percent or less of the original
file size (lossless compression). If storage requirements are critical, you can reduce your LiDAR
file sizes by 90 percent or more by choosing a higher compression ratio and letting LiDAR Compressor select the best way to reach a desired file size (lossy compression). Unlike raw LAS or
ASCII data, LiDAR files compressed to MrSID are easily managed resources you can extract
derivatives from again and again.
For more information about LiDAR Compressor, visit the following URL:
www.lizardtech.com/products/lidar/.
MrSID Decode SDK
Integration of MrSID Support into Third-Party Applications
The MrSID Decode SDK provides a framework for extracting raster or LiDAR data from MrSID
files, including MrSID Generation 4 (MG4™). Used as the foundation for LizardTech's LiDAR
Compressor™ and its Express Suite® line of geospatial products – GeoExpress, Express Server
and Spatial Express software – the MrSID Decode SDK is a robust toolkit suitable for complex
application development needs.
MrSID Decode SDK is available for free download at the following URL:
http://developer.lizardtech.com.
Express Server and Patents
This software is protected by U.S. Patent Nos. 7,218,789, 7,454,084, 7,508,991 and 5,710,835;
Canadian Patent No. 2,236,943; and European Patent No. 0,864,135.
Express Server Feature History
Following are descriptions of the features that were new in past versions of Express Server.
- 237 -
LizardTech Express Server 9 User Manual
Express Server 8
Express Server Manager
You can now configure Express Server without touching an XML file or using the command line,
thanks to a graphical user interface called the Express Server Manager. After installation Windows users will find a link to it from your Start menu and Unix users can bookmark a URL.
Support for Geospatial PDF
Express Server 9 supports Geospatial PDF as an input format, offering you greater flexibility in
your workflow and another way for you to meet the needs of your users.
Trial Version
Express Server 9 can be downloaded as a 30-day trial version, so it's easier than ever to take for a
road test. If you like what Express Server does for your image distribution workflow and decide to
purchase it, we send you a license code that turns your trial installation into the full version, so you
only have to download and install Express Server once.
Other Improvements
This version of Express Server also includes a number of bug fixes and other improvements.
Express Server 7
Support for MrSID Generation 4
As of version 7 Express Server supports MrSID Generation 4 (MG4) as a source format. Like previous versions of the MrSID format, MG4 enables geospatial professionals to mosaic datasets
together and manipulate data in many other ways. But MG4 offers the additional capability of
losslessly compressing multispectral and hyperspectral geospatial data as well as alpha band support and improved mosaicking.
Support for Multispectral Imagery
Version 7 of Express Server introduced support for multispectral images as source imagery.
Administrators can choose which bands of a multispectral or hyperspectral image they wish to be
returned for client requests and specify their order. For more information see Mapping Bands on
page 53 and Serving Different Band Combinations from the Same Images on page 63.
- 238 -
Chapter 12: Appendix
Support for 64-Bit Systems
Express Server 7 and later can be run on 64-bit operating systems. Among other things, this
enables you to allot more memory to caching, which improves Express Server performance. For
more information, see Adjusting the Size of the Image Cache and Item Cache on page 221.
Other Improvements
Version 7 of Express Server also included a number of bug fixes and other improvements, including the addition of the "in-image" exception format (application/vnd.ogc.se_inimage) for WMS
requests and increased default image quality for JPEG images.
Express Server 6
Oracle Support
Express Server’s support for Oracle Spatial enables you to enlist Oracle databases running LizardTech Spatial Express as Express Server image catalogs. Express Server’s integration with
Oracle Spatial 10gR2 means that you can store images hundreds of gigabytes in size in your
enterprise database. Natively serve MrSID and JPEG 2000 imagery stored in a database and
save up to 95 percent in storage space.
GML Support
Support for geography markup language (GML) means Express Server delivers geospatial
metadata added to your JPEG 2000 imagery to GIS and other applications.
Mirroring Support
Express Server includes built-in tools for synchronizing catalog information between multiple
installations, so you can easily add another Express Server to your server farm for load balancing
or as a hot spare.
Updated Sample Applications
Express Server’s sample web applications were updated for version 6 and are included with the
installation, so you can view or show off your imagery using a number of viewing methods – including Javascript, Flash, and Ajax – right out of the box. Customizing the sample applications is an
easy way to get started running Express Server. Just grab the source code and go!
- 239 -
LizardTech Express Server 9 User Manual
IIS Support for Windows 2003
Express Server supports Microsoft IIS on Windows 2003 without additional manual configuration.
Support for Apache on Windows
Upon installation, Express Server offers users the option to use Apache
and, if the Apache option is chosen, automatically configures the Apache server.
JPIP Support
As of version 6.1, Express Server includes support for the JPIP protocol, which enables progressively streaming imagery from a server to a client in support of image use in bandwidth-constrained environments.
ArcGIS Integration
Version 6.1 also introduced interoperability with ESRI products, enabling you to add image layers
from Express Server to ESRI ArcGIS Server and ArcGIS Image Server for rapid viewing of
MrSID, JPEG 2000 and NITF imagery.
Google Earth Integration
As of version 6.1, images in MrSID, JPEG 2000 and NITF formats can be loaded from Express
Server into Google Earth for high-performance viewing of raster imagery.
NITF Support As of version 6.1, Express Server includes support for serving National Imagery Transmission
Format (NITF) images. You can load NITF imagery into ESRI's ArcGIS products or Google
Earth, and serve NITF imagery via ArcIMS, WMS clients or the Web.
Apache 2.2 Support As of version 6.1, Express Server works with Apache Web Server version 2.2.4.
Glossary Following is a list and definitions of several words, phrases and acronyms appearing in the foregoing text.
- 240 -
Chapter 12: Appendix
A
alpha band
Also called 'alpha channel'. An additional band used to contain masking or transparency information about other bands in an image. See
also 'transparency'.
API
A language and message format used by an application program to
communicate with the operating system, communications protocol or
some other control program.
B
band
A set of samples corresponding to one spectral component of an
image, e.g. the 'red' band of an RGB image.
base configuration file
An XML file (“iserv-cfg.xml”) that instructs Express Server in how to
cache image data and perform other basic functions.
Bitmap
A raster graphics image file format used to store bitmap digital
images, independently of the display device (such as a graphics
adapter), especially on Microsoft Windows and OS/2 operating systems. Also known as 'BMP'. The BMP file format is capable of storing
2D digital images of arbitrary width, height, and resolution, both mono-
- 241 -
LizardTech Express Server 9 User Manual
chrome and color, in various color depths, and optionally with data
compression, alpha channels, and color profiles.
C
cache
Generally, a component that transparently stores data so that future
requests for that data can be served faster. Express Server employs
several cache strategies in concert for optimal performance.
catalog
An array of folders with images in them, located on one or more file
systems to which Express Server has access. A catalog can also be
a single indexed image.
catalog configuration file
An XML file (“catalogs.xml”) that defines the image catalogs and their
properties.
cliient
The viewing computer or application. More broadly, the requesting
end of the spectrum in a request/supply relationship between programs.
composite mosaic
A compressed MrSID mosaic in which all the input tiles remain individual images wrapped by a single file structure. Unlike in a flat
mosaic, which becomes a single image upon encoding, any image in
a composite mosaic can be updated in place. See also 'flat mosaic'
and 'mosaic'.
- 242 -
Chapter 12: Appendix
compression
An operation that creates a new image file from an original image file
such that the file size of the new image is smaller. The reduction in
file size may be at the expense of some image quality. (Note that the
file size is what is reduced, not the dimensions of the image itself.)
See also 'lossless' and 'lossy'.
coordinate reference system
Also referred to as CRS, projection, spatial reference system, SRS. A
coordinate-based local, regional or global system used to locate geographical entities. A coordinate reference system defines a specific
map projection, as well as transformations between different coordinate reference systems. Coordinate reference systems are defined by
the OGC's Simple feature access using well-known text, and support
has been implemented by several standards-based geographic
information systems. Coordinate reference systems can be referred to
using a SRID integer, including EPSG codes defined by the International Association of Oil and Gas Producers.
CRS
See 'coordinate reference system'.
D
despeckling
A process by which pixel values that have been slightly changed in
compression are returned to the specified transparency value to eliminate artifacts, usually a speckling in collar or 'no-data' areas.
- 243 -
LizardTech Express Server 9 User Manual
E
element
A discrete section of an XML document. An element can contain
other elements, which can then be thought of as subelements. See
also 'XML'.
EPSG code
A series of numbers representing a coordinate reference system
recognized as one in a set compiled by the European Petroleum Survey Group (EPSG). EPSG was a scientific organization consisting of
specialists working in applied geodesy, surveying, and cartography
related to oil exploration. EPSG compiled and disseminated the
EPSG Geodetic Parameter Set, a widely used database of Earth
ellipsoids, geodetic datums, geographic and projected coordinate reference systems, units of measurement, etc. An example of an EPSG
code is 4326, which identifies the coordinate reference system WGS
84.
F
flat mosaic
A mosaic of tiled images that has been encoded as a new, single
image, as opposed to a composite mosaic, which is an indexed
image file wrapping many separate image tiles. Any tile in a composite mosaic can be replaced in an update operation. In a flat
mosaic the original tiles that comprise it do not retain separate identities. See also 'composite mosaic' and 'mosaic'.
- 244 -
Chapter 12: Appendix
G
georeferenced
Defined in physical space. The location of a georeferenced image is
established in terms of map projections or coordinate reference systems.
GIF (Graphics Interchange Format)
A bitmapped graphics file format developed by CompuServe and
widely used on the Internet.
grayscale
Having a single sample for a value, rather than three (RGB) or more
(multispectral). A grayscale pixel carries only intensity information.
Grayscale images, also known as black-and-white, are composed
exclusively of shades of gray, varying from black at the weakest
intensity to white at the strongest.
H
HTTP (HyperText Transfer Protocol)
The communications protocol used to connect to web servers on the
Internet or on a local network (intranet). Its primary function is to establish a connection with the server and send HTML pages back to the
user's browser. It is also used to download files from the server either
to the browser or to any other requesting application that uses HTTP.
hyperspectral
See 'multispectral'.
- 245 -
LizardTech Express Server 9 User Manual
I
image pyramid
A digital image storage construct in which multiple versions of the
same image are created at different resolutions for responding to
image queries at various zoom levels. For comparison see 'multiresolution'.
J
JPEG 2000
An image compression standard and coding system created by the
Joint Photographic Experts Group committee in 2000. Their purpose
was to supersede their original discrete cosine transform-based
JPEG standard (created in 1992) with a newly designed, waveletbased method.
JPIP (JPEG 2000 Interactive Protocol)
A compression streamlining protocol that works with JPEG 2000 to
produce an image using the least possible bandwidth. JPIP has the
capacity to download only the requested part of a picture, saving
bandwidth, computer processing on both ends, and time. It allows for
the relatively quick viewing of a large image in low resolution or a particular region of the same image at a higher resolution.
JPIP configuration file
An XML file (“jpiphost.exe.config”) that controls how the JPIP Server
operates.
- 246 -
Chapter 12: Appendix
L
layer
With regard to Express Server, an image or catalog of images spatially indexed for viewing in a GIS via WMS.
lossless
Encoded with no loss of data. A losslessly encoded image contains a
representation of all of the original pixel values. When decoded, a
lossless image is mathematically identical to the original. See also
'lossy'.
M
MG2
See 'MrSID'.
MG3
See 'MrSID'.
MG4
See 'MrSID'.
mosaic
A composition of two or more images to form a new, larger image.
Positioning of the images is generally based on geospatial coordinates. See also 'composite mosaic' and 'flat mosaic'.
- 247 -
LizardTech Express Server 9 User Manual
MrSID
A wavelet-based image format designed for large, high-quality geospatial imagery. There are three versions of MrSID, known as MrSID
Generation 2 (MG2), MrSID Generation 3 (MG3) and MrSID Generation 4 (MG4). MG2, the first released version of the format, is limited to lossy encoding and does not support optimization. MG3, the
second version, supports lossless encoding, image optimization, and
composite images. MG4, the most recent version, supports alpha
bands, multispectral imagery, and improved composite mosaicking.
multiresolution
Containing all the image data for multiple representations of an
image at different resolutions. MrSID images are multiresolution
images, in that a single MrSID file contains compressed data that
viewers decode at any desired resolution or 'zoom level'. For comparison see 'image pyramid'.
multispectral
Having more than three bands. A multispectral image contains image
data at a range of frequencies across the electromagnetic spectrum.
An example of a multispectral image is RGB-IR, which contains
bands housing data from the red, green and blue wavelengths plus
an infrared band. Multispectral imagery includes hyperspectral
imagery, which contains potentially hundreds of bands that correspond to extremely narrow divisions of the spectrum.
- 248 -
Chapter 12: Appendix
N
NITF/NITFS (National Imagery Transmission Format Standard)
A suite of standards developed and used by the U.S. Department of
Defense and Federal Intelligence Community for the exchange, storage, and transmission of digital-imagery products and image-related
products.
no-data
See 'transparency'.
O
OGC (Open Geospatial Consortium)
An international voluntary consensus standards organization that originated in 1994. In the OGC, more than 400 commercial, governmental, nonprofit and research organizations worldwide
collaborate in a consensus process encouraging development and
implementation of open standards for geospatial content and services, GIS data processing and data sharing.
optimization
The process of creating an MG3 image from a source MG3 image,
such that the new image is better suited for some purpose or workflow. The most common optimization is compression; other optimization operations include cropping and removal of resolution levels.
- 249 -
LizardTech Express Server 9 User Manual
P
PNG (Portable Network Graphics)
A bitmapped graphics file format endorsed by the World Wide Web
Consortium.
port
An application-specific or process-specific software construct serving
as a communications endpoint in a computer's host operating system.
A port is associated with an IP address of the host, as well as the type
of protocol used for communication.
projection
See 'coordinate reference system'.
R
raster image
A dot matrix data structure representing a generally rectangular grid
of pixels, or points of color, viewable via a monitor, paper, or other display medium. Raster images are stored in image files with varying
formats
reprojection
The process of changing the coordinate reference system or “projection” that an image is displayed in. See also 'coordinate reference
system'.
- 250 -
Chapter 12: Appendix
resolution
The scale at which an image is represented, as expressed in pixel
dimensions. Resolution can also refer to ground units per pixel as
used for georeferencing (a value stored in the metadata of an image).
See also 'zoom level'.
RGB
An additive color model in which red, green, and blue light is added
together in various ways to reproduce a broad array of colors. The
name of the model comes from the initials of the three additive
primary colors, red, green, and blue. The main purpose of the RGB
color model is for the sensing, representation, and display of images
in electronic systems, such as televisions and computers.
S
scene
The area of an image requested by the client for viewing, anything
from a zoomed-in portion of the image to the entire image. In the rendering of a requested scene all portions of the image that constitute
any part of that scene at the quality specified are decoded and
delivered.
selective decompression
Decoding of a portion of an image or mosaic so that some image data
can be viewed immediately, as opposed to decoding the entire image
before showing any desired portion.
- 251 -
LizardTech Express Server 9 User Manual
spatial index
An index used to optimize spatial queries or, in this case, requests for
imagery. A spatial index describes the spatial relationship of each
image in a catalog to every other image in that catalog, enabling
Express Server to mosaic the images together so that each image is
in the right place and is correct according to a given projection system.
speckling
Artifacts in collar or "no-data" areas of a mosaicked image caused by
drifting pixel values during compression. See also 'despeckling'.
streaming
In Express Server’s JPIP implementation, transmitting wavelet coefficients from a compressed image file instead of transmitting an
image. See 'wavelet coefficients'.
T
TIFF (Tagged IMage File Format)
A bitmapped graphics file format developed by Aldus Corporation
that handles monochrome, gray scale, 8-and 24-bit color.
transparency
Also called 'no-data'. A feature of some image file formats, including
MrSID and JPEG 2000, whereby pixel data in specified areas are
ignored in favor of imagery underneath. In an image mosaic source
tiles often overlap, and valid image data in one tile is sometimes
covered by non-image (collar) data from another. A transparency
- 252 -
Chapter 12: Appendix
color value can be assigned so that any pixel whose values match
the transparency value is discarded in favor of the pixel below it.
W
wavelet
A mathematical representation of a pixel value that varies by frequency and duration; in wavelet space, the importance of a pixel
depends on the values of its neighboring pixels. Wavelet-based
image formats are able to present images at multiple levels of resolution without the overhead of pyramidal formats. See also 'multiresolution' and 'image pyramid'.
wavelet coefficients
Arrays of numbers arrived at via a wavelet-based mathematical
algorithm. Wavelet coefficients represent a given set of image data’s
spatial position within an image, scale (or 'resolution'), and quality
contribution.
WMS
(Web Map Service) A standard protocol for serving georeferenced
map images over the Internet that are generated by a map server
using data from a GIS database. The specification was developed
and first published by the Open Geospatial Consortium in 1999.
X
XML (Extensible Markup Language)
A markup language that defines a set of rules for encoding documents in a format that is both human-readable and machine-
- 253 -
LizardTech Express Server 9 User Manual
readable. It is defined in the XML 1.0 Specification produced by the
World Wide Web Consortium (W3C).
Z
zoom level
The resolution of an image expressed as a scale or magnification
number. See also 'resolution'.
- 254 -
Index
ArcGIS Server integration
6
instructions 83
support as of Express Server 240
64-bit systems
and performance 221
supported as of Express Server
Architecture 1
Archive
clearing 93
7 239
supported operating systems and
web servers 7
restoring configuration from 45
Authentication 93
A
About LizardTech 235
Access rights 9
Adding custom properties to a
B
Bands
mapping 53
serving different combinations 63
catalog 56
Blurry images 223
Adding images to existing catalog 63
browse API function 112
Ajax via WMS 73
Browser support 230
Allow item download 54
Buffer merge rule 56
Apache
adding a host on 96
configuring 16
APIs 1
Appendix 235
C
Caches
configuring 35
calcrgn API function 127
Catalog configuration schema 138
- 255 -
LizardTech Express Server 9 User Manual
Catalog groups 65
catalogs.xml file 163
Catalogs
Command-line tools 143
adding 48
Compatibility mode 230
adding images to 63
Computed properties 138
band combinations 63
Configuration archive
band mapping 53
clearing 93
buffer merge rule 56
restoring from 45
custom properties 56
Configuration file
download policy 54
base (iserv-cfg.xml) 150
enabling 49
catalog (catalogs.xml) 163
EPSG codes for index 52
Configuring Express Server
generating an overview 51
authentication 93
global properties and defaults 47
by hand (using XML files) 149
hiding 66
global catalog properties and
indexing 50
not showing up 216
defaults 47
multiple Express Servers (mirroring) 89
publishing in ArcGIS Server 83
Coordinate reference system
removing 67
adding custom 80
removing imagery from 68
for spatially indexing a catalog 52
size constraint 55
crop method 119
special properties 138
cropinside method 120
thumbnails 58
Custom projections 80
tile browsing policy 54
watermarks 57
- 256 -
Index
D
Default catalog folder 29
DHTML and JavaScript 72
version number 230
Web API functions 111
Express Server Manager
Disk cache 35, 222
accessing 21
Displaying image information 147
graphic elements 21
password 75
E
ExpressView Browser Plug-in 70
Environment variables
Extraction cache
Unix 137
configuring 39
Windows 137
troubleshooting 222
EPSG code
F
adding custom 80
finding 79
File formats 134
for spatially indexing a catalog 52
fill method 124
supported for a catalog 59
fit method 121
WMS top layer 42
fitinside method 123
esri_extra.wkt file 81
G
Express Server
GetCapabilities 136
and patents 237
getimage API function 114
demonstration website 231
getimage method
licensing 16
crop 119
processes and permissions 9
cropinside 120
system requirements 7
fill 124
trial version 238
fit 121
- 257 -
LizardTech Express Server 9 User Manual
system requirements 7
fitinside 123
Image cache
scale 123
getitem API function 126
configuring 41
getstyle API function 130
troubleshooting 221
getthumb API function 125
Image manager 39
getwatermark API function 130
Image Server Daemon 133
GML support
Input formats 134
as of Express Server 7 239
Installation 7, 12
directory and file locations 134
benefit of 3
Google Earth integration
IP addresses and ports 133
problems 213
requirements 7
support as of Express Server 6 240
Graphical user interface 238
Installing Express Server
problems 213
IP addresses and ports 133
H
IP restrictions 93
Hidden catalogs 66
iserv-cfg.xml file 150
Host
isindex 144
adding on Apache 96
Item cache
adding on IIS 93
configuring 40
How Express Server works 3
troubleshooting 221
I
J
IIS
JPIP 102
adding a host on 93
client connection 104
permissions 9
- 258 -
Index
general properties 108
Mirroring
network configuration 102
authentication 93
network performance 103
configuration 89
support as of Express Server 6 240
support as of Express Server 7 239
viewing and referencing 99
Mosaicked NITF images 229
viewing with ExpressView 100
MrSID Generation 4
JPIP Server
mapping bands 53
starting and stopping 78
serving different band
combinations 63
L
Leaflet 70
support as of Express Server 7 238
mrsidgeoinfo 147
Licensing Express Server 16
Log files 218
mrsidgeometa 143
Multicatalogs (catalog groups) 65
Log levels, setting 31
Login 75
Multispectral images
mapping bands 53
M
Maximum concurrent extractions 40
serving band combinations 63
support as of Express Server 7 238
Maximum Worker Threads 41
Memory 221
Metadata
N
New features
in previous versions 237
adding and removing from MrSID
NITF images
images 143
mosaicked 229
WMS layer 62
support as of Exrpess Server 6 240
- 259 -
LizardTech Express Server 9 User Manual
O
Optimizing PDFs 64
specifying 36
utility 38
Processes 9
Oracle support
as of Express Server 6 239
Projections
Other LizardTech products 235
custom 80
Output formats 134
supported for a catalog 59
Properties
Overview
generating 51
advanced catalog 53
generating with isindex 145
basic catalog 49
updating 79
custom 56
ows API function 112
special catalog properties 138
Publishing a WMS catalog as an
P
ArcGISServer layer 83
Password
R
changing 75
resetting forgotten 218
Patents 237
PDF
optimizing for delivery 64
support 238
working with 64
Permissions 9
Pixel cache 222
maximum magnification 38
RAM 221
Recover (-recover) command 146
Recovering an unlocked state 146
Refresh status button 76
Reprojection 59
Reprojection algorithm 32
Reprojection precision factor 34
Resampler algorithms 32
Restoring an archived configuration 45
Runtime environment 137
- 260 -
Index
S
Sample web applications
DHTML and JavaScript 72
ExpressView Plug-in 70
JPIP with ExpressView 100
WMS Ajax viewer 73
Starting and stopping Express
Server 76
Starting and Stopping ltcsd 76
Starting and stopping the JPIP
Server 78
Starting and Stopping the Web
Server 76
WMS Flash viewer 73
Starting and Stopping Tomcat 77
WMS JavaScript Viewer 70
Subcatalogs 65
scale method 123
System requirements 7
Scaling algorithm 32
T
Scaling bias 33
Technical support 231
Schema, catalog configuration 138
Thumbnail definitions 58
Security
Tile browsing 54
IP restrictions 93
Troubleshooting 213
with multiple Express Servers 92
accessing and using log files 218
Shared image repositories 91
blurry images 223
Size constraint 55
catalogs not showing up 216
Spatial index 50
forgotten password 218
creating and updating with
isindex 144
updating 79
installation problems 213
memory 221
Speckling 225
NITF images 229
spindex command-line tool 146
speckled images 225
unsupported browser version 230
- 261 -
LizardTech Express Server 9 User Manual
U
support 136
Well Known Text (WKT) 80
Unix
WMS Flash viewer 73
mirroring 92
WMS layers
Upgrade 17
User account preferences 75
attribution 60
User interface 21
authority URLs 63
feature list URLs 61
V
identifiers 61
Version number of Express
indexing 79
Server 230
keywords 60
W
Watermarks 57
Web API functions 111
browse 112
calcrgn 127
getimage 114
getitem 126
metadata URLs 62
scale hint 62
supported projections 59
title 59
WMS service 43
WMS Top Layer 41
World files 229
getstyle 130
X
getthumb 125
getwatermark 130
ows 112
Web Map Service (WMS)
feature support 136
service URLs 136
- 262 -
XML files
basic configuration 150
catalog configuration 163
editing 149
JPIP configuration 196
Index
role in Express Server 3
- 263 -