1
LizardTech
ExpressView Browser
Plug-in 6.5
User Manual
Copyrights
Copyright © 2009–2010 LizardTech. All rights reserved. Information in this document is subject to
change without notice. The software described in this document is furnished under a license agreement or nondisclosure agreement. The software may be used or copied only in accordance with the
terms of those agreements. No part of this publication may be reproduced, stored in a retrieval system, or transmitted in any form or any means electronic or mechanical, including photocopying and
recording for any purpose other than the purchaser's personal use without the written permission of
LizardTech.
LizardTech acknowledges and thanks the many individuals and organizations whose efforts have
made our products possible. A full list of copyright, trademark and credit information is available in the
document "Copyrights Trademarks and Credits" installed automatically with your product.
LizardTech
1008 Western Avenue, Suite 200
Seattle, Washington, U.S.A. 98104
206.652.5211
www.lizardtech.com
- ii -
Table of Contents
Introduction
1
System Requirements
1
Enabling ExpressView on Vista
1
Getting Oriented in ExpressView
2
Viewing and Navigating Images
5
Opening Images
5
Zooming In and Out
5
Panning
7
Viewing an Image in Full Screen Mode
7
Restoring Original View
7
Measuring Distance
Displaying Information
9
11
Image Properties
11
Coordinate and Measurement Information
14
ExpressView Version Information
15
Online Help
15
Printing and Saving Images
17
Printing an Image
17
Saving an Image
18
Advanced Features and Settings
21
Selecting Bands
21
Coordinate Options
21
Express Server Options
23
Appendix
27
About LizardTech
27
Other LizardTech Products
27
ExpressView and Patents
28
Index
29
- iii -
Introduction
Thank you for using LizardTech® ExpressView™ Browser Plug-in. ExpressView enables you to view,
zoom, pan, and navigate native MrSID® and JPEG 2000 imagery in either Internet Explorer or Firefox
(for more information see "System Requirements" on page 1).
Whether you're viewing imagery on your computer's hard drive, across a local area network (LAN), or
from LizardTech Express Server®, ExpressView makes rapid viewing of large images possible while
maintaining maximum image quality. ExpressView supports raster images compressed to the
MrSID Generation 4 (MG4) format.
ExpressView supports the JPIP protocol, which enables JPEG 2000 images to be viewed efficiently
in bandwidth-constrained environments.
This help is designed to give you quick information about how to open and navigate MrSID and JPEG
2000 images, and is organized by task. The most common navigational tasks are covered in "Viewing
and Navigating Images" starting on page 5. Getting and displaying image and other information, printing and saving, and more involved procedures and options are covered in separate chapters. To
access this documentation as WebHelp within the application, click the question mark icon
in the
upper right corner of the plug-in.
The topics in this section cover system requirements and orient you to the ExpressView interface.
System Requirements
The following system requirements represent the minimum for running the ExpressView Browser
Plug-in. Performance will increase with an increase in RAM or processor MHz.
l
l
l
l
Microsoft Windows XP, Windows 2003, Windows Vista, or Windows 7
200-MHz PC processor
64 MB RAM
Firefox 2 or 3 or Internet Explorer 7, 8 or 9.
NOTE: The ExpressView Browser Plug-in supports U.S. English only.
Enabling ExpressView on Vista
The ExpressView Browser Plug-in can be installed automatically via web download or manually from
a product CD-ROM or DVD-ROM. On Windows Vista, if you install ExpressView manually you must
subsequently enable it in Vista's Manage Add-ons dialog in order for it to open.
To enable ExpressView on Vista:
1. After manual installation, open Internet Explorer and click Tools from the menu bar.
2. Choose Internet Options, then select the Programs tab.
3. Click the Manage Add-ons button. The Manage Add-ons dialog appears.
-1-
ExpressView Browser Plug-in 6.5 User Manual
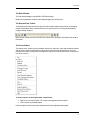
4. Select ExpressView Class in the window, then select the Enable radio button at the bottom
of the dialog.
5. Click OK.
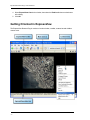
Getting Oriented in ExpressView
The ExpressView Browser Plug-in consists of a main window, a toolbar, a status bar and a hidden
context menu.
-2-
Introduction
The Main Window
The main window displays your MrSID or JPEG 2000 image.
Right-clicking anywhere inside the main window displays the context menu.
The ExpressView Toolbar
The ExpressView toolbar sits directly above the main window and provides controls for navigating
images. Details about these controls and how to use them are given in "Viewing and Navigating
Images" starting on page 5.
Most of these controls can also be found on the context menu, along with other options not found on
the toolbar.
The Context Menu
The context menu, known by many Windows users as the “right-click” menu and sometimes called a
“pop-up” menu, can be used to perform many common functions as an alternative to tools on the
ExpressView toolbar. Consequently, throughout this help you will see the instructions “From the context menu, choose…”.
To access options on the ExpressView context menu:
1. Right-click in the main window. The context menu appears as shown above.
2. Click to select any available option.
Particular options of the context menu are described on their appropriate topic pages.
-3-
ExpressView Browser Plug-in 6.5 User Manual
The ExpressView Status Bar
The ExpressView status bar appears at the bottom of the main window, as shown in the illustration at
the top of this page. It is displayed above any browser-specific status bar that may be present.
The status bar displays cursor position coordinates and measured distances. For more information,
see "Measuring Distance" on page 9 and "Coordinate Options" on page 21. -4-
Viewing and Navigating Images
Viewing images with the ExpressView Browser Plug-in is easy and fast. The topics in this section
show you how to open, zoom and pan around MrSID and JPEG 2000 images.
Opening Images
ExpressView opens MrSID and JPEG 2000 files stored locally or served by LizardTech Express
Server or other image servers.
MrSID files have a “.sid” extension. JPEG 2000 files have a ".jp2" extension.
To open a MrSID or JPEG 2000 image use one of the following methods:
l
l
l
l
Drag a MrSID or JPEG 2000 file icon into the main window of the ExpressView Browser Plugin.
Select Open from the File menu, then browse directories to locate desired image.
Double-click a MrSID or JPEG 2000 file or email attachment. (Note: It is not necessary to
open the ExpressView Browser Plug-in separately before opening images.)
Enter a URL or file path into your Web browser's address field.
Zooming In and Out
You can zoom in and out of an image by any of the following methods:
l
l
l
l
The Zoom In tool
The Zoom Out tool
The Zoom bar
Continuous zoom
The Zoom In Tool
The Zoom In tool can be used either by clicking on the image or by clicking and dragging to create a
selected zoom area. Zoom In is the default mode when an image opens in the ExpressView Browser
Plug-in, before you select one of the other zoom or pan tools.
To use the Zoom In tool by clicking on the image:
1. Click the Zoom In button
on the ExpressView toolbar if it is not already active.
2. Click on the image where you wish to see a closer view. The view refreshes at the next zoom
level in, centered where you clicked.
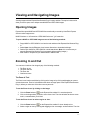
To use the Zoom In tool to select a region to view:
1. Click the Zoom In button
on the ExpressView toolbar if it is not already active.
2. Select a region to view by clicking and dragging to form a rectangle, as shown below. The view
-5-
ExpressView Browser Plug-in 6.5 User Manual
refreshes so that the area you selected fills the main window.
The Zoom Out Tool
To use the Zoom Out tool:
1. Click the Zoom Out button on the ExpressView toolbar if it is not already active.
2. Click on the image where you wish to center a wider view. The view refreshes at the next
zoom level out, centered where you clicked.
The Zoom Bar
The Zoom bar comprises the middle section of the ExpressView toolbar and can be used to quickly
set the desired zoom level. To use the Zoom bar do one of the following:
l
l
Click and drag the “slider” on the Zoom bar to the left or right any number of notches. The view
continues to change to the next zoom level in or out as you continue to move the slider past
each notch.
Click on the Zoom bar to the left or right of the slider to adjust the view by a single zoom level
in or out, respectively.
If you have not yet panned away from the original view (“Home” position), using the Zoom bar brings
you in and out of an image centered on the image’s own centerpoint. Otherwise, the zoom function
centers on the last point in the image that was at the center of the view.
Continuous Zoom
Continuous Zoom mode enables you to zoom in and out quickly without incremental stages.
To use Continuous Zoom:
1.
2.
3.
4.
-6-
Select Continuous Zoom from the context menu.
Click and drag downward to zoom in.
Click and drag upward to zoom out.
To pan while zooming, click and drag (upward or downward) at an angle.
Viewing and Navigating Images
Panning
Panning is repositioning the image in the viewing area. You may wish to pan an image when you have
zoomed in to look at details.
To use the Pan tool:
1. Click the Pan button
on the ExpressView toolbar if it is not already active.
2. Click on the image and drag to reposition it in relation to the main window. The image moves in
the direction you drag it.
Viewing an Image in Full Screen Mode
To view an image in Full Screen mode select "View Full Screen" from the context menu.
While Full Screen mode is engaged, all toolbars are hidden. To use any tools in Full Screen mode you
must select them from the context menu, which remains hidden but available.
To disengage Full Screen mode and return to the regular view deselect "View Full Screen"
on the context menu.
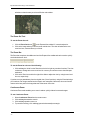
Restoring Original View
The original or “Home” view is the view you see when you first open an image. It represents the best
fit of the entire image in the window frame.
To restore the original view do one of the following:
l
l
Click the Home button on the ExpressView toolbar.
Select Fit Image to Frame from the context menu.
-7-
Measuring Distance
The ExpressView Browser Plug-in allows you to measure distances between points in your georeferenced MrSID and JPEG 2000 images.
NOTE: A coordinate reference unit ("image unit") must be set for the image before measurements
can be made (see "Specifying Image Unit" on page 23)
Marking the Points to be Measured
Marking the points to be measured is accomplished in the main window. You must mark two or more
points to enable a valid measurement.
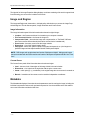
To mark points to be measured using the Measure tool:
1. Zoom and pan the image until the first point you wish to mark is in view. (Consult the ExpressView status bar for the coordinates of the cursor position.)
2. Click the Measure
button on the ExpressView toolbar.
3. Click the image at the point where you wish to begin measuring.
4. Click the image again at a second point. A red line connects the two points. The
length between the points is indicated as "Measured Length" in the status bar. (Note: by
default, measurements are displayed in pixels. To change measurement display unit, see
"Specifying Measurement Display Unit" on page 22.)
5. Continue clicking the image to mark additional points. With each point added the status bar displays the cumulative distance among all the points.
To mark points using the Ctrl key (Windows):
1. Hold down the control (Ctrl) key and click on the image to mark the first point.
2. If necessary, zoom and pan until the next point which you wish to mark is in view.
3. Hold down the control (Ctrl) key and click on that point.
To clear the points you have marked and start over select "Clear Measured Segments" from
the context menu.
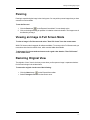
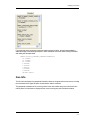
Viewing Measurement Results
Besides being displayed instantly in the ExpressView status bar, the measurements are displayed in
the Coordinate Information box, as shown below, if it is visible (see "Viewing the Coordinate Information Box" on page 14).
-9-
ExpressView Browser Plug-in 6.5 User Manual
- 10 -
Displaying Information
The ExpressView Browser Plug-in enables you to display information about the image you are viewing in the plug-in, measurement results and coordinates, information about which version of the plugin you are using, and this help documentation.
Image Properties
The Image Properties dialog box displays detailed information about your MrSID or JPEG 2000
image. The information is divided into four categories, each with its own tab:
l
l
l
l
Image and Region
Metadata
Geo Info
Bands
To view Image Properties information:
1. Click the Image Properties button on the ExpressView toolbar. The Image Properties
dialog appears as shown below, with tabs on the left and a preview of the current view on the
right.
2. Use the arrow buttons
located to the right of the tab names to bring more tabs into
view.
3. Click the desired tab to bring it to the foreground.
- 11 -
ExpressView Browser Plug-in 6.5 User Manual
The right half of the Image Properties dialog displays a miniature rendering of the entire image with red
lines indicating your current view in relation to the whole.
Image and Region
The Image and Region tab, shown above, is displayed by default when you access the Image Properties dialog box. This tab has two panels, Image Information and Current Scene.
Image Information
The Image Information panel offers information about the entire original image:
l
l
l
l
l
l
Location – the file name and where it is located on your computer or network
File Format and Version – the format the image is in
Compression Ratio – what ratio the image was compressed at, or "Per Band" if different
ratios were used for different bands (those ratios are listed on the metadata tab)
Zoom Levels – how many zoom levels the image contains
Dimensions – size of the original image in pixels
Colorspace – which color spectrum (RGB, Greyscale, Multispectral, etc.) the image occupiesRGB images with an alpha band are listed as "Multispectral Alpha"
NOTE: RGB images with an alpha band are listed as "Multispectral Alpha". Multispectral images
that were encoded with the RGB transform are listed as "Multispectral Alpha with RGB Color Transform".
Current Scene
The Current Scene panel offers information about the selected region:
l
Level – the zoom level of that region of the image visible in the main window
Dimensions – size in pixels of the region that makes up the current scene
Center – which point (by x,y coordinates) in the original image the current scene is centered on
l
Bounds – boundaries of the current scene in resolution-independent coordinates
l
l
Metadata
The Metadata tab displays information about the parameters used in creating the image, including the
individual compression ratios used in per-band compression. Use the scrollbars on the side and bottom to see information outside the initial view.
- 12 -
Displaying Information
For images that were compressed using per-band compression ratios, the per-band metadata is
added according to the following example, in which the bands are listed in order starting with Band 1
and ending with the alpha band.
IMAGE::ACTUAL_PERBAND_COMPRESSIONRATIOS
15.329692
15.329692
15.329692
1.881806
1.854109
1.985572
2.058918
2.260265
597880.769231
Geo Info
The Geo Info tab displays the geospatial information about the image and the current scene, including
the coordinates of the upper-left point, the dimensions and the resolution.
The geospatial coordinates of the cursor’s position in the main window are given in the Scene Information panel. No information is displayed if the cursor is resting at a point outside the window.
- 13 -
ExpressView Browser Plug-in 6.5 User Manual
Bands
See "Selecting Bands" on page 21.
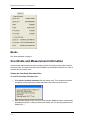
Coordinate and Measurement Information
Coordinate and measurement information are always visible on the ExpressView status bar below
the main window. The same information is also available in the Coordinate Information box, which is
accessed from the context menu.
Viewing the Coordinate Information Box
To view the Coordinate Information box:
1. Select Show Coordinate Information from the context menu. The Coordinate Information
box appears overlaying the main window and remains open while you pan and zoom.
2. When finished viewing results, click the X to close the box. (Note: by default, measurements
are displayed in pixels. To change measurement display unit, see "Specifying Measurement
Display Unit".)
- 14 -
Displaying Information
Both on the status bar and in the Coordinate Information box, measurement results are listed after
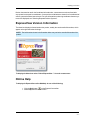
any reported cursor position coordinates. Cursor position coordinates are shown for all coordinated reference systems that have been selected. For more information on selecting coordinate reference systems to be displayed, see "Selecting Reported Position Systems". ExpressView Version Information
The About box displays information about the product, notably the version and build numbers, which
appear on the right side below the image.
NOTE: The build number shown in the illustration below may not be the actual build number of the
product.
To display the About box select "About ExpressView…" from the context menu.
Online Help
To display the ExpressView online WebHelp do one of the following:
l
l
Click the Help button on the ExpressView toolbar.
Select Help from the context menu.
- 15 -
Printing and Saving Images
The ExpressView Browser Plug-in enables you to print MrSID and JPEG 2000 images and save
images in a variety of other file formats.
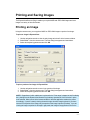
Printing an Image
Using the context menu, you may print a MrSID or JPEG 2000 image or a portion of an image.
To print an image in ExpressView:
1. Use the navigation controls to view the entire image at its best fit in the browser window.
2. Select Print… from the context menu. The Print dialog box appears as shown below.
3. Select desired printing parameters and click OK.
To print a portion of an image in ExpressView:
1. Use the navigation controls to zoom in on a portion of the image.
2. Select Print… from the context menu. The Print dialog box appears as shown above.
3. Select desired printing parameters and click OK.
NOTE: Regardless of which radio button is selected in the "Print range" subpanel of the Print dialog
box, printing from the ExpressView Browser Plug-in always operates as if the "Selection" option
were selected. What you see in the browser window is what the application sends to the printer.
Accordingly, if you are currently viewing the entire image, the entire image is printed. If you have
zoomed in on a portion of the image, only that portion of the image is printed. (Similarly, if you are
viewing an image or a portion of an image in grayscale, that image or image portion is sent to the
- 17 -
ExpressView Browser Plug-in 6.5 User Manual
printer in grayscale. ) For the ExpressView Browser Plug-in, there is no difference among the "Print
range" options and there is no need to choose "Selection".
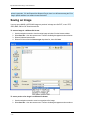
Saving an Image
You may save a MrSID or JPEG 2000 image or a portion of an image as a GeoTIFF, or as a TIFF,
JPEG, BMP, PNG or GIF file with a world file.
To save an image in a different file format:
1.
2.
3.
4.
Use the navigation controls to view the entire image at its best fit in the browser window.
Select Save As… from the context menu. The Save As dialog box appears as shown below.
Select a folder and name the file.
Select a file format from the Save as type drop-down list, then click Save.
To save a portion of an image in a different file format:
1. Use the navigation controls to zoom in on a portion of the image.
2. Select Save As… from the context menu. The Save As dialog box appears as shown above.
- 18 -
Printing and Saving Images
3. Select a folder and name the file.
4. Select a file format from the Save as type drop-down list, then click Save.
NOTE: What you see in the browser window is what the application saves as a separate file.
Accordingly, if you are currently viewing the entire image, the entire image is saved. If you have
zoomed in on a portion of the image, only that portion of the image is saved. (Similarly, if you are
viewing an image or a portion of an image in grayscale, that image or image portion is saved as a
new grayscale image.)
- 19 -
Advanced Features and Settings
This section covers advanced features and options.
Selecting Bands
The band selection drop-down menus enable you to rearrange the bands in an RGB image, select
which bands of a multispectral image you wish to display as the R, G and B bands, or which band
from an RGB or multispectral image to display as the grayscale band.
To access the Bands tab:
1. Click the Image Properties button on the ExpressView toolbar.
2. Use the arrow buttons
located to the right of the tab names to bring more tabs into
view.
3. Select the Bands tab.
To reset the bands to the assignments they originally carried click the "Reset" button.
Coordinate Options
The Coordinate Options dialog is available from the context menu and enables the following:
l
l
Selecting Reported Position Systems
Specifying Measurement Display Unit
- 21 -
ExpressView Browser Plug-in 6.5 User Manual
l
Specifying Image Unit
Selecting Reported Position Systems
You may select the coordinate reference systems in which cursor and image positions are reported
on the ExpressView status bar and in the Coordinate Information box.
To specify the coordinate reference systems to be displayed:
1. Select Coordinate Options... from the context menu. The Coordinate Options dialog box
appears as shown above.
2. Select the checkboxes for any or all of the available coordinate reference systems listed in the
Position panel. All of the selected coordinate reference systems will be displayed.
3. Click OK to activate your changes.
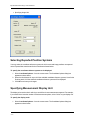
Specifying Measurement Display Unit
The display units are the units in which you would like to have measurements reported. For example,
if you would like to know the number of miles between two points, select "miles" as your display unit.
To specify the display units:
1. Select Coordinate Options... from the context menu. The Coordinate Options dialog box
appears as shown below.
- 22 -
Advanced Features and Settings
2. Select one of the available units from the Display Units drop-down list in the Measurement
panel.
3. Click OK to activate your changes.
Changes to the measurement unit selected here are reflected in the measurement results displayed
on the ExpressView status bar and in the Coordinate Information box.
Specifying Image Unit
Georeferenced images contain information in their metadata which describes the location of the
image in the world and also enables applications to display the position of the cursor in an image.
However, because the units in which this information should be expressed is sometimes not natively
specified in the image, the ExpressView Browser Plug-in provides a means for you to specify the
image's image units.
IMPORTANT: If the CRS is defined, the native units are reported here. If not, the native units are
reported as "(Default metres)". If the reported native unit is correct, you should specify native as the
image unit. If incorrect or undefined, then it is recommended that you specify image pixels. That
way, any measurement display units will be applied on a per-pixel basis.
To specify the image unit:
1. Select Coordinate Options... from the context menu. The Coordinate Options dialog box
appears as shown above.
2. Select a unit from the Image Units drop-down list.
3. Click OK to activate your changes.
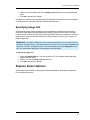
Express Server Options
Several options are available for customizing the relationship between the ExpressView Browser
Plug-in and Express Server.
- 23 -
ExpressView Browser Plug-in 6.5 User Manual
To access Express Server options select "Express Server Options" from the context menu.
The Express Server Options dialog box appears, as shown below.
General Options
Selecting Download Format
You may choose to download imagery in its original format (native) or in JPEG format. These two
options are available as items on the Transport Format drop-down menu.
NOTE: A change of transport format does not take effect until the ExpressView Browser Plug-in is
closed once and reopened again.
By default, images are downloaded in JPEG format.
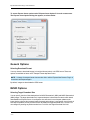
MrSID Options
Selecting Target Download Size
You can specify the size of download packets for MrSID Generation 3 (MG3) and MrSID Generation 4
(MG4) images. The target download size is important because it determines the rate at which data is
downloaded from Express Server. A small packet size will result in more frequent updates to the
image window, showing the increased quality that each packet brings. Larger packet size will result in
less frequent updates, but may be faster overall. By default the target download size is 100 KB. You
can change it by entering any whole number from 1 to 1000 in the Target Download Size field.
- 24 -
Advanced Features and Settings
Balancing Speed and Quality
By default the balance between download speed and image quality is set to favor higher image quality. If higher viewing speed is of greater priority to you, you can change the balance as desired by
clicking and dragging the Fastest/Best Quality slider closer to the "Fastest" end.
- 25 -
Appendix
This appendix offers additional information about LizardTech and its products.
About LizardTech
Since 1992, LizardTech has delivered state-of-the-art software products for managing and distributing
massive, high-resolution geospatial data such as aerial and satellite imagery and LiDAR data. LizardTech pioneered the MrSID® technology, a powerful wavelet-based image encoder, viewer, and file format. LizardTech has offices in Seattle, Denver, London and Tokyo and is a division of Celartem
Technology Inc. (JASDAQ: 4330). For more information about LizardTech, visit www.lizardtech.com.
Other LizardTech Products
We at LizardTech are glad to have you as a customer. While you’re “in the shop", explore LizardTech’s other great products for compressing, managing and distributing geospatial imagery and
LiDAR data.
For instant notification of new LizardTech product releases and patches add the following link to your
favorite RSS feed reader:
http://www.lizardtech.com/files/rss/updates.xml
GeoViewer
Efficient Viewing and Exporting of MrSID and JPEG 2000 Layers
GeoViewer is LizardTech's free, standalone application for viewing geospatial imagery, vector overlays and LiDAR data. GeoViewer enables you to combine, view and export visual layers from varied
sources, such as local repositories, Express Server catalogs, and WMS and JPIP servers. GeoViewer supports a wide range of input formats and exports to GeoTIFF, PNG and JPEG. It's the most
efficient means of viewing MrSID and JPEG 2000 images.
For more information about GeoViewer visit http://www.lizardtech.com/download/.
GeoExpress
The Industry’s Best Image Manipulation and Compression Software
With powerful tools for reprojecting, color balancing, and mosaicking, GeoExpress® software is the
industry’s choice for manipulating and compressing geospatial imagery to industry standard formats.
You can configure Express Server and Spatial Express® software directly from GeoExpress, which
makes it the ideal command center for your storage and distribution workflows.
For more information about GeoExpress visit www.lizardtech.com/products/geo/.
- 27 -
ExpressView Browser Plug-in 6.5 User Manual
LiDAR Compressor
LiDAR Data Meets the MrSID Format
LizardTech LiDAR Compressor™ software enables you to turn giant point cloud datasets into efficient MrSID files that retain 100 percent of the raw data at just 25 percent or less of the original file
size (lossless compression). If storage requirements are critical, you can reduce your LiDAR file
sizes by 90 percent or more by choosing a higher compression ratio and letting LiDAR Compressor
select the best way to reach a desired file size (lossy compression). Unlike raw LAS or ASCII data,
LiDAR files compressed to MrSID are easily managed resources you can extract derivatives from
again and again.
For more information about LiDAR Compressor visit www.lizardtech.com/products/lidar/.
Express Server
Image Delivery Software for Geospatial Workflows
LizardTech Express Server software is the best solution for distributing imagery in MrSID or JPEG
2000 format. With Express Server, users on any device access imagery faster, even over low-bandwidth connections. Express Server is faster, more stable and easier to use than any other solution for
delivering high-resolution raster imagery.
For more information about Express Server visit www.lizardtech.com/products/exp/.
MrSID Decode SDK
Integration of MrSID Support into Third-Party Applications
The MrSID Decode SDK provides a framework for extracting raster or LiDAR data from MrSID files,
including MrSID Generation 4 (MG4™). Used as the foundation for LizardTech's LiDAR Compressor™ and its Express Suite® line of geospatial products – GeoExpress, Express Server and Spatial Express software – the MrSID Decode SDK is a robust toolkit suitable for complex application
development needs.
MrSID Decode SDK is available for free download at http://developer.lizardtech.com.
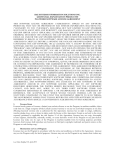
ExpressView and Patents
This software is protected by U.S. Patent Nos. 7,218,789, 7,454,084, 7,508,991 and 5,710,835;
Canadian Patent No. 2,236,943; and European Patent No. 0,864,135 and by additional U.S. and Foreign Patents Pending.
- 28 -
Index
B
ExpressView toolbar
Bands
BMP
14, 21
18
ExpressView version information
3
15
G
C
Geo information
13
Color
Georeferencing unit
23
grayscale
14, 21
GIF
18
RGB
14, 21
GUI
2
Context menu
3
H
Continuous zoom
6
Help
Coordinate and measurement information
viewing coordinate information box
15
Home view
7
14
I
Coordinate options
21
Image formats
18
Coordinate reference systems
22
Image properties
11
Coordinate reference unit
23
Copyrights, trademarks and credits
Current scene
ii
12
D
geo info
13
image and region
12
metadata
12
Image quality vs. download speed
25
Display unit
22
Displaying coordinate reference systems
22
bands
Displaying image properties
11
export formats
Displaying online help
15
extensions
5
Displaying version information
15
files of type
5
Download packet size
24
full screen view
7
Download speed vs. image quality
25
opening
5
printing
17
properties
11
E
Enabling ExpressView on Vista
1
Images
14, 21
18
Export formats
18
restoring original view
Express Server options
23
saving
18
24
Introduction
1
general
ExpressView status bar
7
4
- 29 -
ExpressView Browser Plug-in 6.5 User Manual
J
Printing an Image
JPEG
JPIP support
18
1
L
LizardTech
27
M
Main window
Measurement display unit
Measurement results
3
22
9, 14
17
R
Restoring original view
7
Right-click menu
3
S
Saving an image
18
Scene information
12
Selecting download packet size
24
Show coordinate information
14
Measuring distance
9
Spatial reference system
23
marking points
9
Specifying coordinate reference unit
23
viewing results
9
Specifying measurement display unit
22
Status bar
4
Metadata
12
MrSID options
24
coordinate display
22
Multiband selection
14
System requirements
1
Multispectral images
21
T
O
Online Help
Opening images
15
5
Options
18
Transport format
24
U
UI
2
2
coordinates
21
User interface
Express Server
23
V
MG3 and MG4
24
Version information
position reporting
22
Viewing an image at full screen
27
Viewing coordinate information box
Other LizardTech products
P
15
7
14
W
Packet size
Panning
24
7
PNG
18
Position reporting options
22
Printing an image
entire image
- 30 -
TIFF
17
Windows Vista
World file
1
18
Z
Zoom bar
6
Zoom in tool
5
Zoom out tool
6
Index
Zooming in
5
by clicking
5
by selecting region
5
continuous zoom
6
with zoom bar
6
Zooming out
5
continuous zoom
6
with zoom bar
6
- 31 -