1
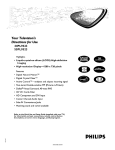
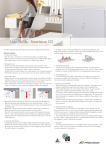
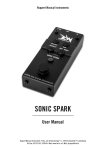
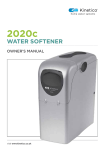
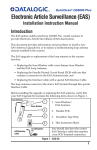
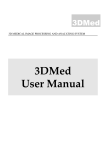
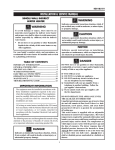
Content
Remote Control & Key
1-2
iLoc system
3-4
Opening
Opening && Closing
Closing
the Case
5-6
Mounting & Dismounting
case onto base plate
7-8
Case
Models
Selection
9 - 10
www.coocase.com
(Int. pat. pending)
User Manual Ver. 1.0
Thank you for purchasing a coocase
luggage carrier.
To ensure the best performance,
please read the user manual before
using.
No 10 Bukit Batok Crescent #13-01
The Spire Singapore 658079
Tel:
+65 9666 7748
Fax:
+65 6219 4686
Email:
[email protected]
Europe
Rousseau Distribution
Hagedoornlei, 19
B-2650 Edegem (Antwerp)
Belgium
Tel:
+32 (0) 3844 5751
Fax:
+32 (0) 3844 3751
Email:
[email protected]
Optional Accessories
11
(Int. pat. pending)
Remote Control & Key
iLoc system
(Int. pat. pending)
Remote control
Changing the remote control battery
The remote control uses a high-frequency transmitter, which has the
following advantages:
- it is not necessary to aim directly at the receiver in the case.
e.g., cloth,
etc. )
- it operates through all materials. (( cloth,
plasticplastic,
)
- it has a very long range. ( approx. 50m )
Unscrew the
cover
to access
battery
(see below).
Unscrew
case
to access
the batteries.
battery
is required
1One
battery
is required
for per
eachremote
remotecontrol.
control. ref : 27A 12V
Locking (arming of alarm) & Unlocking (disarming of alarm)
Under
normalAcircumstance,
press
A (press
) once
to activate
lock
Press button
( ) once to lock
the button
case and
button
B ( ) once
tobutton
unlockBit.( ) once to deactivate lock
&
Pressing
button
holding
it forit three
seconds engages
Press
button
A ( A ())toand
lock
and hold
for 3 seconds,
the alarmthe
will
alarm.
alarm
begin
flashing after five seconds. Press
arm
andThe
lights
willlight
flashwill
after
5 seconds.
button B ( ) to disengage the alarm.
Turning off the siren when alarm is triggered.
1) Press button A ( ) to) to
offoff
siren
and
arming
of alarm.
turn
siren
butmaintain
leave alarm
active.
2) Press
) to
offoff
siren
and
disarm
of alarm.
Press button
button B
B (( ) to
turn
siren
and
disable
alarm.
iLoc Reserve
reserve battery
iLoc
battery
AlliLoc
iLocunit
units
comefitted
fittedwith
withan
a built-in
battery.
Thisonly.
All
comes
in-buildreserve
reservealarm
battery
for alarm
battery
will automatically
charge oncebe
connected
to the
motorcycle
The
reserve
battery will automatically
charge once
a full
power
battery. Please
allow
12 the
hours
for to
thethe
battery
to charge
fully. The
power
connection
is made
from
case
motorcycle’s
battery.
To ensure
drained from the motorcycle battery is negligible.
optimal power, charge reserve battery for 12 hours. The consumption of
the motorcycle battery is almost meaningless.
Water-resistant
Inside,
the electonic
devicecontrol
is protected
byaasilicon
siliconrubber
rubber.barrier
It can for
only
The interior
of the remote
features
water resistance.
maintian
water-resistant.
A
key
B
A
B
All cases
iLoc comes
have ansupplied
includedwith
remote
control. Should
In the 1
Each
caseinstalled
with iLocwith
system
1 controller.
event thatbe
the
remote
control
is lost,aareplacement
replacementfrom
may your
be purchased.
controller
lost,
you can
purchase
nearest
dealer.
unscrew to
remove cover
● If the case is open or incorrectly closed, the locking device will
not operate.
reinitialize it.
it by
● If the remote control does not function, reinitialise
(see the
reseating the
paragraph
on batteries.
“changing the remote control batteries”)
● If the remote control does not function, it is still possible to open the
case using the key.
Anti-theft feature
feature
Anti-theft
(applicable
only
for models
withsystem)
iLoc system)
(applicable to
models
with iLoc
Coocase
iLoc system
and brake
lights operates
frompower
the power
The Coocase
iLoc system
and integrated
brake mainly
lights draw
primarily
from
motorcycle
battery. After
installation,
if theshould
electrical
drawn
from
thethe
battery
of the motorcycle.
Upon
installation,
the
wire connecting
the base the
plate
to the
motorcycle
battery
is tampered
with
electrical
wire connecting
base
plate
to the main
battery
be tempered
or the
power disconnected,
the iLoc
systemiLoc
will will
activate
automatically
thus
disconnecting
power supply,
Coocase
automatically
activate
and engage the alarm for one minute.
it’s alarm for 1 minutes.
battery
NOTE
of other
high
frequency
equipment
(mobile
NOTE :: Simultaneous
Mobile phonesuse
or other
high
frequency
devices
may interfere
phone,etc)
may interfere
the operation of the remote control.
with the remote
control's with
operation.
CAUTION
The remote control has a considerable operating range
which allows you to lock or unlock your case from a distance.
Handling the remote control may sometimes, for example
in your pocket, could accidentally open the case.
1
A
A -- Reset
Reset button.
button. (caution, read instruction
before use) Do not press reset button
Warning: Unnecessarily pressing the reset button
unnecessarily
unless
replacing
of lost or damaged
will cause remote
controls
to become
remote
controller.(see
below
desynchronized
with the
iLocinstructions
system. for
synchronizing remote controller to the main unit)
Synchronising remote control with iLoc system
Synchronising replacement key
Step11- -Press
Hold the reset button until
it beeps
(approximately
Step
for eight
seconds
till a beep iseight
heard. The
seconds).
indicates
that
thecleared.
memoryItisiscleared.
You can
now
memory
forThis
the main
unit is
then
now possible
to syncronise
synchronize two controllers to the iLoc system.
two controllers to the main unit..
Step
andreset
hold RESET
button
for 2 seconds
till you two
hear a beep,
Step22- -Press
Hold the
button until
it beeps
(approximately
followed
bythen
pressing
till youuntil
hear
a beep
seconds),
hold either
either button
button on
on the
the controller
remote control
a beep
is on
heard
on The
the iLoc
unit. The
remote
is now synchronized.
main
unit.
contoller
is then
syncronised.
NOTE
main
unit cancan
have
2 remote with
controller
syncronised.
NOTE -- Each
Only two
remotes
be only
synchronized
the iLoc
system.
Self locking
locking feature
feature
Self
The iLocthe
system
automatically
case 15
Whether
casewill
is open
or closed,lock
iLocthe
system
willseconds
self lockafter
in
opening, regardless of whether the case is open or closed.
15 second after opening.
CAUTION
Do not discard used batteries.
Return them to an approved dealer or to approved
collection centers.
B - Sensitvity
Sensitive dial
dial
Turnfull
dialleft
lefttotooff
disable
● Turn
alarm.alarm.
Turnright
dial right
to adjust
alarmlevel.
sensitivity.
● Turn
to adjust
senstivity
2
3
4
Mounting & Dismounting
case onto base plate
Opening & Closing the Case
A - Release
Press
button Button
A to dismount the base
Press Vice
release
button
to disengage
plate.
versa
the step
1 & 2 to the
case from the mounting plate. Lift
dismount the case completely.
front of case and slide forward to
remove.
A
2
1
To unlock the case, press the unlock button on the remote
control.
Lift up
up the
the top
top of
of the
the case
case totofully
fullyopen
openthe
thecase.
case.When
When
Lift
closing,
untilhear
a click
is felt
to ensure
that lid
closing, press
make firmly
sure you
a click
sound
to ensure
it is
latches.
fully close.
Wiring
Information
Connecting
to wire
Black - negative (-)
black
90
unlock
Pushthe
theupper
buttons
on the
casecase
to release
the top
Push
button
onbottom
the bottom
to release
the
of of
thethe
case.
lid
case.
5
1 - Step
Insert
endinto
as slots
shown
Insert01:
rear
end back
of case
ason
shown.
diagram.
90
yellow
red
Yellow - brake light
Red - positive (+)
lock
control
does
not
function,
is still
to
It Ifis the
alsoremote
possible
to open
the
case
using itthe
key possible
instead of
the
remote
control.
open
the case
using the key. (see pictures above)
Turn clockwise to lock and turn anti-clockwise to unlock.
Turn clockwise to lock and counterclockwise to unlock.
2 - Step
Press
frontdown
end until
a click
Press02:
front
of case
firmly
until the
iscase
felt. locks into place.
6
7
8
Case Models
Selection
298 mm
396 mm
Open/Close
cover
Lock
Base plate release
1 - Lens1 - Lens
2 - Removable lid panel
2 - Top part
3 - Led Lights
3 - LED lights
394 mm
V28 Fusion
C26
420 mm
320 mm
45 mm
267 mm
Open/Close
cover
Lock
The base plate comes
with a rubbery cap to
protect the connector
when not in use.
Base plate release
242 mm
450 mm
V36
C36 Wizard
Wizard
9
Base Plate
10
*Optional
Optional
Accessories
Inner Liner Features
- Provides a comfortable feel and good aesthetics for the interior
- Removable and washable
- Reduces noise and scratches from rolling objects within
- Provide limited insulation to keep packed foods/drinks warm or chilled
Fusion
V28
Fusion
11
V36 Wizard
Wizard
top layer
top layer
bottom layer
bottom layer