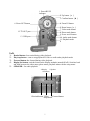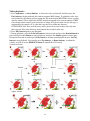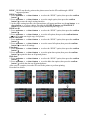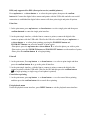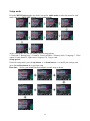
1
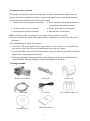
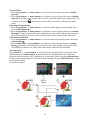
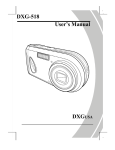
This is a digital video camera of exceptional quality and value. You will be able
to capture videos and pictures; then send and share them with friends and family.
This digital video camera is also able to record audio. Plus, you can connect to a
computer to function as a webcam.
This manual will introduce you to using your digital video camera and how to
install the accompanying software. Make sure that you read this manual carefully and
keep it in a safe place for future reference.
Contents
1. Precautions………………………………………………..…….…...……3
Safety precautions…………………………………………………………………………3
Precautions before use………………………………………………………………………3
Precautions before operation……………………………………………………………………4
Package contents………………………………………………………………………………4
2.
Introduction..……………………......…….5
Digital video camera construction.......................……………..………….………….…….5
Top view………………………………………………………………………………………5
Front………………………………………………………………………………………5
Back……………………………………………………………………………………5
Left………………………………………………………………………………………6
Bottom………………………………………………………………………………………7
Battery status indicator…………………………………………………………………………7
3. Before using the digital video camera…..…..……………..………8
Preparations before operation………………………………………………………………8
4. Using the digital video camera………………………………………9
Function list…………………………………………………………………………………9
Video mode……………………………………………………………………………11
Status indicator…………………………………………………………………………11
Hotkey menu…………………………………………………………………………11
Vi d e o m e n u … … … … … … … … … … … … … … … … … … … … … … … … … … 1 3
Vi d e o s i z e … … … … … … … … … … … … … … … … … … … … … … … … … … … … 1 3
Image quality…………………………………………………………………13
White balance type………………………………………………………………………14
Exposure compensation………………………………………………………………………14
Color effects……………………………………………………………………………14
Return to video mode………………………………………………………………………14
Begin recording………………………………………………………………………………14
Photo mode………………………………………………………………………………15
Status indicator……………………………………………………………………………15
Hotkey menu………………………………………………………………………………16
Photo menu………………………………………………………………………………17
Select image size…………………………………………………………………………17
Select image quality…………………………………………………………………17
Select white balance mode…………………………………………………………………17
Exposure adjustment…………………………………………………………………………18
Color effects……………………………………………………………………………18
Auto shutter………………………………………………………………………………18
1
Select date indicator………………………………………………………………………18
Return to photo mode………………………………………………………………………18
Flash light function……………………………………………………………………………18
How to take a picture………………………………………………………………………18
Audio mode……………………………………………………………………………………18
Status indicator………………………………………………………………………………18
Begin recording………………………………………………………………………………19
Playback mode………………………………………………………………………………19
Video playback………………………………………………………………………………20
Audio playback………………………………………………………………………………21
Delete single file…………………………………………………………………………22
Delete all files…………………………………………………………………………22
Protect single file……………………………………………………………………… 22
Protect all files………………………………………………………………………22
Undo single file protection……………………………………………………………… 23
Undo all files protection………………………………………………………………23
Automatic playback…………………………………………………………………………23
DPOF …………………………………………………………………………………………23
Direct to print (DPS)…………………………………………………………………………24
Exit from playback menu………………………………………………………………25
Setup mode……………………………………………………………………………………26
Options setup………………………………………………………………………………26
Date/time………………………………………………………………………………26
Sounds ………………………………………………………………………………………27
F o r ma t … … … … … … … … … … … … … … … … … … … … … … … … … … … … … … 2 7
Factory default ……………………………………………………………………………… 27
Memory information…………………………………………………………………………27
Language…………………………………………………………………………………… 27
Video output…………………………………………………………………………………27
Shutdown auto timer…………………………………………………………………………27
Light source frequency………………………………………………………………………27
Copy to card……………………………………………………………………………27
Exit setup……………………………………………………………………………27
5. Video output……….……………………….………………..…………28
6. How to connect to PC.......….…..….….…...………………..….….......29
7. Driver installation and software applications……………....….31
Drivers …………………………………………………………………………………31
P r e s t o ! Vi d e o Wo r k s 6 … … … … … … … … … … … … … … … … … … … … … … 3 2
P r e s t o ! M r. P h o t o 3 … … … … … … … … … … … … … … … … … … … … … … … 3 2
XviD 1.03 codec installation………………………………………………………………32
8. Digital recording specifications…………………………….......…36
9. Troubleshooting…....….....………………..…………….….......….…..37
2
1. Precautions
Please carefully read through this user manual before use, and follow the instructions for
operation to prevent unit damage due to inappropriate operation.
Safety precautions
●The included CD is a PC software only and not an audio CD. Please do not playback on
stereo or personal equipment to prevent damage to the CD.
●This product is a precision unit, please do not disassemble as the internal high voltage
components might cause electrical shock or fire hazards. Please do not place this product
under direct sunlight to prevent fire hazards.
Precautions before use
●Before important filming (weddings or overseas travel), please do a test shoot to make sure
the digital video camera functions normally. Any additional damage caused by malfunction
of this product (fees for filming and revenues lost etc), manufacturer will not be responsible
for any indemnity to user.
●Copyright related issues
All images captured by digital video camera, unless authorized by the rights holder, shall not
violate copyright laws. In addition, if filming is prohibited for live performances and
exhibitions, even if just for personal use filming is not allowed. Memory card transfers of
data and copyrighted images should be bound within the range of copyright lays and not be
exceeded.
We will strive to ensure the contents of this manual are up to date. However, the accuracy
cannot be guaranteed. If contents of the manual do not match with the camera, please use the
camera as reference. We reserve the right to change the contents of this manual and
specifications of the product without prior notice. If the packaged contents do not match the
indicated accessories, please use the actual contents as reference.
●About the LCD screen
If the LCD display is damaged, please follow the following instructions about the liquid
crystals from the display:
1. If the liquid crystal makes contact with the skin, please wipe with a cloth and then wash
with warm running water.
2. If the liquid crystal makes contact with the eye, please wash with clean water for at least
15 minutes, and seek medical attention immediately.
3
3. If liquid crystal is swallowed, please wash mouth cavity, drink large amounts of water and
induce vomiting, then seek medical attention immediately.
4
Precautions before operation
This product is composed of electrical components. In order to ensure that the camera functions
properly, please do not apply heavy shock or impact to the digital video camera during operation.
●Avoid operating and storing in the following locations:
1. Damp and excessively dusty environment.
2. Direct sunlight location and enclosed cars,
3. Locations with excessive vibration.
4. Smoky, grimy and hot environment.
5. Strong magnetic field environment.
6. Rain and snow environment.
or other high temperature locations.
●When the digital video camera power is on, please do not open the battery lid.
●If water gets inside the digital video camera interior, immediately turn off power and remove
the battery.
●Care and handling of digital video camera
1. If the lens, LCD screen surface and viewing window are dirty, please use a lens brush and
lens cloth to wipe clean. Please avoid touching the lens with your fingers.
2. To avoid scratches to the lens LCD screen surface, and view window, please do not bump the
digital video camera against hard objects.
3. Please wipe the digital video camera exterior with a soft dry cloth. Do not use harsh cleaners or
volatile solutions. This may damage the exterior shell and paint of the camera.
Package contents
Digital video camera
USB cable
CD
(including drivers)
Carry strap
Leather case
TV cable
“AA” alkaline battery *4
Instruction manual
5
2. Introduction
Digital Video Camera construction
Top view:
1:Flash button
1. Flash button
2:Menu button
2.Menu button
3 Shutter button
3.Shutter button
Front:
1. Lens
1. Lens
2. Auto shutter indicator
3. Flash
2. Auto shutter indicator
4. Microphone
3. Flash
4.Microphone
Back:
1.
Power/Busy indicator - when the digital video camera is powered on, the power
indicator will be lit (green). When the system is busy, the busy indicator will flash (red).
2.
Up button(▲) – select up in different menus, selects the previous file in playback mode,
increase the volume during playback of video and audio.
3.
4.
Confirm button(■)- mainly used to confirm an action and to call out the shortcut menu
Zoom IN button- digital zoom in
5.
6.
7.
8.
9.
Down button(▼)- select down in different menus, selects the previous file in playback
mode, increase the volume during playback of video and audio.
Zoom OUT button- digital zoom out
Movie mode button [Movie] [ ] – enter the movie mode
- enter the still photo mode
Photo mode button [STILL]
On/off button – powers the system on and off
10.
11.
12.
13.
Audio mode button [VOICE]
- enter the voice audio mode
Playback mode button – enter the playback mode
TV-OUT port – connects to the TV to output the display onto the TV
USB port – connects to the computer
6
1. Power/BUSY
indicator
2. Up button(▲)
3. Confirm button(■)
4. Zoom IN button
6. Zoom OUT button
5. Down button(▼)
7. Video mode button
12. TV-OUT port
8. Photo mode button
9. Power on/off button
10. Audio mode button
11. Playback mode
b
13. USB port
Left:
1.
2.
3.
4.
5.
Rewind button- fast rewind during video playback.
Play/stop button – start or stop playback of video or audio under playback mode
Forward button-fast forward during video playback.
Display/Set button- switches between the display methods (normal/all/off). Switches back
and forth between the video menu, photo menu, playback menu with the setup menu.
SPEAKER – for audio playback
4.Display
5.Speaker
/Set button
1.Rewind button 2.Play/ 3.Forward button
Stop button
7
Bottom:
1.
2.
3.
4.
Battery cover latch –press in and push the battery cover out to open the battery
compartment cover.
Battery compartment
SD/MMC card slot
Battery cover
4.Battery
cover
1.Battery cover
latch
2.Battery
3. SD/MMC
compart
card slot
Battery status indicator:
full charge
half charge
=
battery power low
no power
8
3.Before using the Digital Video Camera
Preparations before operation
●First step: Insert four AA alkaline or rechargeable batteries and check the battery life. If the
battery life is low, immediately replace with new or fully-charged batteries to
ensure proper digital video camera operation.
●Second step: Please insert the memory card illustrated below into the memory card slot. To
remove the memory card, lightly press the memory card, the memory card will
automatically pop up.
Note: When inserting the memory card into the digital video camera, the camera has to be
powered off. Turn on the camera again. At this time, all files will be saved to the
memory card and not in the internal memory. After restarting, do not remove or
insert the memory card to prevent loss and damage of data on memory card and
built-in memory.
9
4. Using the digital video camera
●Step one: Press the Power switch button, and the power indicator light will automatically
light up. When the power indicator light is lit, release the power switch button.
Function list
10
Video mode
Video mode
LCD display: normal/all/off
Capture Video: start/stop
Digital zoom: 1x~4x
Hotkey menu
Size: 320*240, 640*480
Exposure compensation: -2EV—+2EV
Image quality: good/standard
White balance: auto/sunlight/light bulb/
florescent light/cloudy
Color effect: color/monochrome/retro
Video menu
Size: VGA/QVGA
Image quality: good/standard
White balance: auto/sunlight/light bulb/
florescent light/cloudy
Exposure compensation: -2EV—+2EV
Color effect: color/monochrome/retro
Photo mode
Photo mode
LCD display: normal/all/off
Picture taking
Digital zoom: 1x~4x
Flash light: off/auto/forced
Hotkey menu
Size: VGA/2M/3M/5M/12M
Exposure compensation: -2EV—+2EV
Image quality: good/standard
White balance: auto/sunlight/light bulb/
florescent light/cloudy
Auto shutter: off/5s/10s/30s
Color effect: color/monochrome/retro
Photo menu
Size: VGA/2M/3M/5M/12M
Image quality: good/standard
White balance: auto/sunlight/light bulb/
florescent light/cloudy
Exposure compensation: -2EV—+2EV
Color effect: color/monochrome/retro
Auto shutter: off/5s/10s/30s
Date indicator: on/off
11
Audio mode
Audio mode
LCD display: normal/off/all
Audio recording
Playback mode
Playback mode
LCD display: normal/off
Previous/Next
Audio playback
Volume adjustment
play/stop
Photo playback
play/stop
Video playback
Volume adjustment
Play/stop
FF/RW
Playback menu
Delete file: delete single file/delete all files
Protect file: protect single file/protect all files
Undo file protection: undo single file protection /
undo all file protections
Slideshow
DPOF (Photos only)
Display date/Display date off
Select all/set single/cancel all
DPS (Photos only)
Print all/print single
Cancel
12
Setup mode
Setup mode
Date/time
Shutter beep: on/off
Format: confirm/cancel
Factory defaults: confirm/cancel
Memory info Photo
Video
Audio
Available space
Language: English/Traditional Chinese/Simplified Chinese/French/German/Italian
/Japanese/Spanish/Russian/Korean/Turkish/Portuguese/Dutch/Arabic
Video output: NTSC/PAL
Auto shutoff: Off/1min/3min
Light source frequency: 60HZ/50HZ
Copy to card: Confirm/cancel
Video mode [
]
Press the video mode button [Movie]
[
]
Status indicator
Video mode indicator
Image format
White balance
Color effects
Image quality
Battery status
Image size
Digital zoom status
Built-in storage status
Hotkey menu (Shortcut)
Under the video mode, use the Confirm button■ to select the shortcut functions: you can
apply the following to the video to be captured: image file size, exposure, video quality, white
balance, color effect setups. After pressing the confirm button■press the up button ▲ or down
button ▼to select each submenu.
13
The control procedures are on the next page.
14
15
Video menu
Under Video mode, press the MENU button to enter the Video menu.
Under the Video menu page, follow these instructions to change settings:
Select image size:
1. Press the up button ▲ or down button ▼ to select the size option and press the confirm
button■.
2. Use the up button ▲ or down button ▼ to select your desired image size and press the
confirm button■.
Image size options: VGA(640X480)、QVGA(320X240)
The control procedures are as below:(the following sub-items eg. Image quality, white balance
controls etc.)
Select image quality:
1. Press the up button ▲ or down button ▼ to select the image quality option and press the
confirm button■.
16
2. Use the up button ▲ or down button ▼ to select your desired image quality and press the
confirm button■.
Image quality options: Best, standard.
17
Select white balance mode:
1. Press the up button ▲ or down button ▼ to select the white balance option and press the
confirm button ■.
2. Use the up button ▲ or down button ▼ to select your desired white balance mode and
press the confirm button ■. There will be five modes of white balance to choose from.
White balance type: auto, sunny, cloudy, light bulb, flourescent light.
Select the exposure compensation:
1. Press the up button ▲ or down button ▼ to select the exposure compensation option and
press the confirm button ■.
2. Use the up button ▲ or down button ▼ to select your desired exposure level and press the
confirm button ■. There will be 13 levels of exposure compensation to select from.
Select color effects:
1. Press the up button ▲ or down button ▼ to select the color effects option and press the
confirm button■.
2. Use the up button ▲ or down button ▼ to select your desired color effects and press the
confirm button ■. There will be three values to select from. They are: color, monochrome,
sepia.
Return to Video mode:
Press the MENU button to return to Video mode.
Begin capturing:
●Step 1 Press the shutter to begin recording and the recorded image will appear on the screen;
press the ZOOM-IN or ZOOM-OUT buttons to perform digital zoom.
Press shutter
Press shutter
18
●Step 2 Press the shutter during recording to stop, or automatically stop recording when
memory is full.
Photo mode
Press mode button [STILL]
, to enter photo mode
Status indicator:
Photo mode indicator
Flash mode
White balance status
Color effects
File quality
Battery status
Time display
Digital zoom
Built-in memory status
Image size
19
Hotkey menu (Shortcut)
Under photo mode, press Confirm button■ to select shortcut functions: you can apply the
following to the image to be captured: image size, exposure, image quality, white balance, auto
timer, color effect setup etc. After pressing the confirm button ■, press the up button ▲ or
down button ▼ to select each submenu.
The control procedures are as below:
20
Photo menu:
Setup the desired options before filming. Press MENU button to access the photo menu.
Follow these instructions to change settings:
Select image size:
1. Press up button ▲ or down button ▼ to select image size option, then press the confirm
button ■. There will be five image size options to select from.
2. Press up button ▲ or down button ▼ to select your desired photo size, press the confirm
button ■ to set image size: 12M(4048X3040), 5M(2608X1952),
3M(2048X1536),2M(1600X1200), VGA(640X480)
Select image quality:
1. Press up button ▲ or down button ▼ to select image quality option, then press the
confirm button ■.
2. Press up button ▲ or down button ▼ to select your desired image quality, press the
confirm button ■.
Image quality options: best, standard.
Select white balance mode:
1. Press up button ▲ or down button ▼ to select white balance option, then press the
confirm button ■.
21
2. Press up button ▲ or down button ▼ to select your desired white balance mode, press the
confirm button ■.
White balance options: auto, sun light, cloudy, light bulb, florescent light.
Exposure adjustment:
1. Press up button ▲ or down button ▼ to select exposure option, then press the confirm
button ■.
2. Press up button ▲ or down button ▼ to select your desired exposure level, press the
confirm button ■.
EV value range: –2.0 ~ +2.0
Color effects:
1. Press up button ▲ or down button ▼ to select color effects option, then press the
confirm button ■.
2. Press up button ▲ or down button ▼ to select your desired special effects, press the
confirm button ■.
Color effects to select are: color, monochrome, retro.
Auto shutter:
1. Press up button ▲ or down button ▼ to select auto shutter timer option, then press the
confirm button ■.
2. Press up button ▲ or down button ▼ to select your desired auto shutter count down time,
press the confirm button ■.
The available timer options are: off, 5 sec, 10 sec, 30 sec.
Select date indicator:
1. Press up button ▲ or down button ▼ to select date indicator option, then press the
confirm button
.
2. Press up button ▲ or down button ▼ to select whether to show the date, press the
confirm button
.
Date indicator selection: on, off.
Return to photo mode:
Press the MENU button to return to photo mode.
Flash light function:
Under photo mode, press the flash button to cycle through and select the flash mode to use.
How to take pictures:
●Step one Make sure the digital video camera is turned on
●Step two Aim the digital video camera at the object to capture, and view the filming angle
from the LCD screen
●Step three Press the shutter, when capturing a picture, the LCD displayed image will freeze
until it is saved into memory. When the screen returns to the browsing status, the
user can begin to shoot the next picture.
Audio mode
Press mode button [VOICE]
to enter audio mode
Status indicator:
Audio mode indicator
22
Battery status
Memory status
23
Begin recording:
Under audio mode, press the shutter to begin recording, then press the shutter to stop recording.
Press shutter
Playback mode
Press the playback button
to enter the playback mode
If there are no files present, the display will be as below:
Otherwise it will display the current file, and press up button ▲ and down button▼ to
browse other files.
Photo (Camera mode) indicator
Audio (Voice Recording mode) indicator
Video (Camcorder mode) indicator
Current file index
Total files
Battery status
24
Video playback:
1. Press up button▲ or down button▼ to select the video to playback, and then press the
Play button to begin playback (this camera supports MP4 format). To playback video clips
not recorded by the camera, please rename the file in the format MPEG0001 before copying
onto the camera. The 4 digits after MPEG should correspond to the current number of MP4
files already on the camera, with extensions of either AVI (please make sure the file type is
supported by the camera: AVI); after that copy the file to under the directory
DCIM/100FSCAM. If no such directory exists, please first record a short video clip and
then copy the files to the directory that contains the recorded video clip.
2. Press Play button again to stop playback.
3. During playback, press the Forward button to fast forward, and press the Rewind button to
fast rewind; press the Shutter to pause playback, and press the Shutter again to resume play.
During fast forward or rewind, press Play button to resume normal playback, press the Play
button to stop playback. You can also press Up button▲ or Down button▼ to adjust the
volume, as well as use the DISP/SET button to turnoff the LCD screen.
Controls as below:
shutter
shutter
shutter
shutter
Adjust volume
25
Audio playback:
1: Under playback mode, use the up button▲ or down button▼ to select the audio file. After
the file has been selected, press Play button to begin playback. If the user wishes to playback
audeo clips not recorded by the camera, please rename the file in the format WAVE0001
before copying onto the camera. The 4 digits after WAVE should correspond to the current
number of files already on the camera, with extensions of wav; after that copy the file to
under the directory DCIM/100FSCAM. If no such directory exists, please first record a short
audeo clip and then copy the files to the directory that contains the recorded video clip
(please note that the camera only supports WAV format audio files).
2: Press play button again to stop playback.
3: During playback, press the Shutter to pause playback, or then press the Shutter again to
resume play.
Volume adjustment:
During the audio playback, press the Up button▲ or Down button▼ to adjust the volume.
Control procedures as below:
shutter
Adjust volume
26
Return to playback menu:
Under playback mode, press the MENU button to enter the the menu page.
Delete single file
1. Press up button ▲ or down button ▼ to select a file to delete, then press the confirm
button ■.
2. Press the up button▲ or down button▼ to confirm or cancel selection, then press confirm
button■. If confirm is selected then a single file will be deleted (protected files cannot be
deleted), otherwise no action will be taken and is returned to the main menu.
Delete all files
1. Press up button ▲ or down button ▼ to select all to delete, then press the confirm button
■.
2. Press the up button▲ or down button▼ to confirm or cancel selection, then press confirm
button■. If confirm is selected then all files will be deleted (protected files cannot be
deleted), otherwise no action will be taken and is returned to the main menu.
Protect single file
1. Press up button ▲ or down button ▼ to select the single audio choice to protect, then
press the confirm button ■.
2. Press the up button▲ or down button▼ to confirm or cancel selection, then press confirm
button■. If confirm is selected then a single file will be protected and the upper right of the
27
LCD will show a locked icon
main menu.
, otherwise no action will be taken and is returned to the
28
Protect all files
1. Press the up button▲ or down button▼ to select the lock all option, then press confirm
button■.
2. Press the up button▲ or down button▼ to confirm or cancel selection, then press confirm
button■. If confirm is selected then all files will be protected and the upper right of the LCD
will show a locked icon , otherwise no action will be taken and is returned to the main
menu.
Undo single file protection
1. Press the up button▲ or down button▼ to select the undo single protection option, then
press confirm button ■.
2. Press the up button▲ or down button▼ to confirm or cancel selection, then press confirm
button■. If confirm is selected then the single file protection will be undone (only protected
files will be applied), otherwise no action will be taken and is returned to the main menu.
Undo all files protection
1. Press the up button▲ or down button▼ to select the undo all protection option, then press
confirm button■.
2. Press the up button▲ or down button▼ to confirm or cancel selection, then press confirm
button■. If confirm is selected then the all file protection will be undone (only protected files
will be applied), otherwise no action will be taken and is returned to the main menu.
Auto playback:
Press up button ▲ or down button ▼ to select the auto playback option, select start option
and then press the confirm button ■, Unit will enter the auto playback mode. Under auto
playback mode each photo will be displayed for a set period of time. Press the confirm button
■ under auto playback mode to exit the auto playback mode, Press the MENU button to return
to the playback menu.
Procedures as below:
MENU
button
29
DPOF:DPOF can directly print out the photos stored on the SD card through a DPOF
supported printer.
DPOF set single
1. Press up button ▲ or down button ▼ to select the “DPOF” option, then press the confirm
button ■.
2. Press up button ▲ or down button ▼ to set the single option, then press the confirm
button ■ to enter the single setting interface.
3. At the single setting interface, the current photo will appear and then use the up button ▲ or
down button ▼ to select a photo. Pressing the ZOOM-IN button and ZOOM-OUT
button can set the number of copies to print, maximum print copy is 5.
DPOF set all:
1. Press up button ▲ or down button ▼ to select the “DPOF” option, then press the confirm
button ■.
2. Press up button ▲ or down button ▼ to set the all option, then press the confirm button
■ to set to print one single copy of all photos.
DPOF cancel all:
1. Press up button ▲ or down button ▼ to select the “DPOF” option, then press the confirm
button ■.
2. Press up button ▲ or down button ▼ to set the cancel all option, then press the confirm
button ■ to cancel all settings.
Print date:
1. Press up button ▲ or down button ▼ to select the “DPOF” option, then press the confirm
button ■.
2. Press up button ▲ or down button ▼ to set the print date option, then press the confirm
button ■ to print the date on all printed photos.
Hide date:
1. Press up button ▲ or down button ▼ to select the “DPOF” option, then press the confirm
button ■.
2. Press up button ▲ or down button ▼ to set the hide date option, then press the confirm
button ■ to hide the date on all printed photos.
After setup is complete, insert the SD card to the printer to perform printing.
Procedures as below:
30
DPS (only supported for DPS (direct print service) enabled printers)
Press up button ▲ or down button ▼ to select the print option, then press the confirm
button ■. Connect the digital video camera and printer with the USB cable and after successful
connection is established the digital video camera will show print single and print all options.
Print One
1. In the print menu, press up button▲ or down button▼ to select single print and then press
confirm button■ to enter the single print interface.
2. At the print single interface, with the hint to connect to printer, connect the digital video
camera to printer with the USB cable. Wait for the OK to be notified and press up button ▲
or down button ▼ to select photo printing, pressing the ZOOM-IN button and
ZOOM-OUT button can select the number of print copies.
-Print photo: press the up button ▲ or down button ▼ to select the photo you wish to print.
-Print copies: press the ZOOM-IN button and ZOOM-OUT button to set the number of prints.
-Print: press the confirm button ■ to begin printing.
Print all
1. At the print menu, Press up button ▲ or down button ▼ to select to print single and then
press the confirm button ■ to go to the print all interface.
2. At the print single interface, with the hint to connect to printer, connect the digital video
camera to printer with the USB cable. Wait for the OK and then press the confirm button
to begin printing. (a single copy of each photo is printed)
Cancel direct printing
1. At the print menu, press up button ▲ or down button ▼ to select cancel direct printing
and then press the confirm button ■ to cancel direct printing.
Exit playback menu
Under the playback menu interface, press MENU button to exit the playback menu interface.
31
Setup mode
Press the MENU button under any mode (except for Audio mode) to enter the menu for each
mode, then press DISP/SET button to enter Setup mode.
At the setup mode, the user can modify the followng options:
1. Date/time 2. Button beep 3. Format 4. Factory defaults 5. Memory info 6. Language 7. Video
output 8. Auto shutoff 9. Light source frequency 10. Copy to card
Setup options
Under the setup mode, press the up button ▲ or down button ▼ to modify the settings, and
press the confirm button ■ to perform setup.
Date/time: Set the year/month/date/hour/minute/second, setup as below
32
Button beep: Set to on or off, controls as below:
Format: Confirm to delete all data in memory. Controls are similar to Sounds setup.
Factory defaults: Confirm to use factory defaults. Controls are similar to Sounds setup.
Memory info: Show total video/photo/audio files and available space
Language: English/Traditional Chinese/Simplified Chinese/French/German/Italian/Japanese/
Spanish/Russian/Korean/Turkish/Portuguese/Dutch/Arabic
Video output: Set the video signal format (NTSC/PAL). Controls are similar to Sounds setup.
Auto shutoff: Set the auto shutdown timer with the following options:
Off: no auto shutdown.
1 min: automatically shutdown after 1 minute idle
3 min: shutdown after 3 minutes idle
Light source frequency: Set the environment light source frequency (60HZ/50HZ). Controls
are similar to Sounds setup.
Copy to card: Copies the contents of the built-in memory to the SD/MMC card.
Confirm/cancel controls are similar to the Sounds setup.
Exit setup
To exit the setup mode, press DISP/SET button to return to each of the mode menus; press the
MENU button to return to each modes.
33
5. Video output
You can use the “video/audio out” on the digital video camera to output the video/audio to an
external device (such as: TV), the method is as below:
●Step one Insert the black plug of the TV cable to the TV port on the back of the digital video
camera, and the yellow plug to the ‘ video in’ of the TV.
●Step two Insert the white and red plug of the AV cable to the audio input of the TV port, and
the black plug to the back of the audio in/out port on the digital video camera.
●
Step three Switch the TV to the correct channel.
●
If the TV standard is not correct, you can switch to the appropriate standards
1.Enter the “Setup mode” page.
2. Use the up button ▲ and down button ▼ to select “video out”.
3. Then use the up button ▲ and down button ▼ to select NTSC or PAL standards and
press the confirm button ■.
Note: Different TV manufacturers will have different broadcast channels, please refer to the
TV’s user manual.
34
6. How to connect to PC
The digital video camera can also function as a webcam/storage device, procedures as below:
●Step one Make sure the digital video camera is installed with
four “AA” batteries
Note: Please make sure to connect the USB cable properly to prevent damage.
●Step two Connect the smaller end of the USB cable plug to the USB port on digital video
camera
●Step three Connect the larger plug of the USB cable to the USB port on the PC
35
●Step four Press up button ▲ or down button ▼ to select removable disk or webcam
and then press confirm button ■, the camera screen will turnoff and enter the
appropriate function. If removable disk is selected, then there will be a newly
added removable disk appearing in “My Computer” of the system. The newly
added removable disk is the SD/MMC card reader provided by the digital
camera and is ready for you to use. If webcam is selected, then the digital
camera can be used as a webcam. For a clearer image on the computer display,
please focus onto the target before using the digital camera. You will be able to
visually connect with friends through the Internet using the webcam camera.
System requirements:
During operation and use of the digital video camera, please refer to the minimum system
requirements for the digital video camera. We strongly suggest you operate the digital video
camera on higher level PC equipment for even greater performance. The digital video camera
minimum system requirements are as below:
System requirements (PC)
Operating system
Microsoft Windows ME, 2000,XP
CPU
Intel® Pentium Ⅲ 500 MHz or above
Memory
Optical drive
Hard drive
256MB or above
4x or above
At least 200 MB of available disk
space
Others
One standard USB 1.1 port
For Microsoft Windows98SE/Me users, please connect the larger USB plug to the PC USB port
and the other end to the digital video camera USB port after installing the drivers and application
software. When the camera enters the “connection to PC” page, press the up button ▲ or down
button ▼ to select webcam and then press the confirm buttom ■. Then follow the below
procedures:
●Step one Right click on “My Computer”.
●Step two Then select “Device manager”.
●Step three Select “GENERIC IDE DISK TYPE47” and then choose “Properties” to show the
below screenshot:
●Step four Please select “DMA” and then press OK.
36
Note: When playing back video on the PC, make sure the PC has DirectX8.0 or newer
versions and is supported.
37
7. Drivers and software applications
1. Drivers
When the camera is connected to a PC, you will be able to use the camera as removable storage
or PC webcam.
Removable storage
The digital video camera is able to provide removable storage functions as a card reader. You can
use this camera as an SD card, removable disk.
If your operating system is Windows 98SE, you will need to install the camera drivers. Windows
XP/ME/2000 operating systems supports Plug-and-play and does not require manual installation
of drivers.
When the drivers are already installed and connected to the camera, the camera built-in memory
and the SD memory card will be shown in Windows My Computer as removable storage. Drag
and drop files normally as you would for any general disk drives.
PC webcam
You must install the camera drivers to be able to use the camera as a PC webcam on all Windows
operating systems (Windows XP/ME/2000/98SE).
Note: All operating systems can accept and install this driver version.
The digital camera can be used as a PC webcam.
Please follow the below instructions:
Insert the included CD into the CD-ROM.
If the CD does not auto-run, use Windows file manager to run the executable InstallMgr.exe
under the root directory on the CD.
Displays the below screen.
Install button
38
Press the install button to install the drivers.
Please follow the on screen instructions.
Press “finish” to restart the PC and complete the driver installation.
Load the driver
1. Insert the included CD into the CD-ROM.
2. If the CD does not auto-run, use Windows file manager to run the executable InstallMgr.exe
under the root directory on the CD.
3. Press the install button to install the drivers.
4. Please follow the on screen instructions.
5. Use the included USB cable to connect the camera with the PC as described in the chapter
(Connect to PC).
2 . Presto! Video Works 6
Presto! Video Works 6 is an advanced application software for video editing.
Install Presto! Video Works 6:
1. Insert the included CD into the CD-ROM.
2. If the CD does not auto-run, use Windows file manager to run the executable InstallMgr.exe
under the root directory on the CD.
3. Press the install button and follow the on screen instructions.
After application is started, you can find more information on Presto! Video Works 6 in the help
files.
3 . Presto! Mr. Photo 3
Presto! Mr. Photo 3 is an advanced application software for photo editing.
Install Presto! Mr. Photo 3:
1. Insert the included CD into the CD-ROM.
2. If the CD does not auto-run, use Windows file manager to run the executable InstallMgr.exe
under the root directory on the CD.
3. Press the install button and follow the on screen instructions.
After application is started, you can find more information on Presto! Mr. Photo 3 in the help
files.
4.
XviD 1.03 codec installation
XviD 1.03 codec installation
1. Insert the included CD into your optical drive.
2. If the CD does not auto run, navigate to the InstallMgr.exe file under the CD root directory using
Windows explorer.
39
3. Press the install button and the installation screen will be shown, please press “Next” to continue.
4. At the EULA screen, please select “I accept the agreement” and then press “Next” to continue.
5. Please follow the instructions and use “Browse” to choose the installation path to use, press
“Next” to continue.
40
6. Please choose the name of the folder to install program, press “Next” to continue.
7. At the install additional tasks screen, press “Next” to continue.
8. At the ready to install screen, press “Install” to begin installation.
41
9. Install in progress. To stop installation, please press “Cancel”.
10. The screen below will be shown after installation is complete, press “Finish” to end program
installation.
42
8 Digital video camera specifications:
Digital video camera specifications:
●Lens: f=9.2mm
●Sensor: 5.17Mega pixel cmos sensor
●Aperture: F / 3.0,8.0
●Exposure: ISO 100
●White balance setting: Auto, sun light, light bulb, florescent light, cloudy
●Shutter: Mechanical shutter
●Shutter speed: 1/10 sec ~ 1/500 sec
●Storage format: Built-in 32MB, Flash Memory SD Card (MMC compatible) slot (maximum
supported 2GB)
●File format: Still image JPEG, video MPEG 4(AVI), audio recording: WAV
●Image resolution: 12M(4048x 3040) (firmware interpolation)
5M (2608x1952)
3M (2048 x 1536)
2M (1600 x 1200)
VGA (640 x 480)
●Digital zoom: 4x
●Normal distance: 150cm ~
●Shutter auto timer: Off, 5 sec, 10 sec, 30 sec
●Video size: 30 fps. (320 x 240)
30 fps. (640 x 480)
●Flash light modes: Off/auto/force
●TV-OUT output: NTSC / PAL
●PC Interface : USB2.0
●Power: “AA” alkaline battery / Ni-MH rechargeable battery x4
●Dimensions: 123mm (L) x 46 mm (W) x 71 mm (H)
●Weight: approx. 190g (not including battery)
43
44
9. Troubleshooting
System hangs
When the digital video camera hangs during operation and cannot accept
input, please check the battery contacts and then restart. If not able to
restart, check if unnecessary operation has caused damage to digital video
camera. Do not attempt to disassemble and please return for repair.
Error message
when entering
direct printing
service
For error messages appearing when entering direct printing service, you
should remove the USB plug from the digital video camera and check
whether the printer is functioning properly; and the digital video camera is
sufficiently charged. Follow the normal operating procedures to connect to
the printer to perform printing.
System hangs
when card is
removed
During digital video camera operation do not attempt to remove the
memory card, doing so may result in system hanging. If the situation
occurs, please restart the unit.
Digital video
The digital video camera cannot guarantee to perform formatting on all
camera cannot
memory card formats. When this happens, please format the memory card
format the
on a PC as the FAT format.
memory card
45
Website:
Please visit our website at www.dxgusa.com for any product updates or
special announcements.
You can also check out our online support desk where you can register your
product, send emails to our technical support, and find a list of frequently
asked questions (FAQs).
DXG USA
46