1
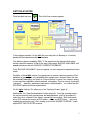
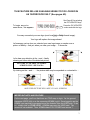
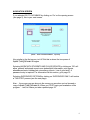
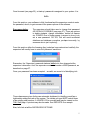
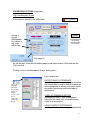
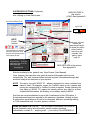
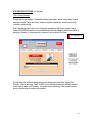
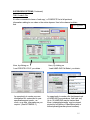
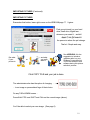
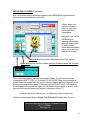
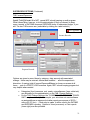
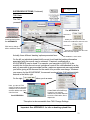
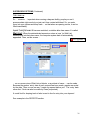
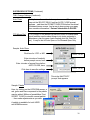
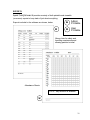
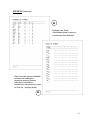
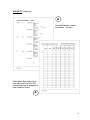
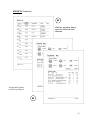
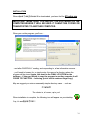
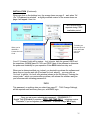
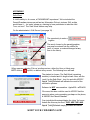
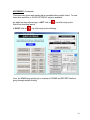
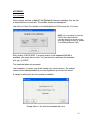
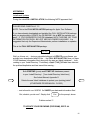
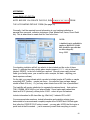
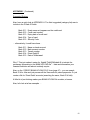
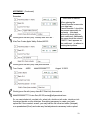
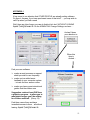
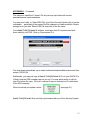
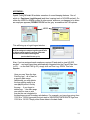
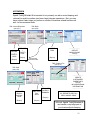
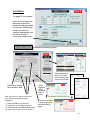
ADMIN MANUAL
Copyright 2015
All Rights Reserved
INDEX
ITEMS
BACKGROUND AND PHILOSOPHY
GETTING STARTED
NAVIGATION SCREEN
PAGES
1
2
4-5
SUPERVISOR OPTIONS
TAB: Edit Class Info
TAB: Add New Record
TAB: Edit Records / E-mail
TAB: Delete Records
TAB: Create A File
TAB: WEBCAM Pics
TAB: Income/Expenses
TAB: Bank
TAB: Staff
TAB: Backup/Restore
TAB: Wait List
TAB: Change Settings
6
6, 7
8
9-13
14
15
16-20
21
22
23
24,25
26
27,28
REPORTS
INSTALLATION
APPENDICES
29-33
34,35
36+
A
B
C
D
E
F
G
H
File Upload
Picture Pop-Ups
Customized Info File
Possible Strategies
Safe Word
Free Updates
Installs and Updates
Banking Information
I
J
K
L
M
N
O
Create BANK-UPLOAD File
Other Software
Door-Security-System
Employee Login/Logout
Business Features Overview
Working With Client Fees
Background Images
1
Apple Tree Software
© 2012 COPYRIGHT
ALL RIGHTS RESERVED
BACKGROUND & PHILOSOPHY
Apple Tree Software © is a package of programs, forms and reports designed to
both aid and enhance the operation of a commercial, public, private or even home ..
daycare facility. The modules contained, herein, will both guide and assist
authorized users and site administrators and supervisors. Each screen will be
presented; its operation and options explained. The user will find screens with
accompanying explanations to both guide and assist in their operation.
Apple Tree Software © MUST be installed on a ‘PC’ computer system that both
supports and runs Microsoft Access ©, part of the Microsoft Office Suite © of
programs. Once installed (see the page entitled ‘Installation’, page 34), the user
need have no familiarity, whatsoever, with Microsoft Access © …
… Apple Tree Software © runs as a user-friendly, stand-alone entity with little, or
no, prior computer expertise required.
And, our software philosophy is quite straight forward: KISS (Keep It Simple ‘Silly’ !!)
We believe that all features should be available on-screen at all times:
•
•
•
•
no having to look through 17 menus to find Wait List
not 12 steps for a teacher to print an allergy list (how about 2)
“Where do I enter expenses?” .. visible and on-screen at all times
“How do I get to the option for WEBCAM pictures? .. again, on-screen
We think you’ll find the KISS strategy helpful, simple and productive.
Oh BTW, we use the terms ‘student’ and ‘child’ … interchangeably, to refer to the
student/child in your care!
☺
Oh, and if you don’t like the screen palettes shown in the manual, you CAN change
them
☺
… see TAB: Change settings.
Oh, one more thing. We have NOT provided an index for this document. Reason?
It’s a ‘pdf document’ and you can view it on-screen at any time while running the
program. Your ‘pdf reader’ provides a WONDERFUL ‘search’ option .. better than we
could ever have hoped to provide or create. Thus, NO INDEX REQUIRED!
OK … NOW let’s begin …
1
GETTING STARTED
Click the desk-top icon
This is the first screen to appear.
Three options provided: On the left, the user may click on ‘Backup’ to, of course,
backup all files associated with the database.
This backup option is available ONLY IF the supervisor has selected that option
during a previous session. If that is the case, the prompt “BACKUP AVAILABLE” will
appear just above the info “BACKUP CURRENT DATABASE”.
If the “BACKUP AVAILABLE” does not appear, no such supervisor request has been
made.
Similarly, in the middle section, the opportunity to restore a previous version of the
database is given. Again, only available after a supervisor’s request! Since this can
be potentially damaging, the option to ‘Cancel Restore’ is given. Use ‘restore’ wisely
or you may lose important, recently entered, information. If you’re unsure, check with
‘everyone’ … teachers, assistants, supervisors, administrators … to confirm that the
RESTORE option should be implemented.
On the right, clicking ‘Go’ takes you to the ‘Opening Screen’ (page 4).
Additionally, the ‘View Documentation’ button (top left)! From this opening screen,
the screen used by both general users and administrators, you’ll be prompted to
select the ‘User’ manual or the ‘Admin’ manual (this document). Both documents
are in PDF format and require a PDF reader .. which you MUST have … as you’re
reading the document now! And, clicking on the ‘blue’ WHERE TO BEGIN .. some
helpful GETTING STARTED screens.
2
THIS FEATURE WILL BE AVAILABLE WHEN YOU’VE LOGGED IN
AS ‘SUPERVISOR ONLY’ (See pages 4/6)
See Page 20 for selecting
the PIC UPDATER keys
To begin, as you’ve
seen above, this appears:
Press the PIC UPDATER
combo and click the logo
You may now select your own logo (must be a jpg or bmp format image).
Your logo will replace the image shown!
Let’s assume you’ve done so, selected your own logo image or maybe even a
picture of Mickey. And yet, when you view your image … it shows as:
-
+
Let’s draw your attention to the + and – faintly
showing on either side of the distorted picture.
FEATURE AVAILABLE ON ADMIN
SCREEN ONLY. SEE PAGE 6
By clicking on the + and – … the picture width may be expanded or contracted to …
ADJUSTED PICTURE WILL APPLY TO ALL SCREENS
IMPORTANT NOTE AND FEATURE
On the next page, you’ll see that there are TWO ways to login. As the general
classroom USER (left) or as the supervisor/ADMIN (right)! Once logged in as the
ADMIN, you may wish to access some of the features from the USER side. To do
so .. simply click on YOUR LOGO. ADMINs may open the USER side! The
reverse is not available! Thus, ADMINs have FULL POWER and access !!
3
NAVIGATION SCREEN
If you selected GO TO DATABASE by clicking on ‘Go’ on the opening screen
(see page 2), this is your next screen.
(Note: ‘View Documentation’, top left)
Very similar to the first screen, isn’t it? But this is where the true power of
Apple Tree Software © begins.
Selecting WORK WITH STUDENTS AND CLASS GROUPS by clicking on ‘GO’ will
allow ‘general’ authorized users to see student/child information, print reports,
attendance sheets, birthday lists, view allergy info etc. Lots of good stuff! A
password entry is required! For information on this section, go to page 35.
Selecting SUPERVISOR OPTIONS by clicking on ‘SUPERVISOR ONLY’ will involve
a TWO-STEP process (see the next page).
Now … the screen you see above is the screen you see when you’ve licensed a
copy of Apple Tree Software ©. When you FIRST begin your evaluation of the
program … well, let’s have you take a peek at page 35.
4
Once licensed (see page 35), a ‘start-up’ password is assigned to your system. It is:
hello
From this point on, your software is fully functional and the supervisor needs to enter
the password, above, to gain access to the power options of the software.
Recommendation:
The supervisor should take care to change that password
AS SOON AS POSSIBLE (see page 27). There are options
to delete students, change information, delete full classes
etc. POWER! One of those powers (a screen to do so) is to
set a new password. DO SO! This will avoid accidental
deletions and database corruption, perhaps innocently, by
someone who is just ‘exploring’.
From this point on (after the licensing (key) code has been entered and verified), the
supervisor will merely have to enter the ‘password’ each time:
Remember, the ‘Supervisor’ password starts as hello but is then changed at the
supervisor’s discretion. And, the supervisor must enter/create a USER password, as
described on page 27.
Once your password has been accepted .. as valid, one more bit of identifying info.
Three chances are given (before an automatic shutdown) to identify yourself as a
legitimately authorized user of the system. The initials you type MUST match those
of an existing staff member. A USAGE LOG is recorded and may be viewed on the
TAB: Staff page. A printout may also be made. See REPORTS for a sample.
Now, let’s look at all the SUPERVISOR OPTIONS!
5
NOTE: To ensure that Apple Tree Software
screens display best on TALLER display screens
as well as SHORTER net-book displays, an
‘auto-detect’ feature has been incorporated. Form
heights will be adjusted automatically .. however,
you may over-rule this feature by clicking:
(top left, most screens).
For TALLER Screens
For SHORTER Screens
SUPERVISOR OPTIONS
If this option is selected from the opening screen (see page 4), and if the correct
password has been entered, the supervisor now is presented with a variety of
TABBED options, all designed to set up, modify, create, delete … all the operations
required in running a full daycare program.
To apply and adjust YOUR LOGO
, see page 3.
TAB: Edit Class Info
+
View, print,
adjust
class fees
See Appendix E
?
Clicking
brings up
context-sensitive HELP
but, for TAB screens
(such as this), hold the
SHIFT key while
clicking. Extra info and
help becomes available.
Any employee may
‘Double Click’ HERE
to log HOURS.
(see APPENDIX L)
View/Print all
children no
longer within the
AGE RANGE
settings.
A variety of room,
class, age options
are available .. as
well as defining
GROUP classes
Note: ‘View Documentation’, top left.
Here, five options are presented:
•
•
•
•
•
DELETE CLASS
ADD NEW CLASS
MODIFY CLASS FEE
RENAME A CLASS
SET / CHECK AGE RANGE (see below)
See page 7
Simply click on the ‘radio button’ for the option you wish … and prompts appear to
obtain the information required. To set an AGE RANGE, click on a class (left side).
6
SUPERVISOR OPTIONS (Continued)
TAB: Edit Class Info (Continued)
NOTES:
It’s wise to check a class (the list box on the left or the ‘View’
and ‘Edit’ screens … available to the general USER and
supervisor ADMIN). If there are NO students remaining in the
class, it is safe to delete the class name.
You are deleting the class name ONLY. The student(s)
is(are) still there, in your database but NOT reachable by any
class name you enter. So ..
… if a class name is deleted, by mistake, simply move to the
‘ADD NEW CLASS’ option to re-enter the name.
Whew !!! SAVED !!!
When developing this software, it was suggested that we should
include a feature to automatically advance/promote a child if their
age puts them outside the AGE RANGE for their current class.
It was pointed out, however, that licensing agencies have specific
guidelines, rules and regulations regarding class sizes. In your
jurisdiction, for example, it might be 5 (children) to 1 (instructor) for
a particular age group. So a class of 10 with 2 instructors would
be quite acceptable (providing, of course, that the regulation of
children per floor space is not violated).
Automatically ‘promoting’ a child to a new class could be
embarrassing. The licensing commission shows up one day and
asks to see your class lists. OOPS. 11 (children) to 2 (instructors).
Now you’ve got some explaining to do.
To circumvent this problem we’ve simply added an AGE RANGE
feature (see page 6). Set the AGE RANGE for each class and, at
any time, view or print a list of children/students with
AGE IRREGULARITIES. How you handle the information is up to
you … but we haven’t put you in an embarrassing position with
‘auto-promotion’.
And, on the Edit screen (see page 10) .. if the ‘Age’ field shows as
3.6
everything normal
3.6
The option to
check for age
irregularities has
been expanded.
Clicking on the
item below ..
.. now gives an
opportunity to
check ‘Current’
irregularities or
‘Future’ (90 days;
3 months). That
way, supervisors
can predict future
class openings
and keep your site
‘fully populated’.
age range irregularity
7
SUPERVISOR OPTIONS (Continued)
TAB: Add New Record
The next TAB along the selection row is Edit Records and it’s used frequently, by the
supervisor. Updating student/child information, adding missing data, changing
records: all very important. However, a student/child record can’t be changed or
edited unless they’ve first been added to the information database. Here’s how we
add that record.
When the Add New Record TAB is selected, the supervisor sees (left side):
See Appendix E
Extra information required if
the ‘Wait List’ class is selected.
Here, the supervisor can SELECT (A) CLASS into which the student/child is placed
and enter both a LAST and FIRST name. Once the ‘Save This Record’ is selected,
the child/student is part of your database and the rest of his/her information can be
entered using the ‘Edit Records’ TAB described on the next page.
This administrator ‘Add New Record’ page simply allows for multiple entries of
students/children in preparation for complete entry, later.
There is ONE ‘reserved’ class name. It’s Wait List! If you assign the student to that
class .. perhaps getting a student into your system for future placement but here,
entering preliminary information only, another prompt/window will appear: asking you
their preference for eventual placement, contact information, etc. The information you
enter, along with the date of their first ‘entry’ into your computer records, will be
printed if you ask for a report of the wait-listed clients (see page 32).
8
SUPERVISOR OPTIONS (Continued)
TAB: Edit Records / E-mail
If this option is selected, the TAB shows:
See Appendix E
PG List
Access a
specific
child/student
for ‘editing’ or
call up an
entire class.
Find child/student
by reviewing
Parent/Guardian
List of names
(see page 11)
As can be seen, there are two distinct parts to this option screen. We’ll deal with the
‘Edit’ side first.
Clicking on the ‘Load Attendance Screen’ button gives …
Here, options are:
This is one of
our longer
forms and
may not fully
display on
smaller
screens. Click
here to
expand and
contract the
display.
ENTER TODAY’S ATTENDANCE
(up to 21 days of attendance may be recorded;
the current date is used by default however an
option will appear to allow you to select a date
and enter a previously unrecorded date of
attendance)
CLASS ATTENDANCE HISTORY
(view/print the last 21 days of attendance
history for the class; then, clear attendance,
ready for a new period)
VIEW STUDENT’S ATTENDANCE
(view the attendance for a single student/child)
9
SUPERVISOR OPTIONS (Continued)
And, clicking on ‘Load Edit Screen’ …
NEW FEATURE in
this version
(LOAD) See Appendix A
BANK INFORMATION
Age Field
3.6
3.6
See Page 7
See APPENDICES H & I
NOTE
E-mail
buttons
And here, you may
indicate the
parental permission
to display the child’s
picture publicly,
rather than just
internally. See
‘gallery’ option,
page 16.
Copy parental info left/right
and even import info from
another child (brother/sister).
Undo option as well!
And here, you may add or
delete pictures .. using the
same technique as on the
WEBCAM page.
See page 20.
See Appendix E
NEW FEATURE in this version
See Appendix B
Note the similarity to the ‘general’ user ‘View Screen’ (User Manual).
Here, however, the supervisor may enter all pertinent information about a new
student/child. The ‘blue’ areas are often deemed ‘required’ information although that
would be totally at the discretion of your daycare.
NOTE: The option, top right, MOVE TO .. allows a supervisor to move a student from
class to class. For example: maybe the Toddler2 class is over crowded and
moving the student/child to Toddler3 is what is required. Simply selecting the
new class by ‘MOVE TO’ makes the transfer without any need to re-enter
student/child information. No deleting, no re-adding: simply a MOVE.
And here we can draw attention to part of the E-mail aspect of this TAB option. If
E-mail addresses have been entered for the parents or guardians, clicking on these
E-mail buttons would allow an E-mail to be composed, and sent; something relating
to THIS student/child only. For other options, continue …
BANK INFORMATION: (top left) … Any five lines of information you choose to
record (institution name, account number, transit number, password
authorization, contact ID … anything at all … your choice). See APPENDIX H.
10
SUPERVISOR OPTIONS (Continued)
TAB: Edit Records / E-mail (Continued)
See Appendix E
Again, this TAB option page …
NOTE: The task of entering
all information can be a large
one (see pervious page). If
you need help (AFTER
you’ve made the initial entry
.. see page 8) .. simply allow
data entry from the USER
side. They’ll now have that
option on their View Screen.
Apple Tree Software © gives THREE (maybe FOUR) E-mail options.
Option 1:
Direct E-mail to the parent/guardian as shown by the E-mail
buttons on the ‘Edit Screen’. If those buttons are clicked …
Continued …
11
SUPERVISOR OPTIONS (Continued)
TAB: Edit Records / E-mail (Continued)
On the pop-up E-mail window, the administrator can
•
•
•
•
Enter a subject for the e-mail
Load a text file created elsewhere … perhaps a ‘standard’ E-mail
Clear the message to start again
Send the message
Now, we’ll point out here that Apple Tree Software © is NOT, repeat NOT an
E-mail program (client). Whatever the administrator creates, in this pop-up window,
is sent to your computer system as a viable E-mail message. The E-mail program
that YOU have on YOUR computer … will then deal with it. If you have OUTLOOK
installed, for example … it may have warning messages, safeguards, a variety of
techniques for dealing with ‘third party’ E-mail messages. This window simply gives
the opportunity to create the message and send it to YOUR program for execution!
Now, back to the TAB screen. Two other E-mail options are available.
By selecting a class, for example: Kindergarten AM … a similar pop-up window will
allow the administrator to create and send the message to ALL parents/guardians for
those students/children … provided the parent/guardian has provided an E-mail
address.
And thirdly, by selecting ‘E-mail All’ … every parent/guardian in your database can
receive the message.
In summary … E-mail to:
•
•
•
A single student’s parents/guardians … buttons on ‘Edit Screen’
All parents of a single class … ‘E-mail Class’ on TAB screen
All parents … ‘E-mail All’ on TAB screen
That’s THREE options … although we did say there might be FOUR. OK, here’s
number four.
Rather than SENDING E-mails to the ‘Class’ parents or to ‘All’ parents, you may
wish to just send all your E-mail addresses to a full, E-mail client/program (such as
Outlook, Hotmail, Gmail etc).
Well ….
12
SUPERVISOR OPTIONS (Continued)
TAB: Edit Records / E-mail (Continued)
… an option on the TAB screen provides for that.
If you wish to allow Apple Tree Software © to handle the E-mail, selecting the
‘radio’ button on the left (as shown above) is your choice.
If you wish to create a file of E-mail addresses and send that file to another program
… click the ‘radio’ button on the right.
That will allow you to name, and create a CSV file of those addresses. A CSV file is
a ‘Comma Separated Values’ file … readable, and understandable, by most E-mail
clients.
So, bottom line, LOTS OF CHOICES. Experiment! Find the best strategy for your
daycare facility.
13
SUPERVISOR OPTIONS (Continued)
TAB: Delete Records
Simply put: things change. Students/children grow older, leave, move away, have a
change in status! There are many reasons that the supervisor would need to fully
remove a student/child.
Now, that having been said, a lot of daycare operations will simply create a class
called WITHDRAWN and move a student/child into that category while their status is
pending. However, if total removal is required, this is where it’s done.
See Appendix E
Simply select the student/child from the pull-down menu and click ‘Delete This
Record’. Word of warning: TAKE CARE! If you delete/remove the WRONG student,
you’ll have to make a full re-entry. Could be time consuming! The student’s/child’s
picture should help to confirm the deletion.
14
SUPERVISOR OPTIONS (Continued)
TAB: Create A File
It’s often convenient to have a ‘hard copy’, a COMPLETE list of all pertinent
information relating to one class or the entire daycare. Here’s the chance to obtain
that.
See Appendix E
Here, by clicking on
‘Load CREATE A FILE’ you obtain …
An opportunity to create your own
information file, customized to your
specifications and needs .. as
much, or as little, information as you
require! (See APPENDIX C)
Here, by clicking on
‘Load HAND-INS File Maker’ you obtain .
An opportunity to create a file that keeps track
of HAND-INS (immunizations, field trips etc)!
Up to 10 HAND-INS may be tracked and
those ‘outstanding/missing’ may be viewed,
printed by full Alpha or Class/Alpha (with or
without parent/guardian phone numbers).
15
SUPERVISOR OPTIONS (Continued)
TAB: WEBCAM Pics
This is where/how you can add pictures to your database. The editing and viewing
screens allow for up to FIVE pictures for each student/child:
The student
Guardian 1
Guardian 2
Alternate Pick-Up 1
Alternate Pick-Up 2
Of course it’s the philosophy and prerogative of each daycare to set their own
standards. You may not want, or need, all FIVE pictures .. nonetheless, the option is
there. Here’s the entry screen:
See Appendix E
Work with students/kids or staff.
The opportunity to display and
print the FULL CLASS (or a
selected group) gallery is a
nice little feature that kids love.
Up to FIVE pictures per
child/student, one per staff! And help to
copy your pics
Click here to View/Print
to the ‘saving’
pictures yet to be taken.
folder.
Now, dealing with
pictures can be a tad
tricky so we’ll spend a
few pages explaining how
Apple Tree Software ©
has cleaned up the
process.
Some pictures, shown here, may
not represent actual children !!
On page 10, we noted that parental permission to display
their child’s picture PUBLICLY is ‘selectable’. That being the
case, be prepared here for a prompt (if a ‘publicly denied’
picture is involved). You will have to indicate whether the
gallery you’re requesting is for OFFICE USE ONLY
(therefore, include the picture) or will be a publicly displayed
collage (therefore, exclude the image). Just a single click!
16
SUPERVISOR OPTIONS (Continued)
TAB: WEBCAM Pics (Continued)
There are three sections here.
Left Section
Here, the user/supervisor can see all the current pictures assigned to a
student’s/child’s record (or the staff member’s record). Again, they are:
The student
Guardian 1
Guardian 2
Alternate Pick-Up 1
Alternate Pick-Up 2
Or
The staff member
Of course, it’s the prerogative of your supervisor, your daycare, as to just how many
pics you want on file and on display.
Right Section
A number of pictures may be taken. How can you remember the names of all the
photos … as many as FIVE per student/child (one per staff member)? Well, here’s
how we help. When the ‘Print Sheet’ option is clicked, a form allowing for entry and
recording of student names, and picture names, is printed. See the REPORTS
section for a sample.
Also, buttons to View/Print pictures yet to be taken.
Middle Section
Take pictures and save them to your hard drive, flash drive .. anywhere.
The pictures must be JPG or BMP. Have the individual's face LARGE and
in the middle. Use your digital camera or your own WEBCAM. You may ...
HOLD
and
PRESS
M
to minimize Apple Tree Software © and run your own WEBCAM software.
Don’t worry about where to save your pictures (but DO remember where). Just save
them! Apple Tree Software © will get them in the right spot for you.
17
SUPERVISOR OPTIONS (Continued)
TAB: WEBCAM Pics (Continued)
When taking the picture with your digital camera or WEBCAM software, there are
just two things to do, or be aware of:
FIRST
If you wish, printout and use the form outlined above .. to record
the names of all pictures associated with a given student/staff
record. Saves having to go through hundreds of pictures, later, to
find which ones were taken for the ‘Mary Smith’ record.
SECOND
Make sure the pictures are saved as either BMP or JPG pics.
These are two of the most common picture formats and
Apple Tree Software © allows you to work with either one.
18
IMPORTING PICTURES (Continued)
IMPORTING PICTURES
Remember that button, lower right corner on the WEBCAM page ?? It gives:
Find your picture(s) on your hard
drive, flash drive, digital cam …
wherever you saved it .. and tell
Apple Tree Software ©
the person to whom the pic belongs.
That’s it. Simple and easy.
But what
if your
picture is:
and what
you really
want is:
or
See APPENDIX J for the
suggestion to include a
‘graphics editor’ on your
Software Connections list.
You’ll have access to that
software during this ‘picture
selection’ process.
Click COPY FILE and your job is done.
The administrator also has the option of changing …
… to an image or personalized logo of their choice.
On any TAB’d ADMIN screen …
Press/Hold CTRL and SHIFT and Click on the current image (above).
You’ll be able to select your own image. (See page 3)
19
IMPORTING PICTURES (Continued)
And, for an even simpler technique to attach your (WEBCAM or digital camera)
pictures to an individual’s file. Here it is!
You’ve taken your
photos and saved
them on your hard
drive, flash drive …
somewhere.
Next step: click on the
WEBCAM pics
(actually, all pics) tab
and call up any child
or staff member.
Some pictures already
there; some yet to be
attached to the file.
Left click a picture to see enlargement (with ‘Print’ option).
Right click on any picture to delete (careful, deletions cannot be un-done).
With a ‘key combination’, click on any picture or blank. You get to pick the ‘key
combination’ (SHFT, CTRL, ALT) beside PIC UPDATER. Once the key combo is
pressed, and the picture Click-ed, you’ll be given a search window to find any of the
pictures you’ve taken and saved. That picture will AUTOMATICALLY be added to
the individual’s file. No name to figure out. No need to figure where to store it. Just
point and click and the picture will be there. How easy is that ???
(You even get to pre-view the pic .. to make sure it’s the correct one.)
Take your pictures and then let Apple Tree Software © attach them for you !!
The same attachment technique is available on the
EDIT SCREEN.
See page 10
20
SUPERVISOR OPTIONS (Continued)
TAB: Income/Expenses
Apple Tree Software © is NOT, repeat NOT a book-keeping or audit program.
What it does allow, however, is for the administrator (if they so choose) to keep
some ‘records’ of INCOME items and EXPENSE items. A rudimentary ledger, if you
will. The two TAB screens are: (selectable by clicking the ‘radio buttons’)
See Appendix E
Income Records
Expense Records
Options are given to record items by category, date, amount with associated
mileage. Items may be entered, deleted and modified … all at the supervisor’s
discretion. A running total of Income/Expense/Mileage is shown on-screen at all
times … sort of a PROFIT/LOSS overview. Again, NOT a book keeping program but
very helpful when needed.
•
•
Categories (food, insurance, rent, sundry, miscellaneous, fees, sublet etc)
are definable (by the administrator) on the TAB: Change Settings.
On the TAB: Change Settings, the ‘CLAIMED AUTO EXPENSE / TRAVEL
UNIT’ may be entered (if, for example, your site does not own/rent/lease
an automobile as an expense but rather reports an expense of $0.50 /
mile or $0.35 / km) .. if that entry is made, it will be used in the INCOME
and EXPENSE reporting. Options to View (on-screen) or Print reports
(lower right) are also provided.
21
See Appendix E
SUPERVISOR OPTIONS (Continued)
TAB: Bank
This TAB
presents:
Connect to INTERNET
See APPENDIX H
Click here to
Additional assistance on
recording/viewing fees.
See APPENDIX N
.. refresh your memory: remove last
month’s fee modifications; add new ones.
Click here to
Click here to change
child to a different class.
.. review all the clients/parents who have
paid a last month ‘deposit’.
Actually, three different ‘banking’ options presented here.
Set ‘REMinders’, Leave ‘Notes’
On the left, an individual student/child’s record (or at least the banking information
associated with the record) may be retrieved. If required, modifications or
ADJUSTMENTS may be made. For example: you may wish to ADD $45 to the
monthly fee for this account record: perhaps a cousin of the child attended for a day
and you were able to accommodate him/her; maybe an agreement was reached and
you will be giving a $60 discount for the month for a previous overcharge. Whatever
your reason for the ADJUSTMENT, the amount is entered here. Full banking details
entered in the fields, right.
On the right,
takes you to a menu:
Here, you can set TAX
options for family accounts;
view/print full or individual
account details; even print
client invoices.
See APPENDIX N
Create BANK-UPLOAD file(s)
to send to your banking
institution to process customer
accounts, credit cards, directdeposit etc.
This option is also accessible from TAB: Change Settings.
Important: See APPENDIX I for info on banking upload files.
22
SUPERVISOR OPTIONS (Continued)
TAB: Staff
Apple Tree Software © simplifies the task of keeping track of the children/students
and the same ability should apply to staff. Well, here it is!
See Appendix E
Option to Enter/View/Print all
Qualifications and Certifications
Be sure to assign each
employee a unique ID for
logging HOURS worked
(see APPENDIX L)
Note the E-mail
option/button, similar to the
‘Student/Guardian’ E-mail
(see pages 10-13)
An employee time log
(see APPENDIX L)
And ‘View’ or ‘Print’ the log file
showing program use. See
REPORTS.
‘View’ or ‘Print’
the log file
showing
employees’ yearly
earnings.
Prepare/print staff ‘Payroll Slips’
An Operations Log (actually 5 logs available) allows
tracking of employee assignments, duties, completed
tasks, time-in, time-out etc.
Define info to send to bank
(See Appendix I)
(2012/12/07)
2012/12/07
Define employee ‘hours’
View/Print
ANY log
ANY time.
Create/print actual pay slips
Complete record keeping, of/for
each staff member, and operation,
at your finger tips!
23
SUPERVISOR OPTIONS (Continued)
TAB: Backup/Restore
At times, disasters happen. Computers foul up. People do too! When this option TAB
is selected:
See Appendix E
UPDATES are FREE
and as easy as clicking
‘Check For Update’
See page 44.
Occasionally, our WebSite might change. If that
happens, click ‘Check For Update’ while holding
the PIC UPDATER keys (see WEBCAM TAB).
You’ll be given a chance to enter a NEW WebSite
address.
Check For Updates
Read the info pop-up
before you
UPDATE ENGINE
A database, and related files, CANNOT BE BACKED UP or RESTORED while in
operation. So, Apple Tree Software © does the following:
Apple Tree Software © files are stored in:
your
drive
letter
:\[Your Install Directory]
When the ‘Set Request For Backup’ is clicked, that is exactly what happens. A
‘request’ only is saved. As the screen explains, the ‘actual’ backup will occur at the
next startup .. before the database itself is activated.
Copies of all files (the database file and the picture files [extensions bmp and jpg])
are made and stored in:
your
drive
letter
:\[Your Install Directory]\SavedFiles
And here’s a bonus. Click the radio button by ‘Full Automatic’
(shown above) and all backups are made automatically at every
startup. FIVE days of backups are always available!
24
SUPERVISOR OPTIONS (Continued)
TAB: Backup/Restore (Continued)
When the backup is made, there will be a date … the backup date .. attached to the
name of the database file. The format may be something similar to:
Database File
(in
your
drive
letter
Copy of Database File
:\[Your Install Directory])
(in
ataback.mdb
your
drive
letter
:\[Your Install Directory]\SavedFiles)
ataback110716.mdb
The modification to the file name … 110716 indicates the date on which the backup
was made, in this case:
2011, July (the 07 th month) on the 16 th day
11
07
16
110716
The RESTORE option on the right side of the screen asks the user/supervisor to
select which backed-up database to restore. A list of the five most recent databases
(with backup dates, as above) will be shown. Usually the most recent one is
selected.
NOTE:
Backing up information, in this case a database, is ALWAYS useful.
However, restoring one .. over top of your current database .. can be
a disaster. The last few days work may be lost. So use this option with
care. In case the RESTORE option was selected by mistake, a
CANCEL option appears in the lower right corner.
NOTE:
If you wish to ‘backup’ the database yourself, by performing a manual
copy of files to another directory or folder, to a flash drive .. however
you plan to do it … the responsibility is YOURS.
NOTE:
When new, updated Apple Tree Software © is ready/available for
installation, the installation/update process is a breeze.
We do suggest, however, that you read the pop-up
corner of screen) first.
(bottom right
Now, see Appendix F for details.
25
SUPERVISOR OPTIONS (Continued)
TAB: Wait List
So … soooooo … important when running a daycare facility: people you can’t
accommodate right now but you just can’t lose contact with them! So, you enter
them into your system and keep track … so that when an opening occurs, it can be
filled immediately.
Apple Tree Software © has one restricted, un-delete-able class name. It’s called
Wait List! When the administrator/supervisor enters a ‘new’ (or Wait List)
student/child into that class name, the computer system date is automatically
appended. Then, on this screen …
See Appendix E
… an on-screen view of Wait List-ed clients, or a printout of same … can be made.
Because the system ‘entry’ date of each request has been made, reports are sorted
by the date. Thus, no one can say “I made my request before you!” The ‘entry’ date
never lies! Sorts can also be made by Class (requested).
A useful tool for keeping track of who is next in line for entry into your daycare!
See a sample in the REPORTS section.
26
SUPERVISOR OPTIONS (Continued)
TAB: Change Settings
An important part of the administrator’s/supervisor’s task is to make sure that the
rest of the Apple Tree Software © functions smoothly and efficiently. This is where
‘Settings’ for a lot of features … are defined:
Room Planner
Program and Menu Planners
Monthly Planners
Memo
Pad
See page 22
See Appendix J
Passwords
Double-entry boxes to set/change the password for both the
general user (USER) and the supervisor (ADMIN).
Palette
Set background palette for USER (‘View’ Screens) and ADMIN
(TAB backgrounds). Go wild !!
Monthly Planner
Keep track of upcoming events, meetings, consultations! Lots of
reasons to need an event ‘planner’! Click on ‘Open’ (Monthly
Planner) and Apple Tree Software © provides a monthlyselectable, and printable, notepad … to keep track of anything
and everything. A whole year’s worth! And, conveniently: one for
PUBLIC viewing, one for PRIVATE notations.
Program/Menu Planners
Keep track and plan for up to 5 weeks of programming (for
EACH CLASS) and 5 weeks of menu selections. (5 or 7 day)
Room Planner
Keep track of room usage. Set schedules for every day of week
as well as before and after class. (5 or 7 day)
Claimed Auto …
The itemized expense feature, for auto travel, described on
TAB: Income/Expenses. Maybe not used, then again, your
daycare may wish to use itemized auto expenses.
Grace Minutes …
Using our Login/Logout option (see p 23 and APPENDIX L) ..
you may enter a ‘Grace Period’ here. So if someone logs out
after 7 hr and 58 min, they get 8 hr (if you set it to 2).
27
SUPERVISOR OPTIONS (Continued)
TAB: Change Settings (Continued)
Auto Close
Safety feature for unattended computer screens! The supervisor
may set the SELECT DELAY until an AUTO CLOSE prompt
appears .. and then the PROMPT DURATION before the actual
shutdown/closure occurs. Just a way to keep prying eyes away
from sensitive information! Entered information is SAVED!
TTD Memo Pad
TTD (Things To Do) Memo Pad lets the USER or ADMIN leave
quick reminder memos about things to do (enter yesterday’s
attendance; play the game Justin wanted; print the ‘Wait List’
etc). It may be set for Auto Open or On-Demand Open Only.
Sample: Auto Close
Click here for ‘YES’ or ‘NO’
Select: 1 to 40
Enter ‘minutes of inactivity’
before prompt occurs, here
Enter ‘minutes of prompt’ time before
AUTO CLOSE, here.
Select: 1 to 40
Click here to save the settings
This is the INACTIVITY
‘prompt’ that appears.
Sample: Palette
Here, by clicking on the UP/DOWN arrows, a
red, green and blue component to the palette
may be added. Millions of possibilities! First,
SELECT CLASS to view the current palette
… then make adjustments as you wish.
A palette is available for both USER
and ADMIN screens.
28
REPORTS
Apple Tree Software © provides a variety of both printable and viewable
(on-screen) reports to keep track of just about everything.
Reports included in the software are shown, below:
U
A
Admin
Printable
U
User
Printable
Allergy Lists for safety and
licensing requirements and
allowing parents to initial
Attendance Sheets
A 5 or 7 day selection is available.
U
29
REPORTS (Continued)
U
Birthday Lists. What
child/student doesn’t want you
to remember their birthday?
Class Lists with teacher definable
columns and headings to
remember anything (money
collected for excursions,
checklists for earned points, times
for Pick-Up .. anything at all)
U
30
REPORTS (Continued)
U
Parental/Guardian contact
information .. by class.
Photo Name Recording List to
keep track of the (up to) FIVE
pictures that may be assigned to
each student’s record.
A
31
REPORTS (Continued)
A
Wait List, sorted by date to
avoid the ‘Who was first?’
dilemma.
Income and Expenses
(Profit/Loss) Reports
A
32
REPORTS (Continued)
A
A USAGE LOG showing
all users of the software
(date and time)
Staff list includes all
on-screen information
A
All-in-all, a variety of forms and reports to make running your daycare as simple and
convenient as possible!
33
INSTALLATION
When Apple Tree Software © is downloaded, you have the file: ATsetup.exe
IMPORTANT: MAKE SURE YOU INSTALL THE SOFTWARE ON THE
COMPUTER WHERE IT WILL BE USED. IT CANNOT BE COPIED OR
TRANSPORTED TO ANOTHER COMPUTER.
When you run the program, you’ll see …
.. and after CAREFULLY reading, and responding to, a few information screens ..
.. you’ll need to browse for, or simply enter, the name of a directory where the
program will be stored [again, this must be the FINAL LOCATION for the
software .. if later you decide to copy the program to another computer it will
CEASE TO FUNCTION … believing you’ve tried to make an illegal copy].
May we suggest you enter a reasonably simple directory name … such as:
C:\atsoft
The choice is, of course, up to you!
When installation is complete, the following icon will appear on your desktop:
Yup, it’s an Apple Tree !!
34
INSTALLATION (Continued)
When you click on the desktop icon, the screen shown on page 2 .. and, when ‘Go’
(Go To Database) is selected .. a slightly modified version of the screen shown on
page 4 will appear. Here it is:
39
NO PASSWORDS
required during FREE
evaluation period
To obtain your
License Un-Lock
Code, we’ll take
you to our
website.
When you’ve
obtained a
License Un-Lock
Code …
Your LC (License Code) will be unique .. but, to begin, both the general USER and
the supervisor (ADMIN) have 50 FULL and FREE uses of the software to determine
the power and suitability for your operation. Enter REAL data from day one!
When you’ve determined that yes, indeed, you do wish to purchase the software and
have done so (see the web site [Purchase Un-Lock, above]) .. you may click on
‘Un-Lock’ to get the ‘Un-Lock’ entry window (shown on the left, above). Entering the
correct code .. which you receive after purchase, will release the software and give
you full access with a starting password of:
hello
This password, or anything else you select (see page 27 .. TAB: Change Settings),
will be required each and every time you, as ADMIN, login.
Once you set a new, administrator password .. REMEMBER IT !!
Apple Tree Software © provides a FREE, ONE TIME ONLY .. unlocking service.
Thereafter, if you’ve forgotten your password .. a service charge WILL apply.
35
APPENDIX A
File Upload
OK, your daycare computer is .. well, AT THE DAYCARE … and you’re at home.
Wish you could just do some data entry from home to save time at the office, when
you’re meeting with parents, meeting with ‘Ministry’ officials etc?
Here’s how Apple Tree Software © solves that problem.
You may create, at home, on your lap-top, watching TV, anywhere, anytime .. a text
file of your registration information:
•
•
•
•
•
•
•
•
•
Class
Last Name
First Name
Gender
…
Guardian 1’s Address
Guardian 2’s Cell Number
Etc
Any or All .. information displayed
All the information that’s visible, and editable, on the supervisor’s ‘Student Edit
Screen’ (see page 10) … may be entered as a text file … saved, and the NEXT time
you’re at your daycare computer, simply uploaded to your database.
Here’s how!
We’ve provided an instruction page (next page) that outlines the pieces of
information that MUST be in your text file, and the information that MAY be in your
text file, if you wish.
Along with the ‘information’, the list, on the right (previous page), allows you to
identify and name each text file, for example:
Name 1
File Name 1
might be:
might be:
Ricky Drummond
c:\rickyd.txt (file name/location is YOUR choice)
It can even be put on a memory stick (flash drive): g:\rickyd.txt
etc.
36
Record child names
and file names below.
Name 1
File Name 1
Name 2
File Name 2
Name 3
File Name 3
Name 4
File Name 4
Name 5
File Name 5
Criteria:
Each line/item MUST be
● Number
● One space
● Information
First three items MUST
begin the text file .. and
match displayed record.
Any, or all, remaining
items may be entered.
37
APPENDIX A (Continued)
If you wish, photocopy the previous page .. simply as a reference and as an aid in
recording the student/child record (Name) and file name used for his/her ‘uploading’
information file (File Name).
Now, here would be a sample text file for Andrew Jones, in Toddler:
< First three lines MUST
It must EXACTLY match
1 Toddler
< be the Class, Last Name
the three pieces of
2 Jones
<
and
First
Name
information
already entered
3 Andrew
35 Bill Turner
36 Uncle
Thereafter, ANY information you have in ANY order …
37 513 884-2436
just matching the numbering system on the left (previous
38 580 213-4412
page) and the criteria, bottom right (previous page)
25 Bell Telephone Systems
And, use the previous page to record the student/record’s name and the file name.
Another example: for Maria Sandoval enrolled in class name Preschool:
1 Preschool
And again .. < First three lines MUST
2 Sandoval
< be the Class, Last Name
3 Maria
< and First Name
14 Henderson Elementary
33 914 226-1991
And again .. Thereafter, ANY information you have in
44 Salt Lake City
ANY order … just matching the numbering
15 K
system on the left (previous page) and the
11 2011/07/14
criteria, bottom right (previous page)
31 Mother
47 Well Fargo 438144231
etc.
MPORTANT
Make sure that, whatever program you decide to use for data entry,
the information gets saved as a TXT file.
ALSO IMPORTANT
Note and adhere to the ‘Criteria’, bottom right, ‘External File Format’,
previous page.
38
APPENDIX A (Continued)
Now, the supervisor MUST have (previously) entered a (preliminary) record for each
student/child (whose ‘more complete’ file is about to be uploaded). See page 8. But,
all that has been entered, thus far, is preliminary information:
•
•
•
the Class to which the student/child is assigned
the Last Name
the First Name
Now, the supervisor moves to that very (minimal information) record, on the ‘Student
Edit Screen’, and clicks ‘LOAD’. ‘Browse’ appears:
CLICK
Just ‘Browse’ to find your file. Click and Click!
After an on-screen confirmation of the file name, and, provided the FIRST THREE
LINES of your file match the record being displayed, the information will be uploaded
and appear immediately, on the edit screen. Worked from home, but made your
‘office/daycare’ work easier!
WHAT WILL THEY THINK OF NEXT ???
39
APPENDIX B
Picture Pop-Ups
For improved visibility, perhaps security (see the freckles on their face) .. clicking on
each picture …
Child/Student
Guardian 1
Guardian 2
Alternate Pick-Up 1
Alternate Pick-Up 2
… will enlarge the picture .. along with a sizing and ‘Print’ option.
40
APPENDIX C
Customized Info File
The ‘txt’ file that is created (see page 15) has the following (sample) information
(only minimal info was requested for this ‘sample’ file):
Top part of file created .. continuous
sequence of all information requested.
Bottom part of file .. explanation of the
labeling used.
The file is a continuous sequence of all students/children requested (CLASS or
ALL). Complete information, in one file or printout!
And for those who are Microsoft Word © literate, here’s a technique:
•
•
•
•
Load the ‘txt’ file
Convert the text to a two-column, tab-delimited table
Delete the first column of the table (that would be the labels)
Convert the table back to text
That will remove headings and give you just the ‘raw data’.
Lots of possibilities!
41
APPENDIX D
Possible Strategies
Create a class called ‘Withdrawn’ or perhaps ‘Pending’. For a prolonged absence,
payment difficulties, illness, custody .. a variety of reasons .. but when problems
arise, move a child/student from, say, Toddler2 into Withdrawn. Later, they may be
moved back (by the supervisor, again using the ‘Edit Screen’, page 10) but, you’ve
saved yourself the time/task of re-entering data.
Starting students/children in ‘Pending’, or even ‘Wait List’ is also a terrific technique.
When space becomes, or is again, available … it’s simply a transfer task as all
information is currently/still ‘inside’ the database.
And use the ‘Create A File’ option (page 15 and APPENDIX C) to keep track of your
‘Wait List’ clients.
Assistance
Do supervisors ever forget their password? No, of course not! UNTHINKABLE!
Well, perhaps occasionally! So what do they/you do?
Apple Tree Software © will provide assistance in retrieving YOUR password. This
service is FREE OF CHARGE … wait, here it comes: ONE TIME ONLY!
Thereafter, a fee will apply for this service. Simply contact us for assistance.
42
APPENDIX E
Safe Word
A child’s safety is, of course, of PARAMOUNT importance! We’ve included the
Parent/Guardian pictures as well as two ‘Alternative Pick-up’ pictures. Still, as fate
would have it … an ‘uncle’ shows up, claiming to have permission to take the child.
True, not true? The ‘Safe Word’ feature may help.
On the administrator’s ‘Edit Screen’ (see page 10) ..
The opportunity to enter a
is given.
The word, chosen by the parent/guardian,
may now be entered into the child’s file
(and, of course, re-entered/changed at any
time in the future).
When a person claiming ‘Pick-up’ privilege arrives, either the User or Admin may
LEFT click on
top left, on almost every screen. The following form will load.
The student is chosen. The Safe Word (remaining
invisible) is loaded and it’s length shown. Now, ask the
‘uncle’ for the Safe Word .. key it in and click VERIFY.
Apple Tree Software will indicate the result of the
verification process.
Safeword is NOT case sensitive: Apple939 = aPPle939
Of course, this also could be used to VERIFY that the
person to whom you’re speaking, perhaps on the phone,
is INDEED the Parent/Guardian.
Your jurisdiction/licensing dictates the ‘rules’ for how a
feature like this may be used. THEY ARE THE LAW.
Apple Tree Software simply provides the feature.
KEEP YOUR CHILDREN SAFE!
43
APPENDIX E (Continued)
There are many forms and reports that are available after multiple ‘clicks’. To save
some time and effort, a ‘QUICK RETRIEVE’ option is available.
As stated on the previous page, a LEFT click on
Safe Word checking feature.
A RIGHT click on
(top left) brings up the
(top left) brings up the following:
Here, the ADMIN may quickly get to a variety of FORMS and REPORTS without
going through multiple clicking.
44
APPENDIX F
Free Updates
When new(er) versions of Apple Tree Software © become available, they are free
to download from our web site. The install is simple and transparent!
Just click on ‘Check For Update’ on the Backup/Restore TAB (see p 24). You’ll see:
NOTE: You may select to have this
CHECK done automatically
(at every start-up) or as you’ve just
done (by clicking ‘Check For Update’
on the Backup/Restore TAB).
After clicking ‘CHECK NOW’, if a newer version of the database ENGINE is
available, you simply have to click ‘Yes’ (see below) to authorize the download.
And yup, it’s FREE!
The download takes only moments.
Just remember, of course, you’re still running your current version. The new(er)
version will be loaded/installed at your next login/start-up. No fuss! No mess!
A sample of what you’ll see if an update is available …
Simply click on ‘Yes’ and the download will occur.
45
APPENDIX G
Installs and Updates
During the initial FULL INSTALLATION, the following NOTE appeared first!
PLEASE READ CAREFULLY !!!!!
NOTE: This is the FULL INSTALLATION package for Apple Tree Software.
If you have already downloaded and installed the FULL INSTALLATION package
and you simply wish to UPDATE the DB ENGINE, this is NOT the package you
want! IF YOU OVERWRITE YOUR DB (database) WITH THIS ONE, ALL YOUR
INFORMATION FILES WILL BE LOST AND NO LONGER AVAILABLE. It is
suggested that only the Supervisor/Administrator perform installations or updates.
This is the FULL INSTALLATION package.
Etc Etc
Well, as it turns out … during a misguided attempt to UPDATE your software, you
actually have downloaded and RE-run … the FULL INSTALLATION. Now you have
YOUR database (information files) along with the start-up (blank) database … both
residing in your ‘Install Directory’. Fortunately, Apple Tree Software has detected
the problem/duplication and has issued this warning …
Both EXISTING (yours) and START-UP databases present
in your ‘Install Directory’: [Your Install Directory listed here]
See Admin Manual, Appendix G
Delete the new 'blank' database to protect your (existing) data?
(OTHERWISE PROGRAM WILL CLOSE)
… and refused to run. WHEW! It’s SAVED your data and information files!
But, what do you do now? Simply click
Yes
to the prompt, above.
Problem solved !!!
TO UPDATE YOUR DB ENGINE (PROGRAM), SEE P 44.
46
APPENDIX H
Banking Information
On page 10, then again on page 22, we alluded to BANKING INFORMATION. The
ADMIN may, from their full Edit Screen, enter up to 5 lines of banking information
related to a child/parent/guardian. A sample is shown below.
See APPENDIX J
for suggestions on
the optimum way to
record your data.
Category
Titles
Fictional/sample data
shown here!
Cruise, Tom
SELECT YOUR OWN CATEGORY TITLES
See Appendix J
(Bank) Name
Acct No.
Transit
Acct Type
Trans. Date
Credit Card
Number
Expiry
Bank
Phone
Card Holder
Number
Expiry
Card Type
Security
Acct ID1
Acct ID2
Acct ID3
Acct ID4
Acct ID5
For Format
Suggestion(s)
(etc.)
And, on page 22, we alluded to a ‘Connect to INTERNET’ option.
Enter YOUR banking web site URL in any
of the five site links.
This way, you may connect directly to
YOUR BANK to make adjustments to
parent/client fees, upload files, whatever
options are available.
Additionally, add shopping sites, children
networks .. anything at all .. or connect
directly to Apple Tree Software (top).
47
APPENDIX I
Create BANK-UPLOAD File
NOTE: BEFORE YOU CREATE THIS FILE, RUN
FROM
THE ‘ACCOUNTING DETAILS’ FORM (See page 22)
Generally, it will be required to send information to your banking institution re
parental fees, amounts, collection techniques (Visa, MasterCard, Amex, Direct Debit
etc). This is where/how to create that file. Here’s the form:
NOTE:
A similar form is available for
employee BANK-UPLOAD
files (useful for payrolls that
are direct-deposit).
See p. 22-23
C:\AppTree\upload7.txt
Your banking institution will tell you what is to be included and the order of those
items. To indicate the order, simply place simple integers (1, 2, 3 .. etc) in the boxes,
labeled ‘ORDER’, to the left of each item required. You may even supply textual
fields (your facility name, your e-mail for return receipts, the date .. anything your
bank requires or allows).
On the right, you may indicate which records to include (maybe all Toddler or maybe
everything BUT Toddler .. maybe just Amex .. the collection type perhaps always
stored in Bank ID 4 etc.). Or, you may select clients from a list. Lots of possibilities!
The bank/file will require a delimiter (to separate the various items) .. that can be a
TAB, COMMA, NEW LINE or just 'spaced fields'. Some banks want values/fees
listed as 914.25 (decimal); others prefer 91425 .. select all your file features.
Include information for $0 class files (eg. Wait List)? Indicate YES or NO !
Your sequence/order numbers, textual information and matching criteria (once
determined to be accurate and complete) maybe all be SAVED and LOADed again.
And, after the ‘CREATE FILE’ button is used .. you may also ‘VIEW’ the file to give a
quick look at the file created … just to reassure yourself that everything is correct.
48
APPENDIX I (Continued)
Suggested Entries
Now, have a quick look at APPENDIX H. The third suggested (category list) was to
include in the 5 Bank ID fields:
Bank ID 1:
Bank ID 2:
Bank ID 3:
Bank ID 4:
Bank ID 5:
Exact name as it appears on the credit card
Credit card number
Expiry date of credit card
Type of card
Security Code
… alternatively, it could have been ..
Bank ID 1:
Bank ID 2:
Bank ID 3:
Bank ID 4:
Bank ID 5:
Name on bank account
Bank account number
Transit number
Direct Debit ID
Date of Withdrawal
Why? This just makes it easier for Apple Tree Software © to include the
necessary information in the BANK-UPLOAD file … data and information your
financial institution will almost certainly require.
Now, on the ‘CREATE BANK-UPLOAD FILE’ form (page 47) .. you can search
Bank ID 4 for Visa and just process all the Visa cards for parent payments. Or just
create a file for ‘Direct Debit’ accounts (searching the same, Bank ID 4 field).
A little bit of pre-thinking makes your BANK-UPLOAD file creation, a breeze.
Now, let’s look at a few examples …
49
APPENDIX I (Continued)
Examples
Just a note of caution ..
Would give a file with (only Toddler) lines such as …
Visa,Tom Cruise,Apple Valley School,495.25
When entering the
Parent/Guardian’s name into
your data base,
Parent/Guardian 1 should be
the person responsible for
payments .. their bank
account for direct debit or
their credit card. Additionally,
the name should be entered
EXACTLY as it appears on
the credit card .. to adhere to
banking/card policies.
Would give a file with (only Visa) lines such as …
Tom Cruise
49525
4444555566667777
August 16 2012
Would give a file with (every class BUT Wait List) lines such as …
4444555566667777,Cruise Suri,495.25,[email protected]
So, we can include info, exclude info, select info, decide on info order, decide on info
format and decide on info delimiters. Everything necessary to create your bankupload file! Once created, as well, you may load the file into a text editor (Notepad)
or a spreadsheet (Excel) and make any final adjustments necessary before upload.
50
APPENDIX J
It has come to our attention that OTHER PEOPLE are actually writing software.
Go figure! Anyway, if you have purchased some of that ‘stuff’ … you may wish to
call it up when you find a need.
Well, there are lots of ways you can do that but let’s do it WITHOUT LEAVING
Apple Tree Software ©. On the ADMIN TAB: Change Settings, we have …
And we’ll draw
your attention to
When this
item is
clicked …
Find your own software.
maybe a word processor or spread
sheet you wish to use frequently
maybe you’ve added some
hardware to your computer system
.. to track the door access codes
maybe you have some instructional
games that the children use
Suggestion: make at least ONE item
a graphics program .. to allow you to
manipulate images you’ll be adding
for children and staff. (See p 19)
Find them, name them and have
immediate access to them .. all without
leaving Apple Tree Software ©.
51
APPENDIX K
Does your site have a Door-Security-System .. perhaps to respond to user-keyed
number entries or swipe cards encoded with a unique ID?
If …
If …
You have a Door-Security-System and
It creates a continually updated text file for those children on-site
… Apple Tree Software © can help you ‘talk’ to that file, synchronize ATS ID’s
with your DOOR ID’s and even use that file to list your on-site/off-site children.
As shown on page 12 of the User Manual …
and remember,
as ADMIN ..
clicking on ‘your
logo’ gets you to
this USER side
You may perform you own on-site/off-site entries but if you wish to talk to your
Door-Security-System’s file … here is how to do so. Click on the ‘DOOR IDs’ that
appears when the TAB: On-Site Status screen is selected. You open this form.
C:\GenDynamics\entries130122.txt
52
APPENDIX K – Continued
The options to View/Print ‘Current’ ID’s let you keep up to date with current
associations and synchronizations.
You may need, daily, to ‘Select DSS File’ (your Door-Security-System’s file of on-site
individuals … particularly if the name of the file changes or is date-modified). Simple
enough to do, just click ‘Select DSS File’ and click on the file name.
Your Apple Tree Software © children must have their ID’s synchronized with
those used by your DSS. Click on ‘Synchronize ID’s’.
The drop-down menu allows you to select individual students/children and enter their
unique, DOOR ID’s.
Additionally, you may just copy all Apple Tree Software © ID’s to your DOOR ID’s
(if that’s how the DSS company has set you up). You may add a prefix or suffix to
your ID’s before the copy. All-in-all, a variety of ways to match your ID’s with those
of the DSS company.
When the set-up is complete, select:
(see page 51).
Apple Tree Software © is now fully synchronized with your Door-Security-System.
53
APPENDIX L
Apple Tree Software © includes a number of record-keeping features. One of
which is: Employee Login/Logout (and thus, keeping track of HOURS worked). On
either the USER or ADMIN screen (in other words, wherever you happen to be when
an employee appears) DOUBLE CLICK on the ‘grey’ area above the TAB options.
HERE
This will bring up a Login/Logout window …
In order for this feature to be used, each employee
MUST be assigned a unique Login/Logout ID and
be diligent about logging in and out, otherwise
HOURS recorded will be meaningless!
(see the Staff Screen, p 23)
Now, if you’ve assigned each employee a unique ID and wish to view HOURS
worked … and even have them automatically integrated into the Payroll Slips form
(p 23) … on the Staff TAB (p 23), simply click on Time Log: OPEN. This form
appears:
Here you may View the logs,
Print the logs .. all of them or
a specific date range.
Additionally you may delete
the logs getting ready for a
new payroll period. And by
the way … if you forget to
delete logs … the date range
you select to view or print
may be the one integrated to
the employee record for salary calculations. For example: you have logs going from
130114 to 130204 (yymmdd) but just wish to VIEW/PRINT/INTEGRATE logs from
130114 to 130125. Simply enter those dates in the date fields.
54
APPENDIX M
Apple Tree Software © is intended to be, primarily, an aid to record keeping and
retrieval for small-to-medium (and even large) daycare operations. But, you may
have noticed it also helps you perform a number of business related functions as
well. Let’s summarize those.
TAB: Income/Expenses
(see p 21)
EXPENSES
+
INCOME
PROFIT/
+
LOSS
PROFIT/
LOSS
(Report)
(Report)
TAB: Bank
(see p 22)
-----------CREATE
BANK-UPLOAD
FILE(S)
------------
CLIENT
FEES
(Report)
Info Included
in PROFIT/LOSS
TAB: Create A File
(see p 15)
TAB: Staff
(see p 23)
EMPLOYEE
YEARLY
PAYROLL
LOGS
(Report)
EMPLOYEE
PAYROLL
EMPLOYEE
SUMMARY
PAY
SLIPS
-----------CREATE
CUSTOMIZED
PARENT INFO
FILE(S)
INCLUDING BANK
INFORMATION
------------
ALL REPORTS ARE FULL
VIEW AND/OR PRINT
(Report)
(Report)
All-in-all, Apple Tree Software ©
can handle a very large part of
your business/book-keeping
operations.
55
APPENDIX N
On page 22, we showed:
Here, the user may enter
and view current fees,
taxes and charges related
to child care. Additionally,
there is an option to
create a parental tax form
as well as modify or
record any existing fees ..
presents the following options:
Create/view/print a
tax form for client
fees or simply view
current fee records.
(2)
(3)
(1)
Delete any existing
fee entries by date.
View, then if correct, add the current fees
to all customer accumulating totals.
Suggestion:
(1) View and Print current fees then
(2) Add fees to accumulating totals then
(3) If adjustments exist, Print all adjustments
Add a
forgotten
fee to
individual
client or
group.
Also available from Bank TAB ( p 22)
Remove a redundant
or incorrect fee from
individual client or
group.
[ (1) and (3) give a future record of all fees ]
56
APPENDIX O
How about some interesting and unique screen backgrounds? Here’s how to do
that. Download images from the internet (or use images already on your system).
We’ve added a ‘tiny’ dot/button, top right, on the Admin screen and the User Screen.
Here’s the ‘dot’
or ‘button’.
Left Click .. on the ‘dot’ or ‘button’
.. allows you to select any JPG or BMP image on your computer (including those
you’ve recently downloaded from the internet). The image you choose will be the
background image for the Admin screen.
Right Click .. on the ‘dot’ or ‘button’
.. allows you to set the image format. The image may be tiled, zoomed, patched …
try it out. Select the image format you like best.
Etc.
57