1
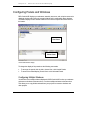
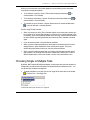
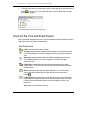
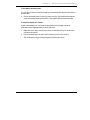
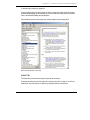
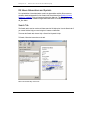
Chapter 3
About the CostLink/AE Display
BSD CostLink/AE provides some flexibility in how data is displayed. You can configure the
display of projects and resource views using multiple panels, windows, and tabs.
This chapter explains how to:
•
Configure panels and windows
•
Recognize icons on the tree and sheet panel
•
Control the information in the tree and sheet panel
•
Customize the toolbars
•
Use the online Help
BSD CostLink/AE User Manual
37
Chapter 3 : About the CostLink/AE Display
Configuring Panels and Windows
BSD CostLink/AE displays your estimates, assembly resources, and unit price resources in
database windows within the main program window, and in panels within these windows.
The default display for each window is with the Tree Panel on top and the Sheet Panel on
the bottom.
Tree Panel
Sheet Panel
CostLink/AE default display
To change the display of the panels use the following commands:
•
To arrange the panels side-by-side, choose View > with Vertical Panels.
•
To return to the default display, choose View > with Horizontal Panels.
Configuring Multiple Windows
You will often have multiple windows displayed in BSD CostLink/AE to show your estimate
and resource windows at the same time, or to show multiple estimates at the same time.
This allows you to copy folders and tasks into your project from resource windows and
other projects.
38
BSD CostLink/AE User Manual
Chapter 3 : About the CostLink/AE Display
When you have more than one window displayed, use the following menu and toolbar
commands to arrange the windows.
•
To tile windows vertically, click the Tile windows vertically toolbar button
choose Window > Tile Vertically.
•
To tile windows horizontally, click the Tile windows horizontally toolbar button
choose Window > Tile Horizontally.
•
To cascade the open windows, click the Stack windows in cascade toolbar button
, or
, or
, or choose Window > Cascade Windows.
Tips For Using Tile and Cascade:
•
When you choose one of the Tile or Cascade options, the currently active window will
be on the left (if you choose Tile Vertically) or on the top (if you choose Cascade or Tile
Horizontally). If you want a different window on the left or top, make the desired window
the active window (by clicking its title bar) and choose the Tile or Cascade command
again.
•
If you minimize a window, it will not be tiled or cascaded.
•
When you have multiple estimates open, the prompt on the bottom left of the screen
displays the drive, path, and filename of the currently active project. This is true
whether the project window is active or one of its resource windows.
•
When you have multiple windows open, the bottom of the Window menu lists all the
open windows. The currently active window is marked with a checkmark. To make a
different window active, click on the window or choose it from the Window menu.
Choosing Single or Multiple Tabs
By default, BSD CostLink/AE divides the display of each project and resource window into
multiple tabs, one tab for each main division as represented by the folders at Level 1. You
can show all of the folders on a single tab.
•
To display all folders on one tab, click the Use single tab for tree button on the toolbar
or choose Tree > Use Single Tab.
CostLink/AE display with all data on a single tab
BSD CostLink/AE User Manual
39
Chapter 3 : About the CostLink/AE Display
•
To display the folders on multiple tabs, click the Use single tab for tree button on the
or choose Tree > Use Single Tab again. (The Use Single Tab command
toolbar
and button are toggles.)
CostLink/AE display with data on multiple tabs
Icons On the Tree and Sheet Panels
BSD CostLink/AE displays many icons in the Tree and Sheet panels to identify the kinds of
data and its position and status in the database.
Tree Panel Icons
Folder: Indicates that the item is a folder.
Plus sign: Indicates that the folder has folders below it in the hierarchy that are
not currently displayed. The view is collapsed. Click the plus sign to expand the
view.
Minus sign: Indicates that the folder has folders immediately below it which
are already being shown. The view is expanded. Click the minus sign to
collapse the view.
Folder/Task: Indicates that the folder has tasks (assemblies or line items)
directly inside it. To view the tasks, click on the folder and the tasks will show in
the Sheet panel.
Notes: Indicates that the folder has Notes attached to it. To view the notes,
click on the folder, and then click the Open the Notes form button on the
toolbar
.
Folder with Link: The green Excel icon in the upper right corner indicates that
the quantity of the folder is linked to the quantity of the parent folder or to Excel.
Linking to Excel automatically inserts a note as indicated by the blue in the
bottom left.
See Chapter 7 for information on linking.
40
BSD CostLink/AE User Manual
Chapter 3 : About the CostLink/AE Display
Sheet Panel Icons
Folder: Indicates that the item is a folder.
Folder/Task: The item is a folder with tasks directly inside it. To view the tasks,
click on the folder in the Tree panel and the tasks will display in the Sheet
panel.
Folder with Link: The green Excel icon in the upper right corner indicates that
the quantity of the folder is linked to the quantity of the parent folder or to Excel.
Linking to Excel automatically inserts a note as indicated by the blue in the
bottom left.
Assembly: The item is an assembly.
Assembly/Note: The assembly has a note as indicated by the blue in the
bottom left.
Assembly with Link: The green Excel icon in the upper right corner indicates
that the quantity of the assembly is linked to the quantity of the parent folder or
to Excel. Linking to Excel automatically inserts a note as indicated by the blue
in the bottom left.
Line Item: The item is a line item.
Line Item/Note: The line item has a note as indicated by the blue in the bottom
left.
Line Item with Link: The green Excel icon in the upper right corner indicates
that the quantity of the line item is linked to the quantity of the parent folder or
to Excel. Linking to Excel automatically inserts a note as indicated by the blue
in the bottom left.
Working with the Tree Panel
The Tree Panel shows the hierarchy of data in the project or resource window, illustrated as
a tree structure of folders. BSD CostLink/AE gives you options for configuring the display of
the Tree Panel.
Expanding and Collapsing the Tree
To expand the view of any collapsed folder:
•
Click on the plus sign
beside the folder.
To collapse the view of any expanded folder:
•
Click on the minus sign
beside the folder.
BSD CostLink/AE User Manual
41
Chapter 3 : About the CostLink/AE Display
To expand a branch to show all folders in that part of the project or resource
window:
1. Position the cursor in any part of the branch.
. (You can also right click on a folder in the
2. Click the Expand Branch toolbar button
branch and choose Expand Branch from the context menu.)
To expand the tree to show all folders:
•
Click the Expand All toolbar button
.
To show folder tags of folders in the Tree Panel:
•
Choose Tree > Show Folder Tags. Or click the Show folder tags button on the toolbar
. This command acts as a toggle. Click it again to turn off the folder tags.
To show summarized cost information:
In the project window, you can show summarized costs for each folder in the tree panel.
•
Choose Tree > Show Data in Tree. Or click the Show folder data in tree button on the
toolbar
. This command acts as a toggle. Click it again to turn off the data display.
Working With the Sheet Panel
The Sheet Panel shows the folders or tasks that are one level below the folder selected in
the Tree Panel. Information about the folders or tasks is displayed in a spreadsheet format.
BSD CostLink/AE lets you modify the way the information is displayed.
To change the width of a column:
1. With the mouse, point to the border between two column headings.
The mouse pointer turns into a double arrow.
2. Click and drag to resize the column.
To autosize rows:
Autosize is a toggle that changes the height of all rows. When Autosize is on (the default),
all the information in the description field is displayed. When off, only the first line of the
description is displayed.
42
•
Point to any row in the sheet panel and click the right mouse button. Choose Autosize
Rows from the context menu.
•
This command acts as a toggle. Choose it again to turn Autosize back on.
BSD CostLink/AE User Manual
Chapter 3 : About the CostLink/AE Display
To sort data in the sheet panel:
You can sort the folders or tasks in ascending or descending order, based on any column
of information.
•
Click on the heading for the column you want to sort by. The folders and/or tasks are
sorted in ascending order by that column. Click again to sort by descending order.
To freeze the display at a column:
As with a spreadsheet, you can freeze the sheet panel so that certain columns of
information remain displayed while you scroll right or left.
1. Right-click on any folder or task in the column of information that you want to freeze.
A context menu opens.
2. From the context menu, choose Freeze Columns to (name of the column).
This command is a toggle. Choose it again to Unfreeze the column.
BSD CostLink/AE User Manual
43
Chapter 3 : About the CostLink/AE Display
Online Help
BSD CostLink/AE includes an online Help system.
BSD CostLink/AE Help, Contents Tab
Contents Tab
The Contents tab is similar to the table of contents in a book. Each book icon represents a
subheading in the Help file. Each page icon represents a topic.
To access the Contents tab:
1. Choose Help > Contents. The Contents tab opens.
2. Select a book and double-click it to view more topics.
44
BSD CostLink/AE User Manual
Chapter 3 : About the CostLink/AE Display
To access a topic, select any page icon.
To print a topic or range of topics, select any book or page icon and click the Print button.
Windows Help displays the Print dialog box. Click OK. Windows Help prints the selected
topic or the selected heading and all subtopics.
Print individual topics by viewing the topic, clicking Options, and choosing Print.
BSD CostLink/AE Help, Index Tab
Index Tab
The Index tab is used to search Help by keywords for each topic.
To access the Index tab, from the Help menu choose Use Index for Help On, or click the
Index tab on any Help window. To Search by Keyword, follow the instructions.
BSD CostLink/AE User Manual
45
Chapter 3 : About the CostLink/AE Display
RS Means Abbreviations and Symbols
For a printable list of the abbreviations used in the Assemblies and Unit Prices resource
windows, download Appendix B of the CostLink/AE User Manual from Building Systems
Design, Inc.'s website. Click on Support and then User Manuals. The R.S. Means
abbreviation list is also available as appb-abbreviations.doc on the BSD SoftLink CD in the
AE_Doc folder.
Search Tab
The Search tab is used to conduct a full-text search of all Help topics. Use the Search tab if
you cannot find the Help you need using the Contents or Index tabs.
To access the Search tab, choose Help > Search for Keyword in Help.
To Search, follow the instructions on the tab.
BSD CostLink/AE Help, Search Tab
46
BSD CostLink/AE User Manual