1
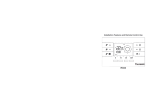
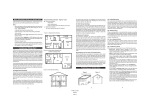
Instruction and maintenance manual
1
ELMEC GROUP S.R.L.
Loc. Ca’ d’Oro • 36020 • Asigliano Veneto (VI)
ITALY
Tel + 39 0444 772023
Fax +39 0444 773129
Mail [email protected]
Web www.b-max.com
2
INDEX
1 GENERAL WARNINGS
1.1 Introduction
1.2 General and safety warnings
1.3 Product description
1.4 Packaging contents
2 TECHNICAL FEATURES
2.1 Burner technical specifications
2.2 Burner overall dimensions
2.3 Hatch opening dimensions
2.4 Pellet loading auger overall dimensions
2.5 Pellet tank overall dimensions
3 TRANSPORTATION
4 ASSEMBLY AND CONNECTION
4.1 Installation of the burner on the boiler
5 START UP
5.1 Before starting up the burner
5.2 First start up
5.3 Switching off
5.4 Later ignitions 6 FUNCTIONING OF THE DEVICE AND USER GUIDE
6.1 Operator • User
6.2 Residual risks
6.3 Safety devices installed
6.4 Control panel and description of keys
6.5 User settings
7 FAULTS • CAUSES • SOLUTIONS
8 ELECTRICAL CONNECTIONS
8.1 Electrical connection
8.2 Wiring diagram
9 MAINTENANCE 9.1 General maintenance
9.2 Maintenance operations table
9.3 Special maintenance
10 SPARE PARTS
11 DISPOSAL
12 DECLARATION OF CONFORMITY
4
4
4
5
8
9
9
10
10
11
11
12
12
12
13
13
14
14
14
15
15
16
16
16
17
18
19
19
20
21
21
22
23
23
23
24
All rights concerning this technical sheet are reserved. No part of it can be reproduced, mentioned in archival systems or
transmitted in any form or by any means, be it electronic, mechanical, photocopying, recording or otherwise, without the prior
written consent of the company Elmec Group S.r.l. If the inaccuracies contained in the manual are due to press transcription
mistakes, Elmec Group S.r.l. disclaims any liability for them. The company reserves the right to introduce those changes to its
products that it deems necessary and useful, without impairing their essential characteristics.
3
Symbols and terminology used in the manual
Symbol
Meaning
THIS SYMBOL PROVIDES USEFUL INFORMATION FOR THE SAFE USE OF THE APPLIANCE
THIS SYMBOL INDICATES THE SAFETY MEASURES AND WARNINGS FOR THE USER
AND/OR THE EXPOSED PEOPLE
1. GENERAL WARNINGS
1.1 INTRODUCTION
The following manual is property of Elmec Group S.r.l.; the contents of this document may not be reproduced
or disclosed to third parties. All rights are reserved.
The machinery is not intended to be used in environments with a potentially explosive atmosphere.
This manual is an integral part of the product, the owner must ensure that it is always supplied with the
machinery, even in the case of sale/transfer to another owner, so that it may be studied by the user or by
the authorized personnel for maintenance and repairs.
Read the instruction manual carefully before using the burner.
The installation of the burner must comply with the instructions in this instruction manual.
Follow the guidelines and instructions in this instruction manual to ensure safe operation of the device
and of the system. In case of doubts concerning the conditions and/or working of the burner and of the
associated equipment, please contact your local distributor for more assistance. The system of the burner
must be installed by authorized technical personnel, trained by the manufacturer/importer. The improper
installation of the system can invalidate the warranty.
1.2 GENERAL AND SAFETY WARNINGS
• The installation of the burner must comply with the instructions in this manual. Follow the guidelines
and instructions in this manual to ensure safe operation of the device and of the system. In case of
doubt concerning the conditions and/or working of the burner and of the associated equipment, please
contact your local distributor for more assistance.The system of the burner must be installed by authorized
technical personnel, trained by the manufacturer/importer. The improper installation of the system can
invalidate the warranty.
• Before starting up the system, the user must consult and follow local laws and regulations regarding
construction.
• The seller is not responsible for the installation of devices which do not comply with current laws, nor
for its use without the necessary permits
4
• The burner is packaged in a standard cardboard box, therefore, during transportation, it must be handled
according to the guidelines on the packaging. The device, during transportation, must be protected against
adverse weather conditions, impacts and damages. Any improper loading, unloading or handling of the
product might damage it.
• Perform a functional testing of the device in case of any damage to the packaging. In case of faulty
operation (noisy operations, friction) or any other defect, contact your nearest authorized dealer to perform
the necessary repairs and maintenance. In case of courier service, inspect the packages at the reception for
any damage. Immediately report to the supplier or courier charged with the delivery of the product any
faults discovered and problems.
• Consult the local safety regulations in force for heating devices, and maintain a 0,8m minimum distance
around the boiler. Ensure the necessary space for maintenance and operation of the burner is provided.
The boiler installation must be kept clean, dry and well ventilated. The air supply in the boiler installation
must be at least equal to the exhaust fumes.
• To minimize the risk of fire do not store flammable materials near the burner.
• Do not leave the appliance exposed to weathering.
• Do not install the appliance on heat generating devices (boiler, hot water heater) situated in rooms
which are poorly ventilated,unprotected from the weather or very humid; the vent openings of the boiler
room must be sized so as to ensure complete combustion.
• The installation of the appliance must be performed by qualified personnel which is authorized in
accordance with the current laws and regulations; an incorrect installation can cause damage to people,
animals or material assets in respect of which the manufacturer of the product cannot be held responsible.
• Connect the device to an effective earthing system, done in accordance with the current safety laws, in
case of doubt of the effectiveness of the earthing system, request a careful check of the electrical system
by qualified and certified staff; the manufacturer cannot be held responsible for any damage caused by the
failure to earth the appliance.
• Have qualified personnel check that the electrical system is suitable for the maximum power of the
appliance, indicated both in this manual and on the plate.
• It is prohibited to use adapters, multiple sockets and/or extensions for the general supply of electricity
to the appliance.
• A double pole differential switch is required for the connection to the electricity grid, as prescribed by
the current safety regulations.
• Do not touch the appliance with wet hands and /or bare feet.
• The use of the appliance by young children or inexperienced people is prohibited.
• Do not use the container, the auger or any other part of the appliance as an earthing system for electric
devices.
• The power cord of the appliance and the electrical framework/burner/generator of heat/supply grid
interface connectors must not be replaced by the user; in case of damage to the cable or to a connector,
contact only qualified and trained personnel.
• When the appliance is not used for a certain period of time, the electrical supply needs to be disconnected
from all the components of the appliance that use electricity; the pellet container needs to be emptied.
5
1.3 PRODUCT DESCRIPTION
The machine is a device consisting of the following parts:
• A burner equipped with an igniter, a fan, a self-cleaning and photoresistant system;
• A fuel supply system consisting of an auger and a flexible tube for loading the pellets into the burner;
• A fuel storage container;
The operation, run by a microprocessor (Programmer), consists of the following phases:
1. Cleaning phase of the heat generator combustion chamber, achieved by the starting of the fan in
conjunction with the mechanical cleaning system;
2. Loading phase of a preset quantity of pellets, achieved by the starting of the auger electric motor.
3. Start up phase: the igniter starts up the combustion;
4. Production phase, during which the burner is fueled with preset quantities of fuel according to the
combustion power; during this phase the combustion chamber is maintained under negative pressure
(vacuum), the igniter is switched off and the combustion is regulated by the fan which doses the quantity
of combustive air in the burner.
1.3.1 DESCRIPTION OF THE BURNER
Extremely versatile, capable of being employed for a wide range of uses, from the installation on new
generation boilers to the transformation of old boilers.
Advanced design and technology, with high reliability and construction qualities able to self manage the
entire heating system using an electronic card.
Fully automatic.
Reliable turning on and off due to a sensor and a photoresistance.
Self-cleaning system equipped with a small rake for the cleaning of the brazier.
Manufactured with certified high quality materials as the parts directly in contact with the heat are made
of high temperature resistant steel.
Electronic self regulation based on the fuel used.
Fig. 1. Burner
6
1.3.2 DESCRIPTION OF THE COCHLEA SUPPLYING THE PELLETS.
IThe pellets supplying device was designed using a cochlea system composed as follows:
• High breakaway torque gearmotor;
• Electrical connection cable, complete with connector;
• Guided rigid type spiral;
• Varnished steel tube;
• Flexible tube for the connection between the auger and the burner;
• Independent fan;
Fig. 2. Auger
1.3.3 PELLET TANK DESCRIPTION
The supply tank is composed as follows:
• Fully removable sides and bottom;
• Conical bottom;
• Hinged lid that can be opened;
Every part is made of varnished steel.
Fig. 3. Tank
7
1.4 PACKAGING CONTENTS
1. BURNER
2.COMBUSTION GRATE
3.FLEXIBLE TUBE CONNECTION SOCKET
4.
O-RING
5.
POWER CABLE
6.WATER SENSOR CABLE
7.FLEXIBLE TUBE
8.
PELLET LOADING AUGER
9.USER MANUAL
Fig. 4. Packaging contents
8
2. TECHNICAL FEATURES
2.1 TECHNICAL SPECIFICATIONS OF THE BURNER
Model
B-Half
B-One
B-Two
B-Two
Power of the burner
KW
34-50
50-100
100-200
Average energy consumption
W
60
60
75
Supply voltage
V
230 V-50 HZ
230 V-50 HZ
230 V-50 HZ
Height
mm
115
135
155
Width
mm
122
170
230
Length
mm
285
370
400
Start up
W
400
400
400
Flame height
mm
200
250
300
Sound level
dB
40
40
40
Burner weight
Kg
17
21
31
Wood pellets
mm
6-8
6-8
6-8
Height
mm
300
300
350
Width
mm
250
250
300
Length
mm
390
390
500
Pellet supplying auger
mm
1700
1700
1700
Chimney flue draught
Pa
25
30
40
Performance
%
More than 91%
when integrated with
a boiler efficiency
minimum 80%
More than 91%
when integrated with
a boiler efficiency
minimum 80%
More than 91%
when integrated with
a boiler efficiency
minimum 80%
Combustion
Height
Minimum
recommended
size of boiler
combustion
9
2.2 BURNER OVERALL DIMENSIONS
Fig. 5. Burner dimensions
A
B
C
D
E
F
G
H
I
J
K
L
M
N
EBB0050-P01
60
116
115
31.5
54
122
54
227
30
268
285
80
633
EBB0100-P01
60
116
135
31.5
55
170
55
231
25
273
370
78
EBB0200-P01
60
96
155
31.5
25
230
25
231
25
273
400
90
Model
[mm] [mm]
[mm]
[mm]
[mm]
[mm]
[mm]
[mm]
[mm]
[mm]
[mm]
P
Q
262.5 84.5
347
230
721
262.5 84.5
367
280
763
282.5 84.5
367
280
[mm] [mm]
[mm]
O
[mm]
[mm]
[mm]
2.3 HATCH OPENING DIMENSIONS
A
B
C
D
E
F
EBB0050-P01
85
85
75
75
118
125
EBB0100-P01
90
90
90
90
138
138
EBB0200-P01
140
140
102.5
102.5
158
233
Model
[mm]
[mm]
[mm]
[mm]
[mm]
[mm]
Fig. 6. Opening dimensions
10
2.4 PELLET LOADING AUGER OVERALL DIMENSIONS
Fig. 7 Pellet loading auger dimensions
Model
A
B
C
D
E
F
G[mm]
EBL0001-P00
1690
140
1147
403
60
215
66
EBL0002-P00
1690
140
1147
403
80
215
66
[mm]
[mm]
[mm]
[mm]
[mm]
[mm]
2.5 PELLET TANK OVERALL DIMeNSIONS
Model
Storage
H
Capacity [KG] [mm]
L
W
EBT0001-P00
300
750
650
1252
[mm]
[mm]
Fig. 8 Tank dimensions
11
Model
Storage
H
Capacity [KG] [mm]
EBT0002-P00 300
1230
L
W
799
799
[mm]
[mm]
Fig. 9 Tank dimensions
3. TRANSPORTATION
Device
Mode of packing
Mode of lifting
Remarks
BURNER
CORRUGATED
CARDBOARD BOX
MECHANICAL MEANS
OR AT LEAST 2 PEOPLE
FRAGILE - DO NOT TURN OVER
HANDLE WITH CARE
COCHLEA
CORRUGATED
CARDBOARD BOX
MECHANICAL MEANS
OR AT LEAST 1 PERSON
HANDLE WITH CARE
PELLET TANKS
CORRUGATED
CARDBOARD BOX
MECHANICAL MEANS
OR AT LEAST 3 PEOPLE
HANDLE WITH CARE
DURING THE INITIAL STAGE OF LIFTING, CHECK THAT THE MACHINERY IS IN THE CORRECT
POSITION SO AS TO KEEP IT IN A BALANCED POSITION.
4. ASSEMBLY AND CONNECTION
4.1 INSTALLATION OF THE BURNER ON THE BOILER
Checks must be carried out at the first start up and after any maintenance operation which has needed the
disconnection of the appliance, an intervention on the safety system or on parts of the burner
WARNINGS: THE BURNER YOU ARE ABOUT TO USE WAS DESIGNED TO FUNCTION
ESCLUSIVELY WITH HEAT GENERATORS THAT HAVE A NEGATIVE PRESSURE COMBUSTION
CHAMBER, HENCE A DIFFERENT USE MAY CAUSE FIRE HAZARD..
12
Fig.10. Installation
1.
2.
3.
4.
5.
MAKE THE HOUSING HOLE AS IN FIGURE “A”
FASTEN THE COLLECTOR (4) (OPTIONAL) TO THE HATCH USING M8 SCREWS (2) M8 SCREW WASHERS (3) - M8 SCREW NUTS (6)
INSERT THE BURNER IN THE COLLECTOR (4) UP TO THE END
FASTEN THE SCREWS (7)
5. START UP
5.1 BEFORE STARTING UP THE BURNER
›› Check that the burner is fixed correctly onto the boiler according to the factory configured calibrations.
›› Check that the boiler and the system are filled with water or diathermic oil, that the valves of the
hydraulic system are open and that the smoke exhaust duct is free and properly sized.
›› Check that the boiler door is closed, so that the flame is only generated inside the combustion chamber.
›› Check the correct positioning of the auger and of the flexible tube connecting it to the burner.
›› Fill the pellet container.
›› Check the correct positioning and connection of the temperature sensor. 13
5. 2 FIRST START UP
This operation has to be carried out by qualified and authorized personnel.
Procedure:
1. Fill the fuel container with pellets (done by the user);
2. Power by switching on the ON/OFF main power button, no. 1 (see fig. 12) and check that the display
is turned on;
3. Press button no. 4 (see fig. 12) to start up the fuel supplying auger, and keep it pressed down until the
auger itself is full (to check that the auger is full it is sufficient to verify that the pellets have begun to flow
from the discharge connection of the auger, through the flexible pellet feeding tube, to the burner); when
the auger is full release button no.4;
4. Start up the burner by pressing the ON/OFF no.1 button for 4 seconds (see fig. 11);
5. It should start up after 4-5 minutes.
6. After starting up the device, check that the heat generator reaches the set temperature and that on the
display the writing “ heater on ” appears;
CALIBRATION OF THE FLOW OF FUEL FOR THE POWER REQUIRED BY THE HEAT
GENERATOR.
CALIBRATION OF THE COMBUSTION AIR AND FUEL RATIO IN ORDER TO ALLOW A
CORRECT COMBUSTION AND TO REACH A PERFORMANCE AT LEAST EQUAL TO THE
MINIMUM PRESCRIBED BY CURRENT REGULATIONS.
CHECK OF THE PROPER FUNCTIONING OF THE CONTROL AND SAFETY DEVICES.
CHECK OF THE PROPER FUNCTIONING OF THE COMBUSTION PRODUCT EXHAUST DUCT.
AT THE END OF THE CALIBRATION OPERATIONS, CHECK THAT ALL THE MECHANICAL
CONTROL SYSTEMS ARE LOCKED AND SECURED.
5. 3 SWITCHING OFF
After pressing the ON/OFF no. 1 button, for 4 seconds (see fig.11), the burner will immediately enter the
switching off phase, stopping the supply of pellets.
5. 4 FURTHER IGNITIONS
Press the ON/OFF no. 1 button, for 4 seconds (see fig.11),) to start up the device, which will happen after
4-5 minutes.
14
6. FUNCTIONING OF THE DEVICE AND USER GUIDE
6.1 OPERATOR - USER
The device functions fully autonomously, without the need of the constant intervention of an operator.
The user acts as the operator of the device. He carries out the first start up. After having started up the
device, he should perform all the checks, monitor its proper functioning, and if necessary, proceed to switch
it off.
Intended use
THE DEVICE IS DESIGNED AND BUILT TO OPERATE ONLY AFTER BEING CORRECTLY
INSTALLED ON A HEAT GENERATOR (BOILER, HOT WATER HEATER). ANY OTHER USE IS TO
BE CONSIDERED IMPROPER.
THE DEVICE IS DESIGNED AND BUILT TO BURN WOOD PELLETS WHICH DO NOT CONTAIN
SAWDUST AND HAVE THE FOLLOWING FEATURES:
Lower calorific value
5 kWh/kg
Density
650 kg/m³
Moisture percentage
8% of the weight (max)
Ash percentage
1% of the weight (max)
Diameter
6 - 8 mm
Length
35 mm (max)
THE USER MUST GARANTEE THE PROPER ASSEMBLY OF THE DEVICE, ENSTRUSTING THE
INSTALLATION TO QUALIFIED AND CERTIFIED PERSONNEL, AND HAVING THE FIRST START
UP DONE BY AN SERVICE CENTER AUTHORIZED BY THE MANUFACTURER.
DO NOT EVER OPEN OR REMOVE ANY COMPONENT OD THE DEVICE.
THE DEVICE IS DESIGNED AND BUILT TO FUNCTION ESCLUSIVELY WITH HEAT GENERATORS
THAT HAVE A NEGATIVE PRESSURE COMBUSTION CHAMBER. DIFFERENT USES MAY CAUSE
FIRE HAZARD.
IMPORTANT: WE RECOMEND THE USER TO USE GOOD QUALITY PELLETS, BECAUSE
LOW QUALITY PELLETS DETERMINE LOWER HEAT OUTPUTS, A HIGHER ASH CONTENT,
CREATING THE NEED FOR MORE FREQUENT CLEANINGS, A CHANCE OF EARLY WEAR OF
THE COMPONENTS OF THE BURNER EXPOSED TO THE FLAME, OBSTRUCTIONS OF THE
COCHLEA AND OF THE BURNER DUE TO THE EXCESS OF DISSOLVED SAWDUST, SHUT
DOWNS DUE TO THE SEDIMENTATION OF NON-COMBUSTIBLE MATERIALS INSIDE THE
BURNER.
15
6.2 RESIDUAL RISKS
DEVICE
Burner
RESIDUAL
RISK
Thermal
risk
NOTES
SIGNS
The surfaces of the burner near the flame, heat both during the prestart phase and during the functioning; they remain hot even after
the burner has been switched off. Therefore there is a risk that a
maintenance operator – while removing the burner from the heat
generator - may come into contact with the heated surfaces. This risk
is managed as residual risk and an appropriate warning is placed on
the device.
Do not touch
the surface
of the burner
while it is still
hot.
6.3 SAFETY DEVICES INSTALLED
The safety devices installed are:
- A fixed setting thermostat (60 °C) is installed on the fuel supply tube; when the temperature of the
tube exceeds the fixed temperature, which derives from a return of heat, the thermostat stops the burner.
- A photoresistance supplied with the burner, which stops the burner if the flame is absent.
6.4 CONTROL PANEL AND DESCRIPTION OF KEYS
Fig. 11 Control Panel
16
BUTTONS
1 ON/OFF button (Starts and turns off the burner)
2 Display
3 UP button (Increases power, if used on the Home Screen)
4 DOWN button (Decreases power, if used on the Home Screen)
5 SET button
» SET+UP = State of the cycle (Shows temperature, etc.)
» SET for 2 seconds = Configures time, timer, language, display contrast
» SET press and release = Water temperature adjustment
» ON/OFF+SET+UP+DOWN for 2 seconds = Actives the setting of technical parameters
6.5 USER SETTINGS
1. Press SET for 2 seconds
2. Select the parameters menu with the arrow keys
A. Time settings
B. Timer settings
C. Not used
D. Language settings
E. Display contrast
TIME SETTINGS
CHRONOTHERMOSTAT SETTINGS
FUEL TYPE
LANGUAGE
CONTRAST
To set the time use the arrow keys. To scroll the configuration
screens press the SET button. To exit press ON/OFF.
To set the timer use the arrow keys. To scroll the configuration
screens press the SET button. To exit press ON/OFF. For every
day of the week it is possible to set 6 different activation time
frames. If the activation times FROM-TO are set on zero, the
activation in that time frame is switched off.
The burner is calibrated only for the use of pellets.
Select the language.
The contrast refers to display visualizations.
17
7. FAULTS - CAUSES - SOLUTIONS
The burner is equipped with a self diagnosis system, which, in case of a fault to the burner, displays the
following messages on the display.
In the following table are indicated the most common faults with their possible solutions.
FAULT
CAUSE
FAILED START UP
Pellet tank empty
Auger cable disconnected
interrupted
Ignition resistance faulty
BLACK OUT ALARM
WATER SENSOR FAULTY ALARM
FUEL EMPTY ALARM
SOLUTION
Fill the tank
or Restore the connection or find the
interruption
Substitute the resistance (call a
qualified technician)
Combustion grate clogged
Remove grate and clean it
Internal power supply of the auger Check that the auger which clogged
clogged
combustion chamber is not
for some reason clogged
Power failure
Restore power. If after having
restored the power the alarm
continues, call a qualified technician.
Sensor badly connected
Check connection
Sensor faulty
Change the sensor
Pellet tank empty
Fill the tank
Auger cable disconnected or Restore the connection or find the
interrupted
interruption
N.B. = WARNING = IF THE PROBLEM FOR THE FAULTS DESCRIBED PERSISTS, DO NOT LOOK FOR
ALTERNATIVE SOLUTIONS TO THOSE LISTED, IN ORDER TO AVOID CAUSING PERMANENT DAMAGE TO
THE BURNER, NOT COVERED BY THE WARRANTY, PLEASE CONTACT A QUALIFIED TECHNICIAN INSTEAD.
18
8. ELECTRICAL CONNECTIONS
Fig. 12 Electrical connections
BUTTONS
1. General ON/OFF power button
2. Auger loading power outlet with fan [Optional]
3. 220 Volt power outlet
4. Button for manual pellet loading
5. Motor power outlet 1 [external loading auger]
6. Connection for water and smoke sensor
7. Connection for self cleaning boiler kit [Optional]
8. Connection for thermostat
9. Connection for earthing
8.1 ELECTRICAL CONNECTION
THE ELECTRICAL CONNECTION OPERATIONS SHOULD BE DONE BY A TRAINED
ELECTRICIAL, APPROVED BY THE MANUFACTURER..
DO NOT EXPOSE THE OUTER CASING OF THE ELECTRICAL PANEL TO DRIPS AND JETS OF
WATER AND /OR DUST.
19
8.2 WIRING DIAGRAM
Fig. 13. Wiring diagram
20
1
2
3
4
5
6
7
8
9
10
11
12
13
14
15
16
17
18
19
20
DESCRIPTION
230/24 100W POWER SUPPLIER
AUGER MOTOR 1 EXTERNAL POWER SUPPLY
AUGER MOTOR 2 INTERNAL POWER SUPPLY
GRATE CLEANING MOTOR
MOTOR 1 THERMAL CONTACT (80°)
230 Vac 300W IGNITION RESISTANCE
230 Vac FAN LOAD SHAFT
230 Vac FAN POWER SUPPLY
SMOKE TEMPERATURE SENSOR
SAFETY THERMOSTAT
WATER TEMPERATURE SENSOR
MOTOR TIME SETTING FOR ASH CLEANING KIT (FROM 1 TO 10 MINUTES)
MOTOR TIME SETTING 2 (FROM 2 TO 8 SECONDS)
THERMAL CONTACT FOR COOLING FAN (40°)
POWER SWITCH
230 Vac POWER SUPPLY OR INVERTER (OPTIONAL)
230 Vac POWER SUPPLY IN CASE OF INVERTER INSTALLED (OPTIONAL)
230 Vac COOLING FAN
MOTOR 1 BUTTON (MANUAL LOAD)
DISPLAY POWER SUPPLY (USB)
9. MAINTENANCE
• Check periodically that those parts of the burner that tend to get dirty due to bad quality pellets or
due to the incorrect setting of the burner, are clean.
• The burner requires periodic maintenance, we recommend a weekly cleaning of the combustion grate
by the user.
• Furthermore, request authorized personnel to perform ANNUALY maintenance operations
THE PELLET TANK SHOULD BE PLACED IN SUCH A WAY AS TO AVOID ANY KINKING AND
/OR BENDS OF THE FLEXIBLE TUBE CONNECTING THE AUGER AND THE BURNER, THUS
ENSURING THE FLOW OF PELLETS. IN ADDITION, AT BOTH ENDS OF THE FLEXIBLE TUBE
FASTEN THE TUBE CLAMPS PROVIDED WITH THE BURNER.
9.1 GENERAL MAINTENANCE
ANY INTERVENTION ON THE ELECTRICAL PARTS INSIDE THE BURNER AND THE AUGER
SHOULD BE DONE BY QUALIFIED AND AUTHORIZED PERSONNEL.
THE MAINTENANCE OPERATIONS SHOULD BE PERFORMED BY QUALIFIED AND
AUTHORIZED PERSONNEL.
21
Safety procedure for the appliance
1. Check that the device has been switched off using the shutdown procedure.
2. Set on “OFF” the “ON/OFF” button, no.1 (see fig. 11) and cut the power to the device selecting the
bipolar button
3. Cut and isolate the fuel supply.
THE PROCEDURE OF SECURING THE DEVICE AND RESETTING NORMAL
OPERATIONAL CONDITIONS, SHOULD BE DONE ONLY BY THE MAINTENANCE
OPERATOR.
9.2 MAINTENANCE OPERATIONS TABLE
During the first start up, after an hour of operation, the burner should be switched off and the grate should
be checked for the presence of unburned materials; in the case of unburned materials modify the setting
of the air and fuel combustion parameters.
The data given in the following table is approximate and related to the use of certified pellets.
In case of use of non-certified pellets, not knowing the quality of the material and its composition, it is not
possible to determine the frequency of cleaning.
In the case of use of non-certified pellets, Elmec s.r.l disclaims all liability for any faults, damage and possible
environmental damage.
WARNING: Please note that the incorrect cleaning also affects the wear and tear on the parts of the
burner exposed to the fire.
If required
Cleaning of the combustion chamber in case
of ash deposit
Cleaning of the space under the grate from
dust and ash
Cleaning of the fan
Cleaning of the burner and of the boiler
Cleaning of the chimney flue and of the rear
of the boiler
Check to identify and replace worn parts
Adjust the combustion process
Fill the pellet tank
Cleaning of the chimney flue
x
7days 14 days 30 days
x
1/2 year
x
x
x
x
x
Every year
x
x
x
x
x
x
x
x
x
x
x
x
This program is merely informational, and if necessary the clearing activity should be constant. The cleaning
varies according to the situation, because the choice of pellets, the system and the burner setting have a
major impact on the frequency of cleaning intervals.
22
9.3 SPECIAL MAINTANANCE
Special maintenance should be done at the end of the season, and in any case once a year.The maintenance
operations to perform are the following:
• Clean all the components of the burner, grate and nozzle etc.;
• Clean and check that the flame check photoresistance is operating correctly;
• Check the correct operation of the igniter;
• Check the bearings and possible cleaning;
• Oil of the auger bearings;
• Clean the fan;
• Empty and clear the pellet tank;
• Check the condition of the flexible tube connecting the auger and the burner, and if necessary replace
it;
• Check the condition of the electric power supply cables and electrical connectors, and if necessary
replace them; such replacement should only be performed by qualified and authorized personnel for
this type of operation.
10. SPARE PARTS
For each maintenance operation which involves the replacement of parts of the device, please refer to
the reference drawings. WARNING: The spare parts for which a claim is being made under the warranty
agreement should not be tampered with, but simply removed from the device and sent to headquarters
for the necessary verifications.
THE USE OF THE DEVICE UNDER BAD MAINTENANCE CONDITIONS CAN RESULT IN THE
APPLIANCE OPERATING IN UNPREDICTABLE AND EXTREMELY DANGEROUS CONDITIONS.
11. DISPOSAL
Most of the device is made of steel and commercial components in general, which do not require special
instructions for their disposal.
Careful attention should be paid to the disposal of oils and grease in general, which must be disposed
according to the current regulations for used oils.
The disposal of plastic parts should be managed similarly.
.
FOR THE DISPOSAL PLEASE CONSULT AUTHORIZED COMPANIES.
23
12. DECLARATION OF CONFORMITY
24
ELMEC GROUP S.R.L.
Loc. Ca’ d’Oro • 36020 • Asigliano Veneto (VI)
ITALY
Tel + 39 0444 772023
Fax +39 0444 773129
Mail [email protected]
Web www.b-max.com
25
26