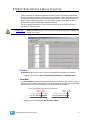
1
™ ETCNet2 Network Configuration Editor (NCE) User Manual v4.0.0 C o p y r i g h t © E le c tr o n i c T h e a t r e C o n t r o l s , I n c . All Rights reserved. P r o d u c t in f o r m a t i on a n d s p e c i f i c a t i o n s s u bj e c t t o c h a n g e . P a r t N u m b e r : 4103M1200-4.0.0 R e v B Released: July 2003 ET C ®, E m p h a s i s ™ , E x p r e s s io n ®, In s i g h t ™ , I m a g i n e ™ , F o c u s ™ , E x p r e s s ™ , U n i s o n ®, O b s e s s i o n ® II , E T C N e t 2 ™ , E D M X ™ , S e n s o r ®, a n d W Y S IL i n k ™ a r e e i th e r r eg i s t e r e d t r a d e m a r k s o r t r a d e m a r k s o f E l e c t r o n i c T h e a t r e C o n t r o l s , I n c . i n th e U n i t e d S ta t e s a n d o t h er c o u n t r i e s . T h e n a m e W Y S IW Y G ™ i s a tr a d e m a r k o f C A S T L i g h t i n g L i m i t e d . M i c r o s o f t ® a n d W in d o w s ® a r e r e g i s t e r e d t r a d e m a r k s o f M i c r o s o f t C o r p o r a t i o n i n t h e U n i t e d S t a t e s a n d o t h e r c o u n tr i e s . Table of Contents Introduction . . . . . . . . . . . . . . . . . . . . . . . . 1 Using this Manual . . . . . . . . . . . . . . . . . . . . . . . . . . . . . . . . . . . . 2 Additional Help from ETC . . . . . . . . . . . . . . . . . . . . . . . . . . . . . . 3 Americas . . . . . . . . . . . . . . . . . . . . . . . . . . . . . . . . . . . . . . . 3 Europe . . . . . . . . . . . . . . . . . . . . . . . . . . . . . . . . . . . . . . . . . 3 Asia . . . . . . . . . . . . . . . . . . . . . . . . . . . . . . . . . . . . . . . . . . . 3 NCE Overview . . . . . . . . . . . . . . . . . . . . . . . . . . . . . . . . . . . . . . . 4 What is Network Configuration Editor (NCE)? . . . . . . . . . . . 4 NCE Uses a Standard Windows Interface . . . . . . . . . . . . . . 5 Emphasis™ Users . . . . . . . . . . . . . . . . . . . . . . . . . . . . . . . . 6 New in NCE v4 . . . . . . . . . . . . . . . . . . . . . . . . . . . . . . . . . . . 6 EDMX™ . . . . . . . . . . . . . . . . . . . . . . . . . . . . . . . . . . . . . . . . . . . . . . . . . . 6 EDMX Priorities . . . . . . . . . . . . . . . . . . . . . . . . . . . . . . . . . . 7 ETCNet2 Node Status LEDs . . . . . . . . . . . . . . . . . . . . . . . . 8 Chapter 1: Quick Starts . . . . . . . . . . . . . . . . . . . . . . . 9 Quick Start Check Lists . . . . . . . . . . . . . . . . . . . . . . . . . . . . . . . 10 Quick Start for New Nodes . . . . . . . . . . . . . . . . . . . . . . . . . 10 Quick Start for Previously Configured Nodes . . . . . . . . . . . 11 Quick Start for Adding a New Node or Nodes . . . . . . . . . . 11 Chapter 2: Installation of NCE and Related Software13 Computer Minimum Requirements . . . . . . . . . . . . . . . . . . . . . . 14 Your Computer’s Network Settings . . . . . . . . . . . . . . . . . . . . . . 15 Default Network Settings for Your Computer . . . . . . . . . . . 15 Installation of NCE Software . . . . . . . . . . . . . . . . . . . . . . . . . . . 16 Chapter 3: Network Features & Functions . . . . . . . . 19 Get Your Nodes Online . . . . . . . . . . . . . . . . . . . . . . . . . . . . . . . 20 Connect to the Network . . . . . . . . . . . . . . . . . . . . . . . . . . . 20 Assign an IP Address to ETCNet2 Nodes . . . . . . . . . . . . . 20 Network Address Server . . . . . . . . . . . . . . . . . . . . . . . . . . 21 Get Unbound Nodes . . . . . . . . . . . . . . . . . . . . . . . . . . . . . 22 Send a Configuration to a Node . . . . . . . . . . . . . . . . . . . . . 23 Optimize EDMX . . . . . . . . . . . . . . . . . . . . . . . . . . . . . . . . . 23 More Network Commands . . . . . . . . . . . . . . . . . . . . . . . . . . . . . 25 Get a Configuration From a Node . . . . . . . . . . . . . . . . . . . 25 Net1 -> Net2 . . . . . . . . . . . . . . . . . . . . . . . . . . . . . . . . . . . . 25 Reboot Nodes . . . . . . . . . . . . . . . . . . . . . . . . . . . . . . . . . . 26 Clear Configuration . . . . . . . . . . . . . . . . . . . . . . . . . . . . . . 26 Update Node Software . . . . . . . . . . . . . . . . . . . . . . . . . . . . 26 Table of Contents 1 Chapter 4: Views of Your Node Data . . . . . . . . . . . . 29 Understanding Views. . . . . . . . . . . . . . . . . . . . . . . . . . . . . . . . . 30 Sorting Your Configuration Data . . . . . . . . . . . . . . . . . . . . . . . . 31 Hiding/Resizing Columns & Getting Them Back . . . . . . . . . . . . 32 Resize a Column . . . . . . . . . . . . . . . . . . . . . . . . . . . . . . . . 32 Hide a Column . . . . . . . . . . . . . . . . . . . . . . . . . . . . . . . . . . 32 Restore a Hidden Column . . . . . . . . . . . . . . . . . . . . . . . . . 32 Chapter 5: ETCNet2 Node Configuration Properties 33 ETCNet2 DMX Node Properties . . . . . . . . . . . . . . . . . . . . . . . . 34 DMX Node Configuration Properties . . . . . . . . . . . . . . . . . 34 DMX Node Port Properties . . . . . . . . . . . . . . . . . . . . . . . . . 35 DMX Node Input Port Properties . . . . . . . . . . . . . . . . . . . . 36 DMX Node Output Port Properties . . . . . . . . . . . . . . . . . . . 38 RFU Port Properties . . . . . . . . . . . . . . . . . . . . . . . . . . . . . . 39 ETCNet2 Video Node Properties. . . . . . . . . . . . . . . . . . . . . . . . 40 Video Node Configuration Properties . . . . . . . . . . . . . . . . . 40 Video Port Properties . . . . . . . . . . . . . . . . . . . . . . . . . . . . . 41 RFU Port Properties . . . . . . . . . . . . . . . . . . . . . . . . . . . . . . 41 Remote Macro Properties [Emphasis Only Feature] . . . . . 42 Remote Trigger Properties [Emphasis Only Feature] . . . . 43 ETCNet2 Software Version Information . . . . . . . . . . . . . . . . . . 44 ETCNet2 Node Network Address Properties . . . . . . . . . . . . . . 45 Chapter 6: Advanced Features. . . . . . . . . . . . . . . . . 47 Edit vPorts . . . . . . . . . . . . . . . . . . . . . . . . . . . . . . . . . . . . . . . . . 48 Edit vPort Table . . . . . . . . . . . . . . . . . . . . . . . . . . . . . . . . . 48 EDMX Values . . . . . . . . . . . . . . . . . . . . . . . . . . . . . . . . . . . 48 Manually Editing EDMX Configuration Values . . . . . . . . . . . . . 49 Advanced Input Patch (AIP) Configuration . . . . . . . . . . . . . . . . 51 Configure AIP . . . . . . . . . . . . . . . . . . . . . . . . . . . . . . . . . . . 51 AIP Tools . . . . . . . . . . . . . . . . . . . . . . . . . . . . . . . . . . . . . . 52 Version Detect and Upgrade Utility . . . . . . . . . . . . . . . . . . . . . . 54 Insert Nodes . . . . . . . . . . . . . . . . . . . . . . . . . . . . . . . . . . . . . . . 56 Binding Nodes . . . . . . . . . . . . . . . . . . . . . . . . . . . . . . . . . . . . . . 57 2 Network Configuration Editor (NCE) v4.0.0 User Manual Appendix A ETCNet2 EDMX v4 Rules. . . . . . . . . . . . 59 Appendix B Default vPort™ Table . . . . . . . . . . . . . . . 61 Appendix C ETCNet2 Default IP Address Ranges. . . 63 Appendix D ETCNet2 Multicast IP Address Usage . . 65 Appendix E Upgrading Node Software . . . . . . . . . . . 67 Appendix F Glossary & Product Definitions . . . . . . . . 69 Table of Contents 3 4 Network Configuration Editor (NCE) v4.0.0 User Manual Introduction This manual covers the basic installation and use of Network Configuration Editor (NCE). It also contains feature and function information about the ETCNet2 Nodes (DMX Node, Two Port Node, and Video Node) that are configured with NCE. Along the way, we’ll cover some general ETCNet2 information to help you get the most out of your ETCNet2 system. The introduction contains the following sections: Introduction • Using this Manual . . . . . . . . . . . . . . . . . . . . . . . . . . . . . . . . . . . 2 • Additional Help from ETC . . . . . . . . . . . . . . . . . . . . . . . . . . . . 3 • NCE Overview . . . . . . . . . . . . . . . . . . . . . . . . . . . . . . . . . . . . . . 4 1 Using thi s Manual This manual is intended for use in conjunction with the ETCNet2 Nodes User Manual and only covers configuring the nodes over the network. Use the ETCNet2 Nodes User Manual for physical installation and connecting nodes to a network. You may also want to refer to the ETCNet2 Planning Guide for additional information on networking, system design, layout and diagrams of sample ETCNet2 systems. This manual assumes that you have a basic familiarity with the Microsoft Windows® operating system, opening and closing files, closing and resizing windows, using Windows Explorer, and performing basic disk operations. In order to be specific about where features and commands are found, the following naming and text conventions will be used: • Emphasis™ Server (hardware): the computer used to run the Emphasis applications. • DMX refers to hard wired DMX512. • EDMX refers to ETCNet2 Ethernet based discrete level information. For more information, please see EDMX™, page 6. • Menus and commands found on the Server are indicated in bold text. For example: In the File menu, click Open. • Server keyboard buttons are indicated in all CAPS. For example, TAB or CTRL. • References to other parts of the manual are indicated in italics (blue italic text). When viewing this manual electronically, click on the reference to jump to that section of the manual. • References to other documents are indicated in just italics (black italic text). Note: Notes are helpful hints and information that is supplemental to the main text. ECS Note: These are notes specific to using NCE on or with an Emphasis Server within an Emphasis Control System. CAUTION: A Caution statement indicates situations where there may be undefined or unwanted consequences of an action, potential for data loss or an equipment problem. WARNING: A Warning statement indicates situations where damage may occur, people may be harmed, or there are serious or dangerous consequences of an action. Please email comments about this manual to: [email protected] 2 ETCNet2 Network Configuration Editor (NCE) v4.0.0 User Manual Addi tional Help from ETC If you have specific questions about any ETC products covered in this user manual, your most convenient resources are the references given in this manual. This manual is also provided in the NCE online help in a searchable format. To search more widely, try the ETC web site at www.etcconnect.com. If none of these resources is sufficient, contact ETC Technical Services directly at one of the offices identified below. Americas ETC International Technical Services Department 3030 Laura Lane Middleton, WI 53562 +1-800-775-4382 +1-608 831-4116 [email protected] Europe ETC Europe Ltd. Technical Services Department 5 Victoria Industrial Estate Victoria Road, London W3 6UU England +44 (0)20 8896 1000 [email protected] Asia ETC Asia, Ltd. Technical Services Department Room 605-606 Tower III, Enterprise Square 9 Sheung Yuet Road Kowloon Bay, Kowloon, Hong Kong +852 2799 1220 [email protected] Introduction 3 NCE Overview W h a t i s N e tw o r k C o n fi g u r a ti o n E d i t o r (N C E )? ETC’s Network Configuration Editor (NCE) is a spreadsheet-style software program designed to make configuring ETCNet2™ DMX and Video nodes easy. With NCE you can configure the parameters of any port on any ETCNet2 node in a Net2 system. Through an Ethernet connection, you can read the configuration of any node on the network, edit it offline, and send the configuration back to the node via the network for use. NCE supports four types of ETCNet2 nodes: • DMX Node • DMX Node without RFU • Video Node • DMX Node Two Port Here’s what NCE looks like with a couple of nodes in the configuration file. The configuration’s file name. Menu Bar Tool Bar Node Properties Node Data Status Bar Progress for Get Config & Get Unbound Nodes Note: Node counts & network status Fields that are greyed out are not editable. NCE will always open with an empty config called “Default.nce”. Note: 4 NCE v4.0.x is only compatible with ETCNet2 nodes running version 4.0.x node software. To update nodes from a previous version of software, please read Appendix E: Upgrading Node Software, page 67. ETCNet2 Network Configuration Editor (NCE) v4.0.0 User Manual NCE cannot configure ETC’s legacy network devices such as the Remote Video Interface (RVI), Remote Interface Unit (RIU) or with ETCNet2 nodes running in ETCNet1 mode with Expression® family consoles. If you have questions about the type of network you have, please call ETC Technical Services at the office nearest you. Please see Additional Help from ETC, page 3 for the contact information. NCE Uses a Standard Windows Interface NCE uses standard Windows functions to manipulate configuration file information. From the File menu, you can open, save, print your file or create a new blank file. Toolbar The Toolbar in it’s default location. The Toolbar as a floating palette. New File Open File Save File Copy Paste Print About NCE The toolbar provides quick graphical access to common functions. Introduction 5 Status Bar Displays relevant information about the state of NCE. Displays the percent complete getting a config or unbound nodes Displays the number of nodes in the current configuration. Displays the number of nodes communicating on the network. Indicates that NCE is connected to the network. The status bar is located along the bottom of the NCE screen. It displays information about the NCE’s current state or activity. Emphasis™ Users Several parts of this manual apply differently to users of NCE on an Emphasis Server. All Emphasis notes assume that NCE is running on the Emphasis Server. Notes have been added in the relevant topics to let you know how they are different for you. Frequently, the changes are things you don’t need to do because Emphasis has already taken care of it. The first of which are meeting the Computer Minimum Requirements (page 14) and performing the initial installation. If you are running NCE on a stand-alone PC in addition to your Emphasis system, then follow all of the normal instructions. New in NCE v4 Advanced Input Patch (AIP) enables you to assign an input port’s DMX512 channels to multiple EDMX addresses on an individual basis in a non-sequential order. These AIP configurations can be copied to other ports on other nodes as needed. AIP also provides for an easy way to do range patching as you build your custom DMX to EDMX patch. The Version Detect Utility provides an easy way to upgrade the software in your nodes. This utility will “see” all ETCNet2 devices online at any version and display that device’s name, IP address, current version of software and more. It also provides an easy method to send new software to most nodes. The exceptions to this are Two Port nodes with software prior to v4.0.0. These nodes do not respond to this command in earlier versions. Additionally, other devices such as Unison processors, Emphasis and Obsession II components have their information displayed but are not able to update via this utility. EDMX ™ EDMX (Ethernet-DMX) is probably the most talked about protocol within the ETCNet2 suite because it is the most configured by users to suit their needs. EDMX is, in a sense, a list of 32,767addresses, each containing level information. This is the method for communicating the equivalent of 64 DMX512 universes of data. The level information, along with priority information, is continually updated on the network for devices to receive as needed. 6 ETCNet2 Network Configuration Editor (NCE) v4.0.0 User Manual EDMX is an ownership-based system of control. Any given device has control over a range of EDMX based on assignable priorities. Only one device can have control at a time. When higher priority control goes away, the next highest priority level takes control. When two or more devices have the same priority, they HTP. For a complete set of EDMX priority rules, please see EDMX Priorities below or Appendix A: ETCNet2 EDMX v4 Rules, page 59. EDMX Priorities Why is being able to configure priorities a good thing? Well for one, you can achieve seamless integration of control from system (console) to system (architectural) over house lights. It’s also useful when running with two redundant DMX512 sources into a DMX Node. By using DMX Nodes and setting the priorities, you can make it so if one signal stopped, the other takes over without having to throw a switch or touch a button. New in ETCNet2 v4 New in ETCNet2 v4 is the added ability to do HTP (Highest Takes Precedence) over the network. HTP occurs when two different controlling devices want control of the same EDMX address(es) and have the same priority. Then the receiving device gets the multiple values for that address and uses the highest level. Unison also got some new EDMX priority agility in ETCNet2 v4 (Unison v1.9). Unison is configured via Unison Light Manager v1.9; not by NCE. It is worth mentioning its new priority and HTP capabilities. In addition to Replace (priority zero) and PTiA (Pass-Through if Active - priority 21), you can set a processor specific/wide “pile-on priority” setting that is used by any zone set to “Pile-on” in the configuration. This is a slight misnomer since this priority setting is an absolute network priority and will assert control of EDMX addresses at a lower priority or submit to another device with a higher priority. It only does pile-on (HTP) when the Unison pile-on priority matches the priority setting of another ETCNet2 EDMX source device. ETCNet2 v4 is governed by a defined set of rules that provide consistent, predictable results. Now with even more flexibility. . The illustration above displays all of the rules necessary to determine the ownership of an EDMX address or range of addresses. For a rule-by-rule text version of this (suitable for framing on a shop wall), please see Appendix A: ETCNet2 EDMX v4 Rules, page 59. Introduction 7 Of the three source devices at the bottom (Emphasis, DMX Node #1 and DMX Node #2), Emphasis has total ownership (control) of its particular patched range of EDMX. This is determined by priority of the different devices. In this case, Emphasis has a priority of two (2) and the DMX nodes both have a priority of three (3). Priorities are changeable settings in devices and these are just used for example. For the remainder of the EDMX address range, DMX Node #1 and DMX Node #2 are calculated on an HTP basis where individual EDMX addresses are checked for the highest value per address. The pull-out circle in the illustration above is a simple example. You should note that Unison can be set to a priority higher than any other ETCNet2 device (in Replace Mode) or lower than any other ETCNet2 device (in Pass-Through if Active Mode) in EDMX. No other ETCNet2 device is capable of these priorities. ETCNet2 Node Status LEDs ETCNet2 DMX and Video Nodes have status LEDs to indicate their operational state. Below is an outline of their functionality. Status LEDs • Power Status is one blue LED. • Network Activity is one green LED. • [DMX Nodes only] One bi-color (red/green) LED per DMX port where a red LED indicates an active input; green an active output; and no LED indicates the port is disabled. Net1 Mode • Powered on and connected to console, the power LED blinks on for three (3) sec. and off for one (1) sec. • Powered on and not connected to console, the power LED blinks at a rate of 2Hz (twice per second). • In Net1 mode, DMX port LEDs 1 - 3 will always be lit green (active output). The fourth DMX port LED will always be off. Net2 Mode • The blue power LED is flashing at a rate of 1Hz (once a second) when the node is powered on at factory defaults or is without a valid IP address. • The blue power LED is on solid when node is powered on and operational. • A green LED indicates network activity by flashing or glowing continuously when the node is processing network information. • [DMX Nodes Only] DMX Port Status- One bi-color LED for each DMX512 port. • Red means that port is an active input. • • 8 • Flashing means “Waiting for DMX” • Steady means “Valid DMX” Green means that port is an active output. • Flashing means “not receiving EDMX” • Steady means “Valid EDMX” No LED means the DMX port is disabled. ETCNet2 Network Configuration Editor (NCE) v4.0.0 User Manual Chapter 1 Quick Starts The purpose of this chapter is to give you a quick list of steps to use as a guide through various configurations. These include starting with new nodes that have not been used before to get up and running in the most direct manner. This is not a detailed explanation of what each step entails, but rather a short description of each step in the proper order with a reference to more detailed information. The introduction contains the following sections: • 1 Quick Starts Quick Start Check Lists . . . . . . . . . . . . . . . . . . . . . . . . . . . . . 10 • Quick Start for New Nodes . . . . . . . . . . . . . . . . . . . . . . . 10 • Quick Start for Previously Configured Nodes . . . . . . . . 11 • Quick Start for Adding a New Node or Nodes . . . . . . . . 11 9 Quick Start Check Li sts Note: It is best that you always use the same computer or Emphasis Server for NCE use on your lighting network. This will minimize the possibility of network complications and/or configuration corruption. ECS Note: Assuming your software is up-to-date, you only need to perform steps 4, and 6 through 10. Quick Start for New Nodes Step 1: Configure your computer for the network. (Your Computer’s Network Settings, page 15) Step 2: Install NCE on your computer.(Installation of NCE Software, page 16) Step 3: Install the proper/current version of node software. This is done automatically in the NCE v4.0.0 Standard installation. Step 4: Launch NCE and Connect to the network. (Connect to the Network, page 20) Step 5: Start the Network Address Server and confirm it says “Bootp server started” in the status bar. (Network Address Server, page 21) You should see the Nodes Online counter start to go up and stop with your total number of installed ETCNet2 Nodes. Step 6: Use Get Unbound Nodes to add all of the nodes on the network to your configuration. (Get Unbound Nodes, page 22) Depending on the number of nodes on the network, this may take several seconds (up to a minute or two for 100 or more) to complete. Step 7: After you are sure you have all of your ETCNet2 nodes loaded in your configuration, stop the Network Address Server. It will display “bootp server stopped” in the status bar. (Network Address Server, page 21) Step 8: Make your desired changes to the configuration of the node(s). Note: • Node properties (ETCNet2 Node Configuration Properties, page 33) • Editing EDMX (Manually Editing EDMX Configuration Values, page 49) • AIP Configuration (Advanced Input Patch (AIP) Configuration, page 51) Using a vPort (page 37) is the fastest and simplest way to configure DMX Nodes. Patching input and output ports to the same EDMX addresses is as easy as setting them to the same vPort number. For example, assign an input port to vPort 22 then simply assign vPort 22 to the desired output port(s) and the configuration is complete once you send it to the nodes. Step 9: Use Send Config to Nodes to make your configuration changes active in the nodes. (Send a Configuration to a Node, page 23) Step 10: Optimize the EDMX Multicast IP addresses. (Optimize EDMX, page 23) Step 11: Save your configuration file to disk. (NCE Overview, page 4) 10 ETCNet2 Network Configuration Editor (NCE) v4.0.0 User Manual Quick Start for Previously Configured Nodes Step 1: Launch NCE and Connect to the network. (Connect to the Network, page 20) You should see the Nodes Online counter start to go up and stop with your total number of installed Net2 Nodes. Step 2: Use... • Step 3: Note: • Open... from the File menu to load an existing configuration into NCE to be edited and/or sent to the nodes. (NCE Overview, page 4) • Get Unbound Nodes to add all of the nodes on the network and their current settings to your configuration. (Get Unbound Nodes, page 22) Depending on the number of nodes on the network this may take several seconds to complete. Make your desired changes to the configuration of the node(s). • Node properties (ETCNet2 Node Configuration Properties, page 33) • Editing EDMX (Manually Editing EDMX Configuration Values, page 49) • AIP Configuration (Advanced Input Patch (AIP) Configuration, page 51) Using a vPort (page 37) is the fastest and simplest way to configure DMX Nodes. Patching input and output ports to the same EDMX addresses is as easy as setting them to the same vPort number. For example, assign an input port to vPort 22 then simply assign vPort 22 to the desired output port(s) and the configuration is complete once you send it to the nodes. Step 4: Use Send Config to Nodes to make your configuration changes active in the nodes. (Send a Configuration to a Node, page 23) Step 5: Optimize the EDMX Multicast IP addresses. (Optimize EDMX, page 23) Step 6: Save your configuration file to disk. (NCE Overview, page 4) Q u i c k S t a r t fo r A d d i n g a N e w N o d e o r N o d e s ECS Note: 1 You do not need to perform Step 2. Step 1: Launch NCE and Connect to the network. (Connect to the Network, page 20) Step 2: Start the Network Address Server and confirm it says “Bootp server started” in the status bar. (Network Address Server, page 21) You should see the Nodes Online counter start to go up and stop with your total number of installed Net2 Nodes. Step 3: Install the new node(s) on the network. You should see the Nodes Online counter start to go up and stop with your total number of installed Net2 Nodes –now including your newly installed nodes. Step 4: Use Open... from the File menu to load an existing configuration into NCE to be edited and/or sent to the nodes if you desire. (NCE Overview, page 4) Step 5: Use Get Unbound Nodes to add all nodes on the network that are not already in your configuration to your configuration. If you do not load a configuration, this will add all of the nodes on the network. If you do load your configuration, this will only add the ones not already in the configuration. (Get Unbound Nodes, page 22) Depending on the number of nodes on the network this may take several seconds to complete. Quick Starts 11 Step 6: After you are sure you have all of your ETCNet2 nodes loaded in your configuration, stop the Network Address Server. It will display “bootp server stopped” in the status bar. (Network Address Server, page 21) Step 7: Make your desired changes to the configuration of the node(s). Note: • Node properties (ETCNet2 Node Configuration Properties, page 33) • Editing EDMX (Manually Editing EDMX Configuration Values, page 49) • AIP Configuration (Advanced Input Patch (AIP) Configuration, page 51) Using a vPort (page 37) is the fastest and simplest way to configure DMX Nodes. Patching input and output ports to the same EDMX addresses is as easy as setting them to the same vPort number. For example, assign an input port to vPort 22 then simply assign vPort 22 to the desired output port(s) and the configuration is complete once you send it to the nodes. Step 8: Use Send Config to Nodes to make your configuration changes active in the nodes. (Send a Configuration to a Node, page 23) Step 9: Optimize the EDMX Multicast IP addresses. (Optimize EDMX, page 23) Step 10: Save your configuration file to disk. (NCE Overview, page 4) 12 ETCNet2 Network Configuration Editor (NCE) v4.0.0 User Manual Chapter 2 Installation of NCE and Related Software This chapter covers the information necessary to configure the network settings of your computer and the steps to install NCE and its supporting software. This chapter contains the following sections: 2 • Computer Minimum Requirements . . . . . . . . . . . . . . . . . . . . 14 • Your Computer’s Network Settings . . . . . . . . . . . . . . . . . . . 15 • Installation of NCE Software . . . . . . . . . . . . . . . . . . . . . . . . . 16 Installation of NCE and Related Software 13 Computer Minimum Requirements ECS Note: Unless you are upgrading to a more recent version of NCE or node software (currently v4.0.0), it is already installed for you as part of your base system. These minimum requirements are for a personal computer running Network Configuration Editor (NCE). 14 • Pentium® or compatible processor, 266MHz or better • 32MB RAM • Screen resolution should be set to 800X600 or greater • Compatible with Windows 98SE, Windows 2000, Windows NT4 (with Service Pack 5 and later), Windows XP Professional. • Microsoft Internet Explorer 5.1 or higher • Network Interface Card (NIC) capable of 10Mbps transmission speeds over UTP cable ETCNet2 Network Configuration Editor (NCE) v4.0.0 User Manual Your Computer’s Network Settings ECS Note: The Emphasis Server network settings are the default ETC values and ready for immediate use. No configuration is required. IP addresses for ETCNet2 nodes are automatically set by NCE based on the IP address of the computer that Network Configuration Editor is running on. You also must set an IP address for any personal computer you plan to use on an ETCNet2 network. ETC recommends that the personal computer used on an ETCNet2 network is dedicated to that network so changes to network settings are kept to a minimum. Note: If the computer you wish to use is currently being used on a non-ETCNet2 network please consult your Network Administrator before changing the IP address, Subnet Mask or Gateway IP addresses. Default Network Settings for Your Computer Prior to changing any Network settings on your personal computer please record the current settings in the following spaces below. IP Address _____._____._____._____ Subnet Mask _____._____._____._____ Gateway IP _____._____._____._____ To use your personal computer on an ETCNet2 network that does not use a network router (i.e. hub and/or switch only), ETC recommends the following default settings: Note: IP Address 10.101.1.101 Subnet Mask 255.255.0.0 Gateway IP 10.101.1.101 If you have a network that does include a network router, you must set the Gateway IP address to the appropriate port on the router. Each additional computer on an ETCNet2 network must have it’s own IP address which must be different from any other computer on the same ETCNet2 network. Select from the following default range of IP addresses for an additional personal computer running NCE: 10.101.1.101 10.101.1.102 10.101.1.103 10.101.1.104 10.101.1.105 10.101.1.106 10.101.1.107 10.101.1.108 10.101.1.109 10.101.1.110 10.101.1.111 10.101.1.112 2 Installation of NCE and Related Software 10.101.1.113 10.101.1.114 10.101.1.115 10.101.1.116 10.101.1.117 10.101.1.118 10.101.1.119 10.101.1.120 10.101.1.121 10.101.1.122 10.101.1.123 10.101.1.124 15 Installation of NCE Software Prior to installing NCE, you must update your Microsoft operating system’s with a group of Microsoft subcomponents. If your computer already has more recent versions of these subcomponents installed, they will not be modified. The Microsoft subcomponents are installed by the application “vcredist.exe” which is included on the NCE CD-Rom and is available as a free download from Microsoft’s web site. Search “vcredist” from the main page to get the link. CAUTION: If you do not install the “vcredist” update prior to installing NCE, it is possible that NCE will not operate properly. Note: If you have ETCNet2 Two Port Nodes that are running a version of software prior to v4.0.0, you will need to use your previous version of NCE to update them. Note: It is recommended that you uninstall previous versions of NCE prior to installing this version. If you need to keep previous versions of NCE installed, it is recommended that you uninstall the previous version and reinstall it in a different location. For example: Use “NCE_v3” instead of the default “NCE”. Note: If, after you have installed NCE v4.0.0, you uninstall NCE v3.0.x, you will need to reinstall NCE v4.0.0 and choose the Repair option to replace a required component. To install ETCNet2 NCE: 16 Step 1: Insert the CD-ROM with NCE v4.0.0 on it into the CD-ROM drive on your computer. A web browser based guide will automatically start after you insert the CD-Rom in your computer. It will provide you with links to related documentation, the “vcredist” installer and NCE installer. Step 2: Install the Microsoft “vcredist” update. Step 3: Reboot your computer before you proceed. Step 4: Choose the NCE installer. This launches an InstallSheild wizard to assist you with installation. ETCNet2 Network Configuration Editor (NCE) v4.0.0 User Manual Step 5: ECS Note: Step 6: ECS Note: Note: 2 Select your installation type. • The “NCE Typical Installation” is for a stand-alone PC computer such as a laptop, or any PC used to configure nodes, that is not also running Emphasis Control System software. • The “NCE for Emphasis Server Installation” is for use on Emphasis Servers only. You only need to install NCE on your Emphasis Server if you are upgrading to a more recent version. It is normally installed by default on all Servers and is a part of the Emphasis software CD’s. Use the default installation location. Emphasis users must install the current version of NCE in its default location. Step 7: If your computer has more than one Network Interface Card (NIC), a NICPicker window will appear near the end of the installation process,.This is to allow you to select which NIC you want to use with ETCNet2 applications such as NCE. If your computer does not, you will next do Step 13. Step 8: Select the box of the one you want to use. If only one NIC is available, use that one. If you have already configured your IP address information, you will be able to identify the NIC more easily. See Your Computer’s Network Settings, page 15. Installation of NCE and Related Software 17 Note: In the screenshot above, the card is already configured for use on an ETCNet2 network and is only shown as an example using defaults. Your MAC address information will be different. Step 9: Once you have selected your NIC, choose Save. Step 10: A Save dialog box will appear. The default directory and file name to save your selection is correct. CAUTION: Do not change the location or the file name! The file name must be: etcnet2.cfg Step 11: Click Save. Step 12: Close NICPicker. Step 13: Click Finish to complete the NCE installation process. Note: 18 Node software is now installed as part of NCE’s normal installation. In previous versions of NCE, the node software was installed separately from the NCE installation. This is no longer the case. ETCNet2 Network Configuration Editor (NCE) v4.0.0 User Manual Chapter 3 Network Features & Functions The network features and functions of NCE are detailed in this chapter. The functions are fundamentally in the order you would use them to bring your nodes online from a state of being new (factory defaults). Additional network functions are then covered. This chapter contains the following sections: • • 3 Get Your Nodes Online . . . . . . . . . . . . . . . . . . . . . . . . . . . . . 20 • Connect to the Network. . . . . . . . . . . . . . . . . . . . . . . . . . 20 • Assign an IP Address to ETCNet2 Nodes . . . . . . . . . . . 20 • Network Address Server . . . . . . . . . . . . . . . . . . . . . . . . . 21 • Get Unbound Nodes . . . . . . . . . . . . . . . . . . . . . . . . . . . . 22 • Send a Configuration to a Node . . . . . . . . . . . . . . . . . . . 23 • Optimize EDMX. . . . . . . . . . . . . . . . . . . . . . . . . . . . . . . . . 23 More Network Commands . . . . . . . . . . . . . . . . . . . . . . . . . . . 25 • Get a Configuration From a Node. . . . . . . . . . . . . . . . . . 25 • Net1 -> Net2 . . . . . . . . . . . . . . . . . . . . . . . . . . . . . . . . . . . 25 • Reboot Nodes . . . . . . . . . . . . . . . . . . . . . . . . . . . . . . . . . . 26 • Clear Configuration . . . . . . . . . . . . . . . . . . . . . . . . . . . . . 26 • Update Node Software . . . . . . . . . . . . . . . . . . . . . . . . . . . 26 Network Features & Functions 19 Get Your Nodes Online The Network menu is where you control NCE’s activity on the network. Connect to the Network Once you’ve opened NCE you must first connect your computer to the network. To connect your computer to the network: • On the Network menu, click Connect. Connecting NCE to the network essentially puts NCE online with other ETCNet2 devices. You may notice nodes appearing online in the status bar. Assign an IP Address to ETCNet2 Nodes When ETCNet2 nodes are shipped from the factory, they all have the same ETC reserved IP address that tells the node to ask for a new one. They need to be assigned an IP address before they can communicate normally on the network. Prior to receiving an IP address, they will not even show up as online in NCE. NCE can automatically set the IP address for ETCNet2 nodes via the Network Address Server. Note: When nodes are first turned on before they have an IP address, the power LED will flash and none of the DMX Node port LED will illuminate to indicate that the node does not have an IP address. For more information, see ETCNet2 Node Status LEDs, page 8. Note: For a node with factory defaults to receive an IP address it must be powered on and connected to the network. ECS Note: 20 To give DMX and Video nodes IP addresses initially, all you have to do is have your Emphasis Server turned on and it will happen automatically for you. ETCNet2 Network Configuration Editor (NCE) v4.0.0 User Manual Network Address Server ECS Note: The Network Address Server within NCE will not function on the Emphasis Server. This is because the Emphasis Server has the same functionality running constantly in the background unless it has been turned off. NCE’s Network Address Server knows not to duplicate that function and will simply not run. The Network Address Server is responsible for assigning IP addresses to nodes and keeping track of which IP addresses have already been used and which ones are still available. When nodes are turned on they attempt to confirm the network setting with the Network Address Server. The node will either be told their IP address is okay or they will be automatically sent new appropriate IP address information. If the Network Address Server isn’t turned on and therefore unable to respond, the node will quickly give up trying (it only tries for 1 second) and continue to boot. Note: Using this piece of information, it is fairly easy to resolve an IP address problem by turning on the Network Address Server and turn the problem node off and back on again. ECS Note: Since the Network Address Server within the Emphasis Server is constantly running, anytime a node is connected to the network (Ethernet connection first, then power) the node has its IP address checked to be appropriate for the network it is connected to. The Network Address Server is also responsible for sending software to nodes that ask for it. For the moment suffice it to say that when you tell a node to update its software, you are merely telling the node to ask for software. If the Network Address Server isn’t there to send it, nothing will happen and the node will continue to ask and wait for software. For more information about downloading software to nodes, Appendix E: Upgrading Node Software, page 67. To start the Network Address Server: • On the Network menu, click Network Address Server. • You should see a message on the status bar that says “bootp server started”. • If you see a message on the status bar that says “bootp server stopped” then you have a problem. See the note below for possible solutions. To stop the Network Address Server (after it is started): 3 • On the Network menu, click Network Address Server. • You should see a message on the status bar that says “bootp server stopped”. Network Features & Functions 21 If you open the Network menu again, it should be checked. This is a toggled state. Meaning that if you click Network Address Server again, it will be turned off. Means it’s running Means it’s not running If you’re trying to start it, you have a problem. See the note below for possible solutions. Note: CAUTION: The two most common problems are either an error in the network settings configuration for your computer or there is already a bootp server running somewhere on the network such as an Emphasis Server. The Network Address Server (bootp server) will only assign IP addresses to the same types of nodes (DMX Node, Two Port Node and Video Node) that it has software installed in the C:\etc\nodesbin directory. Do not change this directory! If the proper node software is not installed, the Network Address Server will not respond to the nodes request for an IP address. Node software is installed by default with both NCE installation options for this release (v4.0.0). Once Network Address Server is enabled, it will send IP addresses to all ETCNet2 nodes that are asking for an IP address on the network. No user intervention is required during this process. Your nodes should now be online and the proper total should be displayed in the Nodes Online portion of the status bar. On larger networks that employ a router (or device with layer 3 services) on the network, the Network Address Server resolves IP addresses for nodes on different network segments automatically. Note: Any programmable switch or router to be used on an ETCNet2 network must be configured prior to using ETCNet2 nodes or Network Configuration Editor. Get Unbound Nodes This function adds any node that is online and not already in your configuration to your configuration. When the node is added, its current configuration settings are also included. When starting with a new system, this is a fast and simple method to build your configuration. Since none of the nodes online are in your configuration, all of them and their default settings will be added to your configuration in NCE. In the same way, this is an easy way to add a new node to your configuration after it is online. 22 ETCNet2 Network Configuration Editor (NCE) v4.0.0 User Manual To add nodes to the configuration and get the node settings from unbound nodes: • On the Network menu, click Get Unbound Nodes. • Click “Yes” when prompted with the “Are you sure...” dialog box. Number of nodes in the configuration file. Once the unbound nodes appear in your configuration file, you can begin editing the node settings. When you are done making changes to the nodes, be sure to send the configuration to the nodes to complete the process. Send a Configuration to a Node Use the Send Config to Nodes command to update a node on the network with a configuration from your pc. Configuration file nodes must be bound to network nodes before sending a configuration to a node. Note: • On the Network menu, click Send Config to Nodes. • Click “Yes” when prompted with the “Are you sure...” dialog box. To send a configuration to a specific node, highlight the node (or nodes) by clicking (or control-clicking to select multiple nodes) in the Node Index column and select Send Config to Nodes. Optimize EDMX This function may require a bit more explanation as to what it does and why it’s good to use. Every EDMX source (Obsession II, Emphasis, and in this case DMX Nodes) sends its EDMX level information over the network on a given multicast IP address. By default, all DMX Nodes are set to send this information on the same “station” (Think multicast IP address = radio station). Other ETCNet2 devices that are configured to use this level information receive all of the information broadcast on that station regardless if it is needed or not. This can be inefficient on larger systems. 3 Network Features & Functions 23 Optimize EDMX assigns a different mulitcast IP address (“station”) to each DMX Node with an enabled input port. This means that the EDMX information is more spread across different stations enabling other ETCNet2 devices better pick and choose which “stations” they need to listen to. All ETCNet2 EDMX devices share this “station” and content information with each other and it is handled automatically by the network devices. For even more detail about multicast IP addresses and their use in NCE and DMX Nodes, please see Appendix D: ETCNet2 Multicast IP Address Usage, page 65. You should perform this function after you have finished configuring your nodes and have sent the configuration to the nodes. Optimize Multicast IP Addresses will assign the different addresses then ask for confirmation to send the new addresses to the nodes and reboot only the nodes affected. Note: Performing this function only sends Multicast IP address information to the nodes that need it. It will then force a reboot of the nodes that got sent a multicast IP information to make the new addresses take effect. It does not send any other configuration settings to the nodes. You still need to Send Config to Nodes to send the rest of the settings to the nodes. To Optimize Multicast IP Addresses: 24 • On the Network menu, click Optimize EDMX. • Click “Yes” when prompted with the “Are you sure...” dialog box. ETCNet2 Network Configuration Editor (NCE) v4.0.0 User Manual More Network Commands Get a Configuration From a Node This function requests all configuration settings from the selected nodes. Use the Get Config from Nodes command to update an existing configuration file data. Nodes must be online to be able to get their configuration settings. To get the configuration from a node: • On the Network menu, click Get Config from Nodes. • Click “Yes” when prompted with the “Are you sure...” dialog box. Note: To get a config from a specific node, highlight the node (or nodes) by clicking (or control-clicking to select multiple nodes) in the Node Index column and click Get Config from Nodes. Net1 -> Net2 The Net1 -> Net2 function sends out a broadcast message instructing all ETCNet2 nodes on the network in Net1 mode to switch to Net2 mode. An example of this is an ETCNet2 Video Node that was previously configured to work with an Expression family console. In previous versions of NCE, this function was called Discover Nodes. Please see ETCNet2 Node Status LEDs, page 8, for Net1 LED status indication. Note: Net1 -> Net2 does not enable an original ETCNet1 device (ETCNet Remote Interface Unit or ETCNet Remote Video Interface) to operate in ETCNet2 mode. Note: All nodes that you are attempting to switch modes must have been reset (via unplugging power or the reset button) after they were connected to a Net1/ Expression family console in order for this function to work. To set all ETCNet2 nodes on the network in ETCNet1 mode to ETCNet2 mode: • 3 On the Network menu, click Net1 -> Net2. Network Features & Functions 25 Reboot Nodes The Reboot Nodes feature is used in the event that you want to reboot your nodes remotely. To reboot all nodes: • On the Network menu, click Reboot Nodes. • Click “Yes” when prompted with the “Are you sure...” dialog box. Note: To reboot a specific node, highlight the node (or nodes) by clicking (or controlclicking to select multiple nodes) in the Node Index column and click Reboot Nodes. Clear Configuration The Clear Configuration feature is used to restore the factory defaults to any nodes selected. It is password protected to prevent its accidental use. Clear Configuration is reserved for use at the direction of ETC Technical Services. Update Node Software Update Node Software sends a message to nodes directing them to stop normal operation (they drop offline in NCE) and request a software download for as long as it takes to get software. As mentioned previously under Network Address Server, page 21, the Network Address Server (or the bootp server for Emphasis Control Systems) is responsible for delivering the software to nodes requesting it. This has two different implications. First, you need to have a bootp server (an Emphasis Server online or Network Address Server enabled in NCE) online and active in order to send software to the node. Second, the nodes that are requesting software will get it from whatever active bootp server has the software that they are looking for. This means that with an Emphasis Server online, you can direct a node from a laptop computer to request software (Update Node Software). The node will start requesting software from a bootp server, but in this case the response and the software will come from the Emphasis Server instead of the laptop. This can be a very handy feature or the source of confusion. You can keep your configurations and node software up-to-date and in one place and direct nodes to download it from this central location from where ever you are on the network from a remote computer. For major version (or minor) software updates (v3.0.0 to v4.0.0) instructions, please see Appendix E: Upgrading Node Software, page 67 for detailed information. ECS Note: Since a bootp server (Network Address Server) is always running in the background on an Emphasis Server (unless it is part of a multiple Emphasis Server system or it has specifically been turned off), directing nodes to do a software download will normally result with them getting the software from the same computer. To direct nodes to request a software download: • Note: On the Network menu, click Update Node Software. To direct a specific node to request a software download, highlight the node (or nodes) and click Update Node Software. You can also use Version Detect to update node software. Please see Version Detect and Upgrade Utility, page 54 for more information. 26 ETCNet2 Network Configuration Editor (NCE) v4.0.0 User Manual Node LEDs While Downloading Software When the nodes download software, they indicate what they are doing by using their LEDs. Below is an outline of the LED activity you should expect. The times provided are approximate and will vary based upon the number of nodes on the network, the speed of your computer and so on. • Moments after the Update Node Software command is executed, all of the LEDs will turn off, except for the power LED. • • When the download is complete, the Network Activity LED will turn on and the Power LED will begin to flash quickly. In the case of a DMX Node, the DMX port red LEDs will chase from left to right (port 1 to port 4). • WARNING: 3 The node is now waiting for software to be downloaded. The node is now erasing its memory and replacing it with the new software. You can damage the node by loosing power while the node is downloading software and the LEDs are chasing. For a brief period of time, the old software is erased and the new software has not been written yet. If this happens, the node will not function and will have to be sent to ETC for service. • The process is almost complete when the Power LED turns on, the Network Activity LED turns off and for the DMX Node, the DMX port 1 LED will flash green for 5 seconds. • The node will now reboot and resume normal operation using the newly downloaded software. Network Features & Functions 27 28 ETCNet2 Network Configuration Editor (NCE) v4.0.0 User Manual Chapter 4 Views of Your Node Data NCE filters the node data you see in most of the views you select. NCE also provides some useful tools to manipulate that information and display it as you want. This chapter guides you through those viewing features. This chapter contains the following sections: 4 • Understanding Views . . . . . . . . . . . . . . . . . . . . . . . . . . . . . . . 30 • Sorting Your Configuration Data. . . . . . . . . . . . . . . . . . . . . . 31 • Hiding/Resizing Columns & Getting Them Back . . . . . . . . . 32 Views of Your Node Data 29 Understanding Views Selecting different views in NCE enables you to easily get a better look at either portions or all of your node configuration information. By selecting different views, you choose what information is displayed and what information is hidden. Views don’t affect what node types are display in your configuration, only the properties (settings) on each node are displayed. So if you were to select the view Video Ports with only DMX Nodes in your configuration, you would still see all of your nodes listed, but you wouldn’t have any Video Ports available to configure. The default view when NCE is started is DMX Nodes. The current view is indicated by a checkmark in front of the view name in the View menu as shown above. Views also determine the content that is printed by NCE. Any of the views selected, how the columns are sized or sorted directly affect the printed output. 30 ETCNet2 Network Configuration Editor (NCE) v4.0.0 User Manual Sorting Your Configuration Data You can sort the nodes display by any column currently visible in that view. Simply position the cursor in the top row above the column you want to sort (as shown below) and doubleclick. All of the node information will be sorted by that property. Double-clicking over the same column a second time will do a reverse-sort on the same property. Sorting also works on a port by port basis as well as a node by node basis (as previously shown with node name). Note: 4 The above configuration is now sorted on a port by port basis. To get this back in a node by node listing, sort by node-wide property such as Name or MAC Address from the Node Address view. Views of Your Node Data 31 Hiding/Resizing Columns & Getting Them Back You can resize or hide any of the columns in the table. This can make it easier to read names and comments in the table. When you print the configuration table, it will use the width that you set. Resize a Column • Position on the right side of the column you want to resize. • Click and drag the cursor to resize the column. Hide a Column • Position on the right side of the column you want to hide. • Click and drag the cursor to the left until the column no longer visible. Restore a Hidden Column • 32 Select any view and the screen will refresh returning all columns to their default widths. ETCNet2 Network Configuration Editor (NCE) v4.0.0 User Manual Chapter 5 ETCNet2 Node Configuration Properties This chapter defines all of the properties of an ETCNet2 Node. Not all DMX Node properties appear for every DMX Node type. For instance, the DMX Two Port Node and the some variations of the DMX Node don’t have RFU and ETCLink ports. Specific node type or system differences are noted. This chapter contains the following sections: • • 5 ETCNet2 DMX Node Properties . . . . . . . . . . . . . . . . . . . . . . . 34 • DMX Node Configuration Properties . . . . . . . . . . . . . . . 34 • DMX Node Port Properties . . . . . . . . . . . . . . . . . . . . . . . 35 • DMX Node Input Port Properties . . . . . . . . . . . . . . . . . . 36 • DMX Node Output Port Properties . . . . . . . . . . . . . . . . . 38 • RFU Port Properties . . . . . . . . . . . . . . . . . . . . . . . . . . . . . 39 ETCNet2 Video Node Properties . . . . . . . . . . . . . . . . . . . . . . 40 • Video Node Configuration Properties . . . . . . . . . . . . . . 40 • Video Port Properties . . . . . . . . . . . . . . . . . . . . . . . . . . . 41 • RFU Port Properties . . . . . . . . . . . . . . . . . . . . . . . . . . . . . 41 • Remote Macro Properties [Emphasis Only Feature] . . 42 • Remote Trigger Properties [Emphasis Only Feature] . 43 • ETCNet2 Software Version Information . . . . . . . . . . . . . . . . 44 • ETCNet2 Node Network Address Properties . . . . . . . . . . . . 45 ETCNet2 Node Configuration Properties 33 ETCNet2 DMX Node Properties To configure the properties of an ETCNet2 DMX node you must first have a node in your configuration. You can accomplish this by either following the procedures in Get Your Nodes Online, page 20 or by inserting a default node. For additional information on inserting default nodes, please see Advanced Features: Binding Nodes, page 57. To add a default node to a configuration: • Open the Insert menu and click DMX Node. The default view (DMX Nodes) shows Node Properties, DMX Port Properties and RFU Port Properties. You will have to change views from the View menu to see all of the properties for a DMX Node. We will now step through the properties one-by-one explaining what they control or indicate. Any editable field (not greyed out) can be edited by click in the field. Some fields are simply checkmarks and others provide increment/decrement arrows to adjust the value or a dropdown list for you to choose a value. DMX Node Configuration Properties • Name This property allows you to name a node. This value (name) is displayed in other ETCNet2 native applications such as Emphasis or WYSIWYG to let you know which node is being referred to. Be sure to use descriptive useful names. For instance: “Moving LightsCatwalk 1” is descriptive for both location and use. • Name [Additional Two Port Only Configuration] You can name the node and the ports of a DMX Two Port Node in NCE and those names will appear on the LCD screen of the Two Port Node. The formatting of the name field is as follows: • 34 In the Name field, type the name of the node, the name of port 1 and the name of port 2 with each of them separated by a colon ‘:’. For example node1:port1:port2. A useful set of names: Catwalk1:Moving Lights:Color Scrollers ETCNet2 Network Configuration Editor (NCE) v4.0.0 User Manual • There is an additional (fourth) field that can be used to set the state of the LCD backlight on the node. Valid values are “ON” or “OFF”. The syntax to enable the backlight is: node1:port1:port2:ON. Note: If nothing is entered in the Name field for the Two Port Node, the IP address of the node will appear on the LCD screen. If nothing is entered in the Port 1 or Port 2 portion of the name field, the EDMX start value will be displayed. These are the default settings of nodes as they will not have any names until you assign them. • Type [Display Only] This will display the type of node these rows represent. The available options are: • DMX Node • DMX Node No RFU Port • Video Node • DMX Node Two Port • Comment This field provides space for additional comments. This field is only stored with the NCE configuration file. It is not stored in the node. This means that if you enter something in the comments field, send the config to nodes, and either start with a blank config or use a second computer, when you next Get Unbound Nodes you will not have those comments in the Comment field. DMX Node Port Properties • Port [Display Only] Displays the DMX port number for a row. This is useful when certain port sorts are done. • Enabled This is a checkbox that is checkmarked when it is enabled. This makes the associated DMX port active. • Input Output Click on Input Output to designate your port as either an input or an output. Clicking in this field will present you list of choices (Input, Output) and typing the first letter is quick way to select one or the other. Typing the first letter and using the arrow keys makes it very easy to change these ports quickly. 5 ETCNet2 Node Configuration Properties 35 DMX Node Input Port Properties When a port on the ETCNet2 DMX node is configured as an Input, the DMX Node can receive DMX512 from other DMX512 compliant devices and output EDMX (become an EDMX source) onto the network. • AIP (Advanced Input Patch) Checking the box in this field enables the Advanced Input Patch for this port. This also disables normal EDMX table fields including vPorts. See Advanced Features: Advanced Input Patch (AIP) Configuration, page 51 for configuring this patch. • DMX Start The number entered in the DMX Start field is the first DMX channel that the DMX Input port listens to. Note: An input port will only take control of EDMX values when valid DMX is coming into the port. • EDMX Start The number entered in the EDMX Start field is the first EDMX value that the DMX Start is mapped to output to the network. Valid numbers range from 1-32,767. • EDMX Channels Enter a number between 1-512 in the EDMX Channels column to designate the number of EDMX channels you want to input. An EDMX port defaults to 512 channels. • EDMX End [Display Only] The EDMX End field will change to reflect the last EDMX channel used on the Input port. Changing the EDMX Start or EDMX Channels will cause the EDMX End field to change accordingly. • DD (Dimmer Double) A check mark in the DD field indicates that Dimmer Doubling is enabled for that port. When Dimmer Doubling is enabled the number of EDMX channels for a port is divided into two ranges of 256 channels. • DD EDMX Start The DD EDMX Start field sets the start address of the “B” channels on a Dimmer Doubled port. • DD EDMX End [Display Only] The DD EDMX End field displays the end address of the “B“ channels on a Dimmer Doubled port. 36 ETCNet2 Network Configuration Editor (NCE) v4.0.0 User Manual • vPort Enter the number of the vPort you want to assign in this field. The default vPort table is a series of 64 vPorts each containing a sequential range of 512 EDMX addresses. When you specify a vPort, NCE displays the default EDMX start address and EDMX end address for that vPort. A table of default vPorts and their values is located in Appendix B: Default vPort™ Table, page 61 of this manual. Also see Advanced Features: Edit vPorts, page 48 to edit and/or add vPorts. Using vPorts is the fastest and simplest way to configure DMX Nodes. Patching input and output ports to the same EDMX addresses is as easy as setting them to the same vPort number. For example, assign an input port to vPort 22 then simply assign vPort 22 to the desired output port(s) and the configuration is complete once you send it to the nodes. Note: When you assign a vPort, the DMX Start address defaults to 1. Changing the DMX Start address to a number other than 1 will clear the vPort selection. • HLLF (Hold Last Look Forever) If an ETCNet2 DMX Node input port loses valid DMX from its source, the node will continue to transmit the last look (the last set of known values) for an indefinite amount of time over the network when the HLLF box is checked. The input port will stop this when either valid DMX comes back or the node is reset. • HLL Time HLL Time is also used in the event of a loss of DMX input. If the HLLF box is not checked, the node will use the HLL Time value. If a time is set, then the node will hold the last look for the amount of time specified. Time is displayed in seconds. The default time is 180 seconds (3 minutes). • Port Priority Use the Port Priority to set an EDMX priority for that port. Port Priorities range from one (1) (the highest priority) to 20 (the lowest priority). Port priorities are used to arbitrate control for each EDMX address on the network. When an EDMX channel is patched to more than one DMX input port, Port Priority determines which DMX port controls that channel. In the event of a tie (both source priorities are the same), the receiving device will use HTP (take the highest level) to determine the value to be used. In ETCNet2 v4, all ETCNet2 devices can set an EDMX priority and all ETCNet2 devices default to an EDMX Priority of ten (10). For a complete set of EDMX priority rules, please see Introduction: EDMX Priorities, page 7 and Appendix A: ETCNet2 EDMX v4 Rules, page 59. • Line Termination [Only visible from Node Details display] Line Termination is a checkbox that turns on active DMX termination on the DMX input port. It is turned on by default. To change the Line Termination setting, select Node Details from the View menu and scroll to the right in NCE. 5 ETCNet2 Node Configuration Properties 37 DMX Node Output Port Properties When a port on the ETCNet2 DMX node is configured as an Output, the DMX Node can receive EDMX from the network and output DMX512 to other DMX512 compliant devices. • EDMX Start The number in the EDMX Start field sets the first EDMX address the node will listen to and output as DMX one (1) (all DMX512 signals must start with one (1)). The valid range is from 1 to 32,767. • EDMX Channels The number in the EDMX Channels field sets the number of EDMX channels you want assigned to that output port. A maximum of 512 EDMX channels can be assigned to a port. • EDMX End [Display Only] The EDMX End field will change to reflect the last EDMX channel assigned to the output port. Changing the EDMX Start or EDMX Channels will cause the EDMX End field to change accordingly. • DD (Dimmer Double) A checkmark in the DD field indicates that Dimmer Doubling is enabled for this port. When Dimmer Doubling is enabled the number of EDMX channels for a port is divided into two ranges of 256 consecutive channels. • DD EDMX Start The DD EDMX Start field sets the start address of the “B” channels on a Dimmer Doubled port. • DD EDMX End [Display Only] The DD EDMX End field displays the end address of the “B“ channels assigned to a Dimmer Doubled port. • vPort Enter the number of the vPort you want to assign in this field. The default vPort table is a series of 64 vPorts each containing a sequential range of 512 EDMX addresses. When you specify a vPort, NCE displays the default EDMX Start address and EDMX End address for that vPort. A table of default vPorts and their values is located in Appendix B: Default vPort™ Table, page 61 of this manual. Also see Advanced Features: Edit vPorts, page 48 to edit and/or add vPorts. Using vPorts is the fastest and simplest way to configure DMX Nodes. If you assign an input port to vPort 22 (or whatever vPort you want to use) and you want that full DMX universe somewhere else, simply assign vPort 22 (or the same vPort you used on the input) to the desired output port(s) and the configuration is complete once you send it to the nodes. 38 ETCNet2 Network Configuration Editor (NCE) v4.0.0 User Manual • Port Speed Port Speed sets the DMX output port’s refresh rate via a pull-down menu to Maximum, Fast, Medium, Slow. Refresh rate is (on average): Maximum = 42Hz, Fast = 39Hz, Medium = 35Hz, Slow = 30Hz. • HLLF (Hold Last Look Forever) When the HLLF box is checked and an ETCNet2 DMX node output port loses EDMX information from its source, the node will continue to output the last known DMX512 values for an indefinite amount of time. The output port will resume normal operation if the information comes back and a reset will clear those values from being output. • HLL Time HLL Time is also used in the event of a loss of EDMX input. If the HLLF box is not checked, the node will use the HLL Time value. If a time is set, then the node will hold the last look for the amount of time specified. Time is displayed in seconds. The default time is 180 seconds (3 minutes). • Data Loss Fade Enabled When HLLF is disabled, check the Data Loss Fade Enabled box to use the value set in Data Loss Fade Time to fade the DMX output of a port to zeros (0) after the HLL Time has expired. • Data Loss Fade Time The Data Loss Fade Time field sets the amount of time used to fade the DMX output to zeros from the last known values. This happens after the HLL Time has expired. • Data Loss Port Disable The Data Loss Port Disable checkbox sets the end state of the DMX output port in the event that the EDMX source is lost. When this box is checked and there is a loss of EDMX, the DMX output port is disabled (no EDMX source = no valid DMX512). When this box is not checked and EDMX input is lost, the DMX output port remains active and continues to output valid DMX512 with level values of zero (0) until an EDMX source is reestablished. RFU Port Properties • Multidrop [Obsession II Only Feature] This checkbox enables Multidrop for this RFU connection. • System ID The System ID is used in networks where there is more than one Emphasis or Obsession II system. Use the System ID to identify which system your RFU port communicates with. The default value for all devices that have a System ID (Emphasis, Obsession II and Net2 Nodes) is zero. 5 ETCNet2 Node Configuration Properties 39 ETCNet2 Video Node Properties To configure the properties of an ETCNet2 Video node you must first have a node in your configuration. You can accomplish this by either following the procedures in Get Your Nodes Online, page 20 or by inserting a default node. For additional information on inserting default nodes, please see Advanced Features: Binding Nodes, page 57. To add a default node to a configuration: • Open the Insert menu and click Video Node. The default view (DMX Nodes) shows Node Properties, DMX Port Properties and RFU Port Properties. You will have to change views from the View menu to see all of the properties for a Video Node. We will now step through the properties one-by-one explaining what they control or indicate. Any editable field (not greyed out) can be edited by click in the field. Some fields are simply checkmarks and others provide increment/decrement arrows to adjust the value or a dropdown list for you to choose a value. V i d e o N o d e C o n f i g u r a t i o n P r o p e r ti e s • Name This property allows you to name a node. This value (name) is displayed in other ETCNet2 native applications such as Emphasis or WYSIWYG to let you know which node is being referred to. Be sure to use descriptive useful names. For instance: “Tech Table Video Node” is descriptive for both location and use. • Type [Display Only] This will display the type of node these rows represent. The available options are: 40 • DMX Node • DMX Node No RFU Port • Video Node • DMX Node Two Port ETCNet2 Network Configuration Editor (NCE) v4.0.0 User Manual • Comment This field provides space for additional comments. This field is only stored with the NCE configuration file. It is not stored in the node. This means that if you enter something in the comments field, send the config to nodes, and either start with a blank config or use a second computer, when you next Get Unbound Nodes you will not have those comments in the Comment field. Video Port Properties • System ID The System ID is used in networks where there is more than one Emphasis or Obsession II system. Use the System ID to identify which system your Video port communicates with. The default value for all devices that have a System ID (Emphasis, Obsession II and Net2 Nodes) is zero. You can split the video ports between two different systems. • Display Number Select CRT 1-CRT 8 to identify which video ports on the Emphasis system or Obsession II system you want the ETCNet2 video node to mimic. Display Number CRT 1 CRT 2 CRT 3 CRT 4 CRT 5 CRT 6 CRT 7 CRT 8 Obsession II Display User one - CRT 1 - console User one - CRT 2 - console User one - expanded channel display 1 User one - expanded channel display 2 User two - CRT 1 - console User two - CRT 2 - console User two - expanded channel display 1 User two - expanded channel display 2 Emphasis Display CRT 1 - console CRT 2 - console • Locked Enable the Locked feature by clicking the checkbox to lock the properties of a video port so that they can only be changed by NCE. This means that when Obsession II or Emphasis change display screens, the node will remain the same. RFU Port Properties • Multidrop [Obsession II Only Feature] This checkbox enables Multidrop for this RFU connection. • System ID The System ID is used in networks where there is more than one Emphasis or Obsession II system. Use the System ID to identify which system your RFU port communicates with. The default value for all devices that have a System ID (Emphasis, Obsession II and Net2 Nodes) is zero. 5 ETCNet2 Node Configuration Properties 41 PC Keyboar d Port Proper ties • System ID The System ID is used in networks where there is more than one Emphasis or Obsession II system. Use the System ID to identify which system your PC Keyboard port communicates with. The default value for all devices that have a System ID (Emphasis, Obsession II and Net2 Nodes) is zero. Remote Macro Properties [Emphasis Only Feature] The Video Node is capable of taking eight (8) individual closures that will fire (execute) a user specified macro on an Emphasis system. • System ID Leading Edge The System ID is used in networks where there is more than one Emphasis system. Use the System ID to identify which system your leading edge remote macro is sent. • Leading Edge Macro The Leading Edge Macro number will fire the corresponding macro on the Emphasis system with the same System ID. This macro will fire at the moment the external closure is closed. • System ID Trailing Edge The System ID is used in networks where there is more than one Emphasis system. Use the System ID to identify which system your trailing edge remote macro is sent. • Trailing Edge Macro The Trailing Edge Macro number will fire the corresponding macro on the Emphasis system with the same System ID. This macro will fire at the moment the external closure is opened or released after being closed. 42 ETCNet2 Network Configuration Editor (NCE) v4.0.0 User Manual R e m o t e T r i g g e r P r o p e r t i e s [E m p h a s i s O n l y F e a t u r e ] The Remote Trigger function allows you to program a macro on an Emphasis system to send an On or Off signal to the remote macro port on a Video Node. This remote dry contact closure can be used to control any external device capable of using this type of closure. The Remote Trigger has a normally open and normally closed output. • System ID The System ID is used in networks where there is more than one Emphasis system. Use the System ID to identify which system your remote macro leading edge trigger is sent to. • Trigger ID The Trigger ID is used to identify which remote trigger command this Video Node will respond to. The remote Trigger ID must match the remote trigger ID set on the controlling Emphasis system. 5 ETCNet2 Node Configuration Properties 43 ETCNet2 Software Version Information There are two place that you can get software version information from your nodes. The first one is Node Details in the View menu. This option only works if the node is online and in the NCE configuration. The second is more flexible and doesn’t require the node to be online in NCE. This option is using VersionDetect and is covered in detail in Advanced Features: Version Detect and Upgrade Utility, page 54. • Version [Display Only] This is the short version number in the format: • <MajorVersion>.<MinorVersion> Patch <PatchNumber> • For the v4.0.0 release, this version number is “4.0 Patch 0” • Version String [Display Only] The Version String contains all of the detailed version information about the software running in a particular node. It contains (but is not limited to) the type of node it runs on, the date the software was released, other subcomponent version information and copyright information. 44 ETCNet2 Network Configuration Editor (NCE) v4.0.0 User Manual ETCNet2 Node Network Address Properties These properties are password protected to keep them from accidentally being altered. Under normal system operation, there is no need to edit these values. These properties are only typically edited under extreme troubleshooting with ETC Technical Services or for a highly complex network where there are very specific network needs that can only be implemented via direct manipulation of these properties. For more detailed information on some of these topics and more, please refer to the ETCNet2 v4 Planning Guide. CAUTION: Making a mistake (a typo or a wrong address) while changing these settings may disable your nodes. • IP Address IP Address is the decimal “name” given to a node which is its address on a network. • Example: 10.101.50.101 (ETC’s default first IP address for a ETCNet2 node) • Subnet Mask The Subnet Mask separates an IP address into a network address and a device address. All devices on the same network based on the subnet mask are capable of communicating with each other. All devices must have a unique address within a network. Use of a Subnet Mask to determine the Logical Network Network Address IP Address Subnet Mask Logical Network • 5 Network Address Device Address 010.101.130.101 255.255.000.000 010.101.000.000 IP Address Subnet Mask Logical Network Device Address 192.168.012.042 255.255.255.000 192.168.012.000 Example: 255.255.0.0 (ETC’s default subnet mask) ETCNet2 Node Configuration Properties 45 • Gateway IP The Gateway IP address is the IP address of a gateway interface on the network. • A gateway is a network address that acts as an entrance to another network. • A gateway is synonymous with a router interface, which knows where to direct a given packet of data that arrives based on a learned or configured path in and out of the router for a given packet. • Example: 10.101.1.1 (default gateway IP address for a routed network) • Example: Gateway IP = IP Address (default gateway IP on a non-routed network) In the event (typically) that there is no router present on the network, it is recommended that the Gateway IP address be set to the same as the IP Address. • Bootp Verify Time Bootp Verify Time is the time in milliseconds (1000msec = 1 sec.) that the node will try to find a bootp server to verify its network settings. If no response if detected in the allotted time, the node continues to boot normally using its existing network settings. • EDMX Admin EDMX Admin is the multicast IP address on which ETCNet2 transmits what device has control of which EDMX addresses and at what priority. This is essentially the listening “station” to find out what’s on all of the other stations. • EDMX Multicast IP This network setting defines the broadcast “station” the source device uses to send EDMX data. This is the network setting that Optimize EDMX... sets for you automatically. See Optimize EDMX, page 23 for more information on automatically setting this property and Appendix D: ETCNet2 Multicast IP Address Usage, page 65 for different device usage. • MAC Address [Display Only] The MAC address is a unique hexadecimal serial number assigned to each Ethernet device to identify it on a network. A MAC address is theoretically unique. This address is set at the time of manufacture, though rarely it can be changed through software. 46 • MAC Address = Media Access Control address • Example: 00:C0:16:00:0A:42 ETCNet2 Network Configuration Editor (NCE) v4.0.0 User Manual Chapter 6 Advanced Features This chapter covers the more powerful tools methods provided in NCE. Some of these tools are new in NCE v4.0.0, such as AIP and the Version Detect Utility. Not everyone needs to or will want to use all of these tools. Version Detect stands out as one that most people will want to know and use. This chapter contains the following sections: 6 • Edit vPorts. . . . . . . . . . . . . . . . . . . . . . . . . . . . . . . . . . . . . . . . 48 • Manually Editing EDMX Configuration Values. . . . . . . . . . . 49 • Advanced Input Patch (AIP) Configuration . . . . . . . . . . . . . 51 • Version Detect and Upgrade Utility. . . . . . . . . . . . . . . . . . . . 54 • Insert Nodes . . . . . . . . . . . . . . . . . . . . . . . . . . . . . . . . . . . . . . 56 • Binding Nodes . . . . . . . . . . . . . . . . . . . . . . . . . . . . . . . . . . . . 57 Advanced Features 47 Edi t vPorts When you open NCE for the first time or start with a new file, NCE’s vPort table is at a default state. You can see the default vPort table in Appendix B: Default vPort™ Table, page 61. Edit vPort Table To edit vPorts: • On the Edit menu, click vPorts... Use to reset an individual row to default Use to reset Prints the vPort Use to add a Use to delete vPorts 1-64 table to the vPort to the an added back to defaults default printer end of the table custom vPort. Accept all changes & close window Ignore all changes & close window EDMX Values The default vPort table shows the list of vPort ID numbers in the left-hand column. To change the EDMX Start and EDMX Channels for a vPort, click in a text box in one of these columns and enter a new value. 48 ETCNet2 Network Configuration Editor (NCE) v4.0.0 User Manual Manually Editing EDMX Configuration Values Network Configuration Editor also makes it easy to configure large networks with multiple nodes and with more than one console controlling the same dimmer rack. For example, two consoles can send DMX512 levels to a single dimmer rack and share certain dimmers by programming offset EDMX addresses in Network Configuration Editor. In the following diagram there are two consoles controlling a single rack. Hub/Switch DMX Express Console Channels 1-24 DMX ETCNet2 DMX Node ETCNet2 DMX Node DMX Sensor Expression 3 Console Channels 1-72 PC running NCE In this configuration, the Express console sends DMX512 to Input port 1 on the ETCNet2 DMX Node and the Insight 3 console sends DMX512 to Input port 2. A second ETCNet2 DMX Node is located in the dimmer room with port 1 configured as Output. Note: Certain fields in the above screen shots are minimized so that the graphics will fit on the printed page. The parameters for DMX Input port 1 are: DMX Start = 1 EDMX Start = 1001 EDMX Channels = 24 The parameters for DMX Input port 2 are: DMX Start = 1 EDMX Start = 1025 EDMX Channels = 72 6 Advanced Features 49 The parameters for DMX Output port 1 are: EDMX Start = 1001 EDMX Channels = 96 Below is a diagram where EDMX is presented as a conceptual bar that accepts data from DMX Nodes that are sending and transmits data to DMX Nodes that are receiving. 0 DMX EDMX et2 ET CN CN Express Console Channels 1-24 1025 thru 1096 DMX 1 thru 24 ET e t2 1001 thru 1024 DMX DMX Node DMX Node DMX 25 thru 96 DMX Sensor Expression 3 Console Channels 1-72 50 32,767 ETCNet2 Network Configuration Editor (NCE) v4.0.0 User Manual Advanced Input Patch (AIP) Configuration Advanced Input Patch (AIP) emulates patching on consoles for the DMX Nodes. AIP enables you to patch multiple non-sequential EDMX addresses to each DMX512 channel on a DMX Node’s input port. There are two restrictions for an AIP patch. The first is that you can only use an EDMX address once per port. The second is that you are limited to 16 EDMX address per DMX512 channel and a total of 8192 EDMX addresses per port and 32,768 per node. Configure AIP To use AIP: Step 1: Note: Select the AIP checkbox for the ports you want to configure. Selecting AIP will disable the ability to edit the normal EDMX port properties. Step 2: On the Edit menu, click AIP to open the AIP Configuration window. Click AIP from the Edit menu. Select the checkbox for the ports you want to configure. Step 3: In the AIP Configuration window, select the node and the port you want to edit from their respective drop down menus. Only nodes and ports that have AIP enabled will appear in these menus. Select the node you want to edit. Select the port of the node you want to edit. Step 4: Edit the AIP configuration as needed. The next two pages explain how to edit the patch directly and with the tools provided. 6 Advanced Features 51 AIP Tools There are a number of different methods to enter data in the patch. An example of absolute EDMX addresses DMX channel patch display and value respond together. “+” and “-” increment and decrement this value respectively. AIP Configuration status bar An example of Port/Offset EDMX address notation • Clicking in the table selects that DMX channel for editing. • Pressing ENTER is the same as clicking Patch. • Pressing “+” and “-” increments and decrements the DMX channel by one (1). • You can enter EDMX addresses by either an absolute EDMX address (12330) or by using port/offset notation (25/42). • 52 DMX channels not patched Port/Offset notation refers to the 512 channels of DMX per port you would get if this were DMX512. The default vPort table (Appendix B: Default vPort™ Table, page 61) reflects the same segmentation of EDMX into DMX512 chunks. So 25/42 refers to the 42nd channel on what would be the 25th port of DMX512. • Patch a DMX channel to zero (0) or an empty field to unpatch all EDMX addresses for that DMX channel. • Patch an EDMX address to zero (0) or an empty field to unpatch that EDMX address. • After you have clicked in the patch window, PAGE UP and PAGE DOWN will jump up or down one page’s worth of DMX channels. ETCNet2 Network Configuration Editor (NCE) v4.0.0 User Manual There are several tools available to help you easily create/modify the AIP configuration. • Copy From Port Enables you to copy an AIP configuration from one port to another. • One to One Patch Enables you to set or restore a one to one patch starting from 1 with both DMX and EDMX. There is also the ability to append/add this to the patch instead of replacing it. Replace is the default option. • Range Patch Enables you to easily assign a sequential range of EDMX address to a defined DMX range. You choose the DMX Start, the DMX End and the EDMX Start and a sequence of one EDMX address per DMX channel will assigned across the range. You can either add this to the patch or replace that range with the new values. The default for this option is to append/add to the patch. • Clear Patch This will clear all of the EDMX addresses from the patch. There is a confirmation dialog before the patch is cleared. • Revert This will discard all of your current changes and go back to your previously saved configuration for this port. 6 Advanced Features 53 Version Detect and Upgrade Utility This window is new in NCE in v4.0.0. This utility can “see” nodes of almost any version of ETCNet2 and easily tell them to download software. Note: Number of devices online and the number of devices that need to be updated. The only node that VersionDetect can’t see is a ETCNet2 Video Node running v1.0.3 or earlier software. Device IP Address Device Name Stop looking for Tell all nodes additional ETCNet2 to download devices. This is useful software with large systems to stop the list from changing. Version of application software. (Same device types should match) Version of ETCNet2 (Should match) Application ID (Geek stuff) Tell selected nodes to download software Device Type Tell all nodes in Net1 mode to switch to Net2 mode. This is the same as Discover Nodes on the Network menu in NCE Click here for icon definitions. Note: 54 The version numbers shown above are representative only and do not reflect the current version of released version. ETCNet2 Network Configuration Editor (NCE) v4.0.0 User Manual The Version Detect and Upgrade Utility is a handy tool to see nodes with older incompatible versions of software. These two DMX Nodes have an older version of software. You can update the node(s) software by: • Clicking and control-clicking on node names • Click on Update Selected. Note: A bootp server (Network Address Server in NCE or an Emphasis Server) must be running in order for nodes to download software. For more details, see Network Address Server, page 21. You can also click Update All to send an update software request to all nodes. Nodes not capable of understanding the command will ignore it. Note: ETCNet2 Two Port DMX Nodes prior to v4.0.0 will not understand an Update command from VersionDetect as indicated by the icon . To update these nodes with an older version of software, you need to follow the procedure outlined in Appendix E: Upgrading Node Software, page 67. Please reference Network Features & Functions: Node LEDs While Downloading Software, page 27, for the node LED behavior during software downloads. 6 Advanced Features 55 Insert Nodes The act of inserting a node into an NCE configuration is really quite simple. To add a node to your NCE configuration: • On the Insert menu, click the type of node you want to insert. This places a default node of the type you chose into your NCE configuration. The advanced part is what you use an inserted node to do. Conceptually for the configuration, there are two different kinds of nodes. There is the node that is only in your NCE configuration and there is the node that is physically on the network and online. When the configuration node is connected to the physical node on the network, the node shows to be online in NCE. The configuration node is bound to the physical node. This “binding” of nodes can be broken and manipulated in NCE. Oddly enough, the next section is Binding Nodes. 56 ETCNet2 Network Configuration Editor (NCE) v4.0.0 User Manual Binding Nodes Binding nodes is the process of making a logical connection between a physical node out on the network and a configuration file node present in the NCE configuration. This can be useful in a couple of different ways. . Node Name Node Type MAC Address IP Address Node Name Node Type MAC Address IP Address Use to make Use to break connection connection between nodes between nodes A use for binding nodes is creating an NCE configuration while not in the presence of the lighting network (Examples of this are: A technician preparing for installation in a hotel room, a shop technician getting the gear configured before it gets back from the previous job, or just at home instead of in the theater). If you know what node equipment you will have, you can just insert those nodes in the configuration and configure them. Later, you can Bind them to the physical nodes on the network. 6 Advanced Features 57 A second use for binding nodes is if you need to replace a physical node with a different one. (An example of this is a forklift somehow rendering your node non-operational.) Through the Bind window, you can Unbind the configuration node from the physical node now bereft of life. Once the replacement node is installed and online, you can Bind the existing configuration node with the replacement physical node. To Unbind nodes, click on the node (either configuration or network) you want to unbind and click on Unbind. When the configuration file node is unbound (in this case from a node that is no more), you will see a screen similar to the one below. . To Bind nodes, click on the configuration file node and then on the network node you want to bind. Click on Bind. In the view as shown below, all nodes will disappear as there are no more unbound nodes in the system. . Closing the bind window will reveal that your newly-bound nodes are online and ready to configure. Note: 58 After you bind nodes, you still need to send the configuration settings to that node. Binding the nodes only makes a connection between them. They can still have different configuration settings until they are synchronized by a Send Config to Nodes or a Get Config from Nodes. ETCNet2 Network Configuration Editor (NCE) v4.0.0 User Manual Appendix A ETCNet2 EDMX v4 Rules With ETCNet2 v4.0.0, the rules for determining ownership of EDMX addresses are more versatile and provide for Highest Takes Precedence (HTP) functionality. HTP is performed on a per EDMX address basis when two or more different EDMX sources (devices) have the same priority setting. It is important to note that EDMX still supports the same priority scheme as in v3.0.0, where the lower the priority value, the higher the priority. However, instead of always arbitrating down to a single “owner” of a value, the same priority values are now handled via HTP. System “givens”. The first few points are either stating the way things are or stating the way they need to be to have a valid network setup. • There are 22 discreet priority settings within EDMX. The lowest number will always be the highest priority. • A Unison zone’s Input Mode set to “Replace” is equal to priority zero (0). • DMX Node input ports, and Emphasis all have a modifiable priority of 1 through 20. • A Unison zone’s Input Mode set to “Pass-Through-If-Active” is equal to priority 21. • All devices (ETCNet2 nodes, Emphasis components and so on) must have unique IP addresses on the network. • Emphasis and Obsession II systems must have unique System ID’s on the network. This only applies if you have multiple control systems on the same network. • ETCNet2 nodes don’t have System ID’s so they are considered to have an ID of zero (0). • Zero is lower than one. Arbitration. Who has control? A • The lowest priority value has the highest priority. (1 is a higher priority than 2) • If multiple devices have the same priority, the receiving device will output HTP per EDMX address. • If two input ports on a ETCNet2 DMX Node are set to the same range and the same priority, the lowest numbered port has the highest priority. Two input ports on the same node will not HTP. ETCNet2 EDMX v4 Rules 59 60 ETCNet2 Network Configuration Editor (NCE) v4.0.0 User Manual Appendix B Default vPort™ Table Use the default vPort table is for reference when working with NCE. B vPort EDMX# vPort EDMX# vPort EDMX# 1 1-512 17 8,193-8,704 33 16,385-16,896 49 24,577-25,088 2 513-1,024 18 8,705-9,216 34 16,897-17,408 50 25,089-25,600 3 1,025-1,536 19 9,217-9,728 35 17,409-17,920 51 25,601-26,112 4 1,537-2,048 20 9,729-10,240 36 17,921-18,432 52 26,113-26,624 5 2,049-2,560 21 10,241-10,752 37 18,433-18,944 53 26,625-27,136 6 2,561-3,072 22 10,753-11,264 38 18,945-19,456 54 27,137-27,648 7 3,073-3,584 23 11,265-11,776 39 19,457-19,968 55 27,649-28,160 8 3,585-4,096 24 11,777-12,288 40 19,969-20,480 56 28,161-28,672 9 4,097-4,608 25 12,289-12,800 41 20,481-20,992 57 28,673-29,184 10 4,609-5,120 26 12,801-13,312 42 20,993-21,504 58 29,185-29,696 11 5,121-5,632 27 13,313-13,824 43 21,505-22,016 59 29,697-30208 12 5,633-6,144 28 13,825-14,336 44 22,017-22,528 60 30,209-30,720 13 6,145-6,656 29 14,337-14,848 45 22,529-23,040 61 30,721-31,232 14 6,657-7,168 30 14,849-15,360 46 23,041-23,552 62 31,233-31,744 15 7,169-7,680 31 15,361-15,872 47 23,553-24,064 63 31,745-32,256 16 7,681-8,192 32 15,873-16,384 48 24,065-24,576 64 32,257-32,767 Default vPort™ Table vPort EDMX# 61 62 ETCNet2 Network Configuration Editor (NCE) v4.0.0 User Manual Appendix C ETCNet2 Default IP Address Ranges Why? The suggested ETC standard, shown in the table below, was created to provide a recommended standard network IP address configuration for ETC equipment. This standard is intended to ease initial setup and configuration of network devices and to provide a common set of guidelines for all ETCNet2 systems. Product IP Address Range PC control (NCE, Light Manager...) 10.101.1.101 to 10.101.1.1252 Obsession II File Server 10.101.1.253 Unison 10.101.10.101 to 10.101.19.253 Obsession II 10.101.30.101 to 10.101.34.253 Obsession II Facepanel 10.101.40.101 to 10.101.41.253 Emphasis Facepanel 10.101.45.101 to 10.101.46.253 DMX, Two Port & Video Nodes 10.101.50.101 to 10.101.74.253 Wireless Access Points 10.101.124.101 to 10.101.124.253 WRFU 10.101.125.101 to 10.101.125.253 Emphasis Server 10.101.130.101 to 10.101.134.253 ETCNet2 Node “Default IP Address” 10.101.0.99 3rd Party products Switches & Routers 10.101.1.1 or 10.101.X.1 10.101.1.2 to 10.101.1.100 & Reserved for network Admin 10.101.X.2 to 10.101.X.100 RAS Connection Clients 10.101.2.101 to 10.101.2.253 Reserved for RAS network Admin 10.101.2.1 to 10.101.2.100 ETCNet2 Compatible 3rd party 10.101.200.101 to 10.101.209.253 nodes The “Default IP Address” The “Default IP Address” is a “reserved address” and cannot be assigned as a “usable” IP address for any of ETC’s products. This is the default IP address for all ETCNet2 DMX and Video Nodes. While they have this IP address, they will continually request an IP address from an address server and will not otherwise function until they do have a “usable” IP address. C ETCNet2 Default IP Address Ranges 63 64 ETCNet2 Network Configuration Editor (NCE) v4.0.0 User Manual Appendix D ETCNet2 Multicast IP Address Usage This appendix is very technical and most users will have little or no need for this information. On the other hand if you are routing your lighting network, this information can be very important and therefore is provided here. In ETCNet2 v4, ETC has spread the EDMX multicast IP addresses so that each device type family has it own range of multicast IP addresses. A system of one of each device type (Obsession II, Emphasis, DMX Node & Unison processor) will not have any duplicates out of the box. The ones mostly likely to have more than one of that device type (DMX Nodes and Unison processors) each have a simple means to distribute themselves across their given ranges. Unison does it automatically at the time of confutation and the DMX Nodes use Optimize EDMX (page 23) from NCE. The IP multicast group addresses are computed to fall into separate hashing bins in an Ethernet controller’s multicast address filtering table. Thus using separate addresses will allow hardware filtering of Ethernet packets, relieving the system and application software of this task. The EDMX Admin IP address (236.1.0.3) is fixed for all ETCNet2 EDMX participants. Sources send their EDMX channel control lists to this group. The control list contains the channels that the source wants to own (actual ownership is subject to arbitration) and the multicast group address on which it will be sending its EDMX data. Publishing the source’s multicast IP address in the administration packet allows sinks (outputs) to dynamically listen to the correct data address for any particular source. This address selection is performed automatically by the EDMX protocol code. The EDMX Source addresses are used for sending EDMX data. Each EDMX source in a multi-source system should be assigned a distinct source address from its range given below. The default would be one of these addresses also; larger systems may need to have some addresses reassigned (to an address from the same range.) DMX Nodes (DMX Node and Two Port) have their EDMX source addresses assigned via NCE. The NCE “Optimize EDMX” feature is used to assign a different source address to each node being used as an EDMX source. The Unison EDMX data multicast groups are separated from all Net2 groups. Ten (10) groups are set up for Unison EDMX data; these addresses would be reused for defaults throughout the 64 possible processors. The EDMX source group address for Expression facepanels is not a changeable property. So all Expression facepanels end up using the same address. They now get their own multicast IP address, 236.1.0.87. D ETCNet2 Multicast IP Address Usage 65 Multicast IP Address Usage Table EDMX Common Administration Address EDMX Administration 236.1.0.3 (Configuration and Patching) EDMX Consoles Source Addresses EDMX Source 1 236.1.0.39 (Obsession default) EDMX Source 2 236.1.0.40 (Emphasis default)1 EDMX Source 3 236.1.0.41 EDMX Source 4 236.1.0.42 EDMX Source 5 236.1.0.43 EDMX Nodes Source Addresses EDMX Source 11 236.1.0.54 (DMX Node default) EDMX Source 12 236.1.0.58 EDMX Source 13 236.1.0.59 EDMX Source 14 236.1.0.60 EDMX Source 15 236.1.0.61 EDMX Source 16 236.1.0.62 EDMX Source 17 236.1.0.63 EDMX Source 18 236.1.0.70 EDMX Unison Source Addresses Unison Processor 1 236.1.0.56 Unison Processor 2 236.1.0.57 Unison Processor 3 236.1.0.69 Unison Processor 4 236.1.0.80 Unison Processor 5 236.1.0.81 EDMX Expression Facepanel Source Address All Expression facepanels 236.1.0.87 1 66 EDMX Source 6 236.1.0.49 EDMX Source 7 236.1.0.50 EDMX Source 8 EDMX Source 9 EDMX Source 10 236.1.0.51 236.1.0.52 236.1.0.53 EDMX Source 19 236.1.0.71 EDMX Source 20 EDMX Source 21 EDMX Source 22 EDMX Source 23 EDMX Source 24 EDMX Source 25 EDMX Source 26 236.1.0.72 236.1.0.74 236.1.0.75 236.1.0.76 236.1.0.78 236.1.0.79 236.1.0.83 Unison Processor 6 Unison Processor 7 Unison Processor 8 Unison Processor 9 Unison Processor 10 236.1.0.88 236.1.0.89 236.1.0.91 236.1.0.93 236.1.0.96 Emphasis Control System v1.4.0 uses 236.1.0.39 instead of 236.1.0.40. Version 1.5.0 and later will use the default as listed here. ETCNet2 Network Configuration Editor (NCE) v4.0.0 User Manual Appendix E Upgrading Node Software Note: Only ETCNet2 Two Port DMX Nodes require this procedure to upgrade from a version prior to v4.0.0 to the current version (v4.0.0). For all other nodes running previous versions of software, it is much easier to use Version Detect and Upgrade Utility (page 54) to do the upgrade process. WARNING: If your ETCNet2 Two Port Node is currently running v1.0.0 software, you MUST upgrade to v1.1.0 before upgrading to v4.0.0. See ETCNet2 Software Version Information, page 44 or Version Detect and Upgrade Utility, page 54 for details on determining the version of software currently running in your Two Port Nodes. You should use NCE v2.1.1 for communicating with Two Port Nodes running both v1.0.0 and v1.1.0 software. To upgrade the software in your ETCNet2 nodes, you will need a version of NCE that matches the same version of node software. NCE and nodes with a major version number difference (3.x.x vs. 4.x.x) will not communicate with one another. Assuming you have nodes running a previous version of software, you should have the same version of NCE available as well. If not, you can find it on ETC’s web site at: www.etcconnect.com under Software Downloads. E Upgrading Node Software 67 Upgrade Nodes: Step 1: Install the version of NCE and node software that you are upgrading to. Step 2: Launch the previous version of NCE. Step 3: Connect to the network and Get Unbound Nodes. Step 4: Confirm that all of your nodes are present in the configuration. If not, attempt to get them online. Only nodes that are currently online will be upgraded. Note: Do not start the Network Address Server now. Step 5: From the Network menu, select Update Node Software. Step 6: All of the nodes should drop offline. This should be confirmed by seeing that the checkmarks in the Online column are no longer marked. The nodes will not reappear online under this version of NCE. Step 7: Close the previous version of NCE. Step 8: Open the current version of NCE. Step 9: From the Network menu, Connect to the network. Step 10: Start the Network Address Server. ECS Note: If this is being performed on an Emphasis Server, then you will not need to do this step. Step 11: After a couple of minutes, you will start to see the Nodes Online counter change. This is showing you how many nodes have completed their software download and are now online under the new version of software. Step 12: Once all of your nodes are online again, Get Unbound Nodes. Step 13: You are now ready to use your nodes under the current version of software. If you have missed any nodes in the upgrade process (nodes that were on loan to another space, ones you forgot in your equipment locker, etc....), you can put them on the network and perform the steps listed above again. 68 ETCNet2 Network Configuration Editor (NCE) v4.0.0 User Manual Appendix F Glossary & Product Definitions AIP Advanced Input Patch. AIP enables you to patch a DMX input port the same basic way you can patch a control system such as Emphasis. See Advanced Features: Advanced Input Patch (AIP) Configuration, page 51. EDMX™ EDMX (Ethernet-DMX) is probably the most talked about protocol within the ETCNet2 suite because it is the most configured by users to suit their needs. EDMX is, in a sense, a list of 32,767addresses, each containing level information. This is the method for communicating the equivalent of 64 DMX512 universes of data. The level information, along with priority information, is continually updated on the network for devices to receive as needed. EDMX is an ownership-based system of control. Any given device has control over a range of EDMX based on assignable priorities. Only one device can have control at a time. When higher priority control goes away, the device with the next highest priority level takes control. For a complete set of EDMX priority rules, please see EDMX Priorities, page 7, or ETCNet2 EDMX v4 Rules, page 59. ETCNet ETC’s proprietary Ethernet based communication protocols used with Expression family consoles, Remote Interface Units (RIU’s), Remote Video Interfaces (RVI’s) and Obsession I consoles. Products using these protocols are not configured with NCE. It also referred to as ETCNet1. ETCNet2 ETC’s current Ethernet protocol suite, ETCNet2 supports IP addressing that allows the use of off-the-shelf Ethernet hubs, switches and routers in network systems. Network A collection of devices (in this case, ETCNet2 gear) connected via a common media and communication type such as Category 5 UTP. System A collection of network or non-network ETC devices connected via any of a variety of communication protocols for the control of a specific geographic area (i.e. Lobby, Theatre, Ballroom, etc.). A system may also refer to a specific family of controllers (Obsession II system, Expression system, Unison system, etc.) It should be noted that a single network may connect several different systems. vPort™ A vPort is a sequential range of EDMX values assigned a numeric label. By default, a vPort contains 512 sequential addresses (and their associated EDMX values). See Appendix B: Default vPort™ Table, page 61 for a table of vPorts and their default EDMX values. F Glossary & Product Definitions 69 Americas 3030 Laura Lane, P.O. Box 620979, Middleton, Wisconsin 53562-0979 USA Tel: +608 831 4116 +800 688 4116 Fax: +608 836 1736 +800 555 8912 Europe Unit 5, Victoria Industrial Estate, Victoria Road, London W3 6UU, UK Tel: +44 (0)20 8896 1000 Fax: +44 (0)20 8896 2000 Asia Room 605-606, Tower III Enterprise Square, 9 Sheung Yuet Road, Kowloon Bay, Kowloon, Hong Kong Tel: +852 2799 1220 Fax: +852 2799 9325 Web: www.etcconnect.com Email: (US) [email protected] (UK) [email protected] (Asia) [email protected] Service: [email protected] Toll free: 800 775 4382 Comments about this document: [email protected] Copyright © 2003 Electronic Theatre Controls, Inc. All Rights Reserved. Product information and specifications subject to change. 4103M1200-4.0.0 Rev B Released 07/2003