1
The LPC1700 Code Bundle is a free software package from NXP that demonstrates the use of the built-in
peripherals on the NXP LPC17xx series of microcontrollers. The example software includes a common
library, peripheral APIs, and test modules for the APIs.
Download LPC1700 Code Bundle from [7] (http://ics.nxp.com/support/software/code.bundle.lpc17xx.keil/)
and save it in your own work directory. Save it with the plan to keep it as we’ll revisit some other example
in the future. Unzip it to get the keil_examples folder created with several examples therein. Take a minute
and read keil_example/readme.txt now.
Launch Keil uVision4 and then open the project UART from among the example just downloaded. The
UART project is a simple program for the NXP LPC17xx microcontrollers using Keil’s MCB1700
evaluation board. When sending some characters from a terminal program on the PC at a speed of 57600
Baud to the LPC17xx UART0 or UART1 the LPC17xx will echo those same characters back to the
terminal program.
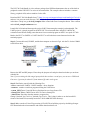
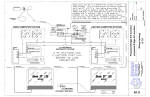
Step 1: Connect the board, ULINK2, and the host computer as shown in Fig.4. Ask the TA for the COM0/1
to Serial Port cable.
Figure 4 Hardware setup.
Remove the RST and ISP jumpers. Please keep the jumpers safe and place them back when you are done
with this lab.
Note: If you are doing this lab using a laptop which does not have a serial port, you can use a USB Serial
Converter. I got mine for about $12 from Amazon [8] and it works great.
Step 2: Familiarize yourself with the following files:
--uart.c: contains the UART0 / UART1 handlers / driver functions
--uarttest.c: contains a small test program utilizing the UART driver
--system_LPC17xx.c: Cortex-M3 Device Peripheral Access Layer Source File
--startup_LPC17xx.s: CMSIS Cortex-M3 Core Device Startup File
--Abstract.txt: Describes what the uarttest.c program does
Change "#include "lpc17xx.h" to "#include <lpc17xx.h>. This is done in order to use the latest Keil’s
release of the header file (normally located in C:\Keil\ARM\INC\NXP directory).
Step 3: Make sure the uVision4 Target setting is FLASH. Then, build the project by rebuilding all target
files. Download to the microcontroller and confirm that download is ok.
3