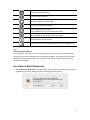
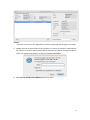
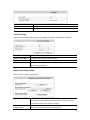
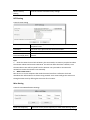
1
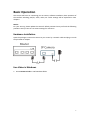
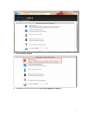
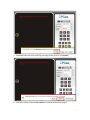
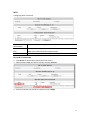
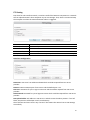
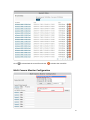
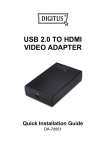
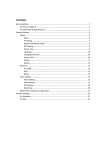
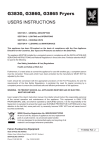
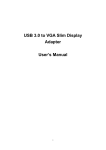
User Manual
For HD Cameras
Version 1.0 - 140915
Catalogue
Basic Operation ..................................................................................................................... 3
Hardware Installation .................................................................................................... 3
Live Video in Windows................................................................................................... 3
Live Video in Mac (Macintosh) ..................................................................................... 10
Camera Settings .................................................................................................................. 13
System......................................................................................................................... 13
About................................................................................................................... 13
Pan/Tilt Setting .................................................................................................... 14
Backup and Restore Setup .................................................................................... 14
NTP Setting .......................................................................................................... 15
Misc Setting ......................................................................................................... 15
Language ............................................................................................................. 16
Change Password ................................................................................................. 16
System User ......................................................................................................... 16
Update................................................................................................................. 17
Reboot ................................................................................................................. 18
Network ...................................................................................................................... 18
IP Config .............................................................................................................. 18
Wi-Fi .................................................................................................................... 19
AP Mode Setting .................................................................................................. 20
P2P Setting .......................................................................................................... 21
Alarm Setting............................................................................................................... 22
Alarm Setting ....................................................................................................... 22
Email Setting ........................................................................................................ 23
FTP Setting ........................................................................................................... 26
Recording............................................................................................................. 27
Record SD card ............................................................................................................ 28
Rec Settings ......................................................................................................... 28
Rec Files ............................................................................................................... 28
Multi Camera Monitor Configuration ........................................................................... 29
Attached List ....................................................................................................................... 30
Run application out of App Store in Mac ...................................................................... 30
Notice: Certain functions mentioned in this manual may vary according to camera's
model. For example, pan and tilt function are for Pan/Tilt enabled cameras only.
2
Basic Operation
This section will focus on connecting your IP camera, software installation, basic operation of
the interface including pan/tilt, video, audio, etc. Other settings will be explained in later
chapters.
Notice:
For your security, please update the camera’s default password once you finish the following
procedure and you can turn to camera settings for reference.
Hardware Installation
Open the package. Connect the camera to your router by a network cable and plug it in with
the provided AC adapter.
Live Video in Windows
1. Run IP Camera Finder in CD’s Windows folder.
3
2. Double click the IP camera listed in the camera list to access the camera in web browser,
the camera’s username and password will be required. The default username is admin.
There is no password by default, so leave the password field blank.
4
3. Select Browser Plug-ins
4. The web browser will show a message Please upgrade the plug-in!.
5
5. Click OK and Player to download the web browser plug-in running.
6. Click Run to install the plug-in.
6
7. The web browser will show a warning message, please ignore it. Click Actions.
8. Click More options and click Run anyway to install the web browser plug-in
7
4.
Then you will see the live video and control panel
8
Instructions of the buttons of main panel
Return to the welcome page
Single camera view mode. For show back to single camera mode
from 4 camera view mode or 9 camera view mode.
4 camera view mode. After set up multiple camera settings, you
could view up to 4 cameras by this mode
9 camera view mode. After set up multiple camera settings, you
could view up to 9 cameras by this mode
Click this button for camera settings
Resolution
Definition
Pan/Tilt Speed
Changed the resolution of the video, there are 3 options:
640x480, 320x240 and 160x120.
Change the video‘s quailty
Change the speed of the pan/tilt of the camera. There are 5
options: Fastest, Fast, Normal, Slower and Slowest.
(only available for the camera with Pan/Tilt)
There are 8 direction keys and the center button is rotation center.
(only available for the camera with Pan/Tilt)
The horizontal cruise will pan automatically
(only available for the camera with Pan/Tilt)
The vertical cruise will tilt automatically
(only available for the camera with Pan/Tilt)
Set preset position; this camera supports 6 preset positions.
What is a preset position? See tips below.
(only available for the camera with Pan/Tilt)
Go a specific preset position you have set
(only available for the camera with Pan/Tilt)
9
Invert the video horizontally
Invert the video vertically
Adjust the brightness of the video
Adjust the contrast of the video
Receive audio from the camera
(only available for the camera with 2-way audio)
Send audio to the camera
(only available for the camera with 2-way audio)
Take snapshot with the camera
Record video to PC, you can change the path in the settings menu
Tips:
What are preset positions?
Preset positions are IP camera's memorized P/T positions. Once you set a preset position,
you do not need to pan the camera to your preferred position. You simply press the preset
button that corresponds to the preset you want to see and the camera will move to that
position automatically.
Live Video in Mac (Macintosh)
1. Run IP Camera Search Tool in CD’s Mac folder. Mac will show a warning message that the
application is not safe, please ignore the warning and run it anyhow.
10
*Notice:
If you still could not run the application successfully, please go the last page to find help.
2. Double click the IP camera listed in the camera list to access the camera in web browser,
the camera’s username and password will be required. The default username is admin.
There is no password by default, so leave the password field blank.
3. Select Non-IE web Browsers(MJPEG) and get live video
11
4. Instructions of the buttons of main panel
Return to the welcome page
Resolution
Video FPS
Pan/Tilt Speed
Changed the resolution of the video, there are 3 options:
640x480, 320x240 and 160x120.
Change the video’s FPS, FPS means how many frames each second
Change the speed of the pan/tilt of the camera. There are 5
options: Fastest, Fast, Normal, Slower and Slowest.
(only available for the camera with Pan/Tilt)
12
There are 8 direction keys and the center button is rotation center.
(only available for the camera with Pan/Tilt)
The horizontal cruise will pan automatically
(only available for the camera with Pan/Tilt)
The vertical cruise will tilt automatically
(only available for the camera with Pan/Tilt)
Set preset position; this camera supports 6 preset positions.
What is a preset position? See tips below.
(only available for the camera with Pan/Tilt)
Go a specific preset position you have set
(only available for the camera with Pan/Tilt)
Invert the video horizontally
Invert the video vertically
Adjust the brightness of the video
Adjust the contrast of the video
Take snapshot with the camera
Click this button for camera settings
Tips:
What are preset positions?
Preset positions are IP camera's memorized P/T positions. Once you set a preset position,
you do not need to pan the camera to your preferred position. You simply press the preset
button that corresponds to the preset you want to see and the camera will move to that
position automatically.
Camera Settings
Click this Settings Button
for camera Settings.
Notice: Certain functions mentioned in this manual may vary according to camera's model.
For example, pan and tilt function are for Pan/Tilt enabled cameras only.
System
About
Basic Device Info.
13
Device SN
Hardware Version
Firmware Version
The camera’s device ID
Camera’s hardware version
Camera’s software version
Pan/Tilt Setting
Camera’ Pan/Tilt and preset setting (only available for cameras with Pan/Tilt function).
Enable PT
Enable Preset Position
Startup Position
Turn the camera’s Pan/Tilt on/off
Turn the camera’s preset position on/off
Preset position that the camera will move to after rebooting
PT Speed
Speed for Pan/Tilt which is also the speed for preset movements
includes 5 speed options.
Backup and Restore Setup
Save or restore camera configuration.
Backup Configuration
Restore Backup
Configuration
Keep the camera settings as a backup file. Download the appeared
box IPCamera_Settings.dat and save it on your computer in case
you need to restore your previous settings.
Click Browse to restore the backup settings which has been saved in
advance to restore the previous configuration.
14
Restore Factory
Setting
Reset the camera to default factory settings
NTP Setting
Camera’s time setting
Current Time
Camera’s time and you can click Sync With Host to match it to your
computer’s time
Time Zone
Time zone of the place that the camera is located
NTP Server
Time server of the network which is connected with the camera
Automatic Calibration Intervals for the camera to correct the time with its own connected
Time Interval(by hour) network.
Tips:
1. Since the camera has no built in battery, the time saved in its memory may be lost when
the camera reboots and reset to 1970.01.01. This will not affect the alarm schedule, since
the exact alarm time will be synced from the Internet. You just need to reconnect the
network to correct the camera’s time manually.
2. What is NTP server?
NTP server is a server computer that reads the actual time from a reference clock and
distributes this information to its clients using network. Your camera will get the exact time
through an NTP sever by offering the time zone of its location.
Misc Setting
Camera’s some Miscellaneous Settings
Power line frequency
Select the correct power frequency to avoid video flashing, adjust
15
Power LED
the options, if your video flickering
The status of front green LED
Language
To set camera’s language and other appearance settings.
Language
Welcome Page
UI Color
To choose from different languages
To select the welcome page
To pick the color for the whole interface
Change Password
To update the camera’s username and password.
User Name
Current Password
New Password
Confirm Password
This camera’s username
To confirm the current password
To fill in the camera’s new password
Fill in the new password to confirm the change
System User
Adding and updating user accounts
16
Defined user contains three different user levels.
Different access is granted to different user levels as specified in the following sheet.
Live
Video
Record
Snapshots
Video
adjustment
Sound
Talkback
PT
operation
Settings
Admin
√
√
√
√
√
√
√
√
Operator
√
√
√
√
√
√
√
×
Guest
√
√
√
×
√
√
×
×
Tips:
PT operation is only available for cameras with Pan/Tilt.
Update
Update the device to the latest firmware version.
Notice:
1. Please choose proper update package for your camera model.
2. Use an Ethernet cable NOT WI-FI to connect to your camera during the update process.
3. Make sure that the camera is not unplugged during the update process.
17
4. The whole process may take about 2-3 minute. Please wait until camera reboots.
5. Please unzip the file to bin document and then update the firmware with it.
6. We are not responsible for any improper update attempts that lead to camera crash.
Reboot
Press reboot button to restart the camera.
Network
IP Config
The Camera’s Basic Network Settings
Device Name
DHCP
IP Address
Net Mask
Default Gateway
DNS Server
Web Port
Camera’s display name which is set to distinguish from other devices on
your network
Enable or disable obtaining IP address from DHCP server automatically. If
it is enabled, IP address and other items cannot be changed manually.
Camera’s local network IP address, which is used to view the camera in
the same local area network.
Specify a unique IP address for your network camera.
Specify the mask for the subnet the network camera is located on
Specify the IP address of the default gateway (router) used for connecting
devices attached to different networks and network segments
DNS (Domain Name Service) provides the translation of host names to IP
addresses of your network
Camera’s communications port which is set to send video and audio data
18
Wi-Fi
Configuring WI-FI connection
Station Site
Search Result
Station Profile(Up
to 4)
WI-FI Link Status
All the nearby wireless signals visible to the camera
Select the wireless signal and add it to Station Profile. Then you can
switch your preferred wireless network easily.
Check and change wireless network status
Set up Wi-Fi connection
1. Click Rescan to search Wi-Fi signal around the camera
2. Select the Wi-Fi SSID you want to connect and click Connect
3. Enter the password of your Wi-Fi network and click Apply.
19
4. Pick the wireless network added in Station Profile (Up to 4) and click Activate.
5. Wireless network is connected if it appears
Wireless network is disconnected if it shows
.
. Please pick Edit to reset the network
configuration or pick Delete to get back to the first step.
Tips:
4 Wi-Fi profiles at most could be saved in the camera. If you want to enable one Wi-Fi
network manually, select the Wi-Fi profile and click Activate to enable it manually. If the
camera could not connect to the manual enabled Wi-Fi, the camera will try to connect the
Wi-Fi network with other Wi-Fi profiles.
AP Mode Setting
If you do not have network cable or you could not access your router’s LAN port, you could
20
connect the IP camera point to point by AP mode and then set up Wi-Fi.
If no network cable or Wi-Fi connected, the camera will be in Wi-Fi Setting Mode for 90
seconds after booting. After 90 seconds’ Wi-Fi Setting Mode, the camera will reboot and be
in AP Mode automatically. When the camera in AP mode, the indicator will flicker, indicator
will be on 1.5 second and off 0.3 second in each flickering period. Then connect the camera’s
Wi-Fi signal of Network Name (SSID) by your PC with wireless adapter, run search tool and
then set up Wi-Fi in web browser. For more details of Search Camera and Set up Wi-Fi
connection, please check the manual above.
Notice:
1. For security concern, enter a password is necessary.
2. The camera will disconnect Wi-Fi after enable AP mode.
P2P Setting
Change P2P password, P2P password is used to view the camera’s live video by mobile
device. The default P2P password is 8888.
21
Alarm Setting
Alarm Setting
Motion Detection
Sensitivity
IO Input Alarm
Input Mode
IO Port Output
On-Screen Display
Warning Tone
Video Recording
Email Alert
FTP Upload Folder
Back to Preset
Alert Interval (sec)
Schedule
Enable or disable the motion detection alarm
The sensitivity of the motion detection alarm which contains 5 levels.
Enable alarm input detection
*Select the input mode.
*Output 5V with 300mA max
Notice on the screen during motion detection alarm which is only
available in IE browser.
Alarm voice when the camera detects moving objects which is only
available for IE browser.
Records to the computer when the camera detects moving objects and
this function only works in web browser live page.
Sending alarm pictures to the specified email when the camera detects
the movements
Sending alarm pictures to FTP server set in advance when the camera
detects movement.
Moves camera to a preset position once the camera detects moving
objects (this is only available for Pan/Tilt IP camera).
Unit of time for periodic motion detection alarm which includes
picture and video alarm.
Specified motion detection period with 15 minutes a unit and one
week per cycle.
Tips:
IO Port definition:
22
Network port
IO port
TF card
1
2
3
4
Power
1.
2.
3.
4.
Out (5V with 300mA max)
VCC 5V
Input
GND
Email Setting
Once the motion detection alarm is enabled, camera will send snapshots to the specified
email when it detects the moving objects. There will be six emails per time and one picture
per email.
Sender([email protected])
Recipient[1]([email protected])
Recipient[2]
Recipient[3]
Recipient[4]
SMTP Server
SMTP Port (default 25)
Transport Layer Security
SMTP User
SMTP Password
IP Address Reported by Mail
Email address for sending the alarm email
1st email address for receiving the alarm email
2nd email address for receiving the alarm email
3rd email address for receiving the alarm email
4th email address for receiving the alarm email
Sending emails provider ‘s SMTP server address
Service port of SMTP server
Encryption protocol of SMTP Server
Sender email’s login username
Sender email’s login password
Sending the camera’s external access URL to the recipient’s
email
E-mail Alarm Configuration
23
Sender is your own email address. Since common email providers have a better service
experience and the built-in email provider SMTP servers are easier to set up, you are strongly
advised to use Gmail, Yahoo and other common email services as the sender email.
Recipient is the email to accept the email alerts and we suggest that you make it a different
email from the sender email.
SMTP Server: The SMTP (short for Simple Mail Transfer Protocol) works like a post assistant,
handling the sending of emails from the camera to an email server. SMTP Server receives
outgoing mail messages from users to the mail recipients they are intended for.
If your sender email provider is a public server, you can search the IP address of the email
provider’s SMTP server or DDNS from Google.
If your sender email provider is a private one, you can consult with the email provider’s
customer service.
SMTP Port: Service port of SMTP server which you can get with the above procedure
Transport Layer Security: Encryption protocol of SMTP Server and you can also get it from
the above procedure
SMTP User: The account you use to login to the SMTP server which is also the sender email
address
SMTP Password: The password you use to login to the SMTP server which is also the sender
email password
IP Address Reported by Mail: Once it is triggered, the latest external IP address will be sent
to recipient’s email as soon as the camera’s WAN IP address changes.
Then click Save and Test. Once it says Success that means the camera has set up e-mail
settings.
24
Go back to alarm settings and enable Email Alert to finfish the whole e-mail alert settings.
Notice:
1. Please check the basic network settings of the camera if it failed the test, go back to
Basic Operation for reference
2. There might be some delay for motion detection alarm since it is related to the network
condition and the service quality of the sender email’s provider. Thus it is beyond the control
of IP camera.
3. If you still can not receive any email alert after getting the test email, please check your
spam box and add your sender email address in the trust list of the recipient email once your
find it in spam.
Tips:
The email alert is sent via sender email’s provider server which is an SMTP server. Once the
camera signs in to the SMTP server, the email alert will be delivered to the recipient email
after getting SMTP server’s authentication. Therefore, the sender email, recipient email and
the SMTP server are all required.
25
FTP Setting
FTP, short for File Transfer Protocol, is used to transfer files between computers on a network.
You can upload camera’s alarm snapshots to your FTP storage. Thus, there is no need to keep
the computer on when the motion detection alarm is triggered.
FTP Server
FTP Port (default 21)
FTP User
FTP Password
FTP Upload Folder
FTP server’s address
FTP server’s port
FTP server’s username
FTP server’s password
FTP server’s subdirectory. Keep it blank if there is no subdirectory
FTP Alarm Configuration
FTP Server: FTP server’s IP address and DNS which could be required from FTP server
provider.
FTP Port: Communication port of FTP server and the default port is 21.
FTP User: Username for you to sign in FTP server which could be required from FTP server
provider.
FTP Password: Password for you to login FTP server which could be required from FTP server
provider.
FTP Upload Folder: File address in FTP server in which to save the alarm pictures. If it is left
blank, the pictures will be kept in FTP’s root directory.
Then click Save and Test. Once it says “Success” that means the camera has set FTP settings
successfully.
26
Go back to alarm settings and enable FTP Upload Folder to finfish the whole e-mail alert
settings.
Notice:
1. Please check the basic network settings of the camera if failed in test, go back to Basic
Operation for reference
2. FTP server is offered by FTP provider. We does not provide FTP service. Web Hosting
usually supports FTP.
3. Please make sure the camera is authorized to upload alarm pictures. For detailed
information, please consult with the FTP server provider.
Recording
Recording and alarm recording are only available for IE browser.
27
Recording Path
Alarm Recording Path
Camera’s destination folder to record to
Camera’s alarm recording destination folder
Notice:
If it does not work, please run IE as administrator. Right click IE browser and pick Run as
Administrator
Record SD card
Rec Settings
Enable or disable SD card record
SD card Status
Record mode
Video Size
Time of Recording
Loop Recording
Record Sound
The SD card’s free space and total space
Recording when alarm or by Schedule
Choose the record quality
Set the record time length
Whether delete the oldest record files if the SD card is almost full
Enable record sound
Rec Files
Check the record files in the SD card
28
Click
to download the record file and click
to delete the record file.
Multi Camera Monitor Configuration
29
Device List in LAN
Alias:
IP Address: Port
User Name: Password
IP camera in your local network
Camera’s name
Camera’s IP address and port or you can fill in DDNS instead.
Camera’s username and password
Attached List
Run application out of App Store in Mac
If your MAC OS could not run IP Camera Search Tool in Mac, it should be the security system
forbit you run application not from App Store. You could set it in System Performatnce.
1. Select Security & Privacy in System Performance.
2. Allow applications downloaded from anywhere.
30
31