1
MAXPRO-Net
Crosspoint Matrix Video Switching System
Software Installation/Troubleshooting
Manual
HMXMU001145- 10/06 - Rev. C
ISSUE
DATE
A
March 2005
Initial Release (PCN 1980)
B
March 2006
Updated licensing section and MAXPRO-Net Installation
Section
C
October 2006
Rev. C
REVISIONS
Added section for upgrading to V8.0 from V5.x, 6.x, and 7.x
ii
HMXMU001145
10/06
SOFTWARE LICENSE AGREEMENT
Honeywell International Inc.
165 Eileen Way, Syosset, NY 11791
.
8. LIMITATION OF REMEDIES. Licensee's exclusive remedy shall be either the
replacement of any diskette or other media not meeting the limited warranty set
forth above and which is returned to HONEYWELL with a copy of Licensee's paid
invoice or, if HONEYWELL is unable to deliver a replacement that is free of
defects, Licensee may terminate this Agreement by returning the Licensed
Programs and thereupon the License Fee shall be refunded. HONEYWELL shall
have no obligation under this Agreement if the Licensed Programs are altered or
improperly repaired or serviced by anyone other than HONEYWELL factory
service. For warranty service, return Licensed Programs transportation prepaid,
to HONEYWELL Factory Service, 165 Eileen Way, Syosset, New York 11791.
You should carefully read the following terms and conditions. If you do not
consent to be bound by this License Agreement, you must promptly return
the unopened package to the person from whom you purchased it within
fifteen (15) days from date of purchase and your money will be refunded to
you by that person. If the person from whom you purchased this Software
fails to refund your money, contact HONEYWELL immediately at the
address shown above.
Important: This Software is security related. Access should be limited to
authorized individuals.
1. GRANT OF LICENSE. Subject to all terms and conditions hereof of Honeywell
International Inc. acting through its Security group ("HONEYWELL") does hereby
grant to the purchaser (the "Licensee") upon payment in full of the published
license fee, or other license fee agreed to in writing (the "License Fee") a
nontransferable, non exclusive license to use the enclosed software ("Licensed
Programs") provided herewith in Licensee's own business on a single computer
for a term commencing on the date of payment in full of the License Fee and
continuing in perpetuity unless terminated in accordance with the terms hereof.
9. LIMITATION OF LIABILITY. REGARDLESS OF WHETHER ANY REMEDY
SET FORTH IN THIS AGREEMENT FAILS OF ITS ESSENTIAL PURPOSE, IN
NO EVENT WILL HONEYWELL OR ITS SUPPLIERS BE LIABLE TO YOU FOR
ANY SPECIAL, CONSEQUENTIAL, INDIRECT OR SIMILAR DAMAGES,
INCLUDING ANY LOST PROFITS OR LOST DATA ARISING OUT OF THE USE
OR INABILITY TO USE THE LICENSED PROGRAMS OR ANY DATA
SUPPLIED THEREWITH EVEN IF HONEYWELL OR ANYONE ELSE HAS
BEEN ADVISED OF THE POSSIBILITY OF SUCH DAMAGES, OR FOR ANY
CLAIM BY ANY OTHER PARTY. THIS PROVISION IS INCLUDED FOR THE
BENEFIT OF HONEYWELL AND ITS LOCAL REPRESENTATIVES, AND IS
ENFORCEABLE BY EACH OF THEM.
2. PROPRIETARY RIGHTS. License hereby acknowledges that the Licensed
Programs including the algorithms contained therein are proprietary to
HONEYWELL. Licensee shall not sell, transfer, disclose, display or otherwise
make available any Licensed Programs or copies or portions thereof to any other
entity. Licensee agrees to secure and protect the Licensed Programs so as to
maintain the proprietary rights of HONEYWELL therein, including appropriate
instructions to and agreements with its employees.
SOME JURISDICTIONS DO NOT ALLOW THE LIMITATION OR EXCLUSION
OF LIABILITY FOR INCIDENTAL OR CONSEQUENTIAL DAMAGES, SO THE
ABOVE LIMITATION OR EXCLUSION MAY NOT APPLY TO YOU.
IN NO CASE SHALL THE LIABILITY OF THE LICENSED PROGRAMS’
PROVIDERS OR OF HONEYWELL EXCEED THE PURCHASE PRICE PAID
FOR THE PRODUCT.
3. DOCUMENTATION. The documentation supplied with the Licensed Programs
is the copyright property of HONEYWELL. Licensee shall not under any
circumstances divulge or permit to be divulged such documentation to any other
entity.
10. REGISTRATION. In order to qualify to receive notification of HONEYWELL
updates to the Licensed Programs, Licensee must complete and return a
Registration Form to HONEYWELL within twenty (20) days from date of
purchase. Notwithstanding, HONEYWELL is under no obligation to release
updates to the Licensed Programs.
4. COPIES. Licensee shall not copy in whole or in part the Licensed Programs
or documentation provided however that Licensee shall be permitted to make one
(1) copy of the Licensed Programs solely for backup purposes provided that all
proprietary notices are reproduced thereon. Any such copy shall remain part of
the Licensed Programs and shall be subject to this agreement.
11. TERMINATION. Upon the breach or non-compliance with any term or
provision of this agreement, HONEYWELL shall have the right to terminate the
license granted hereby by written notice to Licensee. Upon such termination
Licensee shall immediately turn over to HONEYWELL all copies of the Licensed
Programs and any documentation supplied in connection therewith. Such
remedy shall be in addition to and cumulative to any other remedies
HONEYWELL may have at law or in equity with respect to such breach or noncompliance.
5. OBJECT CODE. Licensee understands and acknowledges that the Licensed
Programs consist of object code only and that HONEYWELL shall not supply
source code versions of the Licensed Programs. Licensee shall not create or
attempt to create by de-compilation or otherwise, the source code for the
Licensed Programs, or any part thereof.
6. SECURITY. Licensee acknowledges that the Licensed Programs are security
related and access to the Licensed Software should be limited to authorized
individuals. Licensee assumes full responsibility for use of the Licensed
Programs whether by authorized or unauthorized individuals. Licensee agrees
that the License Fee has been set in reliance upon the limitation on liability
contained herein and that such provisions are fair and not unconscionable.
12. GENERAL. This agreement is the complete and exclusive statement of the
understanding of the parties hereto with respect to the transaction contemplated
hereby and supersedes any and all prior proposals, understandings and
agreements. This Agreement may not be modified or altered except by a written
instrument signed by Licensee and an authorized representative of
HONEYWELL, its rights, duties or obligations under this Agreement to any person
or entity, in whole or in part. If any provision of this Agreement is invalid under
any applicable stature or rule of law it is to that shall be governed by the laws of
the State of New York and the sole venue for suit shall be in an appropriate state
or federal court located in the State and City of New York. The failure of
HONEYWELL to exercise in any respect any rights provided for herein shall not
be deemed a waiver of such right or any further Agreement may be brought more
than two (2) years after the date such cause of action shall have arisen.
HONEYWELL shall have the right to collect from Licensee any expensed incurred
including attorneys' fees in enforcing its right under this agreement.
HONEYWELL does not represent that the Licensed Programs may not be
compromised or circumvented, that the Licensed Programs will prevent any
personal injury or property loss by burglary, robbery, fire or otherwise, or that the
Licensed Programs will in all cases provide adequate warning or protection.
Licensee understands that a properly installed and maintained alarm may only
reduce the risk of burglary, robbery or fire without warning, but is not insurance or
a guarantee that such will not occur or that there will be no personal injury or
property loss as a result.
1.
DISCLAIMER OF WARRANTIES. HONEYWELL does not warrant
that the Licensed Programs will meet your requirements, that operation of the
Licensed Programs will be uninterrupted or error-free, or that all Licensed
Programs’ errors will be corrected. The entire risk as to the quality and
performance of the Licensed Programs is with you.
THE IMPLIED
WARRANTIES OF MERCHANTABILITY, FITNESS FOR A PARTICULAR
PURPOSE AND NONINFRINGEMENT ARE DISCLAIMED. NO ORAL OR
WRITTEN INFORMATION OR ADVICE GIVEN BY HONEYWELL, ITS
EMPLOYEES, DISTRIBUTORS, DEALERS, OR AGENTS SHALL INCREASE
THE SCOPE OF THE ABOVE WARRANTIES OR CREATE ANY NEW
WARRANTIES. SOME JURISDICTIONS DO NOT ALLOW THE EXCLUSION
OF IMPLIED WARRANTIES, SO THE ABOVE EXCLUSION MAY NOT APPLY
TO YOU. IN THAT EVENT, ANY IMPLIED WARRANTIES ARE LIMITED IN
DURATION TO NINETY (90) DAYS FROM THE DATE OF DELIVERY OF THE
LICENSED PROGRAMS. This warranty gives you specific legal rights. You may
have other rights, which vary from state to state.
Rev. C
iii
HMXMU001145
10/06
MAXPRO-Net TECHNICAL SUPPORT
REGISTRATION
License Key No:
Site name: ..........................................................................................................................................................
Company:..........................................................................................................................................................
Contact person: ..................................................
Position/title:...................................................................
Mailing Address: ...............................................................................................................................................
.............................................................................................................................................................................
.............................................................................................................................................................................
Phone:...................................................................
Facsimile:........................................................................
Technical Support Information
Honeywell provides technical support by phone to the installers and users of our various products. We
are happy to assist with installation (wiring, connections and system planning), commissioning
(identifying cabling or interconnection problems, macro programming, reconfigurations) as well as
ongoing service, fault-finding and general maintenance advice.
Every licensed product receives technical support at no charge when the software has been licensed
through our technical support department. Call technical support at 972-620-6500 (1-800-796-2288 in
North America) to register your software via telephone or contact tech support at
[email protected] to register via email. The form can be mailed to the
Honeywell’s Technical Support Department located at 12880-A Valley Branch Lane, Farmers Branch, TX
75234.
Other information
If you wish to minimize the requirement of technical support, Honeywell provides technical training
courses to allow our distributors and clients to further develop their own in depth knowledge and
understanding about our products.
Please contact our company for more information at
www.honeywellvideo.com.
I agree to abide by the terms and conditions as detailed in the software license agreement.
Please Sign/date and return to Honeywell Video Systems
_____________________________________
Signature
Rev. C
_______________________________
Date
iv
HMXMU001145
10/06
TABLE OF CONTENTS
CHAPTER 1: INTRODUCTION ................................................................................................................ 1
1.1
OVERVIEW.................................................................................................................................... 1
1.2
PREREQUISITES .......................................................................................................................... 1
1.3
SYSTEM REQUIREMENTS........................................................................................................... 1
1.3.1 Hardware Requirements.................................................................................................. 1
1.3.2 Software Requirements ................................................................................................... 2
1.4
INSTALLING MAXPRO-NET.......................................................................................................... 2
CHAPTER 2: UNINSTALLING MAXPRO-NET....................................................................................... 15
2.1
OVERVIEW.................................................................................................................................. 15
2.2
UNINSTALLING MAXPRO-NET .................................................................................................. 15
2.2.1 Uninstalling MAXPRO-Net Using Setup.exe [Recommended] ..................................... 15
2.2.2 Uninstalling MAXPRO-Net Using Control Panel ............................................................ 18
CHAPTER 4: TROUBLESHOOTING...................................................................................................... 21
3.1
SETMAX NOT CONNECTING TO DB......................................................................................... 23
3.1.1 Check for SQL Server to be started............................................................................... 23
3.1.2 Check if TCP is enabled for SQL Server........................................................................ 24
3.1.3 Check for Database Connectivity .................................................................................. 25
3.1.4 Check for Max Services Running .................................................................................. 28
3.1.5 Set Service Rights with Admin User Privileges ............................................................. 29
3.2
ERROR DURING IMPORT IN SETMAX CONFIGURATOR ......................................................... 30
3.3
LICENSE ERROR DURING STARTUP OF SETMAX CONFIGURATOR ..................................... 31
3.3.1 License Expired: AUTHORIZATION_NOT_PRESENT ................................................... 31
3.3.2 License Expired: PROGRAM MOVED OR SITEKEY BAD PASSWORD ........................ 31
3.3.3 License Expired: (No Reason Specified)....................................................................... 32
3.4
SITE CODE IS EMPTY IN LICENSE TAB OF SETMAX CONFIGURATOR ................................. 32
3.5
WRONG SITE KEY ERROR DURING SAVE SITE KEY OPERATION IN SETMAX
CONFIGURATOR........................................................................................................................ 33
Rev. C
v
HMXMU001145
10/06
Notes:
Rev. C
vi
HMXMU001145
10/06
CHAPTER 1:
INTRODUCTION
1.1
OVERVIEW
This section describes the steps that you need to perform while installing MAXPRO-Net.
CAUTION: To install the MAXPRO-Net software, you will
need to log on to the system as a user who has
administrative privileges.
1.2
PREREQUISITES
It is necessary that you remove any previous version of 'SetMax for windows' (Max1000)
before installing MAXPRO-Net and ensure that your system login is with the
administrative privileges.
1.3
SYSTEM REQUIREMENTS
This section provides the information pertaining to hardware and software requirements
for the MAXPRO-Net installation and functioning.
1.3.1
Hardware Requirements
Component
Server Module
Description
Processor Speed: Pentium IV, 3GHz
Memory: 1024 MB
Hard Disk Space: 20 GB
Monitor: 256-color VGA
Client
Processor Speed: Pentium IV, 3GHz
Memory: 512 MB
Hard Disk Space: 10 MB
Monitor: 256-color VGA
Local Area Network
(LAN)
Rev. C
Ethernet or Fault Tolerant Ethernet (FTE)
1
HMXMU001145
10/06
1.3.2
Software Requirements
Software
Description
Server Module
Microsoft Windows 2003 with latest
update.
Internet Explorer 5.5 or higher
Client
Microsoft Windows XP with Service Pack
2 or Windows 2000 Professional with
Service Pack 4.
Internet Explorer 5.5 or higher
1.4
INSTALLING MAXPRO-NET
Perform the following steps to install MAXPRO-Net:
CAUTION: You must be logged onto the Windows
operating system with administrative privileges.
1. Download the MAXPRO-Net software package to your computer.
2. Select and double-click the Setup.exe from the MAXPRO-Net Folder to start the
installation. The Choose Setup Language dialog appears.
Rev. C
2
HMXMU001145
10/06
1.4 INSTALLING MAXPRO-NET, CONTINUED
3. Select a language for the installation program.
4. Click OK. The Question dialog appears.
5. Click Yes to proceed with the installation. If you click Yes, skip steps 6 to 19 and
proceed onto step 20 to continue with the installation. Click No, if you want to stop
the installation and change the installation program language.
6. If you click No in the Question dialog the MAXPRO-Net InstallShield Wizard dialog
appears.
7. Click OK. The InstallShield Wizard Complete screen appears.
Rev. C
3
HMXMU001145
10/06
1.4 INSTALLING MAXPRO-NET, CONTINUED
8. Click Finish and then change the operating system language.
Changing the operating system language
9. Choose Start Æ Settings Æ Control Panel.
10. Double-click Regional and Language Options. The Regional and Language
Options dialog appears.
Rev. C
4
HMXMU001145
10/06
1.4 INSTALLING MAXPRO-NET, CONTINUED
11. In the Select an item to match its preferences, or click Customize to choose
your own formats: box, select a language for the operating system.
12. Under Location, select the location where the MAXPRO-Net is being installed.
13. Click Apply.
14. Click Advanced tab. The Advanced Settings for Regional and Language Options
appears.
Rev. C
5
HMXMU001145
10/06
1.4 INSTALLING MAXPRO-NET, CONTINUED
15. In the Select a language to match the language version of the non-Unicode
programs you want to use: box, select a language for the non-Unicode programs.
16. Under Code page conversion tables, select all the items.
17. Click Apply.
18. Click OK.
19. Select and double-click the Setup.exe, in the MAXPRO-Net Folder to re-start the
installation. Refer steps 2 to 4 in this section.
Rev. C
6
HMXMU001145
10/06
1.4 INSTALLING MAXPRO-NET, CONTINUED
20. If you click Yes in the Question dialog, the Welcome screen appears.
21. Click Next. The Select Features screen appears.
22. Select the features to install.
Note: If MAXPRO-Net Server is selected, the setup installs Microsoft SQL Server Desktop
Engine on your computer.
Rev. C
7
HMXMU001145
10/06
1.4 INSTALLING MAXPRO-NET, CONTINUED
23. Click Browse. The Choose Folder dialog appears.
24. Select a folder where the features are to be installed.
25. Click OK to close the Choose Folder dialog.
26. Click Next on the Select Features screen. If you have selected MAXPRO-Net Server
on the Select Features screen, the Choose Destination Location screen appears.
27. Click Browse. The Choose Folder dialog appears.
28. Select a folder where Microsoft SQL Desktop Engine is to be installed.
29. Click OK to close the Choose Folder dialog.
30. Click Next on the Choose Destination Location screen. The Database Server Login
screen appears.
Rev. C
8
HMXMU001145
10/06
1.4 INSTALLING MAXPRO-NET, CONTINUED
31. In the Login ID box, type the SQL User Login ID.
32. In the Password box, type the SQL User Password.
33. Click Next. The User Information screen appears.
Rev. C
9
HMXMU001145
10/06
1.4 INSTALLING MAXPRO-NET, CONTINUED
34. In the Select Language box, select the language to be used for MAXPRO-Net.
Note: Refer to MAXPRO-Net Translation Editor User Manual.pdf (Revision 1.0), having
the part number 900.0675, if you want to add support for other languages in
MAXPRO-Net.
35. Click Next. The Start Copying Files screen appears.
36. Click Next. The Microsoft SQL Server Desktop Engine installation dialog appears.
Note: The computer restarts after Microsoft SQL Sever Desktop Engine is installed.
The SQL Server Network Utility screen appears after the Microsoft SQL Server
Desktop Engine installation is completed.
Rev. C
10
HMXMU001145
10/06
1.4 INSTALLING MAXPRO-NET, CONTINUED
37. In the Disabled protocols box:
a. Select Named Pipes and click Enable.
b. Select TCP/IP and click Enable.
38. Click OK to close the SQL Server Network Utility screen. The SQL Server Network
Utility dialog appears.
39. Click OK. The computer restarts and the Choose Setup Language dialog appears.
Rev. C
11
HMXMU001145
10/06
1.4 INSTALLING MAXPRO-NET, CONTINUED
40. Select a language for the installation program.
41. Click OK. The Question dialog appears.
42. Click Yes. The Start Copying Files screen appears.
The Install Shield Wizard Complete screen appears after the installation is
completed.
Rev. C
12
HMXMU001145
10/06
1.4 INSTALLING MAXPRO-NET, CONTINUED
43. Click Finish to complete the installation.
Rev. C
13
HMXMU001145
10/06
Notes:
Rev. C
14
HMXMU001145
10/06
CHAPTER 2:
UNINSTALLING MAXPRO-NET
2.1
OVERVIEW
MAXPRO-Net can be removed in two ways as follows:
•
Using Setup.exe (Recommended)
•
Using Control Panel
CAUTION: Before removing the software, backup your
existing configuration details using Export option in
SetMax either on a CD or save it to a different folder,
outside the MAXPRO-Net folder.
2.2
Uninstalling MAXPRO-Net
2.2.1
Uninstalling MAXPRO-Net Using Setup.exe [Recommended]
To uninstall MAXPRO-Net using the Setup.exe, perform the following steps:
1. Run Setup.exe from the MAXPRO-Net Folder. The Choose Setup Language dialog
appears.
2. Select a language for the uninstallation program.
3. Click OK. The Question dialog appears.
Rev. C
15
HMXMU001145
10/06
2.2 UNINSTALLING MAXPRO-NET, CONTINUED
4. Click Yes. The Welcome screen appears.
5. Click Remove. The MAXPRO-Net – InstallSheild Wizard dialog appears.
6. Click Yes. The Setup Status screen appears indicating the uninstallation status.
After the uninstallation is complete, the Uninstall Complete screen appears.
Rev. C
16
HMXMU001145
10/06
2.2 UNINSTALLING MAXPRO-NET, CONTINUED
7. Click Finish to complete the uninstallation.
8. Ensure the Setmax Icon was removed from the desktop. If not removed, delete it.
9. Refer to paragraph 2.2.2 to ensure Setmax for MAXPRO-Net, Maxmon, and
MAXPRO-Net components are not in the list of installed programs.
Caution: Do no uninstall MSDE.
Rev. C
17
HMXMU001145
10/06
2.2 UNINSTALLING MAXPRO-NET, CONTINUED
2.2.2
Uninstalling MAXPRO-Net Using Control Panel
To uninstall MAXPRO-Net through Control Panel, perform the following steps:
1. Click Start Æ Settings Æ Control Panel Æ Add/Remove Programs.
2. In the Add/Remove Programs dialog, select the MAXPRO-Net program that you want
to uninstall.
3. Click Remove.
4. Click OK to confirm the removal of the selected application.
5. In the Add/Remove Programs dialog, select SetMax program.
6. Click Remove.
7. Click OK to confirm the removal of the selected application.
Rev. C
18
HMXMU001145
10/06
CHAPTER 3:
UPGRADING MAXPRO-Net
3.1
DOWNLOADING THE UPGRADE
The latest MAXPRO-Net software can be obtained from the Honeywell Video website.
1. Type
http://www.honeywellvideo.com/support/downloads/downloads_matrix.html
in the Internet Explorer address bar.
2. Locate MAXPRO-Net V8.0 Upgrade and download the zip file.
3. Double click on the file MAXPRO-Net8_NoMSDE.zip to open the file and WinZip.
4. Click on Extract.
Rev. C
a. In the Extract to: field, select a drive on your PC. For example, C:\ or D:\.
19
HMXMU001145
10/06
b. Click the check box Use folder names.
c. Click on Extract.
d. Enter the password MAXPRO-Net8.0. The password is also located in the zip.txt
file.
5. You may need the original installer package/CD for the version currently running on
your server. If the CD is not available, you can download earlier versions of the
software from their respective folders on Honeywell’s website. Follow the
instructions in steps 1 through 5. The password to unzip the files is located in the
zip.txt file. For example, the password to unzip Version 7.x is MAXPRO-Net7.0.
3.2
STEPS TO UPGRADE VERSION 7.x TO 8.x
CAUTION: If using redundant MAXPRO-Net Servers with
an MX18 configuration, upgrade the SLAVE server first.
1. Export the MAXPRO-Net (MPN) files of the current configuration to a removable disk
drive or a network-shared folder. This step is only necessary for the first server upgrade.
When upgrading the second server, skip this step.
2. Uninstall v7 by running the setup.exe file from the version 7 CD or from the downloaded
file on the ftp site. Refer to paragraph 2.2, Uninstalling MAXPRO-Net.
3. Run the V8.0Setup.exe file (extracted from the V8 downloaded zip file).
4. Reboot the server.
5. Open Maxmon to verify licensed status.
6. Open Setmax to verify licensed status.
7. Import previously exported MAXPRO-Net configuration from removable drive or networkshared folder.
Rev. C
20
HMXMU001145
10/06
3.2 STEPS TO UPGRADE VERSION 7.X TO 8.X, CONTINUED
8. Click on Yes to COLDBOOT.
9. If upgrading redundant servers, allow the slave system to run for an hour or more with
the MX18 selector on master before upgrading the master or flipping the MX18 switches
to SLAVE. This allows the CPUs to get synched with the current video selections. Using
this process, the users do not notice any change in system operation.
10. Repeat steps 2 – 8 for Master server.
3.2
STEPS TO UPGRADE VERSIONS 5.x or 6.x to VERSION 8.x
CAUTION: Upgrading from Version 5.x or 6.x to Version
8.x voids the license. After installing Version 8.0, you
must contact Honeywell technical support for a new
license via telephone at 1-800-796-2288 (North America)
or via email at
[email protected].
CAUTION: If using redundant MAXPRO-Net Servers with
an MX18 configuration, upgrade the SLAVE server first.
1. Export the .MAX files of the current configuration to a removable disk drive or
network-shared folder. This step is only necessary for the first server upgrade. When
upgrading the second server, skip this step.
2. Uninstall the current version of MAXPRO-Net from the original CD or from the
downloaded version from the ftp site. Refer to paragraph 2.2, Uninstalling MAXPRONet. Caution: Do not uninstall MSDE.
3. Run the V8.0Setup.exe file (extracted from the V8 downloaded zip file).
4. Reboot the server.
5. Open Setmax and verify licensed status. Click on Help, then Licenses. Write down
the code. You will need this code for relicensing your software.
6. Contact Honeywell at 1-800-796-2288. Follow the prompts for licensing products.
7. Import the MAX files you exported in step 1.
Rev. C
21
HMXMU001145
10/06
3.2 STEPS TO UPGRADE VERSIONS 5.X OR 6.X TO VERSION 8.X, CONTINUED
8. If upgrading redundant servers, allow the slave system to run for an hour or more
with the MX18 selector on MASTER before upgrading the master or flipping the
MX18 switches to SLAVE. This allows the CPUs to get synched with the current
video selections. Using this process, the users do not notice any change in system
operation.
9. Repeat steps 2 – 8 for Master server.
Rev. C
22
HMXMU001145
10/06
CHAPTER 4:
TROUBLESHOOTING
4.1
SETMAX NOT CONNECTING TO DB
4.1.1
Check for SQL Server to be started
1. Ensure that the SQL service is running. Check the SQL icon on the taskbar.
2. If the SQL Taskbar icon is not visible, please select the SQL start utility from
"C:\Program Files\Microsoft SQL Server\80\Tools\Binn\sqlmangr.exe."
Rev. C
23
HMXMU001145
10/06
4.1 SETMAX NOT CONNECTING TO DB, CONTINUED
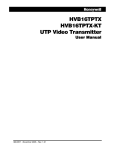
4.1.2
Check if TCP is enabled for SQL Server
1. From the Start menu, select Run and type svrnetcn. Check if the TCP is enabled, as
shown in the following dialog:
NOTE: Please ensure both TCP, Named Pipes is
selected.
Rev. C
24
HMXMU001145
10/06
4.1 SETMAX NOT CONNECTING TO DB, CONTINUED
4.1.3
Check for Database Connectivity
1. Select Control Panel -> Administrative Tools -> DataSource(ODBC). On
DataSource(ODBC) dialog, select the System DSN tab and double click on
MaxDatabase entry.
2. Click the Next button. The following dialog appears:
Rev. C
25
HMXMU001145
10/06
4.1.3 CHECK FOR DATABASE CONNECTIVITY, CONTINUED
3. Click the Next button. The following dialog appears:
4. Click the Next button. The following dialog appears:
Rev. C
26
HMXMU001145
10/06
4.1.3 CHECK FOR DATABASE CONNECTIVITY, CONTINUED
If Error dialog "The database Entered is not valid" pops up.
Please follow these steps:
1. Uninstall MSDE Engine from Control Panel, Add/Remove Programs "Microsoft SQL Desktop Engine."
2. Restart the PC.
CAUTION: If PC is not restarted after MSDE was
uninstalled, the MSDE engine might not function
properly.
Use the following procedure if you have installed MAXPRO-Net without rebooting PC
after reinstallation of MSDE:
a. Uninstall MSDE as in Step-1.
b. Delete the "Microsoft SQL Server" folder in "c:\Program Files\".
c. Restart PC; Redo the MAXPRO-Net installation procedure.
5. Click the Finish button. The following dialog appears:
Rev. C
27
HMXMU001145
10/06
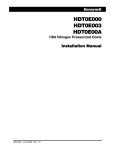
4.1.4
Check for Max Services Running
To verify all services of Max is operational, go to Control Panel->Administrative Tools > Services. And look for the follow the following services to be enabled.
1. MaxDBService
2. MaxServer
3. MaxLicenseManager
4. MSSQLSERVER
Rev. C
28
HMXMU001145
10/06
4.1.5
Set Service Rights with Admin User Privileges
If still SetMax does not connect, set the service rights with an Admin user privileges as
follows:
1. Select Control Panel->Administrative Tools->Services. Double-click on
MaxDBService. The following dialog appears.
2. Select the Logon tab and then select This Account radio button.
3. Type in the Windows User name with Admin privileges (By default the user name is
MAXPRO-Net, Password: maxpronet).
Important: This step has been performed on MaxDBService, MaxServer,
MaxLicenseManager, and MSSQLSERVER services.
Rev. C
29
HMXMU001145
10/06
4.1.5
Set Service Rights with Admin User Privileges, Continued
4. Restart the service using the right click menu.
4.2
ERROR DURING IMPORT IN SETMAX CONFIGURATOR
If the message box "error reading database" pops up during import of .max files:
Reason: This error might occur if MAXPRO-Net was installed but the PC was not rebooted.
Resolution: Reboot PC for normal operation.
Rev. C
30
HMXMU001145
10/06
4.3
LICENSE ERROR DURING STARTUP OF SETMAX CONFIGURATOR
Setmax Configurator pops up License Error for various reasons. You might have to
Obtain License Key to resume operation of the MAXPRO-Net Server.
Following are commonly observed License related errors during startup of Setmax
Configurator:
4.3.1
License Expired: AUTHORIZATION_NOT_PRESENT
Reason 1: MAXPRO-Net is installed in a different folder than it was previously installed.
Resolution: 1. Uninstall and install MAXPRO-Net in the previously installed folder.
2. Obtain new license from your Licensing issuing authority.
Reason 2: The MAXPRO-Net install folder is deleted manually after uninstall.
Resolution: Obtain new license from your Licensing issuing authority.
4.3.2
License Expired: PROGRAM MOVED OR SITEKEY BAD PASSWORD
Reason 1: MAXPRO-Net install folder is moved manually to a different folder.
Resolution: Obtain new license from your Licensing issuing authority.
Reason 2: After MAXPRO-Net was installed, Windows OS was re-installed with
'Retain File System' Option.
Resolution: Follow the steps below,
1. Uninstall MAXPRO-Net.
2. Delete the MAXPRO-Net folder in install directory.
(eg: C:\Program Files\Honeywell\)
3. Re-Install MAXPRO-Net as per the recommended installation procedure.
4. If this problem persists, obtain new license from your Licensing issuing authority.
Rev. C
31
HMXMU001145
10/06
4.3.3
License Expired: (No Reason Specified)
Reason: This error is observed if unspecified error happens in the MAXPRO-Net License
manager.
Resolution: Obtain new license from your Licensing issuing authority.
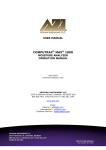
4.4
SITE CODE IS EMPTY IN LICENSE TAB OF SETMAX CONFIGURATOR
In specific instances, the Setmax Configurator fails to display site code in the License
Dialog as in the figure below.
Reason: This error is observed if MAXPRO-Net installed folder is tampered manually.
Resolution: To obtain new license from your Licensing issuing authority, the Site code can be
copied from the LicenseManager.log File in the installed directory,
Eg: C:\Program Files\Honeywell\MAXPRO-Net\MaxNet\LicenseManager.log
NOTE: Scroll to the end of the LicenseManager.Log file copy
the site code from the line with the following format.
<Date> The New Site Code Generated is - <COPY THIS SITE CODE>
Rev. C
32
HMXMU001145
10/06
4.5
WRONG SITE KEY ERROR DURING SAVE SITE KEY OPERATION IN SETMAX
CONFIGURATOR
Reason 1: Site key that is entered is Space Sensitive.
Resolution: Please enter Site Code with spaces as in the key generated for you. If you have received an
email version of site key, Copy-Paste the Site key to the License dialog of the Setmax Configurator and
Select 'Save Site Key' Button.
Reason 2: Site key generated is not for your site.
The Key generation report will contain the Site Code for which site key has been
generated. Please compare the Site code in Setmax License Dialog and the one in the
Key generation Report.
Resolution: Please request re-issue of Site key from your License issuing Authority, if there is mismatch in
Site Code you had sent.
Rev. C
33
HMXMU001145
10/06
Honeywell Video Systems (Head Office)
2700 Blankenbaker Pkwy, Suite 150
Louisville, KY 40299
www.honeywellvideo.com
TEL+1-800-796–2288
Honeywell Video Systems Northern Europe
Netwerk 121
1446 TR Purmerend, The Netherlands
www.SecurityHouse.nl
TEL +31.299.410.200
Honeywell Security Australia Pty Ltd.
Unit 5, Riverside Centre, 24-28 River Road West
Parramatta, NSW 2150, Australia
www.ademco.com.au
TEL +61.2.8837.9300
Honeywell Video Systems UK Ltd.
Aston Fields Road, Whitehouse Ind Est
Runcorn, Cheshire, WA7 3DL, UK
www.honeywellvideo.com
TEL +0844 8000 235
Honeywell Security Asia Pacific
33/F Tower A, City Center, 100 Zun Yi Road
Shanghai 200051, China
www.security.honeywell.com/cn
TEL +86 21.2527.4568
Honeywell Security South Africa
Unit 6 Galaxy Park, 17 Galaxy Avenue,
Linbro Park, P.O. Box 59904
2100 Kengray, Johannesburg, South Africa
www.honeywell.co.za
TEL +27.11.574.2500
Honeywell Security Asia
Flat A, 16/F, CDW Building, 388 Castle Peak Road
Tsuen Wan, N.T., Hong Kong
www.security.honeywell.com/hk
TEL +852.2405.2323
Honeywell Security Deutschland
Johannes-Mauthe-Straße 14
D-72458 Albstadt, Germany
www.honeywell.com/security/de
TEL +49.74.31.8.01.0
Honeywell Security France
Parc Gutenberg, 8, Voie La Cardon
91120, Palaiseau, France
www.honeywell-security.fr
TEL +33.01.64.53.80.40
Honeywell Security Poland
Chmielewskiego 22a, 70-028
Szczecin, Polska
www.ultrak.pl
TEL +48.91.485.40.60
Honeywell Security Italia SpA
Via Treviso 2 / 4
31020 San Vendemiano
Treviso, Italy
www.honeywell.com/security/it
TEL +39.04.38.36.51
Honeywell Security Czech Republic
Havránkova 33, Brno
Dolní Heršpice, 619 00, Czech Republic
www.olympo.cz
TEL +420.543.558.111
Honeywell Security Espana
Mijancas 1.3a Planta
P.Ind. Las Mercedes
28022 Madrid, Spain
www.security.honeywell.com/es
TEL +34-902.667.800
Honeywell Security Slovakia Republic
Vajnorskà 142, 83104 Bratislava
Slovakia
www.olympo.sk
TEL +421.2.444.54.660
Video Systems
www.honeywellvideo.com
1-800-796-CCTV (North America only)
[email protected]
Document HMXMU001145 10/06 Rev C
© 2006 Honeywell International Inc. All rights reserved. No part of this publication may be reproduced by any means without
written permission from Honeywell Video Systems. The information in this publication is believed to be accurate in all respects.
However, Honeywell Video Systems cannot assume responsibility for any consequences resulting from the use thereof. The
information contained herein is subject to change without notice. Revisions or new editions to this publication may be issued to
incorporate such changes.