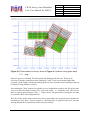
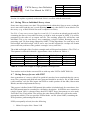
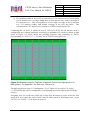
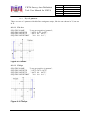
1
Data Flow System
Document Title:
Survey Area Definition Tool:
User Manual for VISTA
Document Number:
VIS-MAN-QMU-00001-0003
Issue:
2.0
Date:
11 September 2009
Document
Prepared By:
Jim Emerson
(QMUL)
Signature
and Date:
Document
Reviewed By:
Jim Emerson
(VISTA PI)
Signature
and Date:
Document
Released By:
Jim Emerson
(VDFS Project Leader)
Signature
and Date:
Jim
Emerson
Digitally signed by Jim Emerson
DN: cn=Jim Emerson, o=Queen
Mary University of London,
ou=Astronmy Unit,
[email protected], c=GB
Date: 2009.09.11 16:48:59 +01'00'
VISTA Survey Area Definition
Tool: User Manual for VISTA
Data Flow System
Doc. Number:
VIS-MAN-QMU-0001-0003
Date:
11 September 2009
Issue:
2.0
Page:
Page 2 of 64
Author:
Jim Emerson
Change Record
Manual
Issue
Date
SADT
version
release
date
Section(s)
Affected
Description of Change/Change Request
Reference/Remarks
1.0
2008-08-22
1.04
All
1st issue.
2.0
2009-09-11
2009-07-07
All
Revision after testing at VISTA prior to
ESO Science Verification
VISTA Survey Area Definition
Tool: User Manual for VISTA
Data Flow System
Doc. Number:
VIS-MAN-QMU-0001-0003
Date:
11 September 2009
Issue:
2.0
Page:
Page 3 of 64
Author:
Jim Emerson
TABLE OF CONTENTS
CHANGE RECORD ............................................................................................................................................. 2
1
INTRODUCTION .......................................................................................................................................... 6
1.1
PURPOSE .................................................................................................................................................... 6
1.2
ABBREVIATIONS AND ACRONYMS ............................................................................................................. 7
1.3
VISTA’S FOCAL PLANE LAYOUT ............................................................................................................... 7
1.4
DEFINITIONS .............................................................................................................................................. 8
1.5
INTRODUCTION .......................................................................................................................................... 9
1.6
WAYS OF DEFINING SURVEY AREAS ....................................................................................................... 10
1.6.1
Rectangular (Geodetic) areas via GUI in a choice of systems ....................................................... 10
1.6.2
Circular areas via GUI in a choice of systems ............................................................................... 12
1.6.3
Coordinate Range areas via GUI in a choice of systems ............................................................... 12
1.6.4
Choosing between the 3 input systems (especially at |Dec| / |Lat| above 60o) ............................... 13
1.6.5
Surveys input as an xml file ............................................................................................................ 13
2
INSTALLATION AND START-UP........................................................................................................... 13
2.1
REQUIREMENTS ....................................................................................................................................... 13
2.1.1
Memory ........................................................................................................................................... 13
2.1.2
Network speed ................................................................................................................................. 14
2.2
SADT INSTALLATION.............................................................................................................................. 14
2.2.1
Install P2PP first............................................................................................................................. 14
2.2.2
Download SADT ............................................................................................................................. 14
2.2.3
Linux/Unix instalaltion: .................................................................................................................. 14
2.2.4
MS Windows instalaltion: ............................................................................................................... 14
2.2.5
MAC OS X Installation: .................................................................................................................. 15
2.2.6
Configure location of IP for SADT ................................................................................................. 15
2.3
RUN ......................................................................................................................................................... 15
2.3.1
Unix/Linux....................................................................................................................................... 15
2.3.2
MS Windows.................................................................................................................................... 15
2.3.3
Mac OS X ........................................................................................................................................ 15
2.4
START-UP WINDOWS ............................................................................................................................... 15
3
SETTING / CHOOSING OPTIONS .......................................................................................................... 17
3.1
MAIN GUI MENU: FILE ........................................................................................................................... 18
3.1.1
Open :.............................................................................................................................................. 18
3.1.2
Save As ...:....................................................................................................................................... 18
3.1.3
Create survey areas from tiles in XML file…: ................................................................................ 18
3.1.4
Convert Existing XML file to Gnuplot ...: ....................................................................................... 18
3.1.5
Network Preferences..:.................................................................................................................... 18
3.1.6
Exit .................................................................................................................................................. 18
3.2
MAIN GUI MENU: OPTIONS .................................................................................................................... 19
3.2.1
Find Guide/aO Stars [On/Off]........................................................................................................ 19
3.2.2
Fixed Aspect Ratio [On/Off] ........................................................................................................... 19
3.2.3
Draw Pawprints [On/Off]............................................................................................................... 19
3.2.4
Draw Aux Detectors [On/Off] ........................................................................................................ 19
3.2.5
Include Overlap [On/Off] ............................................................................................................... 19
3.2.6
Configure Preferences [Select Values]........................................................................................... 20
3.2.6.1
3.2.6.2
3.2.6.3
3.2.6.4
3.2.6.5
Tile-to-Tile Overlap in X ..........................................................................................................................20
Tile-to-Tile Overlap in Y ..........................................................................................................................20
Maximum Jitter Amplitude .......................................................................................................................21
Tile Orientation (Tile relative to Survey Area): ........................................................................................22
Backtrack Step...........................................................................................................................................22
3.3
MAIN GUI MENU: HELP .......................................................................................................................... 23
VISTA Survey Area Definition
Tool: User Manual for VISTA
Data Flow System
Doc. Number:
VIS-MAN-QMU-0001-0003
Date:
11 September 2009
Issue:
2.0
Page:
Page 4 of 64
Author:
Jim Emerson
3.3.1
User Guide:..................................................................................................................................... 23
3.3.2
About…: .......................................................................................................................................... 23
3.4
MAIN GUI BOX: SURVEY ID ................................................................................................................... 23
3.5
MAIN GUI CHOICE: TILE PATTERNS ........................................................................................................ 23
3.6
MAIN GUI CHOICE: CATALOGS .............................................................................................................. 24
4
SURVEY AREAS: CREATING ................................................................................................................. 24
4.1
ADD SURVEY AREA ................................................................................................................................. 24
4.1.1
Tooltips ........................................................................................................................................... 24
4.1.2
Column 1 Type ................................................................................................................................ 24
4.1.3
Column 7 Coordinate System.......................................................................................................... 25
4.1.4
Other fields...................................................................................................................................... 25
4.1.4.1
4.1.4.2
4.1.4.3
4.1.4.4
4.1.4.5
4.1.4.6
4.1.4.7
Column 2 RA, Long, RA1, Lon1 ............................................................................................................25
Column 3 Dec, Lat, Dec1, Lat1...............................................................................................................26
Column 4 Width, Circle diameter, RA2, Long2 ....................................................................................26
Column 5 Height, Dec2, Lat2, ---, .........................................................................................................26
Column 6 Angle (Survey Area relative to Sky): .......................................................................................26
Column 8 Exclude .....................................................................................................................................26
Notes..........................................................................................................................................................27
4.2
EXAMPLE ................................................................................................................................................. 27
4.3
DELETE SURVEY AREA............................................................................................................................ 27
5
SURVEY AREAS: VIEW/ UPDATE, & SAVE ........................................................................................ 28
5.1
OVERVIEW ............................................................................................................................................... 28
5.2
VIEW/UPDATE ......................................................................................................................................... 28
5.3
COORDINATES AT MOUSE IN DISPLAY SYSTEM ........................................................................................ 28
5.4
CHANGING PLOT DISPLAY PARAMETERS .................................................................................................. 29
5.4.1
Zooming .......................................................................................................................................... 29
5.4.2
Display Coordinate system ............................................................................................................. 30
5.4.3
Plot type .......................................................................................................................................... 30
5.5
EXCLUDE SURVEY AREAS ....................................................................................................................... 30
5.6
EXAMPLE ................................................................................................................................................. 30
5.7
INTERPRETING SHAPES DISPLAYED .......................................................................................................... 31
5.8
SAVING SURVEY AREAS – WITHOUT TILES/PAWPRINTS ......................................................................... 31
5.9
READING SURVEY AREAS - WITHOUT TILES/PAWPRINTS ........................................................................ 32
6
TILES/PAWPRINTS: CREATE, SHOW, REFINE & SAVE................................................................. 32
6.1
FINDING TILES/PAWPRINTS ..................................................................................................................... 32
6.1.1
Note ................................................................................................................................................. 32
6.1.2
Start/Resume ................................................................................................................................... 32
6.1.3
Stop ................................................................................................................................................. 34
6.1.4
Reset ................................................................................................................................................ 35
6.1.5
Display ............................................................................................................................................ 35
6.1.6
Guide/aO star finding display......................................................................................................... 35
6.1.7
Inspecting catalogue entries on guide/aO detector footprint display............................................. 37
6.2
MISSING GUIDE/AO STARS ....................................................................................................................... 37
6.3
OPERATIONS ON INDIVIDUAL OR GROUPS OF TILES ................................................................................. 37
6.3.1
Selecting and deselecting tiles ........................................................................................................ 37
6.3.2
Tile operations on selected / deselected tiles .................................................................................. 38
6.4
SAVING TILES/PAWPRINTS– WITHOUT GS/AOS STARS ........................................................................... 39
6.5
WHAT HAPPENS WHEN SADT READS IN AN XML FILE? ........................................................................... 39
6.6
SAVING TILES AS INDIVIDUAL SURVEY AREAS ....................................................................................... 40
6.7
SAVING SURVEYS FOR USE WITH P2PP.................................................................................................... 40
6.8
READING SURVEYS READY FOR P2PP ..................................................................................................... 41
7
TILES/PAWPRINTS: PLOTTING IN ALADIN...................................................................................... 41
VISTA Survey Area Definition
Tool: User Manual for VISTA
Data Flow System
Doc. Number:
VIS-MAN-QMU-0001-0003
Date:
11 September 2009
Issue:
2.0
Page:
Page 5 of 64
Author:
Jim Emerson
8
APPENDIX.................................................................................................................................................... 44
8.1
MAKING A TILE ....................................................................................................................................... 44
8.2
TILE PATTERNS........................................................................................................................................ 47
8.2.1
Npaw=6 patterns............................................................................................................................... 47
8.2.1.1
8.2.1.2
8.2.1.3
8.2.1.4
8.2.1.5
8.2.1.6
Tile6n.........................................................................................................................................................48
Tile6u.........................................................................................................................................................48
Tile6z.........................................................................................................................................................49
Tile6s .........................................................................................................................................................49
Tile6zz .......................................................................................................................................................50
Tile6ss .......................................................................................................................................................50
8.2.2.1
8.2.2.2
Tile 3nx......................................................................................................................................................51
Tile3px.......................................................................................................................................................51
8.6.3.1
8.6.3.2
8.6.3.3
8.6.3.4
Example: Survey Areas (not Tiles yet) .....................................................................................................61
Example: Survey Areas (with tiles/pawprints and Guide/aO stars) ..........................................................62
Example: Pawprint ....................................................................................................................................63
Example: REFSTARS ...............................................................................................................................64
8.2.2
Npaw=3 patterns............................................................................................................................... 51
8.2.3
Npaw=1 patterns............................................................................................................................... 52
8.3
FIXED JITTER PATTERNS .......................................................................................................................... 53
8.3.1
Random ........................................................................................................................................... 53
8.3.2
Single............................................................................................................................................... 53
8.3.3
Jitter2d ............................................................................................................................................ 53
8.3.4
Jitter2u ............................................................................................................................................ 54
8.3.5
Jitter3d ............................................................................................................................................ 54
8.3.6
Jitter3u ............................................................................................................................................ 55
8.3.7
Jitter4u ............................................................................................................................................ 55
8.3.8
Jitter5n ............................................................................................................................................ 56
8.3.9
Jitter5z............................................................................................................................................. 56
8.3.10
Jitter9s........................................................................................................................................... 57
8.3.11
Jitter25s......................................................................................................................................... 57
8.3.12
Jitter30r1....................................................................................................................................... 58
8.4
INSTRUMENT PACKAGE SETTINGS FOR SADT ......................................................................................... 59
8.5
CONFIGURATION FILES & XML SCHEMA ................................................................................................. 60
8.5.1
sad.xsd............................................................................................................................................. 60
8.5.2
sadt.cfg ............................................................................................................................................ 60
8.5.3
skycat.cfg......................................................................................................................................... 60
8.6
XML FILES ............................................................................................................................................... 61
8.6.1
Viewing xml files ............................................................................................................................. 61
8.6.2
Xml Schema..................................................................................................................................... 61
8.6.3
Structure of SADT xml files............................................................................................................. 61
VISTA Survey Area Definition
Tool: User Manual for VISTA
Data Flow System
1
Doc. Number:
VIS-MAN-QMU-0001-0003
Date:
11 September 2009
Issue:
2.0
Page:
Page 6 of 64
Author:
Jim Emerson
Introduction
1.1 Purpose
This document is the User Manual for the Survey Area Definition Tool (SADT) for VISTA.
The SADT user manual for VST will be covered in a separate document. The main functions
of the SADT are:
a) To generate the pointing position for each tile making up a survey.
b) To find the (6) sets of guide stars (GS) and active optics stars (AOS) necessary to
observe each survey tile.
c) To iteratively adjust the tile positions if insufficient GS and/or AOS were found.
d) To enable tiles to be plotted (or overlaid on sky images displayed in) Aladin or other
VO tools communicating via a ‘PLASTIC’ hub.
e) To output the results in a form that can be used in the Phase2 Preparation Program
(P2PP) to generate the OBs ready to await scheduling for execution.
Note that this manual doesn't tell the whole story of how VISTA surveys are prepared – this
is covered in ESO documentation. Figure 1-1 and Figure 1-2 diagram the process of
producing and executing a survey, in two ways, excluding matters related to scheduling.
Figure 1-1 Use of SADT with P2PP
VISTA Survey Area Definition
Tool: User Manual for VISTA
Data Flow System
Doc. Number:
VIS-MAN-QMU-0001-0003
Date:
11 September 2009
Issue:
2.0
Page:
Page 7 of 64
Author:
Jim Emerson
Figure 1-2 Survey process
1.2 Abbreviations and Acronyms
AOS
aO
GS
LOWFS
OB
P2PP
PAF
PLASTIC
SADT
VIRCAM
VISTA
Active Optics Star
Active optics (NOT Adaptive optics)
Guise Star
Low Order Wave-Front Sensor
Observing Block
Phase 2 Preparation Program
PArameter File
PLatform for AStronomical Tool InterConnection
Survey Area Definition Tool
VISTA InfraRed CAMera
Visible and Infrared Survey Telescope for Astronomy
1.3 VISTA’s focal plane layout
Figure 1-3 shows VISTA’s focal plane consisting of
• 16 Science IR (Raytheon) detectors (#s 1-16) shown in green). The number in brackets after
the detector number gives the ID number (1-4) of the IRACE board controlling the detector,
and the letter (A-D) gives the channel in that IRACE board.
• 2 Autoguider CCDs (AG_PY & AG_NY) shown as blue rectangles).
• 2 active Optics (or Low Order Wave Front Sensor) CCDs (LOWFS_PY & LOWFS_NY
shown as blue squares).
VISTA Survey Area Definition
Tool: User Manual for VISTA
Data Flow System
Doc. Number:
VIS-MAN-QMU-0001-0003
Date:
11 September 2009
Issue:
2.0
Page:
Page 8 of 64
Author:
Jim Emerson
Figure 1-3 Focal Plane layout looking down onto it. Note the definition of X and Y
directions. N.B. When looking out onto the sky the detectors are ‘painted’ on the sky
in the mirror image with 1 in the top right.
The IR detectors are not contiguous so a single sky exposure - known as a pawprint - shows
the gaps between the detectors. As is explained in detail in Section 8.1 to make an image
without gaps it is necessary to combine together several (typically 6) pawprints with position
offsets chosen so as to cover the gaps and form a filled ‘tile’. [Six is the minimum number of
pointed observations (with fixed offsets) required for reasonably uniform and completely
contiguous coverage, and exposes each piece of sky, away from the upper and lower edges
(in the ‘Y’ direction) of the tile, to at least 2 camera pixels.]
1.4 Definitions
To use SADT effectively and understand how SADT works it is necessary to appreciate the
following definitions as used in SADT.
•
Survey: A survey corresponds to the total area of sky that needs to be observed. A
survey may consist of a number of non-contiguous survey areas, which may be of
various different types and defined in various different coordinate systems. SADT is
not concerned about what observations are carried out at each position in a survey
(except SADT must be given the Tile pattern (8.2) to be used to determine the order
in which the pawprints will be observed, and the maximum jitter amplitude used
(3.2.6.3) to ensure the GS and AOS stars stay on the CCDs during jitter moves).
Definition of what observation is carried out at each position is handled by P2PP.
VISTA Survey Area Definition
Tool: User Manual for VISTA
Data Flow System
Doc. Number:
VIS-MAN-QMU-0001-0003
Date:
11 September 2009
Issue:
2.0
Page:
Page 9 of 64
Author:
Jim Emerson
•
Survey Area: Each survey area is a contiguous area of sky. A survey consists of one
or more sets of survey areas which may be non-contiguous. In general each will
consist of multiple VISTA tiles.
•
Tile: A tile is a filled and fully sampled area of sky formed by combining multiple
pawprints. Because of the detector spacing, the minimum number of pointed
observations (with fixed offsets) required for reasonably uniform coverage is 6, which
exposes each piece of sky, away from the edges of the tile, to at least 2 camera pixels
(Sec 8.1).
•
Pawprint: A pawprint is the image formed by the 16 non-contiguous images of the
sky produced by VISTA, with its 16 non-contiguous chips.
The four definitions above also determine the hierarchical structure of the xml files that
SADT outputs and that are read by P2PP (Sec 8.6).
•
Angle (Survey Area relative to Sky):
The (position) angle (degrees) on the sky between North in the selected coordinate
system and the Height axis of the survey area. Angle is measured increasing Eastward
from North on the sky.
•
Orientation (Tile relative to Survey Area): The angle on the sky between the
Height axis of the survey area and the +Y (shorter) axis of VISTA focal plane (Figure
1-3) measured increasing Eastward from the Height axis on the sky.
1.5 Introduction
A survey with the wide field survey telescope VISTA involves observing predefined areas of
sky, typically with the same basic observing parameters (Observation Block - OB) except for
position on the sky, repeated at many sky positions, and perhaps at several times or with
different filters. The SADT is intended to automate the process of producing sky position
dependent data needed to execute the (many) OBs required for large area surveys. SADT
provides editing and graphical display facilities for Survey Areas, creates Tiles and
Pawprints, selects guide and active optics stars for these areas, and saves the output in a form
understood by the phase 2 preparation tool P2PP. It also provides facilities to plot the
pawprints on VO tools communicating via a PLASTIC hub such as Aladin. SADT is not
concerned about what observations are carried out at each position in a survey (except SADT
must be given the Tile pattern to be used to determine the order in which the Pawprints will
be observed (Sec 0) and the maximum jitter amplitude used (3.2.6.3) to ensure the GS and
AOS stars stay on the CCDs during jitter moves).
Caution: If either of ’X coord of pointing’ or ’Y coord of pointing’ set to non-zero values in
OBs in P2PP SADT Guide/AO stars will NOT work as SADT does not take any account of
such X/Y coord offsets.
VISTA Survey Area Definition
Tool: User Manual for VISTA
Data Flow System
Doc. Number:
VIS-MAN-QMU-0001-0003
Date:
11 September 2009
Issue:
2.0
Page:
Page 10 of 64
Author:
Jim Emerson
To implement a survey the positions of the component tiles that VISTA will have to observe
must be defined. Each filled tile will consist of (typically) six overlapping pawprints, and for
best image quality autoguiding and active optics should both be used,
For each pawprint in each tile suitable candidate guide stars (GS) and active optics stars
(AOS) must be preselected ready for use when the observation is made. This ensures that
survey speed is not limited by frequent (tedious and sky time wasting) operator intervention.
For guide star acquisition there must be at least one GS -- this can be on either of the two
autoguider CCDs (AG_PY, AG_NY see Figure 1-3).
For active optics operation there must be at least two AOS – one on each of the two Low
Order Wavefront Sensor CCDs (LOWFS_PY (AOSA) and LOWFS_NY (AOSB) see Figure
1-3)
The major functions of the Survey Area Definition Tool (SADT) are:
a) To generate the pointing position for each tile making up a survey.
b) To find the (6) sets of guide stars (GS) and active optics stars (AOS) necessary for
each survey tile.
c) To iteratively adjust the tile positions if insufficient GS and/or AOS were found.
d) To enable tiles to be plotted (or overlaid on sky images displayed in) Aladin or other
VO tools communicating via a ‘PLASTIC’ hub.
e) To output the results in a form that can be used in the Phase2 Preparation Program
(P2PP) to generate the OBs ready to await scheduling for execution.
1.6 Ways of Defining Survey Areas
SADT must calculate, or be given, the positions of the component tiles of each Survey Area
in the chosen coordinate system. SADT deduces the component pawprints and their GS and
AOS stars from the tile positions once the tiling begins. The survey areas and tiles are first
defined in the chosen input coordinate system. Note that regardless of the input coordinate
system used the tiles in the output xml files are specified in RA, Dec (J2000) for use at the
telescope.
SADT has three distinct ways of producing the tiles. There may be multiple instances of each
type in any Survey.
1.6.1
Rectangular (Geodetic) areas via GUI in a choice of systems
In a Geodesic Rectangle opposite sides have an equal number of degrees on the sky at any
Declination / Latitude. Given that the VISTA field of view is itself rectangular on the sky
(neglecting barrel distortion) this is the most natural and efficient way to cover the sky. [N.B.
a rectangle on the sky (tangent plane) projects to a pincushion on the focal plane.]
In Geodetic Rectangle mode a survey area centre position is defined in the chosen coordinate
system, and the number of degrees extent in two orthogonal directions are given, together
with an angle relative to the coordinate system used.
VISTA Survey Area Definition
Tool: User Manual for VISTA
Data Flow System
Doc. Number:
VIS-MAN-QMU-0001-0003
Date:
11 September 2009
Issue:
2.0
Page:
Page 11 of 64
Author:
Jim Emerson
Figure 1-4 Areas defined by Geodetic tiles (b & d) and Coordinate Ranges (a & c)
and showing rotation angle. The darker blue lines represent a fixed coordinate
system (e.g., RA / Longitude, Dec / Latitude) in all four diagrams. The lighter blue
lines in c & d represent the rotated coordinate system in which the survey area was
defined.
Figure 1-4 (b) shows a (green) geodetic rectangle with position angle zero projected on a
fixed spherical coordinate system (dark and light blue grid) with a red dot marking the centre,
Figure 1-4 (d) shows a (green) geodetic rectangle defined in a different (rotated - light blue)
spherical coordinate system, and projected on the fixed spherical coordinate system (as in b)
with a red dot marking the centre. The dark blue grid generally represents RA, Dec. The
yellow angle shows the (position) angle when looking out from the inside of the fixed
system.
VISTA Survey Area Definition
Tool: User Manual for VISTA
Data Flow System
Doc. Number:
VIS-MAN-QMU-0001-0003
Date:
11 September 2009
Issue:
2.0
Page:
Page 12 of 64
Author:
Jim Emerson
The algorithm used to construct the tile pattern starts from the lower right hand (SW) corner
of the area to be filled and then fills in from right to left, goes to the next row up, fills it from
right to left, and continues this until the whole area is filled. N.B. In general this means that
the area produced will look different (i.e. not be just reflected about the equator) if one flips
the sign of the declination / latitude the area is centred on. The exception is in cases where an
area is defined to include an integer number of tiles in both directions.
It is recommended that geodetic rectangles should be used in preference to coordinate ranges
or circles at high |Dec| / |Latitude| (above 60 deg). This should ensure the most complete and
efficient coverage, especially at very high |Dec| / |Lat| (above 60) where the coordinate range
method’s need to follow Dec / Latitude lines can produce poor coverage as the modulus of
|Dec| / |Lat| gets closer to 90.
1.6.2
Circular areas via GUI in a choice of systems
In Circular mode the central position and radius of the areas are defined in the chosen
coordinate system.
1.6.3
Coordinate Range areas via GUI in a choice of systems
In Coordinate Range mode the upper and lower bounds of the areas are defined in the chosen
coordinate system. The angle relative to the coordinate system is fixed at 0 deg as any other
value would be inconsistent with the coordinate range given.
Figure 1-4 (a) shows a (green) coordinate range ‘painted’ on a spherical coordinate system
with a red dot marking the centre, Figure 1-4 (c) shows a (green) coordinate range defined in
a different (rotated) spherical coordinate system ‘painted’ on the different (light blue rotated)
spherical coordinate system with a red dot marking the centre. The dark blue grid represents
RA, Dec. The yellow angle shows the (position) angle from the RA, Dec frame to the new
frame and is used internally in SADT.
The tiling algorithm used constructs the tile pattern starting from the lower right (SW) corner
of the area to be filled (i.e. when defined in RA-Dec system the lowest RA and lowest Dec).
In that example RA-Dec system (the equivalence in other systems, included rotated ones, is
obvious) it then fills the first row from right to left (increasing RA) at constant Dec, and then
fills in the next row up (higher Dec) left to right, and continues this until the area is filled.
Always starting from the SW corner means that in general the area produced will look
different (and not be just reflected about the equator) if one flips the sign of the declination /
latitude the area is centred on. The exception is in cases where an area is defined to include
an integer number of tiles in both directions.
For a given RA / Longitude range the number of degrees on the sky will vary with Dec /
Latitude and this makes use of this mode less intuitive than the geodetic rectangle mode, and
it is not recommended at very high (>60) Dec / Latitude.
VISTA Survey Area Definition
Tool: User Manual for VISTA
Data Flow System
Doc. Number:
VIS-MAN-QMU-0001-0003
Date:
11 September 2009
Issue:
2.0
Page:
Page 13 of 64
Author:
Jim Emerson
Keeping each tile aligned to its Dec produces awkward effects a high Dec as explained in
1.6.4.
1.6.4
Choosing between the 3 input systems (especially at |Dec| / |Lat| above
60o)
Because using coordinate ranges (1.6.3) inevitably produces different shaped areas at
different declinations/latitudes, and because SADT aligns the bottoms of coordinate range
tiles along lines of constant Dec/ Latitude (or at an angle relative to Dec/ Latitude) there will
inevitably be significant problems in automatically covering areas completely when the areas
have been defined as coordinate ranges especially at high Dec / Latitude.
Therefore in general it is recommended that geodetic rectangles (1.6.1) be used as the most
reliable way to cover sky fully and efficiently. For example to tile the whole Southern
hemisphere requires 13,029 tiles in Geodetic rectangle mode, and 13,235 tiles in Coordinate
Range mode which actually fails to cover the S pole region completely.
It is recommended that geodetic rectangles should be used in preference to coordinate ranges
or circles at |Dec| / |Lat| above 60o). This should ensure the most complete and efficient
coverage, especially at |Dec| / |Lat| above 60o where the coordinate range method’s need to
follow Dec / Lat lines can produce poor coverage as |Dec| / |Lat| gets closer to 90 o.
In any case it is strongly recommended to do a visual check that the tiling algorithm has
succeeded in producing adequate coverage of the areas intended before saving the output xml
file.
1.6.5
Surveys input as an xml file
SADT can also read in xml files describing surveys. In general these files will have been
previously written by SADT. The skilled, and very careful, user can create his own xml files
to input complex surveys. These are described in the following sections and in 8.6.
2
Installation and Start-up
2.1 Requirements
SADT is a java application that is required to run under Scientific Linux running java 1.4 or
higher. This can be downloaded at java.sun.com/j2se. As a java application it should also run
under Unix, Mac OS X, or MS Windows OSs running java 1.4 or higher, but is no support is
guaranteed on other systems. Given that running P2PP requires java 1.5 it is suggested that
SADT is also run under java 1.5
The script files which run the SADT need to be able to run Java; therefore it is advised that
your PATH environment variable should include the directory path to the Java executable.
2.1.1
Memory
SADT keeps all the information on a survey as an object in memory, and consequently the
more tiles there are, and the more GS /AOS have been found the more memory is required.
VISTA Survey Area Definition
Tool: User Manual for VISTA
Data Flow System
Doc. Number:
VIS-MAN-QMU-0001-0003
Date:
11 September 2009
Issue:
2.0
Page:
Page 14 of 64
Author:
Jim Emerson
This can lead to progress being uncomfortably slow with large survey areas. One way to
mitigate this is have more memory available which gives better performance. The SADT
start-up script attempts to set a maximum heap size appropriate to the memory available on
the machine it is run on.
Given the finite memory available on any particular machine the alternate mitigation is to
split the survey up into a number of sub-areas and run SADT separately for each sub-area.
The output xml files could subsequently be edited and merged into a single file if required.
[Though on any reload SADT operations on this file would probably run very slowly].
2.1.2
Network speed
Another the speed limitation which can arise is a result of the remote network access to
search for guide/aO stars as when selecting a guide star catalogue that its location (on the
internet) and the speed of the internet connection can have a strong effect on the time it takes
(hours for large numbers of tiles).
2.2 SADT Installation
2.2.1
Install P2PP first
P2PP should be installed according to instructions from ESO before installing SADT.
During installation P2PP will download and install the current version of the VISTA IR
Camera (VIRCAM) Instrument Package (IP) which SADT must read.
Note the path to the directory containinp p2pp on you local system e.g. on the manual writers
Mac with an old version of P2PP containing an old version (1.25) of the IP it is
/Applications/p2pp_v3-3.1beta5-eso/instruments/VIRCAM\*1.25/
2.2.2
Download SADT
Go to www.vista.ac.uk/observing/sadt where the latest version of SADT will be available as
sadtfilename.tgz where sadtfilename.tgz represents the actual name of the file.
2.2.3
Linux/Unix instalaltion:
Download sadtfilename.tgz into a directory, and cd into the directory and type:
gunzip sadtfilename.tgz
a .tar file will then appear
tar xf the .tar file
and a directory called sadtdirectory appears where sadtdirectory represents the actual
name of the directory which should contain at the first level a /bin /lib /cfg and /tsf.
2.2.4
MS Windows instalaltion:
Download sadtfilename.tgz into a directory. SADT understands MS Windows file names
containing blanks so you can install under My Documents. Double click on
sadtfilename.tgz and unpack the directory structure called sadtdirectory where
sadtdirectory represents the actual name of the directory which should contain at the first
level a /bin /lib /cfg and /tsf.
VISTA Survey Area Definition
Tool: User Manual for VISTA
Data Flow System
2.2.5
Doc. Number:
VIS-MAN-QMU-0001-0003
Date:
11 September 2009
Issue:
2.0
Page:
Page 15 of 64
Author:
Jim Emerson
MAC OS X Installation:
Download the sadtfilename.tgz and unpack it.
2.2.6
Configure location of IP for SADT
Once SADT has been installed use a plain text editor to open sadt.cfg in
sadtdirectory/cfg/vista and set the location of the VIRCAM IP on the machine you are using
to (e.g. for the example location in 2.2.1)
INSTRUMENT_PACKAGE_PATH=/Applications/p2pp_v3-3.1beta5-eso/instruments/VIRCAM\*1.25/
and save the modified file.
Note it is very important to do this to ensure use of the same versions of the IP (1.25 in this
example) in both SADT and P2PP. If not differences in the two IPs used could result in OBs
that will fail to execute correctly.
[For trial SADT runs (whose output will not be used to produce executable VISTA OBs),
locally defined tile patterns in sadtdirectory/tsf/vista/vcotsf/config can be used.
These are set to be the same as those in the instrument package at time of the SADT release
so that users without P2PP installed can still carry out explorarory test work.]
2.3 Run
2.3.1
Unix/Linux
To run type: sadtdirectory/bin/sadt
2.3.2
MS Windows
To run:
Start -> Run and browse to (e.g.)
My Computer -> C: -> ... -> MyName -> sadtdirectory -> bin -> sadt.bat so
the box reads C:\...\MyName\sadtdirectory\bin\sadt.bat and click OK
or navigate to (e.g.)
C:\...\Name\sadtdirectory\bin\sadt.bat and double click on sadt.bat
2.3.3
Mac OS X
To run click: sadtdirectory/bin/sadt.
You can also navigate to sadtdirectory/bin and make an alias of sadt. Move this to a
convenient place (say Desktop) and run by clicking on the alias to sadt.
N.B. sadt cannot be put on the application launching toolbar as it is a java file not an .app
file.
2.4 Start-up Windows
When the SADT starts up the first window which opens is an information/log window which
just after start-up contains:
VISTA Survey Area Definition
Tool: User Manual for VISTA
Data Flow System
Doc. Number:
VIS-MAN-QMU-0001-0003
Date:
11 September 2009
Issue:
2.0
Page:
Page 16 of 64
Author:
Jim Emerson
(for WinXP) something like:
path\sadtdirectory\bin>echo off
path\sadtdirectory\bin>java -classpath
..\lib\sdt.jar;..\lib\vecmath.jar;..\lib\jsky.jar;..\lib\log4j.jar;..\lib\diva.jar;..\lib\util.jar;
..\lib\fits.jar;..\lib\image.jar;..\lib\jel.jar;..\lib\jfreechart.jar;;
..\cfg\vista survey.app.SurveyDefinitionTool
Plugins loaded:
class survey.vista.VistaTiles (replacing class survey.area.PrimitivePattern)
class survey.vista.VistaSurveyAreaDisplay (replacing class survey.area.SurveyAreaDisplay)
class survey.vista.VistaGuideSearch (replacing class survey.catalog.DetectorSearch)
class survey.vista.VistaTileCenterIO (replacing class survey.util.TileCenterIO)
class survey.vista.VistaIO (replacing class survey.util.SdtXML)
Using standard format.
Creating a plastic manager
No local USNO catalogue available. Other catalogue(s) will be used.
(for Mac OS X) in Terminal –java -80x24 something like:
Plugins loaded:
class survey.vista.VistaSurveyAreaDisplay (replacing class survey.area.SurveyAreaDisplay)
class survey.vista.VistaTiles (replacing class survey.area.PrimitivePattern)
class survey.vista.VistaTileCenterIO (replacing class survey.util.TileCenterIO)
class survey.vista.VistaIO (replacing class survey.util.SdtXML)
class survey.vista.VistaGuideSearch (replacing class survey.catalog.DetectorSearch)
Using standard format.
Creating a plastic manager
No local USNO catalog available. Other catalog(s) will be used.
If a bug occurs at anytime go to this terminal Window, then right click and select the ‘Select
All’ option to select all the text. Copy and paste this into a simple text file to document the
problem when you report it. The window also displays progress information on tiling and
finding guide/aO stars (GS/AOS).
If you did not set INSTRUMENT_PACKAGE_PATH in sadt.cfg to a valid location
containing the VIRCAM IP (see 2.2.6) you will see something like the window shown in
Figure 2-1
Figure 2-1 Window seen if Instrument Package not found in P2PP
VISTA Survey Area Definition
Tool: User Manual for VISTA
Data Flow System
Doc. Number:
VIS-MAN-QMU-0001-0003
Date:
11 September 2009
Issue:
2.0
Page:
Page 17 of 64
Author:
Jim Emerson
Answering Yes will terminate SADT.
Answering No will allow you to continue using the version of the IP included with SADT but
(for version control reasons) the SADT file that you make may not be usable in P2PP – but
will be useful for ‘practise’.
If you did set the correct path to P2PP’s VIRCAM IP the window in Figure 2-1 will not
appear.
Now the window from which the SADT is driven opens (Figure 2-2).
Figure 2-2 Command/Input GUI window on opening.
3
Setting / Choosing Options
The user must configure some parameters before generating any survey areas, tiles/pawprints
of guide/aO stars.
SADT does not remember the last values used when it was last shutdown so these options
will need to be set each time SADT is started up.
As SADT cannot know what you intend to do in P2PP you must provide it with information
on the Tile pattern you will use in your OBs (3.5) and the maximum jitter amplitude (3.2.6.3)
VISTA Survey Area Definition
Tool: User Manual for VISTA
Data Flow System
Doc. Number:
VIS-MAN-QMU-0001-0003
Date:
11 September 2009
Issue:
2.0
Page:
Page 18 of 64
Author:
Jim Emerson
you will use in your pawprints. If this information is not consistent with what you actually do
in P2PP your OBs will fail!
3.1 Main GUI Menu: File
Clicking on the File menu brings up the following Window
3.1.1
Open :
Open xml files written by SADT
3.1.2
Save As ...:
Save current survey definitions as an xml file
3.1.3
Create survey areas from tiles in XML file…:
Convert tiles within a survey area saved in an xml into multiple survey areas one for each tile
(6.6).
3.1.4
Convert Existing XML file to Gnuplot ...:
Igonore this no longer supported option. It was for debugging by a software engineer in
debug mod and wrote the coordinates of the tile centres, pawprints and guide stars to files
that ccould be read by Gnuplot and created a Gnuplot script that read all these files.
3.1.5
Network Preferences..:
Specify a proxy server if required (e.g. in connection with firewall).
3.1.6
Exit
Exit the SADT program. [N.B. The parameters set in the menus are not stored within SADT
between invocations of it. Be sure to save your work as an xml file or note your settings.]
VISTA Survey Area Definition
Tool: User Manual for VISTA
Data Flow System
Doc. Number:
VIS-MAN-QMU-0001-0003
Date:
11 September 2009
Issue:
2.0
Page:
Page 19 of 64
Author:
Jim Emerson
3.2 Main GUI Menu: Options
Clicking on the Options menu brings up the following Window
3.2.1
Find Guide/aO Stars [On/Off]
If this option is switched off SADT’s algorithm creates tiles/pawprints without any guide/aO
stars. This is useful of you want to see roughly how a survey area is filled with tiles without
having to wait the (sometimes long) time it takes to download guide/aO stars for all tiles from
an online catalogue. To toggle this Tick/Untick Find Guide/AO stars option on the Options
menu.
3.2.2
Fixed Aspect Ratio [On/Off]
The Aspect ratio of the displayed plots can be toggled between fixed or variable (according to
Window aspect). To toggle this Tick/Untick Fixed Aspect Ratio option on the Options menu.
3.2.3
Draw Pawprints [On/Off]
If this option is selected then the shape of all science detectors component pawprints of each
tile is drawn on the survey area display. If this option is not selected a dot marks the central
position of each pawprint in a tile. If the survey area is large then these detectors become
very small and it might be clearer if they were not drawn. To toggle this Tick/Untick the Find
Guide/AO stars option on the Options menu.
3.2.4
Draw Aux Detectors [On/Off]
When Draw Pawprints is set On setting Draw Aux Detectors On will display the positions of
the 2 Autoguider (AG) and 2 aO/Low Order Wavefront Sensor (LOWFS) CCDs. CCD
AG_PY is shown in black. In conjunction with Figure 1-3 this is allows determination of the
directions of the +X and +Y axes of the focal plane and which detector is which.
To toggle this Tick/Untick the Draw Aux Detectors option on the Options menu.
3.2.5
Include Overlap [On/Off]
If this option is selected then tiles which lie partially in an included survey area and partially
in an excluded survey area (4.1.4.6) are included. Otherwise they are excluded. To toggle this
Tick/Untick the Include Overlap option on the Options menu.
VISTA Survey Area Definition
Tool: User Manual for VISTA
Data Flow System
3.2.6
Doc. Number:
VIS-MAN-QMU-0001-0003
Date:
11 September 2009
Issue:
2.0
Page:
Page 20 of 64
Author:
Jim Emerson
Configure Preferences [Select Values]
Clicking on Configure… in the Options menu brings up the Window in Figure 3-1 which
shows the GUI window for setting these parameters
Figure 3-1 Configuration preferences (global value setting) interface.
The default tile-to-tile overlaps of 60 arcsec are recommended for ease of tieing together
adjacent tiles during data processing. Before changing Tile-to-Tile overlaps from the default
parameters consult the Appendix in Section 8.1.
3.2.6.1 Tile-to-Tile Overlap in X
>=2x sampled overlap in X
Set a value for the tile-to-tile overlaps in arcsec required in X (TILE_OVERLAP_X) for
areas covered twice or more with a (default) Tile6 pawprint pattern.
Overlaps double (and greater) coverage in adjacent tiles in X by [60] arcsec (i.e. [60] arcsec
in X at the sides is common double coverage to adjacent tiles in X).
3.2.6.2 Tile-to-Tile Overlap in Y
>=2x sampled overlap in Y
Set a value for the tile-to-tile overlaps in arcsec required in Y (TILE_OVERLAP_Y) for
areas covered twice or more with a (default) Tile6 pawprint pattern.
Overlaps double (and greater) coverage in adjacent tiles in Y by [60] arcsec.
The value of the Y overlap shown in the GUI is the same value that is stored or retrieved
from the XML file. For internal calculations however, the Y overlap used is the Y overlap
from the GUI plus the value of the parameter 1x_STRIP_Y from sadt.cfg. 1x_STRIP_Y is set
at 330 [=0.475*2048*0.339] arcsec which just overlaps the singly exposed edge strips of
VISTA Survey Area Definition
Tool: User Manual for VISTA
Data Flow System
Doc. Number:
VIS-MAN-QMU-0001-0003
Date:
11 September 2009
Issue:
2.0
Page:
Page 21 of 64
Author:
Jim Emerson
adjacent tiles in Y. This is to ensure that the 1x covered strips in the Y direction are covered
twice, as should be the default for efficient surveys.
Examples
• TILE_OVERLAP_Y = 60 overlaps adjacent doubly exposed tiles in Y by [60] arcsec
(i.e. [60] arcsec in Y is common double coverage to both double covered tiles).
•
TILE_OVERLAP_Y = 0 just completely overlaps the singly exposed edge strips of
adjacent tiles in Y giving doubly exposed edge (as elsewhere in the tile).
•
TILE_OVERLAP_Y = -330 just butts (no overlap) the singly exposed strips (not
recommended).
3.2.6.3 Maximum Jitter Amplitude
The maximum amplitude (in arcseconds) of the Jitter pattern to be used in the OBs must be
set from the GUI under Options->Configure -> Maximum Jitter Amplitude.
This is determined by looking at the defined Jitter patterns (8.3), taking the modulus of all the
values finding the largest modulus in OFFSETX and OFFSETY and then rounding up. The
values for Maximum Jitter Amplitude for each available Jitter pattern are given in Table 3-1.
As during OB definition in P2PP the jitter offsets in a pattern may be scaled by the
multiplicative factor, so the Maximum Jitter Amplitude value in Table 3-1 include allowance
for this factor.
The default value of Jitter Scale Multiplier of 15 .0 set in sadt.cfg is large enough to
accommodate all the values in Table 3-1 only if Jitter Scale Multiplier remains at its default
value of 1.0.
The Random Jitter available in P2PP is not a fixed pattern, like the others, but is generated,
with a given amplitude, when the OBs are created. For Maximum Jitter Amplitude use the
amplitude (0-peak) of this Random jitter as (to be) set in P2PP.
Together the position and dimensions of the four guide/aO CCDs in arcsec, which are read
from the Instrument Package (8.4), the Maximum Jitter Amplitude values define the area
over which guide stars will be sought. This ensures the guide/aO stars found will remain on
the guide/aO CCDs during the maximum jitter offsets.
If the value is set wrong there are two possible consequences:
1. If Maximum Jitter Amplitude is set larger than necessary the area over which
Guide/aO stars will be sought will be smaller than necessary, which could be a
problem especially in regions of low star surface density.
2. If Maximum Jitter Amplitude is set smaller than the actual maximum jitter amplitude
used some guide/aO stars may fall off their CCD during a jitter, causing OB execution
to take longer, wasting time whilst the operator intervenes, or possibly to fail.
VISTA Survey Area Definition
Tool: User Manual for VISTA
Data Flow System
Doc. Number:
VIS-MAN-QMU-0001-0003
Date:
11 September 2009
Issue:
2.0
Page:
Page 22 of 64
Author:
Jim Emerson
The Maximum Jitter Amplitudes set in SADT MUST not exceed those implicitly chosen (by
choice of Name of Jitter pattern and Jitter Scale Multiplier) in the P2PP OBs that you will
create.
Name of Jitter Maximum Jitter amplitude
Pattern
(arcsec)
Single
0
Jitter2d
10 * Jitter Scale Multiplier
Jitter2u
10 * Jitter Scale Multiplier
Jitter3d
10 * Jitter Scale Multiplier
Jitter3u
10 * Jitter Scale Multiplier
Jitter4u
14 * Jitter Scale Multiplier
Jitter5n
9 * Jitter Scale Multiplier
Jitter5z
14 * Jitter Scale Multiplier
Jitter9s
14 * Jitter Scale Multiplier
Jitter25s
14 * Jitter Scale Multiplier
Jitter30r1
10 * Jitter Scale Multiplier
Random
The actual jitter patterns are listed and
shown in Section 0.
No jitter
2 point jitter - top left to bottom right
2 point jitter - bottom left to top right
3 point jitter - top left to bottom right
3 point jitter - bottom left to top right
4 point jitter – rotated u shape
5 point jitter – rotated n shape
5 point jitter – rotated z shape
9 point jitter - rotated square shape
25 point jitter - spiral pattern
30 point jitter - generated with random
number generator
Use value set for amplitude of This is not a fixed pattern but generated
the random jitter pattern
with a given amplitude when the OBs
are created.
Table 3-1 Maximum Jitter Amplitudes
3.2.6.4 Tile Orientation (Tile relative to Survey Area):
The tile orientation is the angle on the sky between the Height axis of the survey area and the
+Y (shorter) axis of VISTA focal plane (Figure 1-3) measured increasing Eastward from the
Height axis on the sky. Tile orientation can be set at either 0, 90, 180 or 270 deg.
Because VISTA tiles are rectangular, not square, a more efficient tiling of a survey area
(fewer tiles to cover it) can result from choosing an appropriate Tile Orientation to best fit the
survey area with the minimum number of tiles.
3.2.6.5 Backtrack Step
In case the guide/aO star requirements cannot be met at a tile position SADT moves the Tile
position. Backtrack Step is the amount in arcseconds by which the SADT’s guide/aO star
search algorithm shifts a tile back along the row of tiles. The backtrack step is repeated until
guide/aO stars are found or the previous tile position is reached. [In extremis sidetracking can
also be enabled in sadt.cfg though this is not normally recommended.]
After backtracking there will often be more tiles needed, and they will be at different
positions than would be found with the Find guide/aO Stars selection set to Off in the
Options menu, The X boundaries of tiles in adjacent rows will also not match up.
VISTA Survey Area Definition
Tool: User Manual for VISTA
Data Flow System
Doc. Number:
VIS-MAN-QMU-0001-0003
Date:
11 September 2009
Issue:
2.0
Page:
Page 23 of 64
Author:
Jim Emerson
In the unlikely event that guide/aO stars are not required Backtracking can be suppressed by
setting Backtrack Step =0. Note that some tiles may then not have GS/AOS stars for all the
pawprints and the OBs will not successfully complete without operator intervention.
With Backtrack Step =0 set in the GUI when tiling with guide star search is executed the
catalogue is queried but if no guide star is found no backtracking is applied and the current
position of the pawprint is retained. The result is a set of tiles with the same coordinates as if
no guide star search were performed but with additional REFSTARS information that was
retrieved from the catalogue.
In addition to the geometry there are several other parameters, set in the Instruemnt Package,
which influence whether guide/aO stars will be found. These are described in 8.4.
3.3
Main GUI Menu: Help
Clicking on the Help menu brings up the following Window
3.3.1
User Guide:
Refers the reader to the location of the User Manual (this document). The latest
version should always be avialble at www.vista.ac.uk/observing/sadt
3.3.2
About…:
Gives the version numbers of SADT and Instrument Package version currently being
used, together with terms and conditions of use and a disclaimer.
3.4 Main GUI Box: Survey ID
Define a name for your Survey in the Survey_ID box. This will be the default name used in
saving or exporting files from SADT. It will also form part of the name of the parameter files
ceated for your survey by SADT/P2PP so use something brief but clear. If nothing is entered
then Survey_ID defaults to ‘survey’ (or whatever may have been set as the default in the
sadt.cfg configuration file).
3.5 Main GUI Choice: Tile patterns
The pattern of pawprints that will be used to make a Tile must be selected from the Tile
Patterns drop down menu in the lower left of the main GUI screen. The Tile patterns are
shown in Section 8.2.
Note that SADT does not recognise the Single Tile pattern available in P2PP [this means take
a single pawprint]. The Tile1_00 pattern available in SADT and P2PP is entirely equivalent
to Single. When SADT is being used single pawprints can only be defined using the
Tile1_00 pattern.
VISTA Survey Area Definition
Tool: User Manual for VISTA
Data Flow System
Doc. Number:
VIS-MAN-QMU-0001-0003
Date:
11 September 2009
Issue:
2.0
Page:
Page 24 of 64
Author:
Jim Emerson
The Tile pattern used in SADT must be the same one that the user will use in the
corresponding OBs in P2PP. Otherwise the guide/aO stars will not be associated with the
right pawprints and so the GS and AOS stars will not appear on the CCDs at the telescope
leading to failed execution of the OBs.
3.6 Main GUI Choice: Catalogs
The catalogue choice box is underneath the survey areas text box guide/aO star. The
catalogues are discussed in the Appendix about skycat.cfg in Section 8.5.3, where it is
explained how further catalogues can be added.
Note that the AG/LOWFS guid/aO CCDs are filtered for I band (0.60-0.87 micron) and so
use of catalogues that do not provide equivalent magnitudes should be avoided.
For example although the range of catalogues avialable in SADT offers the possibility to find
guide/aO stars using 2MASS, Abell, IRAS, NED, QSO, ZCAT do not do so!
VISTA commissioning work has been done using GSC-2 at ESO which is believed to be the
most appropriate catalogue for finding VISTA guide/aO stars.
4
Survey Areas: Creating
4.1 Add Survey Area
To define the survey areas press the Add Survey Area button.
4.1.1
Tooltips
Many input widgets of the SADT (buttons, tabs etc) have tooltips that are displayed when the
user hovers with the mouse over them.
4.1.2
Column 1 Type
Select the Type of Survey Area required by single left clicking on one of the entries in the
Type column and using the drop down menu to select Type from:
These 3 types were described in 1.6
1. Geodesic Rectangle (1.6.1). The default height and width correspond to the area
covered at least once in a single Tile6 tile (see Table 6-1 and Table 8-1).
2. Circle (1.6.2)
3. Coordinate Range (1.6.3).
VISTA Survey Area Definition
Tool: User Manual for VISTA
Data Flow System
Doc. Number:
VIS-MAN-QMU-0001-0003
Date:
11 September 2009
Issue:
2.0
Page:
Page 25 of 64
Author:
Jim Emerson
Note in particular the pros and cons of each type as explained in 1.6.4. Geodetic rectangles
are recommended.
The descriptions in the column headers running rightwards from Type change according to
the Type in the row selected for that Type.
4.1.3
Column 7 Coordinate System
Select a Coordinate System for your input by single left clicking on the column value under
System and using the drop down menu to select System from:
1.
2.
3.
4.
FK5(J2000) (default)
FK4(B1950)
Galactic
[SLOAN
5. Ecliptic
requires input in RA and Dec
requires input in RA and Dec
requires input of Galactic Longitude and Latitude
requires input of Longitude and Latitude.]
N.B. SLOAN mode is not supported for VISTA and
has not been tested, and may not work.
requires input of Ecliptic Longitude and Latitude
The descriptions in the column headers running rightwards from Type change according to
the System in the row selected for that Type.
4.1.4
Other fields.
Double left click on the other relevant cells (without drop down menus) in turn to highlight
them for entering a value. The value input is only saved when the cell is closed. Press
carriage return to close the cell, or single click elsewhere to achieve the same effect.
The fields available depend on the Type & System selected for each Survey Area (row) and
are described here by column. Tooltips are displayed when moving the mouse over the
Survey Area table header.
4.1.4.1 Column 2 RA, Long, RA1, Lon1
Depending on survey area Type & coordinate System:
RA/RA1 use "HH:MM:SS.SS" or "HH MM S.SS",
Long/Lon1 use Decimal degrees (not decimal hours).
VISTA Survey Area Definition
Tool: User Manual for VISTA
Data Flow System
Doc. Number:
VIS-MAN-QMU-0001-0003
Date:
11 September 2009
Issue:
2.0
Page:
Page 26 of 64
Author:
Jim Emerson
4.1.4.2 Column 3 Dec, Lat, Dec1, Lat1
Depending on survey area Type & coordinate System:
Dec/Dec1 use "+/-DD:MM:SS.SS" or "+/-DD MM SS.SS",
Lat/Lat1 use Decimal degrees.
4.1.4.3 Column 4 Width, Circle diameter, RA2, Long2
Depending on survey area Type & coordinate System:
Width/Diameter/Long2 use decimal degrees (not decimal hours).
RA2 use "HH:MM:SS.SS" or "HH MM SS.SS".
4.1.4.4 Column 5 Height, Dec2, Lat2, ---,
Depending on survey area Type & coordinate System:
Height and Lat2 use decimal degrees.
Dec2 use "+/-DD:MM:SS.SS" or "+/-DD MM SS.SS".
4.1.4.5 Column 6 Angle (Survey Area relative to Sky):
The (position) angle (degrees) on the sky between North in the selected coordinate
system and the Height axis of the survey area. Angle is measured increasing Eastward
from North on the sky.
SADT applies the Angle and Tile orientation to derive the ‘offangle’ in the output XML
file that must be sent to the Telescope Control System (TCS) in an OB. Note that
‘offangle’ correctly obeys the ESO TCS convention and is not a conventional (net)
astronomical position angle.
4.1.4.6 Column 8 Exclude
Ticking the Exclude on survey areas excludes those areas from being further processed in
SADT (5.5). In SADT’s plots the excluded Survey Areas are shown outlined in red with
no infill.
Exclude can also be used to define a (sub) Survey Area to be excluded from within the
bounds of a larger Survey Area.
Excluding a survey area does not necessarily stop Tiles from covering some of it when
they overlap into it from a non-excluded area. The actual behaviour depends on the
setting of Include Overlap [3.2.5].
The Excluded surveys areas are not removed from the GUI or memory. If Exclude is
unticked the area will be displayed and used again in subsequent SADT operations. This
saves typing the area in again later.
VISTA Survey Area Definition
Tool: User Manual for VISTA
Data Flow System
Doc. Number:
VIS-MAN-QMU-0001-0003
Date:
11 September 2009
Issue:
2.0
Page:
Page 27 of 64
Author:
Jim Emerson
4.1.4.7 Notes
Whenever changes are made to the values in the text boxes defining the Survey Areas
SADT assumes new areas are required and, after asking you if you wish to do this, will
delete all the tiles and guide stars created.
4.2 Example
Figure 4-1 shows the survey definition box for three defined survey areas one of each type all
in the FK5 system and with the Geodesic rectangle row selected. [Column headers will differ
for other Type / System combinations]
Figure 4-1 Example for a 3 area survey, one of each Type and System with one at
Angle 35. Column headings for Geodetic Rectangle Survey Area row.
4.3 Delete Survey Area
A complete Survey area (row) can be permanently deleted (use Exclude to merely stop an
area being plotted and used to generate Tiles) from the table by selecting the row (via any cell
in the row) with the mouse and pressing the Delete Survey Area button to the right of the Add
Survey Area button. You will be prompted ‘Are you sure you want to delete the selected
survey area?’ and can answer Yes or No. After deleting an area click on View / Update Areas
to refresh the display.
VISTA Survey Area Definition
Tool: User Manual for VISTA
Data Flow System
5
Doc. Number:
VIS-MAN-QMU-0001-0003
Date:
11 September 2009
Issue:
2.0
Page:
Page 28 of 64
Author:
Jim Emerson
Survey Areas: View/ Update, & Save
5.1 Overview
SADT allows the user to view the surveys / tiles / pawprints in several coordinate systems
and projections, to zoom, to graphically exclude or delete regions and to query the
coordinates of a point, and iteratively adjust and replot the survey areas and tiles.
5.2 View/Update
Pressing the View/Update Areas button allows viewing of survey areas specified in the text
box without starting generation of pawprints and allocating the guide/aO stars – the areas are
shown in Green with a (selectable) coordinate grid overlaid.
Also use View/ Update after making a change the survey areas defined in the Survey Area
table.
The Survey with 3 types of area (geodesic rectangle, circle and coordinate range in this
example) each in a different coordinate system shown in Figure 4-1 would look like Figure
5-1.
Figure 5-1 View of Survey areas of Figure 4-1 displayed with the Fixed Aspect Ratio
ticked in Options. One area of each type (Geodesic Rectangle, Circle, Coordinate
Range) each defined in a different coordinate system.
5.3 Coordinates at mouse in display system
You can find the coordinates of the current mouse position in the current display coordinate
system by pressing the middle mouse button over a position in the survey area display and
keeping it pressed. A pop up window will display the coordinates.
VISTA Survey Area Definition
Tool: User Manual for VISTA
Data Flow System
Doc. Number:
VIS-MAN-QMU-0001-0003
Date:
11 September 2009
Issue:
2.0
Page:
Page 29 of 64
Author:
Jim Emerson
5.4 Changing plot display parameters
The Aspect ratio of the plot displayed can be toggled between fixed or variable (according to
Window aspect) by Ticking/Unticking the Fixed Aspect Ratio menu item under the Options
Menu (3.2.2).
A Right Mouse click anywhere in the survey area plot display window (except in a selected
(light blue) tile) and the following popup menu will appear
5.4.1
Zooming
The zoom options are:
1. Zoom In
2. Zoom Out
3. Reset Zoom
Select one of these and then Left Mouse click on the point in the plot about which you want
to zoom in or out. The zoomed plot will be centred on the spot you clicked on. This offers a
means of selecting the area being viewed. It does not matter where you click for Reset Zoom.
VISTA Survey Area Definition
Tool: User Manual for VISTA
Data Flow System
5.4.2
Doc. Number:
VIS-MAN-QMU-0001-0003
Date:
11 September 2009
Issue:
2.0
Page:
Page 30 of 64
Author:
Jim Emerson
Display Coordinate system
The options are:
1. FK5 (J2000)
2. FK4 (B1950)
3. Galactic
4. Ecliptic
5. SLOAN [N.B. SLOAN mode is not required for VISTA and has not been tested]
Note this option only affects the displayed plots, changing the display coordinate system is
not a way if converting the coordinates displayed in the Survey Areas Table between
systems.
5.4.3
Plot type
The options are:
1. Cartesian Plot (default)
2. North Polar Plot [Not useful for VISTA]
3. South Polar Plot
The plot type should be chosen to be sensible, i.e. South Polar Plot for areas close to the
South Pole etc.
5.5 Exclude Survey Areas
Individual areas may be excluded by ticking the Exclude box in Column 8 (4.1.4.6). They can
also be re-included by unticking the box.
5.6 Example
Figure 5-2 displays the same area as Figure 5-1 but with the Geodesic Rectangle area
excluded, the Aspect Ratio set variable, the Coordinate System set to Galactic and the
window size/aspect ratio changed by dragging a corner. You can see the red outline of the
excluded Geodesic Rectangle.
VISTA Survey Area Definition
Tool: User Manual for VISTA
Data Flow System
Doc. Number:
VIS-MAN-QMU-0001-0003
Date:
11 September 2009
Issue:
2.0
Page:
Page 31 of 64
Author:
Jim Emerson
Figure 5-2 As Figure 5-1 but with the Circle area excluded, the Aspect Ratio not fixed, and
displayed in Galactic Coordinates.
5.7 Interpreting shapes displayed
SADT’s default display is simple Cartesian, not a spherical projection. Shapes of areas
plotted must be interpreted with this in mind. [North Polar and South Polar projections are
also available].
The shapes seen will also depend on the System, Type, Aspect Ratio and values set, and the
projection used. Be careful not to jump to incorrect conclusions about your tiles based on the
plots. Two examples are
1. In the Cartesian plot a Geodesic Rectangle and a Coordinate Range will look similar
close to the equator, however near the pole a range will still look like a rectangle,
whereas a geodesic rectangle will look like a slice.
2. In a Cartesian Plot a coordinate range defined in a particular coordinate system
appears as a rectangle in the survey area display only if the same coordinate system is
selected as display coordinate system.
3. Equivalent (but different) considerations arise when plotting in S Polar projections.
5.8 Saving Survey Areas – without Tiles/Pawprints
The survey defined can be saved as an xml file for future reference, or for later re-import by
selecting Save As on the File menu and choosing a location and file name (ending .xml).
The saved XML file without any tiles/pawprints can used as a log of what Survey was
defined and can be reimported into SADT for further work (8.6.3.1).
VISTA Survey Area Definition
Tool: User Manual for VISTA
Data Flow System
Doc. Number:
VIS-MAN-QMU-0001-0003
Date:
11 September 2009
Issue:
2.0
Page:
Page 32 of 64
Author:
Jim Emerson
Xml files are in plain text with extension .xml and have a file structure is as governed by the
schema in the Appendix at Section 8.6.
5.9 Reading Survey Areas - without Tiles/Pawprints
xml files containing exported Survey Areas (as described in 5.8) may be reimported into
SADT by selecting Open on the File menu and selecting the directory and xml file name
(must end .xml) required.
This will overwrite any existing Survey Area definition in the GUI and then behave as though
the area had been entered via the GUI.
All the SADT facilities to display and inspect survey areas, make tiles and create and output
guide/aO stars are all available to the imported Survey Areas.
Survey Areas generated ‘by hand’ can be imported, as long as they conform to the xml
schema standard in 8.6.2.
6
Tiles/Pawprints: Create, Show, Refine & Save
Given the user has already set all the parameters required SADT will create the Tiles and
their component pawprints and (if enabled) find all the guide stars (GS) and active Optics
(aO) stars (AOS) needed for observing the pawprints for each tile.
6.1 Finding Tiles/Pawprints
6.1.1
Note
The user should always carefully check the settings of all the configuration parameters before
running any tiling.
6.1.2
Start/Resume
Pressing Start/Resume begins the process of filling the defined survey areas with
tiles/pawprints, and - if Find Guide/AO stars option on the Options menu (3.2.1) is on- it
starts finding guide/aO stars. It is recommended that Guide/aO allocation be kept turned off
until you are ready to find guide/aO stars.
If guide/aO star selection was selected this may take some time, depending on the location of
the catalogue chosen (SADT has mainly been tested at VISTA using GSC-2 at ESO),
especially if your network is congested.
Start/Resume should also resume this process where it left off after an interruption using Stop
[Users are advised to be careful in this mode as there have been reports that some material
may sometimes be lost during a Start/ Stop / Resume sequence. Check that tiles or guide/aO
stars have not gone missing around the sky position you pressed Stop at.]
VISTA Survey Area Definition
Tool: User Manual for VISTA
Data Flow System
Doc. Number:
VIS-MAN-QMU-0001-0003
Date:
11 September 2009
Issue:
2.0
Page:
Page 33 of 64
Author:
Jim Emerson
When the process is finished an summary information window like that in Figure 6-1 will
appear.
Figure 6-1 Information message on completion of tiling as in Figure 6-2.
Figure 6-2 shows the tile found for the areas defined in Figure 4-1. The default 60 arcsec tileto-tile overlap in X has in this case caused 5 more tiles to be produced than are needed. This
is an edge effect due to the small area being surveyed. These 5 unnecessary tiles could be
removed by rerunning with TILE_OVERLAP_X = 0. In general however overlaps should be
retained for later matching up tiles across boundaries in data processing.
VISTA Survey Area Definition
Tool: User Manual for VISTA
Data Flow System
Doc. Number:
VIS-MAN-QMU-0001-0003
Date:
11 September 2009
Issue:
2.0
Page:
Page 34 of 64
Author:
Jim Emerson
Figure 6-2 Tiles created for Survey Areas in Figure 4-1 (without using guide stars).
6.1.3
Stop
Stops the process of making Tiles/Pawprints and finding guide/aO stars. This may be
necessary if Internet connection to the catalogue is slow, or the run is taking longer than
expected. [Run length is limited by finding guide/aO stars from the remote catalogue and can
be hours for large numbers of tiles.]
After hitting the "Stop" button it is possible to save intermediate results to the file in the same
way as for non-interrupted results (5.8). A file with suffix .xml should be used. This file can
later be opened again using the "File" -> "Open" menu. The generation of pawprints can then
be resumed where it had stopped before.
N.B. Be careful in this mode as there have been reports that some material may sometimes be
lost during a Start/ Stop / Resume sequence. Check that tiles or guide/aO stars have not gone
missing around the sky position at which you pressed Stop.
VISTA Survey Area Definition
Tool: User Manual for VISTA
Data Flow System
6.1.4
Doc. Number:
VIS-MAN-QMU-0001-0003
Date:
11 September 2009
Issue:
2.0
Page:
Page 35 of 64
Author:
Jim Emerson
Reset
Resets the plots and deletes any tiles etc. made. Does not affect the surveys defined in the
GUI – just the display. The user is asked to confirm he does want the plotted tiles deleted
from the plot.
N.B. It is sometimes necessary to use Reset before finding of GS/AOS will work (e.g if they
have just been toggled on).
6.1.5
Display
The survey areas as defined in the survey areas text box are displayed in light green, as
described in Section 5.
SADT’s algorithm tries to retrieve suitable guide/aO stars tile by tile, pawprint by pawprint
starting at the bottom left (SW) corner of each survey area. As soon as a guide/aO star has
been found for a pawprint the pawprint is displayed as pink dot. This pawprint is provisional
until guide/aO stars for all the pawprints in the tile have been found. Then the pawprints
become permanent and are displayed in black.
When plotting a large area the plot may become confused by the black pawprints. To mitigate
this uncheck Draw Pawprints (3.2.3) in the Options Menu and only the red outlines of the
Tiles will be displayed with black dots at the pawprint positions.
For very large survey areas the dots representing the pawprint might appear merged together.
You can use the zoom facility (5.4.1) to zoom in on the detail.
6.1.6
Guide/aO star finding display
While the SADT is filling the survey areas with pawprints it searches the selected catalogue
for suitable guide/aO stars if the guide/aO star search mode is enabled. The catalogue entries
and the guide/aO detector footprint currently being searched are displayed (Figure 6-3 &
Figure 6-4) while this process goes on. The AG/LOWFS windows will (if you don’t have a
slow connection to the catalogue) flash by very fast so it will usually be too quick to see
much. A log of difficulties encountered is output in the terminal window (2.3).
VISTA Survey Area Definition
Tool: User Manual for VISTA
Data Flow System
Figure 6-3 Autoguider star search window
Doc. Number:
VIS-MAN-QMU-0001-0003
Date:
11 September 2009
Issue:
2.0
Page:
Page 36 of 64
Author:
Jim Emerson
Figure 6-4 aO star search window
The following colour coding is used for catalogue entries in the guide/aO display windows
green
cyan
The entries that are selected as the guide/aO stars. Note that no green entries are
displayed if at the time of the display it is not yet known which entries will be
selected as guide/aO stars. Example: First the SADT looks for suitable candidate
entries for guide stars on both autoguider chips without displaying any as selected
guide/aO stars. Only after that the SADT decides which of these are selected as
guide stars.
Entry in autoguider range and valid.
yellow
Entry in autoguider range and invalid.
blue
Valid but not in autoguider range.
magenta Not valid and not in autoguider range.
and the following for the background colour in these windws
____ ____ grey
Normal mode of operation.
____ ____ red
No guide/aO star found yet. Backtracking.
____ ____ pink
Backtracking was successful.
____ ____
red and yellow No guide/aO star found. Backtracking unsuccessful. Leaving
flash
this pawprint empty.
It sometimes happens that the change of background colour of the detector display is not
exactly as described here, especially when the algorithm is interrupted by clicking the Stop
button and then can briefly assume it is in backtracking mode and trigger the display to be
VISTA Survey Area Definition
Tool: User Manual for VISTA
Data Flow System
Doc. Number:
VIS-MAN-QMU-0001-0003
Date:
11 September 2009
Issue:
2.0
Page:
Page 37 of 64
Author:
Jim Emerson
painted red although backtracking is subsequently not really executed. Similarly, if the
detector display might sometimes stay red even though backtracking has already finished.
6.1.7
Inspecting catalogue entries on guide/aO detector footprint display
Catalogue entries can be selected in the guide/aO detector footprint display, if you are quick
enough. Click in the centre of any on the circles representing the catalogue entries (being
careful to be very close to the middle of the circle with the mouse). The catalogue ID and the
RA, DEC are then displayed as the frame title of the display window.
6.2 Missing guide/aO stars
As already explained (see Backtrack Step 3.2.6.5) if SADT cannot find suitable guide/AO
stars for pawprints at the tile positions it generated it will attempt to move the tile centre by
the amount specified in BackTrack Step until it does, without leaving any gaps in the survey.
N.B. This will modify the tile centres, and these modifications may depend on the guide /aO
star catalogue used. This behaviour can be stopped by setting BackTrack Step = 0 but then
some pawprints may not find any guide/aO stars and the OBs will stall.
6.3 Operations on individual or groups of Tiles
The user may select assign individual tiles or groups of tiles and delete them. Changes may
be undone. The user can set an internal priority of 0-4 which can be used to label tiles by
colour – however currently such priorities will have no affect on the priority of executions of
the OBs created as the priorities are not used by P2PP.
6.3.1
Selecting and deselecting tiles
Tiles are can be selected and deselected with the mouse in various ways similar to a file
manager program on a computer:
•
Select Tile(s)
o Left Click into a tile.
o Drag mouse along tiles.
o Drag mouse along a closed path to select all tiles inside the path. If closed
loops of tiles are selected then all the tiles inside the loop will be selected as
well.
o To add to an already existing selection press the Control button and keep it
pressed while selecting new tiles. [equiv on Mac OS X TBD.]
Selected tiles appear in the colour cyan (light blue).
•
Deselect Tiles:
o To deselect all tiles left click outside the survey area.
o To deselect a single tile press the Control key and click on the tile. [Equivalent
key on Mac OS X is TBD.]
VISTA Survey Area Definition
Tool: User Manual for VISTA
Data Flow System
6.3.2
Doc. Number:
VIS-MAN-QMU-0001-0003
Date:
11 September 2009
Issue:
2.0
Page:
Page 38 of 64
Author:
Jim Emerson
Tile operations on selected / deselected tiles
Selected tiles can be deleted, restored (with or without a priority) or have an (internal) 4 step
priority set in the integer range 0-3, with each priority associated with a different colour
(0=red (default), 1=purple, 2=light blue, 3=dark blue).
•
Delete Selected Tile(s) (Exclusion of Survey Areas was covered in 4.1.4.6).
Right click on the selected tile(s) gives the Delete Tile option. Selecting it removes the
tile leaving only the location of the centre of each pawprint. [This is achieved through
setting priority to 999.]
•
Restore Selected Tile(s)
Left click on the residual group of pawprint centres for a tile selects it and right click
gives the Restore Tile option. Selecting it restores the pawprints making up the tile. A
priority can also be assigned when doing this.
•
Set Tile Priorities.
Right Clicking inside a selected tile (or group of tiles) gives the Set tile priority option on
the popup menu. The (internal) 4-step priority can be set in the integer range 0-3, with
each priority associated with a different colour (0=red [default], 1=purple, 2=light blue,
3=dark blue). N.B. Currently Tile priorities are not used externally to SADT. Any
priorities needed are currently set outside SADT after OB creation, for example in
scheduling containers (see P2PP manual).
The tiles in Figure 6-2 are shown in Figure 6-5 after deleting several tiles which were
generated due to the Tile-to-Tile Overlap settings (3.2.6.1) and assigning different
priorities to one tile in each of the 3 remaining Tile pairs
VISTA Survey Area Definition
Tool: User Manual for VISTA
Data Flow System
Doc. Number:
VIS-MAN-QMU-0001-0003
Date:
11 September 2009
Issue:
2.0
Page:
Page 39 of 64
Author:
Jim Emerson
Figure 6-5 Tiles in Figure 6-2 with some deleted and various priorities (note colours)
set. Note the dots at the centres of each pawprint of the deleted tiles remain plotted
so they can be found and undeleted if required.
6.4 Saving Tiles/Pawprints– without GS/AOS stars
The survey defined can be saved as an xml file for future reference, or for later re-import by
selecting Save As on the File menu and choosing a location and file name (ending .xml).
The saved XML file with tiles/pawprints can used as a log of what Survey was defined and
can be reimported into SADT for further work. The saved file will not include any deleted
tiles or excluded Survey Areas (8.6.3.2).
6.5 What happens when SADT reads in an xml file?
It is important to appreciate that SADT as designed works at the Survey Area level. In
particular if Start/Resume is pressed SADT will operate on the Survey Areas defined,
computing new Tiles/Pawprints etc and ignoring any Pawprints/guide/aO stars it may already
have.
So when Start/Resume is pressed after a previously saved xml file has been read back in any
changes made to the Tiles that SADT originally generated will be lost. As soon as
Start/Resume is pressed SADT starts to generate a new set of Tiles/Pawprints overwriting in
Memory those that were produced before. [For example a user who kept the same survey area
but generated a complex geometry with many deleted Tiles or by editing the xml file would
find that SADT would recompute all the tile positions based on the Survey area, and the users
carefully made changes would be undone.]
VISTA Survey Area Definition
Tool: User Manual for VISTA
Data Flow System
Doc. Number:
VIS-MAN-QMU-0001-0003
Date:
11 September 2009
Issue:
2.0
Page:
Page 40 of 64
Author:
Jim Emerson
Section 6.6 explains a (partial) workaround if this is conflicts with the users needs.
6.6 Saving Tiles as Individual Survey Areas
Some users may want to save their Tile positions fixed within their Surveys areas, so that the
area is not retiled (and the user’s work adjusting it undone) when SADT is next asked to Tile
the survey. (e.g. to find GS/AOS for such a complex set of tiles).
Use File / Create survey areas from tiles in xml file (3.1) to select an (already saved) xml file
containing the Survey Areas and Tiles that you wish to work on again in SADT. You will be
prompted for the name of an output xml file. The resulting output file will define each
individual Tile as its own Survey Area containing a single Geodetic Rectangle, thereby
protecting each Tile from being changed by SADT’s Tiling algorithms. For each survey area
tileOverlapX and tileOverlapY will be set to zero, but the original tile overlaps will remain
preserved in the positions of the geodetic rectangle ‘survey area/tiles’.
The width and height of the Geodetic rectangle made will depend on whether a Tile1 Tile3 or
Tile6 pattern is selected for that tile. Approximate values as shown in Table 6-1.
Width (X) deg
Coverage
At least 1x
Tile1 (pawprint) 1.292117
Tile3
1.292117
Tile6
1.475
Height (Y) deg
At least 1x
1.017301
1.201
1.201
Width (X) deg
At least 2x
1.292117
1.475
Height (Y) deg
>1x coverage
1.017301
1.017301
Table 6-1 Width and Height of single geodetic rectangle tiles
You can then work with the converted file as with any other VISTA SADT XML file.
6.7 Saving Surveys for use with P2PP
Once generation of a survey with all its guide/aO stars has been completed then the survey
areas, tiles, pawprints and guide/aO stars generated should be saved as a file in XML format
(with extension .xml) for later import into P2PP to enable produce all the OBs (Observation
Blocks) needed to implement the Survey.
This process is defined in the P2PP manual, this outline is included only for convenience, but
the P2PP manual must be consulted for a definitive description. In P2PP the user constructs a
(single) ‘Parent’ OB (i.e. chooses filters, their DIT, NDIT, Nexp, jitter pattern, etc to be used)
for all the Tiles. [If not all the Tiles will use the same Parent OB the user will need to make
appropriate subsets]. The user provides P2PP with the .xml file (from SADT) containing the
N tile positions, pattern and guide/aO stars.
P2PP (conceptually at least!) does the following
1. Makes N copies of the ‘Parent’ OB
VISTA Survey Area Definition
Tool: User Manual for VISTA
Data Flow System
Doc. Number:
VIS-MAN-QMU-0001-0003
Date:
11 September 2009
Issue:
2.0
Page:
Page 41 of 64
Author:
Jim Emerson
2. Copies into each (1 through N) the appropriate telescope pointing coordinates for the
tile derived from the saved SADT xml file.
3. For each of the N tiles, each with n (default 6) pawprints, generates n .paf files
containing the guide and aO star coordinates & magnitudes for each pawprint within
each tile as derived from the saved SADT xml file.
4. Saves the resulting N OBs each with their n associated .paf files. One SADT file will
have spawned N OBs and N*n associated paf files.
Thus the combination of SADT and P2PP enables the astronomer to make OBs for a survey
in an efficient manner. [Other ESO tools based on scheduling containers allow for time and
priority linkages between OBs]. In due course the OB may be scheduled for execution. Then
the Broker for OBs (BOB) interprets the OB and passes the necessary files to the VISTA IR
Camera (VIRCAM) for execution.
Caution: If either of ’X coord of pointing’ or ’Y coord of pointing’ set to non-zero values in
OBs in P2PP SADT Guide/AO stars will NOT work as SADT does not take any account of
such offsets.
6.8 Reading Surveys ready for P2PP
xml files containing exported Survey Areas with Tiles & Pawprints (& even GS/AOS stars)
may be reimported into SADT by selecting Open on the File menu and selecting the directory
and xml file name (must end .xml) required. This will overwrite any existing Survey Area
definition in the GUI and then behave as though the area had been entered via the GUI. All
SADT’s facilities to display, inspect survey areas, make tiles, delete tiles, and create and
output guide/aO stars etc etc are all available to the imported Survey Areas.
7
Tiles/Pawprints: Plotting in Aladin
Aladin (http://aladin.u-strasbg.fr/) is an interactive software sky atlas allowing the user to
visualize digitized astronomical images, superimpose entries from astronomical catalogues or
databases, and interactively access related data and information from the Simbad database,
the VizieR service and other archives for all known sources in the field.
SADT can export Tiles and for plotting in Aladin. SADT does this using a PLASTIC
manager. PLASTIC, the PLatform for AStronomical Tool InterConnection
(http://plastic.sourceforge.net/), is a VO protocol for communication between client-side
astronomy applications.
Once you have created tiles, you should be able to send them to Aladin from SADT’s
PLASTIC dialog. Aladin should be started, with Plastic hub manager, (on the same machine
as the SADT) before you attempt to exports any tiles.
Aladin V4 and V5 launched a PLASTIC manager by default, Aladin V6 will by default
launch a SAMP internal hub and not a PLASTIC internal hub. To launch PLASTIC internal
hub you have to specify in advance the "-plastic" parameter on the Aladin command line.
(http://aladin.u-strasbg.fr/java/FAQ.htx#ToC34).
VISTA Survey Area Definition
Tool: User Manual for VISTA
Data Flow System
Doc. Number:
VIS-MAN-QMU-0001-0003
Date:
11 September 2009
Issue:
2.0
Page:
Page 42 of 64
Author:
Jim Emerson
The Plastic button in the SADT GUI brings up a Plastic dialog as in Figure 7-1.
Figure 7-1 SADT's plastic hub menu
From this dialog it is currently only possible to send survey tiles (not survey areas) to Aladin.
All the pawprints are sent over and you should see their centres in Aladin. If other PLASTIC
managers are running in addition to Aladin the tiles can be exported to these by choosing
between Aladin and the other tools using the selection button at the upper middle right of the
GUI in Figure 7-1.
Aladin should display the pawprint centres as rhombs as in Figure 7-2
Figure 7-2 Pawprint centres in Figure 6-2 plotted in Aladin using the Plastic button
VISTA Survey Area Definition
Tool: User Manual for VISTA
Data Flow System
Doc. Number:
VIS-MAN-QMU-0001-0003
Date:
11 September 2009
Issue:
2.0
Page:
Page 43 of 64
Author:
Jim Emerson
If you want to see the outlines of the pawprints rather than just their centres, you have to
Right Mouse click over the PLASTIC plane on the right hand side of Aladin and open the
properties window of the plane with the pawprints as shown in Figure 7-3.
Figure 7-3 Aladin's Plastic properties window
Clicking on 'Show all associated FoVs' should now show the outline of the boundary of each
tile (but not the individual detectors) as in Figure 7-4.
Figure 7-4 SADT pawprints with their Field of view plotted in Aladin
It should be possible to overlay the pawprints onto an image of the field loaded into Aladin.
VISTA Survey Area Definition
Tool: User Manual for VISTA
Data Flow System
8
Doc. Number:
VIS-MAN-QMU-0001-0003
Date:
11 September 2009
Issue:
2.0
Page:
Page 44 of 64
Author:
Jim Emerson
Appendix
8.1 Making a Tile
The 4x4 array of IR detectors in VISTA’s focal plane are not contiguous (Figure 1-3) so a
single sky exposure shows the gaps between the detectors known as a ‘pawprint’. To make an
image without gaps it is necessary to combine pawprints with position offsets together so as
to cover the gaps and form a filled ‘tile’. Given that detector spacing in the X (0.9 detector)
and Y (0.425 detector) directions are different six (6) pawprints is the minimum number of
pointed pawprints required for reasonably uniform and completely contiguous coverage of an
area, and exposes each piece of sky, away from the +Y and -Y edges of the tile, to at least 2
camera pixels.
Figure 8-1 Tile6’o’ - Six overlapping pawprints in order ‘o’ make up one contiguous tile
As shown in Figure 8-1 these six pawprints, whose order is set by the Tile pattern file used
(8.2), consist of:
a) Three positions offset in Y by 0.475 of a detector in Y. In Y this covers two outer
strips of 0.475 detector once, two strips within these of 0.475 detector twice, nine
strips of 0.425 detector twice, and 10 strips of 0.05 detector 3 times. The resulting 4
strips in X each cover a twice covered contiguous area in X*Y of 1*5.275 detector2
each corresponding to 0.193*1.017 degree2 (11.57*61.04 arcmin2) at VISTA's mean
pixel size of 0.339 arcsec. The once covered strips correspond to 0.193*0.092 degree2
(11.57*5.5 arcmin2 or 694*330 arcsec2) at VISTA's mean pixel size.
VISTA Survey Area Definition
Tool: User Manual for VISTA
Data Flow System
Doc. Number:
VIS-MAN-QMU-0001-0003
Date:
11 September 2009
Issue:
2.0
Page:
Page 45 of 64
Author:
Jim Emerson
b) Two positions offset in X by 0.95 of a detector in X. In X this covers two outer strips
of 0.95 detector once, six strips within these of 0.90 detector once, and seven strips of
0.05 detector twice. This corresponds to at least single coverage in the X direction
over 7.65 detector widths, with double coverage in the 0.05 deg strips. This
corresponds to 1.475 degrees (88.5 arcmin) at VISTA's nominal pixel size.
Combining the 2 X and 3 Y offsets an area of 7.65*5.275 (X*Y)=40.354 detector areas is
contiguously and (almost) uniformly covered (by a minimum of 2 pixels) as shown in light
green in Figure 8-2 which shows the resulting exposure map (assuming no jitters),
corresponding to 1.475*1.017 = 1.501 deg2 sky at VISTA’s mean pixel size
Figure 8-2 Exposure map for Tile6 tiles. Exposure Colour key: Light green = 2x,
Dark green = 1x, Magenta = 3x, Red = 4x, Yellow = 6x.
The dark green areas at top (+Y) and bottom (-Y) of Figure 8-2 are each 0.135 sq deg
(=1.475x0.092) and can be overlapped by corresponding areas from adjacent tiles for many
surveys.
Assigning only one of the two 0.092 deg overlap (top & bottom) to each of the two tiles
involved in an overlap, the result is that each tile, when part of a filled larger area, covers
1.475*(1.017+0.092) = 1.636 deg2 at least twice.
VISTA Survey Area Definition
Tool: User Manual for VISTA
Data Flow System
Doc. Number:
VIS-MAN-QMU-0001-0003
Date:
11 September 2009
Issue:
2.0
Page:
Page 46 of 64
Author:
Jim Emerson
Table 8-1 summarises the various dimensions in units of a VISTA detector and in degrees
using VISTA’s mean pixel scale (i.e. a simple uniform effective pixel scale – although the
real pixel scale is not uniform across the field).
Step size
Y
Area
det
det
det2
X
Y
Area
Adopted mean pixel size
0.339 arcsec
(true size varies over
Focal Plane)
deg
0.950 0.475
Single Detector
Outer Boundary
Pawprint
X
1
of
1
unfilled
Diagonal of 1 unfilled Pawprint
1
deg
deg2
0.1832 0.0916
1
0.1929 0.1929 0.0372
6.70 5.275 35.343
1.2921 1.0173 1.3145
8.5273
1.6445
6 pawprint Tile Outer dimensions
(regardless of multiple coverage)
7.650 6.225
1.4753 1.2005 1.7711
6 pawprint Tile size covered twice
7.650 5.275 40.354
1.4753 1.0173 1.5009
6 pawprint Tile top & bottom (+/-Y)
strips covered once
7.650 0.475
3.634
1.4753 0.0916 0.1351
6 pawprint Tile covered twice if one
of the two 0.475 Y overlaps is
matched by a neighbour tile in large
survey
7.650 5.750 43.988
1.4753 1.1089 1.6360
Table 8-1 Summary of dimensions (unit of 2048 pixel side detector and degrees)
VISTA Survey Area Definition
Tool: User Manual for VISTA
Data Flow System
Doc. Number:
VIS-MAN-QMU-0001-0003
Date:
11 September 2009
Issue:
2.0
Page:
Page 47 of 64
Author:
Jim Emerson
8.2 Tile Patterns
In principle the pawprints making a tile pattern can be executed in any order, although in
practise the available orders are restricted to minimise overhead during movements. As an
example the order illustrated in Figure 8-1 is known as Tile6n (from the n shape of the line
joining positions 123456Tile patterns are chosen from drop down menu).
The VIRCAM instrument package contains, inter alia, the default.isf file and all the defined
tile patterns VIRCAM_TileNpawxx.paf files. Only tile patterns defined in the VIRCAM
Instrument Package (maintained by ESO’s VISTA Instrument Scientist) are executable. Each
TileNpawxx.paf pattern (where Npaw is the number of pawprints in the tile, and xx is a
mnemonic for the tile pattern) defines a tile pattern for the VISTA Camera, and these are
used by observation templates to sequence the telescope offsets. The tile patterns define
absolute offsets from a reference position in units of detector size.
The user must choose which one is to be used from the drop down Tile Patterns menu.
For example:
• For standard Npaw=6 pawprint tiles: Tile6n, Tile6s, Tile6ss, Tile6u, Tile6z and
Tile6zz define the same pattern of 6 pawprints observed in different orders (as
suggested by the mnemonic suffix letters - Section 8.2.1).
•
For Npaw=3 pawprint tiles: Tile3nx, and Tile3px, define the same pattern of 3
pawprints (covering half a tile only) observed in different orders in the X direction
(as suggested by the mnemonic suffix letters – Section 8.2.2).
•
For single (Npaw=1) pawprints (Section 8.2.3): Tile1_00 contains only 1 (null) offset
(0,0) and so the order is not relevant Tile1_00 is equivalent to the Single tile pattern
available in P2PP, but SADT itself does not recognise single. When using SADT for
defining Single pawprints use Tile pattern Tile1_00 and use the same pattern in
P2PP.
The patterns defined in the IP are now described in more detail.
8.2.1
Npaw=6 patterns
The pattern names n, u, z, s, zz or ss are meant as a mnemonic for the user to visualize the
pawprint order. To explain this notation consider labelling the six pawprint positions need to
make a tile ABCDEF as in the table below
^
|
Y
X
C
B
A
->
D
E
F
VISTA Survey Area Definition
Tool: User Manual for VISTA
Data Flow System
Doc. Number:
VIS-MAN-QMU-0001-0003
Date:
11 September 2009
Issue:
2.0
Page:
Page 48 of 64
Author:
Jim Emerson
For example VISTA_Tile6n corresponds to ABCDEF (up right down – forming an n) etc as
detailed below for each available sequence of pawprint positions.
8.2.1.1 Tile6n
VISTA_Tile6n corresponds to ABCDEF (up
right down – forming an n)
SEQ.TILE.NAME
"6 step n pattern";
SEQ.TILE.OFFSETX
"-0.475 -0.475 -0.475 0.475 0.475 0.475";
SEQ.TILE.OFFSETY
"-0.475 0.0
0.475 0.475 0.0 -0.475";
SEQ.TILE.OFFSETROT " 0.0 0.0
0.0 0.0
0.0 0.0";
Figure 8-3 Tile6n
8.2.1.2 Tile6u
VISTA_Tile6u corresponds to CBAFED (down right up – forming an u)
SEQ.TILE.NAME
"6 step u pattern";
SEQ.TILE.OFFSETX
"-0.475 -0.475 -0.475 0.475 0.475 0.475";
SEQ.TILE.OFFSETY
" 0.475 0.0
-0.475 -0.475 0.0 0.475";
SEQ.TILE.OFFSETROT " 0.0 0.0 0.0 0.0 0.0 0.0";
Figure 8-4 Tile6u
VISTA Survey Area Definition
Tool: User Manual for VISTA
Data Flow System
Doc. Number:
VIS-MAN-QMU-0001-0003
Date:
11 September 2009
Issue:
2.0
Page:
Page 49 of 64
Author:
Jim Emerson
8.2.1.3 Tile6z
VISTA_Tile6z corresponds to CDEBAF (right down left down right – forming an z)
SEQ.TILE.NAME
"6 step large Z pattern";
SEQ.TILE.OFFSETX
"-0.475 0.475 0.475 -0.475 -0.475 -0.475";
SEQ.TILE.OFFSETY
" 0.475 0.475 0.0 0.0
-0.475 -0.475";
SEQ.TILE.OFFSETROT " 0.0 0.0 0.0 0.0 0.0 0.0";
Figure 8-5 Tile 6z
8.2.1.4 Tile6s
VISTA_Tile6s corresponds to DCBEFA (left down right down left – forming an s)
SEQ.TILE.NAME
"6 step large S pattern";
SEQ.TILE.OFFSETX
" 0.475 -0.475 -0.475 0.475 0.475 -0.475";
SEQ.TILE.OFFSETY
" 0.475 0.475 0.0 0.0 -0.475 -0.475";
SEQ.TILE.OFFSETROT " 0.0 0.0 0.0 0.0 0.0 0.0";
Figure 8-6 Tile6s
VISTA Survey Area Definition
Tool: User Manual for VISTA
Data Flow System
Doc. Number:
VIS-MAN-QMU-0001-0003
Date:
11 September 2009
Issue:
2.0
Page:
Page 50 of 64
Author:
Jim Emerson
8.2.1.5 Tile6zz
VISTA_Tile6zz corresponds to FAEBDC (left diagonal-up left diagonal-up left – forming
two z s on top of each other written as zz)
SEQ.TILE.NAME
"6 step zz zig zag pattern";
SEQ.TILE.OFFSETX
" 0.475 -0.475 0.475 -0.475 0.475 -0.475";
SEQ.TILE.OFFSETY
"-0.475 -0.475 0.0 0.0 0.475 0.475";
SEQ.TILE.OFFSETROT " 0.0 0.0 0.0 0.0 0.0 0.0";
Figure 8-7 Tile6zz
8.2.1.6 Tile6ss
VISTA_Tile6ss corresponds to AFBECD (right diagonal-up right diagonal-up right –
forming two s s on top of each other written as ss)
SEQ.TILE.NAME
"6 step ss zig zag pattern";
SEQ.TILE.OFFSETX
"-0.475 0.475 -0.475 0.475 -0.475 0.475";
SEQ.TILE.OFFSETY
"-0.475 -0.475 0.0 0.0 0.475 0.475";
SEQ.TILE.OFFSETROT " 0.0 0.0 0.0 0.0 0.0 0.0";
Figure 8-8 Tile 6ss
VISTA Survey Area Definition
Tool: User Manual for VISTA
Data Flow System
8.2.2
Doc. Number:
VIS-MAN-QMU-0001-0003
Date:
11 September 2009
Issue:
2.0
Page:
Page 51 of 64
Author:
Jim Emerson
Npaw=3 patterns
There are two n=3 patterns which define contiguous strips, like the one shown in Y, but not
in X.
8.2.2.1 Tile 3nx
SEQ.TILE.NAME
"3 step nx (negative x) pattern";
SEQ.TILE.OFFSETX
"-0.475 -0.475 -0.475";
SEQ.TILE.OFFSETY
"-0.475 0.0 0.475";
SEQ.TILE.OFFSETROT " 0.0 0.0 0.0 ";
Figure 8-9 Tile3nx
8.2.2.2 Tile3px
SEQ.TILE.NAME
"3 step px (positive x) pattern";
SEQ.TILE.OFFSETX
" 0.475 0.475 0.475";
SEQ.TILE.OFFSETY
"-0.475 0.0 0.475";
SEQ.TILE.OFFSETROT " 0.0 0.0 0.0 ";
Figure 8-10 Tile3px
VISTA Survey Area Definition
Tool: User Manual for VISTA
Data Flow System
8.2.3
Doc. Number:
VIS-MAN-QMU-0001-0003
Date:
11 September 2009
Issue:
2.0
Page:
Page 52 of 64
Author:
Jim Emerson
Npaw=1 patterns
There is one n=1 pattern Tile1_00
which defines a single pawprint.
SEQ.TILE.NAME
"1 pawprint pattern";
SEQ.TILE.OFFSETX
"0.0";
SEQ.TILE.OFFSETY
"0.0";
SEQ.TILE.OFFSETROT "0.0";
Tile1_00 is equivalent to the Single tile pattern available in P2PP, but SADT itself does not
recognise Single. When using SADT for defining Single pawprints use Tile pattern Tile1_00
and use the same pattern in P2PP.
VISTA Survey Area Definition
Tool: User Manual for VISTA
Data Flow System
Doc. Number:
VIS-MAN-QMU-0001-0003
Date:
11 September 2009
Issue:
2.0
Page:
Page 53 of 64
Author:
Jim Emerson
8.3 Fixed Jitter Patterns
The Jitter patterns available are define in a series of VIRCAM_Jitter*.paf files in the
Instrument Package. These include the set of OFFSETX and OFFSETY values in arcsec
which define each pattern.
During OB definition in P2PP the scale of jitter offsets in a pattern may be scaled by setting
the multiplicative factor Jitter Scale Multiplier to a value other than 1.0.
8.3.1
Random
The Random Jitter pattern avialable in P2PP is not a fixed pattern (there is no Random.paf
file) but is generated with a given, user defined, amplitude when the OBs are created.
8.3.2
Single
Single Jitter pattern is not an actual pattern (there is no Single.paf file) but rather an
indication that no jitter pattern should be executed.
8.3.3
Jitter2d
SEQ.JITTER.NAME
"2 position pattern – diagonal left to right down";
SEQ.JITTER.OFFSETX "-10.0 10.0";
SEQ.JITTER.OFFSETY "10.0 -10.0";
VISTA Survey Area Definition
Tool: User Manual for VISTA
Data Flow System
8.3.4
Doc. Number:
VIS-MAN-QMU-0001-0003
Date:
11 September 2009
Issue:
2.0
Page:
Page 54 of 64
Author:
Jim Emerson
Jitter2u
SEQ.JITTER.NAME
"2 position pattern – diagonal left to right up ";
SEQ.JITTER.OFFSETX "-10.0 10.0";
SEQ.JITTER.OFFSETY "-10.0 10.0";
8.3.5
Jitter3d
SEQ.JITTER.NAME
"3 position pattern – diagonal left to right down";
SEQ.JITTER.OFFSETX "0.0 -10.0 10.0";
SEQ.JITTER.OFFSETY "0.0 10.0 -10.0";
VISTA Survey Area Definition
Tool: User Manual for VISTA
Data Flow System
8.3.6
Doc. Number:
VIS-MAN-QMU-0001-0003
Date:
11 September 2009
Issue:
2.0
Page:
Page 55 of 64
Author:
Jim Emerson
Jitter3u
SEQ.JITTER.NAME
"3 position pattern – diagonal left to right up";
SEQ.JITTER.OFFSETX "0.0 -10.0 10.0";
SEQ.JITTER.OFFSETY "0.0 -10.0 10.0";
8.3.7
Jitter4u
SEQ.JITTER.NAME
"4 position pattern U shape rotated 30deg ccw";
SEQ.JITTER.OFFSETX "-3.66 13.66 3.66 -13.66";
SEQ.JITTER.OFFSETY "13.66 3.66 -13.66 -3.66";
VISTA Survey Area Definition
Tool: User Manual for VISTA
Data Flow System
8.3.8
Doc. Number:
VIS-MAN-QMU-0001-0003
Date:
11 September 2009
Issue:
2.0
Page:
Page 56 of 64
Author:
Jim Emerson
Jitter5n
SEQ.JITTER.NAME
"5 position pattern n shape with centre rotated 60deg cw";
SEQ.JITTER.OFFSETX " 0.0 -8.66 5.0 8.66 -5.0";
SEQ.JITTER.OFFSETY " 0.0 5.0 8.66 -5.0 -8.66";
8.3.9
Jitter5z
SEQ.JITTER.NAME
"5 position pattern Z rotated 30deg ccw";
SEQ.JITTER.OFFSETX "0.0 -3.66 13.66 -13.66 3.66";
SEQ.JITTER.OFFSETY "0.0 13.66 3.66 -3.66 -13.66";
VISTA Survey Area Definition
Tool: User Manual for VISTA
Data Flow System
Doc. Number:
VIS-MAN-QMU-0001-0003
Date:
11 September 2009
Issue:
2.0
Page:
Page 57 of 64
Author:
Jim Emerson
8.3.10 Jitter9s
SEQ.JITTER.NAME
"9 position pattern square shape rotated 30 deg ccw";
SEQ.JITTER.OFFSETX " 0.0 -13.66 -8.66 -3.66 5.0 13.66 8.66 3.66 -5.0";
SEQ.JITTER.OFFSETY " 0.0 -3.66 5.0 13.66 8.66 3.66 -5.0 -13.66 8.66";
8.3.11 Jitter25s
SEQ.JITTER.NAME
"25 position pattern square spiral rotated 30 deg ccw";
SEQ.JITTER.OFFSETX "0.0 -4.33 -1.83 2.5 6.83 4.33 1.83 -2.5 -6.83 -11.16 -8.66 -6.16 3.66 0.67 5.0 9.33 13.66 11.16 8.66 6.16 3.66 -0.67 -5.0 -9.33 -13.66";
SEQ.JITTER.OFFSETY "0.0 2.5 6.83 4.33 1.83 -2.5 –6.83 –4.33 –1.83 0.67 5.0 9.33
13.66 11.16 8.66 6.16 3.66 -0.67 -5.0 –9.33 –13.66 –11.16 –8.66 –6.16 –3.66";
VISTA Survey Area Definition
Tool: User Manual for VISTA
Data Flow System
Doc. Number:
VIS-MAN-QMU-0001-0003
Date:
11 September 2009
Issue:
2.0
Page:
Page 58 of 64
Author:
Jim Emerson
8.3.12 Jitter30r1
SEQ.JITTER.NAME
"30 position pattern (random numbers)";
SEQ.JITTER.OFFSETX "5.66 -9.10 9.37 -2.73 -4.77 6.63 -9.56 7.53 3.14 -5.63 -8.22 4.91
2.24 3.61 6.70 -2.66 5.65 6.16 -3.59 -0.88 -2.24 1.16 -3.11 -7.61 -9.96 7.85 4.86 -5.02 -6.66
2.49";
SEQ.JITTER.OFFSETY "9.89 -4.65 4.11 3.19 -4.87 -6.68 4.35 -5.17 1.83 -0.94 -4.27 -8.02
7.95 -8.11 4.76 5.40 -8.78 -2.31 8.16 -7.51 -8.55 -9.94 -5.19 2.57 8.39 5.64 -9.29 -4.03 -0.84
4.00";
VISTA Survey Area Definition
Tool: User Manual for VISTA
Data Flow System
Doc. Number:
VIS-MAN-QMU-0001-0003
Date:
11 September 2009
Issue:
2.0
Page:
Page 59 of 64
Author:
Jim Emerson
8.4 Instrument package settings for SADT
The file default.isf in the VIRCAM Instrument Package contains, inter alia, information some
of which SADT reads. Much of this is to do with the geometry of the IR detectors and CCDs
and will not be discussed here.
Another part deals with parameters that SADT reads, separately for each of the 2 AG and 2
LOWFS CCDs, which define how SADT will find the potential guide/aO stars in the
catalogues it is searching. The relevant values and their seeting as of VIRCAM_IP_1.44 are
Parameter Name Value Description of value
Set
NUMIN
1
Minimum number of stars SADT should find
NUMAX
5
Maximum number of stars SADT should find
SEPMIN
10.0
Minimum separation (arcsec) from neighbouring stars whose
magnitude difference is less than MAGDELTA
Smallest acceptable magnitude difference to neighbouring stars
within distance SEPMIN
MAGDELTA
2.5
MAXECC
0.3
(for GSC-2 only) Maximum eccentricity allowed
MINPMER
5.0
(for GSC-2 only) Minimum value of proper motion / proper
motion error ratio for which SADT applies proper motion
correction. If total proper motion is < MINPMER times its total
error then the guide star is not proper motion corrected by
SADT. Guide stars are not rejected based on their proper
motion regardless of whether or not the proper motion is
corrected
MINMAG
(LOWFS)
MINMAG (AG)
MAXMAG
(LOWFS)
MAXMAG (AG)
11.0
Brightest acceptable guide star for this chip
10.0
16.0
Brightest acceptable guide star for this chip
Faintest acceptable guide star for this chip
16.3
Faintest acceptable guide star for this chip
If a user feels any of these values are not suitable for his program he should contact ESO’s
VISTA Instrument Scientist for to request a change in these values.
VISTA Survey Area Definition
Tool: User Manual for VISTA
Data Flow System
Doc. Number:
VIS-MAN-QMU-0001-0003
Date:
11 September 2009
Issue:
2.0
Page:
Page 60 of 64
Author:
Jim Emerson
8.5 Configuration Files & xml Schema
Instrument parameters required by SADT are read from the Instrument package’s default.isf
file. sadtdirectoryname/cfg/vista contains the xml schema defining the format of the xml files
SADT writes for ingestion by P2PP. The same directory contains two configuration files in
which various configuration parameters are set.
8.5.1
sad.xsd
The xml schema is included as cfg/vista/sdt.xsd. The schema must be recognised by P2PP
when it imports xml files made in SADT. Users must not edit this file.
8.5.2
sadt.cfg
Configures most defaults in SADT. An explanation of all these properties is provided in the
sadt.cfg file itself.
8.5.3
skycat.cfg
The guide/aO stars are searched for in a selected catalogues over the Internet and skycat.cfg
sets up the available catalogues appear in the catalogue choice box of the SADT.
The guide/aO CCDs have I band filters so guide/aO stars should ideally chosen by their
magnitude in I band. Not all of the catalogues accessible via skycat.cfg are suitable as
guide/aO star catalogues (e.g. IRAS, NED, ABELL, 2MASS). One should select a suitable
catalogue for the guide/aO stars. The current recommended catalogue is GSC2- at ESO.
This list of catalogues available was based on the entries of serv_type: catalog contained
in the standard skycat.cfg in Dec 2003. In principle SADT can also read other catalogues that
can be read by tools such as GAIA and JSkyCat. Adding a new catalogue can be done as
follows:
• Create/copy/edit a skycat.cfg file such as this distribution’s
• Put all the catalogues you want to use into the skycat.cfg file.
• Edit the entry jsky.catalog.skycat.config=../cfg/skycat.cfg in the sadt.cfg file of this
SADT distribution so that the value of jsky.catalog.skycat.config is the path of
the skycat.cfg you want to use.
• GAIA/SkyCat/JSky catalogues can be online as well as in a local file conforming with
the GAIA (http://star-www.dur.ac.uk/~pdraper/gaia/gaia.html ) /
SkyCat (http://archive.eso.org/cms/tools-documentation/skycat ) /
JSky (http://archive.eso.org/cms/tools-documentation/jsky/ ) catalogue conventions.
N.B. The use of local GAIA/SkyCat/JSky catalogues has not been tested.
VISTA Survey Area Definition
Tool: User Manual for VISTA
Data Flow System
Doc. Number:
VIS-MAN-QMU-0001-0003
Date:
11 September 2009
Issue:
2.0
Page:
Page 61 of 64
Author:
Jim Emerson
8.6 xml Files
8.6.1
Viewing xml files
After Tile and GS/AOS star generation VISTA’s xml files can become very long. To view
them it is recommended that you use a viewer/editor that recognises xml structures and
allows them to be collapsed to a shorter more readable form. e.g. a web browser such as
Firefox.
8.6.2
Xml Schema
The xml schema is included as cfg/vista/sdt.xsd. The schema must be recognised by P2PP
when it imports xml files made in SADT. Users must not edit this file.
8.6.3
Structure of SADT xml files
The xml file is structured as follows for a VISTA survey:
<SURVEY> element
which contain one or more
< SURVEY_AREA > elements
which contain one or more
<TILE> elements
which each contain (typically 6)
<PAWPRINT> elements
which each contain
<REFSTARS> elements
giving coordinates and magnitudes of the guide and aO stars
which are converted into .paf files attached to the OB
</ REFSTARS >
</ PAWPRINT >
</ TILE >
</ SURVEY_AREA>
</ SURVEY >
8.6.3.1 Example: Survey Areas (not Tiles yet)
As an example the xml file saved for the Survey Areas defined in Figure 4-1 after pressing
View/Update is as follows:
<?xml version="1.0" encoding="UTF-8" standalone="no"?>
<SURVEY backtrackStep="100.0" id="Fig_4-1" ip="VIRCAM-1.25"
maxJitter="15.0" tileAngle="0" tileOverlapX="60.0" tileOverlapY="60.0">
<SURVEY_AREA coordSys="Galactic" exclude="false" height="2.2" lat="-2.0"
long="32.0" number="1" posangle="35.0000" type="Geodesic Rectangle"
width="1.475"/>
VISTA Survey Area Definition
Tool: User Manual for VISTA
Data Flow System
Doc. Number:
VIS-MAN-QMU-0001-0003
Date:
11 September 2009
Issue:
2.0
Page:
Page 62 of 64
Author:
Jim Emerson
<SURVEY_AREA coordSys="Ecliptic" exclude="false" lat="19.5" long="288.0"
number="2" posangle="0.0000" radius="1.47" type="Circle"/>
<SURVEY_AREA coordSys="FK5 (J2000)" exclude="false" lat1="-01:00:00"
lat2="+00:00:00" long1="19:03:00" long2="19:14:40" number="3"
posangle="0.0000" type="Coordinate Range"/>
</SURVEY>
Witin each defined type < /> parameters set are written in alphabetical order. The meaning
of these should be clear from earlier section of this manual except for:
<SURVEY id=” which is Survey_ID name of the whole survey
<SURVEY_AREA number="" - an integer ID conter for each survey area.
8.6.3.2 Example: Survey Areas (with tiles/pawprints and Guide/aO stars)
As a more complex example the xml file saved for the Tiles defined in Figure 6-5 is as
follows, with guide/aO star finding switched off and everthing under the Tile elements
collapsed (using Firefox at the viewer):
Within the <Tile element the id is constructed as TileRowNumber_TileColumnNumber
where the rows and columns start at 1,1 in the bottom right hand corner of each Survey Area.
VISTA Survey Area Definition
Tool: User Manual for VISTA
Data Flow System
Doc. Number:
VIS-MAN-QMU-0001-0003
Date:
11 September 2009
Issue:
2.0
Page:
Page 63 of 64
Author:
Jim Emerson
N.B. Offangle is NOT the position angle input into P2PP (as discussed in 4.1.4.5)
8.6.3.3 Example: Pawprint
The same ouput file is next displayed showing the expanded first Pawprint of the first Tile.
Within the <Pawprint element the id is constructed as Tile_ID:PawprintNumber
VISTA Survey Area Definition
Tool: User Manual for VISTA
Data Flow System
Doc. Number:
VIS-MAN-QMU-0001-0003
Date:
11 September 2009
Issue:
2.0
Page:
Page 64 of 64
Author:
Jim Emerson
8.6.3.4 Example: REFSTARS
The REFSTARS element of the first pawprint of the first Tile from the same ouput file is
shown below expanded fully.
<REFSTARS><![CDATA[PAF.HDR.START
; # Start of PAF Header
PAF.TYPE
"paramfile"; # Type of PAF
PAF.ID
"Fig_6-5-1-1_1-1-20090911142035"; # Unique ID for PAF
PAF.NAME
"Fig_6-5-1-1_1-1.paf"; # Name of PAF
PAF.DESC
"Telescope guide star candidates for Pawprint 1"; #
Short description of PAF
PAF.CRTE.NAME
"SADT v3.04 (VIRCAM-1.25)"; # Name of creator
PAF.CRTE.DAYTIM
"2009-09-11 14:20"; # Civil Time for creation
PAF.LCHG.NAME
"SADT v3.04"; # Name of person/application changing
PAF.LCHG.DAYTIM
"2009-09-11 14:20"; # Timestamp of last change
PAF.CHCK.NAME
""; # Name of application checking
PAF.HDR.END
; # End of PAF Header
TPL.FILE.DIRNAME
"$INS_ROOT/$INS_USER/MISC/VISTA";
OCS.SADT.CAT.ID
OCS.SADT.IP.ID
""; # Guide/AO star candidate catalogue
"SADT v3.04, VIRCAM-1.25"; # Creator version
TEL.AG.START
TEL.AG.GUIDESTAR
(the default)
"T"; # Start autoguiding
"SETUPFILE"; # Select guide stars from this setup file
TEL.AO.START
"T"; # Start active optics
TEL.AO.AOSTARA
"SETUPFILE"; # Select LOWFS_PY stars from this setup
file (the default)
TEL.AO.AOSTARB
"SETUPFILE"; # Select LOWFS_NY stars from this setup
file (the default)
]]></REFSTARS>
Here the unique ID is derived by adding the date and time to the Parameter file (paf) Name.
The name consists of
SurveyID(Fig_6-5)-SurveyAreaNumber(1)-TileID(1_1)-PawprintID
---------------END OF MANUAL----------------------