1
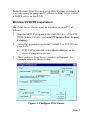
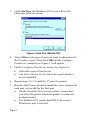
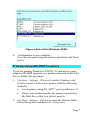
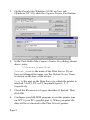
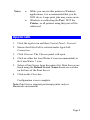
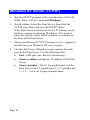
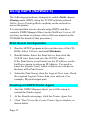
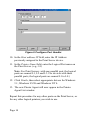
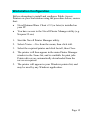
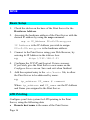
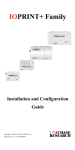
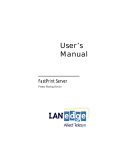
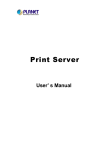
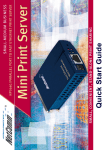
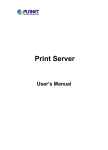
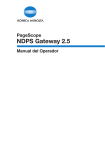
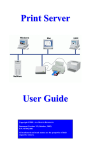
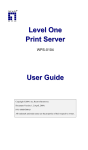
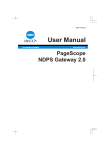
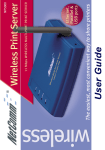
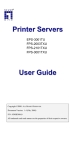
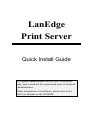
LanEdge
Print Server
Quick Install Guide
This Quick Install Guide contains brief instructions
only, and is intended for experienced users or Network
Administrators.
If this information is insufficient, please refer to the
full User Manual on the CD-ROM.
Table of Contents
Quick Install Guide............................................................ 1
Physical Installation........................................................... 1
Setup - Overview............................................................... 1
Windows Peer-to-Peer ....................................................... 2
AppleTalk ......................................................................... 9
Windows NT Server (TCP/IP) ......................................... 10
NetWare 3.x, 4.x Print Server Mode................................. 11
Using NDPS (NetWare 5)................................................ 12
Unix................................................................................ 16
Physical Installation
1.
Connect the LAN cable to the Print Server. If both
10BaseT and 10Base2 connections are fitted, use only
ONE (1) connection.
2.
Connect the Printer(s).
3.
Connect the Power Adapter Cable.
4.
Power ON, and check the Error LED. It should flash, then
turn off. If it stays on, there is a hardware error.
Setup - Overview
The following sections describe how to make the Print Server
operational in various environments.
The fastest and simplest method of installation is to use
Windows Peer-to-Peer printing. This method can be used even
if there is an existing Network Server (NetWare, Unix or
Windows) on your LAN.
If your situation is not included, or this information is
insufficient, please refer to the full User Manual in the Manual
folder on the CD-ROM.
Page 1
Windows Peer-to-Peer
Peer-to-Peer printing means that each PC prints directly to the
Print Server's printer. This printing method can be used even if
your LAN does have a Server running NetWare, Unix, or
Windows NT Server.
The Print Server supports both the NetBEUI and TCP/IP
protocols; both may be used simultaneously.
•
•
For NetBEUI, no Print Server configuration is required.
If TCP/IP is used, the Print Server must be allocated an IP
Address, as follows:
Assigning an IP Address to the Print Server
1.
Run the SETUP program in the root directory of the CDROM. Select Utilities, and install Windows Peer-to-peer
Printing.
2.
At the Select Protocol window, select the TCP/IP protocol.
3.
At the Select Components screen, install ONLY the
SETBOX utility. Do NOT install the Device Driver until
the Print Server is configured.
4.
Run the SETBOX program.
5.
Enter the Default Name for the Print Server. The Default
Server Name is shown on a sticker on the base of the
device, and consists of 8 letters and/or digits.
6.
Enter and save the following IP Addresses.
•
•
IP Address - use any free value from the IP Address
range used on your LAN.
The Gateway Address and Subnet Mask must be the
same as the PCs on your LAN.
Note: When installing on other PCs, do NOT install SETBOX.
Page 2
Note: Because Print Server is set as DHCP client as default., It
is not necessary to assign an IP address to Print Server if there
is DHCP server in this LAN.
Window 95/98/NT Installation
The Print Server Driver must be installed on each PC, as
follows:
1.
Run the SETUP program in the root directory of the CDROM. Select Utilities, and install Windows Peer-to-peer
Printing.
2.
Select the appropriate protocol (NetBEUI or TCP/IP) for
your LAN.
• If TCP/IP is selected, select Device Driver on the
Select Components screen.
3.
The Configure Print Server window will appear. An
example screen is shown below.
Figure 1: Configure Print Server
Page 3
4.
Click Browse, and select the Print Server from the list.
5.
Ensure that the port displayed in Select Device Port is
correct.
6.
The other fields are optional. Change them if you wish,
then click OK.
7.
You will be prompted “Do you wish to use this port for
your default printer?”.
• If your existing default printer is the correct type,
click “Yes”. The printer is then ready for use.
• Otherwise, click “No”, and follow the procedure
below to create a Windows printer to use the new port.
Windows Printer Installation
1.
Go to Start-Settings-Printers. Run the Add Printer Wizard.
2.
For Windows 95/98, select the Local printer option. For
Windows NT, when prompted for which computer will
manage the printer, select My computer.
3.
Choose the Printer model which is attached to the first port
on the Print Server.
4.
In the Available Ports screen (Windows 95/98) or Select
Port screen (NT 4.0), select the PrintServer port as the
port to use. In Windows NT, ensure that ONLY this port is
checked.
Page 4
Figure 2: Available Ports (Win 95)
Note: If you click the Configure Port button, you will see
the Configure Print Server screen again.
5.
Follow the on-screen instructions to finish adding a printer
as normal.
In Windows NT, do NOT enable sharing on this
printer.
6.
Installation is now complete.
You can now print using this printer.
Installing Additional Ports (95/98/NT4.0)
If the Print Server has more than 1 port, you need to install a
Windows printer for each port, as follows:
1.
Select Start - Settings - Printers and click on the printer
just added. Then select File-Properties. The Properties
screen will appear.
2.
Find the Add Port button.
On Windows 95/98, it is on the Details tab.
On Windows NT 4.0, it is on the Ports tab.
Page 5
3.
Click Add Port. On Windows 95/98, you will see the
following Add Port screen:
Figure 3 Add Port (Win95 PtP)
4.
Select Other as the type of port you want to add and select
the PrintServer port. Then click OK and the Configure
PrintServer window (see Figure 1) will appear.
5.
On the Configure PrintServer screen (see Figure 1):
•
•
Select the correct Print Server.
Use Select Device Port to select the a port which is
not yet installed.
6.
Repeat steps 3 to 5 to add the 3rd port, if required.
7.
Run the Add Printer wizard to install the correct printer for
each port, as you did for the first port.
• On the Available Ports screen (below), ensure that
you select the port to which the printer is connected,
as shown below.
• For Windows NT, ensure that ONLY the correct
PrintServer port is selected.
Page 6
Figure 4 Select Port (Windows 95/98)
8.
Configuration is now complete.
You can now print using the printers attached to the Print
Server.
Printing Using MS-DOS Programs
If you are running Windows 95/98/NT 4.0 and need to print,
using an MS-DOS program, to a printer connected to the Print
Server, follow this procedure:
1.
Use Start - Settings - Printers to run the Windows Add
Printer wizard. Create a new printer, with the following
attributes.
• Local printer, using the "LPT1" port (parallel port 1).
• Printer type/model matches the printer connected to
the Print Server that you wish to print to.
2.
Use Start - Settings - Printers to open the Printers folder.
Select this printer, and then File - Properties.
Page 7
3.
On the Details tab (Windows 95/98) or Ports tab
(Windows NT 4.0), click the Capture Printer Port button.
4.
In the Path field of the Capture Printer Port dialog, shown
above, enter:
\\Server_name\Port
Server_name is the name of the Print Server. If you
have not changed the name, use the Default Server Name
as shown on the base of the device.
Port is the port on the Print Server to which the printer is
attached. Use P1, P2, or P3 for parallel port 1, 2, 3
respectively.
5.
Check the Reconnect at Logon checkbox if desired. Then
click OK.
6.
Configure your MS-DOS program to use this printer type
on LPT1 (your PC's parallel port 1). When you print, the
data will be re-directed to the Print Server's printer.
Page 8
Notes:
•
While you can use this printer in Windows
applications, it is recommended that you do
NOT do so. Large print jobs may cause errors.
•
Windows is redirecting the Port, NOT the
Printer, so all printers using this port will be
redirected.
AppleTalk
1.
Click the Apple icon and then Control Panel - Network.
2.
Ensure that EtherTalk is selected under AppleTalk
Connection.
3.
Click Chooser. The Chooser panel will open.
4.
Click on either the LaserWriter 8 icon (recommended) or
the LaserWriter 7 icon.
5.
Select a Print Server from the printer list. Print Servers are
listed using the Default Server Name shown on a sticker
on the base of the Print Server.
6.
Click on the Close box.
Configuration is now complete.
Note: Print Server supports postscript printer only in
Macintosh environment.
Page 9
Windows NT Server (TCP/IP)
1.
Run the SETUP program in the root directory of the CDROM. Select Utilities, and install BiAdmin.
2.
Run BiAdmin. Select the Print Server, then click the
TCP/IP icon. Enter and save the TCP/IP values.
If the Print Server is not listed, use Set IP Address on the
InitDevice menu to assign an IP Address. You need to
know the Default Name, which is shown on a sticker on
the base of the Print Server.
3.
Ensure that Microsoft TCP/IP printing service support is
installed on your Windows NT server system.
4.
Use the Add Printer Wizard to create a printer for each
port on the Print Server. Use the following data:
•
•
•
Page 10
Port - LPR port (use Add Port if necessary)
Name or address of server - IP address of the Print
Server.
Name of printer - Use L1 for parallel port 1 on the
Print Server and L2 (parallel port 2), L3 (parallel port
3). L1… Ln (n=8) is logical printer name.
NetWare 3.x, 4.x Print Server Mode
For Remote Printer mode, please refer to the full user manual
on the CD-ROM.
1.
Copy the file QUICKSET.EXE from the
\Utility\Dos directory on the CD-ROM to your
workstation’s hard disk.
2.
Log in to the NetWare server as ADMIN.
3.
Run Quickset with the following syntax, to configure both
the Print Server and the NetWare server.
Quickset Name /FS=F
Where Name is the Default Server Name shown on a
sticker on the base of the Print Server, and F is the master
file server. (The /FS=F parameter is not required for NDS
mode.)
4.
Use the CAPTURE command to redirect print jobs to the
queues created by QUICKSET.
Page 11
Using NDPS (NetWare 5)
The following procedure is designed to enable Public Access
Printing under NDPS, using the TCP/IP network protocol.
Public Access Printing allows anybody on the network to
access the printer.
It is assumed that you are already using NDPS, and have
created a NDPS Manager Object on the NetWare 5 server. (If
you have not done so, please refer to full user manual on the
CD-ROM for details of this procedure.)
Print Server Configuration
1.
Run the SETUP program in the root directory of the CDROM. Select Utilities, and install BiAdmin.
2.
Run BiAdmin. Select the Print Server, then click the
TCP/IP icon. Enter and save the TCP/IP values.
If the Print Server is not listed, use Set IP Address on the
InitDevice menu to assign an IP Address. You need to
know the Default Name, which is shown on a sticker on
the base of the Print Server.
3.
Select the Print Server, then the Logical Ports icon. Check
the required Logical Printer data, save and exit. (For
example, Physical output port)
Creating an NDPS Printer Agent
1.
Start the NDPS Manager object you will be using to
control the Printer Agent.
2.
At the Identification page, click the Printer Agent List
3.
Click "New" to see the Create Printer Agent window, as
shown below.
Page 12
Figure 5: Create Printer Agent
4.
Enter the desired name for the Printer Agent (PA) Name
5.
Normally, the NDPS Manager will be the NDPS Manger
object you are using.
6.
Select Novell Printer Gateway in the Gateway Type (see
example above)
7.
Click OK and then select the available printer.
8.
Select Remote (LPR on IP) in the Connection Type.
9.
Click Next to see the following Configure Port Handler
screen.
Page 13
Figure 6 Configure Port Handler
10. In the Host address IP field, enter the IP Address
previously assigned to the Print Server device.
11. In the Printer Name field, enter the Logical Port name on
the Print Server. (e.g.: L1)
Note: For Print Servers with one parallel port, the logical
ports are named L1, L2 and L3. For devices with three
parallel ports, the logical ports are named L1 to L8.)
12. Click Finish, then select appropriate drivers for Windows
3.1, Windows 95/98 and Windows NT 4.
13. The new Printer Agent will now appear in the Printer
Agent List window
Repeat this procedure for any other ports on the Print Server, or
for any other logical printers you wish to use.
Page 14
Workstation Configuration
Before attempting to install and configure Public Access
Printers on your workstation using the procedure below, ensure
that:
• Novell IntranetWare Client v2.2 (or later) is installed on
your PC
• You have access to the Novell Printer Manager utility (e.g.
Nwpmw32.exe)
1.
Start the Novell Printer Manager utility.
2.
Select Printer - New from the menu, then click Add.
3.
Select the required printer and click Install, then Close.
4.
The printer will then appear in the main Printer Manager
window in the Name list, and is available for print jobs.
Printer drivers are automatically downloaded from the
server as required.
5.
The printer will appear in your Windows printer list, and
may be used by any Windows application.
Page 15
Unix
Basic Setup
1.
Check the sticker on the base of the Print Server for the
Hardware Address.
2.
Associate the hardware address of the Print Server with the
desired IP address by using the arp command:
arp -s IP_Address 00:c0:02:xx:yy:zz
IP Address is the IP Address you wish to assign.
00:c0:02:xx:yy:zz is the hardware address.
3.
Connect to the Print Server using your Web Browser, by
entering its IP Address in the Address box:
e.g.
http://192.168.0.21
4.
Configure the TCP/IP and Logical Printers screens.
If you wish, give the Print Server a new name on the
Configure Server screen. Save and exit when finished.
5.
Add the required entry to the etc/hosts file, to allow
the Print Server to be addressed by name.
e.g.
ip_address PS_name # comment
Where ip_address and PS_name are the IP Address
and Name you assigned to the Print Server.
LPD Printing
Configure your Unix system for LPD printing to the Print
Server, using the following data:
•
Remote host name is the name of the Print Server.
Page 16
•
Remote Printer Name is L1 to Ln, representing the
logical printer ports on the Print Server, as configured in
step 4.
Full details of this procedure, for various versions of Unix, are
contained in the full user manual on the CD-ROM.
Printing Using PSfilter
PSfilter is a proprietary printing system which provides many
print options.
To use PSfilter, a C compiler and Socket Library must exist on
the host so that psfilter.c can be compiled to an executable file.
The PSfilter program is shipped in source code as psfilter.c.
Detailed instructions for installing, configuring, and using
PSfilter are provided in the following files. These files, along
with PSfilter.c, are stored on the CD-ROM in the following
directories:
\driver\lpti\tar (tar format)
Operating System
Filename
SCO UNIX System V Release 3
SCO.TXT
HP UXIX on HP workstation
HP.TXT
Sun 5.x on Sun SPARC workstation
SUN5.TXT
Sun 4.x on Sun SPARC workstation
SUN4.TXT
AT&T UNIX SV Release 4
SVR4.TXT
DEC/OSF1
DECOSF1.TXT
IBM AIX
AIX.TXT
UNIXWare
UNIXWARE.TXT
Page 17
If your system is not listed above, do not
attempt to use the PSfilter method of printing.
Page 18