1
GE Fanuc Automation
CIMPLICITY® Monitoring and Control Products
CIMPLICITY HMI Plant Edition
Basic Control Engine
Event Editor and BCEUI Operation Manual
GFK-1282F
July 2001
GFL-005
Following is a list of documentation icons:
Warning notices are used to emphasize that hazardous voltages, currents, temperatures,
or other conditions that could cause personal injury exist in the equipment or may be
associated with its use.
Caution provides information when careful attention must be taken in order to avoid
damaging results.
Important flags important information.
To do calls attention to a procedure.
Note calls attention to information that is especially significant to understanding and
operating the equipment or software.
Tip provides a suggestion.
Guide provides additional directions for selected topics.
This document is based on information available at the time of publication. While efforts have been made to be
accurate, the information contained herein does not purport to cover all details or variations in hardware or software,
not to provide for every possible contingency in connection with installation, operation, or maintenance. Features
may be described herein which are not present in all hardware and software systems. GE Fanuc Automation assumes
no obligation of notice to holders of this document with respect to changes subsequently made.
GE Fanuc Automation makes no representation of warranty, expressed, implied, or statutory with respect to, and
assumes no responsibility for the accuracy, completeness, sufficiency, or usefulness of the information contained
herein. No warranties of merchantability or fitness for purpose shall apply.
CIMPLICITY is a registered trademark of GE Fanuc Automation North America, Inc.
Windows, Windows NT, and Windows 98 are registered trademarks of Microsoft Corporation
This manual was produced using Doc-To-Help®, by WexTech Systems, Inc.
Copyright 1998-2001 GE Fanuc Automation North America, Inc.
All rights reserved
ii
CIMPLICITY HMI Event Editor Operation Manual–July 2001
GFK-1282F
Preface
Content of this Manual
Chapter 1. Introduction. Describes CIMPLICITY HMI functionality and
introduces the Event Editor.
Chapter 2. Event Editor Concepts. Discusses the concepts of events and
actions and how they are combined by the Event Editor.
Chapter 3. Using the Event Editor. Documents the features of the Event
Editor.
Chapter 4. Using the BCEUI (Event Viewer). Documents the features of the
Basic Control Engine User Interface (BCEUI). This interface lets you view and
control script execution.
Appendix A. Configuring the EM_LOG Table. Shows you how to configure
the EM_LOG table in the Database Logger. This will enable you to log Events
and Actions.
Appendix B. Performance Optimization. Documents the global parameter
and point configuration files that you can modify to improve run-time
performance.
Appendix C. Developing C Language Procedures. Shows you how to
develop procedures that use the Event Manager Envelope Process. This
appendix is provided for users transitioning from the Event Manager API
provided with Version 1.0 of the CIMPLICITY HMI for Windows NT and
Windows 95. Starting with Version 2.0, you should use the Program Editor and
the Basic Control Engine language to develop procedures.
Related Publications
For more information, refer to these publications:
CIMPLICITY HMI Base System User's Manual (GFK-1180). This book
describes all the basic features of the CIMPLICITY HMI for Windows NT and
Windows 95 product.
CIMPLICITY HMI Basic Control Engine Language Reference Manual
(GFK-1283). This book documents all the Basic Control Engine language
features available to the Program Editor for the CIMPLICITY HMI for
Windows NT and Windows 95 base system.
CIMPLICITY HMI Basic Control Engine Program Editor Operation Manual
(GFK-1305). This book describes the Program Editor that you can use to
produce scripts that can be executed as actions by the Event Manager.
GFK-1282F
Index
Index-iii
Contents
Introduction
1-1
CIMPLICITY HMI Functionality .......................................................................................... 1-1
Event Management Concepts
2-1
Event Management Defined ................................................................................................... 2-1
Configured Events.................................................................................................................. 2-1
Configured Actions ................................................................................................................ 2-2
Actions versus Events ............................................................................................................ 2-2
Event Manager Startup and Shutdown Scripts ....................................................................... 2-3
Using the Event Editor
3-1
Getting Started ....................................................................................................................... 3-1
Event Editor Menus ................................................................................................. 3-2
Event Editor Window Pop-up Menus ...................................................................... 3-5
Event Editor Toolbar ............................................................................................... 3-6
Event Editor Shortcut Keys...................................................................................... 3-6
Event Editor Properties .......................................................................................................... 3-7
Sample Configurations............................................................................................. 3-8
Creating an Event ................................................................................................................... 3-9
Alarm Acknowledged Events................................................................................. 3-10
Alarm Deleted Events ............................................................................................ 3-11
Alarm Generated Events ........................................................................................ 3-12
Alarm Reset Events................................................................................................ 3-13
Point Change Events .............................................................................................. 3-14
Point Equals Events ............................................................................................... 3-15
Point Transition High Events ................................................................................. 3-16
Point Transition Low Events.................................................................................. 3-17
Point Unavailable Events ....................................................................................... 3-18
Point Update Events............................................................................................... 3-19
Run Once ............................................................................................................... 3-20
Timed Events ......................................................................................................... 3-21
Event Advanced Tab.............................................................................................. 3-22
Associating Actions with an Event....................................................................................... 3-23
Creating an Action ............................................................................................................... 3-24
Alarm Look-Up Actions ........................................................................................ 3-26
Log Only Actions................................................................................................... 3-27
Point Alarm Acknowledge Actions........................................................................ 3-28
Point Alarm Disable Actions ................................................................................. 3-29
Point Alarm Enable Actions................................................................................... 3-30
Recipe Upload/Download ...................................................................................... 3-31
Run Script Actions ................................................................................................. 3-32
Set Point Actions.................................................................................................... 3-33
GFK-1282F
Contents
Contents-v
Source Transition Set Actions................................................................................ 3-34
Transition Set Actions............................................................................................ 3-35
Call Envelope Function Actions............................................................................. 3-36
Copying an Event ................................................................................................................. 3-37
Copying an Action................................................................................................................ 3-37
Configuring Event Display Attributes .................................................................................. 3-38
Configuring Action Display Attributes................................................................................. 3-39
Using the BCEUI (Event Viewer)
4-1
About the BCEUI ................................................................................................................... 4-1
Getting Started........................................................................................................................ 4-1
BCEUI Menus.......................................................................................................... 4-3
BCEUI Window Pop-up Menu ................................................................................ 4-5
BCEUI Toolbar........................................................................................................ 4-5
BCEUI Shortcut Keys .............................................................................................. 4-5
Using the BCEUI Viewer ....................................................................................................... 4-6
Selecting Events ....................................................................................................... 4-6
Using the Event List................................................................................................. 4-8
Controlling Scripts ................................................................................................. 4-11
Appendix A - Creating the Event Manager Log Table
1-1
Creating The EM_LOG Table............................................................................................... A-1
Appendix B - Performance Optimization
2-1
About Performance Optimization.......................................................................................... B-1
Global Parameters ................................................................................................................. B-1
Setting the Maximum Number of Threads .............................................................. B-2
Setting the Thread Timeout..................................................................................... B-2
Basic Control Engine Point Cache File ................................................................................. B-3
Appendix C - Developing User Applications with EM_EP
3-1
Enabling the Event Manager Envelope Process .....................................................................C-1
Adding a Procedure to the Event Manager Envelope Process................................................C-2
Setting the Environment .........................................................................................................C-2
Files to Edit ............................................................................................................................C-3
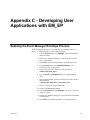
emep_ext_app.h .......................................................................................................C-3
emep_addr_ap.h .......................................................................................................C-3
emep_usrfunc.c ........................................................................................................C-4
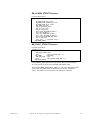
Rebuilding the Executable Files .............................................................................................C-6
Restrictions on User-Defined Functions.................................................................................C-7
Example EM_EP Function .....................................................................................................C-8
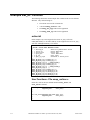
action.idt ..................................................................................................................C-8
User Functions - File emep_usrfunc.c......................................................................C-8
External Declarations - File emep_ext_app.h ..........................................................C-9
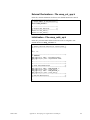
Initialization - File emep_addr_ap.h ........................................................................C-9
Index
Contents-vi
ii
i
CIMPLICITY HMI Event Editor Operation Manual–July 2001
GFK-1282F
Introduction
CIMPLICITY HMI Functionality
CIMPLICITY HMI software's Base System functionality - Point Management,
Alarm Management, Data Logging facilities, plus a full-functioned User
Interface - lets CIMPLICITY HMI software users collect data for reporting and
visualize data via lists, graphic status displays, and alarms. Standard data
communications ability makes CIMPLICITY HMI software a tool that can
provide services such as the following:
•
Downtime reporting
•
Production reporting
•
Records of production counts at work stations
•
Graphic monitoring of automatic data point values
•
Fault reporting via direct point values and alarms
CIMPLICITY HMI software's flexible system architecture and modular design
allows for easy add-on of functionality.
The Event Editor is included in the Basic Control Engine product option for GE
Fanuc's CIMPLICITY HMI software. It is fully integrated with CIMPLICITY
HMI software's Base System functionality, enhancing its already powerful
monitoring capability in a full range of computer integrated manufacturing
environments.
The Event Editor lets you define actions to take in response to events that occur
in a process. One event may invoke multiple actions, or one action may be
invoked by many events. An event can be defined as a changing point or alarm
state, or even a time of day. Based on an event, you can perform the following
actions:
•
Set point values
•
Acknowledge or clear alarms
•
Create log file entries
•
Invoke specific user-defined actions
•
Invoke Basic Control Engine scripts to execute user-defined logic
At run-time, the Basic Control Engine monitors for events and executes the
configured actions. The Basic Control Engine is based on a multi-threaded
design, which allows the system to invoke and execute multiple Basic Control
Engine scripts concurrently.
GFK-1282F
1-1
Event Management Concepts
Event Management Defined
You use the Event Editor to define events and to take actions in response to
those events when they occur. The following may all be defined as events:
•
A point's status changes
•
An alarm's status changes
•
A specific time of day occurs
•
A specified time interval occurs
In response to events, you may define actions to set point values, manage alarms,
create log file entries, and invoke specific user-defined actions.
Configured Events
You can define the following types of events with the Event Editor:
GFK-1282F
Alarm State Changes
These events are triggered when the Alarm
Manager reports that the state of an alarm
changes.
Point Changes
These events are triggered when the Point
Manager reports that the state or value of a point
has changed.
Timed Events
These events are triggered when a specific time of
day or time interval occurs.
2-1
Configured Actions
An event may invoke several actions, and an action may be invoked as a result of
more than one events. You can define any of the following actions to be invoked
in a specific order when an event occurs:
Log Event
Send a message to the Event Log that the event
took place.
Acknowledge Alarms
Acknowledge an alarm with a specified ID.
Enable/Disable
Alarming for a Point
Send a message to the Point Manager to enable or
disable alarming for a device or global point.
Recipe
Upload/Download
Upload or download a recipe.
Run a Script
Run a Basic Control Engine script.
Set a Point Value
Perform a setpoint operation to update the value
of a device point or global point.
Source Transition
Set Point
Perform a setpoint operation to update the value
of a device point or global point to the value of a
source point.
Transition Set Point
Perform a setpoint operation to update the value
of a device point or global point to the value of
the point defined for the event.
Call an Envelope
Function
Run an envelope procedure.
Actions versus Events
Any action can be invoked by any event. Below are a few of the ways actions
and events may be combined, with some comments about each.
2-2
Point Actions Based
on Point Events
You can use this type of event-action to pass
information between points.
Point Actions Based
on Alarm Events
You can use this type of event-action to allow a
physical indication of an alarm, such as activating
a light on a control panel.
Events Whose
Actions Call A UserDefined Routine or
Script
You can use this type of event-action to define
custom functions that are invoked in response to
configured system events.
CIMPLICITY HMI Event Editor Operation Manual–July 2001
GFK-1282F
Event Manager Startup and Shutdown Scripts
The Basic Control Engine calls a startup script when the Event Manager starts up
and a termination script when it shuts down. These scripts are initially null (that
is, they do not do anything). You can use these scripts to perform initialization
and termination tasks, such as restoring and saving the value of a global variable.
The two scripts are:
•
EM_INIT.BCL
•
EM_TERM.BCL
You will find copies of these scripts in your project's \scripts directory.
GFK-1282F
Event Management Concepts
2-3
Using the Event Editor
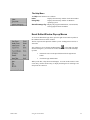
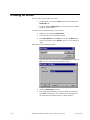
Getting Started
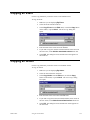
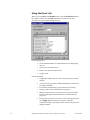
To start the Event Editor, double-click the Event Editor icon in your project's
Workbench.
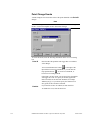
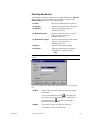
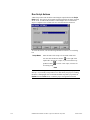
The CIMPLICITY Event Editor window opens.
The window is divided into two panes by a vertical bar that you can move with
the mouse. If you are displaying Events and Actions By Event, the Events will
be in the left pane and their associated Actions in the right pane. If you are
displaying Events and Actions By Action, the Actions will be in the left pane,
and their associated Events will be in the right pane.
GFK-1282F
3-1
Using the Event Editor, you can:
•
•
•
•
•
•
Create, modify, or delete Events
Create, modify or delete Actions
Assign Actions to Events
Reorder the list of Actions for an Event
Change the Event Editor display attributes
Enable or disable Dynamic Configuration update
Event Editor Menus
You can use the menu options to create new events and actions, modify, delete
or copy selected events and actions, reorder the actions for an event, display the
attributes for an event or action, toggle dynamic updates, and access Help.
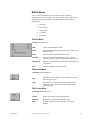
The File Menu
The File menu functions are as follows:
Note
The menu entries depend on which pane is active.
New Event...
Creates a new Event. This option is displayed if the
Event pane is active.
New Event_Action...
Creates a new action for the currently selected Event.
This option is displayed if the Event pane is active,
and you have clicked the mouse once in the Action
pane.
New Action...
Creates a new Action. This option is displayed if the
Action pane is active.
Exit
Exits the Event Editor.
The Edit Menu
The Edit menu functions are as follows:
3-2
CIMPLICITY HMI Event Editor Operation Manual–July 2001
GFK-1282F
Note
The menu entries depend on which pane is active.
Modify Event
Opens the Modify Event dialog box, and lets you
change the Event Type and associated fields.
Modify Action
Opens the Modify Action dialog box, and lets you
change the Action Type and associated fields.
Delete Event
Deletes the selected Event from the list of available
Events
Delete Event-Action
Removes the selected Action from the list of Actions
for the selected Event.
Delete Action
Deletes the Action. This function will remove the
Action from all Events that use it and remove it from
the list of available Actions.
Copy Event
Copies the selected Event to a new Event. You can
also choose to copy the Actions.
Move Up
While viewing Event-Actions, controls the execution
order of the selected Action by moving it up in the
list of Actions for the Event.
Move Down
While viewing Event-Actions, controls the execution
order of the selected Action by moving it down in the
list of Actions for the Event.
Alarm Filter
Opens the Alarm Setup dialog box and lets you set
the filter for the alarms the Event Manager will
respond to.
Note
Scripts run asynchronously, so their order in the list does not guarantee their
order of execution. Other actions, like Setpoint, can be ordered.
The View Menu
The View menu functions are as follows:
GFK-1282F
Using the Event Editor
3-3
Note
The menu entries depend on which pane is active.
Toolbar
Toggles the display of the Toolbar.
Status Bar
Toggles the display of the Status Bar.
Search
If you are displaying By Event, opens the Event
Search dialog box.
If you are displaying By Action, opens the Action
Search dialog box.
Event Attributes...
If you are displaying By Event, opens the Configure
Display Attributes dialog box for Events, and lets you
select Event attributes to display in the window.
Action Attributes...
If you are displaying By Action, opens the
Configure Display Attributes dialog box for Actions,
and lets you select Action attributes to display in the
window.
All Actions
Displays all Actions in the Action pane. You can
then select Actions and drag them into an Event.
By Event
Displays Event and Action information by Event.
By Action
Displays Event and Action information by Action.
The Tools Menu
The Tools menu functions are as follows:
Log
Enable or disables logging of Events and Actions.
Dynamic
Enables or disables Dynamic Configuration of points,
alarms, etc., when configuring Events or Actions.
Update
Dynamically updates the Basic Control Engine with
the current Event configuration and scripts used by
the Actions in the configuration.
The Basic Control Engine normally loads and
compiles your scripts at project startup. If you
modify a script and save it to disk while your project
is running, the Basic Control Engine will not load the
modified script until you perform an Update or the
until project is stopped and restarted.
3-4
CIMPLICITY HMI Event Editor Operation Manual–July 2001
GFK-1282F
The Help Menu
The Help menu functions are as follows:
Index
Displays the main Help window for the Event Editor.
Using Help
Displays the main Help window for Windows
operating system.
About Eventmgr Cfg...Displays the program identification, version number,
and copyright for the Event Editor.
Event Editor Window Pop-up Menus
To access the Window Pop-up menu, press the right mouse button anywhere in
the CIMPLICITY Event Editor window.
The list of options will depend on whether you are working in the Event list or
Action list.
Also, whenever you see the Pop-up Menu button - to the right of an input
field in a dialog box, you can use one of these methods to access the field Popup menu:
•
Position the cursor in the input field and click the right mouse
button.
•
Click the Pop-up Menu button.
When you do this, a drop-down menu displays. You can use this menu to create
a new entity, edit the current entity, or display the dialog box for selecting a new
entity from the current set.
GFK-1282F
Using the Event Editor
3-5
Event Editor Toolbar
The Tools toolbar is available to you in the Event Editor. You can use the View
Toolbars menu item to turn on and off the display of this toolbar. You can fix
the toolbar in the Event Editor window, or display it in a separate window at
your discretion.
The buttons on the Tools toolbar are:
New
Creates a new Event or Action record.
Copy
Makes a copy of the selected Event or
Action.
Delete
Deletes the selected Event(s) or Action(s).
Modify
Modifies the selected Event or Action.
Search
Searches for specified Events or Actions.
Attributes
Opens the Configure Display Attributes
dialog box for Events or Actions.
Dynamic
Enables/disables Dynamic Configuration
Updates.
About
Displays program information, version
number, and copyright.
Show all actions
Shows all actions.
Action order up
Moves the selected Action up in the list for
an Event.
Action order down
Moves the selected Action down in the list
for an Event.
Toggle Logging
Enables/Disables Event Action logging.
Update
Updates Control Manager Runtime.
Event Editor Shortcut Keys
The following are the more commonly used keystrokes that are available for
your use in the Event Editor:
Creates a new Event, Event-Action, or Action.
Ctrl+N
Modifies an Event or Action.
Ctrl+M
Deletes an Event or Action.
Del
Copies an Event or Action.
Ctrl+C
Searches for selected Events or Actions.
Ctrl+S
Opens the Configure Display Attributes dialog box for Events or
Ctrl+A
Actions.
Toggles logging for Events and Actions.
Ctrl+L
Opens the Help window for the Event Editor.
F1
Opens the Alarm Setup dialog box.
Ctrl+F
3-6
CIMPLICITY HMI Event Editor Operation Manual–July 2001
GFK-1282F
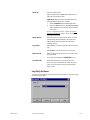
Event Editor Properties
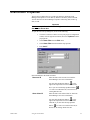
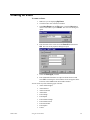
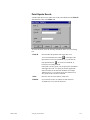
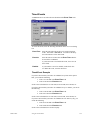
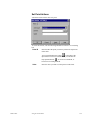
The Alarm Setup dialog box lets you filter the alarms to which the Event
Manager will respond. You can filter by Resource ID and by Alarm Class ID.
You can also have the Event Manager respond to Alarm Log data, Event Log
data, or both.
Important
You must enter information in this dialog box in order to receive
Alarm and/or Event data.
To open the Alarm Setup dialog box, do one of the following:
•
Click once on the Event Editor icon in your project's Configuration
cabinet, click the right mouse button, then select Options from the
pop-up menu.
•
Select Alarm Filter from the Edit menu.
•
Select Alarm Filter from the Window Pop-up menu.
•
Press Ctrl+F.
Enter information in the fields as follows:
Resource ID
Enter the name of the resource for which the
Event Manager can receive information.
You can click the Browser button - to the
right of the input field to browse for a Resource
ID, or you can click the Pop-up Menu button - to create a new Resource ID, or browse for an
existing Resource ID.
Alarm Class ID
Enter the name of the Alarm Class for which the
Event Manager can receive information.
You can click the Browser button - to the
right of the input field to browse for an Alarm
Class ID, or you can click the Pop-up Menu
button - to create a new Alarm Class ID, or
browse for an existing Alarm Class ID.
GFK-1282F
Using the Event Editor
3-7
Alarms
Set this check box if you want the Event Manager
to receive Alarm Log data.
Clear the check box if you do not want the Event
Manager to receive any Alarm Log data.
Events
Set this check box if you want the Event Manager
to receive Event Log data.
Clear the check box if you do not want the Event
Manager to receive any Event Log data.
Maximum
Concurrent Scripts
Specifies the maximum number of scripts that can
execute concurrently within the Event Manager.
When this limit is exceeded an
$EM_MAX_SCRIPTS alarm will be generated.
Additional a “Too many executing threads, action
ignored” message will appear in the status log.
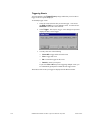
Sample Configurations
Here are some examples of how you can filter information for the Event
Manager.
If you want the Event Manager to receive all alarms and events:
1.
Leave the Resource ID and Alarm Class ID fields blank.
2.
Set the Alarms and Event check boxes.
If you want the Event Manager to only receive Event Log data for system
resources:
1.
Enter "$SYSTEM" in the Resource ID field.
2.
Leave the Alarm Class ID field blank.
3.
Leave the Alarms check box blank.
4.
Set the Events check box.
If you want the Event Manager to receive alarms and events for all resources, by
the alarms will be restricted to the "HIGH" class from "$SYSTEM" resources:
3-8
1.
Enter "$SYSTEM" in the Resource ID field.
2.
Enter "HIGH" in the Alarm Class ID field.
3.
Set the Alarms and Events check boxes.
CIMPLICITY HMI Event Editor Operation Manual–July 2001
GFK-1282F
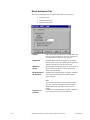
Creating an Event
To create an Event:
1.
Make sure you are displaying By Event.
2.
Click the mouse once in the Event window.
3.
Select New Event from the File menu, or click the New button
on the Tools toolbar, or press Ctrl+N. The New Event dialog box
opens.
4.
Enter the name of the new Event in the Event ID field and select
OK. The New Event properties dialog box opens.
5.
Select the Event type you want.
6.
Enter additional information as required to define the Event and
select OK. The dialog box closes and the new Event appears in the
Event list in the CIMPLICITY Event Editor window.
You can create any of the following types of Events:
• Alarm Acknowledged
• Alarm Deleted
• Alarm Generated
• Alarm Reset
• Point Change
• Point Equals
• Point Transition High
• Point Transition Low
• Point Unavailable
• Point Update
• Timed
GFK-1282F
Using the Event Editor
3-9
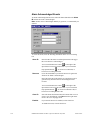
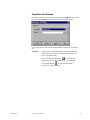
Alarm Acknowledged Events
An Alarm Acknowledged Event occurs when the alarm identified in the Alarm
ID field for the Event is acknowledged.
Note: Alarms can be acknowledged manually by operators, or automatically via
software.
To create this Event, enter the following information in the New Event dialog
box:
Alarm ID
Enter the ID of the alarm or wildcard pattern that will trigger
this event when it is acknowledged.
You can click the Browser button - to the right of the
input field to browse for an Alarm ID, or you can click the
Pop-up Menu button - to create a new Alarm ID, or
browse for an existing Alarm ID.
Resource
Leave this field blank if you want the Event to be generated
whenever the alarm is acknowledged.
Enter a Resource ID in this field if you want the Event to be
generated only when the alarm is acknowledged for that
resource.
You can click the Browser button - to the right of the
input field to browse for a Resource ID, or you can click the
- to create a new Resource ID, or
Pop-up Menu button browse for an existing Resource ID.
Class ID
Select the alarm classification that will evaluate this event. To
create a new classification, select New from the right mouse
menu or the Class ID popup menu..
Enabled
If you want the Event to be enabled, set this check box.
To disable the Event, clear the check box.
3-10
CIMPLICITY HMI Event Editor Operation Manual–July 2001
GFK-1282F
Alarm Deleted Events
An Alarm Deleted Event occurs when the alarm identified in the Alarm ID field
for the Event is deleted.
Note: Alarms may be deleted manually by operators, or automatically via
software.
To create this Event, enter the following information in the New Event dialog
box:
Alarm ID
Enter the ID of the alarm that will trigger this event when it is
deleted.
You can click the Browser button - to the right of the
input field to browse for an Alarm ID, or you can click the
Pop-up Menu button - to create a new Alarm ID, or
browse for an existing Alarm ID.
Resource
Leave this field blank if you want the Event to be generated
whenever the alarm is deleted.
Enter a Resource ID in this field if you want the Event to be
generated only when the alarm is deleted for that resource.
You can click the Browser button - to the right of the
input field to browse for a Resource ID, or you can click the
- to create a new Resource ID, or
Pop-up Menu button browse for an existing Resource ID.
Class ID
Select the alarm classification that will evaluate this event. To
create a new classification, select New from the right mouse
menu or the Class ID popup menu..
Enabled
If you want the event to be enabled, set this check box.
To disable the event, clear the check box.
GFK-1282F
Using the Event Editor
3-11
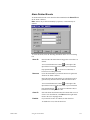
Alarm Generated Events
An Alarm Generated Event occurs when the alarm identified in the Alarm ID
field for the Event is generated.
To create this Event, enter the following information in the New Event dialog
box:
Alarm ID
Enter the ID of the alarm or wildcard pattern that will trigger
this event when it is generated.
You can click the Browser button - to the right of the
input field to browse for an Alarm ID, or you can click the
Pop-up Menu button - to create a new Alarm ID, or
browse for an existing Alarm ID.
Resource
Leave this field blank if you want the Event to be generated
whenever the alarm is generated.
Enter a Resource ID in this field if you want the Event to be
generated only when the alarm is generated for that resource.
You can click the Browser button - to the right of the
input field to browse for a Resource ID, or you can click the
- to create a new Resource ID, or
Pop-up Menu button browse for an existing Resource ID.
Class ID
Select the alarm classification that will evaluate this event. To
create a new classification, select New from the right mouse
menu or the Class ID popup menu..
Enabled
If you want the event to be enabled, set this check box.
To disable the event, clear the check box.
Note: All alarm events allow wildcards for pattern matching. Valid wildcards
are * and ?. In the above example, the event "Alarm" will occur whenever a
HIGH Class alarm occurs.
3-12
CIMPLICITY HMI Event Editor Operation Manual–July 2001
GFK-1282F
Alarm Reset Events
An Alarm Reset Event occurs when the alarm identified in the Alarm ID field
for the Event is reset.
Note: Alarms can be reset manually by operators, or automatically via software.
To create this Event, enter the following information in the New Event dialog
box:
Alarm ID
Enter the ID of the alarm or wildcard pattern that will trigger
this event when it is reset.
You can click the Browser button - to the right of the
input field to browse for an Alarm ID, or you can click the
Pop-up Menu button - to create a new Alarm ID, or
browse for an existing Alarm ID.
Resource
Leave this field blank if you want the Event to be generated
whenever the alarm is reset.
Enter a Resource ID in this field if you want the Event to be
generated only when the alarm is reset for that resource.
You can click the Browser button - to the right of the
input field to browse for a Resource ID, or you can click the
- to create a new Resource ID, or
Pop-up Menu button browse for an existing Resource ID.
Class ID
Select the alarm classification that will evaluate this event. To
create a new classification, select New from the right mouse
menu or the Class ID popup menu..
Enabled
If you want the event to be enabled, set this check box.
To disable the event, clear the check box.
GFK-1282F
Using the Event Editor
3-13
Point Change Events
A Point Change Event occurs when value of the point identified in the Point ID
changes.
Note
Point value changes to and from the unavailable value are not Point Change
Events. Use the Point Update Event to detect these changes.
To create this Event, enter the following information in the New Event dialog
box:
Point ID
Enter the ID of the point that will trigger this event when its
value changes.
You can click the Browser button - to the right of the
input field to browse for an Point ID, or you can click the
- to create a new Point ID, or
Pop-up Menu button browse for an existing Point ID.
If the point is an array point, you can specify the element that
will trigger this event. To specify an element, append the
index in brackets at the end of the Point ID (for example,
ARRAY_PT[3]). If you do not specify the element for an
array point, the first element is assumed.
Enabled
If you want the event to be enabled, set this check box.
To disable the event, clear the check box.
3-14
CIMPLICITY HMI Event Editor Operation Manual–July 2001
GFK-1282F
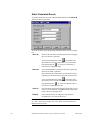
Point Equals Events
A Point Equals Event occurs when value of the point identified in the Point ID
field equals the value in the Value field.
To create this Event, enter the following information in the New Event dialog
box:
Point ID
Enter the ID of the point that will trigger this event.
You can click the Browser button - to the right of the
input field to browse for an Point ID, or you can click the
Pop-up Menu button - to create a new Point ID, or
browse for an existing Point ID.
If the point is an array point, you can specify the element that
will trigger this event. To specify an element, append the
index in brackets at the end of the Point ID (for example,
ARRAY_PT[3]). If you do not specify the element for an
array point, the first element is assumed.
Value
Enter the value to be checked for in this field.
Enabled
If you want the event to be enabled, set this check box.
To disable the event, clear the check box.
GFK-1282F
Using the Event Editor
3-15
Point Transition High Events
A Point Transition High Event occurs when value of the Digital type point
identified in the Point ID field transitions to HIGH (that is, it changes value
from 0 to 1).
To create this Event, enter the following information in the New Event dialog
box:
Point ID
Enter the ID of the point that will trigger this event when its
value transitions to HIGH.
You can click the Browser button - to the right of the
input field to browse for an Point ID, or you can click the
Pop-up Menu button - to create a new Point ID, or
browse for an existing Point ID.
If the point is an array point, you can specify the element that
will trigger this event. To specify an element, append the
index in brackets at the end of the Point ID (for example,
ARRAY_PT[3]). If you do not specify the element for an
array point, the first element is assumed.
Enabled
If you want the event to be enabled, set this check box.
To disable the event, clear the check box.
3-16
CIMPLICITY HMI Event Editor Operation Manual–July 2001
GFK-1282F
Point Transition Low Events
A Point Transition Low Event occurs when value of the Digital type point
identified in the Point ID field transitions to LOW (that is, it changes value from
1 to 0).
To create this Event, enter the following information in the New Event dialog
box:
Point ID
Enter the ID of the point that will trigger this event when its
value transitions to LOW.
You can click the Browser button - to the right of the
input field to browse for an Point ID, or you can click the
Pop-up Menu button - to create a new Point ID, or
browse for an existing Point ID.
If the point is an array point, you can specify the element that
will trigger this event. To specify an element, append the
index in brackets at the end of the Point ID (for example,
ARRAY_PT[3]). If you do not specify the element for an
array point, the first element is assumed.
Enabled
If you want the event to be enabled, set this check box.
To disable the event, clear the check box.
GFK-1282F
Using the Event Editor
3-17
Point Unavailable Events
A Point Unavailable Event occurs when value of the point identified in the
Point ID field becomes unavailable.
To create this Event, enter the following information in the New Event dialog
box:
Point ID
Enter the ID of the point that will trigger this event when it
becomes unavailable.
You can click the Browser button - to the right of the
input field to browse for an Point ID, or you can click the
Pop-up Menu button - to create a new Point ID, or
browse for an existing Point ID.
Enabled
If you want the event to be enabled, set this check box.
To disable the event, clear the check box.
3-18
CIMPLICITY HMI Event Editor Operation Manual–July 2001
GFK-1282F
Point Update Events
A Point Update Event occurs when value of the point identified in the Point ID
field is updated. The rate at which the point is updated is a function of its
Update criteria, which will be one of the following:
On Scan
The point is updated at each scan interval.
On Change
The point is updated when its value changes.
On Demand
The point is updated on request by a
CIMPLICITY process.
On Demand On Scan
The point is updated at each scan interval
while it is being requested by a
CIMPLICITY process.
On Demand On Change
The point is updated when its value changes
while it is being requested by a
CIMPLICITY process.
Poll Once
The point is polled once at startup.
Unsolicited
The point is updated whenever the device
determines that an update is needed.
Note
Point value changes to and from the unavailable value are also Point Update
Events.
To create this Event, enter the following information in the New Event dialog
box:
Point ID
Enter the ID of the point that will trigger this event when its
value updates.
You can click the Browser button - to the right of the
input field to browse for an Point ID, or you can click the
- to create a new Point ID, or
Pop-up Menu button browse for an existing Point ID.
Enabled
If you want the event to be enabled, set check box.
To disable the event, clear the check box.
GFK-1282F
Using the Event Editor
3-19
Run Once
The Event Type, Run Once, is invoked once when the Event Manager starts.
To create this Event, enter the following information in the New Event dialog
box:
Enabled
If you want the event to be enabled, set check box.
To disable the event, clear the check box.
3-20
CIMPLICITY HMI Event Editor Operation Manual–July 2001
GFK-1282F
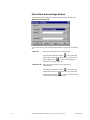
Timed Events
A TIMED Event occurs when the time identified in the Event Time field
occurs.
To create this Event, enter the following information in the New Event dialog
box:
Event Time
Enter the time when the Event is to be triggered in these
fields. The format is HH:MM:SS. You can use the dropdown list button to select AM or PM.
Event Int
Enter the interval of time after the Event Time when the
Event will be rescheduled.
If you do not want to reschedule the Event, leave zeros in
these fields.
Enabled
If you want the event to be enabled, set this check box.
To disable the event, clear the check box.
Timed Event Example
If you have an Event that you want to be scheduled every hour on the quarter
hour, you can do the following:
1.
Enter 12:15:00 AM in the Event Time field
2.
Enter 01:00:00 in the Event Int field.
So the event is scheduled at 12:15:00 AM, 01:15:00 AM, 02:15:00 AM, etc.
If you have an Event that you want to be scheduled every 15 minutes, you can do
the following:
1.
Enter 12:00:00 AM in the Event Time field.
2.
Enter 00:15:00 in the Event Int field.
So the event is scheduled at 12:15:00 AM, 12:30:00 AM, 12:45:00 AM, etc.
If you have an Event that you want to be scheduled at 2:30 AM every day, you
can do the following:
1.
Enter 02:30:00 AM in the Event Time field.
2.
Enter 00:00:00 in the Event Int field.
So the event is scheduled at 2:30 AM everyday.
GFK-1282F
Using the Event Editor
3-21
Event Advanced Tab
The New Event dialog box has an Advanced tab where you can specify:
•
Script Execution
•
Maximum Queue size
•
Response to Overflow
Parallel
Runs a script each time an Event is invoked. More than
one copy of the script may run at a time. You must use
critical sections to control access to resources.
Sequential
(Default) When an Event is triggered, if an existing
instance of the event is still executing the script will be
queued to start after the current script is done.
Maximum
Queue
With sequential a maximum queue size is specified. In
this case when more the 20 events are queued, the
oldest will be discarded.
Generate Alarm
on Overflow
(Default) If the sequential queue overflows, check this
box to generate an $EM_QUEUE alarm when the
queue overflows.
Log Error on
Overflow
3-22
Note
If your event is an alarm event, generating an alarm
may cause your event to trigger again and generate
another alarm. This will cause a circular cycle of
alarms.
(Default) If the sequential queue overflows, check this
box to generate an message in the status log.
CIMPLICITY HMI Event Editor Operation Manual–July 2001
GFK-1282F
Associating Actions with an Event
You can relate each Event that you create to one or more Actions that will be
executed when the Event occurs.
To associate an Action with an Event:
1.
Make sure you are displaying By Event.
2.
Select the Event from the Event list.
3.
Click the mouse once in the Action list.
4.
Select New Event-Action from the File menu, or press Ctrl+C.
The New Event-Action dialog box opens.
Enter the following information in the New Action dialog box:
Action ID
Enter the ID of the Action you want to associate with the Event
in this field.
In addition, you can click the Browser button - to the right
of the input field to browse for an Action, or you can click the
Pop-up Menu button for an existing Action.
- to create a new Action, or browse
If you elect to create a new Action, the New Action dialog box
opens.
Log Flag
Set this check box if you want the Event and the Action to be
logged to the Database Logger Event Log.
Clear this check box to disable logging.
You can also use the Toggle Logging button on the Toolbar
to toggle the Log Flag.
GFK-1282F
Using the Event Editor
3-23
Creating an Action
You can create an Action either of two ways:
•
From an Event, you can select New from the Pop-up Menu in the
Action ID field.
•
If you are displaying By Action, you can create an Action without
having to create an Event
To create an Action without having to create an Event:
1.
Make sure you are displaying By Action.
2.
Click the mouse once in the Action window.
3.
Select New Action from the File menu, or click the New button
on the Tools toolbar, or press Ctrl+N. The New Action dialog box
opens.
When the New Action dialog box opens:
3-24
1.
Enter the name of the new Action in the Action ID field and select
OK. The New Action properties dialog box opens.
2.
Select the Action type you want.
3.
Enter additional information as required to define the Action and
select OK. The dialog box closes and the new Action appears in
the Action list in the CIMPLICITY Event Editor window.
CIMPLICITY HMI Event Editor Operation Manual–July 2001
GFK-1282F
You can create any of the following types of Actions:
GFK-1282F
•
Alarm Look-Up
•
Log Only
•
Point Alarm Acknowledge
•
Point Alarm Disable
•
Point Alarm Enable
•
Recipe Upload/Download
•
Run Script
•
Set Point
•
Source Transition Set
•
Transition Set
•
Call Envelope Function
Using the Event Editor
3-25
Alarm Look-Up Actions
An Alarm Look-Up action associates a list of point values and Alarm IDs to be
acted upon when the value of the Point ID for the associated Event equals the
point value in the configured Alarm Look-Up.
Important: The Event must be a Point event
To edit the Alarm Look-Up action click on the Edit button. The Alarm LookUp for Action ID dialog box opens.
You can enter information in the following fields
Point Value
This is a required field.
Enter the value for the point that will cause the Alarm
Action to occur.
Alarm Message
3-26
Enter the message text that will be associated with
the generated alarm.
CIMPLICITY HMI Event Editor Operation Manual–July 2001
GFK-1282F
Alarm ID
This is a required field.
Enter the name of the CIMPLICITY Alarm ID for
which the action will be taken.
Important: When you create the Alarm ID in the
Alarm Definition dialog box, you must:
1. Select $CIMBASIC in the Alarm type field.
Enter one %s parameter in the Alarm message
field to hold the Alarm Message defined for the
Point Value.
See the "Configuring Alarms" chapter in the Base
System User's Manual, GFK-1180, for details about
creating an Alarm ID.
2.
Alarm Action
Enter the action to be taken for the alarm. You can
click the drop-down list button to the right of the
input field and select the action from the list of
available actions.
Log Alarm
Enter True if you want to log this event in the Event
Log.
Enter False if you do not want to log this event.
Resource ID
Enter an optional Resource ID to be associated with
the given alarm.
If you leave this field blank, $SYSTEM is used.
Text Point ID
Enter the Point ID for a text point in this field.
If you enter a text Point ID in this field, the point's
value is set to the alarm message when the alarm
action occurs.
Log Only Actions
A Log Only action logs the associated Event in the Database Logger Event Log.
No other action is taken.
GFK-1282F
Using the Event Editor
3-27
Point Alarm Acknowledge Actions
A Point Alarm Acknowledge action acknowledges the alarm defined by the
Alarm ID and Resource ID.
To create this Action, enter the following information in the New Action dialog
box:
Alarm ID
Enter the ID of the alarm to be acknowledged.
You can click the Browser button - to the right of the
input field to browse for an Alarm ID, or you can click the
Pop-up Menu button - to create a new Alarm ID, or
browse for an existing Alarm ID.
Resource ID
Enter the ID of the resource for the alarm to be
acknowledged.
You can click the Browser button - to the right of the
input field to browse for an Resource ID, or you can click
- to create a new Resource ID,
the Pop-up Menu button or browse for an existing Resource ID.
3-28
CIMPLICITY HMI Event Editor Operation Manual–July 2001
GFK-1282F
Point Alarm Disable Actions
A Point Alarm Disable action disables alarming for the point in the Point ID
field.
To create this Action, enter the following information in the New Action dialog
box:
Point ID
Enter the name of the Point ID for which alarming is to be
disabled.
You can click the Browser button - to the right of the
input field to browse for an Point ID, or you can click the
Pop-up Menu button - to create a new Point ID, or
browse for an existing Point ID.
GFK-1282F
Using the Event Editor
3-29
Point Alarm Enable Actions
A Point Alarm Enable action enables alarming for the point in the Point ID
field.
To create this Action, enter the following information in the New Action dialog
box:
Point ID
Enter the name of the Point ID for which alarming is to be
enabled.
You can click the Browser button - to the right of the
input field to browse for an Point ID, or you can click the
Pop-up Menu button - to create a new Point ID, or
browse for an existing Point ID.
3-30
CIMPLICITY HMI Event Editor Operation Manual–July 2001
GFK-1282F
Recipe Upload/Download
A Recipe Upload/Download action uploads or downloads the recipe defined by
the Parameter File.
To create this Action, enter the following information in the New Action dialog
box:
Parameter File
Select an Automatic Action file that you created in
Recipes in this field.
You can click the Browser button - to the right of
the input field to browse for an Automatic Action, or
you can click the Pop-up Menu button - to open a
Recipe Configuration window and create a new
Automatic Action file, or browse for an existing
Automatic Action file.
GFK-1282F
Using the Event Editor
3-31
Run Script Actions
A Run Script action runs the Basic Control Engine script defined in the Script
Name field. The script is run in parallel with all actions that are being executed
for the event. In other words, the Basic Control Engine does not wait for the
script to complete before it initiates the next Action defined for the Event.
To create this Action, enter the following information in the New Action dialog
box:
Script Name
Enter the name of the script to be executed in this field.
You can click the Browser button - to the right of the
input field to browse for a script, or you can click the Popup Menu button an existing script.
- to create a new script, or browse for
Note
The Basic Control Engine loads and compiles your scripts when your project
starts up. If you modify a script and save it to disk while your project is running,
the Basic Control Engine will not load the modified script until you perform an
Update from the Tools menu, or until the project is stopped and restarted.
3-32
CIMPLICITY HMI Event Editor Operation Manual–July 2001
GFK-1282F
Set Point Actions
A Set Point action sets the value of a point.
To create this Action, enter the following information in the New Action dialog
box:
Point ID
Enter the ID of the point you want to perform the setpoint on
in this field.
You can click the Browser button - to the right of the
input field to browse for an Point ID, or you can click the
Pop-up Menu button - to create a new Point ID, or
browse for an existing Point ID.
Value
GFK-1282F
Enter the value you want to set the point to in this field.
Using the Event Editor
3-33
Source Transition Set Actions
A Source Transition Set action sets the value of the point in the Point ID field to
the value of the point in the Source field.
To create this Action, enter the following information in the New Action dialog
box:
Point ID
Enter the name of the Point ID that will be updated with the
value of the Point ID in the Source field. You may enter the
name of a device or global Point ID.
You can click the Browser button - to the right of the
input field to browse for an Point ID, or you can click the
Pop-up Menu button - to create a new Point ID, or
browse for an existing Point ID.
Source
Enter the name of the Point ID the will provide the update
value.
You can click the Browser button - to the right of the
input field to browse for an Point ID, or you can click the
Pop-up Menu button - to create a new Point ID, or
browse for an existing Point ID.
Note
If the Source Point is the same as the point that triggered the event, the old
value of the Source Point will be copied to the Point ID. This lets you save a
point value before it is updated. If you want to copy the new value of the point,
use the Transition Set action.
3-34
CIMPLICITY HMI Event Editor Operation Manual–July 2001
GFK-1282F
Transition Set Actions
A Transition Set action sets the value of the point in the Point ID to the value of
the point in the Point ID field of the Event associated with this Action.
To create this Action, enter the following information in the New Action dialog
box
Point ID
Enter the name of the Point ID that will be updated with the
value of the Event's Point ID. You may enter the name of a
device or global Point ID.
You can click the Browser button - to the right of the
input field to browse for an Point ID, or you can click the
Pop-up Menu button - to create a new Point ID, or
browse for an existing Point ID.
GFK-1282F
Using the Event Editor
3-35
Call Envelope Function Actions
A Call Envelope Function action calls a specified procedure that was created
using the Event Manager Envelope Process (EM_EP).
Note
This action is provided for users transitioning from the Event Manager API
provided with Version 1.0 of the CIMPLICITY MMI and MES/SCADA
Software. Starting with Version 2.0, you should use the Program Editor and the
Basic Control Engine language to develop procedures, then use the Run Script
action to invoke them.
To create this Action, enter the following information in the New Action dialog
box:
Proc Name
3-36
Enter the name of the routine to be executed in this field.
CIMPLICITY HMI Event Editor Operation Manual–July 2001
GFK-1282F
Copying an Event
Use the Copy function if you need to create several similar Events.
To copy an Event:
1.
Make sure you are displaying By Event.
2.
Select the Event from the Event list.
3.
Select Copy Event from the Edit menu, or click the Copy button
on the toolbar, or press Ctrl+C. The Event Copy dialog box
opens.
4.
Enter the name of the new Event in the To field.
5.
If you want to copy the Actions associated with the source Event to
the new Event, set the Add the associated actions check box.
6.
Select OK. The dialog box closes and the new Event appears on
the Event list.
Copying an Action
Use the Copy function if you need to create several similar Actions.
To copy an Action:
GFK-1282F
1.
Make sure you are displaying By Action.
2.
Select the Action from the Action list.
3.
Select Copy Action from the Edit menu, or click the Copy
button on the toolbar, or press Ctrl+C. The Action Copy dialog
box opens.
4.
Enter the name of the new Action in the To field.
5.
If you want to copy the Events associated with the source Action to
the new Action, set the Add the associated actions check box.
6.
Select OK. The dialog box closes and the new Action appears on
the Action list.
Using the Event Editor
3-37
Configuring Event Display Attributes
To change the number of Event attributes and their display order on the
CIMPLICITY Event Editor window, you can do one of the following after you
click the mouse once in the Event list:
•
Select Event Attributes... from the View menu.
•
Click the Attributes button on the toolbar.
•
Press Ctrl+A.
The Configure Display Attributes dialog box for the Event list opens.
There are two list boxes in this dialog box.
•
The Available Attributes box lists the Event attributes that are
not currently being displayed.
•
The Display Attributes box lists the Event attributes that are
currently being displayed and the order in which they are
displayed.
You can:
•
Add attributes from the Available Attributes list to the Display
Attributes list.
•
Remove attributes from the Display Attributes list to the
Available Attributes list.
•
Reorder the Display Attributes list.
When you are through modifying the display attributes, select OK to close the
dialog box and save your changes, or select Cancel to close the dialog box
without implementing any changes. If you modified the attribute display, the
CIMPLICITY Event Editor window automatically reflects your changes.
3-38
CIMPLICITY HMI Event Editor Operation Manual–July 2001
GFK-1282F
Configuring Action Display Attributes
To change the number of Action attributes and their display order on the
CIMPLICITY Event Editor window, you can do one of the following after you
click the mouse once in the Action list:
•
Select Action Attributes... from the View menu.
•
Click the Attributes button on the toolbar.
•
Press Ctrl+A.
The Configure Display Attributes dialog box for the Action list opens.
There are two list boxes in this dialog box.
•
The Available Attributes box lists the Action attributes that are
not currently being displayed.
•
The Display Attributes box lists the Action attributes that are
currently being displayed and the order in which they are
displayed.
You can:
•
Add attributes from the Available Attributes list to the Display
Attributes list.
•
Remove attributes from the Display Attributes list to the
Available Attributes list.
•
Reorder the Display Attributes list.
When you are through modifying the display attributes, select OK to close the
dialog box and save your changes, or select Cancel to close the dialog box
without implementing any changes. If you modified the attribute display, the
CIMPLICITY Event Editor window automatically reflects your changes.
GFK-1282F
Using the Event Editor
3-39
Using the BCEUI (Event Viewer)
About the BCEUI
Use the Basic Control Engine User Interface (BCEUI) to connect to
CIMPLICITY HMI projects in your enterprise and monitor events. With this
user interface, you can:
•
View the status of actions executed by selected events in various
projects.
•
Pause, resume, and stop scripts executed by events.
•
Manually trigger events.
•
Configure a view of projects and events and save the configuration
in a file for recall.
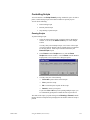
Getting Started
To start the BCEUI, select the BCEUI icon in your CIMPLICITY HMI program
group.
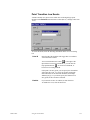
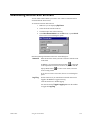
The BCEUI window opens.
GFK-1282F
4-1
The BCEUI window displays the status of actions triggered by events that are
currently being monitored by BCEUI. You can use the Paused option to
display this list in dynamic or paused mode.
•
In dynamic mode, the list is automatically refreshed as events occur
or change status.
•
In paused mode, the list remains fixed until you update it. To
update the list, you can select Refresh from the View menu, or
press F5.
Using the BCEUI, you can:
•
Select events for monitoring.
•
Observe the current status of the actions triggered by events you
are monitoring.
•
Stop, pause or resume scripts being executed by events.
•
Trigger events.
•
Save and restore event-viewing configurations.
Note the following about the display:
•
Actions for all running projects that BCEUI is connected to are
displayed in black.
•
If BCEUI is connected to a CIMPLICITY HMI project and
monitoring events, and the project stops:
•
4-2
•
All events for the project are grayed out in the Properties
dialog box.
•
Triggering is disabled for events in the stopped project.
•
A $Disconnected event displays in the main window with a
message telling you which project is stopped. This event runs
and tries to reconnect to the project until either the project
starts or you close your BCEUI session.
•
All unfinished actions in the main window are grayed out to
indicate that their current status is unknown.
When a CIMPLICITY HMI project that BCEUI is attempting to
connect to restarts, grayed actions are redisplayed in black and
refreshed to their current status.
CIMPLICITY HMI Event Editor Operation Manual–July 2001
GFK-1282F
BCEUI Menus
You can use the menu options to save and restore event monitoring
configurations, add or list events, pause, stop or resume scripts, trigger events,
pause and resume dynamic updates, refresh the display and access Help.
The menus are:
•
File menu
•
Events menu
•
Scripts menu
•
View menu
•
Help menu
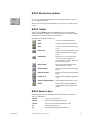
The File Menu
The File menu functions are:
New
Creates a new BCEUI document.
Open
Opens an existing BCEUI document in your currently active
BCEUI window.
Save
Saves the current BCEUI document to a file.
Save As…
Saves the current BCEUI document to a file. Use this
option if you want to specify the pathname of the saved file.
Recent File
Displays a list of recently opened BCEUI document files for
easy retrieval.
Exit
Exits the CIMPLICITY BCEUI viewer.
The Events Menu
The Events menu functions are:
List
Opens the Properties dialog box, from which you can add,
delete or trigger events.
Add
Opens the Select an Event browser, from which you can
connect to a project and select events to add to the list of
monitored events.
The Scripts Menu
The Scripts menu functions are:
GFK-1282F
Pause
Pauses any currently selected running scripts.
Resume
Resumes any currently selected paused scripts.
Stop
Stops any currently selected scripts that are paused or
running.
Using the BCEUI (Event Viewer)
4-3
The View Menu
The View menu functions are:
Toolbar
Enables/disables display of the Toolbar.
Status Bar
Enables/disables display of the Status Bar.
Paused
Toggles between dynamic and paused view.
Refresh
Updates the paused view.
Clear Finished Actions
Clears finished actions from the event list.
The Help Menu
The Help menu functions are:
4-4
Help Topics
Displays the main Help windows for the BCEUI.
About BCEUI
Displays the program identification, version number and
copyright for the BCEUI.
CIMPLICITY HMI Event Editor Operation Manual–July 2001
GFK-1282F
BCEUI Window Pop-up Menu
To access the Window Pop-up Menu, select a running or paused script, then
press the right mouse button.
The list of options depends on whether the script you select is running, paused,
or done.
BCEUI Toolbar
You can use the Toolbar option on the View menu to turn on and off the
display of the BCEUI Toolbar. You can fix the Toolbar in the BCEUI window
or display it in a separate window at your discretion.
The buttons on the BCEUI Toolbar are:
New
Creates a new BCEUI document.
Open
Opens an existing BCEUI document.
Save
Saves the current BCEUI document to
a file.
Opens the Properties dialog box, from
which you can add, delete or trigger
events.
Opens the Select an Event browser,
from which you can connect to a
project and select events to add to the
list of monitored events.
Stops any currently selected scripts
that are paused or running.
Pauses any currently selected running
scripts.
Resumes any currently selected paused
scripts.
Toggles between dynamic and paused
view.
Clears finished actions from the view.
Event List
Add Events
Stop Scripts
Pause Scripts
Resume Scripts
Pause View
Clear Finished Actions
About
Displays the program identification,
version number and copyright for the
BCEUI.
BCEUI Shortcut Keys
The following are the more commonly used keystrokes that are available for
your use in the BCEUI:
Creates a new BCEUI view.
Ctrl+N
Opens an existing BCEUI document.
Ctrl+O
Saves the current BCEUI document to a file.
Ctrl+S
Updates the paused view.
F5
Opens the Help window for the BCEUI.
F1
GFK-1282F
Using the BCEUI (Event Viewer)
4-5
Using the BCEUI Viewer
To create a BCEUI view, you need to:
•
Use the Select an Event browser to connect to a project and select
events to add to the BCEUI event list.
•
Use the Properties dialog box to list monitored events, add or
remove events from the view, and trigger events manually.
After you create a BCEUI view, you can select script actions and pause, resume,
or stop the scripts.
Once you create a BCEUI view, you can save it. You can recall saved views at
any time.
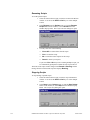
Selecting Events
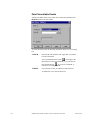
When you select Add from the Events menu or click the Add Events button
on the Toolbar, the Select an Event browser opens.
From the Select an Event browser, you can:
4-6
•
Enable/disable Auto Browse.
•
Change the display attributes.
•
Connect to a project.
•
Select events from the project for monitoring.
CIMPLICITY HMI Event Editor Operation Manual–July 2001
GFK-1282F
After you select events and select OK, the Properties dialog box automatically
opens so that you can add the selected events to your view. If you select
Cancel, the Select an Event browser closes and the main BCEUI window is
redisplayed.
Toggling the Auto Browse
By default, the Auto Browse option is disabled. If you enable the Auto Browse
option, whenever you open the Select a Event dialog box, the events for the first
project in the Project list are automatically displayed in the list window.
If Auto Browse is enabled, a check mark is displayed to its left in the View
menu.
To toggle the Auto Browse:
1.
Select the View menu.
2.
Select the Auto Browse option.
Connecting to a Project
To connect to a project and view the list of its events:
1.
Click the drop-down list button to the right of the Project field to
see the list of currently available projects.
2.
Select a project from the list.
3.
Select Browse to see the list of events available for the project.
Selecting Events
To select events from the list to add to the BCEUI event list:
GFK-1282F
1.
Highlight the events you want to select. You may use the Shift
and Ctrl keys when selecting multiple events.
2.
Select OK to transfer your selection to the BCEUI event list and
close the Select an Event browser.
Using the BCEUI (Event Viewer)
4-7
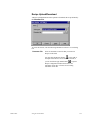
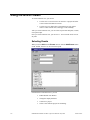
Using the Event List
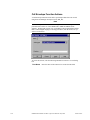
When you select List from the Events menu or click the Event List button on
the Toolbar, or when you select OK on the Select an Event browser after
selecting events, the Properties dialog box opens.
Use this dialog box to:
•
Set the maximum number of completed actions to be displayed by
the view.
•
Add events to the monitored list.
•
Delete events from the monitored list.
•
Trigger events.
Note the following:
4-8
•
Triggering is enabled only for events in connected projects that are
running.
•
All events for projects that are running and BCEUI is connected to
are displayed in black.
•
Events in the list that belong to projects that are not currently
running or that become disconnected are grayed out.
•
When you add events for a new project, they are grayed out in the
Properties dialog box because BCEUI has not connected to the
project yet.
•
The first time you select an event for a newly selected project, then
select Apply, BCEUI connects to the project. When the
connection completes successfully, all the events for the project are
displayed in black.
CIMPLICITY HMI Event Editor Operation Manual–July 2001
GFK-1282F
•
You can select events for projects that are not currently running or
that are disconnected. When the project starts, BCEUI will
automatically connect with the project and start monitoring the
events.
Setting the Maximum Number of Completed Actions
The default maximum number of completed actions that the BCEUI window can
display is 100. You can choose less or more than this number. Once the list
reaches its maximum, the oldest completed action is removed when the newest
one is added.
To set the maximum number of completed actions to be displayed by the view:
1.
Enter the number in the Max. complete items field.
2.
Select OK or Apply.
The BCEUI window redisplays and adjusts the number in the list of completed
actions to match the new maximum.
Adding Events to the View
Do the following to add events to the view:
1.
Select the events you want to monitor from the list of events in the
Select an Event browser. You can use the Shift and Ctrl keys to
select multiple events.
2.
Select Apply to add the events to the view and keep the Properties
dialog box open, or select OK to add the events to the view and
close the Properties dialog box.
The events you select are monitored and their associated actions are displayed in
the BCEUI window as they occur.
Adding More Events to the View
If the events you want are not in the view, select Add… to open the Select an
Event browser and select the events you want to add to the view.
Removing Events from the View
To remove events from the view:
1.
Select the events in the list that you want to remove. You can use
the Shift and Ctrl keys to select multiple events. You can also use
Select All to select all events in the list.
2.
Select Delete.
The events you select are removed from the BCEUI window and the Properties
dialog box.
They will not appear again in Properties dialog box until you add them in the
Select a Event browser, and they will not be monitored again in the BCEUI
window until you select them for viewing in the Properties dialog box.
GFK-1282F
Using the BCEUI (Event Viewer)
4-9
Triggering Events
Your role must have the Trigger Event privilege enabled for you to be able to
trigger events for a particular project.
To manually trigger events:
1.
Select the events in the list that you want to trigger. You can use
the Shift and Ctrl keys to select multiple events. You can also use
Select All to select all events in the list.
2.
Select Trigger. The Confirm Trigger Action dialog box opens and
displays the first event to trigger.
3.
You may select one of the following
•
Yes to All to trigger all the selected events.
•
Yes to trigger this event.
•
No to cancel the trigger for this event.
•
Cancel to cancel your request.
If you select Yes or No and you are triggering multiple events, you
are automatically prompted to confirm the next trigger action.
The statuses of the events you trigger are displayed in the BCEUI window.
4-10
CIMPLICITY HMI Event Editor Operation Manual–July 2001
GFK-1282F
Controlling Scripts
Your role must have the Script Control privilege enabled for you to be able to
pause, resume and stop scripts in the BCEUI window in specific projects.
You can do the following:
•
Pause running scripts
•
Resume paused scripts
•
Stop running or paused scripts
Pausing Scripts
To pause running scripts:
1.
Select the actions whose scripts you want to pause in the BCEUI
window. You can use the Shift and Ctrl keys to select multiple
actions.
You may safely select multiple scripts, even if some of the scripts
you select cannot be paused (such as stopped scripts or scripts that
are already paused). Such scripts will not be affected by the
Pause Scripts request.
2.
Select Pause from the Scripts menu, or click the Pause
Scripts button on the Toolbar, or select Pause from the Window
Pop-up menu. The Confirm Pause dialog box opens.
3.
You may select one of the following
•
Yes to All to pause all the selected scripts.
•
Yes to pause this script.
•
No to cancel the pause request for this script.
•
Cancel to cancel your request.
If you select Yes or No and you are pausing multiple scripts, you
are automatically prompted to confirm the next script in the list.
The status of the scripts you pause changes from Running to Paused, and the
message field for each paused script displays the line number where the script is
paused.
GFK-1282F
Using the BCEUI (Event Viewer)
4-11
Resuming Scripts
To resume paused scripts:
1.
Select the actions whose scripts you want to resume in the BCEUI
window. You can use the Shift and Ctrl keys to select multiple
actions.
2.
Select Resume from the Scripts menu, or click the Resume
Scripts button on the Toolbar, or select Resume from the
Window Pop-up menu. The Confirm Resume dialog box opens.
3.
You may select one of the following
•
Yes to All to resume all the selected scripts.
•
Yes to resume this script.
•
No to cancel the resume request for this script.
•
Cancel to cancel your request.
If you select Yes or No and you are resuming multiple scripts, you
are automatically prompted to confirm the next script in the list.
The status of the scripts resume changes from Paused to Running, and the
message field for each resumed script also displays Running.
Stopping Scripts
To stop running or paused scripts:
4-12
1.
Select the actions whose scripts you want to stop in the BCEUI
window. You can use the Shift and Ctrl keys to select multiple
actions.
2.
Select Stop from the Scripts menu, or click the Stop Scripts
button on the Toolbar, or select Stop from the Window Pop-up
Menu. The Confirm Stop dialog box opens.
CIMPLICITY HMI Event Editor Operation Manual–July 2001
GFK-1282F
3.
You may select one of the following
•
Yes to All to stop all the selected scripts.
•
Yes to stop this script.
•
No to cancel the stop request for this script.
•
Cancel to cancel your request.
If you select Yes or No and you are stopping multiple scripts, you
are automatically prompted to confirm the next script in the list.
The status of the scripts for the events you select changes from Paused or
Running to Stopped and the message field for each stopped script displays
the line number where the script was stopped.
Once you stop a script, you cannot restart it with the Resume command.
GFK-1282F
Using the BCEUI (Event Viewer)
4-13
Appendix A - Creating the Event
Manager Log Table
Creating The EM_LOG Table
In order for you to log Events and Actions for the Event Manager, you must have
the Database Logger option licensed and enabled for your project. Once you
have done this:
GFK-1282F
1.
Select Database Logger in the Workbench left pane
2.
In the CIMPLICITY Logging Configuration window, from the File
menu, select New Table.
3.
In the New Table dialog box, enter "EM_LOG" in the Table
Identifier field, click the Application Table radio button, and
click OK.
4.
In the Table Properties dialog box, select the Maintenance Events
and Maintenance Actions you want for this file.
5.
Exit the Database Logger option
6.
To create the EM_LOG table, you must stop and restart your
CIMPLICITY project.
A-1
Appendix B - Performance
Optimization
About Performance Optimization
You can do the following to optimize the performance of the Event Manager:
•
Make entries in the Global Parameters file to change the maximum
number of scripts that can run simultaneously, or specify how long
an idle thread should remain active.
•
Make entries in the Basic Control Engine points file to cache
frequently used points.
Global Parameters
Use the following procedure to manually change information in the global
parameters file:
GFK-1282F
1.
Open your project's Workbench.
2.
Expand the Advanced folder in the Workbench left pane.
3.
Expand the Global Parameters folder.
4.
Select Project to change the Event Manager global parameters.
5.
Add, Change or delete the Event Manager global parameters. For
details on doing this, see the Global Parameter Configuration
section of the Using Global Parameters chapter in the CIMPLICITY
HMI User's Manual.
6.
Before you restart your project, select Configuration Update
from the Project menu or click the Configuration Update
button on the toolbar to update your run-time configuration.
B-1
Setting the Maximum Number of Threads
The maximum number of scripts that are able to run simultaneously is set to a
default of 25. To change this value, enter the following line in
glb_parms.idt:
CE_MAX_THREADS|1|<num>
where <num> is the maximum number of threads you want to run
simultaneously.
Setting the Thread Timeout
When a script terminates, its operating system thread remains active for a certain
period of time so that it can be used by the next script, which needs to be run.
This provides a faster response, since creating a thread is a relatively timeconsuming process. Conversely, having too many active threads that remain
idle uses up system resources.
The default timeout is 900 seconds (15 minutes). To change this value, enter the
following line in glb_parms.idt:
CE_THREAD_TIMOUT|1|<num>
where <num> is the number of seconds an operating system thread is to remain
active after the script terminates.
B-2
CIMPLICITY HMI Event Editor Operation Manual–July 2001
GFK-1282F
Basic Control Engine Point Cache File
Each time a script uses a point, it must retrieve the point's definition. You can
use the bce_points.cfg file to pre-load point definitions into the Basic
Control Engine for the Event Manager, providing a performance boost.
The bce_points.cfg file is an ASCII file that needs to be located in your
project's Data directory. To create the file:
1.
From your project's Tools menu, select the Command Prompt
option. An MS-DOS Command Prompt window opens.
2.
In the Command Prompt window, type cd %SITE_ROOT%\data
to set up your environment and pathname correctly.
3.
Type notepad bce_points.cfg to open a Notepad and create
or edit your file.
4.
Enter the Point IDs that you want to cache, one per line in the file.
5.
When you are through, exit the Notepad and save the file.
To have the caching take effect, stop and restart your project.
GFK-1282F
Appendix B - Performance Optimization
B-3
Appendix C - Developing User
Applications with EM_EP
Enabling the Event Manager Envelope Process
The Event Manager Envelope Process (EM_EP) is not normally enabled in a
project. To enable EM_EP in a project, do the following:
1.
From the Project menu, select Settings. The Project Properties
dialog box opens.
2.
In the Project Properties dialog box, clear the check box for the
Basic Control Engine.
3.
Select OK to close the dialog and have your change processed.
4.
From the Tools menu, select Command Prompt. The
Command Prompt window opens.
5.
In the Command Prompt window, set your directory to
CIMPLICITY\bsm_data.
6.
Type notepad IC646TEM100.RP. The Notepad window
opens.
7.
In the Notepad window, remove the asterisk at the start of the line
that begins with
"*ANY|EM_EP|BSM_ROOT:[exe]emep.exe".
8.
Exit the Notepad and save the updated file.
9.
Exit the Command Prompt window.
10. From the Project menu, select Settings. The Project Properties
dialog box opens.
11. In the Project Properties dialog box, set the check box for the Basic
Control Engine.
12. Select OK to close the dialog and have your change processed.
GFK-1282F
C-1
Both the EM_EP and EM_RP processes will start the next time you start the
project.
Note
To disable EM_EP, follow the steps above, except in step 7, insert an asterisk (*)
at the start of the line that begins with
"*ANY|EM_EP|BSM_ROOT:[exe]emep.exe".
Adding a Procedure to the Event Manager Envelope
Process
The envelope process can be configured to call any user-defined procedure that
is callable from a C language interface. To do this:
1.
Edit two include files.
2.
Add the routine to the source file.
3.
Rebuild the envelope process.
The files, found in %BSM_ROOT%\api\include\inc_path and/or
%BSM_ROOT%\api\em_api are described below.
Important
A new release of CIMPLICITY HMI software may overwrite files in
the above directories. Always preserve a copy of any modified files
in a non-CIMPLICITY software directory.
Setting the Environment
Do the following to set your environment variables correctly and move to
%BSM_ROOT%:
1.
Open the CIMPLICITY HMI Workbench for your project.
2.
Select Command Prompt... from the Tools menu. This opens
an MS-DOS Command Prompt window in your project with the
correct environment and definitions for %BSM_ROOT% and
%SITE_ROOT%.
3.
Type
cd /d %BSM_ROOT%
to set your disk and pathname to the root directory for
%BSM_ROOT%.
C-2
CIMPLICITY HMI Event Editor Operation Manual–July 2001
GFK-1282F
Files to Edit
To implement user-defined functions, you will have to enter information in the
following files:
emep_ext_app.h
emep_addr_ap.h
emep_usrfunc.c
emep_ext_app.h
This file declares an external reference for user-defined function. A symbolic
constant is also defined to represent the total number of user-defined functions.
For each user-defined function that is to be called, you must add a statement of
the following form to this file.
extern int <func_name> ();
where <func_name> represents the actual name given to a particular userdefined function. This statement is a valid C language statement.
The symbolic constant, EMEP_MAXFUNC, is defined in this include file, and
represents the total number of user procedures declared. Change the value of
this constant to be equal to the number of procedures declared in this file.
emep_addr_ap.h
This file initializes a list of user-defined functions and their respective memory
addresses. For each user-defined function, both the proc_or_srcpt
specified in the ACTION file and the actual function name are needed. These
names may be the same. Two lines of code are required for each entry, as
follows:
emep_applist[i].name = "<proc_or_srcpt>";
emep_applist[i++].func = &<func_name>;
In the first statement, <proc_or_srcpt> is the procedure name specified in
the ACTION file. The procedure name must be in upper-case characters and
enclosed in double quotes.
In the second statement, <func_name> is the actual name of the C language
procedure to be executed. This is the same name used in the external declaration
in emep_ext_app.h.
The number of entries made in this file must equal the value of the symbolic
constant EMEP_MAXFUNC defined in the emep_ext_app.h file.
GFK-1282F
Appendix C - Developing User Applications with EM_EP
C-3
emep_usrfunc.c
This source file contains your initialization routine and user-defined functions.
This file is in the directory, %BSM_ROOT%\api\em_api. To simplify the
handling of CIMPLICITY HMI software upgrades, use #include statements
for modifications.
The procedure emep_user_func_init () is the user's initialization
routine. You can add code in this routine to perform any user specific
initialization. This routine is executed once each time Event Manager is
restarted.
Put your user-defined functions in this source file. These functions are to be
written in the C programming language.
Each user-defined function has a fixed list of parameters. They are the event
types of the event that triggered the call and a structure, which contains data
relating to the event. The function declaration is:
int <func_name> (EM_EVENT_INFO_TYPE event_type,
EM_EVENT_INFO
event_info)
{
:
(insert code here)
:
}
where <func_name> is a function name defined in emep_addr_ap.h.
EM_EVENT_INFO Structure
The EM_EVENT_INFO structure is defined in the C language as a union of an
alarm data structure and a point data structure, as follows:
typedef union
{
EM_ALARM_STRUCT
EM_POINT_STRUCT
} EM_EVENT_INFO;
alarm_struct;
point_struct;
To access the fields in the structure, you must cast event_info against the
appropriate type, as specified in the event type. The two allowable values for the
event type are EM_POINT_EVENT and EM_ALARM_EVENT. The possible
structures to cast event_info against are as follows:
C-4
CIMPLICITY HMI Event Editor Operation Manual–July 2001
GFK-1282F
EM_ALARM_STRUCT Structure
For the Alarm structure:
typedef struct
{
AM_STATE_TYPE prev_state;
AM_STATE_TYPE requested_action;
AM_STATE_TYPE final_state;
COR_STAMP gentime;
COR_I4 generated_time;
COR_I4 clear_time;
COR_I4 alarm_sync;
char alarm_id[ALARM_ID_LEN+1];
char [FR_ID_LEN+1];
char ref_id[AM_REF_ID_LEN+1];
char class_id[CLASS_ID_LEN+1];
char alarm_msg[ALARM_MSG_LEN+1];
COR_I4 log_file;
char _fill; /* alignment data */
} EM_ALARM_STRUCT;
EM_POINT_STRUCT Structure
For the Event structure:
typedef struct
{
PTM_POINT_STATE state;
char
point_id[POINT_LEN + 1];
COR_STAMP
timestamp;
PTM_DATA_TYPE
type;
char
value[POINT_LIMIT_LEN + 1];
} EM_POINT_STRUCT;
Casting event_info against the wrong structure does not cause a runtime
error, but does access the data in a misleading and unusable form.
The procedure emep_user_func_term () is the user's termination routine.
You can add code in this routine to perform any user specific termination
actions. This routine is executed when Event Manager is terminated.
GFK-1282F
Appendix C - Developing User Applications with EM_EP
C-5
Rebuilding the Executable Files
Along with your custom application programs, the following two CIMPLICITY
HMI software files have to be compiled, using the C compiler, to include any
changes:
emep_user.c
emep_usrfunc.c
emep_user.c includes the two header files discussed above, and is not edited.
emep_usrfunc.c is the module to which you have added initialization code
and your user-defined functions.
Your application files must have the file type .c to be compiled.
The files must be linked following compilation. A group of command files are
provided to perform the compilation and link via the steps described below.
Note
These steps assume you have placed your user-written routine into
emep_userfunc.c as instructed earlier.
1.
A Microsoft Visual C makefile is provided to build the executable.
Type the following command to rebuild the program:
nmake
2.
Prepare to test the program by terminating the existing EMEP
process. If you use the standard site configuration, enter the
following command:
pm_driver <node_id> TERM EM_EP
3.
Exercise your program as follows (assuming you have used
standard site configuration):
set PRCNAM=EM_EP
emep
4.
Move your program, when you are satisfied with it, to the directory
where master copies of executables are stored:
copy emep.exe %BSM_ROOT%\exe
5.
Activate your new program as follows (or simply restart all your
CIMPLICITY HMI projects):
pm_driver <node_id> ACT EM_EP
C-6
CIMPLICITY HMI Event Editor Operation Manual–July 2001
GFK-1282F
Restrictions on User-Defined Functions
User-defined functions should be developed with the following constraints:
1.
A user-defined function should never attempt to read or write to a
terminal, unless the terminal is explicitly opened by the userdefined functions.
2.
On CIMPLICITY HMI, the process has no access to the screen.
3.
User-defined functions are invoked by the Event Manager Resident
Process (EM_RP) in response to some event and are executed in
the Event Manager Envelope Process (EM_EP). EM_RP invokes
the user-defined functions by sending messages to the EM_EP.
The first time a user-defined function is invoked, the EM_EP executes that
function as soon as it receives the message. Incoming messages are not read
while the EM_EP is executing a user-defined function; therefore, if several
functions are invoked in a short time span, they are executed sequentially.
Up to 10 messages will be buffered by the system while user-defined functions
are executing. If more than 10 user-defined functions are invoked in a very short
period, it is possible that messages sent to the EM_EP may be lost. If this
happens, an error will be placed in your project's Status log file. To check for
error messages, select Status Viewer in your CIMPLICITY HMI menu, then
select your project's log file.
GFK-1282F
Appendix C - Developing User Applications with EM_EP
C-7
Example EM_EP Function
The following subsections contain sample files constructed for two user-defined
functions. They include listings of:
•
The ASCII version of the ACTION file
•
A skeleton emep_usrfunc.c file
•
The emep_ext_app.h file for the application
•
The emep_addr_ap.h file for the application
action.idt
In this example, any event assigned to the action AC_ID_2 will cause
USER_ROUTINE_1 to be called, and any event assigned to the action AC_ID_7
will cause USER_ROUTINE_2 to be called.
|-*
* RECORD: ACTION EVENT MANAGER ACTIONS
*
*
0 service_id
Service to perform this action
*
1 action_id
Action Identifier
*
2 action_type
Action type
*
3 point_id
Point identifier
*
4 pt_val
Point value
*
5 proc_or_srcpt
Procedure or source point
*
NODE1_EM_RP|AC_ID_1|0|POINT_ID_1|1|
NODE1_EM_RP|AC_ID_2|1|POINT_ID_3|1|
NODE1_EM_RP|AC_ID_3|2| | |USER_ROUTINE_1
NODE1_EM_RP|AC_ID_5|0|POINT_ID_2|0|
NODE1_EM_RP|AC_ID_6|1|POINT_ID_3|0|
NODE1_EM_RP|AC_ID_7|2| | |USER_ROUTINE_2
NODE1_EM_RP|AC_ID_8|3| | |
NODE1_EM_RP|AC_ID_9|0|POINT_ID_2|1|
NODE1_EM_RP|AC_ID_10|0|POINT_ID_4|10|
NODE1_EM_RP|AC_ID_11|0|POINT_ID_5|10|
NODE1_EM_RP|AC_ID_12|0|POINT_ID_6|10|
NODE1_EM_RP|AC_ID_13|0|POINT_ID_7|10|
User Functions - File emep_usrfunc.c
In this file, code for the user-defined functions user_func1, and
user_func2 is defined.
int user_func1(EM_EVENT_INFO_TYPE event_type,
EM_EVENT_INFO
event_info)
{
}
int user_func2(EM_EVENT_INFO_TYPE event_type,
EM_EVENT_INFO
event_info)
{
}
C-8
CIMPLICITY HMI Event Editor Operation Manual–July 2001
GFK-1282F
External Declarations - File emep_ext_app.h
In this file, external declarations for the two user-defined functions are entered.
/* ------------------------------- */
/* Define Number of User Functions */
/* ------------------------------- */
#define EMEP_MAXFUNC 2
/* ------------------------------- */
/* Declare User Functions
*/
/* ------------------------------- */
extern int user_func1();
extern int user_func2();
Initialization - File emep_addr_ap.h
In this file, procedure names defined in the Action file are assigned to userdefined functions in emep_usrfunc.c.
/*---------------------------------------------*/
/* Specify function name and its location here */
/*---------------------------------------------*/
{
int i = 0;
/*---------------------------------------------*/
/* TEMPLATE
emep_applist[i].name = "<procedure name>";
emep_applist[i++].func = &<procedure name>;
*/
/*---------------------------------------------*/
/*---------------------------------------------*/
/* Start User Modification
*/
/*---------------------------------------------*/
emep_applist[i].name = "USER_ROUTINE_1";
emep_applist[i++].func = user_func1;
emep_applist[i].name = "USER_ROUTINE_2";
emep_applist[i++].func = user_func_2;
/*---------------------------------------------*/
/* End User Modification
*/
/*---------------------------------------------*/
}
GFK-1282F
Appendix C - Developing User Applications with EM_EP
C-9
Index
A
About
BCEUI 4-1
Action Display Attributes
Configuring 3-39
action.idt
Sample file for EM_EP C-8
Actions
Alarm Look-up 3-26
Associating Events With 3-23
Call Envelope Function 3-36
Copying 3-37
Creating 3-24
Log Only 3-27
Point Alarm Acknowledge 3-28
Point Alarm Disable 3-29
Point Alarm Enable 3-30
Recipe Upload/Download 3-31
Run Script 3-32
Set Point 3-33
Source Transition Set 3-34
Transition Set 3-35
Actions vs. Events 2-2
Adding a Procedure to the Event Manager Envelope
Process C-2
Adding events to the view
BCEUI 4-9
Adding more events to the list
BCEUI 4-9
Alarm Generated Events 3-12
Alarm Look-up Actions 3-26
Alarm Reset Events 3-13
Associating Actions with an Event 3-23
Auto Browse
Toggling for BCEUI 4-7
About 4-1
Adding events to the view 4-9
Adding more events to the list 4-9
Connecting to a project 4-7
Controlling scripts 4-11
Events menu 4-3
File menu 4-3
Getting started 4-1
Help menu 4-4
Menus 4-3
Pausing scripts 4-11
Removing events from the view 4-9
Running scripts 4-12
Scripts 4-3
Selecting events 4-6, 4-7
Setting maximum number of completed events 4-9
Shortcut keys 4-5
Stopping scripts 4-12
Toggling Auto Browse 4-7
Toolbar 4-5
Triggering events 4-10
Using the BCEUI Viewer 4-6
Using the event list 4-8
View menu 4-4
Window pop-up menu 4-5
C
Call Envelope Function Actions 3-36
CE_MAX_THREADS B-2
CE_THREAD_TIMOUT B-2
CIMPLICITY HMI Functionality
Event Editor 1-1
Configuration Action Display Attributes 3-39
Configured Actions 2-2
Configured Events 2-1
Configuring Event Display Attributes 3-38
Connecting to a project
BCEUI 4-7
Controlling scripts
BCEUI 4-11
Copying an Action 3-37
Copying an Event 3-37
Creating Actions 3-24
Creating an Event 3-9
Creating the EM_LOG Table A-1
D
Database Logger
Creating the EM_LOG Table A-1
Developing User Application With EM_EP C-1
B
BCEUI
GFK-1282F
Index-i
E
EM_ALARM_STRUCT Structure C-5
EM_EP
Adding a procedure to C-2
Example Function C-8
Files to edit C-3
Rebuilding the executable files C-6
Restrictions on user-defined functions C-7
Sample action.idt file C-8
Sample emep_addr_ap.h file C-9
Sample emep_ext_app.h file C-9
Sample emep_usrfunc.c file C-8
Setting the environment C-2
EM_EVENT_INFO Structure C-4
EM_LOG Table
Creating A-1
EM_POINT_STRUCT Structure C-5
emep_addr_ap.h C-3
Sample file C-9
emep_ext_app.h C-3
Sample file C-9
emep_usrfunc.c C-4
Sample file C-8
Event Display Attributes
Configuring 3-38
Event Editor
CIMPLICITY HMI Functionality 1-1
Getting Started 3-1
Introduction 1-1
Menus 3-2
Properties 3-7
Properties, Sample Configurations 3-8
Shortcut Keys 3-6
Toolbar 3-6
Using 3-1
Event Editor Menus
Edit Menu 3-3
File Menu 3-2, 3-3, 3-4
View Menu 3-4
Event Management
Definition 2-1
Event Management Concepts 2-1
Event Manager
Caching Points B-3
Global Parameters B-1
Global Parameters, CE_MAX_THREADS B-2
Global Parameters, CE_THREAD_TIMOUT B-2
Performance Optimization B-1
Shutdown Script 2-3
Startup Script 2-3
Event Manager Envelope Process See EM_EP
Events
Alarm Generated 3-12
Alarm Reset 3-13
Index-ii
Associating Actions With 3-23
Copying 3-37
Creating 3-9
Point Change 3-14
Point Equals 3-15
Point Transition High 3-16
Point Transition Low 3-17
Point Unavailable 3-18
Point Update 3-19
Timed 3-21
Timed, Example 3-21
Events menu
BCEUI 4-3
Example EM_EP Function C-8
F
File menu
BCEUI 4-3
Files to Edit
EM_EP C-3
G
Getting started
BCEUI 4-1
Getting Started
Event Editor 3-1
Global Parameters
Event Manager B-1
H
Help menu
BCEUI 4-4
I
Introduction
Event Editor 1-1
L
Log Only Actions 3-27
M
Maximum number of completed events
BCEUI 4-9
Menus
BCEUI 4-3
Event Editor 3-2
CIMPLICITY HMI Event Editor Operation Manual–July 2001
GFK-1282F
BCEUI 4-10
P
Pausing scripts
BCEUI 4-11
Point Alarm Acknowledge Actions 3-28
Point Alarm Disable Actions 3-29
Point Alarm Enable Actions 3-30
Point Caching
Event Manager B-3
Point Change Events 3-14
Point Equals Events 3-15
Point Transition High Events 3-16
Point Transition Low Events 3-17
Point Unavailable Events 3-18
Point Update Events 3-19
Properties
Event Editor 3-7
Event Editor, Sample Configurations for 3-8
U
Using the Event Editor 3-1
Using the event list
BCEUI 4-8
Using the Viewer
BCEUI 4-6
V
View menu
BCEUI 4-4
W
Window pop-up menu
BCEUI 4-5
R
Rebuilding EM_EP Executable Files C-6
Recipe Upload/Download 3-31
Removing events from the view
BCEUI 4-9
Restrictions on EM_EP User Defined Functions C-7
Run Script Actions 3-32
Running scripts
BCEUI 4-12
S
Scripts menu
BCEUI 4-3
Selecting events
BCEUI 4-6, 4-7
Set Point Actions 3-33
Setting the EM_EP Environment C-2
Shortcut keys
BCEUI 4-5
Shortcut Keys
Event Editor 3-6
Source Transition Set Actions 3-34
Stopping scripts
BCEUI 4-12
T
Timed Events 3-21
Example 3-21
Toolbar
BCEUI 4-5
Event Editor 3-6
Transition Set Actions 3-35
Triggering events
GFK-1282F
Index
Index-iii