1
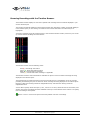
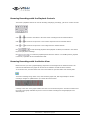
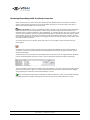
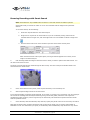
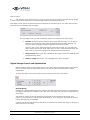
OnSSI NVR Viewer
User Manual
On-Net Surveillance Systems, Inc.
222 Route 59, Suite 303, Suffern, NY 10901
T: 845-369-6400 F: 845-369-8711
www.onssi.com
Table of Contents
USING THE VIEWER ...................................................................................................................... 3
THE VIEWER'S TOOLBAR .................................................................................................................. 4
SETTING UP THE VIEWER'S CAMERA LAYOUT .................................................................................... 5
Selecting Grid Size..................................................................................................................... 5
ASSIGNING CAMERAS ...................................................................................................................... 5
Bars ............................................................................................................................................ 6
STORING AND RECALLING VIEWS...................................................................................................... 6
BROWSING RECORDINGS WITH THE DATE & TIME SELECTOR ............................................................. 6
BROWSING RECORDINGS WITH THE TIMELINE BROWSER ................................................................... 7
BROWSING RECORDINGS WITH THE PLAYBACK CONTROLS ................................................................ 8
BROWSING RECORDINGS WITH THE MOTION VIEW ............................................................................ 8
BROWSING RECORDINGS WITH THE ALARM OVERVIEW ...................................................................... 9
BROWSING RECORDINGS WITH SMART SEARCH .............................................................................. 10
DIGITAL IMAGE CONTROL AND OPTIMIZATION .................................................................................. 11
De-interlacing ........................................................................................................................... 11
Zoom Controls.......................................................................................................................... 12
Smoothening and Scaling ........................................................................................................12
PRINTING, SENDING AND EXPORTING EVIDENCE ............................................................................. 12
HOW TO ........................................................................................................................................ 13
... EXPORT VIDEO AND AUDIO EVIDENCE ........................................................................................ 13
Export format: AVI file .............................................................................................................. 13
Export format: Database files (available when the Viewer is used in connection with selected
surveillance systems only) ....................................................................................................... 14
Export format: JPG/WAV files .................................................................................................. 14
HOW TO PRINT EVIDENCE .............................................................................................................. 14
HOW TO SEND EVIDENCE VIA EMAIL ............................................................................................... 15
... STORE AND RECALL VIEWS ........................................................................................................ 15
... VIEW ARCHIVED RECORDINGS.................................................................................................... 16
© 2002-2008 On-Net Surveillance Systems, Inc. All rights reserved.
NetDVMS, NetEVS, NetDVR, NetGuard, NetGuard-EVS, NetSwitcher, NetMatrix, NetCentral, NetTransact, NetPDA and NetCell
are trademarks of On-Net Surveillance Systems, Inc.
All other trademarks are property of their respective owners.
On-Net Surveillance Systems, Inc. reserves the right to change product specifications without prior notice.
On-Net Surveillance Systems, Inc. | 222 Route 59, Suite 303, Suffern, NY 10901 | Tel: 845-369-6400 | Fax: 845-369-8711
www.onssi.com | [email protected] | page ii
Using the Viewer
The Viewer is a standalone application which lets you browse and play back video recordings. The Viewer also lets
you print still images, send still images via e-mail, and export entire video and audio sequences in a variety of
formats.
The Viewer can be accessed in two ways:
•
If you work on the surveillance system server: You access the Viewer from Windows' Start menu:
Select Start > All Programs > NetDVMS > Viewer.
•
If you have received video evidence material from a surveillance system: This is typically the case
if you are a police officer, and internal or external investigator, or similar. When surveillance system
operators export video evidence, they are able to include the Viewer with the exported evidence. This is a
great advantage for the recipient of the exported evidence, since no installation is required in order to use
the Viewer for browsing exported evidence. If you receive the video evidence on—for example—a CD, the
Viewer will typically start automatically when you insert the CD on your computer.
The Viewer: In this example, the Viewer displays video
from a single camera; the Viewer can display video from
several cameras simultaneously. Note that content of
the Viewer's toolbar may vary depending on configuration.
On-Net Surveillance Systems, Inc. | 222 Route 59, Suite 303, Suffern, NY 10901 | Tel: 845-369-6400 | Fax: 845-369-8711
www.onssi.com | [email protected] | page 3
The Viewer's Toolbar
The Viewer's toolbar lets you quickly switch between the Viewer's different features. Icons in the toolbar
serve as shortcuts to the features available from the File and Tools menus in the Viewer's menu bar.
When you select a feature in the toolbar, settings for the feature typically become available in the Viewer's
control panel, located in the lower part of the window, below the camera layout.
Depending on your rights, not all of the following toolbar icons may be available to you.
Settings: Opens the Viewer's Settings control panel, in which you are able to specify
settings for the camera layout, and specify the time span for use in the Viewer's
timeline browser. See also Setting Up the Viewer's Camera Layout.
Single View: Switches to a single, enlarged view of video from the camera selected in
the camera layout. You may also simply double-click a camera in the camera layout to
switch between single view and multi view.
Multi View: Switches to multi-view, displaying all cameras in the selected camera
layout view. You may also simply double-click a camera in the camera layout to switch
between single view and multi view.
Database Information: Opens the Database Information control panel, in which you
select the cameras you want displayed in the camera layout. See also Setting Up the
Viewer's Camera Layout.
Motion View: Opens the Motion View control panel, in which you are able to view a
graph displaying video sequences with motion. The graph is draggable, allowing you to
browse the sequences.
Alarm Overview: Opens the Alarm Overview control panel, which you are able to view
a list of detected motion and events. By clicking motion detections or events in the list,
you are able to browse recordings from around the time at which the motion or events
occurred.
Image Controls: Opens the Image Controls control panel, in which you have access to
digital zoom and interlacing settings.
Export: Opens the Export control panel, with which you are able to export entire video
and—if applicable—audio sequences in different formats.
Print: Opens the Print control panel, from which you are able to print still images from
the camera selected in the camera layout.
Smart Search:Only available when the Viewer is used with certain surveillance
systems. Opens the Smart Search control panel, in which you are able to search for
motion in one or more selected areas of the view from a particular camera.
Send E-mail Report: Opens the Send E-mail Report control panel, from which you are
able to send evidence via e-mail.
NetTransact: Only available when the Viewer is used with certain surveillance
systems. Opens the NetTransact control panel, from which you are able to specify
settings for the NetTransact add-on product for handling loss prevention through video
evidence combined with time-linked POS or ATM transaction data. For more information
about using NetTransact in connection with the Viewer, see the separate NetTransact
documentation.
Help: Lets you view the built-in help system. Alternatively, press your keyboard's F1
button to open the help system.
On-Net Surveillance Systems, Inc. | 222 Route 59, Suite 303, Suffern, NY 10901 | Tel: 845-369-6400 | Fax: 845-369-8711
www.onssi.com | [email protected] | page 4
Setting Up the Viewer's Camera Layout
The camera layout is the area of the Viewer in which you view video. The camera layout section may
display video from up to 16 different cameras at a time.
You can configure the camera layout to suit your exact needs: First specify the camera layout's grid size
(i.e. how many camera positions you want the camera layout to contain), then specify which camera to
use in each camera position.
Selecting Grid Size
To specify how many camera positions you want in the camera layout, do the following:
1.
Click the Settings icon in the Viewer's toolbar.
This will open the Settings control panel.
2.
In the Settings control panel's Layout list, select the required camera layout grid: 1×1, 2×2, 3×3
or 4×4. With a 4×4 grid, you will be able to display video from 16 cameras simultaneously in the
camera layout.
3.
Assign cameras to the camera layout's camera positions, as described in the following.
Assigning Cameras
Having specified the required grid size for the camera layout, assign cameras to the camera layout's
camera positions the following way:
4.
Click the Database Information icon in the Viewer's toolbar.
This will open the Database Information control panel.
2.
Select a camera position in the camera layout by clicking the required position.
3.
In the Database Information control panel's Video Feed, select the camera you want to assign to
the selected position.
An image from the selected camera will show up in the selected position (unless the selected time
happens to be before the first recorded image from the camera).
Tip: The cameras may not all transfer video in a size that exactly matches the size of the
camera layout's positions. This may result in black bars around video from some cameras when
displayed in the camera layout. If you want to adjust the video from all cameras to fit the camera
layout's camera positions, select the Stretch Images To Fit check box in the Settings control
panel. This may distort some video slightly, but will help you avoid any black bars around video.
4.
If recordings contain audio, you may also select an audio source from the Audio Feed list, in
which case recordings from the selected audio source will be coupled with recordings from the
selected camera.
5.
Repeat for all cameras you want displayed in the camera layout.
On-Net Surveillance Systems, Inc. | 222 Route 59, Suite 303, Suffern, NY 10901 | Tel: 845-369-6400 | Fax: 845-369-8711
www.onssi.com | [email protected] | page 5
Bars
Each camera position in the camera layout is identified by a blue bar, located in the top of each camera
position.
Camera position; enlarged detail shows blue bar
When you select a particular camera in the camera layout, the bar of the selected camera becomes a
lighter blue.
The bar displays the name of the camera as well as the name of the device to which the camera is
connected. The device name is displayed first, in square brackets, followed by the camera name.
Each bar also features two colored indicators:
•
Motion indicator (the left indicator, red): Lights up during periods of motion.
•
Online indicator (the right indicator, green): Lights up during periods with recordings.
Storing and Recalling Views
You are able to save particular configurations of the camera layout as so-called views, and switch between
them using the Views menu in the Viewer's menu bar.
For example, you may store one view displaying video from 16 cameras and another view displaying video
from eight other cameras. See How to Store and Recall Views.
Browsing Recordings with the Date & Time Selector
Using the date & time selector, it is possible to jump straight to recordings from a specific point in time.
Simply select the required date in the date field, and the required time in the time field.
Tip: You are able to overwrite the fields' date and time values.
Tip: Having used the date & time selector to jump to recordings from a specific point in time, you are
able to use e.g. the timeline browser or the playback controls to browse through recordings from around
the specified point in time.
On-Net Surveillance Systems, Inc. | 222 Route 59, Suite 303, Suffern, NY 10901 | Tel: 845-369-6400 | Fax: 845-369-8711
www.onssi.com | [email protected] | page 6
Browsing Recordings with the Timeline Browser
The timeline browser displays an overview of periods with recordings from all cameras displayed in your
current camera layout.
The number of timelines displayed in the timeline browser thus reflects the number of cameras displayed
in the camera layout you are viewing. The timeline of the camera selected in the camera layout is
highlighted.
To browse recordings using the timeline browser, click inside the timeline browser, and move your mouse
up or down without releasing the mouse button.
Timeline browser
The timeline browser uses the following colors:
Red (z): Recordings with motion
Green (z): Recordings without motion
Black (z): Periods without recordings
Yellow (z): Periods with audio recordings—if applicable
The timeline browser's white horizontal line indicates the point in time from which recordings are being
displayed in the camera layout.
The area between the timeline browser's two blue horizontal lines is a magnification of the 30 seconds
preceding and following the point in time from which recordings are being displayed in the camera layout.
Browsing is fast when clicking outside the magnification area, and slow when clicking inside the
magnification area.
You are able to specify which time span (1 hour, 2 hours or 12 hours) should be used in the timeline, and
whether the newest recordings should be indicated at the top or at the bottom of the timeline. You specify
this in the Settings control panel.
Tip: Use 1-hour or 2-hour time spans for the best possible overview of recordings
On-Net Surveillance Systems, Inc. | 222 Route 59, Suite 303, Suffern, NY 10901 | Tel: 845-369-6400 | Fax: 845-369-8711
www.onssi.com | [email protected] | page 7
Browsing Recordings with the Playback Controls
The Viewer's playback controls are used for browsing and playing recordings, just like on a video recorder
Playback controls
Click
or
to browse to the oldest or the most recent recordings from the selected camera.
Click
or
to browse to the previous or next motion sequence from the selected camera.
Click
or
to browse to the previous or next image from the selected camera.
to start and stop playback. When playback is started, all cameras in the camera
Use
layout will play back recordings.
Use
to control the playback speed. When the slider is in its middle position, playback
is real-time, regardless of the recorded frame rates.
Browsing Recordings with the Motion View
Motion view lets you view a graph displaying sequences of recordings from the selected camera. The
motion levels indicated in the graph can be used as an indication of what has been recorded.
To use motion view, click the Motion View icon in the toolbar to open the Motion View control panel.
To browse recordings using motion view, click inside the graph area, and drag sideways to browse
recordings. Images are updated when you release the mouse button.
Motion view graph
A change in the color of the graph indicates the start of a new motion sequence. The black vertical line at
the center of the graph indicates the point in time from which recordings are being displayed in the
camera layout.
On-Net Surveillance Systems, Inc. | 222 Route 59, Suite 303, Suffern, NY 10901 | Tel: 845-369-6400 | Fax: 845-369-8711
www.onssi.com | [email protected] | page 8
Browsing Recordings with the Alarm Overview
Alarm overview lets you view a list of video sequences with detected motion or events for a selected
camera. Listed motion sequences or events are clickable, allowing you to quickly jump to the time at
which motion was detected or an event occurred.
What is an event? An event is a predefined incident occurring on the surveillance system. Depending
on the surveillance system's configuration, events may be caused by input from external sensors, by
detected motion, by data received from other applications, or manually through user input. Typically, most
events on the surveillance system are generated automatically, for example by input from sensors, rather
than manually. Events are used by the surveillance system for triggering actions. For example, received
input can be defined as an event which in turn triggers an action, such as recording on one or more of the
surveillance system's cameras.
To use the alarm overview, click the Alarm Overview icon in the toolbar to open the Alarm Overview
control panel.
By default, the list shows motion sequences from the most recent database for the selected camera. If
you want to view a list of sequences from archived databases as well, click the Alarm Overview control
panel's Get All button.
The Alarm Overview control panel can also display a list of occurred events. To toggle between displaying
a list of motion detections and a list of events, click the Sequences and Events buttons respectively.
Alarm Overview control panel
To view recordings from the time at which motion was detected, or an event occurred, select the required
sequence/event in the list. When you select a sequence/event in the list, the camera layout will display
video matching the exact time of the motion detection or event.
Tip: To view what took place prior to and after the motion detection or event, use the timeline browser
or playback controls to browse recordings from around the time of the motion detection or event.
On-Net Surveillance Systems, Inc. | 222 Route 59, Suite 303, Suffern, NY 10901 | Tel: 845-369-6400 | Fax: 845-369-8711
www.onssi.com | [email protected] | page 9
Browsing Recordings with Smart Search
Note: Smart Search is only available when the Viewer is used with certain surveillance systems.
Smart search lets you search for motion in one or more selected areas of images from a particular
camera.
To use smart search, do the following:
1.
Select the required camera in the camera layout.
2.
Single view is required to use smart search. If you are not already viewing video from the
selected camera in single view, click the Single View icon in the toolbar to switch to single view.
3.
Click the Smart Search icon in the toolbar to open the Smart Search control panel.
Smart Search control panel
When the Smart Search control panel opens, a blue grid will also appear as an overlay on the
image in the camera layout.
4.
Click and drag inside the image to select the areas in which you want to perform the smart search. You
can select more than one area.
The areas you select will become visible through the blue overlay. The blue overlay thus indicates areas to be
excluded from the smart search.
Example of selected area
5.
In the Smart Search control panel, select required sensitivity in the Sensitivity list.
6.
Select required image interval in the Interval list.
If you select All Images, all images will be analyzed. If you select e.g. Image every 10 seconds, only one image per
ten seconds of recordings will be analyzed. Selecting a long interval will greatly reduce the time required to
complete the search. However, with a long interval, the search may not find motion sequences that are shorter
than the specified interval.
7.
In the Boundary Start and Boundary Stop sections, specify the period of time to be covered by the search.
Note that the smart search is always carried out from the time of the image you are viewing and forwards or
backwards in time. The information you specify in the Boundary Start and Boundary Stop sections is only used to
On-Net Surveillance Systems, Inc. | 222 Route 59, Suite 303, Suffern, NY 10901 | Tel: 845-369-6400 | Fax: 845-369-8711
www.onssi.com | [email protected] | page 10
limit the search.
8.
Click the Next (move forward in time) or Previous (move back in time) buttons to search through images
in which motion has been detected in the selected areas within the specified period of time.
Each image in which motion has been detected will be displayed in the camera layout. The Smart Search control
panel will show corresponding time information.
Smart Search control panel, displaying search status information
For each image found, you have the following options in the Smart Search control panel:
•
Deselect: Even while viewing images in which motion has been found, you are able to
adjust the area covered by smart search by dragging inside the image. Normally, the
areas you select by dragging inside the image are included in the search.
However, when you are looking through the smart search results, you may want to be
able to quickly exclude some areas: When this is the case, select the Deselect check box.
Now, areas you select in the image will be excluded from the smart search.
•
Image Overlay: Select check box to display the blue image overlay grid indicating areas
excluded from the search.
•
Motion in Image: Select check box to highlight found motion in images.
Digital Image Control and Optimization
With the Viewer's Image Controls control panel, you are able to adjust the image selected in the camera
layout. The Image Controls control panel also lets you view areas of the selected image in greater
magnification.
To access the Image Controls control panel, click the Image Controls icon in the toolbar.
Image Controls control panel
De-interlacing
Interlacing is a method determining how an image is refreshed when shown on a screen. With interlacing,
the image is refreshed by first scanning every other line in the image, then scanning every opposite line,
and so forth.
This allows for a faster refresh rate because less information must be processed during each scan.
However, in some situations, interlacing may cause flickering, or the changes in only half of the image's
lines for each scan may be noticeable.
If images from the selected camera are interlaced, you are able to de-interlace the image by viewing only
odd or even lines in the image.
On-Net Surveillance Systems, Inc. | 222 Route 59, Suite 303, Suffern, NY 10901 | Tel: 845-369-6400 | Fax: 845-369-8711
www.onssi.com | [email protected] | page 11
Zoom Controls
With the zoom controls, you are able to view areas of the selected image in greater magnification.
Use the large zoom in and zoom out buttons to find the required zoom level. When you have zoomed in on
an area of an image, you are able to move around within the zoomed image by clicking the arrow buttons.
To quickly return to normal view of the selected image (i.e. without zoom), click the H (i.e. home) button.
Tip: To move around within the zoomed image, you may also simply click and drag inside the image.
Smoothening and Scaling
To digitally smoothen images from the camera, select the Smooth Images check box.
To display images from the selected camera in the resolution they were originally recorded in, select the
Scale 1 : 1 check box.
If images are larger than the resolution available in the camera layout's camera position, they will be
reduced in size to fit the camera position. The correct aspect ratio (i.e. height/width relationship) will be
maintained when reducing size this way.
Printing, Sending and Exporting Evidence
With the Viewer, you have several options for generating video and audio evidence. You are able to:
•
Print evidence
•
Send evidence via e-mail (only available if the Viewer is used on the surveillance system server;
not when the Viewer is used with exported video evidence)
•
Export entire video and audio sequences in different formats
On-Net Surveillance Systems, Inc. | 222 Route 59, Suite 303, Suffern, NY 10901 | Tel: 845-369-6400 | Fax: 845-369-8711
www.onssi.com | [email protected] | page 12
How To ...
... Export Video and Audio Evidence
You are able to export entire video and audio sequences in different formats:
•
AVI file (movie clip).
•
Database files (you can include the Viewer itself in the export, so others can easily view the database
files). This option is available when the Viewer is used in connection with selected surveillance systems
only.
•
JPG/WAV files (image/audio clip).
Tip: Even if you are using the Viewer for viewing exported video evidence, you are able to further export
sequences from the Viewer.
To export sequences from the Viewer, use the following procedure:
1.
Click the Export icon:
This will open the Export control panel.
2.
In the Export control panel’s Video Feed and Audio Feed lists, select the camera and—if required—audio
source you want to export.
Tip: With the options Current Video Feed(s) and Current Audio Feed(s) you can batch export all
cameras and microphones in your current camera layout.
3.
Browse to the required start time for the export, and click the Start Time section’s Set button.
4.
Browse to the required stop time of the export, and click the Stop Time section’s Set button.
5.
Select required Export Format, click the Next button, and follow one of the procedures described in the
following. Note that procedures vary depending on the selected export format.
Export format: AVI file
a. Select required Export Path (if you keep the default setting, the files will be exported to an
Exported Images folder on your desktop).
b.
Select required frame rate. Full will export all images to the AVI file; Half will reduce the size of the
AVI file by only exporting every second image, yet still play back in real-time speed.
c.
Select whether timestamps from the surveillance system should be added to the AVI file.
d.
In the Codec list, select the video codec (compression/decompression technology) you want to use
for generating the AVI file.
The Codec list only lists codecs supporting the resolution of the camera.
Tip: If available, the codecs Indeo Video 5.10 or Microsoft Video 1 are recommended.
On-Net Surveillance Systems, Inc. | 222 Route 59, Suite 303, Suffern, NY 10901 | Tel: 845-369-6400 | Fax: 845-369-8711
www.onssi.com | [email protected] | page 13
e.
Click the Next button to start the export.
Export format: Database files (available when the Viewer is used in connection with selected
surveillance systems only)
a.
Select required Export Path (if you keep the default setting, the database files will be exported to
an Exported Images folder on your desktop).
b.
Select whether the Viewer program files should be included in the export. If you include the Viewer
in the export, the exported databases can be viewed on any PC.
c.
Click Next. Fill in the Operator and Operator’s Note fields.
d.
Click Next, and select whether to encrypt and/or compress the exported databases. If you select
encryption, specify a password for decrypting the exported databases, and remember to send the
password to the recipient separately.
e.
Click the Next button to start the export.
Tip: If you included the Viewer application in your export, copying all exported files to the root
of a CD or DVD will start the CD/DVD automatically when the recipient inserts it.
Export format: JPG/WAV files
a.
Select required Export Path (if you keep the default setting, the files will be exported to an
Exported Images folder on your desktop).
b.
Select whether timestamps from the surveillance system should be added to the exported JPGs.
c.
Click Next to start the export.
How to Print Evidence
To print a still image as evidence from the Viewer, use the following procedure:
1.
Select the required camera in the camera layout (see Using the Viewer), and browse to the image you
want to print.
2.
Click the Print icon:
This will open the Print control panel:
3.
Fill in the Operator’s Note, Company, and Operator fields.
4.
Click the Print button to print the evidence on your default Windows printer.
The printed surveillance report will contain the selected image, information about camera name, image
capture time and report print time as well as the specified operator's name and operator's note.
On-Net Surveillance Systems, Inc. | 222 Route 59, Suite 303, Suffern, NY 10901 | Tel: 845-369-6400 | Fax: 845-369-8711
www.onssi.com | [email protected] | page 14
How to Send Evidence Via Email
Note: The e-mail feature is only available if the Viewer is used on the surveillance system server; not when the
Viewer is used with exported video evidence. Even when used on the surveillance system server, the e-mail feature
must be set up by the surveillance system administrator before you can use it. Ask if in doubt.
To send a still image as evidence from the Viewer via e-mail, use the following procedure:
1.
Select the required camera in the camera layout (see Using the Viewer), and browse to the image you
want to send via e-mail.
2.
Click the Send E-mail Report icon:
This will open the E-mail Report control panel:
3.
Type the e-mail address of the recipient. If sending to several recipients, separate e-mail addresses with a
semicolon (example: [email protected];[email protected]).
4.
Type a subject text for the e-mail.
5.
Verify that the Image field lists the camera you require.
6.
Type a message, typically a description of the recorded incident.
7.
Click the Send button.
... Store and Recall Views
You are able to save particular configurations of the Viewer's camera layout as so-called views, and switch between
them using the Views menu in the Viewer's menu bar. For example, you may store one view displaying video from
16 cameras and another view displaying video from eight other cameras.
•
Storing a View
To store your current camera layout as a view, do the following:
1.
In the Viewer's menu bar, select the Views menu.
2.
In the Views menu, select the Add to Views... command. This will open the Name of View
window:
On-Net Surveillance Systems, Inc. | 222 Route 59, Suite 303, Suffern, NY 10901 | Tel: 845-369-6400 | Fax: 845-369-8711
www.onssi.com | [email protected] | page 15
•
3.
In the Name of View window, specify a descriptive name for the view, and click OK.
4.
The view will now be selectable in the Views menu. If storing several different configurations of
the camera layout as views, you will thus be able to switch between them using the Views menu.
Recalling a View
To recall a stored view, simply select the required view in the Views menu.
•
Editing or Deleting a Stored View
To edit or delete stored views, select Organize Views... in the Views menu. This will open the Views control
panel, in which you are able to rename views, change the sequence in which stored views appear in the
menu, and delete views.
... View Archived Recordings
Note: Viewing of archived recordings is primarily of interest when the Viewer is used on the surveillance system
server. Even when the Viewer is used on the surveillance system server, certain archive viewing options are only
available when the Viewer is used with particular surveillance systems.
•
Viewing Recordings from Archives Stored Locally or on Network Drives
For archived recordings stored locally or on network drives, you simply use the Viewer's browsing
features—for example the timeline browser or the playback controls—for finding and viewing the required
recordings; just like you would with recordings stored in a camera's regular database.
•
Viewing Recordings from Exported Archives
For exported archives, e.g. archives stored on a CD, you click the browse button in the Viewer's Database
Information control panel to browse for the archive you want to view.
Arrow indicates the browse button in the
Viewer's Database Information control panel
Once you have specified the required archive this way, you can use all of the Viewer's browsing features
for navigating the recordings in the archive.
On-Net Surveillance Systems, Inc. | 222 Route 59, Suite 303, Suffern, NY 10901 | Tel: 845-369-6400 | Fax: 845-369-8711
www.onssi.com | [email protected] | page 16