1
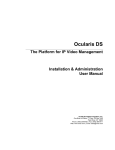
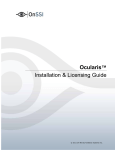
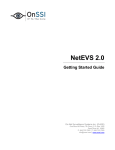
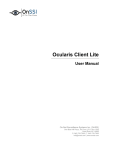
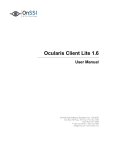
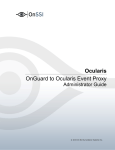
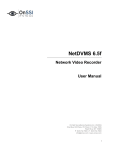
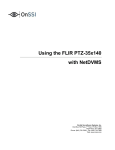
. NetGuard EVS Learning Guide On-Net Surveillance Systems Inc. (OnSSI) One Blue Hill Plaza, 7th Floor | P.O. Box 1555 Pearl River NY 10965 P: 845-732-7900 | F: 845-732-7999 [email protected] | www.onssi.com Revision: 0818/091340 Legal Notice This product manual is intended for general information purposes only, and due care has been taken in its preparation. Any risk arising from the use of this information rests with the recipient, and nothing herein should be construed as constituting any kind of warranty. OnSSI reserves the right to make adjustments without prior notification. (C) 2009 On-Net Surveillance Systems, Inc. OnSSI, the ’Eye’ logo, Ocularis, NetDVMS, NetEVS, NetDVR, ProSight, NetGuard, NetGuard-EVS, NetSwitcher, NetMatrix, NetTransact, NetCentral, NetPDA and NetCell are registered trademarks of OnSSI. Other names are the property of their respective owners. Table of Contents INTRODUCTION ................................................................................................................1 MODULE 1...................................................................................................................... 1-1 GETTING STARTED WITH IP VIDEO ............................................................................... 1-1 VIDEO SURVEILLANCE SYSTEM OVERVIEW................................................................... 1-2 OnSSI Product Suite ....................................................................................................... 1-3 MODULE 2...................................................................................................................... 2-1 DOWNLOADING NETGUARD-EVS ................................................................................ 2-1 DOWNLOADING A VIDEO CLIENT ................................................................................. 2-2 To Access the OnSSI Video Clients Download Page ...................................................... 2-2 To Download NetGuard EVS.......................................................................................... 2-3 MODULE 3...................................................................................................................... 3-1 ONSSI CLIENT SOFTWARE – NETGUARD EVS ............................................................ 3-1 NETGUARD EVS FEATURES ........................................................................................ 3-2 NETGUARD EVS REQUIREMENTS ................................................................................ 3-2 LOG IN TO NETGUARD EVS ........................................................................................ 3-3 THE ONSSI NETGUARD EVS INTERFACE .................................................................... 3-4 Components of the NetGuard EVS Interface .................................................................. 3-4 WHAT IS A VIEW?....................................................................................................... 3-5 Sample views: ................................................................................................................. 3-5 SETUP TAB ................................................................................................................. 3-6 View Window Display Options ..................................................................................... 3-10 Properties ..................................................................................................................... 3-13 LIVE TAB .................................................................................................................. 3-15 Using the Views You Just Created ................................................................................ 3-15 Live Tab Function Pane................................................................................................ 3-16 Using PTZ..................................................................................................................... 3-17 Patrolling...................................................................................................................... 3-19 BROWSE TAB ........................................................................................................... 3-22 Components of the NetGuard EVS Browse Tab............................................................ 3-22 Recorded Video Playback............................................................................................. 3-23 Print.............................................................................................................................. 3-29 EXPORT .................................................................................................................... 3-31 Setting the Export Times ............................................................................................... 3-31 Exporting Video to .AVI................................................................................................ 3-32 Export Video to JPEG .................................................................................................. 3-34 Export Video to Database............................................................................................. 3-34 Using the NVR Viewer .................................................................................................. 3-37 HELP ........................................................................................................................ 3-41 MODULE 4...................................................................................................................... 4-1 EVENTS ...................................................................................................................... 4-1 EVENTS ...................................................................................................................... 4-2 Types of Events ............................................................................................................... 4-3 Event Configuration........................................................................................................ 4-3 Generic Events................................................................................................................ 4-4 Input Events .................................................................................................................... 4-4 VMD Events.................................................................................................................... 4-4 Event Buttons .................................................................................................................. 4-5 i Output Event ................................................................................................................... 4-5 MODULE 5...................................................................................................................... 5-1 PUSHING VIDEO .......................................................................................................... 5-1 WHAT IS PUSHING VIDEO? .......................................................................................... 5-2 Configuring A Manual Push Window in NetDVMS........................................................ 5-2 Pushing Video to Another User of NetGuard EVS.......................................................... 5-4 Configure NetGuard EVS for Push Video....................................................................... 5-5 Configuring Event Driven Push Video ........................................................................... 5-6 ii Introduction This document is presented by On-Net Surveillance Systems Inc. (OnSSI) for the purpose of self training for general competency in navigation and use of our NVR client, NetGuard-EVS. Note: This guide assumes that the OnSSI NVR, NetDVMS 6.5x is in use. For more information on OnSSI training or support documentation, see our website at: www.onssi.com 1 Module 1 Getting Started with IP Video Objectives: Review the Video Surveillance Environment Review the OnSSI Product Suite Module 1: Getting Started with IP Video Video Surveillance System Overview OnSSI NVR software running on non-proprietary hardware NetDVMS, NetDVR, ProSight-SMB NetEVS NetGuard EVS Ocularis Client Lite Remote Client Users Figure 1 - Video Surveillance System Overview The video surveillance system environment can be simplified by focusing on three categories: 1-2 1. Input devices (Cameras and other devices) used to capture information 2. Processing devices (Hardware & Software) used to compile and manage captured data 3. Output devices (Monitors, Mobile devices, Video Walls, Internet Browser) to view captured data NetGuard EVS Learning Guide Module 1: Getting Started with IP Video OnSSI Product Suite Where does OnSSI fit in the Video Surveillance System? In order to meet the needs of the Video Surveillance System discussed in Figure 1, OnSSI provides the following solutions. 1. Input devices (Cameras) used to capture the information OnSSI supports hundreds of IP cameras and continues to add driver support for new cameras on a daily basis. Updated driver packs may be downloaded from the website www.onssi.com. 2. Processing devices (Hardware & Software) used to compile and manage captured data Hardware: OnSSI supports non-proprietary hardware to run its software and maintain recorded video. See www.onssi.com for the latest hardware requirements for our applications. Software: OnSSI provides several software applications to manage the hardware or Network Video Recorder (NVR): o NetEVS – Enterprise wide IP Video Surveillance Management System o NetDVMS – Large scale IP Video Surveillance Management System o NetDVR – NVR Software for Medium-Scale Surveillance Deployments o ProSight-SMB – IP Video Surveillance Platform for Small-Medium Businesses For more information and a product comparison on OnSSI NVR software, see the Product Comparison Chart Error! Reference source not found.on our website. 3. Output devices (Monitors, Mobile devices, Video Walls, Internet Browser) to view captured data In order for video output to be viewed on output devices, OnSSI provides several client application software options: Local, Remote & Web Access o Ocularis Client Lite - Ocularis Client Lite is OnSSI’s breakthrough video client for its entire line of Network Video Recorders. It provides the tools to efficiently and effectively monitor large camera arrays, access and investigate video of incidents and export evidence, all through an intuitive, touch screen-optimized (optional) user interface. o NetGuard EVS - The NetGuard-EVS video client is a robust video monitoring and investigation interface used in conjunction with OnSSI's NetDVMS, NetDVR or ProSight-SMB. o NetGuard - The NetGuard video client is the ideal tool for monitoring and investigating video over the Internet, or whenever the user can not or does not wish to install a video client software (for example, when the user does not have administrative rights to the PC). Portable Video o NetPDA and NetCell Portable Video Clients - NetPDA and NetCell provide the ability to monitor and control live cameras and even investigate incidents on the fly, all from a Windows CE/Mobile-enabled PDA or Smartphone. NetGuard EVS Learning Guide 1-3 Module 1: Getting Started with IP Video Control Room Video-Wall Management System o 1-4 NetSwitcher Virtual Video Matrix Switch - An advanced IP-based Control Room Video Wall Controller, NetSwitcher allows the operator to call any camera to any monitor on the controlroom video wall, and provides for automated event-driven pop-ups of specific camera views, as well as invaluable after-the-fact investigation tools. NetGuard EVS Learning Guide Module 2 Downloading NetGuard-EVS Objectives: Download NetGuard-EVS from an NVR Server Module 2: Downloading NetGuard EVS Downloading A Video Client This document assumes that an NVR, such as NetDVMS, has already been installed and configured on a server PC. For additional information on NetDVMS, refer to the NetDVMS User Manual The next step is to load a client application, such as NetGuard-EVS, onto each workstation in order to view video from that workstation. Note: By default, NetGuard EVS is downloaded on the server automatically when installing NetDVMS. This procedure applies to workstations which will view video from the server. To Access the OnSSI Video Clients Download Page 1. Open a browser (Microsoft Internet Explorer or Mozilla Firefox). 2. Type the NVR server address in the browser URL field using the following format: http://IPAddress:Port # Where: IP address is the server IP address The Port # is the communication port as defined in the NetDVMS Image Server Administrator. (If using port 80, the “:Port #” portion may be omitted) For example: http://192.168.7.236:8080 The resulting page is displayed: Figure 2 Video Client Download Page 2-2 NetGuard EVS Learning Guide Module 2: Downloading NetGuard EVS To Download NetGuard EVS 1. From the OnSSI Video Clients download page (as shown in Figure 2 on page 2-2) click the link: Download the NetGuard Clients 2. NetGuard clients download page appears. * Click the link for the language within the NetGuard EVS Installer section. English is shown in the example below. The following appears: Figure 3 NetGuard Client Download Page 3. Click Save and store the file on the local drive. 4. The file NetGuardEVS_en-US.exe is downloaded to the location of your choosing. (The file name for non-English versions will differ slightly). Run the downloaded executable from each workstation to install NetGuard EVS. * The items shown on the page may be configured by the administrator through the NVR Download Manager. Therefore, your screen may differ from the one shown here. NetGuard EVS Learning Guide 2-3 Module 3 OnSSI Client Software – NetGuard EVS Objectives: Review General Features Logging In Creating and Configuring Views Modifying Views Viewing Live Video Working with PTZ Cameras Viewing Recorded Video Exporting Recorded Video Module 3: NetGuard EVS NetGuard EVS Features NetGuard EVS is a client application used to: Access server data View and control live cameras Playback stored video images NetGuard EVS Requirements NetGuard EVS must be installed locally on a PC with Microsoft .NET framework 2.0 3-2 NetGuard EVS Learning Guide Module 3: NetGuard EVS Log In to NetGuard EVS Launch the NetGuard EVS application by one of the following methods: Use the Windows menu: StartAll ProgramsNetGuard EVSNetGuard EVS Use the desktop icon to launch NetGuard EVS. Figure 4 NetGuard EVS Login Screen NetGuard EVS works with the Administrator and Image Server Modules from the NetDVMS, NetDVR or ProSight SMB NVR products. Server Address The URL or IP address of the NVR server. Port numbers may be required as in the following example: http://123.123.123.123:82 where 82 is the port number. The prefix “http://” is required. You may use the text “localhost” as shown in the example above if connecting to the local PC. Authentication Select the Authentication as defined by the NVR system administrator during account setup. Options are: Basic Authentication, Windows Authentication (current user), Windows Authentication. User name Case sensitive; only used in Basic Authentication or Windows Authentication Password Password for the user account; only used in Basic Authentication and Windows Authentication. Remember password When clicked, allows NetGuard EVS to remember your password for subsequent logins. Auto-login When clicked, the system will automatically bypass the login screen for and go directly to the application for all future logins. Table 1 Login Settings NetGuard EVS Learning Guide 3-3 Module 3: NetGuard EVS The OnSSI NetGuard EVS Interface Figure 5 NetGuard EVS Interface Components of the NetGuard EVS Interface 1 2 3 4 NetGuard EVS Client Tabs These tabs are used to access the three main components of NetGuard EVS: Live – used to view live video Browse – used to playback recorded video Setup - used to configure views Hide/Show Pane Button View Drop-Down Menu Click this button to expand or collapse the Function Pane. Application Icons This drop-down provides access to an available view from any of the three Client tabs. It provides access to views if the Function Pane is collapsed. Log Out Icon: This icon will log the user out of NetGuard EVS. Show Application Menu Icon: This icon will display a shortcut menu. 5 Display View Area Once configured, this area will display video from the camera(s) 6 Function Pane This collapsible pane displays functions related to the active Client Tab. 7 Version The version of NetGuard EVS is displayed here. 3-4 NetGuard EVS Learning Guide Module 3: NetGuard EVS What Is A View? A view is the fundamental component when observing video. It is a collection of panes or windows that display video output. There are many layout options for the number of panes and their sizes. Users select the best configuration according to the size and quantity of monitors that will display the output. Sample views: 2 x 2 View 1 x 5 View 2 x 4 View Too Many!! NetGuard EVS Learning Guide 3-5 Module 3: NetGuard EVS Setup Tab The Setup tab is used to establish and configure views used in the Live and Browse tabs. Access to this tab is granted through User Access in the Image Server Administrator. System Overview The System Overview section of the Setup tab lists the output options available for display in a view. Prior to setting up any Views, ensure camera connectivity by expanding the Cameras folder within System Overview. Installed Camera List Figure 6 System Overview Installed Camera List on your NVR Installed Camera List on Slave NVR Figure 7 Installed Master / Slave Camera List 3-6 NetGuard EVS Learning Guide Module 3: NetGuard EVS Views The Views section of the Setup tab displays an expandable/collapsible list which represent a hierarchical organization of existing views. View Types These are the first level of view organization and represents a collection of Groups. Private vs. Shared Shared views are those which are available to all users on the system. A Private view is visible only for the user who created it. Users may have any combination of rights to create or view private and shared views. Groups – This is the second level of view organization. A Group is a collection of views. Groups are defined by the user and may contain one or more views. Group View Types Views Figure 8 Views Setup View Options The following View configuration options are available. The panes are represented by the number within the View window. The icon aids in visualizing the layout of the panes. NetGuard EVS Learning Guide 3-7 Module 3: NetGuard EVS Figure 9 View Options Create A New View and Add Camera Video Follow these steps to configure a new view. 1. In the Setup tab, highlight the Private or Shared folder based on the desired view access. 2. Create a new group within the selected view by clicking the Create New Group icon right-click and select New Group. 3. Enter a descriptive name for the group. Press [ENTER]. 4. Create a view for the group by clicking the Create New View icon and select New View. or or right-click the group The menu shown in Figure 9 appears. 5. Select the desired view size. 6. Populate the image boxes with output from devices listed within the System Overview section. 7. a. Expand the Camera folder in the System Overview section. b. Expand the Image Server folder. c. Drag and drop a camera from the list to the desired view box or pane. d. Repeat for all panes. Click the Live tab to view results. Note: To enlarge any view, double-click within the camera view window from the Live tab. To restore to the previous size, double-click again. 3-8 NetGuard EVS Learning Guide Module 3: NetGuard EVS Modifying Views Views may be renamed or deleted. The contents of view panes may also be changed. The view configuration, however, may not be changed. For instance, if you have a 2 x 2 view, you may not change it to a 2 x 8 view. You must create a new view with the new configuration and delete the old one if it is no longer necessary. To Rename a View: 1. From the Setup tab, right-click the view to rename and select Rename or select the view and click . the Rename icon 2. Modify the description of the view and press [ENTER] The view has been renamed. To Modify View Contents: The content displayed within a view pane may be changed from one camera to another. 1. From the Setup tab, click the checkbox modify. in the upper right corner of the pane you wish to The contents of that pane disappears from the View. Before After Figure 10 Modifying A Pane 2. Click and drag the desired output to the empty pane. To Delete a View: 1. From the Setup tab, right-click the view to delete and select Delete or select the view and click the Delete icon 2. . An “Are you sure you want to delete the view?” pop-up appears. Click Yes to delete the view. The view has been deleted. NetGuard EVS Learning Guide 3-9 Module 3: NetGuard EVS View Window Display Options Components other than direct video feed from a camera may be displayed within a view pane. These additional options, available in the System Overview section of the Setup tab, include: Carousel Hotspot Html Page Image NetMatrix Carousel A carousel within a view pane will alternate output from camera to camera listed within a single view pane. This feature is often used where there is one large pane surrounded by smaller panes. Note: Only video images from cameras may be included in a carousel. HTML pages or graphic images may not. To Add A Carousel to a View Pane: 1. In the Setup tab Views section, select the view in which to add the carousel. 2. Drag and drop the item pane. from the System Overview section to the desired view The following dialog box appears: Figure 11 Carousel Setup 3-10 3. Select the cameras to be used within the Carousel and click Add or click Add All to use all cameras and move the camera name(s) to the Selected Cameras list. 4. Reorder the cameras within the Selected Cameras list to the desired viewing order by using the Move Up and Move Down buttons. 5. The default time for image transition is 10 seconds from camera to camera (Default Carousel Time). If desired, modify the image transition for all cameras. NetGuard EVS Learning Guide Module 3: NetGuard EVS 6. If a specific camera needs to be displayed at a different time interval, select the camera within the Selected Cameras list. Change the time for the selected camera. 7. When done, click OK. 8. Switch to the Live tab to view the results. Hotspot A Hotspot is a view pane dedicated to displaying the image from another view pane when manually selected by the user. To be useful, a hotspot typically is placed in one of the larger view positions. NetGuard EVS supports only one Hotspot per view. Advantages of Using a Hotspot: The fact that you can view enlarged video in the hotspot is not in itself what makes the hotspot useful; you can enlarge video from any camera in a view by double-clicking the required camera position. What makes the hotspot useful is that you can use a low image quality and/or frame rate for cameras in the view's regular positions and a high image quality and/or frame rate for the hot spot. Then, only when users select a camera for viewing in the hotspot will it be displayed in high quality and/or high frame rate. This can significantly help you save bandwidth on the remote connection.. To Add A Hotspot to a View Pane: 1. In the Setup tab Views section, select the view in which to add the Hotspot. 2. Drag and drop the item pane. 3. Switch to the Live tab. 4. To populate the Hotspot, click in any view position that is displaying a video image. from the System Overview section to the desired view HTML Page An HTML page can also be added to a view pane. Typical examples of these include: Company websites Online map services Link collections E-learning pages HTML page for accessing a camera or DVR’s interface To Add An HTML Page to a View Pane: 1. In the Setup tab Views section, highlight the view in which to add the HTML page. 2. Drag and drop from the System Overview section to the desired view pane. The following appears: NetGuard EVS Learning Guide 3-11 Module 3: NetGuard EVS Figure 12 Open URL Dialog Box 3. Enter the URL and click OK. The webpage appears in the view pane. Image Adding a static image to a view pane may also be desired for a variety of reasons such as: Company logos, floor plans, maps, wanted photos, etc. To Add An Image to a View Pane: 1. In the Setup tab Views section, select the view in which to add the image. 2. Drag and drop the item 3. The standard Windows browse dialog appears. Search for and select the image file and click Open. 3-12 from the System Overview section to the desired view pane. The image appears in the view pane. NetGuard EVS Learning Guide Module 3: NetGuard EVS Properties The Properties section within the Setup tab is dynamic based upon the selected view pane. Properties for Video 1. In the Setup tab, click a pane displaying video. The Properties section for the camera image displays the following: Figure 13 Camera Properties Image Quality – Choices are: Full, Superhigh, High, Medium, Low This setting applies to live as well as recorded video. To save on bandwidth lower the image quality, the video from the selected camera is re-encoded to a JPEG format on the surveillance system server before being sent to the client (NetGuard EVS or Ocularis Client Lite). Image Quality set to Full, the default, provides full quality of the original video. Low re-encodes the image to an output width of 160 pixels and a JPEG quality level of 20%. NetGuard EVS Learning Guide 3-13 Module 3: NetGuard EVS Keep when maximized - When checked, if the image is maximized via double-click, the image quality will maintain the setting found in Image Quality. The default is to display the larger windows in full quality video. Frame rate – this is the frame rate for the camera while viewed in NetGuard EVS. Options are: Unlimited (default), Medium or Low. Save bandwidth by selecting Medium or Low. IPIX Split Mode – For IPIX cameras only (wide angle 360 degree panoramic images), you can select: One by One to view a single viewpoint Two by Two to view four different viewpoints at a time Maintain Image Aspect Ratio – When unchecked, the video will be stretched to fit the window pane and may appear slightly distorted. When unchecked, the original aspect ratio will be maintained but you may notice black vertical or horizontal bars around the video. Update on Motion – If checked, the video from this camera will only be updated on the Live tab when motion is detected. Otherwise the text “No motion” will display. This option can be used to reduce CPU usage. Sound on Motion Detection and Sound on Event – plays a sound (from a .wav file) when motion is detect or an event occurs while viewing video in the Live tab. Apply to All – Click this button to set all applicable settings for all cameras in the view. Other Properties You can modify parameters for non-video panes as well. Click the pane, for instance, displaying the webpage: Figure 14 Properties for a web page 3-14 NetGuard EVS Learning Guide Module 3: NetGuard EVS Live Tab Using the Views You Just Created Now that NetGuard EVS is populated with a selection of views, we will continue to explore the options when viewing live video. The benefit of IP-based digital surveillance software is that recording all video is not necessary. Video is typically recorded when there is motion within the camera field of view or when an event is triggered automatically or manually. Events are configured in the NVR software administration module. Targeted recording frees security personnel and operators from having to view endless amounts of video recording. This option is configured in the NVR administration application. Note: Live video is not necessarily recorded video. Image Bar The top portion of the image pane is called the Image Bar. The recording status of video output is located in the rightmost corner of the image bar. Figure 15 Viewing Live Video Image Bar indicators are defined as follows: Recording Status The recording status options are: REC – this indicates that the video is being recorded. Stopped – this indicates that the video stream has stopped. Live – this means that the displayed video is live but not being recorded. Recording Status Icons To the right of the recording status, are three square icons which indicate the following: NetGuard EVS Learning Guide 3-15 Module 3: NetGuard EVS 1. Event Indicator: The first square alternates between black and yellow. Yellow indicates that an event has occurred on that camera. Click anywhere inside the image to reset the Event Indicator. Events are configured in the NVR Administrator module. An example of an event is: a window was opened (contact disconnect), a camera was tampered with, an access card was swiped in an access, etc. 2. Motion Indicator: The second (center) square alternates between black and red. Red indicates that motion has taken place within that camera’s field of view. Click anywhere inside the image to reset the Motion Indicator. If it becomes red again, motion has occurred since you last turned it off. Note: The Red icon is used to ascertain if motion occurred on a camera particularly if the operator has left his station or otherwise was not watching the monitor. 3. Online Indicator: The third square alternates between black and green. Blinking green indicates a live video feed. Live Tab Function Pane The following sections are found in the Function Pane of the Live Tab. Views This section enables you to see available views and switch between them. Event This section allows you to manually trigger an event. This will be discussed in more depth later in the Event Buttons section. Output This section allows you to manually trigger an output event and will be discussed in more detail later. Audio For cameras with supporting audio, this section allows you to control microphones to listen to as well as the ability to speak to the devices speakers PTZ Control This section allows you to control PTZ cameras as well as zoom levels for all cameras. Views Available views are displayed in the expandable/collapsible view tree. Figure 16 Send Views to Displays 3-16 NetGuard EVS Learning Guide Module 3: NetGuard EVS A right-click menu is available for views and defined as follows: Primary Display Secondary Display Floating Window In the event there are multiple displays or monitors, the view will be maximized in what is considered the main or primary monitor. In the event there are multiple displays or monitors, the view will be maximized in what is considered the secondary or #2 monitor. The view will be opened in a separate window. Audio For supported cameras, you can select the microphone(s) to listen to in addition to the Live video stream. For cameras with speakers, you can connect to the camera’s speaker and talk into the speaker so that you may be heard by those in the camera’s general area. Using PTZ There are many ways in which to control PTZ Cameras when viewing live video: Point-and-Click in the pane to pan the image Scroll with the mouse wheel to zoom the image in and out Navigation buttons (located in the PTZ Control section) to pan and zoom Joystick to pan and zoom Presets Automated Patrolling PTZ Control For PTZ and non-PTZ Cameras there are two types of zoom options: Optical – this is where a camera’s lens physically moves to provide the required angle of view with no loss of quality. Obtain optical zoom on supported cameras by deselecting the Digital Zoom checkbox. Digital – this is where the image itself is enlarged by cropping the image and resizing it back to the pixel size of the original image (interpolation). Digital zoom simulates optical zoom but the digitally zoomed portion will have a lower quality than the original image. PTZ Presets PTZ Presets are camera positions which are saved and assigned a descriptive name. Presets are useful in positioning the camera to particular areas of interest such as a doorway, cash register, safe, reception desk, window, etc. Each PTZ camera has a default preset of “Home”. This “Home” position behaves like any user defined preset. PTZ Presets are configured within the NVR software. Once a preset is set on a camera from NetDVMS or other NVR application, it is available through any of OnSSI client applications (NetGuard, NetGuard EVS, Ocularis Client Lite). NetGuard EVS Learning Guide 3-17 Module 3: NetGuard EVS The camera’s angle and zoom level are saved within the preset. You can access the position in a singlestep from the Live tab. To Set PTZ Presets from NetDVMS Administrator 1. Open NetDVMS Administrator. 2. Click Service Manager button. 3. Click Pause. The Recording Server may not be running in order to PTZ Presets. 4. Select the PTZ Camera for which to configure PTZ Presets. Hint: 5. Click Settings. 6. the NVR Device Manager will display a PTZ camera with the icon: The Camera Settings for [Device_name] Camera Name appears. The PTZ Preset Positions button should be enabled. Click the PTZ Preset Positions button. The following appears: Navigation Zoom Slider Navigation Pan Slider Navigation Buttons Figure 17 PTZ Preset Position Configuration 7. 3-18 Use the navigation buttons, pan sliders or zoom slider bars to establish the first camera position. Don’t forget to consider the zoom level. NetGuard EVS Learning Guide Module 3: NetGuard EVS 8. Select an Undefined slot and click the Set Position button. 9. A prompt appears asking you to enter a descriptive name. Enter the descriptive name and click OK. The list of positions is updated with your new preset. 10. Repeat for all desired presets. 11. Click OK when done. 12. Click OK in the Camera Settings for [Device_name] Camera Name dialog box. 13. Click Service Manager and Resume. 14. Click Exit from NetDVMS Administrator. To Use PTZ Presets in NetGuard EVS 1. Open NetGuard EVS. 2. In the Live tab, click the camera pane with the presets. 3. Do either of the following: a. In the PTZ Control section of the Function Pane, choose the defined preset from the Presets drop-down menu. b. Right-click on the image in the pane and select: PTZ Presets… <Preset Name> Patrolling With PTZ cameras, you can have them automatically move from preset position to preset position. This called “Patrolling”. PTZ Patrolling is configured within the NVR software. Once patrolling is set on a camera from NetDVMS or other NVR application, it is available through any of OnSSI client applications (NetGuard, NetGuard EVS, Ocularis Client Lite). To use patrolling, you must have at least two presets configured. Multiple patrolling schemes are supported. This is useful in the case where you want to monitor one set of areas during business hours and another set after hours. Patrolling can be scheduled as a matter of standard routine or it can be set to trigger when a preconfigured event occurs. A PTZ camera can be configured to return to its “Home” preset position upon completion of a patrol. To Set A Patrol Scheme from NetDVMS 1. If not already done, set at least two preset positions for the camera. See To Set PTZ Presets on page 3-17. 2. Open NetDVMS Administrator. 3. Click the Service Manager button. 4. Click Pause. The Recording Server must not be running when configuring PTZ Presets. NetGuard EVS Learning Guide 3-19 Module 3: NetGuard EVS 5. Select the PTZ Camera for which to configure PTZ Patrolling. 6. Click Settings. 7. Click the PTZ Preset Positions button. 8. The Camera Settings for [Device_name] Camera Name appears. The PTZ Preset Positions button should be enabled. The dialog box in Figure 17 appears. Click the Setup button in the section labeled “Patrolling”. The Setup PTZ Patrolling window appears. Figure 18 Setup PTZ Patrolling 9. Establish a descriptive name for the Patrol scheme. a. To use the default name, “My patrol scheme”, you need not do anything. b. To change the name, click the Rename button and update the Patrol Scheme name. 10. Set the time in seconds for which the camera: a. Should stay at each position in the patrol scheme b. Is expected to move between positions 11. PTZ Scanning is supported by some cameras and displays smooth motion video when the camera is moving from preset to preset position. Click the PTZ Scanning checkbox to enable this feature. 12. Disabling the patrol schedule may be done if motion is detected to allow for recording and analysis by clicking the Disable patrolling schedule if motion is detected checkbox. 13. Preset positions need to be added to the Patrolling List. Use the move right the selected presets to the Patrolling list. Use the move up control the order of the patrolling in the Patrolling list. and move down button to move buttons to 14. To set an additional Patrol scheme, click the New button and repeat steps 9 – 13. 15. When finished, click OK in the Setup PTZ Patrolling window. 3-20 NetGuard EVS Learning Guide Module 3: NetGuard EVS 16. Click OK in the PTZ Preset Positions for <camera_name> window. 17. Click OK in the Camera Settings for [Device_name] Camera Name window. Patrolling must be now be scheduled 18. Click the Scheduler button from NetDVMS Administrator in order to enable patrolling. 19. Select the PTZ Camera with the patrol scheme from the Camera drop-down menu. 20. Verify the desired Patrol Scheme in the Patrol Scheme drop-down menu. 21. Click the Patrolling checkbox. 22. Highlight the days and times by which this patrol scheme should be enabled. 23. Repeat steps 19-22 for each patrol scheme. 24. Click Exit. 25. Click Service Manager. 26. Click Resume to resume the Recording Server. 27. Click Exit from NetDVMS Administrator. To View the PTZ Patrol in NetGuard EVS 1. Launch NetGuard EVS. 2. In the Live tab, you should see the configured camera output alternate between each preset. You can access a preset position directly by selecting it from the Preset drop-down within the PTZ Control section of the Function Pane. To Stop PTZ Patrolling in NetGuard EVS In the event that you wish to pause the patrolling schedule of a camera: 1. From the Live tab in NetGuard EVS, right-click in the view pane for the patrolling camera. 2. Select PTZ Presets 3. Click Stop PTZ Patrolling. NetGuard EVS Learning Guide 3-21 Module 3: NetGuard EVS Browse Tab The center tab in NetGuard EVS is the Browse tab. This tab is used to view recorded video stored locally. When clicked, it will display recorded images from the cameras in the selected view. Figure 19 Browse Interface Components of the NetGuard EVS Browse Tab The Browse tab contains the following sections: 1 Function Pane This collapsible pane displays functions related to the active view. 2 Display View Area This area displays the selected View. 3 Timeline Browser This area displays an overview of periods with recordings from all cameras displayed in the current view. 3-22 NetGuard EVS Learning Guide Module 3: NetGuard EVS The Function Pane in the Browse tab contains the following sections: Views Sequences Alerts Time Navigation Audio PTZ Control Smart Search Print Export Recorded Video Playback Within the Browse tab, there are several functions available to view video recordings: Time Navigation Smart Search Alerts Sequences Timeline Browser NetGuard EVS Learning Guide 3-23 Module 3: NetGuard EVS Time Navigation The Time Navigation section within the Function Pane is used to playback recorded video. Master Time Area Browse Buttons Time Sliders Playback Slider and Buttons Go To Time Figure 20 Time Navigation Components within Time Navigation include: Master Time Area Shows the master time and date of the displayed recordings. All images in the view will be synchronized to † this point in time. The playback speed is also displayed. Browse Buttons Six buttons allow you to manually navigate through recordings from the selected camera. Use the tool tip to help identify the button’s behavior. Time Sliders Click and drag these sliders to browse recordings Playback Slider and Buttons The Playback Slider determines the playback speed. The Playback Buttons allow you to play the recording forwards or backwards or to stop the playback. Go To Time Allows you to jump to a specific point in time. Audio Playback Playback of recorded audio is the same as playback of live audio. In the Audio section of the Browse tab select the Microphone(s) to listen to while viewing recorded video as described in the previous Time Navigation section. † Some cameras may only record during motion detection. Also, there may be no recorded images from one or more cameras in the View matching the specified point in time. If this is the case, the last image in the camera’s database prior to the specified point in time will be displayed in the view. 3-24 NetGuard EVS Learning Guide Module 3: NetGuard EVS Note: The Talk to Speakers function is disabled because outgoing audio is not recorded. PTZ Control Controlling recorded video from a PTZ camera is limited to digital zoom. The zoom functions work the same in the Browse tab as they do in the Live tab. Timeline Browser The Timeline Browser is another way to view recorded video from within the Browse tab. Figure 21 Timeline Browser Timeline bars – Each bar represents a camera. In the example shown in Figure 21, there are four cameras in the view. The bar with the lighter shade represents the selected pane or camera. Red indicates recording with motion Green indicates recording without motion (not shown) NetGuard EVS Learning Guide 3-25 Module 3: NetGuard EVS Using the Timeline Browser The recordings may be advanced or reversed by using the following methods: Click and drag with the mouse on top of the timelines to move the timeline forward or backward Use [CTRL] click and drag to move the timeline slowly Click on the Timeline Browser and use the scroll wheel of the mouse Double-click on a point on the timeline to jump to that time Timeline Browser Options Located at the bottom of the Timelines, the Span drop-down menu allows you control of the amount of video to display in the time span. (1 hour, 2 hours, 4 hours, 6 hours, 8 hours, 12 hours, 1 day) Under Span, you can specify the order of the recordings by clicking the Newest images at top checkbox. Smart Search Lets you search for motion in one or more specified areas of a selected camera’s recordings. 1. In the Browse tab, select the pane for the camera you wish to investigate. In fact, it will be easier if you maximize the window by double-clicking the image within it. 2. Expand the Smart Search section of the Browse tab. 3. Select the Show Grid checkbox. The entire image is covered with a blue grid. 4. Click and drag over the area of the image in which you would like to search. 5. Select the radio button for Include or Exclude. 6. Click Save. Figure 22 Area Selected for Smart Search 3-26 NetGuard EVS Learning Guide Module 3: NetGuard EVS 7. 8. The application will search for motion in the non-blue area of the image. Select the Smart Search parameters: Sensitivity – Very High, High, Medium Low, or Very Low Interval – All Images, 1, 2, 5, or 10 seconds Click either the Next or Previous button (to search forward or backwards respectively). The Smart Search progress window appears. Figure 23 Smart Search Progress 9. When motion in the designated area of the image is detected the search will stop and the moving objected highlighted. The date and timestamp is provided, allowing you to investigate further. Figure 24 Smart Search Motion Detected 10. Continue to click Next or Previous to see subsequent moving objects. 11. Turn off Show Grid under Smart Search and use the Time Navigation function (if necessary) to explore this incident. NetGuard EVS Learning Guide 3-27 Module 3: NetGuard EVS Alerts The Alerts section of the Browse tab allows you to view a list of detected events. Events, as discussed previously, are specific incidents you can configure to trigger automatically or manually. The events listed in the Alerts section of the Function Pane may be clicked allowing you to quickly jump to the time at which the event occurred. Figure 25 Alerts List To View Recorded Video by Events: 1. In the Alerts section of the Browse tab, select the desired camera from the Alerts drop-down menu. 2. Click the Get List button. Events for that camera will be listed. 3. Select the event and the View will change all panes to that date/time. 4. Use Time Navigation to view the video. Sequences In most cases to maximize storage efficiency, video is recorded only when there is motion. Each segment of video is recorded into a “sequence”. The Sequences section of the Browse tab allows you to view a list of recorded sequences for the selected camera. Then, you can preview each sequence according to date and time. To View Recorded Video by Recorded Sequence: 1. In the Browse tab, select the desired camera from the View. 2. In the Sequences section of the Browse tab, click the Get Sequences button. Available sequences for that camera are displayed. Each sequence will be listed with date, time and length A total of 40 sequences will be displayed: 20 prior to the timestamp displayed in the View and 20 sequences after the timestamp displayed in the view. Use the expand icon 3. 3-28 to view the stamp for start, alarm and end. Select the sequence to view. NetGuard EVS Learning Guide Module 3: NetGuard EVS 4. a. If the Preview checkbox is checked, a small preview window will play the video. b. Otherwise, use Time Navigation to play and view the video clip. Click the expand icon next to a sequence to show first, last and alarm image with date and timestamp. Recorded Video Output Beyond simply viewing recorded video, it can also be exported in printed or electronic format. The following options are available for output: Print – to output hard copy reports Export – to output video or images electronically Print Certain incidents may trigger the need to capture the image of the event in a report form. This can be done via the Print section of the Browse tab. To Print an Image for an Evidence Report: 1. In the Browse tab, select the pane with the desired image. Use Time Navigation or other method to obtain the desired image. 2. Expand the Print section of the Function Pane and click the Print button. Figure 26 Printing Evidence NetGuard EVS Learning Guide 3-29 Module 3: NetGuard EVS 3. Print Fields: a. Title – The default title “NetGuard EVS Surveillance Report” may be edited as needed. b. The application will capture the: i. Camera Name ii. Image Capture Time iii. Report Print Time iv. User who generated the report c. 4. User’s Note: Enter any important information regarding this evidence or incident. Print Options: a. Page Setup – this is a standard form allowing you to change the Paper Size, Source, Orientation and Margins. b. Preview – will display the report as it will appear on the printed page and indicate the quantity of pages c. Print – will send the report to the printer d. Close – closes the Report. Changes are NOT saved. Note: If your system contains the driver, you may choose to print to Adobe PDF and save the report as a PDF file. 3-30 NetGuard EVS Learning Guide Module 3: NetGuard EVS Export Exporting video or still images is used for many reasons such as reporting incidents or providing evidence. There are two (2) primary types of exports: 1. AVI/JPEG Export 2. Database Export AVI/JPEG The AVI/JPEG export allows you to select a video clip and export it using standard file types. AVI – The exported video file will be in .avi file format. Only video from one camera can be exported at a time. JPEG – The exported video file will be parsed and saved in multiple JPEG images. Database Export The Database Export will save the video clip in OnSSI proprietary video database format specific to NetGuard EVS and the NVR Viewer. Video from multiple cameras may be exported in a single step. Figure 27 Video Export Setting the Export Times In NetGuard EVS there are two methods for selecting the time to start and stop the video clip to be exported. Manual – If you know exact the start date and time for your exported video clip you may enter the values directly into the Export section of the Function Pane (as shown in Figure 27). Time Navigation – You can use the Time Navigation section of the Function Pane to assist you with setting the start and stop times for the clip. 1. Open Time Navigation and use the Playback and other functions you learned earlier in this section to determine the starting point of the clip. NetGuard EVS Learning Guide 3-31 Module 3: NetGuard EVS 2. Once the starting point is located, in the Export section of the Function Pane, click the Start Time Set button. 3. Go back to Time Navigation and use the Playback and other functions you learned earlier in this section to determine the ending point of the clip. 4. Once the starting point is located, in the Export section of the Function Pane, click the End Time Set button. Exporting Video to .AVI Exporting a video clip to .avi format is useful because as a standard file type, the clip can be viewed by anyone using a supported application such as Windows Media Player. 1. In the Browse tab, select the View containing the desired video clip. 2. Select the camera which contains the clip by either selecting it from the Source drop-down menu in the Export section or clicking on the camera’s pane in the view. 3. Set the Start Time and End Time for the clip. See Setting the Export Times on page 1-1 for more information. 4. Click the AVI/JPEG Export button. Figure 28 AVI/JPEG Export The fields within the pop-up can be defined as follows: 3-32 NetGuard EVS Learning Guide Module 3: NetGuard EVS Export Status Start Time Read-only display of selected Start Date and Time End Time Read-only display of selected End Date and Time Source Read-only display of selected source (camera) Export Type Export Format Choose AVI or JPEG Add Timestamp A date and time stamp will be included in the video and visible upon playback Framerate Applies only to video: Full will include all images and Half will include every other image (yet play back in real time). Digital Zoom Export If the original clip included Digital Zoom you have the option to include it in the export. Otherwise, this option will be disabled. AVI Codec For AVI only, you have the option to select the codec used for conversion/compression. Some compressions favor quality and others favor file size. Export Destination Desktop Select this radio button to save the file to the Desktop in the folder “Exported Images” Path Select this radio button to specify where the “Exported Images” folder should be located AVI Filename The name of the exported .avi file. The default filename uses the following convention taken from the starting time: YYYYMMDD-HHMMSS Close On Completion 5. 6. AVI is the default file format. Select the following: Whether to include a timestamp in the output (Add Timestamp) Location to store the exported file(s) (Export Destination) Whether to Close On Completion Click Export. 7. If you click this checkbox, the NetGuard EVS AVI/JPEG Export dialog box will automatically close when the export is done. An Export status bar will display showing the progress of the export. When the export is complete, access the .avi files in the Exported Images folder in the location specified. The file is available for view or distribution. Double-click to view the file, attach it to an email, copy it to a CD or other media, etc. NetGuard EVS Learning Guide 3-33 Module 3: NetGuard EVS Export Video to JPEG Exporting a video clip to .jpg format is useful in that as a standard file type and the images can be viewed by anyone using a supported application such as Windows Internet Explorer. However, the video clip is parsed and each frame is saved as a .jpg still image so the output is not actual video. The output is a collection of still images. 1. In the Browse tab, select the View containing the desired video clip. 2. Select the camera which contains the clip by either selecting it from the Source drop-down menu in the Export section or clicking on the camera’s pane in the view. 3. Set the Start Time and End Time for the clip. See Setting the Export Times on page 3-31 for more information. 4. Click the AVI/JPEG Export button. 5. AVI is the default file format. Select the following: 6. a. Click the JPEG radio button. b. Whether to include a timestamp in the output (Add Timestamp) c. Location to store the exported file(s) (Export Destination) d. Whether to Close On Completion Click Export. 7. 1. An Export status bar will display showing the progress of the export. When the export is complete, access the .jpg files in the Exported Images folder in the location specified. The files are available for view or distribution. 8. Double-click to view a file, attach to an email, copy to a CD or other media, etc. Export Video to Database Exporting video clips to OnSSI database format has several benefits: 3-34 Support for password protection – this prevents unwanted viewers from seeing the video Ability to view the clip using an OnSSI Viewer, a more robust viewing application than Windows Media Player 1. In the Browse tab, select the View containing the desired video clip. 2. Select the camera which contains the clip by either selecting it from the Source drop-down menu in the Export section or clicking on the camera’s pane in the view. 3. Set the Start Time and End Time for the clip. See Setting the Export Times on page 3-31 for more information. 4. Click the Database Export button. NetGuard EVS Learning Guide Module 3: NetGuard EVS Figure 29 Database Export The fields within the pop-up can be defined as follows: Export Status Start Time Read-only display of selected Start Date and Time End Time Read-only display of selected End Date and Time Source Read-only display of selected source (camera) Include Audio This checkbox gives you the option to include audio with the video. Security Compress Exported Database Click this box to compress the exported database. (Compression reduces file size by approximately 10% but the length of the export process will increase) Encrypt Exported Database Click this box to assign a password to protect access to this video information. Password Enter the password the recipient of the video should use to access the video data. Repeat Password Re-enter the password for verification. Export Destination Desktop NetGuard EVS Learning Guide Select this radio button to save the file to the Desktop in the folder “Exported Images” 3-35 Module 3: NetGuard EVS Path Select this radio button to specify where the “Exported Images” folder should be located Include Viewer Program Files If this box is checked, a stand-alone Viewer application will be included in the export. Close On Completion If you click this checkbox, the NetGuard EVS Database Export dialog box will automatically close when the export is done. 5. Select the desired options from the NetGuard EVS Database Export dialog box. 6. Click Export. An Export status bar will display showing the progress of the export. The files can be copied to a CD or other media. If the database was encrypted, be sure to communicate the password to the user under a separate delivery method. 7. When the export is complete, view the exported clip by opening the Exported Images folder in the location specified and double-clicking the Viewer.exe file. 8. If the clip is encrypted, enter the password. 2. 3-36 The NVR Viewer opens and the clip is displayed. NetGuard EVS Learning Guide Module 3: NetGuard EVS Using the NVR Viewer The NVR Viewer is a standalone application which supports browsing and playback of NetGuard or NetGuard EVS video recordings. It is installed when you install NetDVMS, NetDVR or ProSight-SMB. The NVR Viewer also lets you print still images, send still images via e-mail and export entire video and audio sequences in a variety of formats. Note: Once a video surveillance environment is set up and running, if it is necessary to view directly from the NVR server, it is recommended to do so using the NVR Viewer as opposed to installing a client application such as NetGuard EVS. Accessing the Viewer Access to the NVR Viewer can be done either: 1. From the Windows menu on the NVR Server: Select Start > All Programs > NetDVMS > Viewer (Substitute NetDVMS with NetDVR or ProSight-SMB in applicable environments) 2. From exported video evidence: If the video files are stored on a CD, the NVR Viewer may start automatically when the CD is inserted in the drive. Or double-click the Viewer.exe file in the collection of video evidence files. Date & Time Toolbar Timeline Control Panel Playback Controls Figure 30 NVR Viewer NetGuard EVS Learning Guide Browse Tools 3-37 Module 3: NetGuard EVS Viewing Archived Video If the archived recordings are stored locally or on network drives, you can use NetGuard EVS or the NVR Viewer to browse the recordings. If the archives, however, are stored on a CD, you must use the NVR Viewer to browse the video. Toolbar The Viewer's toolbar lets you quickly switch between the Viewer's different features. Icons in the toolbar serve as shortcuts to the features available from the File and Tools menus in the Viewer's menu bar. When you select a feature in the toolbar, settings for the feature typically become available in the Viewer's control panel, located in the lower part of the window, below the camera layout. Depending on your rights, not all of the following toolbar icons may be available to you. Settings: Opens the Viewer's Settings control panel, in which you are able to specify settings for the camera layout, and specify the time span for use in the Viewer's timeline browser. Single View: Switches to a single, enlarged view of video from the camera selected in the camera layout. You may also simply double-click a camera in the camera layout to switch between single view and multi view. Multi View: Switches to multi-view, displaying all cameras in the selected camera layout view. You may also simply double-click a camera in the camera layout to switch between single view and multi view. Database Information: Opens the Database Information control panel, in which you select the cameras you want displayed in the camera layout. Motion View: Opens the Motion View control panel, in which you are able to view a graph displaying video sequences with motion. You may click and drag the graph allowing you to browse the sequences. Alarm Overview: Opens the Alarm Overview control panel, which you are able to view a list of detected motion and events. By clicking motion detections or events in the list, you are able to browse recordings from around the time at which the motion or events occurred. Image Controls: Opens the Image Controls control panel, in which you have access to digital zoom and interlacing settings. Export: Opens the Export control panel, with which you are able to export entire video and—if applicable—audio sequences in different formats. Print: Opens the Print control panel, from which you are able to print still images from the camera selected in the camera layout. Smart Search: Only available when the Viewer is used with certain surveillance systems. Opens the Smart Search control panel, in which you are able to search for 3-38 NetGuard EVS Learning Guide Module 3: NetGuard EVS motion in one or more selected areas of the view from a particular camera. Send E-mail Report: Opens the Send E-mail Report control panel, from which you are able to send evidence via e-mail. NetTransact: Only available when the Viewer is used with certain surveillance systems. Opens the NetTransact control panel, from which you are able to specify settings for the NetTransact add-on product for handling loss prevention through video evidence combined with time-linked POS or ATM transaction data. Help: Opens online help. Alternatively, press your keyboard's F1 button to access help. Browsing Video Use the items found in the Browse Tools panel to review video: Select a specific date or time from the date and time drop-down menus. Click and drag the timeline to advance the video forward or backward. Use the Playback controls Export Video The NVR Viewer support export to .AVI, Database and .JPG.: To Export Video 1. Click the Export Video icon. The bottom section of the NVR Viewer interface changes: Figure 31 Exporting Video with NVR Viewer 2. Verify the output from the Video Feed drop-down menu. Change if necessary. 3. If supported, select the desired Audio Feed. 4. Select the desired Start Time for the export: 5. a. Either select the start date and time directly from the drop-down menus or b. Use the timeline to click and drag to the desired start time. Click the Set button in the Start Time section. NetGuard EVS Learning Guide 3-39 Module 3: NetGuard EVS 6. Select the desired Stop Time for the export: a. Either select the stop date and time directly from the drop-down menus or b. Use the timeline to click and drag to the desired end time. 7. Click the Set button in the Stop Time section. 8. Select the file format for the exported file from the Export Format drop-down menu. 9. Click Next. The screen changes and the following is displayed: 10. Verify or modify the Export Path. 11. Select Full or Half Framerate. 12. If you want a timestamp included on the exported video, click the Include Timestamps checkbox. 13. Select the Codec you wish to use. 14. Click Next. The screen changes displaying the export status: 15. Click OK. 3-40 NetGuard EVS Learning Guide Module 3: NetGuard EVS Help At any point while working with an OnSSI application, if you need additional support, press the [F1] function key. Context sensitive help will appear. Figure 32 Online Help NetGuard EVS help works similar to most help systems in that you can navigate throughout the content via: Table of Contents Search Tab Embedded Links In addition to online help, the full User Manuals and Quickstart Guides for our applications are available for download in PDF format from the www.onssi.com website. NetGuard EVS Learning Guide 3-41 Module 4 Events Objectives: Understanding Event Types Configuring Events in NetDVMS Viewing Event Data with NetGuard EVS Module 4: Events Events A benefit and power of IP video monitoring software includes the ability to avoid having an operator monitor video output 24/7. The typical time where fatigue and boredom sets in for humans watching surveillance video is 20 minutes. Therefore, configuring the video monitoring software to react to specific events is key to configuring a worthwhile and robust video surveillance system. There are several types of events supported in OnSSI software. Three (3) components to consider for an event: 1. Input Data generated from a variety of sources can generate an event. Some examples include: motion, dry contact, and ASCII text strings from another device. 2. Event Events register triggers in the NVR software. These can be used to initiate actions automatically. These can include: 3. Starting or stopping recording on cameras Send an email or SMS message Make a PTZ camera move to a specific preset position Push the image to a NetMatrix user Activate output Output On devices with supported output ports, actions such as activating lights, alarms or sirens may result from the triggering of an event. Figure 33 Event Flow 4-2 NetGuard EVS Learning Guide Module 4: Events Types of Events There are four (4) types of events that are recognized and monitored within OnSSI software as input events. Two of these are internal to the NVR software and two are external: External to the NVR Software 1. External Input Events from a Camera: These are events based on data received from a camera’s input port. Not all cameras support this feature. An example would be a sensor attached to a window or door or a security card access system. Additionally, some devices have their own capabilities for detecting motion, moving objects or even static objects (typically configured in the device’s proprietary software). These too are considered input events. 2. External Input Events from an ASCII text string: These are events received in UDP or TCP format from an external system. These strings can be analyzed to determine if a match to specified criteria is met. For example: a door using a card swipe system can be configured to send its events in a text string (ASCII) format to the NVR. Each string received can be examined for a specific word or phrase to indicate a desired action and then trigger a corresponding reaction (e.g. move the camera to a preset position and begin recording). Internal to the NVR Software 3. VMD Events (Video Motion Detection): These events are based on the NetDVMS/NetDVR/ProSight-SMB software detecting motion on a camera. 4. Manually Triggered Events: These events are pre-configured in NetDVMS/NetDVR/ProSightSMB and allow a user to trigger the event manually from the client software. Note: This guide assumes that the OnSSI NVR, NetDVMS 6.5x is in use. Event Configuration Configuring events is performed through function buttons found in NetDVMS Administrator. For more information on configuring events, see the NetDVMS User Manual. NetGuard EVS Learning Guide 4-3 Module 4: Events Generic Events As previously mentioned, Generic Events are those which use input from an external source in order to trigger an event. Example of external sources can be: alarm systems, access control systems, etc. You will notice Generic Events in NetGuard EVS through: When browsing video, you can browse by any event, including a Generic Event When viewing the indicators on the Image Bar of a video pane, the event indicator will trigger for Generic Events Video may be pushed via NetMatrix by the triggering of a Generic Event Input Events Input Events are specific to each device. Some examples are: Object detection Motion detection Camera tampering Device rebooting Audio rising or falling below a set decibel level Video signal rising or falling You will notice Input Events in NetGuard EVS through: When browsing video, you can browse by any event, including an Input Event When viewing the indicators on the Image Bar of a video pane, the event indicator will trigger for Input Events Video may be pushed via NetMatrix by the triggering of an Input Event VMD Events Video Motion Detection (VMD) events are triggered when motion is detected on the camera by the NVR. By default, a VMD event is automatically created within NetDVMS for each camera upon its installation. This event can trigger recording in OnSSI client software as configured in Settings within NetDVMS Administrator. You will notice VMD Events in NetGuard EVS through: 4-4 When browsing video, you can browse by any event, including a VMD Event When viewing the indicators on the Image Bar of a video pane, the event indicator will trigger for VMD Events Video may be pushed via NetMatrix by the triggering of a VMD Event NetGuard EVS Learning Guide Module 4: Events VMD events automatically starts the recording process. Therefore, each video Sequence is triggered by a VMD Event. Event Buttons Event buttons are events that can be manually triggered from within NetGuard EVS. These events may be specifically associated with a particular camera or set on a system wide basis. Event buttons are configured in the NetDVMS Administrator module. To Use An Event Button: 1. In the Live tab of NetGuard EVS, expand the Event section on the Function Pane. 2. Click the arrow for the Events drop-down menu. 3. Select the Event Button for the event you wish to initiate. 4. Click Activate. Output Event Outputs are used for activating outputs external to NetDVMS such as switching on lights or sounding a siren. Output events are configured in the NetDVMS Administration module. To Use An Output Event: 1. In the Live tab of NetGuard EVS, expand the Output section on the Function Pane. 2. Click the arrow for the Outputs drop-down menu. 3. Select the Output event you wish to initiate. 4. Click Activate. For more information on events, see the NetDVMS User Manual. NetGuard EVS Learning Guide 4-5 Module 5 Pushing Video Objectives: Configure NetMatrix Configure NetGuard EVS to receive pushed video Module 5: Pushing Video What is Pushing Video? When multiple users are connected to an NVR, one user may select a video stream they are viewing and send it to another user’s computer monitor so that the second user may also view the video. Or, when configured properly, an event may occur which will cause video from a specific camera to automatically appear on any user’s screen when otherwise the screen would be blank (“blank screen monitoring”). This is called “pushing video” (manual and automatic respectively). Pushing video is possible by using OnSSI’s add-on software module, NetMatrix. NetMatrix is included with NetDVMS and NetDVR and installed when the NVR software is installed. Configuring NetMatrix is done in the NVR Administrator module and viewing may be done in NetGuard EVS. There is also a NetMatrix Viewer that will not be covered in this course. Configuring A Manual Push Window in NetDVMS These steps will provide the foundation for pushing video from the OnSSI client application NetGuard EVS. Note: This guide assumes that the OnSSI NVR, NetDVMS 6.5x is in use. From the NetDVMS Administrator module: 1. Click NetMatrix 5-2 The NetMatrix Configuration screen appears. Module 5: Pushing Video Figure 34 Configuring a Push Window 2. Click the Enable NetMatrix checkbox so that it is checked and the remainder of the form becomes enabled. Below the Enable NetMatrix checkbox is a list of all monitors able to receive video. The list is currently blank. Fill in the fields in the Add NetMatrix Monitor section: 3. Enter the Name of the PC which will receive video. A descriptive name that easily identifies the target is recommended. For example: Guard #1 Post, Main Entrance, Reception, etc. 4. Enter the IP Address for the PC to which you will push video. 5. Port – enter any port # that is not in use. It cannot, however, be the same as the Image Server Port number. You will need to remember this when you configure the client later. You may use the same port number for all users. 6. Password – enter any password. This may be the same or different from your NVR password. You will need to remember this when you configure the client later. 7. Click the NetGuard EVS checkbox to enable this function to work in a video client (NetGuard EVS or Ocularis Client Lite ). 8. Click Add. The NetMatrix Configuration screen updates. 5-3 Module 5: Pushing Video Figure 35 Configuring A Push Window 9. Repeat for all PCs (IPs) to which you will forward video or will receive video from this NVR. 10. Click Apply. 11. Click OK. 12. Click Exit. Pushing Video to Another User of NetGuard EVS In order to successfully send video from one PC to another PC, the following conditions must apply: Both users must be logged on to the same NVR Server When pushing video from one PC to another when using different NVR Servers, the NVR Servers must be a Master & Slave to each other for video to be pushed in two directions. Therefore, when working in an environment with multiple NVR servers, be sure to set their Master/Slave relationship. See the NetDVMS User Manual for information on configuring a Master/Slave relationship. 5-4 Module 5: Pushing Video Configure NetGuard EVS for Push Video When viewing a client application such as NetGuard EVS, a pane (or “monitor”) within a view needs to be configured to specifically accept video being “pushed” from NetMatrix. This applies whether the video is triggered manually or upon the result of a preconfigured event. To Configure a Monitor in NetGuard EVS to Receive Video 1. Go to the Setup tab. 2. Create (or modify) a view. In an empty pane, click and drag “NetMatrix” from the System Overview section of the Function Pane. 3. In the Properties section of the NetMatrix pane click the Connection Settings button. (Note: you may need to minimize other sections of the Function Pane in order to see the entire Properties section): 4. a. Enter the TCP/IP Port used when the monitor was configured in Administrator. b. Enter the Password used when the monitor was configured in Administrator. c. Click OK. d. Change the Image Quality or Frame Rate if desired. Click the Live tab. To Manually Push Video to a Monitor using NetGuard EVS 1. In the Live view of NetGuard EVS, right-click on a window displaying video. (This video will be “pushed” to another user). 2. Select NetMatrix 3. The right-click menu appears. A list of all configured monitors appears. Select the monitor to wish you would like to send this video. Figure 36 Push Video in NetGuard EVS The video should appear in the recipient’s pane. 5-5 Module 5: Pushing Video Configuring Event Driven Push Video Configured events may be included as a trigger to push video to a user. Any event (motion, contact closure, content analytics, access control, etc.) can cause video to be forwarded to a specific monitor. Configuration for this is done in the Administrator module of the NVR. To Configure an Event to Push Video within NetDVMS From the NetDVMS Administrator module: 1. Click NetMatrix The NetMatrix Configuration screen appears, displaying the list of existing NetMatrix monitors. 2. Click the Event tab. 3. Right-click on the monitor you wish to configure. 4. Highlight the desired camera or event. 5. A subsequent drill-down menu appears defining events for the selection. Select the desired event associated with the highlighted item. 6. A list of cameras, Generic events and Global events appears. The event is nested under the monitor selected. A red incomplete (exclamation) symbol appears. This indicates that configuration is not complete. You must continue until all symbols disappear. Right-click on the event with the symbol. The following menu appears: Items are defined as follows: 7. 5-6 Delete Delete the event from the current configuration Connect Connect to a camera (to be determined in the next step) Disconnect, then connect Disconnect all NetMatrix feeds and then connect to a camera (to be determined in the next step). This is an attention getting method of pushing video. Disconnect Disconnect the video feed from the selected camera Select the desired item from the table above. Module 5: Pushing Video 8. Right-click on the item with the 9. For any selection other than Delete, another nested item will appear in the list with a symbol. symbol. A right-click menu appears displaying a list of installed cameras as well as a Delete option. Select a camera for which you would like to push video (in the case of “Connect”) or cease streaming video (in the case of “Disconnect”). At this point, there should be no symbols. 10. Click OK. 11. Click Exit. Example The following example will configure an event driven push based upon motion detection. The end result will be that if motion is detected on Camera A, push the video from Camera B to another PC. Preparation In preparation for this exercise, first set a Video Motion Detection event on Camera A. From the NetDVMS Administrator module: 1. Select Camera A from the NetDVMS Device Manager. 2. Click the I/O Setup button. 3. Select Camera A from the I/O Setup window. 4. Click the Add VMD Event (Motion Detection) button. 5. Click OK. Configure the Event From the NetDVMS Administrator module: 1. Click NetMatrix The NetMatrix Configuration screen appears displaying the list of existing NetMatrix monitors. 2. Click the Event tab. 3. Right-click on the monitor of another PC. 4. Highlight Camera A. 5. A list of cameras, Generic events and Global events appears. A subsequent drill-down menu appears defining events for the selection. Select the VMD Event. 5-7 Module 5: Pushing Video Figure 37 Configure VMD Event The event is nested under the monitor selected. A red incomplete (exclamation) symbol symbols appears. This indicates that configuration is not complete. You must continue all disappear. Figure 38 Inserted VMD Event 6. Right-click on the event with the 7. 5-8 The following menu appears: Select Connect. symbol. Module 5: Pushing Video 8. Right-click on 9. The following appears. Connect. A right-click menu appears displaying a list of installed cameras as well as a Delete option. Select Camera B . At this point, there should be no symbols. 10. Click OK. 11. Click Exit. Now, when there is motion on Camera A, video from Camera B will appear in the other PC’s (as defined in Step 3) NetMatrix pane within NetGuard EVS. 5-9