1
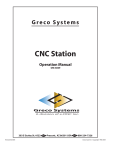
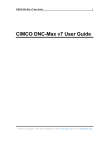
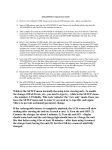
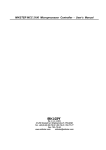
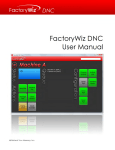
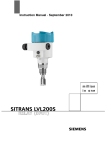
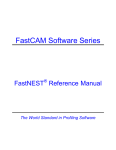
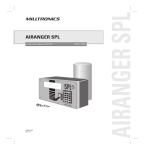
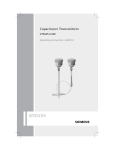
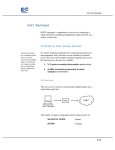
`
USER MANUAL
DNC Max II
DncSync
DncFeed
COPYRIGHT NOTICE
Copyright © 2006 by IDD SolutionNet Pte Ltd
All rights reserved. These materials are confidential and proprietary to
IDD SOLUTIONNET PTE LTD. and no part of these materials should
be reproduced, published in any form by any means, electronic or
mechanical including photocopy or any information storage or retrieval
system nor should the materials be disclosed to third parties without the
express written authorization of IDD SOLUTIONNET PTE LTD.
© IDD SolutionNet Pte Ltd
2/2
`
1.0 INTRODUCTION
`
Thank you for your purchase of DNC Max II. We are glad you have
make a right choice.
DNC-Max II ™ is the most advanced, easy-to-use, and cost efficient CNC
Welcome to DNC Max II
programming tool available. It is designed to bring the power of the PalmOS® to shop
floor communications.
The Dnc Max II is designed to handle all type of CNC machines.
CNC Programmers, Machinists, Engineers, Scientists and Service Technicians now
The following sections of this manual will guide you and assist you step
by step in using DncMax II
have a simple, affordable and powerful RS-232 Serial Communications at their
disposal.
We wish you have a happy time in using our solution.
DNC-Max II ™ consists of three most advanced tools to bring complex shop floor
Please contact our Authorized Distributor for support and services.
communications to easy to use portable hand held PDA’s
It is not designed to replace an existing DNC Network but to compliment it. It also
provides the tools necessary for those facilities that don't have a DNC Network in
Your Sincerely,
place.
DNC-Max II ™ provides the end user the ability to choose the handheld unit that best
Team IDD
serves their needs. With DNC-Max II, users are not locked into a specific handheld
IDD SolutionNet Pte Ltd
model. DNC-Max II has been in production since 2004, and is a tested and stable
program. We look forward to being your partner for years to come.
DNC-Max II supports all PalmOS® based handhelds from version III and up,
As well as windows CE Platform including:
Palm Vx
HandSpring , Hp, Trio, O2 etc…
Minimum PalmOS® PDA System Requirements:
PalmOS® 3.5 or better
8 MB RAM System RAM
1 MB Available RAM
© IDD SolutionNet Pte Ltd
3/3
© IDD SolutionNet Pte Ltd
4/4
`
`
Minimum Windows Ce PDA System Requirements:
Basic Understanding
Windows CE ® 2.2 or better
1. Design Cnc [NC ] program in Desktop . [Use Solid works, Uni Graphics or any
other tools to create NC files]
2. Transfer the program to Palm PDA
3. Connect the PDA to CNC machine via RS232 Cable to transfer the file Or
Drip feed.
4 MB RAM System RAM
1 MB Available RAM
CNC Data Cable Pin-Out for Palm System
This CNC Data cable configuration supports Fanuc, Fadal, Haas, Mazak, Mitsubishi,
Proto-Trak, Milltronics and the vast majority of CNC Controls available. It is a
Modified Asynchronous Null-Modem Pin-Out.
DNC Max II Suite Consists of following tools
Tools
Purpose
DNCMax II
DNCSync
DNCFeed
Desktop version of the software used to transfer Or Synchronize NC
Files to PDA
PDA Version of Synchronizing software work with DNCMax II
Software to DNCFeed NC files to Cnc Machines.
CNC Data Cable Pin-Out windows CE System
Please check with our sales department to get specification
© IDD SolutionNet Pte Ltd
5/5
© IDD SolutionNet Pte Ltd
6/6
`
`
Software Installation
Before installing this software to desktop please ensure following system requirements
are fulfilled.
Pentium 4 PC with minimum 80 MB Hard disk space & 64 Mb Ram
Installation:
Installation CD contains two setup files namely:
DNC Max II
DNC Feed
Note:
Before running Setup_DNCMax II & DNCFeed please ensure PDA Conduit
software is not running in the background of the system as well as keep the
PDA on PDA Cradle which is connected to USB Or Serial port of your
computer.
Figure 0-1
Installations are simple and self-explanatory. Please follow
the instruction as per screen. For your reference please refer
following screen captures.
Figure 0-2
© IDD SolutionNet Pte Ltd
7/7
© IDD SolutionNet Pte Ltd
8/8
`
© IDD SolutionNet Pte Ltd
`
9/9
© IDD SolutionNet Pte Ltd
10/10
`
`
DNC Max II. (Synchronization Tool )
Optional Steps
Before transfer the files if you like to view multiple NC files in synopsis window then
follow the steps bellow:
Step 1
Select the file from File Selection window. (By click single click on file name)
Step 2
Drag the file & Drop it in the Synopsis window
This will automatically creates taped pane window whereby user can view the content
of the file.
To view single file in synopsis window
Step 1
Select the file from File Selection window. (By click single click on file name)
Step 2
Press Synopsis button to view the content of the NC File.
NOTE:
This procedure will
work with conjunction
of DncSync Software.
Please ensure DncSync
Software is running in
PDA as well as PDA is
properly placed in PDA
Cradle.
Figure – 1 DNCMax II Main Screen
Step 1
Design the NC Program & move the same to DNC Max II\cncprog folder
Step 2
From Desktop Start DNC Max II
Step 3
Select the file from File Selection window (From 1)
Step 4
Click the File Transfer Button (From 2)
© IDD SolutionNet Pte Ltd
11/11
© IDD SolutionNet Pte Ltd
12/12
`
`
Activate DNCSync the program from PDA Desktop by tapping DNCSync Icon
DNCSync Main Screen
Step 2
Tap Receive Button.
This will automatically receive the NC Files From Desktop PC.
NOTE:
During installation, system
will
automatically
configure the speed of the
PDA in order to achieve
optimum performance.
If there is any performance
issue,
please
call
our
This is the DNCSync Main Screen.
From this screen you will be able to access receive files which is sent by DNC Max II
Desktop program
How to receive program to PDA From Desk top DNC Max II:
Step 1:
© IDD SolutionNet Pte Ltd
13/13
© IDD SolutionNet Pte Ltd
14/14
`
`
Step3
Once appropriate file name is displayed then tap drip feed button to transmit NC file to
machine.
DncFeed Main Screen
NOTE:
Before installing activating the cncFeed program, please ensure that
PDA is connected to machine (RS232 D25 Socket) using our special
socket plug.
This is the DNCFeed Main Screen.
From this screen you will be able to drip feed the files to CNC Machine using special
cable .
How to drip feed NC program from PDA to CNC Machine.
Step 1:
Activate DNCFeed the program from PDA by tapping DNCFeed icon from PDA
Step 2
Tap Select Button.
This will show the file names from the PDA to transfer to machine
© IDD SolutionNet Pte Ltd
15/15
© IDD SolutionNet Pte Ltd
16/16
1. Click start button of desk top
2. select control panel ( if your pc is installed with windows XP then select
`classic view.)
`
FAQ (Frequently Asked Questions)
Click the system
icon you will be
presented with
screen in left
Q: How many software programs are in DNC MAX II Package?
A: Three
Q: Name the software program which present inside DNC MAX II Package
and purpose ?
A: For PDA
DNCFeed – used to transfer NC files from PDA to machine
DNCSync – used to transfer NC Files from Desktop computer
system to PDA
DNCMAX II – Desktop synchronization program used to transfer
program to PDA
(Figure 0-2)
Q: Why I need DNCMAX II desktop synchronization software?
A: DNCMAX II desktop synchronization software is used transfer
program to PDA
Q: How to install DncMaxII desktop synchronization application?
A: By clicking DncInstall.exe in the desktop
Click the Device
manager tab you
will be presented
with screen in left
Q: What are all components installed by DncInstall software?
A: Java runtime engine version 4.11
Pilot Install application
DncMaxII components
Figure 0-3
Q: Approximately how much hard disk space required to install dncmax
in desktop?
A: 20 MB (this inclusive of java run time engine)
Q: How to configure serial port.?
A: In general there is no need to configure the serial port of your desktop PC.
However there are situation we need to configure the serial port settings (COM
PORT) of desktop PC.
Following procedures are common for window 98/xp/me systems
Click the ports
[Com & LPT]
© IDD SolutionNet Pte Ltd
17/17
© IDD SolutionNet Pte Ltd
System will
display
communication
port [Com 18/18
1]
(Figure 0-4)
`
`
to PDA, Please upload license file also. (Later we can remove license file
permanently)
Q: How to install the programs to PDA ?
A: DNCMAX II suite programs and library files are compressed in the
form of DNCMAXII.pia format
By clicking DNCMAXII.PIJ file system will prompt copyright and
introductory notes Once you accept the copyright messages then
system is ready to install the files to PDA
Q: Sometimes after transmitting the cnc programs I see the memory does not
equal with the original program. ( Ex : the cnc program is 12kb but after
transferring the file into pda the file memory will less and become 10kb.) Why
the program memory will less?
Keep the pda in the cradle
Press sync button in PDA
This will automatically install the software inside the pda
A: There may be two possibilities:
1. Possibility one : Your desktop pc stop working while transferring.
Please verify your comport settings of desktop pc
Note: Before installing DNCMAX II, Please install Pilot install
application to your desktop PC.
Q: Could I re-install dncRelax desk top synchronization in multiple computer ?
N: No
Q: I found some problem while installing DncRelax desktop synchronization
application what to do ?
A: Uninstall the software before re-installing the software.
2. It may not be problem at all (Please check number of bytes
transmitted). In general computer display the file size in KB. Even your
cnc program is 100 byte length it will be displayed as 1 KB (which is not
true). but if you have closer look in to the file by check the properties of
the file then it is displayed as 100 bytes. So there is nothing to worry
about it. (this depend on cluster arrangement of the operating system)
Q: How to Reset a Palm OS PDA ?
Q: I installed DncMaxII Desktop synchronization application as well in PDA
applications, what is the next step to do?
A: Transfer sysini.txt file from desktop to PDA.
The Palm OS, which is what runs the popular Palm Pilot and Handspring
personal digital assistants (PDAs), is pretty robust--but that doesn't mean it
never crashes or freezes. If your PDA suddenly stops working, it's time to
deliver a wake-up call in the form of a reset.
Q. What will happen if I did not transfer sysini.txt file inside PDA ?
1 . If you're sure your unit is frozen, turn it over so that the screen faces down.
A. PDA application used to transfer NC files to machine does not work.
2. Locate the reset hole, which is just large enough for you to insert the end of
an unwound paper clip, and press gently for a "soft" reset. You don't have to
use a paper clip if you've got something else that fits, but don't use anything
sharp, such as a safety pin.
3. If the warm reset doesn't result in a welcome screen, then your only
recourse is a "hard" reset. The hard part about this is that you'll lose all the
data and preferences in your PDA.
Q. What is the content of sysini.txt file and why it is so important?
A. This file contains the information related to machine profiles. For Syindac
engineering we pre-configure the File. So during Drip feed operation machine
profiles are loaded in the pda memory to control the machine properly.
Q: When the cnc programs are deleted from pda , I see the license txt also
missing
A: license txt file is temporary only, basically operation wise there is nothing to
worry about it. Immediate solution is whenever you upload the CNC program
© IDD SolutionNet Pte Ltd
19/19
4. If the soft reset doesn't snap your PDA back to attention (you'll see a
Welcome screen), the next step is a "warm" reset, which bypasses potentially
troublesome system extensions. Repeat the reset procedure in step 2, but hold
down the Page Up button on the front of your PDA while doing so.
© IDD SolutionNet Pte Ltd
20/20
`
`
5. Before proceeding with the hard reset, replace the batteries in your PDA to
make sure the old ones aren't just spent. Check also that the contrast isn't
turned down.
Some interesting facts:
6. Repeat the reset procedure in step 2, but this time hold down the power
button while you reset. This should return your PDA to the way it came from
the box.
The RS-232-C Interface Standard
The RS-232-C interface was developed for a single purpose, unambiguously
stated by its title: "Interface Between Data Terminal Equipment and Data
Communications Equipment Employing Serial Binary Data Interchange."
RS-232 was originally adopted in 1960 by the Electronic Industries Association
(EIA). The standard evolved over the years and in 1969 the third revision (RS232C) was to be the standard of choice of PC makers.
In 1987 a fourth revision was adopted (RS-232D also known as EIA-232D). In
most part of this new revision, they added 3 additional test lines. Most
equipment using RS-232 serial ports use a DB-25 type connector even if the
original documents didn't specify a specific connector. Many PCs today use
DB-9 connectors, since that is all that is required in asynchronous mode is 9
signals. It is important to note that the document DOES specify the amount of
pins and their assignment.
(20 affected to different signals, 3 are reserved and 3 are not affected)
Normally the male connector is on the DTE side and the female connector is
on the DCE side. However there are many pieces of hardware where the
reverse will be the case.
For in-depth information regarding the RS-232-C Standard on the Internet,
please visit http://www.rad.com/networks/1995/rs232/rs232.htm
© IDD SolutionNet Pte Ltd
21/21
© IDD SolutionNet Pte Ltd
22/22
`
`
NC Files
from the transmitting source.
NC program files are the collections of codes (instructions) for axis movement of a
Drip-Feeding with DNC Max II is pre configured to individual factory machine
CNC machine tool and are made up of various word addresses. These start with a letter
controllers.
and are usually followed by a numeric value. A word is usually referred to by its letter,
hence the word X3.5 (specifying an X axis position) would be called an "X-Word".
The word F15.0 (specifying a feed rate) would be called an "F-Word"
BUFFER: This is a temporary data storage area in a CNC Machine Tool Control that
holds the NC File data while drip-feeding. Once a line of NC Code has been executed,
the portion of the buffer that previously held the data is cleared. The buffer capacity in
G-Words in an NC program specify Preparatory Function Codes and have come to be
called "G-Code".
CNC Machine Tool Controls varies widely but, in general, the size of the buffer is
equivalent to the standard memory storage capacity of the CNC Machine Tool Control.
These codes have been standardized by the EIA and ISO organizations and are often
End of document
referred to as either ISO or EIA G-Code.
M-Words in an NC program specify Miscellaneous Function Codes and have come to
be called "M-Code".
O-Words typically specify the "Program Identifier" in an NC program. These words
are generally limited to 1-to 4-digit integer (1-9999). These should NOT be confused
with the filename of the NC program file itself.
Drip Feeding and Buffers
Many times an NC file required to machine a part is too large to completely fit into the
memory of a CNC Machine Tool Control.
In order to run the complete NC File, uninterrupted, the NC File is sent to the CNC
Machine Tool Control in small parts and is executed from Buffer memory. Once a line
of NC Code has been executed, the portion of the buffer that previously held the data
is cleared. More data is then requested by the CNC Machine Tool Control and received
© IDD SolutionNet Pte Ltd
23/23
© IDD SolutionNet Pte Ltd
24/24