1
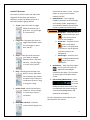
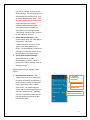
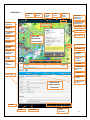
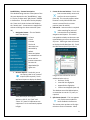
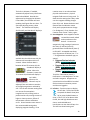
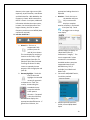
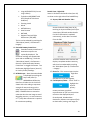
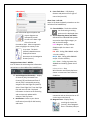
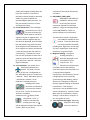
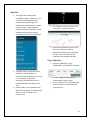
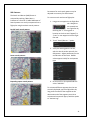
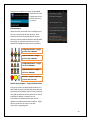
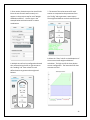
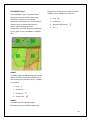
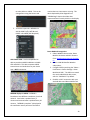
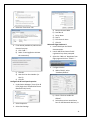
DroidEFB User Manual
The definitive aviation planning and in-flight support app
for Android™.
26 June, 2015: DroidEFB version 1.10.XX
Table of Contents
Disclaimer: .................................................................................................................................................... 3
Android™ Gestures: (An Android tutorial) .................................................................................................... 4
Subscribe and Install: (A Quick Start guide) .................................................................................................. 5
Airport Database and Chart Subscription: ................................................................................................ 5
DroidEFB Application Installation: ............................................................................................................ 5
Product Support and Community Participation: (Contact us!) ..................................................................... 7
DroidEFB Key: (Display can be viewed in Portrait or Landscape) ................................................................. 8
DroidEFB Key – Feature Description: ........................................................................................................ 9
Chart View – Right side: .......................................................................................................................... 10
Details View – Right Side: ....................................................................................................................... 14
Navigation Bar– Bottom: ........................................................................................................................ 15
Details View – Split Screen – Left side: ................................................................................................... 15
Navigation Status Panel – Middle: .......................................................................................................... 16
Chart View – Left side: ............................................................................................................................ 16
Flight Pad: ................................................................................................................................................... 19
Filing a Flight Plan: ...................................................................................................................................... 19
SAR Patterns:............................................................................................................................................... 21
Parallel track search pattern: .................................................................................................................. 21
Sector search pattern: ............................................................................................................................ 21
Expanding square search pattern: .......................................................................................................... 21
Draw on Charts and Plates: ......................................................................................................................... 22
Pinch to Zoom/Measure: ............................................................................................................................ 22
Path to External Storage: ............................................................................................................................ 22
Google Search Settings: .............................................................................................................................. 22
Obstacle data: ............................................................................................................................................. 23
Special Use Airspace – Legend Information:............................................................................................... 23
Weight and Balance: ................................................................................................................................... 24
SIG/AIRMETs Layer: .................................................................................................................................... 26
SIGMET: ................................................................................................................................................... 26
AIRMET:................................................................................................................................................... 26
Updating Charts and Airport Databases: .................................................................................................... 27
Cool Extra Stuff: .......................................................................................................................................... 28
Zaon XRX Traffic Awareness Integration:................................................................................................ 28
ADS-B with WAAS GPS and Traffic: ......................................................................................................... 28
Baron WxWorks Integration: .................................................................................................................. 29
X Plane Simulator Integration: ................................................................................................................ 30
Microsoft FSX Simulator Integration:...................................................................................................... 30
Acknowledgments: ..................................................................................................................................... 33
Disclaimer:
Please reference AC91-78 and AIM Chapter 1 for
more information regarding removal of paper
aeronautical charts from the cockpit and restrictions for
use of hand-held devices for navigation.
3
Android™ Gestures: (An Android tutorial)
This section is for the novice user and can be
skipped if you are fluent with Android.
Otherwise, review the following items for a
brief tutorial before getting started.
1. Touch – Touch the screen to trigger
default functionality for a
given item. Use your finger
to “press and lift.”
2. Long press – Long press the screen to
trigger data selection mode.
Use your finger to “press,
wait, and lift.”
3. Swipe – Touch the screen and move
your finger to navigate
between views in the same
hierarchy. Use your finger
to “press, move, and lift.”
4. Drag – Rearrange data and app icons
within a view or move data
into a container (e.g. folders
on Home Screen). May be a
combination of touch > drag
or long press > drag.
5. Double Touch – Zoom into content or
select text. Use your finger
to “touch twice in quick
succession.”
move them to zoom in or out. Use your
fingers to “press, move inward or
outward, and lift.”
7. Navigation bar – This is typically
located in the lower left of the display
and is always visible. Depending on
your version of Android, these may be
virtual or traditional hardware keys.
a. Going back – Touch this icon to
return to the screen prior
to the current one or
close an active display.
b. Home icon – Touch this icon to
return to the Home
screen. If an application
is currently in use, the app will
continue running in the
background.
c. Recent apps – Touch this icon
to navigate between and
swipe to kill recent
applications.
8. Applications – Touch this multi-square
icon to access a full menu of
applications and widgets
installed on the tablet. This is located
at the top right of the device home
screen.
9. Quick settings/Notifications – Touch
this icon
to access
additional options such as Wi-Fi, GPS
and Bluetooth and system settings or
view and acknowledge device and
application notifications.
For more information, please refer to your
device specific user manual.
6. Pinch open and close – Touch the
screen with two fingers and
4
Android is a trademark of Google Inc.
Subscribe and Install: (A Quick Start guide)
Due to some limitations within Google Wallet,
we recommend signing up from a computer
rather than from a mobile device. Retain the
receipt page for the initial subscription order
and set a reminder to periodically update
payment information, as required.
Airport Database and Chart Subscription:
1. Manage Google Wallet Access wallet.google.com/manage in a
computer browser to verify payment
information is up to date. Credit card
and password information is
confidential to Google Wallet and is
never provided to DroidEFB. staff.
2. Choose a Subscription Option – One
data subscription is valid for a single
user on multiple devices, such as a
tablet and a phone. Use the link below
or visit www.droidefb.com to choose a
subscription option (subscriptions may
be cancelled at any time):
Option 1, standard:
A 30 day free trial is available per user,
for evaluation prior to purchase.
Option 2, standard: (only www.droidefb.com)
A monthly subscription, renewed
automatically, priced at $6.99/mo.
Option 3, standard:
An annual subscription, priced at
$74.99/yr.
Option 4, premium:
A premium subscription, with Georeferenced approach plates and taxi
diagrams priced at $149.99/yr.
Note:
Visit our website for special offers and
promotional activity!
Upgrade your subscription at any time. If you
start a new subscription, remember to cancel
the previous one via Google Wallet to prevent
duplicate billing. Need help or have questions
about a refund for an unused portion of a
purchase? Contact [email protected] if
you ever have questions or need help managing
your account.
Whether purchasing through Google Play, in
app or via our website, all users are authorized
via Google.
DroidEFB Application Installation:
1. Download - After choosing a standard
or premium data option, download and
install DroidEFB with your device. If
downloaded from our website, the
required DroidEFB.apk can be found in
your devices downloads folder.
OR
Install - Touch the DroidEFB.apk to
install DroidEFB. Optionally, DroidEFB
can be downloaded and installed from
the Google Play Store. The Play Store
icon is located in device
applications and will direct
you to the Google Play Store,
where you can search the
keyword “DroidEFB” and choose the
install option.
Open -Touch “Open” after installation
or locate the DroidEFB launcher icon on
your device. After installation, the
DroidEFB icons will be located in the
device “Applications”. Long press an
icon to move it to your device home
screen. Touch the icon to launch the
app, accept the EULA and navigate
through the brief tutorial.
2. Authentication – Your subscription is
authenticated using the Google account
associated with your device or devices.
If the Google account used for the
subscription is different than the one on
*Subscription options and pricing are as of June, 2015.
5
your device, add the account via your
device settings. This is required prior to
downloading data for offline use, such
as airport databases and charts. Use
the same Google account as the ones
used to purchase the “Airport
Database and Chart Subscription.” If
your Google account, password or
subscription is ever changed, touch
“Main Menu > Account Login” to select
or add a different account.
3. Choose Data to Download – Once
authenticated, touch the “Main Menu >
Preferences” and choose
“States/Territories” as well as “Chart
Types” to be downloaded for use
offline. The RouteMinder™ notification
will appear if States/Territories are not
downloaded for the planned route.
4. Specify path to external storage –
Specify the location to store
downloaded chart data in “Menu >
Preferences > Device Settings > Path to
external storage.”
(Restart application for settings to take
effect).
5. Data Download Sequence – After
“States/Territories” and “Chart types”
have been selected for download and
path to external storage specified (SD
card, if applicable), touch “Update
Airports DB”. This update happens
quickly and must be completed prior to
selecting “Update Charts”. Updating
charts can take a while, depending on
Internet quality and amount of data
being downloaded.
1. Touch Menu
(hardware key on
some devices)
3. Update Airports DB
4. Update Charts
2. Choose States/Territories
and Chart types for download
6
Product Support and Community
Participation: (Contact us!)
We enjoy receiving questions, comments and
feature requests from our users!
The best way to contact us is by E-mail
at [email protected] or you can visit our
website: www.droidefb.com. We are typically
able to respond to questions within 24 hours.
If you like DroidEFB, please share your
experience with others by visiting Google Play
and giving us a 5-star review and leaving a
comment.
Whether or not you think we deserve 5 stars,
send us an email and tell us what we can do
better. We sincerely appreciate the
opportunity to share our passion for aviation
with you! Our goal is to make DroidEFB as
compelling and practical as possible!
To see what others are saying about DroidEFB,
Like us on Facebook or Follow us on Twitter.
A current revision of this manual is available at www.droidefb.com
7
DroidEFB Key: (Display can be viewed in Portrait or Landscape)
1. Navigation
Drawer
2. Nearest
Airports
3. Center
on Current
Position
4. POI
search
5. Split
Screen
Control
6. Main Menu
(Hardware key on
some devices)
7. NEXRAD/TFR Age/
Notification Area
33. TrackUp/North-Up
8. Flight Plan
32. Magnetic
Heading
9. Layers Tab
31. AIR/SIGMET
and PIREP
10. Sensors Tab
Chart View
(North-Up or
Track-Up view)
30. Current
Position
29. Course
Rhumb Line
11. User Waypoint
28. Magnetic
Rose Layer
12. Info Box
27. Airport
Reporting Status
and Winds
13. Info Box
Action Bar
26. Chart
Scribbles
14. Extended
Runway
Centerlines
25. Active Flight
Plan
Information
15. NEXRAD
16. Airport, FBO
and Weather
Tabs
17. Direct-To
24. Details View
18. Find Airport
w/Finder
Details View
(Split-screen or
full screen)
19. Show Airport
on Chart
23. Back
22. Home
21. Recent Apps
20. Quick
Settings
/Notifications
8
DroidEFB Key – Feature Description:
This detailed listing contains a description of the
33 items depicted on the “DroidEFB Key”, page
8. The key is shown with “Split Screen” enabled
in Preferences. The top half of the key displays
the “chart view” while the lower half displays
the “details view”. Some items are suppressed
without a GPS signal or data connection (Item
20).
1. Navigation Drawer – This is a flexible
menu that displays:
• Charts
• Tools
• Recent
The last 8
documents are
selectable by
default.
Charts and plates
are viewable via our
server with an
Internet connection
but must be
downloaded for
offline use.
2. Nearest Airports – Touch this icon to
see a query view list of “nearest”
airports (GPS required). Touch
any found airport to display the Details
View (Item 24) for that airport.
Without a GPS fix, the “Find” and
“Direct To” (Items 17-18) buttons are
suppressed. List is continuously update
in flight.
3. Center On Current Position – Touch this
icon to automatically center and
scroll on the current position
(Item 30). This icon only appears when
location is set by GPS and the chart
center is moved from the current
position (Item 20 and 30).
4. POI search – Internet access is required
when searching for points of
interest other than NAVAIDs,
waypoints and airports. This search
uses predictive lookup as characters are
typed allowing an item to be selected at
any time. Touching an item will cause it
to display the Info Box (Item 12). Touch
the Back Button (Item 23) to close it.
Long press the info box for a list of
additional tasks such as:
• Go Direct To POI
• Insert POI into flightplan
• Append POI to flightplan
• Create User Waypoint (Item 11)
The database uses ICAO abbreviations,
so remember to use the “K” prefix, as
required.
5. Split Screen Control – This icon appears
only if split-screen mode has
been enabled in Preferences.
The arrows point up-down or left-right
relative to screen orientation. When
9
split-screen mode is disabled, only one
arrow is present. With split screen
enabled, the arrows allow minimizing
and maximizing of the details view
(Item 24). Split screen settings are
accessed via the Main Menu (Item 6) >
Preferences > General > Split Screen.
6. Main Menu – This icon is the entry to
updating airport data and
charts, setting preferences, help
and exiting the program. This may be a
Main Menu > Help
virtual key or traditional hardware key
on some devices. If no Internet
connection is available, the data items
will be ghosted and inactive. Notice,
the same icon appears at the top of the
Flight Plan tab when open (Item 8) and
allows actions relative to the current
flight plan: Clear, Invert, Save, Load,
Delete and Quit.
Chart View – Right side:
Items 7-19 discuss the details pointed out on
the right side of the DroidEFB key.
7. NEXRAD/TFR Age/Notification Area –
The top center of
the chart is used to
display time since
TFR and NEXRAD data were last
downloaded as well as other
notifications depending on 3rd party
device being used. A data connection is
required to receive updated TFR and
NEXRAD information. Refer to Quick
Setting/Notifications (Item 20) for
additional device and application
notifications.
8. Flight Plan Tab – Touch the Flight Plan
tab to open or close
it and view or edit
waypoints. Long
press the tab to automatically display all
planned waypoints on the selected
chart. Touch the “+” symbol to insert
an airport, NAVAID, coordinate, victor
airway, or intersection. Acceptable
coordinate entry formats are as follows
(use “:” or “.” to differentiate
coordinate type, no spaces):
• Degrees.Decimal minutes
(DDD): 34.639333,-86.7815
• Degrees:Minutes:Seconds
(DMS): 34:38:21,-86:46:53
• Degrees.Minutes.Decimal
(DMM): 34.38.360,-86.46.890
Multiple waypoints can be loaded at a
time by using spaces between the
identifier and name i.e., KHSV RQZ V321
SYI KSYI. Radial and distance format
is FIX/RADIAL/DISTANCE. Enter planned
TAS for a flight while not airborne to
calculate estimated time enroute.
Flight Plan
Menu
Touch to view ETA/ETE
in device, leg,
cumulative or Zulu time.
Touch to enter planned TAS
and altitude
10
Touch an airport, NAVAID, waypoint or
coordinate in the flight plan to center it
on the chart and view its info box (Item
12). Long press an airport, NAVAID,
waypoint or coordinate for additional
options, such as choosing entry and exit
points along a victor airway.
The “Flight Plan Main Menu”, displayed
with the Flight Plan tab open, displays
the usual actions relative to the current
flight plan: Clear, Invert, Save, Load,
Delete. Flight Plan information is
automatically transferred to the Flight
Pad (Item 1) and Flight Pad Briefing tab
for viewing, editing and filing directly
with Lockeed Martin Flight Services. If
the route is edited via Flight Pad, you
will be given the option to transfer the
updated route information to the Flight
Plan tab. The Flight Plan tab will
highlight YELLOW when NOTAMs are
available via ADS-B or if METAR
information has been updated but not
yet viewed.
9. Layers Tab – Touch the Layers tab to
open or close it. Long press
to hide all layers for 5
minutes. While open,
options for NEXRAD, Winds,
SIG/AIRMETS, METARs, PIREPS, Track
Log/Crumbs
(Visit www.droidefb.com for a Track Log
Tutorial), Show Magnetic Rose, Display
TFRs and XRX Traffic are available. Tab
layout varies by type of third party
device being used. If an Internet or
data connection is not available,
deselect data items to prevent
connection notifications from appearing
while in flight.
Long press a layer displayed on the
chart, such as AIR/SIGMET or TFR for an
option to display more information.
10. Sensors Tab – Touch the Sensors tab to
open or close it. From here,
the magnetic heading (Item
32) can be calibrated, the GPS
source being used for position
calculations can be changed and
altimeter setting can be set (for devices
with built-in altimeter). Configure
DroidEFB to use built-in altimeter and
paired Bluetooth or Wi-Fi devices via
the “Main Menu (Item 6) > Preferences
> Device Settings.” DroidEFB looks for
built-in and external devices only during
initial startup. Bluetooth devices must
be turned on and paired prior to
starting DroidEFB. (Helper apps or
mock locations not required)
11
The built-in altimeter, if enabled,
automatically adjusts every 10 minutes
when below 30KIAS. Override the
adjustment by changing the altimeter.
If overridden, the altimeter will start
updating itself again after one hour. To
start auto adjusting sooner, select
“Reset”. The altimeter will display
29.92 initially and altitude will display in
red. With a valid weather source
available less than 60 minutes old, the
altimeter will auto adjust within 15
seconds. When altimeter data is
between 60 and 75 minutes old, the
altitude will display in
yellow. When the
altimeter is more than
75 minutes old, altitude will display in
red. While
airborne, the
altimeter may be
adjusted from one station to another,
as the flight progresses or advised by
ATC. The current altimeter setting does
not account for atmospheric
irregularities such as being inside a
pressurized aircraft, moving to areas of
higher or lower pressure, effects of
temperature or device calibration
errors. Virtual rotation vector sensor is
the recommended setting when
displaying magnetic heading. If use
rotation vector is not selected then
physical accelerometer + physical
magnetic field sensor is being used. To
determine the setting that is best, make
sure the magnetic heading triangle
(Item 32) is red. Rotate the device and
observe that the indication moves
freely and is proportionate to change
(i.e. 90 degrees). If not, deselect “use
rotation vector sensor” and try again.
11. User Waypoint - User waypoints can be
created then saved, edited
and synced across user
devices. Create a user
waypoint by long pressing a location on
the chart, an info box (Item 12)
generated from the POI Search (Item 4)
or GPS WPT. Acceptable coordinate
entry formats are as follows (use “:” or
“.” to differentiate coordinate type, no
spaces):
• Degrees.Decimal minutes
(DDD): 34.639333,-86.7815
• Degrees:Minutes:Seconds
(DMS): 34:38:21,-86:46:53
• Degrees.Minutes.Decimal
(DMM): 34.38.360,-86.46.890
Touch the “Main Menu (Item 6) >
Preferences > User Waypoints” to view
and edit a waypoint. Waypoints are
synced each time DroidEFB is launched
with an Internet connection present
and the user logged in.
12. Info Box – Touch an airport to display
the info box. Touch the Info Box
to expand the Details View (Item
24) or press the Back Button to
close it. Touch “ID” to for Morse Code.
On IFR, low and high altitude enroute
charts, touch NAVAIDs and
intersections to view the Info Box, also.
The info box shows bearing and
12
distance in the upper right corner (GPS
required), airport elevation, coordinates
and ICAO identifier. With NAVAIDs, the
frequency is listed. With intersections,
REP-PT is listed. For airports, additional
information includes the airport name,
its town, the size and direction of the
longest runway, the CTAF or tower
frequency and the current METAR (Data
connection required).
13. Info Box Action Bar –
a. Direct-To – This icon is
suppressed if GPS
position (Items 20
and 30) is not known.
This icon displays by touching a
location on the chart, a flight
plan waypoint (Item 8) or if a
POI (Item 4) has been selected.
Touching the Direct-To adds,
inserts or appends the new
waypoint into the flight plan tab
(Item 8).
b. Runway Highlight – Touch this
icon to select and
highlight the intended
runway for approach
or departure or “Find” the
runway. Arrows along the
extended runway
centerline indicate
traffic pattern
direction. If airspeed
is less than 30 knots,
the indication displays the
appropriate takeoff direction. If
greater than 30 knots, the
appropriate landing direction is
depicted.
c. Weather – Touch this icon or
the weather tab (Item
16) to retrieve and
display a complete
weather summary in the Details
View (Item 24). Touch
the toggle icon to change
time display.
•
•
Choose imagery to display via
“Main Menu (Item 6) >
Preferences > Imagery.” This
icon is suppressed if a data
connection is not available.
Available weather comprises
unexpanded text of local
METAR history, TAF (if
available), Local Radar and
Radar Tops.
Convective AIR/SIGMET with 1,
2 and 3 day outlook
Satellite with Infrared Color,
Visible, Infrared B/W, Water
Vapor
13
•
Icing AIR/SIGMET CIP (Current
Icing Product)
• Turbulence AIR/SIGMET with
GTG (Graphical Turbulence
Guidance)
• Freezing Levels
• Winds
• METAR history
• Area Forecast
• NOTAMS
• Regional Terminal Flight
Restrictions (TFR) Map.
This list can be reduced by touching the
“Main Menu (Item 6) > Preferences >
Imagery.”
14. Extended Runway Centerlines –
Extended runway centerlines of
destination airports are
optionally displayed. The
reference markings are spaced 1NM
apart and are 10NM long. Touch the
“Main Menu (Item 6) > Preferences >
General > Show Destination Runway
Centerlines” to toggle this feature. Use
the Runway Highlight feature (Item 13)
to overlay runway headings.
15. NEXRAD Layer – Next Generation Radar
is displayed by touching the
Layers tab (Item 9) >
NEXRAD Base Reflectivity.
Data from all radar sites in the US are
shown with color coding to represent
strength of returned energy to the
radar expressed in values of decibels
(dBZ). DroidEFB does not smooth or
otherwise alter the raw image to avoid
degrading accuracy. An active Internet
or 3rd party data connection is required
for continuous updating.
Details View – Right Side:
Items 16-19 discuss the Details View (Item 24)
as shown on the right side of the DroidEFB key.
16. Airport, FBO and Weather Tabs –
Access the Details View (Item 24) by
touching an airport InfoBox (Item 12) to
view airport, FBO and weather details.
Fuel Price information is updated
continuously, as the data is received
from the FBO.
Touch the weather tab to retrieve and
display a complete weather summary,
which can be condensed by touching
the “Main Menu (Item 6) > Preferences
> Imagery.”
17. Direct-To – This inserts airport into the
Flight Plan
and
activates it as a current segment.
18. Find Airport w/Finder – Touch “Find” to
highlight the
airports
primary
runway and view a graphical
representation of your current position
relative to the displayed airport.
Ground speed, altitude above
destination, descent rate required (fpm)
to destination, bearing, and range are
14
all shown in the Details View (Item 24).
19. Show Airport on Chart – Touch to
center airport
on chart and
display the
info box (Item 12). Touching an airport,
intersection coordinates or NAVAID
listed in the Flight Plan Tab (Item 8) has
the same functionality.
Navigation Bar– Bottom:
At the bottom of the display are Android
navigation tools (Items 20-23) that are always
displayed.
20. Quick Settings – Touch this group to
access additional options such as Wi-Fi,
GPS and Bluetooth and system settings
or view and acknowledge device and
application notifications.
21. Multitasking –Touch this icon to see a
list of applications running
on the device, or to switch
between them. Choosing
another application will allow DroidEFB
to continue running in the background.
22. Home Button – Touch this icon to
return to the Home screen. If
an application is currently in
use, it will continue running in the
background.
23. Back Button –Touch this icon to return
to the screen prior to the
current one or close an active
dialog. From the chart view,
touching the Back button will prompt
the user to quit DroidEFB.
Details View – Split Screen – Left side:
Item 24 shows the Details View which appears
after touching the Info Box (Item 12) as pointed
out on the left side of the DroidEFB key.
24. Details View – The details view
displays:
• Nearest airports (Item 2) (also
see DroidEFB
Airports, installed
with DroidEFB)
• Airport, FBO and Weather
details
• Find
Information may be displayed in full
screen or split screen view using split
screen control (Item 5). Change split
screen preferences by touching “Main
Menu (Item 6) > Preferences > General
> Split Screen.” Viewable items include
AFDs, Airport Diagrams,
Alternate/Radar Minimums,
Departure/Arrival Procedures and
approach plates (Geo-referenced
approach plates and airport taxi
diagrams available with premium
15
subscription).
b. Cross-Track Error – XTK Displays
distance and position left or right of
course line (Item 29).
Chart View – Left side:
Items 26-32 show the details pointed out on the
left side of the DroidEFB key.
Geo-referenced approach plates and
airport diagrams are
indicated by a small
aircraft in the lower right
of the Charts and
Procedures label. Select an approach
plate to highlight the runway in the
chart view. The last 8
(default) viewed items are
displayed as Recent
Documents in the Navigation
Drawer (Item 1).
Navigation Status Panel – Middle:
Item 25 shows the active waypoint information
pointed out on the middle of the DroidEFB key.
25. Active Waypoint Information – Display
of Distance (DIS), Estimated Time
Enroute (ETE) and Estimated Time of
Arrival (ETA) is activated by entering
waypoints into the Flight Plan (Item 8).
Select “Clear Flight Plan” from the Flight
Plan tab menu to hide. Displayed
information is relative to the active leg
and continuously updates while
airborne if GPS is present.
a. Notifications - Refer to your device
notifications (Item 20) for GPS activity
and status.
26. Chart Scribbles – Touch the scribbles
icon for drawing or writing
options on the displayed chart.
27. Airport Reporting Status and Winds –
Standard color coded METAR symbols
are used to depict flight category as
well as cloud coverage:
LIFR - Magenta - Ceiling is below
500AGL and/or less than 1 mile
visibility.
IFR - Red - Ceiling 500-1000AGL and/or
1-3 miles visibility.
MVFR - Blue - Ceiling 1000-3000AGL
and/or 3-5 miles visibility.
VFR - Green – Ceiling is greater than
3000AGL and visibility greater than 5
miles.
Indeterminate – Gray
Wind direction and velocity barbs are
shown in increments from surface to
53000 feet.
Cloud Coverage
Winds
CLR/SKC
Calm
FEW
5kts
SCT
10kts
BKN
50kts
OVC
METARs and winds require a data
connection and can be turned on or off
via the Layers tab (Item 9).
28. Magnetic Rose – Display this by
touching the Layers tab
(Item 9) > Show Magnetic
Rose. If disabled, CDI (not
16
shown) and magnetic heading (Item 32)
layers are removed. A CDI (Course
Deviation Indicator) display is optionally
shown as a green bar within the
optional Magnetic Rose (Item 28). The
CDI uses standard Terminal, Enroute
and Approach scaling.
29. Course Rhumb Line – This is the flight
planned course or line on
the chart to be taken by
the aircraft. While airborne, the active
segment is shown in magenta color. To
activate a different segment than the
one currently displayed, open the Flight
Plan tab (item 8), long press the name
of the waypoint at the destination end
of the segment you wish to activate and
a menu will pop up with the option to
“Activate Leg.” To display the course
line as a semi-transparent rather than a
solid line, touch the “Main Menu (Item
6) > Preferences > General > Alternate
Flight Path Display.”
30. Current Position – An aircraft icon is
displayed if GPS position is
known. The shape, size and
opacity of this icon is configurable via
the “Main Menu (item 6) > Preferences
> General.” Select “Main Menu (Item 6)
> Preferences > General > Track
Prediction” to display distance +
heading which shows
where the aircraft will be
in one minute, distance
only or none. Track is not shown until
10 Knots is exceeded.
A question mark “ ” displays if GPS
information is “old.” If
unable to calculate GPS
heading and track, an “ ”
will be displayed instead of the airplane
symbol. Refer to your device
notifications (Item 20) for GPS activity
and status.
31. AIR/SIGMET, PIREP, Wind –
AIR/SIGMETs and PIREPs are
enabled for overlay via the
Layers tab (Item 9) (Data
connection required for continuous
updates). Long press a displayed layer,
such as AIR/SIGMET or TFR for an
option to display more information.
The information callout is notification
that a PIREP is available for that
location. Touch the callout box
to view the details of the PIREP
including time, flight level, aircraft type,
sky cover, temperature, wind velocity,
turbulence, icing and remarks.
32. Magnetic Heading – A magnetic
heading indication is
optionally displayed on the
circumference of the
compass rose. The
indication may be extremely
unreliable unless a device with an
accurate compass is used and there are
no nearby electromagnetic
interferences. Below 30 Knots, the red
triangle appears and is constantly
synchronizing to GPS heading. Above
30 Knots, the triangle turns blue and
displays magnetic heading as calculated
by the device. If the display is
inaccurate, it may be updated via the
sensors tab (Item 10). Touch the “Main
Menu (Item 6) > Preferences > Device
Settings > Use the built in compass” to
turn this option on or off.
33. Track-Up/North-Up Toggle - Optionally,
display the chart using
track up or North up.
17
The North pointer always points to
magnetic North, either in Track-Up or
North-Up mode. If using Track-Up, it is
recommended to enable Hardware
Acceleration via “Main Menu (Item 6) >
Preferences > Device Settings.”
18
Flight Pad:
1. The Flight Pad is located under
“Navigation Drawer > Flight Pad.” This
semi-automated organization tool
automatically imports Flight Plan
waypoints into the Departure, Enroute,
and Arrival tabs. Airport diagrams,
takeoff minimums, frequencies, arrival
and approach procedures may be
viewed directly from within Flight Pad.
4. Use Scribbles to write clearances, ATC
instructions, or draw illustrations.
5. Select the back button to return to the
chart view. Waypoint edits are
automatically transferred to the Flight
Plan tab. Plates are automatically
imported to the Navigation Drawer.
Filing a Flight Plan:
1. Select the “BRIEF/FILE” tab to
“CONFIGURE” and “REQUEST” a briefing
2. The Flight Pad can be used to record
weather or ATC information, as
received during the Departure, Enroute
or Arrival phase. Simple E6B
calculations are performed, such as
headwind/tailwind and performance
data.
3. Runway Finder is also available within
Flight Pad and displays a representation
of your aircraft in relation to the
runway in use.
or “FILE” a flight plan directly with
Lockeed Martin Flight Services
2. Touch “Configure” from the Briefing tab
to authenticate user information and
set preferences.
19
3. Touch “Request” from the Briefing tab
to file an FAA Flight Plan and/or
Request Briefing. . “File” and “Brief”
remain ghosted until all required
information is entered for the flight
plan.
20
SAR Patterns:
The Search and Rescue (SAR) feature is
activated by touching “Main Menu >
Preferences > General > Enable SAR Patterns.”
Search patterns are easily incorporated into a
flight plan using three basic search patterns.
Parallel track search pattern:
Sector search pattern:
Expanding square search pattern:
Parameters for each search pattern may be
adjusted as necessary for effectiveness.
To create a search and rescue flight plan:
1. Long press a waypoint in the Flight Plan
tab. Waypoints
are entered into
the Flight Plan by
touching the “+” or long press a
location on the chart and “append” or
“insert” a user waypoint into the Flight
Plan tab.
2. Touch “Search/Rescue…” option.
3. Verify the starting point is correct,
which is also the anchor point for the
SAR pattern. Adjust parameters for size
and direction of the route. Default
values appear initially for each pattern
type.
4. Be sure to fill in all required fields the
select “Add SAR.”
To activate a different segment than the one
currently displayed, open the Flight Plan tab,
long press the name of the waypoint at the
destination end of the segment you wish to
activate and a menu will pop up with the option
to “Activate Leg.”
21
Draw on Charts and Plates:
Path to External Storage:
The drawing feature allows Geo-referenced
drawings of traffic patterns, approaches, holds
etc. to be overlaid onto any chart or procedure
in a selection of colors. All drawings are saved
unless “Clear drawing” is touched, which
removes all drawings from that chart or
procedure.
We recommend saving and running the
DroidEFB application from internal memory and
specifying a path to external storage where
chart and procedure data are downloaded and
stored for offline use.
1. Touch the Scribbles icon displayed in the
lower left of the chart view to
begin.
2. Drawing tools will appear at the top of
the screen and includes color selection,
undo last segment, clear all drawings
and done.
3. When drawing is complete, touch
“Done” to return to normal application
operation.
Some devices with SD can’t use SD. If a device
manufacturer has elected to have external
storage be on-board flash and also has an SD
card, you will need to contact that
manufacturer to determine whether or not you
can use the SD card (not guaranteed) and what
the rules are for using it.
Access “Main Menu > Preferences > Device
Settings > Path to external storage” to specify
the file path.
Pinch to Zoom/Measure:
Pinch zoom is also a function. While performing
the pinch to zoom motion, bearing and distance
are displayed between the two touched points
on the screen. Configure distance to display,
nautical or statute miles, by touching “Main
Menu (Item 6) > Preferences > General > Use
statute miles.”
Restart the application after specifying a new
file path for changes to take effect.
Once complete, navigate to the home screen >
applications > files > device storage >android >
data and delete the com.avilution.AviationMap
or com.avilution.GplayAviationMap folders not
being used.
Google Search Settings:
Tap on the Google search bar from the Home
Screen then choose “Menu > Settings” to
22
configure your device to search the DroidEFB
database from the
Google search bar.
Results may vary
by device.
Obstacle data:
Obstacles taller than 200’ AGL are displayed on
the chart with speeds above 30 Knots. Red
indicates obstacle within 200 feet of current
position, yellow indicates obstacles within 1000
feet and gray indicates obstacles more than
1000 feet to 3000 feet below current position.
Unlighted obstacle – Height
greater than 1000AGL.
Lighted obstacle – Height
greater than 1000AGL.
Unlighted obstacle – Height
less than 1000AGL.
Lighted obstacle – Height
less than 1000AGL.
Balloon – Height is typically
greater than normal!
Special Use Airspace – Legend Information:
Long press within the depicted boundaries of a
Restricted (R) Area, Prohibited (P) Area, Military
Operations Area (MOA), Alert Area (A), Warning
Area (W) or National Security Area for an option
to display its details. Revisions to this
information are published annually and no
updates are published between editions. Flight
Service maintains the most up to date
information regarding SUA.
23
Weight and Balance:
1. Select "New" from the configuration tab and
input aircraft specific parameters for computing
weight and balance. If your aircraft doesn't
specify a "Max Zero Fuel Wt" or "Max Landing
Wt" enter the aircraft max takeoff weight.
2. "Fuel Type" may be entered as AVGAS, JET-A
or Pounds. Specify the "Main Tank Title" and
"Aux Title" as you would like them to appear on
the "Loading" tab.
3. Select "Add Weight/Balance Ranges", starting
with the minimum weight for utility then
normal. View the "Chart" tab and compare to
the aircraft POH for accuracy.
4. Select "Add Weight/Balance Station
Limitations" per the aircraft POH, labeling each
one. The labels are used to define the "Station
Limitations" in the next step.
24
5. Enter station limitations per the aircraft POH.
Enter the text for each station exactly as it
appears in the previous step for each "Weight
and Balance Station". Use the signs in the
example below with each station or station
combination.
6. Multiple aircraft can be configured and saved
then selected using the left or right arrows on
the "Loading" tab. Enter values for each
defined station to generate the weight and
balance.
7. The status of the values entered for each
station are compared to the parameters from
the "Config" tab to generate a status report.
The weight and balance can be shared via Email.
8. Select the "Chart" tab for a visual depiction of
the current aircraft weight and balance
calculation. The high end of the chart depicts
current configuration. The low end of the chart
assumes zero fuel.
25
SIG/AIRMETs Layer:
The SIG/AIRMET “Layers” dropdown allows
plotting of particular hazards such as icing,
convection, turbulence, IFR, mountain
obscuration and volcanic ash. All items may be
shown at once or selected individually to
reduce clutter and improve device
performance. Like TFRs, long press a displayed
icon or region to view raw AIRMET or SIGMET
data.
hazardous to all aircraft but that does not meet
SIGMET criteria. AIRMETs are issued for:
1. Icing 2. Turbulence 3. Mountain Obscuration 4. IFR -
SIGMET:
A SIGMET (Significant Meteorology Information)
advises of weather potentially hazardous to all
aircraft other than convective activity. SIGMETs
are issued for:
1. Icing 2. Turbulence 3. Convection 4. Volcanic Ash AIRMET:
An AIRMET (Airman’s Meteorological
Information) advises of weather potentially
26
Updating Charts and Airport Databases:
The first time you use DroidEFB, it will be
necessary to select the chart types, states and
territories you wish to download data for.
"Update Airports DB" must be selected prior to
“Update Charts”. This updates a textual
database for the entire country, regardless of
states or territories selected. “Update Charts”
checks the Airports DB for imagery, charts and
procedures needing downloaded based on
States/Territories and Chart Types selected
under Preferences. Each time DroidEFB is
launched, a "Data Expires" dialog appears
momentarily indicating when either Charts or
DBs are no longer current.
2. Chart Types Selection - To select chart
types, touch the “Menu > Preferences >
Chart Types.”
3. Downloading Data - The next step is a
two-step process and is only required
once every 28 days (Thursdays), when
prompted to do so.
1. Touch Menu
If you experience trouble updating data, verify
the quality of your Internet connection and
Account Login credentials. You may also try
using our alternate download server, selectable
via the “Menu > Preferences > General >
Alternate Download Server.” Changing Internet
connections during download, such as Wi-Fi to
mobile, or pressing the back button will halt the
update.
1. States/Territories Selection - To select
states and territories, touch the “Menu
> Preferences > States/Territories.”
Choosing all states requires upward of
8GB storage and 30 minutes or more of
download time, depending on device
and Internet speed.
(hardware key on
some devices)
3. Update Airports DB
4. Update Charts
2. Choose States/Territories
and Chart types for download
Terminal Procedures, Sectional Charts
and TAC with legend may be
downloaded digitally
from http://www.faa.gov/air_traffic/flig
ht_info/aeronav/.
27
Cool Extra Stuff:
The following pages contain instructions for
connecting and interacting with optional third
party devices. As DroidEFB. implements and
tests these devices, the manual will be updated
to reflect advances of functionality. Helper
apps are not needed nor should “Allow mock
locations” be selected on ALL Android devices.
Zaon XRX Traffic Awareness Integration:
DroidEFB and the Zaon XRX Portable Collision
Avoidance System (PCAS) integrate to provide
high-quality, low cost traffic information.
Direction, range and relative altitude of threats
are displayed on the chart, in relation to the
aircrafts current position.
1. Obtain a PCAS XRX and connect it to the
XRX BlueLink Bluetooth module
available from www.zaon.aero.
2. See “Placement Considerations” and
“Compass Calibration” in your XRX
Owner’s Manual.
3. Use the “Com” menu on the PCAS XRX
to choose “Profile 1” or “Anywhere
Map” as the output method.
4. Use the “Alt” and “Range” menus on
the PCAS XRX to set detection range to
6NM and ±2500 feet.
5. Touch the Layers tab > XRX Traffic on
DroidEFB (GPS required).
ADS-B with WAAS GPS and Traffic:
Automatic Dependent Surveillance-Broadcast
(ADS-B) delivers unprecedented situational
awareness to General Aviation pilots. With
DroidEFB, ADS-B provides traffic, NEXRAD
Radar, METARs, TAFs, NOTAMs and PIREPs
(TFRs not yet displayed).
Visit http://www.faa.gov/nextgen/implementat
ion/programs/adsb/ for a tutorial from the FAA.
SkyRadar - SkyRadar http://www.skyradar.net/
devices provide WAAS GPS and in-flight
weather through ADS-B transmissions. The
SkyRadar device captures ADS-B transmissions
and sends them to your device over a Wi-Fi
connection.
Dual XGPS170 ADS-B Receiver –
XGPS170 http://xgps170.dualav.com/ devices
also provide WAAS GPS and in-flight weather
through ADS-B transmissions. This device
captures ADS-B transmissions and sends them
to your device over a Bluetooth connection.
1. Obtain an XGPS170 with firmware
version 1.5 or later.
2. See “ADS-B antenna connection”, “GPS
antenna”, “Setup” and “Pairing the
XGPS170 with an Android device”
sections of the XGPS170 Owner’s
Manual. . Helper apps are not needed
nor should “Allow mock locations” be
selected on ALL Android devices.
3. In DroidEFB, select “Menu, Preferences
> Device Settings > Use Bluetooth GPS
or ADS-B” (Changes do not take effect
until DroidEFB is restarted).
4. With the XGPS170 paired, launch
DroidEFB. Within a few seconds of
launching the app, an option will appear
28
to select Builtin or ADS-B. This can be
changed later using the Sensors tab.
receiver data are inaccurate or missing. This
data is depicted by blue diagonal lines.
“NEXRAD Age” depicts the oldest data
represented and currently visible on the display.
5. Touch the Layers tab > NEXRAD via
ADS-B, ADSB Traffic, METARs and
PIREPs in DroidEFB (GPS Required).
ADS-B with AHRS – iLevil and SkyRadar DX
devices provide an AHRS in addition to WAAS
GPS and ADS-B. This device captures ADS-B
transmissions and sends them to your device
over a Wi-Fi connection.
Baron WxWorks Integration:
1. Obtain WxWork data receiver, Baron
Mobile Link device and Wi-Fi antenna
from www.baronservices.com/mobileli
nk
2. Obtain a XM WX Satellite Weather
subscription.
3. Configure SSID by touching the “Menu >
Preferences > Device Settings > Baron
MobileLink SSID.” The SSID must match
the one the MobileLink device uses,
which is “MobileLink” by default.
4. Establish a Wi-Fi connection with your
Android device and Baron Mobile Link.
NEXRAD display via ADS-B – NEXRAD is
broadcast at two different resolutions, local and
national. Local radar is updated every 5
minutes and national radar is updated every 20
minutes. “NEXRAD incomplete” is displayed in
the notification area if portions of the ADS-B
29
X Plane Simulator Integration:
The following procedure outlines steps required
to integrate an Android Tablet running
DroidEFB via Wi-Fi with a computer running XPlane for experimentation at home.
1. Install X-Plane version 10 on your PC.
2. Enable X-Plane as Data Source by
touching the Main Menu > Preferences
> Device Settings > Support X-Plane as
Data Sources.
3. Restart DroidEFB and write down the IP
address for your tablet, which will be
displayed briefly during the boot-up
process.
4. Under X-Plane Settings > Data Input &
Output > Data Set, place check marks
in:
5. Adjust UDP rate to 2.0/sec:
6. Under X-Plane Settings > Net
Connections > Data, enter the IP
address of your Android device and set
the port number to 49000.
7. With X-Plane running, launch DroidEFB
and choose X-Plane as the GPS Source.
Microsoft FSX Simulator Integration:
The following procedure outlines steps required
to integrate an Android Tablet running
DroidEFB with a PC running Microsoft Flight
Simulator X (MS FSX) for experimentation at
home.
Required equipment:
1. PC running Microsoft Flight Simulator X.
2. FSUIPC4; Peter Dowson application to
provide GPS output from FSX.
Download at
http://www.schiratti.com/dowson.html
. This software requires purchase of an
access code to activate the GPS
functionality (€24.00),
http://secure.simmarket.com/petedowson-fsuipc4.phtml.
3. Bluetooth serial data capability, such as
a Rocketfish (Model Number: RFFLBTAD) and Medialink (MUA-BA3) with
the latest drivers, to provide the serial
data functionality.
4. Android Tablet, Bluetooth capable.
5. Bluetooth GPS application (Googoo
Android): Free from Google Play.
6. DroidEFB. application: Available from
Google Play or www.droidefb.com.
Configuring Bluetooth for PC:
1. Open the Bluetooth Settings.
2. Select “Allow Bluetooth devices to find
this computer”.
30
3. Select the “Com Ports” tab.
4. If not already established, add a virtual
Receive Com port:
a) Click “Add…”.
b) Select “Incoming (device initiates
the connection).
c) Click OK.
d) Note the Com Port Number (i.e.
Com X).
e) Click OK.
Configure the BT serial port Properties:
1. Under Device Manager / Ports (Com &
LPTX), Right click “Standard Serial over
Bluetooth link (Com X).
2. Select Properties.
3. Select Port Settings.
a) Bits per Second: 9600
b) Data Bits: 8
c) Parity: None
d) Stop: 1
e) Flow Control: None
f) Click Ok.
Microsoft Flight Simulator X:
1. Install FSUIPC per the FSUIPC
documentation.
2. Launch MS FSX and enter FSUIPC
registration key when prompted.
3. Select the “Add-ons” drop down from
flight page and click on “FSUIPC…”.
4. Configure FSUIPC:
a) Within FSUIPC, select
“AutoSave/GPSout”.
b) Check “Check to enable this
GPSout”.
c) Select the previous noted Comm
Port for the Bluetooth data bus (i.e
31
Comm 6) from the Comm Port Drop
Down.
d) Speed: 9600
e) Interval (msecs) 1000 to 2000.
f) Select GGA, RMC, GSA.
g) Click OK.
Android Tablet Configuration:
1. Install the Bluetooth GPS app.
2. Configure the tablet for Mock GPS
providers
g) Select {} Developer Options, may
require enabling.
h) Check “Allow mock locations”.
i) Turn on Bluetooth in the tablet.
j) Pair the Tablet and the PC.
Note: If a device code is required try 0000 or
1234 on the tablet and PC.
Playing together:
1. Launch Flight Simulator X.
Note: the tablet will need to see Bluetooth
serial activity for the next steps.
2. Launch the tablet Bluetooth GPS app on
the tablet.
3. Click “Connect” in the app.
4. Verify streaming GPS data in the
Bluetooth GPS app.
Note: Data must be streaming in the BT GPS
app for DroidEFB to track.
Tracking the simulator:
1. Launch DroidEFB.
Note: If the setup was successful, DroidEFB will
jump to the reported aircraft location in FSX.
32
Acknowledgments:
For questions or comments regarding the DroidEFB
data, application or this manual, contact:
Paul Coleman at [email protected]
33