1
RAPID/D
October 1993
RAPID
INTEGRATED DEVELOPMENT ENVIRONMENT
USER'S MANUAL
© MOTOROLA Inc., 1993; All Rights Reserved
Motorola reserves the right to make changes without further notice to any products herein to improve reliability,
function, or design. Motorola does not assume any liability arising out of the application or use of any product or
circuit described herein; neither does it convey any license under its patent rights nor the rights of others.
Motorola products are not designed, intended, or authorized for use as components in systems intended for
surgical implant into the body, or other application in which the failure of the Motorola product could create a
situation where personal injury or death may occur. Should Buyer purchase or use Motorola products for any such
unintended or unauthorized application, Buyer shall indemnify and hold Motorola and its officers, employees,
subsidiaries, affiliates, and distributors harmless against all claims, costs, damages, and expenses, and reasonable
attorney fees arising out of, directly or indirectly, any claim of personal injury or death associated with such
unintended or unauthorized use, even if such claim alleges that Motorola was negligent regarding the design or
manufacture of the part.
Motorola and the Motorola logo are registered trademarks of Motorola Inc.
Motorola Inc. is an Equal Opportunity/Affirmative Action Employer.
IDE software and portions of the manual are © P & E Microcomputer Systems, Inc.*, 1992, 1993; All Rights
Reserved
IBM-PC/XT/AT are registered trademarks of International Business Machines Corp.
*
P & E Microcomputer Systems, Inc.
PO Box 2044
Woburn, MA 01888-2044
(617)-353-9206
TABLE OF CONTENTS
TABLE OF CONTENTS
CHAPTER 1 INTRODUCTION
1.1
1.2
1.3
System Overview ..................................................................................................................................... 1-2
Host Computer Requirements................................................................................................................... 1-2
Specifications Summary ........................................................................................................................... 1-3
CHAPTER 2 CONFIGURING RAPID
2.1
2.2
Introduction.............................................................................................................................................. 2-1
RAPID Configuration............................................................................................................................... 2-1
2.2.1
Configuration Options .................................................................................................................. 2-2
2.2.2
File Options .................................................................................................................................. 2-3
2.2.3
Print Options................................................................................................................................. 2-4
2.2.4
Editing Options............................................................................................................................. 2-5
2.2.5
Window Options........................................................................................................................... 2-6
2.2.6
Video Attributes ........................................................................................................................... 2-7
2.2.7
Screen Options.............................................................................................................................. 2-8
2.2.8
Executive Options......................................................................................................................... 2-9
2.2.9
Assembler and Compiler Options................................................................................................ 2-10
2.2.10 CASM Assembler Options .......................................................................................................... 2-11
2.2.11 C Compiler Options.................................................................................................................... 2-12
2.2.12 Compiler 3 Options..................................................................................................................... 2-12
2.2.13 Simulator Options....................................................................................................................... 2-13
2.2.14 Debugger Options ....................................................................................................................... 2-13
2.2.15 Terminal Emulator or Programmer Options ................................................................................ 2-14
2.2.16 Auxiliary Help Options............................................................................................................... 2-14
2.2.17 F Key Definition Options............................................................................................................ 2-15
2.3 Accepting Configuration ........................................................................................................................ 2-15
CHAPTER 3 USING RAPID
3.1
3.2
3.3
3.4
3.3
3.4
Command Syntax ..................................................................................................................................... 3-1
RAPID's Configuration File (RAPID.CFG) .............................................................................................. 3-3
Help ......................................................................................................................................................... 3-4
Hot-Keys .................................................................................................................................................. 3-5
Prompt and Status Lines ........................................................................................................................... 3-6
Commands ............................................................................................................................................... 3-7
3.4.1
Cursor Commands ........................................................................................................................ 3-7
3.4.2
Insert and Delete Commands ...................................................................................................... 3-10
3.4.3
Tab Commands........................................................................................................................... 3-11
RAPID/D
i
MOTOROLA
TABLE OF CONTENTS
CHAPTER 3 USING RAPID (continued)
3.4.4
Undo Commands ........................................................................................................................ 3-12
3.4.5
The Find Command .................................................................................................................... 3-12
3.4.6
The Find-and-Replace Command................................................................................................ 3-13
3.4.7
File Commands........................................................................................................................... 3-17
3.4.8
Window Commands ................................................................................................................... 3-18
3.4.9
Block Commands ....................................................................................................................... 3-19
3.4.10 Printing Commands .................................................................................................................... 3-22
3.4.11 Text Marker Commands ............................................................................................................. 3-22
3.4.12 Macro Commands....................................................................................................................... 3-23
3.4.13 Text Formatting Commands ....................................................................................................... 3-26
3.4.14 Mode Toggle Commands............................................................................................................ 3-27
3.4.15 Screen Toggle Commands .......................................................................................................... 3-28
3.4.16 Program Configuration Commands............................................................................................. 3-29
3.4.17 Miscellaneous Commands .......................................................................................................... 3-30
3.4.18 Program Assembling and Compiling Commands ........................................................................ 3-32
3.4.19 Program Simulation Commands.................................................................................................. 3-33
3.4.20 Program Debugging Commands ................................................................................................. 3-34
3.4.21 Programmer/Terminal Emulation Commands ............................................................................. 3-34
3.5 RAPID's Virtual Memory Manager......................................................................................................... 3-35
CHAPTER 4 CASM OPERATING PROCEDURE
4.1
Introduction.............................................................................................................................................. 4-1
4.1.1
Labels and Reserved Labels.......................................................................................................... 4-1
4.1.2
Operations .................................................................................................................................... 4-2
4.1.3
Operands and Constants................................................................................................................ 4-2
4.1.4
Comments .................................................................................................................................... 4-3
4.1.5
Assembler Directives.................................................................................................................... 4-4
4.1.6
Changing Base.............................................................................................................................. 4-5
4.1.7
Cycle Adder.................................................................................................................................. 4-5
4.1.8
Conditional Assembly................................................................................................................... 4-6
4.1.9
Include.......................................................................................................................................... 4-7
4.1.10 Macros.......................................................................................................................................... 4-7
4.1.11 Pseudo Operations ........................................................................................................................ 4-8
4.1.12 Listing Directives ....................................................................................................................... 4-10
4.1.13 Listing File ................................................................................................................................. 4-11
4.1.14 Object and Map Files.................................................................................................................. 4-12
4.1.15 Error Messages ........................................................................................................................... 4-12
4.1.16 Using Files from Other Assemblers............................................................................................. 4-14
APPENDIX A S-RECORD INFORMATION
RAPID/D
ii
MOTOROLA
TABLE OF CONTENTS
LIST OF FIGURES
Figure
1-1
Page
Block Diagram of RAPID......................................................................................................................... 1-2
LIST OF TABLES
Table
2-1
2-2
2-3
2-4
2-5
2-6
2-7
2-8
2-9
2-10
2-11
2-12
2-13
2-14
2-15
2-16
2-17
3-1
3-2
3-3
3-4
3-5
3-6
3-7
3-8
3-9
3-10
3-11
3-12
3-13
Page
Configuration Options .............................................................................................................................. 2-2
File Options.............................................................................................................................................. 2-3
Print Options ............................................................................................................................................ 2-4
Editing Options ........................................................................................................................................ 2-5
Window Options....................................................................................................................................... 2-6
Video Attributes ....................................................................................................................................... 2-7
Screen Options ......................................................................................................................................... 2-8
Executive Options .................................................................................................................................... 2-9
Assembler and Compiler Options ........................................................................................................... 2-10
CASM Assembler Options...................................................................................................................... 2-11
C Compiler Options................................................................................................................................ 2-12
Compiler 3 Options ................................................................................................................................ 2-12
Simulator Options................................................................................................................................... 2-13
Debugger Options................................................................................................................................... 2-13
Programmer or RapTerm Options........................................................................................................... 2-14
Auxiliary Help Options........................................................................................................................... 2-14
F Key Defaults ....................................................................................................................................... 2-15
Command Line Options............................................................................................................................ 3-2
RAPID Hot-Keys...................................................................................................................................... 3-5
Edit Window Status Line Information ...................................................................................................... 3-6
Cursor Movement Commands .................................................................................................................. 3-7
Insert and Delete Commands .................................................................................................................. 3-10
Tab Commands ...................................................................................................................................... 3-11
Undo Commands.................................................................................................................................... 3-12
Find and Replace Commands ................................................................................................................. 3-14
File Commands ...................................................................................................................................... 3-17
Window Commands ............................................................................................................................... 3-18
Block Commands ................................................................................................................................... 3-19
Printing Commands ................................................................................................................................ 3-22
Text Marker Commands ......................................................................................................................... 3-22
RAPID/D
iii
MOTOROLA
TABLE OF CONTENTS
LIST OF TABLES
(continued)
Table
3-14
3-15
3-16
3-17
3-18
3-19
3-20
3-21
3-22
3-23
3-24
4-1
4-2
4-3
4-4
Page
Macro Commands .................................................................................................................................. 3-23
Special Macro Commands ...................................................................................................................... 3-24
Text Formatting Commands ................................................................................................................... 3-26
Mode Toggle Commands........................................................................................................................ 3-27
Screen Toggle Commands ...................................................................................................................... 3-28
Program Configuration Commands......................................................................................................... 3-29
Miscellaneous Commands ...................................................................................................................... 3-30
Program Assembling and Compiling Commands.................................................................................... 3-32
Program Simulation Commands ............................................................................................................. 3-33
Program Debugging Commands ............................................................................................................. 3-34
Programmer/Terminal Emulation Commands......................................................................................... 3-34
Assembler Directives................................................................................................................................ 4-4
Pseudo Operations .................................................................................................................................... 4-9
Listing Directives ................................................................................................................................... 4-10
Assembler Error Messages...................................................................................................................... 4-12
RAPID/D
iv
MOTOROLA
INTRODUCTION
CHAPTER 1
INTRODUCTION
The integrated development environment RAPID is a special software development tool for your Motorola
Development System. RAPID functions with:
•
M68MMDS05 Motorola Modular Development System – for M68HC05 microcontroller unit (MCU)
based systems
•
M68MMDS11 Motorola Modular Development System – for M68HC11 MCU based systems
•
M68ICD16 In-Circuit Debugger – for M68HC16 MCU based systems
•
M68ICD32 In-Circuit Debugger – for M68300 MCU based systems
•
M68SPGMR11 Serial
EPROM/OTPROM
Programmer
–
for
M68HC11
MCUs
with
internal
EEPROM/
Refer to the specific operations manual for information about your development system.
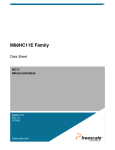
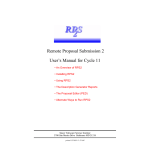
The integrated design environment RAPID consists of a configuration program (RINSTALL) and a cross
assembler (CASM). The RAPID design environment is an editor that allows applications such as cross assemblers,
C compilers, communication packages, programmers, simulators, and debuggers to be blended into a single
environment to simplify writing and debugging source code (see Figure 1-1). RAPID lets you easily correct any
syntactical errors in your source code without leaving the environment. RAPID’s integrated editor is a full
featured source file editor. CASM is a command line cross assembler designed to function with RAPID. The builtin communication environment enables you to work with the M68MMDS05, M68MMDS11, and various Motorola
development tools. You may download and test assembled files during editing and assembly of original source
code. You may access any installed application via hot-keys.
If you access the debugger through RAPID, the debugger passes current source code information into the RAPID
editor when you exit. When you exit a source level debug session, the editor points to the same line of code you
were on during the debug session. This lets you change code and perform true source level debug.
If you access a programmer through RAPID, RAPID passes personality files and device type information to the
programmer. The S-record file is automatically downloaded when the debugger or programmer is initiated.
RAPID also passes custom mem files used on MMDS startup.
RAPID/D
1-1
MOTOROLA
INTRODUCTION
RINSTALL
Simulator
C Complier
RAPID
Assembler/
Compiler
Terminal/
Programmer
Debugger
(MMDS or ICD)
Figure 1-1. Block Diagram of RAPID
1.1
SYSTEM OVERVIEW
RAPID lets you generate standard assembly-language source code or read source code in from a disk file.
According to options you select, the assembler installed under RAPID (CASM) generates one or more of these
types of output files:
•
Object files: machine language for the target processor in S-record format.
•
Listing files: copies of input text with machine code, cycle timing, and other such annotations.
•
Map files: files that MMDS and other P&E Microcomputer software use for source and symbolic
debug.
If RAPID finds an error during assembly of a file using CASM: it highlights the line in question on the screen,
positions the cursor near the error, and notifies the user. After fixing the error you may move into the debugger to
test your code. RAPID automatically downloads the modified code into the debugger.
1.2
HOST COMPUTER REQUIREMENTS
The host PC for RAPID must be hardware and software compatible with IBM PC/XT/AT or PS/2 computers. The
host PC must run DOS 3.0 or later or must run in the DOS window of OS/2 or windows. The host computer needs
at least 640Kb of memory (512Kb for the host software).
An asynchronous communications port, configured as either COM1, COM2, COM3, or COM4, is required for
communications between the MMDS and the host.
RAPID/D
1-2
MOTOROLA
CONFIGURING RAPID
CHAPTER 2
CONFIGURING RAPID
2.1
INTRODUCTION
RAPID has been configured at the factory to get you started as quickly as possible. Alternately, you may
reconfigure RAPID's operational parameters to customize RAPID functionality for your application. The
RINSTALL executable file consists of a series of data entry screens that let you configure the RAPID parameters.
You may page through the RINSTALL screens to view or change options as necessary. Some of the parameters
you may configure are:
2.2
•
The directory pathname that contains your supporting files
•
Which printer to use
•
What colors appear on the screen
•
Names and pathnames of your assemblers and compilers
RAPID CONFIGURATION
To run the RAPID configuration program; enter at the DOS prompt:
> RINSTALL
The available data entry screens are:
TABL
E
TITLE
TABL
E
TITLE
2-1
Configuration Options
2-10
CASM Assembler Options
2-2
File Options
2-11
C Compiler Options
2-3
Print Options
2-12
Compiler 3 Options
2-4
Editing Options
2-13
Simulator Options
2-5
Window Options
2-14
Debugger Options
2-6
Video Attributes
2-15
Programmer or RapTerm Options
2-7
Screen Options
2-16
Auxiliary Help Options
2-8
Exec Options
2-17
F Key Definition Options
2-9
Assembler and Compiler Options
RAPID/D
2-1
MOTOROLA
CONFIGURING RAPID
2.2.1
Configuration Options
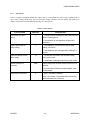
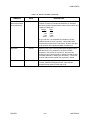
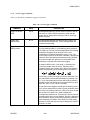
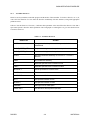
Table 2-1 explains configuring RAPID for the directory containing supporting files, source of virtual memory,
virtual memory file, and etc.
Table 2-1. Configuration Options
CONFIGURATION OPTION
DEFAULT
Directory for supporting files
directory name
Source of virtual memory for
editing
RAM
This determines the source of memory to be used to
store text being edited. By default, RAPID uses normal
RAM, but you can also select EMS, XMS, or Disk. If the
desired source of virtual memory is not available, or is
too limited to be of use, RAPID will display an error
message when it starts and use normal RAM instead.
We generally advise use of Disk space for virtual
memory only if you have a large (1-2 megabyte) disk
cache installed. See the section on RAPID's Virtual
Memory Manager, below, for additional information
about this feature.
$RAPID$.VMF
Specifies the name of the file that the virtual memory
manager uses if Disk is the source of virtual memory. If
no directory is specified, the file is stored in the current
directory.
Amount of EMS/XMS to
reserve (in KB)
0
This value (in kilobytes) specifies the amount of EMS or
XMS that the virtual memory manager leaves available
for other programs. Note that it always sets aside
enough memory for the swapping exec function.
Save config data on exit
N
Y – the CFG file is updated automatically on exit.
File for virtual memory on
disk
DESCRIPTION
Tells RAPID where its help file (RAPID.HLP), the
standard macro file (RAPID.MAC), and the reload list
file (RAPID.RLL) are located. Usually the drive:\
directory containing RAPID.EXE and RAPID.CFG.
N – the CFG file is not updated automatically on exit.
Save reload list on exit
Y
Y – the reload list is saved automatically on exit. The
reload list is a catalogue of the last 24 file loaded by
RAPID; accessed by entering <Ctrl-F3>.
N – the reload list is not saved automatically on exit.
Directory for reload list
Support path
Support path – store the reload list to the support path
when you exit from RAPID.
Current dir – store the reload list to the current directory
when you exit from RAPID. This lets you maintain
multiple reload lists in multiple directories.
RAPID/D
2-2
MOTOROLA
CONFIGURING RAPID
2.2.2
File Options
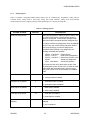
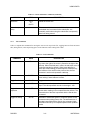
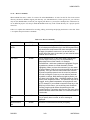
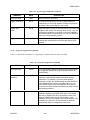
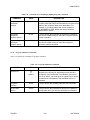
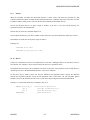
Table 2-2 explains configuring RAPID file options such as: creating BAK files when saving, expanding tabs to
spaces when reading, compressing spaces to tabs when writing, filename extension default, and defining the
number of keystrokes before RAPID automatically saves the open file.
Table 2-2. File Options
FILE OPTIONS
Create BAK files when
saving
DEFAULT
DESCRIPTION
Y
Y – RAPID renames existing files with a BAK extension
before overwriting them.
N – file extension is unchanged and original file is
overwritten.
Expand tabs to spaces
when reading
Y
Y – tab characters are converted to spaces when
reading in a new file.
N – tab characters are unchanged when reading in a
new file.
Compress spaces to tabs
when writing
N
Y – spaces are converted to tab characters when
writing a file to disk.
N – spaces are unchanged when writing a file to disk.
Default extension for
filenames
ASM
Applies ASM as the filename extension when none is
specified.
If you don't want a filename extension applied, leave
this field empty.
Keystrokes to Auto Save
0
0 (zero) – autosave is disabled.
>zero – the number of keystrokes that occurs before
RAPID autosaves the current file.
RAPID/D
2-3
MOTOROLA
CONFIGURING RAPID
2.2.3
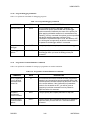
Print Options
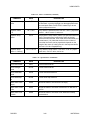
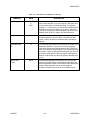
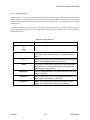
Table 2-3 explains configuring RAPID print options such as: which printer to use, any printer initialization string,
and any printer reset string.
Table 2-3. Print Options
PRINT OPTIONS
Printer to use
DEFAULT
LPT1
DESCRIPTION
Printer to use when printing files. Options are:
LPT1, LPT2, LPT3, COM1, or COM2.
Printer initialization string
character string Printer character string sent to the printer before and
after text. Any strings you specify typically need to
contain control characters, such as <Esc>. To enter a
control character into one of these strings, simply press
<Ctrl-P> first. For example, to enter an <Esc>
character, press <Ctrl-P><Ctrl-[>. The default printer
reset string simply sends a form feed and carriage
return to the printer to eject the last page.
If your printer does not require a character string you
should clear this string.
Printer reset string
RAPID/D
LM
2-4
MOTOROLA
CONFIGURING RAPID
2.2.4
Editing Options
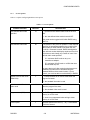
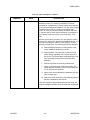
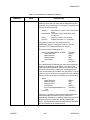
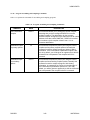
Table 2-4 explains configuring RAPID editing options such as: redefining key assignments, setting insert or
overstrike mode, setting fixed or smart tabs, setting auto indent ON/OFF, setting word wrap ON/OFF,
compressing lines before wrapping, setting left and right margins, size spacing for fixed tabs, .
Table 2-4. Editing Options
EDITING OPTIONS
DEFAULT
Modify key assignments
DESCRIPTION
Modify key assignments. When you press <Enter> with
the cursor on this field or click the mouse when the
pointer is on this field, a new window will appear that
shows the RAPID commands and their assigned keys.
To change or add a key assignment, move the highlight
bar to the one you want to modify and press <Enter>,
then press the key(s) you want to assign to the
command. While entering a key assignment, the
following commands are available:
<BkSp>, <Ctrl-BkSp>
<Ctrl-C>, <Ctrl-Y>
<Ctrl-R>, <Ctrl-Q><L>
<Enter>
<Esc>, <Ctrl-Break>
Delete last key
Clear the key assignment
Restore the previous value
Accept key assignment
Cancel the operation
If you need to enter one of these keys as part of the
key assignment, press <Scroll Lock> to switch to literal
mode rather than command mode, enter the key(s),
then press <Scroll Lock> to switch back to command
mode.
Insert mode on by default
Y
Y – insert mode is enabled.
N – overtype mode is enabled.
AutoIndent on by default
Y
Y – autoindent mode is enabled.
N – autoindent mode is disabled.
Word wrap on by default
Y
Y – word wrap is enabled.
N – word wrap is disabled.
Fixed tabs on by default
N
Y – fixed tabs are enabled.
N – smart tabs are enabled.
Compress lines before
wrapping
Y
Y – excess white space in a line is compressed when
wrapping.
N – line is unaltered.
RAPID/D
2-5
MOTOROLA
CONFIGURING RAPID
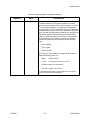
Table 2-4. Editing Options (continued)
EDITING OPTIONS
DEFAULT
DESCRIPTION
Default left margin
1
Specifies the default left margin.
Default right margin
78
Specifies the default right margin.
Default size for fixed tabs
8
Specifies the default spacing for fixed tabs.
Indent level for marked
blocks
2
This setting governs the behavior of the indent and unindent block commands.
Lines to reserve on undelete
stack
20
Specifies the size of the stack used to store deleted
lines.
Default search options
U
Default options to use for search and find-and-replace
commands.
2.2.5
Window Options
Table 2-5 explains configuring RAPID window options such as: setting cursor type (solid or blinking), setting
window zoom when window is opened, setting black and white video attributes, and formatting the status line.
Table 2-5. Window Options
WINDOW OPTIONS
DEFAULT
Use block cursor when
editing
Y
Zoom windows by default
N
DESCRIPTION
Y – a solid block cursor is used.
N – a blinking cursor is used.
Y – new windows are zoomed when opened.
N – zooming is OFF when new windows are opened.
Use black and white video
attributes
N
Y – RAPID uses black and white (monochrome) video
attributes, even if a color adapter is detected.
N – RAPID uses color video attributes.
Status line format (bytes or
lines)
Byte count
Byte count – the status line for each window displays
the absolute position of the cursor within the file.
Total lines – the status line displays the total number of
lines in the file--e.g., "5 / 1024", where 5 is the current
line number and 1024 is the total number of lines in the
file.
RAPID/D
2-6
MOTOROLA
CONFIGURING RAPID
2.2.6
Video Attributes
Video attributes let you change the colors used by RAPID. Video attribute options are listed in Table 2-6. There
are two sets of colors: one for color systems, the other for monochrome adapters and color adapters running in a
black-and-white video mode (BW80). These are the color settings and what they mean:
•
When the cursor is on one of these fields, the line at the top of the screen changes colors to give you a
sample of the current color setting for that particular item.
•
There are two ways to change one of these colors. If you know the hex value for the color you want,
you can just enter it. For example, for white text on a red background, you'd enter "4F". Press <F10>
and select the color you want using the cursor keys. When you've got the correct color highlighted,
press <Enter>. <ESC> terminates the color options screen.
Table 2-6. Video Attributes
VIDEO ATTRIBUTES
DESCRIPTION
DEFAULT
COLOR
MONO
Text
1E
1E
Ordinary text within an editing window.
Line w/cursor
1C
1C
Color used for line in editor that contains the cursor.
Marked blocks
1B
1B
Color used to highlight marked blocks. Also used to
display control characters embedded in the text.
Text markers
5F
5F
Color used to display text markers (sometimes called
bookmarks).
Highlighted search text
4F
4F
Color used to temporarily highlight text found in a
search operation.
Window status line
2F
2F
Color used for each window's status line.
Command line
0B
0B
Color used for the command line at the top of the
screen.
Block cursor
4F
4F
Color used for a solid (non-blinking) block cursor.
Menu items (unselected)
3F
3F
Color used for unselected items in a menu (filenames in
a directory list, for example).
Menu items (selected)
4F
4F
Color used to highlight a selected item in a menu.
Menu items (alternate)
3E
3E
Alternate color used for unselected items in a menu
(directory names in a directory list, for example).
Menu frame
3F
3F
Color used for the frame around a menu/pick list.
RAPID/D
2-7
MOTOROLA
CONFIGURING RAPID
2.2.7
Screen Options
Table 2-7 explains configuring RAPID screen options.
Table 2-7. Screen Options
SCREEN OPTIONS
User-defined video mode
specified
DEFAULT
N
DESCRIPTION
Y – specifies a user-defined video mode in the next
field.
N – the user-defined video mode is turned OFF.
This mode can be toggled on/off within RAPID using
<Alt-TU>.
User-defined video mode
00
If the answer to the previous question is YES, this field
specifies (in hexadecimal notation) the number of the
video mode you want RAPID to use when the <AltT><Alt-U> command is issued. RAPID is designed to
work with text modes that display anywhere from 40 to
132 columns, and virtually any number of rows. Userdefined video mode specified:
01 – activates 40x25 mode on any nonmonochrome adapter.
55 – activates 132x25 mode on a VGA that uses
the Paradise chip set.
Be aware that not all video cards that implement nonstandard text modes can be activated using the
standard BIOS set video mode function. If yours
doesn't, you won't be able to use this facility in RAPID.
Default to 43-/50-line mode
(EGA/VGA)
Y
Y – RAPID switches to 43-/50-line mode when the
program first starts.
N – the standard line mode is used.
Default to user-defined
video mode
N
Y – RAPID switches to the user-defined video mode
when the program first starts.
N – the standard video mode is used.
Suppress snow (CGA)
Y
Y – RAPID suppresses snow when writing to video
memory on a CGA card.
N – snow is not suppressed when writing to video
memory on a CGA card.
Cursor speed
RAPID/D
1
Specifies speed of the cursor (1 - 32). 1 is the fastest
and 32 the slowest.
2-8
MOTOROLA
CONFIGURING RAPID
2.2.8
Executive Options
Table 2-8 explains configuring RAPID executive options.
Table 2-8. Executive Options
EXEC OPTIONS
Name of swap file
Default extension for
executables
DEFAULT
DESCRIPTION
$RAPID$.SWP
This option is important only if your machine lacks
EMS/XMS, or if you don't have enough EMS/XMS for
RAPID to use it when swapping itself out before
executing other programs. (The amount of EMS/XMS
needed varies depending on the number of files loaded,
etc., but at least 250K is needed in all cases, more if
EMS/XMS is being used by the virtual memory
manager.) The default filename is fine, but you will
probably want to specify a complete pathname, so that
the swap file is always in the same place.
EXE
Extension to be applied to filenames when none is
specified. If you don't want one to be applied, leave this
field empty.
DO NOT – specify a path to
a .BAT or .COM file. Specify
a path to .EXE files only.
Use EMS if available
Y
Y – EMS is used for swapping if it is available.
N – EMS is not used for swapping.
Use XMS if available
Y
Y – XMS is used for swapping if it is available.
N – XMS is not used for swapping.
Display "Swapping..."
message
Disk
Disk – the "Swapping" message is displayed only when
swapping to disk.
Always – the "Swapping" message is displayed when
swapping to disk, EMS, or XMS.
Never – the "Swapping" message is never displayed.
Save modified files before
execution
N
Y – save all modified files before executing a DOS shell
or executing a program you specify. Note that this is
always done when RAPID executes the compiler,
assembler, or debugger.
N – files are not saved before executing a DOS shell or
executing a program you specify.
RAPID/D
2-9
MOTOROLA
CONFIGURING RAPID
Table 2-8. Executive Options (continued)
Pause after running primary
program
N
This parameter is not
applicable
Y – you will be asked to press a key to return to RAPID
after it has executed the program associated with the
primary file. Note that you can view the output of your
program by pressing <Alt-F5> to display "the user
screen."
N – no pause when returning to RAPID after executing
a primary file program.
Confirm parameters
N
Y – you may edit the command line sent to any
program before being executed.
N – you may not edit the command line. For example,
when using hot keys, this option automatically executes
the command.
2.2.9
Assembler and Compiler Options
Table 2-9 explains configuring RAPID assembler and compiler options.
Table 2-9. Assembler and Compiler Options
ASSEMBLERS/COMPILER
S
DEFAULT
DESCRIPTION
Default assembler/compiler
1 (CASM)
Press <Space>, <+>, or <-> here to select the compiler
you'll normally want to use. Within RAPID, you can
change this setting with <Shift-F5>.
Y
Y – RAPID attempts to identify errors reported by the
compiler or assembler, and to move the cursor to the
position of the error. Note that in the case of
compilers/assemblers that can generate multiple errors
and warnings, RAPID pays attention only to the first
error or warning still visible on the user screen. Press
<Alt-F5> to view the next sequential error.
Trap compilation errors
N – RAPID does not identify errors reported by the
compiler or assembler,
Open new window for
compile errors
Y
Y – RAPID opens a new window when it detects a
compiler error in a file that is not currently loaded.
N – RAPID loads the file into the current window if it is
not already loaded.
RAPID/D
2-10
MOTOROLA
CONFIGURING RAPID
2.2.10
CASM Assembler Options
Table 2-10 explains configuring CASM assembler options for use with RAPID.
Table 2-10. CASM Assembler Options
CASM ASSEMBLER
Name and Full path of
CASM
DEFAULT
DESCRIPTION
C:\MMDS11\
CASM11.EXE
You specify the complete pathname for your primary
assembler/compiler and any command line options that
should be sent to it, as well as an abbreviation of up to
4 letters that uniquely identifies this compiler. This
abbreviation will be displayed on the status line when
this compiler is the default compiler. The two sets of
options correspond to two different Compile program
commands in the editor, letting you easily alternate
between compiling with or without debug information.
Note that you can specify up to two other compilers for
RAPID to use (Compilers 2-3). RINSTALL also lets you
select a Default compiler (normally Compiler 1), and
RAPID lets you switch compilers dynamically by
entering <Shift-F5>. RAPID assembles code when you
enter <F4>.
DO NOT – specify a path to
a .BAT or .COM file. Specify
a path to .EXE files only.
Primary options
SD
S – specify S-record
D – specify debug map file output
Secondary options (to enter
secondary options; enter
<Ctrl-F4>)
SLD
S – specify S-record
D – specify debug map file output
L – specify listing file
RAPID/D
2-11
MOTOROLA
CONFIGURING RAPID
2.2.11
C Compiler Options
Table 2-11 explains configuring C compiler (user provided) options for use with RAPID.
Table 2-11. C Compiler Options
C COMPILER
DEFAULT
DESCRIPTION
Specify the complete pathname of your compiler.
Name and Full path of
compiler
DO NOT – specify a path to
a .BAT or .COM file. Specify
a path to .EXE files only.
Primary options
Specify primary command line options to send to the
compiler.
Secondary options
Specify secondary command line options to send to the
compiler.
2.2.12
Compiler 3 Options
Table 2-12 explains configuring a third compiler (user provided) for use with RAPID.
Table 2-12. Compiler 3 Options
COMPILER 3
Name and Full path of
compiler
DEFAULT
DESCRIPTION
Specify the complete pathname of your compiler.
DO NOT – specify a path to
a .BAT or .COM file. Specify
a path to .EXE files only.
Primary options
Specify primary command line options to send to the
compiler.
Secondary options
Specify secondary command line options to send to the
compiler.
RAPID/D
2-12
MOTOROLA
CONFIGURING RAPID
2.2.13
Simulator Options
Table 2-13 explains configuring simulator (user provided) options for use with RAPID.
Table 2-13. Simulator Options
SIMULATOR
DEFAULT
DESCRIPTION
Specify the complete pathname of your simulator.
Full path of simulator
DO NOT – specify a path to
a .BAT or .COM file. Specify
a path to .EXE files only.
Options for simulator
2.2.14
Specify command line options to send to the simulator.
Debugger Options
Table 2-14 explains configuring debugger options for use with RAPID.
Table 2-14. Debugger Options
DEBUGGER
Full path of emulator
DO NOT – specify a path to
a .BAT or .COM file. Specify
a path to .EXE files only.
Options for debugger
RAPID/D
DEFAULT
DESCRIPTION
C:\MMDS11
.EXE
Specify the complete pathname of your debugger.
2
Specify the default options you want passed to the
debugger.
2-13
MOTOROLA
CONFIGURING RAPID
2.2.15
Terminal Emulator or Programmer Options
Table 2-15 explains configuring EPROM/EEPROM programmer or terminal emulation options for use with
RAPID.
Table 2-15. Programmer or RapTerm Options
PROGRAMMER OR
RAPTERM
DEFAULT
C:\PROG11\
PROG11.EXE
Full path
DO NOT – specify a path to
a .BAT or .COM file. Specify
a path to .EXE files only.
DESCRIPTION
Specify the complete pathname of your programmer.
C:\MMDS11\RAPTERM.EXE – This input is required
when using a terminal emulator. Specify the complete
pathname of your terminal emulator.
Options
2
/CHC711E9
Specify the default options you want passed to the
terminal emulator or programmer. Default specifies the
communication port (COM2) and PROG personality file.
If RapTerm is installed press the <F7> key to open the communications window for PC serial ports COM1 or
COM2. The parameters of this window (port, baud, parity, word length, and number of stop bits) come from the
options in RINSTALL. (If necessary, consult the manual for your development board for appropriate settings.)
2.2.16
Auxiliary Help Options
Table 2-16 explains configuring auxiliary help options for use with RAPID.
Table 2-16. Auxiliary Help Options
AUXILIARY HELP
Full path to .HLP file
RAPID/D
DEFAULT
DESCRIPTION
C:\MMDS11
Specify the complete pathname of your auxiliary help
\10085V01.HLP file. You may install the MMDS chip info files.
2-14
MOTOROLA
CONFIGURING RAPID
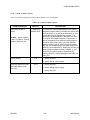
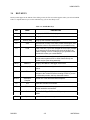
2.2.17
F Key Definition Options
The bottom line of the RAPID screen (shown below) is a quick reference for the RAPID hot-keys. You can
redefine these hot-keys in RINSTALL by entering the desired changes (see paragraph 2.2.4). Table 2-17 defines
the RAPID F-key defaults.
F Key Line
F1-EdHelp
F2-Save
F3-Load
F4-Assemble
ALT-F4-MMDS11
F5-Exit
F7-PROG
F9-Shell
Table 2-17. F Key Defaults
F KEY
2.3
DEFINITION
F1-EdHelp
Open the help window
F2-Save
Save the file that is currently open
F3-Load
Open a new file
F4-Assemble
Assemble the file that is currently open
ALT-F4-MMDS11
Exit RAPID and enter the MMDS11 debugger
F5-Exit
Exit RAPID
F7-PROG
Exit RAPID and load the S-record of the file that is currently open
F9-Shell
Exit RAPID and shell to DOS
ACCEPTING CONFIGURATION
When you have completed RAPID configuration, press <Ctrl-Enter>. RINSTALL saves any changes you have
made by modifying (or creating) a RAPID.CFG file, and it will write a new version of RAPID.HLP that reflects
the key assignments you have specified. Note that, if it doesn't yet exist, RAPID.HLP is created whether you have
modified any configuration settings or not. If you haven't changed anything and you don't want RAPID.HLP to be
created, or if you want to cancel the changes, press <ESC> to exit.
RAPID/D
2-15
MOTOROLA
USING RAPID
CHAPTER 3
USING RAPID
This chapter covers the RAPID operating environment.
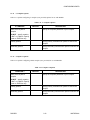
3.1
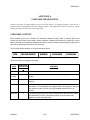
COMMAND SYNTAX
For RAPID to work properly it must reside in your working directory or on your DOS path. The following covers
the RAPID command syntax.
Syntax
>RAPID [Options] [FileName1] .. [FileName8]
where:
>
<options>
<filename>
The DOS prompt.
The command line option to be loaded into the editor immediately (see Table 3-1).
The optional file to be loaded into the editor immediately. You may specify up to eight
filenames on the command line. Note that the editor names all files with the default
extension .ASM. If you have given RAPID a default extension to use, it will apply it to
these filenames if no extension is specified.
Examples:
RAPID /L
RAPID loads the last file edited. /L is a command line option described in
Table 3-1.
RAPID myprog.ASM
RAPID loads MYPROG.ASM (.ASM is optional) or generates a new file
called myprog. If the file to be edited is not in the same directory as
RAPID, you must enter the complete pathname.
RAPID readme.
If you need to edit a file without an extension, add a period to the end of
the name:
RAPID myprog myprog.inc *.src Although a filename may contain wildcards, RAPID ignores all
filenames thereafter. RAPID loads MYPROG.ASM and MYPROG.INC
into the editor, and displays a list of all files in the current directory with
an extension of SRC.
RAPID/D
3-1
MOTOROLA
USING RAPID
If you don't specify a filename, RAPID displays a directory list. If there's a default extension, RAPID uses that
extension (e.g., *.ASM); if not, RAPID displays all files in the directory (if memory allows). If you press <ESC>
twice, RAPID creates a file called NONAME. You can rename the NONAME file when you save the file.
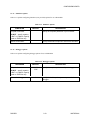
Table 3-1. Command Line Options
COMMAND
DESCRIPTION
/L
Reload last file (can be used multiple times)
/A
Reload all files
/R
Display reload list on startup. If no files are specified (directly or indirectly), this option
displays the reload list on the command line instead of a directory list.
/Jnnn
Jump to the line specified by the value of nnn. This must follow a filename. If a
filename does not precede the parameter, the parameter is ignored.
/E
Use EMS for virtual memory. This option overrides the default setting selected with
RINSTALL.
/X
Use XMS for virtual memory. This option overrides the default setting selected with
RINSTALL.
/D
Use disk for virtual memory. This option overrides the default setting selected with
RINSTALL.
/N
Use normal RAM. This option overrides the default setting selected with RINSTALL.
/U
Use user-defined video mode
/43
Use EGA 43-line mode
/50
Use VGA 50-line mode (same as /43)
/BW
Use black and white (mono) video attributes. This is useful when running RAPID on a
laptop.
/UNIX
Edit UNIX files. If this option is specified, RAPID uses ^J (rather than ^M^J) as a line
delimiter, and it does not append a ^Z to the ends of files it creates.
/C
Specifies a CFG file to use. You might use this option, for example, if you program in
multiple languages, and you want to use one set of configuration options for one
language and a different one for another.
/?
Display this help screen
RAPID/D
3-2
MOTOROLA
USING RAPID
3.2
RAPID'S CONFIGURATION FILE (RAPID.CFG)
When you initialize RAPID it looks for its configuration file (RAPID.CFG) in the current directory. If
RAPID.CFG is not in the current directory, it then looks in the directory from which RAPID.EXE was loaded (the
source directory). If RAPID.CFG is not in the source directory then all directories on DOS's PATH are searched.
If RAPID.CFG cannot be found, an error message is displayed and factory default settings are used.
Note, however, if you run RAPID.EXE from a network drive and have multiple users use it, each with his own
RAPID.CFG file. You can have each user set an environment variable that specifies the directory where his copy
of RAPID is stored:
SET RAPID=C:\RAPID
DO NOT specify the name of the configuration file, just the drive and directory. This environment variable, if it
exists, will be used only to locate RAPID.CFG. (RINSTALL does not check for the existence of this environment
variable.)
Note too that, while it is possible to have multiple RAPID.CFG files stored in different directories, we generally
recommend that you maintain a single CFG file, preferably in the same directory as RAPID.EXE. If you have
multiple CFG files with different settings stored in various directories, the behavior of RAPID will change
depending on where you are when you load it. This could conceivably be desirable in certain cases, but it can also
lead to confusion in others. For this last reason, we discourage the practice.
On the other hand, if you've selected the Save config data on exit option, and you're the kind of programmer who
works on a variety of projects at once, each with its own directory, and you always change to the appropriate
directory before working on that project, you may also prefer to maintain multiple CFG files, one in each of these
directories. If so, you will probably also want to select the option to save the reload list in the current directory
rather than the support path.
It is also possible to use the /C option to specify an alternate CFG file to be used. Because typing in the name of
your CFG file on the command line is a bit cumbersome, you would probably want to use this option only in cases
where another program is invoking RAPID and is passing it pre-defined parameters.
RAPID/D
3-3
MOTOROLA
USING RAPID
3.3
HELP
To bring up the RAPID help system, press F1 from within the editor. The initial window displays a list of topics.
Use the cursor keys to move the highlight bar over the topic desired. If there are more topics than fit in the
window, use the up and down arrow keys to scroll through the topics. When you have highlighted a topic, press
carriage return (<CR>); the first (or only) help page for that item appears. If there are two or more pages of
information, use the PgDn and PgUp keys to scroll through the information. Enter F1 to return to the main help
window to select another topic.
Press <ESC> one or more times to step out of the help system.
The help system covers three main areas:
•
The editor: this help information includes explanations of all the commands.
•
The assembler: this help information covers most assembler commands, as well as options and
structures. Enter <Ctrl-F1> to open the assembler help window.
•
Topics specific to the microcontroller or microprocessor: see the help topic “MANUFACTURER” for
more information. Enter <Shift-F1> to open the MMDS CHIPINFO file.
RAPID/D
3-4
MOTOROLA
USING RAPID
3.4
HOT-KEYS
Hot-key labels appear at the bottom of the editing screen, the first screen that appears when you activate RAPID.
Table 3-2 explains these keys as well as other hot-keys you are most likely to use.
Table 3-2. RAPID Hot-Keys
KEY
NAME
F1
EdHelp
Ctrl-F1
Assembler Help
Brings up the assembler help system.
Shift-F1
Auxiliary Help
Brings up the CHIPINFO help system.
F2
Save
Saves the file currently in the editor, makes a backup file, and
returns the cursor to its position before you pressed this key.
F3
Load
Loads a new file. If you have changed the current file, prompts
you to save the file, then asks for the name of the file to be
loaded. Pressing <Ctrl-F3> loads the file you specified on the
command line when you entered RAPID.
F4
Assemble
Assembles the file currently in the editor; any options chosen
from the menu system will be in effect. Note that only one
window may be open during assembly.
Alt-F4
MMDS11
Brings up the MMDS11 debugger environment.
Ctrl-F4
Secondary Options
F5
Exit
Shift-F5
Assembler/
Compiler
F6
Sim
F7
PROG
F9
Shell
F10
Options
RAPID/D
DESCRIPTION
Brings up the RAPID editor help system.
Assembles the file currently in the editor with secondary
options.
Ends the editing-assembly session. You may save any
changes to the current file before returning to DOS. If you are
in a secondary window, this key closes the window.
Selects one of the three assembler/compilers.
Enters the simulator environment.
Opens or makes active the programmer environment or the
terminal emulation environment.
Shells to DOS. Type EXIT at the DOS prompt to return to
CASM.
Activates the options menu system.
3-5
MOTOROLA
USING RAPID
3.3
PROMPT AND STATUS LINES
The top line of the screen is the prompt line, which displays messages, instructions and responses to prompts.
When you enter a two-key command, the editor echoes the first key at the left edge of the prompt line.
Below the prompt line is the edit window. The top line of the edit window is a status line; Table 3-2 lists statusline information.
Table 3-3. Edit Window Status Line Information
ITEM
»SAVE«
DESCRIPTION
Indicates that the file has been modified since it was last saved.
Series of characters that indicate which of the four line-drawing modes you are in.
ScLock
Scroll lock is on, the line drawing mode is being temporarily overridden.
FILENAME.EXT Name and extension of the file being edited. (You may specify full path names to the
editor, but only the filename and extension appear here.)
line n
File line-number position of the cursor.
Col n
File column-number position of the cursor.
Byte n
Byte-number position of the cursor, relative to the first character in the file.
CAS
The default compiler is CASMxx.EXE. Use <Shift-F5> to select a different compiler.
INS
RAPID is in insert mode. <Ctrl-V> toggles between insert and overtype modes.
OVR
RAPID is in overtype mode.
ST
RAPID is using smart tabs. <Ctrl-OF> toggles between smart and fixed tabs.
FT
RAPID is using fixed tabs.
AI
RAPID is in autoindent mode. <Ctrl-QI> toggles autoindent ON and OFF.
WW
RAPID is in word wrap mode. <Ctrl-OW> toggles word wrap ON and OFF.
*
»ZOOM«
•SYNC•
RAPID is in snow-checking mode (Requires a CGA card). <Alt-TS> toggles snowchecking ON and OFF.
The current window has been zoomed. <Alt-TZ> toggles zoom ON and OFF.
Synchronized scrolling option is on. <Alt-SS> toggles synchronized scrolling ON and
OFF.
RECORD
Macro recording is on. <Ctrl-JT> turns macro recording ON. <ESC> turns macro
recording OFF
MACRO!
A macro is currently being played back, appears until the macro is finished. (Screen
updates are suppressed while a macro is in progress.)
RAPID/D
3-6
MOTOROLA
USING RAPID
3.4
COMMANDS
This paragraph provide descriptions of all the commands in RAPID, arranged into categories. The one that you
will probably find most useful at first is the editor help command, F1, which pops up the help window. The data in
this window, created by RINSTALL, gives a complete list of all the commands (arranged pretty much as they are
here) and the keys to which they are assigned.
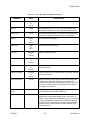
3.4.1
Cursor Commands
There are two ways to move the screen cursor: via the cursor control keys and via control characters. Running the
installation program can define or change either method.
Table 3-3 explains cursor commands. In the table, the symbol Ctrl- means hold down the control key while
pressing the other key or keys.
Table 3-4. Cursor Movement Commands
COMMAND
KEYS
Character left
Left arrow
or
Ctrl-S
Character right
Right arrow
or
Ctrl-D
Word left
Word right
Ctrl-Left arrow
or
Ctrl-A
Ctrl-Right arrow
or
Ctrl-F
DESCRIPTION
Cursor left one character.
Cursor right one character.
Cursor left one word. A "word" is any sequence of characters
delimited by one of the following characters: space, tab,
carriage return, line feed, , . / ? ; : " [ ] { } - = \ + | ( ) % @ & ^
$ # ! ~. If the cursor is at the beginning of a line, it is moved
to the end of the previous line.
Cursor right one word. If the cursor is at the end of a line, it
is moved to the beginning of the following line.
Cursor to left side
Home
or
Ctrl-QS
Cursor to beginning of line.
Cursor to right side
End
or
Ctrl-QD
Cursor to end of line--i.e., the position following the last nonblank character on the line. Trailing blanks are always
removed from all lines to preserve space.
Line up
Up arrow
or
Ctrl-E
Cursor up one line.
RAPID/D
3-7
MOTOROLA
USING RAPID
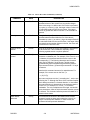
Table 3-4. Cursor Movement Commands (continued)
COMMAND
Line down
KEYS
Down arrow
or
Ctrl-X
DESCRIPTION
Cursor down one line.
Scroll up
Ctrl-W
Scroll window up one line. The cursor will remain on the
current line unless that line is at the bottom of the window.
Scroll down
Ctrl-Z
Scroll window down one line. The cursor will remain on the
current line unless that line is at the top of the window.
Page up
PgUp
or
Ctrl-R
Scroll window up one page.
Page down
PgDn
or
Ctrl-C
Scroll window down one page.
Top of file
Ctrl-PgUp
or
Ctrl-QR
Cursor to beginning of file.
End of file
Ctrl-PgDn
or
Ctrl-QC
Cursor to end of file.
Top of window
Ctrl-Home
or
Ctrl-QE
Cursor to top line of current window. The cursor remains in
the same column.
Bottom of window
Ctrl-End
or
Ctrl-QX
Cursor to bottom line of current window. The cursor remains
in the same column.
Up to equal indent
Ctrl-JB
Moves the cursor to the beginning of the first previous line
with the same indentation level as the current line. For
example, if the first non-blank character in the current line is
at column 20, the cursor is moved to the next line up that
also begins at column 20.
Down to equal
indent
Ctrl-JE
Moves the cursor to the beginning of the next line with the
same indentation level as the current line.
Go to line
Ctrl-JL
Prompts for a line number, then moves the cursor to the
specified line. Any positive integer value in the range 1 to
32767 is valid. If the value is preceded by a plus (+) or minus
(-) sign, the target line number will be calculated relative to
the current line. If the target line number is greater than the
number of lines in the file, the cursor will be moved to the
last line in the file.
RAPID/D
3-8
MOTOROLA
USING RAPID
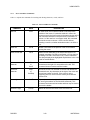
Table 3-4. Cursor Movement Commands (continued)
COMMAND
KEYS
DESCRIPTION
Go to column
Ctrl-JC
Prompts for a column number, then moves the cursor to the
specified column of the current line. Any positive integer
value in the range 1 to 999 is valid. If the value is preceded
by a plus (+) or minus (-) sign, the target column number will
be calculated relative to the current column. If the target
column is greater than 999 or less than 1, the command is
ignored.
Go to byte
Ctrl-JA
Prompts for a byte offset, then moves the cursor to the
specified absolute offset within the file. If the value is
preceded by a plus (+) or minus (-) sign, the target offset will
be calculated relative to the current offset. If the target offset
is greater than the number of bytes in the file, the cursor will
be moved to the end of the file.
Previous cursor
position
Ctrl-QP
Jump to the position the cursor was at before it was moved
to the current line. This command is especially useful
following a global search or replace operation.
Match braces
forward
Ctrl-Q[
This command may be used to locate a matching "brace"
character or character pair. For example, if the cursor is on a
'{' character, this command would move the cursor to the
corresponding '}'. The following characters and character
pairs may be matched: ''single quotes ""double quotes
()parentheses []square brackets angle brackets {}Pascalstyle comment braces (**)Pascal-style comments /**/C-style
comments.
Note that this command accounts for nested braces. For
example, if the cursor were on the first '(' in
I := (X*(Y+Z));
the cursor would move to the ')' preceding the ';', not the one
following the 'Z'. Although the name of the command implies
that it always searches in a forward direction, in most cases
the search direction is determined by the character that the
cursor is on. For example, if it is on a '}', it will search
backwards. The only exceptions are the single- and doublequote characters, cases in which the search direction cannot
be inferred. This command will always search forward for a
match in these cases.
Match braces
backward
RAPID/D
Ctrl-Q]
This command is identical to the Match braces forward
command, except in those cases where the cursor is on
single- or double-quote character. In these cases, the
command will always search backward.
3-9
MOTOROLA
USING RAPID
3.4.2
Insert and Delete Commands
Table 3-5 explains the commands for inserting and deleting characters, words, and lines.
Table 3-5. Insert and Delete Commands
COMMAND
KEYS
DESCRIPTION
New line
Enter
In insert mode, this command inserts a line break at the
position of the cursor; if autoindent mode is in effect, the
cursor moves to the next line and to the same column as the
first non-blank character in the previous line; otherwise, to
column 1 of the new line. In overtype mode, this command
moves the cursor to column 1 of the next line without
inserting a new line, whether autoindent mode is in effect or
not.
Insert line
Ctrl-N
Inserts a line break at the position of the cursor without
moving the cursor.
Insert control char
Ctrl-P
Allows control characters to be entered into the text. For
example, pressing <Ctrl-PG> would insert a ^G into the text
(pressing <Ctrl-PG> would insert a G). Control characters
are always displayed as highlighted capital letters in the color
used for marked blocks.
Delete current
character
Del
or
Ctrl-G
Deletes the character under the cursor and moves any
characters to the right of it one position to the left. This
command does not work across line breaks.
Delete left
character
Delete right word
Delete line right
RAPID/D
Bksp
or
Ctrl-Bksp
Moves the cursor one character to the left and deletes the
character there. Any characters to the right of the cursor are
moved one position to the left. If the cursor is at the
beginning of a line, the current line will be joined with the
previous line.
Ctrl-T
Deletes the word to the right of the cursor (see the definition
of "word" given above for the Word left command). This
command works across line breaks and thus may be used to
remove line breaks.
Ctrl-QY
Delete all text from the cursor to the end of the line.
3-10
MOTOROLA
USING RAPID
Table 3-5. Insert and Delete Commands (continued)
COMMAND
KEYS
DESCRIPTION
Delete line
Ctrl-Y
or
Ctrl-F6
Delete the current line.
Delete line (no
undo)
*none*
This command is the same as the Delete line command, but
the deleted line is not saved in the undo buffer. It is
potentially useful when using the undo buffer to temporarily
store lines being moved.
3.4.3
Tab Commands
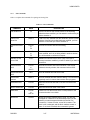
Table 3-6 explains the commands for moving the cursor to tab stops in the file, toggling between fixed and smart
tabs, setting tab size, and compressing spaces to tab characters when writing files to disk.
Table 3-6. Tab Commands
COMMAND
Tab
Backward tab
KEYS
DESCRIPTION
Tab
Moves the cursor to the next tab stop. If insert mode is on,
any text to the right of the cursor is moved to the right of the
tab stop. When fixed tabs are in effect, the tab stops occur at
8-column intervals (by default). When smart tabs are in
effect (the default setting), the tab stops are determined by
the locations of the words on the previous line; the first
character in each word represents a tab stop.
Shift-Tab
Moves the cursor to the previous tab stop. This command
does nothing if smart tabs are in effect.
Toggle fixed tabs
Ctrl-OF
Toggles the tab mode between smart tabs and fixed tabs.
Set tab size
Alt-ST
Prompts the user for the number of columns between tab
stops. The value specified must be in the range 1..100.
Toggle tab
expansion
Alt-TT
Activates or deactivates option to "expand" tab characters to
spaces when reading in files created with other editors. The
assumed size of the tabs is specified with the Set tab size
command.
Toggle tab writing
Alt-TW
Activates or deactivates option to compress spaces to tab
characters when writing files to disk. The assumed size of
the tabs is specified with the Set tab size command. Note
that RAPID will not try to compress spaces within quotation
marks.
RAPID/D
3-11
MOTOROLA
USING RAPID
3.4.4
Undo Commands
Table 3-7 explains the commands for replacing characters from the previous deletion.
Table 3-7. Undo Commands
COMMAND
KEYS
DESCRIPTION
Restore line
Ctrl-QL
or
Shift-F6
Restore the original contents of the current line.
Undo last deletion
Ctrl-QU
or
Alt-U
Used to restore whole lines deleted with the Delete line or
Delete block commands. It will not restore single characters
or words. To "undo" your most recent changes to the current
line, use the Restore Line command. The size of the "undo
buffer" used to save deleted lines may be specified with the
Set undo limit command or with RINSTALL.
Insert undo buffer
Ctrl-QV
Inserts the entire contents of the undo buffer into the current
window just prior to the current line. This command is
intended primarily to be used in macros.
Flush undo buffer
Ctrl-QJ
Empties the undo buffer. This command is intended primarily
for use in macros, in cases where you wish to use the undo
buffer as a scratchpad.
Set undo limit
Alt-SU
Allows you to set the size of the "undo buffer" used to store
deleted lines. The default value is 20 lines. The size of this
buffer may also be set with RINSTALL.
3.4.5
The Find Command
When you enter the find command (see Table 3-8), the status line clears and a prompt asks for the search string
(as long as 67 characters). If you have used this command before, the prompt includes the most recent search
string. To select the same search string, press <CR>. To edit or replace the search string, use these commands:
Backspace
Deletes the character to the left
<Ctrl-R>
Restores the previous string
<Ctrl-S>
Moves cursor left
<Ctrl-D>
Moves cursor right
<Ctrl-P>
Enters a control character
<ESC>
Cancels the command
RAPID/D
3-12
MOTOROLA
USING RAPID
After you enter the search string, a prompt asks for options. (The editor displays any options of the most recent
search; you may use them again or edit them.) Search options are:
B
Backwards search from cursor position
G
Global search from start of file (or from end of file for a backwards search)
L
Search only currently marked block
U
Treat all characters as upper case
When you specify options, the search begins. If a matching pattern is found, the cursor appears at the end of the
pattern.
3.4.6
The Find-and-Replace Command
This command is similar to the find command. However, after you specify the find string, this command prompts
for a replacement string. Like the search string, the replacement string may be as long as 67 characters. The
prompt includes the replacement string (if any) from a previous use of this command. You may accept, edit, or
replace the replacement string, just as you can the search string. Table 3-8 is a list of the find-and-replace
commands.
After you specify the find and replacement strings, the option prompt appears. All the find-command options are
available, plus one more:
N
Replace without a prompt
When you specify options, the search begins. If the search finds a matching pattern and the N option is not in
effect, a prompt requests confirmation that you want the replacement. Respond Y (replace), N (skip), or A
(replace this and all subsequent matches without prompts).
If you specify the N option, replacement of the search string happens without any confirmation prompts. The
screen does not update until all file updates are done.
To abort a search-and-replace operation, press Q or <ESC>.
RAPID/D
3-13
MOTOROLA
USING RAPID
Table 3-8. Find and Replace Commands
COMMAND
Find pattern
KEYS
DESCRIPTION
Ctrl-QF
This command lets you search for any string of up to 67
characters. When you enter this command, you will be
prompted for a search string. The last search string entered
(if any) will be displayed as a default. You may select it again
by pressing Enter, edit it, or enter a new search string.
<ESC> or <Ctrl-U> cancels a search command, and <CtrlP> may be used to enter control characters: for example, to
find a period at the end of a line, you would enter .<CtrlPM>.
After the search string is entered, you are asked for search
options. The options you used last are displayed at first. You
may enter new options, edit the current options, or select
them by pressing Enter. The following options are available:
B
Search backward from the current position of the
cursor toward the beginning of the file.
G
Search globally. The entire file is scanned for the
search string, regardless of the current position of
the cursor. The search starts at the beginning of the
file if searching forward; at the end if searching
backward.
L
Search only within the currently marked block.
n
Find the n'th occurrence of the search string. The
search starts at the position of the cursor unless the
L or G option is also specified.
U
Ignore case; treat all alphabetic characters as if they
were in upper case.
W Search for whole words only; skip matching patterns
that are embedded in other words.
If the text contains a target matching the search string, the
target is highlighted and the cursor is positioned just beyond
it.
RAPID/D
3-14
MOTOROLA
USING RAPID
Table 3-8. Find and Replace Commands (continued)
COMMAND
Find and replace
KEYS
DESCRIPTION
Ctrl-QA
This command allows you to replace one string of up to 67
characters with another. You will be prompted first for a
search string, next for a replacement string, and finally for
the search options. The valid options are the same as those
for the Find pattern command, with the following exceptions:
N
Replace without asking.
n
Make a maximum of n replacements. (Overridden by
L option.)
If the text contains a target matching the search string, the
target is highlighted and the cursor is positioned just beyond
it. You are then asked if you wish to replace it. Press Y to
replace it, N to ignore it, A to replace it and all subsequent
matches without asking, or Q to abort the operation. If the N
option was selected, this question will not be asked.
Search and apply
macro
Ctrl-QM
The Search and apply macro command lets you search for
any string of up to 67 characters and then "apply a macro" to
it: that is, move the cursor to the location of the target, and
execute the commands stored in the macro. Search strings
are entered in the same way that they are for the Find
pattern command. After the search string is entered, you are
shown a menu containing all of the macros you've defined.
Move the highlight with the up and down cursor keys, and
select the macro to apply by pressing Enter. You can abort
the operation by pressing <ESC>.
Finally, you are prompted for options. The options you used
last are displayed at first. You may enter new options
(canceling the old ones), edit the current options, or select
them by pressing Enter. All the options available for the Find
and Replace command are available here as well. The
screen will not be updated while a search and apply macro
operation is being performed. If you need to stop it, use the
Abort command (<Ctrl-U).
The Search and apply macro command can be invoked
inside a macro, making it possible to create an almost
unlimited array of special commands. Note, however, that it
may not be invoked recursively. That is, the macro to be
applied may not itself execute the Search and apply macro
command.
RAPID/D
3-15
MOTOROLA
USING RAPID
Table 3-8. Find and Replace Commands (continued)
COMMAND
Find next
KEYS
DESCRIPTION
Ctrl-L
Repeat the last search operation, if any. If the last search
command called for a Find pattern operation, the same
search string and options will be used to repeat it. If it was a
Find and replace operation, the replacement string will be
reused as well. If it was a search and apply macro operation,
the search string, options, and macro will all be reused. Note
that if a search and apply macro operation is in progress, the
last search operation will temporarily be considered Find
pattern, to allow the macro to search for a second instance
of the same string. For example, suppose you wanted to
delete all text not within single quotes from the following
block:
'One', abcdefg
'Two', hijklmn
'Three', opqrstu
To do this, you could search for a single quote, and then
apply the following macro to it:
BkSp
Delete the first '
<Ctrl-L>
Find the second one on the line
Left Move cursor over the second '
<Ctrl-QY> Delete to end of line
To perform this operation on the entire block, you would
specify "LN" as your search options.
RAPID/D
3-16
MOTOROLA
USING RAPID
3.4.7
File Commands
Table 3-9 explains the commands for opening and closing files.
Table 3-9. File Commands
COMMAND
KEYS
DESCRIPTION
F3
Load a new file into the current window. If the file being
edited has been modified, you'll be asked to confirm that you
wish to abandon it.
Edit file from
reload list
Shift-F3
Load a new file, selected from the reload list, into the current
window. If the file being edited has been modified, you'll be
asked to confirm that you wish to abandon it.
Save and continue
edit
Ctrl-KS
or
F2
Save the current file and continue editing.
Abandon file
Ctrl-KQ
or
F5
Abandon the current file and close its window. If the file has
been modified, and it is not being edited in another window,
you will be asked to confirm this request.
Abandon all and
exit to DOS
*none*
Abandon all files and exit to DOS. If any of the files in
memory have been modified, you will be asked if you want to
save them.
Save and exit to
DOS
Ctrl-KX
or
Ctrl-F2
Save the current file and close its window. If the current
window is the only window, this command exits to DOS.
Edit another file
Save all and exit to
DOS
Alt-X
Save all modified files and exit to DOS.
Save all and
continue
Shift-F2
Save all modified files and continue editing. This command is
especially useful in macros that execute other programs.
Save/switch files
Ctrl-KD
Save the current file and load a new one into the current
window.
Write to named file
Ctrl-KN
Save the current file under a new name.
Read block
Ctrl-KR
or
Alt-F10
Reads a file into the window at the current position of the
cursor and marks it as a block.
Write block
Ctrl-KW
Writes the currently marked block to a file. You are first
prompted for a filename. If the file already exists, you are
asked if you want to append the block to the file or to
overwrite it; if it does not exist, a new file is created. The
block is left unchanged, and the block markers remain in
place. If no block is marked, this command is ignored.
RAPID/D
3-17
MOTOROLA
USING RAPID
3.4.8
Window Commands
Usually, you may have as many as five windows open at any time. During assembly, however, only one window
may be open and that must contain the file being assembled.
Use the Alt key to access window commands. Table 3-10 explains the window commands.
Table 3-10. Window Commands
COMMAND
KEYS
DESCRIPTION
Add window
Ctrl-OA
or
Alt-W
Opens another text window. You will be prompted for a file to
edit; if none is specified, a "NONAME" file is created, which
you may later save as a named file using any of the Save file
commands described above. If too many windows are open,
you will get an error message. If you enter the name of a file
already being edited, the new window will allow you to view a
different section of the file than is displayed in the first
window.
Add window from
reload list
Ctrl-F3
This command is largely identical to the Add window
command, but instead of being prompted for a file to edit you
are asked to pick a file from the reload list.
Previous window
Ctrl-OP
Makes the previous text window the current window.
Next window
Ctrl-ON
Makes the next text window the current window.
Resize current
window
Ctrl-OS
Allows you to change the size of the current window. You
adjust the size by pressing the up and down cursor keys.
When you are finished, pressing Enter or <ESC> returns you
to the editor.
Zoom current
window
Ctrl-OZ
or
Alt-Z
Zooms the current window to fill the entire screen, hiding the
other text windows. When a window has been zoomed,
"»ZOOM«" will appear at the top right corner of the status
line. If you change windows while zoomed, the window you
change to will be zoomed as well. If only one window is open
at the time this command is given, the command does
nothing except request that the next window opened should
be zoomed.
RAPID/D
3-18
MOTOROLA
USING RAPID
3.4.9
Block Commands
A block is any defined, contiguous stream of text, from a single character to many lines — even the entire file. To
define a block, put a begin-block marker at the first character and an end-block marker after the last character.
Once you define a block in this way, you can move it, copy it, delete it, or write it to a file (see file commands
paragraph 3.4.6).
The editor highlights defined blocks, but you may change this via the hide-block command. Block commands
work only with non-hidden, fully defined blocks. Table 3-11 explains block commands.
Table 3-11. Block Commands
COMMAND
KEYS
DESCRIPTION
Begin block
Ctrl-KB
Marks the beginning of a block. The marker itself is not
visible on the screen, and the block becomes visible only
when the end block marker is set. You may also use the
begin block marker as an extra text marker and jump directly
to it with the Top of block command.
End block
Ctrl-KK
or
F8
Marks the end of a block. Like the begin block marker, the
end block marker is invisible, and the block itself will not be
displayed unless both markers are set. You may also use the
end block marker as an extra text marker and jump directly
to it with the Bottom of block command.
Top of block
Ctrl-QB
Moves the cursor to the position of the block begin marker.
The command works even if the block is hidden or the block
end marker is not set.
Bottom of block
Ctrl-QK
Moves the cursor to the position of the block end marker.
The command works even if the block is hidden or the block
begin marker is not set.
Copy block
Ctrl-KC
Copy the currently marked and displayed block to the
position of the cursor. The block markers are placed around
the new copy of the block.
Move block
Ctrl-KV
or
Alt-F8
Move the currently marked and displayed block to the
position of the cursor. The block markers remain around the
block at its new position.
Delete block
Ctrl-KY
Delete the currently marked and displayed block. Although
the Undo command can usually restore portions of an
accidentally deleted block, there is no command to restore a
deleted block in its entirety, so you should use this command
with care.
RAPID/D
3-19
MOTOROLA
USING RAPID
Table 3-11. Block Commands (continued)
COMMAND
KEYS
DESCRIPTION
Toggle block
display
Ctrl-KH
Toggle the display of marked blocks. Note that several of the
other block commands do nothing or generate error
messages if a marked block is not displayed.
Mark current word
Ctrl-KT
Mark the current word as a block. See the description of the
Word left command for a definition of "word."
Indent block
Ctrl-KI
Indent all lines in the currently marked and displayed block
by a fixed number of spaces. The default indention level of 2
may be changed using either RINSTALL or the Set
indentation level command. The cursor must be within the
block when the command is issued.
Unindent block
Ctrl-KU
Un-indent all lines in the currently marked and displayed
block by a fixed number of spaces (default is 2). Note that
this command will not delete any non-blank characters at the
beginning of a line. The cursor must be within the block
when the command is issued.
Increment marked
block
Ctrl-KG
Decrement marked
block
Ctrl-KL
These two commands are somewhat similar to the Upper
case, Lower case, and Toggle case commands. If the cursor
is not within a marked and displayed block, they increment or
decrement the value of the character at the cursor, provided
that it is not a space. If the cursor is within a block, the
contents of that block are examined. If the block is all on one
line *and* the string of characters within the block is a valid
integer number in decimal format within the range MaxLongInt..MaxLongInt, the command will increment or
decrement that number. For example, if the block consists of
"10", " 10", or "010", and the Increment marked block
command were given, the block would be changed to "11", "
11", or "011" respectively. If the block is not on one line, or if
the contents of the block is not a valid number, each nonblank character in the block will be
incremented/decremented. For example, "BCDE" would
become "CDEF"/"ABCD". One obvious use for these
commands is to construct a macro such as the following:
<Ctrl-KT>
<Ctrl-KG>
<Down>
<Alt-SA>
<Alt-SR>
RAPID/D
3-20
Mark the current word as a block
Increment the value of the block
Move the cursor to the next line
Abort the macro if the new line is empty
Repeat this macro
MOTOROLA
USING RAPID
Table 3-11. Block Commands (continued)
COMMAND
KEYS
DESCRIPTION
Assuming that the cursor were at the top of a column of
numbers (a series of constant declarations, for example),
this macro would increment each number in the column until
it reached a blank line.
Increment and
decrement marked
block (continued)
Before
"99"
" 99"
" 99"
"0100"
After
"100"
"100"
" 100"
"0101"
As you can see, it is acceptable for numbers to be leftpadded with either zeros or spaces. If the number after
incrementing is wider than it was before, all text to the right
of the number will be pushed forward to make room.
Align block
Ctrl-KA
Aligns all lines in the currently marked and displayed block
with the first line. For example, if the first non-blank
character in the first line is at column 5, the text in the
remaining lines in the block will be adjusted so that the first
non-blank character in each line is at column 5. The cursor
must be within the block when the command is issued.
Reformat block
Ctrl-KF
Reformats all paragraphs completely contained within the
currently marked and displayed block. Note that this
command does nothing if word wrap is off.
RAPID/D
3-21
MOTOROLA
USING RAPID
3.4.10
Printing Commands
Table 3-12 explains the commands for printing files.
Table 3-12. Printing Commands
COMMAND
KEYS
DESCRIPTION
Print current file
Alt-KP
Prints the current file in its entirety by writing it to the default
printer device (LPT1). You can change the default printer
device using RINSTALL if LPT1 is inappropriate for your
system. (The other choices are LPT2, LPT3, COM1, and
COM2.) By default, RAPID sends a form feed (^L^M) to the
printer at the end of a print job, but you may disable this
behavior using RINSTALL if you wish.
Print block
Ctrl-KP
Writes the currently marked and displayed block to the
default printer device. By default, RAPID sends a form feed
to the printer at the end of the print job.
3.4.11
Text Marker Commands
Table 3-13 explains the text marker commands.
Table 3-13. Text Marker Commands
COMMAND
KEYS
DESCRIPTION
Toggle marker
display
Ctrl-KM
Set marker 0..9
Ctrl-K0..Ctrl-K9
Sets one of the ten text markers at the position of the cursor.
<Ctrl-K0> sets marker 0, <Ctrl-K1> sets marker 1, etc.
Jump marker 0..9
Ctrl-Q0..Ctrl-Q9
Moves the cursor to the specified text marker. <Ctrl-Q0>
jumps to marker 0, <Ctrl-Q1> jumps to marker 1, etc.
RAPID/D
Toggle the display of text markers.
3-22
MOTOROLA
USING RAPID
3.4.12
Macro Commands
When RAPID first starts, it looks for a macro file called RAPID.MAC. It looks for this file first in the current
directory and then in RAPID's support path directory (set with RINSTALL). In the typical case, you will have
only one file (RAPID.MAC) located in your support path. However, you may have multiple files of that name for
use on different projects. Just keep in mind that RAPID looks only in the current directory for a project-specific
macro file.
Table 3-15 explains the commands for recording, editing, and writing and playing back macro to the disk. Table
3-15 explains the special macro commands.
Table 3-14. Macro Commands
COMMAND
KEYS
DESCRIPTION
Toggle macro
record
Ctrl-JT
Turns macro recording on or off. When macro recording is
on, all subsequent keystrokes (up to the 255-keystroke limit)
are saved in the scrap macro until macro recording is turned
off again. (Keystrokes used to turn it on and off are not
saved.) Once the macro is recorded, you are asked to select
a macro "slot" to store it in.
Edit macro
Alt-SM
Edit an existing macro. In the macro editor, special keys
(function keys, cursor keys, etc.) are represented by
abbreviated forms of their names - for example,
EscCtrlNEnter - and these symbols are highlighted. Regular
keystrokes are shown as normal characters, without
highlighting. When you issue this command, you are asked
to select a macro to edit, then to enter a name for the macro
(optional). Then you enter the macro editor itself. Several
keys serve special purposes here: the cursor keys behave
as usual, moving the cursor so you can select a particular
keystroke to change; BkSp deletes a single keystroke, just
as it does in the regular editor; <Ctrl-BkSp deletes an entire
macro; Enter accepts the macro. The ScrollLock key acts as
a toggle, turning literal interpretation of keystrokes on and
off. For example, if you wanted to insert the Enter key or the
BkSp key into the macro, you would first press ScrollLock.
Pressing it again would restore all special keys to their
normal functions. The bottom right corner of the macro editor
window indicates whether the editor is in Command mode or
Literal mode.
Load macros from
disk
Alt-SL
Allows you to load a file of previously saved macros. If the
file you specify does not exist, an error message is
displayed.
Write macros to
disk
Alt-SW
Saves the current macros to the file you specify.
RAPID/D
3-23
MOTOROLA
USING RAPID
Table 3-14. Macro Commands (continued)
COMMAND
KEYS
DESCRIPTION
Playback macro by
menu
Alt-TM
Displays a list of the currently defined macros. To play one
of them back, move the highlight over the appropriate menu
item and press Enter. Press <ESC> instead if you do not
wish to playback a macro.
Playback macro
1..9
Alt-1..Alt-9
Plays back the specified macro one time. <Alt-1> plays back
macro 1, <Alt-2> macro 2, and so on.
Playback scrap
macro
Ctrl-JI
Plays back the scrap macro (macro 0) a specified number of
times. The scrap macro is always the same as the last
macro that was recorded, even if that macro was saved as a
normal macro (1-9). Note that the limit on the number of
times that the macro can be played back depends on the
length of the macro (if nothing else is in the keyboard buffer,
the limit is '512 div Length(Macro)').
Playback scrap
macro 1..9 time(s)
Ctrl-J1..Ctrl-J9
Plays back the scrap macro 1 to 9 times. <Ctrl-J1> plays it
back once, <Ctrl-J2> twice, and so on.
Table 3-15. Special Macro Commands
COMMAND
KEYS
Force insert mode
Alt-FI
Forces insert mode on.
Force overtype
mode
Alt-FO
Forces insert mode off.
Force autoindent
mode
Alt-FA
Forces autoindent mode on.
Force word wrap
on
Alt-FW
Forces word wrap mode on.
Abort macro if line
empty
Alt-SA
Aborts the macro if the current line is empty.
Abort macro if end
of file
Alt-SF
Aborts the macro if the cursor is at the first *or* last line of
the file.
Abort macro if out
of block
Alt-SK
Aborts the macro if the cursor is not within the currently
marked block.
RAPID/D
DESCRIPTION
3-24
MOTOROLA
USING RAPID
Table 3-15. Special Macro Commands (continued)
COMMAND
KEYS
DESCRIPTION
Repeat last macro
Alt-SR
Repeats the last macro. This command should generally be
used only at the end of a macro that is designed to be selfrepeating *and* self-aborting. For example, you might have a
macro such as the following:
<Alt-SK>
Abort macro if cursor is not in the marked
block
HomeDelDel Delete two spaces at the start of the
current line
Down
Move the cursor to the next line
<Alt-SR>
Repeat last macro--i.e., this macro
(This macro is taken from the default macro file,
RAPID.MAC, where it is assigned to <Alt-2>. See the
discussion of The Standard Macro File, below.)
The macro works something like this:
while CursorInMarkedBlock do begin
HomeTheCursor;
DeleteOneChar;
DeleteOneChar;
CursorDown;
end;
{ <Alt-SK> }
{ Home }
{ Del }
{ Del }
{ Down }
{ <Alt-SR> }
The conditional test for aborting the macro should generally
appear at the beginning of the macro or just prior to the
Repeat last macro command. If the test is at the beginning,
the macro will work like a "while" loop, meaning that it will
never be executed if the condition isn't met initially. If it is just
before the end, it will work like a "repeat..until" loop, meaning
that the first part of the macro will always be executed once:
repeat
HomeTheCursor;
DeleteOneChar;
DeleteOneChar;
CursorDown;
if not CursorInMarkedBlock then
Exit;
until False;
{ Home }
{ Del }
{ Del }
{ Down }
{ <Alt-SK> }
{ <Alt-SR> }
Note that it is possible to record a macro that contains the
Repeat last macro command. However, RAPID will
automatically terminate the recording session as soon as the
command is issued, rather than actually repeating the
macro. The Repeat last macro command will then represent
the last command in the recorded macro.
RAPID/D
3-25
MOTOROLA
USING RAPID
3.4.13
Text Formatting Commands
Table 3-16 explains the commands for formatting text.
Table 3-16. Text Formatting Commands
COMMAND
KEYS
DESCRIPTION
Reformat
paragraph
Ctrl-B
Center line
Ctrl-OC
Centers the current line within the left and right margins.
Upper case
Ctrl-OU
Convert all characters in the currently marked and displayed
block to upper case. If the cursor is not within a marked and
displayed block, the character at the cursor is converted to
upper case.
Lower case
Ctrl-OV
Convert all characters in the currently marked and displayed
block to lower case. If the cursor is not within a marked and
displayed block, the character at the cursor is converted to
lower case.
Toggle case
Ctrl-OO
Toggle the case of all characters in the currently marked and
displayed block. If the cursor is not within a marked and
displayed block, the case of the character at the cursor is
toggled.
Set left margin
Ctrl-OL
Set the left margin for text displayed on the screen. The
default left margin of 1 may be changed with RINSTALL.
Set right margin
Ctrl-OR
Set the right margin for text displayed on the screen. The
default right margin of 78 may be changed with RINSTALL.
Set indentation
level
Ctrl-OB
Set the indentation level for marked blocks. This setting
affects the behavior of the Indent block and Un-indent block
commands. The default indentation level of 2 may be
changed with RINSTALL.
RAPID/D
Rearranges words from the current line to the end of the
paragraph such that the lines are as full as possible, given
the constraints imposed by the left and right margins. The
end of a paragraph is signaled by a blank line. This
command is available only when word wrap is on.
3-26
MOTOROLA
USING RAPID
3.4.14
Mode Toggle Commands
Table 3-17 explains the commands to toggle ON and OFF; autoindent, word wrap, word wrap compress, and
synchronized scrolling, and toggling between insert and overtype modes.
Table 3-17. Mode Toggle Commands
COMMAND
KEYS
DESCRIPTION
Toggle insert mode
Ins,
Ctrl-V
Toggle insert mode on or off. A fat cursor indicates insert
mode; a thin cursor indicates overtype mode. (If a solid block
cursor is in use, only the status line will indicate whether you
are in insert or overtype mode.)
Toggle autoindent
mode
Ctrl-QI
Toggle autoindent mode on or off. In autoindent mode,
pressing Enter while in insert mode will cause the new line
inserted to have the same indentation level as the previous
line. Autoindent mode also affects the way that text is
formatted when word wrap occurs--the new line will have the
same indentation level as the previous line--and hence the
behavior of the reformatting commands.
Toggle word wrap
Ctrl-OW
Toggle word wrap on or off. When word wrap is on, any
attempt to insert or append text beyond the right margin will
cause a new line to be inserted following the current line and
all words that are at least partially beyond the right margin to
be moved to the new line.
Toggle compress
at wrap
Alt-TC
This option, which is on by default, tells RAPID to compress
excess white space out of a line before trying to word wrap
it. For example, thisisa test would become this is a test after
compression. Leading white space is never removed. Note
that this setting also affects the behavior of the reformatting
commands.
Toggle
synchronized scroll
Alt-SS
When synchronized scrolling is on, all cursor movement
commands are passed to all visible windows on the screen
for processing. This option is especially useful when
comparing two versions of the same file. Note that many
cursor movement commands, notably Up, Down, Left, and
Right, often has no visible effect on windows other than the
current one. The effects will be visible only if the command
causes the window to scroll. Note too that certain
commands, such as End, <Ctrl-Left>, and <Ctrl-Right>, may
have slightly different effects in different windows.
Synchronized scrolling is temporarily disabled when the
current window is zoomed.
RAPID/D
3-27
MOTOROLA
USING RAPID
3.4.15
Screen Toggle Commands
Table 3-18 explains the commands to toggle screen modes.
Table 3-18. Screen Toggle Commands
COMMAND
KEYS
DESCRIPTION
Toggle 43-/50-line
mode
Alt-TE
Activates/deactivates the 43-line mode on EGA's or the 50line mode on VGA's. RAPID restores the mode that the
system was in initially before exiting to DOS or executing
another program.
Toggle userdefined mode
Alt-TU
Activates/deactivates the user-defined video mode if one
was specified with RINSTALL. If none was specified, this
command does nothing.
Toggle linedrawing mode
Alt-L
This command lets you activate/deactivate one of RAPID's
four line-drawing modes. In a line-drawing mode, pressing
Left, Right, Up, or Down causes an appropriate line-drawing
character to be placed at the position of the cursor,
overwriting the character beneath the cursor, if any. The
cursor is then moved in the direction indicated, if appropriate.
Note that, when line-drawing characters are being inserted,
the current margins are ignored, as are the states of the
autoindent, word wrap, and insert mode toggles.
By default, RAPID runs in "edit mode," in which the four
cursor keys simply move the cursor. Pressing <Alt-L>
repeatedly allows you to select one of the four line-drawing
modes, corresponding to the following sets of characters:
Press <Alt-L> a fifth time brings you back to edit mode. You
can switch back to edit mode immediately by pressing <AltE>, or you can temporarily switch to edit mode by pressing
ScrollLock. Note that ScrollLock is forced off when you give
either the <Alt-L> or the <Alt-E> command.
As with other mode toggles, activating a line-drawing mode
in the current window has no effect on other windows. When
one of the line-drawing modes is in effect for a given window,
the left side of its status line is used to display the
corresponding character set. If ScrollLock is active, however,
and that window is the current window, 'ScLock' is displayed
there instead to remind you that the line-drawing mode has
been temporarily overridden. If the window is in edit mode,
that portion of the status line is used to display the '»SAVE«'
reminder, as usual.
RAPID/D
3-28
MOTOROLA
USING RAPID
Table 3-18. Screen Toggle Commands (continued)
COMMAND
KEYS
Force edit mode
Alt-E
Forces a return to edit mode.
Toggle snow check
Alt-TS
Turns snow checking on or off. Since snow checking is
needed only for older CGA adapters, RAPID will ignore this
command if the current display is not a CGA.
Toggle block
cursor
Alt-TB
Hides the blinking cursor you normally see on the screen and
replaces it with a solid, non-blinking "block cursor". You can
change the appearance of the block cursor with RINSTALL.
The blinking cursor is restored when you exit from RAPID or
when you execute another program.
Toggle initial zoom
Alt-TZ
If the initial zoom option is in effect (it is off by default), new
windows will automatically be zoomed when they are first
opened.
3.4.16
DESCRIPTION
Program Configuration Commands
Table 3-19 explains the commands to set support path, set default extension, and save defaults.
Table 3-19. Program Configuration Commands
COMMAND
KEYS
DESCRIPTION
Set support path
Alt-SP
The support path is the drive:\directory where RAPID looks
for its help file (RAPID.HLP) and the standard macro file
(RAPID.MAC).
Set default
extension
Alt-SE
Used to specify the default extension for filenames. This
extension is automatically added to filenames lacking
extensions. For example, if you have set the default
extension to "PAS" (the default setting) and wish RAPID to
load "MYPROG.PAS" when the program starts, you can
enter RAPID myprog at the command line. Note that you
must issue the Save defaults command if you want to make
this setting permanent.
Save defaults
Alt-SD
Allows you to save the current configuration settings as the
defaults. If RAPID found RAPID.CFG when it first loaded,
that copy of RAPID.CFG will be overwritten with the new
settings. If RAPID.CFG was not found initially, a new
RAPID.CFG file will be created in the current directory. This
command is of little use if you've selected the option to
automatically save the configuration data on exit.
RAPID/D
3-29
MOTOROLA
USING RAPID
3.4.17
Miscellaneous Commands
Table 3-20 explains the miscellaneous commands.
Table 3-20. Miscellaneous Commands
COMMAND
KEYS
DESCRIPTION
Show system info
Ctrl-JV
or
Alt-I
Shows you a variety of statistics about the file in the current
window, as well as certain "system information": the version
of RAPID in use; the full pathname of the file being edited;
the number of lines, bytes, and words in the file; the amount
of RAM and (if appropriate) virtual memory remaining; the
current drive and directory; and the amount of space
remaining on the current drive.
Show available
memory
Ctrl-JR
or
Alt-M
Displays the amount of virtual memory available within the
editor.
Invoke DOS shell
RAPID/D
F9
or
Alt-D
This command gives you access to DOS services or to other
programs from within RAPID. You will be prompted for the
name of a program or a DOS command to be executed. If
you need to run several programs, you can invoke a DOS
"shell" simply by leaving the command string blank and
pressing Enter. To return to RAPID from a DOS shell, enter
"EXIT" at the DOS command line. As mentioned elsewhere,
one of the nicest features of RAPID is its ability to swap itself
almost entirely out of memory before executing other
programs. Only a tiny kernel of about 4K remains in memory;
the rest of the program is swapped to disk, EMS, or XMS.
Note that you cannot load a second copy of RAPID while you
are shelled out to DOS. If you try to do so, RAPID will abort
with the message "RAPID is already loaded." One other
special note about this command. RAPID analyzes the
command line you specify and replaces each instance of
"%p%" with the full pathname of the primary file. (See the
next section of the documentation.) For example, if the
primary file is "C:\ASM\MYPROG.ASM", then "tpc %p%"
would be treated as equivalent to "tpc
C:\ASM\MYPROG.ASM". Note that there may be more than
one instance of "%p%" in the command string. This feature
makes it possible to create a macro that executes a utility
program and automatically passes it the name of the primary
file. For example, the macro "Shift-F2Alt-Dpsa %p%Enter"
would save all modified files and then execute the PSA
program from Turbo Analyst, passing it the name of the
primary file as a parameter.
3-30
MOTOROLA
USING RAPID
Table 3-20. Miscellaneous Commands (continued)
COMMAND
KEYS
DESCRIPTION
Log drive/path
Ctrl-JD
or
Alt-P
Allows you to change the active drive and directory. You may
enter a drive and path, or you can specify a "file mask" and
choose a new path from a directory listing. For example,
entering C:\*.* would show you a list of all the subdirectories
that branch out of the root directory on drive C. When the
name of the directory you want is displayed at the top of the
window, press <ESC> to make it the current directory.
Abort
Ctrl-U
Used to halt an operation in progress. The keyboard buffer is
checked regularly to see if the abort command has been
issued; if it has, the buffer is emptied and the operation is
stopped.
F1
This command tells RAPID to load the help file (RAPID.HLP)
created by RINSTALL. If the file is found on the support
path, and there are fewer than 8 windows open, RAPID will
open a new window, load RAPID.HLP into it, and then zoom
the window. There is nothing special about the help file. It is
an ordinary ASCII text file, and you may do anything with it
that you could do with any other file (perform searches, edit
it, etc.).
Alt-F5
This command displays the contents of "the user screen"-the screen that was active when RAPID first started. If any
other programs have been executed while within RAPID, the
output of those programs can be viewed using this
command. Press any key to return to the RAPID screen.
Load editor help
file
Display user
screen
RAPID/D
3-31
MOTOROLA
USING RAPID
3.4.18
Program Assembling and Compiling Commands
Table 3-21 explains the commands for assembling and compiling programs.
Table 3-21. Program Assembling and Compiling Commands
COMMAND
KEYS
DESCRIPTION
Select assembler/
compiler
Shift-F5
This command allows you to change the current compiler,
assuming that you have configured RAPID for use with
multiple compilers. The abbreviation for the currently
selected compiler will appear on the status lines for all visible
windows. Note that, unlike RINSTALL, RAPID will not allow
you to select a given compiler unless it has a 1- to 4character abbreviation.
Assembler/compile
w/ primary options
F4
This command compiles the primary file using the current
compiler and its primary compiler options. Normally this
command is used to compile a program *without* debug
information. If the Confirmation of parameters option is On,
as it is by default, you will be given an opportunity to edit the
command line to be passed to the compiler before it is
executed.
Assemble/compile
w/ secondary
options
Ctrl-F4
This command compiles the primary file using the current
compiler and its secondary compiler options. Normally this
command is used to compile a program *with* debug
information, in preparation for running it in the debugger. If
the Confirmation of parameters option is On, as it is by
default, you will be given an opportunity to edit the command
line to be passed to the compiler before it is executed.
RAPID/D
3-32
MOTOROLA
USING RAPID
Table 3-21. Commands for Assembling/Compiling Programs (continued)
COMMAND
KEYS
DESCRIPTION
Set path to
assembler/
compiler
Alt-CN
Lets you specify the complete pathname of the current
compiler. Note that RAPID will automatically use the first four
letters of the compiler's name as its abbreviation. For
example, if you set the path to the current compiler to
'C:\BC\BIN\BCCX.EXE', RAPID will set the compiler's
abbreviation to 'BCCX'.
Set primary
assembler/
compiler options
Alt-CO
Lets you specify the command line options to be passed to
the current compiler when you issue the Compile w/ primary
options command.
Set secondary
assembler/
compiler options
Alt-C2
Lets you specify the command line options to be passed to
the current compiler when you issue the Compile w/
secondary options command.
3.4.19
Program Simulation Commands
Table 3-22 explains the commands for program simulation.
Table 3-22. Program Simulation Commands
COMMAND
KEYS
DESCRIPTION
Simulate file
F6
or
Shift-F4
This command simulates either the file in the current window
(default) or the primary file, depending on how RAPID is
configured. If the Confirmation of parameters option is On,
as it is by default, you will be given an opportunity to edit the
command line to be passed to the assembler before it is
executed.
Set path to
simulator
Alt-CC
Lets you specify the complete pathname of the simulator.
Set simulator
options
Alt-CA
Lets you specify the command line options to be passed to
the simulator when you issue the Assemble file command.
RAPID/D
3-33
MOTOROLA
USING RAPID
3.4.20
Program Debugging Commands
Table 3-23 explains the commands for debugging programs.
Table 3-23. Program Debugging Commands
COMMAND
KEYS
DESCRIPTION
Debug primary file
Alt-F4
This command invokes the debugger, passing it any
command-line options specified with the Set debugger
options command, followed by the name of the primary file
(after applying the default extension for executables to the
filename), plus any command line options you have specified
with the Set default parameters command. If the
Confirmation of parameters option is On, the default is OFF,
you will be given an opportunity to edit the command line to
be passed to the debugger before it is executed.
Set path to
debugger
Alt-CD
Lets you specify the complete pathname of the debugger.
Set debugger
options
Alt-CG
Lets you specify the command line options to be passed to
the debugger when you issue the Debug primary file
command.
3.4.21
Programmer/Terminal Emulation Commands
Table 3-24 explains the commands for setting up a programmer or terminal emulation.
Table 3-24. Programmer/Terminal Emulation Commands
COMMAND
KEYS
GoTo programmer
or go to terminal
emulator/browse
current file
F7
Set path to
programmer/
terminal emulator
Alt-F7
Lets you specify the complete pathname to RapTerm.
Set programmer/
terminal emulator
options
Ctrl-F7
Lets you specify the command line options to be passed to
RapTerm when you issue the GoTo Terminal Emulator
command.
RAPID/D
DESCRIPTION
This command invokes the terminal emulator programmer,
passing it any command-line options specified with the Set
Terminal options command followed by the name of the file
in the current window. If the Confirmation of parameters
option is On, the default is OFF, you will be given an
opportunity to edit the command line to be passed to
RapTerm before it is executed.
3-34
MOTOROLA
USING RAPID
3.5
RAPID'S VIRTUAL MEMORY MANAGER
RAPID uses a virtual memory manager that allows it to store text being edited in "virtual memory," which can be
either RAM, EMS, XMS, or disk. By default, RAPID uses normal RAM, but you can select one of the other
sources of memory either by changing the default setting with RINSTALL or by passing the appropriate command
line parameter to RAPID when you go to run it: /E for EMS, /X for XMS, /D for disk, or /N for normal RAM. If
the desired source of virtual memory is not available, or is too limited to be of use, RAPID will display an error
message when it starts and use normal RAM instead.
Note that RAPID does not store all its data in virtual memory; many things are always stored in normal RAM. In
particular, RAPID allocates a single 16-byte data structure in RAM for each line in a given file. In addition, when
using either XMS or disk for virtual memory, RAPID also allocates roughly one third of available RAM for
buffering data stored in virtual memory. Given 600K of available RAM, RAPID will therefore be able to edit a
file of about 27,000 lines if using EMS, or 18,000 lines if using XMS or disk. To see how much RAM and virtual
memory is still available, use the Show system info command (<Ctrl-JV> or <Alt-I>). The Show available
memory command (<Ctrl-JR> or <Alt-M>) displays only the amount of virtual memory remaining.
When RAPID runs out of memory, you'll see one of two error messages. If it has exhausted the supply of normal
RAM, you'll see "Insufficient memory." If it runs out of virtual memory, you'll see "Insufficient virtual memory."
Please keep this distinction in mind. The fact that you have lots of virtual memory available doesn't mean that you
won't be seeing an "Insufficient memory" error message.
There are two other error messages that you might see in this connection. The first is simply a warning message:
"Warning! Limited RAM available". This message will appear only when EMS, XMS, or disk is being used for
virtual memory. What it means is that the virtual heap is badly fragmented, and that RAPID is dangerously close
to not having enough memory (RAM) reserved to keep track of all the blocks of available virtual memory. If you
see this warning, the best thing to do is to save your work, exit from RAPID, and reload RAPID with the /A
option.
The second error message is one we hope you'll never see: "Critical error nnn. Data may be lost." What this means
is that the virtual memory manager has encountered an unrecoverable error, and you need to exit immediately. If
the error number ("nnn") is 204, you're in good shape. That simply means that the virtual heap is so badly
fragmented that RAPID can no longer keep track of all the free memory blocks. No data has been lost, but you
should save all your work and exit immediately. You shouldn't see this message unless you've previously seen the
warning message described above.
Any other critical error message is very bad news indeed. It means that an I/O error occurred while trying to
access the source of virtual memory (a disk read error, for example). In all likelihood, at least some of your data
has been lost. You can try saving your work before exiting, but very likely the file will contain garbage or be
incomplete.
RAPID/D
3-35
MOTOROLA
CASM OPERATING PROCEDURE
CHAPTER 4
CASM OPERATING PROCEDURE
4.1
INTRODUCTION
The CASM cross assembler assembles the file currently in RAPID. The assembler produces object files, map files,
and listing files, according to the control option values. The source file uses factory standard mnemonics. For a
list of acceptable mnemonics, see the environment’s help screens.
Each line of the source file contains a single assembly-language statement. A statement contains as many as four
fields, in this order:
label operation
4.1.1
operand
;comment
Labels and Reserved Labels
Labels, if present, must start in column one. A label may be as long as 16 characters; it must start with a letter.
The assembler does not differentiate between upper- and lower-case letters in labels. The second and subsequent
characters may be alphanumeric characters, underscores, or dashes. You may add a colon to the end of a label, but
this is optional: a space suffices.
Note that labels within macros must not be longer than 10 characters.
Examples of labels are:
Label:
ThisIsALabel:
Loop_1
This_label_is_much_too_long:
Note that the assembler would truncate the last example to 16 characters. To the assembler, the example would be
would be the same as:
This_label_is_much_longer_than_needed
RAPID/D
4-1
MOTOROLA
CASM OPERATING PROCEDURE
4.1.2
Operations
The assembler supports all Motorola opcode mnemonics. To see the full list of these mnemonics, look under
INSTRUCTION SET, in the on-line help system.
Opcodes cannot start in column 1. If a label starts the line, there must be at least one space (or a colon) between
the label and the opcode.
4.1.3
Operands and Constants
Operands are addresses, labels, or constants, as defined by the opcode. Assembly-time arithmetic is allowed
within operands. Such arithmetic uses these possible operators:
*
/
+
<
>
%
&
|
^
multiplication
division
addition
subtraction
left shift
right shift
remainder after division
bitwise and
bitwise or
bitwise xor
Operator precedence follows the rules of algebra. You may use parentheses to alter precedence. If your expression
contains more then one operator, parenthesis, or embedded space, you must put the entire expression inside braces
( { } ).
jmp start
;start is a previously defined label.
jmp start+3
;jump to location start + 3.
jmp {start > 2}
;jump to location start divided by 4.
Constants are specific numbers in assembly-language instructions. The default base for constants is hexadecimal,
but you may change the default via the base assembler directive.
For temporary override of the default base, use the appropriate prefix or suffix (but not both):
Base
Prefix
Suffix
2
%
Q
8
@
O
10
!
T
16
RAPID/D
H
4-2
MOTOROLA
CASM OPERATING PROCEDURE
Additionally, either symbol $ or * means the current program counter.
Examples : 10010111Q = %10010111 = 97H = $97
JMP $
; jump to myself
JMP *
; jump to myself
The assembler also accepts ASCII constants. Specify an ASCII constant by enclosing it in single or double quotes.
A character ASCII constant has an equivalent value: ‘A’ is the same as 41H. An example of a string constant is:
db "this is a string"
4.1.4
Comments
Semicolons delineate comments. A comment may start in any column and runs until the end of its line.
Additionally, if any line has a * or ; in column 1, the entire line is a comment.
Examples of comments are:
;this comment is the only thing on the line.
nop
;this is a comment
* this entire line is a comment.
RAPID/D
4-3
MOTOROLA
CASM OPERATING PROCEDURE
4.1.5
Assembler Directives
Directives are keywords that control the progress and the modes of the assembler. To invoke a directive, use a /, #,
or $ as the first character of a line. Enter the directive immediately after this character, along with appropriate
parameter values.
Table 4-1 lists the directives. The caret (^) indicates that a parameter value must follow the directive. Note that a
space must separate a directive and its parameter value. Paragraphs 4.1.6 through 4.1.10 give more detail on how
to use these directives.
Table 4-1. Assembler Directives
DIRECTIVE
ACTION
BASE ^
Change the default input base to binary, octal, decimal, or
hexadecimal
CYCLE_ADDER_OFF
Stop accumulating instruction cycles and print the total
CYCLE_ADDER_ON
Start accumulating instruction cycles
ELSEIF
Alternate conditional assembly vis-a-vis the IF ^ or IFNOT ^
directive.
ENDIF
End conditional assembly
IF ^
Assemble specified code if condition is true
IFNOT ^
Assemble specified code if condition is false
INCLUDE '^'
Include specified file in source code
MACRO ^
Create a macro
MACROEND
End a macro definition
SET ^
Set specified condition to true
SETNOT ^
Set specified condition to false
RAMEND ^
Set logical end of RAM space.
RAMSTART ^
Set default for ramloc pseudo-operation.
RAPID/D
4-4
MOTOROLA
CASM OPERATING PROCEDURE
4.1.6
Changing Base
The BASE assembler directive changes the default base of the current file. The parameter specified must be in the
current base or have a base qualifier (prefix or suffix). The new base remains in effect until the end of the file or
until you enter another BASE directive.
The original default base is hexadecimal, but you can have binary, octal, or decimal default bases instead. It is a
good idea to specify a base explicitly, as you may not be sure what base is currently in use.
Examples are:
4.1.7
$BASE 10T
;changes default base to decimal
$BASE 0AH
;changes default base to decimal
Cycle Adder
The assembler contains an internal counter for instruction cycles: the cycle adder. The two assembler directives
CYCLE_ADDER_ON and CYCLE_ADDER_OFF control this counter.
When the assembler encounters the CYCLE_ADDER_ON directive, it clears the cycle adder. The cycle adder
starts a running total of instruction cycles as subsequent instructions are assembled. (For instructions that have
variable numbers of instruction cycles, the cycle adder uses the smallest number.)
When the assembler reaches the CYCLE_ADDER_OFF directive, it writes the current cycle-adder value to the
.LST file and disables the cycle adder.
NOTE
For these directives to work, the Listing and Cycle Cntr options (from the
Assemble submenu) must be on.
RAPID/D
4-5
MOTOROLA
CASM OPERATING PROCEDURE
4.1.8
Conditional Assembly
The assembler lets you specify blocks of code to be assembled only upon certain conditions. To set up such
conditional assembly, use the directives SET, SETNOT, IF, IFNOT, ENDIF, and ELSEIF.
The SET directive sets the value of its parameter to true. The SETNOT directive sets the value of its parameter to
false. The maximum number of SETs and SETNOTs is 25.
The directives IF (or IFNOT) and ENDIF determine the block of code for conditional assembly. Code between IF
and ENDIF is assembled if the given parameter value is true. Code between IFNOT and ENDIF is assembled if
parameter value is false.
The ELSEIF directive can precede ENDIF, providing an alternative. For example, if the parameter value is true,
code between IF and ELSEIF is assembled, but code between ELSEIF and ENDIF is not. If the parameter value is
false, code between IF and ELSEIF is not assembled, but code between ELSEIF and ENDIF is. ELSEIF gives the
same alternative arrangement to a directive sequence that starts with IFNOT.
An example is:
$SET debug
;sets debug = true
$SETNOT test
;sets test = false
nop
;always assembles
nop
;always assembles
$IF
debug
;if debug = true
jmp start
;assembles
$ELSEIF
;if debug = false
jmp end
;does not assemble
$ENDIF
;
nop
;always assembles
nop
;always assembles
$IF test ;if test = true
jmp test
;does not assemble
$ENDIF
;
RAPID/D
4-6
MOTOROLA
CASM OPERATING PROCEDURE
4.1.9
Include
When the assembler encounters the INCLUDE directive, it takes source code from the specified file. This
continues until the assembler encounters another INCLUDE directive or until the end of file. In the latter case, the
assembler continues taking source code from the file that contained the INCLUDE directive.
The file specification must be in quotes (single or double). If the file is not in the current directory, the
specification must be the full path name.
Includes may be nested to a maximum depth of 10.
The Assemble submenu lets you choose whether to show the source code from include files within the .LST file.
Note that the file name must be in quotes (single or double).
Examples are:
$INCLUDE "init.asm"
$INCLUDE "c:\project\init.asm"
4.1.10
Macros
A macro is a named block of text to be assembled in lieu of its name. Although similar to an include file, macro is
more flexible. For example, a macro can have labels and can receive parameter values.
The MACRO directive starts a macro definition. The name of the macro is the parameter value for this directive.
All subsequent code, to the MACROEND directive, is the macro definition.
No directives may be within a macro, nor does the definition need parameter names. Instead, the definition
includes the sequential indicators %n for the n'th parameter values of the macro call. The assembler ignores
parameter values on the MACRO directive line, so such values may be helpful for internal documentation.
Example 1 is a macro that divides the accumulator value by 4:
$MACRO divide_by_4
asr a
asr a
$MACROEND
RAPID/D
;Starts macro definition
;Divides accumulator by 2
;Divides quotient by 2
;Ends definition
4-7
MOTOROLA
CASM OPERATING PROCEDURE
Example 2 is a macro that creates a time delay:
$MACRO delay count
ldaa #$01
loop:
deca
bne loop
$MACROEND
The assembler ignores the parameter count, which is on the MACRO directive line. Count merely indicates the
role of the parameter value passed to the macro. That value is substituted for the sequential indicator %1. The first
time this macro is called, the assembler changes the label loop, on lines 3 and 4, to loop:0001. If the calling line
delay 100t
invokes this macro, the loop occurs 100 times. (Note the t decimal suffix.)
The assembler ignores extra parameter values sent to a macro. But if the macro does not receive enough parameter
values, the assembler issues an error message.
Labels are changed automatically each time they are used. Labels within macros cannot be longer than 10
characters. This is because the assembler appends :nnnn (a four-digit hexadecimal number) to the label. This
makes sure that labels always are unique.
Note that code cannot jump into a macro, but code may jump out of a macro. Macros cannot be forward
referenced.
If you do not want the listing file to contain code generated during a macro, select MACROS Hide from the
Assemble submenu. If you do want the listing file to contain this code, select MACRO view. Note that such code
in the listing file is not identical to the macro definition: it is all upper case and comments are stripped out. But
this appearance does not affect the definition itself.
4.1.11
Pseudo Operations
You may use pseudo operations in place of opcode mnemonics. Table 4-2 lists these pseudo operations.
RAPID/D
4-8
MOTOROLA
CASM OPERATING PROCEDURE
Table 4-2. Pseudo Operations
PSEUDO-OP CODE
ACTION
rmb n
or
ds n
Defines storage, reserving n bytes, where n = number or label. No forward
references of n are allowed.
fcb m
or
db m
Defines byte storage, where m = label, number, or string. Strings generate
ASCII code for multiple bytes; number and label parameters receive single
bytes. Separate multiple parameters with commas.
fdb n
or|
dw n
Defines word storage, where n = label, number, or string. Two bytes are
generated for each number or label. Separate multiple parameters with
commas.
lab: equ n
org n
RAPID/D
Assigns the value of the number or label n to the label lab. No forward
references of n are allowed.
Sets the origin to the value of the number or label n. No forward references of n
are allowed.
4-9
MOTOROLA
CASM OPERATING PROCEDURE
4.1.12
Listing Directives
Listing directives are source-code keywords that control output to the listing file. These directives pertain only to
viewing the source-code output; the directives, which may be interspersed anywhere in source code, do not affect
the actual code assembled. Table 4-3 lists these directives. Note the character (^), which indicates a mandatory
parameter value.
To invoke a listing directive, put a period ( . ) in column 1, and start the directive in column 2. The directive itself
does not appear in the listing file. (If you want the directive to appear in the listing file, use /, #, or $ in column 1,
instead of the period.)
Table 4-3. Listing Directives
DIRECTIVE
eject
or
page
header '^'
RAPID/D
ACTION
Begins a new page.
Specified string, in quotes, will be a header on listing pages.
The header can be defined only once. The default header is
blank.
list
Turns on the .list file output. (For this directive to work, the list
choice in the assemble sub-menu must be on.)
nolist
Turns off the .list file output. This directive is the counterpart of
the list directive. At the end of a file, this directive keeps the
symbol-table from being listed.
pagelength ^
Sets the length of the page. The default parameter value is !66
lines (! = decimal).
pagewidth ^
Sets the width of the output, wordwrapping additional text. The
default width is !80 columns (! = decimal).
subheader '^'
Makes the string specified in quotes a subheader on listing
pages. The subheader takes effect on the next page.
4-10
MOTOROLA
CASM OPERATING PROCEDURE
4.1.13
Listing File
A listing file requested via RINSTALL is created during assembly. This listing file has the same name as the file
being assembled, but with the extension .LST. (Any existing file that has the same name is overwritten.) The
listing file has this format :
AAAA [CC] VVVVVVVV LLLL Source Code .....
The first four hexadecimal digits (AAAA) are the address of the instruction in the target processor memory.
The CC field of the format is the number of machine cycles used by the opcode. Note that this value appears only
if Cycle Cntr was turned on before assembly. Also note that the CC value, which always appears in brackets, is a
decimal value. If an instruction has several possible cycle counts and the assembler cannot determine the actual
number, the CC field shows the best case (the lowest number). An example of several possible counts is whether a
branch happens.
The next group of hexadecimal digits (VVVVVVVV) are the values put into that memory address and possibly
the next several addresses. The size of this field depends on the actual opcode.
The LLLL field, as many as four digits, gives the line count. The actual source code follows the line count.
An example line of a listing file is:
0202 [05] 1608
37
bset 3,tcsr
;clear timer overflow flag
At the end of the listing file is the symbol table. This table lists every label and the value of each label.
The listing directives list and nolist affect the .LST file. If the nolist directive is at the end of the source code file,
it suppress the symbol table.
RAPID/D
4-11
MOTOROLA
CASM OPERATING PROCEDURE
4.1.14
Object and Map Files
If an object file is requested via the menu system, it is created during assembly. The object file has the same name
as the file being assembled, but with the extension .HEX or .S19. (S19 is the Motorola 8-bit object code format;
HEX is the Intel 8-bit object code format.) The choice of name depends on the choice made in the Assemble
submenu. Any existing file with the same name is overwritten.
If a map file is requested via the menu system, it is generated during assembly. ICD, MMDS, and other P&E
Microcomputer products use map files during source-level debugging.
Because map files contain DOS path information under which they were created, map files cannot be moved to a
new directory. To move map files to a different directory, reassemble with the map file option in the new
directory.
4.1.15
Error Messages
The assembler highlights any error it finds during assembly and displays an error message on the prompt line.
Table 4-4 lists possible error messages, with probable causes and corrective actions.
Table 4-4. Assembler Error Messages
MESSAGE
PROBABLE CAUSE
CORRECTIVE ACTION
Conditional
assembly variable
not found
The variable in the IF or IFNOT
statement has not been declared
via a SET or SETNOT directive.
Declare the variable via the SET or
SETNOT directive.
Duplicate label
The label in the highlighted line
already has been used.
Change the label to one not used
already.
Error writing .LST
or .MAP file—
check disk space
Insufficient disk space or other
reason prevents creation of an
.LST or .MAP file.
Make sure there is sufficient disk
space. Make sure (per your DOS
manual) that your CONFIG.SYS
file lets multiple files be open at the
same time.
Error writing object
file—check disk
space
Insufficient disk space or other
reason prevents creation of an
object file.
Make sure there is sufficient disk
space. Make sure (per your DOS
manual) that your CONFIG.SYS
file lets multiple files be open at the
same time.
Include directives
nested too deep
Includes are nested 11 or more
levels deep.
Nest includes no more than 10
levels deep.
INCLUDE file not
found
Assembler could not find the file
Make sure quotes enclose the file
specified in the INCLUDE directive. name. Specify any extension that
exists. If necessary, specify the full
path name.
RAPID/D
4-12
MOTOROLA
CASM OPERATING PROCEDURE
Table 4-4. Assembler Error Messages (continued)
MESSAGE
Invalid base value
PROBABLE CAUSE
CORRECTIVE ACTION
Use a qualifier prefix or suffix for
Value inconsistent with current
default base (binary, octal, decimal, the value, or change the default
base.
or hexadecimal).
Invalid opcode, too The opcode on the highlighted line
long
is wrong.
Correct the opcode.
MACRO label too
long
Change the label to have no more
than 10 characters.
A label in the macro has 11 or
more characters.
MACRO parameter The macro did not receive
error
sufficient parameter values.
Send sufficient parameter values to
the macro.
MACRO parameter The macro did not receive
error
sufficient parameter values.
Send sufficient parameter values to
the macro.
Out of memory
The assembler ran out of system
memory.
Create a file that consists only of
an INCLUDE directive, which
specifies your primary file.
Assembling this file leaves the
maximum memory available to the
assembler.
Parameter: invalid,
too large, missing
or out of range
Operand field of the highlighted line Correct the representation or
change the parameter value.
has an invalid number
representation. Or the parameter
value evaluates to a number too
large for memory space allocated
to the instruction.
There are 26 or more conditional
Too many
variables.
conditional
assembly variables
Limit conditional variables to 25 or
fewer.
Too many labels
The assembler ran out of system
memory.
Create a file that consists only of
an INCLUDE directive, which
specifies your primary file.
Assembling this file leaves the
maximum memory available to the
assembler.
Undefined label
The label parameter in the
highlighted line has not been
declared.
Declare the label.
Unrecognized
operation
The highlighted opcode is unknown Correct the opcode or make it
consistent with parameters.
or is inconsistent with the number
and type of parameters.
`}' not found
A mathematical expression is
missing its close brace.
RAPID/D
4-13
Insert the close brace.
MOTOROLA
CASM OPERATING PROCEDURE
4.1.16
Using Files from Other Assemblers
To prepare a source file used with another assembler for CASM, follow these steps:
1.
Make sure all comments start with a semicolon.
2.
Use the global find-and-replace command to change any assembler directives, listing directives, and
pseudo operations, as necessary. Remember that directives must start with the character $, /, ., or #,
and must start in column 1.
3.
If necessary, use the BASE directive to change the default base for operands. CASM defaults to
hexadecimal.
RAPID/D
4-14
MOTOROLA
APPENDIX A
APPENDIX A
S-RECORD INFORMATION
The S-record format for output modules was devised for the purpose of encoding programs or data files in a
printable format for transportation between computer systems. The transportation process can thus be visually
monitored and the S-records can be more easily edited.
S RECORD CONTENT
When viewed by the user, S-records are essentially character strings made of several fields which
identify the record type, record length, memory address, code/data and checksum. Each byte of binary
data is encoded as a 2-character hexadecimal number; the first character representing the high-order 4
bits, and the second the low-order 4 bits of the byte.
The five fields which comprise an S-record are shown below:
TYPE
RECORD LENGTH
ADDRESS
CODE/DATA
CHECKSUM
Where the fields are composed as follows:
FIELD
PRINTABLE
CHARACTER
S
type
2
S-records type -- S0, S1, etc.
record
length
2
The count of the character pairs in the record, excluding type and record
length.
address
4,6,or 8
code/data
0-n
From 0 to n bytes of executable code, memory-loadable data, or descriptive
information. For compatibility with teletypewriters, some programs may limit
the number of bytes to as few as 28 (56 printable characters in the Srecord).
checksum
2
The least significant byte of the one's complement of the sum of the values
represented by the pairs of characters making up the records length,
address, and the code/data fields.
RAPID/D
CONTENTS
The 2-, 3-, or 4-byte address at which the data field is to be loaded into
memory.
A-15
MOTOROLA
APPENDIX A
Each record may be terminated with a CR/LF/NULL. Additionally, an S-record may have an initial field to
accommodate other data such as line numbers generated by some time-sharing systems. An S-record
file is a normal ASCII text file in the operating system of origin.
Accuracy of transmission is ensured by the record length (byte count) and checksum fields.
S-RECORD TYPES
Eight types of S-records have been defined to accommodate the several needs of the encoding,
transportation and decoding functions. The various Motorola upload, download and other records
transportation control programs, as well as cross assemblers, linkers and other file-creating or debugging
programs, utilize only those S-records which serve the purpose of the program. For specific information
on which S-records are supported by a particular program, the user's manual for the program must be
consulted.
An S-record format module may contain S-records of the following types:
S0
The header record for each block of S-records, The code/data.field may contain any descriptive
information identifying the following block of S-records. The address field is normally zeros.
S1
A record containing code/data and the 2-byte address at which the code/data is to reside.
S2
A record containing code/data and the 3-byte address at which the code/data is to reside.
S3
A record containing code/data and the 4-byte address at which the code/data is to reside.
S5
A record containing the number of S1, S2, and S3 records transmitted in a particular block.
This count appears in the address field. There is no code/data field.
S7
A termination record for a block of S3 records, The address field may optionally contain the 4byte address of the instruction to which control is passed. There is no code/data field.
S8
A termination record for a block of S2 records. The address field may optionally contain the 3byte address of the instruction to which control is passed. There is no code/data field.
S9
A termination record for a block of S1 records. The address field may optionally contain the 2byte address of the instruction to which control is passed. If not specified, the first entry point
specification encountered in the object module input will be used. There is no code/data field.
Only one termination record is used for each block of S-records. S7 and S8 records are usually used
only when control is to be passed to a 3 or 4 byte address. Normally, only one header record is used,
although it is possible for multiple header records to occur.
RAPID/D
A-16
MOTOROLA
APPENDIX A
S-RECORDS CREATION
S-record format files may be produced by dump utilities, debuggers, linkage editors, cross assemblers or
cross linkers. Several pro- grams are available for downloading a file in S-record format from a host
system to a microprocessor-based system.
EXAMPLE
Shown below is a typical S-record format module, as printed or displayed:
S00600004844521B
S1130000285F245F2212226A000424290008237C2A
S11300100002000800082629001853812341001813
S113002041E900084E42234300182342000824A952
S113003000144ED492
S9030000FC
The module consists of one S0 record, four S1 records, and an S9 record.
The S0 record is comprised of the following character pairs:
S0
S-record type S0, indicating that it is a header record.
06
Hexadecimal 06 (decimal 6), indicating that six character pairs (or ASCII bytes) follow.
00
00
Four-character, 2-byte, address field; zeros in this example.
48
44
52
ASCII H, D and R - "HDR".
1B
The checksum.
The first S1 record is explained as follows:
S1
S-record type S1, indicating that it is a code/data record to be loaded/verified at a 2-byte
address.
13
Hexadecimal 13 (decimal 19), indicating that 19 character pairs, representing 19 bytes of binary
data, follow.
00
00
Four-character, 2-byte, address field; hexadecimal address 0000, where the data which follows
is to be loaded.
RAPID/D
A-17
MOTOROLA
APPENDIX A
The next 16 character pairs of the first S1 record are the ASCII bytes of the actual program code/data. In
this assembly language example, the hexadecimal opcodes of the program are written in sequence in the
code/data fields of the S1 records:
OPCODE
INSTRUCTION
285F
245F
2212
226A0004
24290008
237C
MOVE.L
MOVE.L
MOVE.L
MOVE.L
MOVE.L
MOVE.L
(A7)+,A4
(A7)+,A2
(A2),D1
4(A2),A1
FUNCTION(A1),D2
#FORCEFUNC,FUNCTION(A1)
(The balance of this code is continued in the code/data fields of the remaining S1
records and stored in memory.)
2A
The checksum of the first S1 record.
The second and third S1 records also each contain $13 (19) character pairs and are ended with
checksums 13 and 52 respectively. The fourth S1 record contains 07 character pairs and has a
checksum of 92.
The S9 record is explained as follows:
S9
S-record type S9, indicating that it is a termination record.
03
Hexadecimal 03, indicating that three character pairs (3 bytes) follow.
00
00
The address field, zeros.
FC
The checksum of the S9 record.
Each printable character in an S-record is encoded in a hexadecimal (ASCII in this example)
representation of the binary bits which are actually transmitted. For example, the first S1 record above is
sent as:
TYPE
S
5
LENGTH
1
3
3
1
1
3
ADDRESS
3
1
3
0
3
3
0
0
3
CODE/DATA
0
0
3
0
0
3
2
0
3
8
2
3
CHECKSUM
5
8
3
F
5
4
•••
6
•••
0101 0011 0011 0001 0011 0001 0011 0011 0011 0000 0011 0000 0011 0000 0011 0000 0011 0010 0011 1000 0011 0101 0100 0110 •••
RAPID/D
A-18
2
3
A
2
4
1
0011 0010 0100 0001
MOTOROLA