1
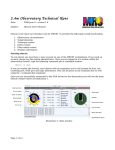
2.4m Observatory Technical Note Date: 2008 January 7 – version 1.1 Subject: Obscam User's Manual Obscam is the main observatory camera user interface tool for MROST. It provides basic functionality common to each of the engineering cameras and video acquisition camera. Starting obscam To run obscam you must have a user account on one of the MROST workstations. If you need an account, please see the system administrator. Once you are logged in at a system within the observatory firewall, type the following command into a command window: obscam -h indi If you are outside the firewall, start obscam with no arguments and it will prompt for host, ssh tunneling port, INDI port and login information. This can be given on the command line as well using the -t command line argument. Throughout Obscam, lingering the cursor over a field or control (without clicking) will display a small temporary tool tip message that summarizes the field and gives key information such as units. Also, Obscam makes extensive use of small colored dots everywhere to indicate specific state information. These are always one of four colors with the following meaning: Gray: Idle or unknown Green: OK or ready Yellow: Busy or in progress Red: Alert or problem Obscam has other command line arguments as well. Follows is the complete list: -h h -p p -i -o -s -t h s i l specify alternate socket host, default is to create an ssh tunnel specify alternate INDI port, default is 7624 display inbound INDI messages for debugging display outbound INDI messages for debugging use smaller and tighter window layout specify host, ssh port, INDI port and login for remote tunnel connection The main Obscam window is showing in Illustration 1. This window has a dual purpose. It can operate any camera on the observatory INDI network that is compliant with the INDI properties listed in the INDI Properties OTN. It can also display any 16 bit FITS file currently on disk. Page 1 of 5 Illustration 1: Obscam Camera Operation To operate a camera, enter the name of the Driver in the field provided and type Enter if it is not already correct. The current cooler temperature is displayed and the target temperature may be set as desired, if this capability is supported by the camera. Set the desired Binning and subwindow size and location as desired (entering window width and height of 0 results in the full size frame). Set whether the shutter will be open or closed (if available) and the exposure duration. Page 2 of 5 To take one exposure click Take 1. A count down timer will be shown in the upper status area then the image will be displayed after it is read from the camera. Continuous exposures can be taken by clicking Run on and will continue until the Run button is clicked back off which will gracefully stop after the next exposure completes. An exposure in progress begun by either means can be abandoned immediately by clicking Abort, which will also turn off Run if it is on. To save the current image, click Save, browse to the desired location, enter the desired file name and click Save. (If dark or flat processing is in effect, the raw image is saved, not the calibrated image). Any image which arrives from the camera will be saved automatically if Auto save is on. The file name consists of the A-S auto save prefix followed by three digits followed by .fits, where the number portion will start at zero and increase by one after each file is saved. The images are always saved in the current working directory from which obscam was executed. Darks and Flats Obscam can apply a dark and/or flat calibration frame automatically as each new exposure arrives if desired. A dark frame is one which is assumed to have been taken with the shutter closed for the same duration as the new image. (If the exposure time is different, the amount of dark current will be somewhat different but this becomes less significant for cameras operating at cold temperatures). A flat frame is one which was taken while pointing at a uniform field of light. To specify the calibration images, click the Dark or Flat buttons to bring up a file selection box to define the desired dark or flat calibration image file as desired. The file(s) will be applied only if they are the same dimensions as the new exposure. Once a file has been selected, it will be applied to each successive exposure as long as the button remains on. To stop applying the calibrations, click the corresponding button back off. Each pixel is replaced by a new value as defined by the following formula: p i '= pi −32768d i f / f i where pi, di and fi are corresponding pixels in the new exposure, dark and flat frames, respectively, and bar f is the mean of all pixels in the flat frame. The formula assumes the FITS 16 bit convention where each pixel is a signed value from -32768 through +32767. Resulting pixel values will be clamped to this range if the formula under- or overflows. Obscam displays the resulting image but always saves the raw image. Displaying FITS Files Obscam may also display any FITS file already residing on disk. To load a FITS file, click on Load and browse to the desired file. Suffixes may be either .fts or .fits. Then Open the file to display it. Image Display Regardless of how the image came to be displayed, the image is shown resized to be entirely visible within the alloted space; beware of sampling artifacts. The initial contrast will be centered on the mean pixel value, with black set at 1σ below the mean and white set at 2σ above the mean. The contrast slider may be adjusted to larger or smaller deviations about the mean. Dragging the cursor over the image will display its pixel grid location and raw value in the top information line and a magnified view centered on the cursor in the lower right of the window. Page 3 of 5 If the FITS file headers contain either the traditional WCS fields or the STScI plate fields then the RA and Dec at the cursor will also be displayed in the top line. Whenever an image is first displayed, the FITS header fields will be displayed in a separate window. This window may be moved or resized as desired. If it is iconified (not closed) it will remain invisible until opened again. Pressing the mouse button near a star will find the brightest pixel in the neighborhood and fit the radial pattern of pixels to a Gaussian. The pixels and the right half of the Gaussian will be displayed in the lower right corner, as shown in Illustration 2, until the mouse is released. The Gaussian maximum, noise level and half-width-at-half-max box will be labeled. The second message line will display the location of the brightest pixel and the FWHM value. Illustration 2: Gaussian fit Page 4 of 5 Document History Version Date Author Changes (1.3) 2007 Feb 21 E.C.Downey First release (within obscon doc) (1.4) 2007 Mar 3 Update camera snapshot to show temp controls (1.5) 2007 Mar 15 E.C.Downey Describe Binning, Run and Auto save camera features. 1.0 2007 Aug 31 E.C.Downey Separate doc; discuss windowing, dark/flat controls. 1.1 2008 Jan 7 Add FWHM Gaussian feature Page 5 of 5 E.C.Downey E.C.Downey