1
06(G'
Management Services for Education Data
Basic Selector Tutorial
This tutorial will only take a few moments, and will teach you how easy it is to create your own
custom reports. The easiest way to use this tutorial is to print it by pressing the Print button at the
top of this help screen.
1. Open the Report menu at the top of the MIS2000 screen, then select Report Builder.
2. You may want to mazimize the Selector window by pressing the square in the top right
corner of the window.
3. Notice that there are 7 tabs across the top of the Selector screen. The first tab is the Report
tab, and it will be open.
4. Uncheck the Advanced tab for now.
5. Press the New Report button.
6. From the Report tab, click on All Enrollments. Wait until you see the list of tables appear
in the white field to the right before moving on to the step 7.
7. Click on the Display Fields tab. Click on the + beside the Student table to open it.
8. Click on Last Name to select it, then press the Add Display Field button. You will see
"Student.Last Name" appear in the large white field.
9. Repeat step 6 to add First Name to your report. Now students’ first and last names will
appear on your report.
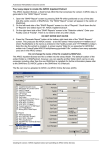
Your screen should look like this.
NOTE: You can also double-click on a field to add it to the display list.
62
MIS2000 User’s Guide