1
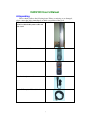
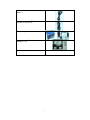
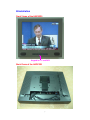
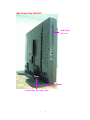
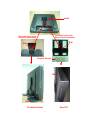
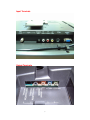
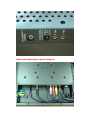
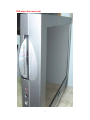
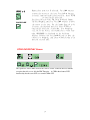
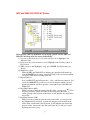
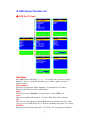
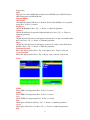
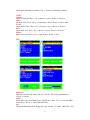
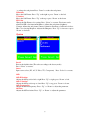
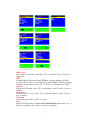
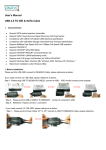
HADV320X
User’s Manual
HADV320 User’s Manual
A.Unpacking
Please check you have the following items. If they are missing or are damaged,
please contact the dealer immediately at which you purchased the good.
LCD monitor/ /TV/DVD/Karaoke Combo
and with undetachable power cable and
table stand
TV remore control x 1
DVD remore control x 1
Karaoke microphone x 1
D-sub 15 Computer VGA cablel x 1
Stereo phone jack 3.5mm computer audio
cablel x 1
Quick F-connector CATV cablel x 1
(connect TV and CATV)
5.1 speak system
x 1 set
Wall mounting metal and hole screw
package x 1 set
User’s manual x 1
B.Installation
Front Views of the HADV320
Keypad for TV and DVD
Back Views of the HADV320
Side Views of the HADV320
DVD Player
Disc slot
Table Stand
undetachable AC power cable
metal
This metal insert to the
Slot of the wall mounting
This metal insert to the
Slot of the table stand
Slot
Slot
Plug Box Position
Wall
Table
Ex-factor Default
User DIY
Input Terminals
Output Terminals
5.1 Rear 5.1 Front
Input and Output cables connect diagram
5.1 speaker system cables connect diagram
Hang up to the housetop metal install diagram
DVD player disc insert slot
Take off the screw of table stand before you want to mount the
TV to wall
Wall mounting metal connect together diagram
C. Keypad
Power
: Power ON/OFF.
DEC
: Decrease item number or item value of the selected item when OSD on.
INC
: Increase item number or item value of the selected item when OSD on.
Decrease volume gain when OSD is off.
Select
Menu
Increase volume gain when OSD is off.
: Activate the selected icon or function.
: Enter the main menu of the on-screen display (OSD)
DVD Play/Pause
: Play or Pause the Disc. when COMP.(DVD) is on..
DVD Prev
: SKIP REVERSE Press this to move back to beginning of the
DVD Next
: SKIP FORWARD Press this to move back to beginning of the
DVD EJECT
current chapter or track.
Press again to move back to beginning of the previous chapter
Or track.
next chapter or track.
: Pressing this key opens the tray. If the tray is already open,
pressing this key will close it. The tray will also close if it is
open and you push on it.
D. TV remote control
1. POWER
Power On/Off.
2. Input Source Select
TV: Select TV video input.
PC: Select PC-VGA input.
AV: Select AV video input.
S-VIDEO: Select S-VIDEO video input.
COMP.: Select internal DVD
3. MEMORY
Channel memories or erase.
4. OSD Control
MENU: Turns On/Off the On-Screen
Display.
SELECT: Execute your selection.
: Select the Item or decrease the value.
: Select the Item or increase the value.
5. MUTE
Sound On or Off.
6. DISPLAY
Shown a channel number in the screen.
7. CHANNEL
Change the channel.
8. VOLUME
Adjust the volume.
9. JUMP
Return to last the TV channel.
10. MTS
Multi-Channel Television sound select.
Stereo
11. Digital key from 0 to 9 and above 100.
Use to select a TV channel.
12. SCAN
Press COMP. Change to DVD
Auto scan TV program.
13. AIR/CATV
Select the input source from Cable TV or
Antenna TV.
14. SLEEP
Setup the sleep timer.
15. PIP
Enable the PIP function
16. Source
Select the Sub. source of Video
17. Audio
Select the PC/Video audio source
E. DVD remote control
POWER
DVD player’s power on/off,
when TV power on the DVD
player’s power will auto on.
SETUP
Pressing this key while the
player is in Stop mode brings
up the Setup Menu.
DISPLAY
Use this key function to display
and change information on the
disc (titles, chapters, time,
audio, subtitles, angles, etc.)
and on the player (repeat, play
mode, markers, etc.).
EJECT
Pressing this key opens the tray.
If the tray is already open,
pressing this key will close it.
The tray will also close if it is
open and you push on it.
ANGLE
This button is used to select the
active angle, when angles are
available (in DVD format only).
SUBTITLE
This button is used to select the
subtitle language and enables or
disables the display of subtitles
from the DVD Disc.
AUDIO
This button is used to select the
available DVD disc audio
languages.
BOOKMARK
This button is used to store
specific portions of the disc in
memory and play them
immediately whenever you
want without the need to search.
CANCEL
This button is used to clear
numbers that you have input.
MENU
Some DVDs include special menus
called DVD menus. For example,
DVDs with complex contents may
contain guide menus, and DVDs with
multiple languages may contain audio
and subtitle language menus. These
menus are called “DVD menus”. This
button is used to select the language
for the subtitles and the language for
the sound, etc. In addition, this button
is used to toggle PBC control while
playing the VCD.
ZOOM
This button is used to view a scene
close-up during playback of the disc.
(DVD, Video CD)
PAUSE
This button is used to pause a playing
disc temporarily.
ENTER
Pressing this button selects the button
highlighted currently when the player
is in DVD menu mode, GUI display
mode or SETUP mode.
CURSOR
These buttons (
) are used to
select the items in a horizontal
direction or a vertical direction in
DVD menu mode, I display mode, or
SETUP mode
FF (Fast Forward)
This button is used to scan forward
through the audio and video.
RETURN
This button is used to return to the
previous menu screen . For VCD or
SVCD with menu can use this
function .
STOP
This button is used to stop the
playing of the disc.
A-B (REPEAT)
This button is used to play your
favorite audio or video sections
repeatedly. Pressing this key once
marks A, pressing it twice marks B
and causes the player to repeat from
A to B.
VOLUME +, VOLUME The volume keys increase or decrease
the audio volume.
NUMERIC 1-9, 0, +10
These buttons are used to input
numbers. Use the +10 button to input
numbers of 10 or over. To input 10:
+10 → 0; To input 25: +10 → +10 →
5
MUTE
This key allows the user to turn off
the volume of the CD, VCD, Mp3,
SVCD or DVD title.
(SKIP REVERSE)
Press this to move back to beginning
of the current chapter or track.
Press again to move back to
beginning of the previous chapter or
track.
SLOW
This button is used to play a DVD
disc slowly.
(SKIP FORWARD)
Press this to move ahead to the
beginning of the next chapter or
track.
ECHO +( microphone control)
REW (Fast Reverse)
This button is used to scan backward
through the audio and video.
FAST
This button is used to play a DVD
disc quickly.
ECHO Not used for this model.
KEY -/+
Not used for this model.
5.1/2
This button allows the user to select
5.1 surround sound / 2 channe on
DVD titles in stop mode.
PROGRAM
This button is used to store the track
number of the Video CD or CD. Use
this feature to play the tracks in a
desired order. Anywhere from two
to 30 tracks can be set in a progra
F. DVD Player operation
This chapter describes how to play a DVD, CD or VCD. Depending on the DVD
or VCD, some operations may be different or restricted. Refer to the instructions
supplied with your DVD or VCD disc.
Each disc placed into the DVD Player has a built-in user interface that allows
you to explore the information on the disc, such as the title and chapter information.
In order to access that information, you must use the remote control or front panel.
The following sections describe the relationship of the remote keys to the disc menu
interface. There are a number of scenarios associated with remote key requests, some
of which will, in fact, result in a “Not Valid” ( ) response. Example; you press the
CHAPTER key during playback mode. This key has no meaning here and will result
in a “Not Valid” message being displayed.
The DVD Player has a wide range and complete set of functions that it can
perform. Some of these functions can be activated from front panel keypad, but most
of them can only be accessed from the IR remote control, therefore, the following
instructions describe the functions of the remote control only.
Preparation:
Turn on the TV on and press the COMP. key(TV remote control), then the screen will
show Honjet logo.
Playing Discs:
1. Press the EJECT button(from DVD remote control or screen keypad) to eject the
disc, if there is a disc inside the DVD tray.
2. Insert the disc to be played in the tray slot, then push the disc to the slot, then DVD
player will automatic insert the disc, the screen will show LOADING , and start
to reading the disc.
3.Press the PLAY button.
The disc tray closes and the playback begins automatically.
When playing a DVD, a DVD menu or title menu may appear on the TV
When playing a VCD/SVCD, a VCD/SVCD menu screen may appear, depending
on the VCD/SVCD.
When playing a MP3/CD, a MP3/CD menu screen will appear.
When playing an audio CD, the CD will begin playing automatically. A menu
screen is not available with audio-only CDs (Note: an OPT connection is required
to play CDs that feature DTS functionality).
4.Use the cursor buttons to select the desired item
For some discs there is a second menu screen. If so, press the ENTER button to
display the next menu screen.
The cursor buttons do not work for VCDs. Use the number button to select the
desired item.
5.Press the ENTER button
The desired item is selected and PLAY starts.
You can return to the menu screen by pressing the MENU button and the ENTER
button while the DVD is playing, though this depends on the disc.
Press the ENTER button during PLAY of a video CD to return to the menu screen.
If the Not Valid ( ) symbol appears on the TV screen while buttons are being
operated, that operation is not possible on the player or with that disc.
The disc keeps turning while the menu screen is displayed on the TV screen.
Always press the STOP button if you do not want to keep playing the disc.
If you leave the player in pause or stop mode for 15 minutes, the screen saver
image appears automatically. To make the screen saver image go away, press PLAY
button. (If you want to set the screen saver function to off, refer to the SETUP
menu)
Stopping Playback
During playback, press the STOP button or EJECT button.
Resume Function
This feature allows you to resume playback from the point where you stopped the
disc.The player automatically stores the point where the STOP button was pressed
during play (RESUME function), so you can resume playback from that point.
1. While playing a disc, press the STOP button to stop playback.
The RESUME function works only with titles for which the elapsed playing time
appears on the player’s DISPLAY screen during playback.
When the tray is opened or the STOP button is pressed again appears, the
RESUME function will be cleared.
This feature will not be cleared even if the player is set to standby mode.
2. Press the PLAY button.
The player starts playback from the point where you stopped the disc in Step 1.
To play from the beginning of the disc, when the playing time appears on the
player’s DISPLAY screen before you start playing, press the STOP button to reset
the playing time, and then press the PLAY button.
Resume Play may not be available depending on the DVD.
Resume Play is not available in Random or Program Play mode.
Depending on where you stopped the disc, the player may resume playback from a
slightly different point.
The point where you stopped playing is cleared when:
You open or close the disc tray
You disconnect the AC power cord
You turn off the power by pressing the POWER switch on the player
You change the play mode
You start playback after selecting a title, chapter or track
You change the settings of “TV TYPE” in “SCREEN SETUP” in the setup display
You change the settings of “PARENTAL CONTROL” in “CUSTOM SETUP” in
the setup display
After 10 minutes in the stop mode, the player’s power automatically turns off and
the standby mode is set. (AutoPower-off function is optional)
Playing at Various Speeds/Frame by Frame
Playing the Still Pictures
During playback, press the PAUSE button.
Press the PLAY button to resume normal playback.
Playing Frame by Frame (for DVDs and VCDs)
During playback, press the PAUSE button.
The picture moves forward one frame each time the button is pressed.
Forward/Reverse Searching
During playback, press one of the SEARCH buttons:
REW: Reverse direction
FF: Forward direction
When pressed again, the search speed increases. Each time the SEARCH button is
pressed, the speed increases as follows: 2x 4x 8x 2x
Press the PLAY button to resume normal playback.
In some cases the menu screen may reappear when one of the SEARCH buttons is
pressed during menu playback on a VideoCD.
Skipping to the Beginning of Chapters or Tracks
During playback, press one of the skip buttons.
A number of chapters or tracks equal to the number of times the button is pressed is
skipped.
When the skip back button is pressed once, the pickup returns to the beginning of the
currently playing chapter or track.
In some cases the menu screen may reappear when one of the SKIP buttons is pressed
during menu playback on a VCD.
Slow Playback (for DVDs and VCDs)
During playback, press the SLOW buttons. When pressed again, the slow play speed
increases. Each time the slow button is pressed, the speed increases as follows:
1/2X 1/4X 1/8X 1/2X
Press the PLAY button to resume normal playback.
Reverse slow play is not possible.
Using the Menus
Using the Chapter Menu
A DVD is divided into long sections of a picture of a music piece called “chapters”.
When you play a DVD that contains several chapters, you can select the title you want
using the chapter menu. To use the chapter feature on your HADV320 DVD Player:
1. Press the MENU button.
The title menu appears on the TV screen. The contents of the menu vary from disc
to disc.
If the MENU button is pressed again, the disc returns to the point at which the title
menu was called out and playback resumes from that point.
2. Press the number buttons to select the title you want to play.
3. Press the ENTER button.
The Player starts playing the selected title. Playback also starts if the PLAY button
is pressed.
Depending on the DVD, you may not be able to select the title.
Depending on the DVD, a “chapter menu” may simply be called a “menu” or “title
menu” in the instructions supplied with the disc.
Using the DVD Menu
Some DVDs include special menus called DVD menus. For example, DVDs with
complex contents may contain guide menus, and DVDs with multiple languages may
contain audio and subtitle language menus. These menus are called “DVD menus”.
When you play these DVDs, you can select the language for the subtitles, the
language for the sound, etc., using the DVD menu.
1. Press the MENU button.
The DVD menu appears on the TV screen. The contents of the menu vary from disc
to disc.
If the MENU button is pressed again, the disc returns to the point at which the
DVD menu was called out and playback resumes from that point.
2. Press the number buttons to select the item you want to change, or press the cursor
buttons ( , , , )
3. Press the ENTER button.
If more menus appear, repeat steps 2 and 3.
If you want to select the language for the DVD menu, change the setting using
“LANGUAGE SETUP” in the setup display.
Depending on the DVD, a “DVD menu” may simply be called a “menu” in the
instructions supplied with the disc.
Playing VCDs with PBC function (PBC playback)
When playing VCDs with PBC functions (Ver. 2.0 discs), you can enjoy simple
interactive operations and operations with search functions. PBC Playback allows you
to play VCDs interactively, following the menu screen on the TV screen.
1. Start Playing a VCD with PBC functions, following the Step 1 to 5 in “Playing
Discs”.
2. Select the item number you want on the player
Press the number button of the item you want remote control unit.
3. Press the ENTER button.
4. Follows the instructions on the menu screen for interactive operations.
Refer to the instructions supplied with the disc, as the operating procedure may
differ according to the VCD.
Going back to the menu screen:
Press the RETURN can back the VCD menu .
To cancel PBC playback of a VCD with PBC functions and play
the disc in continuous play mode:
1. Press the STOP button while the VCD’s menu screen is displayed.
The display switches from “PBC” to the time display.
2. Use the number buttons to input the desired track number.
To play the disc without using the menu playback function:
Refer to the disc’s jacket, etc., for the track numbers.
To start playback from the beginning of the disc, press the number button “1”.
Return to menu playback
Press the STOP button to stop playback, then press the MENU button.
“PBC” appears on the display window and the menu screen appears on the TV
Using the GUI DISPLAY Screens
Use these function to display and change information on the disc (titles, chapters, time,
audio, subtitles, angles, etc.) and on the player (repeat, play mode, markers, etc.).
1. In the play or stop mode, press the DISPLAY button.
The GUI (Graphical User Interface) screen appears. The GUI will be different for
different discs. The functions of the HADV320 DVD Player are similar for DVD,
SVCD, VCD and CD discs.
The GUI on the TV screen switches from the Title/Chapter GUI to the Repeat GUI
each time the DISPLAY button is pressed.
The items displayed differ from disc to disc due to the differences in capability
between DVD, VCD, SVCD, CD-DA, and CD/MP3.
DVD GUI DISPLAY Screen
TIME
AUDIO CHANNEL
Q SURROUND
ANGLE
REPEAT
REPEAT A-B
The Repeat Play function. Use the
buttons to move the
cursor to the icon. Use the
buttons to select the
required function. Press ENTER to confirm the selection.
The Repeat Play from A to B function. Use the
buttons
to move the cursor to the icon. Use the
buttons to
select the required repeat play function. Press ENTER to
confirm the selection.
BOOKMARK
“
”
SVCD/VCD GUI DISPLAY Screen
“
”
“
”
“
”
BOOKMARK
“
”
CDDA GUI DISPLAY Screen
The operations of the CDDA GUI are the same as for the VCD/SVCD GUI, with the
exception that it does not offer the PBC Function. A CDDA that features DTS
functionality has the same GUI as a normal CDDA GUI.
MP3 and WMA GUI DISPLAY Screen
While you put a MP3 or WMA disc in tray to play, you will see the Mp3 and
WMAGUI will bring up to the screen automatically.
1. You can use the arrow key (
) in the remote to move Highlight to the
different folder.
2. Using arrow key ( ) in remote to move Highlight to the Folders position or
File position.
3. While you move the Highlight to song, press ENTER, it will play that song
directly.
4. Number key select:
While the MP3 and WMA GUI are bringing up, input the track number by
using NUMBER Key in remote. System will jump to the correct track which
you select, if the track is existing in the disc.
5. Repeat Function :
Now our MP3 GUI support Repeat One Disc and Directory function .You
can use the REPAET key in remote to choice the function which you need
and the information will show up in the corner right-down of the MP3 and
WMA GUI.
6. Next Skip Function (
):
While you want to jump the next track in the folder, you can press
(Next
skip) key in remote. System will jump to the next track in the folder, if
current playing is the last track in the folder, it will jump the first track in the
next folder.
7. Back Skip Function (
):
While you want to jump the previous track in the folder, you can press the
key
(Back skip) in remote. System will jump the previous track in the
folder. If the current track is the first track, it will jump the last track in the
previous folder, if the track is the first track in the disc, if will go to track’s
beginning and start to play.
8. Fast Forward Function ( ):
While you press the FF key in the remote , system will activate fast forward
function, and it will back to normal play mode , after it go to the end of the
track .
9. Fast Reverse Function ( ):
While you press the FR key in the remote , system will activate fast reverse
function, and it will back to normal play mode , after it go to the beginning of
the track .
10. Pause Function ( ):
System will pause the track and mute the sound output while you press
PAUSE/STEP key in remote.
G. OSD Control Function List
OSD For PC input
Main Menu:
Press MENU button Then Press “+” or “-” to locate the item you desire to change,
then press “Select” to make the adjustment, press “Menu” again to go back to
previous menu.
Picture Adjust:
This item can adjust Auto Adjust, Brightness, Contrast, Pixel Clock, Phase,
H-Position and V-Position for an optimal image.
Color:
This item can select 9300/6500 color temperature or adjust USER color.
Audio:
This item can adjust audio function, as Volume, Mute, Treble, Base, Balance.
PIP:
This item can control Picture in Picture (PIP) function.As picture sub source, audio
source, sub source SIZE, H-Position, V-Position, and change sub picture color setting.
SYSTEM:
This item can Select Source input (PC, AV, S-Video, TV, Component.) and Recall
System data.
OSD:
This item can control OSD window function.As OSD H-Position, OSD V-Position,
OSD Transparence and OSD Off time.
Picture Adjust
Auto Adjust:
Automatically adjusts H-Position, V-Position, Pixel Clock and Phase for an optimal
image.Press “Select” to execute.
Brightness:
Adjusts the Brightness.Press “Up” or “Down“ to adjust the parameter.
Contrast :
Adjusts the difference between the light and dark areas. Press “Up” or “Down“ to
adjust the parameter.
Clock:
Adjusts the video distortion. It will appear horizontal noise on the screen while adjust
the Clock. Press “Up” or “Down“ to adjust the parameter.
Phase:
Adjusts the video distortion. It will appear vertical noise on the screen while adjust
the Phase. Press “Up” or “Down“ to adjust the parameter.
Horizontal Position:
Moves the display picture. Press “Up” to the right or press “Down“ to the left.
Vertical Position:
Moves the display picture. Press “Up” to the up or press “Down“ to the down.
Color:
9300K:
Select 9300 color temperature Press “Select” to execute.
6500K:
Select 6500 color temperature Press “Select” to execute.
User:
Select USER color temperature Press “Select” to execute.
Red:
Adjust gain of the Red color Press “Up” or “Down“ to adjust the parameter.
Green:
Adjust gain of the Green color Press “Up” or “Down“ to adjust the parameter.
Blue:
Adjust gain of the Blue color Press “Up” or “Down“ to adjust the parameter.
Audio:
Volume:
Adjust Volume gain Press “Up” to increase or press “Down“ to decrease.
Mute:
Set Audio mute. Press “Up” to execute mute or Press “Down“ to release mute.
Treble:
Adjust audio Treble . Press “Up” to increase or press “Down“ to decrease.
Bass:
Adjust audio bass . Press “Up” to increase or press “Down“ to decrease.
Balance:
Input source select. Press “Up” to right or press “Down“ to left.
PIP
Sub Source
This item can select sub source (Off, AV, S-Video, TV, and Component) Press
“Select” to execute..
Audio
Select audio come from Main Source or Sub Source. Press “Up” to come form Main
Source Press “Down” to come form Sub Source.
Size
Change the Sub Picture Size. It supports 4 step size( 0% ,33% ,66%, 100%) Press “Up
“ to enlarge the sub picture Press “Down” to reduce the sub picture.
H-Position
Moves the Sub Picture. Press “Up” to the right or press “Down“ to the left.
V-Position
Moves the Sub Picture. Press “Up” to the up or press “Down“ to the down.
PIP Color
Change the Sub Picture color setting. Press “Select” to execute. Five items can be
adjusted in PIP color function Brightness: Adjusts the sub picture brightness.
Contrast: Adjusts the sub picture contrast. Saturation: Between colorful and colorless.
Hue: Color varying Sharpness: Adjusts the Sharpness. Press “Up” to increase or press
“Down“ to decrease.
System
Recall
Restore the default value.(The value according to the factory mode)
Press “Select” to execute.
Source
Input source select. (PC, AV, S-Video, TV, Component) Press “Select” to execute..
OSD
OSD H-Position
Adjusts the OSD position left or right Press “Up” to right, press “Down“ to left.
OSD V-Position
Adjusts the OSD position up or down Press “Up” to up, press “Down“ to down.
OSD Transparence
Adjusts the OSD transparency. Press “Up” or “Down“ to adjust the parameter.
Off Time
Adjusts the OSD exit time. Press “Up” or “Down“ to adjust the parameter.
OSD For Video input
Press “Up” or “Down” to locate the item you desire to change, then press “Select” to
make the adjustment, press “Menu” again to go back to previous menu.
Image Adjust
This item can adjust video color as Brightness, Contrast, Saturation Hue, Sharpness.
Audio
This item can adjust audio function. As Volume, Mute, Treble, Base, Balance.
System
This item can Select Source input (PC, AV, S-Video, TV, Component.) and Recall
System data.
OSD
This item can control OSD window function. As OSD H-Position, OSD V-Position,
OSD Transparence and OSD Off time.
All functions adjustment are same as PC mode
OSD for TV input
Press “Up” or “Down” to locate the item you desire to change, then press “Select”
to make the adjustment, press “Menu” again to go back to previous menu.
Image Adjust, Audio, System and OSD are same as Video mode
AIR / CATV
Select Air TV or Cable TV system Press “Up” for Cable TV or press “Down” for
Antenna TV
MTS
Set Multi-Channel Television Sound. STEREO: A primary language and Hi-Fi
system broadcast. SAP: A second language broadcast. MONO: A primary language
and Mono system broadcast. Press “Up” or “Down” to select then press “Select”
Channel
Change the TV Channel . Press “Up” to next channel or press “Down“ to previous
channel.
CH Memory
Channel memories or erase . Press “Up” to add a new channel or press “Down“ to
erase a channel.
CH Search
Auto Channel scan . Press “Select” to execute.
Sleep
Setup the TV Sleep timer for Disable/10/20/30/40/50/60/90 minutes. Press “Up” to
increase sleep timer or press “Down“ to decrease sleep timer.