1
Salesforce.com: Winter ’13
Salesforce.com Winter '13 Release Notes
Last updated: January 4 2013
© Copyright 2000–2012 salesforce.com, inc. All rights reserved. Salesforce.com is a registered trademark of salesforce.com, inc., as are other
names and marks. Other marks appearing herein may be trademarks of their respective owners.
Table of Contents
Table of Contents
About the Release Notes.......................................................................................................................4
What’s Included in the Release Notes.......................................................................................................................................4
Your Feedback Matters.............................................................................................................................................................4
Release Notes Changes.........................................................................................................................5
Summary of Winter ’13 Features and Impact on Salesforce Users............................................................8
General Enhancements.............................................................................................................................................................8
Chatter Enhancements..............................................................................................................................................................8
Sales Enhancements................................................................................................................................................................10
Service Enhancements.............................................................................................................................................................11
Analytics Enhancements.........................................................................................................................................................13
Mobile Enhancements............................................................................................................................................................14
Data.com New Features and Enhancements...........................................................................................................................14
Site.com Enhancements..........................................................................................................................................................16
Force.com Enhancements.......................................................................................................................................................17
General Enhancements......................................................................................................................25
Salesforce Communities (Pilot)...............................................................................................................................................25
Browser Enhancements...........................................................................................................................................................25
Chatter..............................................................................................................................................26
Polls.........................................................................................................................................................................................26
Chatter Tab Navigation Enhancements..................................................................................................................................26
Chatter Influence Calculation Enhancement..........................................................................................................................27
Improved Posting Experience..................................................................................................................................................28
Chatter Desktop Enhancements.............................................................................................................................................28
Preview Links..........................................................................................................................................................................29
Work.com in Chatter—Pilot..................................................................................................................................................30
Administrator Settings for Rich Media Previews....................................................................................................................31
Additional Chatter Enhancements..........................................................................................................................................32
Chatter REST API Enhancements.........................................................................................................................................35
Sales..................................................................................................................................................39
Forecasts Enhancements.........................................................................................................................................................39
Opportunity Teams Enhancements........................................................................................................................................43
Salesforce for Outlook Enhancements....................................................................................................................................47
Shared Activities Enhancements.............................................................................................................................................55
Additional Sales Enhancements..............................................................................................................................................60
Service...............................................................................................................................................61
Case Feed Enhancements........................................................................................................................................................61
Chatter Answers......................................................................................................................................................................68
i
Table of Contents
Ideas........................................................................................................................................................................................72
Live Agent Enhancements......................................................................................................................................................76
Service Cloud Console............................................................................................................................................................77
Salesforce Knowledge..............................................................................................................................................................81
Additional Service Enhancements...........................................................................................................................................85
Analytics............................................................................................................................................88
Exportable Joined Reports.......................................................................................................................................................88
Joined Reports on Dashboards................................................................................................................................................88
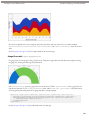
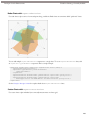
Scatter Charts on Dashboards.................................................................................................................................................89
More Support for the Enhanced Reports Tab.........................................................................................................................90
Mobile...............................................................................................................................................91
Salesforce Touch.....................................................................................................................................................................91
Salesforce Mobile SDK...........................................................................................................................................................98
Chatter for iPhone and iPad – Version 2.4 Generally Available.............................................................................................99
Data.com.........................................................................................................................................101
Data.com Product Suite Overview........................................................................................................................................101
Data.com...............................................................................................................................................................................103
Data.com Administrator Features and Enhancements..........................................................................................................103
Data.com User Enhancements..............................................................................................................................................107
Data.com Clean.....................................................................................................................................................................110
Data.com Clean Administrator Features and Enhancements...............................................................................................110
Data.com Clean User Features and Enhancements..............................................................................................................113
D&B Companies...................................................................................................................................................................116
D&B Companies Administrator Features and Enhancements.............................................................................................116
D&B Companies User Features and Enhancements............................................................................................................120
Site.com...........................................................................................................................................127
Page Breadcrumbs.................................................................................................................................................................127
Updated Menu Source Options.............................................................................................................................................127
Page Visibility in Menus and Breadcrumbs...........................................................................................................................127
Site Map Links......................................................................................................................................................................128
Cascading Editability............................................................................................................................................................128
Default Content in Editable Page Elements.........................................................................................................................128
Improved Linking in Data Elements....................................................................................................................................129
New Status Column..............................................................................................................................................................129
“Nested Templates” Renamed “Child Templates”................................................................................................................129
Repeaters and Repeater Elements Renamed.........................................................................................................................130
Force.com........................................................................................................................................131
Geolocation Custom Field—Beta.........................................................................................................................................131
Organization-Wide Permission Sets.....................................................................................................................................132
User Sharing—Pilot..............................................................................................................................................................135
Visual Workflow Enhancements...........................................................................................................................................139
Schema Builder Enhancements.............................................................................................................................................145
ii
Table of Contents
Security Enhancements.........................................................................................................................................................146
Developer Console Enhancements........................................................................................................................................148
Force.com IDE Enhancements.............................................................................................................................................157
Connected Applications—Pilot.............................................................................................................................................158
Force.com Canvas—Pilot......................................................................................................................................................158
API Enhancements...............................................................................................................................................................159
Apex Code Enhancements....................................................................................................................................................169
Visualforce Charting—Generally Available..........................................................................................................................191
Additional Visualforce Enhancements..................................................................................................................................195
Push Major Upgrade.............................................................................................................................................................203
Environment Hub—Pilot......................................................................................................................................................209
Additional Force.com Enhancements...................................................................................................................................210
Help and Training Enhancements.....................................................................................................214
iii
About the Release Notes
About the Release Notes
The Release Notes are a comprehensive user guide for the latest release of Salesforce. Unlike a traditional release notes document
that includes only a simple list of enhancements, the Salesforce Release Notes give you everything you need to get up and
running with the new features and enhancements in the latest release.
What’s Included in the Release Notes
For every new major enhancement, the Release Notes provide:
•
•
•
•
A brief, high-level description of the functionality
Implementation tips to help you get started with setup and administration
Best practices to help you maximize the benefit
Complete end-to-end instructions
Beyond the major new features, the Additional Enhancements sections include a list and brief description of every other
enhancement or functional change included in the latest release—everything from email, to new report types, to security and
packaging.
Let the Release Notes be your guide to success with the latest release from salesforce.com!
Your Feedback Matters
We know how important the Release Notes, online help, and documentation are to your company's success with Salesforce.
To continually improve the content we deliver to you, we want to know what works and what doesn't. Let us know!
•
•
Feedback forms—Every HTML documentation page, both in the online help and in our developer guides at Developer
Force, includes a feedback form for you to submit your suggestions, corrections, and feedback about the documentation.
Let us know what you think!
IdeaExchange—We're listening to your ideas too. Winter '13 includes some of your top ideas. Visit IdeaExchange for a
complete list of ideas coming in Winter '13.
Want to be notified whenever we publish new documentation or make significant updates to existing documentation? Follow
us on Twitter: @salesforcedocs.
4
Release Notes Changes
Release Notes Changes
Welcome to the Release Notes Change Log. Anything that’s changed with each new iteration of the release notes is right
here, with the newest updates at the top.
Date
What’s New
Description
January 3, 2013
Browser Enhancements
Added a note to the Browser Enhancements section to clarify that
Internet Explorer 10 is not supported for the Service Cloud console.
January 3, 2013
Chatter Reporting and Chatter API Updated the description of reports for hashtag (#) topics and of
Objects
the HashtagDefinition object to include hashtags used only in
public posts and comments and not those used on records or in
private groups.
November 21,
2012
Help and Training Enhancements
•
•
•
November 21,
2012
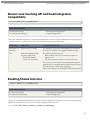
Known Issue Involving API and
Email Integration Compatibility
Added information on help portal change for sandbox and DE
users, as well as for additional languages.
Added a description of the new case collaboration feature.
Changed title of “Usability Enhancements” section to “Help
and Training Portal Enhancements.”
The API version 25.0 or earlier doesn’t return events with multiple
contacts related to the events.
If you use Connect for Outlook or Connect for Lotus Notes, you’ll
lose event data when you relate multiple contacts to an event that
you update in Salesforce and sync these events from Salesforce to
your email system.
November 21,
2012
Expanded Definition of Data.com
Inactive Status
The Data.com Inactive status now includes records that have
been classified as non-marketable by D&B.
November 21,
2012
Expanded International Data from
D&B
Data.com has more international records available, giving you more
account and contact search results.
November 21,
2012
Chatter REST API Enhancements The Bookmarks Resources topic contained an incorrect example
of the Feed-Items resource. The correct example is:
/chatter/feed-items/0D5D0000000Ir6zKAC?isBookmarkedByCurrentUser=true.
November 14,
2012
Chatter REST API Enhancements The File Input request body incorrectly listed the description
parameter. The correct name of the parameter is desc.
November 14,
2012
Chatter REST API Enhancements The Group Member response body incorrectly stated that the value
of the id property was a user ID. The correct value of the id
property is a group membership ID.
November 7, 2012 Salesforce Touch
A downloadable version of Salesforce Touch that can be installed
directly on iPad devices is now available from the Apple App Store
and AppExchange Mobile. The Touch Settings page has been
updated to include a new enablement option for the Salesforce
Touch downloadable app.
November 7, 2012 Force.com IDE Enhancements
Added section about Force.com IDE update.
5
Release Notes Changes
Date
What’s New
Description
October 31, 2012 Clarified Support for IE Conditional Clarified details of IE conditional comments, noting that only a
Comments
limited subset of Visualforce is supported within conditional
comments.
October 31, 2012 Push Major Upgrade
Added a note saying this feature is available only to eligible
salesforce.com partners.
October 24, 2012 Link to Known Issues Site
Added link to the Salesforce Known Issues site.
October 24, 2012 Chatter for iPhone and iPad –
Version 2.4 Generally Available
Added a section announcing the release of Chatter for iOS v2.4.
October 17, 2012 Chatter Desktop Enhancements
Updated release date and removed more frequent feed updates.
October 17, 2012 Aggregate Function Enhancements Added information about updates to SOQL aggregate functions.
October 10, 2012 Unfollow Unused Record
Subscriptions
Added clarifications about the script for unfollowing unused record
subscriptions.
October 10, 2012 “Create and Own New Chatter
Groups” User Permission
Added a section on the “Create and Own New Chatter Groups”
user permission.
October 3, 2012
Workflow Evaluation Criteria
Usability Enhancements
Updated for further changes made to the workflow evaluation
criteria area of the user interface and documentation, based on early
customer feedback.
October 3, 2012
Chatter Enhancements
Updated Chatter Reporting to “Not automatically visible. Feature
is available but requires some setup.” because it requires a new
custom report type.
October 3, 2012
New Behavior for Customer Portal Updated the title and information to accurately reflect email
Email Notifications When No
notification behavior when the Change Owner to Portal
Change Owner to Portal User User Template isn’t set for a portal.
Template is Selected and New
Behavior for Partner Portal Email
Notifications When No Change
Owner to Portal User
Template is Selected
October 3, 2012
Search by D-U-N-S Number
Added entry to the Data.com user enhancements section indicating
you can search Salesforce by D-U-N-S Number.
September 26,
2012
Work.com in Chatter—Pilot
Added a section on Work.com features.
September 21,
2012
Help and Training Enhancements
Added the new Service Cloud Workbook and updated Analytics
Workbook to the Help and Training section.
September 21,
2012
Opportunity Team Known
Limitations
Added a known limitation about renaming tabs and labels for an
opportunity team member.
September 21,
2012
Help and Training Enhancements
Added the Help and Training section, which lists videos and
documents that are new or updated for Winter ‘13.
September 21,
2012
Chatter Desktop Enhancements
Added a list of new features available after mid-October, 2012.
September 13,
2012
Geolocation Custom Field—Beta
Added the Geolocation custom field beta announcement.
6
Release Notes Changes
Date
What’s New
Description
September 12,
2012
Connected Applications—Pilot
Added the Connected Applications announcement.
September 12,
2012
Salesforce Touch
Updated the process for enabling Salesforce Touch. It’s now
automatically available to all organizations without first contacting
Salesforce Customer Support, but a Salesforce administrator must
enable Salesforce Touch before users can access it. Also, the
Salesforce Touch settings page has been slightly modified.
Removed references to Touch App. When the downloadable version
of Salesforce Touch is available, we’ll update these release notes.
September 12,
2012
Environment Hub—Pilot
Added editions table for Environment Hub.
September 12,
2012
Exportable Joined Reports
Added edition availability for printable joined reports.
September 12,
2012
Starting a Batch Job from Another
Batch Job
Added a section announcing a change for Apex batch jobs.
September 12,
2012
Geolocation Custom Field—Beta
Updated geolocation field editions table.
September 12,
2012
Chatter and Salesforce Communities Added edition availability for Salesforce Communities and some
(Pilot)
Chatter features.
September 12,
2012
Percentage sizing for
September 12,
2012
CRUC Notification for Changes to Added details about notification of a pending critical update for
Escaping Behavior in Visualforce
this change in Visualforce.
September 5,
2012
Browser Enhancements
Added a note on discontinued support for Internet Explorer® 6.
September 5,
2012
New Access Token Method
Added an entry for the new getAccessTokenMap method of the
Auth.AuthToken Apex class.
September 5,
2012
Force.com Canvas—Pilot
The name of the Canvas Framework feature has changed to
Force.com Canvas.
September 5,
2012
Chatter API—Connect in Apex
(Pilot)
Changed the content from a note in the Chatter REST API section
to its own topic. Also added the topic to the Apex Code
Enhancements section.
<apex:chart>
Added details for a minor new feature, sizing Visualforce charts
with percentages, in addition to pixels.
7
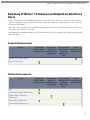
Summary of Winter ’13 Features and Impact on Salesforce Users
Summary of Winter ’13 Features and Impact on Salesforce
Users
Winter ’13 has features that immediately impact all users after the release. You may want to communicate these changes to
your users beforehand so they are prepared. Other features require direct action by an administrator before users can benefit
from the new functionality.
These release notes describe the new and modified features available in this release. For visibility into known salesforce.com
issues, please refer to the Known Issues Site.
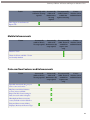
The following table summarizes the Winter ’13 features and their impact on users. Review the feature details for the applicable
Salesforce editions.
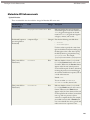
General Enhancements
Feature
Automatically
Automatically
Not automatically
Contact
visible to all users.
visible to all
visible. Feature is salesforce.com to
No setup required. administrators. No
available but
enable this feature.
setup required.
requires some
setup.
Salesforce Communities (Pilot)
Browser Enhancements
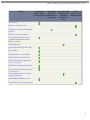
Chatter Enhancements
Feature
Automatically
Automatically
Not automatically
Contact
visible to all users.
visible to all
visible. Feature is salesforce.com to
No setup required. administrators. No
available but
enable this feature.
setup required.
requires some
setup.
Polls
Chatter Tab Navigation Enhancements
Chatter Influence Calculation
Enhancement
Improved Posting Experience
Chatter Desktop Enhancements
8
Summary of Winter ’13 Features and Impact on Salesforce Users
Feature
Automatically
Automatically
Not automatically
Contact
visible to all users.
visible to all
visible. Feature is salesforce.com to
No setup required. administrators. No
available but
enable this feature.
setup required.
requires some
setup.
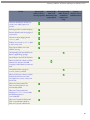
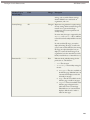
Preview Links
Work.com in Chatter—Pilot
Administrator Settings for Rich Media
Previews
Salesforce Communities (Pilot)
Chatter Messenger Enhancements
(available within 24 hours after the
Winter '13 release)
Chatter Reporting
Improved Feed Sorting Includes Polls
Post Visibility
Updated Chatter Icons and Buttons
Chatter Feed Search Label Change
View the External Apps Approved to
Access Chatter Data
Unfollow Unused Record Subscriptions
“Create and Own New Chatter Groups”
User Permission
Google Talk in Salesforce No Longer
Supported By Google
Chatter REST API Enhancements
Chatter API—Connect in Apex (Pilot)
9
Summary of Winter ’13 Features and Impact on Salesforce Users
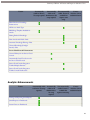
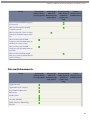
Sales Enhancements
Feature
Automatically
Automatically
Not automatically
Contact
visible to all users.
visible to all
visible. Feature is salesforce.com to
No setup required. administrators. No
available but
enable this feature.
setup required.
requires some
setup.
Use Chatter People Hovers (Rep
Hovers)
Create Forecasting Custom Report
Types
Forecast Managers Can Adjust Forecasts
in Any Currency
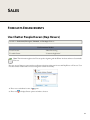
Configurable Forecast List View for the
Opportunity Pane
Customizing Opportunity Teams
Opportunity Team Known Limitations
Enabling Team Selling
Disabling Team Selling
Editing Multi-Line Layouts for
Opportunity Teams
Using Opportunity Teams
Adding Members to an Opportunity
Team
Viewing Your Salesforce World in
Microsoft® Outlook®—Beta
Syncing Recurring Events
Saving Time with Email Associations
Shared Activities for Events
Known Issue Involving API and Email
Integration Compatibility
Enabling Shared Activities
Activity Rollup to Accounts for Contacts
Event and EventAttendee Object
Changes
10
Summary of Winter ’13 Features and Impact on Salesforce Users
Feature
Automatically
Automatically
Not automatically
Contact
visible to all users.
visible to all
visible. Feature is salesforce.com to
No setup required. administrators. No
available but
enable this feature.
setup required.
requires some
setup.
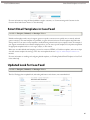
Label Change for Upload New
Document Page
New Behavior for Partner Portal Email
Notifications When No Change Owner
to Portal User Template is
Selected
Salesforce Communities (Pilot)
Service Enhancements
Feature
Automatically
Automatically
Not automatically
Contact
visible to all users.
visible to all
visible. Feature is salesforce.com to
No setup required. administrators. No
available but
enable this feature.
setup required.
requires some
setup.
Case Feed Enhancements
New Customization Options in Case
Feed
Custom Publishers in Case Feed
New Feed Items Available in Case Feed
Email Drafts and Approvals
Support for Chatter Answers in Case
Feed
Smart Email Templates in Case Feed
Updated Look for Case Feed
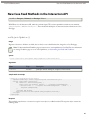
New Case Feed Methods in the
Interaction API
Chatter Answers Enhancements
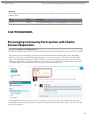
Encouraging Community Participation
with Chatter Answers Reputation
11
Summary of Winter ’13 Features and Impact on Salesforce Users
Feature
Automatically
Automatically
Not automatically
Contact
visible to all users.
visible to all
visible. Feature is salesforce.com to
No setup required. administrators. No
available but
enable this feature.
setup required.
requires some
setup.
Customizing Chatter Answers in Portals
using Visualforce Pages
Adding a Custom Visualforce Page to a
Portal
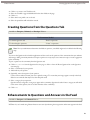
Creating Questions from the Questions
Tab
Enhancements to Questions and
Answers in the Feed
New Options to Customize Questions
Format Text and Add Photos to
Questions
API Access to Names and Photos from
the Feed
Option to Remove Sign-In Links from
Chatter Answers
New Limits for Chatter Answers
Questions and Replies
Customer Portal Enhancements
New Behavior for Customer Portal
Email Notifications When No Change
Owner to Portal User Template
is Selected
Salesforce Communities (Pilot)
Ideas Enhancements
Moderate Ideas Communities with the
Service Cloud Console
Idea Themes
Customize Idea Themes
Live Agent Enhancements
Auto Away Option in Live Agent
Configurations
Salesforce Knowledge Enhancements
12
Summary of Winter ’13 Features and Impact on Salesforce Users
Feature
Automatically
Automatically
Not automatically
Contact
visible to all users.
visible to all
visible. Feature is salesforce.com to
No setup required. administrators. No
available but
enable this feature.
setup required.
requires some
setup.
Minor Salesforce Knowledge
Enhancements
API Access Article Type
Mail Merge Template Available for
Articles
Sharing Rules for Knowledge
Share Articles with Public Links
Automatic Knowledge Filtering—Beta
Universal Knowledge (Sunlight
Search)—Pilot
Service Cloud Console Enhancements
Custom Hotkeys for the Service Cloud
Console
Automatically Saved User Sessions for
the Service Cloud Console
Service Cloud Console Integration
Toolkit: Multiple Domains
Service Cloud Console Integration
Toolkit: Console Notifications
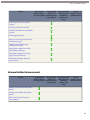
Analytics Enhancements
Feature
Automatically visible Automatically Not automatically
Contact
to all users. No setup visible to all
visible. Feature is salesforce.com to
required.
administrators.
available but
enable this feature.
No setup
requires some setup.
required.
Printing and Exporting Joined Reports
Joined Reports on Dashboards
Scatter Charts on Dashboards
13
Summary of Winter ’13 Features and Impact on Salesforce Users
Feature
Automatically visible Automatically Not automatically
Contact
to all users. No setup visible to all
visible. Feature is salesforce.com to
required.
administrators.
available but
enable this feature.
No setup
requires some setup.
required.
More Support for the Enhanced
Reports Tab
Mobile Enhancements
Feature
Automatically
Automatically
Not automatically
Contact
visible to all users.
visible to all
visible. Feature is salesforce.com to
No setup required. administrators. No
available but
enable this feature.
setup required.
requires some
setup.
Salesforce Touch
Chatter for iPhone and iPad – Version
2.4 Generally Available
Data.com New Features and Enhancements
Feature
Automatically
Automatically
Not automatically
Contact
visible to all users.
visible to all
visible. Feature is salesforce.com to
No setup required. administrators. No
available but
enable this feature.
setup required.
requires some
setup.
Expanded international data gives you
more accounts and contacts
Map Data.com fields to Salesforce
account, contact, and fields
Respect Do-Not-Contact settings in
Data.com search results and exports
Allow duplicate Data.com account,
contact, and lead records in Salesforce
Enjoy new Data.com search filters:
Employee, Revenue, and Location Type
14
Summary of Winter ’13 Features and Impact on Salesforce Users
Feature
Automatically
Automatically
Not automatically
Contact
visible to all users.
visible to all
visible. Feature is salesforce.com to
No setup required. administrators. No
available but
enable this feature.
setup required.
requires some
setup.
Get better identification of Data.com
records you’ve added, exported, or
cleaned
Exclude “green dot” records from exports
Preserve selected records across pages of
search results
Get more accurate mapping for the
Industry field
Find the more accurate Industry field
on the Account Card
Enjoy improved Data.com record
addition error logs
Get improved reports from the Data.com
Reports AppExchange package
Search Salesforce by D-U-N-S Number
(Data.com Premium + Data.com Clean
Product) Get clean jobs for D&B
Company records linked to accounts and
leads
Get field-level Clean settings for
accounts, contacts, and leads
(Data.com Premium + Data.com Clean
Product) Prevent Data.com Clean
auto-updates for account, contact, and
lead records
(Data.com Clean product) The
Data.com Clean product is now
automatically enabled
(Data.com Clean product) Our
definition of Inactive now includes
the D&B designation of
“non-marketable”
(Data.com Corporate and Premium)
Clean is automatically enabled for
Data.com Corporate and Premium
15
Summary of Winter ’13 Features and Impact on Salesforce Users
Feature
Automatically
Automatically
Not automatically
Contact
visible to all users.
visible to all
visible. Feature is salesforce.com to
No setup required. administrators. No
available but
enable this feature.
setup required.
requires some
setup.
(Data.com Premium) D&B Companies
for Leads–GA
(Data.com Premium) Set up D&B
Companies for leads
(Data.com Premium + Data.com Clean
Product) Set Up D&B Company Clean
jobs
(Data.com Premium) Get D&B
Company records (if available) when you
add Data.com contacts as leads
(Data.com Premium) Get D&B
Company records (if available) when you
clean leads
(Data.com Premium) Find and add
Data.com Accounts by Global Ultimate
D-U-N-S Number
Site.com Enhancements
Feature
Automatically
Automatically
Not automatically
Contact
visible to all users.
visible to all
visible. Feature is salesforce.com to
No setup required. administrators. No
available but
enable this feature.
setup required.
requires some
setup.
Page Breadcrumbs
Updated Menu Source Options
Page Visibility in Menus and
Breadcrumbs
Site Map Links
Cascading Editability
Default Content in Editable Page
Elements
16
Force.com Enhancements
Feature
Automatically
Automatically
Not automatically
Contact
visible to all users.
visible to all
visible. Feature is salesforce.com to
No setup required. administrators. No
available but
enable this feature.
setup required.
requires some
setup.
Improved Linking in Data Elements
New Status Column
“Nested Templates” Renamed “Child
Templates”
Repeaters and Repeater Elements
Renamed
Force.com Enhancements
Permission Sets and Sharing Enhancements
Feature
Automatically
Automatically
Not automatically
Contact
visible to all users.
visible to all
visible. Feature is salesforce.com to
No setup required. administrators. No
available but
enable this feature.
setup required.
requires some
setup.
Organization-Wide Permission Sets
User Sharing—Pilot (available within 24
hours after the Winter ‘13 release)
Visual Workflow Enhancements
Feature
Automatically
Automatically
Not automatically
Contact
visible to all users.
visible to all
visible. Feature is salesforce.com to
No setup required. administrators. No
available but
enable this feature.
setup required.
requires some
setup.
Search Controls in the Cloud Flow
Designer
17
Force.com Enhancements
Feature
Automatically
Automatically
Not automatically
Contact
visible to all users.
visible to all
visible. Feature is salesforce.com to
No setup required. administrators. No
available but
enable this feature.
setup required.
requires some
setup.
Zoom Controls in the Cloud Flow
Designer
New Types of Flow Screen Fields
Visualforce Controller Access to Subflow
Variables
Flow Navigation Options
Resources for Getting Started with the
Cloud Flow Designer
Additional Cloud Flow Designer
Usability Enhancements
Merge Fields in Help Text and User
Input Validation Messages
Desktop Flow Designer No Longer
Supports New API Versions
Desktop Flow Designer Links and
Documentation
Schema Builder Enhancements
Feature
Automatically
Automatically
Not automatically
Contact
visible to all users.
visible to all
visible. Feature is salesforce.com to
No setup required. administrators. No
available but
enable this feature.
setup required.
requires some
setup.
Deleting Custom Objects with Schema
Builder
Deleting Custom Fields with Schema
Builder
More Custom Object Properties in
Schema Builder
18
Force.com Enhancements
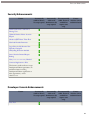
Security Enhancements
Feature
Automatically
Automatically
Not automatically
Contact
visible to all users.
visible to all
visible. Feature is salesforce.com to
No setup required. administrators. No
available but
enable this feature.
setup required.
requires some
setup.
Auth Providers Detect and Link to
Existing Users
Updated OAuth 2.0 Bearer Assertion
Request
OAuth 2.0 JWT Bearer Token Flow
New Auth Provider Parameters
Login Policy for My Domains Now
Explicitly Configured
Clickjacking Protection Available
Service Provider-Initiated Request
Binding
New getAccessTokenMap Method
Connected Applications—Pilot
This feature is visible to all users in new
Development Edition organizations. To
enable this feature in existing
Development Edition organizations or
other organizations, contact
salesforce.com.
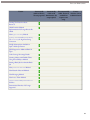
Developer Console Enhancements
Feature
Automatically
Automatically
Not automatically
Contact
visible to all users.
visible to all
visible. Feature is salesforce.com to
No setup required. administrators. No
available but
enable this feature.
setup required.
requires some
setup.
Tests Tool
19
Force.com Enhancements
Feature
Automatically
Automatically
Not automatically
Contact
visible to all users.
visible to all
visible. Feature is salesforce.com to
No setup required. administrators. No
available but
enable this feature.
setup required.
requires some
setup.
Query Editor
Perspectives in a System Log View
Command Line Window
Navigating through Views
Viewing Keyboard Shortcuts
Resuming Updates to the Developer
Console
Force.com IDE Enhancements
Feature
Automatically
Automatically
Not automatically
Contact
visible to all users.
visible to all
visible. Feature is salesforce.com to
No setup required. administrators. No
available but
enable this feature.
setup required.
requires some
setup.
Force.com IDE Enhancements
API Enhancements
Feature
Automatically
Automatically
Not automatically
Contact
visible to all users.
visible to all
visible. Feature is salesforce.com to
No setup required. administrators. No
available but
enable this feature.
setup required.
requires some
setup.
API Enhancements
SOQL Polymorphism—Developer
Preview
Geolocation Custom Field SOQL
Queries—Beta
20
Force.com Enhancements
Feature
Automatically
Automatically
Not automatically
Contact
visible to all users.
visible to all
visible. Feature is salesforce.com to
No setup required. administrators. No
available but
enable this feature.
setup required.
requires some
setup.
SOSL Enhancements
Connected Applications—Pilot
This feature is visible to all users in new
Development Edition organizations. To
enable this feature in existing
Development Edition organizations or
other organizations, contact
salesforce.com.
Force.com Canvas—Pilot (available
within 24 hours after the Winter ’13
release)
This feature is visible to all users in new
Development Edition organizations. To
enable this feature in existing
Development Edition organizations or
other organizations, contact
salesforce.com.
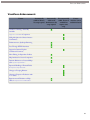
Apex Code Enhancements
Feature
Automatically
Automatically
Not automatically
Contact
visible to all users.
visible to all
visible. Feature is salesforce.com to
No setup required. administrators. No
available but
enable this feature.
setup required.
requires some
setup.
Non-Primitive Types in Map Keys and
Sets
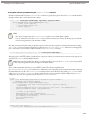
Support for Testing Callouts
Chatter API—Connect in Apex (Pilot)
New ID.getSObjectType Method
New String Methods
21
Force.com Enhancements
Feature
Automatically
Automatically
Not automatically
Contact
visible to all users.
visible to all
visible. Feature is salesforce.com to
No setup required. administrators. No
available but
enable this feature.
setup required.
requires some
setup.
Loading Test Data from Static
Resources
Global Interface Method
Implementations No Longer Need to Be
Global
New Type.toString Method
String.valueOf and System.debug
Use toString for Argument String
Conversion
SOQL Polymorphism Available in
Apex—Developer Preview
JSON Support for Additional Built-In
Types
Code Coverage Percentage Details
Creating sObjects with Default Values
Using the newSObject Method
Starting a Batch Job from Another Batch
Job
New getVariableValue Method
New Network Class and Method
New Messaging Method
New Access Token Method
Support.EmailTemplateSelector
Interface
Parameterized Interfaces No Longer
Supported
22
Force.com Enhancements
Visualforce Enhancements
Feature
Automatically
Automatically
Not automatically
Contact
visible to all users.
visible to all
visible. Feature is salesforce.com to
No setup required. administrators. No
available but
enable this feature.
setup required.
requires some
setup.
Visualforce Charting—Generally
Available
support:caseFeed Component
NoSignIn Option for Chatter Answers
Communities
Enhancements to JavaScript Remoting
Pass-Through HTML Attributes
Support for Internet Explorer
Conditional Comments
Inline Editing for Dependent Picklists
Map Attributes for Custom Components
Dynamic References to Lists and Maps
with <apex:inputText>
Improved Handling of Formula Fields
in <apex:outputField>
Changes to Escaping Behavior
Changes to Expression Evaluation with
Null Values
Restrictions and Validation on Help
URLs in <apex:sectionHeader>
23
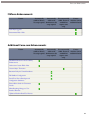
Force.com Enhancements
ISVforce Enhancements
Feature
Automatically
Automatically
Not automatically
Contact
visible to all users.
visible to all
visible. Feature is salesforce.com to
No setup required. administrators. No
available but
enable this feature.
setup required.
requires some
setup.
Push Major Upgrade
Environment Hub—Pilot
Additional Force.com Enhancements
Feature
Automatically
Automatically
Not automatically
Contact
visible to all users.
visible to all
visible. Feature is salesforce.com to
No setup required. administrators. No
available but
enable this feature.
setup required.
requires some
setup.
Workflow Evaluation Criteria Usability
Enhancements
Geolocation Custom Field—Beta
Custom Object Truncation
Retention Policy for Unused Sandboxes
Full Sandbox Configuration
Portal Users Not in Developer and
Configuration Sandboxes
Eastern Name Order for Vietnamese
Locales
Minor Branding Changes to User
Interface Elements
Updates to Platform Portal User Licenses
24
GENERAL ENHANCEMENTS
Salesforce Communities (Pilot)
Available in: Unlimited, Developer, Enterprise Editions
Note: Salesforce Communities is available through a pilot program. Contact your Salesforce.com representative to
find out if your organization qualifies for the pilot.
Communities are customizable public or private spaces for employees, end-customers, and partners to collaborate on best
practices and business processes. You can create multiple communities within your organization for different purposes. For
example, you could create a community for your company and its partners to discuss channel business, or you could have a
community specifically dedicated to an upcoming event.
You can customize communities to meet your business needs, including:
•
•
•
•
•
•
Choosing which members from your company and which customers, partners, or other people outside your company can
join
Selecting which Salesforce features to include
Applying your company’s branding so that the community is recognizable
Enabling your employees, customers, and partners to collaborate on Chatter and business processes (records)
Creating public facing and authenticated pages for your communities
Enabling login options based on SAML for single sign-on for people outside your company
Note: Salesforce Knowledge article URLs within communities have changed. Reset any community article links or
bookmarks you saved before Winter '13.
Browser Enhancements
Salesforce now supports Microsoft® Internet Explorer® 10, except for the Service Cloud console. Additional browser support
updates include:
•
•
Google Chrome Frame™ plug-in for Microsoft® Internet Explorer® 7 is now supported.
Apple® Safari® version 5.1.x is supported on Mac OS X.
As of Summer ‘12, we discontinued support for Internet Explorer® 6. Existing features that have previously worked in this
browser may continue to work through 2014. If you use Internet Explorer®, we recommend using the latest version. See
“Supported Browsers” in the online help for details on browser support.
25
CHATTER
Polls
Available in: Group, Professional, Enterprise, Unlimited, Contact Manager, and Developer Editions
You asked for it! This enhancement is from an idea on the IdeaExchange.
Starting in Winter ‘13, you can create a poll in your feed. Polls are a great way to get people’s opinions or gather data by
providing a list of choices. For example, you are in charge of planning an annual sales meeting and need to find out when most
people are available to attend the meeting. Instead of emailing everybody in the sales organization, you could create a poll in
the Sales Chatter group that lists possible dates and ask people to vote for the date that works best for them.
Posting a Poll
1. Above the feed, click Poll.
2. Type a question in the text box.
You can add a hashtag or mention someone.
3. Type at least two choices.
Click Add more choices to add another choice. You can enter up to ten choices.
4. Select to post the poll to your followers or to a group.
If you’re posting the poll to a group, select the name of the group from the drop-down list.
5. Click Share to post the poll.
Anybody with access to the poll or the post can select one of the choices and click Vote to submit their vote. People can only
cast one vote, but they have the option to change their vote.
Chatter Tab Navigation Enhancements
We’ve collapsed the Chatter Tab sidebar to streamline the navigation on the Chatter tab. On the left sidebar of the Chatter
Tab, you now see
Feed, which contains all of your feeds. The feeds are still the same. We just renamed them and consolidated
them into one navigation filter.
Click
Feed to see available feeds, then click a feed to display the associated subset of posts.
26
Chatter
Chatter Influence Calculation Enhancement
What I Follow
This feed was previously called My Chatter and displays everything you follow, including posts from people you follow,
groups you are a member of, and files and records you're following. Use the drop-down list at the top of your feed to
further narrow the subset of posts.
To Me
This feed was previously called @Me and displays posts others make to your profile feed and posts where you have been
mentioned.
Bookmarked
We didn’t rename this feed. It displays your bookmarked posts in your feed.
All Company
This feed was previously called All Chatter and displays all posts and comments from your entire company.
We’ve also renamed Chatter to Feed or removed the word Chatter in other places throughout the application to match the
new navigation. For example, the Show Chatter and Hide Chatter links on the Home tab now say Show Feed and Hide Feed,
respectively.
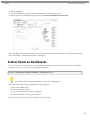
Chatter Influence Calculation Enhancement
Chatter activity statistics include how many posts and comments you've made, how many comments you've received, and how
many people liked your posts and comments. Chatter influence shows how your activity stacks up to other people’s. Because
influence is a relative calculation, users in some organizations might become top influencers very quickly without much activity.
Other organizations might feel that too many of their users are top influencers. Winter ‘13 introduces the ability to customize
Chatter activity thresholds to better fit your organization’s activity patterns. You can now tailor how Chatter influence is
calculated for your organization by specifying the minimum activity before users are included in the calculation.
Customizing Chatter Influence
Customize Chatter activity thresholds to improve the Chatter influence calculation.
Available in: Group, Professional, Enterprise, Unlimited, Contact Manager, and Developer Editions
User Permissions Needed
To customize Chatter influence:
“Customize Application”
1. Click Your Name > Setup > Customize > Chatter > Influence.
2. Click Edit to change the minimum activity thresholds.
All minimum activity thresholds default to zero. If you set non-zero thresholds, users who don’t meet all three minimums
are considered observers and aren’t counted when calculating people’s relative rank in the organization. Users who do meet
all three minimums but have low activity numbers relative to active influencers and top influencers are also considered
observers; however, they are counted when calculating influence.
27
Chatter
Improved Posting Experience
3. Click Save.
Chatter influence is recalculated when you save these values.
Warning: Use caution when setting new thresholds because users’ influence levels can change immediately.
Improved Posting Experience
We’ve made posting even easier. You can now post to your followers or to any group you’re a member of directly from the
Home tab, Chatter tab, or your profile.
1. Above your feed, select Post, File, Link, or Poll.
2. Type something about your post in the text box.
3. Select My Followers or A Group from the drop-down list below the text box.
If you’re posting to a group, type part of the group’s name in the Search Groups field and select the group from the
drop-down list.
4. Click Share.
Chatter Desktop Enhancements
Available in: Group, Professional, Enterprise, Unlimited, Contact Manager, and Developer Editions
The latest version of Chatter Desktop—a desktop app that increases your productivity by letting you collaborate in Chatter
outside of your Web browser—introduces Chatter Messenger for Desktop. With Chatter Messenger for Desktop, you can
chat with one or more people in your organization right from the Chatter Desktop app.
You asked for it! This enhancement is from an idea on the IdeaExchange.
Also in this version, you can:
•
•
•
•
•
Like comments
View a list of people who like a post or comment
View files attached to comments
View dashboard snapshots
View shared messages
Starting after October 2012:
•
•
•
•
•
Attach files to comments
View your chat list sorted by first name
View the last activity date for your Chatter groups
View multiple chats more easily
Sort your chat favorites by people’s availability
28
Chatter
•
Preview Links
See improved icons for your Chatter feed and dragging and dropping files to your posts
Several bugs have been fixed, including feed improvements using new components and an issue that prevented adding an
@mention after a #topic.
In organizations that allow Chatter Desktop standard installations, Chatter Desktop prompts current users to install the
updated version. You can also install the updated version from Your Name > Setup > Desktop Integration > Chatter Desktop.
In organizations that use the Chatter Desktop managed installer, only system administrators can upgrade users to the new
version.
Preview Links
Available in: Group, Professional, Enterprise, Unlimited, Contact Manager, and Developer Editions
Starting with Winter ‘13, you can preview several other links in your feed in addition to videos from the YouTube community.
These rich media previews are powered by Embed.ly, a third-party service. Currently, we support preview links for the following
domains:
•
YouTube
•
Vimeo
•
Mashable
•
Techcrunch
•
NYTimes
•
ReadWriteWeb
•
SoundCloud
We don’t share any content, user, organization, or account data with Embed.ly. We only share the URLs that are on the
domain whitelist, which are currently the seven domains mentioned above. Additionally all of our URL requests pass through
a Salesforce proxy, meaning Embed.ly never receives calls directly from the client and therefore doesn’t have information about
who's making the URL request.
Sharing a Preview Link
1. Above your feed, click Link.
2. Type a link URL to one of the supported domains.
3. Type a name for the link or leave the Link Name field blank.
If you provide a link name, we’ll use yours. If you leave the Link Name field blank, the preview populates the link name
with the title or name from the site URL.
4. Click Share.
After the post is rendered in the feed, we transform the post to a rich media preview including thumbnails, descriptions and
video players (for video URLs). If a post doesn’t render a link as a rich preview in the feed, the URL domain for that link
either isn’t supported or Embed.ly was unable to return the preview content for the URL.
29
Chatter
Work.com in Chatter—Pilot
Rich media previews are supported for link posts, but not for URLs that are added to the text body of the post itself.
Work.com in Chatter—Pilot
Available in: Professional, Enterprise, Unlimited, and Developer Editions
Note: This feature is currently available through a pilot program. For information on enabling it for your organization,
please contact salesforce.com.
Work.com is a suite of human capital management products that enable you to find, align, and motivate your workforce.
Starting with Winter ‘13, some Work.com features are integrated into Chatter. You can now create a Thanks post to recognize
a colleague and view Work.com profile content in Chatter.
Enabling Work.com in Your Organization
1. Click Name > Setup > Customize > Work.com > Work.com Thanks.
2. Select Enable and click Save. A Work.com login dialog appears.
3. Enter your Work.com username and password, which are separate from your Salesforce credentials. If you haven’t yet
created a Work.com account, you can sign up for an account on the Work.com login page. After successfully logging into
your Work.com account, you’ll be asked to approve the connection between Salesforce and Work.com.
4. Click Approve.
To disable Work.com features, click Name > Setup > Customize > Work.com > Work.com Thanks and deselect Enable.
Users will no longer see the Thanks action in the Chatter publisher. However, previously created Thanks posts will not be
deleted and might still be visible where they were posted.
Creating a Thanks Post in Chatter
If Work.com has been enabled for your organization, you’ll see a Thanks button in the Chatter publisher. To create a Thanks
post that recognizes a colleague for work well done:
1. Click Thanks in the Chatter publisher. A drop-down form appears in which you can enter various items needed for the
post.
Note: The first time you click Thanks, you’ll be required to log in to Work.com. Your Work.com username and
password are separate from your login credentials for Salesforce. If you don’t have a Work.com account, you can
sign up for one from this login screen. After logging in to Work.com, you’ll be asked to approve the connection
between Salesforce and Work.com. Click Approve to complete this process. This enables the Thanks feature for
you and you won’t be asked to log in again.
2. Type in the name of the person you wish to thank. Currently, you can only choose one recipient for a Thanks post. However,
you’re free to @mention other people in the body of your post. This is not the same as thanking them directly but lets them
know about your Thanks post.
30
Chatter
Administrator Settings for Rich Media Previews
3. Optionally, you can change the badge associated with the post. Each post is assigned a default badge, based on your
company’s settings in Work.com. Click Change Badge and select another, more specific badge to associate with this post.
In the popup window that appears, browse the available badges and click the one most appropriate. After clicking a badge,
you’ll see details about it and have the option of selecting it for your post, or going back and selecting another badge. At
any time, you can close the popup window to abort picking another badge.
Note: If you want to create a new badge, you must log in to Work.com. New badges cannot currently be created
from inside Salesforce.
4. Type in details about why you’re thanking the recipient. You’re free to @mention other people in the body of the text.
This is not the same as thanking them directly, but lets them know about the post.
5. Click Share to finalize the post. You’ll see the post in your feed and the recipient of the thanks is notified. Anyone that
was @mentioned in the post’s description text is also notified.
If posting from a Chatter group or a standard record page (for example, Leads, Accounts, Opportunities, Cases, and so on),
the post is made to that group’s or record’s wall. Anyone who follows the group or record sees the post in their feed. The
recipient of the Thanks post is always notified.
Viewing Work.com Profile Content in Chatter
If Work.com has been enabled for your organization and your administrator has also enabled the display of Work.com profile
content in Chatter profiles, you’ll see a Work.com button on the left side when viewing a Chatter profile (including your
own). This allows you to see someone’s Work.com profile in addition to their Chatter profile.
Note: The first time you click Work.com, you’ll be required to sign in using your Work.com username and password,
which are separate from your login credentials for Salesforce. If you don’t have a Work.com account, you can sign up
for one from this login screen. After logging in to Work.com, you’ll be asked to approve the connection between
Salesforce and Work.com. Click Approve to complete this process.
When viewing a Work.com profile (including your own), you can browse and interact with the content shown there.
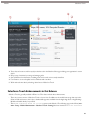
Administrator Settings for Rich Media Previews
You can now enable or disable rich media previews in link posts. Post with links to rich media content are rendered as a
preview, including thumbnails, descriptions and video players for video URLs. The rich media content is provided by Embed.ly,
a third-party service.
We don’t share any content, user, organization, or account data with Embed.ly. We only share the URLs that are on the
domain whitelist, which currently includes the YouTube, Vimeo, Mashable, Techcrunch, NYTimes, ReadWriteWeb, and
SoundCloud domains. All of our URL requests pass through a Salesforce proxy, meaning Embed.ly never receives calls directly
from the client and therefore doesn’t have information about who's making the URL request.
Rich media previews are enabled by default. If you disable rich media previews, users can only preview videos from the YouTube
community.
31
Additional Chatter Enhancements
Chatter Messenger Enhancements
Enabling and Disabling Rich Media Previews
Rich media previews in links are enabled by default.
1.
2.
3.
4.
5.
Click Your Name > Setup.
Under App Setup, click Customize > Chatter > Settings.
Click Edit.
Select Allow Rich Link Previews.
Click Save.
If a post doesn’t render a link as a rich preview in the feed, the URL domain for that link either isn’t supported or Embed.ly
was unable to return the preview content for the URL.
ADDITIONAL CHATTER ENHANCEMENTS
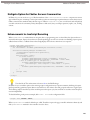
Chatter Messenger Enhancements
Chatter Messenger now includes limited chat history. When you start a chat with someone, your conversations with them
from the last 72 hours are automatically shown. To see a list of all conversations from the last 72 hours:
1. Click the Chat header to expand the chat window.
2. Click
.
3. Click someone’s name to see your chat history with them.
Additionally, your chats and chat history are maintained if you switch between multiple browser tabs.
Chatter Reporting
Available in: Group, Professional, Enterprise, Unlimited, Contact Manager, and Developer Editions
You can now create two new custom report types—one that shows Chatter activity statistics and influence rank and one that
shows how your organization is using public hashtag (#) topics. Public hashtag topics are those used on profiles and in public
groups. For privacy reasons, hashtag topic usage reports don’t include hashtags used on records or in private groups.
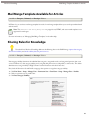
When defining a custom report type with Chatter activity statistics and influence rank data, choose the Chatter Activity
primary object and select from the following fields:
•
•
•
•
•
Comment Count—Number of comments made by the parent
Comment Received Count—Number of comments received by the parent
Influence Raw Rank—Number indicating the parent’s influence rank, which is calculated based on the parent’s Chatter
activity statistics, relative to the other users in the organization
Like Received Count—Number of likes received by the parent
Parent—User name
32
Additional Chatter Enhancements
•
Improved Feed Sorting Includes Polls
Post Count—Number of posts made by the parent
When defining a custom report type with hashtag topic usage data, choose the Hashtag Definitions primary object and
select from the following fields:
•
•
•
•
Created Date—Date the hashtag topic was created
Hashtag Text—Text following the hashtag (#)
Normalized Hashtag Text—Text following the hashtag (#), without capitalization and punctuation
Hashtag Count—Number of times the hashtag is used
Improved Feed Sorting Includes Polls
You can now sort your feed by most recent activity or post date. Sorting by most recent activity shows the posts with the most
recent comments at the top of your feed, including polls with new comments. Sorting by post date shows the latest posts at
the top, regardless of whether they have new comments. For new users, the feed is sorted by most recent activity, by default.
You can toggle the feed sorting at any time by clicking Post Date or Most Recent Activity above your feed.
Post Visibility
Available in: Group, Professional, Enterprise, Unlimited, Contact Manager, and Developer Editions
We’ve added a visibility widget to help you determine who can see the posts and where your posts can be found in Chatter.
The widget is available for each post type (Post, File, Link, or Poll). Select your post type and click
open the visibility widget.
below the text box to
Updated Chatter Icons and Buttons
We’ve changed the appearance of the Chatter icons and buttons to improve the overall navigation and cohesion throughout
the app. For example, the color of the Share button above the feed changed from blue to green and the sidebar on the Chatter
tab now uses gray icons.
33
Additional Chatter Enhancements
Chatter Feed Search Label Change
Chatter Feed Search Label Change
Available in: All Editions except Database.com
In keeping with changes to the Chatter tab navigation, we’ve renamed Search Chatter Updates to Search Chatter Feeds on
the global search results page.
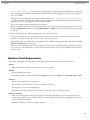
View the External Apps Approved to Access Chatter Data
Available in: Group, Professional, Enterprise, Unlimited, Contact Manager, and Developer Editions
If your organization has Chatter Free users, Chatter Only users, or customers in Chatter groups, Winter ’13 offers them
approved connections, a new security feature. Whenever they authorize an external app such as Chatter Desktop or Chatter
Mobile, they can now see these apps listed in Chatter, for added security.
Approved connections is the list of external applications that can access your data in Chatter. You authorize this access the
first time you run the external application. For example, if you use Chatter Desktop, you created a connection between the
Chatter Desktop application and the login you use to access Chatter on the Web. The first time you authorized the connection
in Chatter Desktop, it was saved as an approved connection. To view your approved connections, click Your Name > My
Settings at the top of any page, then click Approved Connections. You can view and remove your approved connections on
this page but you can’t add them directly.
Removing an approved connection means that you’re revoking the external application’s access to your data in Chatter. The
next time you access the external application, you won’t be able to connect using the previously authorized login.
Warning: Only click Remove if you’re sure you want to revoke the connection. There is no confirmation step and
the approved connection is removed immediately.
To restore a connection that you’ve removed, simply create the connection again the next time you access the external application.
After you authorize the connection, it’s saved as a new approved connection.
Google Talk in Salesforce No Longer Supported By Google
User Permissions Needed
Deactivating Google Talk:
“Customize Application”
Google is constantly changing and evolving their technology infrastructure. As a result of these changes, the Google Talk
sidebar is no longer available within Salesforce.
To deactivate Google Talk in Salesforce:
1. Click Your Name > Setup > Google Apps > Settings.
2. In the Activate Google Apps Services list, next to the Google Talk Sidebar Component option, click Edit.
34
Additional Chatter Enhancements
Unfollow Unused Record Subscriptions
3. Deselect the Active checkbox.
4. Click Save.
For alternative ways to use Google Talk, see the Google Talk online help.
Unfollow Unused Record Subscriptions
In Winter ‘13, we’re running a script to clean up follows for inactive records. We remove subscriptions to records that meet
all of the following criteria:
•
•
•
The record never had any posts or comments.
The record was never changed in any way that’s tracked in Chatter during the past 45 days.
The record has no tracked change of any age that’s been liked or commented on.
We run the script only once after your organization gets the Winter ‘13 release. The script automatically unsubscribes anyone
who was following the record. We don’t remove the record itself, just the subscription to the record. Removing unused record
subscriptions frees up subscription capacity for customers getting close to their subscription limit.
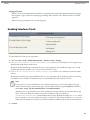
“Create and Own New Chatter Groups” User Permission
Use the “Create and Own New Chatter Groups” user permission to control which users can create new Chatter groups or be
assigned as owners of Chatter groups. This permission is turned on by default for all standard profiles.
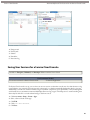
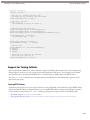
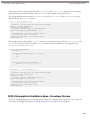
Chatter REST API Enhancements
Winter ‘13 (Chatter API version 26.0) improvements:
•
•
•
•
General Updates
New and Changed Resources
New and Changed Response Bodies
New and Changed Request Bodies
Attention: Resources, parameters, and response bodies change from release to release. We strongly recommend
testing your application in a test environment before deploying it to production.
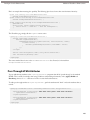
General Updates
•
•
Version information was added to all the resources in the documentation, as well as all request bodies and response bodies.
Now it’s easier to see when something new is added to Chatter API.
The rate limits for Chatter API have been more finely tuned and are measured by per user, per application, per hour rate
limit. Most customers shouldn’t see the difference. When you exceed the rate limit, all Chatter API resources return a 503
Service Unavailable error code for both the user and the application. When polling for feed updates or private messages,
do not exceed one poll per minute (60 per hour.) In addition, use the /feeds/news/me | userId/is-modified
resource to determine if a feed has been updated since the last specified time and date.
35
Additional Chatter Enhancements
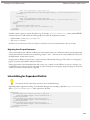
•
Chatter REST API Enhancements
Chatter in Communities is supported by all the resources in Chatter API. Instead of using the regular URL to access the
resource, use the Community URL. For example:
https://na1.salesforce.com/services/data/v26.0/connect
/communities/communityId/chatter/feeds/news/me/feed-items
In addition, information about communities is returned by many of the response bodies.
Note: Communities are available as a pilot program. Contact your salesforce.com representative to find out if
your organization qualifies for the community pilot.
Chatter API—Connect in Apex (Pilot)
Force.com developers no longer need to use Apex callouts to access Chatter API data. Now, many Chatter API resources
have been exposed and are directly accessible using Connect in Apex. The Connect in Apex documentation is available in the
Chatter REST API Developer’s Guide.
Note: Connect in Apex is currently available through a pilot program. For information on enabling Connect in Apex,
please contact your salesforce.com representative.
New and Changed Resources
•
•
•
•
•
•
The Bookmarks Resources topic contained an incorrect example of the Feed-Items resource. The correct example is:
/chatter/feed-items/0D5D0000000Ir6zKAC?isBookmarkedByCurrentUser=true.
The new Connect resource returns the list of available resources for the organization.
The new Communities resources return information about all communities, or the specified community.
The new Feed Items: Feed Poll resource returns information about a feed poll associated with a specific feed item. It can
also be used to vote in a poll.
The new Files Information, Batch resource returns file information for a list of file IDs.
The Files resource now accepts the following HTTP methods:
◊ DELETE
◊ PATCH
•
•
In addition, PATCH has a new parameter, title, used to rename an existing file.
The Flat feed resource is no longer available for all feeds.
The Is-Modified resource is now available. Use this resource to poll a news feed to see if it’s been updated or changed since
the specified time and date: /chatter/feeds/news/me/is-modified
Note: Though the Is-Modified resource is generally available, your organization may not have permission to use
it automatically. If you can’t access this resource, contact your salesforce.com representative and ask about the
“Enabled Chatter Feed Polling” permission.
•
•
The Users resource now returns recommendations for a specific action and key prefix.
The News, Record, To, and User-Profile Feed-Items resources all have the following new POST request parameters:
36
Additional Chatter Enhancements
Chatter REST API Enhancements
◊ isBookMarkedByCurrentUser parameter with POST to specify whether the new feed item should be bookmarked.
◊ pollChoice1 through pollChoice10—The choices used to create a new feed item with a poll.
◊ visibility parameter with POST to specify who can see the feed item.
Note: With Record Feed-Item resources, you can set visibility to InternalUser for records that are
not groups or users. At this time, for all other feed-item resources, you can only set visibility to AllUsers.
•
The documentation incorrectly specified the return for the User Groups resource. The correct return is the User Groups
page response body.
New and Changed Response Bodies
•
•
•
•
•
•
The Group Member response body incorrectly stated that the value of the id property was a user ID. The correct value
of the id property is a group membership ID.
The result property on the Batch Result Item response body now returns File response bodies for the resource
/chatter/files/batch/fileIds.
The organization property on the Chatter Directory response body is no longer available as of version 26.0. Use the
organization property on the Connect Directory response body instead.
A new Connect Directory response body was added, which provides information about the organization.
The new Community and Community page response bodies were added, which provide information about the communities
in the organization.
The community property was added to the following response bodies:
◊ Favorite
◊ Group
◊ Subscription
•
•
•
•
The Feed Item Page response body was incorrectly documented: It does not return a previousPageUrl property.
A new Feed Item Attachment: Poll response body was added, which provides information about the feed poll associated
with the feed item.
A new Feed Poll Choice response body was added, which provides information about the feed poll choice.
The following changes were made to the Feed Item response body:
◊ attachment now includes the new Feed Item Attachment: Poll response body
◊ type now includes the following new feed item types:
-
ChatTranscriptPost
FacebookPost
PollPost
RypplePost
ReplyPost
TwitterPost
◊ A new visibility property was added, which gives information about who can see this feed item.
•
The File Summary and Feed Item Attachment: Content response bodies have the following new properties:
◊ checkSum—Specifies the MD5 checksum for the file
◊ fileExtension—Specifies the extension of the file
37
Additional Chatter Enhancements
Chatter REST API Enhancements
◊ isInMyFileSync —Reserved for future use
◊ mimeType—Specifies the MIME type of the file
•
•
•
•
•
•
•
•
In addition, the Feed Item Attachment: Content response body now includes renditionUrl, a URL to the rendition
resource for the file.
The Flat Feed and Flat Feed Item response bodies are no longer available.
The Group Page does not include a total property as previously listed in the documentation.
A name property has been added to both the Organization and Organization Summary response bodies.
An id property has been added to the Record Summary response body.
The User Group Page response body was missing from the documentation. It is returned by the User Groups resource.
The isChatterGuest property on the User Detail and User Summary response bodies is no longer available as of version
26.0. Use the new userType property in the response body instead.
An isActive property has been added to the User Summary response body.
The User Settings response body has the following new properties:
◊ hasAccessToInternalOrg—User is a member of an internal organization.
◊ hasFileSync—Reserved for future use.
•
•
The Features response body includes chatterTopics, which is reserved for the Chatter topics pilot.
Prior to version 26.0, the following responses were rendered differently in JSON than in XML. The XML response did
not include some Boolean properties. As of version 26.0, all responses are identical in both the JSON and XML versions.
◊ The FeedItem response body event property
◊ The Comment response body isDeletable property
New and Changed Request Bodies
•
•
•
The File Input request body incorrectly listed the description parameter. The correct name of the parameter is desc.
Feed Poll is a new input body for voting on polls.
In the Feed Item Input request body, the attachment property now takes a new input body, Attachment Input: Feed
Poll, for creating a new poll associated with the feed item. Note that the Feed Item body property is used for the poll
question in these feed items.
38
SALES
FORECASTS ENHANCEMENTS
Use Chatter People Hovers (Rep Hovers)
Available in: Professional, Enterprise, Unlimited, and Developer Editions
User Permissions Needed
To use Forecasts:
“Allow Forecasting”
To enable Chatter:
“Customize Application”
Note: This information applies to the Forecasts product beginning with the Winter ‘12 release and not to Customizable
Forecasts.
Now you can use Chatter to connect with your colleagues right from within your forecast with Rep Hovers on Forecasts. Users
must have Chatter enabled and be forecast managers to use this functionality.
1. Hover over a subordinate’s name. A
2. Hover over
appears.
to display Chatter options and make a selection.
39
Forecasts Enhancements
Create Forecasting Custom Report Types
Create Forecasting Custom Report Types
Available in: Professional, Enterprise, Unlimited, and Developer Editions
User Permissions Needed
To create or update custom report types:
“Manage Custom Report Types”
To delete custom report types:
“Modify All Data”
Note: This information applies to the Forecasts product beginning with the Winter ‘12 release and not to Customizable
Forecasts. You must enable Forecasts to create a forecasting custom report type.
You asked for it! These enhancements are from the IdeaExchange: Forecast Quota/Reporting, Improved Forecasts
Reports, and Reporting on All Objects.
Administrators can now create forecasting custom report types for their users with Analytics for Collaborative Forecasts. A
report type defines the set of records and fields available to a report based on the relationships between a primary object and
its related objects. Reports display only records that meet the criteria defined in the report type. Use this table to understand
the report types that you can create for users.
Primary Object
Use to create a report for...
Forecasting Items
Viewing information about forecasting line items, including adjustment amount information.
As a best practice, use all default fields in the report type, including the following:
•
•
•
•
Owner Only Amount—The sum of all of a person’s opportunities, without adjustments.
For example, if you own two opportunities, each worth $10,000, the Owner Only Amount
is $20,000.
Amount Without Adjustments—The sum of all of a person’s owned opportunities and
also his or her’s subordinates’ opportunities, without adjustments. Subordinates include
everyone reporting up to a person in the forecast hierarchy. For example, if the sum of the
amount of all opportunities owned by you is $20,000 and the sum of the amount of your
subordinates’ opportunities is $55,000, the Amount Without Adjustments is $75,000.
Amount Without Manager Adjustments—The forecast number as seen by the forecast
owner. This is the sum of the owner’s opportunities and his or her subordinates’ opportunities,
including adjustments made on the subordinates’ forecasts. It doesn’t include adjustments
made by forecast managers above the owner in the forecast hierarchy. For example, say Anne has
an Amount Without Adjustments of $75,000, made up of $20,000 of her own opportunities
and $55,000 of opportunities owned by her subordinate Ben. Additionally, she adjusted
Ben’s amount to $65,000 for a total of $85,000. If you adjust Anne’s number from $85,000
to $100,000, then you see $85,000 in Amount Without Manager Adjustments because
this is what Anne sees (and Anne can’t see your adjustments as you’re her manager). To see
the amount that includes your adjustment to $100,000, look at Forecast Amount.
Forecast Amount—The forecast from the forecast manager’s perspective and the sum of
the owner’s and subordinates’ opportunities, including all forecast adjustments. For example,
say you’re a forecast manager and have another forecast manager reporting to you who has
40
Forecasts Enhancements
Primary Object
Forecast Managers Can Adjust Forecasts in Any Currency
Use to create a report for...
•
an Amount Without Manager Adjustment totaling $85,000. If you adjust the forecast to
$100,000, the Forecast Amount is $100,000.
Has Adjustment—A checkbox that indicates if an adjustment’s been made on a forecast
owner’s Amount Without Adjustments. For example, if you make an adjustment to one
of your subordinate’s forecast amounts, this box is checked. If your subordinate makes an
adjustment to one of his or her subordinate’s amounts, this box is also checked. However,
unless you have the “View All Data” permission, if your forecast manager makes an adjustment to
your forecast amount, this box remains unchecked; you don’t have access to your forecast manager’s
adjustment information.
Forecasting Items with Viewing opportunity information for specific forecasting line items. For example, you might
want to create a summary report for each of your subordinates that includes the opportunity
Opportunities as a
related object
names and last activity dates for their forecasting items, alongside adjustment information and
final forecast amounts.
Forecasting Quotas
Viewing data about individual or team quotas. As a best practice, include all the default fields
in the report type. For example, you can include lookup fields, such the full name of the owner.
When running the report, you can filter by your own name to see quotas you created and their
related accounts and owners.
To make a forecasting report available to users, administrators must create a custom report type.
1. Start creating a custom report type by clicking Your Name > Setup > Create > Report Types and New Custom Report
Type.
2. For Primary Object, select a Forecasting object, such as Forecasting Items or Forecasting Quotas.
3. For Store in Category, select Forecasts.
After deploying the report types, let your users know their locations and names.
Forecast Managers Can Adjust Forecasts in Any Currency
Available in: Professional, Enterprise, Unlimited, and Developer Editions
User Permissions Needed
To use Forecasts:
“Allow Forecasting”
To adjust Forecasts:
“Override Forecasts”
Note: This information applies to the Forecasts product beginning with the Winter ‘12 release and not to Customizable
Forecasts. You must enable Forecasts to create a forecasting custom report type.
You asked for it! This enhancement is from the IdeaExchange: Amounts in the Forecast to use the same currency.
41
Forecasts Enhancements
Configurable Forecast List View for the Opportunity Pane
Now forecast managers can adjust direct subordinates’ forecasts, no matter what forecast display currency the manager uses.
Previously forecast managers had to set their display currencies to the forecast currency. For example, say the forecast currency
for your organization is set to the organization’s corporate currency of U.S. Dollars. Without changing the display currency
to U.S. Dollars, a forecast manager using Canadian Dollars to forecast can now adjust a subordinate’s forecast who might use
Indian Rupees. The forecast manager will see the adjusted amount in Canadian Dollars. To update the forecast display currency,
from your own forecast page click Display Settings > Change.
Configurable Forecast List View for the Opportunity Pane
Available in: Professional, Enterprise, Unlimited, and Developer Editions
User Permissions Needed
To customize the opportunity pane:
“Customize Application”
To view setup and configuration:
“View Setup and Configuration”
Note: This information applies to the Forecasts product beginning with the Winter ‘12 release and not to Customizable
Forecasts.
Configurable Forecast List View is available! Opportunities appear below the rollup table in a forecast in a list that responds
to user selections. Administrators select up to 15 standard and custom fields that appear in the opportunity pane. Users see
the fields selected based on their field level security settings. Opportunity Name is a required field. Additionally, salesforce.com
recommends adding Forecast Category to the pane.
1. Click Your Name > Setup > Customize > Forecasts > Settings.
2. Under Opportunity List Column, select fields and click Add and Remove to move them between the Available Fields list
and the Selected Fields list. To determine field order in the layout, select fields and click Up, Down, Top, or Bottom.
3. Click Save.
42
Opportunity Teams Enhancements
Customizing Opportunity Teams
OPPORTUNITY TEAMS ENHANCEMENTS
Customizing Opportunity Teams
Available in: Enterprise, Unlimited, and Developer Editions
User Permissions Needed
To enable team selling:
“Customize Application”
To create or change custom fields:
“Customize Application”
To define or change field validation rules:
“Customize Application”
To define Apex triggers:
“Author Apex”
To set up team roles:
“Customize Application”
To add a custom button or link:
“Customize Application”
To edit page layouts:
“Customize Application”
You asked for it! This enhancement helps address the following ideas on the IdeaExchange.
•
•
•
•
•
•
•
•
•
•
Enable opportunity team automatic notifications
Modify visibility of Opportunity Team related list buttons
Make opportunity team member fields visible
Email opportunity team members
Track time spent by an opportunity team on an opportunity
Alert opportunity team members when added
Make opportunity team fields available in custom report types
Make primary campaign source field visable for opportunity team report
Generate an opportunity history with opportunity team report
Include opportunity team in backup
Opportunity team selling allows a team of users, called an opportunity team, to share and work on an opportunity together.
Note: Previously, opportunity teams were called sales teams. If your organization had enabled sales teams prior to
Winter ’13, opportunity team selling will be automatically enabled in Winter ’13.
As an administrator, you can customize opportunity team roles for your organization, such as Account Executive or Sales
Representative. Then, your users can add members to an opportunity team on a particular opportunity, and assign each member
a team role for that opportunity.
43
Opportunity Teams Enhancements
Customizing Opportunity Teams
In Winter ’13, opportunity teams have been expanded to allow greater customization and control. You can define opportunity
team layout pages and add custom fields, custom buttons and links, and related lists to them. You can define validation rules
and triggers to verify and automate team selling and opportunity team changes. And you can create custom report types for
opportunity teams.
When team selling is enabled, you can customize opportunity teams for your organization.
•
•
Enable team selling and select which existing page layouts will include the Opportunity Team related list. To change the
location of the related list on a particular page, customize the page layout.
Create a custom field for the opportunity team. Custom fields appear on the Opportunity Team Member page and can
be included in opportunity team reports. You can create a maximum of 50 custom fields.
Note: If you delete a custom field, filters that use the custom field are also deleted, and the result of assignment
or escalation rules that rely on the custom field’s data might change.
•
•
•
•
Define and activate validation rules that opportunity team data must meet before a user can save the record.
Define and activate Apex code that executes before or after specific data manipulation language (DML) events occur, such
as before opportunity team records are inserted into the database, or after records have been deleted.
Define opportunity team roles for your organization.
Optionally, replace existing team roles.
You can globally replace an existing value in a picklist with a new value that you’ve first created using the picklist edit page.
Replacing an existing team role affects opportunity team and account team members.
•
•
•
•
•
•
Add a custom button or link to the opportunity team.
Customize the Opportunity Team Member page layout and specify which fields will appear on the Opportunity Team
Member multi-line page. You can add custom fields, buttons and links, and customizable related lists to a page layout.
Edit the Opportunity Team related list properties on each page layout containing the Opportunity Team related list. You
can add custom fields and buttons to the related list. To display opportunity team information in a related list on a parent
page, you must create a link between the opportunity team member and the parent. For example, to display opportunity
team member information on the associated account detail page, create a custom lookup relationship field for account on
the opportunity team, add it to the Opportunity Team Member multi-line page, and then set this field to the parent
account for each opportunity team member.
View limits that apply to the opportunity team such as the maximum number of custom fields you can define.
Create custom report types for opportunity teams. The opportunity team must always have a parent object and can’t have
any child objects. For example, an opportunity team member in a custom report type can be related to a parent account
but a contact can’t be related to a parent opportunity team member.
Disable team selling to remove default opportunity teams and existing teams on opportunities.
Opportunity Team Known Limitations
•
•
•
Administrators can’t define workflows for opportunity teams.
Administrators can’t create a look up from an object, such as an account, to an opportunity team member.
Administrators can create a custom report type for an opportunity team but the opportunity team must always have a parent
object and can’t have any child objects. For example, an opportunity team member in a custom report type can be related
to a parent account but a contact can’t be related to a parent opportunity team member.
44
Opportunity Teams Enhancements
Customizing Opportunity Teams
Administrators can’t rename tabs and labels for an opportunity team member. When you select Your Name > Setup >
Customize > Tab Names and Labels > Rename Tabs and Labels, opportunity team member isn’t included in the list of
tabs and labels.
Triggers and validation rules aren’t supported when a user adds the default opportunity team on an opportunity.
•
•
Enabling Team Selling
Enabling team selling gives your users access to create and use opportunity teams on opportunities.
Available in: Enterprise, Unlimited, and Developer Editions
User Permissions Needed
To enable team selling:
1.
2.
3.
4.
5.
6.
“Customize Application”
Click Your Name > Setup > Customize > Opportunities > Opportunity Teams.
Click Settings.
Select Enable Team Selling and click Save.
Select the opportunity page layouts that will display the new Opportunity Team related list.
Optionally, select Append to users’ personal related list customization.
Click Save.
When team selling is enabled, you can add custom fields, custom buttons and links, validation rules, and Apex triggers to
opportunity teams. You can also edit opportunity team page layouts and create custom report types for opportunity teams.
Disabling Team Selling
Available in: Enterprise, Unlimited, and Developer Editions
User Permissions Needed
To disable team selling:
“Customize Application”
1. Delete any custom fields, custom buttons and links, page layouts, validation rules, or Apex triggers that you have added
to opportunity teams. You must also delete any custom reports that include opportunity team information and uninstall
any Apex packages that use opportunity teams.
2. Click Your Name > Setup > Customize > Opportunities > Opportunity Teams.
3. Click Settings.
4. Select Disable Team Selling and click Save.
45
Opportunity Teams Enhancements
Using Opportunity Teams
5. Select Yes at the prompt and click OK. All opportunity teams assigned to opportunities and all default opportunity teams
are permanently deleted.
Note: You can’t disable team selling for your organization if team members are referenced in Apex. For example,
if Apex code references the Team Member field (represented as OpportunityTeamMember in the code), team
selling cannot be disabled. See Apex Code Overview.
Editing Multi-Line Layouts for Opportunity Teams
Available in: Professional, Enterprise, Unlimited, and Developer Editions
User Permissions Needed
To edit multi-line layouts for opportunity teams:
“Customize Application”
You can specify which fields appear on the Opportunity Team Member multi-line page. To view this page, add a new member
to an opportunity team.
1.
2.
3.
4.
Click Your Name > Setup > Customize > Opportunities > Opportunity Teams > Page Layouts.
Next to the name of an opportunity team page layout, click Edit.
Click Edit Multi-Line Layout in the top right corner.
Move fields between Available Fields and Selected Fields.
•
•
•
•
To customize which fields display in the layout, select one or more fields in Available Fields and click Add or Remove.
To sort fields in the layout, select one or more fields in Selected Fields and click Up or Down.
To select multiple fields individually, use CTRL+click.
To select multiple fields as a group, use SHIFT+click.
5. Click Save to apply your changes.
Using Opportunity Teams
As a user, you can now do more with opportunity teams.
•
•
•
•
When adding or editing members to your opportunity teams, specify values for any custom fields that your administrator
has defined.
Create custom reports for opportunity teams to get a clear picture of how your teams are performing.
Include custom fields for opportunity teams in your reports.
View the Opportunity Team related list on additional pages, if your administrator has customized page layouts to include
this list.
Note: Previously, opportunity teams were called sales teams.
46
Salesforce for Outlook Enhancements
Boosting Productivity with Salesforce for Outlook
Adding Members to an Opportunity Team
Available in: Enterprise, Unlimited, and Developer Editions
User Permissions Needed
To add team members to an opportunity:
“Read” on opportunities
Owner of opportunity record, or above owner in your
organization's role hierarchy
To view an opportunity for which you're a team member:
“Read” on the opportunity
1. View the opportunity and navigate to the Opportunity Team related list, then click Add.
2. Enter the member’s name in the User column. If the partner portal is enabled, choose whether the member is a Partner
User or User, and then enter the member’s name.
Note:
When you add an opportunity team member, the member is automatically granted read access to the associated
account.
3. Select an opportunity team role for the member.
4. Select the opportunity access for the member. The access level can’t be less than your organization’s default opportunity
sharing access.
5. Specify values for any custom fields that your administrator has created for opportunity teams.
Important: If your administrator has defined custom fields but not added them to the Add Opportunity Team
Members page, you can’t see them when you add a new team member. See “Working with Custom Fields for
Opportunity Teams” in the online help.
6. Click Save.
Tip: Run the Opportunities with Opportunity Teams report to list the opportunity team members for the opportunities
owned by you or users below you in the role hierarchy. The report also shows information about the opportunities
you own and opportunity teams to which you belong.
SALESFORCE FOR OUTLOOK ENHANCEMENTS
Boosting Productivity with Salesforce for Outlook
For Winter ’13, Salesforce for Outlook includes new features that help your users boost their productivity and improve their
overall experience syncing items with and adding emails to Salesforce.
47
Viewing Your Salesforce World in Microsoft® Outlook®—Beta
Salesforce for Outlook Enhancements
Feature
With this feature, users can
Learn more about this feature in
Salesforce Side Panel
View up to a total of four Salesforce contacts and leads in Viewing Your Salesforce World in
a side panel that appears in Microsoft® Outlook® when Microsoft® Outlook®—Beta
users select an email.
Users can manually add emails to either one contact and
one account or opportunity, or one lead only.
Recurring Events
Sync recurring events between Outlook and Salesforce.
Syncing Recurring Events
Simplified Email
Associations
Save time managing the My Unresolved Items page when Saving Time with Email Associations
Salesforce encounters unresolved email addresses from
emails added to Salesforce.
Viewing Your Salesforce World in Microsoft®
Outlook®—Beta
You asked for it! This enhancement is from an idea on the IdeaExchange.
Available in: Enterprise, Unlimited, and Developer Editions
User Permissions Needed
To display the Salesforce Side Panel in Outlook:
“Side Panel”
To add Outlook emails to Salesforce:
“Email to Salesforce”
AND
“Add Email”
To add email attachments to Salesforce:
“Always save email attachments” in your Email to Salesforce
settings
Note: Salesforce contact and lead details can now appear directly in Outlook with the new Salesforce Side Panel,
which is currently available as a beta feature in Salesforce for Outlook v2.0 and later.
When your users select emails in Outlook, they can now view contact and lead details in the new Salesforce Side Panel. This
side panel displays up to a total of four contacts and leads from the From, To, and Cc fields in your users’ emails.
In addition, your users can:
•
•
See up to a total of four open and past activities and opportunities related to the contacts and leads that appear in the side
panel.
Manually add emails to either one contact and one account or opportunity, or one lead only.
48
Salesforce for Outlook Enhancements
•
•
•
Viewing Your Salesforce World in Microsoft® Outlook®—Beta
See whether Salesforce encounters duplicate contacts or leads, and choose the most appropriate ones to display in the side
panel.
Search for additional contacts, leads, accounts, and opportunities.
Use the blue text links to view details directly in Salesforce.
1. Users can see the contacts, leads, activities, and opportunities to which they’ve added emails. Your users can also click the
search icon ( ) to find other contacts, leads, accounts, and opportunities, and then add emails to them. There’s even a
collapse icon ( ) to hide the side panel.
2. The side panel displays contacts and leads based on the order they appear in the From, To, and Cc fields in your users’
emails. Users can view:
•
•
Contacts and their related activities and opportunities
Leads and their related activities
If you have the Social Accounts and Contacts feature enabled in Salesforce, the side panel displays either Facebook® or
Twitter™ profile pictures for contacts and leads that maintain profile pictures on those sites.
3. Additional contacts and leads from your users’ emails appear, which your users can select to display contact and lead details
along with related activities and opportunities.
Considerations for Using the Salesforce Side Panel
It’s important that you understand the following details before you enable the side panel for your users.
•
When you enable the Salesforce Side Panel, the Add Emails button no longer appears directly in Outlook. Instead, your
users can click
to add emails to either one contact and one account or opportunity, or one lead only.
49
Salesforce for Outlook Enhancements
Viewing Your Salesforce World in Microsoft® Outlook®—Beta
In addition, the Send and Add button no longer appears in individual Outlook emails that your users send. For this beta
release, we don’t offer a Send and Add feature.
•
•
Supported browsers include Microsoft Internet Explorer® 8 or later.
The DELETE function in the search box is inactive. To modify search entries, users can either press BACKSPACE, or
click Done and then search again.
Enabling the Salesforce Side Panel
1. Click Your Name > Setup > Desktop Administration > Outlook Configurations.
2. Either create a new Outlook configuration, or edit an existing one.
3. Select Side Panel.
4. Select any other options that apply to your Outlook configuration.
5. Click Save.
6. If you don’t yet have a remote site configured for your organization, create one now. To do so, click Your Name > Setup
> Security Controls > Remote Site Settings.
7. Click New Remote Site.
8. Add a remote site name. Then, add a remote site URL, which is your organization’s Salesforce URL.
9. Click Save.
50
Salesforce for Outlook Enhancements
Syncing Recurring Events
Syncing Recurring Events
You asked for it! This enhancement is from an idea on the IdeaExchange.
Available in: Professional, Enterprise, Unlimited, and Developer Editions
User Permissions Needed
To sync recurring events between Outlook and Salesforce:
“Recurring Events”
In addition, “Read” and “Edit” on events, and event sync
direction set to any of the following directions.
Outlook to salesforce.com,
Salesforce.com to Outlook, or
Sync both ways
Your users can now keep Outlook and Salesforce recurring events in sync with Salesforce for Outlook, which supports the
following recurrence patterns.
•
•
•
•
Daily
Weekly
Monthly
Yearly
After syncing recurring events to Salesforce, your users can assign the recurrences to related records, like contacts, accounts,
opportunities, and so on. Syncing recurring events also helps your users maintain an accurate view of their availability when
they create events and request meetings from their Salesforce calendars.
Considerations for Enabling the Recurring Events Feature
It’s important that you understand the following details before you enable recurring events for your users.
•
•
•
•
•
•
When you enable recurring events, you enable the feature for your entire organization. You can, however, choose the
Outlook configurations for which you want recurring events to sync.
After you enable this feature, you can’t disable it without help from the salesforce.com Support team.
All Salesforce for Outlook users will need to upgrade to Salesforce for Outlook v2.0 or later.
Recurring events do not appear on the My Unresolved Items page. Instead, your users can go directly to the recurring
events in their calendars to associate the recurring events with Salesforce records.
Your users’ Salesforce for Outlook configuration settings don’t indicate whether their Outlook configurations are set up
to sync recurring events.
In Salesforce, if your users delete all occurrences within a series, but not the series itself, Salesforce for Outlook generates
an error message after it syncs to Outlook. Your users can ignore this error message, which clears during the next sync.
You can also learn about important, although not critical, details in Understanding Differences Between Outlook and Salesforce
and Modifying Recurring Series.
51
Salesforce for Outlook Enhancements
Syncing Recurring Events
Enabling the Recurring Events Feature
1. In Salesforce, click Your Name > Setup > Desktop Administration > Outlook Configurations.
2. For your Outlook configuration, click Edit.
3. Under Advanced Settings, select Recurring Events.
4. Click Save.
Understanding Differences Between Outlook and Salesforce
Recurring events work differently between Outlook and Salesforce.
For
You should know that
Ranges of occurrences
If your users’ recurrences include more than 100 occurrences, Salesforce for Outlook creates the
series with 100 occurrences in Salesforce.
After the dates of occurrences pass, Salesforce for Outlook then automatically adds another group
of occurrences, bringing the total future occurrences up to 100 again. The schedule on which
Salesforce adds these groups depends on the number of occurrences that passed and when users
last synced, as well as whether users changed any existing occurrences.
In addition, when users set up recurring events in Outlook, they must select the option End by.
Salesforce doesn’t support recurring series set with the following options.
•
•
Monthly occurrences
Salesforce for Outlook doesn’t support the following Outlook recurrence pattern options.
•
•
Yearly occurrences
No end date
End after
weekend day
weekday
Salesforce for Outlook lets your users set up events that recur every year. If users enter a number
other than 1 for the Recur every option in Outlook recurrence patterns, Salesforce for Outlook
won’t sync the recurring series. This mean that your users can set up yearly recurrences, but not
recurrences for every other year or every three years.
In addition, Salesforce for Outlook doesn’t support the following Outlook recurrence pattern
options.
•
•
Events lasting longer
than 24 hours
weekend day
weekday
Salesforce doesn’t support recurring events lasting longer than 24 hours.
52
Salesforce for Outlook Enhancements
Syncing Recurring Events
For
You should know that
Updates to events
Salesforce doesn’t notify attendees of meeting updates through email. Instead,
Salesforce for Outlook updates attendees’ Salesforce calendars immediately.
Modifying Recurring Series
Users can modify recurring series, but it’s good to know what to avoid, so that your users won’t lose any details for occurrences
they’ve individually modified.
If users modify
You should know that
Recurring series in
Outlook
Those modifications won’t propagate to individually modified occurrences in Salesforce.
For example, your user modifies the appointment time of an occurrence, and then later modifies
the appointment time for the entire series. The appointment time modification for the series
won’t propagate to the one modified occurrence.
Critical changes include modifications to:
•
•
•
Appointment times
Recurrence patterns
Ranges of occurrences
If your users make critical changes to their recurring series, individually modified occurrences lose
their modifications.
Start dates for recurring
series in Outlook
Salesforce doesn’t support modifications to start dates that already occurred.
End dates for recurring
series in Salesforce
Those modifications won’t propagate to Outlook. Users can, however, modify end dates in
Outlook, but that type of critical change will clear all modifications your users made to individual
occurrences—in both Outlook and Salesforce.
Individual occurrences
Users may lose those changes if they make critical changes to the recurring series.
Recurring series to
single events
Salesforce doesn’t support these types of modifications.
and
Single events to
recurring series
The order of occurrences Outlook doesn’t support this type of occurrence. For example, your user set up a daily recurring
series. Later, your user wants to change the October 10th occurrence to occur on October 8th,
therefore creating two occurrences on October 8th. Outlook doesn’t support this.
Individual occurrences in Outlook modifications propagate to occurrences in Salesforce, regardless of whether the ones in
Outlook
Salesforce include critical modifications.
Deleted occurrences in Salesforce, however, remain deleted, and aren’t replaced with individually
modified occurrences from Outlook.
53
Salesforce for Outlook Enhancements
Saving Time with Email Associations
Saving Time with Email Associations
You asked for it! This enhancement is from an idea on the IdeaExchange.
Available in: Contact Manager, Group, Professional, Enterprise, Unlimited, and Developer Editions
We listened to what your users wanted, so we reinstated the way Salesforce handled unresolved email associations on the My
Unresolved Items page. Starting in Spring ’12, we displayed separate rows for each unresolved email address in the To and
Cc fields of emails your users added to Salesforce. With these separate rows, Spring ’12 and Summer ’12 increased the time
required for maintaining the My Unresolved Items page.
With Winter ’13, the My Unresolved Items page now displays only one row for each email when Salesforce can’t match any
email addresses for recipients that appear in the To and Cc fields of emails your users add to Salesforce. Users will also notice
that we replaced the Recipient column with the reinstated From/To column on the My Unresolved Items page.
54
Shared Activities Enhancements
Shared Activities for Events
SHARED ACTIVITIES ENHANCEMENTS
Shared Activities for Events
Available in: All Editions except Database.com.
User Permissions Needed
To view activity settings:
“View Setup and Configuration”
To customize activity settings:
“Customize Application”
You asked for it! This enhancement addresses ideas on the IdeaExchange.
Winter ’13 expands Shared Activities to let your users relate as many as 10 contacts to a single non-recurring event. One
contact is the primary contact and all others are secondary contacts. This allows your users to easily track the overall activity
and the individual contact activities for the event. It also allows your users to generate useful and accurate activity metrics
reports that include the number of contacts related to an event.
Note: Shared Activities now includes both tasks and events. If you’ve already enabled Shared Activities for tasks,
Shared Activities will be enabled automatically for events with Winter ’13.
Users select contacts using the Select Contacts dialog box, regardless of the number of contacts they relate to an event.
55
Shared Activities Enhancements
Shared Activities for Events
Shared Activities lets your users view:
•
•
•
•
•
Shared events on the event detail page when the user has access to at least one contact, lead, or related record. Users can
also view events if the user’s role is above the activity owner’s in your organization’s hierarchy. Keep in mind, when users
relate contacts to which other users have access, those users can view the activity along with the names, account names,
and titles of all the contacts related to the activity—including the contacts to which those users may not otherwise have
access.
All contacts related to an event on the event detail page if the administrator has added the Name related list to the event
page layout.
The number of contacts related to an event when the Relation Count column is included in activity reports.
One row per contact for each activity in the Activities with Contacts report when the user selects at least one field from
the related contact list.
An activity’s primary contact in two reports: Tasks and Events, and Activities with Cases. The primary contact also appears
in the Name field on the event detail page.
Note:
The Activities with Contacts report displays all contacts related to an activity but doesn’t indicate which is the
primary contact.
56
Shared Activities Enhancements
Known Issue Involving API and Email Integration Compatibility
Known Issue Involving API and Email Integration
Compatibility
Available in: All Editions except Database.com.
User Permissions Needed
To view activity settings:
“View Setup and Configuration”
To customize activity settings:
“Customize Application”
Before you enable Shared Activities, it’s important you understand an issue that may impact administrators or developers using
our API version 25.0 or earlier, as well as users of two Salesforce email integration applications.
If your role is
And you use
It’s important to know that
Administrator or
Developer
API version 25.0 or earlier
The API doesn’t return events with multiple contacts related to
the events. To avoid this issue, upgrade to API version 26.0.
User
Either of the following email
integration applications:
• Connect for Outlook
• Connect for Lotus Notes
You will lose event data when you:
• Relate multiple contacts to an event that you update in
Salesforce, and
• Sync these events from Salesforce to your email system
This issue may occur because the two affected email integration
applications aren’t compatible with the Shared Activities feature.
To avoid this issue, consider either upgrading to
Salesforce for Outlook, or not enabling the Shared Activities feature.
Enabling Shared Activities
Available in: All Editions except Database.com.
User Permissions Needed
To view activity settings:
“View Setup and Configuration”
To customize activity settings:
“Customize Application”
The process for enabling Shared Activities can take up to 48 hours, depending on the volume of activities for your organization.
While you enable this feature, your users can continue working with tasks and events.
1. Go to Your Name > Setup > Customize > Activities > Activity Settings.
57
Shared Activities Enhancements
Activity Rollup to Accounts for Contacts
2. Select Allow Users to Relate Multiple Contacts to Tasks and Events.
3. Click Submit.
4. Add the Name related list to the task detail and event detail page layouts so users can see all contacts on an activity. This
is particularly important for Salesforce Mobile users.
After the process for enabling Shared Activities finishes, you’ll receive a confirmation email.
Tip: To check the status of the process for enabling Shared Activities, view the Activity Settings page. Salesforce
provides helpful messages about both the status and what you need to do if the enabling process doesn’t finish
successfully.
Activity Rollup to Accounts for Contacts
If you create an activity and relate it to an account and a contact, and that contact is related to a different account, the activity
rolls up to the contact’s parent account. For example:
•
•
•
The “Sales Rep Call” task is related directly to the Global Media account and also to the contact Ron Dean.
Ron Dean’s parent account is HiTech Solutions.
The “Sales Rep Call” task appears in the Global Media account details and also in the HiTech Solution account details.
Note: This behavior occurs only when Shared Activities is enabled.
Event and EventAttendee Object Changes
Important changes have been made to the Event and EventAttendee API objects. Now any customer or partner can modify
event attendees with the API. These changes might impact existing Apex and API packages.
•
•
The EventAttendee object is no longer supported.
There is a new EventRelation object with fields to manipulate Whos, Whats, and invitees on events. You can modify
invitees on an event.
Note: A Who is a related contact or lead, and a What is a related record.
•
Update operations on child events are very limited.
These changes allow you to create and modify event attendees (invitees) through the API. Previously, this was possible through
the UI only. The new API also supports Shared Activities for events so users can relate non-recurring events to as many as 10
contacts. Even if you don’t enable Shared Activities for events for your users, the following event object changes will affect
you.
What has changed?
Event Object
How has it changed?
The Event object has two new fields: WhatCount and WhoCount.
58
Shared Activities Enhancements
Event and EventAttendee Object Changes
What has changed?
How has it changed?
EventAttendee Object
The EventRelation object replaces the EventAttendee object.
• The EventRelation object represents a person (user, contact, or lead) or resource (such
as a conference room) invited to an event.
• The EventRelation object allows you to add or remove invitees from an event, and to
manage invitee responses to invitations through theAPI.
• When Shared Activities is enabled, an EventRelation object can also represent a Who
or What object.
• The EventAttendee object is no longer visible to users with API version 26.0 and greater.
Existing Apex and API packages that use API version 25.0 and older can still query the
EventAttendee object.
Invitee Information
The RelationId field contains the ID of the person or resource invited to the event. The
value of this field can’t be changed after it has been specified. When Shared Activities for
events is enabled, this field can also contain the ID of the event's Who or What.
Shared Activities for Events
The EventRelation object includes the following fields.
• AccountId is the Account ID of the relation.
• IsInvitee indicates whether the relation is an invitee.
• IsParent indicates whether the relation is a Who/What.
• IsWhat indicates whether the relation is the Who or the What.
Note: AccountId, IsParent, and IsWhat, are visible when Shared Activities
is enabled. IsInvitee is visible when Shared Activities is enabled, or is in the
process of being enabled or disabled.
Child Events
You can update only the IsReminderSet and ReminderDateTime fields of a child event.
You can query and delete a child event.
You can’t create an EventRelation object for a child event. The EventId field of an
EventRelation object always points to the master record. An invitee on an event can query
the EventRelation object to view the master record.
Adding, Removing, Updating You can add or remove invitees, and update invitee status through the API. To create an
Invitees
invitee:
• If Shared Activities is not enabled, create an EventRelation object for the invitee.
• If Shared Activities is being enabled or rolled back, or is enabled, and the invitee is
already a Who, update IsInvitee to true. If the invitee is not already a Who, create
an EventRelation object for the invitee with IsInvitee set to true. IsInvitee is
defaulted to true during enablement and rollback, and when Shared Activities is enabled
if IsInvitee, IsParent, and IsWhat are not set. This ensures compatibility for code
written prior to enabling Shared Activities when EventRelation represents event attendees
only.
59
Additional Sales Enhancements
Label Change for Upload New Document Page
ADDITIONAL SALES ENHANCEMENTS
Label Change for Upload New Document Page
User Permissions Needed
To upload new documents:
“Create” on documents
On the Upload New Document page, we’ve changed the Internal Use Only checkbox to Indicate Document is
Internal for clarity.
New Behavior for Partner Portal Email Notifications When
No Change Owner to Portal User Template
is Selected
In Winter ’13, we’ve improved the behavior of change owner email notifications sent from portals that don’t have Change
Owner to Portal User Template or a default template set. When a portal user changes the owner of a record to another
portal user whose profile is associated with multiple portals, the email notification sent to the user includes a link to the portal
in which the change of ownership occurred. In previous releases, the link pointed to the oldest login-enabled portal that the
user was a member of.
60
SERVICE
CASE FEED ENHANCEMENTS
New Customization Options in Case Feed
Available in: Enterprise, Unlimited, and Developer Editions
Winter ‘13 gives you more control over the fields and information you include on feed layouts in Case Feed.
1. Choose whether the publisher menu appears in the left column or the center column on the Case Feed page.
2. Customize the Email publisher by:
•
•
•
•
•
•
•
Selecting which header fields to include.
Selecting which email tools, such as templates, to make available to agents.
Enabling the rich text editor and, optionally, making it required when agents write email.
Specifying From addresses.
Making the body field collapsible.
Making the email header collapsible.
Replacing the standard Send Email button in the Email publisher with a custom button. You can use any custom
button you’ve created for cases, except those that have s-controls as content sources.
3. Customize the articles tool to give agents the option of attaching articles to email messages as PDFs, and use the tool to
replace the standard Salesforce Knowledge sidebar in the Service Cloud console
4. Choose which buttons, lists, and links to include on the Case Feed page, and specify where on the page they appear.
5. Choose where and how the feed filters list appears, including making the list floating so that it moves down the page when
agents scroll, rather than remaining static.
6. Choose the feed filters to include on the Case Feed page.
61
Case Feed Enhancements
Custom Publishers in Case Feed
For more information, see “Creating and Editing Feed Layouts in Case Feed” in the online help.
In addition, you can now rename the Case Feed publishers and feed filters so they match the terms your company uses. For
example, if your company refers to customers as guests, you might rename the Answer Customer publisher “Answer Guest.”
For more information, see “Renaming Publishers and Feed Filters in Case Feed” in the online help.
Custom Publishers in Case Feed
Available in: Enterprise, Unlimited, and Developer Editions
Publishers in Case Feed let support agents perform tasks like emailing customers, writing case notes, and changing the status
of a case. Using Visualforce pages, you can create custom publishers that offer agents more functionality.
Here are some examples of custom publishers:
•
•
•
A Case Comment publisher that lets agents write comments on cases longer than the standard 1000 characters for case
notes.
A Task publisher that lets agents create tasks related to a case.
An Entitlements publisher that shows the service level agreement (SLA) status—such as past due, on time, or time to
milestone—on a case and lets agents mark milestones as complete.
You can use any Visualforce page that uses the standard case controller as a custom publisher.
For more information on creating Visualforce pages to use as custom publishers, see Customizing Case Feed with Visualforce.
62
Case Feed Enhancements
New Feed Items Available in Case Feed
New Feed Items Available in Case Feed
Available in: Enterprise, Unlimited, and Developer Editions
Winter ‘13 introduces two new kinds of feed items in Case Feed:
•
•
Live Agent transcripts—The transcript for each Live Agent chat session associated with a case appears in the feed for the
case. The feed item shows basic information about the chat and the first few lines of it. Click More to see more of the chat
directly in the feed, or click View Transcript to see the full transcript record.
Social posts—Facebook and Twitter posts associated with a case, such as those created with Salesforce Social Hub, appear
in the feed.
To include these items in your feed, add them to your list of selected feed filters:
1. Click Your Name > Setup > Customize > Cases > Page Layouts.
2. In Page Layouts for Case Feed Users, click
next to a layout and choose Edit feed view.
3. In Feed and Filter Options, move the items you want to include in the feed from the Available list to the Selected
list.
4. Click Save.
Email Drafts and Approvals
Available in: Enterprise, Unlimited, and Developer Editions
Draft emails let support agents save messages they write to customers without having to send them immediately, and also
make it possible for administrators to create approval processes for email messages. For example, agents can save messages as
drafts so they can gather additional information or confirm troubleshooting steps before replying to a customer, or can take
breaks and log out of Salesforce without losing their work.
Approval processes determine how your organization handles draft email messages—specifying, for example, which messages
require approval and whether approvers are automatically assigned. You can create customized approval processes based on
your company’s needs. You might create an approval process to ensure that newer support agents can’t send messages until
they’re reviewed by a supervisor, or one that requires all messages related to sensitive issues such as financial transactions to
be approved before they’re sent.
For more information, see “Working with Draft Emails” in the online help and “Reviewing and Approving Email Drafts” in
the online help.
To learn more about approval processes for email messages, see“Creating Approval Processes for Email Drafts” in the online
help.
63
Case Feed Enhancements
Support for Chatter Answers in Case Feed
Enabling Email Drafts in Case Feed
Available in: Enterprise, Unlimited, and Developer Editions
User Permissions Needed
To change support settings:
“Manage Cases”
AND
“Customize Application
Before enabling draft emails, set up Email-to-Case and Case Feed.
Enabling draft emails gives support agents who use Case Feed the ability to write and save messages without having to send
them immediately. This option also makes it possible to implement approval processes so messages can be reviewed by
supervisors or senior agents before they’re sent to customers.
1.
2.
3.
4.
Click Your Name > Setup > Customize > Cases > Support Settings.
Click Edit.
Select Enable Email Drafts.
Click Save.
Note: Changes to fields other than To, From, CC, BCC, and Subject in the Email publisher aren’t saved when a
messages is saved as a draft. We recommend removing any additional fields from the Email publisher if you plan to
use draft emails.
Support for Chatter Answers in Case Feed
Available in: Enterprise, Unlimited, and Developer Editions
In organizations with Chatter Answers enabled, support agents can now use the Portal publisher in Case Feed to post replies
to cases that have been escalated from questions.
The Portal publisher shows two options when agents are working on cases that are associated with questions:
1. Customer Only—Selecting this option posts a private reply to the customer who asked the question. Optionally, agents
can select Send Email to send a message to the customer letting them know that a reply to their question has been posted.
2. Everyone—Selecting this option posts a public reply that’s visible to anyone in the Chatter Answers community where
the question was posted.
64
Case Feed Enhancements
Smart Email Templates in Case Feed
For more information on using the Portal publisher to reply to customers, see “Communicating with Customers via the
Customer Portal and Chatter Answers” in the online help.
Smart Email Templates in Case Feed
Available in: Enterprise, Unlimited, and Developer Editions
Default email templates make it easy for support agents to respond to customers more quickly, more accurately, and with
greater consistency. The email templates are preloaded, so agents don’t need to browse for the templates they need before
writing email. You can create as many templates as needed and assign them based on your company’s needs. For example, if
your support center handles issues related to multiple products, you can create a specific template for each product and preload
the appropriate template based on a case’s origin, subject, or other criteria.
Before you can enable default email templates, you need to create text, HTML, or Visualforce templates, and create an Apex
class that contains template selection logic. This class must implement the new Support.EmailTemplateSelector
interface.
For more information on enabling and configuring default templates, see “Enabling Default Email Templates in Case Feed”
in the online help.
Updated Look for Case Feed
Available in: Enterprise, Unlimited, and Developer Editions
The Case Feed page has an updated look, with redesigned buttons and a cleaner, more streamlined feel.
65
Case Feed Enhancements
New Case Feed Methods in the Interaction API
New Case Feed Methods in the Interaction API
Available in: Enterprise, Unlimited, and Developer Editions
With Winter ’13, the Interaction API, which also includes Open CTI, has been expanded to include two new methods:
onObjectUpdate() and refreshObject(). These methods let developers set interactions between elements on a Case
Feed page.
onObjectUpdate()
Usage
Registers a function to call when case fields, the case feed, or case-related list data has changed on a Case Feed page.
Note: Use this method with Visualforce pages you want to use as custom publishers in Case Feed. For more information
on creating Visualforce pages to use as custom publishers, see Customizing Case Feed with Visualforce.
Syntax
sforce.interaction.entityFeed.onObjectUpdate(callback:function)
Arguments
Name
Type
Description
callback
function
JavaScript method called upon completion of the method.
Sample Code–JavaScript
<apex:page standardController="Case">
<apex:includeScript value="/support/api/26.0/interaction.js"/>
<script type="text/javascript">
var callback = function(response) {
alert('Case was updated. Fields = ' + response.fieldsUpdated +
' Related lists = ' + response.relatedListsUpdated + ' Feed = ' +
response.feedUpdated);
};
//Invokes API method
sforce.interaction.entityFeed.onObjectUpdate(callback);
</script>
</apex:page>
Response
This method is asynchronous so it returns its response in an object in a callback method. The response object contains the
following fields:
66
Case Feed Enhancements
New Case Feed Methods in the Interaction API
Name
Type
Description
fieldsUpdated
boolean
true if one or more case fields were updated.
relatedListsUpdated
boolean
true if one or more case related lists were updated.
feedUpdated
boolean
true if the case feed was updated.
refreshObject()
Usage
Notifies the Case Feed page that case fields, the case feed, or case-related list data has changed, and forces an update of these
on the page.
Note: Use this method with Visualforce pages you want to use as custom publishers in Case Feed. For more information
on creating Visualforce pages to use as custom publishers, see Customizing Case Feed with Visualforce.
Syntax
sforce.interaction.entityFeed.refreshObject(
objectId:string,
refreshFields:boolean,
refreshRelatedLists:boolean,
refreshFeed:boolean,callback:function)
Arguments
Name
Type
Description
objectId
string
The record ID of the case object.
refreshFields
boolean
Indicates that one or more fields on the case have changed.
refreshRelatedLists
boolean
Indicates that one or more case-related lists have changed.
refreshFeed
boolean
Indicates that the case feed has changed.
callback
function
JavaScript method called upon completion of the method.
Sample Code–JavaScript
<apex:page standardController="Case">
<apex:includeScript value="/support/api/26.0/interaction.js"/>
<a href="javascript:void(0);"
onclick="sforce.interaction.entityFeed.refreshObject('{!case.id}', true, true, true,
function(response) {alert('Case was updated: ' + response.result);});">Refresh Case</a>
</apex:page>
67
Chatter Answers
Encouraging Community Participation with Chatter Answers Reputation
Response
This method is asynchronous so it returns its response in an object in a callback method. The response object contains the
following fields:
Name
Type
Description
result
boolean
true if the Case Feed page was successfully updated, false if it was not.
CHATTER ANSWERS
Encouraging Community Participation with Chatter
Answers Reputation
Available in: Enterprise and Unlimited Editions
Tap into the expertise and knowledge of your most active community members by rewarding their activity. By enabling
reputations, you let users earn points and ratings that display on hover over a user’s photo in the feed. As your star posters
engage more frequently, they improve the overall content in your community and provide better answers for users who are
searching for help with an issue. This means that users who are searching for a solution can be confident that an answer from
a community expert can be trusted, which means fewer support calls for your organization.
Users earn points when their posts receive votes or are selected as a best answer in any of the communities to which they
belong. When they earn enough points, the hover shows their reputation as well as the number of posts and best answers they
have in that community.
68
Chatter Answers
Customizing Chatter Answers in Portals using Visualforce Pages
Chatter Answers comes with the following pre-defined reputation levels that apply to all communities:
Name
Points per Level
Color
Newbie
0 – 499
Green
Smartie
500 – 1999
Blue
Pro
2000 – 4999
Purple
All Star
5000+
Orange
To add or edit reputation level names or points per level in any of your communities, use the ChatterAnswersReputationLevel
object in the API. You can create up to 25 different reputation levels in the application. Colors for the different reputation
levels can be changed at the stylesheet (CSS) level.
Customizing Chatter Answers in Portals using Visualforce
Pages
Available in: Enterprise and Unlimited Editions
You can create a Visualforce page that displays a Chatter Answers community in a Customer Portal or Partner Portal. By
using a Visualforce page, you can add custom widgets to Chatter Answers, such as announcements or ads, which let you extend
your branding and change the community experience for users. The page you create must include the
chatteranswers:allfeeds component to display the community. After users log in to one of your portals, they can access
Chatter Answers from a tab and interact with that community. When you add Chatter Answers using a Visualforce page,
users only see the community that is related to the page; they can’t switch communities as they can when using the standard
Chatter Answers tab on a portal.
Note: The Visualforce page is visible to portal users only. Internal users can see the Chatter Answers tab, but need
to log in through the portal to view the contents of the tab using the portal.
Adding a Custom Visualforce Page to a Portal
Available in: Enterprise and Unlimited Editions
User Permissions Needed
To set up and update the Customer Portal:
“Customize Application”
To add a custom Visualforce tab to a portal:
1. Click Your Name > Setup > Create > Tabs to display a list of your organization’s Visualforce tabs.
69
Chatter Answers
2.
3.
4.
5.
6.
Creating Questions from the Questions Tab
Click New to create a new Visualforce tab.
Select the Visualforce page and add details for the other fields on the page.
Click Next.
Select which user profiles can see the tab.
Select the portals that will include the new tab.
Creating Questions from the Questions Tab
Available in: Enterprise, Unlimited, and Developer Editions
User Permissions Needed
To view the Questions tab:
“Read” on questions
To ask and reply to questions:
"Create” on questions
Note: Since your administrator determines the fields on questions, some fields might not be included in the following
steps.
You can use the Questions tab in both the application and the console to ask questions of the communities that you moderate
and manage. Asking community members for input or opinions is an easy way to assess interest in topics or create engagement
in the community.
To post a question to the community from the Questions tab:
1. Click New Question from the Questions list view page or click New from the Recent Questions list on the Questions
overview page.
2. Select a community for your question.
3. Add a title for your question.
4. Optionally, enter a description of your question.
Use the rich text editor to format your text or upload an image. To ensure that your images appear correctly in the feed,
Salesforce recommends that they be less than 450 pixels wide.
5. Select a category for your question.
Questions must be assigned to a category to appear in the community. Questions that don’t have a category are still visible
to the owner of the question, but not to other members of the community.
6. Click Save.
Enhancements to Questions and Answers in the Feed
Available in: Enterprise and Unlimited Editions
In Winter ‘13, we’ve made using Chatter Answers even easier by enhancing the way questions and answers appear in the feed.
70
Chatter Answers
•
•
•
•
New Options to Customize Questions
The option to flag a post has been moved into the question or answer in the feed. Previously, you had to click More to
select flagging options.
Click question titles to display a new view of the question with all of its related answers. This replaces the option See
Detail.
Use Like to show support for a question, answer, or knowledge article. With Winter ‘13, Like replaces Useful in the feed.
Additionally, in Open Questions you can now Like a post without having to Follow it. You still receive email updates on
a post when you Follow it.
You can now Unfollow questions that are selected as best answers after you’ve followed them. Previously, there was no
way to stop following those questions. You’ll stop receiving emails when you unfollow the post.
New Options to Customize Questions
Available in: Enterprise and Unlimited Editions
User Permissions Needed
To create or change custom buttons and links:
“Customize Application”
To add custom page layouts:
“Customize Application”
With Winter ‘13, administrators have more options to display a custom view of the Questions detail, edit, and list view pages.
Administrators can create custom page layouts, and add buttons and links to Questions.
•
•
Use a Visualforce page that contains apex:detail to override the default single item view for questions. When you override
the default page layout, you can create different page layouts to display Questions.
By adding custom buttons and links to the Questions detail page, you can add external URLs and access to applications
and other modules.
See “Customizing Page Layouts” and “Understanding Buttons and Links” in the online help.
Format Text and Add Photos to Questions
Available in: Enterprise and Unlimited Editions
In Winter ‘13, administrators can give community members access to a rich text editor, enabling them to format text and add
images when posting questions. Images can be up to 32 KB in size.
71
Ideas
API Access to Names and Photos from the Feed
API Access to Names and Photos from the Feed
Available in: Enterprise and Unlimited Editions
Using the API, developers have programmatic access to a portal user’s first and last name, profile photo, and thumbnail photo
from the feed, enabling them to create a customized view of feed items. In Winter ’13, the following fields have been added
to the Case, CaseComments, Question, and Reply objects.
Field
Description
CreatorFullPhotoUrl
URL of the user’s profile photo from the feed. Chatter
Answers must be enabled to view this field.
CreatorName
Name of the user who posted the question or reply. Only the
first name of internal users (agents) appears to portal users in
the feed. Chatter Answers must be enabled to view this field.
CreatorSmallPhotoUrl
URL of the user’s thumbnail photo from the feed. Chatter
Answers must be enabled to view this field.
Option to Remove Sign-In Links from Chatter Answers
Available in: Enterprise and Unlimited Editions
In Winter ’13, you can use the NoSignIn Boolean attribute in the chatteranswers: allfeeds to remove all sign-in
links from your community. Use this option when you have an external sign-in path and want to ensure that your users follow
it instead of the standard Chatter Answers sign-in. When the NoSignIn Boolean attribute is true, users can still search and
view publicly accessible content for the community. If they already have a valid session, they can still post questions, replies,
vote, and flag content.
IDEAS
Moderate Ideas Communities with the Service Cloud
Console
Available in: Professional, Enterprise, Unlimited, and Developer Editions
With Idea Moderation, moderators can facilitate healthy and respectful community discussions right from the agent console:
72
Ideas
Idea Themes
•
•
•
Moderators and administrators can review, update, create, and manage Ideas and the related Idea Themes from a tab
within the console.
Moderators can now edit and delete ideas from the Ideas list view, making it even easier to manage an Ideas community.
Click the Edit or Del link next to the idea you’re working with.
Switch views quickly and easily from the Ideas tab within the application. Click
List to toggle back to the list view.
to display the Ideas tab. Click
Idea Themes
Available in: Professional, Enterprise, Unlimited, and Developer Editions
Encourage Collaboration with Idea Themes (3:30 minutes)
You asked for it! This enhancement is from an idea on the IdeaExchange.
Idea Themes lets you invite community members to post ideas about specific topics so that members can solve problems or
propose innovations for your company. For example, to engage with your community and create excitement around the launch
of a new product, you can ask community members to work together to create the product’s name. Community members
collaborate and add ideas to the idea theme, while you monitor their activities as they vote and comment on each other’s ideas
until they find a winner.
When you create an idea theme, you can add pictures, videos, and other multimedia content to showcase or explain the idea
that you’re presenting to the community. You can also view and manage the list of ideas that have been posted to the idea
theme.
73
Ideas
Idea Themes
Enabling Idea Themes
Available in: Professional, Enterprise, Unlimited, and Developer Editions
User Permissions Needed
To customize Idea Themes settings:
1.
2.
3.
4.
“Customize Application”
Click Your Name > Setup > Customize > Ideas > Idea Themes > Settings.
Click Edit.
Select Enable Idea Themes.
Click Save.
Note: Once you enable Idea Themes, you can’t disable it.
Creating and Editing Idea Themes
Available in: Professional, Enterprise, Unlimited, and Developer Editions
User Permissions Needed
To view the Idea Themes tab:
“Read” on Idea Themes
To create Idea Themes:
“Create” on Ideas
You can use the Idea Themes tab in both the application and the console to create and edit Idea Themes for the communities
that you manage.
1. Click New Idea Theme from the Idea Themes list view page or click New from the Recent Idea Themes list on the Idea
Themes overview page.
2. Select a community for the idea theme and click Continue.
3. Select the idea theme’s Status.
4. Select a category for the theme.
Idea themes must be assigned to a category to appear in the community.
5. Add a title for the idea theme.
6. Optionally, enter a description of the theme.
Use the HTML editor to format your text or add an image or video.
7. Click Save.
74
Ideas
Idea Themes
Using Idea Themes
Available in: Professional, Enterprise, Unlimited, and Developer Editions
User Permissions Needed
To view the Idea Themes tab:
“Read” on Idea Themes
To create Idea Themes:
“Create” on Ideas
Click the Idea Themes tab to view, filter, moderate, and create themes from lists.
•
•
•
•
Click Create New View to define your own custom list views. To edit or delete any view you created, select it from the
View drop-down list and click Edit. If your organization has multiple communities, we recommend you add Community
to your views so that you can see the name of the community associated with each idea theme.
Click New Idea Theme from the Idea Themes list view page or click New from the Recent Idea Themes list on the Idea
Themes overview page to create a new idea theme.
Click to refresh a list that’s been updated.
Click Edit or Del to edit or delete an idea theme.
Note: Deleting an idea theme also deletes the ideas that are associated with it. Conversely, undeleting an idea
theme also undeletes the ideas that are associated with it.
Managing Idea Themes
Available in: Professional, Enterprise, Unlimited, and Developer Editions
User Permissions Needed
To view the Idea Themes tab:
“Read” on Idea Themes
To create and edit Idea Themes:
“Create” on Ideas
From the Idea Themes detail page, you can manage an idea theme and its related ideas. As an administrator, you can perform
the following tasks:
•
•
•
Edit, Delete, or Clone an idea theme.
Edit or Delete ideas that have been submitted to the idea theme.
Move an idea from one idea theme to another in your communities.
When you edit an idea, you can change the name of the idea theme, which removes the idea from the current idea theme
and moves it to another idea theme that you select.
75
Live Agent Enhancements
•
Auto Away Option in Live Agent Configurations
Create an idea and post it to the idea theme in which you’re working.
Customize Idea Themes
Available in: Professional, Enterprise, Unlimited, and Developer Editions
User Permissions Needed
To create or change custom buttons and links:
“Customize Application”
To add custom page layouts:
“Customize Application”
With Winter ‘13, administrators can display a custom view of the Idea Themes detail, edit, and list view pages. Administrators
can create custom page layouts, add custom fields, and add buttons and links to Idea Themes.
•
•
•
•
When you override the default page layout, you can use Visualforce pages to create different page layouts for Idea Themes.
By adding custom buttons and links to the Idea Themes detail page, you can add external URLs and access to applications
and other modules.
Add custom fields to tailor your Idea Themes to your organization’s unique requirements.
Use triggers to create workflow rules or actions for Idea Themes. For example, you can use triggers to change the status
of an idea theme once it has reached the end date.
LIVE AGENT ENHANCEMENTS
Auto Away Option in Live Agent Configurations
Available in: Enterprise and Unlimited Editions, and Developer Edition organizations created after June 14, 2012
User Permissions Needed
To create and edit configurations:
“Customize Application”
Agent configurations control how Live Agent appears and functions for agents using it in the Live Agent console or the Service
Cloud console. With the Auto Away on Decline option, you can decide whether agents’ status should automatically be
changed to Away when they decline incoming chat requests.
1. Click Your Name > Setup > Customize > Live Agent > Agent Configuration.
2. Click New, or click Edit next to the name of an existing configuration.
76
Service Cloud Console
Custom Hotkeys for the Service Cloud Console
3. Select Auto Away on Decline to automatically change agents’ status to Away when they decline chat requests. Note:
this option applies only when agents are assigned to chat buttons that use push routing.
4. Click Save.
For more information about agent configurations, see “Agent Configuration Overview” in the online help.
SERVICE CLOUD CONSOLE
Custom Hotkeys for the Service Cloud Console
Available in: Enterprise, Unlimited, and Developer Editions with the Service Cloud
The Service Cloud console is designed for users in fast-paced environments who need to find, update, and create records
quickly. With Winter ‘13, administrators can create and customize keyboard shortcuts for each of their organization’s Service
Cloud console apps. Keyboard shortcuts let users perform actions by pressing a combination of keys instead of having to use
a mouse. Keyboard shortcuts can make working with a Service Cloud console more efficient. For example, instead of typing
case details and then using a mouse to click Save, you can create a keyboard shortcut so that users can type case details and
press CTRL+S.
Customizing Keyboard Shortcuts for a Service Cloud Console
Available in: Enterprise, Unlimited, and Developer Editions with the Service Cloud
User Permissions Needed
To customize keyboard shortcuts for a Service Cloud console: “Customize Application”
Once you enable keyboard shortcuts for a console, several default shortcuts are available for customization, such as opening
and closing tabs, moving between tabs, and saving records. Before you can create custom shortcuts, a developer must define
the shortcut’s action with the addEventListener() method in the Service Cloud Console Integration Toolkit. You can’t
create keyboard shortcuts for actions performed outside of the console.
To enable and customize keyboard shortcuts:
1.
2.
3.
4.
5.
6.
Click Your Name > Setup > Create > Apps.
Click Edit next to a Service Cloud console app.
Click Customize keyboard shortcuts.
Click Edit on the top of the page.
Select Enable keyboard shortcuts.
Edit an existing keyboard shortcut or create a new one:
77
Service Cloud Console
•
•
•
Custom Hotkeys for the Service Cloud Console
To edit a shortcut, click Edit next to the shortcut, type the combination of key commands to use, and click OK.
To create a shortcut, click +Add Keyboard Shortcut, type the action the shortcut will perform, a Console Event
Name, which is a unique identifier, the combination of key commands to use, and click OK. For the new shortcut to
work, you must send the Console Event Name to the developer who defined your shortcut’s action so that he or
she can add it to the method that will trigger your shortcut.
To deactivate a shortcut, deselect Active next to the shortcut’s name. You can’t delete the default shortcuts provided
by Salesforce, but you can edit or deactivate them.
7. Click Save.
After you’ve customized keyboard shortcuts for a console, notify users assigned to that console about the actions they can
perform.
Note:
•
•
•
•
You can have up to 144 shortcuts for each console, which includes the default shortcuts provided by Salesforce
and any you create.
Keyboard shortcuts aren’t case sensitive, even if you press SHIFT before a letter key. For example, SHIFT+b is
the same as SHIFT+B.
If CTRL, ALT, or SHIFT is in a keyboard shortcut, the sequence of those keys doesn’t matter. For example,
CTRL+ALT+A is the same as ALT+CTRL+A.
If you create or customize keyboard shortcuts to include standard browser shortcuts, such as CTRL+F, your
shortcuts might not work as intended.
Tip: You can include as many keys in a shortcut as you want, but we recommend that you limit a shortcut to three
keys so that users can easily remember it.
Default Keyboard Shortcuts for a Service Cloud Console
Available in: Enterprise, Unlimited, and Developer Editions with the Service Cloud
After an administrator enables keyboard shortcuts for a Service Cloud console, the following shortcuts display automatically
and are available for customizing.
Action (Keyboard Shortcut) Description
Key Command
Focus keyboard shortcuts on Activates keyboard shortcuts in a browser displaying a Service ESC
the console
Cloud console.
Go to the navigation tab
Selects the navigation tab.
V
Go to tab details
Selects details on a tab.
SHIFT+S
Go to the primary tabs
Selects the row of primary tabs.
P
Go to the subtabs
Selects the row of subtabs on a primary tab.
S
Go to list view
Selects the list view.
N
78
Service Cloud Console
Automatically Saved User Sessions for the Service Cloud Console
Action (Keyboard Shortcut) Description
Key Command
Go to the first list view item Selects the first item on the list view.
SHIFT+F
Go to header search box
Moves the cursor to the header search box.
R
Move left
Moves the cursor left.
LEFT ARROW
Move right
Moves the cursor right.
RIGHT ARROW
Move up
Moves the cursor up.
UP ARROW
Move down
Moves the cursor down.
DOWN ARROW
Open drop-down button on Opens the drop-down button on tabs to select more actions.
tabs
D
Open tab
Opens a new tab.
T
Close tab
Closes a selected tab.
C
Enter
Activates a command.
ENTER
Edit
Switch from detail to edit page.
E
Automatically Saved User Sessions for the Service Cloud
Console
Available in: Enterprise, Unlimited, and Developer Editions with the Service Cloud
The Service Cloud console is designed for users in fast-paced environments who need to find, update, and create records
quickly. Now, if a Service Cloud console is set up, you can choose to save user sessions so that when console users close their
browsers or log out of Salesforce, any previously open navigator tabs, primary tabs, or subtabs automatically display when they
log in again. Additionally, if console users resize an interaction log or any sidebar components, such as pinned lists; or they
close the global search header, those customizations automatically display when users log in again. This helps users to continue
working from where they last left off in a console without having to start from scratch. For example, here’s a Service Cloud
console with several open tabs, a hidden global header, a resized interaction log, and a resized pinned list. Even if this user
sessions ends, all of these items display to a user when he or she logs in again:
79
Service Cloud Console
1.
2.
3.
4.
5.
Automatically Saved User Sessions for the Service Cloud Console
Navigator tab
Primary tabs
Subtabs
Pinned list
Interaction log
Saving User Sessions for a Service Cloud Console
Available in: Enterprise, Unlimited, and Developer Editions with the Service Cloud
User Permissions Needed
To save user sessions for a Service Cloud console:
“Customize Application”
If a Service Cloud console is set up, you can choose to save user sessions so that when console users close their browsers or log
out of Salesforce, any previously open navigator tabs, primary tabs, or subtabs automatically display when they log in again.
Additionally, if console users resize an interaction log or any sidebar components, such as pinned lists; or they close the global
search header, those customizations automatically display when users log in again. This helps users to continue working from
where they last left off in a console without having to start from scratch.
1.
2.
3.
4.
5.
Click Your Name > Setup > Create > Apps.
Select a Service Cloud console app.
Click Edit.
Click Save User Sessions.
Click Save.
80
Salesforce Knowledge
Minor Salesforce Knowledge Enhancements
Repeat these steps for each console.
SALESFORCE KNOWLEDGE
Minor Salesforce Knowledge Enhancements
Available in: Enterprise, Unlimited, and Developer Editions
The following Salesforce Knowledge enhancements are available in Winter ‘13.
•
•
For easier editing, the HTML field in the article editor is now the full width of your display.
Salesforce Knowledge article URLs within communities have changed. Reset any community article links or bookmarks
you saved before Winter '13.
API Access Article Type
Available in: Enterprise, Unlimited, and Developer Editions
Using the API, developers now have programmatic access to article type in both the master and translated versions. This access
allows developers to run reports on specific article versions. In Winter ’13, the following field has been added to the
KnowledgeArticleVersion object.
Field
Description
ArticleType
Indicates the API Name of the article type. The
ArticleType is assigned to the article when it's created. You
can't change the value of this field. This field is available in
API version 26.0 and later
Note: These fields appear on the article object. For example if you have an article type called FAQ, the article object
with the field is: FAQ_kav.
81
Salesforce Knowledge
Mail Merge Template Available for Articles
Mail Merge Template Available for Articles
Available in: Enterprise, Unlimited, and Developer Editions
In Winter ’13, you can have a mail merge template for articles. A mail merge template allows you to send a personalized email
with the article.
Note: The Send Test and Verify Merge Fields popup for text, HTML, and custom email templates is not
supported for article types.
For more information, see “Managing Mail Merge Templates” in the online help.
Sharing Rules for Knowledge
You asked for it! Salesforce Knowledge addresses the following ideas on the IdeaExchange: improve data category
selection and visibility and article visibility based on permission sets.
Available in: Enterprise, Unlimited, and Developer Editions
Data category visibility determines the individual data categories, categorized articles, and categorized questions that a user
can see. In Winter ’13, data category visibility can be assigned with permission sets and profiles, as well as roles. This allows
administrators to assign visibility to High Volume Customer Portal users who don’t have roles.
Now, both the Permission Set and Profile setup pages have options to assign data category visibility.
1. Click Your Name > Setup > Manage Users > Permission Sets or Your Name > Setup > Manage Users > Profiles.
2. Click on a permission set or profile name.
3. Click Data Category Visibility.
82
Salesforce Knowledge
Share Articles with Public Links
4. Click Edit next to the data category group you want to assign access to. Access to data categories is assigned to Permission
Sets and Profiles the same way is it for roles.
5. Select Custom.
6. Select the categories you want the permission set or profile to have access to from the Available Categories list and
add them to the Selected Categories list.
7. Click Save.
For more information, see “About Category Group Visibility” in the online help.
Share Articles with Public Links
You asked for it! This enhancement is from an idea on the IdeaExchange.
Available in: Enterprise, Unlimited, and Developer Editions
In Winter ’13, customer service agents who are working in case feed can share an article from your public knowledge base or
public chatter answers site with a URL, instead of emailing a large PDF.
To allow your agents to share articles with public links:
1.
2.
3.
4.
Click Your Name > Setup > Customize > Knowledge > Settings.
Click Edit.
Under Case Settings, select Allow users to share articles via public URLs.
In the Available Sites list, select the sites you want to allow your agents to send URLs from and add them to the
Selected sites list.
5. Click Save.
From the case feed, agents have the ability to share the article’s link from any of the selected sites.
83
Salesforce Knowledge
Automatic Knowledge Filtering—Beta
Automatic Knowledge Filtering—Beta
Available in: Enterprise, Unlimited, and Developer Editions
In Winter ’13, you can define which articles appear in the Article tab, advanced search, and the article sidebar component
with data category mapping. For example in the figure below, as an agent enters case information, the suggested articles sidebar
is populated with relative articles.
Using data category mapping, select which case fields map to which data category groups and set a default data category for
cases that have no value for the mapped fields. For example, you can map a products custom case field with a products data
category group to filter the articles for the customer's products.
1. Go to Your Name > Setup > Customize > Knowledge > Data Category Mappings.
2. In the Case Field column, use the drop-down list to add a field (contact, organization, etc.).
3. In the Data Category Group column, use the drop-down list to map the information from the lookup field to a data
category group.
4. In the Default Data Category column, use the drop-down to list assign a data category should the information not
map as defined.
5. Click Add.
Beta limitation
Pre-filtering articles based on case information is only supported in text and picklist fields.
84
Additional Service Enhancements
Universal Knowledge (Sunlight Search)—Pilot
Universal Knowledge (Sunlight Search)—Pilot
Available in: Enterprise, Unlimited, and Developer Editions
In Winter ’13, a redesign of the Salesforce Knowledge Article tab is available in pilot. The new tab displays all your Salesforce
Knowledge articles and any external data sources, such as Microsoft SharePoint. This new Knowledge tab uses federated search
to search all these resources at once, then you can filter article results according to language and data category. To participate
in the pilot program contact your salesforce.com representative.
ADDITIONAL SERVICE ENHANCEMENTS
Service Cloud Console Integration Toolkit: Multiple
Domains
The Service Cloud console is designed for users in fast-paced environments who need to find, update, and create records in
Salesforce quickly. The Service Cloud Console Integration Toolkit is a user interface API that provides advanced administrators
and developers with programmatic access to the console so that they can extend it to meet your business needs. For example,
developers can use the toolkit to open and close tabs in the console to streamline a business process. Previously, the toolkit
only functioned with Visualforce. Now, the toolkit is available for use with third-party domains, such as www.yourdomain.com,
so that developers can embed third-party applications in the console. To enable the toolkit for third-party domains, you must
add the domains to the whitelist of a Service Cloud console.
For more information (English only) about the toolkit, see the Service Cloud Console Integration Toolkit Developer's Guide. To
learn how to enable the toolkit for third-party domains, see “Whitelisting Domains for a Service Cloud Console” in the online
help.
Service Cloud Console Integration Toolkit: Console
Notifications
Available in: Enterprise, Unlimited, and Developer Editions with the Service Cloud
The Service Cloud Console Integration Toolkit is an API that uses browsers to display pages as tabs in the console. It provides
advanced administrators and developers with programmatic access to the console so that they can extend it to meet your
business needs. For example, developers can use the toolkit to open and close tabs in the console to streamline a business
process.
With Winter ‘13, the following new methods are available.
85
Additional Service Enhancements
Editing Replies to Questions
Method
Description
addPushNotificationListener()
Adds a listener for a push notification. A user can only register
a listener once until he or she removes the listener, or the
listener is removed by another user.
getPageInfo()
Returns page information for the specified tab after its content
has loaded. If the tab ID is null, it returns page information
for the enclosing primary tab or subtab.
getPrimaryTabIds()
Returns all of the IDs of open primary tabs.
getSubtabIds()
Returns all of the IDs of the subtabs on the primary tab
specified by a primary tab ID. If the primary tab ID is null, it
returns the IDs of the subtabs on the current primary tab.
removePushNotificationListener()
Removes a listener that gets added for a push notification.
For more information (English only) about the toolkit, see the Service Cloud Console Integration Toolkit Developer's Guide.
Editing Replies to Questions
In ’Winter 13, moderators can edit replies to questions that are posted to the community. When you select a question from
the Questions tab, click on one of the question’s replies and select Edit to edit the fields in an existing reply.
86
Additional Service Enhancements
New Limits for Chatter Answers Questions and Replies
New Limits for Chatter Answers Questions and Replies
Available in: Enterprise and Unlimited Editions
In Winter ’13, the maximum number of characters users can type in questions and replies has increased. When you select the
Optimize Question Flow permission on the Chatter Answers Settings page, questions can be up to 32,000 characters in
length. Public replies also increase to 32,000 characters and private replies increase to 4,000 characters. Without Optimize
Question Flow enabled, questions and all replies can be up to 1,000 characters in length.
New Behavior for Customer Portal Email Notifications
When No Change Owner to Portal User
Template is Selected
In Winter ’13, we’ve improved the behavior of change owner email notifications sent from portals that don’t have Change
Owner to Portal User Template or a default template set. When a portal user changes the owner of a record to another
portal user whose profile is associated with multiple portals, the email notification sent to the user includes a link to the portal
in which the change of ownership occurred. In previous releases, the link pointed to the oldest login-enabled portal that the
user was a member of.
87
ANALYTICS
Exportable Joined Reports
You can now select a printable view of joined reports. You can use that view to export all the data that’s displayed in your
joined report to a spreadsheet application. The data is grouped, filtered, aggregated, and displayed the same way as in your
browser.
Available in: Enterprise, Unlimited, and Developer Editions
You asked for it! This enhancement addresses an idea on the IdeaExchange.
Use the printable view when you want to work with the data in a joined report while not logged into Salesforce. For example,
you might want to share data with a colleague, or pull a table into a presentation slide.
•
•
For a complete view, click Show Details, then Printable View. When you open the resulting .xls file, all of the data in
your report is present. Your printable view can display up to 2000 rows of data.
For a summary view, click Hide Details, then Printable View. This .xls file shows a condensed view of your report,
using the summary fields you have chosen.
Joined Reports on Dashboards
You can now show a joined report on a dashboard by selecting the chart used in the report.
Available in: Enterprise, Unlimited, and Developer Editions
User Permissions Needed
To create, edit, and delete dashboards:
“Run Reports” AND “Manage Dashboards”
To create, edit, and delete dynamic dashboards:
“Run Reports” AND “Manage Dynamic Dashboards”
You asked for it! This enhancement addresses an idea on the IdeaExchange.
A joined report can contain data from multiple standard or custom report types.
To show a joined report on a dashboard:
88
Analytics
Scatter Charts on Dashboards
1. Edit the dashboard.
2. From the Data Sources tab, drag and drop a joined report that includes a report chart.
3. Edit the joined report dashboard component and select Use chart as defined in the source report.
You can schedule and email a dashboard that has joined reports for refresh. You can’t filter data on a joined report in dashboard
view or add a filter to a dashboard that only has joined reports.
Scatter Charts on Dashboards
You can now select the scatter chart type on your dashboard to display report information. Scatter charts show meaningful
information using one or two groups of report data plus summaries.
Available in: Professional, Enterprise, Unlimited, and Developer Editions
You asked for it! This enhancement addresses an idea on the IdeaExchange.
The scatter chart component type in dashboards has these limitations:
•
•
•
•
It doesn't show tabular reports.
You can't sort by labels or values.
You can only change how Y-axis units are displayed.
You can manually define the range for Y-axis alone.
For more information, see “Scatter Chart Example” in the online help.
89
Analytics
More Support for the Enhanced Reports Tab
More Support for the Enhanced Reports Tab
Available in: All Editions except Database.com
Starting this release, the enhanced reports tab is available without enabling the user interface theme and is supported in
accessibility mode.
The user interface theme setting, Enable New User Interface Theme, is located under Your Name > Setup > Customize
> User Interface.
To learn more about the reports tab, see the tipsheet Using the Reports Tab.
90
MOBILE
Salesforce Touch
Available in: Group, Professional, Enterprise, Unlimited, Contact Manager, and Developer Editions
Salesforce Touch—a version of Salesforce that’s designed specifically for touchscreen mobile devices—is now generally available!
Using Salesforce Touch, you have real-time access to the same information that you see in the office, but organized for working
while on the go.
Note: This release doesn’t have all of the functionality of the full Salesforce site. See Differences from the Full
Salesforce Site on page 95 for more details.
Salesforce Touch provides these benefits:
•
•
•
An intuitive interface that is optimized for easy navigation and data interaction on an iPad, so you can scroll, tap, and
swipe through records to quickly find the information you need
Automatic updates and enhancements, so you’re always using the most current version
Support for many of your organization’s Salesforce customizations
There are two versions of Salesforce Touch:
•
•
A downloadable app that is available from the Apple App Store or AppExchange Mobile and installs directly on iPad
devices
A mobile browser app that runs in the Safari® for iPad web browser
The downloadable app offers the convenience and time savings of maintaining your Salesforce session, so you don’t need to
log in every time you access Salesforce Touch. Use the mobile browser version if you don’t want to bother with installing an
app on your device.
Salesforce Touch Features Overview
Brush up on the status of deals or notes about contacts before customer meetings. Update records with new information while
the details are fresh. Rally team members back at the office to start working on a customer request. These are just a few of the
ways Salesforce Touch helps your users be productive on the go and avoid time-consuming catch-up work at the end of the
day.
This section highlights some of the key features that make Salesforce Touch a great choice for use when out of the office.
91
Mobile
Salesforce Touch
1. View, edit, and create records for any object that has a tab in the Salesforce Sales app, including your organization’s custom
objects
2. Keep on top of activities by creating and managing tasks
3. Search Salesforce for information, including events and records not in recently viewed lists
4. Use Chatter to see record updates and to collaborate with coworkers
5. Work with real-time data by refreshing desired areas of Salesforce Touch
Salesforce Touch Enhancements in this Release
Salesforce Touch is generally available in Winter ’13. This release includes these enhancements:
•
•
There are now two versions of Salesforce Touch to choose from. In addition to the mobile browser app that runs in the
Safari on iPad web browser, there’s also a downloadable app that’s available from the Apple App Store or AppExchange
Mobile and installs directly on your iPad.
The Enable Salesforce Touch for all users option on the Salesforce Touch Settings page in the full site (Your
Name > Setup > Mobile Administration > Salesforce Touch > Settings) has been renamed Enable the Salesforce
92
Mobile
Salesforce Touch
Touch mobile browser app. This option now controls whether or not users are automatically redirected to Salesforce
Touch when logging in to Salesforce from the Safari on iPad web browser. The setting applies to all users in your organization
and is off by default.
The Salesforce Touch Settings page also includes a new option called Enable the Salesforce Touch downloadable
app. This option allows users to log in to the Salesforce Touch app that users download and install on their mobile devices.
It applies to all users in your organization and is enabled by default.
•
•
You can now mention people in Chatter posts and comments.
There’s a small label change to the Chatter tab in Salesforce Touch. To be consistent with Chatter enhancements in the
full site, the My Chatter feed filter is now called What I Follow. The @Me filter, however, hasn’t been renamed to match
the full site.
And in case you missed it, these important enhancements were released in July ’12:
•
•
•
You can create and edit account, contact, opportunity, and task records, as well as records for custom objects that are
included in your Salesforce Sales app. You can’t create or edit events at this time.
The Salesforce Touch user interface has a new, lighter look. As a result of the redesign, the Chatter subtabs now use Feed,
Groups, and People labels instead of icons.
The Salesforce Touch FAQ was reorganized to incorporate new topics for the create and edit features. The previous Working
in Touch section is now called Working with Records and the tasks and events topics are now available in the new Tracking
Activities section.
Salesforce Touch Requirements
These are the requirements for using both the downloadable and mobile browser versions of Salesforce Touch.
Devices:
Apple iPad (2nd- and 3rd-generation), with iOS® version 5.0 or higher.
Browsers:
The default iPad browser, Safari.
Private Browsing must be turned off. Tap the iPad Settings icon, then select Safari and set Private Browsing to Off.
Salesforce:
Chatter must be enabled for your organization.
You must have an active Salesforce account to access Salesforce Touch.
You must have access to the standard Sales app.
Chatter Free users, Chatter Only users, and Chatter customers aren’t able to use Salesforce Touch.
Wireless Connection:
A Wi-Fi® or cellular network connection is required to communicate with Salesforce. For the best performance, we
recommend using Wi-Fi. If you use Salesforce Touch on a 3G cellular network, data rates may apply and you may incur
roaming charges while traveling.
Offline use of Salesforce Touch isn’t currently supported.
93
Mobile
Salesforce Touch
Language and Locale:
Salesforce Touch works with almost all of the Salesforce-supported locales and the fully-supported and end user languages.
The exception is right-to-left locales and languages (including Arabic, Hebrew, and so forth), which aren’t currently
supported.
Advanced currency management isn’t currently supported.
Enabling Salesforce Touch
User Permissions Needed
To view Salesforce Touch settings:
To modify Salesforce Touch settings:
“View Setup and Configuration”
“Customize Application”
“Modify All Data”
To use the Web Services API:
“API Enabled”
“Manage Users”
To enable Salesforce Touch for your organization:
1. Click Your Name > Setup > Mobile Administration > Salesforce Touch > Settings.
2. Use Enable the Salesforce Touch downloadable app to control access to the Salesforce Touch app that users
download and install on their mobile devices.
By default, the downloadable app is enabled for all users in your organization. If you disable this option, users can still
install the app but they’re unable to use it to log in to their Salesforce accounts.
3. Use Enable the Salesforce Touch mobile browser app to control access to Salesforce Touch from mobile
browsers.
By default, the mobile browser app is disabled for all users in your organization. If you enable this option, users who log
in to Salesforce from the Safari® on iPad web browser are automatically redirected to Salesforce Touch.
Note:
If users prefer to access the full Salesforce site from Safari instead, they can turn off the mobile browser app
redirection for themselves, either from the app or from the full site by deselecting the Touch User checkbox at
Your Name > Setup > My Personal Information > Personal Information.
Alternately, you can use the Web Services API to quickly turn automatic redirection to the mobile browser app
off (or on) for users. When the mobile browser version of Salesforce Touch is enabled, the
UserPreferencesOptOutOfTouch field is added to the User object. By default, this field is set to false—which
turns on automatic access to the mobile browser app—for all user records. Change this field to true to turn the
redirection off for desired users. See the User section in the Web Services API Developer’s Guide for more information.
4. Click Save.
94
Mobile
Salesforce Touch
If you enable both the downloadable and mobile browser apps, users can access either version of Salesforce Touch
interchangeably.
Accessing Salesforce Touch
The way users access Salesforce Touch depends on the versions that you’ve enabled for your organization.
•
Salesforce Touch Downloadable App: If you opt to keep the downloadable version of Salesforce Touch enabled, users
can download and install the app from the Apple App Store or AppExchange Mobile. Once installed, they can launch the
app from the iPad Home screen and log in to their Salesforce accounts as they would normally. By default, the downloadable
app connects to your production environment.
Note: If you disable the downloadable version of Salesforce Touch, your users aren’t blocked from downloading
or installing the app. Any attempts to log in to Salesforce from the app, however, will fail with an error message.
•
Salesforce Touch Mobile Browser App: If you enable the mobile browser version of Salesforce Touch, users simply access
the mobile browser app by logging in to their Salesforce accounts from the Safari web browser. Login sessions from iPad
devices are automatically redirected to the mobile browser app.
Note: If a user sees the full site instead of the mobile browser app, verify that the Touch User checkbox in the
user’s Personal Information settings is selected. You can access this information by selecting Your Name > Setup
> Manage Users > Users, then clicking Edit next to the user’s name.
If you enable both versions of Salesforce Touch, users can access either option interchangeably.
Using Salesforce Touch
To learn about using Salesforce Touch, see the Salesforce Touch FAQ that’s available from the Settings
icon in the app.
Differences from the Full Salesforce Site
Salesforce Touch doesn’t have all of the functionality of the full Salesforce site. Currently, the Salesforce Sales app is the only
tabset that’s available. Users can work with their accounts, contacts, opportunities, tasks, and any custom tabs that are included
in the Sales app, and they can view any events that are accessible from Open Activities or Activity History related lists. With
a few exceptions, all of the standard and custom fields for these objects are available. Additionally, users can see their Chatter
data, including People, Groups, and feeds.
Note: Salesforce Touch uses user profiles and permission sets, so users have access to the same tabs, record types,
fields, page layouts, and object permissions that they do when working in the full site. However, any user interface
customizations that your organization implemented programmatically (for example, using Visualforce, JavaScript,
and so forth) aren’t accessible in this release.
Salesforce Touch has these limits when displaying data:
95
Mobile
Salesforce Touch
•
•
•
•
•
Chatter Groups and People: 15 records displayed initially, expandable to 200 maximum
Recent Items: 15 records displayed initially, expandable to 100 maximum
Related Lists: 30 records displayed initially, not expandable
Search Results: top 5 results per object displayed, not expandable
Tasks: 15 records displayed initially; expandable to 100 maximum
Currently, this release doesn’t support:
•
•
•
•
•
Other standard apps and all custom apps
Objects other than those mentioned in this section
Person Accounts
Standard list views and custom object lists
A few record fields, including:
◊ division fields
◊ rich text area fields
◊ territory management fields
•
•
•
•
•
•
•
Some related lists and some related list fields
Shared Activities for tasks or events
Archived activities
Dashboards
Search on objects other than accounts, contacts, events, opportunities, tasks, users, and custom objects
Advanced currency management
Programmatic customizations to the Salesforce interface, including:
◊ Custom buttons and links
◊ Web tabs and Visualforce tabs
◊ Visualforce components and S-controls
Note:
Unsupported fields and related lists include links to the full site, where you can see the missing information. Links to
unsupported objects also take you to the full site. In addition, the Actions menu on a record detail pane allows you
to switch to the full site so you can perform tasks not currently available in Salesforce Touch.
Salesforce.com provides these links for your convenience but using the full site from Salesforce Touch isn’t officially
supported.
There are some differences from the full site when creating or editing records:
Category
Issue
Any Record
You can’t modify a record’s owner or its record type. Switch to the full site to make
these changes.
Creating
Records
Editing
Records
If territory management is enabled, you can’t assign or modify a record’s territory
rules.
96
Mobile
Salesforce Touch
Category
Issue
Accounts and
Contacts
The Copy Billing Address to Shipping Address and Copy Mailing Address to
Other Address links aren’t available.
Creating
Records
Editing
Records
If territory management is enabled, the Evaluate this account against territory
rules on save option isn’t available when editing account records.
Events
You can’t create or edit event records in Salesforce Touch.
Opportunities
You can’t edit the Probability or Forecast Category fields. However,
values are automatically added to these fields (based on the value of the Stage
field) when you save the record. You can manually override the values for these
fields by editing the record in the full site.
If you make an opportunity private, you don’t get a warning that you’re removing
all sharing from the record.
Tasks
If you set the Name field to Lead, the Related To field shouldn’t be available
but it’s editable in Salesforce Touch. You’ll get a validation error if there’s data in
Related To when you save the record.
The Email and Phone fields for an associated contact aren’t displayed.
You can’t use Shared Activities to relate multiple contacts to a task.
You can’t create recurring tasks or change the details for recurring tasks.
Spell-checking the Comments fields isn’t available.
You can’t add attachments.
You can’t send notification emails.
You can’t set task reminders.
Lookup Fields
Enhanced lookups aren't supported, so you can't use wildcards in lookup searches
and you can't sort, filter, and page through search results.
Dependent lookups aren't supported.
Lookup filters aren't respected, so lookup search results aren't restricted in any
way. You may wind up selecting an item that isn't valid for your organization,
resulting in an error message when you save your record.
Phone Number Salesforce Touch doesn’t apply any formatting to numbers entered in phone
Fields
number fields, so if you enter 4155551212, that’s how the phone number is
displayed when you view the record.
Picklist Fields
Controlling and dependent picklists are supported, but Salesforce Touch doesn’t
display indicators on create and edit pages for these fields. To determine if a picklist
field is dependent, and which picklist field controls it, switch to the full site.
Text Area Fields Text area fields aren’t scrollable in this release. To access text that isn’t visible in
the field, tap the field to display the keyboard, then touch and hold to bring up
97
Mobile
Salesforce Mobile SDK
Category
Issue
Creating
Records
Editing
Records
the magnifying glass. Slowly drag the magnifying glass through the field until you
see the desired text.
On the Chatter tab, you can’t:
•
•
•
•
•
•
•
•
•
•
•
•
•
•
•
•
•
•
•
•
•
•
•
Create or update profile information, or upload profile pictures
See the Followers, Following, Groups, and Files Owned lists on profiles
See Chatter activity statistics or Chatter influence status
Receive Chatter recommendations
See trending topics
Invite coworkers to sign up for Chatter
Update group settings and information
Create new groups
View members of groups or lists of group files
Invite Chatter customers to join private groups
Upload, share, or preview files
View or download files that were uploaded via the Files tab from the full site, or that were uploaded to a comment. (Note
that you can view files that were attached to a post on a Chatter feed. The Salesforce Touch downloadable app can display
these file types only: .doc, .docx, .pdf, .ppt, .pptx, .xls, .xlsx, and all image files, including .gif, .jpg, and
.png formats.)
Find or follow files
Send or view Chatter messages
Bookmark posts
View the list of people who liked a Chatter update
Share public posts
Add or view Chatter favorites
Add topics to posts and comments
Search for data in any Chatter feeds, including Groups, People, and Files
View the full Chatter feed (as with the Feed filter in the full site)
Filter or follow records
Use Chatter as a moderator
Salesforce Mobile SDK
The Salesforce Mobile SDK is an open source suite of developer technologies that simplify the development of mobile
applications.
The Mobile SDK provides the following:
•
•
•
Native OAuth implementations for Android and iOS that work out-of-the-box
OAuth access token management, including persistence and refresh capabilities
App containers for building hybrid applications
98
Mobile
Chatter for iPhone and iPad – Version 2.4 Generally Available
Using the Salesforce Mobile SDK, you can create three types of mobile applications:
•
•
•
Native — Native apps are coded using a mobile platform's native capabilities. Typically, these apps are more difficult to
develop, but they also offer the best performance. In this workbook, we show how to construct native applications for iOS
and Android.
HTML5 — HTML5 apps are built using HTML5, CSS and JavaScript. These lightweight server-side pages typically
offer the most portability, but don't have access to native platform features. HTML5 apps aren't OS-specific, so the same
app will run on an iOS, Android, Windows Mobile, or other device.
Hybrid — Hybrid apps use a JavaScript bridge in a native container to merge the portability of HTML5 with native device
capabilities, such as the camera or address book.
Because the Mobile SDK is new technology, with many rapid changes expected over the coming year, the most recent release
notes can be found at http://wiki.developerforce.com/MobileSDK.
Chatter for iPhone and iPad – Version 2.4 Generally
Available
Chatter for iPhone and iPad v2.4 is now generally available. This release includes several enhancements to the Chatter mobile
app:
Sharing Posts
With the latest version of Chatter for iOS, you can share public Chatter posts to your profile.
To share a post:
1. In your feed, tap the post you want to share.
2. Tap
.
3. Tap Share to my profile.
Comments: “Like” and File Sharing
This release makes it easier to collaborate from the mobile app by providing two new features for comments. You can
now:
•
•
Like comments.
Attach files and photos to comments. The process for adding files and photos to comments is exactly the same as
adding them to posts.
Dashboard Snapshots
In this version of Chatter for iOS, you can view dashboard snapshots in your feed.
For more information about using Chatter on your device, open the Chatter mobile app on your iPhone or iPad, then tap
Settings > Help.
Installing the App
Salesforce Chatter is available for download in the Apple App Store. To use the Chatter for iOS v2.4 mobile app, your iPhone
or iPad must be running iOS 5.0 or higher, and it must be connected to a WiFi or cellular network.
99
Mobile
Chatter for iPhone and iPad – Version 2.4 Generally Available
Upgrading the App
You can upgrade to the latest version of Chatter for iOS by installing the pending update that appears in the App Store on
your iPhone or iPad.
Note: iPad users who have an old version of the Chatter for iPad app – Chatter for iPad v2.0 or earlier – must
download the app from the App Store. Those users won’t see a pending update on their device.
100
DATA.COM
Data.com Product Suite Overview
Watch a Demo (3:19 minutes)
Data.com is salesforce.com's solution for delivering leading business data inside your CRM. Your team can spend less time
entering and updating data and more time growing your business. Data.com combines crowd-sourced contacts with account
information from D&B, managed in the cloud, so you can keep your CRM clean and up to date in real time. Within Salesforce,
you can search for Data.com accounts and contacts right on the Data.com tab, and if you have a Data.com license, you can
add records to Salesforce. You can add your contact search results as either contacts or leads. It's remarkably easy to find the
accounts and contacts you need, and using Data.com is a great way to plan your sales territories, segment campaigns, find new
accounts to engage, and get new contacts to quickly expand your sales network. The Data.com product suite includes Data.com
Corporate and Data.com Premium, as well as related products Data.com Clean and Data.com Reports. This topic describes
them all, and explains how they work together.
New in Winter ’13: D&B Companies for Leads
In Summer ’12, we introduced D&B Companies for accounts. Winter ’13 gives you D&B Companies for leads.
101
Data.com
Data.com Product Suite Overview
The D&B Companies object and related records are available to organizations that purchase Data.com Premium. When you
add a lead from Data.com—or clean a lead—a corresponding D&B Company record (if one exists in Data.com) is automatically
created in Salesforce and linked to that record via its D&B Company field. Just click the link to open the D&B Company
record and view the rich set of D&B data, including a Company Description field, plus sections like Primary Data and
Firmographic Data.
For example, if you add a lead record for Richard Dijkstra at Domino’s Pizza LLC, when you open the lead record,
the D&B Company field value is Domino’s Pizza, LLC. The value is underlined to identify it as a link. Just click the
link to open the Domino’s Pizza LLC D&B Company record.
Data.com Corporate
With Data.com Corporate, all Salesforce users can search Data.com for accounts and contacts. Users with Data.com licenses
can:
•
•
•
•
Add accounts and contacts to Salesforce, and add contacts as leads.
Add contacts for an account directly from the account record.
Access the basic set of D&B fields provided for accounts and leads.
Manually clean Salesforce account, contact, and lead records, whether they were added from Data.com or not.
Starting December 16, 2011, all organizations purchasing Data.com received the Data.com Corporate product. Organizations
using previous versions have a limited set of fields.
Data.com Premium licenses can not be purchased for Salesforce organizations that already have Data.com Corporate licenses.
Data.com Premium
Data.com Premium is an upgrade to Data.com Corporate. With Premium, you get all the features and D&B fields available
to Corporate, plus over 70 additional D&B fields for accounts you add to Salesforce from Data.com. These fields are grouped
in a D&B Company record that’s linked to the account, and accessible on the D&B Companies tab.
Data.com Corporate licenses can not be purchased for Salesforce organizations that already have Data.com Premium licenses.
Data.com Clean
Data.com Clean is an important part of Salesforce’s Data.com product suite, offering both manual and automated cleaning
for your account, contact, and lead records. To get automated cleaning, you must purchase Data.com Clean for every Salesforce
user.
With Data.com Clean, users can manually clean Salesforce accounts, contacts, and leads, and you can configure jobs to flag
field value differences on Salesforce records or automatically fill blank fields.
Data.com Reports
Want to analyze the impact of Data.com data on your business? Use the Data.com Reports AppExchange package. It offers
several preconfigured Data.com reports and two corresponding dashboards. Use these tools to find out how many records are
sourced from Data.com, who has added them and when, and how they contribute to your sales forecast and revenue.
Important Considerations for Organizations Using Jigsaw for Salesforce
Jigsaw for Salesforce is an older version of the product that is no longer for sale. It provides similar search, add, and clean
functionality, but it works differently from the Data.com product suite built in to Salesforce. The Salesforce online help and
release notes describe the built-in Data.com Corporate and Premium products only, not Jigsaw for Salesforce. If your organization
is still using Jigsaw for Salesforce, you should consider migrating to the built-in Data.com product suite for your prospecting
and cleaning needs. For information, please contact your Salesforce account manager.
102
Data.com
Data.com Administrator Features and Enhancements
Important:
You should not attempt to migrate to the built-in Data.com Clean product without having first purchased it through
your Salesforce account manager. If you attempt to enable the built-in Data.com Clean product without purchasing
it, you’ll see an error message: Your organization does not currently have the permission
to run Clean jobs.
DATA.COM
Data.com Administrator Features and Enhancements
Setting up and maintaining Data.com has never been easier. In Winter ‘13, we bring you the following new features.
•
•
•
Map Data.com fields to Salesforce Account, Contact, and Lead fields. Before you begin, make sure you understand how
field mapping works.
Respect Do-Not-Contact settings when you add or export Data.com contacts or leads.
Allow duplicate account, contact, and lead records in Salesforce.
You’ll also want to learn about these enhancements.
•
Enhanced record addition error logs.
103
Data.com
Data.com Administrator Features and Enhancements
Customizing Data.com-to-Salesforce Field Mappings
Data.com available in: Contact Manager, Developer, Enterprise, Group, and Professional Editions
Data.com available for an additional cost in: Unlimited Edition
Data.com Clean available in: Developer, Enterprise, and Professional Editions
Data.com Clean available for an additional cost in: Unlimited Edition
User Permissions Needed
To implement Data.com:
“Customize Application”
To enable Data.com users:
“Manage Users”
To install AppExchange packages:
“Download AppExchange Packages”
Before you begin, make sure you understand how mapping works, what preparations to make, and what kind of results you
should expect.
1. Click Your Name > Setup > Data.com Administration > Field Mapping.
104
Data.com
Data.com Administrator Features and Enhancements
2. For each Data.com field you want to map, select a Salesforce field. If you don’t want to map a field, select Skip Mapping.
Note: Not all Data.com fields are available for all Salesforce fields. To be mappable, the new Salesforce field must
be the same data type as the default field. For example, the Description field can be mapped to a long text area
field with 1,000 characters or more.
Custom field mappings apply when:
•
•
Data.com records are added to Salesforce
Salesforce records are matched with Data.com records and cleaned either manually or with automated jobs
Understanding Data.com-to-Salesforce Custom Field Mapping
Data.com available in: Contact Manager, Developer, Enterprise, Group, and Professional Editions
Data.com available for an additional cost in: Unlimited Edition
Data.com Clean available in: Developer, Enterprise, and Professional Editions
Data.com Clean available for an additional cost in: Unlimited Edition
Create custom mappings from Data.com fields to Salesforce account, contact, and lead fields to get Data.com values in the
Salesforce fields where you want them. Not all Data.com fields are available for all Salesforce fields. To be mappable, the new
Salesforce field must be the same data type as the default field. For example, the Description field can be mapped to a long
text area field with 1,000 characters or more.
Custom field mappings apply when:
•
•
Data.com records are added to Salesforce
Salesforce records are matched with Data.com records and cleaned either manually or with automated jobs
Before you map fields, make sure you understand these potential outcomes and the related actions you should take.
•
•
•
•
•
•
•
Mapping fields or updating mappings forces a full sync with Data.com: all records of enabled CRM objects (accounts,
contacts, and leads) are updated, even if no records have changed.
Data.com field mappings may conflict with any Salesforce field customizations (such as approvals, workflow rules, or Apex
triggers) you use for accounts, contacts, or leads. Review and edit your customizations as needed so they will work with
the values supplied by your mappings.
You can skip mapping individual Data.com fields, but values for skipped fields won't be added, exported, or considered
when we calculate a record's clean status.
Skipping or changing mappings for fields used to match Salesforce and Data.com records may change some records’ clean
status to Not Found.
If you export Data.com search results, the column headers in your Excel file will show the mapped field names. For example,
if you map the Data.com Phone field to the Contact object’s Mobile field, you’ll see a header called “Mobile” for contacts,
not “Phone”.
If you map Data.com fields that do not have values, some Salesforce records might revert to Not Found clean status.
If you map a Data.com field to a custom Salesforce field, the custom field’s label will appear on the Clean comparison
page.
105
Data.com
•
Data.com Administrator Features and Enhancements
If you want to track changes to field mappings, you’ll find them in the Setup Audit Trail. Click Your Name > Security
Controls > View Setup Audit Trail.
Respecting Do-Not-Contact Settings in Data.com Search Results and
Exports
Data.com available in: Contact Manager, Developer, Enterprise, Group, and Professional Editions
Data.com available for an additional cost in: Unlimited Edition
Data.com Clean available in: Developer, Enterprise, and Professional Editions
Data.com Clean available for an additional cost in: Unlimited Edition
User Permissions Needed
To implement Data.com:
“Customize Application”
In Data.com search results and export files, you can mask out or remove email and phone values for contact and lead records
already in Salesforce that have Do Not Call or Email Opt Out selected.
For example: You have a lead record in Salesforce for Sally Larkin and on that record the Do Not Call checkbox is selected.
You search for Sally Larkin as a contact on the Data.com tab and her record appears in the search results list, marked as already
in Salesforce ( ). The Phone field is masked in the search results list, and also on Sally’s contact card. If you export the record,
its Phone field is blank in the .csv file.
1. Click Your Name > Setup > Data.com Administration > Preferences.
2. Select the Respect Do-Not-Contact Settings checkbox.
For records that have Do Not Call or Email Opt Out selected, Phone or Email field values are masked in the search
results and on the Contact Card, and blank in .csv files created when you export records.
Allowing Duplicate Data.com Records in Salesforce
Data.com available in: Contact Manager, Developer, Enterprise, Group, and Professional Editions
Data.com available for an additional cost in: Unlimited Edition
Data.com Clean available in: Developer, Enterprise, and Professional Editions
Data.com Clean available for an additional cost in: Unlimited Edition
Organizations that use a sharing model may want to allow Data.com users to add duplicate account, contact, or lead records
to Salesforce. There are several things to keep in mind when setting your duplicate preferences.
106
Data.com
•
•
•
•
Data.com User Enhancements
Records are considered duplicates when they have the same Data.com ID number in the Data.com Key field.
Duplicates can only be allowed, by object, for the entire organization, not for individual users. If, however, you want to
prevent a user from being able to add duplicates, you can create a trigger.
Records that have already been added to Salesforce by any Data.com user are marked with an icon ( ) in the search results
and can be re-added by any Data.com user.
When a record is added as a duplicate, it will not be counted against the user’s monthly record addition limit. Adding a
record only counts against a user’s monthly addition limit the first time it’s added to Salesforce.
To set up your duplicate preferences, follow these steps.
1. Click Your Name > Setup > Data.com Administration > Preferences.
2. In the Duplicate Preferences section of the page, select which objects you want to allow duplicates for (accounts, contacts,
or leads).
Data.com User Enhancements
Data.com offers lots of enhancements for users in Winter ’13.
•
•
Expanded international data offers more accounts and contacts.
Use new Employee, Revenue, and Location filters to refine your search results.
•
We’ve expanded the scope of the green dot ( ), which now identifies records you’ve added, exported, or cleaned—either
manually or with automated clean jobs.
You can now exclude records you’ve already exported or records already in Salesforce when you export Data.com search
results.
Selections you make from your Data.com search results are now preserved across multiple pages.
Data.com now uses the primary SIC, NAICS, and Data.com Industry Category codes to determine the Industry field
on account records.
The Industry field value on the account card is now the same Industry value that’s on the account record.
If you’re prevented from adding Data.com records to Salesforce, you’ll now get an error log that tells you which records
couldn’t be added and why not.
If you use Data.com Premium, search D&B records for Global Ultimate D-U-N-S Number to see a list of accounts within
an organization’s corporate structure. You can add those records to Salesforce.
We’ve made several improvements to the reports in the Data.com Reports AppExchange Package, which make analyzing
your data easier than ever.
You can now search Salesforce by D-U-N-S Number.
•
•
•
•
•
•
•
•
Expanded International Data from D&B
In Winter ’13, Data.com continues to deliver more account and contact information from D&B, including expanded data for
Australia, India, Ireland, New Zealand, Singapore, South Africa, and the United Kingdom.
107
Data.com
Data.com User Enhancements
New Filters: Employee, Revenue, and Location Type
Data.com offers several new filters you can use to narrow your account and contact search results.
Use the Employee and Revenue filters to manually enter a range for the number of employees within an organization and
the organization’s annual revenue, respectively. Entering ranges is easy when you use abbreviations for multiples of thousands
(K for thousand, M for million, and B for billion). For example, entering 10K automatically converts to 10,000.
Use the Location Type filter to refine your results based on a whether an account (or an account associated with a contact)
is a headquarters, single location, or branch.
Better Identification of Data.com Records Added, Exported, or Cleaned
You asked for it! This enhancement is from an idea on the IdeaExchange.
In previous Salesforce releases, the green dot ( ) next to records in your Data.com search results represented only records you
added from Data.com to Salesforce. With the Winter ’13 release, the green dot now represents:
•
•
•
Data.com records you added.
Data.com records you exported.
Records you manually added to Salesforce that have been matched with Data.com Clean either manually or via automated
jobs.
Exclude Green Dot Records from Export
When exporting account or contact records from Data.com, you can exclude any records that have already been exported or
are already in Salesforce. Just select that option from the export confirmation message.
Selected Records are Preserved Across Search Results Pages
When you select Data.com records from your account or contact search results, your selections are now preserved across
multiple pages of results. That means you can select records on one page of your search results and move to another page to
select more records without losing the selections on the first page. You can select up to 1,000 records.
New Industry Mapping
Data.com now uses the primary SIC, NAICS, and Data.com Industry Category codes to determine the Industry field value
on account records. This simplified approach allows for more accurate and relevant search results no matter which industry
classification system you use in your search query.
108
Data.com
Data.com User Enhancements
For example, if you use the SIC system for your search criteria and select the Computer Peripheral Equipment
industry, which maps to Electronics, your results will include all accounts with a value of Electronics in the Industry
field. If you use the Data.com Industry Categories classification system for your search criteria and select the Computers
and Electronic industry, which also maps to Electronics, your results will again include all accounts with a value of
Electronics in the Industry field.
This new mapping system also means that a number of accounts will be assigned a new, more accurate value in the Industry
field. If your organization uses Data.com Clean, records you have in Salesforce that have been given a new industry value will
have a Data.com Clean status of Different. You can use Data.com Clean to update these records with the new industry
values.
Note: The subindustries under Goverment in the Data.com Industry Categories classification system are currently
unavailable due to mapping limitations between the Data.com Industry Categories and the SIC system.
Industry Field on Account Card
The Industry field value on the account card is now the same Industry field value that’s on the account record. This makes
the account card more useful when you’re deciding whether you want to add an account to Salesforce.
Data.com Record Addition Error Logs
Data.com now provides an easy way to see which records couldn’t be added to Salesforce and why. The error log includes all
the information necessary to help you resolve the errors so you can get access to the records you need.
Resolving Data.com Record Addition Errors
Data.com available in: Contact Manager, Developer, Enterprise, Group, and Professional Editions
Data.com available for an additional cost in: Unlimited Edition
Data.com Clean available in: Developer, Enterprise, and Professional Editions
Data.com Clean available for an additional cost in: Unlimited Edition
User Permissions Needed
To add accounts from Data.com:
“Create” on accounts
To add contacts from Data.com:
“Create” on contacts
To add Data.com contacts from an account
“Read” on accounts AND “Create” on contacts
To add Data.com contacts as leads
“Create” on leads
If errors are preventing you from adding one or more Data.com records to Salesforce, we’ll provide a .csv error log file. How
we provide the error log depends on what you were trying to do.
109
Data.com Clean
•
•
•
Data.com Clean Administrator Features and Enhancements
If you were trying to add fewer than 200 records, you’ll see a message with a link to the error log on the Files tab.
If you were trying to add 200 records or more, you’ll receive an email with a link to the error log on the Files tab.
If you were trying to add any number of records and you do not have Chatter enabled, you’ll receive an email with the error
log attached.
1. Open the record addition error log and review the errors, then take one of these actions.
•
•
•
If you see errors regarding duplicate records, you don’t need to do anything. “Duplicate” errors mean that the records
are already in Salesforce, so you don’t need to add them again. If your Data.com preferences are set to allow duplicates,
the error log will not include any “duplicate” errors.
If you see errors regarding your organization’s custom configurations, such as triggers, validation rules, or workflow,
let your system administrator know because they may need to correct these configurations.
For all other errors, contact your system administrator, who may need to contact Support.
2. After the errors have been resolved, try again to add the Data.com records to Salesforce.
Improved Data.com Reports AppExchange Package
There have been several improvements to the Data.com Reports AppExchange Package, including modifications to a number
of reports in order to provide more useful data. Also, numerous report names have been changed slightly to better align with
the data in the report. For a comprehensive list of the entire Data.com Reports AppExchange Package, see “Using Data.com
Reports and Dashboards” in the Salesforce online help.
Search by D-U-N-S Number
You can now search Salesforce by D-U-N-S Number. Just enter the 9-digit D-U-N-S Number in the global search box and
your search results will return any accounts or leads with that D-U-N-S Number.
DATA.COM CLEAN
Data.com Clean Administrator Features and Enhancements
Winter ’13 offers powerful new Clean features and ehnahcements.
•
•
•
If you use Data.com Premium and the Data.com Clean product, you can now set up clean jobs to automatically update
D&B Company records linked to accounts and leads.
You can also map Data.com fields to Salesforce account, contact, and lead fields. When you export or clean records, put
Data.com values in the Salesforce fields where you want them.
We now offer field-level Clean settings for your accounts, contacts, and leads. You can either flag differences only, or flag
them and auto-fill with Data.com data.
110
Data.com Clean
•
•
•
Data.com Clean Administrator Features and Enhancements
We’ve updated the Data.com Reports AppExchange package to include a preconfigured validation rule that lets you exclude
individual account, contact, and lead records from being cleaned with automated clean jobs. The rule works for organizations
that use Data.com Premium and the Data.com Clean product, which provides automated jobs.
If you’ve purchased the Data.com Clean product, you’ll find that we’ve automatically enabled it for you. The Data.com
Clean product offers automated Clean jobs.
If you use Data.com Corporate or Data.com Premium, you’ll find that we’ve enabled Data.com Clean for you. With
Corporate or Premium, your users can manually clean account, contact, and lead records.
Defining Your Data.com Clean Job Preferences (Data.com Clean Only)
Data.com available in: Contact Manager, Developer, Enterprise, Group, and Professional Editions
Data.com available for an additional cost in: Unlimited Edition
Data.com Clean available in: Developer, Enterprise, and Professional Editions
Data.com Clean available for an additional cost in: Unlimited Edition
User Permissions Needed
To define Data.com Clean Preferences:
“Customize Application”
Clean preferences let you specify:
•
•
Which objects’ records to clean with automated jobs
How you want to clean them
Jobs can either:
•
•
Flag all fields in a Salesforce record whose values are different from those in the matched Data.com record, or
Flag fields with different values and also auto-fill blank fields
You can set flag-only or flag and auto-fill preferences for entire records or field by field. If you use Data.com Premium, you
can also clean D&B Company records that are linked to accounts and leads. D&B Company clean jobs automatically fill or
overwrite field values on D&B company records, but do not change data on linked account or lead records.
Your preferences take effect when the next scheduled clean job runs, and users will see the flags, as appropriate, when they
clean records manually.
Note: Converted leads are excluded from Leads clean jobs.
1. Click Your Name > Setup > Data.comAdministration > Clean > Preferences.
2. Select the Enable Clean jobs checkbox for each object whose records you want to clean. (If you clear the Enable Clean
jobs checkbox, automated jobs will not run for objects of that type.)
3. For each object you’ve enabled, select your clean preference.
•
Flag all differences per record to only identify fields whose values are different from Data.com values
111
Data.com Clean
•
Data.com Clean Administrator Features and Enhancements
Flag differences and auto-fill blank fields to identify fields whose values are different and fill blank
fields with values from Data.com.
•
Customize settings field by field.
4. If you select the Customize option for any object, you can select either Flag or Flag & Auto-Fill for individual
fields.
5. If you want to clean D&B Company records, select the Enable Clean jobs for D&B Companies checkbox.
6. When you finish setting clean preferences for all the objects you want to clean, click Save.
Preventing Data.com Clean Auto-Updates for Account, Contact, and Lead
Records
Data.com available in: Contact Manager, Developer, Enterprise, Group, and Professional Editions
Data.com available for an additional cost in: Unlimited Edition
Data.com Clean available in: Developer, Enterprise, and Professional Editions
Data.com Clean available for an additional cost in: Unlimited Edition
User Permissions Needed
To implement Data.com:
“Customize Application”
To enable Data.com users:
“Manage Users”
To install AppExchange packages:
“Download AppExchange Packages”
You can prevent individual account, contact, and lead records from having blank fields filled with Data.com data when
automated Clean jobs are run. To do so, download and install the Data.com Reports AppExchange package. It provides a
custom field you add to your page layouts to identify the records you don’t want auto-updated, and a validation rule that
identifies attempted auto-updates on fields within those records. The validation rule tells the clean job to skip those records.
Important: If you use the Block Auto-Update validation rule, keep this best practice in mind.
•
This validation rule generates entries and related messages in Data.com Clean job logs, but your jobs may generate
other entries and errors, as well, so make sure you examine your job logs carefully.
1. Download and install the Data.com Reports AppExchange package.
2. For each object you run Clean jobs on, edit your page layouts to add the Data.com Does Not Auto-Update checkbox,
so it’s available to users.
Tip: You can use the Data Loader or a custom trigger to select this checkbox for multiple records.
3. Open each record that you do not want to be auto-updated, and select the Do Not Auto-Update checkbox.
112
Data.com Clean
Data.com Clean User Features and Enhancements
When automated jobs run, for each record that is not updated, you’ll see a message in the job log: “This record has
been excluded from automated field updates from Data.com Clean jobs.”
Data.com Clean Product Automatically Enabled
In Summer ‘12, when you implemented the Data.com Clean product, you had to enable it before you could set up automated
Clean jobs and users could manually clean account, contact, and lead records. With Winter ’13, we’ve eliminated that extra
step and enabled the Data.com Clean product for you. To take a look, just go to Your Name > Setup > Data.com
Administration > Clean > Settings. For complete details, check out “Implementing Data.com Clean” in the Salesforce online
help.
Data.com Corporate and Premium Now Come with Clean Enabled
In Summer ‘12, when you implemented Data.com Corporate or Data.com Premium, you had to enable Clean functionality
before your users could manually clean account, contact, and lead records. With Winter ’13, we’ve eliminated that extra step
and enabled Clean for you. To take a look, just go to Your Name > Setup > Data.com Administration > Clean > Settings.
For complete details, check out “Configuring Data.com Corporate,” “Configuring Data.com Premium,” in the Salesforce
help.
Note: To get automated clean jobs, you need to purchase the Data.com Clean product.
Data.com Clean User Features and Enhancements
Check out these new Data.com Clean user features for Winter ’13.
•
•
When you add a Data.com contact as a lead or clean a lead record, if Data.com has a D&B record for the lead’s company,
we’ll create a D&B Company record and link it to the lead through its D&B Company field. Read the “D&B Companies”
section of these release notes for more information about D&B Company records added to leads.
Our definition of Inactive now includes the D&B designation of “non-marketable”. This may cause you to see more
records with Inactive status.
113
Data.com Clean
Data.com Clean User Features and Enhancements
Adding Data.com Contacts as Leads
Data.com available in: Contact Manager, Developer, Enterprise, Group, and Professional Editions
Data.com available for an additional cost in: Unlimited Edition
Data.com Clean available in: Developer, Enterprise, and Professional Editions
Data.com Clean available for an additional cost in: Unlimited Edition
User Permissions Needed
To add Data.com contacts as leads:
“Create” on leads
Need leads? Get them from Data.com. First search for contacts, then add the contacts you want to Salesforce as leads. Records
you’ve already added from Data.com ( ) won't be added again unless the record has been deleted from Salesforce or your
organization allows duplicates.
If you use Data.com Premium, when you add a lead from Data.com, a corresponding D&B Company record (if one exists in
Data.com) is automatically created in Salesforce and linked to the lead record via its D&B Company field.
1. Search for contacts.
2. Select the contacts you want to add and click Add to Salesforce.
3. Select Leads to add the records as leads and click Continue.
Note: If one or more records can’t be added to Salesforce because of errors, we’ll notify you and provide a .csv file
with the error details.
4. Click Go to Leads to view the list of new records on the Leads home page.
114
Data.com Clean
Data.com Clean User Features and Enhancements
Cleaning Records Manually With Data.com Clean
Data.com available in: Contact Manager, Developer, Enterprise, Group, and Professional Editions
Data.com available for an additional cost in: Unlimited Edition
Data.com Clean available in: Developer, Enterprise, and Professional Editions
Data.com Clean available for an additional cost in: Unlimited Edition
User Permissions Needed
To clean account records:
“Edit” on accounts
To clean contact records:
“Edit” on contacts
To clean lead records:
“Edit” on leads
Use Data.com Clean to make sure your CRM records are always up to date.
Clean works for all the account, contact, and lead records you have access to in Salesforce—not just those you previously added
from Data.com.
If your organization uses Data.com Premium and you clean an account or lead record that doesn’t yet have a D&B Company
record linked to it, Salesforce will create one if it’s available in Data.com and link the two records. You’ll also see a D&B
Company Record Linked field on the comparison page when you clean the account or lead.
Note: If you clean your account records with the Data.com Corporate or Premium product or Data.com Clean,
Data.com converts non-USD currencies to USD every month, which may cause the values in this field to change.
For organizations that use non-USD currencies, we ignore the Annual Revenue field when determining a record’s
clean status (so the Clean Status field’s value does not change). We also remove the value from the Annual
Revenue field on account records and the clean comparison page.
1. Check the record’s Clean Status field.
2. If the status is Different or Not Compared, click Clean to open the comparison page and compare the Salesforce
record with Data.com’s.
Tip: From the Clean Status field, you can also get additional status information (such as which fields have
different data in Data.com) and then clean the record. Just click the status icon ( ) and the popup will guide you.
3. Compare the two records side by side. You’ll see a check mark next to any Data.com field value that matches the
corresponding value in your Salesforce record.
4. Select the check box next to any Data.com value you want to accept.
5. Click Save when you’re satisfied that the record is accurate, even if you don’t accept any data from Data.com.
The Clean Status field reflects the record’s current status and its time stamp is updated to reflect your activity.
Note: If you click Cancel, your Salesforce record’s data won’t be updated, but if Data.com finds a better match
for the record, the values in its Clean Status and Data.com Key fields may change. These two fields always
reflect the best match from Data.com as of the most recent clean process, whether the record was cleaned manually
(by you) or automatically (via Clean jobs).
115
D&B Companies
D&B Companies Administrator Features and Enhancements
If your organization uses Data.com Premium and you’ve cleaned an account or lead record that doesn’t yet have a D&B
Company record linked to it, Salesforce will create a D&B Company record (if available) and link it when you click Save.
The next time you open the comparison page, the linked record will be identified by its D-U-N-S Number in the D&B
Company Record Linked field.
Expanded Definition of Inactive Status for Account Records
A Data.com status of Inactive now includes records that D&B has classified as non-marketable. The expanded definition
now includes any of the following.
•
•
•
The record contains out-of-date or inaccurate information, such as an invalid email address.
The company associated with the account or contact record is no longer in business.
The company associated with the account record has been classified by D&B as non-marketable
A non-marketable company, as defined by D&B, is one that is believed to be in business and has not requested exclusion
from the D&B database; but whose D&B record has not been updated in the past 24 months and does not include a complete
business name, a valid physical or mailing address, or an SIC code.
D&B COMPANIES
D&B Companies Administrator Features and Enhancements
Winter ‘13 offers lots of great enhancements for D&B Companies.
•
•
With Data.com Corporate and Premium, get D&B Company fields on lead records. With Premium, get a linked D&B
Company record (if available) when you add or clean a lead record.
If you use Data.com Premium and the Data.com Clean product, you can now set up clean jobs to automatically update
D&B Company records linked to accounts and leads.
D&B Companies for Leads–GA
For the Winter ’13 release, Data.com has enhanced its D&B Companies offering to include leads.
In Summer ’12, with Data.com Corporate and Premium products,. you got D&B fields on account records, and with Premium,
when you added or cleaned a record, you got a D&B Company record (if available) linked to that record through its D&B
Company field.
With Winter ’13, you get the same features and rich data for leads. To set up D&B Companies for leads, make sure you follow
the guidelines in the Salesforce help topics “Implementing Data.com” and “Implementing Data.com Clean”.
116
D&B Companies
D&B Companies Administrator Features and Enhancements
D&B Companies Overview
Data.com available in: Contact Manager, Developer, Enterprise, Group, and Professional Editions
Data.com available for an additional cost in: Unlimited Edition
Data.com Clean available in: Developer, Enterprise, and Professional Editions
Data.com Clean available for an additional cost in: Unlimited Edition
Dun & Bradstreet (D&B) is the world’s leading source of commercial information and insight on businesses, enabling companies
to Decide with Confidence® for over 170 years. D&B’s global database contains the world’s largest source of business records,
and is backed by D&B’s proprietary DUNSRight® quality assurance process, ensuring you that company information is
complete and accurate.
As part of Salesforce’s Data.com solution, D&B gives users integrated access to its trusted global database of millions of
companies and corporate structures, and over 70 fields of company information, such as D-U-N-S Number and NAICS
industry codes, directly in Salesforce.
D&B Companies is available to organizations that purchase Data.com Premium. Here’s how it works.
When you add an account or lead from Data.com, a corresponding D&B Company record is automatically created and linked
to that record via its D&B Company field. Just click the link to open the D&B Company record and view the rich set of D&B
data, including a Company Description field, plus sections like Primary Data and Firmographic Data. If the D&B Company
record is linked to an account, the Accounts related list on the page links back to the account record.
For example, if you add an account record for Starbucks, when you open its record, the D&B Company field value is Starbucks
Corporation. The value is underlined to identify it as a link. Just click the link to open the Starbucks Corporation D&B
Company record.
For accounts and leads not added from Data.com (those created manually, for example), if a corresponding D&B Company
record exists, it is added to Salesforce and linked to the account or lead record the first time that record is cleaned.
If your company also uses the Data.com Clean product, you can use automated jobs to update your D&B Company records.
117
D&B Companies
D&B Companies Administrator Features and Enhancements
Implementing D&B Companies
Data.com available in: Contact Manager, Developer, Enterprise, Group, and Professional Editions
Data.com available for an additional cost in: Unlimited Edition
Data.com Clean available in: Developer, Enterprise, and Professional Editions
Data.com Clean available for an additional cost in: Unlimited Edition
User Permissions Needed
To implement D&B Companies:
“Customize Application”
If your organization has purchased Data.com Premium, you have access to the D&B Companies object, which provides D&B
data for accounts and leads you add to Salesforce. Cleaning an account or lead record also creates a D&B Company record if
you don’t yet have one in Salesforce.
The D&B Companies tab lists all the D&B Company records you have in Salesforce.
Each D&B Company record displays a large set of D&B fields. If you’ve purchased the Data.com Clean product, you can
also use automated jobs to clean D&B Company records. Cleaning a D&B Company record automatically fills blank fields
and overwrites old data with new.
Setting up D&B Companies is easy to do—just follow the steps for configuring Data.com Premium, and keep these guidelines
in mind.
Tip: To find out which Data.com product your organization has, just click Your Name > Setup > Data.com
Administration > Licenses & Limits. On the Licenses & Limits page, check the Data.com Licenses section. You’ll
see either “Corporate” or “Premium”.
Implementation Guidelines
•
•
•
•
•
Make sure you add the D&B Companies tab to user profiles.
If you use the Data.com Clean product and want to automatically update D&B Company records, define that preference.
The D&B fields that also exist on the account object (such as D-U-N-S Number, SIC Code, and NAICS Code) are
managed fields, and they are updated by both manual and automated clean processes. Automated clean jobs are available
if you use the Data.com Clean product.
Because the D&B Company object is read-only (except for Data.com Clean updates), you can’t create task and field update
workflow rules for it. Rules that are triggered by D&B field changes that act on other objects are permitted, however. For
example, you can create a workflow rule that updates a custom field on an account record when a D&B Company record
is created.
You can enable users to view and delete D&B Company records by assigning the appropriate profile permissions. Standard
profiles automatically have the Read D&B Company records permission, but need to be assigned the Delete D&B
Company records permission. Custom profiles need to be assigned both permissions.
118
D&B Companies
D&B Companies Administrator Features and Enhancements
Defining Your Data.com Clean Job Preferences (Data.com Clean Only)
Data.com available in: Contact Manager, Developer, Enterprise, Group, and Professional Editions
Data.com available for an additional cost in: Unlimited Edition
Data.com Clean available in: Developer, Enterprise, and Professional Editions
Data.com Clean available for an additional cost in: Unlimited Edition
User Permissions Needed
To define Data.com Clean Preferences:
“Customize Application”
Clean preferences let you specify:
•
•
Which objects’ records to clean with automated jobs
How you want to clean them
Jobs can either:
•
•
Flag all fields in a Salesforce record whose values are different from those in the matched Data.com record, or
Flag fields with different values and also auto-fill blank fields
You can set flag-only or flag and auto-fill preferences for entire records or field by field. If you use Data.com Premium, you
can also clean D&B Company records that are linked to accounts and leads. D&B Company clean jobs automatically fill or
overwrite field values on D&B company records, but do not change data on linked account or lead records.
Your preferences take effect when the next scheduled clean job runs, and users will see the flags, as appropriate, when they
clean records manually.
Note: Converted leads are excluded from Leads clean jobs.
1. Click Your Name > Setup > Data.comAdministration > Clean > Preferences.
2. Select the Enable Clean jobs checkbox for each object whose records you want to clean. (If you clear the Enable Clean
jobs checkbox, automated jobs will not run for objects of that type.)
3. For each object you’ve enabled, select your clean preference.
•
•
Flag all differences per record to only identify fields whose values are different from Data.com values
Flag differences and auto-fill blank fields to identify fields whose values are different and fill blank
fields with values from Data.com.
•
Customize settings field by field.
4. If you select the Customize option for any object, you can select either Flag or Flag & Auto-Fill for individual
fields.
5. If you want to clean D&B Company records, select the Enable Clean jobs for D&B Companies checkbox.
6. When you finish setting clean preferences for all the objects you want to clean, click Save.
119
D&B Companies
D&B Companies User Features and Enhancements
D&B Companies User Features and Enhancements
Here are the new user features for D&B Companies.
•
•
•
With Data.com Corporate and Premium products, get D&B Company fields on lead records. With Premium, get a linked
D&B Company record (if available) when you add or clean a lead record..
When you convert a lead, D&B Company data is transferred to the account and lead records that are created.
If you use Data.com Premium, search Data.com by Global Ultimate D-U-N-S Number to see a list of accounts within
an organization’s corporate structure and then add those records to Salesforce.
120
D&B Companies
D&B Companies User Features and Enhancements
Adding Data.com Contacts as Leads
Data.com available in: Contact Manager, Developer, Enterprise, Group, and Professional Editions
Data.com available for an additional cost in: Unlimited Edition
Data.com Clean available in: Developer, Enterprise, and Professional Editions
Data.com Clean available for an additional cost in: Unlimited Edition
User Permissions Needed
To add Data.com contacts as leads:
“Create” on leads
Need leads? Get them from Data.com. First search for contacts, then add the contacts you want to Salesforce as leads. Records
you’ve already added from Data.com ( ) won't be added again unless the record has been deleted from Salesforce or your
organization allows duplicates.
If you use Data.com Premium, when you add a lead from Data.com, a corresponding D&B Company record (if one exists in
Data.com) is automatically created in Salesforce and linked to the lead record via its D&B Company field.
1. Search for contacts.
2. Select the contacts you want to add and click Add to Salesforce.
3. Select Leads to add the records as leads and click Continue.
Note: If one or more records can’t be added to Salesforce because of errors, we’ll notify you and provide a .csv file
with the error details.
4. Click Go to Leads to view the list of new records on the Leads home page.
Understanding Lead Conversion
Available in: Group, Professional, Enterprise, Unlimited, and Developer Editions
When you convert a lead, Salesforce creates a new account, contact, and, optionally, an opportunity using the information
from the lead. Any campaign members are moved to the new contact and the lead becomes read only. If an existing account
and contact have the same names as those specified on the lead, you can choose to update the existing account and contact.
Information from the lead is inserted only into blank fields; Salesforce does not overwrite existing account and contact data.
All open and closed activities from the lead are attached to the account, contact, and opportunity. You can assign the owner
of the records, and schedule a follow-up task. When you assign a new owner, only the open activities are assigned to the new
owner. If you have custom lead fields, that information can be inserted into custom account, contact, or opportunity fields.
Converted leads can't be viewed, although they appear in lead reports. Salesforce updates the Last Modified Date and
Last Modified By system fields on converted leads when picklist values included on converted leads are changed.
Consider the following when converting leads.
121
D&B Companies
Campaigns
D&B Companies User Features and Enhancements
If the lead matches an existing contact and both records are linked to the same campaign, the campaign
member status is determined by whichever is further along in the lifecycle of the campaign. For
example, if the lead member status is “sent” and the contact member status is “responded,” the
responded value is applied to the contact.
Related campaign information is always associated with the new contact record, regardless of the
user's sharing access to the campaign.
When more than one campaign is associated with a lead, the most recently associated campaign is
applied to the Primary Campaign Source field on the opportunity, regardless of the user's sharing
access to the campaign.
Chatter
Data.com / D&B
Company
When you convert a lead into an existing account, you don’t automatically follow that account.
However, when you convert the lead into a new account, you automatically follow the new account,
unless you disabled feed tracking for accounts in your Chatter settings.
If you use Data.com Premium, when you add a lead from Data.com, a corresponding D&B Company
record (if one exists in Data.com) is automatically created in Salesforce and linked to the lead record
via its D&B Company field. If you later convert that lead:
•
•
If the account is created from the conversion, the lead’s Company D-U-N-S Number field value
transfers to the account’s D-U-N-S Number field, and the lead’s D&B Company field value
transfers to the account’s D&B Company field.
The lead’s Data.com Key field value transfers to the contact’s Data.com Key field.
If you use Data.com Corporate, no D&B Company record is created, but the lead’s Data.com Key
field value transfers to the contact’s Data.com Key field.
Divisions
The new account, contact, and opportunity are assigned to the same division as the lead. If you update
an existing account during lead conversion, the account’s division is not changed, and the new contact
and opportunity inherit the account’s division.
Local Lead Names
The Company Name (Local) on the lead automatically maps to Account Name (Local), along
with their associated standard name fields.
Person Accounts
If your organization uses person accounts, you can convert leads to either person accounts or business
accounts. Leads with a blank Company field are converted to person accounts. The default person
account record type for your profile is applied to the new person account. Note that you can only
create leads with a blank Company field using the Force.com API. Leads with a value in the Company
field are converted to business accounts. The default business account record type for your profile is
applied to the new business account.
As a best practice, use different lead record types and page layouts to differentiate leads that will be
converted to person accounts from those that will be converted to business accounts. In particular,
remove the Company field from the page layouts of leads that will be converted to person accounts,
and make the Company field required on the page layouts of leads that will be converted to business
accounts.
If you create a lead, convert it, and then attach it to a person account owned by someone else, the
person account owner becomes the contact owner.
If you convert a lead owned by someone else and attach it to a person account that you own, the lead
owner becomes the contact owner.
122
D&B Companies
Record Types
D&B Companies User Features and Enhancements
If the lead has a record type, the default record type of the user converting the lead is assigned to
records created during lead conversion.
The default record type of the user converting the lead determines the lead source values available
during conversion. If the desired lead source values are not available, add the values to the default
record type of the user converting the lead.
Salesforce to
Salesforce
When you convert a lead, Salesforce to Salesforce inactivates the shared record and updates the
External Sharing related list in your connection's lead record with an Inactive (converted) status. Due
to inactivation of the shared record, changes to the Lead Status during conversion aren't reflected in
your connection's lead record.
Standard and Custom The system automatically maps standard lead fields to standard account, contact, and opportunity
Lead Fields
fields (see “Lead Conversion Mapping” in the online help).
For custom lead fields, your administrator can specify how they map to custom account, contact, and
opportunity fields (see “Mapping Custom Lead Fields” in the online help).
The system assigns the default picklist values for the account, contact, and opportunity when mapping
standard lead picklist fields that are blank. If your organization uses record types, blank values are
replaced with the default picklist values of the new record owner.
Territory Management If your organization uses territory management, the new account is evaluated by account assignment
rules and may be assigned to one or more territories. If the rules assign the account to exactly one
territory, then the opportunity will also be assigned to that territory. If the rules assign the account
to multiple territories, then the opportunity is not assigned to any territory.
Triggers
During lead convert, Apex triggers are fired, and universally required custom fields and validation
rules are enforced, only if validation and triggers for lead convert are enabled in your organization.
Salesforce ignores lookup filters when converting leads if the Enforce Validation and Triggers
from Lead Convert checkbox on the Lead Settings page is deselected.
Workflow
You can’t convert a lead that’s associated with an active approval process or has pending workflow
actions. For more information, see “Managing Approval Processes” in the online help and “Managing
Workflow Rules” in the online help.
Converting a lead to a person account won’t trigger workflow rules.
When a lead is converted by someone who isn't the lead owner, all workflow tasks associated with
the lead that are assigned to that user, except email alerts, are reassigned to the lead owner. Workflow
tasks assigned to users other than the lead owner and lead converter aren't changed.
123
D&B Companies
D&B Companies User Features and Enhancements
Cleaning Records Manually With Data.com Clean
Data.com available in: Contact Manager, Developer, Enterprise, Group, and Professional Editions
Data.com available for an additional cost in: Unlimited Edition
Data.com Clean available in: Developer, Enterprise, and Professional Editions
Data.com Clean available for an additional cost in: Unlimited Edition
User Permissions Needed
To clean account records:
“Edit” on accounts
To clean contact records:
“Edit” on contacts
To clean lead records:
“Edit” on leads
Use Data.com Clean to make sure your CRM records are always up to date.
Clean works for all the account, contact, and lead records you have access to in Salesforce—not just those you previously added
from Data.com.
If your organization uses Data.com Premium and you clean an account or lead record that doesn’t yet have a D&B Company
record linked to it, Salesforce will create one if it’s available in Data.com and link the two records. You’ll also see a D&B
Company Record Linked field on the comparison page when you clean the account or lead.
Note: If you clean your account records with the Data.com Corporate or Premium product or Data.com Clean,
Data.com converts non-USD currencies to USD every month, which may cause the values in this field to change.
For organizations that use non-USD currencies, we ignore the Annual Revenue field when determining a record’s
clean status (so the Clean Status field’s value does not change). We also remove the value from the Annual
Revenue field on account records and the clean comparison page.
1. Check the record’s Clean Status field.
2. If the status is Different or Not Compared, click Clean to open the comparison page and compare the Salesforce
record with Data.com’s.
Tip: From the Clean Status field, you can also get additional status information (such as which fields have
different data in Data.com) and then clean the record. Just click the status icon ( ) and the popup will guide you.
3. Compare the two records side by side. You’ll see a check mark next to any Data.com field value that matches the
corresponding value in your Salesforce record.
4. Select the check box next to any Data.com value you want to accept.
5. Click Save when you’re satisfied that the record is accurate, even if you don’t accept any data from Data.com.
The Clean Status field reflects the record’s current status and its time stamp is updated to reflect your activity.
Note: If you click Cancel, your Salesforce record’s data won’t be updated, but if Data.com finds a better match
for the record, the values in its Clean Status and Data.com Key fields may change. These two fields always
reflect the best match from Data.com as of the most recent clean process, whether the record was cleaned manually
(by you) or automatically (via Clean jobs).
124
D&B Companies
D&B Companies User Features and Enhancements
If your organization uses Data.com Premium and you’ve cleaned an account or lead record that doesn’t yet have a D&B
Company record linked to it, Salesforce will create a D&B Company record (if available) and link it when you click Save.
The next time you open the comparison page, the linked record will be identified by its D-U-N-S Number in the D&B
Company Record Linked field.
Finding and Adding Data.com Accounts by Global Ultimate D-U-N-S
Number
Data.com available in: Contact Manager, Developer, Enterprise, Group, and Professional Editions
Data.com available for an additional cost in: Unlimited Edition
Data.com Clean available in: Developer, Enterprise, and Professional Editions
Data.com Clean available for an additional cost in: Unlimited Edition
User Permissions Needed
To add accounts from Data.com
“Create” on accounts
If you use Data.com Premium, you can search D&B Company records by Global Ultimate D-U-N-S Number to see a list of
accounts within an organizations’s corporate structure and then add those accounts to Salesforce. The Global Ultimate is the
highest entity within an organization and is identified by a nine-digit Global Ultimate D-U-N-S Number. All companies
that are part of the same corporate structure as the Global Ultimate are identified by the same Global Ultimate D-U-N-S
Number.
Note: Before you can search by Global Ultimate D-U-N-S Number, the Search Global Ultimate D-U-N-S
button must be added to the D&B Company page layout.
1. Go to the detail page of the D&B Company record you want to find accounts with the same Global Ultimate D-U-N-S
Number for.
2. Click Search Global Ultimate D-U-N-S.
The Data.com tab opens and displays a list of accounts that match the Global Ultimate D-U-N-S Number of the D&B
Company record.
3. If the results list is long, you can sort the results by any table heading. The Location Type heading, for example, sorts
results by headquarters, single location, and branch.
4. If you don’t see what you’re looking for, use filters to narrow your results.
5. For more information about a particular account, such as its account site, click the account name to see its account card.
6. Add all accounts or a selection to Salesforce.
7. From the confirmation message, click Go to Accounts to view the list of new records on the Accounts home page.
Here are some things to keep in mind when searching by Global Ultimate D-U-N-S Number.
•
•
Global Ultimate D-U-N-S Number search results only include accounts that are in Data.com, so you may not get complete
Global Ultimate D-U-N-S results if some members of the corporate structure are not in Data.com.
You can use filters to narrow down your Global Ultimate D-U-N-S Number search results.
125
D&B Companies
•
•
D&B Companies User Features and Enhancements
You can export records from your Global Ultimate D-U-N-S Number search results.
You can’t save the search.
126
SITE.COM
Page Breadcrumbs
Available for purchase in: Enterprise and Unlimited Editions
Available (with limitations) in: Developer Edition
In Winter ’13, we added a new Breadcrumb page element that you can add to your Site.com pages and page templates to help
users navigate through your site. Just like the Menu page element, a breadcrumb is based on the site map. You can customize
the breadcrumb by changing the root node, the separator between the nodes, and the visual style of the breadcrumb itself.
For more information, see “Adding Breadcrumb Navigation to Pages” in the online help.
Updated Menu Source Options
Available for purchase in: Enterprise and Unlimited Editions
Available (with limitations) in: Developer Edition
In Winter ’13, we updated the Menu Source field on the Properties pane to give publishers and designers greater flexibility
when creating navigation menus for site pages.
•
•
Use Other Map has been renamed to Landing Pages to better identify which pages it refers to.
We also added two new options that let you choose from a wider array of site pages for your menu.
◊ Child Pages—Create a menu using the child pages of the current page.
◊ Sibling Pages—Create a menu using all the pages that share the same parent as the current page.
Page Visibility in Menus and Breadcrumbs
Available for purchase in: Enterprise and Unlimited Editions
Available (with limitations) in: Developer Edition
In Winter ’13 we added a new checkbox to help you customize your navigation elements. You can hide a page in menus,
breadcrumbs, and the site map by selecting the Hide Page checkbox found on the Properties pane for each page. This setting
also prevents website visitors from accessing the page’s direct URL. By default, all pages are visible.
127
Site.com
Site Map Links
Site Map Links
Available for purchase in: Enterprise and Unlimited Editions
Available (with limitations) in: Developer Edition
Now pages aren’t the only things you can assign to your site map. Add internal or external URLs to your site map to customize
your navigation menus and breadcrumbs. To create a site map link, click New in the Site Pages view on the Overview tab and
select Site Map Link. Give it a name, type in a URL, and you’re off!
Site map links are automatically included in navigation menus and breadcrumbs. However, you can’t set a site map link as a
custom root node in a breadcrumb.
Cascading Editability
Available for purchase in: Enterprise and Unlimited Editions
Available (with limitations) in: Developer Edition
Previously, when you made a page element in a page template editable, it was editable only in pages or templates based directly
on that template. With Winter ’13, we’ve removed that restriction.
When you enable the Editable property of a page element, any pages or child templates based on the template also inherit
the enabled status. In turn, the enabled status in the child template cascades to any of its children, and so on. If you don’t want
its editability to cascade to any lower levels, disable the Editable property of a page element in a child template.
Default Content in Editable Page Elements
Available for purchase in: Enterprise and Unlimited Editions
Available (with limitations) in: Developer Edition
With Winter ’13, content added to an editable area on a page template becomes default content for the area in derived pages
and templates.
The content of all editable page elements on a child page or template is linked to the content of the editable elements on its
parent page template. When you update the content of an editable page element on the parent template, the changes are
pushed down to any child pages or page templates. However, if you modify the content of an editable page element at the
child page or template level, you break the link between the elements, and any subsequent changes made to the page element
on the parent template won't trickle down to its children.
Break the link between parent and child editable elements by selecting the child element on the page or in the Page Structure
pane and clicking
> Override Parent Content.
128
Site.com
Improved Linking in Data Elements
You can return control of the editable page element to the parent template by selecting the child element on the page or in
the Page Structure pane and clicking
> Revert to Parent Content. When you do this, any custom content in the child
editable page element is lost.
Disabling the Editable property of a panel in a parent template overrides any changes made to that panel in child pages or
templates. Changes to the panel at the child level disappear, and the panel reflects only the content from the parent template.
However, the changes at the child level aren’t lost. Re-enabling the Editable property of the panel in the parent template
restores the custom content previously added to its children.
Improved Linking in Data Elements
Available for purchase in: Enterprise and Unlimited Editions
Available (with limitations) in: Developer Edition
When using data elements (previously called “repeater elements”), you can now more easily create hyperlinks to custom URLs,
to items in your site, and to emails. The new link type options match those available when adding links in content blocks to
provide a more consistent look and feel. You can also specify where to open the linked item, such as in a new browser window
or in a popup window.
See “Displaying Data Using Data Elements” in the online help.
New Status Column
Available for purchase in: Enterprise and Unlimited Editions
Available (with limitations) in: Developer Edition
We’ve added a Status column to the Site.com site list page that shows you what state your site is in:
•
•
In Development—The site has never been published.
Published—The site has been published at least once.
“Nested Templates” Renamed “Child Templates”
Available for purchase in: Enterprise and Unlimited Editions
Available (with limitations) in: Developer Edition
When you create a page template from another page template, the derived template inherits the characteristics of its parent.
Therefore, in the interest of clearer and more user-friendly terminology, “nested templates” are now “child templates.”
When working with page templates, the Create Nested Template menu option is now Create Child Template.
129
Site.com
Repeaters and Repeater Elements Renamed
Repeaters and Repeater Elements Renamed
Available for purchase in: Enterprise and Unlimited Editions
Available (with limitations) in: Developer Edition
In Winter ’13, Repeater Elements and Repeaters in the Page Elements pane are now called “Data Elements” and “Data
Repeaters,” respectively.
130
FORCE.COM
Geolocation Custom Field—Beta
Available in: All Editions
User Permissions Needed
To create or change custom fields:
“Customize Application”
The geolocation custom field allows you to create a field that identifies a location by its latitude and longitude. You can then
use the geolocation field with the DISTANCE and GEOLOCATION formula functions to calculate distances between
locations. For example, you can calculate the distance between two geolocation fields (such as between the warehouse and the
store), or between a geolocation field and any fixed latitude-longitude coordinates (such as between the warehouse and 37.775°,
–122.418°, also known as San Francisco).
Note: This is a beta release of geolocation and its functionality has known limitations, outlined here. To provide
feedback on geolocation, go to IdeaExchange.
Geolocation Field Limitations
Geolocation is a compound field that counts toward your organization’s limits as three custom fields: one for latitude, one for
longitude, and one for internal use. In this beta release, support for the compound field (geolocation) vs. the field’s components
(latitude and longitude) varies depending on the functionality you’re using in Salesforce. For example, you can create list views
that show the field and its components, but you can’t select the compound geolocation field in Apex; you can only run SOQL
queries on a geolocation field’s components.
Other limitations of this geolocation beta release include:
•
•
•
•
•
•
•
History tracking is not available for geolocation fields.
Geolocation fields are not supported in custom settings.
Geolocation fields are not available in reports, dashboards, validation rules, Visual Workflow, or workflow and approvals.
Geolocation fields cannot be searched.
Geolocation fields are not available in Schema Builder.
DISTANCE and GEOLOCATION formula functions are available only when creating formula fields and in Visual
Workflow.
Geolocation is supported in Apex only through SOQL queries, and only at the component level.
Creating a Geolocation Custom Field
1. Click Your Name > Setup > Create > Objects and select one of the custom objects in the list.
2. In Custom Fields & Relationships, click New.
3. Choose Geolocation and click Next.
131
Organization-Wide Permission Sets
Organization-Wide Permission Sets Overview
4. Enter the Geolocation field attributes, including Latitude and Longitude Display Notation, which determines how the
notation appears in the Salesforce interface:
Degrees, Minutes, Seconds
A notation for angular measurement that is based on the number 60: there are 360 degrees to a circle, 60 minutes to
a degree, and 60 seconds to a minute.
Decimal
Expresses the value as degrees, and converts the minutes and seconds to a decimal fraction of the degree. Decimal
notation does not use cardinal points. North and East are positive values; South and West are negative values.
5. Follow the steps to complete the wizard.
ORGANIZATION-WIDE PERMISSION SETS
Organization-Wide Permission Sets Overview
Available in: Enterprise, Unlimited, and Developer Editions
User Permissions Needed
To create and assign permission sets:
“Manage Users”
In Winter ’13, you can create organization-wide permission sets, which aren’t associated with a specific user license. In the
past, if you wanted to assign one set of permissions and settings to users with different user licenses, you would create several
permission sets—one for each type of user license. Now with organization-wide permission sets, you can create a single
permission set and assign it to users with different user licenses.
For example, let’s say you’d like to grant the “API Enabled” permission to several users in your organization—some have the
Salesforce user license and others have the Salesforce Platform user license. You can now create a single organization-wide
permission set with no associated user license and assign it to both types of users.
Creating an Organization-Wide Permission Set
Before creating a permission set, consider who you’ll assign it to. If you plan to assign the permission set to users with only
one type of user license, it’s still a best practice to associate that user license with the permission set. But if you plan to assign
the permission set to users with different licenses, create an organization-wide permission set.
To create an organization-wide permission set:
1. Click Your Name > Setup > Manage Users > Permission Sets.
2. Click New.
3. Enter a label, API name, and description.
132
Organization-Wide Permission Sets
Organization-Wide Permission Sets Overview
4. For User License, select --None--.
5. Click Save.
In the permission set overview page, a permission set with no associated user license has a blank User License field.
Showing Organization-Wide Permission Sets in List Views
Once you’ve created multiple permission sets, you might want to keep track of their user license assignments. For a quick
overview of user license assignments in permission sets, create or edit a permission sets list view that includes the User License
column.
1. Click Your Name > Setup > Manage Users > Permission Sets.
2. Click Create New View, or select a view and click Edit.
3. Under Specify Filter Criteria, specify the conditions that the list items must match.
Tip: To show only organization-wide permission sets (that is, permission sets with no user license), enter User
License for the Setting, set the Operator to equals, and enter "" in the Value field.
4. Under Select Columns to Display, add User License to the settings that you want to appear as columns in the list view.
5. Click Save, or if you're cloning an existing view, rename it, and click Save As.
This permission sets list view includes a User License column. The Recruiter App permission set has no associated user license,
so its User License entry is blank.
133
Organization-Wide Permission Sets
Organization-Wide Permission Sets Overview
Assigning Permission Sets
When you assign a permission set with no associated user license, all of its enabled settings and permissions must be allowed
by the user’s license, or the assignment will fail. For example, if you create an organization-wide permission set and enable
“Read” on opportunities, you can’t assign that permission set to users with the Salesforce Platform user license because the
license doesn’t allow access to opportunities.
To assign permission sets:
1.
2.
3.
4.
Click Your Name > Setup > Manage Users > Users.
Select a user.
In the Permission Set Assignments related list, click Edit Assignments.
To assign a permission set, select it from the Available Permission Sets box and click Add. To remove a permission set
assignment, select it from the Enabled Permission Sets box and click Remove.
5. Click Save.
Best Practices for Organization-Wide Permission Sets
Specifying a user license option
You can only specify the user license when creating a new permission set; you can’t change its user license when editing
or cloning it.
Editing organization-wide permission sets
When editing organization-wide permission sets that are already assigned to users, any additional permissions and
settings that you enable must be allowed by all assigned users’ licenses or the edit will fail. For example, if an existing
permission set is assigned to a Salesforce Platform user, you can’t enable “Modify All Data” in the permission set because
the user license doesn’t allow it.
Using organization-wide permission sets in packages
When creating permission sets for AppExchange packages, you can’t always anticipate the user licenses within organizations
that will install a package. Furthermore, if you don’t have the required user licenses in your own organization, you can’t
create permission sets that are associated with those licenses. Organization-wide permission sets are a great solution in
these situations. As a best practice, create packaged permission sets that grant access to the components in a package,
and not standard Salesforce components. As in any organization, organization-wide permission sets respect the contract
terms of any user license.
134
User Sharing—Pilot
User Sharing Overview
USER SHARING—PILOT
User Sharing Overview
Available in: Enterprise, Unlimited, and Developer Editions
Winter ’13 introduces Sharing capabilities to the user object, enabling you to restrict or extend access to user records. These
new features are collectively referred to as User Sharing, and they can’t be used simultaneously with Chatter or the Communities
pilot.
Note: User Sharing is available through a pilot program. In Winter ’13, user sharing can’t be disabled after it is turned
on. For more information on enabling it for your organization, contact salesforce.com.
With User Sharing, you can grant Read/Write or Read Only access to user records. A user record contains a user’s details,
including his or her role and profile information. This table explains what it means to have Read access on a user record.
Read access to the record?
What can you see?
No
User’s name only. You can’t edit the record.
Yes
User’s name and detail page. You can also see the user in lookups, list views,
ownership changes, user operations, and search. Internal users with Read/Write
access can edit the record, excluding fields such as role, profile, or permissions.
Portal users can’t edit user records.
User Sharing includes these new features:
•
•
•
•
Organization-wide defaults for user records
User sharing rules based on membership to a public group, role, or territory
Manual sharing on individual user records
“View All Users” permission
These features are introduced in the following sections.
135
User Sharing—Pilot
User Sharing Overview
Setting the Organization-Wide Defaults for User Records
User Permissions Needed
To set default sharing access:
“Manage Users”
Note: When User Sharing is first turned on, the default access setting is Public Read Only for internal users, and
Private for external users. If the default access is Private for external users such as high-volume portal users and guest
users, they don’t have Read access to internal users. Internal users maintain Read/Write access to their own records.
You can open up access using sharing rules, manual sharing, or user permissions.
Let’s say that your organization has internal users (employees and sales agents) and external users (customers/portal users)
under different agents or portal accounts, with these requirements:
•
•
•
Employees can see everyone.
Sales agents can see employees, other selected agents, and their own customer user records only.
Customers can see other customers only if they are under the same agent or portal account.
To achieve the above requirements, you can set the default internal and external access to Private, and extend access using
sharing rules, manual sharing, or user permissions. Employees can be granted the “View All Users” permission.
This graphic illustrates how the organization-wide defaults work with sharing rules, manual sharing, and the “View All Users”
permission.
136
User Sharing—Pilot
User Sharing Overview
You can set the sharing defaults to Private or Public Read Only for internal and external user records. It must be set to Private
if at least one user shouldn’t see a record. After setting the defaults, you can open up access by granting Read/Write or Read
Only access to selected user records.
To set the organization-wide sharing defaults for the user object:
1. Click Your Name > Setup > Security Controls > Sharing Settings.
2. Click Edit in the Organization-Wide Defaults area.
3. Select the default internal and external access you want to use.
The default external access must be more restrictive or equal to the default internal access.
4. Click Save.
You can’t deselect Grant Access Using Hierarchies for the user object. Users that are higher in the role or territory hierarchy
maintain Read access to their subordinates.
Note: Users inherit the same level of access to records that users below them in the role hierarchy have access to.
These are common combinations for default internal and external access.
Default Internal
Access
Default External
Access
Description
Scenario 1
Private
Private
Users have Read access to those below them in the role hierarchy.
External users don’t have Read access to internal users and vice
versa.
Scenario 2
Public Read Only
Private
Internal users have Read access to all internal and external users.
External users don’t have Read access to internal users.
Internal users have Read/Write access to their own records and Read access to their subordinates, regardless the defaults.
External users include portal users and guest users. Portal users have Read access to other portal users if they are in the same
portal account, even if the default external access is Private.
Creating User Sharing Rules
User Permissions Needed
To create sharing rules:
“Manage Users”
Create user sharing rules if you are extending access to user records. User sharing rules can be based on membership—public
groups, roles, or territories—or on other criteria, such as Department and Title. You can define up to 300 user sharing rules,
including up to 50 criteria-based sharing rules.
User sharing rules based on membership enable user records belonging to members of one group to be shared with members
of another group. Before you can create a membership-based user sharing rule, confirm that the appropriate groups have been
created. For example, if you wish to share users who are based in San Francisco with members of the Sales Agent role, you
may have two groups with the selected members in each group.
To create a user sharing rule:
137
User Sharing—Pilot
1.
2.
3.
4.
5.
User Sharing Overview
Click Your Name > Setup > Security Controls > Sharing Settings.
In the User Sharing Rules related list, click New.
Enter the Label Name and click the Rule Name field to auto-populate it.
Select a rule type.
Depending on the rule type you selected, do the following:
Based on group membership
Users that are members of a group can be shared with members of another group. In the Users who are members
of line, select a category from the first drop-down list and a set of users from the second drop-down list (or lookup
field, if your organization has over 200 groups, roles, or territories).
Based on criteria
Specify the Field, Operator, and Value criteria that records must match to be included in the sharing rule. The fields
available depend on the object selected, and the value is always a literal number or string. Click Add Filter Logic...
to change the default AND relationship between each filter.
6. In the Share with line, specify the group who should have access to the user records. Select a category from the first
drop-down list and a set of users from the second drop-down list or lookup field.
7. Select the sharing access setting for users.
Access Setting
Description
Read Only
Users can view, but not update, records.
Read/Write
Users can view and update records.
High-volume portal users and guest users cannot be included in sharing rules. Use manual sharing when sharing high-volume
portal users and guest users with internal users.
Granting Access to User Records Manually
User Permissions Needed
To grant access to your own user record:
“View All Users”
To grant access to any other user record:
“Manage Users”
Users can manually grant or increase access to user records if others cannot access it through other methods such as the
organization-wide defaults, sharing rules, or role hierarchy. Users inherit the same access as users below them in the role
hierarchy. High-volume portal users can be included in manual shares to be shared with other users.
To grant access to a user record:
1. Click Sharing on the user record you want to share.
The Sharing Detail page lists the users, groups, roles, and territories that have access to the user record.
2. Click Add.
3. From the drop-down list, select the group, user, role, or territory to share with.
138
Visual Workflow Enhancements
Search Controls in the Cloud Flow Designer
4. Choose the specific groups, users, roles, or territories who will have access by adding their names to the Share With list.
5. Select the access level for the record you are sharing.
Possible values are Read/Write or Read Only, depending on your organization-wide defaults for users. You can only grant
a higher access than your organization-wide default.
6. Click Save.
To edit or delete the record access, click Sharing on the record, and click Edit or Del next to the manual share. You can’t edit
the access in some cases, such as when your organization-wide defaults is set to Public Read Only and the only valid access
level on the manual share is Read/Write.
Note these restrictions when sharing external users with internal users.
External users
Comments on manual sharing
High-volume portal users
Share with internal users only. You can’t share internal users
with high-volume portal users.
Guest users
Share with internal users, and vice versa.
“View All Users” User Permission
“View All Users” grants users Read access to all users in the organization, including both active and inactive users, portal users,
and guest users. Only users in the User Sharing pilot program can use this permission, which lets a user view all user records
regardless of the sharing settings.
System administrators and users with the “Manage Users” permission get the “View All Users” permission automatically with
User Sharing.
VISUAL WORKFLOW ENHANCEMENTS
Search Controls in the Cloud Flow Designer
Search controls have been added to the Palette and expanded in the Explorer to help you quickly find what you need to build
and update your flows.
139
Visual Workflow Enhancements
Search Controls in the Cloud Flow Designer
Searching the Palette
As you add Apex classes that use the Process.Plugin interface and add more flows to your organization, it becomes more
challenging to find a specific Apex class or flow within the Palette. You can, however, search the Palette to quickly find what
you need to add an Apex plug-in or subflow element to your flow.
Available in: Enterprise, Unlimited, and Developer Editions
User Permissions Needed
To open, edit, or create a flow in the Cloud Flow Designer:
“Manage Force.com Flow”
Open a flow in the Cloud Flow Designer. Then use the following options to find a Palette item.
•
On the Palette tab, enter search text.
The Palette displays only the items that contain the entered text.
•
Click
•
To remove the filter, click
to filter the Palette tab contents to one type of element.
and select SEARCH ALL.
Searching a Flow
As a flow grows and becomes more complex, it becomes more challenging to find things within it. The Cloud Flow Designer
offers tools for quickly finding flow elements and resources.
Available in: Enterprise, Unlimited, and Developer Editions
User Permissions Needed
To open, edit, or create a flow in the Cloud Flow Designer:
“Manage Force.com Flow”
Open the flow in the Cloud Flow Designer. Then use one or more of the following options to find an element or resource in
the flow.
•
On the Explorer tab, enter search text.
The Explorer tab displays only the elements and resources whose properties contain the entered text.
•
Click
to filter the Explorer tab contents to one type of element or resource.
To remove the filter, click
•
•
•
and select SEARCH ALL.
Select Highlight Results on Canvas to dim all visible elements on the canvas other than the Explorer search or filter
results.
Zoom in and out as desired using the controls near the top right corner of the canvas area.
To see the location of an Explorer item on the canvas, complete one of the following procedures.
140
Visual Workflow Enhancements
Zoom Controls in the Cloud Flow Designer
If the Explorer item is a canvas-visible element or a screen field:
1. Hover over the item on the Explorer tab.
2. Click its
.
If the Explorer item is a resource that doesn’t appear on the canvas:
1. Click the item on the Explorer tab.
2. Click the Usage tab in the Description pane.
3. Hover over an element listed on the Usage tab.
4. Click its
.
The canvas shifts to display the element and momentarily highlights it.
Zoom Controls in the Cloud Flow Designer
Available in: Enterprise, Unlimited, and Developer Editions
You can now zoom in and out using the controls located near the top right corner of the canvas area. Combine zoom with the
new search options to greatly ease the management of large flows.
New Types of Flow Screen Fields
You asked for it! This enhancement is from an idea on the IdeaExchange.
Available in: Enterprise, Unlimited, and Developer Editions
You can now add the following types of fields to flow screens. In the Cloud Flow Designer, these options appear on the Screen
overlay’s Add a Field tab.
•
•
Checkbox input
Multi-select choice
◊ Multi-select checkboxes
◊ Multi-select picklist
Checkbox Input Fields Overview
Available in: Enterprise, Unlimited, and Developer Editions
A checkbox screen field is of type boolean. Use a checkbox screen field to offer flow users a yes or no choice. For example:
141
Visual Workflow Enhancements
•
•
•
Visualforce Controller Access to Subflow Variables
Whether to opt into a marketing campaign.
Whether to receive a follow-up call after a purchase or case resolution.
Whether an important policy is understood.
In this case, you can validate that the user selects the checkbox before proceeding to the next screen.
Multi-Select Choice Fields Overview
Multi-select checkboxes and multi-select picklist fields enable flow users to select multiple choices in a screen field. At runtime,
each multi-select field stores its field value as a concatenation of the user-selected choice values, separated by semicolons.
Available in: Enterprise, Unlimited, and Developer Editions
When using multi-select choice fields, consider the following:
•
•
•
•
•
At runtime, any semicolons in the selected choices’ stored values are removed when added to the multi-select field value.
Similar to single-selection choice fields, such as radio buttons and drop-down lists, you can populate multi-select choice
fields with flow-specific choices and dynamic choices only. You can’t populate multi-select picklists in flows with the
picklist values of standard or multi-select picklist fields elsewhere in your organization.
A multi-select choice field can have only one default value.
A dynamic choice resource can be configured to assign field values from one user-selected record to variables in the flow.
When the dynamic choice is used in a multi-select choice field, flow variables store the field values of only the last selected
record in the dynamically generated set of choices. If the dynamic choice is used in multiple multi-select choice fields on
the same screen, the flow variable assignments are determined by the first multi-select choice field on the screen.
To ensure the correct runtime behavior of Decision elements that reference multi-select choice fields:
◊ Configure a stored value for each choice that you use in multi-select choice fields.
◊ Don’t use the same choice in multiple multi-select choice fields on the same screen.
Visualforce Controller Access to Subflow Variables
Available in: Enterprise, Unlimited, and Developer Editions
Previously, a Visualforce controller could access variable values in only the flow that’s embedded in the Visualforce page. If
that flow contained subflow elements, the values of variables in the referenced flows could not be obtained by the Visualforce
controllers.
The new getVariableValue method in the Flow.Interview class enables a Visualforce controller to get the value of a
flow variable. The variable may be in the flow embedded in the Visualforce page, or in a separate flow that is called by a subflow
element. See New getVariableValue Method on page 187.
142
Visual Workflow Enhancements
Flow Navigation Options
Flow Navigation Options
Available in: Enterprise, Unlimited, and Developer Editions
At runtime, the system automatically determines which of the Next, Previous, and Finish buttons are relevant for each screen,
depending on whether there are any preceding or following screens in the flow path. The new Navigation Options field
on the Screen overlay enables you to restrict a screen from displaying either the Previous or Finish button.
Options:
•
•
•
No navigation restrictions—(Default) The system displays all relevant navigation buttons on the screen.
Don’t show Previous button—Select this option if revisiting the previous screen triggers an action that musn’t be repeated,
such as a credit card transaction.
Don’t show Finish button—Select this option if you need the user to go back to a previous screen to continue or complete
the flow.
For example, suppose the flow prompts the user to enter information to identify an existing contact. The flow then looks
up the user-entered info in the database. If no matching contact is found, the flow displays a screen whose sole purpose is
to tell the user to go back and try again. That screen shouldn’t offer a Finish button to the user.
Resources for Getting Started with the Cloud Flow Designer
Available in: Enterprise, Unlimited, and Developer Editions
When you open or create a flow in the Cloud Flow Designer, you will see a collection of useful resources to help you build
flows with confidence.
•
•
•
Videos—Watch demos on how to get started with Visual Workflow.
Flow Sample Package—Install an AppExchange package of sample flows, including some that contain Apex plug-ins.
The package also includes sample Apex classes you can plug into your flows.
Tutorials—Follow simple, step-by-step instructions in the Cloud Flow Designer Workbook to create sample flows from
scratch.
Whenever you want to view this collection of resources from the Cloud Flow Designer, click Get Started.
Additional Cloud Flow Designer Usability Enhancements
Available in: Enterprise, Unlimited, and Developer Editions
•
You can now edit choices, including dynamic choices, from the Screen overlay. Previously, you could only edit choices
from the Explorer.
143
Visual Workflow Enhancements
Merge Fields in Help Text and User Input Validation Messages
When you select a choice field in the preview pane of the Screen overlay, the Field Settings tab provides an edit option
( ) for each choice.
•
•
You can now expand and collapse Palette sections and drop-down menu sections by clicking anywhere in the section
header. Previously, you had to click the arrowhead to expand or collapse a section.
You can use the keyboard to navigate drop-down menus.
◊ Use the RIGHT ARROW and LEFT ARROW to expand and collapse sections.
◊ Use the UP ARROW and DOWN ARROW to move up and down in a menu.
◊ Press RETURN to select the highlighted item in a menu.
•
•
Selected elements on the canvas now have a green border and no special shading. Previously, selected elements were shaded
blue.
Selected connectors are now green. Previously, selected connectors were colored red.
Merge Fields in Help Text and User Input Validation
Messages
Available in: Enterprise, Unlimited, and Developer Editions
You can now use merge fields in help text for screens and user input fields. In the Cloud Flow Designer, the help text editor
includes a drop-down menu for selecting merge fields.
Merge fields now also work correctly in error messages for user input validation. If you added merge fields to error messages
for user input validation in Summer ’12, API version 25.0, or earlier releases, open and save the flows in the Winter ’13 Cloud
Flow Designer to enable the merge fields to work correctly at runtime.
Desktop Flow Designer No Longer Supports New API
Versions
The desktop Flow Designer supports API version 25.0 and earlier. To access new fields, metadata types, and other components
or features introduced in API version 26.0 and later, use the Cloud Flow Designer to create your flows.
Desktop Flow Designer Links and Documentation
Many flow administrators, almost all of whom use the Cloud Flow Designer, have been confused by the presence of legacy
desktop Flow Designer links and documentation.
Therefore, we consolidated all legacy desktop Flow Designer–specific content in the user manual that is bundled with the
desktop Flow Designer. You can access this content from within the desktop Flow Designer by clicking Help > User manual.
We also removed the following options from the Flows list page:
•
•
Upload flows that were created in the legacy desktop Flow Designer.
Download the latest version of the legacy desktop Flow Designer.
144
Schema Builder Enhancements
Deleting Custom Objects with Schema Builder
You can contact salesforce.com to re-enable these options for your organizations. If you had previously uploaded flows that
were created in the legacy desktop Flow Designer, the Upload button might already continue to appear in your organization.
SCHEMA BUILDER ENHANCEMENTS
Deleting Custom Objects with Schema Builder
Available in: All Editions
User Permissions Needed
To delete custom objects in Schema Builder:
"Customize Application"
You can now delete custom object with Schema Builder.
Schema Builder displays list of side effects when you try to delete a custom object. Be sure you’re ready to accept these side
effects before finalizing the deletion. See “Deleting Custom Objects” in the online help and “Managing Deleted Custom
Objects” in the online help.
1. Click
on the custom object’s icon.
2. Select Delete Object.... A dialog box displays that explains the side effects of deleting an object. Read this information
carefully.
3. If you accept the conditions, check Yes, I want to delete the custom object.
4. Click Delete.
Deleting Custom Fields with Schema Builder
Available in: All Editions
User Permissions Needed
To delete custom fields in Schema Builder:
"Customize Application"
You can now delete custom fields using Schema Builder.
Schema Builder displays a list of side effects when you try to delete a custom field. Be sure you’re ready to accept these side
effects before finalizing the deletion. See “Managing Deleted Custom Fields” in the online help.
1. Right click on the custom field.
2. Select Delete Field.... A dialog box displays that explains the side effects of deleting a custom field. Read this information
carefully.
145
Schema Builder Enhancements
More Custom Object Properties in Schema Builder
3. If you accept the conditions, check Yes, I want to delete the custom field.
4. Click Delete.
More Custom Object Properties in Schema Builder
Two additional custom object properties can now be selected or deselected when working in Schema Builder:
Enable Divisions
If your organization has divisions enabled, select this option to enable the custom object for divisions. Divisions group
records for simplified search results, list views, reports, and other areas within Salesforce. Salesforce adds a Division
field to the custom object, and if the custom object is the master in a master-detail relationship, any custom objects on
the detail side also get the Division field and inherit their division from the master record.
Available for Customer Portal
This option makes the custom object available through the Salesforce Customer Portal.
Security Enhancements
Available in: All Editions
Winter ’13 introduces several new features that enhance security.
Auth Providers Detect and Link to Existing Users
The createUser method for the Auth.RegistrationHandler class is now able to return existing users as well as
new users. It’s no longer mandatory to create a new user when createUser is called. The single sign-on flow creates
the link between the third-party identity and the returned user, then logs the user in.
Updated OAuth 2.0 Bearer Assertion Request
Prior to Winter ’13, when you requested a new access token with JWT or SAML in an OAuth bearer assertion request,
all your previous approvals containing a refresh token were examined. If a matching approval was found, a new access
token was issued with the most recent matching approval’s scopes. If no prior approvals included a refresh token, no
approved scopes were available, and the request failed.
Starting with Winter ’13, we changed the behavior from taking only the scope of the most recent approval to combining
the scope values from all matching approvals to issue the new access token. If no prior approvals contained a refresh
token, the request still fails due to a lack of approved scopes.
OAuth 2.0 JWT Bearer Token Flow
The OAuth 2.0 JWT bearer flow implementation now supports the HMAC SHA256 and RSA SHA256 algorithms.
The HMAC SHA256 uses the consumer’s private key as the signing secret, while RSA SHA256 uses an uploaded
certificate. Previously, the JWT bearer token flow implementation used the certificate as the signing secret if one was
uploaded, or the consumer’s private key otherwise.
146
Schema Builder Enhancements
Security Enhancements
New Auth Provider Parameters
You can now use two new parameters with authentication providers: startURL and scope. The startURL parameter
directs your users to a specific location after authenticating. The scope parameter requests access tokens with additional
permissions. For more information, see “Using Request Parameters with Client Configuration URLs” in the online
help.
Login Policy for My Domains Now Explicitly Configured
The Login Policy for My Domains is now explicitly rather than implicitly configured. Prior to Winter ’13, if your
organization had SAML enabled, you were automatically asked to log in with SAML instead of with your user name
and password. Now, if you have SAML enabled, you’ll still see the SAML login but also the option to use your user
name and password choice. In addition, if a third-party Authentication Provider is enabled, you’ll get that choice too.
After you deploy your domain, you set your login policy in My Domain Settings.
Clickjacking Protection Available
You can enable protection against clickjack attacks (also known as user interface redress attacks) for non-setup pages
and your custom Visualforce pages. Setup pages already include protection against clickjack attacks. Click Your Name
> Setup > Security Controls > Session Settings to select Enable clickjack protection for non-setup
Salesforce pages and Enable clickjack protection for non-setup customer Visualforce pages.
It’s possible that pages will either display as a blank page or without the frame if either of these settings is enabled and
either of the following conditions exists:
•
•
Your organization displays Salesforce.com user interface pages within a frame or iframe.
You use custom Visualforce pages within a frame or iframe.
The behavior varies depending on your browser and its version. To ensure that these pages will continue to work correctly
in your organization, discontinue displaying these pages within a frame or iframe.
Service Provider-Initiated Request Binding
If you’re using My Domains, you can chose the binding mechanism your identity provider requests for your SAML
messages. Available request binding types are HTTP POST and HTTP Redirect. Make your selection from the Single
Sign-On Settings page at Your Name > Setup > Security Controls > Single Sign-On Settings, and with SAML
Enabled checked, click Edit. The default setting is HTTP POST.
New getAccessTokenMap Method
The Auth.AuthToken Apex class has a new method to retrieve access tokens: getAccessTokenMap. Use this method
if the user ID is mapped to multiple third-party users. getAccessTokenMap returns a map of access tokens for each
third-party user. For Apex information, refer to the Force.com Apex Code Developer's Guide.
147
Developer Console Enhancements
Tests Tool
DEVELOPER CONSOLE ENHANCEMENTS
Tests Tool
The Winter ‘13 release adds a Tests tool to the Developer Console. Use the Tests tool to run Apex unit tests on the server
and check your code coverage. Now you can edit, debug, and test your applications without leaving the Developer Console.
Creating and Running Test Runs
A test run is a collection of classes that contain test methods. Run a test run to execute the test methods in the classes.
1. In the Developer Console, click the Tests tab.
2. Click New Run.
Classes with test methods are listed in the Select Tests window.
3. To filter classes, type in the Filter box.
4. Select classes and click
to move the classes to the Selected Test Classes pane.
To select multiple adjacent classes, select a single class and press the SHIFT key while you click the classes you want to
select. To select nonadjacent classes, select a single class and press the CTRL key while you click the other classes you
want to select. You can also click Select All.
5. When you’ve created a test run, click Run to queue and run the classes.
148
Developer Console Enhancements
Tests Tool
Note: If your test methods call other methods or classes defined as tests in your organization, those methods and
classes are also run.
6. To stop a test, click Abort.
7. In theTests tab, expand the test run to see the results for each method invoked by each class in the run.
8. The Overall Code Coverage pane displays the percentage of code coverage for each every class in your organization. The
pane always displays the current percentage for every class. After you perform a test run, the pane also displays the overall
percentage in bold.
Note: Test classes don’t require code coverage. Therefore, test classes show 0% coverage and don’t affect the
overall code coverage percentage.
9. Double-click the completed test run to open the results in a Tests view.
The Tests view displays the tested class, the tested method, the duration, result (skip, pass, or fail), and an optional error
message. If a test failed, a Stack Trace column shows the method and line number at which the test failed.
10. Select a Class in a Tests view to see the code coverage for each method invoked by the class in the Class Code Coverage
pane.
149
Developer Console Enhancements
Tests Tool
Checking Code Coverage
To deploy Apex code to a production organization, 75% of the code must be covered by tests. Code coverage is the percentage
of code covered by tests.
The Developer Console retrieves and displays code coverage information from your organization. Code coverage results come
from any tests you’ve run from an API or from a user interface (for example, the Developer Console, the Force.com IDE, or
the Apex Test Execution page). When you edit a class, the code coverage for that class clears until you run the tests again.
You can view code coverage in several places in the Developer Console.
1. Click the Tests tab. The Overall Code Coverage panel displays the code coverage percentage for every Apex class in your
organization that has been included in a test run. It also displays the overall percentage.
2. Double-click a completed test run to open a Tests view.
The Tests view displays the tested class, the tested method, the duration, result (skip, pass, or fail), and an optional error
message. If the test failed, a Stack Trace column shows the method and line number at which the test failed.
3. Select a Class in a Tests view to see the code coverage for each method invoked by the class in the Class Code Coverage
pane.
4. To view line-by-line code coverage for an Apex class, double-click the class in a Tests view or in the Repository tab to
open it in a Source Code view.
5. From the Code Coverage menu, select one of the following:
Option
Description
None
No tests have been run.
All Tests
The percentage of code coverage from all test runs.
className.methodName
The percentage of code coverage from a method executed during a test run.
Lines of code that are covered are blue. Lines of code that aren’t covered are red. Lines of code that don’t require coverage
(for example, curly brackets, comments, and System.debug calls) are left white.
150
Developer Console Enhancements
Tests Tool
6. When you edit class with code coverage, the blue and red dims to indicate that the coverage is no longer valid. When you
edit and save a class, the coverage is removed for that class. In the Overall Code Coverage panel, the class name is marked
with a small red triangle to indicate that it was edited since tests were run. To check coverage for that class, run the tests
again.
151
Developer Console Enhancements
Query Editor
Query Editor
The Winter ‘13 release adds a Query Editor tool to the Developer Console. Use the Query Editor tool to query data from
your organization. For example, while developing Apex code, write a SOQL query and verify that the results are what you
expect. Edit and execute the query until you have the data you want. Then use the query in your code.
Executing a SOQL Query
Use the Query Editor in the Developer Console to query data from your organization.
1. In the Developer Console, click the Query Editor tab.
2. Enter a SOQL query in the top pane of the Query Editor.
3. Click Execute.
If the query generates errors, the errors display in the bottom pane of the Query Editor.
The data displays in a Query Results view.
4. To rerun the query, click Refresh Grid.
Warning: If you click Refresh Grid, data in a Query Results view that you’ve edited but haven’t saved is lost.
Inserting Rows
You can create a record (insert a row) in the Object displayed in a Query Results view in the Developer Console.
To insert a row and save it, the query results must contain all the required fields of the object and the required fields must be
simple text or number fields. If these conditions aren’t true, a blank row is created but you can’t save it. In this case, click
Create New to create a new record in Salesforce.
1. In the Developer Console, click the Query Editor tab.
2. Execute a query that contains all the required fields of an object.
3. In the Query Results view, click Insert Row.
Editing and Saving Rows
You can edit and save records (rows) in the Object displayed in a Query Results view in the Developer Console.
1. To edit a row in a Query Results view, double-click a field in the row and edit it.
2. To save modified rows to Salesforce, click Save Rows.
152
Developer Console Enhancements
Perspectives in a System Log View
Warning: If you click Refresh Grid, data in a Query Results view that you’ve edited but haven’t saved is lost.
Deleting Rows
You can delete a record (row) in the Object displayed in a Query Results view in the Developer Console.
1. To delete a row, select it in the Query Results view.
2. Click Delete.
Navigating to a Record in Salesforce
After executing a query, you can jump to the record in Salesforce.
1. Select a row in a Query Results view.
2. Click Create New, Open Detail Page, or Edit Page to jump to the record in Salesforce.
Perspectives in a System Log View
When you open a debug log in the Developer Console, it opens in a System Log view which is a collection of panels for
analyzing the log. In the Winter ‘13 release, you can create perspectives in a System Log view. A perspective is a layout of
panels. Create perspectives to organize and simplify System Log views to match the way you work. Switch between perspectives
as you change tasks. For example, you might have one perspective for analyzing performance and another perspective for
all-purpose debugging.
Creating Perspectives in a System Log View
A perspective is a layout of panels in a System Log view in the Developer Console.
The default perspective is “All,” which displays every panel. Most tasks you perform in a System Log view don’t require you
to use every panel. When you perform a task in a System Log view, use a perspective that makes completing the task fast and
easy. Every developer has a different style, but the following is a list of perspectives you could create to perform common tasks:
•
•
•
“Log Only”—Contains the Execution Log panel. An all-purpose perspective for viewing log execution.
“Performance”—Contains the Stack Tree panel and the Execution Overview panel. Use this perspective to test performance.
“Limits”—Contains the Execution Overview panel. Use this perspective to check governor limits.
Tip: If you create a perspective that includes the Execution Log, you may want to include the Source panel. Use the
Source panel to navigate from System Log view back to Source Code view to edit or view your code.
153
Developer Console Enhancements
Perspectives in a System Log View
1. In the Developer Console, click the Logs Tab and double-click a debug log to open it in a System Log view.
2. Click Perspective: Perspective Name > View Panels and select the panels you want to include in the perspective.
If you modify a perspective, an * is appended to the perspective name. When you save the perspective, the * is removed.
3. To create a new perspective, click Save Perspective As and enter a name for the perspective.
Modifying Perspectives in a System Log View
A perspective is a layout of panels in a System Log view in the Developer Console. The default layout includes all panels. To
create layouts that let you work quickly and easily, modify existing perspectives to include only the panels you need.
1. In the Developer Console, click the Logs Tab and double-click a debug log to open it in a System Log view.
2. Click Perspective: Perspective Name > View Panels and select the panels you want to include in the perspective.
If you modify a perspective, an * is appended to the perspective name. When you save the perspective, the * is removed.
3. Click Save Perspective. You can also click in the System Log view and press CTRL+S (Windows) or Command+S (Mac
OS).
Switching Perspectives in a System Log View
A perspective is a layout of panels in a System Log view in the Developer Console. You can switch perspectives to best suit
the task at hand.
1. In the Developer Console, click the Logs Tab and double-click a debug log to open it in a System Log view.
2. Click Perspective: Perspective Name > Perspective Manager.
3. Select a perspective name and click Open, or double-click the perspective.
Deleting a Perspective in a System Log View
A perspective is a layout of panels in a System Log view in the Developer Console. You can delete perspectives you no longer
need.
1. In the Developer Console, click the Logs Tab and double-click a debug log to open it in a System Log view.
2. Click Perspective: Perspective Name > Perspective Manager.
3. Select a perspective to delete and click Delete.
154
Developer Console Enhancements
Additional Enhancements to the Developer Console
Setting the Default Perspective in a System Log View
A perspective is a layout of panels in a System Log view in the Developer Console. When you open a log, it opens in the
default perspective. Set your most commonly used perspective as the default.
1. In the Developer Console, click the Logs Tab and double-click a debug log to open it in a System Log view.
2. Click Perspective: Perspective Name > Perspective Manager.
3. Select a perspective name and click Set Default.
Additional Enhancements to the Developer Console
In addition to the major features, the Winter ‘13 release includes the following minor enhancements to the Developer Console.
Command Line Window
Winter ‘13 adds a Command Line Window to the Developer Console. Use the Command Line Window to execute anonymous
Apex code and search the resulting debug log. Usually you work with debug logs in a System Log view. However, at some
points during development, you might want to search the log for a specific term. In this case, use the Command Line Window.
Developer Console Command Line Reference
To open the Developer Console Command Line Window, choose Your Name > Developer Console and press CTRL+L.
To close the Developer Console Command Line Window, press CTRL+L.
Command
Parameters
Description
commands
None.
A list of all commands.
exec <Apex statements>
<Apex statements>—One or more
Executes the <Apex statements> and
generates a log.
Apex statements.
-o: Opens the Execute Anonymous
exec [-o | -r]
window.
-r: Executes the code in the Execute
Anonymous window and generates a log.
find <string>
<string>—A string of characters.
Searches the log for a string.
help
None.
Explains how to get information about
commands.
man <command>
<command>—A Command Line
Displays the description of the command.
Window command.
155
Developer Console Enhancements
Additional Enhancements to the Developer Console
Searching a Debug Log
To search for text in a debug log, use the Command Line Window in the Developer Console.
Before you can search a log, you must execute Apex statements to generate a log.
1. To open the Developer Console Command Line Window, choose Your Name > Developer Console and press CTRL+L.
2. To execute Apex code and generate a log, do one of the following:
•
To enter Apex statements at the command-line, type exec <Apex statements>.
For example, type:
exec List<Account> accts = new List<Account>();
for (Integer i=0; i<20; i++){
Account a = new Account(name='Account Name ' + i);
accts.add(a);
}
•
To execute code that already exists in the Execute Apex Code window, type exec -r.
3. To search for text in the debug log, type find <string>.
For example, type find Account Name.
View the search results in the command-line window.
4. To close the command-line, press CTRL+L.
Navigating through Views
•
To move left and right through views in a workspace, click the view’s tab or use these shortcuts:
◊ Left—CTRL+Page Up
◊ Right—CTRL+Page Down
Viewing Keyboard Shortcuts
•
To see a list of Developer Console keyboard shortcuts, press CTRL+SHIFT+?.
Resuming Updates to the Developer Console
After twenty minutes of inactivity, the Developer Console stops polling for new logs, test runs, and heap dumps.
•
To resume updating the Developer Console, click Resume Updates in the global toolbar of the Developer Console.
156
Developer Console Enhancements
Force.com IDE Enhancements
Force.com IDE Enhancements
Available in: Unlimited, Developer, Enterprise, and Database.com Editions
The Winter ’13 release of the Force.com IDE contains the following enhancements:
•
•
Support for Metadata API version 26.0
All documentation includes Winter ’13 content
The Force.com IDE is available as a standalone application or as an Eclipse plug-in.
•
•
To install the latest version of the Force.com IDE standalone application or Eclipse plug-in, download an installer from
wiki.developerforce.com/page/Force.com_IDE_Installation.
To upgrade to the latest version of the Force.com IDE Eclipse plug-in, follow the directions at
wiki.developerforce.com/page/Updating_the_Force.com_IDE.
After you install the Winter ‘13 Force.com IDE, you can upgrade your projects. To upgrade a Force.com project:
1. Right click a project and choose Force.com > Upgrade Project to open the Project Upgrade wizard.
2. On the first page of the wizard, review the information and click Next to continue.
3. On the second page of the wizard, review the full details of what will be changed. If you don’t want to upgrade all of these
components, click Cancel. Otherwise click Finish.
4. On the final page of the wizard, review your changes.
5. Click Finish to retrieve the specified components.
Note: Force.com IDE releases prior to Winter ’09 were “Developer Preview” releases. To migrate to the latest
Force.com IDE from a “Developer Preview” release, delete all Force.com projects from your workspace, uninstall the
older IDE plug-in from Eclipse, and install the latest release.
157
Developer Console Enhancements
Connected Applications—Pilot
Connected Applications—Pilot
Available in: Developer Editions
This feature is visible to all users in new Development Edition organizations. To enable this feature in existing Development
Edition organizations or other organizations, contact salesforce.com.
Note: The Connected Applications feature is currently available through a pilot program. For information on enabling
it for your organization, contact Salesforce. Any unreleased services or features referenced in this or other press releases
or public statements are not currently available and may not be delivered on time or at all. Customers who purchase
our services should make their purchase decisions based upon features that are currently available
A Connected Application, or Connected App, is an application that can connect to salesforce.com over identity and data
APIs. Connected Applications use the standard OAuth 2.0 protocol to authenticate, provide Single Sign-On, and acquire
access tokens for use with Salesforce APIs. In addition to standard OAuth capabilities, Connected Applications add additional
levels of control, allowing administrators explicit control over who may use the application, and various security policies which
should be enforced.
Connected Applications begin with a developer defining OAuth metadata about the application, including:
•
•
•
•
Basic descriptive and contact information for the connected application
The OAuth scopes and callback URL for the connected application
Optional IP ranges where the connected application might be running
Optional information about mobile policies the connected application can enforce
In return, the developer is provided an OAuth client ID and client secret, as well as an install URL for the connected application.
The developer can then provide this URL to a Salesforce administrator.
The administrator can install the connected application into their organization and use profiles, permission sets, and IP range
restrictions to control which users can access the application. Management is done from a detail page for the connected
application. The administrator can also uninstall the connected application and install a newer version. When the app is
updated, the developer can notify administrators that there is a new version available for the app – their existing installation
URL installs the new version.
For more information, see the Connected Application Tip Sheet.
Force.com Canvas—Pilot
Available in: Developer Editions
This feature is visible to all users in new Development Edition organizations. To enable this feature in existing Development
Edition organizations or other organizations, contact salesforce.com.
Note: The Force.com Canvas feature is currently available through a pilot program. For information on enabling it
for your organization, contact salesforce.com. Any unreleased services or features referenced in this or other press
158
Developer Console Enhancements
API Enhancements
releases or public statements are not currently available and may not be delivered on time or at all. Customers who
purchase our services should make their purchase decisions based upon features that are currently available.
Force.com Canvas enables you to easily integrate a third-party application in Salesforce. Force.com Canvas is a set of tools
and JavaScript APIs that you can use to expose an application as a canvas app. This means you can take your new or existing
applications and make them available to your users as part of their Salesforce experience.
Instead of redesigning and reintegrating your external applications, you can now use these tools to integrate your technology
within Force.com Canvas. Force.com Canvas includes tools that handle:
•
•
•
Authentication—If your application requires authorization, you can implement it by using a signed request or OAuth 2.0.
Cross-Domain XHR—JavaScript support for cross-domain XML HTTP requests back to the Salesforce domain.
Context—API support that enables you to retrieve context information about the environment in which the canvas app
is running.
The third-party app that you want to expose as a canvas app can be written in any language. The only requirement is that the
app has a secure URL (HTTPS).
For more information, see the Force.com Canvas Developer’s Guide.
Force.com Canvas Scenarios
From a high-level view, there are two common scenarios where Force.com Canvas is implemented.
•
•
Application integration—You’re a partner, systems integrator, or customer that builds cloud apps, and you’d like to integrate
these applications with Salesforce.
Application rationalization/enterprise desktop—You’re a large organization that has many existing apps that your users
access in addition to Salesforce. You’d like to integrate these apps into Salesforce so that users can accomplish all of their
tasks in one place.
API Enhancements
Available in: Enterprise, Unlimited, Developer, and Database.com Editions
Winter ‘13 (API version 26.0) improvements:
Changes across the API layer:
•
New and Changed Objects
◊ Chatter API Objects
•
•
SOQL Enhancements
SOSL Enhancements
Changes to individual APIs:
•
SOAP API Enhancements
159
Developer Console Enhancements
•
API Enhancements
Metadata API Enhancements
New and Changed Objects
For information about new and changed Chatter objects, see Chatter API Objects.
New Objects
These objects are new in API version 26.0.
•
•
•
•
The ChatterAnswersReputationLevel object represents a reputation level within a Chatter Answers community.
The Domain object represents a custom web address assigned to a site in your organization.
The DomainSite object is a junction object between the Domain and Site objects.
The EventRelation object replaces the EventAttendee object. See Event and EventAttendee Object Changes.
◊ It includes several fields for Shared Activities: IsParent, IsWhat, IsInvitee, AccountId.
◊ The RelationId field contains the ID of the person or resource invited to the event.
•
•
The IdeaTheme object represents an invitation to community members to submit ideas that are focused on a specific
topic.
These objects are part of the Salesforce Communities pilot program:
◊ The Network object represents a community.
◊ The NetworkMember object represents a member of a community.
◊ The NetworkProfile object represents a profile in a community.
•
These objects are part of the User Sharing pilot program:
◊ The UserShare object represents a sharing entry on a user record.
◊ The UserMembershipSharingRule object represents the rules for sharing user records from a source group to a
target group.
•
The following objects are new and available to organizations that use Collaborative Forecasts (Forecasts, originally
released in Winter ‘12).
◊ ForecastingAdjustment: This object represents an individual user’s adjustment for a subordinate’s forecast via a
ForecastingItem. Available in API versions 26.0 and greater.
◊ ForecastingFact: This is a read-only object linking a ForecastingItem with its opportunities, such as opportunities
that share the same owner or forecast category and have a closing date within the period of the forecasting item.
Available in API versions 26.0 and greater.
◊ ForecastingItem: This is a read-only object used for individual forecast amounts. Users see amounts based on
their perspectives and forecast roles. The amounts users see include one of the following:
AmountWithoutAdjustments, AmountWithoutManagerAdjustment, ForecastAmount,
OwnerOnlyAmount.
Changed Objects
These objects have changed in API version 26.0.
•
The SiteDomain object has been deprecated. Use the Domain and DomainSite objects instead.
160
Developer Console Enhancements
•
•
•
•
•
•
•
•
•
•
•
In the Event object, the WhatCount and WhoCount fields have been added. In addition, you can update only the
IsReminderSet and ReminderDateTime fields of a child event. See Event and EventAttendee Object Changes.
In the ForecastingQuota object, the StartDate field now includes nillable.
In the KnowledgeArticleVersion object, the ArticleType field has been added.
In the OpportunityTeamMember object, the CurrencyIsoCode field has been added. In addition, this object now
supports describeLayout() and describeSObjects() calls.
In the PermissionSet object, the UserLicenseId field is now nillable.
In the Idea object, the IdeaThemeID field has been added.
In the Case object, the CreatorFullPhotoUrl, CreatorName, and CreatorSmallPhotoUrl fields have been
added.
In the CaseComment object, the CreatorFullPhotoUrl, CreatorName, and CreatorSmallPhotoUrl fields
have been added.
In the Question object, the CreatorFullPhotoUrl, CreatorName, and CreatorSmallPhotoUrl fields have
been added.
In the Reply object, the CreatorFullPhotoUrl, CreatorName, and CreatorSmallPhotoUrl fields have been
added.
The EmailMessage object is now updateable, as are the following fields:
◊
◊
◊
◊
◊
◊
◊
◊
◊
◊
•
•
•
Bcc Address
Cc Address
From Address
From Name
Headers
Html Body
Message Date
Subject
TextBody
ToAddress
In addition, Draft is now available as a value for the Status field, and the ReplyToEmailMessageId field has
been added.
In the User object, the UserPreferencesHideCSNDesktopTask and
UserPreferencesHideCSNGetChatterMobileTask fields have been added.
In the LiveChatUserConfig object, the IsAutoAwayOnDecline field has been added.
The NetworkId field, used for the Salesforce Communities pilot, has been added to the following objects:
◊
◊
◊
◊
•
API Enhancements
ChatterActivity
CollaborationGroup
EntitySubscription
HashtagDefinition
The NetworkScope and Visibility fields, used for the Salesforce Communities pilot, have been added to the
following objects:
◊ AccountFeed
◊ AssetFeed
◊ CampaignFeed
161
Developer Console Enhancements
◊
◊
◊
◊
◊
◊
◊
◊
◊
◊
◊
◊
◊
◊
◊
◊
◊
◊
◊
◊
•
•
API Enhancements
CaseFeed
CollaborationGroupFeed
ContactFeed
ContentDocumentFeed
ContractFeed
DashboardComponentFeed
DashboardFeed
EntitlementFeed
EventFeed
FeedItem
LeadFeed
NewsFeed
OpportunityFeed
Product2Feed
ReportFeed
ServiceContractFeed
SolutionFeed
TaskFeed
UserFeed
UserProfileFeed
The ContentDocumentLink object now has the Visibility field, which is used for the Salesforce Communities
pilot program.
The User object has the following new fields:
◊
◊
◊
◊
◊
◊
◊
◊
◊
◊
◊
UserPreferencesShowCityToExternalUsers
UserPreferencesShowCountryToExternalUsers
UserPreferencesShowEmailToExternalUsers
UserPreferencesShowFaxToExternalUsers
UserPreferencesShowManagerToExternalUsers
UserPreferencesShowMobilePhoneToExternalUsers
UserPreferencesShowPostalCodeToExternalUsers
UserPreferencesShowStateToExternalUsers
UserPreferencesShowStreetAddressToExternalUsers
UserPreferencesShowTitleToExternalUsers
UserPreferencesShowWorkPhoneToExternalUsers
Chatter API Objects
New Objects
These objects are new in API version 26.0.
•
The HashtagDefinition object represents hashtag (#) topics in public Chatter posts and comments. Public posts and
comments include those on profiles and in public groups, but not those on records or in private groups.
162
Developer Console Enhancements
API Enhancements
Changed Objects
These objects have changed in API version 26.0.
•
•
The ChatterActivity object now includes an InfluenceRawRank field, which indicates the ParentId’s Chatter
influence rank. This number is calculated based on the ParentId’s ChatterActivity statistics, relative to the other users
in the organization.
The Type field for feed items now includes PollPost, which specifies a poll posted on a feed. The PollPost type
is available for the following objects: AccountFeed, AssetFeed, CampaignFeed, CaseFeed, CollaborationGroupFeed,
ContactFeed, ContractFeed, DashboardFeed, EntitlementFeed, EventFeed, FeedItem, LeadFeed, NewsFeed,
OpportunityFeed, Product2Feed, ReportFeed, ServiceContractFeed, SolutionFeed, TaskFeed, UserFeed, and
UserProfileFeed.
SOQL Enhancements
Use the Salesforce Object Query Language (SOQL) to construct query strings used in Salesforce APIs. For a full description
of the SOQL query syntax, see the Force.com SOQL and SOSL Reference.
SOQL Polymorphism—Developer Preview
SOQL Polymorphism lets you select different sets of fields in your SOQL queries, depending on the object type of a polymorphic
relationship field. For example, the What field in an Event record could reference an Account, Opportunity, or Campaign.
You can now specify different fields to select based on the referenced object type using the TYPEOF clause. The following
example specifies different fields for each of the possible object types:
SELECT
TYPEOF What
WHEN Account THEN Phone, NumberOfEmployees
WHEN Opportunity THEN Amount, CloseDate
WHEN Campaign THEN ExpectedRevenue, StartDate
ELSE Name
END
FROM Event
If the object type referenced by Event.What is an Account, the query returns the referenced Account’s Phone and
NumberOfEmployees fields. If the object type is an Opportunity, the query returns the referenced Opportunity’s Amount
and CloseDate fields. If the object type is a Campaign, the query returns the referenced Campaign’s ExpectedRevenue
and StartDate fields. Finally, if the object type is any other type, the Name field is returned.
There are several considerations to keep in mind when using SOQL Polymorphism. See the TYPEOF and Understanding
Polymorphic Keys and Relationships sections of the Force.com SOQL and SOSL Reference for more details.
Geolocation Custom Field SOQL Queries—Beta
The geolocation custom field allows you to create a field that identifies a location by its latitude and longitude. You can then
use the geolocation field with the DISTANCE and GEOLOCATION formula functions to calculate distances between
locations. For example, you can calculate the distance between two geolocation fields (such as between the warehouse and the
store), or between a geolocation field and any fixed latitude-longitude coordinates (such as between the warehouse and 37.775°,
–122.418°, also known as San Francisco).
DISTANCE
Calculates the distance between two locations in miles or kilometers.
163
Developer Console Enhancements
API Enhancements
GEOLOCATION
Returns a geolocation based on the provided latitude and longitude. Must be used with the DISTANCE function.
As a beta-release feature, geolocation is supported in the SOAP API, with limitations, in Winter ’13:
•
•
•
•
•
You can calculate distances in SOQL using the DISTANCE and GEOLOCATION functions.
DISTANCE and GEOLOCATION are supported in WHERE and ORDER BY clauses in SOQL, but not in GROUP
BY or SELECT.
DISTANCE only supports the logical operators > and <, returning values within (<) or beyond (>) a specified radius.
Syntax is restricted when running SOQL queries: When using the GEOLOCATION function, the geolocation field
must precede the latitude and longitude coordinates. For example, DISTANCE(warehouse_location__c,
GEOLOCATION(37.775,-122.418), “km”) works but DISTANCE(GEOLOCATION(37.775,-122.418),
warehouse_location__c, “km”) doesn’t work.
Geolocation is supported in Apex only through SOQL queries, and only at the component level. In other words, you have
to query the latitude or longitude; you can’t query the compound location field.
For more information, including sample queries, see the Force.com SOQL and SOSL Reference.
Aggregate Function Enhancements
The COUNT(fieldName) SOQL aggregate function changed to ensure consistent behavior. In rare cases, a SOQL query
using the COUNT(fieldName) aggregate function used to return a single row containing null if no rows matched the query
filtering condition. This query now returns a single row containing 0. Note that this doesn’t apply to COUNT() when used
without a field name. Also, queries using aggregate functions other than COUNT(fieldName), such as MAX(), returned an
empty result set in some rare cases when no rows matched the filtering condition. This query now returns a single row containing
null.
SOSL Enhancements
Use the Salesforce Object Search Language (SOSL) to perform text searches using Salesforce APIs.
SOSL Query Limits
The SOSL statement character limit is now tied to the SOQL statement character limit defined for your organization. By
default, SOQL and SOSL queries cannot exceed 10,000 characters. However, if your organization is participating in the pilot
program that allows a higher SOQL query length limit of up to 20,000 characters, the raised SOQL limit applies to SOSL
queries as well. For a full description of the SOSL query syntax, see the Force.com SOQL and SOSL Reference.
SOAP API Enhancements
New Calls
These calls are new in API version 26.0.
•
describeSearchScopeOrder(): Use this call to retrieve an ordered list of objects in the global search scope of
a logged-in user. The returned list reflects the object order in the user’s default search scope, and does not account
for any pinned objects on the user’s search results page. This call is useful if you want to implement a custom search
results page using the optimized global search scope. You must enable Chatter to enable global search.
164
Developer Console Enhancements
•
API Enhancements
sendEmailMessage(): Use this call to immediately send up to 10 draft email messages. The ID() specified must
target EmailMessage objects whose Status is Draft.
Polymorphic Relationship Field Changes—Developer Preview
If your organization has the SOQL Polymorphism feature enabled, polymorphic relationship fields, which were previously
defined as Names, are now defined as sObjects in the Enterprise WSDL. As an example, you could now access the Owner
field on a Merchandise__c custom object directly as an SObject as shown in the following Java snippet:
...
Merchandise__c myMerch = (Merchandise__c)queryRecord;
SObject merchOwner = myMerch.getOwner();
// Cast and access merchOwner as a User or Group depending on owner type
...
Without the SOQL Polymorphism feature, you would need to access the Owner field as a Name:
...
Merchandise__c myMerch = (Merchandise__c)queryRecord;
Name merchOwner = myMerch.getOwner();
// Use Name information in merchOwner to determine owner type and Id
...
See SOQL Polymorphism—Developer Preview for more details about SOQL Polymorphism.
Chatter API Objects
New Objects
These objects are new in API version 26.0.
•
The HashtagDefinition object represents hashtag (#) topics in public Chatter posts and comments. Public posts and
comments include those on profiles and in public groups, but not those on records or in private groups.
Changed Objects
These objects have changed in API version 26.0.
•
•
The ChatterActivity object now includes an InfluenceRawRank field, which indicates the ParentId’s Chatter
influence rank. This number is calculated based on the ParentId’s ChatterActivity statistics, relative to the other users
in the organization.
The Type field for feed items now includes PollPost, which specifies a poll posted on a feed. The PollPost type
is available for the following objects: AccountFeed, AssetFeed, CampaignFeed, CaseFeed, CollaborationGroupFeed,
ContactFeed, ContractFeed, DashboardFeed, EntitlementFeed, EventFeed, FeedItem, LeadFeed, NewsFeed,
OpportunityFeed, Product2Feed, ReportFeed, ServiceContractFeed, SolutionFeed, TaskFeed, UserFeed, and
UserProfileFeed.
165
Developer Console Enhancements
API Enhancements
Metadata API Enhancements
Updated Metadata
These metadata fields have been added or changed in Metadata API version 26.0.
Metadata Type or
Related Object
Field
Change
CustomField
displayLocationInDecimal New
DashboardComponent
(an existing field on
Dashboard)
compontentType
Description
Indicates how the value of a Geolocation
custom field appears in the user interface. If
true, the geolocation appears in decimal
notation. If false, the geolocation appears
as degrees, minutes, and seconds.
Changed Now has the following new valid values:
• Scatter
• ScatterGrouped
Use these values to specify the scatter chart
type for a dashboard component and to group
the data again on the scatter chart. Specify
the field by which to group the data using
groupingColumn. For example,
<groupingColumn>FieldName</groupingColumn>.
Flow (a new field on
FlowScreen)
allowBack
New
Indicates whether to show (true) or hide
(false) the Previous button on the screen
at runtime. When true, the Previous button
appears only if the user visited a previous
screen in the flow path. Set this to false when
revisiting the previous screen would trigger
an action that should not be repeated, such as
a credit card transaction.
Default: true
You can set either allowBack or
allowFinish to false, but not both.
Flow (a new field on
FlowScreen)
allowFinish
New
Indicates whether to show (true) or hide
(false) the Finish button on the screen at
runtime. When true, the Finish button
appears only if the screen element is the end
of a flow path. Set this to false if you need the
user to go back to a previous screen to
continue or complete the flow. For example,
you wouldn’t want to offer a Finish button
on a screen that tells the user to go back and
make corrections on a previous screen.
166
Developer Console Enhancements
Metadata Type or
Related Object
API Enhancements
Field
Change
Description
Default: true
You can set either allowBack or
allowFinish to false, but not both.
Flow (an existing field on helpText
FlowScreen and
FlowScreenField)
Changed Now supports merge fields.
Flow (an existing field on choiceReferences
FlowScreenField)
Changed Supports the new multi-select checkboxes and
multi-select picklist screen fields.
Flow (an existing field on dataType
FlowScreenField)
Changed Must be set to String to support the new
multi-select checkboxes and multi-select
picklist screen fields.
Also supports the new checkbox input screen
field, which is specified by this combination
of settings:
•
•
dataType—Boolean
fieldType—InputField
Flow (an existing field on defaultSelectedChoiceReference Changed Supports the selection of one FlowChoice
FlowScreenField)
element to use as the default value for a
multi-select checkboxes field or a multi-select
picklist field.
Flow (an existing field on fieldType
FlowScreenField)
Changed Now has the following new valid values:
• MultiSelectCheckboxes
• MultiSelectPicklist
At runtime, each multi-select field stores its
field value as a concatenation of the
user-selected choice values, separated by
semicolons. Any semicolons in the selected
choice values are removed when added to the
multi-select field value.
Also supports the new checkbox input screen
field, which is specified by this combination
of settings:
•
•
MobileSettings
All
New
dataType—Boolean
fieldType—InputField
New settings file located in the orgSettings
directory of the corresponding package
directory. Represents an organization’s mobile
167
Developer Console Enhancements
Metadata Type or
Related Object
API Enhancements
Field
Change
Description
settings, such as mobile Chatter settings,
whether Mobile Lite is enabled for an
organization, and so on.
SecuritySettings
All
Changed Represents an organization’s security settings.
Security settings define trusted IP ranges for
network access, password and login
requirements, and session expiration and
security settings.
In version 26.0, this type is supported by the
deploy() and update() calls, in addition
to the retrieve functionality available in version
25.0.
In order to add an IP range, you need to
deploy all existing IP ranges, as well as the
one you want to add. Otherwise, the existing
IP ranges are replaced with the ones you
deploy. To remove all the IP ranges in an
organization, leave the networkAccess field
blank (<networkAccess></networkAccess>).
PermissionSet
tabSettings
New
Indicates the tab visibility settings for the
permission set. The fields are:
• tab—The tab name
• visibility—The visibility settings for
the tab:
◊ Available—The tab is available on
the All Tabs page. Individual users can
customize their display to make the
tab visible in any app.
◊ None—The tab isn’t available on the
All Tabs page or visible in any apps.
◊ Visible—The tab is available on the
All Tabs page and appears in the
visible tabs for its associated app.
Individual users can customize their
display to hide the tab or make it
visible in other apps.
168
Developer Console Enhancements
Apex Code Enhancements
Apex Code Enhancements
Apex includes the following enhancements in Winter '13. For detailed information on these enhancements, refer to the
Force.com Apex Code Developer's Guide.
Non-Primitive Types in Map Keys and Sets
You can now add map keys of a non-primitive data type. Map keys can be sObjects, collections, user-defined types, and built-in
Apex types. Previously, map keys could only be primitive types. Similarly, sets can now contain elements of any data type.
This provides you with more choice for what kind of data you can store in your collections.
For non-primitive types in map keys and sets, except for user-defined types, Apex determines the uniqueness of two map keys
or set elements based on the field values. For user-defined types, you should provide implementations for the equals and
hashCode methods. Apex uses these methods to compare the instances of your classes.
Using Custom Types in Map Keys and Sets
When using a custom type (your Apex class) for the map key or set elements, provide equals and hashCode methods in
your class. Apex uses these two methods to determine equality and uniqueness of keys for your objects.
Adding equals and hashCode Methods to Your Class
To ensure that map keys of your custom type are compared correctly and their uniqueness can be determined consistently,
provide an implementation of the following two methods in your class:
•
The equals method with this signature:
public Boolean equals(Object obj) {
// Your implementation
}
Keep in mind the following when implementing the equals method. Assuming x, y, and z are non-null instances of your
class, the equals method must be:
◊
◊
◊
◊
◊
Reflexive: x.equals(x)
Symmetric: x.equals(y) should return true if and only if y.equals(x) returns true
Transitive: if x.equals(y) returns true and y.equals(z) returns true, then x.equals(z) should return true
Consistent: multiple invocations of x.equals(y) consistently return true or consistently return false
For any non-null reference value x, x.equals(null) should return false
The equals method in Apex is based on the equals method in Java.
•
The hashCode method with this signature:
public Integer hashCode() {
// Your implementation
}
Keep in mind the following when implementing the hashCode method.
169
Developer Console Enhancements
Apex Code Enhancements
◊ If the hashCode method is invoked on the same object more than once during execution of an Apex request, it must
return the same value.
◊ If two objects are equal, based on the equals method, hashCode must return the same value.
◊ If two objects are unequal, based on the result of the equals method, it is not required that hashCode return distinct
values.
The hashCode method in Apex is based on the hashCode method in Java.
Another benefit of providing the equals method in your class is that it simplifies comparing your objects. You will be able
to use the == operator to compare objects, or the equals method. For example:
// obj1 and obj2 are instances of MyClass
if (obj1 == obj2) {
// Do something
}
if (obj1.equals(obj2)) {
// Do something
}
Sample
This sample shows how to implement the equals and hashCode methods. The class that provides those methods is listed
first. It also contains a constructor that takes two Integers. The second example is a code snippet that creates three objects of
the class, two of which have the same values. Next, map entries are added using the pair objects as keys. The sample verifies
that the map has only two entries since the entry that was added last has the same key as the first entry, and hence, overwrote
it. The sample then uses the == operator, which works as expected because the class implements equals. Also, some additional
map operations are performed, like checking whether the map contains certain keys, and writing all keys and values to the
debug log. Finally, the sample creates a set and adds the same objects to it. It verifies that the set size is two, since only two
objects out of the three are unique.
public class PairNumbers {
Integer x,y;
public PairNumbers(Integer a, Integer b) {
x=a;
y=b;
}
public Boolean equals(Object obj) {
if (obj instanceof PairNumbers) {
PairNumbers p = (PairNumbers)obj;
return ((x==p.x) && (y==p.y));
}
return false;
}
public Integer hashCode() {
return (31 * x) ^ y;
}
}
This code snippet makes use of the PairNumbers class.
Map<PairNumbers, String> m = new Map<PairNumbers, String>();
PairNumbers p1 = new PairNumbers(1,2);
PairNumbers p2 = new PairNumbers(3,4);
// Duplicate key
PairNumbers p3 = new PairNumbers(1,2);
m.put(p1, 'first');
170
Developer Console Enhancements
Apex Code Enhancements
m.put(p2, 'second');
m.put(p3, 'third');
// Map size is 2 because the entry with
// the duplicate key overwrote the first entry.
System.assertEquals(2, m.size());
// Use the == operator
if (p1 == p3) {
System.debug('p1 and p3 are equal.');
}
// Perform some other operations
System.assertEquals(true, m.containsKey(p1));
System.assertEquals(true, m.containsKey(p2));
System.assertEquals(false, m.containsKey(new PairNumbers(5,6)));
for(PairNumbers pn : m.keySet()) {
System.debug('Key: ' + pn);
}
List<String> mValues = m.values();
System.debug('m.values: ' + mValues);
// Create a set
Set<PairNumbers> s1 = new Set<PairNumbers>();
s1.add(p1);
s1.add(p2);
s1.add(p3);
// Verify that we have only two elements
// since the p3 is equal to p1.
System.assertEquals(2, s1.size());
Support for Testing Callouts
Apex now provides the ability to test callouts. The native support for handling callouts made in test context and generating
artificial responses increases your code coverage by tests and simplifies the testing process. You no longer need to modify
auto-generated code of an external SOAP Web service, or add extra logic for callouts made via the HTTP classes.
The new Test.setMock method instructs the Apex runtime to handle callouts in test methods and to generate a mock
response that you specify.
Testing HTTP Callouts
To deploy or package Apex, 75% of your code must have test coverage. By default, test methods don’t support HTTP callouts
and tests that perform callouts are skipped. However, you can enable HTTP callout testing by instructing Apex to generate
mock responses in tests by calling Test.setMock and by specifying the mock response in one of the following ways:
•
•
By implementing the HttpCalloutMock interface
By using Static Resources with StaticResourceCalloutMock or MultiStaticResourceCalloutMock
171
Developer Console Enhancements
Apex Code Enhancements
Testing HTTP Callouts by Implementing the HttpCalloutMock Interface
Provide an implementation for the HttpCalloutMock interface to specify the response sent in the respond method, which
the Apex runtime calls to send a response for a callout.
global class YourHttpCalloutMockImpl implements HttpCalloutMock {
global HTTPResponse respond(HTTPRequest req) {
// Create a fake response.
// Set response values, and
// return response.
}
}
Note:
•
•
The class that implements the HttpCalloutMock interface can be either global or public.
You can annotate this class with @isTest since it will be used only in test context. In this way, you can exclude
it from your organization’s code size limit of 3 MB.
Now that you have specified the values of the fake response, instruct the Apex runtime to send this fake response by calling
Test.setMock in your test method. For the first argument, pass HttpCalloutMock.class, and for the second argument,
pass a new instance of your interface implementation of HttpCalloutMock, as follows:
Test.setMock(HttpCalloutMock.class, new YourHttpCalloutMockImpl());
After this point, if an HTTP callout is invoked in test context, the callout is not made and you receive the mock response you
specified in the respond method implementation.
Note: If the code that performs the callout is in a managed package, you must call Test.setMock from a test method
in the same package with the same namespace to mock the callout.
This is a full example that shows how to test an HTTP callout. The interface implementation
(MockHttpResponseGenerator) is listed first. It is followed by a class containing the test method and another containing
the method that the test calls. The testCallout test method sets the mock callout mode by calling Test.setMock before
calling getInfoFromExternalService. It then verifies that the response returned is what the implemented respond
method sent. Save each class separately and run the test in CalloutClassTest.
@isTest
global class MockHttpResponseGenerator implements HttpCalloutMock {
// Implement this interface method
global HTTPResponse respond(HTTPRequest req) {
// Optionally, only send a mock response for a specific endpoint
// and method.
System.assertEquals('http://api.salesforce.com/foo/bar', req.getEndpoint());
System.assertEquals('GET', req.getMethod());
// Create a fake response
HttpResponse res = new HttpResponse();
res.setHeader('Content-Type', 'application/json');
res.setBody('{"foo":"bar"}');
res.setStatusCode(200);
return res;
}
}
public class CalloutClass {
public static HttpResponse getInfoFromExternalService() {
172
Developer Console Enhancements
Apex Code Enhancements
HttpRequest req = new HttpRequest();
req.setEndpoint('http://api.salesforce.com/foo/bar');
req.setMethod('GET');
Http h = new Http();
HttpResponse res = h.send(req);
return res;
}
}
@isTest
private class CalloutClassTest {
@isTest static void testCallout() {
// Set mock callout class
Test.setMock(HttpCalloutMock.class, new MockHttpResponseGenerator());
// Call method to test.
// This causes a fake response to be sent
// from the class that implements HttpCalloutMock.
HttpResponse res = CalloutClass.getInfoFromExternalService();
// Verify response received contains fake values
String contentType = res.getHeader('Content-Type');
System.assert(contentType == 'application/json');
String actualValue = res.getBody();
String expectedValue = '{"foo":"bar"}';
System.assertEquals(actualValue, expectedValue);
System.assertEquals(200, res.getStatusCode());
}
}
Testing HTTP Callouts Using Static Resources
You can test HTTP callouts by specifying the body of the response you’d like to receive in a static resource and using one of
two built-in classes—StaticResourceCalloutMock or MultiStaticResourceCalloutMock.
Testing HTTP Callouts Using StaticResourceCalloutMock
Apex provides the built-in StaticResourceCalloutMock class that you can use to test callouts by specifying the response
body in a static resource. When using this class, you don’t have to provide your own implementation of the HttpCalloutMock
interface. Instead, just create an instance of StaticResourceCalloutMock and set the static resource to use for the response
body, along with other response properties, like the status code and content type.
First, you must create a static resource from a text file to contain the response body:
1. Create a text file that contains the response body to return. The response body can be an arbitrary string, but it must match
the content type, if specified. For example, if your response has no content type specified, the file can include the arbitrary
string abc. If you specify a content type of application/json for the response, the file content should be a JSON string,
such as {"hah":"fooled you"}.
2. Create a static resource for the text file:
a.
b.
c.
d.
Click Your Name > Setup > Develop > Static Resources, and then New Static Resource.
Name your static resource.
Choose the file to upload.
Click Save.
To learn more about static resources, see “Defining Static Resources” in the Salesforce online help.
173
Developer Console Enhancements
Apex Code Enhancements
Next, create an instance of StaticResourceCalloutMock and set the static resource, and any other properties.
StaticResourceCalloutMock mock = new StaticResourceCalloutMock();
mock.setStaticResource('myStaticResourceName');
mock.setStatusCode(200);
mock.setHeader('Content-Type', 'application/json');
In your test method, call Test.setMock to set the mock callout mode and pass it HttpCalloutMock.class as the first
argument, and the variable name that you created for StaticResourceCalloutMock as the second argument.
Test.setMock(HttpCalloutMock.class, mock);
After this point, if your test method performs a callout, the callout is not made and the Apex runtime sends the mock response
you specified in your instance of StaticResourceCalloutMock.
Note: If the code that performs the callout is in a managed package, you must call Test.setMock from a test method
in the same package with the same namespace to mock the callout.
This is a full example containing the test method (testCalloutWithStaticResources) and the method it is testing
(getInfoFromExternalService) that performs the callout. Before running this example, create a static resource named
mockResponse based on a text file with the content {"hah":"fooled you"}. Save each class separately and run the
test in CalloutStaticClassTest.
public class CalloutStaticClass {
public static HttpResponse getInfoFromExternalService(String endpoint) {
HttpRequest req = new HttpRequest();
req.setEndpoint(endpoint);
req.setMethod('GET');
Http h = new Http();
HttpResponse res = h.send(req);
return res;
}
}
@isTest
private class CalloutStaticClassTest {
@isTest static void testCalloutWithStaticResources() {
// Use StaticResourceCalloutMock built-in class to
// specify fake response and include response body
// in a static resource.
StaticResourceCalloutMock mock = new StaticResourceCalloutMock();
mock.setStaticResource('mockResponse');
mock.setStatusCode(200);
mock.setHeader('Content-Type', 'application/json');
// Set the mock callout mode
Test.setMock(HttpCalloutMock.class, mock);
// Call the method that performs the callout
HTTPResponse res = CalloutStaticClass.getInfoFromExternalService(
'http://api.salesforce.com/foo/bar');
// Verify response received contains values returned by
// the mock response.
// This is the content of the static resource.
System.assertEquals('{"hah":"fooled you"}', res.getBody());
System.assertEquals(200,res.getStatusCode());
System.assertEquals('application/json', res.getHeader('Content-Type'));
}
}
174
Developer Console Enhancements
Apex Code Enhancements
Testing HTTP Callouts Using MultiStaticResourceCalloutMock
Apex provides the built-in MultiStaticResourceCalloutMock class that you can use to test callouts by specifying the
response body in a static resource for each endpoint. This class is similar to StaticResourceCalloutMock except that it
allows you to specify multiple response bodies. When using this class, you don’t have to provide your own implementation of
the HttpCalloutMock interface. Instead, just create an instance of MultiStaticResourceCalloutMock and set the
static resource to use per endpoint. You can also set other response properties like the status code and content type.
First, you must create a static resource from a text file to contain the response body. See the procedure outlined in Testing
HTTP Callouts Using StaticResourceCalloutMock.
Next, create an instance of MultiStaticResourceCalloutMock and set the static resource, and any other properties.
MultiStaticResourceCalloutMock multimock = new MultiStaticResourceCalloutMock();
multimock.setStaticResource('http://api.salesforce.com/foo/bar', 'mockResponse');
multimock.setStaticResource('http://api.salesforce.com/foo/sfdc', 'mockResponse2');
multimock.setStatusCode(200);
multimock.setHeader('Content-Type', 'application/json');
In your test method, call Test.setMock to set the mock callout mode and pass it HttpCalloutMock.class as the first
argument, and the variable name that you created for MultiStaticResourceCalloutMock as the second argument.
Test.setMock(HttpCalloutMock.class, multimock);
After this point, if your test method performs an HTTP callout to one of the endpoints
http://api.salesforce.com/foo/bar or http://api.salesforce.com/foo/sfdc, the callout is not made and
the Apex runtime sends the corresponding mock response you specified in your instance of
MultiStaticResourceCalloutMock.
This is a full example containing the test method (testCalloutWithMultipleStaticResources) and the method it is
testing (getInfoFromExternalService) that performs the callout. Before running this example, create a static resource
named mockResponse based on a text file with the content {"hah":"fooled you"} and another named
mockResponse2 based on a text file with the content {"hah":"fooled you twice"}. Save each class separately and
run the test in CalloutMultiStaticClassTest.
public class CalloutMultiStaticClass {
public static HttpResponse getInfoFromExternalService(String endpoint) {
HttpRequest req = new HttpRequest();
req.setEndpoint(endpoint);
req.setMethod('GET');
Http h = new Http();
HttpResponse res = h.send(req);
return res;
}
}
@isTest
private class CalloutMultiStaticClassTest {
@isTest static void testCalloutWithMultipleStaticResources() {
// Use MultiStaticResourceCalloutMock to
// specify fake response for a certain endpoint and
// include response body in a static resource.
MultiStaticResourceCalloutMock multimock = new MultiStaticResourceCalloutMock();
multimock.setStaticResource(
'http://api.salesforce.com/foo/bar', 'mockResponse');
multimock.setStaticResource(
'http://api.salesforce.com/foo/sfdc', 'mockResponse2');
multimock.setStatusCode(200);
multimock.setHeader('Content-Type', 'application/json');
175
Developer Console Enhancements
Apex Code Enhancements
// Set the mock callout mode
Test.setMock(HttpCalloutMock.class, multimock);
// Call the method for the first endpoint
HTTPResponse res = CalloutMultiStaticClass.getInfoFromExternalService(
'http://api.salesforce.com/foo/bar');
// Verify response received
System.assertEquals('{"hah":"fooled you"}', res.getBody());
// Call the method for the second endpoint
HTTPResponse res2 = CalloutMultiStaticClass.getInfoFromExternalService(
'http://api.salesforce.com/foo/sfdc');
// Verify response received
System.assertEquals('{"hah":"fooled you twice"}', res2.getBody());
}
}
Testing Web Service Callouts
Generated code is saved as an Apex class containing the methods you can invoke for calling the Web service. To deploy or
package this Apex class and other accompanying code, 75% of the code must have test coverage, including the methods in the
generated class. By default, test methods don’t support Web service callouts and tests that perform Web service callouts are
skipped. To prevent tests from being skipped and to increase code coverage, Apex provides the built-in WebServiceMock
interface and the Test.setMock method that you can use to receive fake responses in a test method.
Specifying a Mock Response for Testing Web Service Callouts
When you create an Apex class from a WSDL, the methods in the auto-generated class call WebServiceCallout.invoke,
which performs the callout to the external service. When testing these methods, you can instruct the Apex runtime to generate
a fake response whenever WebServiceCallout.invoke is called. To do so, implement the WebServiceMock interface
and specify a fake response that the Apex runtime should send. Here are the steps in more detail.
First, implement the WebServiceMock interface and specify the fake response in the doInvoke method.
global class YourWebServiceMockImpl implements WebServiceMock {
global void doInvoke(
Object stub,
Object request,
Map<String, Object> response,
String endpoint,
String soapAction,
String requestName,
String responseNS,
String responseName,
String responseType) {
// Create response element from the autogenerated class.
// Populate response element.
// Add response element to the response parameter, as follows:
response.put('response_x', responseElement);
}
}
Note:
•
•
The class implementing the WebServiceMock interface can be either global or public.
You can annotate this class with @isTest since it will be used only in test context. In this way, you can exclude
it from your organization’s code size limit of 3 MB.
176
Developer Console Enhancements
Apex Code Enhancements
Now that you have specified the values of the fake response, instruct the Apex runtime to send this fake response by calling
Test.setMock in your test method. For the first argument, pass WebServiceMock.class, and for the second argument,
pass a new instance of your interface implementation of WebServiceMock, as follows:
Test.setMock(WebServiceMock.class, new YourWebServiceMockImpl());
After this point, if a Web service callout is invoked in test context, the callout is not made and you receive the mock response
specified in your doInvoke method implementation.
Note: If the code that performs the callout is in a managed package, you must call Test.setMock from a test method
in the same package with the same namespace to mock the callout.
This is a full example that shows how to test a Web service callout. The implementation of the WebServiceMock interface
is listed first. This example implements the doInvoke method, which returns the response you specify. In this case, the
response element of the auto-generated class is created and assigned a value. Next, the response Map parameter is populated
with this fake response. This example is based on the WSDL listed in Understanding the Generated Code. Import this WSDL
and generate a class called docSample before you save this class.
@isTest
global class WebServiceMockImpl implements WebServiceMock {
global void doInvoke(
Object stub,
Object request,
Map<String, Object> response,
String endpoint,
String soapAction,
String requestName,
String responseNS,
String responseName,
String responseType) {
docSample.EchoStringResponse_element respElement =
new docSample.EchoStringResponse_element();
respElement.EchoStringResult = 'Mock response';
response.put('response_x', respElement);
}
}
This is the method that makes a Web service callout.
public class WebSvcCallout {
public static String callEchoString(String input) {
docSample.DocSamplePort sample = new docSample.DocSamplePort();
sample.endpoint_x = 'http://api.salesforce.com/foo/bar';
// This invokes the EchoString method in the generated class
String echo = sample.EchoString(input);
return echo;
}
}
This is the test class containing the test method that sets the mock callout mode. It calls the callEchoString method in
the previous class and verifies that a mock response is received.
@isTest
private class WebSvcCalloutTest {
@isTest static void testEchoString() {
// This causes a fake response to be generated
Test.setMock(WebServiceMock.class, new WebServiceMockImpl());
177
Developer Console Enhancements
Apex Code Enhancements
// Call the method that invokes a callout
String output = WebSvcCallout.callEchoString('Hello World!');
// Verify that a fake result is returned
System.assertEquals('Mock response', output);
}
}
Chatter API—Connect in Apex (Pilot)
Force.com developers no longer need to use Apex callouts to access Chatter API data. Now, many Chatter API resources
have been exposed and are directly accessible using Connect in Apex. The Connect in Apex documentation is available in the
Chatter REST API Developer’s Guide.
Note: Connect in Apex is currently available through a pilot program. For information on enabling Connect in Apex,
please contact your salesforce.com representative.
New ID.getSObjectType Method
The new getSObjectType method on the ID type enables you to obtain the sObject token that corresponds to the sObject
of the ID. This is particularly helpful when you don’t have access to the sObject itself, for example, in future methods that
don’t accept sObject types as their parameters, and therefore you can’t call getSObjectType on the sObject. Also, with this
new method, you don’t have to perform a global describe call to obtain an sObject token for a specific sObject name. You can
simply call getSObjectType on the ID. In this way, you also avoid reaching the describe governor limits.
This sample shows how to use the getSObjectType method to obtain an sObject token from an ID. The updateOwner
method in this sample accepts a list of IDs of the sObjects to update the ownerId field of. This list contains IDs of sObjects
of the same type. The second parameter is the new owner ID. Note that since it is a future method, it doesn’t accept sObject
types as parameters; this is why it accepts IDs of sObjects. This method gets the sObject token from the first ID in the list,
then does a describe to obtain the object name and constructs a query dynamicallly. It then queries for all sObjects and updates
their owner ID fields to the new owner ID.
public class MyDynamicSolution {
@future
public static void updateOwner(List<ID> objIds, ID newOwnerId) {
// Validate input
System.assert(objIds != null);
System.assert(objIds.size() > 0);
System.assert(newOwnerId != null);
// Get the sObject token from the first ID
// (the List contains IDs of sObjects of the same type).
Schema.SObjectType token = objIds[0].getSObjectType();
// Using the token, do a describe
// and construct a query dynamically.
Schema.DescribeSObjectResult dr = token.getDescribe();
String queryString = 'SELECT ownerId FROM ' + dr.getName() +
' WHERE ';
for(ID objId : objIds) {
178
Developer Console Enhancements
Apex Code Enhancements
queryString += 'Id=\'' + objId + '\' OR ';
}
// Remove the last ' OR'
queryString = queryString.subString(0, queryString.length() - 4);
sObject[] objDBList = Database.query(queryString);
System.assert(objDBList.size() > 0);
// Update the owner ID on the sObjects
for(Integer i=0;i<objDBList.size();i++) {
objDBList[i].put('ownerId', newOwnerId);
}
Database.SaveResult[] srList = Database.update(objDBList, false);
for(Database.SaveResult sr : srList) {
if (sr.isSuccess()) {
System.debug('Updated owner ID successfully for ' +
dr.getName() + ' ID ' + sr.getId());
}
else {
System.debug('Updating ' + dr.getName() + ' returned the following errors.');
for(Database.Error e : sr.getErrors()) {
System.debug(e.getMessage());
}
}
}
}
}
New String Methods
Apex now has a richer library of String methods. Additional methods have been added for String manipulation and utility
operations. The new methods enable you to:
•
Manipulate Strings, and make them longer or shorter:
◊
◊
◊
◊
◊
◊
◊
◊
◊
◊
◊
◊
◊
•
abbreviate
center
join
leftPad
remove
removeEnd
removeEndIgnoreCase
removeStart
removeStartIgnoreCase
repeat
rightPad
splitByCharacterType
splitByCharacterTypeCamelCase
Change and check the case of String characters:
◊ capitalize
179
Developer Console Enhancements
◊
◊
◊
◊
•
isAllLowerCase
isAllUpperCase
swapCase
uncapitalize
Search and extract substrings:
◊
◊
◊
◊
◊
◊
◊
◊
◊
◊
◊
◊
◊
◊
◊
◊
◊
◊
◊
◊
◊
◊
◊
◊
◊
•
Apex Code Enhancements
containsAny
containsIgnoreCase
containsNone
containsOnly
containsWhitespace
countMatches
deleteWhitespace
difference
endsWithIgnoreCase
getCommonPrefix
indexOfAny
indexOfAnyBut
indexOfDifference
indexOfIgnoreCase
lastIndexOf
lastIndexOfIgnoreCase
left
mid
right
startsWithIgnoreCase
substringAfter
substringAfterLast
substringBefore
substringBeforeLast
substringBetween
Escape and unescape Strings:
◊
◊
◊
◊
◊
◊
◊
◊
◊
◊
escapeCsv
escapeEcmaScript
escapeHtml3
escapeHtml4
escapeXml
unescapeCsv
unescapeEcmaScript
unescapeHtml3
unescapeHtml4
unescapeXml
180
Developer Console Enhancements
•
Determine what type of characters are in the String:
◊
◊
◊
◊
◊
◊
◊
◊
•
Apex Code Enhancements
isAlpha
isAlphanumeric
isAlphanumericSpace
isAlphaSpace
isAsciiPrintable
isNumeric
isNumericSpace
isWhitespace
Other utility methods:
◊
◊
◊
◊
◊
◊
◊
getLevenshteinDistance
isBlank
isEmpty
isNotBlank
isNotEmpty
normalizeSpace
reverse
For more information about these methods, see the Force.com Apex Code Developer's Guide.
Loading Test Data from Static Resources
Using the new Test.loadData method, you can populate data in your test methods without having to write many lines of
code. Simply, add the data in a .csv file, create a static resource for this file, and then call Test.loadData within your test
method by passing it the sObject type token and the static resource name. For example, for Account records and a static
resource name of myResource, make the following call:
List<sObject> ls = Test.loadData(Account.sObjectType, 'myResource');
The Test.loadData method returns a list of sObjects that correspond to each record inserted.
You must create the static resource prior to calling this method. The static resource is a comma-delimited file ending with a
.csv extension. The file contains field names and values for the test records. The first line of the file must contain the field
names and subsequent lines are the field values. To learn more about static resources, see “Defining Static Resources” in the
Salesforce online help.
Once you create a static resource for your .csv file, the static resource will be assigned a MIME type. Supported MIME types
are:
•
•
•
•
text/csv
application/vnd.ms-excel
application/octet-stream
text/plain
181
Developer Console Enhancements
Apex Code Enhancements
Test.loadData Example
The following are steps for creating a sample .csv file and a static resource, and calling Test.loadData to insert the test
records.
1. Create a .csv file that has the data for the test records. This is a sample .csv file with three account records. You can use
this sample content to create your .csv file.
Name,Website,Phone,BillingStreet,BillingCity,BillingState,BillingPostalCode,BillingCountry
sForceTest1,http://www.sforcetest1.com,(415) 901-7000,The Landmark @ One Market,San
Francisco,CA,94105,US
sForceTest2,http://www.sforcetest2.com,(415) 901-7000,The Landmark @ One Market Suite
300,San Francisco,CA,94105,US
sForceTest3,http://www.sforcetest3.com,(415) 901-7000,1 Market St,San Francisco,CA,94105,US
2. Create a static resource for the .csv file:
a.
b.
c.
d.
Click Your Name > Setup > Develop > Static Resources, and then New Static Resource.
Name your static resource testAccounts.
Choose the file you just created.
Click Save.
3. Call Test.loadData in a test method to populate the test accounts.
@isTest
private class DataUtil {
static testmethod void testLoadData() {
// Load the test accounts from the static resource
List<sObject> ls = Test.loadData(Account.sObjectType, 'testAccounts');
// Verify that all 3 test accounts were created
System.assert(ls.size() == 3);
// Get first test account
Account a1 = (Account)ls[0];
String acctName = a1.Name;
System.debug(acctName);
// Perform some testing using the test records
}
}
Global Interface Method Implementations No Longer Need to Be Global
When you implement methods of a global interface, you can declare those methods as public or global in your class. You’re
no longer required to declare them as global. This gives you a choice of how much visibility you would like your method
implementations to have. If you’re a package developer, you can include an interface implementation in a package and make
it inaccessible to the subscriber’s org by declaring the class and methods as public. For example, the package can include a
public batch implementation class with public methods that isn’t visible to the subscriber.
This also applies to overriding global class methods. The methods overriding global methods can be declared as public or
global.
182
Developer Console Enhancements
Apex Code Enhancements
This first example shows that global interface methods can be implemented as public methods. The interface is listed first,
followed by the class that implements it.
global interface Vehicle {
Long getMaxSpeed();
String getType();
}
public class Car implements Vehicle {
// Implement global interface methods in public
//
methods.
public Long getMaxSpeed() { return 100; }
public String getType() { return 'Sedan'; }
}
This second example shows that global methods can be overridden as public methods in the class extension. The base class is
listed first, followed by the class that extends it.
global virtual class MyBaseClass {
global virtual String getMessage() {
return 'Hello from MyClass!';
}
}
public class MyExtension extends MyBaseClass {
// Override the getMessage() method from MyBaseClass
public override String getMessage() {
return 'Overriding the returned message.';
}
}
New Type.toString Method
The toString method has been added to the Type class. This method returns the type name as a String. Other Apex
methods, such as String.valueOf and System.debug, call this method to convert their Type argument into a String.
This example calls toString on the Type corresponding to a list of Integers.
Type t = List<Integer>.class;
String s = t.toString();
System.assertEquals('LIST<Integer>', s);
String.valueOf and System.debug Use toString for Argument
String Conversion
String.valueOf now performs String conversion for its object argument using the toString method on the argument,
if available. And the same is true for System.debug since it calls String.valueOf to perform the String conversion of its
object argument. If the argument to convert is a built-in type with a toString method, or a user-defined type with an
overridden toString method, the toString method is called. Otherwise, System.debug and String.valueOf compute
183
Developer Console Enhancements
Apex Code Enhancements
a String representation of the argument. Previously, System.debug and String.valueOf always wrote or returned the
argument’s String representation and didn’t call toString, even when available on the argument object.
This example illustrates the new behavior of System.debug. It calls String.valueOf and System.debug on a type,
which invokes the Type toString method.
Type t = List<Integer>.class;
// Converts to String using the Type.toString method
String s = String.valueOf(t);
// Returns: LIST<Integer>
// It used to return: Type:[aot=LIST<Integer>]
System.assertEquals('LIST<Integer>', s);
// System.debug use the Type.toString method
// to convert the type to a string.
// Writes LIST<Integer> to the debug output
System.debug(t);
This example shows how the overridden toString method of a user-defined class gets invoked by String.valueOf and
System.debug. The class with the overridden toString method is listed first, followed by a code snippet that calls
String.valueOf and System.debug.
public class PairNumbers {
Integer x,y;
public PairNumbers(Integer a, Integer b) {
x=a;
y=b;
}
public override String toString() {
return '(' + x + ',' + y + ')';
}
}
PairNumbers p = new PairNumbers(1,2);
// Converts to String using the Type.toString method
String s = String.valueOf(p);
// Returns: (1,2)
// It used to return: PairNumbers:[x=1, y=2]
System.assertEquals('(1,2)', s);
// System.debug use the Type.toString method
// to convert the type to a string.
// Writes (1,2) to the debug output
System.debug(p);
SOQL Polymorphism Available in Apex—Developer Preview
You can use SOQL Polymorphism in your SOQL queries in Apex. This is typically done using the new TYPEOF clause. For
more details about SOQL Polymorphism, see SOQL Polymorphism—Developer Preview on page 163.
184
Developer Console Enhancements
Apex Code Enhancements
JSON Support for Additional Built-In Types
JSON serialization and deserialization support has been added to additional built-in Apex types. These types are the return
types of Database methods, namely:
•
•
•
•
•
•
DeleteResult
EmptyRecycleBinResult
LeadConvertResult
SaveResult
UndeleteResult
UpsertResult
In addition to these supported types, JSON continues to be supported as previously for sObjects (standard objects and custom
objects), Apex primitive and collection types, and instances of your Apex classes.
Code Coverage Percentage Details
The code coverage percentage for a class or trigger displayed on the Apex Classes or the Apex Triggers page includes a fraction
between parentheses with the numbers used to compute this percentage, for example, 90% (72/80). The code coverage
percentage is calculated by dividing the number of lines covered by tests by the total number of lines that are part of the coverage
calculation. Some lines of code are excluded from code coverage calculation, such as:
•
•
•
•
Comments
System.debug statements
Test methods
A code statement that is broken up into multiple lines—only the first line is counted
To generate code coverage results, you must run your Apex tests first. If no tests have been run, no code coverage data will
exist and 0% (No coverage data) displays for classes (except for test classes) and triggers on the Apex Classes and Apex Triggers
pages.
Creating sObjects with Default Values Using the newSObject Method
Using the newSObject method on the sObject token (of type Schema.sObjectType), you can now create new sObjects
with custom fields prepopulated with default values that have been predefined in your organization. You can also specify the
record type of the sObject to create. This is useful when default values vary for different record types, like for picklist and
multi-select picklist custom fields. To learn more about default field values, see “About Default Field Values” in the Salesforce
online help.
185
Developer Console Enhancements
Apex Code Enhancements
Name
Argument
newSObject
ID recordTypeId sObject
Boolean
loadDefaults
Return Type
Description
Constructs a new sObject of this type, and optionally, of the
specified record type ID and with default custom field values.
The recordTypeId argument specifies the record type ID
of the sObject to create. If no record type exists for this
sObject, use null. If the sObject has record types and you
specify null, the default record type is used.
The loadDefaults argument specifies whether to populate
custom fields with their predefined default values (true) or
not (false).
Remarks:
•
•
•
•
•
•
For required fields that have no default values, make sure
to provide a value before inserting the new sObject.
Otherwise, the insertion results in an error. An example
is the Account Name field or a master-detail relationship
field.
Since picklists and multi-select picklists can have default
values specified per record type, this method populates the
default value corresponding to the record type specified.
If fields have no predefined default values and the
loadDefaults argument is true, this method creates
the sObject with field values of null.
If the loadDefaults argument is false, this method
creates the sObject with field values of null.
This method populates read-only custom fields of the new
sObject with default values. You can then insert the new
sObject with the read-only fields, even though these fields
cannot be edited after they’re inserted.
If a custom field is marked as unique and also provides a
default value, inserting more than one new sObject will
cause a run-time exception because of duplicate field
values.
To learn more about default field values, see “About Default
Field Values” in the Salesforce online help.
For an example, see Sample: Create New sObject with Default
Values.
Sample: Create New sObject with Default Values
This sample creates an account with any default values populated for its custom fields, if any, using the newSObject method.
It also creates a second account for a specific record type. For both accounts, the sample sets the Name field, which is a required
field that doesn’t have a default value, before inserting the new accounts.
// Create an account with predefined default values
Account acct = (Account)Account.sObjectType.newSObject(null, true);
186
Developer Console Enhancements
Apex Code Enhancements
// Provide a value for Name
acct.Name = 'Acme';
// Insert new account
insert acct;
// This is for record type RT1 of Account
ID rtId = [SELECT Id FROM RecordType WHERE sObjectType='Account' AND Name='RT1'].Id;
Account acct2 = (Account)Account.sObjectType.newSObject(rtId, true);
// Provide a value for Name
acct2.Name = 'Acme2';
// Insert new account
insert acct2;
Starting a Batch Job from Another Batch Job
You can now start a batch job from another batch job by calling Database.executeBatch from the finish method of
the batch class. This allows you to link your batch jobs and create a chain of jobs. Note that the governor limits of batch jobs
still apply. This change applies to batch Apex saved using Salesforce.com API version 26.0 and later. Previously, with Apex
saved using Salesforce.com API version 25.0 and earlier, you couldn’t call Database.executeBatch from within any batch
Apex method. The version used is the version of the running batch class that starts another batch job. If the finish method
in the running batch class calls a method in a helper class to start the batch job, the Salesforce.com API version of the helper
class doesn’t matter.
New getVariableValue Method
The new getVariableValue method in the Flow.Interview class enables a Visualforce controller to get the value of a
flow variable. The variable may be in the flow embedded in the Visualforce page, or in a separate flow that is called by a subflow
element. This method is used with Visual Workflow.
Method
Arguments
getVariableValue String
variableName
Return
Type
Description
Object
Returns the value of the specified flow variable. The flow variable
can be in the flow embedded in the Visualforce page, or in a
separate flow that is called by a subflow element.
The returned variable value comes from whichever flow the
interview is currently running. If the specified variable can’t be
found in that flow, the method returns null.
The variableName argument specifies the unique name of the
flow variable.
This method checks for the existence of the variable at run time
only, not at compile time.
187
Developer Console Enhancements
Apex Code Enhancements
Sample
The following sample uses the getVariableValue method to obtain breadcrumb (navigation) information from the flow
embedded in the Visualforce page. If that flow contains subflow elements, and each of the referenced flows also contains a
vaBreadCrumb variable, the Visualforce page can provide users with breadcrumbs regardless of which flow the interview is
running.
public class SampleContoller {
//Instance of the flow
public Flow.Interview.Flow_Template_Gallery myFlow {get; set;}
public String getBreadCrumb() {
String aBreadCrumb;
if (myFlow==null) { return 'Home';}
else aBreadCrumb = (String) myFlow.getVariableValue('vaBreadCrumb');
return(aBreadCrumb==null ? 'Home': aBreadCrumb);
}
}
New Network Class and Method
The Network class, which is used for the Communities pilot, represents a community.
Note: Salesforce Communities is available through a pilot program. Contact your Salesforce.com representative to
find out if your organization qualifies for the pilot.
This class contains the getNetworkId method. The getNetworkId method returns the user’s current community. If
Communities isn’t enabled for the user’s organization or the user is currently in the internal organization, this method returns
null.
New Messaging Method
The new sendEmailMessage method in the Messaging class allows up to 10 draft email messages to be sent. This method
is used with Case Feed.
Name
Argument
Return Type
Description
sendEmailMessage List <ID>
Messaging.SendEmailResult[] Sends up to 10 draft email messages as defined by the
emailMessageIds
specified email message IDs and returns a list of
Boolean
allOrNothing
SendEmailResult objects.
The sendEmailMessage method assumes that the
optional opt_allOrNone parameter is always false and
ignores the value you set. This optional parameter specifies
whether sendEmailMessage prevents delivery of all
other messages when any of the messages fail due to an
188
Developer Console Enhancements
Name
Argument
Apex Code Enhancements
Return Type
Description
error (true), or whether it allows delivery of the messages
that don't have errors (false).
Example:
This example shows how to send a draft email message.
It creates a case and a new email message associated with
the case. Next, the example sends a draft email message
and checks the results. Before running this example, make
sure to replace the email address with a valid address.
Case c = new Case();
insert c;
EmailMessage e = new EmailMessage();
e.parentid = c.id;
// Set to draft status.
// This status is required
// for sendEmailMessage().
e.Status = '5';
e.TextBody =
'Sample email message.';
e.Subject = 'Apex sample';
e.ToAddress = '[email protected]';
insert e;
List<Messaging.SendEmailResult>
results =
Messaging.sendEmailMessage(new ID[]
{ e.id });
System.assertEquals(1, results.size());
System.assertEquals(true,
results[0].success);
New Access Token Method
The Auth.AuthToken Apex class has a new method to retrieve access tokens: getAccessTokenMap. Use this method if
the user ID is mapped to multiple third-party users. getAccessTokenMap returns a map of access tokens for each third-party
user. For more information, see “About External Authentication Providers” in the Salesforce online help.
Name
Argument
Return Type
getAccessTokenMap String
Map<String, String>
authProviderId
String
providerName
Description
Returns a map from the third-party identifier to the access
token for the currently logged-in Salesforce user. The
identifier value depends on the third party. For example,
for Salesforce it would be the user ID, while for Facebook
it would be the user number.
189
Developer Console Enhancements
Apex Code Enhancements
Support.EmailTemplateSelector Interface
The Support.EmailTemplateSelector interface enables providing default email templates in Case Feed. With default
email templates, specified email templates are preloaded for cases based on criteria such as case origin or subject.
To specify default templates, you must create a class that implements Support.EmailTemplateSelector. The
Support.EmailTemplateSelector interface contains the following method.
Name
Arguments
getDefaultTemplateId ID caseId
Return Type Description
ID
Returns the ID of the email template to preload for
the case currently being viewed in the case feed using
the specified case ID.
Example Implementation
This is an example implementation of the Support.EmailTemplateSelector interface. The
getDefaultEmailTemplateId method implementation retrieves the subject and description of the case corresponding to
the specified case ID. Next, it selects an email template based on the case subject and returns the email template ID.
global class MyCaseTemplateChooser implements Support.EmailTemplateSelector {
// Empty constructor
global MyCaseTemplateChooser() {
}
// The main interface method
global ID getDefaultEmailTemplateId(ID caseId) {
// Select the case we're interested in, choosing any fields that are relevant to
our decision
Case c = [SELECT Subject, Description FROM Case WHERE Id=:caseId];
EmailTemplate et;
if (c.subject.contains('LX-1150')) {
et = [SELECT id FROM EmailTemplate WHERE DeveloperName = 'LX1150_template'];
} else if(c.subject.contains('LX-1220')) {
et = [SELECT id FROM EmailTemplate WHERE DeveloperName = 'LX1220_template'];
}
// Return the ID of the template selected
return et.id;
}
}
The following example tests the above code:
@isTest
private class MyCaseTemplateChooserTest {
static testMethod void testChooseTemplate() {
MyCaseTemplateChooser chooser = new MyCaseTemplateChooser();
// Create a simulated case to test with
Case c = new Case();
c.Subject = 'I\'m having trouble with my LX-1150';
Database.insert(c);
// Make sure the proper template is chosen for this subject
190
Developer Console Enhancements
Visualforce Charting—Generally Available
Id actualTemplateId = chooser.getDefaultEmailTemplateId(c.Id);
EmailTemplate expectedTemplate =
[SELECT id FROM EmailTemplate WHERE DeveloperName = 'LX1150_template'];
Id expectedTemplateId = expectedTemplate.Id;
System.assertEquals(actualTemplateId, expectedTemplateId);
// Change the case properties to match a different template
c.Subject = 'My LX1220 is overheating';
Database.update(c);
// Make sure the correct template is chosen in this case
actualTemplateId = chooser.getDefaultEmailTemplateId(c.Id);
expectedTemplate =
[SELECT id FROM EmailTemplate WHERE DeveloperName = 'LX1220_template'];
expectedTemplateId = expectedTemplate.Id;
System.assertEquals(actualTemplateId, expectedTemplateId);
}
}
Parameterized Interfaces No Longer Supported
Parameterized interfaces are not supported in Apex saved using Salesforce.com API version 26.0 and later.
Visualforce Charting—Generally Available
Available in: Group, Professional, Enterprise, Unlimited, and Developer Editions
Custom controllers and standard controller extensions are not supported in Group or Professional Editions.
User Permissions Needed
To create, edit, and set version settings for Visualforce pages: “Customize Application”
To edit custom Visualforce controllers or Apex:
“Author Apex”
Visualforce charting is now Generally Available. In addition to being available to all Visualforce customers, charting features
a number of enhancements.
New Chart Types
The existing Visualforce chart types (bar, line, and pie) are joined by four new chart types: area, gauge, radar, and scatter.
Area Charts with <apex:areaSeries>
Area charts are an alternative to vertical bar charts.
191
Developer Console Enhancements
Visualforce Charting—Generally Available
Area charts are plotted on the same rectangular grid as the other linear data series charts. You can combine multiple
<apex:areaSeries>, <apex:barSeries>, <apex:lineSeries>, and <apex:scatterSeries> charts in the same
chart.
See the Visualforce Developer’s Guide for complete details of the area chart type.
Gauge Charts with <apex:gaugeSeries>
Use gauge charts to show progress along a specific metric. They plot a single value from their data series and place it along
the gauge axis, showing the total range of possible values.
Like <apex:pieSeries> pie charts, gauge charts use one data series. Unlike <apex:pieSeries> charts, gauge charts use
only the first data value. To use <apex:gaugeSeries> charts, add an <apex:axis type="Gauge"> component, which
sets the beginning and ending values for the gauge dial. Here’s a simple example:
<apex:chart height="250" width="450" animate="true" legend="true" data="{!data}">
<apex:axis type="Gauge" position="gauge" minimum="0" maximum="100" steps="10"/>
<apex:gaugeSeries dataField="data1" highlight="true" tips="true" donut="50">
<apex:chartLabel display="over"/>
</apex:gaugeSeries>
</apex:chart>
See the Visualforce Developer’s Guide for full details of the new chart type.
192
Developer Console Enhancements
Visualforce Charting—Generally Available
Radar Charts with <apex:radarSeries>
Use radar charts to plot a series of connected points along a radial axis. Radar charts are sometimes called “spider web” charts.
You can add multiple <apex:radarSeries> components to a single chart. To use an <apex:radarSeries> chart, add
an <apex:axis type="Radial"> component. Here’s a simple example:
<apex:chart height="530" width="700" legend="true" data="{!data}">
<apex:legend position="left"/>
<apex:axis type="Radial" position="radial">
<apex:chartLabel/>
</apex:axis>
<apex:radarSeries xField="name" yField="data1" tips="true" opacity="0.4"/>
<apex:radarSeries xField="name" yField="data2" tips="true" opacity="0.4"/>
<apex:radarSeries xField="name" yField="data3" tips="true"
markerType="cross" strokeWidth="2" strokeColor="#f33" opacity="0.4"/>
</apex:chart>
See the Visualforce Developer’s Guide for complete details about <apex:radarSeries> charts.
Scatter Charts with <apex:scatterSeries>
Use scatter charts to plot individual (not connected) measurements on a linear grid.
193
Developer Console Enhancements
Visualforce Charting—Generally Available
Area charts are plotted on the same rectangular grid as the other linear data series charts. You can combine multiple
<apex:areaSeries>, <apex:barSeries>, <apex:lineSeries>, and <apex:scatterSeries> charts in the same
chart.
See the Visualforce Developer’s Guide for complete details about scatter charts.
Additional Charting Improvements
The default color scheme for Visualforce charts has been revised to better match the colors of the Salesforce reporting and
analytics charts. The new color scheme makes it easier to create visually consistent dashboards.
In addition to the new default color scheme, most charting components support a colorSet attribute. Use this attribute to
control the colors in charts and data series. Add HTML-style (hexadecimal) colors to the attribute, and the component cycles
through them for each element. For example:
<apex:barSeries orientation="vertical" axis="left" xField="name" yField="data1"
colorSet="#000000,#FF0000,#00FF00,#0000FF,#FFFF00,#00FFFF,#FF00FF"
colorsProgressWithinSeries="true"/>
Most chart types have additional style customization options available through a data series component. See the Visualforce
Developer’s Guide for details of each chart’s options.
Visualforce charting offers enhanced rendering control, including delayed loading of data, reloading data, showing and hiding
charts, and support for re-rendering charts via partial-page refreshes. Rendering controls are generally used in conjunction
with JavaScript Remoting.
The <apex:chart> component now supports setting the height and width attributes as percentages, in addition to pixels.
Use pixels for consistent sizing and behavior across browsers and screen sizes. Use percentages when the size of your chart
should vary with the screen size, or when the data set can produce very large and small charts.
194
Developer Console Enhancements
Additional Visualforce Enhancements
Compatibility with Charting Pilot
Charts created using the Pilot version of Visualforce charting are compatible with the GA version of charting, with these
exceptions:
•
•
The border attribute is no longer available on the <apex:chart> component. Remove the border attribute from any
charts that used it.
The change in the default color scheme means that the visual appearance of existing charts will change.
Additional Visualforce Enhancements
Available in: Group, Professional, Enterprise, Unlimited, and Developer Editions
Custom controllers and standard controller extensions are not supported in Group or Professional Editions.
User Permissions Needed
To create, edit, and set version settings for Visualforce pages: “Customize Application”
To edit custom Visualforce controllers or Apex:
“Author Apex”
Visualforce includes the following enhancements in Winter ’13. For detailed information on these enhancements, refer to the
Visualforce Developer’s Guide.
support:caseFeed Component
The new support:caseFeed component includes all of the standard Case Feed page elements: the Email, Portal, Log a
Call, and Write Case Note publishers, case activity feed, feed filters, and highlights panel. You can use this component to
create a version of the standard Case Feed page for certain users if your organization also wants to use Visualforce to create a
customized Case Feed page for other users.
For example, a company might want to create a highly customized Case Feed page that’s tailored for field support agents using
mobile devices while still allowing support agents in the contact center to use the standard Case Feed page. The company
would create two Visualforce pages: one that uses support:caseFeed, assigned to agents working with desktop computers
in the contact center; and one that uses a custom combination of other Case Feed components, assigned to field agents.
support:caseFeed can only be used in organizations that have enabled Case Feed, Chatter, and feed tracking on cases.
For more information on using support:caseFeed and the other Case Feed components, see Customizing Case Feed with
Visualforce.
195
Developer Console Enhancements
Additional Visualforce Enhancements
NoSignIn Option for Chatter Answers Communities
In Winter ’13, you can use the NoSignIn Boolean attribute of the <chatteranswers:allfeeds> component to remove
sign-in links from your community. Use this option when you have an external sign-in path and want to ensure that your users
follow it instead of the standard Chatter Answers sign-in. When NoSignIn is true, users can still search and view publicly
accessible content for the community. If they already have a valid session, they can still post questions, replies, vote, and flag
content.
Enhancements to JavaScript Remoting
When a @RemoteAction method throws an exception due to a programming error or other failure, the Apex stack trace is
returned to the browser. Inspect the stack trace in a JavaScript debugger console or use it in the error handling of your response
callback function. Here’s a callback function that simply displays the stack trace when there’s an exception:
<script type="text/javascript">
function getRemoteAccount() {
var accountName = document.getElementById('acctSearch').value;
Visualforce.remoting.Manager.invokeAction(
'{!$RemoteAction.MyController.getAccount}',
accountName,
function(result, event){
if (event.status) {
document.getElementById('acctId').innerHTML = result.Id
document.getElementById('acctName').innerHTML = result.Name;
} else if (event.type === 'exception') {
document.getElementById("responseErrors").innerHTML =
event.message + "<br/>\n<pre>" + event.where + "</pre>";
} else {
document.getElementById("responseErrors").innerHTML = event.message;
}
},
{escape: true}
);
}
</script>
You asked for it! This enhancement is from an idea on the IdeaExchange.
In Winter ’13 you can add an option to the remoting request configuration array to prevent automatic buffering of requests.
JavaScript remoting optimizes requests that are executed close to each other in time and groups the calls into a single request.
This buffering improve the efficiency of the overall request-and-response cycle, but sometimes it’s useful to ensure all requests
execute independently.
To disable buffering in the previous example, add buffer: false to the configuration block:
{escape: true, buffer: false}
When a @RemoteAction method is looked up or called, Visualforce inspects the page controller’s inheritance hierarchy and
finds @RemoteAction methods in the controller’s ancestor classes.
196
Developer Console Enhancements
Additional Visualforce Enhancements
Here’s an example demonstrating this capability. The following Apex classes form a three-tier inheritance hierarchy:
global with sharing class ChildRemoteController
extends ParentRemoteController { }
global virtual with sharing class ParentRemoteController
extends GrandparentRemoteController { }
global virtual with sharing class GrandparentRemoteController {
@RemoteAction
global static String sayHello(String helloTo) {
return 'Hello ' + helloTo + ' from the Grandparent.';
}
}
This Visualforce page simply calls the sayHello remote action.
<apex:page controller="ChildRemoteController" >
<script type="text/javascript">
function sayHello(helloTo) {
ChildRemoteController.sayHello(helloTo, function(result, event){
if(event.status) {
document.getElementById("result").innerHTML = result;
}
});
}
</script>
<button onclick="sayHello('Jude');">Say Hello</button><br/>
<div id="result">[Results]</div>
</apex:page>
The remote method doesn’t exist in the ChildRemoteController class. Instead, it’s inherited from
GrandparentRemoteController.
Pass-Through HTML Attributes
You can add arbitrary attributes to the <apex:outputPanel> component that will be “passed through” to the rendered
HTML. This is useful, for example, when using Visualforce with JavaScript frameworks, such as jQuery Mobile and
Knockout.js, that use data-* attributes as hooks to activate framework functions.
To add a pass-through attribute to <apex:outputPanel>, prefix the attribute with “html-” and set the attribute value as
normal:
<apex:page showHeader="false" standardStylesheets="false" doctype="html-5.0">
<apex:outputPanel layout="block" html-data-role="panel" html-data-id="menu">
<apex:insert name="menu"/>
</apex:outputPanel>
<apex:outputPanel layout="block" html-data-role="panel" html-data-id="main">
<apex:insert name="main"/>
</apex:outputPanel>
</apex:page>
197
Developer Console Enhancements
Additional Visualforce Enhancements
This produces the following HTML output:
<!DOCTYPE HTML>
<html>
<head> ... </head>
<div id="..." data-id="menu" data-role="panel">
<!-- contents of menu -->
</div>
<div id="..." data-id="main" data-role="panel">
<!-- contents of main -->
</div>
</html>
Every attribute that begins with “html-” is passed through to the resulting HTML, with the “html-” removed.
Note: Pass-through attributes that conflict with built-in attributes for <apex:outputPanel> will generate a
compilation error.
For additional considerations and examples of using HTML attributes, see Setting Custom HTML Attributes on Visualforce
Components in the Visualforce Developer’s Guide.
Support for Internet Explorer Conditional Comments
Prior to Winter ’13, HTML and XML comments were allowed in Visualforce pages but were automatically removed during
page rendering. This included Internet Explorer-specific “conditional comments” that are often used to address browser
compatibility issues. In Winter ’13, these comments are recognized by Visualforce and passed through to the browser.
This change is versioned, and you must update your Visualforce pages to API version 26.0 to enable this feature.
HTML Comments and IE Conditional Comments
Visualforce removes most HTML and XML comments from the page before rendering, without processing their contents.
Internet Explorer conditional comments, however, will be rendered, allowing you to include IE-specific resources and meta
tags.
Internet Explorer conditional comments are most commonly used to address browser compatibility issues, generally with older
versions of IE. Although conditional comments work wherever they are used on the page, they are frequently placed inside
the page’s <head> tags, where they can be used to include version-specific stylesheets or JavaScript compatibility “shims.”
To place conditional comments inside a page’s <head> tag, disable the standard Salesforce header, sidebar, and stylesheets,
and add your own <head> and <body> tags:
<apex:page docType="html-5.0" showHeader="false" standardStylesheets="false">
<head>
<!-- Base styles -->
<apex:stylesheet value="{!URLFOR($Resource.BrowserCompatibility, 'css/style.css')}"/>
<!--[if lt IE 7]>
<script type="text/javascript"
src="{!URLFOR($Resource.BrowserCompatibility, 'js/obsolete-ie-shim.js')}>
</script>
198
Developer Console Enhancements
Additional Visualforce Enhancements
<link rel="stylesheet" type="text/css"
href="{!URLFOR($Resource.BrowserCompatibility, 'css/ie-old-styles.css')}" />
<![endif]-->
<!--[if IE 7]>
<link rel="stylesheet" type="text/css"
href="{!URLFOR($Resource.BrowserCompatibility, 'css/ie7-styles.css')}" />
<![endif]-->
</head>
<body>
<h1>Browser Compatibility</h1>
<p>It's not just a job. It's an adventure.</p>
</body>
</apex:page>
Visualforce doesn’t support or evaluate Visualforce tags, for example, <apex:includeScript/>, within standard HTML
comments. However, it will evaluate the following expressions within IE conditional comments:
•
•
Global variables, such as $Resource and $User
The URLFOR() function
See Microsoft’s documentation for Internet Explorer conditional comments for further details of how to use them.
Migrating from Escaped Comments
Versions of Visualforce prior to Winter ’13 allowed, in certain limited contexts, for conditional comments to be passed through
to the browser when the comments were encoded using escaped “<” and “>” characters for the comment delimiters. This wasn’t
intended behavior, and has been corrected.
On pages that use API version 26.0 or later, escaped comments render literally on the page. The solution is to change these
pages to use syntactically valid IE conditional comments.
Existing pages that use this unintended feature will, in most cases, continue to work in Winter ’13 as long as the page is set
to API version 25.0 or below. Customers who made use of this technique are encouraged to change their pages to use true IE
conditional comments now that they are supported.
Inline Editing for Dependent Picklists
You asked for it! This enhancement is from an idea on the IdeaExchange.
Dependent picklists support inline editing. To enable inline editing on the controlling or dependent <apex:outputField>,
add an <apex:inlineEditSupport> child component to the field:
<apex:form>
<apex:outputField value="{!Location.country}">
<apex:inlineEditSupport event="ondblClick" />
</apex:outputField>
<apex:outputField value="{!Location.state}">
<apex:inlineEditSupport event="ondblClick" />
</apex:outputField>
<apex:outputField value="{!Location.city}">
<apex:inlineEditSupport event="ondblClick" />
</apex:outputField>
</apex:form>
199
Developer Console Enhancements
Additional Visualforce Enhancements
Pages must include the controlling field for a dependent picklist that is inline edit-enabled. Failing to include the controlling
field on the page causes a runtime error when the page is displayed.
If you combine inline edit-enabled dependent picklists with Ajax-style partial page refreshes, refresh all fields with dependent
or controlling relationships to each other as one group. Refreshing fields individually isn’t recommended, and might result in
inconsistent undo/redo behavior. Here’s an example of the recommended way to partially refresh a form with inline edit-enabled
dependent picklists:
<apex:form>
<!-- other form elements ... -->
<apex:outputPanel id="locationPicker">
<apex:outputField value="{!Location.country}">
<apex:inlineEditSupport event="ondblClick" />
</apex:outputField>
<apex:outputField value="{!Location.state}">
<apex:inlineEditSupport event="ondblClick" />
</apex:outputField>
<apex:outputField value="{!Location.city}">
<apex:inlineEditSupport event="ondblClick" />
</apex:outputField>
</apex:outputPanel>
<!-- ... -->
<apex:commandButton value="Refresh Picklists" reRender="locationPicker" />
</apex:form>
All of the inline edit-enabled picklists are wrapped in the <apex:outputPanel> component. The <apex:outputPanel>
is rerendered when the <apex:commandButton> action method is fired.
Map Attributes for Custom Components
It’s now possible to assign maps to attributes of custom components. Declare the map attribute like this:
<apex:component>
<!-- Attribute definitions -->
<apex:attribute name="items" description="A map of items to be listed."
type="map" required="true"/>
<!-- Component implementation -->
<ul>
<apex:repeat value="{!items}" var="itemKey">
<li><strong>{!itemKey}</strong> {!items[itemKey]}</li>
</apex:repeat>
</ul>
</apex:component>
You don’t need to declare the specific data types for the map collection contents, it will be determined at runtime.
Dynamic References to Lists and Maps with <apex:inputText>
Use dynamic references to lists and maps in an <apex:inputText> tag to create forms using data that isn’t in your
organization’s custom objects. Working with a single map can be much simpler than creating a series of instance variables in
an Apex controller or creating a custom object just for the form data.
200
Developer Console Enhancements
Additional Visualforce Enhancements
Here’s a Visualforce page that uses a map to hold form data for processing by a custom controller:
<apex:page controller="ListsMapsController">
<apex:outputPanel id="box" layout="block">
<apex:pageMessages/>
<apex:form >
<apex:repeat value="{!inputFields}" var="fieldKey">
<apex:outputText value="{!fieldKey}"/>:
<apex:inputText value="{!inputFields[fieldKey]}"/><br/>
</apex:repeat>
<apex:commandButton action="{!submitFieldData}"
value="Submit" id="button" rerender="box"/>
</apex:form>
</apex:outputPanel>
</apex:page>
And here’s a simple controller that works with the form:
public class ListsMapsController {
public Map<String, String> inputFields { get; set; }
public ListsMapsController() {
inputFields = new Map<String, String> {
'firstName' => 'Jonny', 'lastName' => 'Appleseed', 'age' => '42' };
}
public PageReference submitFieldData() {
doSomethingInterestingWithInput();
return null;
}
public void doSomethingInterestingWithInput() {
inputFields.put('age', (Integer.valueOf(inputFields.get('age')) + 10).format());
}
}
Improved Handling of Formula Fields in <apex:outputField>
The <apex:outputField> component provides a read-only display of sObject fields. The component adapts its output to
match the type of the field displayed, and the behavior is intended to match the standard Salesforce interface. Prior to Winter
’13 this wasn’t always the case; formula fields that used the HYPERLINK() function to create custom URLs weren’t handled
correctly by <apex:outputField>. The field value was escaped when it shouldn’t have been, and instead of displaying an
active link it displayed the HTML for the hyperlink. This is now fixed.
This change is versioned, and you must update your Visualforce pages to API version 26.0 to enable the new behavior.
The most common work around for the issue was to use <apex:outputText> with the escape attribute set to false:
<apex:outputText value="{!someSObject.customURL}" escape="false"/>
201
Developer Console Enhancements
Additional Visualforce Enhancements
This can now be rewritten to use the more general <apex:outputField>:
<apex:outputField value="{!someSObject.customURL}"/>
Warning: Be aware that either approach might be a security risk because it allows arbitrary content, including
JavaScript, that can be used in a malicious manner. This is true for all formula fields that use HYPERLINK(), whether
displayed in Visualforce or in the standard Salesforce interface.
Formula fields are only unescaped in the above two situations. Formula fields displayed using expressions continue to be
escaped. For example:
Here is the URL: {!someSObject.customURL}
When used this way, the URL field is escaped and appears as HTML in the user’s browser, not as an active link.
Changes to Escaping Behavior
Prior to the Winter ’13 release, text in some Visualforce pages and components might have been generated incorrectly. This
markup could contain fragments that should have been escaped (for example, the "<" character generated as "<") but were
not. These fragments might be interpreted by the browser as markup rather than as text in the page. This problem has been
corrected for all pages with API version 26.0 or later.
Your organization might contain pages or components that depend on this incorrect processing. These pages need to be fixed.
To fix them, use <apex:outputText> with the attribute escape="false" to generate unescaped text.
For existing organizations, the Critical Updates page shows a pending change. When you have corrected any pages or
components that depend on the incorrect behavior, activate the change on the Critical Updates page. You must make this
change by the date indicated on the Critical Updates page. See “Critical Updates Overview” in the online help for details about
managing critical updates.
If your organization contains pages or components with the problem installed from managed packages, you might need to
contact the package’s supplier to obtain a newer, corrected, version.
Changes to Expression Evaluation with Null Values
Expression evaluation has been changed to throw a specific exception when the value on either side of a relative comparison
is null. For example, this expression causes a runtime error when currentReservations or maxReservations is null:
{! currentReservations < maxReservations}
The affected comparison operators are:
•
•
•
•
< (less than)
<= (less than or equals)
> (greater than)
>= (greater than or equals)
202
Developer Console Enhancements
Push Major Upgrade
Previously, this programming error produced the value null, rather than a Boolean true or false. This often caused
difficult-to-diagnose misbehavior on affected pages.
Additionally, the result of equality comparisons involving null values has changed to always return a Boolean true or false.
The affected equality comparison operators are:
•
•
== (equals)
!= (not equals)
Previously, equality comparisons with null on either side resulted in null, rather than a Boolean value.
This change is versioned. You must update your Visualforce pages to API version 26.0 to enable the new behavior.
It’s a best practice to verify that a variable isn’t null before using it. For example, change the previous expression to:
{! (currentReservations != null) && (maxReservations != null) &&
(currentReservations < maxReservations)}
Alternatively, ensure that variables, properties, and attributes can’t be null. For example, initialize member variables, set the
default attribute on <apex:attribute>, and so on.
Note: This change affects Visualforce expression evaluation only. Formula evaluation in custom fields is unchanged.
Restrictions and Validation on Help URLs in <apex:sectionHeader>
New restrictions and validations for the help attribute of <apex:sectionHeader> address a security vulnerability with
this component. A help URL must now be a fully-qualified, absolute, or relative URL. JavaScript URLs are no longer
permitted.
This change is not versioned and affects all Visualforce pages. Existing pages with invalid help URLs will now display a
warning icon ( ) instead of the usual “Help for this Page” link.
Push Major Upgrade
Available in: Developer Edition
User Permissions Needed
To push an upgrade:
“Upload AppExchange Packages”
Note: This feature is available only to eligible salesforce.com partners. For more information on the Partner Program,
including eligibility requirements, please visit us at www.salesforce.com/partners.
203
Developer Console Enhancements
Push Major Upgrade
Starting with Winter ‘13, ISVs can push a new major version of your package directly to any subscriber. Previously, push
upgrades were supported only for patches, that is, upgrades that did not add any new components. Winter ‘13 removes that
restriction, enabling you to also push major upgrades involving significant new functionality.
Warning:
When you push an upgrade, you’re making changes to a subscriber’s organization without their explicit consent.
Hence, it’s important to plan ahead and exercise due caution.
About Push Upgrades
You can push either a patch or a major upgrade. A patch only contains bug fixes and minor enhancements. In contrast, a major
upgrade can include major enhancements and new features that add new components. At a high level, pushing an upgrade
involves the following steps:
Pushing a major upgrade entails a higher degree of risk as it can break existing functionality in a subscriber’s organization.
This is because new components in the upgraded package might not be available to existing users of the package, or could
overwrite users’ customizations. As the app developer, it’s your responsibility to protect users from any adverse impact due to
upgrading. We strongly recommend you consider all potential consequences of the upgrade and take appropriate steps to
prevent any problems.
When pushing a major upgrade, we recommend that you divide changes in your package into two categories:
1. Enhancements to existing features that users already have access to—Use a post install Apex script to automatically assign
the relevant components to existing users. This ensures all current users of the package can continue using it without explicit
action by administrators.
2. New features you’re introducing for the first time—Don’t use a post install Apex script to auto-assign components. This
ensures your subscribers have the opportunity to decide if and when to use the new features.
Here are some additional guidelines to keep in mind when planning a push upgrade.
•
•
•
•
•
Avoid changes to validation rules, formula fields, and errors thrown from Apex triggers, as they may negatively impact
subscribers’ integrations.
Don’t make visible changes to a package in a patch. This is because other than a change in the package version number,
subscribers aren't notified of push upgrades.
Test your upgraded package in multiple environments, replicating all relevant features of your customers’ organizations,
including editions, customizations, other installed packages, and permission sets.
Schedule push upgrades at your customers’ off-peak hours and outside of salesforce.com's major release windows, to
minimize potential subscriber impact.
Notify your subscribers in advance about the timing of the upgrade, its potential consequences, and any steps they need to
take.
Assigning Access to New Components and Fields
If the new version of your package includes new components or new fields in existing components, existing users of the package
won’t automatically have access to the new components and fields after the upgrade. This can limit them from using the new
features you’ve added or prevent older features from working properly. By default, any new components in your package are
assigned only to administrators. You have two options for ensuring that all users of the package have access to the new
components and fields.
Notify administrators to assign the appropriate permissions to all users of the package
We recommend this for any new features you’re introducing. This ensures administrators have the option of deciding
if and when to make the new features available.
204
Developer Console Enhancements
Push Major Upgrade
Assign the new components to existing users automatically, using a post install Apex script
We recommend this for enhancements to existing features. This ensures all current users of the package can continue
using it without explicit action by administrators.
To assign access to new components automatically, you can use the following strategy.
1. Create new permission sets that define the default access settings for all new components and fields.
2. Include the new permission sets in the new package version.
3. Write a post install Apex script to run automatically in the subscriber organization after the package is upgraded. The
script must perform these tasks.
a. For each new permission set, choose an existing component whose user assignment needs to be copied.
b. Find all profiles that can access that component.
c. Assign the new permission sets to every user with those profiles.
Note: The default permission sets for all standard profiles aren’t editable. Hence, the post install script will trigger
an exception if it tries to update one of these permission sets. It’s important that you create a new permission set to
assign access to the new components in your package.
Sample Post Install Script for a Push Upgrade
This section shows a sample post install script that automates the assignment of new components to existing users of a package.
For more information on writing a post install Apex script, see “Running Apex on Package Install/Upgrade” in the ISVforce
Guide.
The sample script covers a scenario in which an ISV is upgrading subscribers to a new package version that contains new
Visualforce pages and a new permission set that grants access to those pages. After upgrading, existing users of the package
will not have access to the new pages by default. The post install script resolves this problem by identifying which users have
access to the Visualforce pages in the old version of the package and granting them access to the new pages. The script performs
the following actions.
•
•
•
•
•
Get the Id of the Visualforce pages in the old version of the package
Get the permission sets that have access to those pages
Get the list of profiles associated with those permission sets
Get the list of users who have those profiles assigned
Assign the permission set in the new package to those users
global class PostInstallClass implements InstallHandler
global void onInstall(InstallContext context) {
{
//Get the Id of the Visualforce pages
List<ApexPage> pagesList =[SELECT Id FROM ApexPage WHERE NamespacePrefix =
'TestPackage' AND Name = 'vfpage1'];
//Get the permission sets that have access to those pages
List<SetupEntityAccess> setupEntityAccessList = [SELECT Id,
ParentId, SetupEntityId, SetupEntityType FROM SetupEntityAccess
where SetupEntityId IN:pagesList];
Set<ID > PermissionSetList = new Set<ID> ();
for(SetupEntityAccess sea : setupEntityAccessList){
PermissionSetList.add(sea.ParentId)};
List<PermissionSet> PermissionSetWithProfileIdList =
[SELECT id,Name,IsOwnedByProfile,Profile.Name,
ProfileId FROM PermissionSet where IsOwnedByProfile = true
AND Id IN :PermissionSetList ];
205
Developer Console Enhancements
Push Major Upgrade
//Get the list of profiles associated with those permission sets
Set<ID> ProfileList = new
Set<ID> ();
for(PermissionSet per : PermissionSetWithProfileIdList){
ProfileList.add(per.ProfileId);
}
//Get the list of users who have those profiles assigned
List<User> UserList =[SELECT id FROM User where ProfileId IN :ProfileList ];
//Assign the permission set in the new package to those users
List<PermissionSet> PermissionSetToAssignList = [SELECT id,Name
FROM PermissionSet where Name='TestPermSet' AND
NamespacePrefix = 'TestPackage'];
PermissionSet PermissionSetToAssign = PermissionSetToAssignList[0];
Set<ID> UsersSet = new Set<ID> ();
for(User us : UserList){
PermissionSetAssignment psa= new PermissionSetAssignment();
psa.PermissionSetId = PermissionSetToAssign.id;
psa.AssigneeId = us.id;
UsersSet.add(us.id);
}
}
@isTest
public static void test() {
PostInstallClass myClass = new PostInstallClass();
Test.testInstall(myClass, null);
}
}
Known Limitations for Push Upgrade
The following are known limitations when pushing an upgrade.
•
•
Settings for tab visibility are not carried over by permission sets. Hence, if your upgrade requires changes to tab settings,
you can’t implement the changes automatically using a post install script. Instead, you’ll need to notify administrators to
make the change manually.
Push upgrade fails if the package contains Visualforce markup that attempts to access the OpenActivity entity. For
example, the following code in the package will cause the push upgrade to fail.
<apex:outputLabel for="taskDate"
value="{!$ObjectType.OpenActivity.fields.ActivityDate.label}" />
As a workaround, avoid using the global ObjectType reference to obtain the label for OpenActivity.ActivityDate
by specifying the label as follows:
<apex:outputLabel for="taskDate" value="Date" />
Scheduling Push Upgrades
After you’ve created a patch version of your package, you can automatically deploy it to customers using a push upgrade.
Tip: Salesforce.com strongly recommends following this sequence for pushing package upgrades.
1. Push the upgrade to your own organizations so you can run tests and fix any bugs before upgrading subscribers.
2. When you’re ready and have coordinated with your customers on their change management process, push to a
small number of customer organizations. Try sandbox organizations first, if possible.
3. Once you’re comfortable with the initial results, push to your wider customer base, based on your agreements with
each customer.
206
Developer Console Enhancements
Push Major Upgrade
4. Deprecate the previous version of your package in your main development organization. Replace the version on
AppExchange if necessary, and update your Trialforce setup.
5. If your upgrade was a patch, after you’ve successfully distributed the upgrade to subscriber organizations, reintegrate
those changes into your main development organization. For more information about combining patches into the
main development organization, see “Working with Patch Versions” in the ISVforce Guide.
For more information, see “Best Practices for Push Upgrades and Patch Versions” in the online help.
To schedule a push upgrade:
1. Log in to your main development organization.
2. Under Your Name > Setup > Create > Packages, click the name of the managed package whose upgrade you want to
push. On the package detail page, click the Versions tab, and then click Push Upgrades.
3. Click Schedule Push Upgrades.
4. Select a package version to push from the Patch Version drop-down list.
Note: Beta versions aren’t eligible for push.
5. Enter a Scheduled Start Date, indicating when a push upgrade should begin.
6. In the Select Target Organizations section, select the organizations to receive your push upgrade. If an organization already
received a push upgrade for the selected package version, it won’t appear in this list. You can select organizations by:
•
•
•
•
Entering a term that filters based on an organization’s name or ID. Names can match by partial string, but IDs must
match exactly.
Choosing between production and sandbox organizations from the Organizations drop-down list.
Choosing organizations that have already installed a particular version.
Clicking on individual organizations, or the Select All and Deselect All checkboxes.
This section lists the following information about the organization (in alphabetical order):
Field
Description
Current Version
The current package version an organization has installed.
Organization ID
The ID that uniquely identifies the organization to
salesforce.com.
Organization Name
The name of the organization. Clicking this name shows
the upgrade history for the organization.
Primary Contact
The name of the contact who installed the package.
7. Click Schedule.
While a push upgrade is in progress, you can click Abort to stop it.
Viewing Push Upgrade Details
For information about a specific push upgrade that your organization sent, click Your Name > Setup > Create > Packages,
click the name of the package you want to view, then click Push Upgrades. Clicking on the name of a Target takes you to
the Push Upgrade Details page, which has information both for the push job and each organization that it was pushed to.
The Job Details section has the following information about the overall push upgrade (in alphabetical order):
207
Developer Console Enhancements
Push Major Upgrade
Field
Description
End Date
The date and time the push upgrade finished.
Ignore Apex Test Failures
Whether Apex test failures that may cause the installed
application not to function properly were ignored.
Scheduled By
The name of the user who initiated the push upgrade.
Start Date
The scheduled start date and time of the push upgrade.
Status
The status of the push upgrade, whether scheduled, in
progress, completed, aborted, or completed with failures.
Version
The package version number that was pushed.
In the Organizations section, you can get a list of all the organizations that received a push upgrade. You can filter organizations
by using the search box and entering a term that filters based on an organization’s name or ID. Names can match by partial
string, but IDs must match exactly. From the drop-down list, you can also filter based on the status of the push upgrade.
The list contains the following information specific to each organization (in alphabetical order):
Field
Description
Duration
The amount of time the push upgrade took.
Failure Type
Lists the type of failure that occurred (if any). If the push
upgrade did fail, a possible explanation is provided in the
collapsible section. If the push upgrade was unsuccessful, click
Retry to try it again.
Organization ID
The ID that uniquely identifies the organization to
salesforce.com.
Organization Name
The name of the organization. Clicking this name shows the
upgrade history for the organization.
Start
The scheduled start date and time of the push upgrade.
Status
The status of the push upgrade, whether scheduled, in
progress, completed, aborted, or completed with failures.
Viewing Push Upgrade History
To view the details of all push upgrades sent by your organization, click Your Name > Setup > Create > Packages, click the
name of the package you want to view, then click Push Upgrades.
The Push Upgrade History page lists the status of all your pending and previous push upgrades. To filter your push upgrade
history:
1. Select a version number from the drop-down list. Not selecting any version is equivalent to selecting all of them.
2. Select one or more statuses from the Status list. Not selecting any status is equivalent to selecting all of them.
3. Click Apply to filter the list. Click Clear to remove all the filters.
The history displays the following information (in alphabetical order):
208
Developer Console Enhancements
Environment Hub—Pilot
Column
Description
Action
While a push upgrade is in progress, you can click Abort to
stop it.
Start Date
The scheduled start date and time of the push upgrade.
Status
The status of the push upgrade, whether scheduled, in
progress, completed, aborted, or completed with failures.
Target
The name of the organization the push upgrade went to. For
multiple organizations, this field only lists the first organization
in the queue, followed by the number of the total selected
organizations. Clicking on this link provides you with more
information about the target push upgrade and each individual
organization.
Version
The package version number that was pushed.
Environment Hub—Pilot
Available in: Professional, Enterprise, Unlimited, and Developer Editions
Note: This feature is currently available through a pilot program. For information on enabling it for your organization,
please contact salesforce.com.
Starting in Winter ‘13, you can use the Environment Hub to view details of all your Salesforce organizations from one, central
location. This can make administration much easier, especially for companies that use a large number of organizations for
development and testing.
From the Environment Hub, you can:
•
•
•
•
•
Register all organizations currently used by your company
Automatically detect relationships between organizations
View details about each organization, such as its type (for example, Development, Patch, or Release) and tags
Assign one or more tags to any organization
Filter organizations by tag
Setting Up the Environment Hub
You only need to set up the Environment Hub once.
1. Click Name > Setup > Company Profile > Environment Hub.
2. Click Create Hub.
Your current organization is now the Environment Hub. From the Hub, you can perform these actions.
•
•
•
Click Add Organization to add another organization.
Click the name of any organization to view details about it, including any child organizations it has.
Click Edit next to an organization to update its details.
209
Additional Force.com Enhancements
Workflow Evaluation Criteria Usability Enhancements
Click Remove next to an organization to remove it from the Hub.
Click Filter and then click the name of a tag to view a list of all organizations with that tag.
Click Remove Hub to remove the Hub.
•
•
•
Adding Organizations to the Environment Hub
To add an organization:
1.
2.
3.
4.
5.
6.
Click Name > Setup > Company Profile > Environment Hub.
Click Add Organization.
Enter your username and password for the organization.
Optionally, select Auto-Detect Related Organizations to add related organizations to the Hub.
Click Save & Next.
On the next page, optionally:
•
•
•
Edit the name of the organization
Write a description for it
Specify one or more tags, separated by commas
7. Click Save.
ADDITIONAL FORCE.COM ENHANCEMENTS
Workflow Evaluation Criteria Usability Enhancements
Available in: Enterprise, Unlimited, Developer, and Database.com Editions
Tasks, Sites, and Email Alerts are not available in Database.com
The process of configuring a workflow rule involves specifying evaluation criteria. Many users found this area of the user
interface confusing, so we clarified the text in the field label and options. We also reordered the options to present the simplest
option first, and the most complex option last.
Note: The default setting hasn’t changed, but it’s now the last option in the list.
The evaluation criteria field now appears as follows:
Evaluate the rule when a
record is:
Description
created
Evaluate the rule criteria each time a record is created. If the rule criteria is met, run
the rule. Ignore all updates to existing records.
With this option, the rule never runs more than once per record.
210
Additional Force.com Enhancements
Evaluate the rule when a
record is:
Custom Object Truncation
Description
created, and every time it’s Evaluate the rule criteria each time a record is created or updated. If the rule criteria
edited
is met, run the rule.
With this option, the rule repeatedly runs every time a record is edited, as long as
the record meets the rule criteria.
Note: You can't add time-dependent actions to the rule if you select this
option.
created, and any time it’s
edited to subsequently meet
criteria
(Default) Evaluate the rule criteria each time a record is created or updated.
• For a new record, run the rule if the rule criteria is met.
• For an updated record, run the rule only if the record is changed from not meeting
the rule criteria to meeting the rule criteria.
With this option, the rule can run multiple times per record, but it won’t run when
the record edits are unrelated to the rule criteria.
For example, suppose that for an opportunity record to meet the rule criteria, the
opportunity probability must be greater than 50%. If you create an opportunity with
a probability of 75%, the workflow rule runs. If you edit that opportunity by changing
the probability to 25%, the edit doesn’t cause the rule to run. If you then edit that
opportunity by changing the probability from 25% to 75%, the edit causes the rule
to run. With this last edit, the rule runs because the record is changed from not
meeting the rule criteria to meeting the rule criteria.
Custom Object Truncation
Available in: Contact Manager, Group, Professional, Enterprise, Unlimited, Developer, and Database.com Editions
User Permissions Needed
To truncate custom objects:
“Customize Application”
Truncating custom objects is a fast way to permanently remove all of the records from a custom object, while keeping the
object and its metadata intact for future use. Truncating is useful, for example, if you have created a custom object and filled
it with test records. When you’re done with the test data, you can truncate the object to purge the test records, but keep the
object and put it into production. This is much faster than batch-deleting records and possibly recreating the object.
Truncating custom objects requires that you enable an organizational permission.
Note: You must turn on the truncate organization permission even if you had access to truncation in the pilot release.
211
Additional Force.com Enhancements
Retention Policy for Unused Sandboxes
1. Click Your Name > Setup > Customize > User Interface.
2. Select Enable Custom Object Truncate.
Truncating custom objects causes some irreversible changes to the truncated object and its records. After enabling the truncate
permission, make sure you fully understand the implications of truncation before you use the feature. See “Truncating Custom
Objects Overview” in the online help for more information.
Retention Policy for Unused Sandboxes
Available in: Enterprise, Unlimited, and Database.com Editions
With Winter ’13, sandboxes that no one has logged into for 180 days are now deleted. Users who have created or most recently
refreshed any sandbox for your organization will be notified prior to scheduling the sandbox for deletion. They will get at least
three email notifications over 30 days. To keep a sandbox active and avoid email notifications, log in periodically.
Full Sandbox Configuration
Available in: Enterprise, Unlimited, and Database.com Editions
In Winter ’13, new settings encourage you to further reduce the amount of data you copy when creating or refreshing a full
sandbox. Using the minimum selections speeds up your sandbox copy.
•
•
The Opportunity History option allows you to select the number of days of opportunity history from your production
organization to copy to your sandbox. You can copy from 0 to 180 days, in 30 day increments. The default value is 0 days.
The default values for the Object History and Case History options are changed from 30 days to 0 days.
Updates to Platform Portal User Licenses
The Platform Portal User Licenses table has been updated to reflect the current permissions that can be given to a Platform
portal user.
Users with this license have read and create access on ideas and questions and answers, and read-only access to documents,
knowledge, price books, and products.
This table lists the permissions that can be given to Platform portal users.
Create
Read
Update
Delete
Documents
Ideas
Knowledge
Price Books
212
Additional Force.com Enhancements
Portal Users Not in Developer and Configuration Sandboxes
Create
Read
Update
Delete
Products
Questions and Answers
Portal Users Not in Developer and Configuration
Sandboxes
Available in: Enterprise, Unlimited, and Database.com Editions
In an effort to improve the performance of sandbox copy, portal users are no longer copied to developer and configuration
sandboxes. Contacts, which are required by portal users, weren’t copied to those sandbox types. Therefore, the functionality
of the sandbox remains the same without portal users. All portal licenses are still copied, so you can create portal users in your
sandbox if you need them.
Eastern Name Order for Vietnamese Locales
Available in: Group, Professional, Enterprise, Unlimited, Developer, and Database.com Editions
User Permissions Needed
To view company information:
“View Setup and Configuration”
To change company information:
“Customize Application”
The available personal setup options vary according to which Salesforce Edition you have.
The supported locales Vietnamese (vi) and Vietnamese (Vietnam) (vi_VN) now display in Eastern name order (family name
first) throughout Salesforce.
If you have existing reports run in organizations with Vietnamese or Vietnamese (Vietnam) as the locale and conditions on a
person’s name (such as Contact Name), you will need to update the report to have it display the new name order.
Minor Branding Changes to User Interface Elements
In Winter ’13, we made minor changes to the Aloha skin. We’re now using more neutral colors for list views and related list
headers. If you have Visualforce pages that overrode the styling for list views or related list headers by adding CSS to the page,
your pages won’t be impacted.
213
Help and Training Enhancements
Help and Training Enhancements
Videos
•
Who Sees What: This video series explains how you can control access and visibility to your organization’s data.
◊
◊
◊
◊
◊
◊
◊
•
•
•
•
•
•
•
Overview
Organization Access
Object Access
Organization-Wide Defaults
Record Access via the Role Hierarchy
Sharing Rules
Field-level security
Letting Your Salesforce Administrator Access Your Account (1:42 minutes)
Making Your Reports Run Faster (3:13 minutes)
Removing Users’ Access to Salesforce (3:45 minutes)
Building a Simple Flow (3:29 minutes)
Getting the Most out of Chatter Feeds (2:31 minutes)
Entitlements Management Setup (2:46 minutes)
Idea Themes (3:30 minutes)
Tip Sheets and Implementation Guides
•
Service Cloud Console Implementation Guide—Planning questions and implementation tips to get the most from Service
Cloud Console apps.
Developer Guides
•
Integration Patterns and Practices—When you implement Salesforce, you frequently need to integrate it with other
applications. Although each integration scenario is unique, there are common requirements and issues that developers
must resolve.
This document describes strategies (in the form of patterns) for these common integration scenarios. Each pattern describes
the design and approach for a particular scenario rather than a specific implementation. In this document you’ll find:
◊ A number of patterns that address key “archetype” integration scenarios
◊ A selection matrix to help you determine which pattern best fits your scenario
◊ Integration tips and best practices
This document is for designers and architects who need to integrate the Force.com platform with their on-premises
applications. This content is a distillation of many successful implementations by salesforce.com architects and partners.
If implemented properly, these patterns enable you to get to production as fast as possible and have the most stable, scalable,
and maintenance-free set of applications possible. Salesforce.com’s own consulting architects use these patterns as reference
points during architectural reviews and are actively engaged in maintaining and improving them.
•
Force.com REST API Developer’s Guide—New information on authentication has been added in the “Understanding
Authentication” section. The organization of the guide’s “Reference” and “Using Rest Resources” sections has been
improved.
214
Help and Training Enhancements
Workbooks
•
•
•
Service Cloud Workbook: PDF—Gives you an introduction to creating a unified help desk for your support team.
Site.com Workbook: HTML PDF—Introduces you to Site.com and shows you how to create a simple website using Site.com
Studio.
Analytics Workbook: HTML PDF—Updated to cover new reporting and dashboard features such as joined reports, buckets,
cross filters, and dashboard filters.
Help and Training Portal Enhancements
•
•
•
•
You can now access the Salesforce Help and Training portal without having to log in: http://help.salesforce.com.
Sandbox and Developer Edition organizations have been upgraded to use the public Help and Training portal. To contact
Support, view your cases, or launch premier training courses, log in to your production organization. The login button is
located in the upper right-hand corner of the help portal.
The Help and Training portal provides a rich set of new resources and improvements, including an updated look and a
more intelligent knowledge base to get you to the right answers faster. To view it, click Help & Training within Salesforce.
Access to the new Help and Training portal was previously limited to English, French, German, Italian, Japanese, and
Spanish users. The new help portal is now also available to users in these languages.
◊
◊
◊
◊
◊
◊
◊
◊
◊
◊
•
•
•
Chinese Simplified
Chinese Traditional
Danish
Dutch
Finnish
Korean
Portuguese
Russian
Swedish
Thai
If your help search results include Salesforce videos hosted on YouTube, a separate tab displays them for your convenience.
The case collaboration feature allows you to add up to 20 individuals from your organization to a case you file with
salesforce.com Support to keep them up to date on the status of the case. You and case collaborators can reply to the email
to add comments to the case.
The Help and Training portal includes a new Quick Starts gadget that provides links to topics about a single area from
different sources on one page. Use them to get started with reports and dashboards, Salesforce for Outlook, Data.com,
and other important areas.
215