1
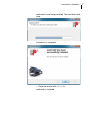
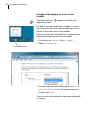
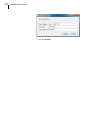
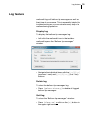
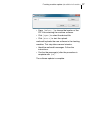
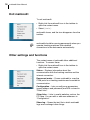
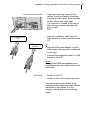
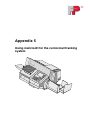
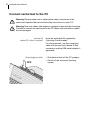
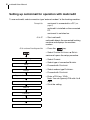
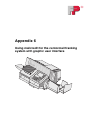
mailcredit
Connected to the FP World
User Manual
2 mailcredit User Manual
About this manual
Target group
The User Manual of mailcredit is primarily aimed at
users of FP franking machines and systems, but
also system administrators.
Users of mailcredit should have basic knowledge of
Windows. To install the application, you need
administrator rights but no special PC knowledge.
Topics
The present manual gives an overview of the
software functions, describes software installation in
detail and how to perform daily routine tasks.
The appendices describe how to operate mailcredit
with the respective franking machine.
The following icons and text markups have been
used in the present manual:
• Bullet points precede instructions.
– Dashes precede list items.
mailcredit.exe
[Next]
Menu commands, file names, path names are
printed in the Courier font.
Names of links and buttons are given in square
brackets.
Warning! indicates a potential hazard which may
result in injury.
Caution! indicates potential operating errors and
operations which may result in malfunctions. The
tips help avoiding such errors.
A tip offers advice or additional suggestions for
improving the operation and provides additional
information.
Contents
Contents
About this manual ________________________________________________ 2
The mailcredit application _________________________________________ 4
Installation in Windows 7 __________________________________________ 5
Install the driver for the USB-serial-adaptor (optional) _____________________ 11
Use mailcredit for communication between franking machine
and data centre _________________________________________________ 13
Log feature _____________________________________________________ 15
Franking machine update _________________________________________ 16
Exit mailcredit __________________________________________________ 18
Other settings and functions ______________________________________ 18
Uninstall mailcredit ______________________________________________ 19
Troubleshooting ________________________________________________ 20
Appendix
Appendix 1: Install mailcredit in Windows XP
Appendix 2: Using mailcredit for the mymail franking machine
Appendix 3: Using mailcredit for the optimail 30 franking machine
Appendix 4: Using mailcredit for the ultimail franking system
Appendix 5: Using mailcredit for the centormail franking system
Appendix 6: Using mailcredit for the centormail franking system with graphic
user interface
3
4 mailcredit User Manual
The mailcredit application
What is mailcredit?
mailcredit is a convenient PC application for easily
linking FP franking machines with the data centre via
the internet.
The fast internet connection replaces the connection
via the analogue modem of the franking machine.
Functions (examples)
– Load postage
– Franking machine update
– Load rate tables
– Contact the data centre during installation of the
franking machine
These Remote Services run exactly like those you
are familiar with when a modem connection is active.
Supported operating systems
– Windows XP
– Windows Vista
– Windows 7
Download
You can download mailcredit from
mailcredit.francotyp.com.
Installation in Windows 7
Installation in Windows 7
System requirements
– Processor / RAM: No prerequisites exceeding
those of the OS
– Hard disk space: 15 MB
– Internet access (broadband connection
recommended)
– Administrator rights
Procedure
• Download the latest mailcredit version.
• Quit all running applications.
• Run the file setup.exe by double-clicking it.
• Confirm the Windows security prompt (“Do you
want the following program to allow changes to
this computer?”) with [Yes].
The mailcredit installation wizard starts.
• Confirm with [Next].
5
6 mailcredit User Manual
The wizard now prompts you to specify the
installation path.
Installation
folder
• Accept the suggested path
or
• choose another path with [Browse].
When the desired settings are displayed:
• Continue with [Next].
• Enable “Create desktop shortcut” if you want to
have a shortcut on your desktop.
• Start installation with [Next].
Installation in Windows 7
mailcredit is now being installed. This can take some
time.
Installation is complete.
• Close the wizard with [Finish].
mailcredit is installed.
7
8 mailcredit User Manual
Configure the display of icons in the
taskbar
The mailcredit icon
application starts.
appears only when the
By default, the mailcredit icon is hidden. To view it,
you must click the arrow (“Show hidden Icons”) to
the left of the other icons in the taskbar.
When you want the mailcredit icon to appear in the
right-hand notification area of the taskbar:
• Click the arrow [Show hidden Icons].
• Select [Customize].
Show hidden icons
• For mailcredit.exe, choose the option Show icon
and notifications in the drop-down menu.
• Confirm with [OK].
The icons will now be always visible when mailcredit
is running.
Installation in Windows 7
Proxy configuration
By default, mailcredit uses the connection settings of
the internet explorer to access the internet. In case
this does not work, you have to enter the data for
your local proxy server manually. If in doubt, please
contact your network administrator.
Change proxy configuration
• Start mailcredit.
• Right-click the mailcredit icon in the taskbar to
open the context menu.
• Select Configuration
proxy.
Configure
mailcredit opens the “Proxy Configuration” dialogue.
• Remove the “Use Default Proxy” check mark.
You can now enter the data for your local proxy
server.
Proxy Address
• Enter the protocol name (e.g. “http://”).
• Enter the IP-adress.
• Enter the port number (usually “80” for HTTP or
“443” for HTTPS).
Proxy User
Proxy Password
• Enter the proxy user name.
• Enter the proxy password.
9
10 mailcredit User Manual
• Save the data.
Install the driver for the USB-serial-adaptor (optional)
Install the driver for the USB-serial-adaptor (optional)
Caution! Only use the supplied USB-serial-adaptor and install it exactly
according to the instructions prior to plugging the adaptor to the PC and
connecting the franking machine.
USB-serial-adaptor
(similar to illustration)
Connection
cable
To use the USB-serial-adaptor, you must configure
it in Windows once during commissioning.
The franking machine need not be running.
• Install the drivers from the supplied CD.
• Plug the USB-serial-adaptor to the D-Sub socket
of the connection cable and screw tight.
• Connect the connection cable to a USB interface
of the PC.
USB-serial-converter
Windows will detect a new device and starts the
wizard for driver installation.
The wizard prompts you whether to establish a
connection with Windows Update.
• Choose one of the two variants of [Yes].
• Confirm with [Next].
The wizard prompts you for the type of installation.
• Choose the option [Install the software
automatically].
• Confirm with [Next].
Windows installs the “USB-Serial-Converter”. This
can take a few minutes.
When installation is complete, the wizard prompts
you to finish the procedure.
• Finish installation with [Finish].
11
12 mailcredit User Manual
USB Serial Port
Windows now continues by installing the driver for
the “USB Serial Port”. This procedure is identical
with the preceding one:
The wizard prompts you whether to establish a
connection with Windows Update.
• Choose one of the two variants of [Yes].
• Confirm with [Next].
The wizard prompts you for the type of installation.
• Choose [Install the software
automatically].
• Confirm with [Next].
Windows installs the “USB Serial Port”. This can
take a few minutes.
When installation is complete, the wizard prompts
you to finish the procedure.
• Finish installation with [Finish].
Installation is complete.
Use mailcredit for communication between franking machine and data centre
Use mailcredit for communication between franking
machine and data centre
Caution! Quit all other applications using the COM
port (e.g. mailreport) before starting mailcredit.
• Connect the franking machine to the PC (see the
Appendix for the respective franking machine).
• Switch the franking machine on.
• If necessary: Establish the communication to the
PC at the franking machine (see the Appendix for
the respective franking machine).
• Run mailcredit by double-clicking the desktop
shortcut.
The mailcredit icon displays a green postage stamp
and the message “Connected”.
mailcredit is now ready for operation. As a rule, no
further steps are required, and you can operate the
franking machine as usual.
13
14 mailcredit User Manual
Status displays
Icon
Status display
Meaning
Red
No postage meter found.
Internet communication could
not be checked.
No communication with the
franking machine.
Green
Connected (balloon-tip)
Communication with the
franking machine established.
But connection to the internet is
interrupted.
Waiting for connection by the
postage meter on interface:
COM…
The Internet server cannot be
reached.
Connected (balloon-tip)
Waiting for connection by the
postage meter on interface:
COM…
Internet communication
possible.
Green
(flashing)
Starting data transfer
(balloon-tip)
Communication with the
franking machine and
connection to the internet are
established. You can operate
mailcredit.
Data transmission to the data
centre in progress.
Log feature
Log feature
mailcredit logs all balloon tip messages as well as
their time of occurrence. This is especially helpful for
troubleshooting as you can retrace every step of a
malfunctioning operation.
Display log
To display the balloon tip messages log:
• Left-click the mailcredit icon in the taskbar.
mailcredit opens the “Balloon tip messages”
window.
• Navigate the individual items with the [<<] / [>>]
(previous / next) and [|<<] / [>>|] (first / last)
buttons.
Delete log
To clear the balloon tip messages log:
• Press [Delete History] to delete all logged
balloon tip messages.
Quit log
To close the “Balloon tip messages” window:
• Press [Close me] or click on the [x] button in
the upper right corner.
15
16 mailcredit User Manual
Franking machine update (not available in all countries)
Caution! Initiate a Teleset procedure prior to updating the software of your franking machine. Otherwise, certain data may be lost during the process.
The amount of “0” is sufficient.
mailcredit offers a convenient function to update the
software of the franking machine. This feature is not
available in all countries and not available for all
franking machines.
Prerequisites
– The new machine software is available as a file on
the PC.
– mailcredit indicates that communication with the
franking machine is possible.
Teleset
In order to exchange certain data, a connection to
the TDC is necessary before updating the software.
• Run Teleset as usual. If you do not need additional
credit, simply initiate the process with an amount
of “0”.
Update software
• Right-click the mailcredit icon in the taskbar to
open the context menu.
• Select [Update meter].
mailcredit opens the “Update Software” dialogue
where you select the file and start the update.
Franking machine update (not available in all countries)
• Press [Select…] to choose the location of the
FPF file containing the machine software.
• Click [Open] to select the desired file.
• Click [Start] to start the upload.
mailcredit uploads the new software to the franking
machine. This step takes several minutes.
• Heed the mailcredit messages. Follow the
instructions.
• Confirm the message(s) after the procedure is
complete with [OK].
The software update is complete.
17
18 mailcredit User Manual
Exit mailcredit
To exit mailcredit:
• Right-click the mailcredit icon in the taskbar to
open the context menu.
• Select [Exit].
mailcredit closes, and the icon disappears from the
taskbar.
mailcredit should be running permanently when you
operate franking machines that establish
connections to the data centre automatically.
Other settings and functions
The context menu of mailcredit offers additional
functions. To access these:
• Right-click the mailcredit icon in the taskbar to
open the context menu.
Status – Displays information about the
communication with the franking machine and the
internet connection.
Reconnect meter – Forces mailcredit to scan the
COM ports for a franking machine and re-establish
communication.
Configuration – Lets you edit proxy parameters
(proxy address and password) and URLs stored in
“Other links”.
Other links – Links to useful websites such as the
FP Shop. You can edit or add new addresses in
“Configuration”.
Show log – Opens the text file in which mailcredit
logs errors amongst other things.
Uninstall mailcredit
Uninstall mailcredit
To uninstall mailcredit, proceed as follows:
Windows 7
• In the Windows Start menu, choose Control
Panel => Programs and Features.
• Click “mailcredit” in the list.
• Right-click and choose [Uninstall]
or
click the [Uninstall] button at the top.
• Confirm the security prompt with [Yes].
• If applicable: confirm the Windows security
prompt.
mailcredit is now being uninstalled.
Windows XP
• In the Windows Start menu, choose Settings =>
Control Panel.
• Select Software.
• Highlight “mailcredit” in the list and click the
[Change or Remove Programs] button.
• Confirm the security prompt with [Yes].
mailcredit is now being uninstalled.
19
20 mailcredit User Manual
Troubleshooting
Issue
Cause and possible elimination
mailcredit cannot be
started.
You do not have administrator rights.
Change to a user account with administrator rights.
mailcredit does not
recognise the franking
machine.
The drivers for “USB Serial Converter” and “USB
Serial Port” are not installed. Plug the USB-serialadaptor in again and let Windows execute the
automatic installation via Windows Update. See page 11.
Establish a connection with the PC at the franking
machine. See the Operator Manual of your franking machine.
mailcredit malfunctions.
Communication problem between mailcredit and
franking machine.
Quit and restart mailcredit or use the “Reconnect
meter” function.
mailcredit cannot access the COM port because it is
in use by another application (e.g. mailreport).
Close all applications. Restart mailcredit.
The franking machine
cannot establish a
connection to the data
centre.
Communication error with
remote station.
Cable issue.
Check whether or not the connection cable between
franking machine and PC is properly connected (see
Appendix).
Quit and restart mailcredit or use the “Reconnect
meter” function.
Franking machine is not configured for mailcredit
operation.
Check the current modem configuration (see Appendix).
PC problem, web access failure.
Check the phone number of the data centre (see Operator
Manual of your franking machine).
Proxy configuration incorrect.
Configure the proxy settings (see page 9).
Troubleshooting
Issue
Cause and possible elimination
The mailcredit icon is not
visible in the taskbar.
Edit the taskbar properties. See page 8.
For further details how to correct malfunctions
yourself, please refer to the Appendix for the
respective franking machine.
21
22 mailcredit User Manual
Appendix
Appendix 1
Install mailcredit in Windows XP
2 mailcredit User Manual
System requirements
– Processor / RAM: No prerequisites exceeding those
of the OS
– Hard disk space: 15 MB
– Internet access (broadband connection
recommended)
– Administrator rights
– Service Pack 3 (Windows XP 32 bit) / Service Pack 2
(Windows XP 64 bit)
– .NET Framework 3.5
Procedure
• Download the latest mailcredit version.
• Quit all running applications.
• Run the file setup.exe by double-clicking it.
The mailcredit installation wizard starts.
• Confirm with [Next].
Appendix 1: Install mailcredit in Windows XP
The wizard now prompts you to specify the installation
path.
Installation
folder
• Accept the suggested path
or
• choose another path with [Browse].
When the desired settings are displayed:
• Continue with [Next].
• Enable “Create desktop shortcut” if you want to have
a shortcut on your desktop.
• Start installation with [Next].
3
4 mailcredit User Manual
mailcredit is now being installed. This can take some
time.
Installation is complete.
• Close the wizard with [Finish].
mailcredit is installed.
Appendix 2
Using mailcredit for the mymail franking
machine
To operate mailcredit for the mymail franking machine, you need the
mailcredit Kit mymail. You can order this kit from Francotyp-Postalia.
Please read the mymail Installation Guide and the mymail Operator Manual
on how to use mailcredit with the mymail franking machine.
2 mailcredit User Manual
Appendix 3
Using mailcredit for the optimail 30 franking
machine
2 mailcredit User Manual
Things you should know
Topics
The present Appendix describes how to operate
mailcredit with the optimail 30 franking machine.
In this document you will learn
– how to connect the optimail 30 to a PC
– how to set up the optimail 30 for operation with
mailcredit
– how to use mailcredit in your daily routine
– the special points to observe when setting up and
commissioning the optimail 30 if you want to use
mailcredit for communication with the data centre
– troubleshooting tips for mailcredit issues.
Supplementary documents
The present Appendix supplements the documentation
that came with your optimail 30 franking machine.
Please read the optimail 30 Installation Guide and the
optimail 30 Operator Manual before commissioning the
optimail 30.
Please make sure to observe the notes on intended use
and the safety instructions in the Installation Guide and
the Operator Manual.
mailcredit Kit
The mailcredit Kit optimail 30 / ultimail / centormail
contains all items you need to operate mailcredit for the
optimail 30 franking machine.
You can order this kit from Francotyp-Postalia.
Appendix 3: Using mailcredit for the optimail 30 franking machine
Contents
Things you should know ___________________________________________2
Connect optimail 30 to the PC _______________________________________4
Setting up optimail 30 for operation with mailcredit _____________________6
Using mailcredit __________________________________________________7
Commissioning of optimail 30 when using mailcredit ____________________8
Tips for helping yourself ___________________________________________13
3
4 mailcredit User Manual
Connect optimail 30 to the PC
Warning! Please make sure to observe the safety instructions in the
optimail 30 Operator Manual and the safety instructions for your PC.
Warning! Use only cables and adaptors supplied or approved by FrancotypPostalia to connect the optimail 30 to the PC. Make sure connection cables
are not damaged.
mailcredit Kit
optimail 30 / ultimail / centormail
Have the mailcredit Kit supplied by
Francotyp-Postalia ready.
For the optimail 30, use the connection
cable with the male 25-pin D-Sub
connector and the 9-pin D-Sub socket
and the USB-serial-adaptor if applicable.
Before plugging in cables
• Shut down/switch off the PC properly.
• Switch off the optimail 30. (The power
switch is located on the left side of the
franking machine.)
Power switch
Appendix 3: Using mailcredit for the optimail 30 franking machine
Connect the connection cable
• Plug the connection cable (D-Sub,
male, 25-pin) provided by FrancotypPostalia to the serial interface on the
optimail 30 and screw tight. (The serial
interface is at the rear of the franking
machine.)
• Plug the connection cable (9-pin DSub, female) to a serial interface of the
PC.
Serial interface at the
PC
or
USB interface
at the PC
or
• Plug the USB-serial-adaptor to the DSub socket of the connection cable and
screw tight.
• Connect the connection cable to a USB
interface of the PC.
Note:
The provided USB-serial-adaptor can
look different than the model shown in the
illustration.
Switching on
• Switch on the PC.
• Switch the optimail 30 on again.
You must make some settings at the
franking machine before you can operate
mailcredit for the optimail 30. For this
purpose, please refer to the following
pages.
5
6 mailcredit User Manual
Setting up optimail 30 for operation with mailcredit
To operate mailcredit, you must configure the connection to the data centre via GSM
modem (as an external communication device).
Prerequisites
– optimail 30 is connected to a PC (see
page 4).
– mailcredit is installed on the connected
PC.
– The optimail 30 is switched on.
At the PC
• Start mailcredit.
mailcredit detects the connected franking
machine and displays the machine
number.
On optimail 30
Modem and Telephone Numbers
Set Modem Parameters
Continue
GSM Modem
Enter PIN
• Press the
key.
• Select in the menu:
MODEM AND TELEPHONE
NUMBERS
SET MODEM
PARAMETERS.
optimail 30 opens the procedure where
you configure the connection to the data
centre.
• Press CONTINUE to proceed.
optimail 30 performs a scan for available
communication devices and offers them
in a selection list.
• Select GSM MODEM.
• Enter a PIN (e.g. 1234).
Save
Note: You can type any PIN with 4 to 8
digits.
• SAVE the PIN you typed.
Appendix 3: Using mailcredit for the optimail 30 franking machine
Using mailcredit
Prerequisites
– optimail 30 is connected to a PC (see
page 4).
– mailcredit is installed on the connected
PC.
– optimail 30 is set up for operation with
mailcredit (see page 6).
Communication between
mailcredit and optimail 30
• Switch the optimail 30 on.
• Start mailcredit.
“No modem available” appears during the
start routine because communication
between mailcredit and the optimail 30
has not yet been established. Confirm the
message with the ENTER key.
As soon as the optimail 30 has finished its
start routine, mailcredit detects the
connected franking machine and displays
the machine number.
Connection with the data centre
• When mailcredit indicates it is ready for
communication with the optimail 30
and the internet (context menu
Status), you can load postage or start
other Remote Services (e.g. update the
rate table).
The connection to the data centre is
established, and data transmission starts.
Messages in the display of the franking
machine and balloon tips in mailcredit
provide status information.
7
8 mailcredit User Manual
Commissioning of optimail 30 when using mailcredit
Warning! Read the Installation Guide for the optimail 30 franking machine.
Heed the safety instructions regarding set-up and commissioning.
Warning! Use only cables and adaptors supplied or approved by FrancotypPostalia to connect the optimail 30 to the PC. Make sure connection cables
are not damaged.
Warning! Heed the safety instructions for your PC.
Set-up and commissioning of the optimail 30 is covered in detail in the Installation
Guide. Instead of the connection options described therein, you can also establish a
connection to the data centre via the internet using a PC and mailcredit. Particularities
of this connection type are described below.
Prior to commissioning
Prerequisites
To ensure smooth installation of your
optimail 30, you should verify whether or
not the following prerequisites are met:
– The mailcredit Kit optimail 30 /
ultimail / centormail supplied by
Francotyp-Postalia is at hand.
For the optimail 30, use the connection
cable with the 25-pin male D-Sub
connector and the 9-pin female D-Sub
connector or the USB-serial-adaptor if
applicable.
– mailcredit is installed on the connected
PC.
Installation
Unpacking
Checking the contents of the package
…
Installing the sealer
• Set up the franking machine as
described in the Installation Guide
optimail 30.
Follow the installation steps from
unpacking to setting up the optional
sealer.
Appendix 3: Using mailcredit for the optimail 30 franking machine
Connecting
Connect optimail 30 to the PC
• Plug the connection cable (D-Sub,
male, 25-pin) provided by FrancotypPostalia to the serial interface on the
optimail 30 and screw tight. (The serial
interface is at the rear of the franking
machine.)
• Plug the connection cable (9-pin
D-Sub, female) to a serial interface of
the PC.
Serial interface at the
PC
or
USB interface
at the PC
or
• Plug the USB-serial-adaptor to the
D-Sub socket of the connection cable
and screw tight.
• Connect the connection cable to a USB
interface of the PC.
Note:
The provided USB-serial-adaptor can
look different than the model shown in the
illustration.
9
10 mailcredit User Manual
Connect power cable
• Plug the power cable appliance
connector into the power connection of
the franking machine. The power
connection is at the rear of the
optimail 30.
• Plug the power plug into a grounded
socket (230 VAC).
Power cable
Switching on
• Push I (= ON) on the power switch, the
toggle switch on the left side of the
franking machine.
Log-in procedure: Start screen
The display lights up and the authorisation procedure starts.
Appendix 3: Using mailcredit for the optimail 30 franking machine
Log-in procedure
Log in
• Now follow the instructions in the
Installation Guide optimail 30 up to step
“Connection configuration”.
Connection configuration
Communication between
franking machine and mailcredit
Connection configuration: mailcredit
• Start mailcredit on the PC.
Heed the status information of mailcredit
on the PC screen.
When mailcredit indicates that
communication with optimail 30 and the
web is possible, you can proceed with
connection set-up.
• Click CONTINUE to start the
connection configuration.
optimail 30 scans connected devices and
offers a list where you can select from
available connection types. This can take
a few seconds.
11
12 mailcredit User Manual
To operate mailcredit:
• Select GSM MODEM.
• Enter a PIN (e.g. 1234).
Note: You can type any PIN with 4 to 8
digits.
• SAVE the connection configuration.
Authorisation …
Follow the optimail 30 Installation Guide
optimail 30 will call the data centre when
Connection Configuration has been
completed successfully.
Authorisation and all further installation
steps take place as described in the
Installation Guide optimail 30.
Appendix 3: Using mailcredit for the optimail 30 franking machine
Tips for helping yourself
Below, you will find tips on how to eliminate problems that may arise when operating
mailcredit for the optimail 30.
Please read chapter “Troubleshooting” in the present manual when you have
problems with the mailcredit application itself.
Refer to the optimail 30 Operator Manual when you need help with regard to
malfunctions or problems in operating the optimail 30 franking machine.
The “Installation Guide optimail 30” provides help when you have problems setting up
and commissioning the franking machine.
If you cannot eliminate a fault yourself by following these hints, please contact
the Francotyp-Postalia Service.
Issue
Possible cause and remedy
mailcredit does not
recognise the franking
machine.
Communication error between mailcredit and franking
machine.
Quit and restart mailcredit or use the “Reconnect
meter” function.
Cable issue.
Check whether or not the connection cable between
franking machine and PC is properly connected (see
page 4).
Quit and restart mailcredit or use the “Reconnect
meter” function.
Connection configuration:
“GSM Modem” is not
offered in the list.
mailcredit is not active.
Start mailcredit.
Restart the connection configuration.
mailcredit does not recognise the franking machine.
Check whether or not the connection cable between
franking machine and PC is properly connected (see
page 4).
Quit and restart mailcredit or use the “Reconnect
meter” function. Restart the connection configuration.
13
14 mailcredit User Manual
Issue
Possible cause and remedy
A modem is not available.
If the error occurs during commissioning:
Confirm the error message with the ENTER key and
continue. Setting up the connection to the data centre
is part of the log-in procedure.
mailcredit is not active.
Start mailcredit. Repeat the procedure.
After switching on the optimail 30, communication
between mailcredit and franking machine is not
immediately effective. Confirm message.
mailcredit detects the franking machine as soon as the
optimail 30 has finished its start routine.
Cable issue.
Check whether or not the connection cable between
franking machine and PC is properly connected (see
page 4).
Quit and restart mailcredit or use the “Reconnect
meter” function.
Appendix 3: Using mailcredit for the optimail 30 franking machine
Issue
Possible cause and remedy
No connection with the
data centre.
mailcredit is not active.
Start mailcredit. Repeat the procedure.
Communication issue
with the modem.
Cable issue.
Check whether or not the connection cable between
franking machine and PC is properly connected (see
page 4).
Quit and restart mailcredit or use the “Reconnect
meter” function.
Check the connection parameters for communication
with the data centre (see page 6).
PC problem, web access failure.
Check the phone number of the data centre (see
optimail 30 Operator Manual).
Proxy configuration incorrect.
Configure the proxy settings (see mailcredit User Manual,
page 9).
Data centre issue. Try again later.
15
16 mailcredit User Manual
Appendix 4
Using mailcredit for the ultimail franking
system
2 mailcredit User Manual
Things you should know
Topics
The present Appendix describes how to operate
mailcredit with the ultimail franking system.
In this document you will learn
– how to connect the ultimail to a PC
– how to set up the ultimail for operation with
mailcredit
– how to use mailcredit in your daily routine
– troubleshooting tips for mailcredit issues.
Supplementary documents
The present Appendix supplements the documentation that came with your ultimail franking system.
Please read the Operator Manual before using the
ultimail franking machine. Pay special attention to
the information of how to safely operate the franking
machine.
mailcredit Kit
The mailcredit Kit optimail 30 / ultimail /
centormail contains all items you need to operate
mailcredit for the ultimail franking system.
You can order this kit from Francotyp-Postalia.
Appendix 4: Using mailcredit for the ultimail franking system
Contents
Things you should know ___________________________________________2
Connect ultimail to the PC __________________________________________4
Setting up ultimail for operation with mailcredit ________________________6
To enable InfoPrint at the ultimail _________________________________6
To configure the connection via mailcredit __________________________7
Using mailcredit __________________________________________________8
Tips for helping yourself ____________________________________________9
3
4 mailcredit User Manual
Connect ultimail to the PC
Warning! Please make sure to observe the safety instructions in the ultimail
Operator Manual and the safety instructions for your PC.
Warning! Use only cables and adaptors supplied or approved by FrancotypPostalia to connect the ultimail to the PC. Make sure connection cables are
not damaged.
mailcredit Kit
optimail 30 / ultimail / centormail
Have the mailcredit Kit supplied by
Francotyp-Postalia ready.
For the ultimail, use the connection cable
with the two 9-pin female D-Sub connectors and the USB-serial-adaptor if applicable.
Before plugging in cables
• Shut down/switch off the PC properly.
• Switch off the ultimail franking system.
(The power switch is located on the
back of the franking machine.)
Appendix 4: Using mailcredit for the ultimail franking system
Connect the connection cable
• Plug the connecting cable (D-Sub,
female, 9-pin) provided by FrancotypPostalia into the (serial) 9-pin interface
on the ultimail and screw tight.
The interface is located at the rear of
the franking machine and bears the
symbol.
• Plug the connection cable (9-pin DSub, female) to a serial interface of the
PC.
Serial interface at the
PC
or
USB interface
at the PC
or
• Plug the USB-serial-adaptor to the DSub socket of the connection cable and
screw tight.
• Connect the connection cable to a USB
interface of the PC.
Note:
The provided USB-serial-adaptor can
look different than the model shown in the
illustration.
Switching on
• Switch on the PC.
• Switch on the ultimail franking system.
You must make some settings at the
franking machine before you can operate
mailcredit for the ultimail. For this
purpose, please refer to the following
pages.
5
6 mailcredit User Manual
Setting up ultimail for operation with mailcredit
To operate the ultimail with mailcredit, you must enable the “InfoPrint” function and
set the modem type to “external”.
To enable InfoPrint at the ultimail
You receive the machine-specific authorisation code for InfoPrint from
Francotyp-Postalia.
SET UP
SYSTEM SETTINGS
• Go to the SET UP menu using the
key.
• Select SYSTEM SETTINGS
MORE
MORE
MORE
MORE
ENABLE / INHIBIT INFOPRINT.
MORE
ENABLE / INHIBIT INFOPRINT
• Type the authorisation code.
• Confirm with CONTINUE.
ultimail enables the InfoPrint function.
• Confirm the pop-up message with the
key.
Appendix 4: Using mailcredit for the ultimail franking system
To configure the connection via mailcredit
SET UP
SYSTEM SETTINGS
• Go to the SET UP menu using the
key.
• Select SYSTEM SETTINGS
MODEM.
MODEM
Setting the modem type External
• Press the key next to MODEM TYPE.
The setting switches between
INTERNAL and EXTERNAL.
If MODEM TYPE EXTERNAL is
displayed:
• Press CONTINUE to confirm and
proceed with the configuration
procedure.
Setting PIN
• Press the key next to CHANGE PIN to
open the menu for setting or changing
your PIN.
• Enter a PIN (e.g. 1234).
Note: You can type any PIN with 4 to 8
digits.
• Press SAVE to set the PIN.
Finally, the ultimail displays the saved
modem configuration.
• Press CONTINUE to end the modem
configuration procedure.
7
8 mailcredit User Manual
Using mailcredit
Prerequisites
ultimail is connected to a PC (see page 4).
mailcredit is installed on the connected
PC.
ultimail is set up for operation with
mailcredit (see page 6).
Communication between
mailcredit and ultimail
• Switch the ultimail on.
• Start mailcredit.
mailcredit detects the connected franking
machine and displays the machine
number.
Connection with the data centre
• When mailcredit indicates it is ready for
communication with the ultimail and the
internet (context menu
Status),
you can load postage or start other
Remote Services (e.g. update the rate
table).
The connection to the data centre is
established, and data transmission starts.
Messages in the display of the franking
machine and balloon tips in mailcredit
provide status information.
Appendix 4: Using mailcredit for the ultimail franking system
Tips for helping yourself
Below, you will find tips on how to eliminate problems that may arise when operating
mailcredit for the ultimail.
Please read chapter “Troubleshooting” in the present manual when you have
problems with the mailcredit application itself.
Refer to the ultimail Operator Manual when you need help with regard to malfunctions
or problems in operating the ultimail franking system.
If you cannot eliminate a fault yourself by following these hints, please contact
the Francotyp-Postalia Service.
Issue
Possible cause and remedy
mailcredit does not
recognise the franking
machine.
Communication error between mailcredit and franking
machine.
Quit and restart mailcredit or use the “Reconnect
meter” function.
Cable issue.
Check whether or not the connection cable between
franking machine and PC is properly connected (see
page 4).
Quit and restart mailcredit or use the “Reconnect
meter” function.
ultimail is not configured for mailcredit operation.
Check whether or not InfoPrint is enabled (see page 6).
Check the present modem configuration (see page 7).
Quit and restart mailcredit or use the “Reconnect
meter” function.
9
10 mailcredit User Manual
Issue
Possible cause and remedy
Modem does not respond. mailcredit is not active.
Start mailcredit. Repeat the procedure.
Communication error between mailcredit and franking
machine.
Check whether or not the connection cable between
franking machine and PC is properly connected (see
page 4).
Check the settings for communication with the data
centre at the ultimail (see page 6).
Quit and restart mailcredit or use the “Reconnect
meter” function.
Connection to the data
centre cannot be
established.
Communication error
with data centre.
mailcredit is not active.
Start mailcredit. Repeat the procedure.
Cable issue.
Check whether or not the connection cable between
franking machine and PC is properly connected (see
page 4).
Quit and restart mailcredit or use the “Reconnect
meter” function.
Check the connection parameters for communication
with the data centre (see page 6).
PC problem, web access failure.
Check the phone number of the data centre (see ultimail
Operator Manual).
Proxy configuration incorrect.
Configure the proxy settings (see mailcredit User Manual,
page 9).
Data centre issue.
Try again later.
Appendix 5
Using mailcredit for the centormail franking
system
2 mailcredit User Manual
Things you should know
Topics
The present Appendix describes how to operate
mailcredit with the centormail franking system.
In this document you will learn
– how to connect the centormail to a PC
– how to set up the centormail for operation with
mailcredit
– how to use mailcredit in your daily routine
– troubleshooting tips for mailcredit issues.
Supplementary documents
The present Appendix supplements the documentation
that came with your centormail franking system.
Please read the Operator Manual before using the
centormail franking machine. Pay special attention to
the information of how to safely operate the franking
machine.
mailcredit Kit
The mailcredit Kit optimail 30 / ultimail / centormail
contains all items you need to operate mailcredit for the
centormail franking system.
You can order this kit from Francotyp-Postalia.
Appendix 5: Using mailcredit for the centormail franking system
Contents
Things you should know ___________________________________________2
Connect centormail to the PC _______________________________________4
Setting up centormail for operation with mailcredit _____________________6
Using mailcredit __________________________________________________7
Tips for helping yourself ____________________________________________8
3
4 mailcredit User Manual
Connect centormail to the PC
Warning! Please make sure to observe the safety instructions in the
centormail Operator Manual and the safety instructions for your PC.
Warning! Use only cables and adaptors supplied or approved by FrancotypPostalia to connect the centormail to the PC. Make sure connection cables
are not damaged.
mailcredit Kit
optimail 30 / ultimail / centormail
Have the mailcredit Kit supplied by
Francotyp-Postalia ready.
For the centormail, use the connection
cable with the two 9-pin female D-Sub
connectors and the USB-serial-adaptor if
applicable.
Before plugging in cables
OFF
• Shut down/switch off the PC properly.
• Switch off the centormail franking
system.
Appendix 5: Using mailcredit for the centormail franking system
Connecting the connection cable
• Plug the connection cable (D-Sub,
female, 9-pin) provided by FrancotypPostalia to the vertical interface on the
franking machine and screw tight.
• Plug the connection cable (9-pin
D-Sub, female) to a serial interface of
the PC.
Serial interface at the
PC
or
USB interface
at the PC
or
• Plug the USB-serial-adaptor to the
D-Sub socket of the connection cable
and screw tight.
• Connect the connection cable to a USB
interface of the PC.
Note:
The provided USB-serial-adaptor can
look different than the model shown in the
illustration.
Switching on
• Switch on the PC.
• Switch on the centormail franking
system.
You must make some settings at the
franking machine before you can operate
mailcredit for the centormail. For this
purpose, please refer to the following
pages.
5
6 mailcredit User Manual
Setting up centormail for operation with mailcredit
To use mailcredit, select connection type “external modem” at the franking machine.
Prerequisites
centormail is connected to a PC (see
page 4).
mailcredit is installed on the connected
PC.
centormail is switched on.
At the PC
• Start mailcredit.
mailcredit detects the connected franking
machine and displays the machine
number.
At the centormail franking machine
• Press the
key.
• Select SYSTEM SETTINGS
SETUP.
centormail opens the setup procedure.
System Settings
• Select CHANGE.
• Select type of connection MODEM.
Setup
Change
• Proceed with CONTINUE.
• Select modem type EXTERNAL.
• Proceed with CONTINUE.
Type of Connection: Modem
Continue
• Enter a PIN (e.g. 1234).
Note: You can type any PIN with 4 to 8
digits.
• SAVE the setting.
External
Continue
Enter PIN
Save
Appendix 5: Using mailcredit for the centormail franking system
Using mailcredit
Prerequisites
centormail is connected to a PC (see
page 4).
mailcredit is installed on the connected
PC.
centormail is set up for operation with
mailcredit (see page 6).
Communication between
mailcredit and centormail
• Switch centormail on.
• Start mailcredit.
mailcredit detects the connected franking
machine and displays the machine
number.
Connection with the data centre
• When mailcredit indicates it is ready for
communication with the centormail and
the internet (context menu
Status), you can load postage or start
other Remote Services (e.g. update the
rate table).
The connection to the data centre is
established, and data transmission starts.
Messages in the display of the franking
machine and balloon tips in mailcredit
provide status information.
7
8 mailcredit User Manual
Tips for helping yourself
Below, you will find tips on how to eliminate problems that may arise when operating
mailcredit for the centormail franking system.
Please read chapter “Troubleshooting” in the present manual when you have
problems with the mailcredit application itself.
Refer to the centormail Operator Manual when you need help with regard to
malfunctions or problems in operating the centormail franking system.
If you cannot eliminate a fault yourself by following these hints, please contact
the Francotyp-Postalia Service.
Issue
Possible cause and remedy
mailcredit does not
recognise the franking
machine.
Communication error between mailcredit and franking
machine.
Quit and restart mailcredit or use the “Reconnect
meter” function.
Cable issue.
Check whether or not the connection cable between
franking machine and PC is properly connected (see
page 4).
Quit and restart mailcredit or use the “Reconnect
meter” function.
A modem is not installed.
mailcredit is not active.
Start mailcredit. Repeat the procedure.
Communication error between mailcredit and franking
machine.
Check whether or not the connection cable between
franking machine and PC is properly connected (see
page 4).
At the franking machine: Check the current modem
configuration (see page 6).
Quit and restart mailcredit or use the “Reconnect
meter” function.
Appendix 5: Using mailcredit for the centormail franking system
Issue
Possible cause and remedy
centormail cannot
establish a connection to
the data centre.
mailcredit is not active.
Start mailcredit. Repeat the procedure.
Communication error
with remote station.
Cable issue.
Check whether or not the connection cable between
franking machine and PC is properly connected (see
page 4).
Quit and restart mailcredit or use the “Reconnect
meter” function.
centormail is not configured for mailcredit operation.
Check the current modem configuration (see page 6).
PC problem, web access failure.
Check the phone number of the data centre
(see centormail Operator Manual).
Proxy configuration incorrect.
Configure the proxy settings (see mailcredit User Manual,
page 9).
Data centre issue. Try again later.
9
10 mailcredit User Manual
Appendix 6
Using mailcredit for the centormail franking
system with graphic user interface
2 mailcredit User Manual
Things you should know
Topics
The present Appendix describes how to operate
mailcredit with the centormail franking system.
In this document you will learn
– how to connect the centormail to a PC
– how to set up the centormail for operation with
mailcredit
– how to use mailcredit in your daily routine
– troubleshooting tips for mailcredit issues.
Supplementary documents
The present Appendix supplements the documentation
that came with your centormail franking system.
Please read the Operator Manual before using the
centormail franking machine. Pay special attention to
the information of how to safely operate the franking
machine.
mailcredit Kit
The mailcredit Kit optimail 30 / ultimail / centormail
contains all items you need to operate mailcredit for the
centormail franking system.
You can order this kit from Francotyp-Postalia.
Appendix 6: Using mailcredit for the centormail franking system with graphic user interface
Contents
Things you should know ___________________________________________2
Connect centormail to the PC _______________________________________4
Setting up centormail for operation with mailcredit _____________________6
Using mailcredit __________________________________________________7
Tips for helping yourself ____________________________________________8
3
4 mailcredit User Manual
Connect centormail to the PC
Warning! Please make sure to observe the safety instructions in the
centormail Operator Manual and the safety instructions for your PC.
Warning! Use only cables and adaptors supplied or approved by FrancotypPostalia to connect the centormail to the PC. Make sure connection cables
are not damaged.
mailcredit Kit
optimail 30 / ultimail / centormail
Have the mailcredit Kit supplied by
Francotyp-Postalia ready.
For the centormail, use the connection
cable with the two 9-pin female D-Sub
connectors and the USB-serial-adaptor if
applicable.
Before plugging in cables
OFF
• Shut down/switch off the PC properly.
• Switch off the centormail franking
system.
Appendix 6: Using mailcredit for the centormail franking system with graphic user interface
Connecting the connection cable
• Plug the connection cable (D-Sub,
female, 9-pin) provided by FrancotypPostalia to the vertical interface on the
franking machine and screw tight.
• Plug the connection cable (9-pin
D-Sub, female) to a serial interface of
the PC.
Serial interface at the
PC
or
USB interface
at the PC
or
• Plug the USB-serial-adaptor to the
D-Sub socket of the connection cable
and screw tight.
• Connect the connection cable to a USB
interface of the PC.
Note:
The provided USB-serial-adaptor can
look different than the model shown in the
illustration.
Switching on
• Switch on the PC.
• Switch on the centormail franking
system.
You must make some settings at the
franking machine before you can operate
mailcredit for the centormail. For this
purpose, please refer to the following
pages.
5
6 mailcredit User Manual
Setting up centormail for operation with mailcredit
To use mailcredit, select connection type “external modem” at the franking machine.
Prerequisites
centormail is connected to a PC (see
page 4).
mailcredit is installed on the connected
PC.
centormail is switched on.
At the PC
• Start mailcredit.
mailcredit detects the connected franking
machine and displays the machine
number.
At the centormail franking machine
• Press the
key.
• Select SYSTEM SETTINGS
System Settings
MODEM.
centormail opens the modem settings
menu.
• Select modem type EXTERNAL.
Modem
• Proceed with
.
• Enter a PIN (e.g. 1234).
External
Continue
Enter PIN
Save
Note: You can type any PIN with 4 to 8
digits.
• Save the setting with
.
Appendix 6: Using mailcredit for the centormail franking system with graphic user interface
Using mailcredit
Prerequisites
centormail is connected to a PC (see
page 4).
mailcredit is installed on the connected
PC.
centormail is set up for operation with
mailcredit (see page 6).
Communication between
mailcredit and centormail
• Switch centormail on.
• Start mailcredit.
mailcredit detects the connected franking
machine and displays the machine
number.
Connection with the data centre
• When mailcredit indicates it is ready for
communication with the centormail and
the internet (context menu
Status), you can load postage or start
other Remote Services (e.g. update the
rate table).
The connection to the data centre is
established, and data transmission starts.
Messages in the display of the franking
machine and balloon tips in mailcredit
provide status information.
7
8 mailcredit User Manual
Tips for helping yourself
Below, you will find tips on how to eliminate problems that may arise when operating
mailcredit for the centormail franking system.
Please read chapter “Troubleshooting” in the present manual when you have
problems with the mailcredit application itself.
Refer to the centormail Operator Manual when you need help with regard to
malfunctions or problems in operating the centormail franking system.
If you cannot eliminate a fault yourself by following these hints, please contact
the Francotyp-Postalia Service.
Issue
Possible cause and remedy
mailcredit does not
recognise the franking
machine.
Communication error between mailcredit and franking
machine.
Quit and restart mailcredit or use the “Reconnect
meter” function.
Cable issue.
Check whether or not the connection cable between
franking machine and PC is properly connected (see
page 4).
Quit and restart mailcredit or use the “Reconnect
meter” function.
A modem is not installed.
mailcredit is not active.
Start mailcredit. Repeat the procedure.
Communication error between mailcredit and franking
machine.
Check whether or not the connection cable between
franking machine and PC is properly connected (see
page 4).
At the franking machine: Check the current modem
configuration (see page 6).
Quit and restart mailcredit or use the “Reconnect
meter” function.
Appendix 6: Using mailcredit for the centormail franking system with graphic user interface
Issue
Possible cause and remedy
centormail cannot
establish a connection to
the data centre.
mailcredit is not active.
Start mailcredit. Repeat the procedure.
Communication error
with remote station.
Cable issue.
Check whether or not the connection cable between
franking machine and PC is properly connected (see
page 4).
Quit and restart mailcredit or use the “Reconnect
meter” function.
centormail is not configured for mailcredit operation.
Check the current modem configuration (see page 6).
PC problem, web access failure.
Check the phone number of the data centre
(see centormail Operator Manual).
Proxy configuration incorrect.
Configure the proxy settings (see mailcredit User Manual,
page 9).
Data centre issue. Try again later.
9
Notes
Service
Francotyp-Postalia, Ltd.
Lakeside House,
74 Questor, Powdermill Lane,
Dartford, Kent DA1 1EF
Phone
Website
0844 225 2233
www.fpmailing.co.uk
Francotyp-Postalia applies DQS-certificated integrated management systems with quality and environmental management (DIN EN ISO 9001, 14001).
These are valid for design and manufacturing of
franking machines and postal equipment.
(registration no: 275570 QM 08, UM)
2011-08 / xxx / helbig berlin
51.0013.5133.00 Rev. 02


![[mailcredit / ENG] User Manual](http://vs1.manualzilla.com/store/data/005957121_1-8f833d5244dc8652c61044097905507f-150x150.png)


![[mailcredit / DEU] Benutzerhandbuch](http://vs1.manualzilla.com/store/data/006807112_1-6a17b3ffb51c5dd0e9115a9ceb8dba6d-150x150.png)


![[mailcredit / DEU] Benutzerhandbuch](http://vs1.manualzilla.com/store/data/006791615_1-b2641a328bc2d08eeb4dcb5311a189f6-150x150.png)