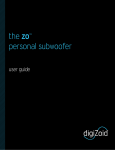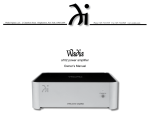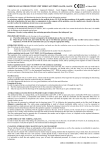
1
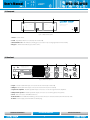
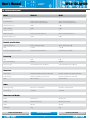
OUTPUT TO
SPEAKER A
User’s Manual
EQUAL.
FILTER
CH B
OVER
FLAT
1+ LOW+
1- LOW2+ HIGH+
2- HIGH-
max
min
LEVEL
DYNAMIC PROCESSOR
INPUT FROM
AMPLIFIER
1+POS
1-GND
CH A
2+POS
2-GND
CH B
PUSH
3
DP 60-120 Cross Fire
ON
PROCESS
BY-PASS
SOUND REINFORCEMENT
CONTROLLED RADIATION
1
1
3
OUTPUT TO
SPEAKER B
INPUT FROM
AMPLIFIER
1+ LOW+
1- LOW2+ HIGH+
2- HIGH-
1+POS
1-GND
CH B
INK
INPUT
XLR BAL
1=GND
2=HOT+
3=COLD-
PUSH
1
3
2
2
1
3
OUTPUTL
DP60-120, DP180
2
2
OUTPUTL
POWER
CH A
DP60-120, DP180
1
USER’S MANUAL
ACOUSTIC RESEARCH
INK
INPUT
CH B
OUTPUT TO
SPEAKER A
User’s Manual
EQUAL.
FILTER
CH B
OVER
FLAT
1+ LOW+
1- LOW2+ HIGH+
2- HIGH-
INPUT FROM
AMPLIFIER
1+POS
1-GND
CH A
2+POS
2-GND
CH B
PUSH
DYNAMIC PROCESSOR
1
3
DP 60-120 Cross Fire
ON
BY-PASS
2
2
OUTPUT TO
SPEAKER B
INPUT FROM
AMPLIFIER
1+ LOW+
1- LOW2+ HIGH+
2- HIGH-
1+POS
1-GND
CH B
INK
3
2
2
1. IMPORTANT SAFETY INSTRUCTIONS
pag. 3
2. DECLARATION OF CONFORMITY
pag. 3
3. WARRANTY
pag. 3
4. USER LIABILITY
pag. 4
4.1 Dangerous output voltage
4.2 Radio interferences
pag. 4
5.1 Unpacking
5.2 Installation
5.3 Front panel
5.4 Rear panel
pag. 6
6.1 Connection cables
6.2 Power supply
7. DEVICE DESCRIPTION
pag. 6
7.1 Functional features
7.2 Controls and functions
SOUND REINFORCEMENT
8. SETUP
pag. 7
9. SAMPLE CONFIGURATION
pag. 7
10. TECHNICAL SPECIFICATIONS
pag. 8
CONTROLLED RADIATION
2
XLR BAL
1=GND
2=HOT+
3=COLD-
1
3
INK
TABLE OF CONTENTS
6. CONNECTIONS
INPUT
PUSH
1
OUTPUTL
5. INTRODUCTION
1
3
OUTPUTL
POWER
PROCESS
CH A
DP60-120, DP180
max
min
LEVEL
ACOUSTIC RESEARCH
INPUT
CH B
OUTPUT TO
SPEAKER A
User’s Manual
EQUAL.
FILTER
CH B
OVER
FLAT
1+ LOW+
1- LOW2+ HIGH+
2- HIGH-
max
min
LEVEL
DYNAMIC PROCESSOR
INPUT FROM
AMPLIFIER
1+POS
1-GND
CH A
2+POS
2-GND
CH B
PUSH
3
DP 60-120 Cross Fire
ON
PROCESS
BY-PASS
OUTPUT TO
SPEAKER B
INPUT FROM
AMPLIFIER
1+ LOW+
1- LOW2+ HIGH+
2- HIGH-
1+POS
1-GND
CH B
INK
INPUT
XLR BAL
1=GND
2=HOT+
3=COLD-
PUSH
1
3
2
2
1
CH B
3
INK
INPUT
3. WARRANTY
This symbol indicates key operating instructions and
information requiring particular attention for correct use
of the product.
Peecker Sound products are guaranteed against malfunction due to
defective materials or workmanship for a specified period of time, starting
from the date of original purchase. Should a malfunction occur during
the warranty period, the product will be repaired or replaced (at the
manufacturer’s discretion) free of charge. The shipping costs and related
risks, and any loss during shipment to authorized service centres are the
responsibility of the customer. The product will be returned to the customer
with a carriage forward shipment.
This symbol warns of dangerous voltage and the
consequent risk of electric shock. Take extra care and
proceed with caution.
Warranty terms
The warranty covers the appliance under its initial purchase in compliance
with the laws in force. The warranty is valid for 3 years, starting from the date
of receipt of the product. Peecker Sound reserves the right, in certain cases, to
decide to replace the appliance with another identical or similar product. The
warranty is not extended following a product failure. The warranty does not
cover any incidental or consequential damages, without limitation, caused to
persons or property during any period of inefficiency of the appliance.
1. Read carefully all the attached product documentation and keep for
further reference.
2. Heed the warnings.
3. Keep the packaging and check that all the material is in perfect condition.
4. Do not use the product in the vicinity of water or pour water or any
other liquid on the processor. Take care not to use it with wet hands or
with your feet in water.
5. Do not use near sources of heat such as radiators, stoves or other heatproducing appliances.
6. Check that the power cable is intact and undamaged. Do not tread on
the cable and take care not to put any pressure on the plug.
7. Connect the plug to a properly earthed electric socket. Do not tamper
with the plug. Should the plug supplied not fit your socket, have an
electrician replace it with the correct one.
8. Connect to the mains supply having identical voltage as that indicated
on the back of the processor.
9. Install the processor in compliance with the instructions.
10.Disconnect the appliance in case of storms or when not in use.
11.Wire exclusively as shown in the instructions.
12. Do not remove the upper or lower covers as this would expose the
user to the risk of electric shock.
Exclusions and limitations
The warranty does not apply to:
• any damage to exterior finishings or surfaces, aesthetic elements, or electric/
electronic parts resulting from negligent use of the product;
• malfunction resulting from incorrect or improper use of the product or from
transport without due care;
• malfunction resulting from repairs carried out by unauthorized persons or
service centres;
• malfunction due to circumstances that cannot be ascribed to manufacturing
defects of the appliance;
• plastic or glass parts, bulbs and the like, as well as all that can be regarded
as normal wear and tear. As regards circuit components (transistors, diodes,
etc.) the general terms set by the original manufacturers apply.
The following are also not covered by the warranty:
• damage caused by accidents, product modifications, negligence or
incorrect connection
• damage that occurred during transport
• damage resulting from failure to comply with the instructions contained in
the user’s manual
• claims based on misrepresentations by the seller and any product whose
serial number has been rubbed off, modified or removed.
13.Do not attempt to repair the appliance yourself but always seek the
assistance of qualified technicians.
14. Clean with a dry cloth only.
15.The product must be handled by qualified technicians when:
• the power cable or the plug is damaged
• the product has been exposed to rain or humidity
• liquid has got inside the unit
• an object has fallen on the unit
• the unit has fallen and is damaged
• the appliance seems to be malfunctioning or is showing a marked
change in performance
16. Careful supervision is required if the product is used in the presence of
children or by unskilled adults.
Receiving warranty service
To receive repair or replacement of the product under warranty, the customer
must deliver the product in its original packaging carriage paid to an
authorized Peecker Sound service centre together with the relevant proof of
purchase, i.e. bill of sale, receipt or invoice.
The warranty service and list of authorized service centres is available at the
address below:
Peecker Sound - “After Sales Service”
Via Monti Urali, 29 - 42100 Reggio Emilia (Italy)
Tel: +39 0522 557735 - Fax: +39 0522 391268
E-mail: [email protected]
2. DECLARATION OF CONFORMITY
Repair or replacement of the product and its return to the customer are the
only services provided to the customer. Peecker Sound shall not be held liable
to pay incidental or consequential damages including, without limitation,
injury to persons or property or loss of use.
This device complies with the requirements of the European Electromagnetic
Compatibility Directive 89/336/EEC (and relevant 92/31/EEC amendment),as
well as the requirements of the Low Voltage Directive 72/23/EEC (and relevant
93/68/EE amendment).
Regulations applied:
EN 55 103-1 (Emissions)
EN 55 103-2 (Immunity)
EN 60065 Class I (Safety)
SOUND REINFORCEMENT
1
3
OUTPUTL
1. IMPORTANT SAFETY INSTRUCTIONS
2
2
OUTPUTL
POWER
CH A
DP60-120, DP180
1
Costs paid by Peecker Sound
Peecker Sound will pay for all labour and material expenses necessary for the
repairs covered by the warranty. Make sure you keep the original packaging;
otherwise, the cost of replacing will be charged to you if necessary. Produce
the original invoice to establish the date of purchase.
Do not send the product to the factory without prior authorization. Should
shipment of the product be a problem, please contact the service centre,
who will deal with it promptly. Otherwise, the customer is responsible for
shipment and handling of the product to be repaired and payment of all
shipping costs.
CONTROLLED RADIATION
3
ACOUSTIC RESEARCH
OUTPUT TO
SPEAKER A
User’s Manual
EQUAL.
FILTER
CH B
OVER
FLAT
INPUT FROM
AMPLIFIER
1+ LOW+
1- LOW2+ HIGH+
2- HIGH-
1+POS
1-GND
CH A
2+POS
2-GND
CH B
PUSH
DYNAMIC PROCESSOR
1
3
2
2
DP 60-120 Cross Fire
ON
BY-PASS
OUTPUT TO
SPEAKER B
INPUT FROM
AMPLIFIER
1+ LOW+
1- LOW2+ HIGH+
2- HIGH-
1+POS
1-GND
CH B
INK
INPUT
XLR BAL
1=GND
2=HOT+
3=COLD-
PUSH
1
3
2
2
1
3
OUTPUTL
Limitation of implicit warranties
All implicit warranties, including guarantee of merchantability and suitability
to specific purposes, are limited to the duration of the present warranty.
With the exception of certain types of damage, Peecker Sound liability is
limited to repairing or replacing, at its discretion, any defective products, with
no obligation of compensation for any kind of incidental or consequential
damages. In case of any controversy, the court of jurisdiction will be
exclusively the Court of Reggio Emilia (RE) – Italy.
1
3
OUTPUTL
POWER
PROCESS
CH A
DP60-120, DP180
max
min
LEVEL
INK
INPUT
5.1 Unpacking
Inspect the packaging and its contents immediately to check whether
there are any signs of damage. After unpacking, inspect the product
and any accessories. Should you notice any damage, inform your dealer
immediately.
Please keep all the packaging materials, which will be useful for returning
the product to Peecker Sound or sending it to one of our authorized Service
Centres if the product does not arrive in perfect condition. Use exclusively
the original packaging, as it is the best way to protect the appliance from
mishandling by the carrier.
4. USER LIABILITY
4.1 Dangerous output voltage
Please take care of the environment.
Once the device has become obsolete, please dispose of
it in the appropriate recycling container.
Do not touch exposed speaker cables while the processor is
operating.
4.2 Radio interferences
A sample of this product has been tested and approved in compliance with
the limits set out by the Electromagnetic Compatibility Directive (EMC). These
limits have been determined in order to provide reasonable protection
from dangerous interferences caused by electrical appliances. Should this
product not be installed or used in compliance with the instructions as set
out in this manual, it might interfere with other appliances such as radio
receivers, for example.
There is no guarantee, however, that interferences will not occur in a
particular installation.
5.2 Installation
The Peecker Sound DP60-120 and DP180 Stereo Dynamic Processors
have been designed to stand on a surface (e.g. a table) or to be installed
in a 19” rack unit.
483
Should the device interfere with two-way radios (switching
the device on and off will allow you to check whether this
is the case), you should try to eliminate the interference by
adopting one of the following measures:
A) Increase the distance between the appliance and the
receiver.
B) Connect the appliance to a socket positioned on a
circuit different from the one the receiver is connected to.
C) Re-position or move the aerial of the receiver.
CH B
CH A
OVER
FLAT
FLAT
max
min
LEVEL
DYNAMIC PROCESSOR
POWER
DP 60-120 Cross Fire
PROCESS
PROCESS
ON
BY-PASS
374
Figure 1. DP60-120 and DP180 unit dimensions
Check that the unit complies with the EMC immunity limits (it must carry
the CE mark). All electrical appliances sold in the EU must be approved for
immunity to electromagnetic fields, high voltage and radio interferences.
Seek for professional assistance.
Remember to allow an extra clearing space of 10 cm at the back for the
connectors.
Do not set the unit directly on top of power amplifiers or power supply
units, as the heat and electromagnetic fields produced by these appliances
can interfere with correct device operation.
5. INTRODUCTION
Congratulations on your choice of Peecker Sound Stereo Dynamic
Processors (DP60-120 or DP180) and thank you for your confidence in us
and our products. Your device have been carefully engineered down to the
smallest detail, from component selection to final assembly.
All Peecker Sound products aim for full customer satisfaction and you can rest
assured that the product you have chosen uses cutting-edge technology.
When moving the equipment with a trolley take extra
care not to injure yourself.
Please remember that the unit should not be installed in venues with:
• High temperatures
• Dust or excessive humidity
• Intense magnetic fields
• Water in the vicinity of the unit
• Vibrations
• Enclosed spaces that inhibit proper ventilation.
The DP60-120 and DP180 Stereo Dynamic Processors have been designed
in the Sound Corporation Design and Research&Development (R&D)
departments paying particular attention to the choice of materials, safety
devices and electronic design for the manufacture of a safe, reliable and longlasting product.
Since inappropriate use of the device can jeopardize its correct operating
performance, please ensure that you use it carefully and correctly.
Please read this manual carefully: all the information it contains is vitally
important for using your appliance safely.
SOUND REINFORCEMENT
EQUAL.
FILTER
EQUAL.
FILTER
OVER
88
max
min
LEVEL
CONTROLLED RADIATION
4
ACOUSTIC RESEARCH
CH B
OUTPUT TO
SPEAKER A
EQUAL.
FILTER
User’s Manual
CH B
CH A
2+POS
2-GND
CH B
PUSH
1
3
ON
PROCESS
BY-PASS
OUTPUT TO
SPEAKER B
INPUT FROM
AMPLIFIER
1+ LOW+
1- LOW2+ HIGH+
2- HIGH-
1+POS
1-GND
1
3
EQUAL.
FILTER
CH B
CH A
OVER
OVER
FLAT
FLAT
DYNAMIC PROCESSOR
POWER
DP 60-120 Cross Fire
ON
BY-PASS
3
4
3
1
Figure 2. DP60-120 front panel
2
2
1. Power - Power switch.
2. Level - Equalization filter level control (for Ch A and Ch B).
max
min
LEVEL
EQUAL.
FILTER
EQUAL.
FILTER
max
min
LEVEL
3. Over/Flat/Process - LED indicators
in Bprocessing signals (for Ch
A and Ch B).
CH Ashowing processor actionCH
DYNAMIC PROCESSOR
OVER
OVER
4. By-pass - Switch that enables by-pass of the device.
FLAT
8
POWER
DP 60-120 Cross Fire
FLAT
7
6
5
ON
PROCESS
PROCESS
BY-PASS
WARNING:
OUTPUT TO
SPEAKER A
TO REDUCE THE RISK OF
FIRE OR ELECTRIC SHOCK DO NOT EXPOSE
THIS EQUIPMENT TO RAIN OR MOISTURE.
DO NOT REMOVE COVER.
3
S.N.
1+ LOW+
1- LOW2+ HIGH+
2- HIGH-
4
CAUTION
RISK OF ELECTRIC SHOCK
MAINS
230VG
50-60Hz
INPUT FROM
AMPLIFIER
3
1+POS
1-GND
CH A
2+POS
2-GND
CH B
5.4 Rear Panel
FOR CONTINUED
GROUNDING
PROTECTION DO NOT
REMOVE SCREW
PUSH
1
3
MADE IN ITALY
OUTPUT TO
SPEAKER B
INPUT FROM
AMPLIFIER
1+ LOW+
1- LOW2+ HIGH+
2- HIGH-
1+POS
1-GND
CH B
1
3
2
2
CH A
XLR BAL
1=GND
2=HOT+
3=COLD-
1
CH B
3
LINK
INPUT
9
8
WARNING:
S.N.
7
OUTPUT TO
SPEAKER A
TO REDUCE THE RISK OF
FIRE OR ELECTRIC SHOCK DO NOT EXPOSE
THIS EQUIPMENT TO RAIN OR MOISTURE.
DO NOT REMOVE COVER.
1+ LOW+
1- LOW2+ HIGH+
2- HIGH-
CAUTION
RISK OF ELECTRIC SHOCK
6
5
INPUT FROM
AMPLIFIER
1+POS
1-GND
CH A
2+POS
2-GND
CH B
PUSH
1
3
Peecker Sound
MADE IN ITALY
OUTPUT TO
SPEAKER B
INPUT FROM
AMPLIFIER
1+ LOW+
1- LOW2+ HIGH+
2- HIGH-
1+POS
1-GND
CH B
2
2
OUTPUT
DO NOT OPEN
FOR CONTINUED
GROUNDING
PROTECTION DO NOT
REMOVE SCREW
1
1
3
10
CH A
3
LINK
INPUT
XLR BAL
1=GND
2=HOT+
3=COLD-
PUSH
OUTPUT
11
INPUT
PUSH
10
MAINS
230VG
50-60Hz
1
3
LINK
OUTPUT
11
1
2
2
OUTPUT
DO NOT OPEN
Peecker Sound
2
2
1
CH B
3
LINK
INPUT
9
Figure 3. DP60-120 rear panel
5. Input - Female Neutrik® XLR input connectors for both channels (Ch A and Ch B).
6. Output - Male Neutrik® XLR output connectors for both channels (Ch A and Ch B).
7. Input from amplifier - Neutrik® SpeakOn input connectors to receive the signal from the amplifiers.
8. Output from speaker - Neutrik® SpeakOn output connectors to send the signal to the speakers.
9. Link - Jack connectors to link different devices.
10. Ground Lift - Ground lift switch allowing connection-disconnection of electrical earth to/from mechanical earth.
11. Mains - Power supply cable with CEE 7/7 Schuko plug.
SOUND REINFORCEMENT
CONTROLLED RADIATION
5
CH A
XLR BAL
1=GND
2=HOT+
3=COLD-
1
3
max
min
LEVEL
PROCESS
PROCESS
INPUT
2
2
2
EQUAL.
FILTER
INK
PUSH
CH B
5.3 Front panel
max
min
LEVEL
1
3
OUTPUTL
2
2
2
OUTPUTL
POWER
DP 60-120 Cross Fire
FLAT
1+POS
1-GND
DP60-120, DP180
DYNAMIC PROCESSOR
OVER
INPUT FROM
AMPLIFIER
1+ LOW+
1- LOW2+ HIGH+
2- HIGH-
max
min
LEVEL
ACOUSTIC RESEARCH
INK
INPUT
CH B
OUTPUT TO
SPEAKER A
User’s Manual
EQUAL.
FILTER
CH B
1+ LOW+
1- LOW2+ HIGH+
2- HIGH-
max
min
LEVEL
DYNAMIC PROCESSOR
OVER
1+POS
1-GND
CH A
2+POS
2-GND
CH B
PUSH
ON
PROCESS
BY-PASS
3
1
3
OUTPUT TO
SPEAKER B
INPUT FROM
AMPLIFIER
1+ LOW+
1- LOW2+ HIGH+
2- HIGH-
1+POS
1-GND
CH B
INK
INPUT
XLR BAL
1=GND
2=HOT+
3=COLD-
PUSH
1
3
2
2
1
3
INK
INPUT
7. DEVICE DESCRIPTION
The Peecker Sound Stereo Dynamic Processors DP60-120 and DP180
are intelligent dynamic processors which make it possible to adapt
sound emission to the physiological characteristics of human hearing.
Its main function is to coordinate the operation of the speaker-amplifier
combination to provide a high performance sound reinforcement system.
Check that mains power voltage corresponds to that indicated
on the back of the unit. Before connecting the cable to the AC
mains, make sure it is undamaged and there are no bare cables.
Remember to turn off the processor before connecting it to or
disconnecting it from any other units.
The DP60-120 is typically used in configurations with Peecker Sound AS60
or AS120 controlled radiation speakers, while DP180 is linked to AS180
speakers.
6.1 Connection cables
Input and output wiring diagrams are shown in Fig. 4.
Cannon XLR and Neutrik® SpeakON connectors are used for connecting the
main audio inputs and outputs, while 6.3 mm stereo Jacks are used for auxiliary
connections. To guarantee the maximum performance, both inputs and
outputs are balanced without the use of transformers.
7 .1 Functional features
The term loudness normally refers to the characteristic of a sound that
determines the degree of intensity with which it is perceived by a listener.
Loudness levels are determined by varying the intensity levels of one
sound in relation to another sound used as a benchmark. Sets of curves
are then plotted with equal levels of auditory perception, normally
called “isophonic” curves. The level of sound perception is a subjective
measurement since it is linked to individual hearing sensitivity, which is
both relative to and strongly influenced by listening conditions. In fact,
hearing sensitivity to sounds is not linear but depends on their frequency
and intensity. It is easy to see how the human ear behaves differently if it
is exposed to many acoustic signals of varying intensity instead of a single
pure sound.
SpeakON connectors are now required for connections with amplifiers (such
as the new Peecker Sound PS2000-PS2600-PS3400 models, for example) and
speakers (e.g. in the configuration designed to use the Peecker Sound AS60,
AS120 or AS180 Crossfire).
The high standard of SpeakON connectors guarantees trouble-free operation.
Once introduced in the relevant socket, they lock to prevent accidental
disconnection. The plug provides protection against electric shock and
ensures correct electric polarization.
XLR BAL INPUT/OUTPUT
Pin 1
GND
Pin 2
HOT+
Pin 3
COLD-
The DP60-120 and DP180 can be regarded as intelligent devices through
which the sound content best adapts itself to the characteristics of
human hearing. It is worth recalling that if sound pressure levels are high,
sensitivity remains constant across all frequencies; as sound pressure levels
gradually drop, the ear becomes increasingly sensitive across a range of
around 2,500 Hz, while at the lowest and highest frequencies significant
sensitivity loss is experienced.
Everyday experience tells us, for example, that when travelling in a car, we
hardly perceive the low-frequency drone produced by the tyres rolling on
the road surface (this noise often exceeds 90 dB), yet the smallest vibration
by a plastic part inside the passenger compartment or the hiss of the air
flowing in from a slightly open window can be unbearable.
Similarly, in the world of professional audio, the sound from a wellbalanced sound system with the amplifier on full volume often becomes
poor as soon as the amplification level is turned down, particularly in low
frequencies. This deficiency has been addressed in many different ways,
depending on the types of speakers being used.
JACK INPUT/OUTPUT
Pin 1 (Sleeve)
GND
Pin 2 (Ring)
COLD-
Pin 3 (Tip)
HOT+
Pin 4
Insulating rings
Speakers can be of the following different types:
a) acoustic speakers suitable for systems capable of delivering strong
sound levels (dance clubs, music pubs, etc.),
b) speakers for medium sound levels (wine bars, entertainment),
c) acoustic speakers for home stereo and Home Theatre systems.
With home speakers set on high volume, sounds are distorted and reach
saturation level, while disco speakers set on low volume produce “flimsy”
sounds lacking in tonality.
The solution incorrectly put forward up to now has been to filter the
audio signal to compensate for possible non-uniformities in the frequency
response of the unit producing it. To this end, electric circuits called
equalizers have been used to amplify or attenuate particular frequencies.
Their intended aim is in fact to correct the speakers’ response mainly over
low and high frequencies. Unfortunately, these devices work the same
way whatever the signal level, so that a sound that is good at low levels
invariably becomes chaotic and annoying to the ear when the volume is
turned up.
Neutrik ® speakON
Pin 1 +
POS
Pin 1 -
NEG
Pin 2 +
POS
Pin 2 -
NEG
Figure 4. Cannon® XLR, Jack and Neutrik® SpeakOn connectors
6.2 Power supply
In response to these problems, the Sound Corporation R&D labs have
perfected a new idea, i.e. to produce “intelligent dynamic processors”
that are not designed to compensate for the deficiencies of the speakers,
but to effect a genuine physiological compensation.
The appliance is designed to operate with a 230 VAC – 50/60Hz mains power
supply. Should the unit fail to work when switched on, check the protection
fuse; if it blows immediately, do not try to resolve the matter yourself but have
the appliance checked by a qualified Peecker Sound service centre.
SOUND REINFORCEMENT
2
2
OUTPUTL
6. CONNECTIONS
CH A
DP60-120, DP180
1
OUTPUTL
POWER
DP 60-120 Cross Fire
FLAT
INPUT FROM
AMPLIFIER
CONTROLLED RADIATION
6
ACOUSTIC RESEARCH
CH B
OUTPUT TO
SPEAKER A
EQUAL.
FILTER
User’s Manual
CH B
OVER
FLAT
INPUT FROM
AMPLIFIER
1+ LOW+
1- LOW2+ HIGH+
2- HIGH-
1+POS
1-GND
CH A
2+POS
2-GND
CH B
PUSH
DYNAMIC PROCESSOR
3
1
2
2
DP 60-120 Cross Fire
ON
BY-PASS
OUTPUT TO
SPEAKER B
INPUT FROM
AMPLIFIER
1+ LOW+
1- LOW2+ HIGH+
2- HIGH-
1+POS
1-GND
INK
INPUT
XLR BAL
1=GND
2=HOT+
3=COLD-
PUSH
CH B
3
1
2
2
CH B
1
3
OUTPUTL
INK
INPUT
• By-pass switch
The DP60-120 and DP180 feature a BY-PASS switch that enables its exclusion
from the reproduction chain. When in OFF position, input and output
connectors can be wired directly through high quality audio releases.
The switch is normally used to compare the unprocessed signal with the
signal resulting from using the processor.
The DP60-120 and DP180 can perform the following operations, in real
time:
• receive musical signals;
• effect a spectral breakdown across the various frequencies;
• compare the level with the ear sensitivity curves;
• generate a compensation curve.
The processors are capable of producing dynamic equalization with
spectral behaviour that changes in line with frequency variations.
In the case of low level input signals, the processors boost the energy
content of low frequencies and adapt the level of high frequencies to
make them more pleasing to the ear. As the level increases, we can see
the dynamic equalization curve gradually falling and adapting further
to high frequencies to produce optimal listening conditions. Should the
input signal level be too high, the processors act to cancel the entire
signal spectrum to prevent any resulting hearing damage to listeners
and electronic damage to the linked devices.
They are also equipped with an onboard passive crossover capable of
spectral breakdown for the speakers’ high and low sections, thereby
compensating for the inefficiency of speakers unable to deliver
satisfactorily the whole range of perceptible sounds (from 20 Hz
to 20 kHz) and whose frequency response shows non-uniformities,
drops or bursts. Acoustic feedback is reduced thanks to an additional
equalization filter located in the front panel, which filters away
unwanted environmental reverberation without any repercussions on
the rest of the frequency spectrum.
BY-PASS
Figure 7. BY-PASS switch
8. SETUP
Once you have connected the DP60-120 to the power supply, wire the input
and output connectors as follows:
• Cannon® XLR inputs receive signals from a mixer or pre-amplifier
• Cannon® XLR outputs are used for connecting to the amplifier
(e.g. Peecker Sound PS2000-PS2600-PS3400)
• Neutrik® SpeakOn inputs receive signals from the amplifier (e.g. Peecker
Sound PS2000-PS2600-PS3400)
• Neutrik® SpeakOn outputs are used for connecting to AS60 or AS120
controlled radiation loudpeaker systems.
Operate in a similar way in the case of the DP180 processor to connect it to
a mixer, amplifier and Peecker Sound AS180 controlled radiation speakers.
The final result is an absolutely perfect acoustic signal, in terms of both
quality and quantity, that is enjoyable and exciting to any listener. No
more “inflated” and annoying sounds or – even worse – dull sounds
lacking in dynamic impact.
7 .2 Controls and functions
1
3
OUTPUTL
POWER
PROCESS
CH A
DP60-120, DP180
max
min
LEVEL
Manuale d’uso
9. SAMPLE CONFIGURATION
DP180 application is downstream from a
input pre-amplifier and upstream from an amplifier (such as the Peecker
Sound PS2000-PS2600-PS3400, for example) and from the AS180 loudspeaker
system.
A possible
Peecker Sound
9. Esempio
di configurazione
Il processore DP180 Peecker Sound trova una possibile
applicazione a valle di un pre-amplificatore di ingresso e a monte
di un amplificatore (come ad esempio i nuovi: PS2000-PS2600PS3400 Peecker Sound) e del sistema di diffusori AS180
CrossFire.
• Equalization control
The DP60-120 and DP180 processors independently apply the most
appropriate equalization so as to optimize the output signal. There are
two further controls on the front panel to manually adjust the signal level
in order to reduce acoustic feedback.
����
�������
����������������������
�����������
�����
��������������
�
�
�������������
����
�����
�������
�����
�����
�����
����������������
�����
�����
������������
�������
��������������
����
�
����
�
�
����
�
�
�
�
�
�����
�����
�����
����
����
����
�
����
�
�
�
����
�
�
�����
�����
����������������������������
����
����
�
����
�
�
����
�
�
�
�
�����
�����
����
����
����
����
�
�
������� �
�
���������
����������
�
�����
�������
��������������������
����
EQUAL
FILTER
���
���
�����
�����
������
������
������
������
����
����
����
max
min
LEVEL
�����
�����
����������������
�����
����
������������
�
�
�
�
�
�
�
�
�
���
����
����
�
�
�
�
�
����
����
����������������������������
�
�
�
�
�
�
�
�
�
����
����
����
�����������������������
���
���
�����
����
����
����
�������
�����������������
�����
��������������������
��
�������
�������
�������� ���������������������
������������������������������������
�����������������������������������
��������������������
����
Figure 5. Equalization filter control
���������
���������
�������
�������
��������
��������
�������
����������������������
�����
����
�������
����������
���������
�����
�����
����
�����
�����
����
�������������
�������������
���������
�����������������
������������
����
�
�
�������������
���������
���������
����������
���������
�������
�������
��������
��������
�����
�����
����
�
�
������
�����������
�
�����
�������
�����
������
�������
����
�
�
�
�
������
����
�
����
�
����
�
����
�����
• Equalization indicators
The three LED lights per channel (PROCESS, FLAT, OVER) situated on
the front panel indicate respectively: processor operation in processing
signals at low and mid-low frequency levels (PROGRESS), linearization of
the signal as the level increases (FLAT), and saturation of the input signal
(OVER).
OVER
DAS - system configurations
DAS - system configurations
FLAT
PROCESS
AS180 Crossfire
Figure 6. Signal processing LEDs
Figura 8: Esempio di configurazione
Figure 8. Sample configuration with DP180 and AS180
DP 60/120/180
SOUND REINFORCEMENT
CONTROLLED RADIATION
www.peeckersound.com
PS3400
ACOUSTIC RESEARCH
9
via Monti Urali, 33 - 42100 Reggio Emilia (Italia) • tel. +39 0522 557735
• fax +39 0522 391288 • e-mail: [email protected]
7
Mixer
OUTPUT TO
SPEAKER A
User’s Manual
EQUAL.
FILTER
CH B
1+ LOW+
1- LOW2+ HIGH+
2- HIGH-
DYNAMIC PROCESSOR
OVER
1+POS
1-GND
CH A
2+POS
2-GND
CH B
PUSH
1
3
ON
PROCESS
BY-PASS
2
2
OUTPUT TO
SPEAKER B
INPUT FROM
AMPLIFIER
1+ LOW+
1- LOW2+ HIGH+
2- HIGH-
1+POS
1-GND
CH B
INK
3
2
2
Model
DP60-120
DP180
Input Channels
2
2
Input Impedance
40 kΩ, electronically balanced
20 kΩ, electronically unbalanced
40 kΩ, electronically balanced
20 kΩ, electronically unbalanced
Nominal Input Level
0 dBu
0 dBu
Input Sensibility
0 dBu
0 dBu
Output Channels
2
2
Output Impedance
50 Ω, electronically balanced
50 Ω, electronically balanced
Nominal Output Level
0 dBu
0 dBu
Frequency Response
20 Hz ÷ 20 kHz (± 0.5 dB)
20 Hz ÷ 20 kHz (± 0.5 dB)
SNR
> 94 dB
> 94 dB
Controlled Loudspeaker Systems
Double Array Seris AS60-120
Double Array Seris AS180
Gain
0 dB
0 dB
Crossover Frequency
1800 Hz
1800 Hz
Crossover Type
2nd ord. Butterworth (-12 dB/oct)
2nd ord. Butterworth (-12 dB/oct)
Audio Inputs
Neutrik® speakON, 3-pin female XLR, JACK
Neutrik® speakON, 3-pin female XLR, JACK
Audio Outputs
Neutrik® speakON, 3-pin male XLR
Neutrik® speakON, 3-pin male XLR
Mains
CEE 7/7 Schuko
CEE 7/7 Schuko
Operating Voltage
230 VAC ± 10% (50/60 Hz)
230 VAC ± 10% (50/60 Hz)
Consumption
< 25 Watt
< 25 Watt
Width
483 mm (19”)
483 mm (19”)
Height
88 mm (2 rack units)
88 mm (2 rack units)
Depth
380 mm
380 mm
Net Weight
9 kg
9 kg
Acoustic specifications
Processing
Connectors
Power
Dimensions and Weight
8
CH A
XLR BAL
1=GND
2=HOT+
3=COLD-
1
3
INK
10. TECHNICAL SPECIFICATIONS
CONTROLLED RADIATION
INPUT
PUSH
1
OUTPUTL
SOUND REINFORCEMENT
1
3
OUTPUTL
POWER
DP 60-120 Cross Fire
FLAT
INPUT FROM
AMPLIFIER
DP60-120, DP180
max
min
LEVEL
ACOUSTIC RESEARCH
INPUT
CH B