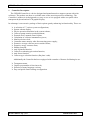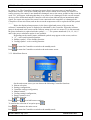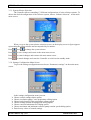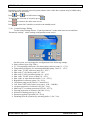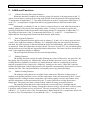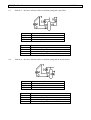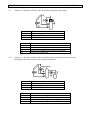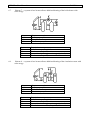
1
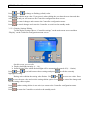
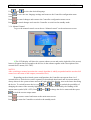
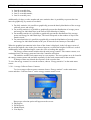
P.P.U.H. „Geco” spółka z o. o.
32-060 Liszki, Cholerzyn 376
tel. 012 6369811, 6361290
fax. 012 6362002
____________________________________________________
USER MANUAL
FOR SOLAR COLLECTOR
SYSTEM CONTROLLER
GH20SB
Software release 02A
GH20SB – User Manual
PAGE 2
CONTENTS
1.
Controller Description .............................................................................................................. 4
2.
Connecting External Devices.................................................................................................... 5
3.
Controller Usage ........................................................................................................................ 6
3.1. Enabling the Controller ............................................................................................................ 6
3.2. Standby Mode. ......................................................................................................................... 6
3.3. Operation. ................................................................................................................................. 6
3.3.1. Main Screen........................................................................................................................ 6
3.3.2. Main Menu Screen ............................................................................................................. 7
3.3.3. System Scheme Selection................................................................................................... 8
3.3.4. Settings Configuration Menu Screen ................................................................................. 8
3.3.5. Controller Configuration Menu Screen ............................................................................ 15
3.3.6. Manual Control ................................................................................................................ 18
3.3.7. Cooling ............................................................................................................................. 19
3.3.8. Energy and Collector Power Counters ............................................................................. 19
3.3.9. Holiday function ............................................................................................................... 21
4.
Settings ..................................................................................................................................... 23
4.1. Control Settings ...................................................................................................................... 23
4.2. Controller Settings.................................................................................................................. 25
5.
Additional Functions ............................................................................................................... 26
5.1.
5.2.
5.3.
5.4.
6.
Collector Freezing Prevention Function ................................................................................ 26
Anti-Legionella Function ....................................................................................................... 26
Holiday Function .................................................................................................................... 26
Manual Cooling Function....................................................................................................... 26
Controller Operation Scheme ................................................................................................ 27
6.1. Scheme 1 – the basic scheme. ................................................................................................ 27
6.2. Scheme 2 – the basic scheme with a circulation pump. ......................................................... 27
6.3. Scheme 3 – the basic scheme with a circulation pump and a gas boiler. ............................... 28
6.4. Scheme 4 – the basic scheme with a circulation pump and an electric heater. ...................... 28
6.5. Scheme 5 – the basic scheme with a circulation pump and a heat pump. .............................. 29
6.6. Scheme 6 – the basic scheme with a circulation pump, activating domestic hot water heating
after the boiler achieves the required temperature. ......................................................................... 29
6.7. Scheme 7 – a system of two heaters allows additional heating of the boiler heater with solar
energy. ............................................................................................................................................. 30
6.8. Scheme 8 – a system of two heaters allows additional heating of the circulation return with
solar energy. .................................................................................................................................... 30
6.9. Scheme 9 – a system with a three-way valve for domestic hot water heating and pool water
heating. Additional control of the pool water filtering system pump. ............................................ 31
6.10. Scheme 10 – a system with two collector pumps for domestic hot water heating and pool
water heating. Additional control of the pool water filtering system pump. .................................. 31
6.11. Scheme 11 – a system with a three-way valve for domestic hot water heating in two solar
heaters with additional control of a circulation pump. .................................................................... 32
6.12. Scheme 12 – a system with two collector pumps for domestic hot water heating in two solar
heaters with additional control of a circulation pump. .................................................................... 32
6.13. Scheme 13 – a system allowing the cooperation of collectors with the buffer container used
for cooperation with the SH. ........................................................................................................... 33
PPUH “GECO” Sp. z o.o.
Release I
FROM 05/01/2015
GH20SB – User Manual
PAGE 3
6.14. Scheme 14 – a domestic hot water heating system with solar collectors. Additionally the
system controls a gas boiler and activates domestic hot water heating after the boiler achieves the
required temperature. ...................................................................................................................... 33
6.15. Scheme 15 – a system allowing control of pumps cooperating with collector batteries placed
in various directions; additionally the system controls a circulation pump. ................................... 34
6.16. Scheme 16 – a system allowing control of pumps cooperating with collector batteries placed
in various directions. The system allows domestic hot water heating in two heaters. .................... 34
6.17. Scheme 17 – the basic scheme with a circulation pump, allowing emergency water dump
from the heater. ............................................................................................................................... 35
7.
Sensor Error Alarm ................................................................................................................ 35
8.
Information on Marking and Collection of Waste Electric and Electronic Equipment .. 35
PPUH “GECO” Sp. z o.o.
Release I
FROM 05/01/2015
GH20SB – User Manual
1.
PAGE 4
Controller Description
The GH20SB Controller is a device designed and manufactured to support systems with solar
collectors. The product was base on a reliable state-of-the-art microprocessor technology. The
Controller is modern in its design and very easy to use as it is equipped with a user panel with a
transparent keyboard and an LCD graphic display.
Its advantage is an extensive package of basic options greatly enhancing its functionality. These are:
A selection of 17 various system configurations,
System scheme display,
Device operation animation in the system scheme,
Collector pump rotation speed adjustment,
External device manual control option,
Calculation of collector instantaneous power,
Inbuilt real-time clock,
Controller status memory after disconnecting power supply,
Extensive average collector power statistics menu,
Extensive energy counters menu,
Holiday function,
Anti-legionella function,
Collector overheating prevention function,
Anti-freeze function,
Collector type selection function (flat plate / tube).
Additionally the Controller has been equipped with a number of features facilitating its use:
Transparent menu,
Graphic presentation of time intervals,
Selection of many language versions,
Easy and quick control settings configuration.
PPUH “GECO” Sp. z o.o.
FROM 05/01/2015
GH20SB – User Manual
PAGE 5
2.
Connecting External Devices
The GH20SB Controller is equipped with 4 inputs enabling connection of NTC10K
temperature sensors and three outputs enabling connection of external devices, pumps or three-way
valves, depending on the system scheme chosen. A drawing contains a graphic presentation of the
input and output marking. The description of the Controller inputs and outputs is provided in the
table.
Marking of Controller inputs and outputs
Input/Output
Un
O1
O2
O3
O4
T1,T2,T3,T4
Description
Mains connection (230VAC~/ 50Hz)
Main pump output
Maximum current rating: 3.15A
Relay output – dry, switch relay
Maximum current rating: 8A
- S1-S2 – NC (normally closed),
- S2-S3 – NO (normally open).
Relay output – live, 230VAC~
Maximum current rating: 8A
Mains power outlet 230VAC~ bridged within the Controller. This output
may be bridged outside with the switch relay output, thus providing
switching power supply for controlling e.g. a three-way valve.
Temperature sensor inputs – NTC10k
Description of Controller inputs and outputs
When connecting devices to the Controller outputs it must be remembered that outputs
marked as O1 and O3 are live outputs to which an external device may be connected directly. The
O2 output is dry and to be placed in series between the power source and the external device.
PPUH “GECO” Sp. z o.o.
FROM 05/01/2015
GH20SB – User Manual
3.
PAGE 6
Controller Usage
The GH20SB controller can’t be connection with electronic flow meter. Before
you start using controller make sure that “Measurmem” parameter is adjust to
“Rotameter”. (pkt. 3.3.4.5.)
3.1.
Enabling the Controller
After connecting the Controller to the power supply, controller for about 5 second make
touch-pad keyboard calibration, and inform user about this fact by inscription on the display:
“Keyboard calibration, Do not touch sensors”
After connecting the Controller to power supply the Collector will be activated in the
standby mode (if before deactivation it was in the standby mode) or in the operation mode (if before
deactivation it was in the operation mode).
If touch sensors display doesn’t work correct please make calibration process again.
Before you start next calibration Please turn of the controller from the power supply for a moment.
3.2.
Standby Mode.
In this mode the LCD display is slightly backlit and the Controller name and the current
software release are shown on the screen.
In the standby mode all outputs remain disabled and the alarm sounds are inactive.
Press
3.3.
to cause the Controller to exit the standby mode and switch to the operation mode.
Operation.
3.3.1. Main Screen.
In the upper line of the LCD display, on the left, the number of the currently supported
system scheme is shown. In the middle and on the right the time and date are shown. Below the
time and date line, on the left, the system scheme and the collector pump control level are
displayed. The digits in the scheme represent the numbering of the temperature sensors. You need
to ensure that the sensors are properly installed, as described in the scheme. Sensor substitution may
result in control system malfunction.
On the right of the system scheme the temperatures measured by sensors are shown. T1
corresponds to the temperature measured by sensor 1, T2 corresponds to the temperature measured
PPUH “GECO” Sp. z o.o.
FROM 05/01/2015
GH20SB – User Manual
PAGE 7
by sensor 2 etc. The Controller is designed to ensure that it is not necessary to install all four
temperature sensors. You need to install only those sensors which are necessary for control. If a
sensor necessary for control is not installed or damaged, next to the sensor symbol on the screen the
word ”Err” will appear, indicating that there is no sensor or it is damaged. In this case all external
devices will be deactivated and the Controller will raise alarm indicated by an intermittent audio
signal. If a sensor not required for control is not connected to the controller or is damaged, the
Controller will not raise alarm, and on the screen the temperature will be replaced with the symbol
“-----”.
Below the displayed temperatures, in the lower right-hand corner of the screen, the
collectors’ instantaneous power is displayed as calculated by the Controller. When the collector
pump is deactivated or the sensor on the collector return (as a rule it is sensor T3) is disconnected,
the power indication is replaced with the symbol “-----”. For systems numbered 6, 10, 12, 14, 15
and 16 the power calculation option is not available.
Depending on the control status, additional symbols may appear on the screen, such as:
“L” – active anti-legionella function.
Holiday symbol – active holiday function.
Cooling symbol – active cooling function.
Press
to cause the Controller to switch to the standby mode.
Press
to cause the Controller to switch to the main menu screen.
3.3.2. Main Menu Screen
On the main menu screen you can choose the following Controller functions:
Scheme selection,
Settings configuration,
Controller settings configuration,
Manual control,
Cooling settings configuration,
Energy counters view,
Holiday function.
Press
and
to switch between options.
To confirm the selection of an option press
Press
Press
.
to return to the main screen.
to cause the Controller to switch to the standby mode.
PPUH “GECO” Sp. z o.o.
FROM 05/01/2015
GH20SB – User Manual
PAGE 8
3.3.3. System Scheme Selection
The Controller allows controlling 17 different configurations of solar collector systems. To
choose the desired configuration of the collector system, choose “Scheme Selection” on the main
menu screen.
When you go to the system scheme selection screen, on the display screen a figure appears
representing the system scheme and accompanied by its number.
Press
and
Press
to save changes and return to the main menu screen.
Press
to cancel changes and return to the main menu screen.
Press
to change the system scheme.
to cancel changes and cause the Controller to switch to the standby mode.
3.3.4. Settings Configuration Menu Screen
To go to the settings configuration menu choose “Parameters settings” on the main menu
screen.
In the settings configuration menu you can:
Choose control settings edition option,
Choose circulation pump C time programme editing option,
Choose boiler/heater K time programme editing option,
Choose heating medium freezing point editing option,
Choose rated and minimum flow editing option,
Choose maximum and minimum collector pump rotation speed editing option,
Enter factory values of control settings.
PPUH “GECO” Sp. z o.o.
FROM 05/01/2015
GH20SB – User Manual
PAGE 9
Depending on the currently selected system scheme some of the above options may be hidden (they
will not appear in the menu).
Press
and
to switch between options.
To confirm the selection of an option press
Press
Press
.
to return to the main menu screen.
to cause the Controller to switch to the standby mode.
3.3.4.1. Control Settings Editing
To edit control settings choose “Control parameters” on the main menu screen and then
“Parameters settings” on the settings configuration menu screen.
On this screen you can change the configuration of the following settings:
Solar collector type (Flat /Tube) ,
T1, T2 temperatures difference for deactivating collector pump (2…15ºC),
Temperatures difference for activating additional pump, valve (2…15ºC),
Max. temp. T2 OFF collectors pump (10…85ºC)
Min. temp. T3 ON boiler pump (10…85ºC
Min. temp. T4 ON circulation pump (10…85ºC)
Max. temp. T4 OFF source of heat (10…85ºC)
Max. temp. of water heated in boiler C (10…85ºC)),
Regulation of collectors pump (No / Yes)),
Circulation pump mode (Discon / Continuous)),
Coll. Power OFF boiler heater, heat source (100…3000W)),
Overheat protection of collectors ON (No / Yes)),
MaxTemp. T2 overheat protection OFF (60…85ºC)),
Freezing protection of collectors ON (No / Yes)),
Selection of heating priority (A / B)),
Protection against Legionella (No / Yes)),
Disabling boiler K operation by activating boiler C (No / Yes).
PPUH “GECO” Sp. z o.o.
FROM 05/01/2015
GH20SB – User Manual
PAGE 10
Depending on the currently selected system scheme some of the above settings may be hidden.
Press
and
to switch between settings.
Press
to edit the current setting. During edition the setting value flashes. Press
to define a new value. Press
and
to save the new value and exit the setting edition option. Press
to cancel the change and exit the setting edition option.
Press
Press
(when setting edition is not active) to return to the settings configuration menu screen.
to cause the Controller to switch to the standby mode.
3.3.4.2. Editing Circulation Pump C Time Programme
To edit the circulation pump C time programme choose “Parameters settings” on the main
menu screen and then “Time program C” on the settings configuration menu screen.
The external devices operating hours setting mode allows setting time separately for week
days (Monday-Friday) and for Saturday and Sunday. The horizontal arrow shown above the scale at
the top of the screen indicates the hour range active for edition.
The edition of the time programme begins with defining the device operation on weekdays
(Monday-Friday). To change the hour displayed use
and
. After setting the last hour in
this range the Controller will switch to editing the time programme for Saturday, and after setting
the last hour for Sunday it will switch to editing the time programme for Sunday.
To activate or deactivate an external device at a selected hour, press
. If the device is
set to operate during the selected hour, it will be indicated by a white field on the hour scale. To
deactivate the device for the selected hour, use the
hour scale.
key to put out the white field above the
Press
to save new settings and return to the settings configuration menu screen.
Press
to cancel changes and cause the Controller to switch to the standby mode.
3.3.4.3. Editing Boiler/Heater K Time Programme
To edit the boiler / heater K time programme choose “Parameters settings” on the main
menu screen and then “Time program K” on the settings configuration menu screen.
PPUH “GECO” Sp. z o.o.
FROM 05/01/2015
GH20SB – User Manual
PAGE 11
To set the time zones for the device marked with “K” on the scheme follow the same
procedure as when selecting working hours for circulation pump C.
3.3.4.4. Editing Heating Medium Freezing Point
To edit heating medium freezing point choose “Parameters settings” on the main menu
screen and then “Heat transfer fluid” on the settings configuration menu screen.
When you go to this screen the setting value flashes. Press
and
heating medium freezing point temperature in the range from -35 to 0ºC.
Press
to save the new value and return to the settings configuration menu.
Press
to cancel changes and return to the settings configuration menu.
Press
to define a new
to cancel changes and cause the Controller to switch to the standby mode.
3.3.4.5. Editing Rated and Minimum Flow
To edit rated and minimum flow choose “Parameters settings” on the main menu screen and
then “Flow rate” on the settings configuration menu screen.
PPUH “GECO” Sp. z o.o.
FROM 05/01/2015
GH20SB – User Manual
PAGE 12
On this screen you can edit:
Speed (1...3)
Measurem: (Rotameter/Electr.916)
The nominal flow (0.5…30.0l/min),
the minimum flow (0…rated flow–0.5l/min).
The GH20SB controller can’t be connection with electronic flow meter. Before
you start using controller make sure that “Measurmem” parameter is adjust to
“Rotameter”. (pkt. 3.3.4.5.)
If the “Regulation of collectors pump” is set to “No” the minimum flow will be hidden (it cannot
be edited).
If the “Regulation of collectors pump” is set to “Yes” the minimum flow will be hidden (it can be
edited).
Press
setting.
and
to switch between these settings and press
During active edition the setting value flashes. Use
to edit the highlighted
and
to set a new value. Press
to save the new value and exit the setting edition option. Press
exit the setting edition option.
to cancel the change and
Press
Press
(when setting edition is not active) to return to the settings configuration menu screen.
to cause the Controller to switch to the standby mode.
3.3.4.6. Factory Control Settings
To restore factory control settings choose “Ustaw. parametrów” (Settings Config.) on the
main menu screen and then “Nastawy fabryczne” (Factory Settings) on the settings configuration
menu screen.
When you choose this option the Controller will ask for confirmation of factory settings
restoration. Press
to restore factory control settings and return to the settings configuration
menu screen. Press
to return to the settings configuration menu, the control settings will
remain unchanged.
The values of the factory control settings depend on the currently set system scheme
PPUH “GECO” Sp. z o.o.
FROM 05/01/2015
GH20SB – User Manual
Setting
Typ kolektora
słonecznego (Solar
collector type)
Różnica temp. T1,T2
włącz. Pompy kolektorów
(T1, T2 temperatures
differences for activating
collector pump)
Różnica temp. włączenia
dod. pompy, zaworu
(Temperatures differences
for activating additional
pump, valve)
Max. temp. T2
wyłączenia pompy
kolektorów (Max. T2
temperature for
deactivating collector
pump)
Min. temp. T3
uruchomienia pompy
kotła (Min. T3
temperature for activating
boiler pump)
Min. temp. T4 włączenia
pompy cyrkulacyjnej
(Min. T4 temperature for
activating circulation
pump)
Max. temp. T4
wyłączenia źródła ciepła
(Max. T4 temperature for
deactivating heat source)
Max. temp. wody grzana
z kotła C (Max.
temperature of water
heated in boiler C)
Regulacja obrotów pompy
kolektorów (Collector
pump rotation speed
adjustment)
PAGE 13
System scheme number
1
2
3
Płaski
Płaski
Płaski
(Flat
(Flat
(Flat
plate)
plate)
plate)
6ºC
6ºC
6ºC
4
Płaski
(Flat
plate)
6ºC
5
Płaski
(Flat
plate)
6ºC
6
Płaski
(Flat
plate)
6ºC
7
Płaski
(Flat
plate)
6ºC
8
Płaski
(Flat
plate)
6ºC
9
Płaski
(Flat
plate)
6ºC
10
Płaski
(Flat
plate)
6ºC
11
Płaski
(Flat
plate)
6ºC
12
Płaski
(Flat
plate)
6ºC
13
Płaski
(Flat
plate)
6ºC
14
Płaski
(Flat
plate)
6ºC
15
Płaski
(Flat
plate)
6ºC
16
Płaski
(Flat
plate)
6ºC
17
Płaski
(Flat
plate)
6ºC
-
-
-
-
-
5ºC
5ºC
5ºC
5ºC
5ºC
5ºC
5ºC
5ºC
5ºC
-
-
-
65ºC
65ºC
65ºC
65ºC
65ºC
65ºC
65ºC
65ºC
65ºC
65ºC
65ºC
65ºC
65ºC
65ºC
65ºC
65ºC
65ºC
-
-
-
-
-
41ºC
-
-
-
-
-
-
-
41ºC
-
-
-
-
35ºC
35ºC
35ºC
35ºC
35ºC
35ºC
-
-
-
35ºC
35ºC
-
-
35ºC
-
35ºC
-
-
50ºC
50ºC
50ºC
50ºC
50ºC
-
30ºC
30ºC
65ºC
65ºC
-
50ºC
-
65ºC
80ºC
-
-
-
-
-
-
-
-
-
-
-
-
-
65ºC
-
-
-
Tak
(Yes)
Tak
(Yes)
Tak
(Yes)
Tak
(Yes)
Tak
(Yes)
-
Tak
(Yes)
Tak
(Yes)
Tak
(Yes)
-
Tak
(Yes)
-
Tak
(Yes)
-
-
-
Tak
(Yes)
GH20SB – User Manual
Tryb pracy pompy
cyrkulacyjnej (Circulation
pump operation mode)
Moc kolekt. wyłącz.
kotła, grzałki, pompy
ciepła (Collector power
for deactivated boiler,
heater, heat pump)
Ochrona przed
przegrzaniem kolektorów
(Collector overheating
prevention)
Max. temp. T2 wył.
ochrony przegrz.
kolektorów (Max. T2
temperature for
deactivating collector
overheating prevention)
Ochrona przed
zamrożeniem kolektorów
(Collector freezing
prevention)
Wybór priorytetu grzania
(Heating priority
selection)
Ochrona przed bakteriami
Legionella (Protection
from Legionella)
Blokada pracy kotła K
uruchomieniem kotła C
(Blocking boiler K
operation by activating
boiler C)
-
PAGE 14
Przer.
(Interm
.)
1500W
Przer.
(Interm
.)
1500W
Przer.
(Interm
.)
1500W
Przer.
(Interm
.)
-
Przer.
(Interm
.)
-
Przer.
(Interm
.)
-
-
-
-
Przer.
(Interm
.)
-
-
Przer.
(Interm
.)
-
Przer.
(Interm
.)
-
-
Nie
(No)
Nie
(No)
Nie
(No)
Nie
(No)
Nie
(No)
Nie
(No)
Nie
(No)
Nie
(No)
Nie
(No)
Nie
(No)
Nie
(No)
80ºC
80ºC
80ºC
80ºC
80ºC
80ºC
80ºC
80ºC
80ºC
80ºC
Nie
(No)
Nie
(No)
Nie
(No)
Nie
(No)
Nie
(No)
Nie
(No)
Nie
(No)
Nie
(No)
Nie
(No)
-
-
-
-
-
-
-
-
-
-
Nie
(No)
Nie
(No)
-
-
-
-
-
-
-
-
-
-
-
Przer.
(Interm
.)
-
Przer.
(Interm
.)
-
-
Przer.
(Inter
m.)
-
Nie
(No)
Nie
(No)
Nie
(No)
Nie
(No)
Nie
(No)
Nie
(No)
80ºC
80ºC
80ºC
80ºC
80ºC
80ºC
80ºC
Nie
(No)
Nie
(No)
Nie
(No)
Nie
(No)
Nie
(No)
Nie
(No)
Nie
(No)
Nie
(No)
B
B
B
B
-
-
-
B
-
-
-
-
-
-
-
Nie
(No)
-
-
-
-
-
-
-
-
-
Nie
(No)
-
-
-
Factory control settings
-
-
GH20SB – User Manual
PAGE 15
3.3.5.Controller Configuration Menu Screen
To go to the Controller configuration menu choose “Controller settings” on the main menu
screen.
In the Controller configuration menu you can:
Choose date and time edition option,
Choose display settings edition option,
Choose sound edition option,
Choose language selection option.
Press
and
to switch between options.
To confirm the selection of an option press
Press
Press
.
to return to the main menu screen.
to cause the Controller to switch to the standby mode.
3.3.5.1. Editing Date and Time
To go to date and time edition screen choose “Controller settings” on the main menu screen
and then “Date and Time” on the Controller configuration menu screen.
GH20SB – User Manual
Press
and
PAGE 16
to change to flashing (edited) value.
Press
to edit the next value. If you press it when editing the year then the new time and date
will be saved and you will return to the Controller configuration menu screen.
Press
Press
to cancel changes and return to the Controller configuration menu.
to cancel changes and cause the Controller to switch to the standby mode.
3.3.5.2. Display Settings Editing
To edit display settings choose “Controller settings” on the main menu screen and then
“Display” on the Controller configuration menu screen.
On this screen you can edit:
Display backlight intensity (1…10),
Inactivity time after which the backlight will be automatically turned off (1…10min).
Press
and
highlighted setting.
to switch between these settings and press
During active edition the setting value flashes. Use
to edit the currently
and
to set a new value. Press
to save the new value and exit the setting edition option. Press
exit the setting edition option.
to cancel the change and
Press
screen.
Press
(when setting edition is not active) to return to the Controller configuration menu
to cause the Controller to switch to the standby mode.
GH20SB – User Manual
PAGE 17
3.3.5.3. Sound Settings Editing
To edit sound settings choose “Controller settings” on the main menu screen and then
“Sound settings” on the Controller configuration menu screen.
On this screen you can edit:
Alarm sounds (Yes / No),
Keys (Yes / No).
Press
and
highlighted setting.
to switch between these settings and press
During active edition the setting value flashes. Use
to edit the currently
and
to set a new value. Press
to save the new value and exit the setting edition option. Press
exit the setting edition option.
to cancel the change and
Press
screen.
Press
(when setting edition is not active) to return to the Controller configuration menu
to cause the Controller to switch to the standby mode.
3.3.5.4. Language Selection
To go to the language selection screen choose “Controller settings” on the main menu screen
and then “Language” on the Controller configuration menu screen.
GH20SB – User Manual
Use
and
PAGE 18
to select the desired language.
Press
screen.
to save the new language settings and return to the Controller configuration menu
Press
to cancel changes and return to the Controller configuration menu screen.
Press
to cancel changes and cause the Controller to switch to the standby mode.
3.3.6. Manual Control
To go to the manual control screen choose “Manual control” on the main menu screen.
»The LCD display will show the system scheme screen and (on the right side of the screen)
letters will appear that correspond to the devices in the scheme together with a description of the
external device status (ON / OFF).
NOTE!!!
After switching to manual operation the control algorithm is wholly suspended and the user has full
control over the status of the outputs (external devices).
Depending on the selected system configuration, the Controller can operate from 1 to 3
external devices. Each device can be separately activated and deactivated, and its current status is
always shown in the system scheme and on the right side of the display, next to the letter describing
and
Press
to unlock the possibility of
the device. To switch between devices use
changing the status of the currently highlighted output, which is indicated by the flashing of the
output status symbol (ON / OFF). Press
and
to change the device status and then press
to lock the current output status.
Press
to restore control and return to the main menu screen.
Press
to cause the Controller to switch to the standby mode.
GH20SB – User Manual
PAGE 19
3.3.7. Cooling
To choose the cooling settings editing option choose “Cooling” on the main menu screen.
On this screen you can activate cooling and set the temperature of cooling activation and
deactivation.
Press
and
Press
to choose current setting editing option. During edition the setting value flashes. Press
and
to set a new value. Press
option. Press
Press
Press
to switch between settings.
to save the new value and exit the setting edition
to cancel the change and exit the setting edition option.
(when setting edition is not active) to return to the main menu screen.
to cause the Controller to switch to the standby mode.
3.3.8. Energy and Collector Power Counters
The energy and collector power counters function is not available for schemes 6, 10, 12, 14,
15, 16.
The Controller has an inbuilt module for recording average collector power and the energy
generated by the collectors. The Controller enables recording and readout of power and energy
statistics for the following time intervals:
GH20SB – User Manual
PAGE 20
Last 60 recorded days,
Last 20 recorded weeks,
Last 12 recorded months,
Last 10 recorded years,
Additionally, for days, weeks, months and years statistics there is possibility to present the time
intervals graphically, by means of bar charts:
For daily statistics it is possible to graphically present the hourly distribution of the average
collector power and energy,
For weekly statistics it is possible to graphically present the distribution of average power
and energy for individual days in the interval from Monday to Sunday,
For monthly statistics it is possible to graphically present the distribution of the average
power and energy for individual days, The interval depends on the number of days in the
month viewed,
For annual statistics it is possible to graphically present the distribution of average power
and energy for individual months in the year in intervals from January to December.
When the graphical presentation in the form of bar charts is displayed, in the left upper-corner of
the screen the highest value in the given interval appears, to which the height of each bar is scaled.
Additionally, in the right-hand upper corner the series recording date appears.
The energy counters menu includes also the total energy counter. This counter counts, on a
continuous basis, the energy generated since the Controller activation.
The statistics and the total counter may be reset anytime. The reset options are to be found in
the energy counters menu and available separately for the total counter and for the statistics.
A change of date may disturb the sequence of the recorder data.
To view the energy counters or reset the counters, choose “Energy statistics” on the main menu
screen.
3.3.8.1. Average Collector Power Counters
To view average collector power counters choose “Energy statistic” on the main menu
screen and then “Collector Power” on the energy counters menu screen.
Report type selection option will appear on the screen:
Day Report,
Week Report,
Month Report,
Year Report,
GH20SB – User Manual
PAGE 21
When you select the desired report a list including the date and the average power value for a given
time interval (day, week, month, year) will appear on the screen.
To edit power distribution in a given time interval use
interval and press
Press
or
to select the desired time
.
to go back to the previous menu.
3.3.9. Holiday function
To use the holiday function editing option choose “Holiday settings” on the main menu
screen.
On this screen you can change the status of the holiday function and define holiday start and
end date.
Press
and
to switch between settings and press
to edit the currently
highlighted setting.
During holiday start or end date the value being edited (day, month or year) flashes. Using
and
change the flashing (edited) value and press
to edit the next value. When
editing the year value press this button to save the new date and exit holiday start and end date
to cancel the changes and exit the holiday start or end date edition option. If the
edition. Press
holiday function status is set to “Yes” , a change of the holiday start or end date will automatically
change the status to “No”.
GH20SB – User Manual
When editing the holiday function status use
PAGE 22
and
to set a new value and press
save the new value and exit the holiday function status edition. Press
exit the holiday status edition option.
Press
Press
to cancel the change and
(when setting edition is not active) to return to the main menu screen.
to cause the Controller to switch to the standby mode.
to
GH20SB – User Manual
PAGE 23
4. Settings
4.1.
Control Settings
Setting
Typ kolektora
słonecznego (Solar
collector type)
Różnica temp.
T1,T2 włącz. pompy
kolektorów (T1, T2
temperatures
differences for
activating collector
pump)
Symbol
Description
This setting applies to all system schemes and enables
collector type selection.
Range
Flat plate /
Tube
DT1
2…15ºC
Różnica temp.
włączenia dod.
Pompy, zaworu
(Temperatures
differences for
activating additional
pump, valve)
Max. temp. T2
wyłączenia pompy
kolektorów (Max.
T2 temperature for
deactivating
collector pump)
Min. temp. T3
uruchomienia
pompy kotła (Min.
T3 temperature for
activating boiler
pump)
Min. temp. T4
włączenia pompy
cyrkulacyjnej (Min.
T4 temperature for
activating
circulation pump)
Max. temp. T4
wyłączenia źródła
ciepła (Max. T4
temperature for
deactivating heat
source)
Max. temp. wody
grzana z kotła C
(Max. temperature
of water heated in
boiler C)
DT2
The main control delta (temperature difference).
This setting specifies the condition for activating and
deactivating the collector pump. When the sum of the
∆1 setting and the tank temperature T2 exceeds the
temperature measured by the collector sensor T1, the
collector pump deactivates. If the sum is lower than
the T1 value, the collector pump is active.
Additionally, to ensure stable operation of the heating
system, a control hysteresis of 3°C is applied.
The auxiliary control delta (temperature difference).
The setting is applied to controlling more extensive
systems.
T2max
Setting associated with temperature sensor T2 located
inside the tank. This setting specifies the maximum
allowable temperature measured by the sensor T2
which, when exceeded, causes the collector pump to
stop.
10…85ºC
T3min
Setting applied in schemes 6 and 14. It defines the
minimum boiler pump K activation temperature.
10…85ºC
T4mincyrk
Setting associated with the circulation pump and the
T4 sensor. It defines the minimum circulation pump
activation temperature (T4).
10…85ºC
T4max
Setting applied in more extensive schemes.
10…85ºC
T4maxC
Setting applied only in scheme 14. Defines the
maximum value measured by the T4 sensor for boiler
pump control.
10…85ºC
2…15.ºC
GH20SB – User Manual
Setting
Regulacja obrotów
pompy kolektorów
(Collector pump
rotation speed
adjustment)
Symbol
RegFaz
Description
Main pump (collector pump) adjustment. If the
collector pump adjustment is selected in the Controller
settings, the Controller will adjust the collector pump
rotation speed. If the collector pump speed adjustment
option is disabled, the Controller will only control the
pump in the on/off operation mode.
In schemes 6, 10, 12, 14, 15 and 16 the collector pump
rotation speed adjustment is never active.
When it is set to “Ciągły” (Continuous), the
circulation pump is activated in the hours set in the
“Program czasowy” (Time Programme) menu. If it is
set to “Przerywana” (Intermittent), the circulation
pump will additionally operate in the hours set in the
“Program czasowy” (Time Programme) menu,
however, it will operate on a cyclical basis, activating
for 10 minutes, then after 10 minutes deactivating for
another 10 minutes after it will again activate for 10
minutes.
Setting applied in schemes 3, 4, 5 and 14. The
Controller calculates the collector power and
deactivates the boiler or the heater if the calculated
power exceeds the power defined in the control
setting. When the collector power value is lower than
the value defined in the settings, the boiler, heater and
pump outputs are controlled in accordance with their
control algorithm.
Setting defines enabling or disabling the boiler
overheating prevention function.
Range
No / Yes
Tmaxprzeg
Setting defines the maximum temperature within the
tank when the collector overheating function is
enabled. This setting has priority over the
T2max.setting.
60…85ºC
Przeciw.Zam
Setting enables/disables the collector freezing
prevention function.
No / Yes
PriorytAB
Setting associated with schemes 9, 10, 11, 12 and 16.
Defines the priority of the tank / pool heating.
A/B
Setting associated with schemes 3, 4, and 14. Defines
whether the anti-legionella function is enabled or
disabled.
No / Yes
Tryb pracy pompy
cyrkulacyjnej
(Circulation pump
operation mode)
Moc kolekt. wyłącz.
kotła, grzałki,
pompy ciepła
(Collector power for
deactivated boiler,
heater, heat pump)
Ochrona przed
przegrzaniem
kolektorów
(Collector
overheating
prevention)
Max. temp. T2
wyłącz. ochrony
przegrz. kolektorów
(Max. T2
temperature for
deactivating
collector
overheating
prevention)
Ochrona przed
zamrożeniem
kolektorów
(Collector freezing
prevention)
Wybór priorytetu
grzania (Heating
priority selection)
Ochrona przed
bakteriami
Legionella
(Protection from
Legionella)
PAGE 24
ZabPrzeg
Interm. /
Contin.
100…3000W
No / Yes
GH20SB – User Manual
Setting
Blokada pracy kotła
K uruchomieniem
kotła C (Blocking
boiler K operation
by activating boiler
C)
Symbol
4.2.
Controller Settings
Setting
Poziom jasności wyświetlacza
(Display backlight intensity)
Czas wygaszenia wyświetlacza
(Display sleep time)
Dźwięki alarmów (Alarm sounds)
Dźwięki klawiszy (Key sounds)
PAGE 25
Description
Setting associated only with scheme 14. Allows
blocking gas boiler K activity during solid fuel boiler
C operation.
Range
No / Yes
Description
Setting defines display backlight intensity.
Range
1…10
Setting defines time without any button pressed after
which the display becomes inactive for reasons of energy
savings.
Setting enabling or disabling alarm sounds when
temperature sensors are disconnected or damaged.
Setting enabling or disabling key sounds.
1…10min
No / Yes
No / Yes
GH20SB – User Manual
PAGE 26
5. Additional Functions
5.1.
Collector Freezing Prevention Function
When this function is enabled, the collector pump will activate if the temperature at the T1
sensor is lower than or equal to the freezing point defined in the Heat transfer fluid setting and the
T2 temperature is higher than 7°C. The pump will deactivate if the T2 temperature falls below 5°C
or the (T1 – 2) temperature is higher than the freezing point defined in the Heat transfer fluid
setting.
Additionally, in schemes 15 and 16, where a second collector is used, when this function is
enabled, pump K will activate if the temperature at the T3 sensor is lower than or equal to the
freezing point defined in the Heat transfer fluid setting and the T2 temperature is higher than 7°C.
The pump will deactivate if the T2 temperature falls below 5°C or the (T3 – 2) temperature is
higher than the freezing point defined in the Heat transfer fluid setting.
5.2.
Anti-Legionella Function
The anti-legionella function applies only in schemes 3, 4 and 14. It is always activated once
a week, in the night from Sunday to Monday, at 12 midnight. When the anti-legionella function is
activated, the collector pump is deactivated and the boiler and, additionally, the circulation pump,
are turned on. When the temperature measured by the T4 sensor exceeds 70°C, the circulation pump
and the boiler turn off and the anti-legionella function deactivates. Next time it will be activated in a
week, in the night from Sunday to Monday.
The anti-legionella function does not work during holidays.
5.3.
Holiday Function
The holiday function consists in totally disabling the control of the heater, the gas boiler, the
heat pump, the boiler pump etc. Additionally, when the holiday function is active, the collector
cooling function (regardless of whether it is enabled) and the collector overheating prevention
function (regardless of the value in the “ZabPrzeg” setting) are also active. When the Controller
finishes the application of the holiday function, the function is automatically deactivated so as not to
activate next year. This function should be set manually before any planned holidays.
5.4.
Manual Cooling Function
The manual cooling function is available in the main menu. When the cooling option is
enabled or the holiday function is active and the temperature in the tank measured by the T2 sensor
is higher than the cooling activation temperature, the collector pump activates and remains active
until the temperature in the tank measured by the T2 sensor falls below cooling deactivation
temperature. The pump activation is always linked with the freezing prevention function.
The manual cooling function is time-based and is active between 12 midnight and the
cooling end hour defined in the settings. During the collector cooling, only the main collector pump
P operates, while all other devices are inactive. The only exception here is the dump valve in
scheme 17, i.e. it will be active if the T4 temperature is higher than the T4max temperature and it will
be inactive if the T4 temperature is lower than the (T4max – 1) temperature.
GH20SB – User Manual
PAGE 27
6. Controller Operation Scheme
6.1.
Scheme 1 – the basic scheme.
Output
O1
O2
O3
Sensor
T1
T2
T3
T4
6.2.
Device connected
Collector pump P
Description
Collector sensor (Required)
Tank sensor (Required)
Sensor for calculating power/energy (Optional)
Tank sensor (Optional)
Scheme 2 – the basic scheme with a circulation pump.
Output
O1
O2
O3
Sensor
T1
T2
T3
T4
Device connected
Collector pump P
Circulation pump C
Description
Collector sensor (Required)
Tank sensor (Required)
Sensor for calculating power/energy (Optional)
Tank sensor (Required)
GH20SB – User Manual
6.3.
Scheme 3 – the basic scheme with a circulation pump and a gas boiler.
Output
O1
O2
O3
Sensor
T1
T2
T3
T4
6.4.
PAGE 28
Device connected
Collector pump P
Boiler K
Circulation pump C
Description
Collector sensor (Required)
Tank sensor (Required)
Sensor for calculating power/energy (Optional)
Tank sensor (Required)
Scheme 4 – the basic scheme with a circulation pump and an electric heater.
Output
O1
O2
O3
Sensor
T1
T2
T3
T4
Device connected
Collector pump P
Heater K
Circulation pump C
Description
Collector sensor (Required)
Tank sensor (Required)
Sensor for calculating power/energy (Optional)
Tank sensor (Required)
GH20SB – User Manual
6.5.
Scheme 5 – the basic scheme with a circulation pump and a heat pump.
Output
O1
O2
O3
Sensor
T1
T2
T3
T4
6.6.
PAGE 29
Device connected
Collector pump P
Heat pump K
Circulation pump C
Description
Collector sensor (Required)
Tank sensor (Required)
Sensor for calculating power/energy (Optional)
Tank sensor (Required)
Scheme 6 – the basic scheme with a circulation pump, activating domestic hot water
heating after the boiler achieves the required temperature.
Output
O1
O2
O3
Sensor
T1
T2
T3
T4
Device connected
Collector pump P
Boiler pump K
Circulation pump C
Description
Collector sensor (Required)
Tank sensor (Required)
Sensor for calculating power/energy (Optional)
Tank sensor (Required)
GH20SB – User Manual
6.7.
Scheme 7 – a system of two heaters allows additional heating of the boiler heater with
solar energy.
Output
O1
O2
O3
Sensor
T1
T2
T3
T4
6.8.
PAGE 30
Device connected
Collector pump P
Pump K
Circulation pump C
Description
Collector sensor (Required)
Tank sensor (Required)
Sensor for calculating power/energy (Optional)
Tank sensor (Required)
Scheme 8 – a system of two heaters allows additional heating of the circulation return with
solar energy.
Output
O1
O2
O3
Sensor
T1
T2
T3
T4
Device connected
Collector pump P
Valve U
Circulation pump C
Description
Collector sensor (Required)
Tank sensor (Required)
Sensor for calculating power/energy (Optional)
Circulation return sensor (Required)
GH20SB – User Manual
6.9.
Scheme 9 – a system with a three-way valve for domestic hot water heating and pool water
heating. Additional control of the pool water filtering system pump.
Output
O1
O2
O3
Sensor
T1
T2
T3
T4
6.10.
PAGE 31
Device connected
Collector pump P
Valve U
Pool pump C
Description
Collector sensor (Required)
Tank sensor (Required)
Sensor for calculating power/energy (Optional)
Pool sensor (Required)
Scheme 10 – a system with two collector pumps for domestic hot water heating and pool
water heating. Additional control of the pool water filtering system pump.
Output
O1
O2
O3
Sensor
T1
T2
T3
T4
Device connected
Collector pump P
Collector pump K
Pool pump C
Description
Collector sensor (Required)
Tank sensor (Required)
Sensor for calculating power/energy (Optional)
Pool sensor (Required)
GH20SB – User Manual
6.11.
Scheme 11 – a system with a three-way valve for domestic hot water heating in two solar
heaters with additional control of a circulation pump.
Output
O1
O2
O3
Sensor
T1
T2
T3
T4
6.12.
PAGE 32
Device connected
Collector pump P
Valve U
Circulation pump C
Description
Collector sensor (Required)
Tank sensor (Required)
Sensor for calculating power/energy (Optional)
Tank sensor (Required)
Scheme 12 – a system with two collector pumps for domestic hot water heating in two solar
heaters with additional control of a circulation pump.
Output
O1
O2
O3
Sensor
T1
T2
T3
T4
Device connected
Collector pump P
Collector pump K
Circulation pump C
Description
Collector sensor (Required)
Tank sensor (Required)
Sensor for calculating power/energy (Optional)
Tank sensor (Required)
GH20SB – User Manual
6.13.
Scheme 13 – a system allowing the cooperation of collectors with the buffer container used
for cooperation with the SH.
Output
O1
O2
O3
Sensor
T1
T2
T3
T4
6.14.
PAGE 33
Device connected
Collector pump P
Valve U
Description
Collector sensor (Required)
Tank sensor (Required)
Sensor for calculating power/energy (Optional)
SH return sensor (Required)
Scheme 14 – a domestic hot water heating system with solar collectors. Additionally the
system controls a gas boiler and activates domestic hot water heating after the boiler
achieves the required temperature.
Output
O1
O2
O3
Sensor
T1
T2
T3
T4
Device connected
Collector pump P
Boiler K
Boiler pump C
Description
Collector sensor (Required)
Tank sensor (Required)
Sensor for calculating power/energy (Optional)
Tank sensor (Required)
GH20SB – User Manual
6.15.
Scheme 15 – a system allowing control of pumps cooperating with collector batteries
placed in various directions; additionally the system controls a circulation pump.
Output
O1
O2
O3
Sensor
T1
T2
T3
T4
6.16.
PAGE 34
Device connected
Collector pump P
Collector pump K
Circulation pump C
Description
Collector sensor (Required)
Tank sensor (Required)
Collector sensor (Required)
Tank sensor (Required)
Scheme 16 – a system allowing control of pumps cooperating with collector batteries
placed in various directions. The system allows domestic hot water heating in two heaters.
Output
O1
O2
O3
Sensor
T1
T2
T3
T4
Device connected
Collector pump P
Valve U
Collector pump K
Description
Collector sensor (Required)
Tank sensor (Required)
Collector sensor (Required)
Tank sensor (Required)
GH20SB – User Manual
6.17.
PAGE 35
Scheme 17 – the basic scheme with a circulation pump, allowing emergency water dump
from the heater.
Output
O1
O2
O3
Sensor
T1
T2
T3
T4
Device connected
Collector pump P
Dump valve K
Circulation pump C
Description
Collector sensor (Required)
Tank sensor (Required)
Sensor for calculating power/energy (Optional)
Tank sensor (Required)
7. Sensor Error Alarm
The Controller checks the temperature sensors for proper connection. If a sensor is damaged,
a cable is broken or a sensor is disconnected, the Controller raises alarm for that sensor (in the event
of sensor short-circuit the Controller will nor raise alarm but indicate a temperature of 125ºC). In
the alarm condition all outputs are disconnected; additionally, when the Controller displays the
main screen, alarm is indicated by audio signal. In the alarm mode, you can browse the menu
system, configure settings, and manually control the external devices. The information which sensor
is in alarm condition is available in the main screen. The display shows “Err” instead of the
temperature next to the sensor marking. When the Controller raised sensor alarm, check the system
for proper connection and installation of the sensors.
8. Information on Marking and Collection of Waste Electric and
Electronic Equipment
NOTE!
The symbol placed on a product or on its packaging indicates that it is
subject to selective collection of waste electric and electronic
equipment. This means that the product should not be discarded with
other household waste. Appropriate removal of old and waste electric
and electronic equipment will prevent potentially harmful effects on the
environment and human health.
The obligation of selective equipment collection rests on the user who
should deliver the equipment to a collection point.
P.P.U.H. „Geco” Spółka z o. o.
32-060 Liszki, Cholerzyn 376
tel. +48 12 6369811, +48 12 6361290
fax.+48 12 6362002
http://www.geco.pl