1
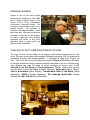
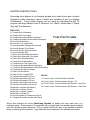
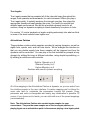
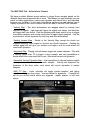
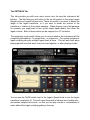
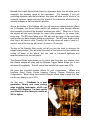
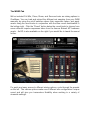
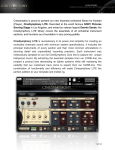
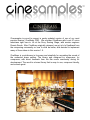
Cinesamples is proud to present a newly updated version of one of our most
popular libraries, CineBrass PRO. We recorded CineBrass with Local 47 union
musicians right here in LA at the Sony Scoring Stage, with master engineer
Dennis Sands. After CineBrass originally released, we got a lot of feedback from
the composing community on how it could be better, and decided to implement
many of those ideas in this version 1.5.
CineBrass is revolutionary in its power and simplicity for recreating the sound of
the orchestral brass section. The library was designed by composers, for
composers, with direct feedback from the film music community during itʼs
development. The result is a brass library that is easy to use, composer-friendly,
and sounds great.
DENNIS SANDS
Dennis is one of the most sought
after mixers in Hollywood. His credit
list is a sight to behold (Back to the
Future, Forrest Gump, Shawshank
Redemption, American Beauty, The
Avengers), and includes some of our
favorite scores.
He continues to
produce incredible-sounding mixes
year after year. We were enormously
honored to have him on this project;
his ears, equipment, and general
expertise are some of the most
important parts of what youʼll get
when you use CineBrass.
THE SONY PICTURES SCORING STAGE
The Sony Pictures Scoring Stage is the largest motion picture scoring venue in the
world. The main scoring area has remained unchanged since the 1930s to preserve its
unmatched acoustics and unique ambiance. It measures 93ʼ wide by 67ʼ long by 34ʼ
high. One of the first scores recorded there was the Wizard of Oz (Herbert Stothart).
Its success allowed the stage to become primarily dedicated to the art of the film score.
John Williams has used the stage on many occasions for scores such as ET,
Schindlerʼs List, War Horse, and The Adventures of Tin-Tin. Other scores recently
recorded there include Toy Story 3 (Randy Newman), Spider-Man (Danny Elfman),
Alice in Wonderland (Danny Elfman), Transformers: Dark of the Moon (Steve
Jablonsky), Wall-E (Thomas Newman), The Amazing Spider-Man (James
Horner) and Star Trek (Michael Giacchino).
INSTRUMENTATION
Recording union players in Los Angeles allowed us to select from a pool of active
Hollywood studio musicians, some of whom are members of the Los Angeles
Philharmonic. These stellar players can be heard on countless film and TV
projects including: Indiana Jones 4, Monsters, Inc., Wall-E, Spider-Man 2, Family
Guy, and The Simpsons.
PATCH LIST
01 Trumpet Solo Articulations
02 Trumpet Solo True Legato
03 Trumpets Ensemble Muted Articulations
04 Trumpets Ensemble Harmon Mute Articulations
05 Horn Solo Articulations
06 Horn Solo True Legato PRO
07 Horns Ensemble Stopped and Fluttered
08 Horns Ensemble Triad Chords
09 Horns Ensemble Seventh Chords
10 Horns Ensemble Rips
11 Twelve Horn Ensemble Articulations
12 Twelve Horn Ensemble True Legato
13 Twelve Horn Ensemble Mutes
14 Trombone Solo Articulations
15 Trombone Solo True Legato PRO
16 Trombones Ensemble Muted Articulations
17 Trombones Ensemble Harmon Mute Articulations
18 Trombones Ensemble Fluttered
19 Tuba Solo Articulations
20 Tuba Solo True Legato PRO
MULTIS
21 Full Brass Ensemble FX Part 1
22 Full Brass Ensemble FX Part 2
01 Concert Order - Full Articulations Standard
23 Full Brass Ensemble FX Part 3
02 Concert Order - Full Articulations Groups + FX
24 Full Brass Ensemble High Chords
03 Concert Order - Full Articulations Split Patches - Hrns-Tpts
25 Full Brass Ensemble Low Chords
04 Concert Order - Full Articulations Split Patches - Trmb-Tuba
26 Monster Low Brass Articulations
27 Monster Low Brass Scoops
28 Monster Low Brass Clusters
29 Monster Low Brass FX
30 Horns Ensemble fff Sustains and Shorts
31 Trumpets Ensemble Sustains and Tenuto
The Patches
Weʼve also included old school Short/Long Patches for people who may want more of a
traditional setup. These consist of long patches with no legato and short patches that are eighths
only with velocity sensitive dynamics. A lot of people still work this way so we decided to take the
liberty of setting up these presets. They utilize the same samples as the articulations patches.
True Legato
True Legato means that we sampled all of the intervalic leaps throughout the
ranges, both upwards and downwards, for each instrument. When you play a
True Legato patch, it instantly analyzes the intervals you play, then plays the
appropriate transitional leap between the notes. The result is a smooth and
realistic legato performance. We did this at multiple dynamic levels for all
sections, using our dynamic morphing to blend seamlessly from piano to forte.
For version 1.5, weʼve tweaked our legato scripting extensively into what we think
is some of the most realistic brass legato ever.
Articulations Patches
These patches contain sustain samples recorded at varying dynamics, as well as
eighth note, quarter note, and half note shorts. Weʼve arranged the interface so
that you can decide exactly how these samples will be triggered and how the
dynamics will be controlled. You can play a line that includes any sample at any
dynamic by striking the keys at different velocities, using simple keyswitching, or
by utilizing a continuous midi controller.
Eighths Staccato p to ff
Quarters Tenuto p to ff
Halves Marcato p to ff
Sustains with smooth dynamic morphing
All of the mapping in the Articulations Patches is dynamic, so you can select from
five intuitive presets in the user interface. A custom mapping grid is offered for
users who wish to customize the parameters beyond the presets. Every
parameter and value is changeable and nearly any combination is possible. Of
course, if you choose not to tweak, you can stick with one of the preset mappings
(recommended).
Note: The Articulations Patches also contain legato samples for your
convenience. They are the same samples as on the true legato patches, so
playing legato on an articulations patch is the same as playing a true legato patch.
The MAPPING Tab - Articulations Presets
We have provided different preset options to trigger these samples based on the
different ways most composers like to work. This means you can intuitively use one
patch for many applications, create more dynamic and natural lines, and ultimately
improve your workflow. In the main Articulations patches you can choose from a
variety of presets in the form of buttons on the left side of the MAPPING interface:
•Velocity Map - The short articulations are mapped based on velocity from
shortest to longest. Light taps will trigger the eighth note shorts, and hard hits
will trigger half note shorts. Hold the sustain pedal down and hit a key to trigger
the sustain samples, and overlap midi notes to trigger legato samples. Use the
mod wheel to control dynamics for both long and short articulations.
•Velocity Inverse Map - Similar to the Velocity Map, except the shorts are
mapped inversely; from longest to shortest as velocity increases. Holding the
sustain pedal will still give you sustains and legato, and the mod wheel still
controls all dynamics.
•Keyswitch Map - Playing soft will always trigger the sustain samples. Play with
a velocity higher than 70 to trigger a short sample, and use keyswitches to
decide which short you would like to use. Mod wheel controls all dynamics.
•Keyswitch Velocity Dynamics Map - Use keyswitches to choose between eighth
note, quarter note, half note, or sustain samples. Velocity will determine the
dynamics of the short notes, mod wheel will control dynamics of sustain
samples.
•MIDI CC Map - Lower velocities will trigger sustain samples, and higher
velocities will trigger short notes. Use mod wheel for dynamics. Controller #3
will let you choose which shorts are triggered - eighth, quarter, or half note
shorts.
You can adjust any of the presets should you desire, and the Custom Map button
provides you with a blank set of assignments if you want to build your own.
Simply adjust how each articulation will be triggered using the provided
parameters - Velocity, Keyswitches, Sustain Pedal, or Continuous Midi
Controllers.
•Short/Sustain Order - If you decide to split sustain samples and short
samples based on velocity, this will control whether high velocities trigger
shorts and low velocities trigger sustains, or vice versa.
•Short/Sustain Split - This will let you choose at which value the abovementioned split will occur. For example, you may want velocities above 100
to trigger sustain samples and below to trigger shorts.
•Sustain Dynamics - Choose how the dynamics of the sustain samples will be
controlled; with a controller or by velocity (the latter is not recommended).
•Short Dynamics - Choose how the dynamics of the short articulations will be
controlled; with a controller or by velocity.
•Staccato Overlay - This feature will layer the eighth note samples over the
sustain samples on high velocity.
THis feature is useful for simulating
sforzandos.
Note: If you decide to use keyswitches, you are provided with a latching or nonlatching option. When a latching keyswitch is pressed, you will be stuck in that
articulation until a different keyswitch is triggered or another parameter takes you
to another articulation. If you choose non-latching, the keyswitch will need to be
held down continuously in order to trigger that articulation.
Double/Triple Tonguing
On the articulations patches, we have added a feature that will allow you to easily
play quick, short repetitions. For double-tonguing, hold down the non-latching C#
keyswitch, displayed on the Kontakt keyboard in green, while playing eighth note
samples. A second round robin will be triggered on the release of the key,
allowing you to play quick passages without having to program them, or break
your controller by hammering on the keys. For triple-tonguing, hold down the D#
keyswitch. This script will calculate the time between attack and release, and
play a third note equally spaced after the release. Give it a try!
The SETTINGS Tab
This tab provides you with even more control over the way the instrument will
behave. The first thing you will notice in the top left section is the large Legato
Speed knob and Legato Volume knob. These are useful if you want to adjust the
length of the legato transitions, or if you want to tweak the volume of the
transitions in relation to the sustain samples. When playing a very fast passage
for example, you might want to turn up the legato speed and/or turn down the
legato volume. Both of these knobs can be mapped to a CC controller.
The mono/poly mode switch allows you to control whether the instrument will be
completely monophonic - for single lines - or polyphonic. Our custom polyphonic
legato scripting can play multiple legato lines at once. This will work best when
playing parallel lines that donʼt stray too close together, or when playing chords.
You can use the On/Off switch next to the Legato Speed Knob to turn the legato
transitions completely off. This will cause the patch to behave more traditionally just sustain samples and shorts - so that you can play chords or combinations of
notes without the legato scripting getting in the way.
Beneath the Legato Speed Knob there is a dynamics fader that will allow you to
compress the dynamic range of the instrument.
For example, if you are
controlling dynamics with the mod wheel, this slider will allow you to “zoom in” on
a specific dynamic range and have the sound of the instrument affected less by
extreme changes in the mod wheelʼs position.
Across the bottom of the Settings tab, you will see more sample controls. When
set to Random, the Round Robin switch will randomly cycle through different
short samples to prevent the dreaded “machine-gun effect.” When set to Cycle,
the engine will just cycle through the round robin samples in the same order
every time. The RR reset, when set to ON, will reset the order of the round robin
cycling after you have stopped hitting any midi keys. The RR reset knob controls
how long it will take to reset. Turning it all the way down will make it reset in 1
second, and all the way up will cause it to reset in 10 seconds.
Turning on the Sample Start control will let you use the knob to advance the
sample start position. This will make the attack of the note sound less realistic by
cutting off some of the attack, but can lead to increased tightness and
responsiveness from the instrument.
The Release Delay knob allows you to control how long after you release a key
the release sample will play, and the Release Trigger switch allows you to turn
releases off completely. This will sound less realistic but require less CPU.
We have also provided multiple effects for your convenience - HiPass and
LowPass filters, Delay, Stereo Imaging, Chorus, Flanger, Distortion and
Compression. When using these built-in Kontakt effects keep in mind that they
can be very heavy on your CPU.
On that note:
CineBrass is a next
generation library and uses cutting
edge scripting techniques, which can
be very CPU intensive. For best results
you should run this library at a buffer of
256 or higher.
The MIXER Tab
Weʼve included Full Mix, Close, Room, and Surround mics as mixing options in
CineBrass. You can load and unload the different mic samples from your RAM
manually by using the on/off switches above their respective faders, and apply
reverb using the send knobs in conjunction with the blue reverb knob/switch in
the bottom right. Click the “Preset” button below the reverb knob to choose from
seven different impulse responses taken from the famous Bricasti M7 hardware
reverb. An EQ is also available on the right if you would like to tweak the sound
further.
For quick and easy access to different mixing options, cycle through the presets
on the left. The various options make use of different mic configurationsʼ unique
sound and will give you tremendous flexibility when working in a variety of
cinematic settings.
Recording CineBrass
Sampling in Los Angeles is no easy task. Especially when you want to do it the
right way. This library is the first of itʼs kind, because it is the first commercial
library to be recorded under a special AFM (American Federation of Musicians)
Sampling Agreement. The product of this, is that for every purchase, a
percentage of the sales go directly to the musicians who played on the
CineBrass session. Not only does it go to the musicians, but weʼve extended it
to the copyists, the engineers and everyone who had a critical role in producing
the library. Important to note that this does not effect the user agreement, and
CineBrass can be used like any other Cinesamples library in your music
productions.Why do this? We want to keep recording here in Los Angeles, with
the best musicians, at the best scoring stages in the world. We are grateful to the
AFM for having the vision to do this with us, and we look forward to extending
this to all our future libraries.
Be sure to check out the screencast videos on the Cinesamples website to get a
detailed look at the library!
Enjoy CineBrass 1.5!