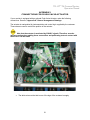
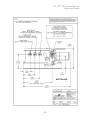
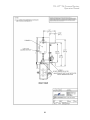
1
Operation Manual TD-1075.0 Oil Content Monitor DNV Type Approval Programme No. 771.61 Certified May 2, 2014 P/N NAG2544 Rev. B Applicable to TD-107 Serial Numbers 2000001F and greater. Global Sales & Service Support: NAG Marine 2511 Walmer Avenue Norfolk, VA 23513 +1 800 830 5186 www.nagmarine.com [email protected] TD-1075.0 Oil Content Monitor Operation Manual THIS PAGE INTENTIONALLY LEFT BLANK 2 TD-1075.0 Oil Content Monitor Operation Manual To ensure proper system operation, NAG Marine strongly recommends reading this manual in full. After reading the entire manual, please review the following: INSTALLATION Prior to installation, completely review the Pre-installation/ Installation Checklist, Appendix A, page 30. START-UP Prior to start-up, completely review the Start-Up Section, page 10. NORMAL OPERATION Summary sheet designed for normal operation and cleaning Appendix J, page 53. CALIBRATION CHECK Prior to calibrating the TD-1075.0 OCM, completely review the Calibration Check Procedure, page 12. DNV DATALOGGER This section describes the Datalogger alarm events. Please review prior to operation. See page 15. TROUBLESHOOTING Prior to calling NAG Marine for assistance, completely review the Troubleshooting Guide, page 22. 3 TD-1075.0 Oil Content Monitor Operation Manual 9.0. TD-1075.0 OCM MAINTENANCE .......18 9.1 Battery Back-Up .........................18 9.2 Preventative Maintenance ..........18 9.3 Replacement Parts.....................19 10.0 ALARMS and ADVISORIES .........20 10.1 Alarm Delay ...............................20 10.2 Alarm Activation .........................20 10.3 Multiple Alarms ..........................20 10.4 Alarm History .............................20 10.5 Alarm / Advisory Definitions .......21 11.0. TROUBLESHOOTING ....................22 11.1 Diagnostics ................................22 11.2 Display Screens .........................23 11.3 Datalogger Failure......................24 11.4 Fuse Replacement .....................24 11.5 Service Assistance .....................24 11.6 Troubleshooting Guide ...............25 12.0 RESPONSIBILITY FOR SAFE DELIVERY ...............................................27 13.0 LEGAL & WARRANTY .................28 Table of Contents 1.0 1.1 1.2 2.0 2.1 2.2 2.3 2.4 2.5 2.6 3.0 4.0 4.1 4.2 4.3 4.4 4.5 INTRODUCTION ............................. 5 General ........................................ 5 Symbols ....................................... 5 THEORY OF OPERATION ............. 5 Light Source................................. 6 Excitation Filter ............................ 6 Sample Cell ................................. 6 Emission Filter ............................. 6 Light Detector .............................. 6 Control Functions ......................... 6 SPECIFICATIONS .......................... 7 INSTALLATION .............................. 7 Pre-Installation/Installation ........... 7 Required Tools & Accessories ..... 7 Location & Sampling Point ........... 7 Mechanical Connections .............. 8 Power and Input/Output Signal Requirements .............................. 8 4.6 Electrical Connections ................. 9 5.0. START-UP / SHUT-DOWN ............... 10 5.1 Start-Up Materials ...................... 10 5.2 Start-Up Procedure .................... 10 5.3 Start-Up Sample Cell Maintenance and Cleaning ............................. 11 5.4 Shut-Down Sample Cell Maintenance and Cleaning ........ 12 6.0 CALIBRATION CHECK ................ 12 6.1 Calibration Check Procedure ..... 12 7.0 TD-1075.0 OCM SOFTWARE FUNCTIONS ............................................ 13 7.1 Screens ..................................... 13 7.2 Keypad Functions ...................... 14 7.3 Standby Mode............................ 15 8.0. DATALOGGER................................ 15 8.1. General ...................................... 15 8.2 Data Retrieval ............................ 16 8.3 Example: TD-1075.0 OCM “EVENTS.txt” ............................. 17 8.4 Example: TD-1075.0 OCM “ALLDATA.txt” ........................... 17 APPENDIX A INSTALLATION CHECKLIST ..................30 APPENDIX B CONFIGURATION RECORD...................32 APPENDIX C TD-1075.0 OCM CONTROL FUNCTIONS .33 APPENDIX D: TD-1075.0 OCM SOFTWARE FUNCTIONS .......................34 APPENDIX E: TD-1075.0 OCM SCREEN FLOW CHARTS .......................35 APPENDIX F SYSTEM VALUES ...................................46 APPENDIX G: TD-1075.0 OCM TROUBLESHOOTING WORKSHEET .....48 APPENDIX H FUSE SPARES AND REPLACEMENT ...50 APPENDIX I: CONNECTIONS FOR FLUSH VALVE ACTUATOR ...................51 APPENDIX J SAMPLE CELL MAINTENANCE .............53 APPENDIX K: GENERAL ARRANGEMENT DRAWINGS ................56 APPENDIX L CALIBRATION CERTIFICATION ............64 4 TD-1075.0 Oil Content Monitor Operation Manual the activation of discharge control devices to divert bilge water discharge in the event oil content exceeds 5 ppm. The TD-1075.0 OCM also permits process monitoring through system-function relays, oil content relays, and analog sample concentration outputs. Compared with oil content detection technologies that utilize turbidity or light scatter techniques, the TD-1075.0 OCM offers: 1.0 INTRODUCTION This operations manual is applicable to instruments with serial numbers of 2000001F and greater. If you require an operations manual for an instrument with an earlier serial number, please contact NAG Marine for assistance. • • 1.1 General Resistance to high oil content readings resulting from suspended non-oil particles. Selectively tuned optics to minimize chemical interferences. 1.2 Symbols This manual contains instructions for the installation, operation and maintenance of the TD-1075.0 OCM. For information regarding the installation, operation and maintenance of associated equipment supplied by NAG Marine, refer to the separate manual supplied with those products. The following symbols are used to call attention to specific types of information. A warning to use caution! In some instances, personal injury or damage to the TD-1075.0 OCM may result if these instructions are not followed properly. Improper installation, use, application or unauthorized servicing of this equipment voids all warranties. An explanation or information of interest. If the manual instructs the user to press a key on the instrument, the designated key will be CAPITALIZED in boldface type enclosed by < >. The TD-1075.0 must be installed, operated, and maintained according to this manual to remain in compliance with DNV TAP NO. 771.61 regulations. Operation of the TD-1075.0 OCM in a manner other than described here may be documented by the instrument and may result in the invalidation of the DNV TAP NO. 771.61 Certification. Failure to adhere to the directions and recommendations exactly as presented in this manual may result in oil discharges violating DNV TAP NO. 771.61 regulations. Display screen names will be in boldface type and in ALL CAPITALS. References to appendixes, tables and figures will be in boldface type and in italics. 2.0 THEORY OF OPERATION The TD-1075.0 OCM measures the oil content of post oily water separator (OWS) effluent via fluorescence. Fluorescence occurs when a molecule—in this case a hydrocarbon molecule—relaxes to its ground state after being electronically excited. Fluorescent hydrocarbons absorb The TD-1075.0 Oil Content Monitor (OCM) is a DNV TAP NO. 771.61 certified 5 ppm Bilge Alarm. Its primary function is to monitor bilge water oil content and facilitate 5 TD-1075.0 Oil Content Monitor Operation Manual transmitted to the light detector. The emission filter is selected to maximize transmission of light emitted by the targeted oil while meeting DNV TAP NO. 771.61 performance criteria. light—excite— at one wavelength and emit light—relax— at a longer (less energetic) wavelength. The emitted light is filtered and translated to a voltage response which corresponds to the concentration of fluorescent hydrocarbons in the sample. The TD-1075.0 OCM contains five important components that it uses to make the fluorescence measurement: 1. 2. 3. 4. 5. 2.5 Light Detector The light detector produces a pulse of electricity when it detects a photon that has passed through the emission filter. The TD1075.0 OCM counts these pulses and relates that value to the stored calibration value to determine the oil content of the water passing through the sample cell. Light Source Excitation Filter Sample Cell Emission Filter Light Detector 2.1 Light Source 2.6 Control Functions 5.0 The TD-107 OCM light source emits photons over a specific wavelength range. The light source wavelength range has been selected to maximize the response of the targeted oil and meet the DNV TAP NO. 771.61 mandated detection range while minimizing the impact of chemical interferences and sample turbidity. The light source also has an internal power output monitor to determine light output independent of the fluorescence measurement. The TD-1075.0 is a microprocessor-based instrument designed to measure the oil content in the sample, display the current oil content, and report the value to the Datalogger. The digital display shows the oil content (0.000–999 ppm), any internal alarm notification, process water temp and the cell condition %. Additional information is displayed or changed by pressing various keys on the instrument keypad. Additional diagnostic information is also recorded in the Datalogger. The TD-1075.0 OCM provides the following control functions: 1. Activates the High (5 ppm) Signal Alarm upon the concentration reaching 5.0 ppm. 2. Activates the Early Warning upon the concentration reaching 3.0 ppm (the default value) or any user defined set point between 1.0 and 3.0. 3. Activates the Zero Signal Alarm when the concentration is measured at approximately 0.0 ppm. 4. Activates a System Alarm when there is an OCM failure. 5. Activates High Signal Alarm, Early Warning, Zero Signal Alarm, and System Alarm Relays when the TD1075.0 OCM is put into the MAINTENANCE MODE. 6. Activates the Cell Condition Alarm when below the minimum voltage limit for light transmitted through the sample cell. In addition to the Cell Condition Alarm, a System alarm will also be activated in this case. 2.2 Excitation Filter The excitation filter narrows the range of wavelengths emitted by the light source. The excitation filter is also selected to maximize the response of the targeted oil and meet the DNV TAP NO. 771.61 mandated detection range while minimizing the impact of chemical interferences and sample turbidity. 2.3 Sample Cell The sample cell is the portion of the sample block where the water sample is exposed to the light transmitted by the excitation filter. 2.4 Emission Filter The light emitted by the sample passes through an emission filter, which narrows the range of wavelengths once again. This ensures only the desired wavelengths— those emitted by the targeted oil— are 6 TD-1075.0 Oil Content Monitor Operation Manual 3.0 SPECIFICATIONS Range: NAG Marine Part Number: NAG2541 Physical Specifications 17.375 in. W x 7.1875 in. D Dimensions x 15.0625 in. H [442.1 mm (overall): W x 182.4 mm D x 383 mm H] Dimensions 9 in W x 12.25 in H (enclosure 228.6 mm W x 311.2 mm H] only): Weight: 12 lbs. [5.4 kg] Enclosure FRP & Stainless Steel Standards: NEM 4 Inlet Valve Pipe Size: 0.25 in. [6.35 mm] FNPT Outlet Pipe Size: 0.25 in. [6.35 mm] compression tube fitting Oil Types Measured: Oil Measurement Range: Accuracy oil + solids: 4.0 INSTALLATION 4.1 Pre-Installation/Installation Do not break the provided tamper evident DNV certification seal for any reason. Breaking such seals will invalidate the DNV certification of the monitor. Electrical Specifications Power: 20-240 VAC/VDC, 50/60 Hz, 15 watts Alarm Relays (5 total): Dry contact, 240 VAC or 28 VDC, 6 A maximum, Normally Open/Normally Closed connections System Status Inputs (2 total): Continuity or 3–28 VDC, 10 mA minimum, 100 mA maximum Signal Output (1 total): Internally powered, 4–20 mA (isolated) Data Retrieval: One internal USB port. The Pre-Installation/Installation Checklist found in Appendix A provides important guidelines and information to aid in preparing for installation. 4.2 Required Tools & Accessories • • • Operating Limits Sample Pressure: 100 psig [689.5 kPa(g)] maximum Sample Temperature: 140 °F [60 °C] maximum Standard plumbing and electrical tools are required for installation. NAG Marine recommends that stainless steel flexible tubing be used on the inlet and outlet connections. This will facilitate future maintenance and prevent damage to the monitor from to transmitted vibration and/or pipe strain. DNV Certified OWS system including diverter valve. 4.3 Location & Sampling Point The sampling point should be located such that the sample is homogeneous and free of all air. It should also approximate the bulk oil concentrations of the treated bilge water. Operating Limits Ambient Temperature: Relative Humidity As per DNV TAP No. 771.61 requirements. Scaled 0–15 ppm, as per DNV TAP No. 771.61 requirements. As per DNV TAP No. 771.61 requirements. It is extremely important to eliminate air entrapment in the sample line. The best way to accomplish this is to sample from the 40–120 °F [4–49 °C] 0–100 % 7 TD-1075.0 Oil Content Monitor Operation Manual this is not feasible, contact NAG Marine for assistance. center of the pipe or from the side of the pipe. Mounting the unit at eye level is recommended. The unit should not be installed: • • Adjacent to known heat sources or in direct sunlight; this could cause the internal temperature of the unit to be significantly higher than ambient temperature and produce errors or damage the components. Within 10 feet [3.05 m] of devices such as large generators or transformers, which generate a strong electromagnetic field—cooling water recirculating pumps are not a problem. 4.4.1 • • • • • Flow Rates and Tubing Sample Flow Rates: 0.13 U.S. gal/min [0.5 L/min] minimum U.S. gal/min (3.78L/min) maximum Sample Pressure: Less than [689.5 kPa(g)] 100 psig Greater than 1 psig Recommended Maximum Sample Tubing Dimensions: Diameter: 0.25 in. [6.35 mm] Length: 25 ft [7.62 m] The maximum environment temperature is specified at 120 °F [49 °C]. Higher flow rates may require more frequent cleaning of the sample cell. 4.4 Mechanical Connections 4.4.2 Refer to the General Arrangement Drawings for the location of the required mechanical connections. The TD-1075.0 OCM must be mounted to a vertical surface with the mounting tabs. The mounting tabs accept a maximum 0.375 in. [9.53 mm] diameter bolt. • • • Drain/Outlet Sample outlet from the TD-1075.0 OCM should be piped to either an atmospheric drain with no back pressure or a pressurized system. Atmospheric drains must have the drain pipes terminate below the unit. Pressurized system discharge must create sufficient pressure drops to create flow through the instrument. Do not combine the discharge from other devices to the TD1075.0 OCM discharge. Two 0.25 in. [6.35 mm] connections are provided for pipe hook-up. Sample inlet line: 0.25 in. [6.35 mm] FNPT Sample outlet line: 0.25 in. [6.35 mm] compression tube fitting Optional vent connection: 0.25 in. [6.35 mm] compression tube fitting In installations where this is not feasible, contact NAG Marine for assistance. The outlet plumbing connections MUST NOT place stress on the 0.25 in. [6.35 mm] tube drain connection point. Damage to the instrument may occur if plumbed incorrectly. 4.5 Power and Input/Output Signal Requirements Pipe rises greater than 10 ft [3.05 m] should be avoided. In installations where Required Power: 20-240 VAC, 50/60 Hz, 15 W or 20-240 VDC. Power must be connected to the monitor at all times. 4.5.1 8 Power TD-1075.0 Oil Content Monitor Operation Manual 4.5.2 4.5.5 Input Signals The TD-1075.0 OCM requires two input signals for operation. They are the Oily Water Separator (OWS) Status signal and the Flow Status signal. These signals communicate to the TD-1075.0 OCM that there is an operational OWS connected and the status of its function. The following input signal is required for both the Separator Status and Flow Status signals. The USB port is located internally on the Datalogger PCB. It must remain accessible for data retrieval. 4.6 Electrical Connections Only trained personnel should make electrical connections. • Input Required: Continuity or a 3–28 VDC, min 10 mA, max 100 mA signal. Refer to the General Arrangement Drawings for the input and output terminal locations required for the power, alarm outputs, process status inputs, and 4–20 mA connections. If the Separator Status input signal is not present, the monitor will send an alarm signal to close the overboard discharge valve. This alarm signal functions in the same manner as the High (5 ppm) Alarm signal. 4.5.3 USB Do not break the provided tamper evident DNV certification seals for any reason. Breaking such seals will invalidate the DNV certification of the monitor. Output Signal Relays There are five output signal relays providing information on the sample and the system status of the TD-1075.0 OCM. They are as follows: High (5 ppm) Signal Alarm, Early Warning, Zero Signal Alarm, System Alarm and Cell Condition Alarm. The relay specifications are: The 4–20 mA output is internally powered and internally shielded. DO NOT connect customer end of shield to ground. • To connect a wire to the pre-wired cabling: • 4.6.1. Making Wiring Connections Relay Type: Normally Open (NO)/Normally Closed(NC) dry contact Relay contact rating: 240 VAC or 28 VDC, 6 A. 1. Turn off main power to the instrument at the breaker. 2. Verify all process inputs and switched outputs are off. 3. Terminate the wire cabling as mandated by shipboard requirements in junction boxes. The High (5 ppm) Signal Alarm relay output must be connected to the vessel’s diverter valve (or to the system that controls the valve) in order for it to actuate the valve. If the High (5 ppm) Signal Alarm relay is not properly connected, the instrument will still indicate an alarm condition but overboard discharge will not cease. 4.5.4 4.6.2 Disconnecting Wiring Connections To disconnect a wire from the pre-wired cabling: 1. Turn off main power to the instrument at the breaker. 2. Verify all process inputs and switched outputs are off. 3. Access the junction box to disconnect the wire. Signal Output One internally-powered 4–20 mA signal (isolated) providing a 0.0–30.0 ppm measurement range. 9 TD-1075.0 Oil Content Monitor Operation Manual Sample HOME Screen: Signal wires and power wiring should not be run in the same conduit. Failure to separate or shield these wires can result in electrical interference. 3.5 PPM TD-1075.0 5.0. START-UP / SHUT-DOWN 5.1 Start-Up Materials The TD-1075.0 OCM (P/N NAG2541) includes the following components: • • • If the screen appears blank or dark, try adjusting the screen contrast using the UP <> and DOWN <> arrows. TD107™ OCM Instrument Assembly Accessory Kit: P/N NAG2502 Operation Manual: P/N NAG2544 The user must return to the HOME screen (by pressing either <HOME> or <ESC>) after verifying each value. Jumping between screens without returning to the HOME screen is not permitted. Components and materials supplied by the user: • • DNV Certified Oily Water Separator with Diverter Valve Deionized (DI) or distilled water 3. During start-up, verify the following settings: 3a. High Signal Alarm Concentration • Press <1> to verify the factory programmed value of 5.0 ppm. 3b. Early Warning • Press <2> to verify the programmed value. This value may be user set. 3c. Zero Signal Alarm • Press <3> to verify the factory programmed value of 0.0 ppm. 3d. 4 mA Output • Press <4> to verify the factory programmed value of 0.0 ppm. 3e. 20 mA Output • Press <6> to verify the factory programmed value of 30.0 ppm. This value may be user set to adjust for existing equipment. If necessary, please contact your NAG Marine representative or contact NAG Marine at +1 757 852 3998 for additional information. 5.2 Start-Up Procedure Diagrams of the screens are located in Appendix E. Perform the following steps to start the TD1075.0 OCM: 1. Bring sample flow to and from the TD1075.0 OCM; check for leaks in plumbing. 2. Power on the TD-1075.0 OCM by enabling the AC or DC power circuit wired to the instrument power terminations. (see the General Arrangement Drawings). a. When power is first turned on, an identification screen will appear for a few seconds, showing the software version and date. After 10 seconds, the HOME screen will appear. The HOME screen will display the oil content. The User ID will intentionally not allow access to features of the monitor which would compromise its application performance or data storage. 10 TD-1075.0 Oil Content Monitor Operation Manual 5.3 Start-Up Sample Cell Maintenance and Cleaning 5.3.2.1 Sample Cell Cleaning with Detergent Proper maintenance and cleaning of the TD-1075.0 sample cell is a key component of consistent oil content monitoring. Significant build-up of residue, iron oxide, or other foreign material on the inner sample cell wall can significantly affect the detection of the fluorescent properties of the oil. Consistently following these simple cleaning and maintenance procedures will ensure accurate and reliable operation from the monitor. 1. Close the TD-107 inlet valve handle. MAINT MODE will be displayed on the left side of the LCD. 2. Fill the supplied syringe that has been labeled “Cleaning Solution” with 60 mL of the provided cleaning solution (NAG Part Number 2522). 5.3.1 If the recommended cleaning solution is not available, substitute mild detergent diluted with 50% fresh water. Pre-OWS Operation Check Prior to starting the OWS, perform the following steps: 1. Inject the cleaning fluid into the sample cell via the Luer-Lok® fitting. 2. Unscrew the clean-out port fitting cap (located at the top of the sample block). 3. Insert the provided sample cell brush (NAG Part Number 2506) and aggressively scrub the inner wall of the sample cell for approximately one (1) minute. 1. Close the TD-107 inlet valve handle. MAINT MODE will be displayed on the left side of the LCD. 2. Use the supplied syringe that has been labeled “Distilled Water” to inject 60 mL of fresh clean water into the sample cell via the Luer-Lok® fitting 3. On the LCD, you will see the ppm value and Cell Condition Percentage displayed on the right side. 4. Allow the ppm value to stabilize between 0–5 ppm in fresh clean water. 5. Allow the Cell Condition Percentage to stabilize between 70–100% in fresh clean water. 6. If the ppm value has stabilized between 0–5 ppm AND the Cell Condition Percentage has stabilized between 70– 100 %, the unit is ready for operation. If not, perform the cleaning steps outlined in Section 5.3.2. 7. Open the TD-107 inlet valve. Ensure MAINT MODE is no longer displayed on the LCD. The instrument is now ready to begin OWS operations. 5.3.2 Use of a flow cell brush other than part number NAG2506 could potentially scratch the inner wall of the sample cell and cause the OCM to malfunction. 4. Remove the brush and screw the cap back onto the top of the clean-out port fitting. Hand-tighten + ¼ turn to secure the clean-out port fitting cap. Do not overtighten or use pliers or wrenches on the cap. 5. Use the provided syringe labeled “Distilled Water” to inject 120 mL (two syringes full) of clean fresh water into the sample cell. 6. Allow the ppm value and the Cell Condition Percentage to stabilize. 7. If the ppm value has stabilized between 0–5 ppm AND the Cell Condition percentage has stabilized between 70– 100 %, the instrument is ready for operation. Sample Cell Cleaning If the ‘ppm value’ OR the ‘Cell Condition Percentage’ is out of starting parameters, the sample cell requires chemical and mechanical cleaning prior to operation 11 TD-1075.0 Oil Content Monitor Operation Manual 8. If the ppm value has stabilized between 0–5 ppm AND the Cell Condition percentage has stabilized between 70– 100 %, the instrument is ready for operation. 9. Open the TD-107 inlet valve. Ensure MAINT MODE is no longer displayed on the LCD. The instrument is now ready to begin OWS operations. 10. If the ppm value OR Cell Condition Percentage is still out of starting parameters, repeat the acid cleaning procedure. 8. Open the TD-107 inlet valve. Ensure MAINT MODE is no longer displayed on the LCD. The instrument is now ready to begin OWS operations. 9. If the ppm value OR Cell Condition Percentage is still out of starting parameters, repeat the detergent cleaning procedure. 10. If starting parameters are still not attained after two detergent cleanings, proceed to Section 5.3.2.2 and perform cleaning with acid. 5.3.2.2 Sample Cell Cleaning with Acid 5.4 Shut-Down Sample Cell Maintenance and Cleaning 1. Close the TD-107 inlet valve handle. MAINT MODE will be displayed on the left side of the LCD. 2. Unscrew the clean-out port fitting cap (located at the top of the sample block). 3. Dip the provided sample cell cleaning brush (NAG Part Number 2506) in 6N Hydrochloric Acid. If 6N HCL is unavailable, muriatic acid or citric acid is an acceptable substitute. 4. ®Insert the brush into the clean-out port and aggressively scrub the inner wall of the sample cell for approximately one (1) minute. After Completing OWS operations: It is important to fill the TD-107 Sample Cell with fresh clean water at the end of every OWS operation. A cell which is left filled with either dry air or dirty sample water can permanently foul the sample cell. Repeated failure to fill the sample cell with clean water at the end of OWS operations could result in a permanently fouled cell and inaccurate OCM readings. 1. Close the TD-107 inlet valve handle. MAINT MODE will be displayed on the left side of the LCD. 2. Use the supplied syringe that has been labeled “Distilled Water” to inject 60 mL of fresh clean water into the sample cell via the Luer-Lok® fitting. 3. Leave the TD-107 inlet valve handle closed while the OWS is secured. Use of a sample cell brush other than part number NAG2506 could potentially scratch the inner wall of the sample cell and cause the OCM to malfunction. 5. Remove the brush and screw the cap back onto the top of the clean-out port fitting. 6.0 CALIBRATION CHECK 6.1 Calibration Check Procedure Hand-tighten + ¼ turn to secure the clean-out port fitting cap. Do not overtighten or use pliers or wrenches on the cap. Refer to Appendix K: General Arrangement Drawings for locations of items. A diagram of display screens is located in Appendix E. 6. Use the provided syringe labeled “Distilled Water” to inject 120 mL (two syringes full) of clean fresh water into the sample cell. 7. Allow the ppm value and the Cell Condition Percentage to stabilize. Perform the following steps to check the fluorescence calibration: 1. Close the inlet valve. The instrument will now be in Maintenance Mode. A 12 TD-1075.0 Oil Content Monitor Operation Manual 7.0 TD-1075.0 OCM SOFTWARE FUNCTIONS Maintenance event will be recorded by the Datalogger. Confirm discharge/outlet piping is not pressurized. 2. Clean the unit by injecting 60 mL of cleaning solution into the sample cell with one of the provided 60 mL syringes. The syringe screws onto the Luer-Lok® connector on the inlet valve. Inject the cleaning solution at a slow, steady rate into the sample cell. Allow the cleaning solution to remain in the sample cell for three to five minutes. Then, using a clean 60 mL syringe, flush sample cell thoroughly with 120 mL of DI water. The TD-1075.0 OCM has menu driven software that simplifies the user interface. The following descriptions of the user interface functions will help provide a better understanding of the interface. See Appendix E for a visual depiction of the listed functions. 7.1 Screens A series of computerized screens built into the unit are accessed using the keypad and shown on the LCD. A syringe is provided in the TD1075.0 OCM Accessory Kit (P/N NAG2502). 7.1.1 HOME Screen The HOME screen is displayed continuously during normal operation. The current oil concentration reading (in ppm) is obtained from this screen. The presence of an alarm is also indicated on the HOME screen by ‘ALM’ flashing in the upper lefthand corner. Other screens are accessed from the HOME screen by pressing various keys on the keypad. 3. Using the same DI water syringe, inject another 60 mL of DI water into the sample cell and allow it to remain in the sample cell by leaving the syringe attached. Note the HOME screen reading for the clean water. Variations of ± 2 ppm are allowed. 4. Using another clean syringe, flush the sample cell with 60 mL of check solution. Then, inject another 60 mL of check solution and allow it to remain in the sample cell by leaving the syringe attached. NOTE: The HOME screen reading for the 30 ± 5 ppm check solution. It should be within ± 2 ppm of the value on the bottle. If not, clean the sample cell and repeat steps 1 through 4. 5. Remove the syringe. Open the inlet valve to allow normal operation of the instrument. The instrument will no longer be in Maintenance Mode. Bubbles trapped during injection are a possible source of instrument error. With the syringe in a vertical position, tap against a solid object to move bubbles to the needle end of the syringe. Then, force bubbles out by pushing a small amount of solution through the needle end of the syringe. 7.1.2 Warning Screens There are warning screens throughout the software, which inform of invalid entries (for values or ID). 7.1.3 Alarms When an alarm occurs, "ALM" blinks in the upper left-hand corner of the HOME screen. The nature of the alarm can be determined by pressing <ESC> from the HOME screen. The alarm history can be viewed from the HOME screen by pressing <>. 7.1.4 Parameter Screens These screens are accessed by the various numerical keys. Most of these screens are view-only and require a service ID to change the values. 7.1.5 Diagnostics Screens These screens are accessed by the <DIAG> key. They provide current status of 13 TD-1075.0 Oil Content Monitor Operation Manual different measurements taken by the OCM sensors. 7.2.4 Escape Key <ESC> The <ESC> key is used from the HOME screen to view the current alarms. <ESC> is also used to return to a previous screen or to exit a parameter change screen after the parameter has been changed. 7.1.6 Cell Condition and Zero Drift Correction The cell condition and zero drift correction is electronic and self-correcting. 7.2 Keypad Functions 7.2.1 Left Arrow The left arrow is used to correct typing errors when data is being entered or changed (as a backspace or delete key). It is also used from the HOME screen to view the alarm history and to move backwards through the diagnostics screens. 7.2.5 Home Key <HOME> The <HOME> key will return the user to the home screen from any of the various parameter screens. 7.2.2 7.2.6 Up & Down Arrows Numbers 0 through 9 each access a different parameter screen if pressed from the HOME screen. The number keys are also used to enter values into the OCM. From HOME screen, these arrows can be used to adjust the LCD contrast. 7.2.3 Numerical Keys Enter Key <ENT> The <ENT> key is used to accept values, access parameter change screens, access the CAL DATA screen and move forward through the diagnostics screens. 14 TD-1075.0 Oil Content Monitor Operation Manual 7.2.7 minutes elapse with no record of a key pressed, the detection system will turn off and the LCD will display a STANDBY message. From the STANDBY screen, the press of any key will restart the detection system and the 10 minute delay clock. From there, the 10 minute delay is restarted after each press of a key. If while the TD-1075.0 is in standby the OWS is started, the detection system will turn on and oil in water measurements will resume <> Key This key initiates the Zero Adjust function of the TD-1075.0 OCM. 7.2.8 <> Key This key is used to reset the alarm history. 7.3.2 7.2.9 The 30 minute delay is operational only when the inlet valve handle is closed (MAINTENANCE MODE). The movement of the handle from open to closed is the trigger to start the 30 minute countdown. If no keys are pressed for 30 minutes after the valve is closed, the detection system will turn off and the LCD will display a STANDBY message. From minute 30 to minute 11 in the countdown, pressing a key will do nothing to reset the countdown timer. With less than 10 minutes remaining in the countdown, any key pressed will restart the countdown timer at 10 minutes. The only mechanism available to restart the 30 minute delay clock is to open and then close the instrument inlet valve. If the instrument is experiencing a SEPARATOR alarm and already in the 10 minute countdown window, moving the inlet valve handle to close will still initiate the 30 minute countdown. <> Key Displays the current GMT time and date as maintained by the OCM. All timestamps in data files will come from this clock value. 7.2.10 Diagnostics Key <DIAG> This key allows access to the diagnostics screens. Use <ENT> and <> to navigate the screens. 8.0. DATALOGGER 7.3 Standby Mode 8.1. General The TD-1075.0 is equipped with a standby mode to preserve the operating lifetime of the detection system. There are two preset standby delay times; 10 minutes and 30 minutes. 7.3.1 30 Minute Delay The Datalogger maintains alarm events and concentration readings for a minimum of 18 months. Although the data can be retrieved at any time, data cannot be deleted or edited from the memory of the TD-1075.0 OCM. Data are retrieved by inserting a USB data key into the USB data port. The “EVENTS.txt” and “ALLDATA.txt” files which are transferred to the USB data key can then be reviewed via computer. Data exceeding the large storage capacity (more 10 Minute Delay The 10 minute delay is operational in the normal instrument operating mode. The trigger for the initiation of the 10 minute delay countdown is the SEPARATOR alarm. If after the alarm is triggered 10 15 TD-1075.0 Oil Content Monitor Operation Manual writing progresses. This process may take longer than Step 4 due to the larger file size. 4. When the LED is not illuminated the USB key can be safely removed. 5. Shut and secure the enclosure door after retrieving data. than 18 months) will be overwritten on a first in-first overwrite basis. All dates and times are set to Greenwich Mean Time (GMT) and cannot be changed. The following alarms and indications are possible logged events within the Datalogger: • POWER ON: Indicates that the power has been turned on. • FLOW: Indicates whether or not bilge water is flowing to the monitor. • SEPARATOR: Indicates whether or not the separator is operating. • HIGH (5 ppm) SIGNAL ALARM: Indicates that the oil content is 5.0 ppm or higher. • EARLY WARNING: Indicates that the oil content is higher than the set point stored in the instrument. • ZERO SIGNAL ALARM: Indicates that the oil content reads 0.0 ppm. • CELL CONDITION: Indicates the sample cell requires cleaning. • MAINTENANCE MODE: Indicates that the monitor is being maintained (or that the inlet valve is closed). Note that all alarm relays are in alarm state while in MAINTENANCE MODE. The data files are text files that can be imported into a computer. The EVENTS.txt file only writes when there is a change of alarm states. It includes the time and date upon which alarm event occurred in addition to the concentration measurement at that time. The ALLDATA.txt file writes every 10 seconds with all alarm events and concentration measurements. Failure to shut the enclosure door properly can result in corrosion of the internal electronics. The “EVENTS.txt” data file is written first, followed by the “ALLDATA.txt” data file. A 512 MB minimum size data key for file retrieval is recommended. Any existing Datalogger (EVENTS.txt or ALLDATA.txt) files on the USB data key will be overwritten during the data retrieval process. Electronic files generated by other programs will not be erased from the USB data key or overwritten during the data retrieval. 8.2 Data Retrieval Perform the following steps to retrieve data from the Datalogger: 1. Close the inlet valve. This will log a MAINTENANCE MODE event. 2. Open the enclosure door and insert a USB data key into the USB data port.“EVENTS DOWNLOAD“ will flash on the LCD to indicate that the “EVENTS.txt” file is being written to the USB key. A row of ‘’ will appear across the bottom of the LCD as the file writing progresses. This process may take some time if the file to be written is large. 3. “ALLDATA DOWNLOAD“ will flash on the LCD to indicate that the “ALLDATA.txt” file is being written to the USB key. A row of ‘’ will appear across the bottom of the LCD as the file 16 TD-1075.0 Oil Content Monitor Operation Manual 8.3 Example: TD-1075.0 OCM “EVENTS.txt” 8.4 Example: TD-1075.0 OCM “ALLDATA.txt” Turner Designs Hydrocarbon Instruments: Datalogger Software Part Number and Revision: 103054 REV. C Build Date: 20100120 USB Interface Ver 03.68VDPSF TD-107 5.0 Firmware 104754 REV A Build Date: 20130502 SN# 1000000 Last Power-Up: 17:19:27 05/08/13 LastCal:01/01/07, CalSlope:0.1080, CalInt:0.0000 HiConc:10.800PPM, LoConc:0.000PPM, HiSTD:100.000, LoSTD:0.000 HiSTD_REF:0.000V, HiSTD_FL:0.000V, LoSTD_REF:0.000V, LoSTD_FL:0.000V CalTemp:24.0C, CellCalTempco:0.643%/C TD-107 5.0 OnTime:00000 Hrs, LED OnTime:00000 Hrs, H20TempMAX:0.1C Hi Set: 5.0ppm, Early Set: 3.0ppm, Zero Set: 0.0ppm Turner Designs Hydrocarbon Instruments: Datalogger Software Part Number and Revision: 103054 REV. C Build Date: 20100120 USB Interface Ver 03.68VDPSF TD-107 5.0 Firmware 104754 REV A Build Date: 20130502 SN# 1000000 Last Power-Up: 17:19:27 05/08/13 LastCal:01/01/07, CalSlope:0.1080, CalInt:0.0000 HiConc:10.800PPM, LoConc:0.000PPM, HiSTD:100.000, LoSTD:0.000 HiSTD_REF:0.000V, HiSTD_FL:0.000V, LoSTD_REF:0.000V, LoSTD_FL:0.000V CalTemp:24.0C, CellCalTempco:0.643%/C TD-107 5.0 OnTime:00000 Hrs, LED OnTime:00000 Hrs, H20TempMAX:0.1C Hi Set: 5.0ppm, Early Set: 3.0ppm, Zero Set: 0.0ppm Events Legend: Events Legend: P=PowerUp, F=Flow Alarm, S=Separator Alarm, M=Maintenance Mode, P=PowerUp, F=Flow Alarm, S=Separator Alarm, M=Maintenance Mode, I=Instrument Failure, H=High Alarm, Z=Zero Alarm, I=Instrument Failure, H=High Alarm, Z=Zero Alarm, E=Early Warning Alarm, C=Cell Fouling Alarm E=Early Warning Alarm, C=Cell Fouling Alarm 04/24/2013 15:01:03 P M 04/24/2013 15:01:14 04/24/2013 16:56:37 P M 04/24/2013 16:57:16 04/30/2013 17:15:58 P M 04/30/2013 17:16:14 M 04/30/2013 17:16:24 04/30/2013 17:25:24 M 09/18/2010 23:49:42 04/30/2013 17:42:35 P M 04/30/2013 17:43:16 M 04/30/2013 17:52:02 04/30/2013 18:05:02 P M 04/30/2013 18:05:15 04/30/2013 18:05:25 M 04/30/2013 18:06:05 04/24/2013 15:01:03 P M 04/24/2013 15:01:14 04/24/2013 15:01:24 04/24/2013 15:01:34 04/24/2013 15:01:44 04/24/2013 15:01:54 04/24/2013 15:02:04 04/24/2013 15:02:14 04/24/2013 15:02:24 04/24/2013 15:02:34 04/24/2013 15:02:44 04/24/2013 15:02:54 04/24/2013 15:03:04 04/24/2013 15:03:14 04/24/2013 15:03:24 04/24/2013 15:03:34 04/24/2013 15:03:44 1.580 1.560 0.044 0.047 0.023 0.037 0.038 0.033 5.540 0.004 0.004 0.004 0.003 0.006 0.004 0.003 17 1.580 1.560 1.560 1.560 1.550 1.550 1.550 1.540 1.530 1.540 1.540 1.530 1.520 1.520 1.530 1.520 1.540 TD-1075.0 Oil Content Monitor Operation Manual 9.2 Preventative Maintenance 9.0. TD-1075.0 OCM MAINTENANCE Preventative maintenance should be performed to ensure optimum monitor operation and maximum life. The two maintenance actions that the user can perform are Sample Cell Cleaning and Desiccant Plug Replacement. Do not break the provided tamper evident DNV certification seals for any reason. Breaking such seals will invalidate the DNV certification of the monitor. 9.2.1 Desiccant Plug The TD-1075.0 OCM has been assembled with a new desiccant plug to ensure the area surrounding the sample cell is free of any moisture. As the desiccant absorbs moisture, it will change from a light blue to a light pink at the saturation point. The desiccant should be promptly replaced upon turning pink or annually (from the date of installation) if no color change is noted. Refer to 9.3. Replacement Parts for the replacement desiccant plugs part number. When performing maintenance, always move the inlet valve to the maintenance position. Improper installation, use, application or unauthorized servicing of this equipment voids all warranties. Proper maintenance and cleaning of the TD-107 sample cell is a key component of consistent oil content monitoring. Significant build-up of residue, iron oxide, or other foreign material on the inner quartz tube can materially affect the measurement of the fluorescent properties of the oil. Consistently following these simple cleaning and maintenance procedures will ensure accurate and reliable operation from the monitor. Failure to regularly replace the desiccant plug can result in incorrect operation and measurement. 9.2.1.1 Desiccant Plug Replacement For replacement of the desiccant plug, perform the following steps; refer to the General Arrangement Drawings: 1. Move the inlet valve to the maintenance position. 2. Unscrew the existing desiccant plug. 3. Remove the new desiccant plug from its packaging. 4. Install the new desiccant plug by handtightening onto the monitor. 5. Move the inlet valve to the flow position. 9.1 Battery Back-Up TD-1075.0 OCM System Values are retained in battery back-up memories for up to five years. However, the Start-Up procedure should be followed to ensure oil content monitor calibration and control settings are correct if the unit has been disconnected for any length of time. The battery is not userserviceable. The back-up battery should be replaced during re-calibration of the TD1075.0 OCM by a factory-authorized dealer. 9.2.2 Cleaning the Sample Cell Sample cell cleaning frequency is dependent on the quality of the water sample being monitored. The sample cell is unlikely to clog, but over time residue can build up on the inside of the quartz cuvette, especially where oily water is involved. A fouled or discolored sample cell can result in low or erratic readings. Sample cell cleaning steps are outlined in Section 5.3.2. The Datalogger data are retained in battery back-up memories for up to seven years. The battery is not user-serviceable. The back-up battery should be replaced during re-calibration of the TD-1075.0 OCM by a factory-authorized dealer. 18 TD-1075.0 Oil Content Monitor Operation Manual Be sure to move the inlet valve to the flow position after completing the cleaning. 9.2.3 Calibration Check The calibration should be checked using the provided Check Solution. If the Check Solution does not read within the allowed tolerance, clean the sample cell. If the calibration discrepancy persists, contact the factory-authorized dealer. The TD-1075.0 OCM must be re-calibrated on a periodic basis as indicated on the calibration certificate. Per DNV TAP No. 771.61 regulations, this calibration must be conducted by the factory-authorized dealer. Contact the factory-authorized dealer within the two months prior to the expiration of the calibration certificate to arrange recalibration. 9.3 Replacement Parts TD-1075.0 OCM replacement parts can be obtained from your NAG Marine representative or by calling NAG Marine at +1 757 852 3998. Common Replacement Parts: NAG2544 Operation Manual (Serial numbers 2000001F and higher) 5.0 NAG2502 TD-107 OCM Accessory Kit NAG2504 60 mL Syringe (Qty. 3) NAG2505 Desiccant Plugs (Qty. 3) NAG2506 Flow-cell Brushes (Qty. 3) NAG2508 0 ppm Check Solution Cap w/Luer-Lok® connector NAG2509 Check Solution Cap w/LuerLok® connector NAG2510 0 ppm Check Solution Carboy NAG2520 2 Year Spares Kit NAG2522 Cleaning Solution NAG2528 Cleaning Spares Kit NAG2529 Calibration Check Spares NAG2530 Clean Out Plug Replacement Fitting NAG2532 Check Solution 19 TD-1075.0 Oil Content Monitor Operation Manual causes what appears to be a failure in another part of the unit. For example, putting the TD-1075.0 OCM in Maintenance Mode will trigger a Maintenance Mode Advisory and a Flow Alarm since the inlet valve has been closed and water is not flowing through the instrument. 10.0 ALARMS and ADVISORIES The primary purpose of the TD-1075.0 OCM is to act as an alarm to oil content greater than 5 ppm. There are only two alarms required by the DNV TAP NO. 771.61 regulation; the High (5 ppm) Signal Alarm and the Zero Signal Alarm. Other alarms that are recorded by the Datalogger relate to system status. These alarms are the LED Failure, Cell Condition, Separator, Flow and High Temp alarms. While not mandatory, these system alarms provide valuable information and can help greatly in troubleshooting instrument problems and suspected measurement errors. The TD1075.0 OCM has two advisories as well. These are the Early Warning and Maintenance Mode advisories. Refer to Table 3 and 4 and Appendix F (Table 5) for alarm default values. 10.4 Alarm History The alarm history can be viewed, by pressing <> from the HOME screen. This shows which alarms have been activated since the alarm history screen was last cleared. To clear this screen, press <> five times while the alarm history screen is displayed; "No Alarm Since Last Reset" will be displayed. The alarm history does not store or display the alarms in the order in which they occurred. No internal alarms are monitored when the unit is turned OFF. During an alarm condition, the 4–20 mA will still send out the oil content concentration. 10.1 Alarm Delay To avoid unnecessary triggering of certain alarms, the condition must be in effect for a certain delay period (see Table 3). 10.2 Alarm Activation When an alarm is triggered, "ALM" will blink in the upper left-hand corner of the HOME screen. Pressing <ESC> will display the current alarm. Take the appropriate action to clear the condition (see Troubleshooting Section). When the condition triggering the alarm is cured, "ALM" will disappear from the HOME screen. Alarms cannot be aborted without curing the problem. 10.3 Multiple Alarms If multiple alarms are triggered, alarms will be listed on the alarm screen when <ESC> is pressed from the HOME screen. Alarms are not listed in the order they occur. Certain alarms will trigger other alarms because a failure in one part of the unit 20 TD-1075.0 Oil Content Monitor Operation Manual Table 3. Alarm Display / Delay Time Alarm/Advisory As Displayed on LCD Condition Delay time High (5 ppm) Signal HIGH OIL READING Oil Content > 5 ppm 0 sec Zero Signal LED Failure ZERO OIL READING LED FAILURE Oil Content = 0 ppm LED output too low 0 sec 10 sec High Water Temperature H2O TEMPERATURE Water Temp > 60 °C [140 °F] 10 sec Cell Condition CELL CONDITION Separator SEPARATOR Flow FLOW HAS STOPPED Flow through instrument has stopped 0 sec Early Warning EARLY WARNING Oil Content > Set point 0 sec Maintenance Mode MAINTENANCE MODE TD-107 in Maintenance Mode (inlet valve closed) Cell transmission voltage < xx mV OWS not in operation 10 sec 0 sec 5.0 0 sec 10.5.5 Cell Condition 10.5 Alarm / Advisory Definitions If the voltage from the light transmitted through the sample cell falls below the level deemed acceptable by the factory, CELL CONDITION will be displayed. This typically occurs because the sample cell is excessively dirty, a process condition exists that will no longer allow accurate measurements to be taken, or an electronics failure has occurred. 10.5.1 High (5 ppm) Signal If the measured oil in water concentration exceeds 5.0 ppm, HIGH OIL READING will be displayed. 10.5.2 Zero Signal If the measured oil in water concentration equals 0.0 ppm, ZERO OIL READING will be displayed. 10.5.6 Separator If the TD-1075.0 OCM is on and the OWS input signal is not satisfied, SEPARATOR will be displayed. This could indicate a problem with the OWS or a faulty separator input connection. 10.5.3 LED Failure If LED output power drops below the level deemed acceptable by the factory for 10 seconds, LED FAILURE will be displayed. 10.5.7 Flow 10.5.4 High Water Temperature If the input signal for sample flow is not satisfied, FLOW HAS STOPPED will be displayed. This could indicate a blockage in the sample line, a closed valve prior to the inlet or a faulty flow input connection. This alarm is also activated when the inlet valve is closed to put the instrument in Maintenance Mode. If the bilge sample temperature exceeds 60 ° C [140 °F] for 10 seconds, H2O TEMPERATURE will be displayed. 21 TD-1075.0 Oil Content Monitor Operation Manual 10.5.8 Early Warning The troubleshooting procedure works best in this sequence: 1. Handle any alarms first (see 10.0. Alarms and Advisories). 2. Determine whether or not System Values have been entered correctly (see recorded values in Appendix B, and the System Default Values in Appendix F, Table 5). 3. Perform the diagnostics procedure as described in the following section. 4. Determine whether or not the bilge water process is behaving as expected. Does the clean water read close to zero on the HOME screen and 30±5 ppm check solution read between 25 and 35 on the HOME screen? Check the CAL DATA screen (see Appendix E: Calibration Data Screen) to determine whether the last calibration seems correct. 5. Complete the Troubleshooting Worksheet (Appendix G). 6. Contact your NAG Marine representative or NAG Marine directly at +1 757 852 3998 (see Service Assistance/Returned Goods Section). If the measured oil in water concentration exceeds the Early Warning set point (default is 3.0 ppm), EARLY WARNING will be displayed. 10.5.9 Maintenance Mode If the inlet valve handle is moved to the closed position (handle horizontal), MAINTENANCE MODE will be displayed. This indicates maintenance is being performed on the instrument. 10.5.10 Cell Condition If the cell transmission voltage falls below the low level limit and remains there for 10 seconds, a CELL CONDITION alarm will be displayed. 11.0. TROUBLESHOOTING Because the TD-1075.0 OCM includes hardware, software, and chemical elements, it is important to collect all diagnostic data first. A troubleshooting worksheet is provided in Appendix G to facilitate data collection. After collecting all data on the worksheet, most problems can be solved over the phone. Refer to the Service Assistance Section for the appropriate telephone numbers. 11.1 Diagnostics The TD-1075.0 OCM contains diagnostic screens to aid in troubleshooting. They are accessed from the HOME screen by pressing <DIAG>, then <ENT> to page through the series of seven screens. Press the <> to return to a previous screen, or <ESC> or <HOME> to return to the HOME screen. See Appendix E for a flow chart to aid in navigating the diagnostic screens. This guide assumes that all problems associated with alarms have been resolved first. Something as simple as a clogged inlet line can lead to other alarm messages, which could all be solved at one time simply by clearing the obstruction. If there is no System Alarm, it is highly probable that the electronics of the instrument are functioning properly. In that case, it is likely that the problem is either mechanical, or has resulted from another system problem, or from the operator's unfamiliarity with the unit. 22 TD-1075.0 Oil Content Monitor Operation Manual 11.2 Display Screens Diagnostics SCREEN 3 is a display of the LED status. • LED: ON indicates normal operating. OFF indicates that the LED has failed or is in Power Save Mode. • Current LED output voltage is displayed to the right of the LCD. • Initial LED output voltage is displayed along the bottom of the LCD. 11.2.1 SCREEN 1 (Software Version) TD-1075.0 SW: 104754 Rev A 11.2.4 SCREEN 4 (FL Voltage) Diagnostics SCREEN 1 is a display of the current software version. 11.2.2 SCREEN 2 (RAW and FS %) RAW: FS%: FL: 0.076V GAIN: 100 0.05 0.071 Diagnostics SCREEN 4 is a display of the current fluorescence voltage being produced in the sample cell. 11.2.5 SCREEN 5 (REF and REFCAL) Diagnostics SCREEN 2 is a display of the RAW value and the % FS value. • RAW: The signal output from the unit's light detector. This is the output the TD1075.0 OCM uses (in conjunction with the Cal Solution Value and Offset) to arrive at the readout on the HOME screen. It can be used to diagnose problems with the unit. For example, if the HOME screen always reads zero, and the raw reading is also zero, there may be an optics problem. If the HOME screen reads zero but the RAW reading does not read zero, then check the Cal Solution Value to make sure the proper value is entered. • FS%: Acts like an analog meter. It indicates the raw signal output as a percentage of the maximum that can be read. REF: 1.062V REFCAL: 1.608V Diagnostics SCREEN 5 is a display of the REF and REFCAL voltage values. • REF: The current voltage measurement produced by the non-fluorescent light passing straight through the sample cell. • REFCAL: The REF value stored from the last instrument calibration. 11.2.6 SCREEN 6 (PPM and Cell Condition) 11.2.3 SCREEN 3 (LED) 10.0 PPM CELL: 100% LED: ON 00231 Hours 23 TD-1075.0 Oil Content Monitor Operation Manual Diagnostics SCREEN 6 is a display of the real time PPM value and the real time cell condition percentage as measured in the sample cell. will cause Relays 1–5 to go into alarm state and can be used for alarm circuit testing. Failure of the Datalogger to retain data may be due to the back-up battery being exhausted. This battery is replaced by a factory-authorized representative during re-calibration and cannot be replaced by the end-user. There are no user-changeable features other than described here. Changing features other than described here will violate the DNV certification. There are no user serviceable components within the Datalogger other than described here. 11.2.7 SCREEN 7 (Water Temp) H2O TEMP: 23.0C MAX TEMP: 37.8C Diagnostics SCREEN 7 is a display of the current sample water temperature and the maximum sample water temperature experienced by the instrument. • H2O TEMP: The temperature of the water currently p assing through the sample cell. • MAX TEMP: The maximum water temperature that has been recorded by the instrument. 11.4 Fuse Replacement Spare Fuses are located on each circuit board. The spares are labeled on the board. Only personnel familiar with electronics should change these fuses. Prior to changing ensure all power is secured to the unit. 11.5 Service Assistance 11.2.8 SCREEN 8 (High/Low Std) The experienced technical staff of NAG Marine is available to assist you in troubleshooting the TD-1075.0 OCM instrument. High Std: 3.753 Low Std: 0.054 NAG MARINE Telephone USA: +1 800 830 5186 E-mail: [email protected]. www.nagmarine.com Hours: 8:00 am - 5:00 pm Eastern Standard Time Diagnostics SCREEN 8 is a display of High and Low Standard values from the last instrument calibration. • • High Std.: The fluorescence value for the high calibration standard stored from the last instrument calibration. Low Std.: The fluorescence value for the low calibration standard stored from the last instrument calibration. Improper installation, use, application or unauthorized servicing of this equipment voids all warranties. For the ranges, and default values of these items, see Appendix E: Calibration Data Screen. 11.3 Datalogger Failure The Datalogger is set-up and configured by the factory. Moving the inlet valve to the maintenance position (valve closed) 24 TD-1075.0 Oil Content Monitor Operation Manual 11.6 Troubleshooting Guide [HANDLE ANY ALARMS FIRST] SYMPTOM HOME screen displays over/OVER (blinking from over to OVER). A blinking 'over/OVER' is a different symptom than a steady 'OVER' and indicates that the sample reading exceeds 999. This is most likely related to the System Values entered for the site. If, for example, a Cal Solution Value of 200 was erroneously entered, the unit's numerical calculation of the sample reading might exceed 999. (NOTE: Examine "Possible Cause"/"Solution" in the numbered order.) HOME screen displays OVER (not blinking from over to OVER). A steady 'OVER' is a different symptom than a blinking 'over/OVER' and indicates that the sample reading is too high for the unit's light detector. This is related to the chemistry of the sample and displays that the sample readings are too high for the unit at the current sensitivity level. (NOTE: Examine the "Possible Cause"/"Solution" in the numbered order.) HOME screen displays minus sign (negative readings), i.e., sample is reading less concentrated than blank as set during last calibration. POSSIBLE CAUSE 1. System Values are incorrect (i.e .Fluor Temp Compensation, Cal Solution Value, etc.). 2. Incorrect calibration 3. Controller is, or has been, in alarm 1. Possible optics problem. 2. Incorrect calibration. 3. System Values are incorrect (i.e. Cal Solution Value, Fluor Temp Compensation etc.). 1. Fouled sample cell. 2. Incorrect calibration. Note: some negative measurements may occur in normal operation and can be expected. 25 SOLUTION Check the Configuration Record for the site. Access the System Values and verify that they are entered correctly. Check the Calibration Data screen. Contact a factoryauthorized dealer for recalibration. Check active alarms and correct as required. Check the FS% reading in the Diagnostics sequence. Check the Calibration Data screen. Contact a factoryauthorized dealer for recalibration. Check the Configuration Record. Access the System Values and verify they are entered correctly. Thoroughly clean and rinse sample cell with recommended solution, using a sample cell cleaning brush if necessary. Contact a factory-authorized dealer for re-calibration. TD-1075.0 Oil Content Monitor Operation Manual Troubleshooting Guide (Continued) SYMPTOM POSSIBLE CAUSE HOME screen reads zero. System Values incorrectly set, no water or clean water running through the monitor. Screen blank or black. LCD screen contrast too high or too low Offset value ineffective (i.e. HOME screen reading does not change when the Offset value is changed). Unit does not respond to Calibration Check Solution. Cell calibration alarm This is not usually cause for alarm as the HOME screen reading is a result of a combination of factors. System Values incorrectly entered Zero Alarm ( Datalogger) Clean water in sample cell No Datalogger data on USB key Data key was pulled from USB port prior to completion of downloading data. Defective data key Dirty sample cell 26 SOLUTION Make sure valid System Values were entered (see Appendix F). If screen is blank, adjust contrast by pressing UP ARROW (if screen is black, use the DOWN ARROW) continuously until screen is visible. Use arrows to fine adjust. Contact a factory-authorized dealer for re-calibration. Ensure correct Cal Soln and Offset have been entered (see Appendix F). Clean sample cell. Re-calibrate cell condition after cleaning. This is a normal situation. Note that a zero alarm with treated bilge water may be possible. Keep data key in USB port until LED indicates that data download has been completed. Try another data key. TD-1075.0 Oil Content Monitor Operation Manual 12.0 RESPONSIBILITY FOR SAFE DELIVERY NAG Marine has done everything possible to protect this equipment from damage due to normal transportation hazards. After the product leaves the manufacturing site, responsibility for its safe handling and delivery is assumed by the transportation company handling the equipment. If the boxed unit shows evidence of rough handling, request that the person making the delivery write "Received In Damaged Condition" on the delivery receipt. If concealed damage is revealed after the shipment is unpacked, contact a representative of the transportation company and request that a "Damaged Goods" report be completed. In either event, the transportation company should be notified immediately of any damage to the shipment to protect your rights of recovery. 27 TD-1075.0 Oil Content Monitor Operation Manual 13.0 LEGAL & WARRANTY 13.1 Copyrights All rights reserved. This document contains proprietary information of Turner Designs Hydrocarbon Instruments Inc., Fresno California, USA and NAG Marine, Norfolk, Virginia, USA embodying confidential information, ideas, and expressions. No part of this document may be reproduced or transmitted in any form or by any means, electronic, mechanical, or otherwise, without prior written permission from Turner Designs Hydrocarbon Instruments, Inc. and/or NAG Marine. 13.2 Trademarks TD-1075.0 Oil Content Monitor (Bilge Alarm) is a trademark of Turner Designs Hydrocarbon Instruments, Inc. Other brand and product names are trademarks and/or registered trademarks of their respective holders. 13.3 Right of Change Information in this document is subject to change without notice and does not represent a commitment on the part of Turner Designs Hydrocarbon Instruments, Inc. or NAG Marine. For questions or comments about this manual, please contact: NAG Marine, 2511 Walmer Avenue, Norfolk, VA 23513. United States of America Tel: +1 800 830 5186 Fax: +1 757 852 9007 Email: [email protected] Website: www.nagmarine.com. 13.4 Warranty NAG Marine in cooperation with Turner Designs Hydrocarbon Instruments warrants the TD1075.0 and accessories to be free from defects in materials and workmanship under normal use and service for a period of one year from the time of initial activation, unless an additional warranty period was purchased with the original order, with the following restrictions. The instrument and accessories must be installed, powered, and operated in compliance with the directions in this TD-1075.0 Oil Content Monitor DNV TAP NO. 771.61-Certified Operations Manual, and directions accompanying the accessories. Damage incurred in shipping is not covered. Damage resulting from measurement of samples found to be incompatible with the materials used in the sample system is not covered. Damage resulting from contact with cleaners or chemicals not specifically named in this manual are not covered. Damage caused by modification of the instrument by the user is not covered. The backlight on the digital display is warranted for 1800 hours of operation. 13.5 Warranty Service Within the United States of America Components potentially covered by warranty must be shipped freight pre-paid to NAG Marine or Turner Designs Hydrocarbon Instruments. NAG Marine or TDHI will make a determination upon inspection of the inoperable or damaged component to determine if the component is covered by warranty. In the event the component is covered by warranty, Nag Marine or TDHI will repair the item at no cost and ship the component freight paid back to 28 TD-1075.0 Oil Content Monitor Operation Manual the customer. In the event the damage is not covered by warranty, an inspection charge will apply in addition to repair costs and return shipping costs. To obtain service during the warranty period, the owner shall take the following steps. Follow the instructions in Troubleshooting and Maintenance Sections. Contact a NAG Marine representative at Tel: +1 800 830 5186, Fax: +1 757 852 9007, or Email: [email protected] and describe, as precisely as possible, the nature of the problem. Carry out minor adjustments or tests as instructed by the NAG Marine representative. If proper performance is not obtained after consultation with NAG Marine’s service representative, obtain a RMA number from NAG, and directions as to whom to ship the monitor. You must obtain a RMA number prior to shipping the monitor. The monitor will be repaired and returned free of charge if the damage is covered by the warranty. This warranty service is provided to NAG Marine and Turner Designs Hydrocarbon Instruments’ users in the contiguous continental United States. 13.6 Warranty Service Outside of the United States of America Components potentially covered by warranty must be shipped freight pre-paid to NAG Marine or Turner Designs Hydrocarbon Instruments, as directed by NAG Marine representative. NAG Marine or TDHI will make a determination upon inspection of the inoperable or damaged component to determine if the component is covered by warranty. In the event the component is covered by warranty, NAG or TDHI will repair the item at no cost; however, the customer is responsible for the shipping to and from our facility, including any potential customs clearance. In the event the damage is not covered by warranty, an inspection charge will apply in addition to repair costs and return shipping costs. For users outside of the contiguous continental United States and who have purchased the equipment from a distributor, contact the distributor. If the purchase was direct, contact Turner Designs Hydrocarbon Instruments. For International Support please contact NAG Marine at +1 800 830 5186. NOTE: Under no conditions should the instrument or accessory be returned without notice. Prior correspondence is needed for the following reasons. 1. Many problems may be rectified on site. 2. The nature of the problem must be defined in detail to speed the repair of the instrument. 3. A RMA number must accompany the monitor. This number is used to track the repair cycle. 29 TD-1075.0 Oil Content Monitor Operation Manual APPENDIX A INSTALLATION CHECKLIST CUSTOMER INFORMATION: To be completed by Service Technician Customer:____________________________________ Date: ____________________ Location:_______________________________________________________________ System Name: __________________________________________________________ Estimated Start-up Date: __________________________________________________ Service Technician Name: _________________________________________________ Service Technician Telephone Number: ______________________________________ Type of oil being detected: _________________________________________________ CHECKLIST The following checklist is provided so the appropriate preparations may be made prior to equipment start-up. Completion of the listed items is mandatory to assure proper installation and a properly functioning piece of equipment. Although it may be tempting to compromise on the initial requirements, history has proven that "doing it right the first time" pays off in the long run. 30 TD-1075.0 Oil Content Monitor Operation Manual INSTALLATION CHECKLIST To Do Complete Requirements INITIAL REQUIREMENTS -- WATER ENGINEER 1. Ensure turbidity is less than 50 NTU. (NOTE: Install appropriate filter/strainer on inlet if required). 2. Assure bilge water temperatures of 32–140 F [0–60 C]. ° ° INSTALLATION REQUIREMENTS -- WATER ENGINEER 1. Locate unit within 25 ft [7.62 m] from sample point. 2. Locate unit out of direct sunlight. 3. Locate unit where ambient temperatures are 40–120 °F [4–49 °C]. 4. Locate unit at least 10 ft [3.05 m] from devices such as large generators, which require a great deal of electrical power, or generate a strong electromagnetic field. CUSTOMER REQUIREMENTS – PLUMBER 1. Sample stream must be plumbed to the unit to deliver at a rate greater than 0.13 U.S. gal/min [0.5 L/min], less than 1.0 U.S. gal/min [3.78 L/min] and less than 100 psig [689.5 kPa(g)]. One 0.25 in. FNPT pipe connections is provided for pipe inlet hook-up. One ¼ inch Swagelok is provided discharge water (see General Arrangement Drawings). NAG Marine recommends flex lines for the inlet/outlet connections. Ensure sampling point avoids air entrapment. 2. Sample from side of water line to avoid air entrapment (if appropriate). 3. Provide free, unrestricted drain for sample stream if possible. CUSTOMER REQUIREMENTS – ELECTRICIAN 1. Ensure environment will support a NEMA 4-type enclosure. 2. Provide continuous 20–240 VAC/VDC, 50/60 Hz, 15 watt electrical 5.0 service to the TD-107 OCM. Connect the High Signal (5 ppm) Alarm Relay to the bilge water treatment system diverter valve. 3. Connect5.0the separator system status input and flow status input to the TD-107 OCM. FINAL REQUIREMENTS -- WATER ENGINEER AND CUSTOMER 1. If the unit is to be installed by a third party arrange a time during start-up when you and the customer can be trained together. 2. Obtain needed materials (check solution, 0 ppm clean water, cleaning solutions, accessory kit, and flow-cell cleaning brushes) prior to commissioning the System. Customer Responsibilities: This checklist outlines work required prior to start-up. This work is necessary to ensure quality and proper operation. However, if any of these requirements cannot be met, contact your NAG Marine representative or NAG Marine. 31 TD-1075.0 Oil Content Monitor Operation Manual APPENDIX B CONFIGURATION RECORD Date Configured: ___________________________________________________________ Factory Authorized Company: _________________________________________________ Service Engineer Name: _____________________________________________________ System Name: _____________________________________________________________ TD-1075.0 OCM serial number: ____________________ System Parameter Value High Standard Concentration Low Standard Concentration High (5 ppm) Signal Alarm Early Warning Set Point (as defined by user) Zero Signal Alarm 4 mA Output 20 mA Output Cell Condition % (with oil-free process water in the sample cell) Reference Appendix E for the key presses required to obtain the above values. 32 TD-1075.0 Oil Content Monitor Operation Manual APPENDIX C TD-1075.0 OCM CONTROL FUNCTIONS See the General Arrangement Drawings for the location of the following controls on the unit: Digital LCD Keypad Main Power Switch Inlet Valve Luer-Lok® Injection Port Clean-out Port Sample In Sample Out Sample Block Input/Output Cabling USB Data Port Continuously displays HOME screen when values are not being entered or viewed. The contrast of the LCD can be adjusted by pressing the UP or DOWN arrow. Used to enter new unit values and to move among the display screens. Main power switch for entire unit—when ON, the LCD will illuminate. Starts and stops sample flow to the OCM. When the inlet valve is closed—the maintenance position—sample flow is stopped, permitting solutions to be injected into the OCM via the Luer-Lok® injection port. This valve also contains the maintenance mode switch, which places the OCM into MAINTENANCE MODE when the valve is closed. A port on the sample block into which solutions can be injected. It is only accessible with the inlet valve closed. When the inlet valve is open, the valve handle blocks the injection port. This prevents injection of solutions while the sample is flowing. A port on top of the sample block, which allows the sample cell to be cleaned with a brush. Where the sample inlet line is attached to allow sample to flow through unit. Sample outlet line attaches here. Houses sample cell and optical filters. The sample block must be replaced by a factory authorized dealer. Pre terminated cabling is available for all TD-1075.0 OCM signal inputs and outputs. Only trained personnel should make electrical connections. Located internally on the Datalogger circuit board. Provides access for retrieving Datalogger data. 33 TD-1075.0 Oil Content Monitor Operation Manual APPENDIX D TD-1075.0 OCM SOFTWARE FUNCTIONS D.2. Keypad Functions D.2.1. Left Arrow: The left arrow can be used to correct typing errors when data is being entered or changed. It acts as a backspace or delete key. It is also used from the HOME screen to view the alarm history. The unit has a software interface that simplifies evaluation (see Screens Flow Charts in Appendix E). The following descriptions of the unit's software functions will help provide a better understanding of the unit: D.2.2. Up & Down Arrows: From HOME screen, these arrows can be used to change screen contrast. D.2.3. Escape & Enter: You can escape to the previous screen or abort the calibration sequence by pressing the <ESC> key. While viewing a System Value, press <ENT> to access the screen to change that value. After entering a new System Value, press <ENT> to accept the new value. D.1. Screens: A series of computerized screens built into the unit are called up using the keypad and shown on the digital display. D.1.1. Home Screen: Once the unit has been activated, the HOME screen is continuously displayed, except when accessing other screens. D.3. User Identification From the HOME screen, access the calibration data by pressing <ENT>. Other screens are accessed from the HOME screen by pressing various keys on the keypad (Appendix E). The TD-1075.0 OCM is protected from unauthorized changes by passwords. These passwords are not available or provided to the end-user. Go to the HOME screen by pressing the <HOME> key, except during the calibration procedure. D.4. Fluorescence Display After the unit is powered-up or after cell calibration, the oil content displayed will not react immediately, but will respond after a delay of about 10 seconds. D.1.2. Warning Screens: There are warning screens throughout the software, which inform of invalid entries (for values or ID). D.5. LCD Contrast D.1.3. Internal Alarms: When an internal alarm occurs, "ALM" blinks in the upper left-hand corner of the HOME screen. The nature of the alarm can be discovered by pressing <ESC> from the HOME screen (see Alarms and Troubleshooting Sections). The contrast of the Liquid Crystal Display (LCD) can be adjusted on any screen (except during calibration) by pressing the up & down arrows. 34 TD-1075.0 Oil Content Monitor Operation Manual APPENDIX E TD-1075.0 OCM SCREEN FLOW CHARTS Viewing High and Low Standard Concentration Values 3.5 PPM TD-1075.0 From the HOME screen press <0>. The STD CONC menu should now be displayed. Press <1> to view the High Standard Concentration value or <2> to view the Low Standard Concentration value. Press <ESC> to return to the STD CONC menu. From here, press <ESC> to return to the HOME screen or <1> or <2> to view the values again. 35 TD-1075.0 Oil Content Monitor Operation Manual Viewing High Signal Alarm Value 3.5 PPM TD-1075.0 HIGH SIG ALARM 5.0 PPM From the HOME screen press <1>. The HIGH SIGNAL ALARM value will be displayed. Press <ESC> to return to the HOME screen. The user is unable to change this value. Viewing Early Warning Setting 3.5 PPM TD-1075.0 EARLY WARNING: 3.000 PPM From the HOME screen press <2>. The EARLY WARNING setting will be displayed. Press <ESC> to return to the HOME screen. Changing this value is described on the next page. 36 TD-1075.0 Oil Content Monitor Operation Manual Changing Early Warning Setting 3.5 PPM TD-1075.0 EARLY WARNING: 3.000 PPM 3.000 NEW: 2.000 NEW: EARLY WARNING: 2.000 PPM From the HOME screen press <2>. The current Early Warning Alarm Value will be displayed. Press <ENT> to access the PARAMETER CHANGE screen. Enter a value between 1.0 and 4.9. Press <ENT> to accept the new value. Press <ESC> to confirm the new value. Press <ESC> once more to return to the HOME screen. 37 TD-1075.0 Oil Content Monitor Operation Manual Viewing Zero Signal Alarm Value 3.5 PPM TD-1075.0 From the HOME screen press <3>. The ZERO SIGNAL ALARM value will be displayed. Press <ESC> to return to the HOME screen. The user is unable to change this value. Viewing 4 mA Output Value 3.5 PPM TD-1075.0 From the HOME screen press <4>. The 4 mA OUTPUT value of 0 ppm will be displayed. Press <ESC> to return to the HOME screen. The user is unable to change this value. 38 TD-1075.0 Oil Content Monitor Operation Manual Changing the User ID from the Default Value 3.5 PPM TD-1075.0 From the HOME screen press <5>. The ID entry screen will appear and will require the Master ID. Press <ENT> once the User ID screen is displayed to access the PARAMETER CHANGE screen. Enter the desired User ID and press <ENT> then <ESC> to display the desired ID as the new User ID. Press <ESC> again to return to the HOME screen. 39 TD-1075.0 Oil Content Monitor Operation Manual Viewing 20 mA Output Value 3.5 PPM TD-1075.0 From the HOME screen press <6>. The 20 mA Output Value of 30 ppm will be displayed. Press <ESC> to return to the HOME screen. The user is unable to change this value. Viewing Cell Condition 3.5 PPM TD-1075.0 From the HOME screen press <9>. The current concentration reading (in ppm) and cell condition percentage will be displayed. Press <ESC> to return to the HOME screen. 40 TD-1075.0 Oil Content Monitor Operation Manual Viewing Current Alarms *Current alarms will only be present to view if ALM is flashing in the upper left corner of the LCD.* From the HOME screen press <ESC>. All alarms that are currently affecting the instrument will flash in sequence at a rate of one per second. Press <ESC> to return to the HOME screen. Viewing Alarm History 3.5 PPM TD-1075.0 From the HOME screen press <>. All alarms that are in the instrument history since the last alarm history reset will flash in sequence at a rate of one per second. Press <ESC> to return to the HOME screen. To clear the Alarm History, press <> five times while on the ALARM HISTORY screen. 41 TD-1075.0 Oil Content Monitor Operation Manual Diagnostic Screens TD-1075.0 SW: 104754 Rev A LED: ON 00231 Hours FL: 0.076V GAIN: 100 10.0 PPM CELL: 100% 42 TD-1075.0 Oil Content Monitor Operation Manual From the HOME screen, press <DIAG> to access the DIAGNOSTICS screens. Either <ENT> or <> may be pressed to scroll through the diagnostic screens. <ENT> takes you forward and <> takes you backward. These are view-only screens. Viewing Calibration Data 3.5 PPM TD-1075.0 To view the calibration data, press <ENT> from the HOME screen. This is the CAL/DATA screen. <1> is reserved for factory authorized calibration and is not accessible by the user. Pressing <2> will display the first of two calibration data screens. Pressing <ENT> will allow selection of either calibration screen. Pressing <ESC> once will return to the CAL/DATA screen and pressing <ESC> a second time will return to the HOME screen. 43 TD-1075.0 Oil Content Monitor Operation Manual Keystroke Error Correction 3.5 PPM TD-1075.0 From the HOME screen press <>. The current date and UTC time (24-hour clock format) will be displayed. Press <ESC> to return to the HOME screen. The user is unable to change the time or date setting. Invalid ID Entry If upon ID entry the INVALID ID screen appears, press <ESC> and re-enter the ID. If the INVALID ID screen repeatedly occurs despite entering a correct ID code, the desired function is not available with the code entered. 44 TD-1075.0 Oil Content Monitor Operation Manual Correcting Parameter Entries If a numerical value is entered in error, simply press the <> key to delete the value just entered. In this example if 10 is the desired value and 13 is entered accidentally, simply press <> once to delete the 3 and enter 0 instead. LCD Contrast Adjust 3.5 PPM TD-1075.0 3.5 PPM TD-1075.0 3.5 PPM TD-1075.0 3.5 PPM TD-1075.0 From the HOME screen only, press <> to increase the contrast and <> to decrease the contrast. If the screen appears blank, the contrast may be adjusted too low. 45 TD-1075.0 Oil Content Monitor Operation Manual APPENDIX F SYSTEM VALUES • System Values are accessed from the HOME screen (see Appendix E). Default values and value ranges are listed in Table 5 below. Refer to Appendix B to determine how the unit was configured at the time of installation. These values can only be changed by a factory-authorized service engineer and are not user-changeable. Table 5. System Default Values and Ranges To View: Current Alarms Alarm History Instrument Time/Date High Standard Concentration Low Standard Concentration Calibration Data Software Version RAW / FS% LED Status FL REF / REFCAL H2O / MAX Temp High / Low Standard High Signal Alarm Value Early Warning Alarm Value Zero Signal Alarm Value 4 mA Output Value Press the keys in this order: Default N/A N/A Range N/A N/A N/A N/A ESC 0 1 5.0 ppm N/A 0 2 0.0 ppm N/A ENT DIAG DIAG DIAG DIAG DIAG DIAG 2 ENT ENT ENT ENT ENT ENT ENT ENT ENT ENT ENT ENT ENT ENT ENT ENT N/A N/A N/A N/A N/A N/A N/A N/A N/A N/A N/A N/A N/A N/A DIAG ENT ENT ENT ENT ENT N/A N/A 5.0 ppm N/A 2 3.0 ppm 1.0– 2.9 ppm 3 0.0 ppm N/A 0.0 ppm N/A 0258 N/A 30.0 ppm N/A 100% 10– 100 % 1 4 User ID 5 20 mA Output Value 6 Master ID ENT ENT Press ESC to return to the HOME screen. 7 8 Cell Condition 9 Zero Adjust 46 TD-1075.0 Oil Content Monitor Operation Manual To Change: Early Warning Alarm Value User ID 2 5 Press the keys in this order: Enter desired value ENT ENT (1.0–4.9) Master ID ENT ENT Enter desired value. F.1. System Value Definitions ENT ESC ESC The lower limit of the analog output sent to the Datalogger, which is 0 ppm. F.1.1. High Std Conc Value This value relates the fluorescence measurement value to a high standard concentration reference oil content fluorescence measurement. F.1.7. User ID / Master ID The User ID allows the user to access certain functions in the software not accessible to those who do not possess the User ID. The Master ID allows access to the same functions as the User ID and includes others such as the ability to change the User ID. F.1.2. Low Std Conc Value This value relates the fluorescence measurement value to a low standard concentration reference oil content fluorescence measurement. F.1.8. 20 mA Output Value The upper limit of the analog output sent to the Datalogger, which is 30 ppm. F.1.3. High (5 ppm) Signal Alarm Value This is the value at which the High (5 ppm) Signal Alarm is triggered. The date and time values are accessed under the <> menu. The Datalogger date and time are set to Greenwich Mean Time (GMT) regardless of the date and time setting in the TD1075.0 OCM. The time and date cannot be changed. F.1.4. Early Warning Value This is the value at which the Early Warning is triggered. F.1.5. Zero Signal Alarm Value This is the value at which the Zero Signal Alarm is triggered. F.1.6. 4 mA Output Value 47 TD-1075.0 Oil Content Monitor Operation Manual APPENDIX G TD-1075.0 OCM TROUBLESHOOTING WORKSHEET The Troubleshooting Worksheet is designed to facilitate diagnostic data collection. After collecting all data on the worksheet, most problems can be solved over the telephone. Refer to the Service Assistance Section for the appropriate numbers. Please fill out worksheet completely -- All entries are important GENERAL INFORMATION: Unit Serial No.: (Tag is located on the left hand side of the instrument.) Field Contact Name: Field Contact Phone: Description of Symptoms: Date/Time Symptoms Started: Describe Any Physical Damage To Unit: Date Of Last Calibration: (Press <ENT> from HOME screen to read last calibration date.) THE HOME SCREEN READS: ____ ppm If "ALM" is blinking, press <ESC> and record alarms PHYSICAL INSPECTION: YES NO 2. Can LCD contrast be adjusted using the YES UP/DOWN arrows? NO 1. Is main power switch on? 3. Date flow-cell was last cleaned: With Cleaning Solution: With Brush: 4. Turn main power to the instrument off and access power and signal connections. Make sure all connections are tight. 48 TD-1075.0 Oil Content Monitor Operation Manual RECORD TD-1075.0 OCM SYSTEM VALUES Access Keys System Value Value <HOME> <0><1> High Standard Conc. <HOME> <0><2> Low Standard Conc. <HOME> <1> High Signal Alarm <HOME> <2> Early Warning Signal Alarm <HOME> <3> Zero Signal Alarm <HOME> <4> 4 mA Output <HOME> <5> User ID <HOME> <6> 20 mA Output <HOME> <7> <HOME> <8> <HOME><DIAG> Software Version <HOME> <DIAG> <ENT> Raw *Process water flowing for this step FS % <HOME> <DIAG> <ENT> Raw *Stop flow and inject DI water—0 ppm FS % solution—for this step <HOME> <DIAG> <ENT> Raw *Stop flow and inject Calibration Check FS % solution for this step <HOME> <DIAG> <ENT> <ENT> LED: ON/OFF LED T=0Hr <HOME> <DIAG><ENT><ENT><ENT> FL: X.XXXV <HOME> <DIAG><ENT><ENT><ENT><ENT> REF: X.XXXV REFCAL: X.XXXV CAL TEMP MAX TEMP <HOME> <DIAG><ENT><ENT><ENT><ENT> <ENT> <HOME> <DIAG><ENT><ENT><ENT><ENT> <ENT><ENT> High Std: X.XXX Low Std: X.XXX 49 . X.XXX V X.XXX V TD-1075.0 Oil Content Monitor Operation Manual APPENDIX H FUSE SPARES AND REPLACEMENT 50 TD-1075.0 Oil Content Monitor Operation Manual APPENDIX I CONNECTIONS FOR FLUSH VALVE ACTUATOR If your monitor is equipped with an optional Flush Valve Actuator, make the following connections. See also, Appendix K: General Arrangement Drawings. The actuator is manipulated by instrumentation and control logic supplied by the customer. Three wires are used to control the position of the actuator. Note that the actuator is motivated by 230VAC signals. Therefore, exercise extreme caution when making these connections and performing tests as contact with these wires can be lethal! • The white wire must be tied to one of the legs of the customer’s supply. 51 . TD-1075.0 Oil Content Monitor Operation Manual • The black wire (CW travel) should be tied to the normally closed side of a double throw switch. When this leg of the actuator is powered by 230VAC, the valve will move to the “sample” position. • The red wire (CCW travel) should be tied to the normally open side of a double throw switch. When this leg of the actuator is powered by 230VAC, the valve will move to the “flush” position. 52 TD-1075.0 Oil Content Monitor Operation Manual APPENDIX J SAMPLE CELL— MAINTENANCE AND CLEANING INSTRUCTIONS Please Note: Proper maintenance and cleaning of the TD‐107 sample cell is a key component of consistent oil content detection. Significant build‐up of residue, iron oxide, or other foreign material on the inner glass tube can materially affect the detection of the fluorescent properties of the oil. Consistently following these simple cleaning and maintenance procedures will ensure accurate and reliable operation from the monitor. Starting parameters of TD‐107 OCM must equal the following: a. PPM Value between 0‐5 ppm in fresh clean water b. Cell Condition Percentage between 70%‐100% in fresh clean water Before Starting OWS Operations 1. Place the TD‐107 Sample Cell Inlet handle to the Maintenance position (you will see an ALM flash on the display screen). 2. Use the supplied cleaning syringe to inject 50ml of fresh clean water into the sample cell via the Luer-lok® fitting. 3. On the display screen, you will see (a) Alarm, (b) PPM value, (c) Cell Temperature, (d) Cell Condition Percentage (between 0% ‐ 100%). 4. Allow PPM value to stabilize (typically between 0‐5ppm in fresh clean water). 5. Allow the Cell Condition Percentage to stabilize (typically between 70‐100% in fresh clean water). 6. If the PPM value has stabilized between 0‐5ppm AND the Cell Condition percentage has stabilized between 70‐100%, the unit is ready for operation. 7. Place the sample cell valve handle into Operating position and begin OWS operations. After Completing OWS Operations Note: It is important to fill the TD‐107 Sample Cell with fresh clean water at the end of every OWS operation. A cell which is left filled with either dry air or dirty sample water can permanently foul the sample cell. Repeated failure to fill the sample cell with clean water at the end of OWS operations could result in a permanently fouled cell and inaccurate OCM readings. 1. Place the TD‐107 Sample Cell Inlet handle to the Maintenance position (you will see an ALM flash on the display screen). 2. Use the supplied cleaning syringe to inject 50ml of fresh clean water into the sample cell via the Luer-lok® fitting. 3. Leave the Sample Cell Inlet handle in maintenance position while the OWS is secured. 53 . TD-1075.0 Oil Content Monitor Operation Manual Detergent Sample Cell Cleaning Instructions (if Sample Cell Is Dirty) 1. If the ‘PPM value’ OR the ‘Sample Cell Condition Percentage’ is out of starting parameters, the sample cell requires chemical and mechanical cleaning prior to operation. 2. Turn the TD‐107 Sample Cell Inlet handle to the Maintenance position (you will see an ALM flash on the display screen). 3. Fill the cleaning syringe with 30ml of the provided cleaning solution (NAG Part Number 2522). If the recommended cleaning solution is not available, substitute mild detergent diluted with 50% fresh water. 4. Inject 30 ml of the cleaning fluid into the sample cell via the Luer-lok® fitting. Leave the syringe attached to the Luer-lok® while performing the next step 5. Unscrew the sample cell cap (fitting located at the top of the sample cell) 6. Aggressively scrub the inner quartz tube of the sample cell with the provided flow cell brush (NAG Part Number 2506) for approximately 1 minute. Note: Use of a non‐recommended flow cell brush could potentially scratch the inner quartz tube of the sample cell and cause the OCM to malfunction. 7. Remove the brush and screw the sample cell cap back onto the top of the sample cell. Note: Hand‐tighten + ¼ turn for the sample cell cap. Do not over‐ tighten or use pliers or wrenches on the sample cell cap. 8. Use the cleaning syringe to draw out the cleaning fluid currently in the sample cell. Discard the cleaning fluid. 9. Use a clean syringe to inject 50ml of clean fresh water into the sample cell. 10. On the display screen, you will see (a) Alarm, (b) PPM value, (c) Cell Temperature, (d) Cell Condition Percentage (between 0% ‐ 100%). 11. Allow PPM value to stabilize (typically between 0‐2ppm in fresh clean water). 12. Allow the Cell Condition Percentage to stabilize (typically between 70‐100% in fresh clean water). 13. If the PPM value has stabilized between 0‐5ppm AND the Cell Condition percentage has stabilized between 70‐100%, the unit is ready for operation. Place the sample cell valve handle into Operating position and begin OWS operations. 14. 15. If the PPM value OR Cell Condition percentage is still out of starting parameters, acidic cleaning is required. Acidic Sample Cell Cleaning Instruction in Cases where Sample Cell Is Extremely Fouled 1. Turn the TD‐107 Sample Cell Inlet handle to the Maintenance position (you will see an ALM flash on the display screen). 2. Unscrew the sample cell cap (fitting located at the top of the sample cell). 3. Dip the provided flow cell cleaning brush (NAG Part Number 2506) in 6N Hydrochloric Acid. If 6N HCL is unavailable, muriatic acid or citric acid is an acceptable substitute. 4. Aggressively scrub the inner quartz tube of the sample cell with the acid cleaner for approximately 1 minute. Note: Use of a non‐recommended flow cell brush could potentially scratch the inner quartz tube of the sample cell and cause the OCM to malfunction. 5. Remove the brush and screw the sample cell cap back onto the top of the sample cell. Note: Hand‐tighten + ¼ turn for the sample cell cap. Do not over‐ tighten or use pliers or wrenches on the sample cell cap. 6. Use a clean syringe to inject 50ml of clean fresh water into the sample cell to flush the acid out. 54 TD-1075.0 Oil Content Monitor Operation Manual 7. Inject another 50ml of clean fresh water into the sample cell and observe the display screen. 8. On the display screen, you will see (a) Alarm, (b) PPM value, (c) Cell Temperature, (d) Cell Condition Percentage (between 0% ‐ 100%). 9. Allow PPM value to stabilize (typically between 0‐5ppm in fresh clean water). 10. Allow the Cell Condition Percentage to stabilize (typically between 70‐100% in fresh clean water). 11. If the PPM value has stabilized between 0‐5ppm AND the Cell Condition percentage has stabilized between 70‐100%, the unit is ready for operation. 12. Place the sample cell valve handle into Operating position and begin OWS operations. 13. If the PPM value OR Cell Condition percentage is still out of starting parameters, repeat the acidic cleaning process. Notes on Cell Condition Alarms Please note that Cell Condition Alarms are simple warnings to the operator that the TD‐ 107 Sample Cell may be getting dirty. The Cell Condition logic compensates for a dirty cell and will read accurately between 10% and 100%. The Cell Condition Alarm will not put the OWS into Recirculation mode until the Cell Condition percentage reaches 10% or less. If the 30% Cell Condition threshold is reached, the TD‐107 will output three alarms a Cell Alarm ( C ). At this point this alarm is to bring attention of the operator to check the unit to ensure the cause of the alarm is simply dark process water and not a fouled cell. The TD 107 will go into recirculation mode at 10% cell condition. At this point a Cell Condition Alarm ( C ), System Alarm ( I ) and a High Alarm ( H ) will all be present. The unit will continue to run in recirculation mode until some action is taken or the process water clears up. It is recommended however, if the cell condition reaches 10% a stays there that the cell be cleaned to ensure it is not the cause for the cell alarm. 55 . TD-1075.0 Oil Content Monitor Operation Manual APPENDIX K GENERAL ARRANGEMENT DRAWINGS 56 TD-1075.0 Oil Content Monitor Operation Manual 57 . TD-1075.0 Oil Content Monitor Operation Manual 58 TD-1075.0 Oil Content Monitor Operation Manual 59 . TD-1075.0 Oil Content Monitor Operation Manual 60 TD-1075.0 Oil Content Monitor Operation Manual 61 . TD-1075.0 Oil Content Monitor Operation Manual 62 TD-1075.0 Oil Content Monitor Operation Manual 63 . TD-1075.0 Oil Content Monitor Operation Manual APPENDIX L CALIBRATION CERTIFICATION 64 TD-1075.0 Oil Content Monitor Operation Manual 65 . TD-1075.0 Oil Content Monitor Operation Manual 66