1
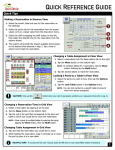
Projector CP-X9110/CP-WX9210/CP-WU9410 User's Manual - Network Quick Setup Guide Thank you for purchasing this product. This manual is intended to explain only how to setup this product. For proper use of this product, please refer to this manual and the other manuals for this product. See the corresponding pages for quick setup. ・Connection Setup (7) ・System Requirements for Applications (13) 1. Features 1.1 Web Control Connecting the projector and the computer via the network, remote control and status monitoring of the projector can be performed by Web browser. Two types of interface, ”Projector Web Control” and “Crestron e-Control”, are available for this projector. Projector Web Control Crestron e-Control 1 1.2 Network Presentation The projector can display the computer screen images transmitted through the network. To use Network Presentation, an exclusive application, "LiveViewer" is required. The following application is required to use Network Presentation. OS Windows Mac OSX iOS(iPhone/iPad) 2 Application LiveViewer LiveViewer Projector Quick Connection 1.3 My Image Function The projector can display still images transferred via the network. ,WLVSRVVLEOHWRDOORFDWHXSWRLPDJH¿OHV MY IMAGE transmission requires an exclusive application for your computer. Use the application to transfer the image data. Transfer image data 1 2 3 4 Display image data (ex. ) 3 1.4 Messenger Function The projector can display text data transferred via the network on the screen. It is possible to store up to 12 text data. Transfer text data 1 2 3 4 12 Display text data (ex. 4 ) 1.5 Network Bridge Function This projector is equipped with the NETWORK BRIDGE function to perform mutual conversion of a network protocol and a serial interface. By making use of the NETWORK BRIDGE function, a computer connected to the projector via wireless or wired LAN is able to control an external device via RS-232C communication using the projector as a network terminal. TCP/IP data Protocol change RS-232C RS-232C cable Wired LAN LAN cable Computer Serial data External device Wireless LAN CONTROL port LAN port WIRELESS port (USB wireless adapter) 1.6 Other Functions 1.6.1 E-mail Alerts 7KHSURMHFWRUFDQDXWRPDWLFDOO\VHQGDQDOHUWPHVVDJHWRWKHVSHFL¿HG e-mail addresses when the projector detects a certain condition that requires maintenance or detects an error. 1.6.2 Projector Management using SNMP The SNMP (Simple Network Management Protocol) enables to manage the projector information, which is a failure or warning status, from the computer on the network. The SNMP management software will be required on the computer to use this function. 5 1.6.3 Event Scheduling The scheduling function enables to setup scheduled events including power on / power off. It enables to be “self-management” projector. The schedule can be set in web display or SETUP-SCHEDULE menu in the projector. 1.6.4 Command Control via the Network <RXFDQFRQ¿JXUHDQGFRQWUROWKHSURMHFWRUYLDWKHQHWZRUNXVLQJ56& commands. Please follow the on-screen display (OSD) for proper operation. 2. Changing the Display Language 1) Press the MENU button on the remote control or the control panel of the projector. MENU button 2) From EASY MENU, select LANGUAGE. Then, select your desired language. 6 MENU button 3. Connection Setup For Mac users: Mac OS does not support some applications. Refer to System Requirements for Applications (13¿UVWEHIRUHVHWWLQJXSWKHFRQQHFWLRQ 3.1 Connection via Wired LAN The connection via wired LAN is available. Set wired LAN for the projector by following the instructions of your network administrator when connecting to the existing network. hub 3.2 Connection setup of Wired LAN 1) Connect the projector to the computer via a hub with a LAN cable (CAT-5e or higher). 2) Press the MENU button on the remote control or the control panel of the projector. The MENU you last used will appear. Use the cursor button to select the following. EASY MENU > ADVANCED MENU > NETWORK > WIRED SETUP 3) Set the following items in WIRED SETUP. 䞉 㻌DHCP 䞉 IP ADDRESS 䞉 SUBNET MASK 䞉 DEFAULT GATEWAY 䞉 DNS SERVER As for setting an IP address, refer to “About IP address”. (8) 6HOHFW$33/<WKHQSUHVVWKH(17(5EXWWRQWRUHÀHFWWKHVHWWLQJV 7 [About IP address] Ŷ6HWWLQJPDQXDOO\ The Network address portion of the IP address setting on your computer must be the same as the setting on the projector. Also, the entire IP address on the computer must not overlap with that of the other devices on the same network, including the projector. The projector’s settings are as follows. IP address: 192.168.1.254 Subnet mask: 255.255.255.0 (Network address: 192.168.1 in this case) Therefore, specify the computer’s IP address as follows. IP address: 192.168.1.xxx (xxx shows decimal number.) Subnet mask: 255.255.255.0 (Network address: 192.168.1 in this case) For example Select from 1 to 254 for “xxx” not duplicating with any other equipments. In this case, since the IP address of the projector is “192.168.1.254”, specify a setting between 1 to 253 for the computer. Ŷ6HWWLQJDXWRPDWLFDOO\ When a DHCP server exists in the connected network, it assigns an IP address to the projector and the computer automatically. If DHCP server is not available, set IP ADDRESS, SUBNET MASK and DEFAULT GATEWAY. NOTE $OWKRXJK+'%DVH7DQG/$1SRUWFDQEHXVHGIRUZLUHG/$1WKH\FDQQRWEH used simultaneously. Connect LAN cable to the port set in WIRED NETWORK on NETWORK menu. The same network address cannot be used for both wireless LAN and wired LAN. ,f the projector and the computer exist in the same network (i.e., same network DGGUHVV\RXFDQOHDYHWKHGHIDXOWJDWHZD\¿HOGEODQN :KHQWKHSURMHFWRUDQGWKHFRPSXWHUH[LVWLQGLIIHUHQWQHWZRUNVWKHGHIDXOW gateway must be set. Consult with the network administrator in detail. 8 3.3 Connection via Wireless LAN Connection via wireless LAN is available with option parts, USB wireless adapter (USB-WL-11N). Wireless LAN has two types of connection, Ad Hoc and Infrastructure. Fig. 3.3.a Without an access point communication (Ad Hoc) Fig. 3.3.b With an access point communication (Infrastructure) * Ad Hoc is one of the wireless LAN communication methods without having an access point to communicate. * Infrastructure is one of the wireless LAN communication methods with having an access point to communicate. If communicating with existing network, consult with your network administrator. NOTE Network settings can also be changed in Network Settings of Projector Web Control. Wireless LAN initial settings for the projector is as follows. Mode: Ad Hoc DHCP: Off IP address: 192.168.10.254 Subnet Mask: 255.255.255.0 Default Gateway: 0.0.0.0 SSID: wireless Encryption: Off Channel: 1 7KHVDPHQHWZRUNDGGUHVVFDQQRWEHXVHGIRUERWKZLUHOHVV/$1DQGZLUHG/$1 9 3.3.1 Connection in Ad Hoc Mode Set the following when connecting the projector and the computer in Ad Hoc mode. Projector setting [Restriction on plugging and unplugging the USB wireless adapter] Before you insert or pull out the USB wireless adapter from the projector, turn off the power of the projector and pull out the power cord’s plug from the outlet. Do not touch the USB wireless adapter that is connected to the projector while the projector is receiving AC power. Do not use any extension cable or device when connecting the adapter to the projector. 1) Attach the USB wireless adapter to the WIRELESS port of the projector. 2) Turn on the projector. 3) Press the MENU button on the remote control or the control panel of the projector. The MENU you last used will appear. Use the cursor button to select the following. EASY MENU > ADVANCED MENU > NETWORK > WIRELESS SETUP 4) Set the following items in WIRELESS SETUP. 䞉 MODE: ADHOC 䞉 㻌DHCP 䞉 IP ADDRESS 䞉 SUBNET MASK 䞉 SSID 䞉 ENCRYPTION 䞉 CH As for setting an IP address, refer to “About IP address”. (8) 6HOHFW$33/<WKHQSUHVVWKH(17(5EXWWRQWRUHÀHFWWKHVHWWLQJV Computer setting 1) Set IP ADDRESS and SUBNET MASK for the computer according to IP ADDRESS and SUBNET MASK set for the projector. Set the projector and the computer so that they can have the same network address. 2) Select SSID set for the projector by following the procedure of wireless connection of the computer. Enter encryption key by following the computer’s instruction if it is encrypted. NOTE As for the procedure of setting network and wireless connection for the computer, refer to the manual of computer or wireless LAN device. 10 3.3.2 Connection in Infrastructure Mode Set the following when connecting the projector and the computer in Infrastructure mode. [Restriction on plugging and unplugging the USB wireless adapter] Before you insert or pull out the USB wireless adapter from the projector, turn off the power of the projector and pull out the power cord’s plug from the outlet. Do not touch the USB wireless adapter that is connected to the projector while the projector is receiving AC power. Do not use any extension cable or device when connecting the adapter to the projector. 1) Attach the USB wireless adapter to the WIRELESS port of the projector. 2) Turn on the projector. 3) Press the MENU button on the remote control or the control panel of the projector. The MENU you last used will appear. Use the cursor button to select the following. EASY MENU > ADVANCED MENU > NETWORK > WIRELESS SETUP 4) Set the following items in WIRELESS SETUP. 䞉 MODE: INFRASTRUCTURE 䞉 㻌DHCP 䞉 IP ADDRESS 䞉 SUBNET MASK 䞉 DEFAULT GATEWAY 䞉 DNS SERVER 䞉 SSID 䞉 ENCRYPTION 䞉 CH As for setting an IP address, refer to “About IP address”. (8) 6HOHFW$33/<WKHQSUHVVWKH(17(5EXWWRQWRUHÀHFWWKHVHWWLQJV 11 Connection in Infrastructure Mode (continued) SSID SCAN LIST function The connection can be set up by selecting from SSID SCAN LIST without setting SSID and ENCRYPTION in WIRELESS SETUP. The procedure of connecting by SSID SCAN LIST is as follows. 1) Select SSID SCAN LIST in WIRELESS SETUP on NETWORK menu. The list of SSID in wireless network is displayed. 2) Select SSID in wireless network that you want to connect in SSID SCAN LIST. The display to enter the encryption key appears if it is encrypted. Enter the encryption key by using software keyboard. 3) The icon indicating “connected” ( ) is displayed in SSID SCAN LIST screen when the connection is complete. NOTE 㻌Transmission speed may be slow depending on the settings of an access point. If the projector and the computer exist in the same network (i.e., same network DGGUHVV\RXFDQOHDYHWKHGHIDXOWJDWHZD\¿HOGEODQN :KHQWKHSURMHFWRUDQGWKHFRPSXWHUH[LVWLQGLIIHUHQWQHWZRUNVWKHGHIDXOW gateway must be set. Consult with the network administrator in detail. 6HWZLUHOHVV/$1IRUWKHSURMHFWRUE\IROORZLQJWKHLQVWUXFWLRQVRI\RXUQHWZRUN administrator when connecting to the existing network. 2SHQ6\VWHP$XWKHQWLFDWLRQLVXVHGIRU:(3HQFU\SWLRQDQG6KDUHG.H\ Authentication is not supported. The authentication with an access point succeeds and it is regarded that the connection is established normally even when entering illegal encryption key due to Open System Authentication, but data cannot actually be transmitted. 12 4. Applications 4.1 Applications The latest version of the application software can be downloaded from the website below. http://www.hitachi-america.us/digitalmedia/ http://www.hitachidigitalmedia.com/ http://www.hitachi-dm.cn/ http://www.hitachi.co.jp/proj/ For iOS Network Presentation software, refer to the URL below for details and downloads of Projector Quick Connection. http://www.hitachi.co.jp/Prod/vims/proj/en/index.html http://www.hitachi.co.jp/Prod/vims/proj/jp/index.html [System Requirements for Applications] Application LiveViewer Hardware and Software [Windows] OS: Windows® XP Windows Vista®(Service Pack 1 or later) Windows® 7 Windows® 8 Graphic card: VGA: 640x480 or higher (recommended XGA: 1024x768) CPU: Pentium 4 (2.8 GHz or higher) Hard disk space: 100MB or higher 13 [System Requirements for Applications] (continued) Application Hardware and Software LiveViewer [Mac] Mac OSX 10.5 Mac OSX 10.6 Mac OSX 10.7 Mac OSX 10.8 Hard disk space: 15MB or higher NOTE Only for Intel version. Power Mac is not supported. LiveViewer for MAC is not included in the bundled CD-ROM. Download it from the website. Projector Quick Connection Projector Image Tool(PJImg) iOS 5.1.1 or later iPad, iPad2, New iPad iPhone4/4S/5 OS: Windows® XP Windows Vista® Windows® 7 Windows® 8 CPU: Pentium 3 (500MHz or higher) Hard disk space: 20MB or higher Projector Messenger Tool (PJMessenger) OS: Windows® XP Windows Vista® Windows® 7 Windows® 8 CPU: Pentium 3 (500MHz or higher) Hard disk space: 20MB or higher 14 5. Troubleshooting 3OHDVHFKHFNWKHIROORZLQJZHEDGGUHVVZKHUH\RXPD\¿QGWKHODWHVWLQIRUPDWLRQ for this projector. http://www.hitachi-america.us/projectors http://www.hitachiserviceeu.com/support/guides/userguides.htm NOTE 7KHLQIRUPDWLRQLQWKLVPDQXDOLVVXEMHFWWRFKDQJHZLWKRXWQRWLFH 7KHLOOXVWUDWLRQVLQWKLVPDQXDODUHIRULOOXVWUDWLYHSXUSRVHV7KH\PD\GLIIHU slightly from your projector. 7KHPDQXIDFWXUHUDVVXPHVQRUHVSRQVLELOLW\IRUDQ\HUURUVWKDWPD\DSSHDULQ this manual. 7KHUHSURGXFWLRQWUDQVIHURUFRS\RIDOORUDQ\SDUWRIWKLVGRFXPHQWLVQRW permitted without express written consent. 15