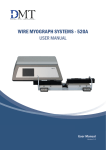
1
Blood FlowMeter
Owner’s Guide
This document was, as far as possible, accurate at the time of release. However, changes
may have been made to the software and hardware it describes since then. ADInstruments
Pty Ltd reserves the right to alter specifications as required. Late-breaking information
may be supplied separately.
Trademarks of ADInstruments
PowerLab®, LabChart®, LabTutor®, LabAuthor® and MacLab® are registered trademarks of
ADInstruments Pty Ltd. The names of specific recording units, such as PowerLab 8/35,
are trademarks of ADInstruments Pty Ltd. LabTutor Server, Chart and Scope (application
programs) and LabTutor Online are trademarks of ADInstruments Pty Ltd.
Other Trademarks
Apple, Mac and Macintosh are registered trademarks of Apple Computer, Inc.
Windows, Windows 7 and Windows Vista are either registered trademarks or trademarks
of Microsoft Corporation.
All other trademarks are the property of their respective owners.
Product: IN191 Blood FlowMeter
Document Number: Part Number: 5768
U-IN191-OG-035A
Copyright © May 2014 ADInstruments Pty Ltd.
Unit 13, 22 Lexington Drive, Bella Vista, NSW 2153, Australia
All rights reserved. No part of this document may be reproduced by any means without
the prior written permission of ADInstruments Pty Ltd.
Web: www.adinstruments.com
Technical Support: [email protected]
Documentation: [email protected]
ADInstruments Pty Ltd. ISO 9001:2008 Certified Quality Management System
Reg. No. 1053
ii
Blood FlowMeter Owner’s Guide
Contents
Safety Notes
1 Introduction
5
13
How to Use This Guide��������������������������������������������������������������������������������� 14
Checking the Blood FlowMeter������������������������������������������������������������ 14
The Blood FlowMeter������������������������������������������������������������������������������������ 14
The Front Panel �������������������������������������������������������������������������������������� 14
Power Indicator ������������������������������������������������������������������������������15
Probe Status Indicator��������������������������������������������������������������������15
Probe Input Connector������������������������������������������������������������������15
The Back Panel ��������������������������������������������������������������������������������������15
Probe Calibration Button��������������������������������������������������������������15
Signal Output Connectors ������������������������������������������������������������16
Fan Outlet����������������������������������������������������������������������������������������16
DC Power Connector����������������������������������������������������������������������16
Power Switch������������������������������������������������������������������������������������16
2 Setting Up
17
Connecting the Blood FlowMeter ��������������������������������������������������������������18
Switching on the Blood FlowMeter������������������������������������������������������18
Connecting the Laser Doppler Probe��������������������������������������������������18
Probe Application����������������������������������������������������������������������������������19
Temperature Warning ��������������������������������������������������������������������������19
Probe Calibration ����������������������������������������������������������������������������������20
Using the Blood FlowMeter with LabChart����������������������������������������������21
LDF Output Calibration������������������������������������������������������������������������21
BSC Output Calibration������������������������������������������������������������������������22
Removing the Probes������������������������������������������������������������������������������������22
A Care and Maintenance
23
Care of the Blood FlowMeter ��������������������������������������������������������������23
Storage����������������������������������������������������������������������������������������������23
Contents
iii
Cleaning��������������������������������������������������������������������������������������������23
Care of the Probes����������������������������������������������������������������������������������23
Handling the Probes����������������������������������������������������������������������23
Storing the Probes��������������������������������������������������������������������������24
Cleaning��������������������������������������������������������������������������������������������24
Disinfection��������������������������������������������������������������������������������������25
Sterilization��������������������������������������������������������������������������������������25
B Troubleshooting27
C Technical Aspects
31
Laser Doppler Flowmetry����������������������������������������������������������������������32
LDF Theory��������������������������������������������������������������������������������������32
How it Works������������������������������������������������������������������������������������������33
Probe Operation�������������������������������������������������������������������������������������34
What the Blood FlowMeter Measures������������������������������������������������34
The Blood Perfusion Unit (BPU)����������������������������������������������������������34
Zero BPU��������������������������������������������������������������������������������������������������35
Motion Artifact Noise����������������������������������������������������������������������������35
D Specifications37
Doppler Flow Specifications����������������������������������������������������������37
Power Supply������������������������������������������������������������������������������������38
Physical Configuration������������������������������������������������������������������38
Index39
iv
Blood FlowMeter Owner’s Guide
!
Safety Notes
Statement of Intended Use
All products manufactured by ADInstruments are intended for
use in teaching and research applications and environments only.
ADInstruments products are NOT intended to be used as medical
devices or in medical environments. That is, no product supplied by
ADInstruments is intended to be used to diagnose, treat or monitor a
subject. Furthermore no product is intended for the prevention, curing
or alleviation of disease, injury or handicap.
Where a product meets IEC 60601-1 it is under the principle that:
•• it is a more rigorous standard than other standards that could
be chosen.
•• it provides a high safety level for subjects and operators.
The choice to meet IEC 60601-1 is in no way to be interpreted to mean
that a product:
•• is a medical device.
•• may be interpreted as a medical device.
•• is safe to be used as a medical device.
  Safety Notes
5
Safety Symbols
Devices manufactured by ADInstruments that are designed for direct
connection to humans are tested to IEC 601-1:1998 (including amendments
1 and 2) and 60601-1-2, and carry one or more of the safety symbols below.
These symbols appear next to those inputs and output connectors that can be
directly connected to human subjects.
BF symbol: Bodyprotected equipment
CF symbol: Cardiacprotected equipment
!
Warning symbol: See
Documentation
The three symbols are:
•• BF (body protected) symbol. This means that the input connectors
are suitable for connection to humans provided there is no direct
electrical connection to the heart.
•• CF (cardiac protected) symbol. This means that the input
connectors are suitable for connection to human subjects even when
there is direct electrical connection to the heart.
•• Warning symbol. The exclamation mark inside a triangle means
that the supplied documentation must be consulted for operating,
cautionary or safety information before using the device.
Further information is available on request.
Bio Amp Safety Instructions
The Bio Amp inputs displaying any of the safety symbols are electrically
isolated from the mains supply in order to prevent current flow that may
otherwise result in injury to the subject. Several points must be observed for
safe operation of the Bio Amp:
•• All Bio Amp front-ends (except for the FE138 Octal Bio Amp) and all
PowerLab units with a built-in Bio Amp are supplied with a 3-lead or
5-lead Bio Amp subject cable and lead wire system. The FE138 Octal
Bio Amp is supplied with unshielded lead wires (1.8 m). Bio Amps
are only safe for human connection if used with the supplied subject
cable and lead wires.
6
Blood FlowMeter Owner’s Guide
•• All Bio Amp front-ends and PowerLab units with a built-in Bio Amp
are not defibrillator-protected. Using the Bio Amp to record signals
during defibrillator discharges may damage the input stages of the
amplifiers. This may result in a safety hazard.
•• Never use damaged Bio Amp cables or leads. Damaged cables and
leads must always be replaced before any connection to humans is
made.
Isolated Stimulator Safety
Instructions
The Isolated Stimulator outputs from a front-end signal conditioner or
a PowerLab with a built-in isolated stimulator are electrically isolated.
However, they can produce pulses of up to 100 V at up to 20 mA. Injury can
still occur from careless use of these devices. Several points must be observed
for safe operation of the Isolated Stimulator:
•• The Isolated Stimulator output must only be used with the supplied
bar stimulus electrode.
•• The Isolated Stimulator output must not be used with individual
(physically separate) stimulating electrodes.
•• Stimulation must not be applied across the chest or head.
•• Do not hold one electrode in each hand.
•• Always use a suitable electrode cream or gel and proper skin
preparation to ensure a low-impedance electrode contact. Using
electrodes without electrode cream can result in burns to the skin or
discomfort for the subject.
•• Subjects with implantable or external cardiac pacemakers, a cardiac
condition, or a history of epileptic episodes must not be subject to
electrical stimulation.
•• Always commence stimulation at the lowest current setting and
slowly increase the current.
•• Stop stimulation if the subject experiences pain or discomfort.
•• Do not use faulty cables, or those that have exhibited intermittent
faults.
•• Do not attempt to measure or record the Isolated Stimulator
waveform while connected to a subject using a PowerLab input or
any other piece of equipment that does not carry the appropriate
safety symbol (see Safety Symbols above).
  Safety Notes
7
Always check the status indicator on the front panel. It will always flash green
each time the stimulator delivers a current pulse. A yellow flash indicates
an ‘out-of-compliance’ (OOC) condition that may be due to poor electrode
contact or electrode cream drying up. Always ensure that there is good
electrode contact at all times. Electrodes that are left on a subject for some
time need to be checked for dry contacts. An electrode impedance meter can
be used for this task.
•• Always be alert for any adverse physiological effects in the subject. At
the first sign of a problem, stimulation must be stopped, either from
the software or by flicking down the safety switch on the front panel
of any built-in Isolated Stimulator or the FE180 Stimulus Isolator.
•• The FE180 Stimulus Isolator is supplied with a special transformer
plug pack. The plug pack complies with medical safety requirements.
Therefore, under no circumstances should any other transformer be
used with the Stimulus Isolator. For a replacement transformer plug
pack please contact your nearest ADInstruments representative.
General Safety Instructions
To achieve the optimal degree of subject and operator safety, consideration
should be given to the following guidelines when setting up a PowerLab
system either as stand-alone equipment or when using PowerLab equipment
in conjunction with other equipment. Failure to do so may compromise the
inherent safety measures designed into PowerLab equipment.
The following guidelines are based on principles outlined in the international
safety standard IEC60601-1-1: General requirements for safety - Collateral
standard: Safety requirements for medical systems. Reference to this standard
is required when setting up a system for human connection.
PowerLab systems (and many other devices) require the connection of a
personal computer for operation. This personal computer should be certified
as complying with IEC60950 and should be located outside a 1.8 m radius
from the subject (so that the subject cannot touch it while connected to
the system). Within this 1.8 m radius, only equipment complying with
IEC60601‑1 should be present. Connecting a system in this way obviates
the provision of additional safety measures and the measurement of leakage
currents.
Accompanying documents for each piece of equipment in the system should
be thoroughly examined prior to connection of the system.
8
Blood FlowMeter Owner’s Guide
While it is not possible to cover all arrangements of equipment in a system,
some general guidelines for safe use of the equipment are presented below:
•• Any electrical equipment which is located within the SUBJECT
AREA should be approved to IEC60601-1.
•• Only connect those parts of equipment that are marked as an
APPLIED PART to the subject. APPLIED PARTS may be recognized
by the BF or CF symbols which appear in the Safety Symbols section
of these Safety Notes.
•• Only CF-rated APPLIED PARTS must be used for direct cardiac
connection.
•• Never connect parts which are marked as an APPLIED PART to
those which are not marked as APPLIED PARTS.
•• Do not touch the subject to which the PowerLab (or its peripherals)
is connected at the same time as making contact with parts of the
PowerLab (or its peripherals) that are not intended for contact to the
subject.
•• Cleaning and sterilization of equipment should be performed in
accordance with manufacturer’s instructions. The isolation barrier
may be compromised if manufacturer’s cleaning instructions are not
followed.
•• The ambient environment (such as the temperature and relative
humidity) of the system should be kept within the manufacturer’s
specified range or the isolation barrier may be compromised.
•• The entry of liquids into equipment may also compromise the
isolation barrier. If spillage occurs, the manufacturer of the affected
equipment should be contacted before using the equipment.
•• Many electrical systems (particularly those in metal enclosures)
depend upon the presence of a protective earth for electrical safety.
This is generally provided from the power outlet through a power
cord, but may also be supplied as a dedicated safety earth conductor.
Power cords should never be modified so as to remove the earth
connection. The integrity of the protective earth connection between
each piece of equipment and the protective earth should be verified
regularly by qualified personnel.
•• Avoid using multiple portable socket-outlets (such as power boards)
where possible as they provide an inherently less safe environment
with respect to electrical hazards. Individual connection of each
piece of equipment to fixed mains socket-outlets is the preferred
means of connection.
  Safety Notes
9
If multiple portable socket outlets are used, they are subject to the following
constraints:
•• They shall not be placed on the floor.
•• Additional multiple portable socket outlets or extension cords shall
not be connected to the system.
•• They shall only be used for supplying power to equipment which is
intended to form part of the system.
Cleaning and Sterilization
ADInstruments products may be wiped down with a lint free cloth moistened
with industrial methylated spirit. Refer to the Data Card supplied with
transducers and accessories for specific cleaning and sterilizing instructions.
Preventative Inspection and
Maintenance
PowerLab systems and ADInstruments front-ends are all maintenancefree and do not require periodic calibration or adjustment to ensure safe
operation. Internal diagnostic software performs system checks during
power up and will report errors if a significant problem is found. There is no
need to open the instrument for inspection or maintenance, and doing so
within the warranty period will void the warranty.
Your PowerLab system can be periodically checked for basic safety by using
an appropriate safety testing device. Tests such as earth leakage, earth
bond, insulation resistance, subject leakage and auxiliary currents and
power cable integrity can all be performed on the PowerLab system without
having to remove the covers. Follow the instructions for the testing device if
performing such tests.
If the PowerLab system is found not to comply with such testing you should
contact your PowerLab representative to arrange for the equipment to be
checked and serviced. Do not attempt to service the device yourself.
10
Blood FlowMeter Owner’s Guide
Environment
Electronic components are susceptible to corrosive substances and
atmospheres, and must be kept away from laboratory chemicals.
Storage Conditions
•• Temperature in the range 0–40 °C
•• Non-condensing humidity in the range 0–95%.
Operating Conditions
•• Temperature in the range 5–35 °C
•• Non-condensing humidity in the range 0–90%.
Disposal
•• Forward to recycling center or return to manufacturer.
•• Unwanted equipment bearing the Waste Electrical and Electronic
Equipment (WEEE) Directive symbol requires separate waste
collection. For a product labeled with this symbol, either forward
to a recycling center or contact your nearest ADInstruments
representative for methods of disposal at the end of its working life.
WEEE Directive
symbol
  Safety Notes
11
12
Blood FlowMeter Owner’s Guide
C
1
H
A
P
T
E
R
Introduction
The ADInstruments Blood FlowMeter is one of a family of stand-alone
instruments, designed to extend the capabilities of the PowerLab system.
The Blood FlowMeter is designed to measure blood cell perfusion levels
in the microcirculatory beds of skin and other tissues.
This owner’s guide covers the features of the Blood FlowMeter, its
operation, maintainence and safety information.
Chapter 1 Introduction
13
How to Use This Guide
This owner’s guide describes how to set up and begin using your Blood
FlowMeter. Topics discussed included how to connect the hardware,
perform a simple power-up test and calibration of the Blood FlowMeter. The
appendices provide technical information about the Blood FlowMeter and
look at some potential problems and their solutions. There is an index at the
end of this guide.
Checking the Blood FlowMeter
Before connecting the Blood FlowMeter to anything, check it carefully for
signs of physical damage.
1. Check that there are no obvious signs of damage to the outside of the
Blood FlowMeter casing.
2. Check that there is no obvious sign of internal damage, such as
rattling. Pick up the Blood FlowMeter, tilt it gently from side to side,
and listen for anything that appears to be loose.
If you have found a problem, contact your authorized ADInstruments
representative immediately, and describe the problem so arrangements can
be made to replace or repair the unit.
The Blood FlowMeter
The remainder of this chapter contains general information about the
features, connections, and indicators of the Blood FlowMeter. More detailed
information can be found in Appendix C.
The Front Panel
Figure 1–1
Front panel of the
Blood FlowMeter
Power and probe status indicators
14
Probe input connector
Blood FlowMeter Owner’s Guide
Power Indicator
The power indicator is located at the bottom left of the front panel. When
lit, it indicates that the Blood FlowMeter has power from the external power
supply.
Probe Status Indicator
The probe input has an associated Status indicator. This indicator is used to
indicate what is happening to the channel at any given time. Flash and color
indications are listed below:
•• Green (continuous):
Channel OK — no probe connected
•• Red/Amber (flashing):
Calibration in progress
•• Amber (continuous):
Probe connected and laser operating
Probe Input Connector
The Blood FlowMeter is a single channel device and provides one probe input
connector. The input connector is a polarized (keyed) multi-pin connector
with optical interfaces for the fiber optics in the probe cable. The probes are
designed to push and click into the connector. Do not touch or tamper with
any part of the connector as it may damage the optics or internal circuitry.
The Back Panel
Figure 1–2
The back panel of the
Blood FlowMeter
Probe calibration
button
Signal output
connectors
Fan outlet
Power switch and
DC power connector
Probe Calibration Button
The Blood FlowMeter is designed to automatically configure and calibrate
itself for specific probes. This operation requires a MLA191 Calibration Kit,
which includes a controlled concentration of latex spheres in suspension.
This is discussed in Probe Calibration, page 20.
Chapter 1 Introduction
15
Signal Output Connectors
There are two BNC output connectors on the back panel. All signals are
analog and are designed to be suitable for connection to a variety of data
recording systems, particularly PowerLabs.
The signal from the Output BSC represents the percentage backscatter (tissue
remittance). It has a range of 0–5 V (1% remittance is 50 mV).
The Output LDF provides the laser Doppler flowmetry output signal, in
the range 0–5 V. This signal represents the relative Blood Perfusion with
1 perfusion unit equalling 1 mV.
Fan Outlet
In order to maintain the internal laser diode temperature, the Blood
FlowMeter utilizes a thermostatically controlled fan to supplement cooling
when required. The fan outlet must remain clear of obstructions during
operation.
Warning
The Blood FlowMeter’s
medical rating is only
valid when used in
conjunction with the
power supply provided.
Using any other type of
supply will not guarantee
medical approval.
DC Power Connector
Power to the Blood FlowMeter comes from an external, medically rated,
power supply (provided with the Blood FlowMeter). The power supply unit
is designed to connect to a wide variety of AC supplies. Connection of power
to the Blood FlowMeter is via a mini DIN connector. All power at this point
is low voltage.
Power Switch
The power switch controls power to the unit from the external power supply.
It should be switched off when the power supply and the signal output cables
are connected.
16
Blood FlowMeter Owner’s Guide
C
2
H
A
P
T
E
R
Setting Up
This chapter guides you through connecting your Blood FlowMeter and
subsequent operation of the instrument. You should read this chapter
carefully before using your Blood FlowMeter.
Chapter 2 Setting Up
17
Connecting the Blood FlowMeter
Before connecting anything make sure that the power outlet and the switch
on the rear panel of the Blood FlowMeter are turned off.
Connect the power supply output of the external supply to the power input of
the Blood FlowMeter. Make sure that this connector is pushed all the way in,
as it does not have a locking facility.
Connect the outputs of the Blood FlowMeter to the signal inputs of your
recording device. Note that the Blood FlowMeter has outputs for both LDF
and BSC signals (see Signal Output Connectors, page 15). Both signal
outputs do not need to be used. You only need to connect the output signal
that you wish to record.
Switching on the Blood FlowMeter
When the power has been connected, turn on the power switch on the rear
panel of the Blood FlowMeter. The Power indicator on the front of the Blood
FlowMeter should glow green and you should hear a double beep from the
unit to indicate that it has initialized.
Connecting the Laser Doppler Probe
Very carefully remove the probe from its protective case and check that the
probe connector is clean and free from dust. To connect the probe to the
probe connector on the front of the Blood FlowMeter, orientate the plug with
respect to the socket until it is aligned correctly. The socket is designed to
only accept the plug in one particular orientation. Once aligned, carefully
push the plug into the socket until locked in position.
If everything is OK then the status indicator for the probe will glow amber.
If there is something wrong with the probe or connection then the status
indicator will remain green.
Wait at least ten minutes before making any measurements to allow the
instrument’s temperature to stabilize. Please note that temperature ‘out-ofrange’ beeps may occur during the warm-up period.
18
Blood FlowMeter Owner’s Guide
Probe Application
Warning: Needle (implantable) laser Doppler probes are ONLY for use in
animals. Only surface laser Doppler probes are safe for use on humans.
Surface probes can be attached to tissue using a self adhesive ring. These have
adhesive on both sides with a small hole in the center. Needle probes can be
secured by using a micro-manipulator or some similar device.
It is important to control the relative movements of the tissue (especially that
induced by breathing) with respect to the probe. Relative movements will
produce artifacts in the perfusion signal. These can be reduced by allowing
the supported probe to lightly contact the surface of the tissue. Under some
conditions it may be desirable for the probe to be held in position by hand.
It is essential to ensure that the pressure on the tissue is minimal, otherwise
local occlusion of the microvasculature may result.
Excessive ambient lighting at the probe site can disturb the blood perfusion
reading. Avoid direct illumination of the measurement site, especially
direct sunlight. If erroneous readings of the measurement site from external
lighting levels are suspected, cover the attached probe and measurement area
with a light piece of opaque material.
Probe signal outputs for different conditions are listed in Table 2–1.
Table 2–1
Probe outputs for
different conditions
Condition
LDF
Backscatter
No probe
-2.5 V
0V
Unrecognized probe
-5 V
-5 V
Low backscatter
0V
-2.5 V
Flow over range
+5 V
+5V
Temperature Warning
If the internal temperature of the Blood FlowMeter moves outside the
operating temperature range of the device, then it will emit a double beep
every 16 seconds. If this occurs, the instruments should be moved to a cooler
environment for proper operation.
With the temperature out of range, output signals will continue to be
generated but may no longer be within the calibrated tolerance of the system
and should be interpreted with caution. If there are any problems or faults
please contact your ADInstruments representative for further advice.
Chapter 2 Setting Up
19
Probe Calibration
The Blood FlowMeter is designed to be easily configured and calibrated
for new probes. This operation requires a MLA191 Calibration Kit, which
includes a controlled concentration of latex spheres in suspension. It is
important to follow the instructions provided with the Calibration Kit as
calibration of probes is not possible without it and should not be attempted.
Before starting this it is advisable to have a stable workbench free from
vibration. A clamp to hold the probe reliably in the suspension is provided
in the calibration kit. Set up the probe in the center of the suspension, with
the measuring surface of the probe at a maximum distance from all edges
of the vessel. Follow the procedure below to calibrate the probe. Note that
calibration can be abandoned at any time by removing the probe or by
pressing the CAL button during the calibration.
1. Ensure the probe has been properly initialized for at least 10 minutes
prior to attempting the calibration (see Connecting the Laser Doppler
Probe, p. 18).
2. Using the positioning clamps provided with the MLA191 Calibration
Kit, immerse the probe to mid-depth in the calibration solution.
3. Press the CAL button once. A single beep is emitted, followed by a
series of double beeps, lasting approximately 20 seconds.
4. While the beeping continues, press the CAL button once. A long beep
will sound and the red and amber lights will flash for approximately
25 seconds.
5. A double beep will sound to indicate the end of the calibration,
confirming the calibration. After five seconds, the red indicator light
returns to amber and the unit is ready for use.
During calibration keep the bench free of vibration and movement as this
may invalidate the result. Generally a probe does not require recalibration
unless a new or replacement probe is introduced.
20
Blood FlowMeter Owner’s Guide
Using the Blood FlowMeter with
LabChart
The Blood FlowMeter has been designed to be used with the ADInstruments
PowerLab system, or any analog recording device such as a paper chart
recorder.
The following sections describe how to use the Blood FlowMeter with a
PowerLab system and LabChart software. It is assumed that you know how
to connect the Blood FlowMeter to your PowerLab system and that you are
familiar with the LabChart software.
LDF Output Calibration
Both the LDF and BSC outputs have been factory calibrated to give a certain
voltage output per calibrated unit. The LDF output produces 1 mV for each
blood perfusion unit. As the maximum output of the Blood FlowMeter is 5000
perfusion units or 5 V, you should set the range of the corresponding input
in LabChart to 5 V, or more sensitively depending on your requirements. As
LDF output only produces an output in the range 0 – 5 V, you can also set the
Amplitude axis scale to single-sided for the LabChart channel.
To calibrate the system, open the Input Amplifier dialog for the LDF channel.
Click the Units… button to open the Units Conversion dialog.
At the top of the dialog type in the values shown in Figure 2–1. Note that you
must enter the numbers on the left as mV in order to get the correct scaling.
You can define a suitable unit name, for example ‘Perf Unit’, by selecting
Define Unit… in the Units drop-down list. Click OK to make sure that the
units conversion is applied to that channel. Check to see if it has been applied
by looking at the scale of the Input Amplifier dialog.
Figure 2–1
Entering units conversion
information for the LDF
channel
Chapter 2 Setting Up
21
An example of what you should see is shown in Figure 2–2. This figure also
shows a typical waveform from the LDF output. You can use a Low pass filter
setting to remove any unwanted noise. You should not use the AC coupled
feature as this will result in an incorrect measurement of blood perfusion
units.
Figure 2–2
Amplifier dialog once LDF
waveform conversion has
been applied
BSC Output Calibration
Calibrating the BSC channel is a similar process to that for the LDF output,
but with different values required. As the BSC output represents the relative
strength of the returned signal, it is a voltage that represents the percentage of
backscattered light. A 100% backscattered signal is represented by a voltage
of 5 V. Zero backscattering corresponds to 0 V. This gives an output that
corresponds to 50 mV per % backscattering.
Removing the Probes
To remove a probe from the instrument, gently pull the outside of the probe
connector (the knurled sleeving). This will disengage the locking mechanism
and the connector should just pull out. Do not attempt to force the connector.
22
Blood FlowMeter Owner’s Guide
A
A P P E N D I X
Care and
Maintenance
Care of the Blood FlowMeter
Storage
When not in use, the Blood FlowMeter should be stored at room
temperature, although it may be stored at temperatures in the range of
5 – 50 °C. When returning from extremes of temperature, it is important
to allow the instrument to stabilize at room temperature before use.
Cleaning
Warning: Do not spray, pour or spill any liquid on the Blood FlowMeter,
its accessories, connectors, switches or openings in the enclosure. Do not
submerse the instrument in liquid.
To clean the outside cover of the Blood FlowMeter or to remove spills,
wipe the device with a soft, lint free cloth. Do not use alcohol or abrasivebased cleaners as this may damage the external surfaces of the device.
Care of the Probes
Handling the Probes
Caution: Probes for the Blood FlowMeter must be handled with care.
Failure to do this may result in breakage of the internal optical fibers,
scratching the polished probe ends or separation of the cable from the
probe ends or connectors.
The optical fibers used in the probes are glass and have a diameter of
125 µm. Although the fibers are flexible and can be bent, it is recommended
that they are not subjected to bends with a radius less than 30 mm.
Appendix A Care and Maintenance
23
The probe connectors must be kept clean and free from dust. Connectors
should be inspected before each use. Dust can be removed from the
connectors using an air-duster.
The integrity of probes may be checked by holding the probe end to a source
of bright diffuse light, for example a lamp, and inspecting the connector end.
Two bright spots of light of equal intensity should be visible from the pins
within the connector.
Storing the Probes
When not in use, probes should be stored either in the probe box or, following
sterilization, stored unopened in the packaging in which they were sterilized.
Probes should be stored with the optical fiber coiled neatly.
Cleaning
Probes are cleaned prior to packing and dispatch. It is recommended that the
probe end on all new probes be wiped with a soft cloth, preferably one that
does not shed fibers, impregnated with 70% alcohol in water.
It is recommended that after use probes are cleaned immediately as it is
easier to remove soiling and particulate matter before it dries onto the probe
surfaces.
1. Visually inspect the probe end, cable and connector. If there is
no visible soiling, wipe the probe end and cable with a soft cloth
impregnated with 70% alcohol in water. Allow the alcohol to dry
completely before using the probe.
2. If there is visible soiling, clean the probe with warm water containing
a mild detergent.
3. Careful rubbing with a soft cloth or brush should be employed to
ensure that all soiling and particulate matter is removed. These actions
should be carried out beneath the surface of the cleaning solution.
Note: Avoid immersing the probe connector in the cleaning solution.
4. Rinse the probe end and cable in clean water.
5. Wipe the probe end and cable with an absorbent cloth and leave the
probe to dry completely.
24
Blood FlowMeter Owner’s Guide
Disinfection
Probes can be disinfected by immersion of the probe end and cable in:
•• 2% glutaraldehyde, or
•• 70% alcohol in water
The disinfectant manufacturer’s recommended immersion times should be
used.
Sterilization
Only some of the dedicated perfusion probes may be sterilized by moist
heat (steam). For further details please contact your ADInstruments
representative.
Appendix A Care and Maintenance
25
26
Blood FlowMeter Owner’s Guide
B
A P P E N D I X
Troubleshooting
This appendix describes some problems that may arise when using the
Blood FlowMeter. If you have any trouble getting the Blood FlowMeter to
work, use this section to try and isolate and fix the problem. If you cannot
find a solution to your problem in this appendix, or in the appendices
of your PowerLab hardware and software guides, please contact your
ADInstruments representative.
Although the Blood FlowMeter has been designed to be very reliable,
there may be occasions when it does not appear to function correctly. In
the majority of cases, the problem can be fixed by checking connections
and or resetting the Blood FlowMeter. Very rarely will there be an actual
problem with the Blood FlowMeter. This appendix will help you to
determine what kind of fault you have and an appropriate solution.
Appendix B Troubleshooting
27
The Power indicator fails to light when the unit is turned on
The power is switched off at the wall, the power cable is not connected firmly,
or a fuse has blown.
•• Check switches, power connections, and fuses.
The power cable from the external power supply is loose.
•• Check that the power supply cable is firmly connected to the power
input connector on the back of the Blood FlowMeter.
A faulty power supply unit.
•• If you suspect the power supply unit or the Blood FlowMeter itself
then contact your ADInstruments representative for advice. Do not
attempt to fix these components yourself as it will void the warranty
and may compromise the safety aspects of the system.
The Power indicator is lit but the Status indicator does not light when the
probe is plugged in
A faulty or damaged probe connector.
•• Check that all the connection pins are straight. If one or more is bent
do not attempt to bend them back. Contact your ADInstruments
representative for help.
The Blood FlowMeter internal processor is not working.
•• Turn off the power, wait five seconds and turn on the power again. If
the Status indicator light still does not light then the main processor
circuitry may be faulty. Contact your ADInstruments representative
for help.
The Blood FlowMeter does not produce any laser output when the power is
on
A faulty probe connection.
•• Make sure the probe is properly connected to the system by pushing
its connector firmly into the front panel socket. If this fails to correct
the problem, remove the probe and check the connector pins to verify
that they are straight. If any of the pins are bent do not attempt to
fix them, instead contact your ADInstruments representative for
assistance.
28
Blood FlowMeter Owner’s Guide
A faulty optic fiber in the probe.
•• If the probe cable has been subject to undue mechanical stress then
the internal optic fiber could be damaged. Although this is unlikely,
the probe should not be used in this case. A replacement will need to
be purchased.
A faulty laser diode.
•• This is very unlikely, but if everything else has been checked and there
is still no laser output, then you should contact you ADInstruments
representative for service.
There is no signal output from the Blood FlowMeter
No power to the Blood FlowMeter.
•• Check that the Power indicator on the Blood FlowMeter is on.
The probe is not plugged in correctly.
•• Check the probe is connected correctly.
A loose or missing output connection to your recording equipment.
•• Make sure that the appropriate output signals from the Blood
FlowMeter are connected properly to your recording equipment.
Appendix B Troubleshooting
29
30
Blood FlowMeter Owner’s Guide
C
A P P E N D I X
Technical
Aspects
Blood flow in the skin performs an essential role in the regulation of the
metabolic, hemodynamic and thermal state of the individual. Despite
the fact that the skin is the body’s largest and most accessible organ, the
measurement of cutaneous microcirculatory blood perfusion has until
quite recently proved a formidable task.
By far the largest proportion of the body’s dermal vasculature is involved
in regulating body temperature and controlling systemic blood pressure.
A smaller but significant proportion of the bulk skin blood perfusion also
fulfils the skin’s metabolic requirements. It is the upper dermis (i.e the
first 1.5–4.0 mm of tissue, depending on the site) that is chiefly responsible
for providing a nutritional supply of blood to the avascular epidermis, the
integrity of which is essential for the well-being of the individual. The
degree of blood cell perfusion in this region of the microvascular tree,
over both long and short time periods, can provide a reliable indicator
of peripheral vascular disease or injury. Reduction or even complete
occlusion of blood perfusion in the microcirculatory blood vessels can
often be attributed to a variety of cutaneous vascularization disorders.
Appendix C Technical Aspects
31
Laser Doppler Flowmetry
Laser Doppler flowmetry (LDF) offers a continuous measurement of blood
cell perfusion in the microcirculatory beds of skin tissue and other tissues
without influencing the blood perfusion. LDF is established as an effective
and reliable clinical medicine and microvascular research technique. This
has been achieved largely because LDF satisfies the need for continuous,
non-invasive and real-time measurement of blood perfusion in the
microvasculature.
Laser Doppler flowmeters produce an output signal that is proportional to
the blood cell perfusion (or flux). This represents the transport of blood cells
through microvasculature and is defined as:
Microvascular Perfusion = number of blood cells × mean velocity
Microvascular perfusion, therefore, is the product of the mean cell velocity
and mean blood cell concentration present in the small volume of tissue
under illumination from the laser beam.
LDF Theory
LDF makes use of the fact that when tissue is illuminated by a coherent,
low powered laser, light is scattered by both moving and static structures
within the microcirculatory beds. Photons, scattered by moving blood
cells are spectrally broadened according to the Doppler effect. Maximum
Doppler shifts occur when blood cells are moving in a direction parallel to
the incident light beam and the detected light (scattered light) from the cells
is detected in a direction opposite to its origin. For example, a Doppler shift
of about 4 kHz is obtained when laser light (of a wavelength of 830 nm) is
backscattered from a particle in water moving at 1 mm/s parallel to the light
beam. In general a continuous range of Doppler frequency shifts is expected.
Photons scattered by static structures alone do not undergo Doppler shifting.
In order to detect these small frequency shifts it is necessary to use a
technique called ‘optical beating’. This basically means that the original
output light is mixed with the backscattered light to effectively add the
signals. (In technical terms this is referred to as heterodyning). When these
signals are presented to the detector the result is an output which contains a
fluctuating component related to the difference between the two beams.
This is performed using a photo diode detector. The frequency and magnitude
of the alternating component of the photocurrent from this device (i.e. the
power spectral density) is related to the mean velocity and concentration of
blood cells present in the measuring volume.
32
Blood FlowMeter Owner’s Guide
The signal from the photodiode is converted to digital information and then
processed using a DSP (Digital Signal Processor). This device performs the
spectral analysis and produces an LDF signal.
How it Works
The Blood FlowMeter determines the blood flow perfusion by illuminating
the surface of the skin with laser light and measuring the backscattered light.
Various calculations are then performed on the returned signal which is then
turned into a continuous signal that represents the blood perfusion in the
illuminated area. The block diagram below shows a very basic outline of the
fundamental components.
The input channel is supplied with laser light at a wavelength of 830 nm
(visible red light) from an internal semiconductor laser diode which is
temperature controlled by means of a Peltier cell and fans.
The laser light is transferred to the Probe connector by optic fiber.
Figure C–1
Block diagram of the
Blood FlowMeter
DSP
Probe
Head
Photodetector
LDF
Signal
Converter
Fiber Optic
Cables
Signal
Outputs
BSC
Peltier Cell
Laser Diode
Appendix C Technical Aspects
33
When the probe is connected the system will turn on the laser, therefore
passing red light down the length of the probe’s fiber optics to the probe
head. The probe head has an optical lens that allows light to be transmitted
to the skin surface as well as allowing the transmission of backscattered light
via a separate optic fiber. The returned or backscattered light travels up to the
probe cable to a photodiode assembly attached to the input connector. The
photodiode generates an electrical signal proportional to the light it receives.
The returned signal will be a combination of the original light and
backscattered light which results in a signal with a varying frequency
content. This varying signal content is the signal of interest as it represents
the Doppler shift as a result of light being backscattered off moving blood
cells.
This photodiode signal is digitized and a digital signal processor is used to
perform a spectral analysis of the signal to determine the mean velocity of
the blood cells and thus generate an LDF signal. The result is converted back
into an analog signal that is proportional to the blood perfusion in the area
of measurement.
Probe Operation
There are several types of optic probes that can be used with the system,
each one having its own optical characteristics. In order to make sure that
different probes will produce consistent results, each probe contains a means
of identifying itself to the system. In this way you can change probes without
having to recalibrate your system.
What the Blood FlowMeter Measures
The Blood FlowMeter is a laser Doppler flowmeter whose primary purpose
is to measure real-time microvascular red blood cell (RBC) perfusion
(otherwise known as RBC flow or RBC flux). Laser Doppler signals are
recorded in BPU which is a relative units scale defined using a carefully
controlled motility standard.
The Blood Perfusion Unit (BPU)
The Blood FlowMeter has been factory calibrated with a constant, known
motility standard so that, for a given perfusion situation, all probes will
read the same value of BPU. However, it should be noted that BPU is not an
intrinsic physiological definition of blood perfusion.
The notion of a universal physiological standard, valid for all types of tissue
is scientifically inconceivable. Such activity rests on the assumption that
microcirculatory blood perfusion is essentially homogeneous for all tissue
structures over the human body. This assumption is seriously flawed due to
34
Blood FlowMeter Owner’s Guide
the regional complexity of the skin’s microvasculature, its global variability
over the human body, and the fact that the complex nature of light scattering
in tissue makes LDF suitable for characterizing only relative changes in blood
perfusion. So, although the Blood FlowMeter can be absolutely calibrated
using an in vitro model, the complex and variable geometry of the vascular
tree precludes absolute calibration for in vivo applications. This means that
even though the Blood Perfusion Unit (BPU) can be traced to a physical
standard, the measurements expressed in BPU must be considered as strictly
relative.
Zero BPU
The zero reading of the Blood FlowMeter has been obtained by calibrating
the system against a special static scattering material where no movements
occur. In such cases the back-scattered light processed by the Blood
FlowMeter contains no Doppler shifted frequencies and a true zero is
obtained. A zero reading therefore indicates zero motion in the measuring
volume under examination and also zero artifactual motion arising from
relative movements between the probe and the measuring volume. During
in vivo measurements an absolute zero is rarely obtained. Even during total
occlusion of the tissue blood perfusion, there is often some small, residual
motion of blood cells trapped in the vessels, as well as some small muscle
and tissue movement in the measuring volume. Even after surgical removal
of tissue, localized cell movement and Brownian motion may still occur in
the severed blood vessels.
The Blood FlowMeter’s internal software allows the zeroing of the laser
Doppler signal when there is insufficient light returning from the tissue to
the probe. In the default condition (power on), the cut-off threshold is set to
1%. This means that if the backscatter signal falls below 1%, the laser Doppler
signal is automatically zeroed.
Motion Artifact Noise
Laser Doppler studies sometimes reveal changes in the blood perfusion signal
which are often unrelated to actual physiological changes in blood perfusion.
These artifacts in the blood perfusion signal can often be attributed to the
movement of the optical fibers in the beam delivery/collection system and
are noticeable in situations where the subject moves or twitches. This type
of artifact may be worse in situations where the probe moves with respect to
the tissue. This effect can therefore be minimized by using a probe which is
connected to, rather than clamped over the tissue, for example by using the
standard right angle or saturable probes.
Appendix C Technical Aspects
35
Spurious motion artifact may occur when a ventilator, or other mechanical
device is employed. Under these conditions, artifacts should be minimized
by controlling vibration reaching the measurement site and the Blood
FlowMeter. This may be achieved by placing the ventilator on a separate table
and on a vibration absorbing medium.
36
Blood FlowMeter Owner’s Guide
D
A P P E N D I X
Specifications
Doppler Flow Specifications
Mode:
Continuous laser Doppler flowmetry
Primary measurand:
Microvascular blood perfusion
(Relative RBC Flux)
LDF units:
Relative units (0-5000 Blood Perfusion
Units, corresponding to 0-5 V output)
BSC units:
Relative units (0-100% corresponding to
0-5 V output)
Laser type:
Semiconductor laser diode
(temperature stabilized)
Laser wavelength:
830 nm ± 10 nm
Laser power:
< 0.5 mW from probe
Laser class:
Class 1 (as per 21 CFR 1040-10 and
1040‑11)
Doppler signal bandwidth:
16 kHz
Linearity range:
Up to 0.35% moving scatterers by volume
Flow response time:
< 0.2 s
Reading stability:
5% (measured with standard motility
solution)
Zeroing:
Automatic, controlled
Appendix D Specifications
37
Flux calibration:
Factory or user calibrated using a motility
standard (concentration of latex spheres
undergoing Brownian Motion)
Power Supply
Supply type:
Power supply in external enclosure
Voltage range:
100-240 V AC (50-60 Hz), 0.8-0.4 A
Output power:
+ 5 V, ± 12 V DC
Fusing:
Internal, 2 A 240 V resettable
Physical Configuration
Dimensions (h × w × d):
70 mm × 240 mm × 260 mm
(2.70" × 9.45" × 10.2")
Weight:
2.5 kg
Power requirements:
240 V or 120 V (internally set) @ 15 W
Operating temperature:
5-35 °C
Operating humidity:
0-70% (non-condensing)
ADInstruments reserves the right to alter these specifications at any time.
38
Blood FlowMeter Owner’s Guide
Index
A
F
artifacts 35
fan outlet 16
front panel 14
B
back panel 15
backscatter output 15
blood cell perfusion 32
Blood FlowMeter
checking for damage 14
cleaning 23
connecting to other equipment 18
operating principles 31
troubleshooting 27
Blood Perfusion Units 34
BPU
limitations 34
zero readings 35
BSC output 15
C
checking the Blood FlowMeter 14
cleaning 10, 23
connecting probes 18
connectors
back panel 15
front panel 14
power 16
probe input 15
signal output 15
cooling requirements 16
D
Doppler effect 32

Index
I
indicator lights
power 15
probe status 15
L
Laser Doppler Flowmetry 32
laser illumination 32
LDF output 15
LDF theory 32
M
maintenance 10
microvascular perfusion 32
motion artifacts 35
O
optic fiber 33
P
power indicator light 15
power supply socket 16
power switch 16
probe
connection 18
input connector 15
operation 34
removal 22
status indicator light 15
sterilization 25
39
storage 24
R
RBC 34
red blood cell perfusion 34
removing probes 22
S
Safety Notes 5–11
signal connection 18
signal outputs 15
sterilization of probes 25
storage 11
storage of probes 24
T
technical aspects 31
troubleshooting 27
U
using this guide 14
Z
zero BPU readings 35
40
Blood FlowMeter Owner’s Guide