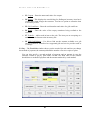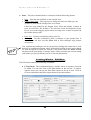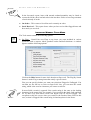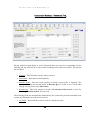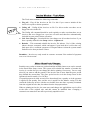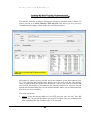
1
VERSION
3.0
USER GUIDE
POINT OF SALE, INVENTORY CONTROL AND INVOICING
Retail Plus Point Of Sale
For Windows
User Guide
Copyright 2013
Retail Plus Point Of Sale Inc.
i
R E T A IL
P L U S
F O R
W IN D O W S
3 . 0
Table of Contents
CHAPTER 1 GETTING STARTED
Features Of Retail Plus
Installation
Getting Started
CHAPTER 7 PURCHASE ORDERS
1
2
3
CHAPTER 2 POINT-OF-SALE
How To Make A Quick Sale
The POS Window
POS Client Functions
POS Logs And Histories
Filling Back Orders
Returned Merchandise
4
5
14
15
17
18
CHAPTER 3 INVENTORY
Managing Inventory
Inventory Menus
Item Detail
Sales Records
Pricing Options
Ordering Options
Product Notes & Photos
Kits Or Assemblies
Matrix Items
Serialized Stock
CHAPTER 4 CLIENTS
The Client Database
Client Menus
Client Detail
Purchase Histories
Special Options & Photos
CHAPTER 8 SALES STAFF
Staff Records
Printing Hours & Commissions
77
78
20 Business ID
79
21 Tax Setup
79
32 POS Defaults
80
35 Slip Printer Setup
81
36 Pole Display Setup
83
4038 Users & Passwords
84
41 Miscellaneous Options
85
42
43 CHAPTER 10 BACKUP AND RESTORE
44
Backup / Rebuild / Restore
88
Avoiding Data Loss
89
47
48
52
53
54
56
59
60
CHAPTER 6 SUPPLIERS
The Supplier Database
Supplier Menus
Importing Suppliers
67
71
73
75
76
CHAPTER 9 CONFIGURATION
CHAPTER 5 INVOICES
Accounts Receivable
Notes About Late Charges
Printing Invoices
Purchase Order Menus
Posting Orders & Shipments
Editing Purchase Orders
Order Detail
Matrix Orders
63
63
65
i
CHAPTER 11 COMMUNICATIONS
Overview And Internet Setup
View Sales
Stock Levels
Stock Transfers
Stock Updates
92
94
95
95
96
APPENDIXES
A – About Client Data
B – About Stock Codes
C – About Networks
D – Upgrading
E – Code 39 Bar Code Font
P – Payment Systems
Q – QuickBooks Integration
Z – Software License
999
100
102
105
107
108
114
119
R E T A IL
P L U S
F O R
W IN D O W S
3 . 0
C HAPTER
Introduction
Features, installation and first look.
1
The goal of any retail management software is to help you focus on your sales and
your customers. Retail Plus is a tool that serves this goal. It is designed for retailers
who wish to streamline customer checkouts, tracking sales, making purchase orders,
counting stock or preparing invoices. Retail Plus is an organizer, an analyser and a
time saver. Some of it’s most useful features include:
Easy to learn and use - no expensive training required.
Sales tracking by product, department and client.
Accounts receivable/invoicing system.
Complete sales and inventory data for every item.
Full-featured POS system with slip printer, barcode and cash drawer support.
Weekly and monthly sales figures for each product.
History of daily sales and POS totals.
Staff hours and commissions.
On-screen credit, debit and gift card processing.
Auto-generated PO's with four methods of calculating order quantities.
On-screen review and editing of purchase orders.
Customer orders, price quotes, layaways, gift certificates.
Client database with every customer’s purchase history.
Fast lookups using pick lists, word searches and photos.
Automatic discounts, price levels, credit limits or tax rates for any customer.
A bonus points system to identify and reward your best customers.
Price quotes that you can later process as sales.
Flexible sales and inventory reports with on-screen preview.
Price tags, bin labels, shipping labels and barcode labels.
U.S. or European (A4) label formats.
Optional VAT style sales taxes.
Product photos and client photos.
Sales data exports to database or spreadsheet programs for further analysis.
Works with all barcode and credit card readers.
Jump to client’s email or web site.
Optional password system with four levels of access.
Programmable keys for quicker checkouts.
Returned merchandise authorizations.
1
R E T A IL
P L U S
F O R
W IN D O W S
3 . 0
System Requirements & Installation
System Requirements
1.
2.
3.
4.
Any microcomputer running Windows XP or later.
30MB of free space on the hard drive.
500 MB of RAM for XP, 2 GB RAM for later versions.
Optional Accessories - a POS printer for sales slips, an automatic cash drawer, a
barcode reader, weigh scale, pole display or a label printer.
Running The Installer
Retail Plus comes with an easy install program. If you have a CD just insert it in your
C: drive and the installer will appear. You can also use Windows Explorer or My
Computer to open the Retail Plus distribution disk (or the folder where the download
file was saved) and double-click on RETAIL30.EXE. This will launch the installer and
put Retail Plus in it's own program group.
If you have high speed internet you can also run the installer without saving it to your
C: drive. Just click on RUN instead of SAVE when you download the program from
our web site.
The installation process will also place the bar code font (3of9.ttf) in your Windows
System directory. Depending on your version of Windows you may have to use the
font manager to install it in the usual manner to print barcode labels. See Appendix E
for more details.
Entering A Business Name And License Number
The first time that you start up Retail Plus you can enter your business name and
license number, if it is available.
♦ Double click on the Retail Plus icon to start the program.
♦ When the Main Menu appears click on Help and then select License Key.
♦ In the Software License field enter the license number that is on the
installation disk and press Validate. This If you entered a license number
you will see a dialog box that confirms your single or multi-user license. If
you did not enter a license number the system will run as a multi-user demo
for 60 sessions (60 times launching the software).
♦ If you entered a license number you will see a dialog box that confirms your
single or multi-user license. If you did not enter a license number the system
2
R E T A IL
P L U S
F O R
W IN D O W S
3 . 0
will run as a multi-user demo for 60 sessions (60 times launching the
software).
♦ In the Setup screen / Taxes tab enter your business name and address. This
is used as the return address when printing envelopes or shipping labels.
♦ If you wish to do other setups at this time skip to Chapter 9.
GETTING STARTED
How The System Is Organized
Retail Plus allows you to keep sales and inventory for one or more stores. We call them
Locations and before you can conduct business you must set up at least one Location
and put some inventory in it. If you are using the sample Location this has been done
for you.
Each location is identified by a three character Location Code. The code for the sample
inventory is “POS” and you can see it displayed after the store name at the top of the
screen. This is a file name for the demo inventory only and has no other special
significance
You can delete the sample location after you have set up a new one for yourself, or you
can just delete the inventory in it and start entering your own.
Exploring The Menus
When Retail Plus is started you will see the Main Menu. Each selection has a pulldown menu that provides access to a group of related commands. To help new users
explore the system, Retail Plus has been pre-loaded with sample data which simulates
a store that sells products for hiking and camping.
How This Manual Works
The general layout of this manual will follow the layout of the menus, in order from
left to right. If you wish, you can customize your system configurations first by
jumping to Chapter 9, then coming back to Chapter 2.
From time to time this manual makes reference to the names of files on your computer.
These are often named and referred to by their file type, i.e. DBF or DAT. Windows is
configured by default not to show you the full file name, but this is a setting you can
change. To make Windows display full filenames, double-click on My Computer (on
some versions it is just Computer), pull the Tools menu down to Folder Options,
click on the View tab and then de-select the check box for Hide Extensions For
Known File Types. Now do the same in Windows Explorer.
3
R E T A IL
P L U S
F O R
W IN D O W S
3 . 0
CHAPTER
Making Sales
Using The Point-Of-Sale System
2
To open the point-of-sale screen just select File / Point-Of-Sale from the opening
menu. Later you can configure Retail Plus to boot directly into this screen and
optionally ask for passwords from the sales staff.
POS Simplified - How to make a quick cash sale.
If you want to see how the point-of-sale system works without getting into details, here
are the steps in a basic cash sale:
1. Press F2 to and enter a stock code (or scan a label). If you have to look up the item
press F2 again. If you select a matrix or serialized item you will be prompted to
pick one from a list (more on this later).
2. When the item detail window appears press ENTER. Note that the item detail
window is optional and can be suppressed.
3. To total and print, press F4 and ENTER. If the system is not set to Auto Save press
F9 to save the sale.
That’s all!
The POS system does not require a mouse unless you prefer to use it. All POS
functions can be done without it.
There is a lot more to a retail business than cash sales, so let’s look at the features that
make this a very flexible POS system.
4
R E T A IL
P L U S
F O R
W IN D O W S
3 . 0
THE POS Window
Menu And Function Keys
The buttons across the bottom of the POS screen mostly duplicate all the commands
under the File menu. In all cases the commands you need to use the point-of-sale
window can all be executed on the keyboard without requiring a mouse.
F2 New Sale – Use this to add the first item to the transaction. New options appear at
the bottom of the screen where you can specify the one you want.
Type the stock code of the item then press ENTER, or scan a barcode label. If you
need to look up the item then press F2 again to get a pick list that is sorted by name
or code.
The button labelled F3 Detail is available only if the system is set up to operate in
Fast Scan Mode, in which case it displays the Item Detail window only when this
button has been pressed first. If the system is not set up to operate in Fast Scan
Mode, then you will get the Item Detail window by default.
5
R E T A IL
P L U S
F O R
W IN D O W S
3 . 0
About Fast Scan Mode - This is an option in the Retail Plus Setup window. When
Fast Scan Mode is OFF, the POS screen pops up the Item Detail window every
time an item is added to a sale. This window lets you change the price, add a
discount, change the tax status, specify a quantity sold, or view the product
description. This adds flexibility and options at the time of sale. On the other hand
it adds keystrokes and gives the user more chances to make errors, which may be a
factor if you have part-time and occasional employees.
When Fast Scan Mode is ON, the POS screen does not pop up the Item Detail
window. It simply lists each item at the default price with a quantity sold of one.
This makes scanning sales with a barcode reader easy because you don’t have to hit
any keys between items. In order to see the detail window for any given item, press
F3 Detail just before ringing it up. This allows you to change a price, add a
discount, set the tax status or change the quantity sold.
The Item Detail window displays the Onhand quantity and default sales
configuration for the item. You can make changes as necessary then press ENTER
to accept the item as shown or F12 to cancel it. When it pops up the quantity field
is already selected. Just press TAB to move to the Price or Discount field.
Press F5 to select different price levels if they have been set up for the item. Press
F6 or F7 to over-ride any sales taxes that are normally applied.
The Product Info button gives you access to the Notes field associated with the
item which is usually filled in when the item is added to the inventory records. This
can be used to contain any type of product information that the customer may ask
for at the time of sale. For example, a drug store might use it to make note of drug
interactions and side effects.
6
R E T A IL
P L U S
F O R
W IN D O W S
3 . 0
The Zero Scale and Get Weight buttons are used to control the weigh scales and
the Pad buttons are used to show a keypad that makes changing values faster on a
touch-screen system.
♦ F9 FastKeys – FastKeys are programmable buttons you can use to quickly sell the
most popular items that do not have barcodes. They work particularly well with a
touch screen. To configure the keys click on FastKey Setup. There are 25 keys and
each one can be configured with the following settings:
FastKey Number - Enter the number of the key you want to configure (1 25).
Stock Code If Inventory Item - Enter the stock code of the item or choose
it from the pick list (click on the spyglass). Leave this blank if it is a nonstock item.
Key Name Or Department - Enter the text you want to appear on the
button. Some retailers use these keys for generic department sales like
"Beverage" or "Grocery".
Credit To Client - Check this box if the item is a credit such as a bottle
return.
Taxable - Check the taxes normally applied to this item.
Fixed Price - Enter the price of the item if it is always the same. If you leave
this at zero then the user is prompted to enter a price. Note that you cannot
use Fastkeys to add an item with a price of zero.
Clear This Key - Remove any item linked to the current button.
Save This Key - You must press this to save the current FastKey setup.
Once you have set up the keys just press the items you want. To get multiples of
any item just press one of the quantity buttons at the bottom before selecting the
item button. If an item is not set up with a fixed price you will be prompted to
enter the amount.
Press Close if you are going to scan more items.
Press Delete Item to remove the last item on the list.
Press Pay if you want to complete the sale.
♦ F3 Credit – Use this to add a credit or return to a sale. A new menu appears with
the options available:
F2 Discount – Apply a discount to the subtotal of the sale rather than
individual items.
7
R E T A IL
P L U S
F O R
W IN D O W S
3 . 0
F3 Coupon – Enter the name and value of a coupon.
F4 Return – This displays the usual dialog for finding an inventory item but it
credits rather than charges the customer. You have a option to return the item
to inventory or not.
F5 Gift Certificate – Enter the serial number and value of a gift certificate.
F6 Bottle – Enter the value of the empty containers being credited to the
customer.
F7 Trade In – Add a trade-in item to the sale. The item you are accepting as a
trade-in must be known to the inventory file.
F8 Gift Card Balance – Use this to find out the amount available on a gift
card. You must be subscribed to a supported gift card service provider such as
X-Charge.
F4 Pay – The Total Sale window shows you the result of the sale and lets you change
the method of payment, the amount paid and the number of invoice copies to print.
You can also specify a second method of payment and an amount in case the
customer wishes to pay by split tender. In that case both sides of the window
should show a method of payment and the amount tendered by each method.
8
R E T A IL
P L U S
F O R
W IN D O W S
3 . 0
The buttons on the Total Sale window are:
F2 Gift Card – Set the method of payment to gift card and, if a service is
connected, use the funds available on the card.
F3 Debit Card – Select debit card as the method of payment and, if a service is
connected, charge the customer’s account.
F4 Credit Card – Select a credit card as the method of payment and, if a service
is connected, charge the customer’s card.
F5-F6 Paid By – Each time you press F5 or F6 the method of payment skips
forward or back.
F7 Split Payment – If the customer wished to use two methods of payment this
opens a window where you can enter the second method.
F8 Number Pad – If you have a touch screen this can be useful for entering the
amount tendered. On the right side you can also see buttons with cash
denominations where the amount can also be entered quickly.
F9 Currency – Change the amount due to another currency if you have
exchange rates set up. The rates are entered under the Tools menu / Foreign
Exchange Rates.
F10 Currency –Choose the number of receipt or invoice copies needed. The
default number of copies can be set up in the POS Setup tab.
F11 More Options – Presents another set of options for completing the sale.
F2 Save Sale No Print - Save the current sale without printing a receipt
or invoice
F3 Print Preview - Show the current transaction as it would look on the
printer.
F4 Recalc - Recalculate the sale totals if needed. Sometimes this is
necessary after entering, then changing, a split payment.
F5 Printing Invoices / Receipts - Switch the printer output between the
receipt printer and the invoice printer if both are connected to the
computer. The setting is maintained for subsequent sales but reverts
back to the default selected in the Setup screen the next time you open
the POS system.
F7 Gift Receipt / No Gift Receipt - Turn the gift receipt on or off. The
default is off.
9
R E T A IL
♦
P L U S
F O R
W IN D O W S
3 . 0
F12 Cancel – Close the Total Sale window without doing anything. This lets
you go back and add more items to the sale or cancel it.
ENTER Print – Close the Total window and print the invoice or sales slip. If
the system has been set up for Auto Save then the sales is automatically posted
and the inventory database is updated.
F5 Client – This brings up the client functions that are accessible in the POS
screen. They appear on the buttons at the bottom of the window with the following
options:
F2/F3/F4 Invoices, Quotes, Layaways – If you click on this button with a
mouse you will get the client’s on-account invoices by default. You may find
it easier to press the function key which corresponds to the type of transaction
you want. A list will appear where you can select the transaction. Double-click
on it or press 6 to see the details and more options. These are explained by
clicking on the Help button or pressing ALT-F1.
F5 Find – Pop up a pick list of clients in the system. For more info on how the
pick list works just click on the Help button or ALT-F1.
F6 New – Pop up a window where you can enter the client’s information. For
more info on how the new client window works just click on the Help button
or press ALT-F1.
F7 Edit – Pop up an edit window where you can modify the current client’s
information. For more info on how the edit window works just click on the
Help button or press ALT-F1.
F8 Ship To - This command pops up a dialog where you can enter an alternate
shipping address. It will be printed on the invoice as the Ship To address. This
will also be stored with the client’s record and will be used by default.
F9 Clear – Use this to remove the client name from the screen. This is useful if
someone left a client name on the screen and want to make a simple cash sale.
F10 History – If there is a client name on the screen this command will display
the client’s purchase history. You can also enter any notes you wish to keep
about the client in this window.
F11 Delete – This command deletes the current client record.
10
R E T A IL
P L U S
F O R
W IN D O W S
3 . 0
♦ F6 Delete – Use this to delete the last item from the sale. If you want to delete an
item in the middle of a sale you can just treat the item list like an edit window i.e.
highlight the line with the mouse and hit D.
♦ F10 Drawer – The Drawer command provides access to the cash drawer functions.
A new menu appears with the following options:
F2 Float - Enter the cash drawer opening balance.
F3 View - This command can be used to monitor the progress of sales
throughout the day. It pops up a window that shows the current state on the
POS totals and they will keep running up until you clear them. If you are on a
network it shows the total sales made on the local workstation.
F4 Print - Produce a hard copy of the POS totals.
F5 End Of Day - Clear the current POS totals and save them to the history file.
This is usually done at the end of every shift or at the end of the day. When the
POS totals are cleared two things happen - the running totals are reset to zero
and the last line of the POS History table is closed out with the date and time of
the last sale. In this way Retail Plus builds a daily history of the drawer totals.
If you forget to do this Retail Plus will prompt you once the date has rolled
over.
F6 Pay Out - This function allows you to take cash out of the drawer.
F7 Pay In - This function allows you to put cash in the drawer.
F10 Pop - Open the drawer without having to make a sale. Make sure the cash
drawer trigger has been entered in the Setup window.
11
R E T A IL
P L U S
F O R
W IN D O W S
3 . 0
♦ F11 More – This option leads to a collection of specialized functions that you only
need occasionally but which come in handy:
F2 U / I – This stands for Unknown Item and it allows you to put an item on
the sale that has not been entered into the inventory records. Use it to sell
something that has just come in the back door. A two-part window appears.
You can enter an item name, the price, and the quantity sold in the upper part.
If you also supply the information in the lower part, the item is added to the
inventory records automatically. It is generally not a good idea to sell stock
that is unknown to your inventory system. If you do not fill in the lower part of
the window then no record of the sale is made in the inventory file or on your
sales reports. It will, however, appear on the Itemized Sales Log.
F3 Void – This button allows you to void the current sale. To void a sale that
has already been saved see the Itemized Sales Log command under the Totals
menu. When voiding a sale you may be asked for a supervisor’s password if
the system has been set up to require it. A supervisor is anyone who has level
three access to the system.
F4 Suspend – Puts away the current sale so other sales staff can enter sales
while you continue to serve the customer.
F5 Recall – Pops up the suspended sales one at a time so you can select the
one you want to complete or to delete any you no longer need.
F6 Taxes – Displays the current status of the sales taxes and the automatic
add-on charge if any were set up. You can use this to suspend taxes for any
items or the entire sale. After the current sale the tax settings go back to their
default settings as defined in the setup configurations.
How Taxes and Charges work – In the Retail Plus setup screen you can
define two taxes and an add-on charge. You can also choose the ones that are
applied by default at the time of sale. This command allows you to change
those settings only for the current sale and only for the items that are not
already on the POS screen. Any items that were put on the sale before calling
up this window are still taxed as usual.
If the tax status has to be changed for one item only it is easier to change it on
the Item Detail window which appears when the item is put on the sale.
F7 Output – Allows you to select a number of printing function:
12
R E T A IL
P L U S
F O R
W IN D O W S
3 . 0
Select the style of printer output or turn the printing off.
Reprint the last sale. Use this in case the printer jams and you want to try
again. This feature is also available just by pressing F7 in the main POS
screen. Receipt printer output is stored and transactions can be located
by number and reprinted at any time. Note that only the last 600
transactions are saved. If you need to keep them longer just copy the
Reprint folder to a CD.
Edit the header and footer message on the sales receipt. This command
is also available under the Tools menu.
Select a printer port for the POS output.
F8 Login – Pops up the user ID dialog so the next person who uses the system
will have to enter a password first. This works only if the system has been
configured to require passwords.
F9 Clock – This option allows your staff to clock in and clock out. This will
require that they enter a staff ID.
Two more useful function keys that are not displayed at the bottom of the POS screen
but are available on the Transaction Menu:
♦ F7 Reprint – Reprint a sale.
♦ F8 Packing Slip – Use this if you need a packing or delivery slip.
13
R E T A IL
P L U S
F O R
W IN D O W S
3 . 0
POS WINDOW - CLIENT MENU
The client functions are key to many of the features in Retail Plus so they are
accessible by more than one route. The buttons on the tool bar and the commands on
the Client menu mirror each other. They are also accessible using the corresponding
SHIFT-Function Key combination displayed on the menu, or you can use the F5
button at the bottom of the POS screen to access the same commands.
On the upper part of the POS screen is the client window where name, address, phone
number and other customer information is displayed. If you choose to display the
optional POS Toolbar you will note that all the buttons on it relate to the client
functions except one. The toolbar buttons and their corresponding keyboard
equivalents are as follows:
Close the POS screen - key F12.
Enter a Staff ID - key CTRL-I.
Print the address on a Com 10 envelope – key SHIFT-F12.
Print a shipping label – key SHIFT-F11.
Find an existing client - key SHIFT-F5.
Enter a new client - key SHIFT-F6.
Delete the current client – key SHIFT-F10.
Display the current client’s account – key SHIFT-F2.
Display the current client’s price quotes – key SHIFT-F3.
Display the current client’s layaways – key SHIFT-F4.
View the client’s notes and purchase history.
14
R E T A IL
P L U S
F O R
W IN D O W S
3 . 0
Enter or edit the ship-to address – key SHIFT-F8.
Send the current invoice or price quote by Windows Mail - key ALT-F11.
Recurrent charges.
Returned Merchandise Authorization.
Go to the first client ( CTRL-PGUP ), previous client ( PGUP ), next
client ( PGDN ), or last client ( CTRL-PGDN ). If you use the previous and next
buttons the clients appear in the order that they made purchases (most recent clients
first).
POS WINDOW - TOTALS MENU
As sales are entered on the POS screen a history starts adding up. It includes dates,
staff, items, taxes, discounts, cost of goods sold, customer’s orders and so on. The
information available on this menu relates to this data.
♦ Itemized Sales Log – Every time a sale is saved, the line items are added to the
sales log and are tagged with the date, time, sales person and transaction number.
This command displays the log along with a new menu of options:
Delete – You can delete the current line with F6, the flagged lines with F7, the
old lines with F8 (everything before the current month), or the entire log
contents with F9. You might want to do this at the end of every week or
whenever the log gets so big that the POS system slows down. Be careful with
this command because deletion is permanent.
F2 Void Transaction – The following is the sequence used to void a sale that
has already been saved:
-
Pull the Totals menu down to Itemized Sales Log.
-
Scroll the log window until you have located the transaction.
-
Click on any one of the items in the transaction.
-
Press F2 or pull File down to Void Transaction.
F3 Clear Flags – Unflag any flagged lines..
Print – There are a variety of print options here which will give you the reports
you need to track details of your sales.
15
R E T A IL
P L U S
F O R
W IN D O W S
3 . 0
Open In Excel – Open the sales log in MS-Excel. The file is opened in "read
only" mode but if you “Save As..” with another filename and then you can do
all the number crunching you want.
♦ POS History– Every time a sale is saved the numbers are added to the entries on
the last line of this table. Every time the POS totals are saved ( F10 Drawer / F5
Save ) the last line is closed out with the current date and time and a new line is
started.
Let’s say that you decide to clear the POS totals at the end of every day. This will
build a history consisting of daily records. You can then print reports with specific
start dates and end dates. This allows you answer questions like “How much did we
make last Tuesday? What portion was paid by credit cards? How much did we
collect in sales taxes this month?” The information can also be imported directly
into most spreadsheet programs since they can read the .DBF file format. See your
spreadsheet manual for information on importing .DBF files. The file to look at is
called TOTAL001.DBF.
The POS History table comes with a pull-down menu of it’s own that contains the
following options:
F5 Unflag All - Unflag all the records in the POS exit totals table.
F6 Delete Line - Use this to delete an entry in the table. Be careful with this
command because deletion is permanent.
Print – Access the following print options:
o F7 Print Flagged - This produces a report that only includes the entries
that have been flagged. To Flag or Unflag an entry double-click on the
small box at the left side of the window.
o F8 Cash Flow - This produces a report that includes the cash drawer
totals for a period of time specified by a starting date and an ending
date. A dialog box appears where the dates may be entered.
o F9 Print Tax Report - Use this to get a report of the taxes collected and
the cost of goods sold that are not part of the above reports.
Some notes on POS totals
When a sale is made where the method of payment is On Account there are a
couple of things to keep in mind:
16
R E T A IL
P L U S
F O R
W IN D O W S
3 . 0
- The POS totals only show the amount paid, not the entire sale. The sales person
is still credited with the entire subtotal.
- The exit totals show the value of returned goods purchased on account. The
following fields are adjusted downward to reflect the return: On Account receipts,
the department net sales, and the total receipts.
♦ Customer Order Log - When customer orders are created on sales transactions
they are placed in the Customer Order Log where they can be accessed for review
and processing. This menu command pops up a table where all the orders are listed.
To access the details on any one just click on the Detail Tab, which contains the
following two options:
Fill This Order - Pressing this button causes Retail Plus to check if there is now
enough stock to fill the order. If so, the client's name will be displayed on the
POS screen and the back ordered item is put on the sale. Repeat this for any
other items that the same client has on order.
Delete - Delete the item from the customer orders.
Further options are available under the File menu as follows:
Print - Print a list of the flagged orders.
Delete Flagged Orders - Use this to delete multiple orders at once.
Reindex - This rebuilds the index file associated with the order file. You won't
need it very often but use it if you suspect that the orders are not in the correct
sequence, i.e. listed by client name.
Printer Setup - Pops up the usual print driver dialog.
An item is deleted from the back order log as soon as it is moved to the POS screen for
processing as a sale. If you void the sale the order is not restored to the order log! Note
also that inventory is not adjusted and the cost of goods sold is not calculated until the
order has been filled, even if it has been prepaid.
POS WINDOW - REPORTS MENU
This reports menu consolidates the same ones that are available in the Itemized Sales
Log and the POS History. They are repeated here for convenience.
17
R E T A IL
P L U S
F O R
W IN D O W S
3 . 0
POS WINDOW - TOOLS MENU
The sales you make at one computer can be exported to a data file. This file can then
be imported by another computer running Retail Plus. The computer that is importing
the data is referred to as the Master and the computer that is exporting the data is
referred to as the Remote. This can be useful for businesses that have sales counters
spread out in different locations but require a master inventory at the main office. The
commands available to do this are:
RMA - Returned merchandise authorizations (RMA) are often required by
stores or their suppliers when they want to control the circumstances around
the return of a high ticket item. They are used to track the details of who is
returning what and why. This helps staff make sure that the returned
merchandise qualifies for a refund, exchange or credit according to the
policies of the store and/or the supplier.
You can work with two types of RMA's:
1. RMA's issued by your store to a customer when they want to return
an item for exchange, refund, credit or a free repair.
2. RMA's you request from a supplier when you want to send an item
back. Not all suppliers require them but some will not accept returns
unless they display an RMA number on the package.
The RMA window is split into sections designed to identify the customer, the
item, the supplier, and a place to write any notes about the circumastances of
the return.
There are two ways to create an RMA.
1 Put a client's name on the POS screen and click on Credits and then
Returns. Once you have selected the item being returned you will be
asked if you want to create an RMA. If you select "Yes" the client
and the item being returned are automatically set up in the RMA
window where you can supply more details if necessary and print
the RMA.
2 Select RMA from the tools menu in the POS screen and fill in the
details yourself. This will often be the method you use to create and
track an RMA you are requesting from a supplier.
18
R E T A IL
P L U S
F O R
W IN D O W S
3 . 0
The customer's RMA number is automatically supplied but this is not the case
for RMA's you request from a supplier. In that case must get an RMA number
issued by the supplier is entered in the Supplier RMA # field.
Payment Options - Edit the list of tender types you accept for payment.
Foreign Exchange Rates - View and edit a table of currency exchange rates.
Use this if you will be accepting other currencies.
Gift Card Balance – Check the balance available on a gift card if you have a
service connected via internet. Call for more information if you need gift card
services.
Delete Old Price Quotes – Clear out old price quotes prepared for customers.
You will be asked for a cutoff date and all piece quotes prepared before that
date will be removed.
Invoice Header - Select this to edit the header and footer text that appears on
invoices or sales slips. Headers can be up to seven lines long and two lines for
footers.
When printing invoices, the first line of the header text will be printed in a
larger font than the rest. If you are not using pre-printed stock or letterhead,
then the header text can be used to show a company name followed by the
address and phone number.
For a more customized look leave the header text blank and create your own
invoice letterhead using a word processor and a color inkjet printer. This will
result in a very professional looking invoice.
Tool Bar - Display the client functions as icons on a tool bar above the POS
screen. Please note that this option is not available if you have your screen
resolution set to 640 X 480 because there is not enough space.
19
R E T A IL
P L U S
F O R
W IN D O W S
3 . 0
C HAPTER
Managing
Inventory
Setting up and maintaining your stock records
3
In the Main Menu, pull File down to Inventory and select Open. You will then see
the current inventory viewed on a grid. This is usually referred to as a Browser
Window and it allows you to scroll up and down or left and right. This type of display
is used throughout Retail Plus to browse different types of information.
The other type of screen widely used in Retail Plus is called Form View. It displays
fields from only one record at a time but with more detail. This can be seen by
selecting an item in the Browse window then clicking on one of the tabs above the
data. The contents of the menus will be explored first and the different tabs will be
explained later in the chapter.
Although this chapter deals mostly with inventory data, the screen navigation is the
same for most other data windows including clients, suppliers, invoices and purchase
orders etc.
20
R E T A IL
P L U S
F O R
W IN D O W S
3 . 0
Navigating The Browse View Screen
Browse View gives you quick access to lots of information. You can bring more rows
and columns into view in several ways:
34
Use the scroll bars to move the columns left or right, up or down.
.
Other tips for using Browse View windows:
To put new data in any cell just click on it once and start typing. If you want existing
text selected with a cursor at the end then double-click on it. If you want to insert new
text into the existing text then triple-click on it.
The first column in most Table View screens has is used to flag items that you want
included in various operations. Just click on a checkbox to flag or unflag any item.
To rearrange the column order place the mouse pointer over the title of any column,
click and hold the left mouse button then drag the column where you want it. It will
stay there until you change it again.
On the top right corner of the tabbed windows there are three buttons. The first
displays the previous record; the second turns the record flag on and off while the third
displays the next record.
INVENTORY WINDOW - FILE MENU
On the Retail Plus opening menu (mostly a blank screen with a tool bar across the top)
under File you will see the following options:
♦
Inventory:
Open – Open the default inventory file. The last used inventory is always the
default.
New – Create a new, empty inventory file.
21
R E T A IL
P L U S
F O R
W IN D O W S
3 . 0
Select – Use a different inventory file. This will become the default until
another is chosen.
Delete – delete an inventory file.
To open an inventory file you can pull the File menu down to open or simply click the
Inventory button on the opening menu tool bar. Later on you can configure Retail Plus
to skip this opening screen entirely and go directly to the Point Of Sale screen.
On many Retail Plus windows and dialogs you will see a small button with a question
mark on it. Press this button to see an explanation of what is happening on that screen
and what your options are.
Once the inventory screen is open you have a new menu and a new tool bar. Under the
File menu you have the following commands:
♦ Receive Stock - You can either manually enter shipments item-by-item or read in
the information from a data file created with a portable data collector. Shipments
can usually be posted more efficiently if they are associated with a purchase order
that you created in Retail Plus. Then you can skip this command and post your
shipments directly from the Purchase Order screen. Click on the Help button for
more info about this feature.
♦ Transfer Stock – This command allows you to move stock between stores or from
a from one inventory file to another. There are two options:
F6 Transfer Out - A window appears where all the transfers are conducted.
22
R E T A IL
P L U S
F O R
W IN D O W S
3 . 0
First, select the destination location from the pick list. To start making transfers
just type the stock code of an item in the Stock Code field. If you don’t know
the code, click on the Find button to get a pick list to choose from. The window
displays a running list of the transfers which can be executed all at once by
clicking the Transfer button.
Select Internet Transfer if you are going to send the transfer data to the
destination store by internet. When you select Send the Internet
Communications window will appear.
F7 Transfer In – Receive stock transfer data files from the internet via the FTP
file transfer window.
See Chapter 11 for more information.
♦ Adjust Stock - There are several types of adjustments you can make to the
inventory records without having to find and edit each record. Pull the Inventory
menu down to Adjust Stock to get a submenu with the following choices:
F8 Batch Price Adjustments - This command allows you to make price
adjustments quickly to any flagged items. The process would go as follows:
1. Flag the items you want to adjust.
2. Select Batch Price Adjustment from the menu then select Increase
or Decrease.
3. Check off the price levels to be adjusted.
4. Select Percentage Adjustment or Fixed Adjustment.
5. Enter the Amount of the increase or decrease.
If you chose a percentage adjustment then the amount is used to calculate a
new price. If you chose a fixed adjustment, the amount is simply added or
subtracted from the price. Note that only flagged items will be included in
the process.
Let's say you need to increase the price of every item in a given department
by 5%. The procedure would look like this:
1. Pull the Tools menu down to Set Flags and select Unflag All. This
ensures that there are no items will be accidentally included.
23
R E T A IL
P L U S
F O R
W IN D O W S
3 . 0
2. In the Set Flags dialog and select Flag By Search and flag all the
items in the target department.
3. Pull the File menu down to Adjust Stock and select Batch Price
Adjustments. Set the options you want and click on OK.
F9 Batch Onhand Adjustments – The inventory counts can be updated
automatically if you have a stock counting device that will download it’s data
to your computer. The device should be set up to download just the stock code
and the shelf count in a comma-delimited file format. The most common
delimited data files are the .CSV files produced by MS-Access and MS-Excel.
Once the file is on your hard drive you can open it with this menu command.
The result is a display of variances that shows you which shelf counts do not
agree with the inventory records.
This display comes with it’s own menu consisting of the following commands:
•
•
Change Sort Order – This will toggle the sorting order between the item
name and the stock code.
Value Of Variances – This pops up a dialog box showing the total
wholesale value of the stock discrepancies. Some retailers refer to this
as “shrinkage” and it represents the cost of any shortfall in inventory.
•
Update Inventory – After you have made any required changes to the
Onhand quantities this command will write the corrections to the
inventory file.
•
Print Report – This command prints a hard copy of the inventory
variances and the cost of the discrepancies.
As with most Retail Plus dialogs you can click on the ? button for more
information about this feature.
F10 Manual Onhand Adjustments – Use this to correct the Onhand quantities
in the inventory records. Just type the stock code of the item you want in the
Stock Code field. If you don’t know the code click on the Find button to get a
pick list to choose from. To help you keep track, the window shows you a
running list of the adjustments, which can be printed at any time. Click on the ?
button for more info about this feature.
24
R E T A IL
P L U S
F O R
W IN D O W S
3 . 0
♦ Print – The print command leads to a submenu with the following options:
Item – Print the data available on the selected item.
Labels / Price Tags – This pops up to a dialog box where the label type, the
quantity to print and the sorting order are selected.
Labels are only printed for the flagged items. Select the number of labels to
print for each item. The default (1 for each item in the last shipment) works
best if you use the flagging option when receiving stock. Labels are printed in
the current sorting order.
Price List – Use this command to print a price list.
Catalogue - Use this command to print a catalogue of your product line. It
assumes that you have used the Notes field to enter catalogue style product
descriptions.
Very sophisticated catalogues can be prepared by loading this output into a word
processor or publishing program where professional looking layouts can be added.
To send the output to a disk file instead of the printer select the Print To File
checkbox on the print dialog. Catalogue items will be printed in the current sorting
order unless you specify that they are to be listed by department.
Inventory Window - Edit Menu
The Edit menu contains the following commands:
♦ F2 Add Item – This command displays a window where an inventory item can
be added. You can also click on the New button on the tool bar. A window
appears where you can type the basic data required to set up an item. Click on
for more information about the required data or the other buttons.
25
R E T A IL
P L U S
F O R
W IN D O W S
3 . 0
Once an item has been established any further information you want to add is done
on the detail tabs above the inventory data.
You must enter at least an item name, a stock code and a selling price. See the
beginning of this chapter for a description of what all the other fields are and which
ones you can fill in now.
♦ F3 Find Item – This command pops up a dialog box that will help you locate an
item.
♦ Clone Item – Use this to make a copy of the current item so you can enter a similar
item without re-typing all the information. The stock code is copied without the last
character to reduce the chance of duplicating a code. Be sure to edit the cloned
stock code before moving on.
♦ Delete Item – Trash the current item.
♦ Delete Flagged Items – Trash all flagged items.
♦ Undelete Items – This option recalls all the items that were deleted during the
current session. When items are deleted they disappear from view but are not
physically removed until the Rebuild command is run or the program is shut down.
Discontinued items should not be deleted until you have run the year-end closing;
otherwise their sales figures will not be included in any sales reports.
♦ Department List – Retail Plus has a list of valid department names in the
inventory. This command opens a window where you can review, add, edit, or
delete the department names you use. The ones you enter here will appear on the
pick list of valid department names when entering or editing inventory records.
♦ Category List – Retail Plus has a list of valid category names in the inventory.
This command opens a window where you can review, add, edit, or delete them.
The ones you enter here will appear on the pick list of valid categories when
entering or editing inventory records.
INVENTORY WINDOW – VIEW MENU
The following options are on the View menu:
♦ All Items - View all items in the inventory.
♦ Flagged Items – View only the flagged items.
♦ Sort Inventory – Choose a sorting order.
26
R E T A IL
P L U S
F O R
W IN D O W S
3 . 0
♦ Get Info – View a window with information about the status of the system and the
contents of your inventory.
♦ Full Screen Browse – This window displays the same columns as the Browse tab
on the Inventory window but is expanded to the entire screen. The commands
available are limited to what is on the tool bar.
♦ Open In MS-Excel – This opens the main inventory data file (DBF) in Microsoft
Excel. You will see a message that says it is being opened in read-only mode. This
means you can save the data as a spreadsheet but you cannot use Excel to modify
the data and write it back to Retail Plus.
Inventory Window – Reports Menu
The Reports menu contains a variety of sales and inventory reports:
♦ Sales - When a sales report is selected (except for weekly sales) a dialog box
appears with options to print various types of sales figures.
♦ Inventory – This report also offers a number of options :
Sorting Order – Select the order you want to use for the report.
Current location only – Report inventory only in the active location.
27
R E T A IL
P L U S
F O R
W IN D O W S
3 . 0
All locations – Report inventory from all locations that have been set up in
Retail Plus. If you select this the following two options are available to you:
•
Combine counts – This causes the report to show only the total quantity of
any given item across all locations.
•
Show separate counts – This option causes the report to show the quantity
of each item at each location.
•
Hide onhand quantity – Select this to avoid printing the computer’s stock
count on the inventory report. This is useful if you want to hand out a list
for taking inventory without revealing what the computer says should be on
the shelf.
♦ Top Sellers – Use this report to show which items are the top sales performers.
You have an option to use volume or gross sales as the measure of performance.
You can also choose to report the year-to-date figures or just for a given month.
♦ Analysis – This gives you more detailed sales and inventory stats to work with.
♦ Stock Value – This produces an auditor’s report on the value of your inventory.
♦ Stock Levels – An item appears on the Understock report if it the Onhand
quantity is less than the Base Stock or the Reorder Point. Items are placed on the
Overstock report according to a formula that considers the stock on hand, stock on
order, base stock and average sales.
28
R E T A IL
P L U S
F O R
W IN D O W S
3 . 0
In the Overstock report, items with normal on-hand quantities may be listed as
overstocked if they have not had sales in the last three weeks or have large amounts
of stock already on order.
♦ On Order – This creates a list of the stock currently on order.
♦ Stock Received – This report shows when you last received the flagged items and
how much you received.
INVENTORY WINDOW - TOOLS MENU
The Tools menu contains the following options:
♦ Set Flags – Retail Plus uses Flags to tag items you want included in various
operations such as reports, labels, purchase orders and bulk deletions. A window
appears with the following options:
Click on the Help button for more info about how flags work. The Flag By Search
feature is used to tag or untag items that satisfy a given criteria.
First you can specify whether you want your selections Flagged or Unflagged. You
can then use the list box to select a target field. Last, you can enter the search
string, which is the word or characters you want to search for.
In most fields a match is reported if the search string is the same as the leading
characters in the target field. For example, if you search in the Stock Code and look
for 10, then every item whose stock code begins with 10 will be Flagged. The
exception to this rule occurs when you search in the Product Notes field. In this
case, an item is Flagged if the search string is found anywhere in the Notes.
29
R E T A IL
P L U S
F O R
W IN D O W S
3 . 0
Flagging records can be a cumulative activity. If you Flag all the items in one
department and then Flag all the items from one supplier you have Flag all the
items that contain either one of these targets. Remember to use the "Unflag All
Items" command before targeting a new set of items.
You can use another two-pass strategy to make more complex choices. For
example, let’s say you want to make a purchase order for a certain supplier but
wish to exclude the items in a given department. You would Flag all items from
that supplier on the first pass then Unflag all items in a given department on the
second pass.
♦ Set Taxes – this is a fast way to set the default tax status of all flagged items. If the
items are normally taxable for one or both sales taxes then you can set them here
without having to visit each record.
♦ Set Reorder Points – Flag all the items that will have the same reorder values and
set them all in one operation.
♦ Recalculate Margins – If you have entered or imported new items, or made some
price and cost changes, you can recalculate the margins on all of them at once.
♦ Stock Updates – This allows you to create a data file that can be used to update the
inventory in other Retail Plus computers. It is an easy way to send out inventory
adds & changes i.e. to make sure that every one has new items listed and is using
the same stock code and price for each existing item. You also have an option to
reset the onhand quantities as well. To create an update file make your inventory
changes and flag the items affected. Now select Stock Updates / Write and the file
is created. Send the file to other Retail Plus computers where the user selects Stock
Updates / Read. You also have the option to send and receive updates via the
internet. See Chapter 11 for more information.
30
R E T A IL
♦
P L U S
F O R
W IN D O W S
3 . 0
Import Inventory – Use this command to import items from a comma-delimited
data file. A file dialog appears where you can find and double-click on the file
from which to import. The default filename extension for the import file is .CSV.
The field order for importing is: item name, stock code, department, category, size,
pack quantity, cost, price, onhand, supplier, supplier’s stock code, and minimum
order. Please see the Inventory Import Help screen for more information.
♦ Export Inventory – Use this command to export the flagged items to a commadelimited data file. A file dialog appears where you can tell Retail Plus where to
write the export file. The default filename extension for the export file is .DTA.
The field order for exporting is: item name, stock code, department, size, pack
quantity, cost, price, onhand, year-to-date sales volume, year-to-date gross,
supplier, supplier's stock code and minimum order.
♦ Duplicate Check – This command scans the inventory for items with identical
stock codes. When the Duplicate Search window appears, click on Search to get
started. If a duplicate is found some details about the two items are shown. You
have an option to delete one of the items or continue the search without taking any
action just by clicking on the Search button again.
♦ Year-End - This command runs the fiscal year-end closing routine and saves data
to an archive file. Before running this command you should print a final year-todate sales report from the Reports menu and make a backup of the inventory so that
you can always undo the year-end closing if there is a problem. A file dialog
appears where you can tell Retail Plus where to write the archive. Note that the
default filename for the archive contains the location code and the closing year.
The inventory file is set up for the new fiscal year, the sales histories are cleared
and the monthly sales figures are moved to the Last Year column.
The data archived by the year end closing process can be reviewed with any
spreadsheet or database program that can open .DBF files, which is almost all of
them.
♦ Rebuild Indexes – Retail Plus uses index files extensively to speed up all it’s
processes. These indexes are constantly being read from and written to. It can
happen from time to time that the indexes get corrupted if there is an abnormal
shutdown of the system (i.e. a power failure) or an aging hard drive. A symptom of
corrupted indexes is that you cannot find an item you know is in the inventory. Use
this command to rebuild them. If you suspect that you have file corruption, see the
Backup / Rebuild command on the opening menu. The Rebuild option acts on
both indexes and data files. See Chapter 9 for more information about rebuilding
corrupted files and about avoiding them altogether.
31
R E T A IL
P L U S
F O R
W IN D O W S
3 . 0
INVENTORY WINDOW – DETAIL TAB
Retail Plus can subdivide inventory into Types, Departments and Categories. There are
many different ways to use these subdivisions and you can mould them to suit your
business. Both the Departments and Categories are user-defined while the item Types
are a fixed part of the system. Here is a description of how they work:
♦ Item Type - This tells Retail Plus how to handle an item. The available choices
are:
Standard - This is the default Type. Assign it to your merchandise that has no
special characteristics.
Matrix - Assign this Type to an item if you have to track sales and inventory by
color, size, style or any other characteristics you want to define.
Serialized - Assign this Type to an item if you have to track sales and inventory
by serial number.
Kit - Use this to create an item that consists of a collection of standard
inventory items. Use the Kit Tab to define the contents. These are also referred
to as assemblies or Gift baskets.
Gift Card – Use this to set up gift card sales if you have a service connected via
internet. Please call us if you are interested in setting this up.
32
R E T A IL
P L U S
F O R
W IN D O W S
3 . 0
Non-Stock - Assign this to items that are not normally kept in stock and require
special orders.
Rental - Assign this to rental items.
Service - Assign this to service or labour - usually sold in hours or fractions of
hours.
Shipping - You can create a number of shipping items for different carriers and
destinations (local, domestic, and international). Put them on an invoice along
with the merchandise.
Admission - Use this Type for selling ticket inventory.
♦ Departments - This is a user-defined subdivision of the inventory and it is a good
idea to enter all your initial Department names in the Department List before you
enter all your inventory. This will allow you to pick the Department from a pick list
as you set up each item. Please note that you are not required to create Departments
and can leave this field blank if you wish.
♦ Categories - This is also a user-defined subdivision of the inventory and it is a
good idea to enter all your initial Category names in the Category List before you
enter inventory. This will allow you to pick the Category from a pick list as you set
up each item. Please note that you are not required to create categories and can
leave this field blank if you wish. Some retailers who sell books and CDs put the
author/artist name in this field.
♦ Taxable - These two check boxes are used to identify which taxes normally apply
to the current item. These settings can be over-ridden at the time of sale manually
or automatically using the client tax settings.
♦ Bin Location - Enter the stock room shelf where the item is found or the
showroom display location. In effect you can put any information here that is
useful to you.
♦ Always Read Weigh Scale – Checking this box will tell Retail Plus that this item
is usually placed on a scale connected to the computer. The weight will be read and
the price is automatically calculated.
♦ Qty In Stock – This is the quantity you have available for sale.
♦ Last Sold On - This date field is maintained by the system and you do not
normally need to enter anything here unless you need to correct it.
33
R E T A IL
P L U S
F O R
W IN D O W S
3 . 0
♦ Last Cost - Enter the wholesale cost each the last time you sent an order to the
supplier. As you create purchase orders the system will modify this field
automatically.
♦ Avg. Cost - As you create purchase orders the system calculates the average cost.
You can include shipping costs in this figure if you use the Post Shipment
command in the Purchase Order system.
♦ Regular Price - Enter the default selling price for the item. There is a calculator
available on the button to the right if you need it. You can also enter a cost in the
Last Cost field and a margin in the Gross Margin field then click on Suggest A
Price. See the Pricing Tab for more options.
♦ Gross Margin - If you enter the Regular Price and a Last Cost the system will
calculate the gross margin or, enter the desired gross margin and a cost then the
system will suggest a selling price.
Gross margin is different from a percentage mark up and is more widely used in
retail. It accurately reflects what portion of the selling price is profit. If you mark
up an item by 50% then only one third of the selling price is profit (1.00 + 50% =
1.50). If you mark up an item to a Gross Margin of 50% then half the selling price
is profit. The formula for calculating gross margin is: ((price - cost) / price) X 100
♦ Navigation And Flagging Buttons - On the top right corner of the tab are three
buttons. The first displays the previous record; the second turns the record flag on
and off while the third displays the next record.
34
R E T A IL
P L U S
F O R
W IN D O W S
3 . 0
INVENTORY WINDOW – SALES TAB
The Sales tab displays the monthly volume and gross for the current item. These numbers are
maintained by the system and you do not normally need to enter them here. If you need to
change any of them just double-click on the cell and type a new number. When you are
finished be sure to click on Save Changes or your edits will be discarded.
Sales commissions can be set up for individual items. The controls work as follows:
Type - Select the button that corresponds to the type of commission you want to pay.
The Percent Of Profit commission is calculated on the last wholesale cost and the
actual selling price.
Amount - Enter the amount of commission. If you chose a percentage commission
enter a percent. If you chose a fixed commission enter the amount paid.
Max Commission - If you chose a percentage commission and wish to keep it below a
certain number enter the maximum payable on this item.
35
R E T A IL
P L U S
F O R
W IN D O W S
3 . 0
Update All - If you need to set the sales commissions on multiple items you can save
time by clicking on this button. It will set the sales commissions on all the flagged
items to match the current item.
View Weekly Sales – See the sales volume broken down by week.
Recalculate Totals – If you change any numbers in the monthly sales figures press this
button to update the totals on the right side of the tab.
INVENTORY WINDOW – PRICING TAB
Retail Plus gives you flexibility to charge the right price at the right time. Customers can be
assigned different price levels as well as standard discounts. You can assign price break points
for volume buyers, date sensitive sale pricing and 2-for-1 type specials.
For your decision-making convenience this tab also displays the item's past sales performance.
36
R E T A IL
P L U S
F O R
W IN D O W S
3 . 0
♦ Price Levels - Retail Plus lets you to set up four price levels for each item. They serve several
purposes:
At the point of sale staff can choose a price to apply if they have the access rights.
In conjunction with assigned price levels a customer always pays the assigned price
level if it was entered for any given item.
Different price levels can be charged on volume purchases using Price Break
Points.
♦ Price Break Points - Price break points are used in situations where the price changes
with the quantity purchased. This means that the regular price is charged unless the
quantity reaches the Level 2 break point, at which time the price each drops to Level 2.
When the quantity reaches the Level 3 break point then the price drops again to the Level
3 price, and so on. To apply break point pricing do the following:
1. On the Price Levels panel fill in the prices - Regular, Level 2, Level 3 and Level 4 (the
last two are optional).
2. On the Price Break Points panel fill in the quantities the customers must buy to drop
the price to the next level.
♦ Sale Pricing - Use this to create sale pricing with a start date and a finish date. Simply
enter a discount and the dates you want to apply it. If the current date is not within the
dates supplied then the regular price is charged, unless one of the other pricing features
applies. Click on Apply To All Flagged Items if you want other items to have the same
discount.
♦ Bonus Pricing - This panel consists of a checkbox and two data fields. Check the box if
you want to apply Bonus Pricing to this item. Then in the first field enter the quantity the
customers must buy to get the quantity in the second field free i.e. Buy 2 and get 1 free.
1. Check the box if you want to apply Bonus Pricing to this item.
2. In the first field enter the quantity the customers must buy to get any free.
3. In the second field enter the number the customers get free if they buy the quantity in
the first box.
37
R E T A IL
P L U S
F O R
W IN D O W S
3 . 0
INVENTORY WINDOW – ORDERING TAB
Having trouble keeping things in stock? Surprised when you run out of something? On the
Ordering tab any item can be set up to make reordering easier and more reliable. The options
are as follows:
In Stock - This field tells you how many you have.
Base Stock - Enter the base shelf quantity.
Reorder Point - Enter the stock quantity at which a repeat order is triggered. The
system will order the amount shown in Reorder Qty or, if that is zero it will order
enough to bring it back up to Base Stock.
Reorder Qty - This is the amount to reorder if the Reorder Point method is used. See
Creating Purchase Orders for more info.
The following fields are automatically maintained by the system and you do not normally need
to enter any data unless it needs to be corrected.
On Order - This field tells you how many are already on order.
38
R E T A IL
P L U S
F O R
W IN D O W S
3 . 0
Order Date - This field tells you the date the last order was posted.
Last Cost - The cost each on the last order. Note that costs can be entered to three
decimal places to allow commodities with small price variations.
Last Supplier - The supplier on the last order.
Last Shipment - The quantity received in the last shipment.
Date Received - When the last shipment was posted.
Cust. Orders - How many you currently have customer orders for.
Retail Plus keeps a list of suppliers for any given item and allows you to put them in order of
preference. The buttons on the Ordering tab are the means to do this:
Add - Put a supplier on list for this item. The supplier currently at the top of the list
will be considered the preferred supplier and will be used by default in a purchase
order. See Suppliers List for more info.
Edit - Change the details of the highlighted entry.
Remove - Delete the highlighted supplier from the list.
Promote - Move the highlighted supplier up the order of preference.
Demote - Move the highlighted supplier down order of preference.
39
R E T A IL
P L U S
F O R
W IN D O W S
3 . 0
INVENTORY WINDOW – NOTES TAB
♦ Product Notes - Enter a catalogue description of the product and any special notes you
may need to refer to. These notes can be consulted at the point of sale. In a sporting goods
store this may be equipment specs, in a pharmacy this may be drug interactions and
counter indications. It can also be used as copy for the Print Catalogue command.
♦ Product Photos - Pictures of the inventory can be displayed on both the Inventory
window and the Point Of Sale screen.
To get photos into the system take pictures of your stock with a digital camera or scan
regular photos then save them into one folder on your computer for easy management.
Once they are in your computer click on the button next to the field at the bottom of the
tab. This allows you to point to the picture you want displayed for this item.
Please note that the pictures are not displayed when browsing the database until you click
on View Photos. This prevents the system slowdown associated with automatic photo
displays, particularly where a network is involved.
40
R E T A IL
P L U S
F O R
W IN D O W S
3 . 0
INVENTORY WINDOW – MATRIX TAB
A matrix is used to track an item in it's variations such as color, size and style. Each item can
have from one to three different elements in the matrix and they do not have to be the same for
each item. You can invent your own matrix elements to describe the options a customer has on
purchasing any given item.
To set up a matrix item you need to do three things:
1. Create an inventory item with a name and a stock code.
2. On the Stock Tab set the Item Type to MATRIX.
3. On the Matrix Tab name the matrix columns and enter the quantities in stock.
To name the matrix columns for an item click on Column Headings, enter a name in one, two
or three fields then click OK. To add products to the matrix do the following:
1. Click on Add Line to put a blank line on the matrix.
41
R E T A IL
P L U S
F O R
W IN D O W S
3 . 0
2. Double-click in the empty cell under each column and enter a description that fits the
column heading.
3. Add lines till you have entered all the possible variations for the item then click on
Save Changes. Do not omit this step or you will have to start over!
The last element of the matrix will always be In Stock. In this column enter the quantity you
have on hand. You can leave this blank if you are just setting it up. To change the In Stock
quantity in an existing matrix line double-click on the number and type the new one.
The other buttons on the Matrix Tab are:
Delete Line - Click on this to remove the highlighted line in the matrix.
Clone Matrix - Click here to copy the matrix structure from an existing matrix
item. A Find dialog appears listing the matrix items that you can copy from.
Clear Matrix - Use this to delete all the lines and leave an empty matrix.
42
R E T A IL
P L U S
F O R
W IN D O W S
3 . 0
Inventory Window – Kit Tab
Kits are used to sell a group of related items under one stock code. Kits are also known as
assemblies and gift baskets. Each time a kit is sold it's components are all processed by the
system as if they had been sold separately. To set up a kit you need to do three things:
1. Create an inventory item with a name and a stock code. This can be a kit, an assembly
of parts or a gift basket.
2. On the Stock Tab set the Item Type to KIT.
3. On the Kit Tab define the contents using items already in the inventory.
To define the contents of a kit do the following:
1. Code - Enter the stock code of an item you want in the kit.
2. Quantity - Enter the number you want in the kit.
3. Add - Push Add to put the item on the list.
4. Delete - Click on this button to remove the highlighted item from the list
43
R E T A IL
P L U S
F O R
W IN D O W S
3 . 0
INVENTORY WINDOW – SPECIAL TAB
♦ Serial Numbers - If you have stock that needs to be tracked by serial number do the
following:
1. Create an inventory item for the serialized stock. Go to the Detail Tab and set
Item Type to Serialized.
2. Go to the Special Tab and click on Add. Enter a serial number and the date
received. Save and repeat for each item in the shipment.
3. At the time of sale you will be prompted to pick the serial number from the list.
Edit - Click this to change the highlighted entry.
Delete - Click this to remove the highlighted entry.
Print - Click this to get a list of units sold and those remaining in stock.
44
R E T A IL
P L U S
F O R
W IN D O W S
3 . 0
♦ Substitute Item - If you have products that can be substituted for out-of-stock items
they can be identified here. When customers want something that is not available the
staff will be prompted to offer them the alternative.
♦ Tag-Along Item - A tag-along item is any product that is usually sold with something
else, and of course the usual example is batteries to go with the gadget. Whenever the
item is sold a window appears on the screen with the option to add the tag-along item.
By defining a tagalong item you can make sure that staff encourages customers to buy
those batteries from you, and that the sales person will give them the right ones. Other
examples are things like plant food to go with house plants or an extended warranty to
go with an appliance.
♦ Parent Item - Parent items are usually cases of something. For example, a case of
wine is the parent item to a single bottle of the same wine (the child). Being able to
break cases into single bottles without having to make complicated stock adjustments
saves time.
Lets say a customer wants a bottle of wine but the records show you only have cases
left. Using this feature a case can be broken so the inventory record for cases is
decreased by one while the record for bottles is increased by 12. You can now go on
selling single bottles while keeping the records accurate.
To set up a parent and child item do the following:
1. Set up an inventory record for the parent then go to the Special Tab in the
inventory window. In the Case Qty field enter the number of items in a case.
2. Set up an inventory record for the child then go to the Special Tab in the inventory
window. In the Parent Item field locate the parent using the find dialog.
♦ Ship Weight - Enter the weight of the item for shipping purposes. It does not matter
which unit of measure you use. If you always use the same one the totals will come out
right.
♦ Case Qty - If this is the case form of an item you also sell individually then enter the
number in a case here. See Parent Items for more information.
Retail Plus allows you to display messages on the screen or print them on the invoice each
time an item is sold.
45
R E T A IL
P L U S
F O R
W IN D O W S
3 . 0
♦ Message On The Point Of Sale Screen - This can be used to prompt staff to do
something related to the sale such as asking to see the customer's ID before selling
them alcohol or offering the customer a related item to go with their purchase. For
another good way to prompt staff to sell related items see Tagalong Items.
♦ Message On The Invoice - Use this to print item-related messages for the customer's
information and/or your protection on the invoice. For example: ' No returns or
exchanges on bathing suits.' Some retailers use these messages to promote related
items or events i.e. 'Present this slip and get 15% off your next widget' or 'Call us to
sign up for art classes!'
INVENTORY - NEW, SELECT, DELETE
The other options on the Inventory submenu are:
♦ New - Retail Plus can manage multiple inventories (sometimes referred to as
Locations). When you create a new inventory file a dialog box appears where the
three-character location code is entered to keep it separate from any other
inventories. If you are running more than one store or business with Retail Plus
make sure each one has a unique Location code. Next you will see a standard
dialog where you can double-click on the folder where you want to put the new
data. Each inventory is treated as a separate database and is kept in it's own folder
labelled with the three-character code.
♦ Select – Once the system has more than one inventory set up, this command is used
to move from one to another. A standard file dialog appears where you can locate
the inventory you want. Simply double-click on the one you want and all
operations will then focus on it.
♦ Delete - A standard file dialog appears where you can locate the inventory to
delete. Simply double-click on the one you want. Please note that you cannot delete
the active inventory file. You must always select another one first.
Be very careful with this command because you can trash a lot of data with it. If a
number of staff members are using the system, turn on the password requirement
and assign levels of access so only authorized people can use this command. Once
an inventory has been deleted the only way to get it back is to restore it from a
backup.
46
R E T A IL
P L U S
F O R
W IN D O W S
3 . 0
C HAPTER
Managing
Clients
Using the Client Database
4
As sales are made in the POS screen, transactions can be associated with a customer
just by having the customer’s name on the screen when the sale is saved. This means
that the details of the sale are stored under the customer’s name in the client database,
and you can use this information to carry out targeted mailings or other marketing
activity.
The client database can be used to perform advanced functions using your client’s
purchase histories. For example, say that you are having a special sale on widgets.
Retail Plus can identify everyone who bought a widget in the past year and print a
mailing label for them. The result is that your flyers may get to the customers who are
most interested. You can also find out who has a birthday coming up and send them an
email.
To view the client database, go to the Main Menu and pull File down to Clients.
47
R E T A IL
P L U S
F O R
W IN D O W S
3 . 0
On the left side of the Browse View window there is a narrow column of check boxes.
These are used to “Flag” client records, which selects them to be included in some
operation such as a print job or a bulk deletion. Records are flagged (or unflagged) by
double clicking on the check box.
Client Window - File Menu
The first pull down menu in the client database contains the following commands:
♦ Print – There are a variety of printing options:
This Client – Print all the data available on the current client.
Client List – Creates a list of flagged clients which includes their contact
information.
Envelope – Print the current client’s address on a standard COM10 envelope.
You have the option of including the customer number and your return address
as well.
Mailing Labels – Print the flagged clients on Avery 5160 or 8160 address labels
(30 per page).
Shipping Labels – Print the flagged clients on Avery 8163 shipping labels (10
per page).
Open Layaways – Print a list of uncompleted layaways.
Reward Points – Print a list of client’s points sorted by total points earned.
Client Window - Edit Menu
The Edit menu contains the following commands:
♦ Add – Select this to enter a new customer in the database. New customers can also
be entered in the POS screen at the time of sale.
♦ Delete – Deletes the current record.
♦ Find – A dialog appears where you can specify what to look for and where to look.
If you are not sure which client record you want you can enter the first few
characters of the search target then press the Find Next button until the right one
comes up.
48
R E T A IL
P L U S
F O R
W IN D O W S
3 . 0
♦ Delete Flagged Clients – Delete all the flagged clients. Use it to clear out old data
but be careful – it can do a lot of damage if you make a mistake.
Client Window - View Menu
The View menu contains the following commands:
♦ All Clients – Restores the screen to a full display of all clients in the database. Use
this if you have previously used the next command.
♦ Flagged Clients – Causes the client window to display only the flagged client
records.
♦ Sort Clients – The sort command pops up a dialog box where the sort field can be
chosen from a pick list.
♦ Get Info – Displays a dialog box of status information about the client database
and the computer it is running on.
♦ Open In Ms-Excel – Open the client file in read-only mode in Microsoft Excel.
You can do searches, sorts and print custom reports but you cannot make changes.
If you wish you can save it under another name and the read-only restriction goes
away.
♦ Reset Column Order – Set the browse window columns back to their default
order.
49
R E T A IL
P L U S
F O R
W IN D O W S
3 . 0
Client Window - Tools Menu
The Tools menu contains the following commands:
♦ Set Flags – Just as you can flag inventory items for a particular function you can
do the same with client records.
There are several pre-programmed flagging options, and you can customize your own
using the Flag By Search feature. For more information on how flagging works just
click on the ? buttons.
♦ Duplicate Check – Customer numbers are assigned by Retail Plus but you can
reassign them at will to conform to your own system. Periodically check the client
database for to make sure no errors have been made.
Duplicate numbers can be unintentionally assigned in two ways: if a user resets
Next Customer Number in the setup screen to a smaller number or it is edited
directly in the customer’s record.
♦ Import Clients – There are several sources you can use to import clients.
From A Delimited Data File – This command allows you to bring client lists
into Retail Plus from another source. A file dialog pops up where you locate the
50
R E T A IL
P L U S
F O R
W IN D O W S
3 . 0
file to be imported. It uses a common data exchange file type called a CSV file.
The import field order for client records is:
Field No. / Description / Max Length / Type
1. First name, 12, Char
2. Last name, 16, Char
3. Title, 30, Char
4. Company, 30, Char
5. Address Line 1, 30, Char
6. Address Line 2, 30, Char
7. City, 18, Char
8. State/Province, 4, Char
9. Zip/Postal Code, 10, Char
10. Country, 15, Char
11. Phone, 13, Char
12. Extension, 6, Char
13. Fax, 13, Char
14. Mobile Phone, 13, Char
15. Customer Number, 10, Numeric
16. Email, 100, Char
The data being imported does not necessarily have to contain all these fields.
The only rule is that a double comma must be used to represent any empty field
if it is not the last one.
♦ Export Clients – This command allows you to export the data in the client
database to a standard interchange file format called a comma-delimited data file.
These are sometimes referred to as CSV files (which stands for Comma Separated
Values).
A file dialog pops up where you can supply a name and location for the export file.
You will also be asked if you want the first record in the export file to contain the
field names. Answer Yes if the program you are exporting to requires this header
record. Please note that only the flagged clients are exported..
♦ Reindex – This command rebuilds the client file indexes. Use it if the existing
indexes become corrupted, which can happen if your hard drive is old or has very
little space left. A common symptom of corrupted indexes is that the system cannot
find a record that you know is there.
51
R E T A IL
P L U S
F O R
W IN D O W S
3 . 0
Client Window – Detail Tab
The Detail Tab displays the basic information available on each customer. The
Customer Number, Last Purchase Date and Last Mailing date fields are automatically
maintained by the system and you do not need to enter them manually unless some
change is needed.
To enter a new client just click on the New button on the Tool Bar and a new, blank
client form will appear.
52
R E T A IL
P L U S
F O R
W IN D O W S
3 . 0
Client Window – History Tab
The History tab displays a customer's purchase history, account number and credit
limit. It also has buttons used to display the customer's invoices, price quotes and
layaways.
Purchase History - This is a standard edit field where you can enter any other
notes you need to keep about the customer.
Acct. No. - A unique account number is automatically assigned by Retail Plus and
it is used to link invoices with customers. If you change this number be sure the
customer does not have any invoices, quotes or layaways on file and you must
make sure the number you assign is unique.
Credit Limit - Enter the customer's credit limit. Caution: a limit of zero means
there is no limit to the customer's credit.
Invoices, Quotes or Layaways - click on the corresponding button to show a list
of such transactions on file for this customer. When the list appears just doubleclick on the one you want to see more detail.
Recurring Charges - This allows you to set up repeating invoicing. Use it to
charge a client for a product or service every set number of days, weeks or months.
You can only set up one recurring charge per client.
53
R E T A IL
P L U S
F O R
W IN D O W S
3 . 0
· Stock Code Of Item Or Service - set up the item you are invoicing for and
enter the stock code here.
· Bill Every - Enter the number of days, weeks or months between invoices.
· Pick List - Select Days, Weeks or Months.
· Next Billing - Select the first invoicing date.
· Max Billings - Enter the total number of invoices required.
· Active - Uncheck this to stop the billings, check it to start them again.
· Last Billed - The date the last time the client was charged.
· Times Billed - The number of times the client has already been charged.
· Update Clients - Apply this recurring charge to all the flagged clients.
To create the actual invoices you must run the following command regularly as
needed: Point Of Sale / Clients / Invoices / Recurring Charges...
Client Window – Options Tab
54
R E T A IL
P L U S
F O R
W IN D O W S
3 . 0
The Options tab displays a number of features for managing the client plus an optional
photograph.
Point Total – If the reward points feature is turned on this will show the number of
points accumulated.
Usual Discount - If this client gets a standard discount on all purchases then enter
the percentage here. The discount can be overridden at the time of sale.
Tax Exemptions - If the client is exempted from paying any of the listed taxes
(where taxes have been set up) then check them here. These exemptions can be
overridden at the time of sale.
Price Level - If the client normally pays a certain price level click on the
corresponding button. If that price is available for any given item it will
automatically be applied, otherwise the regular price is used. The price level can
also be overridden at the time of sale.
Ship To Address - Enter a ship to address here only if the billing address is
different from the shipping address.
Photo - This area is reserved for any photos you have relating to the client. For
example, if you are in the carpentry business you can display a picture of the last
job you did for them. Place the pictures in a folder and click on the button next to
the field at the bottom of the tab. This produces a file dialog used to point to the
picture you want. Please note that the pictures are not displayed when browsing the
client database until you click on View Photos. This prevents the system slowdown
associated with automatic photo displays.
55
R E T A IL
P L U S
F O R
W IN D O W S
3 . 0
C HAPTER
Managing
Invoices
Using the Accounts Receivable Database
5
As sales are made in the POS screen, some or all of the transactions can be placed on
the customer’s account simply by setting the Method Of Payment to “On Account” at
the time of sale. This produces an invoice that is saved in a file, making it available for
the accounts receivable functions such as payments, statements, re-prints, late charges,
and the receivables report.
To view invoices go to the Main Menu and pull File down to Invoices. The first
screen you see is a Browse tab with all the invoices in the system.
On the left side of the window there is a narrow column of check boxes. These are
used to “flag” invoices, which selects them to be included in some operation such as a
print job or a deletion. Invoices are flagged (or unflagged) by double clicking on the
check box. There is also a menu and tool bar dedicated to the invoice functions. These
are covered on the following pages.
Invoice Window - File Menu
The File menu contains the following commands:
56
R E T A IL
P L U S
F O R
W IN D O W S
3 . 0
♦ Print – This command pops up a sub-menu with the following options:
Current Invoice – Print the current invoice. Retail Plus will give you an
opportunity to preview the invoice before printing it.
Flagged Invoices – Print all the flagged invoices.
Account Statements – Print a statement for the client or clients for which there
is at least one flagged invoice. A dialog box appears where you enter the date
range of the invoices to be included.
Receivables – This command prints a summary of all open invoices with a nonzero balance.
Invoice Window - Edit Menu
The Edit menu contains the following commands:
♦ Find Invoice -This command pops up a dialog box that is used to locate an
invoice.
There are a variety of search fields to choose from and the search target is not case
sensitive. If you look for "smith" or "SMITH", it will still find "Smith". It also
searches from the beginning so "sm" will find "Smith", but "mi" will not.
♦ Delete Invoice – This command removes the current invoice. Be careful with it
because deletion is permanent.
♦ Delete All Flagged Invoices - Delete all the flagged invoices. Be very careful with
this command because deletion is permanent. The only way to recover them is to
restore the invoice files from a backup.
♦ Invoice Header – This command pops up an edit window where the header and
footer text for the invoice or sales slip can be entered. You may enter up to seven
57
R E T A IL
P L U S
F O R
W IN D O W S
3 . 0
lines in the header and two lines in the footer. When printed, the fist line in the
header appears in a larger font than the rest of the lines.
The header and footer text is used to create complete invoices (or sales slips)
that include your business name and other messages. To get a customized look try
leaving this window blank and creating your own invoice letterhead with word
processing or graphics software. This allows you to create something with your
business logo and other effects. You may put your design and message in the top
two inches and the bottom inch of a standard page. Print a hundred copies at a time
and then feed it back into your printer every time you need invoices.
Invoice Window - View Menu
The View menu contains the following commands:
♦ All Invoices – Display all the invoices on file.
♦ Flagged Invoices – Display only the flagged invoices.
♦ Non-Zero Balances – Display only the open invoices.
♦ Sort – This command pops up a dialog box used to select a sorting order for the
invoices.
♦ Get Info – Displays the status of your invoice file and your computer.
♦ Open In Ms-Excel – Open the invoice file in read-only mode in Microsoft Excel.
You can do searches, sorts and print custom reports but you cannot make changes.
If you wish you can save it under another name and the read-only restriction goes
away.
58
R E T A IL
P L U S
F O R
W IN D O W S
3 . 0
Invoice Window - Tools Menu
The Tools menu contains the following commands:
♦ Flag All – Flag all the invoices on file. Use this if you want to include all the
invoices in a print or delete operation.
♦ Unflag All – Unflag all the invoices on file. Use this to make sure there are no
flagged invoices in the file.
The Unflag All command should be used regularly to make sure that there are no
invoices that were flagged on a previous occasion and therefore unintentionally
included in some print or delete operation.
♦ Calc Late Charges – Recalculate the late charges on all overdue invoices if you
have a penalty defined in the Setup window / Options tab.
♦ Reindex – This command rebuilds the invoice file indexes. Use it if the existing
indexes become corrupted, which can happen if your hard drive is old or has very
little space left. A common symptom of corrupted indexes is that the system cannot
find an invoice that you know is there.
Reminder - Invoices are only stored in customer accounts if the method of payment
was set to "On Account".
Notes About Late Charges
Penalties on overdue accounts are optional and the monthly interest rate can be entered
in the Retail Plus Setup screen. The system will calculate the number of months the
invoice is overdue but you can change this before printing if necessary. You are only
asked if you want to add the penalty if the invoice date is more than the grace period
days behind the current date. The grace period can be set in the Setup screen on the
Options tab and is usually 15 or 30 days.
If a partial payment is made on an invoice that already has a penalty on it the payment
is applied to the penalty first, and the rest is applied to the balance owing. For this
reason the follow-up invoice with the new balance does not show a penalty calculated
from the original invoice date, but rather from the last payment date.
When re-printing an invoice, the same taxes and charges are applied that were in effect
at the time of the original sale, and this cannot be modified later. Changing a
customer's tax status does not affect previously unpaid invoices.
59
R E T A IL
P L U S
F O R
W IN D O W S
3 . 0
Invoice Window – Details Tab
The buttons on the Invoice Detail tab are as follows:
Void Invoice - This button voids the current invoice and return the balance
owing to zero. Please note that neither the invoice nor the entry in the client's
purchase history is deleted but a void notice is added to both.
Refund - Refund any payments made on this invoice.
Print - Reprint the current invoice.
The fields on the Invoice Detail tab are as follows:
Invoice Number - This is automatically assign by the system and you do not normally
have to edit this field. If you do, make sure that the invoice number you are entering is
unique.
Account Number - This is automatically assign by the system and you do not
normally have to edit this field. If you do, make sure that the account number
you are entering is for the client shown.
60
R E T A IL
P L U S
F O R
W IN D O W S
3 . 0
Date - This is the date the invoice was originally created.
Staff - This is the staff member who created the invoice.
Invoice Total - The total sale with taxes and charges.
Balance Due - The outstanding amount.
Invoice Window – Payment Tab
The Invoice Payment tab allows you to apply a payment to the current invoice or
spread a payment over all the client's open invoices.
Amount - Type the amount being paid on the invoice. It defaults to the amount
owing.
Method - Select the method of payment from the pick list.
Date - The date of payment defaults to today's date but can be back-dated if
necessary.
Distribute This Payment - Check here if you want to distribute the payment to
all the client's open invoices. Let's say a client has three invoices with a balance
61
R E T A IL
P L U S
F O R
W IN D O W S
3 . 0
due and he gives you a check to be applied to all three. Retail Plus will find the
oldest invoice and pay into it. If there is any money left over it will find the
next oldest invoice and pay into that one, and so on.
62
R E T A IL
P L U S
F O R
W IN D O W S
3 . 0
C HAPTER
Managing
Suppliers
Using The Supplier Database
6
Maintaining a list of suppliers has several advantages. When entering an item into
inventory, for example, the supplier can be chosen from a pick list. When purchase
orders are created, the name and address of the suppliers can be included.
To view the suppliers go to the Main Menu and pull File down to Suppliers. The first
screen you see is a Browse window of all the suppliers in the system.
On the left side of the Browse window there is a narrow column of check boxes. These
are used to “flag” suppliers, which selects them to be included in some operation such
as a print job or a bulk deletion. Suppliers are flagged (or unflagged) by double
clicking on the check box. There is also a menu and tool bar for the supplier functions.
These are covered on the following pages.
Supplier Window - File Menu
The File menu contains the following commands:
♦ Print – This command produces a sub-menu with the following options:
Current Supplier – Print all the information on file for the current supplier.
Supplier List – Print a list of suppliers.
Mailing Labels – Print the flagged supplier addresses on Avery #8160 address
labels.
63
R E T A IL
P L U S
F O R
W IN D O W S
3 . 0
Envelope – Print the supplier’s name and address on a standard COM 10
business envelope. There is an option to include the return address.
♦ Printer Setup – This pops up the standard printer dialog box.
Supplier Window – Edit Menu
The Edit menu contains the following commands:
♦ Add Supplier – Add a new supplier to the database. The screen automatically
jumps to Form View with the cursor in the company name field.
♦ Delete Supplier – Delete the current supplier.
♦ Delete Flagged Suppliers – Delete all flagged suppliers. Be careful with this
command - deletions are permanent.
♦ Find Supplier – This command pops up a dialog box used to locate a supplier by
company name.
Supplier Window – View Menu
The View menu contains the following commands:
♦ All Supplier – View all suppliers.
♦ Flagged Suppliers – View only the flagged records.
♦ Sort – This command pops up a dialog box used to select a sorting order for the
suppliers.
♦ Get Info – Display some tech information about the supplier file and the computer.
Used mostly for troubleshooting.
♦ Open In Ms-Excel – Open the supplier file in read-only mode in Microsoft Excel.
You can do searches, sorts and print custom reports but you cannot make changes.
If you wish you can save it under another name and the read-only restriction goes
away.
64
R E T A IL
P L U S
F O R
W IN D O W S
3 . 0
♦ Reset Column Order – Set the browse window columns back to their default
order.
Supplier Window – Tools Menu
The Tools menu contains the following commands:
♦ Flag All – Flag all the suppliers on file. Use this if you want to include all the
suppliers in a print or delete operation.
♦ Unflag All – Unflag all the suppliers on file. Use this to make sure there are no
flagged suppliers in the file.
The Unflag All command should be used regularly to make sure that there are no
suppliers that are still flagged from a previous occasion and therefore accidentally
included in some print or delete operation.
♦ Duplicate Check – Scan the supplier records to make sure you do not have any
duplications.
♦ Import Suppliers – This command allows you to bring a list of suppliers into
Retail Plus via comma-delimited data files often referred to as a CSV files in
Microsoft literature. Each record simply contains all the fields on one line
separated by commas and terminated by a carriage return. The field order for each
record is:
Field Name
1. Contact First name
2. Contact Last name
3. Title
4. Company
5. Addr 1)
6. Addr 2)
7. City
8. State
9. Zip
10. Country
11. Phone
12. Mobile Phone
13. Fax
65
Max Length Type
12
16
30
30
30
30
18
4
10
15
13
13
13
Char
Char
Char
Char
Char
Char
Char
Char
Char
Char
Char
Char
Char
R E T A IL
P L U S
F O R
W IN D O W S
3 . 0
14. Supplier Number
15. Email Address
6
30
Char
Date
The data being imported does not necessarily have to contain all these fields. You
can supply just the first 10 fields if you wish. The only rule is that a double comma
must be used to represent any empty field before the last one.
♦ Reindex – This rebuilds the index file associated with the supplier list. Use it if
you suspect that the suppliers are not in the correct order or if the system cannot
find a supplier you know is there.
66
R E T A IL
P L U S
F O R
W IN D O W S
3 . 0
C HAPTER
Purchase
Orders
7
Keeping Inventory In Stock
Purchase orders are used to keep stock on the shelves. They can be also used to acquire
for customers special items for that are not usually kept in stock. To access these
functions from the opening menu pull File down to Purchase Orders.
Purchase Order Window – File Menu
♦ New – This opens a window with the options for creating a new PO.
You can tell Retail Plus which items to include, where to order and how to calculate
the order quantities.
The options in each panel are as follows:
Items to consider for this order:
All items stocked from this supplier - Choose a supplier from the list box if you
only want one purchase order from a specific supplier. Otherwise an order will
be created for multiple suppliers and you will get a separate printout for each
one.
67
R E T A IL
P L U S
F O R
W IN D O W S
3 . 0
Flagged items only – Use this option if you have pre-selected the items you
want to order. You can flag items manually or by search criteria. See menu File
/ Inventory / Tools / Set Flags for more information on selecting items.
Customer orders only – Use this to create purchase orders for items that have
customer orders.
All items in inventory – Use this to consider your entire stock for reordering.
Who to order from:
The preferred supplier – The purchase orders will be directed to the supplier
which appears at the top of the list. The list is maintained on the item’s
Ordering Tab in the Inventory section. This option will produce not one PO
but one for each supplier.
The supplier with the lowest cost - The purchase orders will be directed to the
supplier who shows the lowest cost on the list. The list is maintained on the
item’s Ordering Tab in the Inventory section. This option will produce not
one PO but one for each supplier encountered.
How many to order:
Whenever you create a purchase order, Retail Plus will suggest an order quantity based
on the formula you choose. The exception, of course, is the first one:
Blank order – This option creates an order file where all the order quantities are
either zero or the minimum order quantity where specified. You can simply
review the blank order. When you see an item you want shipped, change the
order quantity to a number greater than zero. When you print the final order
Retail Plus will automatically omit all items that you have skipped.
1 Week Of Stock - This orders one week's worth of stock based on a formula
that looks at average sales over the past 3 weeks.
2 Weeks Of Stock - This is the same as above but orders 2 week's worth.
Reorder Points - There are two ways to use this. Both ways look at the Reorder
Point and Reorder Quantity fields in your inventory records.
1 - If you have put a number in the Reorder Quantity field this orders the
Reorder Quantity whenever the Onhand quantity falls below the Reorder
Point. Use this to order a fixed amount of stock each time.
2 - If you leave the Reorder Quantity at zero this orders enough to bring it
back up to the Base Stock when Onhand falls below the Reorder Point.
Use this to order a variable amount of stock depending on how much you
have on hand and what you need as your base stock.
68
R E T A IL
P L U S
F O R
W IN D O W S
3 . 0
Monthly Sales – This calculates orders based on sales for the same month last
year, the amount of stock on hand, the base stock, and the amount of stock on
order. It relies on the availability of monthly sales figures for last year. Retail
Plus automatically saves monthly sales figures for the current year but you will
have to enter these for last year if you need to use this method as soon as you
start working with Retail Plus. The Monthly Sales formula orders a large
amount of stock and should be used for suppliers who cannot ship to you on
short notice.
When you have made your selections click ok and you will see a file dialog that
allows you to specify the name and location of the purchase order file. The file name
has been suggested for you and is based on a PO number sequence. Go to the Options
tab on the Setup screen to specify the PO number where you want to start.
Please note that you may change the filename but not the file extension (the three
characters after the dot). This must always be the three-character location code that
Retail Plus uses to tell which orders belong to each location. If you change it you will
not be able to open the file from within Retail Plus.
♦ Open - You will then see a file dialog box that allows you to double-click on the
order you want. After you select an order file from the items are displayed in the
Browse window.
This window supplies you with the information you need to make a judgement about
the quantities being ordered and gives you an opportunity to adjust them. You
normally need to edit the order quantity column and occasionally the Case Quantity
69
R E T A IL
P L U S
F O R
W IN D O W S
3 . 0
column. If any of the other fields need to be changed it should be done in the inventory
file, not in the order file.
The most important columns displayed when reviewing a purchase order are as
follows:
Flag – The first column has no heading but all Browse screens in Retail Plus
have one. It is used to flag items that are to be used in various operations. Just
click on this column to flag and unflag an item.
Order Qty - The number of items or packages being ordered. If the Case
quantity is 1, this is the number of items. If the Case quantity is more than 1,
this is the number of cases or packages, not the number of items being ordered.
Note that the ordering formula rounds this off to the nearest full case but you
can change this to a split case if you wish. For example, if the case quantity is
12 and you order 1.5 then your PO will show one and a half cases (18 items).
Case Qty - The number of items that the supplier ships in one package. This is
the same Case Qty field as the one in the inventory window. If Case Qty is
greater than 1 the order is rounded off to the nearest full case and the Order
Qty column shows the number of cases being ordered, not the number of items.
Cost Each - What you pay the supplier for one item.
Order Cost - The result of multiplying Order Qty times Case Qty times Cost
Each.
Qty Recvd – How many you got in the shipment.
In Stock – How many you had on hand when the order was generated.
On Order – How many you already have on order, including back orders.
Minimum Stock - The quantity shown in the inventory records as the minimum
shelf quantity. This is also referred to as Base Stock.
Reorder Point - The re-order point as shown in your inventory records.
Reorder Qty - The re-order quantity as shown in your inventory records.
Back Orders – How many you need to fill current customer orders.
You can remove an item from the order simply by changing the Order Qty field to
zero. Items with an order quantity of zero will be excluded when you print the final
order.
70
R E T A IL
P L U S
F O R
W IN D O W S
3 . 0
♦ Delete – Get rid of some old PO files.
♦ Post Order – Once you have finished creating a PO, printed it and sent it to the
supplier you can use this command to update the On Order fields in your
inventory records. It adds the order quantity to the On Order field and updates the
Order Date field for each item. Usually you do not run this command until you are
sure your PO is final and ready to send.
♦ Post Shipment - When a shipment arrives that is associated with a purchase order
you can update your inventory records quickly. Bring your packing slip to the
computer and go down the column titled Qty Recvd. Check this against the
packing slips and correct the Qty Recvd where it does not match the actual
number received. The default number in the Qty Recvd column is the same as the
Order Qty with one difference. Where items were ordered by the case the Qty
Recvd column shows the number if pieces, not the number of cases. For example,
if the purchase order shows an Order Qty of 8 and a Case Qty of 12, then the Qty
Recvd column will show 96.
When you have finished checking the Qty Recvd column select the Post
Shipment command to update the In Stock, Last Cost and Avg Cost figures. You
will have the following options:
Flag these items for printing – Select this if want the new items flagged as the
inventory is updated. This allows you to see which items were received and to
print labels for them.
Unflag all the previously flagged items – If you selected the previous option
then you would probably select this one too unless you are receiving several
shipments and need to print labels for all of them.
71
R E T A IL
P L U S
F O R
W IN D O W S
3 . 0
Add shipping costs to these items – Select this if you know the shipping costs
and want Retail Plus to calculate them into the Avg Cost of the item.
Total costs to add – Enter the entire cost of shipping so it can be distributed
across all the items received and calculated into the Avg Cost. In practice, you
can enter any costs you wish, not just the shipping cost.
♦ Print – Where there is more than one supplier on a purchase order the print
function will split them up into suppliers so you can send the right order to the right
supplier. There are also other print options as follows:
Print supplier’s address – Put the suppliers mailing address at the top of the PO.
Print the supplier’s stock code – On the printed order, substitute the supplier’s
stock code for your own where it is available. In the inventory records the
supplier’s stock code is entered as the re-order number.
Print the PO Header text – This allows you to add some standard text to the top
of your PO’s such as delivery instructions or conditions for placing the order.
To create a PO Header, pull the Edit menu down to PO Header Text.
You may be wondering why an order is not automatically posted to the inventory file
when it is printed. Consider this situation: say that you need to prepare December
orders in August to make sure you have enough stock for Christmas. You create the
order, print it, and send it off to the supplier. The supplier can now make sure there has
enough stock in December to fill your Christmas order. If you post this order to your
inventory in August, the orders you generate for September, October and November
will be too small because the data shows a large amount of stock already on order.
Those orders will be correct only if you to post the December order after those for the
preceding months.
72
R E T A IL
P L U S
F O R
W IN D O W S
3 . 0
Purchase Order Window – Edit Menu
The Edit menu contains the following commands:
♦ Add Item – This command pops up a pick list where you can locate an item and
add it to the order.
♦ Delete Item – Items with an order quantity of zero are omitted from the final order
when it is printed. You do not normally have to delete them, but if you want them
removed, this command will do it.
♦ Delete Flagged Items – This command will remove all items that have been
flagged.
♦ Add PO Header – This pops up a window where you can enter any text that you
want to appear at the top of the printed order. This can be delivery instructions, PO
numbers etc.
♦ Find Item – This command pops up a dialog box that helps you find an item.
Purchase Order Window – View Menu
The View menu contains the following commands:
♦ View All Items – Select this to view all items on the order.
♦ View Flagged Items Only – Select this to view only the flagged items on the
order.
♦ Sort – Select a sorting order for the PO.
♦ Open In Ms-Excel – Open the order in read-only mode in Microsoft Excel. You
can do searches, sorts and print custom reports but you cannot make changes. If
you wish you can save it under another name and the read-only restriction goes
away.
♦ Get Info – Display systems information about the current PO and your computer.
This is usually used for troubleshooting.
73
R E T A IL
P L U S
F O R
W IN D O W S
3 . 0
Purchase Order Window – Tools Menu
The Tools menu contains the following commands:
♦ Set Flags – Flag all the items from one supplier.
♦ Recalculate Order Costs – If you change an order quantity, pack quantity or
wholesale price, then you can use this command to update the Order Cost column.
♦ Export - This pops up a file dialog that allows you to select a name and destination
for the output file. The file will contain the flagged items in comma-delimited
format, which can be imported into many different types of programs such as MSExcel and MS-Access as a CSV file (comma separated values). You can use this to
further process the orders according to your needs and preferences.The exported
fields are Order Quantity, Stock Code, Item, Size, Pack, Dept, Supplier, Reorder
Number. The last one is usually the supplier's stock code and may be the same as
your stock code (makes life easier if it is). The field names will appear in the first
line of the export file.
♦ QuickBooks – Transfer the cost of this order to QuickBooks accounts payable.
If you have created an order that contains items from more than one supplier you can
limit the scope of your editing and printing to one supplier at a time. To do this pull the
Tools menu down to Set Flags and use the Flag By Search feature to tag the a chosen
supplier. Then pull the View menu down to View Flagged Items.
74
R E T A IL
P L U S
F O R
W IN D O W S
3 . 0
PURCHASE ORDER WINDOW – DETAIL TAB
While editing purchase orders the Detail tab is where you can get some details about an
item to help you decide how much and from which supplier to order. The fields are as
follows:
Supplier - This list contains the suppliers available for this item. It is usually
kept in order of preference and when the PO is finalized the item will be
ordered from the one you have put at the top. The buttons on the lower right
relate to this list and are used as follows:
Add - Choose a supplier from the pick list and add it to the preferred list for this
item.
Remove - Take the selected supplier off the list. You can select one just by
clicking on it.
Promote - Move the selected supplier up the list.
Demote - Move the selected supplier down the list.
75
R E T A IL
P L U S
F O R
W IN D O W S
3 . 0
The rest of the fields are duplicates of the data in the inventory files and are included
for reference to help you decide how much to order. The following two fields are
exceptions to note:
Cust Orders - Also for reference - this is the quantity for which you have taken
customer orders.
Order Quantity - If you have chosen an ordering formula when you created the
PO this shows the quantity the system has suggested. Enter a number only if
you wish to change it. To take an item off the order simply set this field to zero.
PURCHASE ORDER WINDOW – MATRIX TAB
If the item you are ordering is a matrix item you will want to specify an order quantity
for each detail (color, size, style etc.) in the matrix. Just highlight each one in turn on
the Matrix tab, enter an order quantity in the edit field to the right of the list and press
Save Changes.
76
R E T A IL
P L U S
F O R
W IN D O W S
3 . 0
Managing
Sales Staff
Working With Staff Hours And Commissions
C HAPTER
8
Data about staff hours and commissions is collected in the point-of-sale screen as
business is conducted at the sales counter. Keeping track of commissions requires that
all staff enter an ID before each sale. Keeping track of hours requires that they also
clock in and clock out. Both of these features depend on having a staff ID for each
employee, which can be entered in the Setup window on the Users Tab. Sales
commissions on can be set up in the Inventory screen on the Sales Tab.
The staff commissions and hours can be accessed from the opening menu by pulling
File down to Sales Staff. A window appears where the information can be maintained
and reported.
To view the data available on any staff member just click on the member’s name. The
options available on this window work as follows:
♦ Show Date Range – View only the data that occurs between two given dates for
the current staff member.
77
R E T A IL
P L U S
F O R
W IN D O W S
3 . 0
♦ Show All – View all available data. This just removes the date filter applied by the
above command.
♦ Delete Line – Remove the highlighted line from the table.
♦ Delete All – Clear the entire table for the current staff member.
♦ Recalc Hours – Use this to recalculate the Hours column after changing any
Clock In and Clock Out times.
♦ Report – Print a hard copy report with total hours and commissions.
♦ Exit – Close the window and return to the opening menu.
78
R E T A IL
P L U S
F O R
W IN D O W S
3 . 0
Configuration &
Preferences
Choosing Program Defaults And Options
C HAPTER
9
Retail Plus offers considerable flexibility through options affecting how the system
works for you. To access these options go to the Main Menu and pull Tools down to
Setup. The setup screen is arranged in tabbed sections as follows:
♦
Taxes Tab
The Business ID section is where you identify your business. The address can be used
on purchase orders or for the return address on shipping labels and envelopes.
The Tax Setup section is where you can identify the names and rates of the sales taxes
in your area:
Taxation Type - Select Tax Inclusive if your taxes are normally included in the
sticker price and Tax Exclusive if they are not.
Tax Registration Number - Enter your tax registration number if you are
required to print it on your invoices and sales slips.
Tax 1 Name - Enter the name of a sales tax that applies in your area.
Tax 1 Rate - Enter the percentage amount of Tax 1 i.e. a tax of five percent is
entered as 5.000 not .05.
Tax 2 Name - Enter the name of a second sales tax.
Tax 2 Rate - Enter the percentage amount of Tax 2.
Tax 2 Compound - Select this if Tax 1 is included in the calculation of Tax 2.
Normally sales taxes are not themselves taxable, but unfortunately there are
still some areas where merchants are required to do this.
79
R E T A IL
♦
P L U S
F O R
W IN D O W S
3 . 0
POS Tab
The point of sale system is flexible in many details of how sales are handled. The
options are:
Go To POS On Startup – When Retail Plus is launched it boots straight into the
point of sale screen rather than going to the opening menu.
Staff May Discount - Allow sales staff with an access level less than three to
give discounts. Otherwise, only personnel with level three or four access can
give them. This does not apply if the password requirement is not turned on. In
that case everyone is automatically given level four access.
Allow Tax Over Ride - Allow sales staff to over-ride the default taxes on any
given item. When items are entered into inventory they can be identified as
taxable or non-taxable. This can be over-ridden at the time of sale, but only if
this option is selected. That means sales staff are allowed to exempt a customer
from a tax that is usually charged, or apply tax to an item that is not usually
taxed.
Print Client Name On Sales Slip - Print the client information on the sales slip
when it is available. This is available on 40 column sales slips only. See Printer
Output below.
Carry Over City, State, And Zip - Select this if most of your customers are in
the same town or neighbourhood. It eliminates having to re-enter this
information for every customer.
Print Credit Card Signature Line - Print the standard message and signature line
on the sales slip for credit card sales.
Show Total Margin On Transaction – This is useful for retailers who negotiate
prices in package deals. It allows you to make sure the transaction as a whole
remains profitable.
Allow Item List Edit – Let the sales staff type notes directly in the invoice. This
allows you to grab the mouse, click on the end of any existing line and hit
Enter. You then get a new edit line where you can start typing anything and as
much as you wish. The resulting text goes on the invoice and becomes a
permanent part of the client’s purchase history.
Fast Scan Mode - Enable uninterrupted bar code scanning. Normally an Item
Detail window appears on the POS screen when putting each item on a sale.
This window allows you to change the item's quantity, price or discount. If you
turn on Fast Scan Mode then the Item Detail window is suppressed, requiring
fewer keystrokes per customer. If you still want to see the Item Detail window
for any given item you can press 3 Detail just before ringing it up. This makes
scanning sales with a barcode reader easy because you do not have to hit any
keys between items.
80
R E T A IL
♦
P L U S
F O R
W IN D O W S
3 . 0
Auto Save Sales - Select this to have the sales and inventory data automatically
updated when the sales slip is printed. Otherwise you must press 9 Save to save
the sale. When this option is turned on fewer keystrokes are needed to make a
sale.
Scan Random Weight Barcodes - Enable processing of random weight
barcodes.
Confirm Before Saving Sales - Select this to ask the salesperson to confirm that
a transaction is finished before saving it. This allows the user to an additional
chance to check the transaction before completing it.
Use RMA on Returned Items – Require and track Returned Merchandise
Authorizations either for items clients return to the store or items you return to
the supplier.
Credit & Debit Card Approvals - Select Use X-Charge if you have installed the
X-Charge software. Please see Appendix P for more information about this
setup.
QuickBooks Version - Set the radio button to your country version and use the
file dialog to point at your QuickBooks company file. QuickBooks should be
closed when you do this. See Appendix Q for more details on this setup.
Default Method Of Payment - This is the method of payment that will be
applied to all sales by default unless some other method is chosen.
POS Station ID - This should be a unique, three digit number between 001 and
999. It is used to identify a particular computer when Retail Plus is used on a
network.
Printers Tab
This is for the location of invoice and receipt printers and the commands used to
control the output style, tape cutter and ribbon colour.
The fields are as follows:
Invoice Printer – Select a page printer from the list of installed printers. This
would normally be an inkjet or laser printer that creates full page invoices.
Receipt Printer – Select a receipt printer from the list of installed printers. This
would normally be a dedicated point of sale printer that creates standard
receipts on paper tape.
Setup Command - Enter the control string (if any) to send to the printer before
printing a receipt. For most receipt printers made by Epson and Star (the most
popular ones) no setup command is needed.
81
R E T A IL
♦
P L U S
F O R
W IN D O W S
3 . 0
Cutter Command - Enter the control string (if any) that activates the tape cutter
on the sales slip printer. The Epson cutter command is 27,105. For Star printers
it is 27,100,48.
Printer Output - Select the radio button that describes the POS printer output
you want. Invoices contain the most detail. A 40-column sales slip shows item
names as well as stock codes, and 20-column sales slips show only the stock
codes. Printer output can be selected on the POS screen as well. If you select
Invoices you must
Red Command - If your slip printer supports two color printing enter the
control string that selects the red ribbon for the store name and address. The
Epson red command is 27,114,49.
Black Command - If your slip printer supports two color printing, enter the
control string that selects the black ribbon. The Epson black command is
27,114,48.
Print Signature Copy On Credit Card Sales - Select this if you need to print a
signature copy on credit card sales. This is usually used in combination with the
Credit Card Signature Line option in section 1.
Page Eject After Print - Select this if you want a page eject sent to the printer
after printing an invoice or sales slip. Usually this will be applied to slip
printers only. Note that there are some slip printers that ignore eject commands.
Default Invoice Or Sales Slip Copies - Select the number of copies to print. The
number printed can always be changed at the time of sale but it will default
back to this number.
Label Printer Setup - Select the printer language your label printer works with
and select the printer name on the pulldown list.
Invoice Header Text - Enter the store name, address and phone number in the
header text window and your thank you message in the footer text window. be
sure to press Save Text when you are done.
Hardware Tab
This section is used only if you have a cash drawer or pole display connected to the
computer.
Cash Drawer
Cash Drawers come in two basic types - those that connect to a serial port and those
that connect to the back of the receipt printer (the most popular option). In both cases
you will need to supply the trigger command and the connection port.
82
R E T A IL
P L U S
F O R
W IN D O W S
3 . 0
Trigger Command - Enter the cash drawer trigger in decimal ASCII form. If
you have a drawer connected to a serial port this may be 0 (zero) or 65. If you
have a drawer connected to the back of the receipt printer the trigger command
will be either Epson compatible (27,112,0,50,250) or Star compatible (07).
Connection Port - Select the port the drawer is connected to. If it is connected
to the back of the receipt printer then this will be the same port as the printer.
Trigger Repeat Count - Select the number of times to repeat the trigger. If it
doesn't open on 1 set this to two. Some serial port drawers may need more.
Open Cash Drawer When Printing - Select this if you want the drawer to pop
when the sale is printed.
Pole Display
Retail Plus supports the popular Logic Controls PD3000 serial pole display, the Logic
Controls LD 9000 or any work-alike unit. The setups are as follows:
Use Pole Display - Select this if a serial pole display is connected. Before
enabling the pole display in Retail Plus, please make sure you have tested the
unit's operation according to instructions in the PD3000 Serial manual.
Connection Port - Select the port to which the pole display is attached.
Scrolling Idle Message - Enter a scrolling message to be displayed between
sales, such as "Ask About Our Special On Space Travel". The line is restricted
to 45 characters in length and will appear on the first line of the display.
Fixed Idle Message - Enter a fixed message to be displayed between sales, such
as "Aliens R Us". The line is restricted to 19 characters in length, including
spaces, and will appear on the second line of the display.
Pinpad
Retail Plus supports the pinpads supplied by the merchant services company for your
card transactions. Make sure you have installed the client software supplied by them
and followed the setup instructions. See Appendix P in the manual for more
information.
Scale Settings
Retail Plus has been tested with the Mettler-Toledo Viva model. It is an excellent
choice for economy and durability. If you buy any other scale make sure you can test it
before committing to it. When you buy a scale make sure you get the serial cable that
83
R E T A IL
P L U S
F O R
W IN D O W S
3 . 0
goes with it. Many require a nine pin null modem cable that is hard to find in a regular
computer shop.
♦
Use Weigh Scale - Select this if a serial scale is connected. Before enabling the
scale in Retail Plus, please make sure you have tested the unit's operation
according to instructions in the scale’s manual.
Serial Communications Type – Select the one you have activated on the scale.
Get Weight – After reading the instructions for the scale enter the character to
send that will cause it to respond with the weight. For the Mettler-Toledo Viva
it is “W”.
Zero Scale – After reading the instructions for the scale enter the character to
send that will cause the scale to return to zero. For the Mettler-Toledo Viva it is
“Z”.
Users Tab
You can add security to the use of Retail Plus in your business by setting up user passwords
and assigning access levels. WARNING: BE SURE ALWAYS TO HAVE A LEVEL 4
PASSWORD FOT THE SYSTEM ADMINISTRATOR. OTHERWISE YOU MAY BE
LOCKED OUT OF THE SETUP SCREEN.
The setup options are as follows:
Require Passwords And Assign Access Levels - Force a password entry to get
into the system or to change your own password.
Require Supervisor Password for Voiding Sales - Force a level 3 password
entry before the system will void a sale. That means sales staff will have to
have a supervisor on hand in order to void a sale.
Track Staff Sales Or Commissions - Force a password before every sale so the
system can identify the sales person and tag their name onto the transaction.
This is important where you need to keep track of everyone's sales totals, and is
essential if you need to know who conducted any given transaction (which can
be seen on the Itemized Sales Log).
Use Employee Time Clock - Turn on the Clock In & Clock Out feature to track
staff hours. Using this feature means you should also use the one above to
prevent staff from making a sale without clocking in.
84
R E T A IL
P L U S
F O R
W IN D O W S
3 . 0
Enable POS Trainee Mode - Select this if you want to allow a trainee to
practice checkouts without posting any sales. Just enter "trainee" at the POS
password ID prompt.
Add User - When you push this button a blank line appears at the top of the
user list. Just fill in the blanks, assigning a Level between 1 and 4. The levels
assign access rights as follows:
1. Can make sales in the POS screen only. Assign this to new staff that have
been given a basic orientation to the Retail Plus point of sale functions.
2. Can make additions and changes in the various database screens but can't
delete anything or authorize voided sales.
3. Can perform all functions except create & delete users or assign access
levels. Also cannot change any program setups & configurations.
4. Can perform all functions without restriction.
There is a fifth access level for trainees. If a person logs into Retail Plus
using password "Trainee" they will be assigned an access level of 0 (zero).
This means he or she can access the POS screen and practice making sales
but nothing will be saved.
Delete User - Remove the highlighted user from the list.
There are two ways to invoke the password requirement. The first is to select the
Require Passwords checkbox, which forces a password on start-up. The second is to
select the Track Staff Sales Or Commissions checkbox, which forces the user to
enter his or her password before every sale. Selecting both Track Staff Sales Or
Commissions and Go To POS On Start-up effectively turns on the password
requirement (and the resulting access levels) for the entire system.
♦
Options Tab
This tab contains a set of optional configurations as follows:
Assigned Numbers
Next Customer Number - This number that will be assigned to the next new
customer. If you want all your customer numbers to be the same length start
counting at 10000.
85
R E T A IL
P L U S
F O R
W IN D O W S
3 . 0
Next Invoice Number - This is the number that will be assigned to the next invoice
or sales transaction.
Next Purchase Order Number - This is the number that will be assigned to next PO
generated by the system.
Next RMA Number - This is the number that will be assigned to next Returned
Merchandise Authorization generated by the system.
Gift Cards Maximum Value – Set the highest value that can be assigned to a gift
card. Please see Appendix for more information.
Bonus Points Setup
The bonus points system is a feature that you can turn on and off. It is meant to provide
the means to set up a rewards program for your best customers by giving them bonus
points with every purchase. This qualifies them for a discount when they have
accumulated enough points. The number of points a customer has is displayed on the
POS screen at the end of the Bill To field. The setup options are:
Use Bonus Points System - Turn on the bonus points system.
Print Points On Sales Slips - Show the points earned on the customer's invoices and
sales slips.
Points Per Dollar - Enter the number of bonus points the customers will receive for
every dollar they spend (before taxes and charges). If you enter 1 they will get one
point per dollar. If you enter 0.10 they must spend ten dollars to get one point.
Points are still awarded on sales that contain discounted items but not on sales
where there is already a discount on the subtotal.
Minimum Required - Enter the number of points a customer needs to qualify for a
reward (discount) on their next purchase. The points a customer has accumulated
will be displayed on the screen at the end of the line containing the Customer
Number. When that number reaches the Minimum Required you will be notified
the next time they make a purchase, and they can decide whether to use the reward
now or let the points keep adding up. If a bonus point reward is taken on a given
sale, the customer's point total is decreased by the same number as the Minimum
Required. For example, if the minimum is 500 and the customer has 600 points,
they will have 100 points left after they take their reward. If a customer returns an
item the point total is reduced again.
Percent Discount Rewards - Select this to give rewards as a discount on the
subtotal of a sale. Enter the percentage discount that customers will receive when
they have enough points to qualify.
Fixed Discount Rewards - Select this to give rewards as a fixed amount credited to
the customer on a sale. Enter the amount credited to the sale when the customer has
86
R E T A IL
P L U S
F O R
W IN D O W S
3 . 0
enough points to qualify. If both the Percent Discount and the Fixed Discount are
selected the customer's reward is calculated as a percentage discount up to a
maximum of the amount shown in the Fixed Discount. For example, if the Percent
Discount is set to 10 and the Fixed Discount is set to 20, then the reward is a 10%
discount up to a maximum of 20 dollars. In order for a customer to qualify for a
reward two conditions must be satisfied: the customer must have earned the
minimum required bonus points and there cannot already be a discount applied to
the subtotal of the sale.
Overdue Interest Charges
Interest Rate Per Month - Enter the monthly penalty rate on overdue accounts.
This is usually in the area of 1% to 1.5%.
Grace Period - Enter the number of days after the invoice date when the penalty
begins. This is usually 30, 60 or 90 days.
Other
Minimum Tender - Enter the smallest coin available for payment. For most
countries this will be .01 (a penny) but this can be changed here.
Use UK Date Format - Select this if you prefer a British style date format i.e.
MM/DD/YYYY instead of DD/MM/YYYY.
87
R E T A IL
P L U S
F O R
W IN D O W S
3 . 0
Backup, Restore
And Rebuild
Redundancy, Recovery And Fixing Files
C HAPTER
10
Crashes, floods, fires and even computer thefts happen, but they always happen to
someone else...
In the world of computers, redundancy refers to making copies of your work for
safekeeping. Nowhere is redundancy so important as in the computer world. The
question is not “will my disk drive fail?” but rather “when will it fail?”, and when it
does, having a fresh backup saves much heartache.
You should always keep backup copies of your data. This is also important if you are
about to delete a lot of records which you think you don't need any more because it
allows you to go back if you have to.
Files should also be copied to a backup device for safe keeping. See the Windows
Backup utility under Programs / Accessories / System Tools. If you use your computer
every day for business transactions you MUST have a tape drive, CD, Zip Drive or
other easy means to make regular backups.
If you do not want to back up all files just check the ones you want and click OK. This
allows you to use a different floppy disk for each option when the whole set is too big
to fit on one disk. It also makes it easier and safer to move data between computers by
limiting the type of data transferred.
Rotating Backups - Some users back up to a different folder each day of the week by
creating five folders labelled "Mon, Tue, Wens"…etc. At the end of each day they
create a backup in the appropriate folder. This allows them the option to roll back their
data to a previous date.
N.B. - Please note that the Backup command can only 'see' files that are in the folder
for the active location. If you have more than one inventory you will have to select it to
back it up.
88
R E T A IL
P L U S
F O R
W IN D O W S
3 . 0
AVOIDING DATA LOSS
There are steps you can take to minimize the chances of losing data. The most effective
are:
•
Use the drive maintenance programs weekly. They are found in the Windows
Accessories program group and are called Scan Disk and Disk Defragmenter.
•
Get any virus-scanning program. This is important if the computer is exposed to
floppy disks that people bring in from home or other businesses.
•
Avoid old equipment. Do not use any drives that are more than four years old.
Upgrading a disk drive is no longer expensive.
•
Never turn the power off while Retail Plus (or any other program) is still loaded.
Always use normal Windows shutdown procedures.
•
Uneven or “dirty” power can destroy a hard drive. Use a quality surge protector on
the computer’s power supply. Beware of inexpensive power bars that claim to
incorporate surge protection because they are very slow to react to a surge. If you
have a network server get an uninteruptible power supply for it.
•
Avoid sharing a single-user program with another user over a network. Databases
such as Retail Plus should never be shared unless the multi-user functions are
enabled.
The most effective protection against file corruption and equipment failure is to
make backups a priority. Ideally it should be in someone’s job description to make sure
that regular backups are made, and that at least one backup is stored off site. This is
important because a fresh backup does not help you if it is burned in the same fire as
your computer, or stolen along with the computer and tape drive.
In cases where you have a small inventory (1000 items or less) Retail Plus can
write the backup to a floppy disk. Otherwise Retail Plus creates a backup file set that
can be written to tape or floppy disks using any backup program. If you have not
checked it out, see the Windows Backup program in the Accessories program group.
89
R E T A IL
P L U S
F O R
W IN D O W S
3 . 0
TOOLS MENU – BACKUP COMMAND
Making a complete backup file set is easy.
1. Go to the Main Menu; pull Tools down to Backup/Rebuild.
2. A dialog box appears; accept the default settings by clicking OK.
3. A file dialog appears; double-click on the folder where you want the backup, then
click OK.
That’s all there is!
The backup dialog box has several uses. There are three types of operations and
they can be applied to six different file options.
The operations are:
♦ Backup – Create a backup file set. If you do not want to back up all files just check
the ones you want and click OK. This allows you to use a different floppy disk for
each option when the whole set is too big to fit on one disk. It also makes it easier
and safer to move data between computers by limiting the type of data transferred.
Some users keep a different backup for each day of the week by creating five
folders labelled “Mon, Tue, Wens”…etc. At the end of each day they create a
backup file set in the appropriate folder. This allows them the option to roll back
their data to a previous date.
90
R E T A IL
P L U S
F O R
W IN D O W S
3 . 0
♦ Restore – Restore from existing backup files. A standard file dialog appears.
Double-click on any one of the files you want restored and, if more than one file is
required, they will all be copied. The Restore command can be used to move data
files from one machine to another or to roll back the data to a previous date. Please
note: You have an option to backup and restore the configuration files (this
includes Setup.dbf and Plus20.ini). On a network there are universal configurations
that apply to all workstations (Setup.dbf) and local configurations that apply only
to the workstation you are on (Plus20.ini). If you are restoring files on a network
server you must go to all workstations and check the Setup screen to make sure the
settings are correct.
♦ Rebuild – This command is used to rebuild damaged files. Retail Plus relies
heavily on index files to sort and locate information. These files are constantly
being read from and written to. In all database programs the index files
occasionally get corrupted. A symptom of this is not being able to find something
you know is there or failing to get the sorting order you asked for.
The Rebuild option not only creates new indexes; it also makes a clean copy of the
data files. If the data files are corrupted this process may or may not help,
depending on the extent of the damage.
91
R E T A IL
P L U S
F O R
W IN D O W S
3 . 0
C HAPTER
Internet
Communications
Transmitting And Receiving Information
11
There are a number of features in Retail Plus that take advantage of the fact that you no
longer need to be a major retail chain in order to afford computer links between your
stores. This is done by putting an internet hookup in each store and pointing Retail Plus
to the disk space usually provided free of charge by the same service that hosts your
web site. Communications through this space is done via File Transfer Protocol (FTP).
The Retail Plus functions that can work this way include:
Sales Logs - You can post your itemized sales log or view those of any other
stores. If you wish, the logs can be read into MS-Excel or MS-Access for
further processing at head office.
Stock Levels - You can post your stock levels or view those of any other store.
If you wish, the levels can be read into MS-Excel or MS-Access for further
processing at head office.
Stock Transfers - Send stock to other stores or from the warehouse to the
stores. The inventory files at each location can be updated without doing any
more data entry.
Stock Updates - Send inventory adds and changes to other stores or from the
warehouse to the stores. This ensures that everyone is selling the same stock for
the same price and calling it by the same name.
Generic File Transfers - You can transfer any file you wish in or out of your
store. For example, after creating a purchase order file you can send it
anywhere you like via standard FTP. This would allow a supplier to receive
your order and load it into MS-Excel, MS-Access or any other application for
further processing.
92
R E T A IL
P L U S
F O R
W IN D O W S
3 . 0
Setting Up And Testing Communication
The internet function all happen through the Internet Communications window. To
open it you can go to Tools / Internet / FTP Any File. This allows you to try out your
communications settings without doing any actual data transfers.
ISP stands for internet service provider and is the computer system that connects your
PC to the internet and contains some storage space for your web site. This storage
space is often divided into at least two directories - one for your web site material and
one for FTP file transfers. FTP stands for file transfer protocol. It is a process used to
upload and download data files over the internet and this allows you to send Retail Plus
data from one store to another.
The setup options are:
Server - Enter the internet address of your FTP space on your web site. Your ISP
support line can provide the address you need. If you have your own webname.com
then something like "ftp.webname.com" is all you need.
93
R E T A IL
P L U S
F O R
W IN D O W S
3 . 0
Proxy - Enter the local server TCP address if you are accessing the internet through
your office computer network. You need this only if your computer is not directly
connected to the internet.
User ID - Enter the user name you use to logon to your FTP space. This is usually
the same name you use to log onto the internet.
Password - Enter the password you use to logon to your FTP space. This is usually
the same oneyou use to log onto the internet.
Use HTTP - Select this only if you cannot use FTP on your internet server and
need an alternative.
Save Setup - If you do not use this button your logon info will not be stored.
To test your server setup make sure you have an internet connection available on your
computer and press Connect FTP. If the connection fails check your settings and also
check with your ISP to make sure you have the system rights for an FTP login.
SALES LOGS
This feature is used to transmit sales data, usually from the stores to the office. You
can see the Itemized Sales Log for each individual sales desk regardless of it's location
and print the daily sales and department reports.
Send Your Sales Log - To make your sales data available on the internet:
1. Select Send Your Sales Log to open the internet connections window. The
Local Files list shows the name of the sales data file with the POS station
number and the three-character location code.
2. Make sure the server information is correct then click on Connect FTP to
establish a connection.
3. On the Local Files list right-click on the sales log file and select Send File.
View Remote Sales Logs - To see the daily sales posted by other locations:
1. Select View Remote Sales Log to open the Internet Connections window.
2. Click on Connect FTP to establish a connection.
94
R E T A IL
P L U S
F O R
W IN D O W S
3 . 0
3. On the Remote Files list right-click on the sales log you want and select
Receive File. The sales log will be displayed as soon as the data has been
downloaded:
STOCK LEVELS
This feature is used to send and receive stock levels to and from other stores so
everyone can look up the availability of an item.
Send Your Stock Levels - To make your stock levels available on the internet:
1. Select Send Your Stock Levels to open the internet connections window. The
Local Files list shows the name of the stock levels data file with the threecharacter location code.
2. Make sure the server information is correct then click on Connect FTP to
establish a connection.
3. On the Local Files list right-click on the levels file and select Send File.
View Remote Stock Levels - To see the stock levels posted by other locations:
1. Select View Remote Stock Levels to open the internet connections window.
2. Click on Connect FTP to establish a connection.
3. On the Remote Files list right-click on the stock levels you want (look for the
three-letter code of the location you want) then select Receive File. The stock
levels will be displayed as soon as the data has been downloaded and a window
appears where you can search for items.
STOCK TRANSFERS
This feature is used to transfer stock to or from other stores. It allows you to update the
inventory at both the sending and receiving locations without doing additional data
entry.
Transfer Out - To transfer stock to another location:
1. Select Transfer Out to open the Stock Transfers window. Put together the list
of items you are going to send and print it for the shipper.
95
R E T A IL
P L U S
F O R
W IN D O W S
3 . 0
2. Click on the Internet Transfer button, enter the destination location code, and
click on Send to open the Internet Connections window. The Local Files list
shows the name of the transfer data files with the three-character destination
location code.
3. Click on Connect FTP to establish a connection.
4. On the Local Files list right-click on each of the two transfer files (DBF, FPT)
and select Send File.
Transfer In - To receive transferred stock:
1. Select Transfer In to open the internet connections window and click on
Connect FTP to establish a connection.
2. On the Remote Files list right-click each of the two transfer files (DBF, FPT)
and select Receive File. When the data has been downloaded the system will
update your inventory.
Caution: If you have more than one inventory set up on your computer make sure you
have the right one loaded before you send or receive transfers.
Stock Updates
Retail Plus can produce data files for the purpose of updating the inventory on other
computers. This saves time and reduces errors by making sure that all stores are selling
the same item for the same price and calling it by the same name. This feature allows
you to harmonize the inventory at any and all locations without doing additional data
entry.
These files can be sent to their destination by any means but sending them by internet
is often the easiest. To create update files see Inventory Updates.
To send stock update files:
1. Make the inventory add & changes on your computer and flag the affected
records as you go.
96
R E T A IL
P L U S
F O R
W IN D O W S
3 . 0
2. Select Stock Updates / Internet / Write and navigate the folder dialog to
identify the folder where the update files are to be stored. Wait while the
system writes the files.
3. When the Internet Connections window appears make sure the server
information is correct then click on Connect FTP to establish a connection.
4. On the Local Files list right-click on each of two update files (DBF & FPT) and
select Send File.
To read update files from the internet:
1. Select Stock Updates / Internet / Read to open the Internet Connections
window.
2. Click on Connect FTP to establish a connection.
3. On the Remote Files list right-click on the update file you want (DBF) and
select Receive File. When the data has been downloaded you will be given an
opportunity to halt the process before the update changes your inventory.
Caution: If you have more than one inventory set up on your computer make sure you
have the right one loaded before you send or receive stock updates.
GENERIC FILE TRANSFERS
As a bonus Retail Plus can also transfer any other data files you wish using this
window.
To begin make sure you are logged onto the internet then click Connect FTP. The
panel on the left will show the files on your computer (Local Files) while the one on
the right shows your files on the ISP computer (Remote Files).
To send a file right-click on it in the left hand panel and select Send File.
To receive a file right-click on it in the right hand panel and select Receive
File.
You can change directories just by clicking on the directory names. To upload or
download a file just select it and click the right mouse button to see your options.
Click on Disconnect FTP to break the file transfer connection when you are finished.
97
R E T A IL
P L U S
F O R
W IN D O W S
98
3 . 0
R E T A IL
P L U S
F O R
W IN D O W S
3 . 0
Client Data And
Mailing Lists
Using Client’s Historical Data Files
APPENDIX
A
The client database consists of two files called CLIENTS.DBF and CLIENTS.FPT.
They are compatible with MS-FoxPro, MS-Access, and MS-Excel. Each time you
make a sale in the POS screen with the customer’s name on the screen the sales
information is saved in their record. Using this purchase history you can always find
out who bought what, when, how many, how much they paid for it and how they paid
for it. There are several standard ways to use this information and you will probably be
able to think of a few yourself.
o Example 1 - Let’s say you are having a special promotion on the latest widgets.
You have some flyers printed to get the word out, but now you have to get
those flyers into the right hands. You can easily find everyone who ever bought
a widget and generate mailing labels for them.
o Example 2 - Mr. Jones brings back his widget for a warranty repair. He says he
lost his sales slip and can’t prove that it is still under warranty. Using the client
database you can look up his name and find out the exact date that he bought
the item and whether he bought it at a discount.
The client database can also be used to classify your customers into categories such as
business, institutional, government, private using the Client Type field. If you have a
sporting goods store you could enter the customer’s best sport. You can now tailor
your promotional mailings to the customer type by pulling out the appropriate names
and addresses according to a key word search. If you want to make your mailings a
little more personal, Retail Plus will create merge files for your word processor that
you can use in generating form letters.
The client database does have a limitation - it can only hold about 400 sales per client.
Retail Plus will warn you when you are getting close to the limit for any given client.
At that time you should clear out some of the old data from the records. If you do not
do this, Retail Plus will clear the client’s purchase history when the limit is reach and
will start over with a clean slate, but you will have plenty of warning before that
happens.
99
R E T A IL
P L U S
F O R
W IN D O W S
3 . 0
About Using
Stock Codes
Things To Consider
APPENDIX
B
When choosing a stock code numbering system you should take the following into
account.
Retail Plus allows alphanumeric codes (letters and numbers) and you may use any
combination of letters and numbers you wish but you should avoid using any other
characters such as dashes, slashes, spaces and punctuation. Examples such as "A123"
are valid. When you sort your stock by code it will appear according to it's
alphanumeric order. This means that "A99" will come after "A100" for the same
reason that ABC comes after AABC. This is due to the fact that, in an alphanumeric
sort, the number of characters is not as significant as their ordinal value while in a
strictly numeric sort the number of characters is more significant than their ordinal
value.
Retail Plus is compliant with standard UPC Type 2 and EAN Random Weight Bar
Codes. These are also called Variable Measure Barcodes. They are printed by deli
scales and other electronic weight scales that embed the price within the barcode.
When the cashier scans the item, Retail Plus extracts the net price from the barcode. It
then divides the retail price per unit measure into the barcode net price, calculates the
quantity sold, and deducts this from physical inventory.
In order for Retail Plus to recognize Random Weight barcodes you must have selected
"Scan Random Weight Barcodes" in the Setup screen / POS tab.
Random Weight Barcodes - Scale Setup
The weigh scale must be set up to print barcodes in either UPC-12 or EAN-13 format
as follows:
UPC-12: 2ABBBBCDDDDE or
EAN-13: 20BBBBBDDDDDE where:
2 or 20 identifies this as a random weight barcode.
100
R E T A IL
P L U S
F O R
W IN D O W S
3 . 0
A = Package Code (this digit may be output by the scale; refer to the scale
documentation for specifics. Retail Plus includes this digit in the stock code.
B = The stock code.
C = Price check - not used by Retail Plus but must be present in UPC-12 codes.
D = Net price which will be read in the format 99.99 (UPC) or 999.99 (EAN).
E = Check Digit
In UPC Random Weight barcodes the stock code stored in the Retail Plus inventory
item record must be the Package Code and the item identifier (ABBBB) which must be
5 digits exactly; that is, you must use zeroes before 3, 2, and 1-digit Item IDs.
When Random Weight barcode is scanned at the checkout, the 5-digit item code is
extracted and Retail Plus looks for the item. If the item record is found, the item is
entered into the transaction at the price embedded in the bar code. When the
transaction is completed, the price charged for the item is divided by Price 1 in the item
record to determine how much of the item was sold.
Note that the rounding of quantity and currency numbers can produce slightly inexact
inventory tracking but your numbers should very close.
Also note that UPC Random Weight Barcodes allow a maximum net price of 99.99 per
line item, while EAN Random Weight Barcodes go up to 999.99.
To track the inventory movement of an item sold with Random Weight bar codes,
Price 1 must be set to a consistent price per unit measure.
If the Price 1 is left blank or is zero, a quantity of 1 (one) will be subtracted from the
Quantity On Hand for each package sold.
If the checkout staff over-rides the price, the price entered will be applied as the price
per unit (such as pound or kilo) and will be multiplied by the weight as calculated from
the embedded price.
101
R E T A IL
P L U S
F O R
W IN D O W S
3 . 0
About
Networks
Systems
Installing
Retail Plus On A Network
APPENDIX
C
Retail Plus can be installed on LAN servers or peer-to-peer, networks. It is very easy to
network Retail Plus. Here are the basic steps:
Connect your computers with Fast Ethernet cable. Avoid using wireless routers if
you have multiple workstations all using Retail Plus because wireless is too slow
for intensive multi-user applications.
Decide which machine will contain Retail Plus and all it's data (we call this the
host) and install Retail Plus on it. Do not install Retail Plus on any other machines
except the host.
Share the host's C: drive so it shows up as a drive letter on all the other
workstations. You must share the drive, not just the Retail Plus folder. Windows
will give you some warnings about security but don't let that stop you.
Go to each workstation on the network and open Windows Explorer (not Network
Neighborhood). Pull Tools down to Map Network Drive and follow the Wizard.
On each workstation use Windows Explorer to create a shortcut pointing to
PLUS30.EXE on the host.
Some configurations in the Retail Plus Setup screen are workstation-specific so make
sure you open the Setup screen on each one and check the settings.
NETWORK ERROR 21 AND HOW TO FIX IT
We sometimes get calls from users who are getting an error message that looks like
"Error 21 - Open Database" when they network Retail Plus. This means that Windows
Explorer was not used to map the drive and so there is a network alias name for the
host machine instead of a drive letter:
Wrong: \\Host_PC\\C\\Retail Plus Folder\...etc.
Right: Z:\Retail Plus Folder\...etc.
102
R E T A IL
P L U S
F O R
W IN D O W S
3 . 0
The problem is how the drive mapping was done. Using something like Network
Neighborhood inserts an alias name for the Retail Plus host computer instead of a drive
letter and you must re-map the drive using Windows Explorer. In Windows Explorer
pull Tools down to Map Network Drive and let the Wizard lead you through it.
If you already have a Retail Plus icon on your desktop right-click on it and correct the
Target path to look like Z:\RetailPlus 20\Plus20.exe where Z: is the drive letter you
have assigned in the mapping step.
Now start Retail Plus on the workstation and reselect the default inventory (File /
Inventory / Select).
Error 21 can also be caused by sharing only the Retail Plus folder instead of the entire
C: drive of the host machine.
NETWORK ERROR 23
Error 23 is generated by Windows and usually indicates a LAN hardware problem. The
network transmits data in packets which are subject to an integrity test called CRC or
Cyclic Redundancy Check. When a packet fails the test the network automatically
requests a re-transmission. If that does not fix it an error 23 is generated. This usually
indicates an intermittent fault in a LAN card, cable or router.
USER’S ACCESS RIGHTS
Getting the file and directory privileges set up is important. Since the program
routinely creates, updates and deletes index files each user must be able to do the
following: read, write, create, erase, modify, and file scan (list directory). This does not
mean you must give them direct access to the Retail Plus directory where they may do
some damage. The goal is to give all users the required rights, but allow them to
exercise those rights only through Retail Plus so that their activities are effectively
restricted. If you are using Windows as the network system check to see that the drive
mappings are configured correctly, otherwise every computer may try to set up it's own
inventory data rather than working with the one on the host machine.
NETWORK SCREEN UPDATES
A good thing about networks and multi-user systems is that any additions or changes
you make are available to all other users on the system. But this ability does present
complications, one of which you need to be aware of. Many parts of Retail Plus
include browse windows that allow you to see your data in a table, i.e. you see a
window with multiple records on a grid. Suppose that two users both open the same
browse window. They are looking at the same data and the display order is controlled
by the same index. If the first of these users adds or edits something, the information
on the second user's screen is out of date. It will not be updated until the second users
103
R E T A IL
P L U S
F O R
W IN D O W S
3 . 0
scrolls the window, and in some cases only if the window is closed and re-opened. This
situation is aggravated if the first user changes the field on which the second user’s
table is sorted. The second user's screen is now out of date in two ways, i.e. display
order and the data itself. Many multi-user programs lack browse windows for this
reason, but we believe they are too useful to leave out. You need only be aware of the
problem and be patient if you see unexpected effects in the browse window when there
is more than one user making changes.
104
R E T A IL
P L U S
F O R
W IN D O W S
3 . 0
APPENDIX
Upgrading From
Older Versions
Moving Your Retail Plus Data Into Version 3.0
D
If you are upgrading from version 2.0 or 2.5 you need only run the Backup command
in the old version to create a folder with all your data, and then run the Restore
command in version 3.0. Follow this with the Rebuild command in version 3.0 to make
sure the data and index files are updated. You can move the data folder from one
machine to another if necessary using a memory key. Unless you are a computer tech
avoid using a CD to copy the data folder. Burning files to a CD sometimes changes the
file attributes to read-only and this has to be corrected before restoring them in Retail
Plus.
Here are the upgrading steps in sequence:
1- In the older version run the Backup command and let Retail Plus write the data files
to a backup folder on the local C: drive. The menu path is: Tools / Backup / OK …
2 - Create a fresh installation of Retail Plus 3.0 on the same machine or a new one. If it
is the same machine do not install it into the same folder as the old version. The easiest
thing to do is just accept the installer defaults. If it`s a new computer then copy the
Backup folder you just made on the old computer onto the new computer. The easiest
way to do this is with a USB memory key or thumb drive. Avoid using a CD because
Windows changes the file attributes to Read Only on a CD.
3 – Launch version 3.0 and create a new empty inventory file with the same name as
the one you used in the old version. The menu path is: File / Inventory / New…
4 – When the new empty inventory file is set up run the Restore command and point
the file dialog at the old inventory file in the Backup folder. The menu path is: Tools /
Backup / Restore…
5 – When the restore operation is done (it usually goes very fast) update the file
structures using the Rebuild command. The menu path is: Tools / Backup / Rebuild…
If you are planning to print your own barcode labels you may need a bar code font
installed on your computer. Do the following to install the one supplied with Retail
Plus:
105
R E T A IL
P L U S
F O R
W IN D O W S
3 . 0
For Windows XP - Click on the Start button, select Settings and then Control Panel.
Double-click on the Fonts folder. This opens a window with a menu. Pull the File
menu down to Install New Font. A window appears where you can locate and open
the Retail Plus folder. When the font name appears double-click on 3 of 9 Barcode
(True Type).
106
R E T A IL
P L U S
F O R
W IN D O W S
3 . 0
Code 39
Barcode Font
APPENDIX
E
If you are planning to print your own barcode labels you may need a bar code font
installed on your computer. Do the following to install the one supplied with Retail
Plus:
For more recent versions of Windows: Open the C: drive and find the Retail Plus
folder. Look for a file called 3OF9.TTF. Right click on it and select Install.
For Windows XP: Click on the Start button, select Settings and then Control Panel.
Double-click on the Fonts folder. This opens a window with a menu. Pull the File
menu down to Install New Font. A window appears where you can locate and open
the Retail Plus folder. When the font name appears double-click on 3 of 9 Barcode
(True Type).
Once the font is installed you can print barcode labels from Retail Plus. This can be
done on any inkjet or laser printer loaded with any 30-per-page label stock such as
Avery No. 8160.
Retail Plus also supports label printers. The Advantage LX from Cognitive Solutions,
the Zebra 2824 and the Wasp WPL 305. These printers for retailers who need to print
large numbers of labels every day. They are also useful for those who need complete
control over the size and appearance of their labels.
107
R E T A IL
P L U S
F O R
W IN D O W S
3 . 0
APPENDIX
Credit, Debit and
Gift Cards
Setting Up And Using Card Processing
P
Retail Plus supports X-Charge online card processing. To use this you will need a
standing internet connection and the card swipe supplied by X-Charge.
INSTALLATION
Step 1: Install and configure the X-Charge XpressLink Software as supplied by
Accelerated Payment Technologies. This puts the X-Charge client on your computer. It
ensures that your customer’s card information is immediately encrypted and can only
be used by the payment server.
Step 2: Launch Retail Plus and go to the opening menu. If you have the software
configured to boot directly into the point of sale screen you will need to close it again
(press F12 or select Close from the tool bar). On the opening menu click on the Setup
button and then on the POS tab. Look for the area circled below.
108
R E T A IL
P L U S
F O R
W IN D O W S
3 . 0
Step 3: In the panel labelled Credit And Debit Card Approvals check Use XCharge.
You will see another setting in the same panel called Auto Print Slip When
Approved. Selecting this will cause Retail Plus to start printing the customer’s receipt
as soon as a card approval is received from X-Charge. This is usually convenient but
there is one detail you should be aware of. If you also check Auto Save Sales then a
card approval message will trigger not only the receipt printer but Retail Plus will
automatically save the sale and clear the transaction window for the next customer.
This is fine for most retail sales counters that have no special checkout procedures, but
be prepared to try different settings until you find the right one for you.
Step 4: Enter your ID number in the X-Charge User ID field and your password on
the X-Charge Password field.
Step 5: Click on the Hardware tab and look for the Pin Pad panel circled below.
If you are in the United States you only need to select the USA option if you plan to do
debit transactions, otherwise leave it set to None. If you are in Canada then click on the
Canada button for both credit card and debit transactions. Now select the port where
the pin pad is connected.
109
R E T A IL
P L U S
F O R
W IN D O W S
3 . 0
GIFT CARD INVENTORY
In order to sell gift cards they must be in the Retail Plus inventory database. Simply
open the Inventory screen, click on the New button in the tool bar and create an
inventory item for each card value you plan to sell i.e. 10, 20, 50, 100, 200.
CAUTION - Make sure the Item Type is set to Gift Card and that the tax flags (circled
above) are not checked (tax is applied only when the card is used). What is entered in
the Department and Category fields is up to you.
ISSUING A GIFT CARD
In order to use a gift card it must first be initialized in a process called Gift Card Issue.
Retail Plus does this at the time the card is paid for by a customer. The steps look like
any other sales transaction:
- a customer asks for a gift card,
- a card with the desired value is put on a sale (just like any other item),
- the sale is totalled and the customer pays,
- Retail Plus prompts the merchant to swipe the new card to initialize it.
The card can now be used.
GETTING A GIFT CARD BALANCE
110
R E T A IL
P L U S
F O R
W IN D O W S
3 . 0
Whenever a gift card is used to make a purchase the remaining balance on the card is
printed on the customer’s receipt. If you need to check a balance before a transaction is
started just press F3-Credits
then F8-Gift Card Balance. Run the card through the reader the amount will be
displayed.
111
R E T A IL
P L U S
F O R
W IN D O W S
3 . 0
MAKING CREDIT CARD AND GIFT CARD SALES
Using credit, debit and gift cards to pay for purchases is as easy as pushing a button
and swiping a card.
Once all the items are on a sale press F4-Total then select one of the options as shown
below:
If you are processing a credit card just run it through the card reader and wait a few
seconds for the approval (or decline message). In the example below Retail Plus is
ready to accept a card swipe in a credit card transaction. First it prompts for a card
swipe:
112
R E T A IL
P L U S
F O R
W IN D O W S
3 . 0
This is followed by a window where the transaction details can be verified before the
card is processed.
113
R E T A IL
P L U S
F O R
W IN D O W S
3 . 0
QuickBooks
Integration
APPENDIX
Q
Using QuickBooks for accounting
Retail Plus exchanges data with QuickBooks using Intuit's new QB-XML data
exchange standard. You must be running QuickBooks Pro or Premier, 2003 or later
because those are the only versions that support the process. In order for the two
programs to communicate you must have your QuickBooks company file open in
multi-user mode and Retail Plus must be registered in QuickBooks as an unrestricted
user.
Retail Plus does not require you to have QuickBooks open at the same time as you
make sales in order for the accounting data to be posted. You always have the freedom
to choose when and what information is passed to the accounting system before it is
posted.
Follow these steps to prepare QuickBooks for use with Retail Plus:
· If you have not done so make a company file with the chart of accounts for a retail
business. Just pull File down to New Company and follow the Easy Step Interview.
· Once the company is set up pull File down to Multi-User Mode then pull Company
down to Set Up Users and enter Retail Plus as an unrestricted user with no password.
· Set up the sales tax with the same name and rate as those in Retail Plus. If you have
not entered any in QuickBooks the steps are:
- From the Lists menu, choose Item List.
- From the Item menu button, choose New.
- From the Type list, select Sales Tax Item.
- Enter a tax name.
- Enter a description to describe this sales tax on your sales forms.
- The description prints on your sales forms after the final line item. You cannot edit it
on the forms themselves.
- Enter the tax rate. QuickBooks assumes the rate is a percentage. For example, enter
7.25 if the rate is 7.25%.
- Enter the tax agency to whom you pay the tax.
- Click OK.
114
R E T A IL
P L U S
F O R
W IN D O W S
3 . 0
· Set up the method of payment list exactly as it appears in Retail Plus. The menu path
to do this is: Lists / Customer & Vendor Profile / Payment Method List.
· If they do not already exist on the Chart Of Accounts create the following accounts:
POS Revenue, account type Bank.
Cost Of Goods Sold, account type Cost Of Goods Sold.
Other Income, account type Income.
Inventory Asset, account type Other Asset.
Sales, account type Income.
· Check to see that QuickBooks has created an account called Accounts Payable and
the account type is set also to Accounts Payable. If it is not there just pull the Vendors
menu down to Enter Bills and it will automatically be created.
· In order for Retail Plus to transfer subtotal discounts to QuickBooks invoices they
must be on the Item List as a Discount Item. To do this in QuickBooks the steps are:
- Pull Lists down to Item List.
- At the bottom of the screen click on the Item button and select New.
- Set the Type to Discount, the Item Name to DISC and the Description to
SUBTOTAL DISCOUNT.
- Set the Tax Code to Tax so the items on the invoice will not be taxed at the full price.
- Set the Account to Cash Discounts or another of your choice.
- Leave the Amount or % at zero - it will be supplied at the right time.
Follow these steps to prepare Retail Plus for use with QuickBooks:
· On the opening menu pull Tools down to Setup and select the POS tab.
· Check the box labelled Use QuickBooks.
· Click on the file browser button on the right of Company File. Locate and click on
the QuickBooks company file that you want Retail Plus to work with.
UPDATING ACCOUNTS AND DATABASES
Menu Path - Main Menu / Tools / QuickBooks
The QuickBooks Update commands fall into two categories - those that update data
from Retail Plus to QuickBooks and those that update data from QuickBooks to Retail
Plus. As a normal precaution we recommend using the backup procedure in both
programs before running any of these commands.
115
R E T A IL
P L U S
F O R
W IN D O W S
3 . 0
Update To QuickBooks
· Customers - Writes the contents of the Retail Plus Client Database to the QuickBooks
Customer List. Duplicate records (based on the customer name) will automatically be
prevented. This list must be kept current for invoice transfers to work. If you transfer
an invoice from Retail Plus to QuickBooks that belongs to a client not on the Customer
List then QuickBooks will generate an error message.
· Inventory - Write the Retail Plus inventory data to the QuickBooks Item List.
Duplicate records (stock code) will automatically be prevented. This list must also be
kept current for invoice transfers to work. If you transfer an invoice from Retail Plus to
QuickBooks that contains items not on the Item List then QuickBooks will generate an
error message.
· Vendors - Write the Retail Plus supplier data to the QuickBooks Vendors List.
· Invoices - Transfer all open invoices to QuickBooks. If there is nothing owing on an
invoice it will not be transferred. All transferred invoices will be removed from Retail
Plus. Once invoices are transferred you can still make payments on them from within
the Retail Plus POS screen.
· POS Revenue - Transfers the POS revenues to QuickBooks (as they appear on the
POS History table). If you are on a network it will include the POS revenues from all
workstations. In QuickBooks you must have an Income account called Sales. Also
create a Bank account called POS Revenue. This account was set up for you
automatically if you used the QuickBooks installation wizard to set up a retail
business. Please note that all transferred POS revenues are deleted from Retail Plus and
the POS History table is cleared.
Update From QuickBooks
· Customers - Writes the contents of the QuickBooks Customer List to the Retail Plus
Client Database. Duplicate records (based on the customer name) will automatically be
prevented.
· Inventory - Write the QuickBooks Item List to the Retail Plus Inventory Database.
Duplicate records (stock code) will automatically be prevented.
· Vendors - Write the QuickBooks Vendors List to the Retail Plus Supplier Database.
Troubleshooting Info
· Last QB Request - If QuickBooks generates an error message after one of the above
commands is executed this button will pop up a window showing the request sent to it
116
R E T A IL
P L U S
F O R
W IN D O W S
3 . 0
in QB-XML format. You can copy and past it into a fax which will make it easier for
us to see why your request was rejected.
· Last QB Response - Similar to the previous button but shows the data returned from
QuickBooks.
INVOICE PAYMENTS
Menu Path - Main Menu / Point Of Sale / Client / Invoices / QuickBooks
You can view and make payments on QuickBooks invoices from the point of sale
screen. Just find the client and press Alt-F3 to check QuickBooks for invoices. These
will be listed in the upper part of the window. Select any invoice in the list to make a
payment on it.
The controls available in this window are:
· Paid By - Select the method of payment being used.
· Amount - Enter the amount being paid.
· Make Payment - This applies the payment to the selected QuickBooks invoice.
· Show All - By default the invoice list will contain only the invoices on which there is
a balance owing. Press this button to toggle between that and listing all the client's
invoices.
Please note that QuickBooks will not allow you to pay more on an invoice than is
owing on it.
SUPPLIER PAYMENTS
Menu Path - Main Menu / Purchase Orders / Tools / QuickBooks
After creating the final version of a purchase order you can post the total amount as a
bill to the Accounts Payable file in QuickBooks. This is equivalent to using the Enter
Bills command in QuickBooks. If there is more than one supplier listed on the PO then
a separate bill is created for each one.
The controls available in this window are:
· Vendor - The supplier to be paid.
117
R E T A IL
P L U S
F O R
W IN D O W S
3 . 0
· PO Number - The purchase order number.
· Amount - The total cost of the goods coming from the supplier listed.
· Due Date - By default the due date is 30 days from today. Press the calendar button to
the right to change the date.
· View QB XML - Press this button if you are getting error messages from
QuickBooks concerning the bills posted. When the next bill is sent to Accounts
Payable you will get a display showing exactly what was sent to QuickBooks and the
response. Note that this information is formatted in standard XML language and is
used only for troubleshooting.
For this process to work you must have certain accounts set up in QuickBooks. If you
have not done so please see QuickBooks Setup before attempting to use the accounting
links.
118
R E T A IL
P L U S
F O R
W IN D O W S
3 . 0
APPENDIX
Software
License
Z
Please Read This
Retail Plus can be a valuable tool in helping you manage your business. It does not
supply you with sound business practices and does not substitute for your own mastery
of what goes on in the store. Test it mercilessly to satisfy yourself that it is the right
tool. We will make every effort to help you use Retail Plus successfully and to correct
any deficiencies that may come to light.
Retail Plus Software License
1. Retail Plus POS Inc. (the "Licenser") grants a non-exclusive License to the registered user (the
"Licensee") to use Retail Plus, (the "Software") which comprises computer programs, supporting
documentation, and any copies thereof. The Licensee acknowledges that the Licenser is the sole owner
of the Software and that neither title to nor ownership of the Software is transferred to the Licensee.
2. The Licensee agrees that each store or network server on which the Software is installed will
require the purchase of one copy of the Software except for instances where the Licensee wishes to work
at home. The Licensee shall not permit the Software or any part to be disclosed in any form to any third
party and shall not permit unauthorized copying and distribution.
3. This License may not be assigned to a third party. If you sell your business you cannot include
Retail Plus in the deal.
4. The Licenser’s sole warranty to the Licensee is that the Licenser has the right to grant a License
of the Software in the manner set out here. The Licenser gives the Licensee no other warranties,
expressed or implied, including any implied warranties of fitness for a particular purpose. In no event
arising from the performance or non-performance of the Software shall the Licenser be obligated or
liable to the Licensee in any manner for consequential, special or incidental damages, including loss of
profits or suits by third parties. Furthermore, in no event shall the Licenser be liable to the Licensee for
amounts in excess of the amounts already paid by the Licensee to the Licenser.
5. The Licensee further acknowledges that the Software does not enable the user to carry out the
steps needed to conduct a profitable trade and that the Software is merely a system which facilitates the
storage and retrieval of information, the accuracy, security and integrity of which cannot be guaranteed
by the Licenser.
6. The Licenser may terminate this License if the Licensee fails to comply with these License
terms.
7. Any License Of Software is subject to the terms of this Software License Agreement and those
terms supersede any other agreement between the Licensers and the Licensee.
119