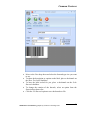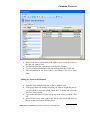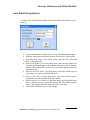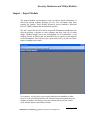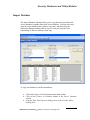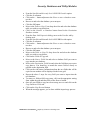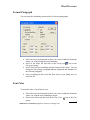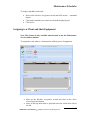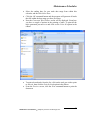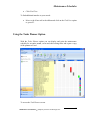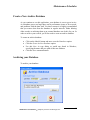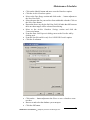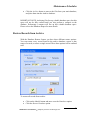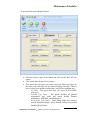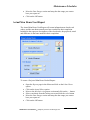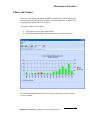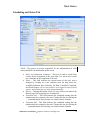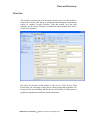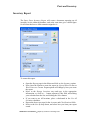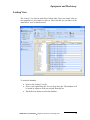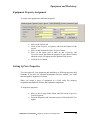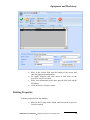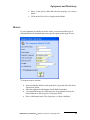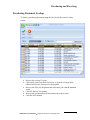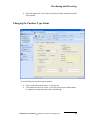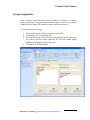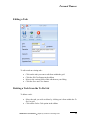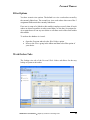
1
ADVANCED COMPUTERIZED MAINTENANCE MANAGEMENT SOFTWARE VERSION 6.x STANDARD AND COMMON FEATURES Maintenance Coordinator Software System Copyright 2001 – 2009 Mark Dunbar GENERAL CONTACT INFORMATION Simplicity Software Technologies Inc. 648 So. Canyon Drive Cedar City, UT 84720 Business Phone: (435) 867-0132 Fax Number: (435) 503-3447 World Wide Web: www.SimSoftTech.com Emails: Support: [email protected] General Information: [email protected] LICENSE AGREEMENT YOU SHOULD CAREFULLY READ THE FOLLOWING TERMS AND CONDITIONS BEFORE INSTALLING THIS SOFTWARE PACKAGE. INSTALLING THE SOFWARE PACKAGE INDICATES YOUR ACCEPTANCE TO THE CONTAINED TERMS AND CONDITIONS. IF YOU DO NOT AGREE WITH THEM, YOU SHOULD PROMPTLY RETURN THIS PACKAGE, IN REUSABLE CONDITION, FOR A FULL REFUND OF THE PURCHASED PRICE. SIMPLICITY SOFTWARE TECHNOLOGIES INC. provides single copies of this software ("computer program") and licenses its use. You are responsible for the selection of the program and the installation, use and results obtained. You may not sub-license, assign or transfer the license or the program without expressed permission from SIMPLICITY SOFTWARE TECHNOLOGIES INC. You further agree that this is the complete and exclusive statement of agreement, oral or written, and any other communications between us relating to the subject matter of this Agreement. SIMPLICITY SOFTWARE TECHNOLOGIES INC. licenses this software as either a single user version or as a site license, unlimited users version. This is done through the activation file that is supplied by SIMPLICITY SOFTWARE TECHNOLOGIES. Once the software is activated, this licensing condition is also indicated in the About dialog screen found within the main section of the application. For Single User licenses, THIS LICENSE permits you to: 1. Use the program on a maximum of one computer or workstation at a single facility. 2. Copy the program onto a hard drive or other media for use on a maximum of one computer or workstation located at the same facility. 3. Modify the program and/or merge it into another program for use on the maximum of one computer or workstation. 4. Transfer the program and license to another party if the other party agrees to accept the terms and conditions of this Agreement. If you transfer the program, you must at the same time transfer all copies of the original single copy to the same party or destroy any copies not transferred, and 5. Copy the databases used by this program to single computer or to a network drive to be shared by no more than 1 computer or workstation. For Site licenses, THIS LICENSE permits you to: 1. Use the program on as many computers or workstations as needed, at a single facility. 2. Copy the program onto a hard drive or other media for use on as many computers or workstations as needed, located at the same facility. 3. Modify the program and/or merge it into another program for use at a single facility. 4. Transfer the program and license to another party if the other party agrees to accept the terms and conditions of this Agreement. If you transfer the program, you must at the same time transfer all copies of the original single copy to the same party or destroy any copies not transferred, and 5. Copy the databases used by this program to single computer or to a network drive to be shared by a single facility. The conditions above also apply to any portions of the program contained or merged in other programs. You must reproduce and include the copyright notice on any copy, modification, or portion merged into another program. YOU MAY NOT USE, COPY, MODIFY, OR TRANSFER THE PROGRAM OR ANY COPY, MODIFICATION, OR MERGED PORTION IN WHOLE OR IN PART, EXCEPT AS EXPRESSLY PROVIDED FOR IN THIS LICENSE. IF YOU TRANSFER ANY COPY, MODIFICATION, OR MERGED PORTION OF THIS PROGRAM TO ANOTHER PARTY, THIS LICENSE IS AUTOMATICALLY TERMINATED. YOU MAY NOT USE, COPY, MODIFY, OR TRANSFER THE ACTIVATION FILE SUPPLIED BY SIMPLCITY SOFTWARE IN ANY WAY WHATSOEVER. You may however make a single copy of the file for backup purposes only. This license is effective until terminated. You may terminate it at any time by destroying the program along with all copies, modifications and merged portions in any form. It will also be terminated upon conditions set forth elsewhere in this Agreement. THIS PROGRAM IS PROVIDED "AS IS" WITHOUT WARRANTY OF ANY KIND, EITHER EXPRESSED OR IMPLIED. THE ENTIRE RISK AS TO THE PERFORMANCE OF THE PROGRAM IS WITH YOU, IF THE PROGRAM PROVE DEFECTIVE. YOU ASSUME THE ENTIRE COST OF ALL NECESSARY SERVICING, REPAIR, OR CORRECTION. SOME COUNTRIES DO NOT ALLOW EXCLUSION OF IMPLIED WARRANTITES, SO THE ABOVE EXCLUSION MAY NOT APPLY. SIMPLICITY SOFTWARE TECHNOLOGIES INC. does not warrant the function contained in the program will meet your requirements or the operation of the program will be uninterrupted or error-free. However, SIMPLICITY SOFTWARE TECHNOLOGIES INC. does warrant that the media on which the program is furnished is to be free of defects in materials and workmanship under normal use for 180 days from the date of shipment. SIMPLICITY SOFTWARE TECHNOLOGIES INC. ENTIRE LIABILITY AND YOUR EXCLUSIVE REMEDY FOR THE PROGRAM SHALL BE THE REPLACEMENT OF ANY DISKETTE OR CD-ROM FOUND TO BE DEFECTIVE. IN NO EVENT WILL SIMPLICITY SOFTWARE TECHNOLOGIES INC. BE LIABLE FOR DAMAGES, INCLUDING ANY LOST PROFITS, LOST SAVINGS, OR OTHER INCIDENTAL OR CONSEQUENTIAL DAMAGES ARISING OUT OF THE USE OR INABLILTY TO USE SUCH SOFTWARE. SOME COUNTRIES DO NOT ALLOW EXCLUSION OF IMPLIED WARRANTITES, SO THE ABOVE EXCLUSION MAY NOT APPLY. IF THIS SOFTWARE IS INSTALLED AS A "TRIAL VERSION", IT SHOULD EITHER BE REGISTERED WITH SIMPLICITY SOFTWARE TECHNOLOGIES, OR REMOVE FROM ALL COMPUTERS WITHIN FOURTY-FIVE DAYS OF INITIAL INSTALLATION. THIS LICENSE CAN ONLY BE MODIFIED BY AN AUTHORIZED REPRESENTATIVE OF SIMPLICITY SOFTWARE TECHNOLOGIES INC., AND MUST BE SIGNED BY AN AUTHORIZED REPRESENTATIVE. MAINTENANCE COORDINATOR SYSTEM Getting Started Maintenance Coordinator Simplicity Software Technologies Inc. 2 Getting Started Table of Contents Introduction ......................................................................................................................... 4 Administrator Rights ........................................................................................................... 4 Installing the Application .................................................................................................... 4 Installing for Network Use.................................................................................................. 5 Already Have a Demo Version Installed ............................................................................ 6 System Requirements.......................................................................................................... 7 Running the Program .......................................................................................................... 7 Validating the Software ...................................................................................................... 7 You Cannot Access The Activation File ............................................................................ 8 Entering a Software Key ..................................................................................................... 8 Sample Databases ............................................................................................................... 9 Moving Between Modules ................................................................................................ 10 Program Settings ............................................................................................................... 11 How to Get Started with Maintenance Coordinator ......................................................... 16 More Information .............................................................................................................. 17 Maintenance Coordinator Simplicity Software Technologies Inc. 3 Getting Started Introduction The procedures presented herein assume that the purchaser of this product has basic computer skills, and has used the Windows environment in the past. Many of the functions such as file open, file save and the like can change depending on the operating environment the application is executed in. In such cases please refer to the user’s manual for that environment (supplied by that vendor). Administrator Rights Throughout the documentation we talk about logging into the system as a user with Admin/Administrator rights. These rights are setup with user accounts, please refer to the Security, Databases and Utility Modules chapter for more information on this subject. Please note that if password protection has not been turned on, all users effectively have Administrator rights. Installing the Application To install Maintenance Coordinator onto your computer: Insert the CD into an available reader. If your computer is setup correctly, the program should run automatically. If the program doesn’t start automatically: Click the Start menu and choose the Run option. Click the Browse button and navigate to your CD-ROM reader. Select the Setup.exe application on the root directory of the CD. Click Open. Maintenance Coordinator Simplicity Software Technologies Inc. 4 Getting Started Click OK. Click the Install Products option. Click on the option that best describes the application you want to install. Follow on screen instructions. Installing for Network Use Please note that a Network/Site License must have been purchased to use the routines outlined in this section. If such a license has not been purchase the your databases must reside on a local C: drive To install the program for use on the a network, please follow these steps: Install the program on each client computer as you would as if it was a single user setup (previous section). Activate the software on each computer it's installed to. Copy the databases used by the program to a sharable network drive. These are the files with an .mdb extension. Point to the databases on the network from each computer the program is installed. That's it. To find which databases are currently in use: Start the program in your normal manner. Log in as an administrator. Open the Admin drop down menu for the main menu of the program and select the Databases / Set Database paths option. To setup your database paths: Start the program in your normal manner. Log in as an administrator. Open the Admin drop down menu for the main menu of the program and select the Databases / Set Database paths options. Now move to the Primary and Work Orders Database Path section and type in the complete path of this database. You can also use the Browse button to open and use a File Open type dialog screen to locate the database file. This file location can be either on a local drive, or pointing to a network drive (site license required) Repeat the above steps for the other databases. Move to and click on the Close button and you're done with your setup. Maintenance Coordinator Simplicity Software Technologies Inc. 5 Getting Started For more information on this subject please refer to the Security, Databases and Utility Modules chapter. Already Have a Demo Version Installed If you already have a demo version of the software installed, and it’s the same version as the one supplied with your purchase, then you do not need to install the program again. Just activate the demo and it will become a full working version. If the supplied disk is a new version than the one you have installed on your computer then you may want to upgrade. To do so, please follow these steps. IMPORTANT FIRST STEP If you have your database files in the main program directory (files with an mdb extension), then you need to copy these to a safe location. There's a 99.9% chance that any files found in the program directory will be over written, and lost forever. MAIN STEPS TO UPGRADING 1. Backup all database files and any other files saved in the application's main directory. 2. Remove the previous version from the computer. 3. Install the new version. To install the update: 1. If you have entered information into the application then first back up all database files (files with an mdb extension found in the application directory) 2. On your computer select Start -> Settings -> Control Panel 3. Select Add/Remove Program 4. Select Maintenance Coordinator in the list then Click Add/Remove button 5. When the Install Wizard loads, click Next 6. Choose the Remove option, and click Next 7. Click Un-Install and remove the previous version of the application. 8. Insert the CD and select the program to install 9. Follow on screen instruction for installing the software. 10. Once the update has been installed you can copy your databases back to their original locations. Maintenance Coordinator Simplicity Software Technologies Inc. 6 Getting Started System Requirements The following are minimum system requirements to operate the Maintenance Coordinator system on your computer. We highly recommend installing on the most powerful systems available to help increase performance. Pentium® 90 MHz or higher microprocessor SVGA 600x800 or higher-resolution screen supported by Microsoft Windows. Microsoft Windows NT 4.0 (Service Park 5 or higher) or later, Microsoft Windows 9x, Windows 2000, Windows XP or Windows Vista. CD-ROM 95MB free hard disk space Running the Program Once the program has been successfully installed onto your computer, you can now begin using it by following the next instructions: Click the Start button for Windows 95 or later. Click SST then the Maintenance Coordinator option to start the program. Or Click the Maintenance Coordinator icon on your desktop. Validating the Software To unlock a demo version into a full working version please follow these steps: The application must first be purchased and an activation file supplied by Simplicity Software Technologies Inc. Run the application in your normal manner. Open the File menu and select the Validate Demo Version option. Use the file open dialog box and locate the activation file supplied. This would normally be found on your A: drive. Once located click on this file to select it and click on the Open button. The program will now read this file, and if the file is in a valid format it will turn a demo version into a full working version. Maintenance Coordinator Simplicity Software Technologies Inc. 7 Getting Started Please note that this activation file can be distributed to you through email or on other computer media. This file must be kept in a safe location and will be needed to activate the software on any computer or terminal it will be installed on. Feel free to make a single copy of this activation file for safeguarding. IMPORTANT NOTE – Please note that validating the software is only part of the activating procedure. This step will only unlock a demo for a period of 45 days. In order to continue to use the software a Software Key must also be entered. Also note that the software will function without any limitations whatsoever within this 45 day period. You Cannot Access The Activation File If you cannot access the Activation file that we sent you because your computer does not support the device the file was sent on, or because the file is otherwise not useable then: Email [email protected] with your company name, and explain that you need the activation file. We will then email you the activation file with instructions on how to install it. Entering a Software Key Once the inspection period has been completed, and full payment has been secured by Simplicity Software Technologies Inc, you will be supplied a software key. Once the software key has been supplied we recommend that you enter it immediately. If not entered within 45 days of the activation date, the software will lock you out. Also note that we normal use first class mail to deliver these software keys to you, so please be on the lookout for this letter/ Maintenance Coordinator Simplicity Software Technologies Inc. 8 Getting Started To enter your software key: Open the File menu and select the Software Key option. Enter the key in the space provided. Click Ok. INPORTANT NOTE: As with validating the software, the software key must also be used for each installation. Please keep this key information, as well as the validating file in a safe place. Sample Databases When you run the program for the first time there will be sample databases installed for your use. Use this sample database to help you get used to the program. Change and add records, view and run some of the reports, and get a good feel for the program. When you're done using the sample database, and feel comfortable with the program you will be ready to begin using your own databases. To start using your own databases please look into the following sections: Security, Databases and Utility Modules chapter. Maintenance Coordinator Simplicity Software Technologies Inc. 9 Getting Started Moving Between Modules The Maintenance Coordinator program is arranged in modules, with each module providing its own functions and features. The modules are accessed mainly through the use of the program’s Main Menu screen. Screen shot is from the Professional Edition, your menu may be different To move between program modules: Option One Move to the various command buttons located across the screen, placing your mouse pointer over the button that best describe the module you want to access. Click on the button to move to that module. Option Two Open the Modules drop down menu Maintenance Coordinator Simplicity Software Technologies Inc. 10 Getting Started Click on the module of your choice. Program Settings The Program Setting allows you setup general features that will be pretty much global to the application. Each of the individual modules in the system may also have other settings that pertain to that module only and in many cases maybe local to that computer only. To configure the program settings: Login to program with Administrator rights. Move to the Main Menu screen of the program. Open the Admin drop down menu and select the Program Settings option. COMPANY INFORMATION AND LOGO To setup your company information and logo: Click on the Company tab. Maintenance Coordinator Simplicity Software Technologies Inc. 11 Getting Started Move the Company Information section and enter the appropriate information for the fields found there. Move to the Company Logo section and click on the Browse button. Browse to and select the graphic you want to use for your logo and click Open. The company logo accepts square bitmap images that display on the printed document in appropriate 7/8” x 7/8” size. If you logo does not display well in this size we suggest editing the logo with a graphic editor program such as Paint which is found as part of Windows. E-MAIL SETTINGS The program using built in e-mail features for e-mailing work orders, and support requests. In order for these features to work correctly, the e-mail server information must be setup on each computer. To setup your e-mail settings for OUTLOOK OR OUTLOOK EXPRESS: Click on the E-Mail tab. Place a checkmark in the Use Outlook or Outlook Express for Outgoing Mail checkbox. To setup your e-mail settings for other internet based mail servers Maintenance Coordinator Simplicity Software Technologies Inc. 12 Getting Started Click on the E-Mail tab. Remove the checkmark in the Use Outlook or Outlook Express for Outgoing Mail checkbox. Move to the User Name field and type in the default user’s name for this computer. Move to the E-Mail Address field and type in the return address for this computer. Move to the Outgoing Mail Server field and type in your mail server configuration. DISPLAY/REPORTS Maintenance Coordinator supports various visual themes that effect the overall appearance of the application and it’s modules. Please note that not all the included themes will render themselves the same on all operating systems and configurations. Play with the different themes until you find the one that works and looks the best to you. The other option on this tab in the Conserve Ink on Reports option. This option turns off many of the ink intensive features within the program, effectively conserving ink usage. Maintenance Coordinator Simplicity Software Technologies Inc. 13 Getting Started To setup the options on this tab: Move to the Graphical Theme drop down and select the graphical theme of your choice. Next place a checkmark in the Conserve Ink on Reports if you wish to turn on this option. ISO DOCUMENTS We know that many organizations today are getting ISO certified, and require ISO document control numbers to be included with their primary documents. For this reason we allow you to include document control numbers with work order and purchasing documents. To setup ISO control numbers: Click on the ISO Documents tab. To use ISO control numbers, place a checkmark in the Use ISO Control Numbers checkbox. Move to the various other fields on this tab and enter the appropriate information for that document. Maintenance Coordinator Simplicity Software Technologies Inc. 14 Getting Started DATABASE SETTINGS When you move your databases to new locations or create new database you need to tell the program where they are. To setup your databases: Move to the Main Databases Setup tab. Now move to the Primary and Work Orders Database Path section and type in the complete path of this database. You can also use the Browse button to open and use a File Open type dialog screen to locate the database file. This file location can be either on a local drive, or pointing to a network drive (if you have network license). Repeat the above step for the other two databases. If you purchased add-on modules or the Professional Version, move to the Add-On Database Setup tab and setup the database on that tab. SINGLE USER LICENSES – Please note that when the application is either registered as a single user or is running in demo mode, the databases must reside on the C: drive. To place the database on a network drive a site license must be obtained. Maintenance Coordinator Simplicity Software Technologies Inc. 15 Getting Started How to Get Started with Maintenance Coordinator With Maintenance Coordinator we have tried to make it possible to enter things as needed. This to say, if you need to add a mechanic to a work order, you can add the mechanic to the database at the time the work order is created. Most of our lookup screens allow you to add new items as you are selecting them. This approach allows you to get started using the program almost immediately. The first thing you need to setup is your databases. Everything you enter into the program will be saved to these databases. Please refer to the Security and Databases chapter for more information on how to do this. Creating new databases is as simple as opening and saving files. Once these new databases are created, be sure to point to them. The next area to explore and setup are the program’s general settings. This is found using the Admin drop down menu and selecting the Program Settings option. This is accessible from the main menu of the application. Here you setup company information, your company logo, your e-mail server, database paths, and other general information. The most important of these is setting up your databases. You can always configure the other setting later on if needed. Work Orders need the following items available for there creation: Mechanics or employees responsible for their completion. Equipment the work order will be assigned to. Materials or spare parts that will be needed to complete the work order. Safety Instructions The actual work instructions. The items in the above list should be available for the creation of work orders. Equipment information is perhaps the most important of these items and you should work on this list first. Gather information such as descriptions, serial, model and reference numbers. More information can always be added later as needed. Also dealing with the equipment, you also want to gather any special safety instructions along with recommended planned maintenance instructions. This information is usually available from the equipment vendor or manufacturer. If you can obtain this information in electronic form it would be an added plus as you should then be able to just copy and paste this information into the program (a great time-saver). The next thing you need to do is build your database of task instructions. This is necessary for planned maintenance tasks only, as you can and should reuse Maintenance Coordinator Simplicity Software Technologies Inc. 16 Getting Started the same set of instructions over and over. For example, say you have five air compressors in your facility it would only make sense to reuse the same set of instructions for all five air compressors. Once you have built your database of task instructions, you should do the same thing with your safety instructions. Unlike task instructions, safety instructions should be assigned to each and every work order regardless of whether it’s a planned maintenance or repair type. Basically, with the above completed, you are ready to start using the program for the creation of both planned maintenance and repair types of work orders. Please keep in mind that these have only been basic recommendations to get you up and running quickly, there are many more features you need to consider while using this powerful and feature rich CMMS application. More Information Try browsing the installation compact disk for additional information. We normally have a few PowerPoint presentations and other information there. Also our Quick Tour demo can also be used as a valuable training tool, as it will get you familiar with the application. Maintenance Coordinator Simplicity Software Technologies Inc. 17 Getting Started Maintenance Coordinator Simplicity Software Technologies Inc. 18 MAINTENANCE COORDINATOR SYSTEM Common Features Maintenance Coordinator Simplicity Software Technologies Inc. 2 Common Features Table of Contents Chapter Overview ............................................................................................................... 5 Getting Around in Program Controls.................................................................................. 5 Editing Basics ..................................................................................................................... 5 Pull Down Menus ............................................................................................................... 6 Use the Ribbon .................................................................................................................... 7 Quick Access Toolbar ......................................................................................................... 8 The Coordinator, Module or Application Button ............................................................... 9 Edit Functions ..................................................................................................................... 9 Selecting Text for Editing ................................................................................................. 10 Deleting Text .................................................................................................................... 10 Cutting Text ...................................................................................................................... 11 Copying Text .................................................................................................................... 11 Pasting Text ...................................................................................................................... 11 Opening Files - Import ...................................................................................................... 11 Saving Files - Export ........................................................................................................ 12 Shortcut Bar (Outlook Style) ............................................................................................ 13 Tasks Panel ....................................................................................................................... 13 Shortcut Bars and Task Panel Options.............................................................................. 14 Data Controls - Moving Between Records ....................................................................... 14 Searching the Database ..................................................................................................... 15 Quick Find ........................................................................................................................ 16 Printing Files and Documents ........................................................................................... 16 Data Quick Entry .............................................................................................................. 16 Print Preview Screens ....................................................................................................... 19 Picture Viewer .................................................................................................................. 20 Using the Calendar ............................................................................................................ 21 Date Range Selection ........................................................................................................ 22 Spell Check ....................................................................................................................... 24 User-Defined Fields .......................................................................................................... 25 Using the Text Editor ........................................................................................................ 25 Documents (Document Feature) ....................................................................................... 29 Attachments Feature ......................................................................................................... 32 Creating Barcodes ............................................................................................................. 33 Printing Barcode Labels .................................................................................................... 35 E-Mail Composer .............................................................................................................. 36 Setting Up an Account for the E-Mail Composer ............................................................. 37 Writing an E-Mail with the E-Mail Composer ................................................................. 38 Insert a Text Document into Your E-Mail Message ......................................................... 38 Budgets ............................................................................................................................. 39 Parts Lookup ..................................................................................................................... 41 Maintenance Coordinator Simplicity Software Technologies Inc. 3 Common Features Equipment and Machinery Lookup .................................................................................. 44 Employee Lookup ............................................................................................................. 45 Contact and Vendor Lookup ............................................................................................. 47 Chart and Graphs Designer ............................................................................................... 49 Accessing the Chart Designer ........................................................................................... 49 Using the Chart Floating Menu......................................................................................... 50 Chart Data Grid ................................................................................................................. 52 Chart Wizard ..................................................................................................................... 56 Standard Work Orders Wizard.......................................................................................... 61 Purchase Requisition Wizard ............................................................................................ 63 Maintenance Coordinator Simplicity Software Technologies Inc. 4 Common Features Chapter Overview This chapter outlines features that are in common use throughout the Maintenance Coordinator software system. Some of the features explained here may apply to every module in the system, whereas others may only apply to a couple of modules. By placing common features together we have reduced the documentation size, and at the same time helped to reduce the learning curve. Procedures outline in this, and all other chapters assumes the user has basic computer skills, and has worked in the Windows environment before. Getting Around in Program Controls To input text into a text field, just move to and then click in that field. Then begin entering or editing the text. To move forward from field to field without using your mouse use the TAB key. To move backwards from field to field use the SHIFT + TAB key combination. To move to the beginning of a text field use the HOME key. To move to the end of a text field use the END key. To move in list boxes, such as in the employee lookup, use PAGE UP, PAGE DOWN, HOME, END and ARROW keys. You can also type the first letter of the word or name you wish to access. To move between option () buttons use the ARROW keys. To start a new line in text boxes or editors press the ENTER key. is a default command button present, use the SHIFT + ENTER combination. Editing Basics To delete a character at the current cursor location, press the DEL key. To delete from the current character to the end-of-text press CTRL + DEL. To insert a character at the current cursor location press the INS key. To delete character behind the cursor use the BACKSPACE key (Arrow). 5 Maintenance Coordinator Simplicity Software Technologies Inc. Common Features Pull Down Menus Throughout the program are pull down menus that are located directly beneath the screen header or title bars. You'll also notice that these menus will change depending on the screen or module that is currently displayed. These menu options allow for easy access of many features and functions the program has to offer to the user. There are a couple of different methods in which the user can access the contents of pull down menus and are outlined next. Press the ALT key along with the highlighted letter to access the pull down menus. Press the highlighted letter to access the options of that menu. Use the arrow keys to highlight the desired menu option and then press ENTER. Put the mouse pointer on the desired option, and then click on the menu option of your choice with the left mouse button. If the menu option of your choice has a HOT KEY assignment, you can use that to select the menu option. Some of the HOT KEYS used by the program are CTRL + X for cutting text, and CTRL + V for pasting text. Maintenance Coordinator Simplicity Software Technologies Inc. 6 Common Features Use the Ribbon When you first start some of the modules in the Maintenance Coordinator system, you may be surprised by what you see. The menus and toolbars in most of modules have been replaced with the Ribbon, which is part of the Microsoft Office Fluent user interface. The Ribbon as it appears in the Maintenance Scheduler module The Ribbon is designed to help you quickly find the commands that you need to complete a task. Commands are organized in logical groups, which are collected together under tabs. Each tab relates to a type of activity, such as clipboard functions. Minimize the Ribbon The Ribbon is designed to help you quickly find the commands that you need to complete a task. Commands are organized in logical groups that are collected together under tabs. Each tab relates to a type of activity, such as creating reports, filtering the database or other routines. There is no way to delete or replace the Ribbon with the toolbars and menus from the earlier versions. However, you can minimize the Ribbon to make more space available on your screen. Always keep the Ribbon minimized Click Customize Quick Access Toolbar In the list, click Minimize the Ribbon. To use the Ribbon while it is minimized, click the tab you want to use, and then click the option or command you want to use. Keep the Ribbon minimized for a short time To quickly minimize the Ribbon, double-click the name of the active tab. Double-click a tab again to restore the Ribbon. Maintenance Coordinator Simplicity Software Technologies Inc. 7 Common Features Restore the Ribbon Click Customize Quick Access Toolbar In the list, click Minimize the Ribbon. . Quick Access Toolbar The Ribbon control has a Quick Access Toolbar associated with it. This toolbar normally contains features that are widely used throughout the system. One set controls you’ll find in wide use are the data controls that are used to scroll through the records of the database. Customize the Quick Access Toolbar Move the Quick Access Toolbar The Quick Access Toolbar can be located in one of two places: Upper-left corner next to the Coordinator Button Below the Ribbon, which is part of the Microsoft Office Fluent user interface If you don't want the Quick Access Toolbar to be displayed in its current location, you can move it to the other location. If you find that the default (default location) location next to the Coordinator or Module Button is too far from your work area to be convenient, you may want to move it closer to your work area. The location below the Ribbon encroaches on the work area. Therefore, if you want to maximize the work area, you may want to keep the Quick Access Toolbar in its default location. Click Customize Quick Access Toolbar . In the list, click Show Below the Ribbon or Show Above the Ribbon. Maintenance Coordinator Simplicity Software Technologies Inc. 8 Common Features The Coordinator, Module or Application Button In the upper left hand corner of the new ribbon control is the Coordinator or Module button. This is the same style of button that Microsoft calls the Office button in their Office 2007 suite. In Office, this button has the Office icon displayed in it. In our modules, we have an icon that is representative of the module its installed in. Clicking on this button opens a pop up that closely resembles the old File menu. Once clicked, the user can then click on the various other buttons or options found there. Please note that in most cases, the Coordinator or Module button is a direct replacement for the File menu. Edit Functions For your convenience we have placed edit functions throughout most of the modules, and have placed them in the areas we thought would be the most useful. The same rules apply to these edit functions no matter where they are located. So for convenience, we will explain them just once here. Maintenance Coordinator Simplicity Software Technologies Inc. 9 Common Features Selecting Text for Editing Most edit functions first require you to select, or block the text to be edited. The procedure for this is as follows: METHOD ONE To select text to be edited, place the cursor at the beginning of the text. Now while holding down the SHIFT key, use the ARROW keys to drag the cursor over, and blocking the text of your choice. METHOD TWO Use the SHIFT + HOME key combination to select text from the current cursor location to the end of the line. METHOD THREE To select a range of cells, such as those found in the form modules, click and hold the left mouse button and drag through the range you want to select. METHOD FOUR (Mouse Users) Place the mouse pointer at the beginning of the text to be selected. While holding down the left mouse button, drag the mouse over the text to be edited, and thereby blocking the text. Once text has been selected, it can be cut, copied, pasted elsewhere, deleted, and in some cases reformatted such as changing fonts or colors. Deleting Text To delete text, you must: Select the text for deletion Press the Del key Maintenance Coordinator Simplicity Software Technologies Inc. 10 Common Features Cutting Text To cut text from its original position and store it in the Windows clipboard for possible insertion elsewhere, you must: Select the text to be cut. Access the Cut option under the Edit menu heading, or use the Hot key assignment of CTRL + X. Copying Text To make a copy of text and store in the Windows clipboard for possible insertion elsewhere, you must: Select the text to be copied. Access the Copy option under the Edit menu or use the Hot key assignment of CTRL + C. Pasting Text To paste text that has been stored in the Windows clipboard from either a previous CUT or COPY function, you must: Place the text into the clipboard using either the CUT or COPY functions. Place your cursor at the position you wish the insertion to take place. Use the Paste function under the Edit menu, or use the Hot key assignment of CTRL + V. Opening Files - Import Throughout the program you will be required to re-open saved files, forms and documents. The procedure on opening files is basically the same no matter what module you are currently working in, and is basically the same in all windows platforms. Maintenance Coordinator Simplicity Software Technologies Inc. 11 Common Features To open a saved document or file: Click on the Coordinator button and select the Open or Import option. Move to List Files of Type drop down listing, and select the file type you wish to open. Move to the Drives drop down list and select the drive that your desired file is located on. Move to the Directory list box and double click on the directory that contains the file you wish to open. Move to the Files list box and select the file of your choice. Now either double click on the file of your choice or click on the OK button. If everything was done correctly the file should now load into the program. Saving Files - Export Once you have created a file using the built in forms or editor for example, you'll want to save your information. It is always best to make a few directories on your hard drive in which to save your files in. To save a file to disk: Choose the Save As or Export option under the Coordinator button. Move to the Drives drop down list and select the drive you wish to save the file to. Move to the Directory list box and double click on the directory that you wish to save the file in. Move to the File Name text box and type the name you want to assign to the file. Also include the file name extension if you wish to specify one. Move to and click on the OK button to begin the save. Maintenance Coordinator Simplicity Software Technologies Inc. 12 Common Features Shortcut Bar (Outlook Style) The Shortcut Bar allows you to branch to either different parts of the module or program, or execute commonly used routines. This control breaks things into different groups. Clicking on the large bar opens different groups and displays different options. Click on an item within the shortcut bar will activate that option. Note that most if not all the options on the shortcut bar are also available from drop down menus and ribbons, and the Go menu when available. Tasks Panel The Tasks Panels allows easy access to and the ability to execute commonly used routines. This control breaks things into different groups. Clicking on the double arrows will expand or close the different groups and displays different options. Clicking on an item within the Task Panel will activate that option. Note that most if not all the options on the Task Panel are also available from drop down menus, and the Go menu when available. Maintenance Coordinator Simplicity Software Technologies Inc. 13 Common Features Shortcut Bars and Task Panel Options In many of the module you can both close and minimize the shortcut bars and Tasks Panels, and once closed reopen them. Minimize Shortcuts or Tasks Click on the tack icon Restore Shortcuts or Tasks Click on its name or tab as it rests on the left side of the screen. To keep in place, click on the tack icon. Hide the Shortcuts or Tasks Click on the X Display Hidden or Close Shortcuts or Tasks Click on the Options dropdown in the ribbon. Select the appropriate option found there. Data Controls - Moving Between Records or Located in various areas of the program are Data Controls. These controls allow the user to move through records in a database. The following are the elements of a data control. Clicking on the first arrow, on the far left, will move you to the first record in the database. Clicking on the next arrow moves you backward in the database one record at a time. Maintenance Coordinator Simplicity Software Technologies Inc. 14 Common Features Clicking on the next arrow moves you forward in the database one record at a time. Clicking on the last arrow, on the far right, will move you to the last record in the database. Searching the Database The Find record method has been designed to look and work the same no matter which module you are accessing. The procedures are the same only the effected database fields are different. To find a record using the built in search routine: Move to and click on the Find icon within the ribbon or press the Ctrl key and the F key at the same time. Move to the Search Text field and enter your search criteria. Wild cards are not acceptable. Move to the Search Type drop down list and select which database field you would like to conduct the search in. Options here will change depending on the module you are currently in. To only find records with an exact match, place a check in the Exact Match Only checkbox. Otherwise wild card characters will be used in the search criteria. Move to and click on the FIND FIRST command button. To continue a search for other matching records, click on the Find Next icon in the ribbon, or press the F3 function key on your keyboard. Maintenance Coordinator Simplicity Software Technologies Inc. 15 Common Features Quick Find Besides from the Search or Find Record routines used throughout the program, we have also incorporated a Quick Find routine in various areas in the program. Where available, move to the Sort By drop down list and select how you want the database sorted. The Quick Find routine will use this field for its search. Move to the Quick Find text box and type in the item you are looking for. As you type, the program will search the database for a matching item. Printing Files and Documents With most of the screens, functions and reports installed throughout the program, you will be given the option to print that information to the currently selected printer. The print options for the screens differ somewhat. With some of the screens, such as the Editor or Notes section, you have a choice to either print the document, or preview it. With other sections you are dumped directly into a print preview screen, and can then either print the document, or close the preview. Data Quick Entry One time saving feature we have installed in most of the data input screens used by the program are what we call "Data Quick Entry" routines. These routines are used to store information that you would use repeatedly. The idea behind this feature is to allow you to type in commonly used information just once. The next time you need it you just call up the routines, select the text from a list, and have it automatically inserted for you. Maintenance Coordinator Simplicity Software Technologies Inc. 16 Common Features Each text field in the program, which works with these routines, have there own little databases. For example, if you call up the listing while in the "Problem" text field, you'll get a different list of items than if you where in the memo field. CALLING UP THE QUICK ENTRY LIST To call up the Data Quick Entry list from one of the supported text input fields: Move to the text field that uses the quick entry routines. Click on the … button adjacent to this field. ADDING NEW QUICK ENTRY ITEMS Before you can begin using the Quick Entry option, you'll need to add information into the listing. Once entered this information will be available for insertion. To add information to the Quick Entry list, you must: Maintenance Coordinator Simplicity Software Technologies Inc. 17 Common Features Press or click on the NEW command button on the Quick Entry screen. Type in the information you want included in the listing. This text can be any combination of text characters and numbers. Press or click on the OK command button to save the text, and add it to the list box. SELECTING TEXT FOR INSERTION Once you have information installed into the Quick Entry listing, you can use and reuse this text any countless number of times. The procedure for selecting text from the Quick Entry list, and inserting it at the current cursor location is as follows: Place your cursor into the text box that you want the information inserted into. Click on the … button adjacent to this field. Move to the list box and highlight the text of your choice. Press Enter, or click on the Select button to insert the highlighted text at the current selected control. DELETING ITEMS FROM THE QUICK ENTRY LIST If you have information in the Quick Entry list box that you no longer feel is valid; you can delete it by following these steps: Click on the … button adjacent to the field. Move into the list box and highlight the text you wish to delete. Move to and click on the Delete command button to delete the text from the list. Maintenance Coordinator Simplicity Software Technologies Inc. 18 Common Features Print Preview Screens There are actually a couple of different print preview screens used by the Maintenance Coordinator system, but we have tried to design them so they look and feel the same. This way as you learn one, you learn them all. When available, the following elements are found in the top toolbar of a Print Preview screen. Print – Open the print dialog and prints the document. 2 Pages / 1 Page – Toggles the preview to showing one or two pages. Only works when the program is more that 1 page in length. Zoom – Zooms in and out on the preview document Previous - Moves you through your print preview document from the current page towards the beginning. Export – When present open a Save As dialog and allows you to save a copy of the report or document to file. It can then be opened by other supported applications. Maintenance Coordinator Simplicity Software Technologies Inc. 19 Common Features Next - Moves you through your print preview document from the current page towards the last page. Close – When available, closes the preview screen. If this button is not available click the ESC key to close the screen. Picture Viewer The Picture Viewer is used by the application to insert images into your database, view existing images or pictures, and send a copy of the image to a printer. TO VIEW AN EXISTING PICTURE Open the Picture Viewer and then click the Picture option in the View group. Maintenance Coordinator Simplicity Software Technologies Inc. 20 Common Features TO INSERT OR CHANGE THE INSTALLED PICTURE Open the Picture Viewer and then click the Change Picture option. Use this File Open dialog to locate the image or picture file you want to use. With the file selected, move to and click on the OPEN command button. TO PRINT AN EXISTING PICTURE Open the Picture Viewer and then click the Print Picture option. TO CLEAR AN EXISTING PICTURE Open the Picture Viewer and then click the Clear Picture option. TO CHANGE THE ORIETATION To change the print orientation of the picture document click on the Orientation option. Click on one of the two choices found there. Using the Calendar Throughout the program and its modules, we have made use of a pop up calendar for the input of dates. This calendar is normally accessible by clicking on the … button located to the right of that field. The use of this calendar is the same, no matter where it is accessed and will be explained next: To select a date click on the date of your choice, a box should appear around the date showing it is indeed selected. To move backwards one month at a time click on the command button with < on it. To move backwards two months at a time click on the command button with << on it. Maintenance Coordinator Simplicity Software Technologies Inc. 21 Common Features To move forward one month at a time, click on the button with > on it. To move forward two months at a time, click on the button with >> on it. To move back by one year, click the <Year button. To move forward by one year, click the Year> button. To move to a specific month, open the Months menu and select the appropriate option. To move to today's date move to and click on the Today button. To insert the selected date into the selected input field, move to and click on the Select Date button. To exit the Calendar without selecting a date, move to and click on the Close Calendar button. Date Range Selection Use in various locations of the program is a Date Range Selection dialog. This is commonly used in the creation of reports and for the generation of a date range of work orders for two examples. We will now outline the use of this control. Maintenance Coordinator Simplicity Software Technologies Inc. 22 Common Features To change either the Start Month or End Month: Move to the appropriate area. Move to the Month drop down option box, and click on the arrow shown there. Click on the month of your choice. To change either the Start Day or End Day of the month: Move to the appropriate area. Move to the Day drop down option box, and click on the arrow shown there. Click on the month of your choice. To change either the Start Year or End Year: Move to the appropriate area. To decrease the year, click on the < button adjacent to the year field. To increase the year, click on the > button adjacent to the year field. To select the dates using the built-in calendar: Move to either the Start Date or End Date section. Click on the … button adjacent to the date field. Select the date from the pop up calendar. Maintenance Coordinator Simplicity Software Technologies Inc. 23 Common Features Spell Check Spell checking is available for use throughout the program. The Notepad, Editor, and the various sections that contain forms have a built in, 250,000 + word spell check. To use the built in spell checker, you must: Open the Tools menu, the Spelling menu or click on the Spell Check button, depending on which module and screen you are currently working in. Select the Spell Check option. When the spell checker encounters a misspelled word, the "Word Not Found In Dictionary" dialog box will appear. From here you have the following choices: IGNORE - The misspell word is ignored, and spell checking continues. IGNORE ALL - The present occurrence and all future occurrences of the misspelled word are ignored. CHANGE - Here you can replace the misspelled word with the word in the Suggestions list box. Or you can choose a word from the list box by clicking on it to select it. You can also correct the word in the Not in Dictionary text box by typing in it, and then hitting the Change button. CHANGE ALL - works just like the Change button, but the program will replace all occurrences of the misspelled word without any more prompts. Maintenance Coordinator Simplicity Software Technologies Inc. 24 Common Features ADD – Adds the misspelled word to the custom dictionary. User-Defined Fields It’s impossible to know what everyone could possibly want to keep information on, as we work differently. For this reason we have installed userdefined fields in a few of the system’s modules. These fields operate the same no matter where it’s used. Basically, a user defined field works just like any other field in the system. These fields are setup as text fields, and will accept any combination of text or numbers, up to 30 characters each. To change a User-Defined field title: Click on the User Fields tab by clicking on it. Move to and double mouse click on the field’s title. Type in the new title description in the space provided. This can be up to 20 characters in length. Click the OK command button. Using the Text Editor The Text Editor has been installed throughout the system where the user may need to create or edit large amounts of text. In most cases the Editor is accessed by clicking on a button with this icon: Maintenance Coordinator Simplicity Software Technologies Inc. 25 Common Features In the Maintenance Scheduler module, this editor is used as the Instructions Editor to create and edit both work orders tasks instructions, and tasks safety instructions. You gain access to this editor by using one of the available command buttons on the Scheduler's Instructions tab, or by selecting one of the options found under the Instructions ribbon tab. Text Editor Home Tab Maintenance Coordinator Simplicity Software Technologies Inc. 26 Common Features The following elements are found on the Instructions Editor Home tab, reading left to right: Save and Close – Saves the current text and closes the editor Paste – Inserts any clipboard text into the document, and at the current cursor location Cut – Deletes selected text and places it into the clipboard. Copy – Copies selected text and places it into the clipboard. Delete – Deletes selected text Set Next Number – Allows you to set the next number to use for numbered lists. Reset to One – Resets the next number for numbered lists to one. Bullets Off – Turns on and off the bullets. Numbers – Turns on or off the numbered bullets. Numbers / Checkbox – Turns on and off the number – checkbox combination bullets, Checkbox – Turns on and off the checkbox bullets. Find – Helps to find matching text Find Next – Helps to find the next match. Select All – Selects the entire document. Cancel – Closes or exits the editor without saving any changes made. Maintenance Coordinator Simplicity Software Technologies Inc. 27 Common Features Changing the Name of Your Instructions To change or edit the name of the loaded instructions (Maintenance Task/Safety Instructions Only): Click the Coordinator button and select the Edit Title option. Type or edit the instructions name or title to your liking. Click the OK button. Importing a Text File If you want to, you can create your instructions in other applications such as Windows Notepad, save the file as a text file, and then import it here. To import a text file, replacing any currently loaded document: Click on the Tools tab. Click on the Text Document option in the Insert group. Use this File Open dialog as would any such dialog found in Windows. Spell Check the Text Editor’s Document To spell check your document: Click on the Tools tab. Click on the Spelling option in the Proofing group Print the Text Editor’s Document To print the current text editor’s document: Click on the Coordinator button Move over the Print button. Select the appropriate print option. Maintenance Coordinator Simplicity Software Technologies Inc. 28 Common Features Documents (Document Feature) Any maintenance department is sure to accumulate a wide variety of documents. Examples of these documents could be warranty information, information about your equipment, notes about your mechanics, and the list goes on and on. These documents can also be proven to be very important to the day-to-day operation of your maintenance department. For these reasons we have included the Documents feature. The Document feature is included in many of our modules where we felt it would be useful. You can find this feature in the Equipment module, Purchasing module, Contacts module, Mechanics module and the Reports module. The Mechanics module differs from the others as it’s attached to each mechanic’s record, where you can create various documents on a single employee. The Document Feature found in the Reports module is for general type documents and is compatible with the Document Feature in our PM Coordinator application. Maintenance Coordinator Simplicity Software Technologies Inc. 29 Common Features You can create three different types of documents with this feature. One is a picture document, which can be GIF, JPG, BMP, WMF and ICO formats. The next type of documents can be the editor type. These editor type documents features the use of our built-in word processor. This word processor feature many professional features such as multiple fonts, colors, paragraph formatting, the use of tables and more. Documents created in our word processor are compatible with almost all windows based word processors such as Word and Word Perfect. The third type of documents are Attachment type documents. Attachments point to other files store on hard drives, or other locations such as web-sites. We recommend that you use this document type for picture also. You can point to picture stored on a hard drive as opposed to storing it directly in the database. This saves database space and improves database performance by keeping the database at a reasonable size. Add Document Group Every document used with this program must belong to a document group. These groups will help you keep your information in a more organized form. To create a Document Group: Move to and click on the New Group option. Type in the name of your new group in the space provided. Click the OK button. You can edit the name of your group directly from within the grid once it has been created. Maintenance Coordinator Simplicity Software Technologies Inc. 30 Common Features Adding a New Document To create a new document: Move to the Documents Groups grid and select the group you want to assign your new document to. Click the Add New option in the Documents group. Move to the Document Name field and type in a descriptive name for your new document. Move to the Document Type area and select the type of document you are creating. With everything setup to your liking, move to and click the OK button. Opening Documents for Viewing or Editing To open a document for viewing or editing: Move to the Documents Groups grid and select the group your document belongs to by clicking on its name. Click on the Documents option under the View/Edit group. You can also right click on a document file to bring up a popup menu with various options. Maintenance Coordinator Simplicity Software Technologies Inc. 31 Common Features Documents Types EDITOR DOCUMENTS The Documents Editor is the word processor that we have included with our applications to create, edit and view text type documents. To learn how to use this power feature please refer to the Word Processor chapter. PICTURE DOCUMENTS Picture documents make use of our Picture Viewer features. This feature is outlined elsewhere in this chapter. ATACHMENT DOCUMENTS When you create this type of document, you will be greeted by a File Open type dialog. Use this dialog to browse to the file you want to link to. If you want to link to a relative path, such as a web-site, or file folder, click Cancel to the File Open dialog. Next a Input box dialog will appear. Type in the path of the file, web-site or whatever in the space provide and click OK. Attachments Feature Many of the modules within the system use the Attachments Feature. This feature allows you to attach items to various records such as work orders, equipment records, employee records and more. Basically any type of document, or path that can be accessed by the Windows, Start – Run option can be used. Normally you just point to a file, and when opened that file will open itself along with the appropriate application. These can include, but not limited to pictures, CAD drawings, documents, web-sites and more. When using pictures, we highly recommend using this feature as opposed to importing them into the database. Picture or image files can use a lot of database space in a short amount of time. This could both consume database space and effect database performance. Links to image files on the other hand use very little space, and actually provide better support. Maintenance Coordinator Simplicity Software Technologies Inc. 32 Common Features Where supported, you can attach a file by: Moving to the Detail View of the module you’re in. Click on the Attach or Attachments tab located near the bottom on the screen. Click on the Browse button to located and point to the file you want to attach. Click the Open button To view an attached file: Click on the Attach tab located near the bottom on the screen of the Details view. Click on the Open button adjacent to the file you want to open. Creating Barcodes The program allows for the creation of Barcode labels for the Equipment and Parts and Inventory modules. All the major barcodes are supported, as well as variety of formatting options. To create a bar code: Move to the appropriate module. Move to the Details tab by clicking on it. Move to the tabs near the lower part of the screen and click on the Barcode tab Enter the text you want to use with the barcode in the space provided. Click the Setup Barcode command button. Move to the Width and Height text boxes and enter this information, along with choosing one of the inches and cm options. Move the Format drop down box and select the barcode format you want to use with the label by clicking on it from with in the list. Maintenance Coordinator Simplicity Software Technologies Inc. 33 Common Features Move to the Font drop down and select the font and type size you want to use. To show the description or caption on the label, place a checkmark on the Show Text Label checkbox. To have the label scaled for you, place a checkmark on the Scale Barcode checkbox. To change the rotation of the barcode, select an option from the Rotation drop drown list. Click the Use Barcode option to save the barcode to file. Maintenance Coordinator Simplicity Software Technologies Inc. 34 Common Features Printing Barcode Labels To print barcode labels: Move to the appropriate module. Move to the Details tab by clicking on it. Move to the tabs near the lower part of the screen, and click on the Barcode tab Click on the Print Barcode button. From the Label Setup screen, move to the Select Label Type drop down box, and select the label type you want to print to. Move to the Label To Print drop down box, and select which label on the sheet you want to print to. To print a full sheet of identical labels, choose the All option. Click on the Preview button. Use this Print Preview as outline elsewhere in this chapter. Maintenance Coordinator Simplicity Software Technologies Inc. 35 Common Features E-Mail Composer The E-mail Composer is for writing and sending e-mails to vendors, other employees, or anyone you so choose. You can import text files with this editor, along with checking your spelling. To access the E-Mail composer from the Purchasing module: Move to the Purchasing main screen. Maintenance Coordinator Simplicity Software Technologies Inc. 36 Common Features Click on the Mail tab in the ribbon Then select one of the following options: o Send Approval o Quotation Request o Current Document o E-Mail Composer To access the E-Mail Composer from the Scheduler module: Click on the Go tab in the ribbon. Click on the Email Composer option. Setting Up an Account for the E-Mail Composer (THIS APLLIES TO PURCHASING MODULE ONLY) Before you can send e-mails with the E-Mail composer you must tell the program what e-mail account to use. This step however is not required when using Outlook as your mail server. If you want to use Outlook as your mail server, make sure it’s setup properly in the main settings of Maintenance Coordinator application. To specify which e-mail account to use: Click on the Mail tab in the ribbon and click on the E-Mail Composer option.. Click on the Coordinator button and select the Change Accounts option. Select the account you want to use from those listed in the grid. Click on the Select button. The application will remember the account you picked on this computer only, and will maintain this setting until you or another user changes it. To use the Email composer with the work orders module, you must setup you email information in the main program settings. Maintenance Coordinator Simplicity Software Technologies Inc. 37 Common Features Writing an E-Mail with the E-Mail Composer To create and send a new e-mail message: Open the composer as outlined. Move to the Mail To text box and type in the complete e-mail address of the person you’re sending the e-mail to or click on the Recipient button in the ribbon and then either the Vendors or Employees option. o Select the recipient from those listed and click Select. Move to the Subject text box and enter a subject for your e-mail. If want to add an attachment to your document click on the Attachment button. o Browse to and select the file you want to attach and click on the Open button. Move to the big text box on the screen and type in the body of the email message. To insert your signature at the current cursor location, click on the Sign option in the Insert group. To spell check your document, click on the Spelling option in the Proofing group. Click on the SEND button when ready send your message. Insert a Text Document into Your E-Mail Message If you have text that you reuse a lot in your e-mail messages, you can use a program like Window’s Notepad to create a library of text files for reuse in your email documents. Once created you can insert one of these files into the current document and save yourself a lot of typing. To insert a text file into an e-mail message: Create your email message in your normal manner. Place the cursor in the email body where you would like the insertion to take place. Click on the Insert Doc option. Browse to and select the file you want to insert, and click on the Open button. Maintenance Coordinator Simplicity Software Technologies Inc. 38 Common Features Budgets With the Maintenance Coordinator system you can setup three different types of budgets. The first is based on purchasing and purchase items accounts, and the other two are based on maintenance activities, using maintenance accounts or projects. To setup a budget: Move to the Budget screen. Move to the Expense Type drop down box and select the expense type you want to base your budget on. Move the Accounting Types drop down and select either the Accounts or Projects types. If you’re in the Purchasing module you may only have one type available. Move to the Year list box and select a budget year. Click on the Refresh button. Click on the Add option in the Categories group. Maintenance Coordinator Simplicity Software Technologies Inc. 39 Common Features Select a category from those listed and click the Select button. From the budget main screen, move to the Categories grid and select the category you want to base your budget on. Move to the various month fields and type in your budget for that month. Opening Saved Budgets To open saved budgets: Move to the Budget screen. Move to the Expense Type drop down box and select the expense type you want to base your budget on. Move the Accounting Types drop down and select either the Accounts or Projects types. If you’re in the Purchasing module you may only have one type available. Move to the Year list box and select a budget year. Click on the Refresh button. From the budget main screen, move to the Categories grid and select the category containing your budget. Retrieving Actual Expenses To have the program retrieve the actual amounts spent, and then show you a comparison between the actual amounts and budget amounts: Move to the Budget screen. Move to the Expense Type drop down box and select the expense type you want to base your budget on. Move the Accounting Types drop down and select either the Accounts or Projects types. If you’re in the Purchasing module you may only have one type available. Move to the Year list box and select a budget year. Click on the Refresh button. From the budget main screen, move to the Categories grid and select the category containing your budget. Click on the Retrieve Actual button. Maintenance Coordinator Simplicity Software Technologies Inc. 40 Common Features Printing the Current Budget To print the current Budget: Move to the Budget screen. Open the Budget you want to print. Click on the Current Budget option in the Reports group. Printing All Budget Categories To print all categories of a set of budgets: Move to the Budget screen. Move to the Expense Type drop down box and select the expense type you want to open your budget on. Move the Accounting Types drop down and select either the Accounts or Projects types. If you’re in the Purchasing module you may only have one type available. Move to the Year list box and select a budget year. Click on the Refresh button. Click on the All Categories option in the Reports group. Type in a name for your budget report, and click OK. Parts Lookup The Parts Lookup screen is used throughout the system to input or retrieve information on inventory items. This information can be used with work orders, issues, purchasing and other places in the program. This routine is the same no matter where you use it. Selecting Parts from the Parts Database To select a part: Move to the far left Groups Name grid and select the group you think your part belongs to. The Parts grid on the right will be sorted by whatever group you select. To view all parts, regardless of groups, place a checkmark in the View All Parts checkbox. Maintenance Coordinator Simplicity Software Technologies Inc. 41 Common Features Move to the Parts grid located to the right of your screen and click on the part you want to view. To insert the Part into a document, click the Select button. To view or edit information on the selected part click the Details tab. Edit information on the Details tab to your liking. Click Close when done. Adding new Parts to the Database Open the Parts database from one of the acceptable ways. If the group does not already exist that you want to assign the part to, you will need to create the group. Open the File menu and select the Add New Group option. Type in the description of your new group in the space provided. Click Ok. Move to the Group Name grid on the left of your screen and click on the group that you want to add the part to. Maintenance Coordinator Simplicity Software Technologies Inc. 42 Common Features Open the File menu and select the Add New Part option. When asked if you want to add the new part to the selected group, click on the OK button. When prompted, enter the part number of your new part in the space provided and click Ok. The program will now search to see if there is a matching part number already in the database. Click on the Details tab. Move to and edit the various fields with the appropriate information on that new part. Click Close and changes will be saved or click on the Post button Deleting Parts from the Parts Database To remove a part from the Parts Database: Open the Parts database from one of the acceptable ways. Move to the Group Name grid on the left of your screen and click on the group that you want to remove the part from. Move to the Parts Grid on the right of your screen and select the part you want to remove. Open the File menu and select the Delete Record option. When prompted about the deletion, click Ok. Maintenance Coordinator Simplicity Software Technologies Inc. 43 Common Features Equipment and Machinery Lookup The following section will outline the use of the Equipment and Machinery lookup screen. This dialog screen is used throughout the application. To Select a Piece of Equipment Move to the Lookup tab. Move to the grid and select the item you wish to choose. Click on the Select button. To Add a Piece of Equipment Open the File menu and select the Add New option. Move to and click on the Details tab. Maintenance Coordinator Simplicity Software Technologies Inc. 44 Common Features Move to the various fields and enter the information appropriate to that field. To ensure the information was written to the database, click the Post button. To Delete a Piece of Equipment Move to and click on the Lookup tab. Move to the grid and select the record that you want to delete. Open the File menu and select the Delete Record option. When prompted about the deletion, click the Yes button to proceed. Employee Lookup The following section will outline the use of the Employees lookup screen. This dialog screen is used throughout the application. Maintenance Coordinator Simplicity Software Technologies Inc. 45 Common Features To Select an Employee Move to the Lookup tab. Move to the grid and select the name you wish to choose. Click on the Select button. To Add an Employee Open the File menu and select the Add New option. Move to and click on the Details tab. Move to the various fields and enter the information appropriate to that field. To ensure the information was written to the database, click the Post button. To Delete an Employee Move to and click on the Lookup tab. Move to the grid and select the record that you want to delete. Open the File menu and select the Delete Record option. When prompted about the deletion, click the Yes button to proceed. To view an Employee’s Work Schedule In the Scheduler module you can view an employee’s work schedule. This comes in handy when you want to see if they are available to perform a task. Move to and click on the Lookup tab. Move to the grid and select the record that you want to view. Click on the Schedule tab. Maintenance Coordinator Simplicity Software Technologies Inc. 46 Common Features Contact and Vendor Lookup The Vendor Lookup screen is used throughout the system to input or retrieve information on contacts. This information is primarily used with inventory, equipment and purchasing items. Selecting a Vendor from the Contacts Database To select a contact: Move to the far left Groups Name grid and select the group you think your contact belongs to. The Contact grid on the right will be sorted by whatever group you select. To view all contacts, regardless of groups, place a checkmark in the View All Contacts checkbox. Move to the Contacts grid located to the right of your screen and click on the contact you want to view. To insert the Contact into a document, click the Select button. Maintenance Coordinator Simplicity Software Technologies Inc. 47 Common Features To view or edit information on the selected contact click the Details tab. Edit information on the Details tab to your liking. Click Close when done. Adding new Contacts to the Database Open the Contact and Vendors database from one of the acceptable ways. If the group does not already exist that you want to assign the contact to, then you will need to create the group. Open the File menu and select the New Group option. Type in the description of your new group in the space provided. Click Ok. Move to the Group Name grid on the left of your screen and click on the group that you want to add the contact to. Open the File menu and select the Add New Contact option. Click on the Details tab. Move to and edit the various fields with the appropriate information on that new contact. Click Close and changes will be saved or click on the Post button to ensure your changes where saved to the database. Deleting Contact from the Database To remove a contact from the contact Database: Open the Contact database from one of the acceptable ways. Move to the Group Name grid on the left of your screen and click on the group that you want to remove the contact from. Move to the Contact Grid on the right of your screen and select the part you want to remove. Open the File menu and select the Delete Record option. When prompted about the deletion, click Ok. Maintenance Coordinator Simplicity Software Technologies Inc. 48 Common Features Chart and Graphs Designer The Charts and Graphs designer is used throughout the program to help you present graphical data. This designer was purchased by us as an add-in control and is very feature rich. To include and write about all the features of this control would require an additional manual all by itself. Lucky for us, the creator of this designer wrote an extensive help file that outlines all its many features. Therefore we would like you to refer to this help file whenever you need help with this designer. Accessing the Chart Designer There are two methods of accessing the Chart Designer. One is through reports, where you create a chart from report data. The other is where you can enter the chart data directly from the Reports module. Maintenance Coordinator Simplicity Software Technologies Inc. 49 Common Features To open the Chart designer for use with a Reports and Graphics module: Move to the Reports and Graphics module Click on the Charts – Graphics option in the toolbar. The chart designer will load automatically when used with the built in reports. The features of this powerful control remain unchanged no matter how it is accessed. Using the Chart Floating Menu The Chart Designer module is called a pop up or floating menu. The use of this menu allows the user to access many of the module’s built-in options. To call up the Chart Designer floating menu, you must: Have a chart displayed in the Chart Designer screen. Click the right mouse button anywhere in the chart to display the pop up menu. Once the menu is displayed you can use it as you would any normal menu. OR Main Options button in the ribbon. The following options are available from the floating menu: WIZARD - Displays the chart wizard, and guides you through the chart design process. EDIT CHART DATA - This option allows you to add or edit chart data, rows, columns and labels in the data grid. GENERAL - This option allows you to setup the fill, frame and shadow of the chart backdrop. It also allows the option of selecting some of the displayed elements, such as the title, the legend, the footnote or the 2nd Y axis. PLOT - This option is currently unavailable to the user. SERIESSERIES - Controls the display of series, plots a series on a secondary axis, formats series appearance. SERIESLABEL - This option controls the series label location and line styles, edits and formats the label text, position and backdrops. Maintenance Coordinator Simplicity Software Technologies Inc. 50 Common Features SERIESDATA POINT - Formats the fill and marker for an individual data point. SERIESDATA POINT LABEL - This option control the type and location of label on individual data points. Formats the font and layout of text, and formats the backdrop. AXISAXIS - The option is for future use. AXISLABEL - This option formats the axis labels and backdrops. AXISTITLE - This option is for future use. LEGEND - This option allows the user to format the chart legend with backdrops, fonts and location. TITLE - This option allows the user to format the chart title with backdrops, fonts, location and displayed text. FOOTNOTE - This option allows the user to format the chart footnote with backdrops, fonts, location and displayed text. COPY - This option copies the current chart into the clipboard in the Windows Metafile (.wmf) format. PASTE - Take a graphic in from the clipboard, in either the Bitmap (.bmp) or Metafile (.wmf) formats and places it the selected element’s backdrop or fill. PRINT - Allow the user to print the current chart. SAVE AS - Allows the user to save the current chart as a chart file (.vtc), a bitmap (.bmp), or metafile (.wmf). LOAD - Load an existing chart file (.vtc) into the Chart Designer, replacing any currently loaded chart. Maintenance Coordinator Simplicity Software Technologies Inc. 51 Common Features Chart Data Grid Every chart must have a data grid associated with it. With Maintenance Coordinator there are actually two of these data grids available. One is associated with the reports module and the other is a dedicated grid for use with the Chart Designer. Our discussion will concentrate on the dedicated grid since it’s the more powerful of the two when creating charts from raw data. The other grid that was designed to take data from reports can still be used with raw data. To access the Chart Data Grid you must: Click on the Edit Data option in the ribbon, or. Right click your mouse button somewhere on the chart control within the Chart Designer. Choose the EDIT CHART DATA from the menu. When you first view the Data Grid Editor it will contain a possible of two types of data. It could contain data from the Reports module grid, or if this grid was left empty, the grid could be filled with random data. Maintenance Coordinator Simplicity Software Technologies Inc. 52 Common Features The following illustration shows the relationship between a data grid and a chart. When the grid is filled with random data you may want to start by resizing the grid to agree with your data. To Resize the Data Grid for the proper number of rolls and Columns you must: Double click on the ROWS field of the Editor dialog to select the current row value. Type in your new number. Use the Tab key to move to the COLUMNS field. Type in your new number. Use the Tab key to exit the COLUMNS field, and view your changes within the grid. To Modify the data within the Data Grid, you must: Place the cursor over and click on the grid cell you want to edit, or use the tab key, left, right, up or down arrow keys to select the desired cell. The cell location will then be highlighted indicating that it’s selected. Once selected type in your new data value. Maintenance Coordinator Simplicity Software Technologies Inc. 53 Common Features The cell will display the new value once you either leave the cell or press Enter. Applying Data Grid Changes to the chart: You can apply the changes you have made by clicking on the APPLY command button. You can apply any changes you’ve made and exit the Data Grid Editor by clicking on the OK command button. You can exit the Data Grid Editor without applying changes by clicking on the CANCEL command button. To add Row and Column Labels you must: Double-click in the Row Labels field to select the current number of row labels. Type in the number of the desired row labels. Use the Tab key to move to the Column Label field. Type in the number of the desired column labels. Use the Tab key to exit the Column Labels field. Once you have added row and column labels, you can modify them. To Modify Row and Column Labels in the Grid, you must: Using the mouse cursor, click to select a label cell. You can also use the Tab, Right, Left, Up or Down Arrow keys to select the cell. Once the cell is selected, type in your new label. To Insert a Data Grid Row, you must: Use the mouse or Arrow keys to move to the desired cell location. Open the INSERT menu and select the ROW option. An entire data grid row will be inserted at that point, moving the current row down one level. To Insert a Data Grid Column, you must: Use the mouse or Arrow keys to move to the desired cell location. Open the INSERT menu and select the COLUMN option. An entire data grid column will be inserted at that point, moving the current column to the right one position. Maintenance Coordinator Simplicity Software Technologies Inc. 54 Common Features To Delete a Data Grid Row, you must: Use the mouse or Arrow keys to move to the desired cell location. Open the DELETE menu and select the ROW option. The entire data grid row will be deleted at that point, moving the row below the current cell up to the current position. To Delete a Data Grid Column, you must: Use the mouse or Arrow keys to move to the desired cell location. Open the DELETE menu and select the COLUMN option. The entire data grid column will be deleted at that point, moving the column to the right into the current column position. To Insert a Column of Data Grid Row Labels, you must: Use the mouse or Arrow keys to move to the desired row label location. Once your location selected open the INSERT menu and select the ROW LABEL option. Choose BEFORE to insert a column of row labels to the left of the currently selected label. Choose AFTER to insert a column of row labels to the right of the currently selected label. To Insert a Column of Data Grid Column Labels, you must: Use the mouse or Arrow keys to move to the desired column label location. Once your location selected open the INSERT menu and select the COLUMN LABEL option. Choose BEFORE to insert a row of column labels to the left of the currently selected label. Choose AFTER to insert a row of column labels to the right of the currently selected label. To Delete a Column of Data Grid Row Labels, you must: Use the mouse or Arrow keys to move to the desired row label location. Once your location is selected, move to the DELETE menu and choose the ROW LABEL option. The entire column of row labels will be deleted. Maintenance Coordinator Simplicity Software Technologies Inc. 55 Common Features To Delete a Row of Data Grid Column Labels, you must: Use the mouse or Arrow keys to move to the desired column label location. Once your location is selected, move to the DELETE menu and choose the COLUMN LABEL option. The entire row of column labels will be deleted. Chart Wizard The Chart Wizard is a series of tabbed dialog screens that will guide you through the creation and modification of the charts. To open up the Chart Wizard you must: Click on the Chart Wizard option in the ribbon, or Have a chart displayed in the Chart Designer screen. Click the right mouse button anywhere in the chart to display the pop up menu. Once the menu is up choose the WIZARD option. The Gallery Tab The Gallery tab allows you to select the type of graph you want to design. It also allows for the selection of 2D and 3D chart types. Maintenance Coordinator Simplicity Software Technologies Inc. 56 Common Features To select a chart type you must: Click on the picture of the chart type of your choice. The Style Tab The Style Tab of the Chart Wizard allows the user to select the chart style that relates to the selected chart type. To select a chart style you must: Click on the picture of the chart style of your choice. Maintenance Coordinator Simplicity Software Technologies Inc. 57 Common Features Please note that the number and types of options you have on this screen will vary according the Type of chart you chose on the GALLERY tab. Once you have finished making you selection on the STYLE tab use the BACK or NEXT command buttons to continue the chart setup process. The Layout Tab The LAYOUT tab allows you to specify the Chart Title, Chart Footnote, Chart Legend Position, and whether the series data in the chart range should be charted along rows or columns. The chart preview on this tab will allow you to see how the chart will look with the current modifications. To change the Chart title and footnote, you must: Move to the appropriate field and type or edit the text. Maintenance Coordinator Simplicity Software Technologies Inc. 58 Common Features To change the Chart legend, you must: Move to the CHART LEGEND drop down list and select the option of your choice. To change how data in a series is read, you must: Move to the SERIES DATA ALONG option button and click on the option of your choice. Maintenance Coordinator Simplicity Software Technologies Inc. 59 Common Features The Axes Tab This tab will allow you to enter the optional axes titles for all the axes on your chart. The preview on the tab will allow you to view your changes. To change the Chart axes, you must: o Move to the appropriate field and type or edit the text. When you are done setting up all your options using the Chart Wizard you must: o Click on the FINISH command button to apply your changes. Maintenance Coordinator Simplicity Software Technologies Inc. 60 Common Features Standard Work Orders Wizard Because this program is primary basic around maintenance operations, we allow the creation and editing of Standard, or Repair types of work orders throughout the system. One of the main way of working with work orders is with the Standard Work Orders Wizard. This feature will be outlined next To use the Standard Work Orders Wizard: Open the wizard by one of the approved methods. These methods can vary by module. Move to the General Setup tab. Move to the Work Orders Types section and select a task type that best fits this task. Select the type by clicking on it. Maintenance Coordinator Simplicity Software Technologies Inc. 61 Common Features The Date field indicate the creation date of this task. To change it, click on the … button adjacent to this field. Next select a new date from the pop-up calendar. Next click on the Lookup button next to the Equipment or Machine field. Select the equipment you want to assign to this task from the Equipment Lookup screen, and click on Select. Move to the Requested By field and type in your name. Move to the Estimated Down Time field and type in your best estimate of how long you think it would take to complete this task. Click the Next button or the Work To Perform tab. Move to the Brief Description if Work to Be Performed field and type in a brief, descriptive title for this work order. This field can contain up to 100 characters. Move to the Detailed Description of Work to be Performed field and type in more details about this work order. Click on the Save and Close option to save your changes. Maintenance Coordinator Simplicity Software Technologies Inc. 62 Common Features Purchase Requisition Wizard The Purchasing Requisition Wizard can be found in the Purchasing and Receiving and Personal Manager modules. This wizard allows the user to create purchasing requisition for goods they need. To use the Purchasing Requisition Wizard: Open the wizard by one of the approved methods. These methods can vary by module. Move to the Originator tab by clicking on it. Click on the … button adjacent to the Requested field to pull the Employees Lookup screen. Click on your name from within the list, and click the Select button. Move to the Priority drop down box, and select a priority indicator that you want to assign to this document. Maintenance Coordinator Simplicity Software Technologies Inc. 63 Common Features Click on the … button adjacent to the Date Required field. Select the date you require the items on this document by clicking on the appropriate date and clicking the Select button. Click the Forward arrow or the Suggested Vendor tab Click on the Lookup button. Select the vendor you want to assign to this document, and click the Select button. Click the Move Next option or click the Materials tab. To add a stocked item for purchase: o Click on the Parts Lookup button. o Select the part from the Inventory Lookup screen and click the Select button o Move to the Qty field within the tab, and double-click to enter that field. Type in the quantity you need. Maintenance Coordinator Simplicity Software Technologies Inc. 64 Common Features To add a none stocked item: o Click on the Add Non-Stock button. o Move to the newly added row in the grid, then double click in each column of the row to edit it’s contents. To remove a item from the list: o Click in the row that contains the item you want to remove. o Click on the Remove Item button. Click on the Save and Close button to create the document. Maintenance Coordinator Simplicity Software Technologies Inc. 65 Common Features Maintenance Coordinator Simplicity Software Technologies Inc. 66 MAINTENANCE COORDINATOR SYSTEM Security, Databases and Utility Modules Maintenance Coordinator Simplicity Software Technologies Inc 2 Security, Databases and Utility Modules Table of Contents Chapter Overview ............................................................................................................... 4 Logging into the Program ................................................................................................... 4 Re-Logging into the Program ............................................................................................. 5 Lost or Forgotten Passwords ............................................................................................... 5 Turning Password Protection On and Off ........................................................................... 6 Changing Your Own Password ........................................................................................... 7 User Setups – Creating a New User .................................................................................... 8 Setting Individual Module Rights ....................................................................................... 9 Setting Menu and Module Access Options ....................................................................... 11 Deleting Users ................................................................................................................... 12 Creating New Databases ................................................................................................... 13 Database Settings .............................................................................................................. 14 Saving and Opening Database Settings ............................................................................ 15 Opening Different Databases at Startup ........................................................................... 16 Networking Your Databases ............................................................................................. 16 Backing Up Your Database .............................................................................................. 17 Compact and Repair Databases ........................................................................................ 18 Access the Backup Utility from Outside the Program ...................................................... 19 Work Orders Auto Email .................................................................................................. 20 Auto Email Setup Options ................................................................................................ 21 Import – Export Module ................................................................................................... 22 Import Database ................................................................................................................ 23 Import Spreadsheet ........................................................................................................... 25 Open Database .................................................................................................................. 27 Maintenance Coordinator Simplicity Software Technologies Inc 3 Security, Databases and Utility Modules Chapter Overview In this chapter we will be discussing the program security and database setups along with built in utility modules for automatically sending work order emails, backing up, and importing/exporting data. With the Maintenance Coordinator program you can setup different locations for your databases, such as putting them on a network. You can also regulate which areas or program modules your users have access to. You have the ability to turn password protection or security completely off, allowing user access to everything You can also import and export your data, repair and compact databases, backup your databases and automatically e-mail work orders to mechanics. Logging into the Program When password protection is active, and when the application first starts up, you'll be greeted with a login screen. This login restricts unauthorized users from gaining access, and also sets defaults setups for authorized users. Maintenance Coordinator Simplicity Software Technologies Inc 4 Security, Databases and Utility Modules To login to the program, please follow these steps: Start the program in your normal manner. When the Login screen appears, move to the User Name text field and type in the name your administrator has issued you. Move to the Password text field and type in your assigned password. Move to and click on the OK button. Re-Logging into the Program While the application is already running, you may wish to re-log into the program. There are a couple of reasons you may wish to do this. One would be to log in as a different user; the other might be to allow different user setup properties to take affect. To re-log into the program: From the Main Menu screen open the File drop down menu and select the Login as New User option. Login as you would normally. Lost or Forgotten Passwords If you have lost or forgotten the password to gain access to the program, we have provided a backdoor password for emergency use. This password should be kept by your administrator and kept in a secured place. This emergency password is the Software Key used to unlock the program, and supplied with registered copies of the program. To login to the program using the emergency password: Start the program in your normal manner. When the Login screen appears, move to the Password text field and type in the Software Key that was provided you when you purchased the program. Click on the OK button. Maintenance Coordinator Simplicity Software Technologies Inc 5 Security, Databases and Utility Modules Turning Password Protection On and Off To toggle password protection either on or off, you must: Log into the program as a user that has Administrator rights. From the Main Menu screen open the Admin drop down menu, then select Users Accounts option. From the Users Accounts screen click on the Coordinator button and select the Toggle Password Protection option. When prompted as to whether you want to change the password protection, move to and click on the OK button. Close the Users Accounts screen. The above procedure is used to both turn on and turn off password protection. Maintenance Coordinator Simplicity Software Technologies Inc 6 Security, Databases and Utility Modules Changing Your Own Password Once a user has logged into the program, and with password protection turned on, they can change their own individual password to anything they want. For a user to change their password: Ensure password protection has been turned on. Log in to the program and normal. Open the File menu and select the Change Your Password option Ensure your user name is in the User Name text box. Type in your current or old password in the Old Password text box. Type in your new password in the New Password text box. Retype your new password in the Confirm Password text box. Click on the OK button. Maintenance Coordinator Simplicity Software Technologies Inc 7 Security, Databases and Utility Modules User Setups – Creating a New User To create a new user: Start the program in your normal manner. When the Login screen appears, login as an administrator. From the Main Menu screen open the Admin drop down menu, then select Users Accounts option. Click on the Add User option in the ribbon. This will give you a new user record to work with. Now click on the … button to the right of the User Name text field. Type in the new user's login name in the box provided, click the OK button. Click on the … button to the right of the Password text field. Maintenance Coordinator Simplicity Software Technologies Inc 8 Security, Databases and Utility Modules Type in the user's password in the box provided, then click on the OK button. If you want to assign this user a personal database to be used with the Personal Planner module, move to and click on the … button to the right of the Personal D.B. text field. When the Database Setup dialog screen opens, find and locate the database file you want to assign to this user. Use this dialog as you would use any File Open type dialog found in windows. Once the database file has been selected, move to and click on the Open button. Now click on the … button to the right of the Internal Employee Assignment text field. The Mechanics and Employees lookup screen should load. Select the employee you want to assigned to this user from those listed. This information is used by the Personal Manager module, and with Work Orders and Purchasing documents assignments. If you want to give this user administrator rights, place a checkmark in the System Administrator checkbox. Setting Individual Module Rights Each user can be setup with different user rights to each of the different modules. The rights vary somewhat with each module they apply to, and some rights may not apply to certain modules at all. The following is a summary of some of the most common rights, and these can vary between modules. Administrator Rights A check here allows the user rights to everything within the list, including module access. Please note that checking this option overrides all the other module options, checked or not. Allow Module Access A check here allows the user to access or open the given module Allow Adding Records A check here allows the user to add or create new records within the module. Maintenance Coordinator Simplicity Software Technologies Inc 9 Security, Databases and Utility Modules Allow Deleting Records A check here allows the user to delete or remove records within the module. Allow Report Viewing A check here allows the user to view and create reports from within the given module Allow Support Tools Removing the checkmark here will hide or disable many of the built-in support tool options. Allow Database Routines Removing the checkmark here will hide or disable many or all of the module’s built in database routines and options Allow Setup A check here allows the user to setup option found in some of the modules Again, these are just some of the user right’s options. Some modules will have all these rights, some will only have a few of them, and other modules will have completely different ones. To set individual module rights: Start the program in your normal manner. When the Login screen appears, login as an administrator. From the Main Menu screen open the Admin drop down menu, then select Users Accounts option. Use the data control to scroll through the records until you locate the user you want to work with. Move to the Module drop down list and select the module you want to modify the rights on. Move to this rights list and add or remove checks to each of the available options to your liking. Click on the Save Module Rights button to save the rights for the selected module. Repeat the above steps for each module you want to make assignments on. Maintenance Coordinator Simplicity Software Technologies Inc 10 Security, Databases and Utility Modules Setting Menu and Module Access Options You can setup which modules are accessible to a user and also the buttons locations on the main menu screen. Each user can have a different setup according to their logons. This feature is extremely useful when you don't want all your users to have access to everything. For example, you may want your mechanics to have access to the Scheduler, Work Orders, and Maintenance Issue modules, but nothing else. Likewise, you may want to limit your purchasing department to only the Purchasing, Contacts, and the Parts modules. With the following setup, limiting your users like this is quite easy. To limit which modules you want a user to have access to: Start the program in your normal manner. Log in as an administrator. Open the Admin drop down menu for the main menu of the program and select the User Accounts options Locate the user you wish to edit by using the data control. Move to and click on the Setup Buttons option in the ribbon. Maintenance Coordinator Simplicity Software Technologies Inc 11 Security, Databases and Utility Modules From the User’s Main Menu Setup screen, move to the Displayable Buttons drop down list and select how many buttons you want displayed on the Main Menu of the program. You can select any combinations from 2 to 18 displayable buttons (depending on your license). One by one, move to and click on each of the buttons displayed on this setup screen. You’ll notice that as you click a button the text in the Button’s Action drop down list will change. This drop down list displays what module the program will run when that button is clicked on the main menu. To change a buttons action, first click on the menu button you want to change, then click the desired action from the Button’s Action drop down list. Move to the Drop Down Menu area and place a checkmark next to each module you want your user to have access to. Remove the checkmark if you don’t want the user to have access to that module. Click on the OK command button. NOTE: If the options you have currently setup deal with the person that is currently logged into the program, that user will need to re-log into the program in order for the changes to take effect. If the changes are not for the current user, that user will see the changes the next time they log into the application. Deleting Users To delete a user from using the program: Start the program in your normal manner. When the Login screen appears, login as an administrator. Open the Admin drop down menu for the main menu of the program and select the User Accounts options Locate the user you wish to delete by using the data control. With the user's record displayed, move to and click on the Remove User option in the ribbon. Maintenance Coordinator Simplicity Software Technologies Inc 12 Security, Databases and Utility Modules Creating New Databases The Maintenance Coordinator program allows you to create new databases for use with the program. This feature can prove to be useful when you want to clear data from the program, but not destroy it. It will also prove useful when you have multiple users and want a different Personal Database assigned to each of your users. Hot Tip: You could create a new Issues Database every year, giving each one of them a name something like Issues07.mdb. In this fashion you can start with a clean slate each year, but effectively archiving the last year's database. You can switch between previous years and current year's database by changing the setups found under the Database Setting, which will be discussed elsewhere in this chapter. You can create the following databases using this program: Main Database – This database stores reusable information such as user's accounts, contacts, equipment, inventory, task instructions, tasks and work orders, mechanics, procedures, and more. Personal Database – You may wish to create one of these databases for use by each of your users. This database stores daily planner tasks, daily log, to do lists, and special personal log information. Purchasing Database- This database is used for storing information on your purchasing activities, such as requisitions and purchase orders. Optional databases for Add-on features Issues Database – This database stores production numbers, production issues and maintenance issues. Maintenance Services and Safety Management Database – This database stores information pertaining to the optional Maintenance Service and Safety management modules. To create a new database, please follow these steps: Start the program in your normal manner. Log in as an administrator. Open the Admin drop down menu for the main menu of the program and select the New Databases option, then select the type of database you wish to create. Maintenance Coordinator Simplicity Software Technologies Inc 13 Security, Databases and Utility Modules Move to the Save In drop down list box and setup the folder or directory you wish to save your new database in. Now move to the File Name text box and enter the name you want this database to have. Examples here could be John, Mark or Lynn for personal databases, or Issues99, Issues00 and so on for issue database. Click the Save button. Database Settings When you move your databases to new locations or create new databases you need to tell the program where they are so it can use them. To setup your databases: Start the program in your normal manner. Log in as an administrator. Open the Admin drop down menu for the main menu of the program and select the Databases / Setup Database Path options Move to the Main Databases Setup tab. Maintenance Coordinator Simplicity Software Technologies Inc 14 Security, Databases and Utility Modules Now move to the Primary and Work Orders Database Path section and type in the complete path of this database. You can also use the Browse button to open and use a File Open type dialog screen to locate the database file. This file location can be either on a local drive, or pointing to a network drive (if you have network license). Repeat the above step for the other two databases. If you purchased add-on modules or the Professional Version, move to the Add-On Database Setup tab and setup the database on that tab. SINGLE USER LICENSES – Please note that when the application is either registered as a single user or is running in demo mode, the databases must reside on the C: drive. To place the databases on a network drive, a site license must be obtained. Saving and Opening Database Settings You can create different database setups to be used at different times. For example, if you use a laptop you could have a setup saved for use at home and one for work. To save the current setup, you must: Setup all the options on the Main Databases Setup tab to your liking. Next click on the Save Setup button. Use this Save As dialog as you would any Save As dialog found in Windows. Make the file name something like Home, Office or Work, and click the Save button. To open a saved setup, you must: Move to and click on the Open Setup button from the Program Setup screen. Use this File Open dialog as you would any File Open dialog found in Windows, locating the setup file you wish to open. Click on the Open button. Maintenance Coordinator Simplicity Software Technologies Inc 15 Security, Databases and Utility Modules Opening Different Databases at Startup Once you have saved various database setups as in the Database and Program Setting section, you can open one of these setups from the main menu of the application. This feature can come in handy for a variety of reasons. A couple of good examples are when you have database setups for either different clients, or different plant locations. To open a saved database setup: Start Maintenance Coordinator in your normal manner. Open the File drop down menu from the main menu of the program, and then choose the Open Database Setup option. Use this file open dialog to select one of your saved setups. Click open and the program will restart. Networking Your Databases If you purchased a site or network license you can install or copy your databases to a shared, network drive. This way multiple users can access the information stored there at the same time. We sell the application as either a single user version or an unlimited/network version, but in reality the databases can not handle unlimited users. It is recommended that there be no more than 6 users connected to the database at any single time. Once 6 or more users have connected you may begin experiencing some performance issues. To install and use the database on a network: A Network license must have been purchased. Using a program like Windows Explorer, copy all your database files to a shared network drive. Our databases have a file extension such as .mdb (Microsoft Access Databases). Once the databases have been copied to a network drive, use the Database Settings routines to point to these networked databases. To install and use a network version on multiple computers first install Maintenance Coordinator on each computer access is require from, then setup Maintenance Coordinator Simplicity Software Technologies Inc 16 Security, Databases and Utility Modules the database paths to point to the location you have your databases installed. This must be done on each computer access is required. Backing Up Your Database It is highly recommended that you backup your database on a regular bases. Database can become corrupt and unusable at times for a variety of reasons. We have included a repair feature to help fix bad databases, but there are times that this repair is not going to work. How often should you backup a database? The answer is an individual one, but ask yourself, how much information are you willing to lose, or have to reenter. Backing up your database on a daily bases may be your best bet. To backup your database: Log in to the program as a program administrator. Open the Admin drop down menu. Select the Databases then the Backup Databases option. Maintenance Coordinator Simplicity Software Technologies Inc 17 Security, Databases and Utility Modules The main menu module will close and the Database Backup / Copier screen will load. The program closes to ensure you’re not accessing any databases, as all users must be out of the program when backing up. Move to the Drives list and select the hard drive you want to backup to. Move to the Directories list and double click on the directory or directories (or folders) you want to backup to. The full backup path should be displayed in the Backup Path area. Click on the Backup button to begin the backup or copy operation. The program will copy all the files as setup in the Program Settings screen. To exit click Cancel. IMPORTANT NOTE: You must get all users out of the program prior to backing up the database files. This backup utility is a stand-alone application and can run separately from the main program. This can come in handy when you have a corrupt database and can’t gain access to the main program. This utility also incorporates Database Compact and Repair Database routines. These features are found under the Tools menu. Please read more about these features elsewhere in this chapter. Compact and Repair Databases The Database Backup/Copier utility also contains a valuable database support tool, this is the Compact and Repair Database routine. As you add and delete data in a database, the file can become fragmented, and use more disk space than necessary. Periodically, you should compact your databases in order to defragment the file. The resulting compacted database will usually be smaller. Essentially what the program does is copies the data from one database to another. In the process, the data in the resulting database is organized contiguously to recover disk space. Once the new database has been created, you can go back and delete the original database. Since, during this operation the program creates a duplicate copy of the original database you must have enough disk space available for both copies. The repair database part of the routine will try to repair any Microsoft Access compatible database, which is the database format used by this program. The Maintenance Coordinator Simplicity Software Technologies Inc 18 Security, Databases and Utility Modules repair function will repair a database that was left invalid by an incomplete write operation. This can happen when an application quits unexpectedly because of a power failure or other computer hardware problems. To perform a compact/repair operation on an Access database: Start the program in your normal manner. Log in as an administrator. Open the Admin drop down menu and select the Databases – Backup Databases option. From the Database Backup/Copier screen open the Tools drop down menu and select the Compact/Repair Database option. Use the File Open type dialog to locate the database you wish to compact, and click Open. Next a Save As type dialog will load. Specify the name and location you want to save the new database to. Click Save. Access the Backup Utility from Outside the Program IF YOU CAN’T GAIN ACCESS TO THE PROGRAM AT ALL If your main database is corrupted, you may not be able to gain access to the program at all. If this is the case, please follow these instructions to start the Database Backup / Copier module. Click your computer’s Start button. Choose the Run option. Browse to the area you have Maintenance Coordinator installed. The default path is C:\Program Files\SST\Maintenance Coordinator Select the MC_Backup.exe application. Click Run. Follow the Repair Database procedure above. Maintenance Coordinator Simplicity Software Technologies Inc 19 Security, Databases and Utility Modules Work Orders Auto Email The Work Orders Auto Email feature is a small but extremely useful little utility. What this module does is looks through the Work Orders database for tasks that are becoming due, and then emails the people responsible for the completion of these work orders a copy of the actual work order. This module can be operated either manually or automatically when it is set to run in the background. This utility will email the people found in the Resource Assignment fields, as found on the Details tab of the Maintenance Scheduler module. These resources must also have a valid email address setup in the Mechanics Database for this utility to work properly. To use the auto email feature: Ensure you have Outlook installed or your e-mail server properly setup. Log into Maintenance Coordinator as a user with Administrator rights. Open the Admin menu and select the Auto Work Orders Email option. To search the database, and have work orders automatically email to the parties responsible for their completion, click on the Send Now button. To have the program look for new task about every 15 minutes, and new orders mailed automatically, leave the program open. Otherwise, click the Close button. Maintenance Coordinator Simplicity Software Technologies Inc 20 Security, Databases and Utility Modules Auto Email Setup Options You have a few setup options with the Auto Work Orders Email feature, to set these up: Log into Maintenance Coordinator as a user with Administrator rights. Open the Admin menu and select the Auto Work Orders Email option. From the Work Orders Auto Email screen, open the File menu and click on Setup Options. Move to the Export File Format drop down, and select the format you want the email attachment, or Work Order document saved in. Options here include Acrobat PDF, or the Rich Text Format supported by most word processors. Move to the Work Order Types drop down, and select which types of work orders you want to automatically email. Move to the Who to Email drop down, and select which resource assignment you want included in the auto emails. Move to the Days in advance to email drop down, and select how many days in advance that you would like emails sent. This field related to today’s date, and the Schedule Start date of the work order. Click on the OK button to save your settings. Maintenance Coordinator Simplicity Software Technologies Inc 21 Security, Databases and Utility Modules Import – Export Module The Import Module was designed to help our clients import information or data from existing software packages to ours. You can import from three popular file formats. These include Microsoft Access databases, Microsoft Excel 97 (BIFF8 format) and tab-delimited text files. We don’t expect that you’ll be able to import all information straight from one software package to another as each company has their own way of doing things. Finding straight one-to-one relationships for all information is very unlikely, but we do believe that you should be able to import a great majority of the information. This will save you a great deal of time, as you won’t have input everything from scratch. As a courtesy, we also allow you to export data form our database to either Excel 97 or as a Tab-Delimited text file. Besides from moving data from one database to another, this feature can come in handy when you just want to work with the data in a spreadsheet format. Maintenance Coordinator Simplicity Software Technologies Inc 22 Security, Databases and Utility Modules Import Database The Import Database function allows you to copy data from one Microsoft Access database to another Microsoft Access database. You first select and open the source database and a table to copy from, and then select the destination database and the table to copy to. Next you setup the field relationships of the two databases, then copy. To copy one database to a different database: Click on the Import Database button in the main toolbar. Click on the Connect to Database button in the Source Database section. From the Data Link Properties dialog, move to the Provider tab by clicking on it. Maintenance Coordinator Simplicity Software Technologies Inc 23 Security, Databases and Utility Modules From the list click on Microsoft Jet 4.0 OLE DB Provider option. Click the Next button. Click on the … button adjacent to the Select or enter a database name text box. Browse to and select the database you want open. Click the OK button. Move to the Table to Copy From drop down list and select the database table you wish to copy data from. Click on the Connect to Database button found in the Destination Database section. From the Data Link Properties dialog, move to the Provider tab by clicking on it. From the list click on Microsoft Jet 4.0 OLE DB Provider option. Click the Next button. Click on the … button adjacent to the Select or enter a database name text box. Browse to and select the database you want open. Click the OK button. Move to the Table to Copy To drop down list and select the database table you wish to copy data to. Click on the Fields to Copy tab. Move to the Source Fields list and select a database field you want to copy into the new database. Move to the Destination Fields list and select the field that you want to copy data to. You should try to match the source field as closely as possible to the destination field. Click on the Add button. Information about the two fields that will be copied to one another will be displayed in the lower grid. Repeat the above 3 steps for every field you want to import into the new database. To remove a field-to-field copy setup, click on the appropriate setting from within the grid and then click on the Remove button. Once all your fields to copy have been setup, move to and click on the Copy Database Fields tab. Click on the Copy Records button. When the message appears, you’re done with the import/copy process. Maintenance Coordinator Simplicity Software Technologies Inc 24 Security, Databases and Utility Modules Import Spreadsheet The Import Spreadsheet function allows you to import data from either an Excel 97, or a tab-delimited text file, and save the information into a Microsoft Access database. To import a spreadsheet: Click on the Import Spreadsheet button in the main toolbar. Click on the Browse command button in the Source Spreadsheet section. Locate and open the spreadsheet you want to use as the data source by using this familiar File Open type dialog. You can select between tabdelimited, and Excel files by accessing the File of Type drop down list. If you selected an Excel type file, move to the Selected Sheet. Click on the Connect to Database button found in the Destination Database section. Maintenance Coordinator Simplicity Software Technologies Inc 25 Security, Databases and Utility Modules From the Data Link Properties dialog, move to the Provider tab by clicking on it. From the list click on Microsoft Jet 4.0 OLE DB Provider option. Click the Next button. Click on the … button adjacent to the Select or enter a database name text box. Browse to and select the database you want open. Click the OK button. Move to the Table to Copy To drop down list and select the database table you wish to copy data to. Click on the Setup Spreadsheet- Fields tab. The spreadsheet should be filled with the imported data. Move to the spreadsheet and click in a column of data that you want to import to the database. Either double click in that spreadsheet column, or click on the Assign Field to Column button. Select a database field to assign to the selected column from within the list of fields, and the click the OK button. The name of this database field should now be displayed in the column header section. Repeat the above 3 steps for every column of data you want to import into the new database. To remove a field from copy setup, click on the appropriate column from within the grid and then click on the Clear Field from Column button. Once all your fields to copy have been setup, move to and click on the Copy Data tab. Click on the Copy Records button. When the message appears, you’re done with the import/copy process. Maintenance Coordinator Simplicity Software Technologies Inc 26 Security, Databases and Utility Modules Open Database The Open Database function allows you to open a database and one of its tables. Once opened information can be edited directly within the grid, or the data can be exported to either a tab-delimited text file, or an Excel 97 compatible file. To open a database: Click on the Open Database button in the main toolbar. Click on the Connect to Database button in the Database Path and Table section. From the Data Link Properties dialog, move to the Provider tab by clicking on it. From the list click on Microsoft Jet 4.0 OLE DB Provider option. Click the Next button. Click on the … button adjacent to the Select or enter a database name text box. Maintenance Coordinator Simplicity Software Technologies Inc 27 Security, Databases and Utility Modules Browse to and select the database you want open. Click the OK button. Move to the Table to Open drop down list and select the database table you wish to view. To export the database: With the database and table already selected, move to and click on the View Database tab. Open the File menu and choose the Export option. Use this familiar dialog box to name the file, type of file, and the path to save the file. Click the Save button. Maintenance Coordinator Simplicity Software Technologies Inc 28 MAINTENANCE COORDINATOR SYSTEM Word Processor Maintenance Coordinator Simplicity Software Technologies Inc. 2 Word Processor Table of Contents Editor / Word Processor Overview ..................................................................................... 5 Understanding the Ribbon’s Home Tab ............................................................................. 6 Understanding the Ribbon’s Insert Tab .............................................................................. 7 Understanding the Ribbon’s Options Tab........................................................................... 8 Clearing the current document – New ................................................................................ 8 Import Document – Open ................................................................................................... 9 Export Document - Save ..................................................................................................... 9 To Print the Document ........................................................................................................ 9 Print Preview..................................................................................................................... 10 Edit Functions ................................................................................................................... 11 Finding Text ...................................................................................................................... 11 Replacing Text .................................................................................................................. 12 Select All ........................................................................................................................... 12 Page View ......................................................................................................................... 13 Normal View ..................................................................................................................... 13 View Control Characters................................................................................................... 13 View Ruler ........................................................................................................................ 13 View Status ....................................................................................................................... 14 Insert Image ...................................................................................................................... 14 Insert Text ......................................................................................................................... 14 Insert Date ......................................................................................................................... 15 Insert Special Character .................................................................................................... 15 Format Character .............................................................................................................. 16 Format Paragraph .............................................................................................................. 17 Font Color ......................................................................................................................... 17 Back Color ........................................................................................................................ 18 Bullets and Number Attributes ......................................................................................... 18 Increase Bullet Level ........................................................................................................ 19 Decrease Bullet Level ....................................................................................................... 20 Insert Table ....................................................................................................................... 20 Insert Columns to an Existing Table ................................................................................. 20 Inserting Rows to an Existing Table ................................................................................. 21 Deleting a Table ................................................................................................................ 21 Deleting a Table Column .................................................................................................. 21 Deleting a Table Row ....................................................................................................... 22 Selecting an Entire Table .................................................................................................. 22 Select a Row from within a Table..................................................................................... 22 Select a Cell from within a Table ..................................................................................... 22 Toggling the Display of Table Grid Lines ........................................................................ 23 Setting up a Tables Properties........................................................................................... 23 3 Maintenance Coordinator Simplicity Software Technologies Inc. Word Processor Spell Check ....................................................................................................................... 24 Calculator .......................................................................................................................... 24 Calendar ............................................................................................................................ 24 Maintenance Coordinator Simplicity Software Technologies Inc. 4 Word Processor Editor / Word Processor Overview We use the same Editor or Word Processor throughout all the modules. This way you only have to learn it once and then use it over and over again. The included word processor is very powerful and contains a What-You-See-IsWhat-You-Get editor environment. This word processor is used for all notes sections, used by our documents feature, used a stand alone editor and is an integral part of the Procedures and Solutions module. Maintenance Coordinator Simplicity Software Technologies Inc. 5 Word Processor Understanding the Ribbon’s Home Tab The following elements are found on the Editor’s Home tab, reading left to right and top to bottom by groups. Paste – Pastes clipboard text into the document at the current cursor location Cut – Removes selected text and places it into the clipboard. Copy – Copies selected text and places a copy of it into the clipboard Delete – Deletes selected text. Fonts dropdown – Both shows and sets the selection’s font. Font Size dropdown – Both shows and sets the selection’s font point size. Bold – Set the selection’s font bold characteristics. Italic – Set the selection’s font italic characteristics. Underline – Set the selection’s font underline characteristics. Fonts – Calls the format characters dialog screen Font Color – Sets the color used by the selected fonts. Back Color – Sets the background color of selected text. Bullets – Turn on and off the bullet style and also allows the selection of the bullet style. Increase – Increases the bullet indention. Decrease – Decreases the bullet indention Paragraph – Calls the format paragraph dialog screen. Centered – This sets the selected paragraph as centered text Left Right Justified – This sets the selected paragraph as right justified. Left Justified – This sets the selected paragraph as left justified. Full Justified – This sets the selected paragraph as fully justified.. Table Options – Click for options. o Table Properties – Opens the table properties dialog (borders, colors, etc.). o Grid Lines – Toggles the display of table grid lines. Maintenance Coordinator Simplicity Software Technologies Inc. 6 Word Processor Insert Options – Click for table insert options o Table – Inserts a table at the current cursor location o Column Left – Inserts a new column to the left of the selected column o Column Right – Inserts a new column to the right of the selected column. o Row Above – Inserts a new row above the selected row. o Row Below – Inserts a new row below the selected row. Delete Options – Click for table deletion options. o Delete Table – Deletes the selected table. o Delete Column – Deletes the selected table column. o Delete Row- Deletes the selected table row. Select Options – Click for table selection options. o Select Table – Selects the entire table. o Select Row – Select the entire row. o Select Cell – Select the table cell. Find – Help you find specified text within the document. Replace – Replaces specified text with new text. Select All – Selects the entire document. Understanding the Ribbon’s Insert Tab The following elements are found on the Editor’s Insert tab, reading left to right and top to bottom by groups. Images – Opens a file open type dialog and allows the insertion an image at the current cursor location. Text Document - Opens a file open type dialog and allows the insertion of a text or rtf file at the current cursor location. Current Date – Inserts the current date into your document. Symbols – Opens a font selection dialog for the selection and insertion of symbol type characters. Maintenance Coordinator Simplicity Software Technologies Inc. 7 Word Processor Understanding the Ribbon’s Options Tab The following elements are found on the Editor’s Options tab, reading left to right and top to bottom by groups. Clearing the current document – New To clear out the present document in preparation of creating a new one: Click on the Module button (Editor Icon) Select the New option. Maintenance Coordinator Simplicity Software Technologies Inc. 8 Word Processor Import Document – Open To import a document from file, overwriting any information already loaded: Click on the Module button (Editor Icon) Select the Open option. Use the File Open dialog to locate the file, and select it. Click Open. Export Document - Save To export the currently loaded document: Click on the Module button (Editor Icon) Select the Save option. Move to the Save as File Type list box and select how you want the file exported. Available options here are the default style, Word Documents or doc documents, HTM or Internet documents, RTF or Rich Text Format, and standard txt or text documents. Move to the directory you want to save your file to, type in the file name, and click Save. To Print the Document Click on the Module button (Editor Icon) Select the Print option. Maintenance Coordinator Simplicity Software Technologies Inc. 9 Word Processor Print Preview To receive a print preview of your document: Open the File menu and click the Print Preview option. To zoom in or out of the preview use either the Zoom In or Zoom Out command buttons. To view two pages of the document at one time click the Two Pages command button. To scroll through the various pages of the document use the Previous and Next command buttons. To print the document from the Preview screen, click the Print button. Maintenance Coordinator Simplicity Software Technologies Inc. 10 Word Processor Edit Functions The edit functions of cut, copy, paste and clear are all found under the Home tab and the Clipboard group. To cut, copy or clear text: Select the text you wish to work with. Open the Home tab and select the appropriate option in the Clipboard group. To paste text: Place your cursor in your document where you want the insertion to take place. Open the Home tab and select the Paste option. Finding Text To find text within your document, please follow these steps: Open the Home tab and select the Find option. Type in the text you wish to find in the box provided. If you want the search to be case sensitive place a check mark in the Match Case check box. Move to the Direction area and select which direction you want to conduct your search. Up would search the document from the current cursor position towards the start of your document. Down would search in the opposite direction. Move to and click on the Find Next command button. To continue the search for the next match, again click the Find Next. Maintenance Coordinator Simplicity Software Technologies Inc. 11 Word Processor To cancel the search move to and click on the Cancel button. Replacing Text To find and then replace selected text within your notes document: Open the Home tab and select the Replace option. Type the word you wish to search for in the Find what text box. Type in your replacement text in the Replace With text box. To replace all occurrences of matching text move to and click on the Replace All command button. To find matching text before replacing it, move to and click on the Find Next button. To replace text once it's been found, move to and click on the Replace button. Select All To select all the text in you document to perform some type of formatting, deletion, or other operation: Open the Home tab and select the Select All option. Maintenance Coordinator Simplicity Software Technologies Inc. 12 Word Processor Page View With the Page View option your can view your document as pages with visual page breaks, as opposed to Normal view, or as one endless document. To switch the view to Page view: Click on the Options tab and select the Page option in the Document Views group. Normal View To switch from Page View mode, where your document is broken into pages, to normal view, or one continuous document: Click on the Options tab and select the Normal option in the Document Views group View Control Characters You can toggle the hidden control characters to make them either hidden or visible by: Click on the Options tab and select the Control Characters option in the Show/Hide group . View Ruler You can toggle the display of the document Ruler: Click on the Options tab and select the Ruler option in the Show/Hide group Maintenance Coordinator Simplicity Software Technologies Inc. 13 Word Processor View Status You can toggle the display of the Status bar on the bottom of the screen: Click on the Options tab and select the Status Bar option in the Show/Hide group. Insert Image To insert an image into your document: Click in your document where you would like the insertion to take place. Click on the Image option on the Insert tab. Move to the Files of Type drop down and select the graphic format of the image you want to insert. Use the other controls of this dialog to locate and select the graphic of your choice. Click Open. Insert Text To insert a text file into your document: Click in your document where you would like the insertion to take place. Click on the Text Document option on the Insert tab. Use the other controls of this dialog to locate and select the text file of your choice. Click Open. Maintenance Coordinator Simplicity Software Technologies Inc. 14 Word Processor Insert Date To insert the current date into your document: Click in your document where you would like the insertion to take place. Click on the Current Date option on the Insert tab.. Insert Special Character To insert a special character into your document: Click in your document where you would like the insertion to take place. Click on the Symbol option on the Insert tab. Move to the list box near the top, and select the name of the Font that holds the character you want to insert. Click on the character of your choice from those displayed. A copy of the selected character will be displayed in the upper left hand corner. Click Insert. Maintenance Coordinator Simplicity Software Technologies Inc. 15 Word Processor Format Character To change or set the font: Select the text to be formatted or place your cursor within the document where you wish the new formatting to begin. Move to the Home tab and click on the Format Font icon in the Font group. Setup the options available on this dialog as you would to similar dialogues found in Windows. Click Ok. Maintenance Coordinator Simplicity Software Technologies Inc. 16 Word Processor Format Paragraph You can setup the formatting characteristics of selected paragraphs: Select the text to be formatted or place your cursor within the document where you wish to begin the new formatting . Move to the Home tab and click on the Paragraph icon in the Paragraph group.. Move to the various formatting elements found on this screen. You can change the line spacing, paragraph indents, alignment and distances for the selected paragraph. Once everything on this screen has been setup to your liking move to and click Ok. Font Color To setup the color of your fonts or text: Select the text to be formatted or place your cursor within the document where you wish the new formatting to begin. Move to the Home tab and click on the Font Color icon in the Font group.. 17 Maintenance Coordinator Simplicity Software Technologies Inc. Word Processor Click on the color of your choice by clicking on it. Click Ok. Back Color To setup the background color: Select the text to be formatted or place your cursor within the document where you wish to begin the new formatting. Move to the Home tab and click on the Back Color icon in the Font group. Click on the color of your choice by clicking on it Click Ok. Bullets and Number Attributes To change or setup the attributes of bullets or numbering: Maintenance Coordinator Simplicity Software Technologies Inc. 18 Word Processor Select the text to be formatted or place your cursor within the document where you wish to begin the new formatting. Click on the Home tab and select the Bullet icon in the ribbon. Move to the Bulleted/Numbered section and select the formatting option of your choice. Other options on this screen will become available depending on your choice. To specify the bullet character to use: Move to the Bullet Character section and click on the bullet you want to use, or click the Bullet button to specify a different character. Click on the new character of your choice from the Symbols dialog. Click Ok. To specify the number format to use: Move to the Number Format section and select the Number Style from the drop down list found there. To specify a character to be placed in front of the number, select an option from the Character in front drop down list. To specify which number to start with, change the value in the Start at field. To restart numbering, click the Restart Numbering radio button. To continue the numbering sequence, click the Continue List radio button. To specify other formatting: Move to the Formatting section. Edit the various fields in this section. Increase Bullet Level To increase the level or tab position of your bullets: Select the text to be formatted or place your cursor within the document where you wish the new formatting to begin. Click on the Home tab and select the Increase Level icon. Maintenance Coordinator Simplicity Software Technologies Inc. 19 Word Processor Decrease Bullet Level To decrease the level or tab position of your bullets: Select the text to be formatted or place your cursor within the document where you wish the new formatting to begin. Click on the Home tab and select the Increase Level icon.. Insert Table To insert a table into your document: Click in your document at the position that you want the insertion to take place. Move to the Home tab if not already there. In the Table group select the Insert option followed by the Table option. Move to Rows combo box and select the number of rows for your table. Move to Columns combo box and select the number of columns for your table. Click Ok. Insert Columns to an Existing Table To insert an additional column into an existing table: Place your cursor within the table where you want to make the insertion at. Move to the Home tab if not already there. Maintenance Coordinator Simplicity Software Technologies Inc. 20 Word Processor In the Table group select the Insert option followed by either the Column Left or Column Right option. Inserting Rows to an Existing Table To insert an additional row into an existing table: Place your cursor within the table where you want to make the insertion at. Move to the Home tab if not already there. In the Table group select the Insert option followed by either the Row Above or Row Below option. Deleting a Table To delete an existing table: Click anywhere in the table you want to delete and select it. Click on the Home tab to select it. In the Table group select the Delete option followed by Delete Table option. Deleting a Table Column To delete a column from an existing table: Click in the column you want to remove. Click on the Home tab to select it in the ribbon. In the Table group select the Delete option followed by Delete Column. option. Maintenance Coordinator Simplicity Software Technologies Inc. 21 Word Processor Deleting a Table Row To delete a row from an existing table: Click in the row you want to remove. Click on the Home tab to select it in the ribbon. In the Table group select the Delete option followed by Delete Row option. Selecting an Entire Table To select an entire table: Click anywhere in the table you want to select. Click on the Home tab to select it in the ribbon. In the Table group select the Select option followed by Select Table. Select a Row from within a Table To select a row from within a table: Click anywhere in the row that you want to select. Click on the Home tab to select it in the ribbon. In the Table group select the Select option followed by Select Row. Select a Cell from within a Table To select a cell from within a table: Click anywhere in the cell that you want to select. Click on the Home tab to select it in the ribbon. In the Table group select the Select option followed by Select Cell. Maintenance Coordinator Simplicity Software Technologies Inc. 22 Word Processor Toggling the Display of Table Grid Lines To toggle the display of table grid lines: Click on the Home tab to select it in the ribbon. In the Table group select the Table option followed by Show Grid Lines choice. Setting up a Tables Properties To format a table: Select the cells within the table that you want to change the formatting on. This can be the entire table or just one or two cells. In the Table group select the Table option followed by Table Properies choice. To place a frame around selected cells, move to the Line Width drop down list and select the point size you want to assign to the frame. Move to the Frame section and setup the framing elements you wish to assign to the selected cells. Add or remove framing elements by clicking on them with your mouse. To assign a background color to the selected cells, move to the Background section and click on the User Defined option button. Maintenance Coordinator Simplicity Software Technologies Inc. 23 Word Processor Open the dropdown list found in this section, and select the color you want to use. To setup the text distance from the frame within the selected cells, change the values in the Text Distances area of the screen. Click Ok. Spell Check To spell check your document: Click on the Options tab in the ribbon to select it. Click on the Spelling option in the Tools group. Follow the directions found in the Fundamentals chapter for more information on using the spell check option. Calculator To use the built in calculator: Click on the Options tab in the ribbon to select it. Click on the Calculator option in the Tools group.. Follow the directions found in the Fundamentals chapter for more information on using this option. Calendar To use the build in calendar: Click on the Options tab in the ribbon to select it. Click on the Calendar option in the Tools group... Follow the directions found in the Fundamentals chapter for more information on using this option. Maintenance Coordinator Simplicity Software Technologies Inc. 24 MAINTENANCE COORDINATOR SYSTEM Maintenance Scheduler Maintenance Coordinator Simplicity Software Technologies Inc. 2 Maintenance Scheduler Table of Contents Overview ............................................................................................................................. 7 Work Orders Setup ............................................................................................................. 8 Work Order Creation Wizard............................................................................................ 12 Creating a New Work Order ............................................................................................. 16 Checking the Task ID Number ......................................................................................... 16 Understanding the Scheduler Tabs ................................................................................... 17 Lookup View .................................................................................................................... 17 Sorting and Filtering the Database .................................................................................... 18 Details Tab ........................................................................................................................ 19 Task Types ........................................................................................................................ 19 Personnel Assignments ..................................................................................................... 20 Scheduling......................................................................................................................... 21 Work Requested By .......................................................................................................... 21 Recurring Tasks ................................................................................................................ 22 Machine or Equipment Assignment.................................................................................. 23 Assigning to a Client and their Equipment ....................................................................... 24 Classification Assignments ............................................................................................... 25 Specifying Account and Project Assignments .................................................................. 26 Assigning Parts to a Work Order ...................................................................................... 26 Removing Parts and Materials from Work Orders ........................................................... 27 Recording Materials Used................................................................................................. 28 Printing the Work Order‟s Material List ........................................................................... 28 Assigning Labor to a Work Order .................................................................................... 28 Adding Labor .................................................................................................................... 29 Recording Labor Actually Work ...................................................................................... 30 Special (User-Defined) Fields........................................................................................... 30 Automatic Email of Work Orders ..................................................................................... 31 Joining PM Groups ........................................................................................................... 32 Work Order Attachments .................................................................................................. 32 Work Order Audits Overview ........................................................................................... 32 Creating Audit Lists .......................................................................................................... 33 Assigning an Audit List to a Work Order ......................................................................... 33 Performing a Work Order Audit ....................................................................................... 33 Instructions Tab ................................................................................................................ 34 Task Instructions ............................................................................................................... 35 Safety Instructions ............................................................................................................ 36 Comments for PMs – Task Instructions for Standard Work Orders ................................. 36 Status Tab.......................................................................................................................... 37 Completion Information.................................................................................................... 37 Task Status ........................................................................................................................ 38 Costs.................................................................................................................................. 39 Complete Button ............................................................................................................... 39 PM Groups ........................................................................................................................ 40 3 Maintenance Coordinator Simplicity Software Technologies Inc. Maintenance Scheduler Setting Up a P.M. Group................................................................................................... 41 Deleting a P.M. Group ...................................................................................................... 42 Rescheduling with P.M. Groups ....................................................................................... 43 Setting the Status of PM Group Members ........................................................................ 44 Scheduling by Meter ......................................................................................................... 45 Classification Assignments Overview .............................................................................. 46 Adding New Classifications ............................................................................................. 47 Deleting Classification Assignments ................................................................................ 47 Editing Recurring Tasks ................................................................................................... 48 Repair Codes ..................................................................................................................... 49 Maintenance Personnel – Employees Database ................................................................ 50 Adding Records to the Maintenance Personnel List ......................................................... 51 Deleting Records from the Maintenance Personnel List .................................................. 51 Generating Tasks .............................................................................................................. 52 Printing and Generating Tasks .......................................................................................... 52 Generate by Classification ................................................................................................ 54 Printing the Current Work Order ...................................................................................... 54 Print Previewing the Current Work Order ........................................................................ 55 Printing the Main Lookup View Grid ............................................................................... 55 Printing All Work Orders.................................................................................................. 55 Saving the Work Orders to History .................................................................................. 56 Deleting a Work Order...................................................................................................... 57 Deleting a Recurring Work Order..................................................................................... 57 Emailing the Work Order.................................................................................................. 58 Accessing the Email Composer ........................................................................................ 58 Copying and Pasting Work Orders ................................................................................... 58 Filtering the Database by Work Assignments .................................................................. 58 Filtering the Database by Equipment Assignment............................................................ 59 Custom Sorting of Work Orders Database ....................................................................... 59 Other Sort and Filter Options ............................................................................................ 60 Automatic Task Descriptions ............................................................................................ 60 Work Order Search ........................................................................................................... 60 Using the Tasks Planner Option ....................................................................................... 61 Print the Planner Schedule ................................................................................................ 62 Printing a Single Task with the Planner ............................................................................ 62 Creating a New Work Order with the Planner .................................................................. 62 Editing a Task with the Planner ........................................................................................ 62 Moving Between Months on the Planner Screen .............................................................. 63 Exporting with Tasks Planner ........................................................................................... 63 View PM Types Only in the Task Planner ....................................................................... 63 Tasks Calendar .................................................................................................................. 64 Changing Views of the Tasks Calendar ............................................................................ 64 Creating a Work Order with the Tasks Calendar .............................................................. 65 Editing a Task with the Tasks Calendar ........................................................................... 65 Changing Dates with the Tasks Calendar ......................................................................... 65 Printing the Current Tasks Calendar Schedule ................................................................. 66 Maintenance Coordinator Simplicity Software Technologies Inc. 4 Maintenance Scheduler To Print a Blank Month Calendar ..................................................................................... 67 Print a Single Work Order from the Month Calendar....................................................... 67 Maintenance Documents ................................................................................................... 67 Adding Task, Safety or Comments Instructions ............................................................... 68 Editing Task, Safety or Comments Instructions ............................................................... 68 Printing Task, Safety or Comments Instructions .............................................................. 68 Create a New Archive Database ....................................................................................... 69 Archiving your Database .................................................................................................. 69 Restore Records from Archive.......................................................................................... 71 Deleting a Date Range of Work Orders ............................................................................ 73 Work Order Report Wizard .............................................................................................. 73 Work Orders Cost Wizard Report..................................................................................... 76 Work Orders Down Time Report ..................................................................................... 78 Work Order Details Report ............................................................................................... 80 Work Orders Inventory Report ......................................................................................... 80 Current Work Order Estimated Costs ............................................................................... 80 Work Orders Completion Analysis Report ....................................................................... 81 Repair Codes Report ......................................................................................................... 81 Equipment Summary Report............................................................................................. 82 Completion Summary Report ........................................................................................... 83 Open Work Orders by Equipment .................................................................................... 83 Projected Work Orders Costs Report ................................................................................ 84 Open Work Orders by Mechanic Report .......................................................................... 85 Closed Work Orders by Mechanic Report ........................................................................ 86 Mechanics Phone List Report ........................................................................................... 86 Projected Man Hours Needed Report ............................................................................... 86 Actual Man Hours Used Report ........................................................................................ 87 Charts and Graphs ............................................................................................................. 88 Maintenance Coordinator Simplicity Software Technologies Inc. 5 Maintenance Scheduler Maintenance Coordinator Simplicity Software Technologies Inc. 6 Maintenance Scheduler Overview The Maintenance Scheduler module is the heart of all CMMS type programs, and you‟ll find ours to be extremely powerful, feature rich, and easy to use. The Maintenance Scheduler module was designed to handle all work order types. These include recurring and single shot, or repair types of work orders. RECURRING TYPES (Default): Full Planned Maintenance - This task indicator specifies a full-blown planned maintenance type task. Mini Planned Maintenance - This type of task would indicate a mini PM, such as a full PM that has been cut down into 2 or more smaller tasks to allow for less continuous machine downtime. Planned Change Over - This type of task would indicate a planned change over of a machine‟s setup. This could be to run a different product for example. Maintenance Coordinator Simplicity Software Technologies Inc. 7 Maintenance Scheduler REPAIR, SINGLE-SHOT TYPES (Default): Imminent Danger Safety Hazard Safety Concern Standard Work Orders One of the most valuable features of this module is found in its ability to create and use recurring type tasks. Once a task has been setup the program will handle the responsibility of keeping track of when the task is next due to be performed, and will schedule it accordingly, and automatically. This module also accommodates for the easy creation of reports, and when possible we use report wizards. With the wizards you can create some fairly custom reports. These reports will allow you to view and analyze information in a way that is right for you and your organization. Please note that the work order titles described in this section can be customized by the end user. Only the Planned Maintenance and Standard Work Order types at not customizable. Work Orders Setup The Scheduler module allows you to setup various options for this and the Work Orders modules. These includes elements on the printed documents, view options, and other general features. To access the Work Orders Setup screen: Move to the Maintenance Scheduler screen. Click on the Module button in the ribbon and select the Work Orders Setup option. General Setup Options This tab allows you to specify the following options: Next Work Order Number – The number here specifies the next sequential number to use in the automatic work order number generation. These numbers use the following format: yymm – xx. Where yy equals the year of task creation, mm equals the month of task creation, and xx is a sequential number. Maintenance Coordinator Simplicity Software Technologies Inc. 8 Maintenance Scheduler Days in Advance to Generate Work Orders – To help keep the database at a reasonable size, we allow you to specify how many days in advance to generate or display work orders. Allow the Automatic Printing of Work Orders – Selecting this option allows a notice to popup when you first open the program. This will notifies you about work orders due today, and gives you the chance to print them from the pop up. Allow the Past Due Notification of Work Orders – Selecting this option allows a popup to displayed when you first enter the Maintenance Scheduler module. This informs of work orders that are still open, but due dates have past. You then have the option of sorting the database by only past due work orders. To return to the normal view click the Refresh button. Generate New PMs for In-service Equipment Only – Selecting this option prevents the automatic creation of new work orders when the assigned equipment record has not been placed in service. Please refer to the Equipment and Machinery chapter for more information. Do No Generate New Work Orders for Weekends – Selecting this option prevents new work works from being scheduled for weekends. If it does fall on a weekend, it will be moved to the following Monday. Maintenance Coordinator Simplicity Software Technologies Inc. 9 Maintenance Scheduler View Options This tab lets you setup the following options: Table View Options – The Show Table/Grid Only option displays only the table on the lookup tab. Show Classes Tree Only option will only display the classification tree on the lookup tab. The Show Both Above option displays both the Table and the Classes tree. Recurring WO Select the options on this tab that you want printed on your recurring types of work order documents. A checkmark indicates the item will be printed, removing the checkmark prevent the item from printing. Standard WO Select the options on this tab that you want printed on your standard types of work order documents. A checkmark indicates the item will be printed, removing the checkmark prevents the item from printing. User Fields This tab let you setup the following elements: Maintenance Coordinator Simplicity Software Technologies Inc. 10 Maintenance Scheduler Work Orders User Defined Fields – This allows you to specify the default user defined fields titles that will be filled in for you when a new work order is created. You can change them on the original work order at any time. Print User Defined Fields – Placing a checkmark here will cause the user-defined fields to show up on the printed document. Use Custom Comments – Placing a checkmark here will cause the program to use your custom Comments Section title. Leaving this unchecked will cause the program to use it‟s own built in title of “Comments”. Custom Title - Here you would specify the custom title you would like to use for the Comments field of PM types of work orders. Work Order Types The WO Types tab allows you to customize the names used by the work orders. The top 3 work order types are recurring types of work orders, and the bottom 4 are single shot, or repair types of work orders. All of these titles can be changed by the user except the Planned Maintenance and Standard Work Order types. Maintenance Coordinator Simplicity Software Technologies Inc. 11 Maintenance Scheduler To change or setup the work order types names: Move to the various fields on this tab and edit the name to whatever you want. The flags displayed here indicates the legend used within the tree view control of the Scheduler’s Lookup View tab. Work Order Creation Wizard In this section we will create a new work order and at the same time explain the use of the Work Orders Creation Wizard. The Work Order Creation Wizard is used in various parts of this module, and follows the same guidelines no matter where used. 1. From the Home page of the ribbon, click on the Add New Record option. 2. Next you‟re asked if you would like to use the Work Order wizard, answer yes. A no answer would create a new record for you, which you would have to edit directly without the use of the wizard. Maintenance Coordinator Simplicity Software Technologies Inc. 12 Maintenance Scheduler 3. When the wizard loads you will be placed on the Task ID tab. Move to the Task Description field and type in a brief description of your task. Something like “Monthly PM of Compressor 1 Control Panel” maybe appropriate here. This field will accept up to 100 characters. 4. The Task ID field has already been filled in for you. You have the option of changing this if you would like. Click Next. 5. Now you should be on the Task Type tab. Move to and select the task type assignment of your choice here. You have 3 planned maintenance types (normally recurring), and 4 standard work order types (normally single shot tasks). For this exercise click the Full Planned Maintenance Type Task option. 6. Click Next 7. You should now be on the Scheduling tab. Click on the … command button adjacent to the Scheduled Start field. 8. Select the date you want to start working on this task from within the pop up calendar. First clicking on the date and then the Select Date command button does this. 9. Repeat the above step for the date you expect to be done with this task. 10. Move to the Start Time drop down list and select an appropriate time to commence this work. Maintenance Coordinator Simplicity Software Technologies Inc. 13 Maintenance Scheduler 11. Repeat the above step for the Ending Time. 12. Click Next. 13. You should now be on the Recurring tab. Move to the Frequency drop down list and select an appropriate frequency indicator for this task. Since we named this task as a “Month PM” we have a couple of legitimate choices here. We could choose Monthly or Every XX Weeks. For this example click on the Every XX Weeks text. 14. Move to the Every XX Criteria text box and type in the number 4. This task is now setup to regenerate itself every 4 weeks. 15. Placing a check in the Do Not Generate A New Task check box will prevent the application from regenerating this task. The program places a check here automatically once a new task has been generated. 16. Placing a check in the Generate New When Done checkbox will prevent the program from regenerating this task until it has been marked as completed. 17. Click Next to move to the Personnel tab. 18. Move to and click on the … command button adjacent to the first field in the Personnel section. 19. Select the mechanic you want to assign to this work order from one of those listed. You select the mechanic by clicking on them from within the grid. 20. Click the Select command button. Maintenance Coordinator Simplicity Software Technologies Inc. 14 Maintenance Scheduler 21. Repeat the above two steps for the next Personnel assignment, if you wish to make more than one, that is. 22. Click the Next command button to move to the Assignments tab. 23. Click on the … command button within the Machine Assignment section. 24. Click on the machine description that you want this work order to be assign to from within the grid. 25. Click the Select command button. 26. Click the … command button within the Classification Assignment section. 27. Click on the description of the class that you want to use from those within the list. Classifications are much like user-defined fields. They can group your tasks by productions lines, buildings, clients, or anything that makes sense to your organization. 28. Click the Select command button. 29. Click on the … command button in the Work Requested By section. 30. Click on the person who is requesting this work to be done from those within the list. 31. Click the Select button. Maintenance Coordinator Simplicity Software Technologies Inc. 15 Maintenance Scheduler 32. Click the Next button to move to the Instructions tab. 33. Click the Lookup button in the Safety Instructions section. 34. Click the safety instructions you want to use with this work order from those listed within the grid. 35. Click the Accept command button. 36. Repeat the above steps for the Planned Maintenance Instructions. 37. Click the Save and Close button in the ribbon and you have just created a PM type work order. Creating a New Work Order To create a new work order: From the Home page of the ribbon, click on the Add New Record option. When asked if want to use the Work Orders Creation wizard, click Yes to use the Wizard, or click No to create the work order the standard way. If you choose No then a new blank record will be created for you. Move to the Task Description area and type in a description for this task. This field is located between the bottom toolbar and just above the tabs. Something like “Bi-Annual water tower maintenance” maybe appropriate here. This field will accept up to 100 characters. Change or edit the Task ID field if you do not want to accept the default. Move through the various tabs and setup the appropriate information. The task will be automatically saved to the database for you. Please refer to the discussions on Understanding the Scheduler Tabs for explanations on how to setup each available option. Checking the Task ID Number This field, found in the upper part of the screen should contain a unique identifier for each different task in the database. We did not however make this a mandatory rule as everyone has their own way of doing things. You can however verify if the identifier you‟ve entered is unique to the database. To test to see if your identifier is unique: Enter your Task ID in the space provided. Maintenance Coordinator Simplicity Software Technologies Inc. 16 Maintenance Scheduler Move to and click on the Check button adjacent to this field. The program will then inform you as to whether a matching identifier was found. Understanding the Scheduler Tabs In this section we will explore each tab of the Maintenance Scheduler module and discuss the function of each element on that tab. Lookup View This tab helps in locating tasks by grouping and sorting work orders. All the tasks in the current sort are located here. To select a task and make it active the user needs only to click on the task from within the grid. Once selected the user can click on the other tabs to view or edit the task itself. Maintenance Coordinator Simplicity Software Technologies Inc. 17 Maintenance Scheduler When the Classification Tree is displayed, you can also select a work order by first clicking on the folder icon that contains the work order and then clicking on the work order itself. Using Classification Assignments and the Classes Tree can help streamline item lookup. Sorting and Filtering the Database You have a couple of sort and filtering options available to help you better manage the tasks or work orders found on the Lookup tab. To setup the sort and filtering options: From the Table View tab, select how you would like the database sorted by selecting one of the sort options found in the Sort By drop down list. Options found here are Description, Reference ID, Start Date and Classification. Select what type of work orders you want to include in the sort by selecting one of the options in the Types drop down list. Options here include All Types, Planned Maint. (Planned Maintenance), and Standard WO (Standard Work Orders) Next select the status indicator that best describes the type of tasks you want to view. Selecting a description from the Status drop down list performs this function. Move to the Start Date field and click on the … command button to bring up a calendar. Select a date from within this calendar. All tasks that meet the other criteria you just setup, and have a scheduled starting on or before this date will be included in the sort. Once all the criteria above has been set, move to and click on the Refresh command button. This will cause the database to be resorted by the criteria you have setup. NOTE: After changing the setup to hide or display the grid and classes tree functions, clicking the Refresh button will force these new display options to take effect. Maintenance Coordinator Simplicity Software Technologies Inc. 18 Maintenance Scheduler Details Tab Under the Details tab you can setup your scheduling information, equipment, classification assignments, mechanic resources and other task specifics. Task Types When creating or editing a task setup, this area allows for the specification of the task type. You can change or assign different task types by clicking on the proper task type description from the pull down list. The available task type assignments are: Full - Planned Maintenance - This assigns the task as a PM type task. In general practice this task would be a recurring type task for a planned maintenance procedure to be completed. Such a task could be a 50,000-mile tune-up on an automobile, for example, or perhaps a compressor maintenance procedure that needs to be performed. Maintenance Coordinator Simplicity Software Technologies Inc. 19 Maintenance Scheduler Mini - Planned Maintenance - This type of assignment is almost exactly the same as a Full PM. The difference is maybe that a full PM may last up to 8 hours or so, while this one could be for maybe half of that time or less. Using the automobile example above, this task may only be an oil change, as compared to a full tune-up. Planned Change Over - This task type is for machines that may require a change over to run a different part or product. Safety - Imminent Danger - This is the first of the "Standard Type" or “Single-shot” types of work orders, and the one that should hold the highest priority to be completed. Safety - Safety Hazard - This assigns the task as a Safety Hazard classification. Safety - Safety Concern - This is the last of the safety types of work orders, and would normally hold the lowest priority rating for these types of tasks. Standard Work Orders - This is you normal (repair) work order. Examples could be a door that needs painted, pictures hung, etc. Task Priority - This allows you to edit the priority assignment given to the selected task. Note the names used by the types, except for the Planned Maintenance and Standard Work Order types can be changed. Personnel Assignments This section allows for the assignments up to three mechanics or employees to this task. To make your personnel assignment: Click on the … button adjacent the assignment field you want to use. Select the mechanic from the displayed grid by clicking on them. Click the Select button. Next you‟re prompted as to whether you would like to add the resource to the labor list also. If you would like to track the labor costs of this person, click on the OK button. Repeat the above steps for any additional assignment you wish to make, up to a total of three. Please note that these 3 assignments are also used for the Auto-Email of work orders which will be outlined later. Maintenance Coordinator Simplicity Software Technologies Inc. 20 Maintenance Scheduler Scheduling This area sets up the task scheduling criteria. This section needs not to be filled in manually when the task has been assigned to a PM group. Move to the Scheduling section. Date Scheduled - This area specifies the date that this task was first scheduled. You can change the date here by clicking the … button adjacent to this field, then selecting the new date from within the popup calendar. Schedule Start - This field specifies the date in which work should commence on the task. Change this date by clicking on the … button adjacent to this field with your left mouse button. Schedule End - This field should indicate the date you expect the work on the task to be completed. Change this date by clicking on the … button adjacent to this field with your left mouse button. Start Time - This field should show the scheduled starting time of the task. Change this time by clicking on the arrow and selecting a new time from within the list. Ending Time - This field should indicate the expected ending time of the task. Work Requested By To specify who requested this work: Type in the name of the person in the box provided, or. Click the … command button adjacent to the text box. Select the name of the person by clicking on it from the installed list. Click the Select button. Maintenance Coordinator Simplicity Software Technologies Inc. 21 Maintenance Scheduler Recurring Tasks The section allows the setup of repeating criteria for work orders of the recurring types. These include Planned Maintenance, and the other 2 top most types of tasks. Like the Scheduling section, this information does not require manual setup if the task has assigned to a PM group. Move to the Recurring Setup section. Frequency - This drop down list setups the recurring frequency of the task. Options available here are: None, Every XX Days, Daily, Daily No Weekends, Weekly, Every XX Weeks, Bi-Weekly, Monthly, Every XX Months, Bi-Monthly, Quarterly, Semi-Annually, Annually, Every XX Units. Every XX Criteria - Information typed here would work in association with the following Frequency selections, and would replace the XX portion of that selection: Every XX Days, Every XX Weeks, and Every XX Months. Generate New When Done – Placing a checkmark here prevents the program from generating new tasks until this one has been marked completed. If left unchecked the program will generate new tasks by whatever other criteria is setup, regardless if the previous task has been completed or not. Do Not Generate A New Task - When a check is placed here the program will not generate a new task for the selected task even if a recurring frequency has been set up. The program itself places a check here right after a new task has been created. This is done to prevent the program from repeatedly generating the same task over and over again. To setup recurring criteria: Move to the Frequency drop down list and select the recurring criteria you want to assign to this task by clicking on it. If necessary, move to the Every XX Criteria box and type in the appropriate interval here. Maintenance Coordinator Simplicity Software Technologies Inc. 22 Maintenance Scheduler If you want to have the program wait until this task is completed before generating a new task, place a checkmark in the Generate New When Done checkbox. To toggle the value of the Do Not Generate New Task checkbox open the File menu and select the Change Do Not Generate New Task option. Machine or Equipment Assignment This section allows you to assign the task or work or to a piece of equipment. This helps in identifying the equipment to be serviced, along with building a history database on that equipment. Maintenance Coordinator Simplicity Software Technologies Inc. 23 Maintenance Scheduler To assign a machine to this task: Move to the Machine Assignment section and click on the… command button. Click on the machine you want to use from the displayed grid. Click Select. Assigning to a Client and their Equipment Note: This feature is only available when licensed to use the Maintenance Services add-on module. To assign the work order to a client and one of their pieces of equipment: Move to the Machine Assignment section and click on the Select Client/Equipment button Move to the top most table or grid and select the client from with in the list. Maintenance Coordinator Simplicity Software Technologies Inc. 24 Maintenance Scheduler Move to the lower table or grid and select the Equipment you want to assign to the work order. Click the Select command button. Classification Assignments Classifications are much like a user defined field and should be used in such a way that makes the most sense to your organization. Valid classifications could describe a production line, property, building, a client, or any other way you would like to group your work orders. Classifications or classes help group tasks for reporting and viewing purposes. To assign a classification to the task: Click on the Assignments tab located near the bottom on the screen. Move to the Classification Assignment section and click on the… button. Select the class you want to use from within the list by clicking on it. Click Select. Note: The Color Scheme properties is used with Task Planner feature. Maintenance Coordinator Simplicity Software Technologies Inc. 25 Maintenance Scheduler Specifying Account and Project Assignments You can assign Account and Project Assignment to work orders. This comes in handy with reports and other related information. To specify Account or Projects: Click on the Assignments tab located near the bottom on the screen. Move to and click on the … button adjacent to the field you want to make an assignment to. Select the assignment for this Quick Entry type dialog box. Click on the Select button. Assigning Parts to a Work Order You can assign parts or materials needed in work order completion, and also have these materials checked out of inventory. To add materials to a Work Order: Move to the Details tab by clicking on it. Click on the Assignments tab near the bottom of the screen. Click on the Edit Work Orders Parts button. Click Add Part. Move to Group Name grid located on the left of the screen and click on the group you believe your part would belong to. The grid on the right will be resorted by whatever group you select. You can also place a check in the View All Parts checkbox to view all parts, ignoring groups. Move to the Parts List grid, located to the right of the screen and click on the part of your choice. Click Select. Move to the Quantities section and click in the Qty Needed text box. Maintenance Coordinator Simplicity Software Technologies Inc. 26 Maintenance Scheduler Type in the quantity you need for the selected part to complete the task. Repeat the above steps until you have added all parts and materials you want to the current work order. Removing Parts and Materials from Work Orders To remove a part from the current work order: Move to the Details tab by clicking on it. Click on the Assignments tab near the bottom of the screen. Click on the Edit Work Orders Parts button Move to the grid and click on the part you wish to remove. Click Remove Part. Answer Yes to the prompt. Maintenance Coordinator Simplicity Software Technologies Inc. 27 Maintenance Scheduler Recording Materials Used Once a work order has been completed you should record the actual materials that were used. By doing so you can automatically update your inventory levels and assist in the calculation of the task total costs. To record actual materials used: Move to the Details tab by clicking on it. Click on the Assignments tab near the bottom of the screen. Click on the Edit Work Orders Parts button Move to the grid and click on the part you wish to record information on. Move to the Quantities section and click in the Qty Used text box. Type in the actual quantity that was used for the selected part. Repeat the above steps for each part used. If you wish to update your inventory levels, reducing stock levels by the amounts recorded here, move to and click Update Inventory. Printing the Work Order’s Material List To receive a print of the materials associated with a work order: Move to the Details tab by clicking on it. Click on the Assignments tab near the bottom of the screen. Click on the Edit Work Orders Parts button Open the File menu. Click Print Parts List option. From the preview screen, click Print. Assigning Labor to a Work Order You can assign as many mechanics as needed to a work order. The mechanics assigned here differ from the three possible assignments made in the Personnel Assignments section. The resources here will be used in the calculation of the total work order cost, whereas the others only appear on the work orders themselves and used for the Auto-Email feature. Maintenance Coordinator Simplicity Software Technologies Inc. 28 Maintenance Scheduler Adding Labor To add labor or resources to a task: Move to the Details tab by clicking on it. Click on the Assignments tab near the bottom of the screen. Click on the Edit Work Orders Labor button. Click Add Mechanic. Click on the resource you want to add by clicking on them from within the grid. Click Select. Repeat the above steps for each additional resource you want to add. Note: You can check to see if the mechanic is available to perform the task by clicking on the Schedule tab of the Employees lookup screen. Maintenance Coordinator Simplicity Software Technologies Inc. 29 Maintenance Scheduler Removing Labor To remove a resource from a task: Move to the Details tab by clicking on it. Click on the Assignments tab near the bottom of the screen. Click on the Edit Work Orders Labor button. Move to the displayed grid, and click on the resource you wish to remove. Click Remove Mechanic. Answer Yes to the prompt about removing the resource. Recording Labor Actually Work To record the time your labor actually worked on the completion of a task: Move to the Details tab by clicking on it. Click on the Assignments tab near the bottom of the screen. Click on the Edit Work Orders Labor button. Move to the displayed grid, and click on the resource you wish to record the information on. Click in the Enter Actual Time Worked field to select it. Enter the actual time the selected resource worked on the completion of the task. Repeat the above steps for all resources that apply. Special (User-Defined) Fields You can specify two user defined fields to be included or printed with your work orders. These include both the field‟s title, and the contents or value of that field. Maintenance Coordinator Simplicity Software Technologies Inc. 30 Maintenance Scheduler To setup your special fields: Click on the Options tab located near the bottom on the screen of the Details view of the Scheduler. Move to the Special Fields section and type in the appropriate information for that field. Automatic Email of Work Orders To allow the program to use the automatic email feature for work orders, you must tell it to do so. To allow auto email of a work order: Click on the Options tab located near the bottom on the screen of the Details view of the Scheduler. Place a checkmark in the Use Auto Email Feature checkbox. When the program sends out an email of the work order it sets the Send Email flag, preventing the program from sending out duplicate emails of the same work order. To override the send email flag, allow an addition email to be sent: Move to and click on the Options tab near the lower left hand corner of the Details tab. Remove the checkmark form the Prevent Future Emails for This Work Order Only checkbox. This is just one step in setting up the Auto Email feature. For more information look at the Security, Database and Utilities Modules chapter. Maintenance Coordinator Simplicity Software Technologies Inc. 31 Maintenance Scheduler Joining PM Groups This section allows you to assign a task to a PM group. PM groups are useful so you can reschedule all members within a group with just a few keystrokes. To join a PM group Click on the Options tab located near the bottom on the screen of the Details view of the Scheduler. Move to the PM Group Member checkbox and place a check here. Click on the … button found in this section. Select the name of the group you want to join by clicking on it from within the grid. Click the Select button. Click on the Retrieve Current Schedule button to insert the PM Group‟s scheduling information into the current task. This completes the group joining process. Work Order Attachments For information about the Attachments Feature please refer to the Common Features chapter. Work Order Audits Overview With Work Order Audits you can attach an audit list to the end of work orders. These audits can be a requirement of in-house personnel or from your customers. Possible audit items could be a check list to see if any tools were left in the work area, was welding performed, was the area inspected and so on. Audit lists require a few steps. A group is first created, and then audit items are added to this group. The next step is to assign one of these audit groups to actual work orders. Please note that if you later add items to audit groups, these new audit items may also show up on previously closed items. Maintenance Coordinator Simplicity Software Technologies Inc. 32 Maintenance Scheduler Creating Audit Lists To create an audit list: Open the Maintenance Scheduler module. Click on the Details tab. Near the bottom of the screen, click on the Audits tab. Click on the Select button in the Audit Assignment section. Click on the Add Group button to create a new audit group. Enter a name for your group in the space provide and then click OK Now select the group in the grid so we can start adding items to the group. Click the Add Item button to add a new audit question to the selected group. Double click in the Order column of the new group and type in a number or letter for the sort order of the item. Double click in the Question column to edit your question. You can also click on a Question row and then click on the Edit Question button in the toolbar. This will bring up the built-in text editor to edit the question‟s contents. Repeat the above two steps for each question you want to assign to the selected group. Click the Close button in the toolbar when done. Assigning an Audit List to a Work Order To assign an audit list to a work order: Open the Maintenance Scheduler module. Locate and select the work order you want to add an audit list to. Click on the Details tab. Near the bottom of the screen, click on the Audits tab. Click on the Select button in the Audit Assignment section. Move to the Groups grid located on the left of the screen and select the audit group you want to use by clicking on it. Click on the Select button in the toolbar. Performing a Work Order Audit To perform a work order audit: Open the Maintenance Scheduler module. Locate and select the work order you want to perform the audit on Maintenance Coordinator Simplicity Software Technologies Inc. 33 Maintenance Scheduler Click on the Details tab. Near the bottom of the screen, click on the Audits tab. Click on the Perform Audit button. Move through the Questions Grid selecting one audit question at a time. You can do this by either clicking on the question or using the data control in the toolbar. Move to the Audit Response text box and enter your response to the selected question. Repeat the last two steps for each question a response is required. Click the Close button in the toolbar when done. Instructions Tab The items found on the Instructions tab allow you to setup task instructions for both normal and recurring type work orders. You can also set up the safety instructions to be included, along with task comments. Maintenance Coordinator Simplicity Software Technologies Inc. 34 Maintenance Scheduler Task Instructions This section allows you to select and setup instructions for recurring type tasks. These tasks would be where you could use the same set of instructions for a variety of machines. For example, let's say you have various production lines that use the same type of gearboxes. Instead of writing separate instructions for each gearbox, or lines, you would just reuse the same instructions over and over. This makes task setups easier, and at the same time reduces database size. To select instructions: Click on the Lookup button. Highlight the instruction's description from within the list by clicking on it. Click the Select button. You can setup three sets of instructions for any given task. This can be useful when you wish to schedule separate tasks that need completion at the same time, such as grouping a weekly, monthly, and quarterly PM together. Maintenance Coordinator Simplicity Software Technologies Inc. 35 Maintenance Scheduler The Edit buttons found in this section allows you to edit the instructions that are assigned to this task. The New command buttons found in this section allows you to create a new set of instructions for use with the current task. Safety Instructions This section allows you to specify the safety instructions to be used by this task. This section works exactly the same way as the Task Instructions just discussed. The difference however is that you can include only one set of safety instruction per task. Comments for PMs – Task Instructions for Standard Work Orders This section when used with PMs and Change Over type tasks is used to add comments to the work orders. These comments could be almost anything in nature, such as special instructions or precautions. This section, when dealing with both Safety and Standard type of work orders is used as a "Work to Be Performed and Why" field. This is where you would explain the work that needs to be performed, and why it should be done. To enter information: Move to the Comments for PMs – Task Instructions for Standard Work Orders field by clicking in it. Type in the appropriate information. Maintenance Coordinator Simplicity Software Technologies Inc. 36 Maintenance Scheduler Status Tab On the Status tab you can record the current status of the selected work order, record completion information, and record the costs occurred performing the task. Completion Information Use this section to record information about the completion of the currently selected task. To record completion information: Move to the Completion Information section and click on the … command button adjacent to the Date Completed field. Select the date that the task was completed from within the popup calendar and click on Select Date. Click on the … button adjacent to the Completed By field. 37 Maintenance Coordinator Simplicity Software Technologies Inc. Maintenance Scheduler Click on the name of the person to be credited for completing this task from within the displayed grid. Click Select. Click on the … command button next to the Inspected By field. Click on the name of the person who inspected the completion of this task from the displayed grid. Click Select. Move to the Down Time section and record how many hours and minutes the equipment was down for the completion of this work order. To retrieve the current Equipment Meter reading at time of completion, click the Retrieve Current button. Note: When closing a work order for task completion, don‟t forget to set the status of that task. You may also want to record the activity in the machine history records. Clicking on the History button does this for you. Task Status Use this section to indicate the current status of the work order or task. You set this status by selecting one of the options from the drop down list box. Available options are as follows: Ready - This status would indicate that the task is ready to be performed. You may only be waiting for the time and resources to do it. On Hold - This status would indicate that the task has been put on hold for one reason or another. One of the most common On Hold reasons could be something like "Waiting on Parts". Completed - This status would indicate that the task has been completed. It will be removed from the normal sort routines, or in other words, it will appear invisible when you first open this module. Cancelled - This status description would indicate that the task could not be performed. This could be because of production demands, a duplicate work order, etc. Setting a task with this status is not the same as deleting the task, as the task still resides in the database. WO Request – This type of a status would indicate a task that someone has requested to be done, but still needs approval by the administrator. To change the status of your work order: Move to the Task Status section and select the appropriate indicator from the drop down list by clicking on it. Maintenance Coordinator Simplicity Software Technologies Inc. 38 Maintenance Scheduler Costs This section will assist you in calculating the total costs involved with the completion of this work order. This is used in reports and can also assist you in charging clients, when such is applicable. The cost of a work order is broken down into the following elements: Total Labor Costs – This refers to the labor setup on the Labor tab. Taken into consideration that each employee is assigned to the task, the hours they worked on the task, and their hourly rate of pay. Total Material Costs – This refers to the total material and parts used to complete this task as recorded on the Material tab. Contractor – Vendor Costs – This is a manual entry, and would be the place to record any contracted costs occurred in the completion of this task. Taxes – This would be the place to record any taxes or permits that were paid in the completion of this task. Other Cost – This is the place you would record any other additional costs associated with the completion of this task. Total Costs – This is the sum of the amounts specified above, and would indicate the total cost of performing this work order. To record and calculate the total cost of a work order: Completed the information on both the Materials tab and the Labor tab. Move to the Contractor – Vendor Costs text field and enter the appropriate amounts, if any. Repeat the above step for the Taxes and Other Costs fields. Click on the Calculate Costs command button. Complete Button With the Complete Button found on the Status tab, you can select the person who completed the task, mark the task as completed, update the tasks cost, and if a machine has been assigned, write the task to the Machine History log. The Complete button will perform all these task and more for you, to help streamline the closing of tasks or work orders. Maintenance Coordinator Simplicity Software Technologies Inc. 39 Maintenance Scheduler To use the Complete button: Move to the Status tab by clicking on it. Click the Complete button. Setup or select the various options of this dialog. Click on the OK button. PM Groups Many of you may find the PM Group feature to be very useful, especially if you have sets of machines or equipment that need servicing at the same time. You may find it an even greater value if you are required to reschedule these tasks on a regular bases, as to meet production demands for example. The PM Group feature gives you these added benefits as compare to the normal scheduling of Planned Maintenance type tasks: You can quickly retrieve a schedule into a new task by just clicking on a single button. You can reschedule tasks belonging to a PM group with a minimum number of keystrokes. Maintenance Coordinator Simplicity Software Technologies Inc. 40 Maintenance Scheduler You can change the status of all PM group members with a minimum number of keystrokes. Setting Up a P.M. Group The first step in using a PM group is to setup one, and we'll explain this procedure next. Click the PM Groups option in the Go page of the ribbon. From the PM Groups screen click Add option. Move to the Group Title field and type in a brief, but descriptive title for this PM group. This field can be up to 40 characters in length. Move to the Scheduling section and setup the task scheduling criteria. The fields in this section are outlined below. Maintenance Coordinator Simplicity Software Technologies Inc. 41 Maintenance Scheduler o Date Scheduled - This area specifies the date that this task was first scheduled. You can change the date here by double clicking within this field, then selecting the new date from within the popup calendar. For recurring type task groups this date would show the date the program itself reschedule the group. o Schedule Start - This field specifies the date work should commence on the task. Change this date by double clicking on the field with your left mouse button. o Schedule End - This field should indicate the date you expect the work on the task to be completed. Change the date by double clicking. o Start Time - This field should show the scheduled starting time of the task. Change this time by clicking on the arrow and selecting a new time from within the list. o End Time - This field should indicate the expected ending time of the task. Move to the Recurring Tasks section and fill out the fields located there. o Frequency - This drop down list setups the recurring frequency of the task. Options available here are: None, Every XX Days, Daily, Daily - No Weekends, Weekly, Every XX Weeks, BiWeekly, Monthly, Every XX Months, Bi-Monthly, Quarterly, Semi-Annually, Annually, Every XX Units. o Every XX Criteria - Information typed here would work in association with the following Frequency selections, and would replace the XX portion of that selection: Every XX Days, Every XX Weeks, and Every XX Months. o Do Not Generate A New Task - When a check is placed here, the program will not generate a new task schedule for the selected group even if a recurring frequency has been set up. o Once all the fields on this screen has been setup, this information will be automatically saved for you by the program, and you can begin using the PM Group that you have just set up. Deleting a P.M. Group To delete a PM Group setup: Click the PM Groups option in the Go page of the ribbon. Using the data control, scroll through the setups until you locate the PM Group you wish to remove. 42 Maintenance Coordinator Simplicity Software Technologies Inc. Maintenance Scheduler Click on the Delete option in the ribbon. Answer Yes to the prompt about the deletion. Rescheduling with P.M. Groups With PM Groups you can reschedule tasks that belong that group, and that meet the certain criteria. The criteria for task rescheduling is that the tasks must have the same scheduled start date as a start date that you specify. All other tasks in the database with a different scheduled starting date will be ignored, even if they belong to the group. To reschedule a PM group, and all it's members that have the same scheduled starting date, please follow these steps: Maintenance Coordinator Simplicity Software Technologies Inc. 43 Maintenance Scheduler Click the PM Groups option from the Go page. Using the data control, scroll through the setup until you locate the PM Group you wish to reschedule. Move to and click on the Task Options tab. Move to the Scheduled Start Date field and enter the scheduled start date of the task you wish to reschedule. Move to both the New Schedule Start and New Schedule End date fields and enter the appropriate information. Click on the Update Now button found in that section. Next you'll be greeted with a Reschedule Group dialog screen. If you wish to continue with the rescheduling operation move to and click on the Yes command button. If you do not want to continue with the rescheduling procedure, click either the No or Cancel command buttons. Once you are done rescheduling your work orders or tasks, click the Restore Screen command button to return the PM Groups screen to its original size and position (NOTE: Scrolling through the records will also restore the screen). Setting the Status of PM Group Members With PM Groups you can change the status indicator for all tasks that fall under that group and that meet a certain criteria. This task requirement is the group the task belongs to, and the scheduled start dates of the tasks. To change the status of PM Group members, please follow these steps: Click the PM Groups option from the Go page. Using the data control, scroll through the setups until you locate the PM Group you wish to change the status on. Move to and click on the Task Options tab. Move to the Schedule Start field of the lower section, and change this date to reflect the date of the tasks you wish to update the status on. Move to the Status drop down list, and select the status indicator that you wish to use. Options here include Ready, On Hold, Completed and Cancelled. Move to the Date Completed field and change this date to reflect the date you want to use for this status change. Click on the Update Now command button to start the status change process. As each task is about to be updated with the new status, you'll be prompted to either update the task or skip it. To accept the update, click the OK command button. To skip the displayed task, click the Cancel 44 Maintenance Coordinator Simplicity Software Technologies Inc. Maintenance Scheduler command button, and move to the next task, if any, needs to be changed. Once you are done updating the status of your Work orders or tasks, click the Restore Screen command button to return the PM Groups screen to its original size and position (NOTE: Scrolling through the records will also restore the screen). Scheduling by Meter With the scheduler module you can have new recurring tasks scheduled by meter, hours or odometer readings. This comes in handy for a variety of reasons such as scheduling equipment maintenance after so many hours or miles have past. To schedule by meter: Move to the Details tab. Move to the Recurring Setup section. Select the recurring frequency of Every XX units. Move to the Every XXX Criteria text box and enter how often you would like this task to repeat. For example, you have an automobile that you want to change the oil every 3,000 miles. You would enter 3000 here (no commas). Now you need to setup when to perform the first task. Move to the Work Orders page in the and select the Set Next Meter Setting option. Enter the appropriate value in the space provided and press enter. When the equipment meter value equals or exceeds this value, the work order will become due. The Generate New When Done flag is always used when scheduling By Meter (the checkmark in the scheduler is ignored), this is to say that the following criteria must be satisfied for a “Meter Type Task” to generate a new work order. A piece of Equipment is assigned to a task. Maintenance Coordinator Simplicity Software Technologies Inc. 45 Maintenance Scheduler The Equipment current meter is greater than zero. The Recurring frequency for the current task must be setup to “Every XX Units”. A Value must be set for the “Every XXX Criteria”. The “Next Meter” has been set for the current work order or task. The previous task must be set as “Completed”. The “Do Not Generate New Task” flag has NOT been set. When a new work order is created the new task will have a scheduled start date 2 years in advance of the date it was created. This is to prevent the task from showing up in the default sorts, and from being reported as being past due. When the Equipment meter value reaches or exceeds the Next Meter value the schedule start date will be changed to the date this information was first realized. When the new work order is created: The previous task will have its “Do Not Generate New Task” flag set to true to prevent the task from regenerating itself multiple times. The program will add the current equipment meter reading to the value as setup in the “Every XXX Criteria” section, and use the result as the value to meet before the next work order becomes due. The program will copy the other information from the old task to the new one. The new task will have a scheduled start date 2 years in advance from the date the new task was created. Entering Equipment Meters Equipment meter or odometer readings are recorded in the Machinery and Equipment module and can also be recorded from the Equipment lookup screen. Classification Assignments Overview With the task setup you can assign both planned maintenance, and standard work orders to Classification Assignments. This feature proves useful in grouping and reporting, where you can group reports by these classes. Maintenance Coordinator Simplicity Software Technologies Inc. 46 Maintenance Scheduler Adding New Classifications To setup new classifications: From the Scheduler Details tab, click on the Assignments tab near the bottom of the screen. Move to the Classification Assignment section and click on the … button. To create a new classification click Add New. Next a dialog screen will appear prompting you for the name of the new classification assignment. Type this information in the box provided. This field can contain any combination of text characters and numbers, and be a maximum length of 40 characters. Please note that the program will allow you to type in more than this 40-character limit, but all-excess characters will be filtered out of the final description. Click Ok. Select the Classification Assignment you just created from those listed with in the list box by clicking on it. Click the Color Scheme command button. This will allow you to assign a color scheme to the class. This color scheme is used by the Task Planner. After the color picker screen appears, move to and click on the color of your choice to select it. Click on the OK command button to accept the color and assign it to the currently selected classification. Repeat the above steps for any addition classifications you wish to set up. To insert the selected classification into the currently selected task, move to and click on the Select button. Deleting Classification Assignments To delete classification assignments: From the Scheduler Details tab, move to the Classification Assignment section and click on the … command button. Move to the list box containing the descriptions of available classifications, and select the class you wish to remove by left mouse clicking on it. Click Delete. Maintenance Coordinator Simplicity Software Technologies Inc. 47 Maintenance Scheduler Click Yes to the prompt about deleting the classification. Editing Recurring Tasks The program is designed to allow users to create recurring tasks or work orders. These tasks regenerate themselves from previously created tasks, copying all the fields of the previous task to the new task or work order. Only the schedule dates are changed in the new tasks (or next meter value, as the case may be). To change or delete a task in the database you need to find the tasks that have NOT yet regenerated themselves. Changing tasks that have yet to regenerate will affect only those tasks from that point forward. All previously generated tasks will not be affected. If you want to change tasks or works orders that have already regenerated, you will need to do this manually. To find all the tasks that are set to regenerate: Open the Maintenance Scheduler module. Move to the Filters page in the ribbon and Not Re-Generated option. This will sort the database by all tasks that HAVE NOT regenerated. Deleting one of these tasks will prevent the program from regenerating that one again. You can also change the Do Not Generate New Task flag for the task to prevent it from regenerating. To change the Do Not Generated New Task: Open the Maintenance Scheduler module. Locate the task you wish to stop from regenerating. Open the Work Orders page in the ribbon and select the Change Do Not Generate New Task Flag option, setting the Do Not Generated New Task flag (checked). To change tasks that have already regenerated with new information: Open the Maintenance Scheduler module. Locate the task that has the task description that you want to edit. Open the Filters page in the ribbon and select the With Current Description option. You can edit these tasks with new dates or delete them from the database. Please note that if you edit a task that has already been regenerated (Do Not Maintenance Coordinator Simplicity Software Technologies Inc. 48 Maintenance Scheduler Generate New Task checked) it will ONLY affect that task. Other, already created tasks or work orders will not be affected. Repair Codes With repair you can have both universal repair codes, and machine specific repair codes. With the universal codes you can assign the same code to every work order regardless of the machine assignment. Examples here may be Normal Maintenance, Scheduled Downtime, etc. Machine specific codes can be more specific to what was done, and the list will change according to the equipment assigned to the work order. Examples here could be Main Motor Replacement, Brushes Changed, Main CAM replaced etc. Machine specific repair codes can be used for predictive maintenance type reports where you can see trends develop, and scheduled preventive maintenance accordingly. To assign a Repair Code to a work order: Select the work order you want to assign the code to. If this is a machine specific type code, then also ensure the work order has a piece of equipment assigned to it. Click on the Status tab in the Scheduler. Click on Assign Code button near the bottom right hand corner of the screen. Select the code you want to use from within the list. Click on the Select button. To add a new item to the list. Follow the above procedure up to the point of clicking on the Assign Code button. Click on the Add New option in the ribbon. Type in the new code in the space provided and click OK. When asked about adding to the global yes, reply with the appropriate answer. Maintenance Coordinator Simplicity Software Technologies Inc. 49 Maintenance Scheduler Maintenance Personnel – Employees Database If you want to assign tasks to specific mechanics, or other personnel, you will need to use the built in Maintenance Personnel option. This option builds a database of names that can be used in the following tasks fields: Personnel Assignments, Work Requested By, Completed By and Inspected By. This feature also allows you to print a list of Maintenance Personnel that includes their names, position, home phone numbers and pager numbers. The email field must be included if you plan on using the Automatic Email feature for work orders. The program looks at the three Personnel assignments fields, and emails these three assignments if their emails are properly setup. The Maintenance Personnel database is also used by the optional Mechanics and Employees module were a great deal of additional information can be maintained on your personnel. Maintenance Coordinator Simplicity Software Technologies Inc. 50 Maintenance Scheduler Adding Records to the Maintenance Personnel List To add mechanics and other personnel to the Maintenance Personnel list: Click Support Tools in the Shortcut bar, then click Mechanics or open the Go page and select the Mechanics option. Open the File drop down menu and click Add New option in the ribbon. Move to the Details tab by clicking it. Move to the various fields and type in the appropriate information for that field. Click on the Post button to ensure your changes are saved Repeat the above steps for each person you wish to add to the database. Deleting Records from the Maintenance Personnel List To remove personnel from the Maintenance Personnel list, please follow these steps: Click Support Tools in the Shortcut bar, then click Mechanics or open the Go page and select the Mechanics option. Scroll through the records using the data control until you locate the record you wish to remove. Click Delete Record option in the ribbon. Now you are greeted with a Delete Personnel dialog screen asking if you are sure you want to delete the associate. If you are sure that you indeed want to remove the selected person from the database click on the Yes command button. If you have changed your mind click either the No or Cancel. Maintenance Coordinator Simplicity Software Technologies Inc. 51 Maintenance Scheduler Generating Tasks Whenever the program executes one of the generate tasks routines it looks for tasks that meet the following criteria. A scheduled starting date that falls within the generating range, and/or falls behind today's date. The „Do Not Generate New Task‟ flag has not been set. A recurring frequency has been setup. The task has been assigned as a recurring type. If turned on, the Equipment assigned to the task must also be marked as „In-Service” within the Equipment module (this feature can be turned off from within the Work Orders Setup screen). If the „Generate New When Done‟ option has been set, the task must also have a status of „Completed‟ before a new task is created. If all the above criteria has been satisfied the program will regenerate a new task for all tasks it finds. This includes both open tasks, and those that have already been closed. When the module first loads, by default, it will look 30 days into the future, and generate all tasks that fall into this range. You can specify a new value under the Work Orders setup. Printing and Generating Tasks With the Generate Tasks option you can setup and print a date range of tasks. If the date range you specify contains tasks that have not already been generated by the program, the program will generate then as this routine is executed. To generate a range of tasks to be printed: . From the Home page of the ribbon and select the Generate Tasks option. From the Select Task Dates screen, move to and click on the … command button adjacent to the Start Date field. Select the Start Date range from within this calendar, and click Select Date. Move to and click on the … command button adjacent to the End Date field. 52 Maintenance Coordinator Simplicity Software Technologies Inc. Maintenance Scheduler Select the ending date for your tasks date range from within this calendar, and the click Select Date. Click the OK command button and the program will generate all tasks that fall within the date range you have just setup Next the Generated Work Orders screen will be displayed. From here you have a couple of options in the printing of tasks. To print all the tasks generated just move to and click on the Print All option in the ribbon. To print selected tasks from the list, click on the task you wish to print to select it, then click the Print Selected option in the ribbon. From the Preview screen, click the Print command button to print the document. Maintenance Coordinator Simplicity Software Technologies Inc. 53 Maintenance Scheduler Generate by Classification To generate a range of tasks to be printed by Classification assignment, please follow these steps: . From the Home page of the ribbon and select Generate by Classes option. From the Select Task Dates screen, move to and click on the … command button adjacent to the Start Date field. Select the Start Date range from within this calendar, and click Select Date. Move to and click on the … command button adjacent to the End Date field. Select the ending date for your tasks date range from within this calendar, and the click Select Date. Click the OK command button. From Classifications Lookup screen, select the Classification assignment of your choice from those listed. Click the Select button to have the program start the generation process. Next the Generated Work Orders screen will be displayed. From here you have a couple of options in the printing of tasks. To print all the tasks generated just move to and click on the Print All option in the ribbon. To print selected tasks from the list, click on the task you wish to print to select it, then click the Print Selected option in the ribbon. From the Preview screen, click the Print button to print the document. . Printing the Current Work Order To print the currently selected work order: From the Home page of the ribbon select the Print Record option. Maintenance Coordinator Simplicity Software Technologies Inc. 54 Maintenance Scheduler Print Previewing the Current Work Order To preview the currently selected work order: From the Home page of the ribbon select the Preview Record option. From the Print Preview screen, click the Print button. Printing the Main Lookup View Grid You can print the main grid or table that‟s located on the Lookup tab of the Scheduler. To print the main grid and all its information: Sort or filter the database to your liking. Click on the Module button and move over the Print option. Select the Print Table option. Printing All Work Orders If the current sort or filtering of the Scheduler database has 30 or less records, you can tell the program to print every work order in the list. To print all work orders: Open the Filters page in the ribbon and select the Custom Sort Wizard Option. Setup the criteria on this screen to show only the records you want to include. There will be more information on this wizard later in this chapter. If the resulting sort (filter) has 30 or less record in it, then click on the Module button and move over the Print option. Click on the Print All option. Maintenance Coordinator Simplicity Software Technologies Inc. 55 Maintenance Scheduler Saving the Work Orders to History You can save a summary of any work order with a machine assigned to it to the machine or equipment‟s history log. This is an extremely useful feature as you can maintain a complete maintenance history on your equipment. This history record will be maintained even if the associated work order has been deleted or archived. The program also copies task completion notes to this history record for you automatically. To save a task to equipment‟s history log: Locate and select the work order you want to save, and ensure there‟s a Equipment record assigned to the document. Open the Work Orders page in the ribbon. Click on the Save to History Log option. Next you‟ll be asked if you want to use the Task Completion Date. Click Yes to use the recorded completion date as found on the Status tab. A No answer will use the scheduled end date instead. Cancel, cancels the whole operation. You can also save a copy of the task to history by using the Complete button found near the History button on the Status tab. The following information is saved to the history record: General Task Information Current Equipment Meter reading Parts Used Labor Used Down Time Used Completion Notes Plus you can click on the History button on the status tab to save to history. Maintenance Coordinator Simplicity Software Technologies Inc. 56 Maintenance Scheduler Deleting a Work Order To delete a work order from the database: Locate the work order you want to delete. Move to the Home page in the ribbon and select the Delete Record option. When prompted, click the Yes button. IMPORTANT NOTE: Once a task has been deleted it‟s gone forever. If it‟s a recurring type task and the program has not already generated a new task for it, this functionality will also be lost. However, if the Do Not Generate New Task flag has been set, you should be completely safe in deleting it. Deleting a Recurring Work Order Recurring work orders are set to regenerate themselves at given intervals. Many times deleting only the work orders in the current sort does not get rid of them or prevent the work order from recreating itself. This is because there maybe tasks in the database that have not had the „Do Not Generate New Task‟ flag set, and are stored in the future or beyond the current sort. To delete a recurring work order and prevent it from regenerating itself, you must first locate the task in the database that does not have it‟s „Do Not Generate New Task‟ set. Once located you can set the „Do Not Generate New Task‟ flag or delete the task (work order). To delete a recurring work order from the database: Open the Filters page in the ribbon and select the Not Re-Generated option. Locate the work order you want to delete. Open the Home page in the ribbon and select the Delete Record option. When prompted, click the Yes button. . Maintenance Coordinator Simplicity Software Technologies Inc. 57 Maintenance Scheduler Emailing the Work Order To email a work order: Select the work order document you want to email from within the database. Open the Work Orders page in the ribbon and the Email W.O. option. Type in or select the person‟s email address in the Mail To text box. Click the Send button. For more information about the Email Composer please refer to the Common Features chapter. Accessing the Email Composer To access the email composer: Open the Go page in the ribbon. Select the Email Composer option. For more information about the Email Composer please refer to the Common Features chapter. Copying and Pasting Work Orders To copy a work order to be pasted into a new or different work order: Display the work order you want to copy. Open the Work Orders page and select the Copy W.O. option. Create or display the work order you want to copy to. Open the Work Orders page and select the Paste W.O. option. Filtering the Database by Work Assignments You can have the work orders database filtered by work assignments and open work orders. This comes in handy when you want to view a mechanic‟s back log or current work order assignments. To filter the database by Work Assignments: Maintenance Coordinator Simplicity Software Technologies Inc. 58 Maintenance Scheduler Open the Filters page in the ribbon and move to the Assignments group. Click on the Mechanics option. From the Employees Lookup screen, select the mechanic you want to base your filter on. The database is searched for this mechanics in the three personnel assignments fields. Once the employee is selected, click on the Select button. To restore the database back to its normal sort, click the Refresh button on the Lookup tab. Filtering the Database by Equipment Assignment You can have the work orders database sorted by equipment assignments and open work orders. This comes in handy when you want to view all the open work orders for a given piece of equipment. To sort the database by Equipment Assignments: Open the Filters page in the ribbon and move to the Assignments group. Click on the Equipment option. From the Equipment Lookup screen, select the equipment you want to base your sort on. Once the equipment is selected, click on the Select button. To restore the database back to its normal sort, click the Refresh button on the Lookup tab. Custom Sorting of Work Orders Database To create a custom sort of the database: Open the Filters page in the ribbon and move to the General Sorts/Filters group. Click on the Custom Sort Wizard option. Setup the options on this wizard to you liking, and click on the OK button. To restore the database back to its normal sort, click the Refresh button on the Lookup View tab. Maintenance Coordinator Simplicity Software Technologies Inc. 59 Maintenance Scheduler Other Sort and Filter Options Besides from the options available on the Lookup tab, you have other sort/filter options found under the Filters page in the ribbon. These options are useful when you want to sort or filter the database by specific criteria. To use one of the above sort options: Open the Filters page in the ribbon and select the option of your choice. Automatic Task Descriptions There are two places within the Scheduler module that can create an automatic task description for you. These are found in the Equipment selection section on the Details tab, and on the Instructions tab in the Task Instructions for Standard Work Orders section. To insert the auto descriptions: Move to the appropriate section. Click on the Blue Arrow. Edit the automatic description to your liking. Click on the OK button. Note, the current description will be over written. Work Order Search To find a Work Order: Move to the Home tab in the ribbon and click on the Find First option or, press Ctrl - F. Move to the Search Text field and enter your search criteria. Move to the Search Type drop down list and select on which database field you want to base you search on. If you only want to return exact matching records from your search, place a check in the Exact Match Only check box. If this box is left blank, the application will automatically insert wild card characters in to the search. Maintenance Coordinator Simplicity Software Technologies Inc. 60 Maintenance Scheduler Click Find First. To find additional matches to your search: Move to the Home tab in the ribbon and click on the Find Next option or, press F3. Using the Tasks Planner Option With the Tasks Planner option you can display and print the maintenance schedule for an entire month, create and edit existing tasks and export a copy of the planner to Excel. To access the Task Planner screen: Maintenance Coordinator Simplicity Software Technologies Inc. 61 Maintenance Scheduler Click on the Task Planner option in the shortcut toolbar or from the Go page in the ribbon. Print the Planner Schedule To print the planner schedule: From the Tasks Planner screen move to and click on the Print option in the ribbon. Printing a Single Task with the Planner To print a single work order using the Task Planner: Move to the Tasks Planner screen. Select the task you want to print from those found in the planner‟s grid. Click on the Print Task option in the ribbon. Creating a New Work Order with the Planner To create a new task or work order using the Task Planner: Move to the Tasks Planner screen. Click on the Add New option in the ribbon. Create your task using the Work Order Wizard. For more information on this wizard look at the Work Orders Creation Wizard section found earlier in this chapter. Editing a Task with the Planner To edit a new task or work order using the Task Planner: Move to the Tasks Planner screen. Select the task you want to edit from those found in the planner‟s grid. Click on the Edit option in the ribbon. Edit your task using the Work Order Wizard. For more information on this wizard look at the Work Orders Creation Wizard section found earlier in this chapter. Maintenance Coordinator Simplicity Software Technologies Inc. 62 Maintenance Scheduler Moving Between Months on the Planner Screen To move between months on the Tasks Planner screen use the Previous Month and Next Month option in the ribbon. Exporting with Tasks Planner To export or save the Tasks Planner screen to be read by another (supported) program, please follow these steps: From the Tasks Planner screen move to and click on the Export option in the ribbon. This will bring up the Save Schedule dialog screen. Use this dialog as you would use any normal "Save As" dialog. Select the save path and directory. Specify the file name, and under the Save as Type drop down, select the file type you wish to save this file as. Click Save. View PM Types Only in the Task Planner By default, the Task Planner displays all work orders types. However, so people may want to only view recurring, or planned maintenance types of tasks or work orders. To view only recurring types of work orders: Open the Tasks Planner. Click on the View PM Types Only option in the ribbon. To switch back to viewing all work order types: Click on the View PM Types Only option in the ribbon. Maintenance Coordinator Simplicity Software Technologies Inc. 63 Maintenance Scheduler Tasks Calendar Everyone is different, and we all have our own preferences on how we like to do things, for this reason we have added the Tasks Calendar to our list of Work Order management tools. With this option you can create and edit tasks, view tasks in day, week, work week and month views. You can also any of these views, along with a blank month calendar that you can fill in yourself. To access the Tasks Calendar option: Click on the Tasks Calendar option in the shortcut toolbar or from the Go drop down menu Changing Views of the Tasks Calendar You have the option to change the views available in the Tasks Calendar to a single day, week, work week, or full calendar month. To change the view of your Tasks Calendar: Maintenance Coordinator Simplicity Software Technologies Inc. 64 Maintenance Scheduler Move to the Calendar View Options group in the ribbon and select the option of your choice. Creating a Work Order with the Tasks Calendar To create a new task or work order using the Tasks Calendar: Move to the Tasks Calendar screen. Select a blank time slot within the calendar. Either double-click in this time slot or click on the Add New button in the ribbon. When asked about creating a new work order, click the Yes button. Create your task using the Work Order Wizard. For more information on this wizard look at the Work Orders Creation Wizard section found earlier in this chapter. Editing a Task with the Tasks Calendar To edit task or work order using the Tasks Calendar: Move to the Tasks Calendar screen. Double-click the task you want to edit in the calendar grid. Edit your task using the Work Order Wizard. For more information on this wizard look at the Work Orders Creation Wizard section found earlier in this chapter. Changing Dates with the Tasks Calendar To change the current day or week of the Tasks Calendar: Access the Calendar control located in the Shortcut bar on the left side of your screen. Click on the date of your choice to move to that date. Click on the Left and Right arrows on the top of this calendar to scroll forward and backwards through the months. Click on the Today button to move to today‟s date. Maintenance Coordinator Simplicity Software Technologies Inc. 65 Maintenance Scheduler Printing the Current Tasks Calendar Schedule To print the current schedule as currently viewed: Select the view option of your choice. Click on the Schedule option in the ribbon‟s Print Options group. Setup the options on the Calendar Page Setup dialog screen to reflect your preferences. Click the OK button. Click the Print button from the Print Preview screen. Maintenance Coordinator Simplicity Software Technologies Inc. 66 Maintenance Scheduler To Print a Blank Month Calendar To print a blank calendar: Move to and open the Tasks Calendar option. Click on the Blank Calendar option in the ribbon‟s Print Options group. Once the calendar loads, open the File menu and select how you want to print the calendar. Options are Print B&W or Print Color. To scroll through the months: Click on the Forward or Backwards arrows. Print a Single Work Order from the Month Calendar To print a blank calendar: Move to and open the Tasks Calendar option. Click on the work order in the calendar that you want to print. Click on the Work Order option in the ribbon‟s Print Options group. Once the calendar loads, open the File menu and select how you want to print the calendar. Options are Print B&W or Print Color. Maintenance Documents You can maintain many other documents, links and pictures dealing with your maintenance activities by accessing the Documents section. To learn how to work with this documents feature, please refer to the Common Features chapter. To access the Documents feature: Open the Go page and select the Documents option. PM Coordinator Users – Please note that this Documents feature is compatible with the one in PM Coordinator. This will allow full compatibility when upgrading from this software package. Maintenance Coordinator Simplicity Software Technologies Inc. 67 Maintenance Scheduler Adding Task, Safety or Comments Instructions For recurring type tasks we have provided a way of creating and then reusing multiple sets of task instructions, or work to be performed instructions. Once created the same set of instructions can be used over and over again and assigned to multiple work orders. This saves you time as you do not have to rewrite instructions for common tasks. To add new instructions for use with your work orders: Open the Instructions page in the ribbon and select the appropriate Add Instructions option within the different groups found here. Type in a description or title for your new instructions in the space provided. The title can be up to 60 characters in length. Click Ok. Editing Task, Safety or Comments Instructions To edit instructions that you may have stored in your database, please follow these steps: Open the Instructions page in the ribbon and select the appropriate Edit Instructions option within the different groups found here. Next you‟ll be greeted with a screen containing a list box holding the descriptions of all the appropriate instructions found in the database. Move to this list and click on the description of the instructions you wish to edit. Click on the Accept command button. Once the Instructions Editor screen loads, edit your instructions by following the procedures as outlined in the Using the Instruction Editor section found Common Features chapter. Printing Task, Safety or Comments Instructions To print out complete instruction lists: Open the Instructions page in the ribbon and select the appropriate Print Instructions option within the different groups found here. Maintenance Coordinator Simplicity Software Technologies Inc. 68 Maintenance Scheduler Create a New Archive Database As you continue to use this application, your database is sure to grow in size. As a database grows too large there can be performance issues as far as speed, and problems with the data itself. For these reasons it is highly recommended that you remove data from the database in regular intervals. Either deleting older records or archiving them to an external database can do this for you. In order to archive your records, you‟ll first need to create an archive database. To create an archive database: Click on the Module button and move over the Databases option. Click the Create Archive Database option. Use this Save As type dialog as would any found in Windows, specifying the name and save path of this new database. Click the Save command button. Archiving your Database To archive your database: Maintenance Coordinator Simplicity Software Technologies Inc. 69 Maintenance Scheduler Click on the Module button and move over the Databases option. Click the Archive Database option. Move to the Date Range section and click on the … button adjacent to the Start Date field. Select the start date for your archive from within this calendar. Click on the Select Date button. Repeat the above step for the End Date field. All tasks that fall between these two date ranges will be selected for archiving. Move to the Archive Database Settings section and click the Connection button. From the Data Link Properties dialog, move to the Provider tab by clicking on it. From the list click on Microsoft Jet 4.0 OLE DB Provider option. Click the Next button. Click on the … button adjacent to the Select or enter a database name text box. Browse to and select the database you want open. Click the OK button. Maintenance Coordinator Simplicity Software Technologies Inc. 70 Maintenance Scheduler Click the Archive button to remove the files from your main database, and place them into the Archive database. IMPORTANT NOTE: Archiving files free up valuable database space, but this space will not be fully realized until you also perform a compact on the database. Performing a compact will free up this valuable database space. Please refer to the Database chapter for more details. Restore Records from Archive With the Database Restore feature you have three different restore options. You can restore every record found in the archive database, restore a date range of records, or restore a single record. These three options will be outlined next. To restore all records from archive: Click on the Module button and move over the Databases option. Click the Restore Database option. Maintenance Coordinator Simplicity Software Technologies Inc. 71 Maintenance Scheduler Move to the Restore Options section and click on the Restore All radio button. Move to the Archive Database path section and click the Connection button. From the Data Link Properties dialog, move to the Provider tab by clicking on it. From the list click on Microsoft Jet 4.0 OLE DB Provider option. Click the Next button. Click on the … button adjacent to the Select or enter a database name text box. Browse to and select the database you want open. Click the OK button. Click Restore. To restore a date range of records from archive: Click on the Module button and move over the Databases option. Click the Restore Database option. Move to the Restore Options section and click on the Restore Dates radio button. Move to the Restore Date Ranges section and click on the … command button adjacent to the Start Date field. Select the start date range for your restore from the calendar and click on the Select Date button. Repeat the above 2 steps for the End Date field to setup the ending date of the restore range. Move to the Archive Database path section and click the Connection button. From the Data Link Properties dialog, move to the Provider tab by clicking on it. From the list click on Microsoft Jet 4.0 OLE DB Provider option. Click the Next button. Click on the … button adjacent to the Select or enter a database name text box. Browse to and select the database you want open. Click the OK button. Click Restore. To restore a single record from archive: Click on the Module button and move over the Databases option. Click the Restore Database option. Maintenance Coordinator Simplicity Software Technologies Inc. 72 Maintenance Scheduler Move to the Restore Options section and click on the Restore One radio button. Move to the Task ID or Work Order to Restore field and type in the Task ID number. Move to the Archive Database path section and click the Connection button. From the Data Link Properties dialog, move to the Provider tab by clicking on it. From the list click on Microsoft Jet 4.0 OLE DB Provider option. Click the Next button. Click on the … button adjacent to the Select or enter a database name text box. Browse to and select the database you want open. Click the OK button. Click Restore. Deleting a Date Range of Work Orders To permanently remove a date range of work orders from the database: Click on the Module button and move over the Databases option. Click the Delete Date Range option. Select the ending date for this completion from the calendar, and click the Select Date button. All task that fall on or before this date will be permanently removed from the database. Next you‟ll be notified of how many records will be deleted, and given your last change to back out. To continue with the deletion, click the Yes button to the prompt. If you have changed your mind, click any of the other two buttons. Work Order Report Wizard This option is the most robust reporting option found in the Scheduler module. This option utilizes the Work Order Report Wizard, which will allow you to setup a wide variety of reports based on the criteria you setup using the wizard. You can setup this wizard to only report on tasks of a certain type, only report on a single piece of equipment, a single classification, a specific date range, and any combination of the above. Maintenance Coordinator Simplicity Software Technologies Inc. 73 Maintenance Scheduler To use the Work Orders Report Wizard: Open the Reports page in the ribbon and click on the Main Wizards option. Click on the Main Report Wizard option. First choose the task types you want to report on. These task types are the same as the task types you use when setting up your tasks. There is however three new options available here, and will be explained next. o All Tasks - This option will allow you access to all available task types. o Planned Type Tasks - This option includes all planned maintenance type tasks, and would include Planned Maintenance, Mini PMs, and Changeovers. o Work Order Type Tasks - Tasks falling under this category include Imminent Danger, Safety Hazard, Safety Concern and Standard Work Orders. Maintenance Coordinator Simplicity Software Technologies Inc. 74 Maintenance Scheduler Next you need to choose the status indictors for the report wizard. Options here include the following: o View All - This status indicator will select all tasks no matter what their status. o All Open - This indicator will select all open tasks. This includes task with the Ready and On Hold status. o Ready - This indicator will only select those tasks that have a status setup of Ready. o On Hold - This indicator will only select those tasks that have a status setup of On Hold. o Completed - This indicator will only select those tasks that have a status setup of Completed. o Cancelled - This indicator will only select those tasks that have a status setup of Cancelled. o All Closed - This indicator will select all tasks that have been closed. These include those marked as both Completed and Cancelled. Click the NEXT button in the toolbar. Next to setup in the Report Wizard is Classification Assignment. Here you select the Classes you want to include in your report. By clicking on the ALL CLASSES command button will include all available classifications. To select only those tasks that are assigned to a specific Classification, move to and click on the SELECT CLASS command button. This will display the Classifications Assignments screen. Next move to the list of classifications and select the class of your choice by clicking on. Next click on the SELECT command button to insert this class into the wizard. Repeat the above steps in setting up the Equipment, Project, Account and Mechanic you want to include in your report. Click the NEXT button in the toolbar. The next area that needs setup on the wizard is the Date Ranges section. Options available here include the following: o Requested Dates - When this option is selected only those tasks with a Requested Date that falls within the specified date range will be included in the sort. o Schedule Start Dates - When this option is selected only those tasks with a Scheduled Start Date that falls within the specified date range will be included in the sort. o Completion Dates - When this option is selected only those tasks with a Completion Date that falls within the specified date range will be included in the sort. Maintenance Coordinator Simplicity Software Technologies Inc. 75 Maintenance Scheduler Start Date - This field should indicate the start date of the date range for your sort. Change this date by double clicking in the field, and selecting your new date from within the displayed calendar. End Date - This field should indicate the ending date of the date range for your sort. Change this date by double clicking in the field, and selecting your new date from within the displayed calendar. Include All Dates Check Box - This check box is very important. If this box remains checked, any date range criteria that you may have setup will be ignored, and the program will return tasks of all dates. Removing the check here will allow the program to return only those tasks that meet the date range criteria that you have setup in this section. The last section of this wizard that requires you attention is the Sort By area. Here you can specify how you want the records sorted. You setup this criteria by selecting an option from those within the drop down list. Options available here include Request Dates, Task Priority, Task ID Numbers, Completion Dates, Task Types, Start Dates and Classifications. Next select an option button to tell the program to sort either in the ascending or descending order. If you want to include task instruction place a check in the Print Task Instructions checkbox. If you want to include completion comments place a check in the Print Completion Comments checkbox. Once the wizard has been fully setup to your liking, move to and click on the Create Report button to generate the report. Work Orders Cost Wizard Report The Work Orders Cost Report allows you to analyze the costs associated with your work orders. The report can be used on certain types of work orders, only certain machines, certain classes, including any combination of the above. You also have a different options available as how the information is grouped, such as by months, quarters, and so. To use the Work Order Cost Wizard Report: Open the Reports page in the ribbon and click on the Main Wizards option. Click on the W.O. Costs Wizard option. Move to the Work Orders Types drop down list and select the type of work orders you want to base your report on. Maintenance Coordinator Simplicity Software Technologies Inc. 76 Maintenance Scheduler To specify what Classification Assignment to use, move to the Classifications section and click on the Select Class button. Move to the list box and select the Classification you want to use by clicking on it. Click Select. To use all classifications in your report. Click on the All Classes button in the Classifications section. To specify which equipment to report on, move to the Equipment / Machines sections and click on the Select Equip button. Select the equipment you want to base your report on by clicking from within the installed grid. Click Select. To base your report on all equipment, click on the All Equipment button in the Equipment / Machines section. Repeat the above couple of steps for the Account and Project sections. To specify the date ranges of your report move to the Date Ranges section and click on the … command button adjacent to the Start Date field. Select the starting date of your report date range from within this calendar. Click Select Date. Repeat the above step for the End Date field. Maintenance Coordinator Simplicity Software Technologies Inc. 77 Maintenance Scheduler To use the specified date range, remove the check from the Include All Dates checkbox. To include all dates in your report, ensure this checkbox is checked. Move to the Group Report By drop down list and select how you would like to have the report grouped. The report will sub total the total costs for each group. To have the report grouped in descending order place a check in the Descending Order check box. Click Ok to generate the report. Work Orders Down Time Report The Down Time Report Wizard allows you to run a report on a machine or machines down time. This report allows you to specify date ranges and other criteria for some fairly custom reporting. To use the Down Time Report Wizard: Open the Reports page in the ribbon and click on the Main Wizards option. Maintenance Coordinator Simplicity Software Technologies Inc. 78 Maintenance Scheduler Click on the Downtime Wizard option. Move to the Work Orders Types drop down list and select the type of work orders you want to base your report on. To specify what Classification Assignment to use, move to the Classifications section and click on the Select Class button. Move to the list box and select the Classification you want to use by clicking on it. Click Select. To use all classifications in your report. Click on the All Classes button in the Classifications section. To specify which equipment to report on, move to the Equipment / Machines sections and click on the Select Equip button. Select the equipment you want to base your report on by clicking from within the installed grid. Click Select. To base your report on all equipment, click on the All Equipment button in the Equipment / Machines section. Repeat the above couple of steps for the Account and Project sections. To specify the date ranges of your report move to the Date Ranges section and click on the … command button adjacent to the Start Date field. Select the starting date of your report date range from within this calendar. Click Select Date. Repeat the above step for the End Date field. To use the specified date range, remove the check from the Include All Dates checkbox. To include all dates in your report, ensure this checkbox is checked. Move to the Group Report By drop down list and select how you would like to have the report grouped. The report will sub total the total costs for each group. To have the report grouped in descending order place a check in the Descending Order check box. Click Ok to generate the report. Maintenance Coordinator Simplicity Software Technologies Inc. 79 Maintenance Scheduler Work Order Details Report This report is based on the currently selected work order and will provide detailed information about the work order. This includes work order scheduling, assignments, materials list, total cost and more. To create a Work Order Details Report: Locate and make current the work order you want to base your report on. Open the Reports page in the ribbon and click on the Current W.O. option. Click on the Work Order. Details option. Work Orders Inventory Report The Work Orders Inventory Report checks the currently selected task against the inventory database and then reports on parts availability. This comes in handy when you want to check inventory levels to see if all parts that are needed to perform a task are on-hand. To create a Work Orders Inventory Report: Locate and make current the work order you want to base your report on. Open the Reports page in the ribbon and click on the Current W.O. option. Click on the Parts Inventory option. Current Work Order Estimated Costs This report gives you a printout of the cost information associated with the currently selected work order. To create a Current Work Order Estimated Costs Report: Locate and select the Work Order you want to base your report on. Open the Reports page in the ribbon and click on the Current W.O. option. Click on the Estimated Costs option. Maintenance Coordinator Simplicity Software Technologies Inc. 80 Maintenance Scheduler Work Orders Completion Analysis Report The Work Orders Completion Analysis Reports look at all work orders that are completed in a given time frame, and then breaks down this information as to the total number of different work orders types that were completed, and the percentage of these types that where completed on time or late. To create a Work Orders Completion Analysis Report: Open the Reports page in the ribbon and click on the Completed WOs option. Click on the Completion Analysis option. Select your start and end dates for your reports and click the Accept button. Repair Codes Report The Repair Codes Report allows you to create a report based on a single piece of equipment, either one or all repair codes for that equipment‟s work orders, and a date range you specify. Maintenance Coordinator Simplicity Software Technologies Inc. 81 Maintenance Scheduler To create a Work Orders Completion Analysis Report: Open the Reports page in the ribbon and click on the Completed WOs option. Click on the Repair Codes Report option. Click on the … button adjacent to Equipment Assignment Selection field. Click on the equipment you want to base your report on from those listed and click on the Select option in the ribbon. Click on the … button adjacent to Repair Code Selection field. Click on the repair code you want to base your report on from those listed and click on the Select option in the ribbon. To use all codes insure that the Include all Codes checkbox is checked, Move and click on the … buttons adjacent to the two date fields and setup this criteria To use all dates insure that the Include All Dates checkbox is checked. Click on the Ok button to run the report. Equipment Summary Report The Equipment Summary Report groups the report by equipment and then gives totals for the following: Labor Hours Labor Costs Material Costs Other Costs Total Costs Total number of Work Orders Issues/Performed Total Downtime. To create an Equipment Summary Report: Open the Reports page in the ribbon and click on the Summary Reports option. Click on the Equipment Summary option. Move to the various section and setup you‟re the report criteria to your liking. Click the OK button. Maintenance Coordinator Simplicity Software Technologies Inc. 82 Maintenance Scheduler Completion Summary Report The Completion Summary Report groups the report by dates and then reports on the following: Date Completed Equipment Reason for Outage Labor Hours Downtime Labor Costs Other Costs Total Costs To create a Completion Summary Report: Open the Reports page in the ribbon and click on the Summary Reports option. Click on the Completion Summary option. Move to the various section and setup you‟re the report criteria to your liking. Click the OK button Open Work Orders by Equipment The Open Work Orders by Equipment reports allows you create a report on all open work orders for a given piece of equipment or machinery. This really comes in handy on PM day when you can try to work on completing as many work orders as possible while the machine is down. To create a Open Work Orders by Equipment Report: Open the Reports page in the ribbon and click on the Open WOs option. Click on the Open by Equipment option. From the Equipment Lookup screen, click on the equipment that you want to base your report on. Click on the Select button. Type in a title for your report and click OK. Maintenance Coordinator Simplicity Software Technologies Inc. 83 Maintenance Scheduler Projected Work Orders Costs Report The Projected Work Orders Cost Report allows you to analyze the costs associated with your work orders. The report can be used on certain types of work orders, only certain accounts, certain classes, and other criteria. You also have a different options available as how the information is grouped, such as by months, quarters, and so. To use the Projected Work Order Cost Wizard Report: Open the Reports page in the ribbon and click on the Open WOs option. Click on the Projected Costs option. Move to the Work Orders Types drop down list and select the type of work orders you want to base your report on. To specify what Classification Assignment to use, move to the Classifications section and click on the Select Class button. Move to the list box and select the Classification you want to use by clicking on it. Click Select. To use all classifications in your report. Click on the All Classes button in the Classifications section. Maintenance Coordinator Simplicity Software Technologies Inc. 84 Maintenance Scheduler To specify which equipment to report on, move to the Equipment / Machines sections and click on the Select Equip button. Select the equipment you want to base your report on by clicking from within the installed grid. Click Select. To base your report on all equipment, click on the All Equipment button in the Equipment / Machines section. Repeat the above couple of steps for the Account and Project sections. To specify the date ranges of your report move to the Date Ranges section and click on the … command button adjacent to the Start Date field. Select the starting date of your report date range from within this calendar. Click Select Date. Repeat the above step for the End Date field. To use the specified date range, remove the check from the Include All Dates checkbox. To include all dates in your report, ensure this checkbox is checked. Move to the Group Report By drop down list and select how you would like to have the report grouped. The report will sub total the total costs for each group. To have the report grouped in descending order place a check in the Descending Order check box. Click Ok to generate the report. Open Work Orders by Mechanic Report The Open Work Orders by Mechanic reports allows you create a report on all open work orders for a given mechanic or employee. To create an Open Work Orders by Mechanic Report: Open the Reports page in the ribbon and click on the Labor Resources option. Click on the Open by Mechanic option. From the Mechanic Lookup screen, click on the mechanic that you want to base your report on. Click on the Select button. Type in a title for your report and click OK. Maintenance Coordinator Simplicity Software Technologies Inc. 85 Maintenance Scheduler Closed Work Orders by Mechanic Report The Closed Work Orders by Mechanic reports allows you create a report on all completed work orders for a given mechanic or employee. To create an Closed Work Orders by Mechanic Report: Open the Reports page in the ribbon and click on the Labor Resources option. Click on the Closed by Mechanic option. From the Mechanic Lookup screen, click on the mechanic that you want to base your report on. Click on the Select button. Type in a title for your report and click OK. Mechanics Phone List Report This report creates a list of all those people that are in the Maintenance Personnel database. It includes their names, titles, home telephone numbers and pager numbers. To use the Maintenance Personnel report: Open the Reports page in the ribbon and click on the Labor Resources option. Click on the Telephone List option. Projected Man Hours Needed Report The Projected Man Hours Needed Report will return information on open work orders, and the man hours assigned for there completion. Included in the report are descriptions of the open tasks, the projected actual and difference in the hours needed in their completion. To create a Projected Man Hours Needed Report: Open the Reports page in the ribbon and click on the Labor Hours option. Click on the Projected Hours option. Move to the Mechanic Assignment section and click on the … button. Select a mechanic from the lookup screen and click the select button Maintenance Coordinator Simplicity Software Technologies Inc. 86 Maintenance Scheduler Move the Date Ranges section and setup the date range you want to base your report on. Click on the OK button. Actual Man Hours Used Report The Actual Man Hours Used Report will return information on closed work orders, and the man hours actually used are recorded for their completion. Included in the report are descriptions of the closed tasks, the projected, actual and difference in the hours needed in their completion. To create a Projected Man Hours Needed Report: Open the Reports page in the ribbon and click on the Labor Hours option. Click on the Actual Hours option. Move to the Mechanic Assignment section and click on the … button. Select a mechanic from the lookup screen and click the select button Move the Date Ranges section and setup the date range you want to base your report on. Click on the OK button. Maintenance Coordinator Simplicity Software Technologies Inc. 87 Maintenance Scheduler Charts and Graphs There are a few charts and graphs available on work orders. These routines use the same report wizards that are available to the normal reports, so please refer to appropriate reports on how to use them. To create a chart on work orders: Click on the Graphs page in the ribbon. Select the option that best descriptions what you want to report on. For more information about the Charts Designer please refer to the Common Features chapter Maintenance Coordinator Simplicity Software Technologies Inc. 88 MAINTENANCE COORDINATOR SYSTEM Work Orders Maintenance Coordinator Simplicity Software Technologies Inc. 2 Work Orders Table of Contents Overview ............................................................................................................................. 4 Sample Work Order System ............................................................................................... 5 Understanding the Work Orders Tabs ................................................................................ 5 Lookup View ...................................................................................................................... 6 Detail View ......................................................................................................................... 7 Scheduling and Status Tab .................................................................................................. 9 Adding or Creating a New Work Order ............................................................................ 10 Adding a New Work Order with the Wizard .................................................................... 11 Deleting a Work Order...................................................................................................... 12 Saving the Work Order to the Equipment History Log .................................................... 12 Filtering Options ............................................................................................................... 12 Filtering the Database by Work Assignments .................................................................. 12 Filtering the Database by Equipment Assignment............................................................ 13 Lookup View Options ....................................................................................................... 13 Safety Instructions ............................................................................................................ 14 Printing the Current Work Order ...................................................................................... 14 Report Wizard ................................................................................................................... 15 Work Orders by Classification Report .............................................................................. 16 Work Orders Remote Request .......................................................................................... 17 Create Request Data File .................................................................................................. 17 Importing Remote Work Order Requests ......................................................................... 18 Maintenance Coordinator Simplicity Software Technologies Inc. 3 Work Orders Overview This module is designed for use with standard work orders, which includes three safety related types. We believe you'll find this module much easier to use for these types of work orders than the Maintenance Scheduler module. This module is ideal for use as a Work Orders Request module. It’s possible to give the user access to just this module if wanted. All the user needs to fill out is a single screen of information when creating a work order request, as opposed to a couple with the Scheduler module. All works orders when first created are assigned a status of Work Requests. Your system coordinator needs to only sort the database by this status to quickly find all work requests. He can then perform whatever action he wants with these tasks. This module was made simple with limited abilities on purpose. When more features and reports are needed with these work orders we suggest working with them in the Maintenance Scheduler module. Maintenance Coordinator Simplicity Software Technologies Inc. 4 Work Orders Sample Work Order System The following flow chart illustrates a possible work order system that can be used with this module. This system will work best if you are able to make this module available to all employees that write work orders. Some of the advantages to this system compared to a paper system lie in the easy tracking of work orders, and there used in a variety of reports. You can print reports based on these work orders by open items, closed items, pre-maintenance reports and more. As work orders are first entered into the system they are assigned a status of Work Requests. These work requests will remain with that status until your administrator previews them, and changes the status. This step ensures the easy location of recently entered work orders. Understanding the Work Orders Tabs In this section we will explore and explain the features found on each of the Work Orders module’s tabs. Maintenance Coordinator Simplicity Software Technologies Inc. 5 Work Orders Lookup View This is a lot like a lookup table. All work orders in the current sort will be located here. To select a work order simply move to the grid and click on the record of your choice. Once selected you can move to the other tabs and edit the selected task. Maintenance Coordinator Simplicity Software Technologies Inc. 6 Work Orders Detail View This is where you would create your standard work orders. Describe the work to be done, where it should be done, and other related information. Work Order Reference Number – This is the internal number assigned to work orders. The first two digits of this number indicate the year the work order was generated. The next two numbers indicate the month the work order was generated. The last set of numbers is a sequential number generated by the program. You can change or reset the sequential part of this ID in the Scheduler module. Estimated Down Time Needed – This field is where you input the down time that may be required completing the task. Brief Description of Work To Perform – This field allows for a brief (100 characters max) description of the work to be performed. Work Request By – This field indicates the name of the person requesting the work to be performed. You can change this field by typing directly in it. Maintenance Coordinator Simplicity Software Technologies Inc. 7 Work Orders Request Date – This is the date this work order was requested. Change the date here by clicking the … command button, and then selecting a new date from the calendar. Classification– This is the classification assignment this work request relates to. Change this field by clicking the … command button, and then selecting the new classification from within the list. Safety Instructions – This is where you select the safety instructions to use with your work order. These instructions can be setup in the Scheduler module. To select instructions just click the … button adjacent to this field, and then select the instruction from the list. Click Accept. Equipment – This is where you specify what equipment this work order applies to. To select or make an equipment assignment, move to and click the … button adjacent to this field, then select the equipment from the list. Click Select. Equipment Details – Clicking this command button will display additional details about the assigned piece of equipment. Work Order Types – This indicates the type assignment for the current work orders. Available options here are Imminent Danger, Safety Hazard, Safety Concern and Standard Work Orders. Change this assignment by clicking the appropriate option button. Work To Be Performed and Why It Should Be Performed – This field allows for a detailed description of the work to be performed, and any explanations as to why it should be done. Note about Classifications This module does not allow you to add Classifications to the database for assignment to these work orders. These Classification can however be modified in the Maintenance Scheduler module. Classification modified in the Maintenance Scheduler module affect both modules. Maintenance Coordinator Simplicity Software Technologies Inc. 8 Work Orders Scheduling and Status Tab NOTE: The person or persons responsible for the administration of work orders should fill out information on this screen. Delay and Completion Comments – This area is used to record delay reasons for the completion of the work order. It is also used to record any comments on the completion of the task. Status – This field indicates the current status of the task, and is changed by clicking on a new indicator from the drop down list. Available indicators here are Ready, On Hold, Cancelled, Completed, and Work Request. All new work orders are assigned a status of work request, and remain this way until changed manually. History – Clicking this button will save a copy of this work order to the History log of the assigned piece of equipment. Scheduled Start – This field indicates the scheduled starting date the administrator has assigned to the task. Change this date by clicking the … command button, and selecting a new date from the calendar. Scheduled End - This field indicates the scheduled ending date the administrator has assigned to the task. Change this date by clicking the … command button, and selecting a new date from the calendar Maintenance Coordinator Simplicity Software Technologies Inc. 9 Work Orders Assigned To – This field indicates the name of the person that is currently assigned to perform or see that the task is completed. Change this field by clicking on the … button adjacent to it, then selecting a name from within the list. Click Select. Responsible Manager – This area indicates the manager that is responsible to make sure that the work order is completed. Change this name by clicking on the … command button and then selecting the name from within the quick entry list. Date Completed – This field indicates the date the work order or task was completed. Change or assign a date here by clicking on the … command button and selecting a new date from the calendar. Completed By - This field indicates the name of the person that completed the assigned task. Change this name by selecting a new name from the drop down list. Down Time – Use these fields to record the total down that was required to complete the work order. Meter Value – Use this field to record the meter reading at the time the work order was completed Retrieve Current – This retrieves the current meter reading from the equipment database and inserts this information into the Meter Value field. Adding or Creating a New Work Order To create a new work order: Click the Add New Record option on the Home page of the ribbon. Move to and setup the various fields found on the Work Order Details View tab. Click on the Post/Save Changes option to ensure the record is saved. Maintenance Coordinator Simplicity Software Technologies Inc. 10 Work Orders Adding a New Work Order with the Wizard For some people creating a new work order maybe simplified by using a wizard, and in other cases the user may not have rights to create a new work order the conventional way. For these reasons we have made the wizard available To create a new work order: Click on the Module button and select the Add New with Wizard option (Alt + N). The procedures for using this wizard are outlined in the Common Features chapter. Maintenance Coordinator Simplicity Software Technologies Inc. 11 Work Orders Deleting a Work Order To delete a work order: Select the work order you want to delete. Click the Delete Record option on the Home page of the ribbon. When asked about the deletion, click Yes. Saving the Work Order to the Equipment History Log To save a copy of the work order to the equipment history log: Select the work order you want to save information on. Ensure that work order has equipment assigned to it. Click on the Save To History option in the ribbon or click the History button on the Scheduling and Status tab. Filtering Options To specify which records to include in the current database filter: Move to the Filters tab in the ribbon. Select the filter/sort option of your choice Filtering the Database by Work Assignments You can have the work orders database filtered by work assignments and open work orders. This comes in handy when you want to view a mechanic’s back log or current work order assignments. To sort the database by Work Assignments: Move to the Filters tab in the ribbon and move to the Filter by Assignments group. Click on the Mechanic Assignment or Mechanic Due Today options. Maintenance Coordinator Simplicity Software Technologies Inc. 12 Work Orders From the Employees Lookup screen, select the mechanic you want to base your sort on. The database is searched on mechanics in the three resource assignments fields. Once the employee is selected, click on the Select button. To restore the database back to its normal sort, click the Refresh button on the Lookup View tab. Filtering the Database by Equipment Assignment You can have the work orders database sorted by equipment assignments and open work orders. This comes in handy when you want to view all the open work orders for a given piece of equipment. To sort the database by Equipment Assignments: Move to the Filters tab in the ribbon and move to the Filter by Assignments group. Click on the Equipment Assignment option. From the Equipment Lookup screen, select the equipment you want to base your sort on. Once the equipment is selected, click on the Select button. To restore the database back to its normal sort, click the Refresh button on the Lookup View tab. Lookup View Options On the Lookup tab you have the option to display just the table of records, just a classification tree or both. Once selected the program will remember your setup the next time the module in activated. To setup your view options: Click on the Module button and move over the Lookup View Options choice. Now click on the option of your choice. Click on the Refresh button on the Lookup View tab. Maintenance Coordinator Simplicity Software Technologies Inc. 13 Work Orders Safety Instructions You have your choice of using the standard set of safety instructions with your work orders or specifying your own instructions. You can’t actually create your own instructions from within this module, but you can create them in the Scheduler module, and then use them here. To specify your own set of safety instructions: Locate the work order you want to apply the instructions to. Select on the Insert Safety Instructions option in the ribbon or click on the … button adjacent to the Safety Instructions field on the Details View tab. Move to the grid containing the descriptions of available instructions and click on the one of your choice. Click Select. Printing the Current Work Order To print the current work order: Click on the Print Report or Review Record options in the ribbon. Click on the icon of the Printer in the Preview’s screen toolbar to print the document. Maintenance Coordinator Simplicity Software Technologies Inc. 14 Work Orders Report Wizard With the report wizard you can create some fairly custom reports on work orders by using the built in View Sort/Filter Wizard. To create reports using the Report Wizard: Open the Report page in the ribbon and select the Report Wizard option Move to the Work Order Types section and select the type of work orders you wish to view by clicking on one of the option buttons found there. Move to the Work Order Status drop down list, and select the status indicator that best describes the tasks you wish to view. Move to the Sort By drop down and select the item you wish to sort the work orders by. Set up the sort order by clicking on the Ascending Order or Descending Order option buttons. Move the Date Ranges section and setup the date range you want to base your report on. Once everything on the wizard is setup to your liking move to and click on the OK. Click on the icon of the Printer in the Preview’s screen toolbar to print the document. Maintenance Coordinator Simplicity Software Technologies Inc. 15 Work Orders Work Orders by Classification Report To create a work orders by classifications report: Open the Report page in the ribbon and select the Classifications Report option. The Select Date and Line dialog screen should appear. Move to the Start Date field and click on the … button adjacent to this field to bring up a calendar. Now click on the desired date and then click the Select Date button. Repeat the above step for the Ending Date. Next move to the Classifications list box and select the classification you wish to base your report on. You select a classification by clicking on it. Next move to and click on the Select button. Click on the icon of the Printer in the Preview’s screen toolbar to print the document. Maintenance Coordinator Simplicity Software Technologies Inc. 16 Work Orders Work Orders Remote Request As an add-on feature to the Maintenance Coordinator system, we offer the Work Orders Remote Request module. This module is designed to be used in remote locations where Maintenance Coordinator needs not be installed. This module needs a couple of support functions, and these will be outlined next. Create Request Data File The Work Orders Remote Request module allows you to assign Equipment to the work orders requests. In order to do this, some type of file must be used to select equipment from. Access database files, which are used though out this system, are much too large for what we wanted to use with this remote module. We wanted to keep Equipment file as small as possible so it could be easily attached to an Email when updates are needed. To create the Equipment file: Click on the Module button and move over the Remote Service Requests option. Click on either the Create Data File by Description or Create Data File by Reference options. The data file will be sorted by the choice you make here. A file will now be create to the same path the application is running in, which by default would be: C:\Program Files\SST\Maintenance Coordinator. The file that is created is named RegDB.dat. This file will have all of your current equipment included. This file will need to be updated whenever equipment is added or removed from the system. Once created, this file can be emailed to whoever is using the Work Orders Remote Requests module. Maintenance Coordinator Simplicity Software Technologies Inc. 17 Work Orders Importing Remote Work Order Requests With the Remote Work Orders Request module, people have the ability to create work orders request from remote locations, and then email these requests to the system’s administrator. The administrator must then have a means to import these requests into the system, where the request can be turned into actual work orders, or denied. To import remote work order requests: Save the work request email attachment file, Request.wko to your hard drive. Click on the Module button and move over the Remote Service Requests option. Click on the Import Remote Requests option. Use this file open type dialog to browse to where you saved the Request.wko file. Select the file, and click Open. The work order request will now be imported in the work orders module. Maintenance Coordinator Simplicity Software Technologies Inc. 18 MAINTENANCE COORDINATOR SYSTEM Parts and Inventory Maintenance Coordinator Simplicity Software Technologies Inc. 2 Parts and Inventory Table of Contents Overview ............................................................................................................................. 4 Lookup View ...................................................................................................................... 5 Quick Find .......................................................................................................................... 6 Adding New Parts ............................................................................................................... 6 Part Identification Field ...................................................................................................... 6 Deleting a Part..................................................................................................................... 7 Inventory Control ................................................................................................................ 7 Part Substitutions ................................................................................................................ 8 Selecting and Viewing Substitute Parts .............................................................................. 8 Removing Substitute Parts .................................................................................................. 9 Part Movement .................................................................................................................... 9 Deleting a Part Movement Entry ...................................................................................... 10 Purchasing Costs ............................................................................................................... 10 Barcodes ............................................................................................................................ 11 User-Defined Fields .......................................................................................................... 11 Attachments ...................................................................................................................... 11 Group Assignments ........................................................................................................... 12 Adding New Group Titles ................................................................................................. 13 Removing a Part from a Group ......................................................................................... 13 Viewing Part Groups......................................................................................................... 14 Parts Lookup ..................................................................................................................... 15 Understock Inventory Sort ................................................................................................ 16 Sorting the Database ......................................................................................................... 16 Printing the Current Part ................................................................................................... 17 Using the Quick Checkout ................................................................................................ 17 Parts Notes ........................................................................................................................ 18 Parts Picture ...................................................................................................................... 18 Check Out Report ............................................................................................................. 19 Parts Last Movement Report ............................................................................................ 20 Inventory Report Wizard .................................................................................................. 21 Inventory Report ............................................................................................................... 22 Under Stocked Items Report ............................................................................................. 23 Parts in Part Groups Report .............................................................................................. 23 Parts by Equipment Report ............................................................................................... 24 Maintenance Coordinator Simplicity Software Technologies Inc. 3 Parts and Inventory Overview This module is used as part of an inventory control system. Use this module to keep track of all the parts that your production and maintenance departments require to conduct everyday business. With this module you can track inventory levels, storage locations, set minimum and maximum stock levels, record costs, and more. One of the key features of this module is with its use of Part Groups. With Part Groups you can assign a single part to various groups and equipment. Use Groups to ease in part lookup, and for the easy association of various parts to equipment, departments, and other related information. Maintenance Coordinator Simplicity Software Technologies Inc. 4 Parts and Inventory Lookup View This tab acts much like a lookup table. Here you simply click on the part of your choice to select it. Once selected you can move to the other tabs to view or edit the record’s contents. To resort the database: Move to the Lookup View tab. Select a sort option from the Sort By drop down list. The database will be sorted by whatever field you selected from this list. Click the Refresh button. Maintenance Coordinator Simplicity Software Technologies Inc. 5 Parts and Inventory Quick Find To find a part using the Quick Find routine: Move to the Lookup View tab. Move to the Sort By drop down list and select how you want the database sorted. The Quick Find routine will use this field for its search. Move to the Quick Find text box and type in the item you are looking for. As you type, the program will search the database for a matching item. Adding New Parts To add a new part to the database: Click on the Add New Record option on the Home page of the ribbon. Move to the various fields on the Details View tab and enter the appropriate information for that field. Information on this screen will be automatically saved into the database for you. Click on the Post/Save Changes button in the ribbon to ensure all information is saved Part Identification Field This field, found on the Details View should contain a unique identifier for each different part entered into the database. We did not however make this a mandatory rule as everyone has their own way of doing things. You can however verify if the identifier you’ve entered is unique to the database. To test to see if your identifier is unique: Enter your Part Identification in the space provided. Move to and click on the Check button adjacent to this field. The program will then inform you as to whether a matching identifier was found. Maintenance Coordinator Simplicity Software Technologies Inc. 6 Parts and Inventory Once you have enter the Part Description, you can click on the ID button adjacent to this field and program will automatically create you a unique ID for the selected part. Deleting a Part To delete a part from the parts database: Locate the part that you want to remove by using one of the lookup routines. Click on the Record Record option on the Home page of the ribbon. When prompt about the deletion, click the Yes button. Inventory Control Inventory control is maintained by setting up your inventory levels, specifying minimum, maximum, and reorder quantities. Other items that fall under this category include unit information, and unit pricing. The unit pricing information is use by the Purchasing and Receiving module, and for work orders where this pricing information is used for total costs calculations. To setup inventory control information: Locate and select the inventory item you want to work with. Move to the Details View tab by clicking it. Move to the Inventory Control tab by clicking it. This is found near the bottom of the screen on the Details View. Enter the appropriate information for each of the fields found here. Maintenance Coordinator Simplicity Software Technologies Inc. 7 Parts and Inventory Part Substitutions It is highly recommended that you setup substitute parts whenever possible. This comes in handy when you run out of stock on a specific inventory item, but have other parts that can be used in its place. Setting up substitute parts can save a lot of wasted time in situations when time is most valuable. To setup substitute inventory items: Locate and select the inventory item you want to work with. Move to the Details View tab by clicking it. Move to the Substitution tab by clicking it. This is found near the bottom of the screen on the Details View. Click the Add Part command. Move to the Group Name grid on the left and select the group you believe your part belongs to. The grid on the right will display all the parts that belong to that group. To view all parts, regardless of groups, check the View All Parts checkbox. Select the part you want to use from the grid located on the right of the screen. To verify that it’s the correct part, click the View Part button. After viewing the part, click Close. Click Select to use the selected part. Selecting and Viewing Substitute Parts To view and move the record holding a substitute part: Locate and select the inventory item you want to work with. Move to the Details View tab by clicking it. Move to the Substitution tab by clicking it. This is found near the bottom of the screen on the Details View. Select the substitute part you want to move to from the grid by clicking on it. Maintenance Coordinator Simplicity Software Technologies Inc. 8 Parts and Inventory Click the View Part button. When asked if you want to view the substitute part, click the Yes button. Removing Substitute Parts To remove substitute parts: Locate and select the inventory item you want to work with. Move to the Details View tab by clicking it. Move to the Substitution tab by clicking it. This is found near the bottom of the screen on the Details View. Select the substitute part you want to remove by clicking on it from within the grid. Click the Remove button. When asked if you want to remove the selected part, click the Yes button. Part Movement Knowing if a part is actually being used can be considered as very valuable information, especially when you want to reduce inventory, tax purposes for example. This information can also be proven useful when you want to increase stock levels to keep up with demand. The parts database will record and maintain the last 5 inventory movements of an item. It will record whether the item was purchased, checked out or used in the completion of a work order or task. Important Note: In order for an item to be recorded as checked out, the Quick Checkout routine should be used when checking out a part. Just reducing the inventory level will not record this information. Maintenance Coordinator Simplicity Software Technologies Inc. 9 Parts and Inventory To view the part movement history: Locate and select the inventory item you want to work with. Move to the Details View tab by clicking it. Move to the Movement tab by clicking it. This is found near the bottom of the screen on the Details View. Deleting a Part Movement Entry To remove a Part Movement history entry: Locate and select the inventory item you want to work with. Move to the Details View tab by clicking it. Move to the Movement tab by clicking it. This is found near the bottom of the screen on the Details View. Select the entry you want to remove from those displayed in the grid. Click the Remove Record button. Click the Yes button when prompted about the deletion. Purchasing Costs The parts database maintains a listing of recent purchases and the costs associated with these purchases. This information is automatically undated when items are received into inventory from the Purchasing and Receiving module. To view the purchasing costs history: Locate and select the inventory item you want to work with. Move to the Details View tab by clicking it. Move to the Purchasing Costs tab by clicking it. This is found near the bottom of the screen on the Details View. Maintenance Coordinator Simplicity Software Technologies Inc. 10 Parts and Inventory Barcodes You can create and use barcodes and labels. To access the Barcode feature: Locate and select the inventory item you want to work with. Move to the Details View tab by clicking it. Move to the Barcodes tab by clicking it. This is found near the bottom of the screen on the Details View. For more information on the Barcodes feature, please refer to Common Features chapter. User-Defined Fields The Parts and Inventory database allows the use of 8 user defined fields where you can store additional information about your inventory items. To access the user defined fields: Locate and select the inventory item you want to work with. Move to the Details View tab by clicking it. Move to the User Fields tab by clicking it. This is found near the bottom of the screen on the Details View. For more information on the User-Defined Fields feature, please refer to Common Features chapter. Attachments The Parts and Inventory database allows to you to attach 2 external documents of links to each inventory record. To access the attachments feature: Locate and select the inventory item you want to work with. Move to the Details View tab by clicking it. Move to the Attachments tab by clicking it. This is found near the bottom of the screen on the Details View. Maintenance Coordinator Simplicity Software Technologies Inc. 11 Parts and Inventory For more information on the Attachments Feature, please refer to Common Features chapter. Group Assignments You can and should assign each of your parts to a group. These groups by default would be related to machines they are used on, but they could also be any type of group you want to create. Assigning parts to areas they are stored in for example, would also be a good group. The type of item it relates to is also a good group, such as Electrical, Hardware, Bearings, and so on. Each part can be assigned to a countless number of groups, limited only by disk space and you imagination. To assign a part to a group: Locate and select the inventory item you want to work with. Click on the Group Assignments tab. Move to the Groups on Disk list box and select the name of the group you want to join from those within the list. The item should appear highlighted showing it is indeed selected. Click on the ADD/DISK button. Maintenance Coordinator Simplicity Software Technologies Inc. 12 Parts and Inventory Adding New Group Titles To add a new group title to both those listed on disk, and to the currently selected part: Locate and select the inventory item you want to work with. Click on the Group Assignments tab Click in the Enter New Group text box and type in your new group description. This description can be up to 30 characters in length. Move to and click on the ADD/NEW button to add this group to both the selected part, and those listed on disk. Removing a Part from a Group To remove a part from one of the groups please follow these steps: Locate and select the inventory item you want to work with. Click on the Group Assignments tab. Move to the Current Assignments list box and select the group title you want to disassociate with by clicking on it from within the list. The item should appear highlighted showing it is indeed selected. Move to and click on the Delete button. To remove a part from a group assignment, and at the same time remove the group name from those listed on disk please follow these steps: Locate and select the inventory item you want to work with. Click on the Group Assignments tab. Move to the Current Assignments list box and select the group title you want to disassociate with by clicking on it within the list. The item should appear highlighted showing it is indeed selected. Move to and click on the Master Del button. The group assignment will then be remove from the current part and ALL other parts that were assigned to it. Please note that using the MASTER DEL routine will not only remove the group assignment from the current item, but from every item associated with it. So please be certain that you actually want to do this before you use this option. Maintenance Coordinator Simplicity Software Technologies Inc. 13 Parts and Inventory Viewing Part Groups One of the advantages of groups is helping with the lookup process. You can also open Part Groups, effectively filtering out all other parts except those belonging to the selected group. To have the database sorted by a single group, please follow these steps: Click on the Groups tab in the ribbon and select the Parts Group option. Move to the Groups Title grid and select the group you wish to open by clicking on it. Move to and click on the Select command button. Your parts database will now only show parts that belong to the selected group. To return to normal, and view all parts, open the Groups page in the ribbon, and select the Close Group – View All option. Maintenance Coordinator Simplicity Software Technologies Inc. 14 Parts and Inventory Parts Lookup The Parts Lookup screen divides up the database by part groups, which can make finding a specific part much easier than sorting through the entire database. This screen also allows you to quickly checkout parts from inventory. To locate a part using the Part Lookup routine: From the Home page of the ribbon select the Part Lookup option or click Ctrl+L. Move to the Group Name grid on the left and select the group you believe your part belongs to. The grid on the right will display all the parts that belong to that group. To view all parts, regardless of groups, check the View All Parts checkbox. Select the part you want from the grid located on the right of the screen. To verify that it’s the correct part, click the Details tab. Maintenance Coordinator Simplicity Software Technologies Inc. 15 Parts and Inventory Click Select to open the selected part. To check-out a part: Locate the part you wish to check out by using one of the available lookup routines. Click on the Checkout button. Move to the Quantity Checked Out field and type in the appropriate information. You can also use the two arrow buttons located on either side of the field to change the quantity. Move to Check Out Type drop down list and select a description that best describes the type of check out this is. Click the Ok button. Understock Inventory Sort To have the database sorted by all items that are currently falling under the recommended inventory levels: Open the Go page in the ribbon and select the Under-Stock Items option. To return to the default sort click on the View All option on the Go page. Sorting the Database You have a few different sort options with the inventory database. These are found on the Lookup tab. To resort the Parts database: Move to Lookup View tab. Move to the Sort By drop down box and select the sort option of your choice. Click on the Refresh button. Maintenance Coordinator Simplicity Software Technologies Inc. 16 Parts and Inventory Printing the Current Part To print the current part: Move to the Home page in the ribbon and select either the Print Record or Preview Record options. Click on the icon of the Printer in the Preview’s screen toolbar to print the document. Using the Quick Checkout The Quick Checkout routine was design for the easy and quick issuing of inventory items. This routine will not only remove items from stock, but will also update the Parts Movement database. To use the Quick Checkout option: Locate the part use wish to check out using one of the available lookup routines. Move to the Home page in the ribbon and select the Part Checkout option Move to the Quantity Checked Out field and type in the appropriate information. You can also use the two arrow buttons located on either side of the field to change the quantity. Move to Check Out Type drop down list and select a description that best describes the type of check out this is. Maintenance Coordinator Simplicity Software Technologies Inc. 17 Parts and Inventory Next enter who’s making this checkout in the Checkout By field. Move and click on the … button adjacent to the Account field, and select which account this checkout show apply to. Click the Ok button. Parts Notes You can keep detailed notes on each of your parts. The notes editor uses our built in word processor that is used throughout the Maintenance Coordinator system. To find how to use the features of this word processor please refer to the Word Processor chapter. To access the parts notes: Locate and select the inventory item you want to work with. Open the Go page in the ribbon and select the Notes option. Parts Picture You can include a picture of each of your parts in the database. The picture viewer used here is used throughout the Maintenance Coordinator system. To find out more about this viewer please refer to our Common Features chapter. To view or edit the parts picture: Locate and select the inventory item you want to work with. Open the Go page in the ribbon and select the Picture option. We included this feature because a lot of people require the ability to embed images into the database. We do not however recommend over using this feature as images use a lot of database space, and can effect performance if too much space is used. A better way to include images is by using the Attachments feature, where images can be stored on hard drives and just linked to. You can find more information on the Attachments Feature in the Common Features chapter. Maintenance Coordinator Simplicity Software Technologies Inc. 18 Parts and Inventory Check Out Report The database keeps track of the last 5 activities on any given part. These include part check out, record creation and receiving parts into inventory. Parts can be checked out using the Quick Checkout in the Parts module, by work orders in the Scheduler module, and by issues from either of the Issues modules. The Check Out Report will report on all parts that have been checked out from a given date range forward, and has been marked as a check out type. However, if the part has more than 5 activities within this date range, only the most recent ones will be reported. This report can be useful when you want to know which items were removed from the stock room over a weekend for example. To create a Check Out Report: Open the Reports page in the ribbon and select the Checked Out Report option. Select the report date from the calendar and then click the Select Date button. To print the report, click on the Print option in the toolbar. Maintenance Coordinator Simplicity Software Technologies Inc. 19 Parts and Inventory Parts Last Movement Report After your parts room has been operational for sometime, you may want to know what parts are just sitting there, taking up space, and costing you at tax time. Once this information is known, these parts can be removed from inventory, saving money and space. To create the Parts Last Movement Report: Open the Reports page in the ribbon and select the Parts Movement option. Move to the Date Selection field and click on the … button adjacent to the date field. Select a date for your report from the calendar by clicking on it. Click the Select Date button. If you would like to base your report on movement item prior to this date, click on the Report on Items Prior to the above date radio button, otherwise click on the Report on Items After the above date radio button. Move to the Transaction Types drop down list and select the type of transaction you want to base your report on. To include all transaction types in your report, move to and place a check in the Use All Types checkbox. To print the report, click on the Print option in the toolbar. Maintenance Coordinator Simplicity Software Technologies Inc. 20 Parts and Inventory Inventory Report Wizard The Inventory Report will return a document showing all items presently in inventory. To create this report: Open the Reports page in the ribbon and click on the Report Wizard option. Move to the Storage Locations area and type in the appropriate information, or click on … button adjacent to this field, and making your selection from the list, and clicking the Select button. If you want to use all locations, place a checkmark in the Use All Locations checkbox. Repeat the above two steps for the Accounts and Classifications fields. Move to the Sort By drop down, and select how you want your report sorted. Click on the OK button to create the reports. Maintenance Coordinator Simplicity Software Technologies Inc. 21 Parts and Inventory Inventory Report The Spare Parts Inventory Report will create a document reporting on all inventory levels within the database, and at the same time give a dollar figure for all items that have a dollar amount assigned to it. To create this report: Open the Reports page in the ribbon and click on the Inventory option. Next chose the format to create the report in; Spread Sheet Format or Word Processor Format. Export options will change by how you create the report. Move to the Storage Locations area and type in the appropriate information, or click on … button adjacent to this field, and making your selection from the list, and clicking the Select button. If you want to use all locations, place a checkmark in the Use All Locations checkbox. Repeat the above two steps for the Accounts and Classifications fields. Move to the Sort By drop down, and select how you want your report sorted. Maintenance Coordinator Simplicity Software Technologies Inc. 22 Parts and Inventory If you want to specify a cost range of items to report on, move to the Unit Cost Range section and setup the report criteria found in this section. Click on the OK button to create the reports. Under Stocked Items Report The Reorder (Under Stock) Report will report on all inventory items that are below suggested inventory levels. To use this report: Open the Reports page in the ribbon and click on the Under Stocked Items option. To print the report click on the Print option in the toolbar. Parts in Part Groups Report To create a report on all parts that belong to a single part group: Open the Reports page in the ribbon and click on the Parts in Parts Group option. Select the name of the group you want to base your report on from those listed in the grid. Click on the OK button. When asked, enter a title for your report and click OK. Maintenance Coordinator Simplicity Software Technologies Inc. 23 Parts and Inventory Parts by Equipment Report To create a report on all parts that is assigned to a single piece of equipment: Open the Reports page in the ribbon and click on the Parts In Equipment Group option. Select the equipment you want to base your report on from those listed in the grid. Click on the Select button. When asked, enter a title for your report and click OK. Maintenance Coordinator Simplicity Software Technologies Inc. 24 MAINTENANCE COORDINATOR SYSTEM Equipment and Machinery Maintenance Coordinator Simplicity Software Technologies Inc. 2 Equipment and Machinery Table of Contents Overview ............................................................................................................................. 5 Lookup View ...................................................................................................................... 6 Adding New Equipment ..................................................................................................... 7 Equipment Reference Field................................................................................................. 7 Deleting a Equipment Record ............................................................................................. 7 Leasing and Warranty Information ..................................................................................... 8 Assigning the Equipment to a Client .................................................................................. 8 Appraisal and Asset Information ........................................................................................ 9 Vehicle Information ............................................................................................................ 9 Equipment Property Assignment ...................................................................................... 10 Setting Up New Properties................................................................................................ 10 Deleting Properties............................................................................................................ 11 Motors ............................................................................................................................... 12 Pumps................................................................................................................................ 13 Calculating the Appraised Value of an Asset ................................................................... 13 Default Safety Instructions ............................................................................................... 14 Equipment Module Setup ................................................................................................. 14 Enter Meter or Mileage Readings ..................................................................................... 15 Export Meter Collection Spreadsheet ............................................................................... 16 Import the Meter Collection Spreadsheet ......................................................................... 16 Copy and Paste Equipment ............................................................................................... 17 Equipment Notes ............................................................................................................... 17 Printing the Current Equipment ........................................................................................ 18 Equipment Log.................................................................................................................. 19 Adding Records to the Log ............................................................................................... 19 Editing History Log Entries .............................................................................................. 20 Deleting Records from the Log......................................................................................... 21 Printing the Equipment Log .............................................................................................. 21 Equipment Bill of Materials.............................................................................................. 21 Documents ........................................................................................................................ 22 Sorting the Database by Only Motors ............................................................................... 22 Equipment Asset/ List Report ........................................................................................... 23 Print the Equipment Log ................................................................................................... 24 Selected Equipment Work Orders .................................................................................... 24 Predictive Maintenance Worksheet .................................................................................. 25 Selected Equipment Work Types Report .......................................................................... 25 All Equipment Work Orders Types Report ...................................................................... 25 Print Property Information ................................................................................................ 25 Spare Parts Inventory Report ............................................................................................ 26 Upcoming Motor Inspections Report................................................................................ 26 Print All Motors Report .................................................................................................... 26 Print All Pumps Report ..................................................................................................... 27 Maintenance Coordinator Simplicity Software Technologies Inc. 3 Equipment and Machinery Printing the Equipment Bill of Materials List................................................................... 27 Maintenance Coordinator Simplicity Software Technologies Inc. 4 Equipment and Machinery Overview In this section we'll be discussing the Equipment and Machinery database module. Use this module to record information about your facility's equipment, including such items as warranty information, asset numbers and other related information. Also keep complete histories on your equipment using the Notes and Equipment Log features. Records in this database are also used in the machine assignment sections within the Maintenance Scheduler, Work Orders and Issues modules. Maintenance Coordinator Simplicity Software Technologies Inc. 5 Equipment and Machinery Lookup View The Lookup View tab acts much like a lookup table. Here you simply click on the equipment of your choice to select it. Once selected you can move to the other tabs to view or edit the record. To resort the database: Move to the Lookup View tab. Select a sort option from the Sort By drop down list. The database will be sorted by whatever field you selected from this list. Hit the Refresh button to resort the database Maintenance Coordinator Simplicity Software Technologies Inc. 6 Equipment and Machinery Adding New Equipment To add a new Equipment record to your database: Click the Add New Record option in the ribbon. Move to the Details View tab by clicking on it. Then enter the appropriate information for each of the fields found there. Click on the Post/Save Changes button to ensure everything is written back to the database Equipment Reference Field This field, found on the Details View should contain a unique identifier for each different piece of equipment entered into the database. We did not however make this a mandatory rule as everyone has their own way of doing things. You can however verify if the identifier you’ve entered is unique to the database. To test to see if your identifier is unique: Enter your Reference ID in the space provided. Move to and click on the Check button adjacent to this field. The program will then inform you as to whether a matching identifier was found. Once you have entered the Description field, you can click on the REF button adjacent to this field and program will automatically create a unique ID for the selected equipment record. Deleting a Equipment Record To delete a record from the database please follow these steps: Locate the record you want to delete by using one of the available lookup routines on the Equipment Details tab. Click on the Delete Record option in the ribbon. When prompted about the deletion, move to and click on the Yes button. Maintenance Coordinator Simplicity Software Technologies Inc. 7 Equipment and Machinery Leasing and Warranty Information You can maintain leasing, ownership and warranty information on your equipment by: Moving to the Details View tab and then clicking on the Leasing and Warranty tab near the bottom of the screen. Move to the various fields on this tab and setup the appropriate information for that field. Assigning the Equipment to a Client (Requires the licensing of the Maintenance Services Module) You can assign your equipment to a client so that they can be billed for PM and other work orders through the optional Maintenance Service module. To assigned equipment to a client: Move to the Details tab. Click on the Leasing and Warranty tab near the bottom of the screen. Move to the Owner/Leased drop down, and select the Client Owned option. A Select Client button should appear. Click on it. Move to the top most grid of the Client/Properties Lookup screen and select the client you want to assign this equipment to. Move to the lower grid, and select property this equipment is located at. Click the Select button. Maintenance Coordinator Simplicity Software Technologies Inc. 8 Equipment and Machinery Appraisal and Asset Information To maintain appraisal and asset information: Move to the Details View tab and then click on the Appraisal tab near the bottom of the screen. Move to the various fields on this tab and setup the appropriate information for that field. Vehicle Information To maintain vehicle type information: Move to the Details View tab and then click on the Vehicle tab near the bottom of the screen. Move to the various fields on this tab and setup the appropriate information for that field. Use the Meter value in the upper section to record mileage. Maintenance Coordinator Simplicity Software Technologies Inc. 9 Equipment and Machinery Equipment Property Assignment To assign your equipment to different properties: Move to the Details tab. Click on the Property Assignment tab near the bottom of the screen. Move to and click on the Select Property button. Move to the upper grid or table on this Properties and Locations screen, and select the property of your choice. Details about the select will appear near the bottom of the screen. Click the Select button. Setting Up New Properties You can assign all your equipment and machinery to different properties and locations. If you have the optional Maintenance Services module, you could then assign these properties to clients. When you assign a piece of equipment to a work order, the property assignment automatically follows that equipment assignment. To setup new properties: Move to the Go page in the ribbon, and click on the Properties Database option. From the Properties and Locations screen, click on the Add New option. Maintenance Coordinator Simplicity Software Technologies Inc. 10 Equipment and Machinery Move to the various field near the bottom of the screen, and enter the appropriate information. To supply direction and note, move to and click on the Directions and Notes button. Write your information in the space provide, then click on the OK button. Click on the Save Changes option. Deleting Properties To delete properties from the database: Move to the Go page in the ribbon, and click on the Properties Database option. Maintenance Coordinator Simplicity Software Technologies Inc. 11 Equipment and Machinery Move to the grid or table and select the property you want to delete. Click on the Delete Record option in the ribbon. Motors If your equipment is actually an electric motor, you can record this type of information into the database and create special reports on this type of asset. To setup an asset as a motor: After creating the initial record, open the Go page and select the Motor Information option Enter the appropriate information for the fields found here. To assigned the motor to a different piece of equipment click on the … button adjacent to the Equipment Assignment field. Place a checkmark in the This Equipment is a Motor checkbox. Maintenance Coordinator Simplicity Software Technologies Inc. 12 Equipment and Machinery Pumps If your equipment is actually an pump, you can record this type of information into the database and create special reports on this type of asset. To setup an asset as a pump: After creating the initial record, open the Go page and select the Pump Information option Enter the appropriate information for the fields found here. To assigned the motor to a different piece of equipment click on the … button adjacent to the Equipment Assignment field. Place a checkmark in the This Equipment is a Pump checkbox. Calculating the Appraised Value of an Asset You can calculate an asset’s depreciation using either the double-declining balance method or the straight-line depreciation method. When using this option you will need the following information available, as you will be prompted for it: The initial cost of the asset. The asset’s useful life in months. The salvage, or value of the asset at the end of its life. The current year in the depreciation calculation. To calculate the appraised value of a piece of equipment: Locate the piece of equipment you want to make you calculation on using one of the lookup methods. Move to the Details View tab and then click on the Appraisal tab near the bottom of the screen. Click on the Calculate Value button or open the Asset page and select the Calculate Depreciation option. Maintenance Coordinator Simplicity Software Technologies Inc. 13 Equipment and Machinery Click the Yes button to use the ‘double-declining’ method, click No to use the ‘straight-line’ method. As prompted, fill in the appropriate information. Click the Ok button to move to the next question. Default Safety Instructions You can assign a default set of safety instructions to each of your assets. This way as this equipment is assigned to new work orders, these instructions will be automatically insert into these new tasks. You’ll still have the ability to use a different set of instructions if you so desire. To assign default safety instructions to an asset: Locate the piece of equipment you want to make assign the instructions to by using one of the lookup methods. Open the Asset page and select the Default Safety Instructions option Select the safety instructions of your choice from those listed. Click on the Select button. To create or edit these instructions, you will need to do so from within the Maintenance Scheduler module. Equipment Module Setup You can have a couple of setup options available to this module. These include the colors used for the shortcut bar, and for the display of the classification tree, and table. To setup the equipment module: Maintenance Coordinator Simplicity Software Technologies Inc. 14 Equipment and Machinery Click on the Module button move over the Lookup View Options button. Select the appropriate option as which elements you want displayed. Move to the Short Cut Bar Colors selection and click on the Select button adjacent to the item you want to change colors on. Select the new color from the Color Picker dialog and click Ok. Repeat the above two steps for the other color. Click on the OK button Enter Meter or Mileage Readings If you have the Use Meter checkbox checked on the Details view of a piece of equipment, then that equipment will show up in a Meter Quick Entry screen. This quick entry screen will allow you to enter updated equipment reading in one easy to use screen. This saves you from having to browse through all the records in the database to enter this information. To enter meter readings for all equipment set for meters: Maintenance Coordinator Simplicity Software Technologies Inc. 15 Equipment and Machinery Open the Home page and select the Enter Meters option. Move to the far left column of the grid, and double mouse click to enter edit mode. Type or edit the reading for that piece of equipment. When you are done with one meter, click the Enter key to move down to the next. Once all readings have been updated, move to and click on the Update Meters button to update the database. Export Meter Collection Spreadsheet To export the meter collection form to an Excel 97 spreadsheet: Open the Home page and select the Enter Meters option. Move to and click on the Export button. Browse to where you want to export this document to, and type in a name in the File Name text box.. Hit the Save button. You may want to use the export function so you can use the spreadsheet in Excel, for perhaps some automatic data collection supplied by your technical department, for example. Import the Meter Collection Spreadsheet You can import a Meter Collection spreadsheet that was previously exported by the program. You want to make sure you only import spreadsheets created by our application or it may not have the proper format for importing the information back to the database. To import the meter collection form from an Excel 97 spreadsheet: Open the Home page and select the Enter Meters option. Move to and click on the Import button. Browse to where you want to import document save, and then select the file Hit the Open button. Move to the Select Sheet drop down and select the sheet name that contains the imported information. Maintenance Coordinator Simplicity Software Technologies Inc. 16 Equipment and Machinery If the spreadsheet is in the proper format, you could now updated the database with new information. To do so click on the Update Meters button. Copy and Paste Equipment As a time saving feature, we allow you to copy an equipment record to be pasted into another equipment record. This comes in handy when you have multiple equipment of the same type. After the paste, you may only need to modify a few select fields. To Copy an equipment record: Display the record you want to copy. Click the Copy Equipment option in the ribbon. To Paste an equipment record: Create or display the record you want to copy to. Click the Paste Equipment option in the ribbon. Equipment Notes You can keep detailed notes on each piece of your equipment. The notes editor uses our built in word processor that is used throughout the Maintenance Coordinator system. To find how to use the features of this word processor please refer to the Word Processor chapter. To access the parts notes: Locate and select the equipment item you want to work with. Move to the Assets page in the ribbon. Click on the Notes option. Maintenance Coordinator Simplicity Software Technologies Inc. 17 Equipment and Machinery Equipment Picture You can include a picture of each of your assets in the database. The picture viewer used here is used throughout the Maintenance Coordinator system. To find out more about this viewer please refer to our Common Features chapter. To view or edit the asset’s picture: Locate and select the equipment item you want to work with. Move to the Assets page in the ribbon. Click on the Picture option. We included this feature because a lot of people require the ability to embed images into the database. We do not however recommend over using this feature as images use a lot of database space and can effect performance if too much space is used. A better way to include images is by using the Attachments feature, where images can be stored on hard drives and just linked to. You can find more information on the Attachments Feature in the Common Features chapter. Printing the Current Equipment To print the current equipment record: Locate the record you want to print using one of the available lookup routines. From the Home page of the ribbon select the Print Record, or the Preview Record option. Maintenance Coordinator Simplicity Software Technologies Inc. 18 Equipment and Machinery Equipment Log Use the Equipment Log to keep a complete history of your equipment. Record such items as PMs, repairs made, and other important items. Entries to this log can come from work orders, issues and can also be made manually. For entries from work orders please refer to the Maintenance Scheduler and Work Orders modules. Adding Records to the Log To add a record to the Equipment Log: Move to the Equipment Log tab. Click on the Add New button. To change the date of the entry, click on the … button adjacent to the date field. Maintenance Coordinator Simplicity Software Technologies Inc. 19 Equipment and Machinery Move to the Entry Title field, and enter a descriptive title for this entry. Move to the Log Entry section and record the details about this entry. Click on the OK button when done. Editing History Log Entries To edit an entry: Move to the Equipment Log tab. Move to the grid and select the entry you want to edit. Click on the Edit Entry button. Edit the entry in the same fashion as it was created. Click the OK button. Maintenance Coordinator Simplicity Software Technologies Inc. 20 Equipment and Machinery Deleting Records from the Log To delete a record from the Equipment Log: Move to the Equipment Log tab. Move to the grid and select the record you wish to remove by clicking on it. Move to and click the Delete button. Printing the Equipment Log To print the log for the currently selected equipment: Locate and select the equipment record that you want to print the log from. Move to the Equipment Log tab, and click on the Print button or open the Reports menu and select the Equipment Log option. To print the document, click on the Print option in the toolbar. Equipment Bill of Materials The Equipment Bill of Materials feature allows you to assign every part a specific piece of equipment may need, You can built a new list for every piece of equipment in the database, and a specific part can belong to multiple equipment lists. To view or edit the list: Move to the Asset page in the ribbon. Click on the Bill of Materials option. To add to the list: Click on the Add Part option in the ribbon. Select the part you want to add from the Parts Lookup. Click on the Select option Repeat the above sets for each part you’re adding. Maintenance Coordinator Simplicity Software Technologies Inc. 21 Equipment and Machinery To delete or remove a part from the list. Click on the part you want to remove from those listed. Click on the Delete Parts option in the ribbon. To print the list: Click on the Print List option in the ribbon. Documents You can maintain many other documents and pictures dealing with your equipment by accessing the features on the Documents tab. To learn how to work with this documents feature, please refer to the Common Features chapter. To access the Documents feature: Open the Go page in the ribbon and then select the Equipment Documents option. Sorting the Database by Only Motors To sort the equipment database by only equipment designated as motors: Move to the Lookup View tab. Move to Sort By drop and select the View Motors Only option. Click the Refresh button. Maintenance Coordinator Simplicity Software Technologies Inc. 22 Equipment and Machinery Equipment Asset/ List Report To create an Equipment Asset/List Report: Open the Reports tab and select the Assets option in the Main List group. Next select how you want the report created, PDF Format or Spreadsheet Format. Export options change by the selection you make. Move the Locations area and type in the location you want to base your report on. You can also click on the … adjacent to this field to pull up a list, select the location from the list, and then click the Select button. If you want to use all locations, place a checkmark on the Use All Locations checkbox. Repeat the above two steps for the Accounts, Classification, Assignments, Building and Manufacturer fields. Move to the Sort Records By drop down, and select how you want your report sorted. Move to the Status drop down and select the indicator you want to report on. Maintenance Coordinator Simplicity Software Technologies Inc. 23 Equipment and Machinery Click on the OK button to create the report. Print the Equipment Log To print the Equipment Log: Locate and select the equipment you want to print the history log on. Open the Reports page and select the Print Log option. Selected Equipment Work Orders To obtain a summary of work order that is assigned to the currently selected equipment: Open the Reports page and select the Work Orders option Move to the Work Order Types section and select the work order types to base your report on. Move to the Status section and select the appropriate option from the drop down list. Move to the Date Range section and setup this criteria Click on the OK button. Maintenance Coordinator Simplicity Software Technologies Inc. 24 Equipment and Machinery Predictive Maintenance Worksheet This report will report on the dates between a part's repeated replacements. It calculates both the days and months between these replacements. With this information the user can predict when a part may fail again. To create a Predictive Maintenance Report: Select the equipment record you want to base your report on. Open the Reports page and select the Predictive option. Now select what type of work orders you want to use in the creation of the report. Options are: o Include All Work Order Types o Include Repair Types Only o Include PM Types Only Selected Equipment Work Types Report To print a report on all the work orders types that are currently assigned to the currently selected equipment: Open the Reports page and select the Selected by Types option. All Equipment Work Orders Types Report To print a report on all the work orders types that are currently assigned to all your equipment: Open the Reports page and select the All by Types option. Print Property Information To print the equipment information that’s assigned to a piece of equipment: Locate and display the equipment record you want to print information on. Open the Reports page and select the Property Assignment option. Maintenance Coordinator Simplicity Software Technologies Inc. 25 Equipment and Machinery Printing a Meter Readings Data Collection Sheet To print a meter data collection sheet: Open the Home page and select the Print Collections option. Spare Parts Inventory Report The Spare Parts Inventory Reports return all parts that are assigned to the currently selected piece of equipment, and reports on stock levels. To create a Spare Parts Inventory Report: Select the equipment record you want to base your report on. Open the Reports page and select the Spare Parts option. Upcoming Motor Inspections Report The Upcoming Motor Inspections Report returns a report on motors that are coming due for inspections. In order for a piece of equipment to be included in this report the following criteria must be met: This Equipment is a Motor checkbox is checked on the Motors tab. There is a date setup in the Next Check Date field on the Motors tab. To create a Upcoming Motor Inspections report. Open the Go page and select the Inspections Report option in the Motors Options group. Setup the date range for upcoming inspections and click OK. Print All Motors Report To get a report on all motors in the database: Open the Go page and select the Print All Motors option in the Motors Options group. Maintenance Coordinator Simplicity Software Technologies Inc. 26 Equipment and Machinery Print All Pumps Report To get a report on all motors in the database: Open the Go page and select the Print All Pumps option in the Pumps Options group. Printing the Equipment Bill of Materials List To print a report based on the Bill of Materials List: Select the equipment record that you want to report on. Move to the Report page in the ribbon. Click on the Bill of Materials option. Maintenance Coordinator Simplicity Software Technologies Inc. 27 Equipment and Machinery Maintenance Coordinator Simplicity Software Technologies Inc. 28 MAINTENANCE COORDINATOR SYSTEM Purchasing and Receiving Maintenance Coordinator Simplicity Software Technologies Inc. 2 Purchasing and Receiving Table of Contents Overview ............................................................................................................................. 5 Differences between Purchase Requisition and Orders ...................................................... 5 Lookup View ...................................................................................................................... 6 Purchasing Document Lookup ............................................................................................ 7 Creating a New Purchase Document .................................................................................. 8 Add New with Wizard ........................................................................................................ 8 Entering General Date Information .................................................................................. 10 Entering Vendor Information ............................................................................................ 11 Ship To Information .......................................................................................................... 11 Document Assignments .................................................................................................... 12 Number Field .................................................................................................................... 12 Entering Materials for Purchase........................................................................................ 13 Removing Items from the Material List............................................................................ 14 Adding Additional Cost to the Current Document ........................................................... 14 Calculating the Total Cost of the Purchase ....................................................................... 14 Specifying Comment for Purchase Orders ....................................................................... 15 Marking the Document as Taxable ................................................................................... 15 Updating the Status of your Document ............................................................................. 15 Changing the Purchase Type Status .................................................................................. 16 Deleting a Purchase Document ......................................................................................... 17 Purchasing Items Accounts ............................................................................................... 17 User –Defined Purchase Document Fields ....................................................................... 18 Purchasing E-Mail Notification Overview ....................................................................... 19 Turning On the Purchasing E-Mail Notification .............................................................. 19 Setting Up Individual Documents with E-Mail Notification ............................................ 20 E-Mail Approval Routing of Purchase Documents .......................................................... 21 E-Mail Routing Default Recipient .................................................................................... 21 Create a New Archive Database ....................................................................................... 22 Archiving your Database .................................................................................................. 22 Restore Records from Archive.......................................................................................... 23 Deleting a Date Range of Purchasing Documents ............................................................ 25 Purchasing Setup ............................................................................................................... 25 Printing the Current Document ......................................................................................... 28 Print Purchasing Documents by Types ............................................................................. 28 Printing Multiple Purchasing Orders ................................................................................ 28 Printing a Quotation Request ............................................................................................ 28 Under Stock Inventory Items ............................................................................................ 29 Aging Purchase Orders ..................................................................................................... 30 Blanket Purchase Orders Overview .................................................................................. 31 Create a New Blanket Purchase Order.............................................................................. 32 Add a New Child Document to a Blanket PO .................................................................. 32 Viewing an Existing Blanket PO Child Document........................................................... 33 Add an Existing Document to a Blanket PO .................................................................... 33 Maintenance Coordinator Simplicity Software Technologies Inc. 3 Purchasing and Receiving Removing an Existing Document for a Blanket PO ......................................................... 34 E-Mail Accounts ............................................................................................................... 34 E-Mail Composer .............................................................................................................. 35 Setting Up an Account for the E-Mail Composer ............................................................. 35 Using the E-Mail Composer ............................................................................................. 36 Documents ........................................................................................................................ 36 Notes ................................................................................................................................. 36 Receive an Item into Inventory ......................................................................................... 37 Receiving All Items into Inventory................................................................................... 37 Updating the Unit Cost of Individual Purchase Items ...................................................... 38 Filtering the Database ....................................................................................................... 38 Purchasing Report Wizard ................................................................................................ 39 Purchase Items Report ...................................................................................................... 40 Back Order - Aging Report ............................................................................................... 41 Vendor Report ................................................................................................................... 41 Received Items Reports .................................................................................................... 42 Maintenance Coordinator Simplicity Software Technologies Inc. 4 Purchasing and Receiving Overview Use this module for all your purchasing and receiving needs. Create quotation requests, purchase requisitions and purchase orders. Track backorders, receive items and update your inventory levels. With this module you can also assign each of your purchase orders to a variety of different groups for reporting purposes. These include Cost Center, Used On and Projects. A complete note file can also be attached to each order to provide an almost unlimited amount of information about a specific order. Differences between Purchase Requisition and Orders When entering your documents, there is basically no difference between a Purchase Requisition, Purchase Order or Quotation Request. This is also true when printing any of these three documents. The only real difference is found on the Status / Ordering tab, and placing the appropriate check at the Purchase Maintenance Coordinator Simplicity Software Technologies Inc. 5 Purchasing and Receiving Type Status area. Here you have two options, Purchase Requisitions or Purchase Order. Lookup View The Lookup View tab facilitates the quick retrieval of purchase documents. Here you simply click on the purchase document of your choice to select it. Once selected you can move to the other tabs to view or edit it. To resort and filter the database: Move to the Lookup View tab. Move to the Filter By drop down list and select what type of purchase documents you want to view. Select a sort option from the Sort By drop down list. Click on the Refresh Now button. Maintenance Coordinator Simplicity Software Technologies Inc. 6 Purchasing and Receiving Purchasing Document Lookup To locate a purchasing document using the Purchasing Document Lookup screen: Move to the Lookup View tab. Click on the icon of the Blue Binoculars or open the Go page in the ribbon and select the Document Lookup option Move to the Filter By drop down and select how you want the database sorted. Click the Refresh Now button. Move to the grid and select the document your want to open. Click the Select button. Maintenance Coordinator Simplicity Software Technologies Inc. 7 Purchasing and Receiving Creating a New Purchase Document To create a new purchasing document: Open the File menu and select the Add New option or click on the icon of a plus sign in the toolbar. Move to the various sections on the first two tabs, and enter or select the appropriate information. Add New with Wizard You can create a new purchase document using the built in Purchase Requisition Wizard. This wizard should help simply the creation process by removing extra elements out of the process. Maintenance Coordinator Simplicity Software Technologies Inc. 8 Purchasing and Receiving To use the Purchasing Wizard: Click on the Module button and select the Add New with Wizard option (Alt + N). Move to the Originator tab by clicking on it. Click on the … button adjacent to the Requester field. Select an employees name from the list and click on the Select button. Move to the Priority drop down list and select the indicator that you want to assign to this document. Click on the … button adjacent to the Date Needed field. Select the date you need these items by from the pop up calendar and then click on the Select button. Either click the Next arrow in the tool bar or on the Suggested Vendor tab. Move to and click on the Lookup button to pull up the Contacts and Vendors dialog. Select the vendor you suggest we purchase these items from those listed, and click on the Select button. Maintenance Coordinator Simplicity Software Technologies Inc. 9 Purchasing and Receiving Either click the Next arrow in the tool bar or on the Materials tab. To enter the materials you wish to buy from stock items: o Move to click on the Part Lookup button. o Move to the Part Groups grid, and click on the part group that best describes the group your part belongs to. o Move to the Parts List grid and click on the part that you want to insert into the purchase document. o Click on the Select button. To add non-stock items to your purchase document: o Click on the Add Non-Stock. This will insert a row into your material list. o Move to the new inserted row, and edit the fields to match the item you're adding. Repeat the above steps until you’ve added all the materials you want to assign to this purchase document and then click on the Save and Close button to create the Purchase Requisition. Entering General Date Information Under the General Information section of the Details View tab are two items, the date and the Number of the document. The program enters both of these items automatically. You can however edit both of these fields. To specify general information: Move to the Date area and click on the … button. This will open up a calendar. Select the desire date, and then click on the Select Date button. The new date will be inserted for you. Enter your document Number in the space provided. Move to and click on the Check button adjacent to the Number field. The program will then inform you as to whether a matching identifier was found Move to and click on the … button adjacent to the Classification field Select a classification from within the list and click on the Select button. Move to the Requester section and click on the … button. Move to the list and select the appropriate name by clicking on it, then click on the Select button. Move to and click on the … button adjacent to the Department field Maintenance Coordinator Simplicity Software Technologies Inc. 10 Purchasing and Receiving Select a department from within the list and click on the Select button. Move to the Priority drop down list and select the priority indicator you wish to assign to this purchase. Entering Vendor Information To select a vendor for your current document: Move to the Vendor Section of the Details View tab, and click on the Look Up button. Move through the Vendors grid and select the vendor of your choice by clicking on it. Move to and click on the Select command button and the vendor will be inserted into the current document. Ship To Information To record ship to information: Move to the Ship To section and type in the appropriate information for that field To use the default ship address: Move to the Ship To section and click on the Insert Default button. To assign the requester as the ship to attention person. Move to the Ship To section and enter the appropriate information for that field. Click on the Attn Requester button. Maintenance Coordinator Simplicity Software Technologies Inc. 11 Purchasing and Receiving Document Assignments There are additional fields that may need your attention with the Documents Assignments section. To enter these: Move to the Documents Assignments section on the Details View tab. Click on the … button adjacent to the Project Field. Select a project from the pop up list and then click on the Select button. Repeat the above step for the Buyer, Cost Center, Carrier and Used On fields. Move to the Confirmation No. field and type in the appropriate information for this field. Move to and click on the … field adjacent to the Date Ordered field. Select the appropriate date from the pop up calendar, and the click on Select. Repeat the above 2 steps for the Date Promised field. Number Field This field, found on the Details View should contain a unique identifier for each document entered into the database. We did not however make this a mandatory rule as everyone has their own way of doing things. You can however verify if the identifier you’ve entered is unique to the database. To test to see if your identifier is unique: Enter your Number in the space provided. Move to and click on the Check button adjacent to this field. The program will then inform you as to whether a matching identifier was found. Maintenance Coordinator Simplicity Software Technologies Inc. 12 Purchasing and Receiving Entering Materials for Purchase ADD MATERIALS FROM STOCK To enter the materials you wish to buy or be quoted on from stock: Move to Details View tab and the Materials List section Click on the Part Lookup button. Move to the Part Groups grid, and click on the part group that best describes the group your part belongs to. Move to the Parts List grid and click on the part that you want to insert into the purchase document. Click on the Select button. Maintenance Coordinator Simplicity Software Technologies Inc. 13 Purchasing and Receiving ADDING NON-STOCK ITEMS To add non-stock items to your purchase document: Move to the Material List section and click on the Add Non-Stock. This will insert a row into your material list. Move to the new inserted row, and edit the fields to match the item you're adding. Removing Items from the Material List To remove an item from the current purchase material list: Move to the Details View tab and the Material List section. Click on the item you want removed from within the list. Click on the Remove Item command button. Click on the OK button when prompt. Adding Additional Cost to the Current Document To record and add any addition cost to the current purchase document: Move to and click on the Details View tab. Move to the three cost fields found under the Materials List and enter the appropriate costs. To calculate taxes based on the rate as setup in the Purchasing Setup, move to and click on the Tax button. Calculating the Total Cost of the Purchase Once all the materials and other costs have either been entered or changed for the current purchase document, you need to calculate the total cost. To calculate the total cost: Move to and click on the Details View tab. Click on the Calculate Total button. Maintenance Coordinator Simplicity Software Technologies Inc. 14 Purchasing and Receiving Specifying Comment for Purchase Orders To specify special comments to show up on purchase orders: Move to and click on the Details View tab. Click the Comments button near the lower right hand side of the screen. Enter your comments in the space provided. Click the Ok button. Marking the Document as Taxable To mark the purchase document as taxable: Move to and click on the Status / Ordering tab. Click on the Taxable checkbox to add a checkmark there. Updating the Status of your Document To change the status of your current purchase document: Move to and click on the Status / Ordering tab. Move to the Purchase Order Status section and click on the appropriate list item found there. Available options include On Hold, On Order, Completed and Cancelled. Marking the Document as Approved To mark and fill in the purchase approval of the current document: Move to and click on the Status / Ordering tab. Move to the Approval section. Click on the Approved for Purchase checkbox to place a checkmark there, and mark the document as approval. Move to the three … buttons located next to the approvals, and click on the ones that apply. Maintenance Coordinator Simplicity Software Technologies Inc. 15 Purchasing and Receiving Select the approvals of your choice from those listed, and then click the Select button. Changing the Purchase Type Status To switch from one purchase type to another: Move to and click on the Status / Ordering tab. Click either the Purchase Order or Purchase Requisition radio buttons to assign the current document as the selected type. Maintenance Coordinator Simplicity Software Technologies Inc. 16 Purchasing and Receiving Deleting a Purchase Document To delete a purchase document from the database: Locate the purchase document you wish to delete using one of the available lookup routines. Move to the Home page and select the Delete Record option. Click on the OK command button when prompt. Purchasing Items Accounts You can assign each of your purchase items an account number. When turned on this account information will show up on the Details view, and on both Purchase Requisitions and Purchase Orders. To turn on the Accounts feature: Click on the Module button and select the Purchasing Setup option. Move to the General tab. Place a checkmark in the Use Account Information checkbox. Click the OK button. Repeat the above steps for each computer you want to use this option on. To use the Accounts feature: Add either a stock or non-stock item to a purchase document. Move to the Account field in the grid and press enter. Type in the account information. Add either a stock or non-stock item to a purchase document. Move to and double click in the Account field within the grid. Select the account information from this Data Quick Entry screen. For more information on Data Quick Entry, look for that section in the Common Features chapter of the manual. Or Maintenance Coordinator Simplicity Software Technologies Inc. 17 Purchasing and Receiving User –Defined Purchase Document Fields There are 4 user defined fields that can be included and printed on Purchase Orders. To use these fields you must tell the program to use them. To tell the program to use the user-defined fields: Click on the Module button and select the Purchasing Setup option. Click on the General tab. Place a check in the Print User Defined Fields on Purchase Orders checkbox. To access and edit user defined fields: Click on the Status – Ordering tab. Move to the User Defined Fields section near the bottom of the screen. Move to the various fields and edit their contents. To change a user defined field’s title: Click on the Status – Ordering tab. Move to the User Defined Fields section near the bottom of the screen. Double mouse click on any field you want to edit. Edit the field’s title to what you want, then click on the Ok button. These title can be up to 20 characters in length. Maintenance Coordinator Simplicity Software Technologies Inc. 18 Purchasing and Receiving Purchasing E-Mail Notification Overview The Purchasing E-Mail Notification system will automatically e-mail a person or persons you specify a notice on any new purchasing documents you create. This can come in handy for a couple of reasons. For one example you may want to e-mail a notice to an approving manager, or the purchasing agent or both. The e-mail recipient or e-mail address can contain up to 200 characters, where you can include more than one recipient by separating them with a semicolon “;”. When a computer has been allowed to send the Automatic E-mails, these emails are sent in one of two ways. Sending the E-Mails: To manually send the e-mails, move to the Mail tab in the ribbon of the Purchasing and Receiving module and select the Send Approval option. EMails are also sent automatically when you exit the Purchasing and Receiving module. Turning On the Purchasing E-Mail Notification Maintenance Coordinator Simplicity Software Technologies Inc. 19 Purchasing and Receiving To setup Purchasing Auto E-Mail Notification: Open the Purchasing module. Click on the Module button and select the Purchasing Setup option. Click the E-Mail tab. Place a checkmark in the Use Auto E-Mail for New Requisitions checkbox. Move to the Default E-Mail Recipient text box and enter the email address or addresses you want the e-mail to be sent to. You can separate multiple addresses by using the semi-colon “;”. If you want to use this computer to send the emails, place a checkmark in the Allow E-mails to be sent by this computer checkbox. Setting Up Individual Documents with E-Mail Notification When the E-mail feature has been turned on, all new purchase documents will automatically have default e-mail information inserted in them upon creation. You then have the opportunity to change this information. To setup individual documents e-mail options. Move to the purchase document record you want to modify. Click on the Status - Ordering tab and move to the E-Mails Options section. To enable this document to use the e-mail system, place a checkmark in the Use Auto E-Mail Feature check box. To specify who to e-mail, move to the E-Mail Notice to text box, and enter the e-mail address or addresses you want to e-mail the notification to. To prevent further e-mails to be sent for this document, place a checkmark in the Prevent Further E-Mails for This Document Only checkbox. The program itself places a checkmark here once the e-mail has been sent. Maintenance Coordinator Simplicity Software Technologies Inc. 20 Purchasing and Receiving E-Mail Approval Routing of Purchase Documents Most organizations today need various individuals to approve a Purchase document prior to allowing the actual purchase. An example of such an approval system is as follows: 1. A purchase document is created and the program automatically e-mails a notice to the default e-mail recipient (the buyer). 2. The second person (buyer) reviews the document, and then manually emails a notice to a person they have specified on their computer (they press an e-mail button and the rest is automatic). This third person maybe a department manager. 3. The third person reviews the document and then clicks a button to manually e-mail a notice to a person they have specified on their computer. For this example, let’s say this e-mail goes to the Plant Manager. 4. This fourth person reviews the document and then clicks a button to e-mail a notice to a person they have specified on their computer (the Plant Manager has the buyer as their default). Thus the approval procedure is completed, semi-automatic and completely paperless. E-Mail Routing Default Recipient To set the default e-mail recipient to be used by your computer only (this is a non-global or local setting): Open the Purchasing module. Click on the Module button and select the Purchasing Setup option. Click the E-Mail tab. Move to the E-Mail Button Recipient text box and type in the full email address of the person you want to send emails to. Close the window Maintenance Coordinator Simplicity Software Technologies Inc. 21 Purchasing and Receiving Create a New Archive Database As you continue to use this application your database is sure to grow in size. As a database grows too large there can be performance issues such as speed, and problems with the data itself. For these reasons it is highly recommended that you remove data from the database in regular intervals. Either deleting older records or archiving them to an external database can do this for you. In order to archive your records you’ll first need to create an archive database. To create an archive database: Click on the Module button Move over the Databases button and select the Create Archive Database option. Use this Save As type dialog as would any found in Windows, specifying the name and save path of this new database. Click the Save command button. Archiving your Database To archive your database: Click on the Module button Move over the Databases button and select the Archive Database option. Move to the Date Range section and click on the … command button adjacent to the Start Date field. Select the start date for your archive from within this calendar. Click on the Select Date button. Repeat the above step for the End Date field. All tasks that fall between these two date ranges will be selected for archiving. Move to the Archive Database path section and click the Browse button. Locate and select your archive database using this file open type dialog. Click Open. Click the Archive button to remove the files from your main database and place them into the Archive database. Maintenance Coordinator Simplicity Software Technologies Inc. 22 Purchasing and Receiving IMPORTANT NOTE: Archiving files frees up valuable database space, but this space will not be fully realized until you also perform a compact on the database. Performing a compact will free up this valuable database space. Please refer to the Database chapter for more details. Restore Records from Archive With the Database Restore feature you have three different restore options. You can restore every record found in the archive database, restore a date range of records, or restore a single record. These three options will be outlined next. To restore all records from archive: Click on the Module button Move over the Databases button and select the Restore Database option. Move to the Restore Options section and click on the Restore All radio button. Move to the Archive Database path section and click the Browse button. Locate and select your archive database using this file open type dialog. Click Open. Maintenance Coordinator Simplicity Software Technologies Inc. 23 Purchasing and Receiving Click Restore. To restore a date range of records from archive: Click on the Module button. Move over the Databases button and select the Restore Database option. Move to the Restore Options section and click on the Restore Dates radio button. Move to the Restore Date Ranges section and click on the … command button adjacent to the Start Date field. Select the start date range for your restore from the calendar and click on the Select Date button. Repeat the above 2 steps for the End Date field to setup the ending date of the restore range. Move to the Archive Database path section and click the Browse button. Locate and select your archive database using this file open type dialog. Click Open. Click Restore. To restore a single record from archive: Click on the Module button. Move over the Databases button and select the Restore Database option. Move to the Restore Options section and click on the Restore One radio button. Move to the PO Number of Document to Restore field and type in the PO number. Move to the Archive Database path section and click the Browse button. Locate and select your archive database using this file open type dialog. Click Open. Click Restore. Maintenance Coordinator Simplicity Software Technologies Inc. 24 Purchasing and Receiving Deleting a Date Range of Purchasing Documents To delete a range of purchasing documents: Click on the Module button Move over the Databases button and select the Delete Date Range option. Select the ending date of the deletion from within the calendar. All records falling before this date will be removed from the database. Once the date is selected move to and click on the Select Date button. Click on the YES button when prompt. Purchasing Setup To setup your company's name and address, the next PO number to use, default shipping address and default PO Comments, view option and other options: Maintenance Coordinator Simplicity Software Technologies Inc. 25 Purchasing and Receiving Open the Purchasing module. Click on the Module button and select the Purchasing Setup option. Move to and click on the Company tab. Move to the various fields and input the appropriate information for that field. Click on the General tab. To specify the next PO number to use, move to and edit the Next PO Number field. To disable the program automatic prefix, place a checkmark in the Do Not Use Auto Prefix field. If unchecked the program will use a prefix in the following format: yymm. Where yy equals the year and mm the month the new document was created. To specify how many decimal places to use on the purchase document, move to and click on the … button adjacent to the Decimal places to show on Purchase Items. Type in the appropriate number in the space provided. A valid range is from 2 to 4 decimal places. Check on the OK command button. Maintenance Coordinator Simplicity Software Technologies Inc. 26 Purchasing and Receiving To allow the use of account information to be applied to each individual purchase item, place a checkmark in the Use Account Information checkbox. To specify the tax rate to use for your documents, move to and edit the Tax Rate field. To enable the ink save feature on documents, place a checkmark in the Conserve Ink/Toner on Printed Documents field. To have the program warn you about printing a document more than once place checkmark in the Warn about the Duplicate Printing of Documents checkbox. Click on the View Options tab. Chose the option that best describes how you want information displayed on the Lookup View tab of the main purchasing screen. When you return to the main screen, click on the Refresh Now button to see your changes. Click on the Default tab. Move to the two fields on this tab and setup default information for these fields. Click the E-Mail tab. To have the computer send a notice about the creation of new purchase requisition place a checkmark in the Use Auto Email Feature for New Requisitions checkbox. Move to the Default E-Mail Recipient text box and enter the full email address that you want the notice sent to (purchasing agent). Move to the E-Mail Button Recipient text box and type in the full email address of the person you want to send emails to. To setup the mail recipient to use when the Email button is clicked, move to the E-Mail Recipient text box and enter the full e-mail address. To setup the Outgoing e-mail account to use when sending approval emails and the like move to and click on the Select Default E-mail Account for Outgoing Mail button. Move to the grid and select the account that you want to use. Click on the Select button. Click on the PO Approval tab. To enable a PO approval line to be displayed on the bottom of printed purchase orders, place a checkmark in the Use Approval Line on Purchase Orders checkbox. To specify the text to use in the approval line, move to and edit the Approval Line Text field. Click on the OK button. Maintenance Coordinator Simplicity Software Technologies Inc. 27 Purchasing and Receiving Printing the Current Document To print the current document: Locate the record you want to print using one of the available lookup routines. Click on the Print Record option on the Home page of the ribbon. Print Purchasing Documents by Types To print preview the current document: Locate the record you want to print using one of the available lookup routines. Click on the Module button and move over the Print option. Click on the type of document you want to print. Printing Multiple Purchasing Orders To print multiple purchase orders at a single time: Click on the Module button and move over the Print option. Click on the Print Date Range option. Select the date ranges you want to print from the Date Range dialog screen. These dates correspond to the Order Dates of the Purchase Orders. Click the Accept button. Printing a Quotation Request To print a quotation request: Locate the purchase document that you want to print a price quotation on by using one of the lookup routines. Click on the Module button and move over the Print option. Click on the Print Quote option. After the Print Preview screen loads, move to and click on the Print. Use this Print dialog as you would use any print dialog found in Windows. Maintenance Coordinator Simplicity Software Technologies Inc. 28 Purchasing and Receiving Under Stock Inventory Items The Under Stock Inventory Items routine searches the database and returns a screen full of items where the stock levels have fallen below recommended inventory levels. You can then have the application create purchase requisition for you automatically from these items. To use the Under Stock Inventory Items routine: From the Purchasing main screen, move to the Go menu and select the Under Stock Items option. To have the list sorted by only a single vendor, move to the list and select an item that has the vendor you want to sort by listed. Click on the Current Vendor option in the ribbon’s Filters group To return the sort to all under stock items, click the Sort by All Under Stock button. Maintenance Coordinator Simplicity Software Technologies Inc. 29 Purchasing and Receiving Now move to the far left column of the grid and click and place a checkmark next to each item you want to create a purchase requisition for. To select all click on the the Select All option in the ribbon. When ready to create your requisition, move to and click on the Create Purchase Requisition button. Aging Purchase Orders To obtain a list of Purchase Orders that is past due: From the Purchasing main screen, move to the Go page and select the Aging Documents option. Move to the Sort Options and select the criteria that best describes how you want the list sorted. To view a Purchase Order from the list: Select the document you want to view from those listed. Click the Open Document button in the ribbon. Maintenance Coordinator Simplicity Software Technologies Inc. 30 Purchasing and Receiving Blanket Purchase Orders Overview Blanket Purchase Orders are documents that you have setup with vendors for the items that they supply. These orders are normally approved for certain dollar amounts. Once the blanket purchase order is created, you issue child purchase orders against the original amount. The Blanket Purchase Orders routine allows you to create a master blanket order and then create child documents that are attached to this master. As child documents are added, a running balance will be calculated for you so you will know exactly where you stand. Maintenance Coordinator Simplicity Software Technologies Inc. 31 Purchasing and Receiving Create a New Blanket Purchase Order To create or setup a new blanket purchase order: From the Purchasing main screen open the Go page in the ribbon and select the Blanket POs option. Move to and click on the Add New button. Move to the various fields and input or edit the appropriate information for that field, ensuring that enter an Approved Amount. To select a vendor move and click on the select Supplier button. Select a vendor from those listed and click on the Select button. Click the Refresh button. Add a New Child Document to a Blanket PO To add a new child document to a master Blanket PO: Maintenance Coordinator Simplicity Software Technologies Inc. 32 Purchasing and Receiving From the Purchasing main screen open the Go page in the ribbon and select the Blanket POs option. Select the master blanket PO that you want to add a child document to from those listed. Click the Child POs tab. Click the Add New PO button. Click the Refresh button. Viewing an Existing Blanket PO Child Document To view or edit an existing Blanket PO Child document: From the Purchasing main screen open the Go page in the ribbon and select the Blanket POs option. Select the master blanket PO that contains the child document you want to view from those listed. Click the Child POs tab. Click on the child document you want to open. Click the View Existing PO button. Add an Existing Document to a Blanket PO To add an existing document to a blanket PO: From the Purchasing main screen open the Go page in the ribbon and select the Blanket POs option. Select the master blanket PO that contains the child document you want to add an existing purchase order to. Click the Child POs tab Click the Add Existing PO button. From the Purchase Documents Lookup screen, select the document to assign to this master Blanket PO from those listed. Click the Select button. Maintenance Coordinator Simplicity Software Technologies Inc. 33 Purchasing and Receiving Removing an Existing Document for a Blanket PO To remove a document from a master blanket PO document: From the Purchasing main screen open the Go menu and select the Blanket PO option. Select the master blanket PO that contains the child document you want to remove from those listed. Click the Child POs tab. Click on the child document you want to remove. Click on the Remove PO button. E-Mail Accounts E-mail accounts are only used if Outlook is not setup as your default e-mail server. Otherwise at least one e-mail account must be setup to use the e-mail features in the Purchasing and Receiving module. The setting use for this module is different from the rest of the Maintenance Coordinator system. Maintenance Coordinator Simplicity Software Technologies Inc. 34 Purchasing and Receiving To setup e-mail accounts: From the Purchasing main screen open the Mail page and select the EMail Accounts option Move to and click on the New button. Click the Details tab. Enter a descriptive account name in the Account Name field. Move to the User Name field and enter your account’s user name. Move to the E-Mail Address box and enter your user’s return e-mail address. Move to the Outgoing mail servers (SMTP) box and enter the SMTP address of your outgoing e-mail server. Click on the Signature tab. Enter your signature as you would like it to appear when using it with the built-in E-Mail Composer. Repeat the above steps for each account you want to set up. E-Mail Composer The E-mail Composer is for writing and sending e-mails to vendors, other employees, or anyone you so choose. You can import text files with this editor, along with checking your spelling. To access the E-Mail composer: Move to the Purchasing main screen. Open the Mail page and select one of the following three options: o Email Composer o Quotation Request o Current Document Setting Up an Account for the E-Mail Composer Before you can send e-mails with the E-Mail composer you must tell the program what e-mail account to use. This step however is not required when using Outlook as your mail server. If you want to use Outlook as your mail server, make sure it’s setup properly in the main settings of Maintenance Coordinator application. To specify which e-mail account to use: Maintenance Coordinator Simplicity Software Technologies Inc. 35 Purchasing and Receiving Open the E-Mail Composer window. Click the Module button and select the Change Accounts option. Select the account you want to use from those listed in the grid. Click on the Select button. The computer will remember the account you picked on this computer only, and will maintain this setting until you or another user changes it. Using the E-Mail Composer The procedures for using the Email Composer are outlined in the Common Features chapter. Documents You can maintain many other documents and pictures dealing with purchasing by accessing the feature. To learn how to work with this documents feature, please refer to the Common Features chapter. To access the Documents feature: Open the Go page and select the Purchase Documents option. Notes You can attach a set of notes to either a normal purchase document or a blanket purchase order. To access a document’s notes: Select the document that the notes belong to. From the Home page of the ribbon, select the Notes option. Maintenance Coordinator Simplicity Software Technologies Inc. 36 Purchasing and Receiving Receive an Item into Inventory Once an order has been placed you will eventually start receiving the items ordered. To receive a single item and at the same time update your inventory levels with the amount received, please follow these steps: Locate the purchase document you wish to receive the item to from one of the available lookup routines. Move to the Details View tab by clicking it. Move to the Material List grid, and click on the item you wish to receive. Open the Receiving page in the ribbon and select the Current Item option. When the Receive Item dialog appears, move to and enter the amount that you are receiving into inventory. Move to and click on the OK command button. Receiving All Items into Inventory Once an order has been placed, you will eventually start receiving the items ordered. To receive all items purchased, and at the same time update your inventory levels with the amounts received, please follow these steps: Locate the purchase document you wish to receive the items to from one of the available lookup routines. Open the Receiving page in the ribbon and select the All Items option. When the Receive Item dialog appears, move to and enter the amount that you wish to receive into inventory for the displayed item. Once the amount has been entered, move to and click on the OK button. Continue the above two steps until all items have been received into inventory. Maintenance Coordinator Simplicity Software Technologies Inc. 37 Purchasing and Receiving Updating the Unit Cost of Individual Purchase Items To update the unit cost of an individual purchase item: Locate the purchase document you wish to update the unit cost on using one of the available lookup routines. Move to the Details View tab by clicking on it. Move to and click on the item you want to update from within the Material List grid. Open the Receiving page in the ribbon and select the Update Costs option. Enter the new unit price in the box provided. Click on the OK button. Please note that this routine updates both the parts inventory database, and the current document. Filtering the Database You can filter the purchasing database by a few available sort or filtering options. To change the current database filter: Open the Sorts page in the ribbon. Now select one of the available options. Maintenance Coordinator Simplicity Software Technologies Inc. 38 Purchasing and Receiving Purchasing Report Wizard The Purchasing Module contains a very powerful tool that can be used for the creation of reports. This is found in the Report Wizard. To use the Purchasing Report Wizard: Open the Reports page in the ribbon and click the Wizard option. Next select the how you wanted report formatted, either Spreadsheet Format or PDF format. Export options will change by what you select here. Move to the Types area, and select what types of documents you want to base this report on. Options are Requisition, Purchase Order or both. Move to the Status area and select one of the available options here. Options include On Hold, On Order, Completed, and Cancelled. Next move to the Project Assignment area, and click on the … command button. Select the project you wish to base your report on from those listed. Then click the Select command button. If you wish to ignore the different project, move to and click on the Use All check box. Maintenance Coordinator Simplicity Software Technologies Inc. 39 Purchasing and Receiving Repeat the above three steps for the Cost Center, Used On, Originator, and Buyer fields. Move to the Dates area and setup the Start and End Dates for your report. Set these up by clicking the… command buttons and selecting the desired dates from within the calendar. To have your report grouped by various available options, select the option of your choice from the Group By drop down list. Once everything has been setup to your liking click on the OK button. Purchase Items Report The Purchase Items report allows you to report on Purchase items that have accounts assigned to them. You can print a date range on the report, include just a single account, use all accounts, and the results grouped. To create a Purchase Items Report: Open the Reports page in the ribbon and select the Purchase Items option. Next select the how you wanted report formatted, either Spreadsheet Format or PDF format. Export option will change by what you select here. Maintenance Coordinator Simplicity Software Technologies Inc. 40 Purchasing and Receiving Move to the Date Range section and click on the … buttons adjacent to the Start and End Dates fields to bring up a calendar. Select the dates for your reports from within this calendar. To include all dates, place a checkmark in the Include All Dates checkbox. Move to and click on the … button adjacent to the Account field. Select the account that you want to base your report on from within the list, and click the Select button. To use all accounts, place a checkmark in the Include All Accounts checkbox. Move to the Group By drop down, and select how you want your report information grouped. Click on the Ok button to create your report. Back Order - Aging Report The Back Order Report allows you to create a report based on Purchase Orders that have a status of On Order, and fall on or before a date you specify. To create a Back Order Report: Open the Report page in the ribbon and select the Backorder - Aging option. Select the date you want to base your report on from within the Calendar. All On Order documents that fall on or before this date will be reported on. Vendor Report The Vendor Report, reports on purchases made to a single vendor. To use this report: Open the Reports page in the ribbon and select the Vendor Report option. From the Vendor Report Wizard, move to the grid and select the vendor you wish to base your report on. Move to the Start Date and End Date areas and click on the … buttons located besides them. Maintenance Coordinator Simplicity Software Technologies Inc. 41 Purchasing and Receiving From the calendar, select the appropriate date you wish to base your report on. If you want to use all available dates, place a checkmark in the Use All Dates check box. Once everything is setup to your liking, move to and click on the OK command button. Received Items Reports The Received Items Report will report on all items received within a given time period. To use this report: Open the Reports page in the ribbon and select the Receiving Report option. Move to the Start Date and End Date areas and click on the … buttons located besides them. From the calendar, select the appropriate date you wish to base your report on. Once everything is setup to your liking, move to and click on the OK command button. Maintenance Coordinator Simplicity Software Technologies Inc. 42 MAINTENANCE COORDINATOR SYSTEM Contacts and Vendors Maintenance Coordinator Simplicity Software Technologies Inc. 2 Contacts and Vendors Table of Contents Overview ............................................................................................................................. 4 Lookup View ...................................................................................................................... 5 Adding New Contacts ......................................................................................................... 6 Contact Identification Field ................................................................................................ 6 Alternate Contact ................................................................................................................ 6 Group Assignments ............................................................................................................. 7 Adding New Group Titles ................................................................................................... 8 Removing a Contact from a Group ..................................................................................... 8 Copy and Pasting a Contact Record.................................................................................... 9 Filtering the Contact Database ............................................................................................ 9 Contact Lookup ................................................................................................................. 10 Searching the Database ..................................................................................................... 11 Printing the Current Record .............................................................................................. 11 Opening a Contact Group ................................................................................................. 12 Contacts Notes .................................................................................................................. 13 Documents ........................................................................................................................ 13 Phone List Report ............................................................................................................. 13 Group Phone List Report .................................................................................................. 14 Contact List Report ........................................................................................................... 14 Group Contact List Report ................................................................................................ 14 Maintenance Coordinator Simplicity Software Technologies Inc. 3 Contacts and Vendors Overview With the contact module you can keep track of all your business contacts, these can include vendors, suppliers, co-workers, or just general everyday contacts. As you are more than likely aware, contact information can be extremely valuable to conducting everyday business. One of the unique features of this module is with its use of contact groups. Contact groups allow you to group like contacts for easy lookup, and reporting purposes. Each contact within the database should be assigned to a group, specifying the services or products they supply. Each contact can be assigned to a countless number of groups, allowing for an almost unlimited crossreferencing setup. Let's say you buy a special motor for one of your cooling towers. You input the vendor into your database for later reference. You also assign this vendor to two different contact groups. One titled Cooling Towers and the other Motors. Now lets say that three years from now that motor again needs replacing, depending on how good your memory is, you may or may not remember where you obtained the last one. With contact groups you are not required to Maintenance Coordinator Simplicity Software Technologies Inc. 4 Contacts and Vendors remember. Just open either the Motors or Cooling Tower groups and scroll through the records. You're sure to find the correct contact, and in record time. Lookup View The Lookup View tab acts much like a lookup table. Here you simply click on the contact of your choice to select them. Once selected you can move to the other tabs to view or edit their file. To resort the database: Move to the Lookup View tab. Select a sort option from the Sort By drop down list. The database will be sorted by whatever field you selected from this list. Maintenance Coordinator Simplicity Software Technologies Inc. 5 Contacts and Vendors Adding New Contacts To add a new contact to your database, please follow these steps: Click on the Add New Record option in the ribbon. Move to the various fields on this screen and input the appropriate information for those fields. This information will be automatically saved within the database. Click the Post/Save Change option to ensure all your changes are posted back to the database. NOTE: Be certain to check the appropriate Contact Type as found near the bottom of the screen. This is very important with some of the other modules, especially with the Purchasing module that looks only for Vendors type contacts. Contact Identification Field This field, found on the Details View should contain a unique identifier for each different contact in the database. We did not however make this a mandatory rule as everyone has their own way of doing things. You can however verify if the identifier you’ve entered is unique to the database. To test to see if your identifier is unique: Enter your Contact ID in the space provided. Move to and click on the Check button adjacent to this field. The program will then inform you as to whether a matching identifier was found. Alternate Contact To record alternate contacts information: From the Details tab, move to and click on the Alt. Contact tab near the bottom of the screen. Enter the appropriate information. Maintenance Coordinator Simplicity Software Technologies Inc. 6 Contacts and Vendors Group Assignments Once a contact record has been created it should be assigned to a contact group. This group, or groups should indicate the types of services or products supplied by that contact. This makes locating contacts much easier. To assign a contact to a group: Locate and select the contact you want to work with. Click on the Group Assignments tab. Move to the Groups on Disk list box and select the name of the group you want to join from those within the list. The item should appear highlighted showing it is indeed selected. Click on the ADD/DISK button. Maintenance Coordinator Simplicity Software Technologies Inc. 7 Contacts and Vendors Adding New Group Titles To add a new group title to both those listed on disk, and to the currently selected contact: Locate and select the contact you want to work with. Click on the Group Assignments tab Click in the Enter New Group text box and type in your new group description. This description can be up to 30 characters in length. Move to and click on the ADD/NEW button to add this group to both the selected part, and those listed on disk. Removing a Contact from a Group To remove a contact from one of the groups please follow these steps: Locate and select the contact you want to work with. Click on the Group Assignments tab. Move to the Current Assignments list box and select the group title you want to disassociate with by clicking on it from within the list. The item should appear highlighted showing it is indeed selected. Move to and click on the Delete button. To remove a contact from a group assignment, and at the same time remove the group name from those listed on disk: Locate and select the contact you want to work with. Click on the Group Assignments tab. Move to the Current Assignments list box and select the group title you want to disassociate with by clicking on it within the list. The item should appear highlighted showing it is indeed selected. Move to and click on the Master Del button. The group assignment will then be removed from the current contact and ALL other parts that were assigned to it. Please note that using the MASTER DEL routine will not only remove the group assignment from the current item, but from every item associated with it. So please be certain that you actually want to do this before you use this option. Maintenance Coordinator Simplicity Software Technologies Inc. 8 Contacts and Vendors Deleting a Contact Record To delete a contact, and permanently remove the record from the database: Locate the contact record you want to delete by using one of the available lookup routines. Open the File menu and select the Delete Record option or click on the icon of a minus sign in the toolbar. Copy and Pasting a Contact Record At times you may find that you have two or more contacts with almost identical information. These could be perhaps company for example. Because this happens quite often when working with contacts, and as a time saving feature, we have provided you with a way to copy a contact's record to be pasted into another's. To copy a contact record to be pasted into another record: Locate the contact record you want to copy by using one of the available lookup methods. Move to the Duplicate group and select the Copy Contact option. Locate the contact record you want to paste into by using one of the available lookup methods, or by adding a new record. Select the Paste Contact option. Filtering the Contact Database There are a few ways in which you can sort the contact's database. To resort the database by one of the available options: Move the Filters page in the ribbon. Click on the Sort or Filter option of your choice Maintenance Coordinator Simplicity Software Technologies Inc. 9 Contacts and Vendors Contact Lookup The Contact Lookup screen divides up the database by groups, which can make finding a specific contact much easier the sorting through the entire database. To locate a contact using the Contact Lookup routine: From the Home page of the ribbon click on the Contacts Lookup option. Move to the Group Name grid on the left and select the group you believe your contact belongs to. The grid on the right will display all the contacts that belong to that group. To view all contacts, regardless of groups, check the View All Contacts checkbox. Select the contacts you want from the grid located on the right of the screen by clicking on them. Click the Select button. Maintenance Coordinator Simplicity Software Technologies Inc. 10 Contacts and Vendors Searching the Database To find a Contact: Click on the Find First option in the ribbon. Move to the Search Text field and enter your search criteria. Move to the Search Type drop down list and select on which database field you want to base you search on. If you only want to return exact matching records from your search, place a check in the Exact Match Only check box. If this box is left blank, the application will automatically insert wild card characters into the search. Click Find First. To find additional matches to your search: Click on the Find Next option in the ribbon or click F3. Printing the Current Record To print the current record: Click on the Print Record or Print Preview option in the ribbon. Click on the icon of the Printer in the Preview’s screen toolbar to print the document. Maintenance Coordinator Simplicity Software Technologies Inc. 11 Contacts and Vendors Opening a Contact Group With the Contacts module you can have the database sorted by a Contact Group, effectively filtering out all other contacts. This makes it easy to find a contact that supplies a specific item or service. To open a contact group: Move to the Filters page and select the Open Group option. Move to grid listing all the contact groups and click on the group you want to open. Click on the OK button. The database will not only be showing contacts that belong to the selected group. Move to the Filters page and select the Close Group option. Maintenance Coordinator Simplicity Software Technologies Inc. 12 Contacts and Vendors Contacts Notes You can include a complex set of notes to be attached to each one of your contact files. The sizes of these note files is limited only by available disk space, and are saved within the contact database. The editor used for the contact notes section is actually a small word processor, and contain many of the features of commercial word processing programs. To find how to use the features of this word processor please refer to the Word Processor chapter. To access the contact notes: Locate and select the contact you want to work with. From the Home page in the ribbon select the Contact’s Notes option. Documents You can maintain many other documents and pictures dealing with your contacts by accessing the features on the Documents tab. To learn how to work with this documents feature, please refer to the Common Features chapter. To access the contact documents: From the Home page in the ribbon select the Contact’s Documents option. Phone List Report To create a phone list report on your contacts: Move to the Reports page in the ribbon. Move to the Phone Lists group and click on the Main Contacts button. Select the option that best describes how you want the list sorted. To print the report, click on the Print icon in the toolbar. Maintenance Coordinator Simplicity Software Technologies Inc. 13 Contacts and Vendors Group Phone List Report To create a phone list report based on a contact group: Move to the Reports page in the ribbon. Move to the Phone Lists group and click on the Group Lists option. To print the report, click on the Print icon in the toolbar. Contact List Report To create a contact list report on your contacts: Move to the Reports page in the ribbon. Move to the General Lists group and click on the Main Contacts button. Select the option that best describes how you want the list sorted. To print the report, click on the Print icon in the toolbar. Group Contact List Report To create a contact list report based on a contact group: Move to the Reports page in the ribbon. Move to the General Lists group and click on the Group Lists option. To print the report, click on the Print icon in the toolbar. . Maintenance Coordinator Simplicity Software Technologies Inc. 14 MAINTENANCE COORDINATOR SYSTEM Personal Planner Maintenance Coordinator Simplicity Software Technologies Inc. 2 Personal Planner Table of Contents Overview ............................................................................................................................. 4 Moving Between Modules .................................................................................................. 4 Personal Scheduler .............................................................................................................. 5 Changing Views of the Personal Scheduler ........................................................................ 6 Creating a New Task with the Personal Scheduler ............................................................. 6 Recurring Tasks .................................................................................................................. 7 Editing a Task with the Personal Scheduler ....................................................................... 8 Printing the Current Personal Scheduler Schedule ............................................................. 8 Deleting a Task with the Personal Scheduler ..................................................................... 8 Changing Dates with the Personal Scheduler ..................................................................... 9 Viewing Assigned Work Orders Schedule ......................................................................... 9 To Do List ......................................................................................................................... 10 Adding a Task to the To Do List ...................................................................................... 10 Editing a Task ................................................................................................................... 11 Deleting a Task from the To Do List ................................................................................ 11 Purging all Completed Tasks ............................................................................................ 12 Sorting the To Do List ...................................................................................................... 12 Printing the To Do List ..................................................................................................... 12 Personal Log ..................................................................................................................... 13 Entering a New Personal Log Category............................................................................ 13 Creating a New Personal Log Entry ................................................................................. 14 Editing Personal Log Entries ............................................................................................ 15 Deleting a Personal Log Entry .......................................................................................... 15 Printing a Personal Log Report ......................................................................................... 15 Daily Journal ..................................................................................................................... 16 Creating a New Daily Journal Entry ................................................................................. 17 Opening a Daily Journal Entry ......................................................................................... 18 Using the Daily Journal’s Word Processor ....................................................................... 18 Using the Stand Alone Word Processor............................................................................ 18 Personal Work Orders ....................................................................................................... 19 Filter Options .................................................................................................................... 20 Work Orders Tabs ............................................................................................................. 20 Creating a New Work Order Request ............................................................................... 21 Printing a Work Order ...................................................................................................... 21 Purchasing Documents...................................................................................................... 22 Purchasing Tabs ................................................................................................................ 23 Creating a New Purchase Document ................................................................................ 23 Maintenance Coordinator Simplicity Software Technologies Inc. 3 Personal Planner Overview The Personal Planner module is a feature designed for your whole team. With this module you can plan your tasks, schedule events in advance, keep detailed logs of your activities, plus create and track work orders and purchasing documents. This feature rich module is broken into even more modules or cells, with each cell providing its own unique features. The first cell allows the user to plan and schedule activities on a daily/weekly or monthly bases. These activities can be either personal or business related. The second cell is a To Do List, where you can record non-timed items to be done, and have these items sorted by priority. The third cell of the Personal Planner module is the Personal Log. This log allows you to break things down into categories for reporting and easy retrieval of information. The fourth cell of the Personal Planner is the Daily Log. This log makes use of a word processor to allow you to record activities on a daily bases, while at the same time giving you a lot of formatting options. This word processor features a what-you-see-is-what-you-get environment that supports multiple fonts, special characters, tables and more. Other options of this module include the creation and tracking of both work order requests and purchase requisitions. To round out the module, we give the user access to build in word processor where they can made a countless number of other documents. Moving Between Modules To move from one module or cell within the Personal Planner: Click on the feature you want to access in the shortcut bar located on the left hand side of the screen. Open the Go menu and select the module or cell of your choice. Or Maintenance Coordinator Simplicity Software Technologies Inc. 4 Personal Planner Personal Scheduler With the Personal Scheduler option you can create and edit personal or business related tasks, view tasks in day, week or work week view. You can also print day, week and month views. If a user is linked to this module, you can also view a work orders schedule this user is assigned to. To access the Personal Scheduler option: Open the Go menu and select the Personal Planner option. Maintenance Coordinator Simplicity Software Technologies Inc. 5 Personal Planner Changing Views of the Personal Scheduler You have the option to change the views available in the Personal Scheduler to a single day, work week, full calendar week, or month view. To change the view of your Personal Scheduler: Move to the Calendar View Options group in the ribbon and select the view option of your choice. Creating a New Task with the Personal Scheduler To create a new task using the Personal Scheduler: Maintenance Coordinator Simplicity Software Technologies Inc. 6 Personal Planner Move to the Personal Scheduler screen. Select a blank time slot within the calendar. Either double-click in this time slot or click on the Add New option in the ribbon. Move to the Subject field and enter a descriptive title for this appointment. This field will accept up to 100 characters. Move to the Location field and type in where this task will take place. Move to the calendar and select the date of this appointment. Move to the Scheduled Start Time and Scheduled End Time drop down boxes and select the appropriate times here. Move to the Category drop down box and select how you want this task to be classified as. Move to and click on the Notes tab. Enter any notes you may have concerning this task. Click on the Save and Close button in the ribbon. Recurring Tasks To setup a recurring task: Create the task or appointment in your normal manner. With the Appointment editor still opened, click on the Recurring button in the ribbon. Move to the Interval drop down box and select the interval that best describes how you want this task to repeat. Move to the Repeat drop down box and select how many times you want this task to repeat. Click on the Generate button. Save you task. Maintenance Coordinator Simplicity Software Technologies Inc. 7 Personal Planner Editing a Task with the Personal Scheduler To edit task or work order using the Personal Scheduler: Move to the Personal Scheduler screen. Select the task you want to edit in the calendar grid. Double-click on the task you want to edit. Edit the task to your liking. Click on the Save and Close button. Printing the Current Personal Scheduler Schedule To print the current schedule as currently viewed: Select the view option of your choice. Open the File drop down menu and select the Print option or click on the Print icon in the main toolbar. Setup the options on the Calendar Page Setup dialog screen to reflect your preferences. Click the OK button. Click the Print button from the Print Preview screen. Deleting a Task with the Personal Scheduler To delete a task or work order using the Personal Scheduler: Move to the Personal Scheduler screen. Double-click on the task you want to delete Move to the ribbon and click the Delete and Close button. When asked about deleting the task, click Yes. Maintenance Coordinator Simplicity Software Technologies Inc. 8 Personal Planner Changing Dates with the Personal Scheduler To change the current day or week of the Personal Scheduler: Access the Calendar control located in the shortcut bar on the left of your screen. Use this calendar to change dates. Viewing Assigned Work Orders Schedule To see a work order schedule: Ensure that there’s a user assigned to this module from the User Setup of the Main Menu module. Move to the View Options group in the ribbon and select the Work Orders option. Maintenance Coordinator Simplicity Software Technologies Inc. 9 Personal Planner To Do List Any manager or mechanic is sure to have a list of items that need their attention. This is where the To Do List will come in handy. With this feature, you can create yourself a list of items that need completion. Give each of these tasks a priority indicator and then sort this list by that indicator. These priority indicators can be any combination of text and numbers. Adding a Task to the To Do List To add a task: Move to and click on the Add Task button in the ribbon. This will open up the Task Editor dialog. Move to the various fields and enter or edit the information appropriate to that field. Click the Save and Close button. Maintenance Coordinator Simplicity Software Technologies Inc. 10 Personal Planner Editing a Task To edit a task an existing task:: Click on the task you want to edit from within the grid. Click the Edit Task button in the ribbon Move to the various fields of this edit them to your liking. Click the Save and Close button. . Deleting a Task from the To Do List To delete a task: Select the task you wish to delete by clicking on it from within the To Do List grid. Click on the Delete Task option in the ribbon. Maintenance Coordinator Simplicity Software Technologies Inc. 11 Personal Planner Purging all Completed Tasks To delete all completed tasks from the To Do List: Click on the Module button and select the Purge Completed option. When the Purge Records dialog appears, move to and click on the Yes button. Sorting the To Do List You can have your To Do List sorted by either the tasks Dates or Priority fields. To sort the database by dates: Move to and click on the Sort Date button in the ribbon. To sort the database by priority indicators: Move to and click on the Sort Priority button in the ribbon. Printing the To Do List To print all open tasks within the To Do List: Move to the To Do List screen. Move to and click on the Print List button in the ribbon. Now move to and click on the Print button on the preview screen to send the report to the default printer. Maintenance Coordinator Simplicity Software Technologies Inc. 12 Personal Planner Personal Log The Personal Log tab allows the user to keep complete records on a wide variety of items. This log differs from the Daily Log in that it uses categories to group its entries. Possible uses for this log are to keep track of items done on a specific machine, or interactions with a specific person. Because it uses groups or categories, histories or log items can be retrieved much easier. Entering a New Personal Log Category To create a new Personal Log category: Move to the Personal Log by opening the Go menu and selecting the Personal Log option Move to and click on the New Category button. Type in your new category title in the box provided and then click the OK button. Maintenance Coordinator Simplicity Software Technologies Inc. 13 Personal Planner Creating a New Personal Log Entry To create a new Personal Log entry: Move to the Personal Log by first clicking on the Personal Options button in the shortcut bar, and then choosing the Personal Log option. Move to Categories grid and click on the category description that you want to assign this new entry to. Click on the New Entry button. When the Log Data Entry screen appears move to the date field and set the date for your entry. Change this date by clicking on the arrows attached to this field. Move to the Entry text box and type in the information you want for this entry. Click on the Save and Close button to save your work. Maintenance Coordinator Simplicity Software Technologies Inc. 14 Personal Planner Editing Personal Log Entries Move to the Personal Log by first clicking on the Personal Options button in the shortcut bar, and then choosing the Personal Log option. Move to Categories grid and click on the category that contains the entry you want to edit. Click on the entry you want to edit from within the Entries grid. Move to and click on the Edit Entry button. Now edit this entry in the same fashion as you created it. Deleting a Personal Log Entry Move to the Personal Log by opening the Go menu and selecting the Personal Log option.. Move to Categories grid and click on the category that contains the entry you want to delete. Next move to and click on the entry you want to delete. Move to and click on the Delete Entry button in the ribbon. Printing a Personal Log Report The reports used by the Personal Log print all entries that fall under a specific category. To print a Personal Log report: Move to the Personal Log by opening the Go menu and selecting the Personal Log option. Move to Categories grid and click on the category description that best describes the category you want to base your report on. Move to and click on the Print List button in the ribbon. Maintenance Coordinator Simplicity Software Technologies Inc. 15 Personal Planner Daily Journal Use the Daily Journal log to record all the important activities you've done for the day. This module features a what-you-see-is-what-you-get word processor with many formatting options. A smart manager is a well-organized manager, and this feature allows for just this. Keep yourself covered by keeping a detailed record of actions and observations. Maintenance Coordinator Simplicity Software Technologies Inc. 16 Personal Planner Creating a New Daily Journal Entry To create a new Daily Log entry: Move to the Personal Journal by first clicking on the Personal Options button in the shortcut bar, and then choosing the Personal Journal option Move to and click on the Add New Entry button in the ribbon When the calendar screen appears, move to and click on the date you wish to create this new entry for. Move to and click on the Select button, your new entry will be created and ready for editing. Maintenance Coordinator Simplicity Software Technologies Inc. 17 Personal Planner Opening a Daily Journal Entry To open a previously created entry for viewing or editing: Move to the Daily Journal screen by opening the Go menu and selecting the Daily Journal option. Move to the Sort drop down box and select how you want the database sorted. Move to the grid and select the entry you wan to open. Click the Edit Entry button. Using the Daily Journal’s Word Processor The word processor used by the Daily Journal is the same one used throughout the Maintenance Coordinator system.. To learn about all the other features of this editor, refer to the Word Processor chapter. Using the Stand Alone Word Processor We have made the word processor used by the system available as stand-alone word processor or editor. With this editor you can create, save and edit documents for your own use, or to share with others. To learn about all the other features of this editor, refer to the Word Processor chapter. To access the stand alone word processor: Open the Go menu and select the Word Processor option or click on the System Options button in the toolbar and then select the Word Processor sub item. Maintenance Coordinator Simplicity Software Technologies Inc. 18 Personal Planner Personal Work Orders With the Personal Work Orders feature you can create new work order requests, and then track their progress. By default, work orders found here will only be those work orders that can be identified as created by the current user, and have the Work Requested field exactly match those of the logged in user. If no user is linked to this module, then all work orders are returned. You can also sort this database to those work orders assigned to the logged in, or linked user. Please note that you can create new work orders in this module. But you can not delete or edit them. To access the personal work orders option. Open the Go menu and select the Work Orders option or click the System Options button in the shortcut bar and then chose the Personal Work Orders option. Maintenance Coordinator Simplicity Software Technologies Inc. 19 Personal Planner Filter Options You have to main view options. The default is to view work orders created by the currently linked user. The second is to view work orders where one of the 3 assignment fields match the currently linked user. If no user is setup to be linked to this module (employee record), then all work orders are shown regardless to who created them, or who they are assigned to. At no point however can any user delete or edit these work orders from within this module. To set how the database is viewed: Open the Go menu and select the Work Orders option. Move to the Filters group in the ribbon and then select filter option of your choice . Work Orders Tabs The Lookup view tab of the Personal Work Orders tab allows for the easy lookup of system work orders Maintenance Coordinator Simplicity Software Technologies Inc. 20 Personal Planner To use the Work Orders Lookup View: Open the Go menu and select the Work Orders option. Move to the Sort By drop down list and select how you want this database sorted. Click on a work order within the list to select it Once selected you can click on the Details View tab to view its information and status. Creating a New Work Order Request By default, all new work orders made in this module will have a status of Work Order Request. The administrator of this system can then go into either the Work Orders module, or Maintenance Scheduler module and turn these requests into actual work orders. To create a new work order request: Click the System Options button in the shortcut bar and then chose the Personal Work Orders option. Click on the Add New option in the ribbon. The Work Orders Creation wizard should open. For more information on how to use the Work Orders Creation wizard, please refer to the Common Features chapter. Printing a Work Order To print a work order: Open the Go menu and select the Work Orders option. Click on a work order within the list to select it. Click the Print Preview option in the ribbon. Maintenance Coordinator Simplicity Software Technologies Inc. 21 Personal Planner Purchasing Documents With the Personal Purchasing feature you can create purchase requisitions and then track their progress. Purchase documents found here will only be those that can be identified as created by the current user. To access the personal Purchasing Documents option. Open the Go menu and select the Purchase Requisitions option or click the System Options button in the shortcut bar and then chose the Purchasing Documents option. Maintenance Coordinator Simplicity Software Technologies Inc. 22 Personal Planner Purchasing Tabs The Lookup view tab of the Purchasing Documents tab allows for the easy lookup of system purchase documents To use the Lookup View: Open the Go menu and select the Purchasing Requisitions option. Move to the Sort By drop down list and select how you want this database sorted. Click on a document within the list to select it Once selected you can click on the Details View tab to view its information and status. Creating a New Purchase Document By default, all new documents made in this module will have a status of Purchase Requisition. The administrator of this system can then go into either the Purchasing and Receiving module, and turn these requisitions into purchase orders. To create a purchase document: Click the System Options button in the shortcut bar and then chose the Purchase Documents option. Click the Add New option in the ribbon. The Purchase Requisition Creation wizard should open. For more information on how to use the Purchase Requisition Creation wizard, please refer to the Common Features chapter. Maintenance Coordinator Simplicity Software Technologies Inc. 23 Personal Planner Maintenance Coordinator Simplicity Software Technologies Inc. 24