Download Geller Touch User Guide
Transcript
Geller Touch Geller Touch User Guide Version 1.0 (8.1.0 r2b31) 1 Contents About This Manual ..................................................................................................... 9 Back Office .............................................................................................................. 10 General Navigation ............................................................................................... 10 Your Product Database ........................................................................................ 11 How to create a new PLU/Product ..................................................................... 12 Editing existing Product ..................................................................................... 13 Deleting a Product ............................................................................................. 14 Add a comment .................................................................................................. 15 Enable Compulsory Receipts for a Product ....................................................... 16 Suppliers ............................................................................................................... 17 Creating new Supplier........................................................................................ 17 Editing an existing Supplier................................................................................ 18 Deleting a Supplier ............................................................................................. 18 Condiments ........................................................................................................... 19 Creating a new Condiment ................................................................................ 19 Editing a Condiment........................................................................................... 20 Deleting a Condiment ........................................................................................ 20 Attaching a Condiment to a Product .................................................................. 21 Removing a Condiment from a Product ............................................................. 22 Menus ................................................................................................................... 23 How to create a new Menu ................................................................................ 23 To edit an existing Menu .................................................................................... 23 To delete a Menu ............................................................................................... 24 Questions .............................................................................................................. 25 To create a new Question .................................................................................. 25 Attaching a Question to a product...................................................................... 26 To remove a Question from a Product ............................................................... 26 Customer Display (Pole Display) .......................................................................... 27 Create a message .............................................................................................. 27 Saving Changes ................................................................................................. 28 Operators .............................................................................................................. 29 2 To create a new Operator .................................................................................. 29 To edit an existing Operator............................................................................... 31 To delete an Operator ........................................................................................ 31 Receipt Set Up ...................................................................................................... 32 Setting the Header and Footer for Receipts ...................................................... 32 Reason Menus ...................................................................................................... 34 To add a value to a reason type ........................................................................ 34 To remove a reason ........................................................................................... 35 Sales Mode .............................................................................................................. 37 Basic User Operations (Hospitality) ...................................................................... 37 To access Sales Mode from the Back Office ..................................................... 37 Signing on to the till ............................................................................................ 38 Making a Sale .................................................................................................... 39 Using the Quantity Button .................................................................................. 40 Selling with a Modifier ........................................................................................ 41 Free Text ............................................................................................................ 42 Using a menu ..................................................................................................... 42 Selling Products with Condiments ..................................................................... 43 Layaway ............................................................................................................. 43 To recall a transaction that has been laid away ................................................. 44 Storing to Tables/Tabs ....................................................................................... 45 Covers ................................................................................................................ 47 Splitting the Bill .................................................................................................. 48 Moving products to another table....................................................................... 49 Product Search .................................................................................................. 50 Product Enquiry ................................................................................................. 51 Paying a transaction .......................................................................................... 52 To accept multiple Tender Types....................................................................... 53 Printing a Receipt ............................................................................................... 54 Basic User Operations (Retail) ............................................................................. 55 To access Sales Mode from the Back Office ..................................................... 55 Signing on to the till ............................................................................................ 56 Making a Sale .................................................................................................... 57 Product code ...................................................................................................... 58 Using the Quantity Button .................................................................................. 59 Free Text ............................................................................................................ 59 3 Using a menu ..................................................................................................... 60 Using the scanner for products with barcodes ................................................... 61 Layaway ............................................................................................................. 61 Product Search .................................................................................................. 63 Product Enquiry ................................................................................................. 64 Paying a transaction .......................................................................................... 65 To accept multiple Tender Types....................................................................... 66 Printing a Gift Receipt ........................................................................................ 67 Printing a Receipt: .............................................................................................. 67 Functions .............................................................................................................. 68 Fixed Discount ................................................................................................... 68 Item Discount ..................................................................................................... 68 All Discount (Subtotal Discount) ........................................................................ 69 Void/Void Entire Transaction ............................................................................. 70 Void Entire Transaction...................................................................................... 71 Refund Item ....................................................................................................... 71 Refund Current Transaction............................................................................... 72 No Sale .............................................................................................................. 72 Paid Out ............................................................................................................. 73 Paid In ................................................................................................................ 74 Price Change ..................................................................................................... 75 Terminal Reports ..................................................................................................... 76 Current Financial .................................................................................................. 76 Current Financial ................................................................................................ 76 Group/Dept ........................................................................................................ 76 Product Sales ..................................................................................................... 76 Sales Commission ............................................................................................. 76 Charge Sheet Status.......................................................................................... 76 Mix and Match .................................................................................................... 76 Archive/Central – Sales ........................................................................................ 77 Daily Sales ......................................................................................................... 77 Weekly Sales By Day ......................................................................................... 77 Consolidated Weekly Sales ............................................................................... 77 Sales By Period ................................................................................................. 77 Sales Commission ............................................................................................. 78 Operator Sales ................................................................................................... 78 4 Group/Dept......................................................................................................... 78 Product Sales Report ......................................................................................... 78 Hourly Report ..................................................................................................... 78 Mix and Match .................................................................................................... 78 End of Day ......................................................................................................... 79 Cash Declaration ............................................................................................... 79 Sales Review ........................................................................................................ 82 Central/Archive Sales ........................................................................................ 82 To find a transaction from a past date ............................................................... 83 To Print a Copy Receipt ..................................................................................... 86 To Print an A4 copy of the receipt...................................................................... 86 To void the transaction....................................................................................... 87 To Print the Search result List from the Receipt Printer .................................... 87 To Print a Copy Of a Selection Of Receipts ...................................................... 88 To Export to HTML ............................................................................................. 88 To Export to Excel: ............................................................................................. 88 To Change the Current Criteria:......................................................................... 88 Serial Tracking ...................................................................................................... 89 Set up a product for serial tracking .................................................................... 89 Selling a Product with serial tracking ................................................................. 89 Looking up Serial Tracking transactions ............................................................ 91 Mail Merge Wizard ................................................................................................ 92 To Export Data ................................................................................................... 92 Commission .......................................................................................................... 96 Setting Up Personnel ......................................................................................... 96 Deleting Personnel ............................................................................................. 97 Editing Personnel ............................................................................................... 98 Saving Changes ................................................................................................. 99 Setting Up Rates ................................................................................................ 99 Selling with Commission Set ............................................................................ 100 Clock In/Out ........................................................................................................ 102 To Clock In ....................................................................................................... 102 To Clock Out .................................................................................................... 102 Labels ................................................................................................................. 103 Printing from the Product Record..................................................................... 103 Printing from the Database .............................................................................. 104 5 Credit Notes ........................................................................................................ 107 Issuing a Credit Note ....................................................................................... 107 Using/Redeeming a Credit Note ...................................................................... 108 Stock In/Out ........................................................................................................... 109 Setting up a Stock item .................................................................................... 109 To set up a recipe item .................................................................................... 111 Stock Orders ....................................................................................................... 114 To create a new Order manually...................................................................... 114 Setting a Product to use min and max criteria ................................................. 117 To Book an Order into Stock............................................................................ 118 If the delivery was correct: ............................................................................... 120 If the delivery Qty or Cost was incorrect: ......................................................... 121 Deleting an Item ............................................................................................... 122 Adding an Item ................................................................................................. 122 Edit an Item ...................................................................................................... 123 Goods In ............................................................................................................. 124 Creating Goods In ............................................................................................ 124 Goods In Page ................................................................................................. 127 Stock Taking ....................................................................................................... 128 Doing a Stock Take.......................................................................................... 128 Stock Adjustments .............................................................................................. 131 To create a new adjustment............................................................................. 131 Stock Adjustments Screen ............................................................................... 134 Edit an Adjustment: .......................................................................................... 135 Delete an Adjustment....................................................................................... 135 View an Adjustment ......................................................................................... 136 Customer Back Office............................................................................................ 137 Customers .......................................................................................................... 137 Creating a New Customer................................................................................ 137 Adding a Customer to a Group ........................................................................ 139 Attaching a Picture ........................................................................................... 139 Allocating a Swipe Card ................................................................................... 140 Entering Birthdays and Anniversaries .............................................................. 140 Putting a Customer ‘On Stop’ .......................................................................... 140 Adding Comments ........................................................................................... 140 View Deposit History ........................................................................................ 141 6 Transaction Overview ...................................................................................... 142 Customer Groups ............................................................................................... 143 Adding a New Group........................................................................................ 143 Deleting a Group .............................................................................................. 144 Customer Orders ................................................................................................ 146 Create a New Order: ........................................................................................ 146 Add to an Existing Order: ................................................................................. 148 Remove an Item from an Order ....................................................................... 150 Amending a Product on an Order .................................................................... 151 To Print the Order ............................................................................................ 151 To Print a Mini Statement ................................................................................ 151 Deleting an Order ............................................................................................. 152 Loyalty ................................................................................................................ 153 Setting Up a Customer for Loyalty Discount .................................................... 153 Loyalty Points Overview................................................................................... 153 Comments .......................................................................................................... 154 Adding Text ...................................................................................................... 154 Listing ................................................................................................................. 155 Run a Report .................................................................................................... 155 Customer on the Terminal ..................................................................................... 156 Credit Notes ........................................................................................................ 156 Issuing a Credit Note ....................................................................................... 156 Using/Redeeming a Credit Note ...................................................................... 157 Deposits .............................................................................................................. 159 Taking a Deposit .............................................................................................. 159 Refund a Deposit ............................................................................................. 161 Print a Deposit List: .......................................................................................... 162 Redeeming a Deposit ...................................................................................... 163 Orders ................................................................................................................. 165 Create a New Order ......................................................................................... 165 Add to an Existing Order .................................................................................. 167 Remove an Item from an Order ....................................................................... 169 Amending a Product on an Order .................................................................... 170 To Print the Order ............................................................................................ 170 To Print a Mini Statement ................................................................................ 170 Deleting an Order ............................................................................................. 171 7 Adding a Deposit to an Order .......................................................................... 172 Refunding a Deposit from an Order ................................................................. 174 Finalising an Order ........................................................................................... 176 On Stop ............................................................................................................... 178 What happens on the till? ................................................................................ 178 Loyalty ................................................................................................................ 179 Making a Sale with Loyalty .............................................................................. 179 Redeeming Points ............................................................................................ 180 FAQs and Top Tips ............................................................................................... 182 8 About This Manual This Manual tells you how to use Geller Touch. It gives you information on how to set up and maintain your system and some general good practice advice. Any information you cannot find in this manual is covered in the Advanced User Manual, please speak to your Dealer. This manual assumes that the target audience is familiar with PC s and their general use. To make the manual user friendly; icons that you will see on your screen have been used e.g. Keep an eye out for boxes like this as they contain tips and helpful hints! Mix and Match is not included in this version as it is currently being rewritten Handhelds, Location Stock, Accounts, Bookings and Scales will be included in the next release 9 Back Office General Navigation Top - takes you to the first record Previous - takes you to the previous record Next - takes you to the next record Last - takes you to the last record Delete - will delete the current record Save – saves any changes made to the current record Abort – exits the current record and does not save any changes Exit – exits the Geller Touch Software 10 Your Product Database Your Product Database should be regularly maintained with key information such as cost and retail prices. The product database is divided into 3 areas; Groups, Departments and PLUs (products). A ‘Group’ is a reportable area e.g. Food. A ‘Department’ is a reportable area within a ‘Group’ e.g. Starters. To create a PLU you must have the Group and Department in place first e.g. if we wanted to create ‘Soup’ we would need Food and Starters. Before you start to set up your system it is a good idea to decide how you would like your reports to look and devise a naming convention for your PLUs e.g. 01001, 01 may be the Department e.g. Food and 001 the first product e.g. Soup so the product will have a PLU of 01001 and a description of Soup. If being used in the Retail environment with scanner the PLU should be the barcode. Other mandatory information for the product record is the supplier name; this can be created from the product record. Group Department Starters PLU/Product Prawn Cocktail Soup Food Mains 11 Lasagne How to create a new PLU/Product You can also create products on the fly in sales mode – see Functions section If you are using the stock control module as well please also refer to Stock In/Out section of the manual before saving the item. Select Select A blank product record is displayed Enter the PLU number (barcode) or if not being used in conjunction with a scanner enter the name of the product – this is limited to 14 characters, defaults to uppercase and is shown on reports 12 Press Enter, if you wish to create this product select Yes, if a product with the PLU already exists you will be taken to that record Enter the description of the product – this is limited to 30 characters and is shown on reports In the price levels section enter the retail price for the relevant sale sizes and price levels Select the ‘Profile’ tab From the drop down list select the department the product belongs to From the drop down list select the supplier Select save If the Department or Supplier does not exist select ‘Add’ and you can add them straight in to the database Editing existing Product Select Select 13 Enter the PLU or description of the product or use the search boxes and press Enter The Product record is displayed, from here you can edit information such as prices, reporting department, name The PLU field cannot be edited Once all changes have been made select Save Any changes made will take effect immediately Deleting a Product Select Select Enter the PLU (or use the PLU and description search boxes) of the product to be deleted and press Enter Select The system will ask if you are sure Select Yes/No The deleted product can still be reported on historically If the PLU has more than one barcode use ‘Alternative PLU’s’ tab to add the extra ones in – each barcode can have its own price 14 Add a comment Comments are displayed on the terminal and/or customer receipts and are product specific Select This will display the comments page If the comment is to be displayed to the Operator only Tick the display comment to operator box Type text into the text box below If the text is only for a Trainee Operator Tick the display only for trainee operator box If the comment is to print on a receipt Tick the print comments on receipt box If the text is different type the text into the receipt comments lines Once the product is selected for sale on the terminal it will display this screen 15 Enable Compulsory Receipts for a Product Select Tick Every time this product is sold it will produce a receipt 16 Suppliers Creating new Supplier Select Select A blank Supplier record is displayed In the supplier code field enter in the unique supplier code – this can simply be 001 if your suppliers do not use codes Press Enter, if you wish to create this Supplier select Yes, if a Supplier with the code already exists you will be taken to that record Enter the company name in the company field This is the only mandatory information; you can however fill in the other fields, 17 this information will be shown in the supplier list report. Editing an existing Supplier Select Select From the drop down box select the supplier to be edited or type in the supplier code and press enter Edit the information as required Select Save Deleting a Supplier Select Select From the drop down box select the supplier to be edited or type in the supplier code and press enter Select delete If you are sure you want to delete this supplier select Yes, if not select No 18 Condiments Condiments are extra instructions that can be added to the profile of a product e.g. cooking instructions for a steak or size of shoe sold. Creating a new Condiment Select Select A blank Condiments record is displayed Enter the unique condiment number (you can see the last one used by looking in the drop down list) Press Enter, if you wish to create this Condiment select Yes, if a Condiment with the code already exists you will be taken to that record 19 Enter the title of the condiment e.g. Cooking Instructions or Shoe Colour Press Enter In the first field type the first selection you would like to see in your list If this is not a compulsory selection remove the tick from the ‘Compulsory’ box Once all the options have been entered select Save, if you do not wish to Save this select Abort The options will be displayed on the till in the order they are entered in this list Editing a Condiment Select Select From the drop down box select the Condiment to be edited or type in the condiment number and press enter Edit the information as required Select Save Deleting a Condiment Select Select From the drop down box select the Condiment to be edited or type in the condiment number and press enter Select Delete, if the Condiment is attached to 1 or more products you will see the following message: 20 If you are sure you want to delete it select Yes if not select No Attaching a Condiment to a Product Select Products Find the product you wish to attach the Condiment to Select the ‘Profile’ tab In Condiments use the drop down selections to chose the options you wish to attach Select Save 21 Removing a Condiment from a Product Select Products Find the product you wish to remove the Condiment from Select the ‘Profile’ tab In Condiments Select the Select Save next to the option you want to remove You can have a maximum of 3 condiments attached to a product and each condiment can have a maximum of 16 options These print on remote printer tickets only. 22 Menus Menus are buttons on the tills that display predefined products e.g. all pasta dishes or all type of shoe. How to create a new Menu Select Select Enter the unique menu number (you can see the last one used by looking in the drop down list) Press Enter, if you wish to create this Menu select Yes, if a Menu with the number already exists you will be taken to that record Enter the title of the Menu e.g. Pasta Dishes or Trainers Press Enter With the cursor in the Option 1 field select ‘Search Product’ From the tree view select the 1st product you wish to be displayed in the menu Once all the products are listed select Save To edit an existing Menu Select Select 23 A blank menu record will be displayed From the drop down box select the Menu to be edited and press enter Edit the information as required Select Save You can have a maximum of 16 options attached to a menu To delete a Menu Select Select From the drop down box select the Menu to be edited and press enter Select Delete If you are sure you want to delete it select Yes if not select No 24 Questions Questions can be used in several ways e.g. in the bar environment they can be used to prompt the user to check for ID when selling alcohol or in the retail environment to up sell; so if they are selling a pair of shoes would the customer like shoe polish? To create a new Question Select Select A blank Questions record will be displayed 25 Enter the unique number (you can see the last one used by looking in the drop down list) Press Enter, if you wish to create this Question select Yes, if a Question with the number already exists you will be taken to that record Enter the title of the Question e.g. Over 18 or Shoe Polish? In the Question field type in the question or prompt Select the type of result to be entered e.g. Yes/No or a number In the result lengths select the minimum and maximum answer length Unique Question – does it ask once in the transaction or each item that has the question attached If this does not need to be printed on the receipt tick the Do Not Print box Attaching a Question to a product Select Products Find the product you wish to attach the Question to Select the ‘Profile’ tab In Questions use the drop down selections to chose the options you wish to attach Select Save To remove a Question from a Product Select Products Find the product you wish to remove the Question from Select the ‘Profile’ tab In Questions Select the Select Save next to the option you want to remove You can have a maximum of 3 Questions attached to a product 26 Customer Display (Pole Display) The customer display allows you to create messages to be shown at different statuses of a terminal Create a message Select Select Select This will show the Customer Display Messages Screen 27 Enter the text you want to appear on the Customer Display depending on the status of the terminal You can have a maximum of 20 characters on each line Saving Changes Select If you do not wish to save changes made select 28 Operators Operators are till users who are or are not given permission to carry out functions on the tills To create a new Operator Select Select A blank Operator record will be displayed 29 Enter the Operator name and press Enter, if the name already exists you will be taken to the record, if not you will be asked if you wish to create the new operator Tick the ‘Display Button’ option if you want the operator name to appear on the log on screen Tick ‘Allow Reports’ if the user will be able to access POS reports Tick ‘Allow Back Office’ if the user will be able to access Back Office Enter a ‘Sign On Code’ to enable ‘Manual Sign On’ Enter a ‘Password’ to be used in conjunction with ‘Manual Log On’ If the operator is being assigned a Passwords are numerical and can have a maximum of 6 characters Sales Mode Functions – This is the option that gives operator permissions on the terminal when in Sales Mode If the Operator is to be allowed to carry out ‘Functions’ on the tills: Select The Allowed Functions screen is displayed From the window on the left, select the Function to be allowed 30 Select the to move the Function in to the Allowed Functions window Select Save You have now successfully set up a new operator To edit an existing Operator Select Select A blank Operator record will be displayed From the drop down box select the Operator you wish to edit the details of Edit required information Select Save To delete an Operator Select Select A blank Operator record will be displayed Select the operator to be deleted from the drop down list Select delete The Operator will be deleted from the Operator list 31 Receipt Set Up Setting the Header and Footer for Receipts Select Select This will display the Receipt Set Up screen Type the desired text into the relevant fields and select the text size from the drop down boxes on the right Selecting Print will print a copy of the text Selecting View will display the text on screen as below 32 Selecting Save will save the changes made Exit will go back to the menu selection screen without saving changes If you have made changes and they have not saved you may be in DEMO mode 33 Reason Menus Reason menus are attached to various till functions by default. When doing a function on the till you are prompted for a reason e.g. voiding an item the reason may be the order was incorrect To add a value to a reason type Select Select This displays the Reason Types Screen From the drop down list select the Reason Type you wish to add a value to 34 The Reason values are displayed In the Reason x boxes type in the reason for the Function e.g. for a refund it may be ‘undercooked’, ‘burnt’ or ‘damaged’. Select Save to save the changes or Abort to go back to the previous page To remove a reason Select Select 35 This displays the Reason Types Screen From the drop down list select the Reason Type you wish to remove the value from The Reason values are displayed Delete the text Select Save 36 Sales Mode Basic User Operations (Hospitality) Sales Mode is the function which allows you to run a point of sale (till) from the Back Office machine, from Sale Mode you can carry out sales, process refunds manage tabs and tables amongst other things The illustrations used in the Sales mode section may not reflect the layout of your tills exactly e.g. the colour, size and wording on the buttons may be slightly different depending on how your system has been configured. To access Sales Mode from the Back Office Select Select 37 An example of a typical Hospitality layout: Signing on to the till There are 4 main ways of signing on to a till 1. Dallas Key – this is a fob that is attached the till (usually on the card swipe) 2. Manual Sign On – this is a box for the operator to enter their Sign On code and confirm their password 3. Button Sign On – this is a displayed button on the Sign On screen, it will also prompt for a Password if the user has been allocated one 38 4. Swipe Card – User has a designated card to swipe on to the till with, this may be password protected Making a Sale Select the product to be sold from the keyboard layout The selected product and it’s price will be displayed in the transaction screen If the product is not recognised because it does not exist there is a setting that can be switched on to allow you to create products ‘on the fly’ in sales mode You will see the following Select Yes 39 Enter the description, price and select the correct department Select Accept The product will be pulled onto the transaction screen Using the Quantity Button The Quantity button can be used to sell multiples of a product Select the number to be sold from the number pad e.g.6 Select Select the product The selected product and it’s price will be displayed in the transaction screen 40 Selling with a Modifier A Modifier is a button which allows a product to be sold at another size and or price e.g. Half Pint, Double or Childs Portion Select the modifier button Select the Product The selected product and it’s price will be displayed in the transaction screen The Product must have a price against the unit in price levels; if not you will receive the message below It is important that modifiers are used correctly because if you are using Stock as well it will affect the amount of stock that is deducted 41 Free Text This prints out on order printers and receipts but will not shown in the transaction pane Select Enter the text that you want to print beneath your product The product must be sold before you can use this function Using a menu A menu may be used when a number of items can be grouped together e.g. all Starters if you cannot fit the individual items onto the page Select the Menu button The predefined list will be displayed Select the required product from the list or exit the menu The selected product and it’s price will be displayed in the transaction screen 42 Selling Products with Condiments Condiments are extras that can be added to a profile of a product. When a product with a Condiment is selected the Condiment window is displayed Select the option required if the choice is not compulsory there will be an ‘Exit’ button displayed to leave the menu Layaway This function can be used to temporarily store a transaction; a ‘Layaway’ can be recalled by any operator Select The transaction will disappear and the main screen displayed 43 To recall a transaction that has been laid away Select The Layaway recall screen is displayed Select the transaction to be recalled Select The transaction is recalled to the transaction pane as normal 44 Storing to Tables/Tabs Tables (with table planner) are used predominantly in the Restaurant environment If you are in a transaction and want to store the products to a table: Select The table planner screen is displayed Select the table number The following message will appear Select Yes The following message will appear – this message will appear if you are opening the table in a transaction (with items being run through and not stored or cashed off) 45 Select Yes Select Table Status When you view the table planner the table numbers may show in different colours; this is referred to as the table status; this is configurable In this example Table 3 = Starters Table 1 = Main Course Table 2 = Deserts When the table is stored you will be asked which status the table is; the list may look similar to this Select No Change if the table status remains the same If they are now having Dessert the Dessert status should be selected 46 Selecting the Abort option will take you back to the transaction – a status must be selected It is also possible to configure table statuses to work with time limits, if this limit has been exceeded the table will flash Covers Covers can be used either in a table or in a normal transaction Select the number from the number pad Select You can see the number of covers displayed at the top of the POS If you have the prompt setting switched on the system will automatically prompt for the number of covers 47 Splitting the Bill Splitting the bill enables a table/tab to be split up into a number of bills that can be paid separately Recall the table Select The Split Bill page is displayed Select the items to be taken off of the current bill by clicking on the line Select The products appear on the transaction screen the bill can now be paid 48 Moving products to another table Recall the table Select The Split Bill page is displayed Select the items to be taken off of the current bill by clicking on the line Select The products appear on the transaction screen Select Select the table number you want to move the items to Store the table 49 Product Search Product Search can be used when you cannot find a specific product on the terminal Select Enter at least one character of the PLU or description Select Enter The results page is displayed To sell the product press the Select Product button Retry will take you back to the search entry page Abort will exit from the Product Search mode If you cannot find the product using the search facility try un-ticking the ‘Include Only Items In Stock’ 50 Product Enquiry Product Enquiry can be used when you need to know certain details about a product; the information you see is configured by your dealer so every system will be different Select The Product Enquiry – Stock Details Page will be shown 51 Paying a transaction When all the items have been selected and you are ready to accept payment Select This will display the payments screen Using the numeric keypad enter the amount that is being tendered e.g. 2000 Select the tender type from the right hand side e.g. cash 52 To accept multiple Tender Types When all the items have been selected and you are ready to accept payment Select This will display the payments screen Using the numeric keypad enter the amount that is being tendered e.g. 500 Select the tender type from the right hand side e.g. cash Enter the next amount to be tendered e.g. 1000 Enter the next amount to be tendered e.g. 500 53 Printing a Receipt Select When in a transaction or an open table and receipt is selected a bill will be printed, if you have just signed in and receipt is selected the last receipt (for the terminal) will be printed You may have product countdown configured, this is a number displayed by the product that advises the user how many are in stock – it will only display if the figure is positive 54 Basic User Operations (Retail) The illustrations used in the Sales mode section may not reflect the layout of your tills exactly e.g. the colour, size and wording on the buttons may be slightly different depending on how your system has been configured. Sales Mode is the function which allows you to run a point of sale (till); from Sale Mode you can carry out sales, process refunds manage tabs and tables amongst other things To access Sales Mode from the Back Office Select Select 55 An example of a typical Retail layout: Signing on to the till There are 4 ways of signing on to a till 1. Dallas Key – this is a fob that is attached the till (usually on the card swipe) 2. Manual Sign On – this is a box for the operator to enter their Sign On code and confirm their password 3. Button Sign On – this is a displayed button on the Sign On screen, it will also prompt for a Password if the user has been allocated one 56 4. Swipe Card – User has a designated card to swipe on to the till with, this may be password protected Making a Sale Select the product to be sold from the keyboard layout The selected product and it’s price will be displayed in the transaction screen If the product is not recognised because it does not exist there is a setting that can be switched on to allow you to create products ‘on the fly’ in sales mode You will see the following Select Yes 57 Enter the description, price and select the correct department Select Accept The product will be pulled onto the transaction screen Product code Product Code can be used when you have memorised the PLU and it is quicker to type it in than look for the button or if the barcode is not scanning Enter the PLU e.g. 12345 Select The product and price appears in the transaction pane 58 Using the Quantity Button Select the number to be sold from the number pad e.g.6 Select Select the product The selected product and it’s price will be displayed in the transaction screen Free Text This prints out on order printers and receipts but will not shown in the transaction pane Select Enter the text that you want to print beneath your product The product must be sold before you can use this function 59 Using a menu A menu may be used when a number of items can be grouped together e.g. all Starters if you cannot fit the individual items onto the page Select the Menu button The predefined list will be displayed Select the required product from the list or exit the menu The selected product and it’s price will be displayed in the transaction screen 60 Using the scanner for products with barcodes From Sales Mode hold the product with the barcode across the beam from the scanner The product name and price appears in the transaction pane If you get this message The barcode is not in the product record – add as a PLU Layaway This function can be used to temporarily store a transaction; a ‘Layaway’ can be recalled by any operator Select The transaction will disappear and the main screen displayed To recall a transaction that has been laid away: Select The Layaway recall screen is displayed 61 Select the transaction to be recalled Select The transaction is recalled to the transaction pane as normal 62 Product Search Product Search can be used when you cannot find a specific product on the terminal Select Enter at least one character of the PLU or description Select Enter The results page is displayed To sell the product press the Select Product button Retry will take you back to the search entry page Abort will exit from the Product Search mode If you cannot find the product using the search facility try un-ticking the ‘Include Only Items In Stock’ 63 Product Enquiry Product Enquiry can be used when you need to know certain details about a product; the information you see is configured by your dealer so every system will be different Select The Product Enquiry – Stock Details Page will be shown 64 Paying a transaction When all the items have been selected and you are ready to accept payment Select This will display the payments screen Using the numeric keypad enter the amount that is being tendered e.g. 2000 Select the tender type from the right hand side e.g. cash 65 To accept multiple Tender Types When all the items have been selected and you are ready to accept payment Select This will display the payments screen Using the numeric keypad enter the amount that is being tendered e.g. 500 Select the tender type from the right hand side e.g. cash Enter the next amount to be tendered e.g. 1000 Enter the next amount to be tendered e.g. 500 66 Printing a Gift Receipt From the Subtotal screen select: Printing a Receipt: Select When in a transaction or recalled lay away and receipt is selected a bill will be printed, if you have completed a transaction and receipt is selected then a receipt will be printed. You may have product countdown configured, this is a number displayed by the product that advises the user how many are in stock – it will only display if the figure is positive 67 Functions The illustrations used in the Sales mode section may not reflect the layout of your tills exactly e.g. the colour, size and wording on the buttons may be slightly different depending on how your system has been configured. Some of these functions may not be available depending on specifications given to your dealer Fixed Discount Ring the items through Select This will discount the transaction by the predefined amount Item Discount This will apply a discount to the last item on the transaction. You can either discount an item by %, sell for a reduced price or take an amount off Ring the item through Select Enter the amount e.g. 10 Select either this will reduce the item selling price by 10% Or this will sell the item for 10p Or this will take 10p off of the selling price 68 All Discount (Subtotal Discount) This may be configured to allow the items to be tagged individually but is usually set up to apply to all items in a transaction Ring the items through Select Enter the percentage amount to be discounted Select Discount will only be applied up to the max discount percentage in the product record 69 Void/Void Entire Transaction This will allow you to either remove an item or several items from a transaction or void the entire transaction To remove 1 item or a selection of items Select The void screen will be displayed Tag the item/items to be removed Select 70 Void Entire Transaction Select The reason menu is displayed Select the reason You may also have an error correct button which will allow 1 item to be removed or void last item which will remove the last item on the transaction Refund Item This will allow the operator to refund an item Select Select the product to be refunded The item will be displayed in the transaction pane as a negative amount 71 Refund Current Transaction This will allow the operator to refund all items on one transaction Ring the products through to be refunded Select All the items in the transaction will be shown as a negative The refund function will automatically add the product back in to stock. No Sale The No Sale button is used to open the till drawer e.g. to give a customer change there is a reason menu attached to the function. You cannot do a No Sale in a transaction. Select Select the reason for opening the drawer 72 Paid Out The Paid Out function is for accounting for monies that have left the till during the trading day e.g. the window cleaner was paid, petty cash for the corner shop, there is a reason menu attached to the function. This function cannot be done in a transaction Select The Paid Out window is displayed From the drop down box select the reason for the function From the drop down box in the ‘Tender Type’ field select the method the person was given Type the amount in the ‘Amount’ field The free text field is for any extra notes you may want to add e.g. if it was Petty Cash you could add milk into the free text field No. Of Copies is the number of receipts you want to print once the OK button has been selected Select OK to save the ‘Paid Out’ 73 Paid In The Paid In function is to account for monies that have been added to the till during the trading day e.g. Float, there is a reason menu attached to the function. This function cannot be done in a transaction Select The Paid In window is displayed From the drop down box select the reason for the function From the drop down box in the ‘Tender Type’ field select the tender type of the money Type the amount in the ‘Amount’ field The free text field is for any extra notes you may want to add e.g. if you added an extra float because you were unusually busy No. Of Copies is the number of receipts you want to print once the OK button has been selected Select OK to save the ‘Paid In’ 74 Price Change The Price Change Function is mainly used for reducing (but will increase as well) the price of a product outside of a discount e.g. if an item is damaged and you wish to knock down the price. Ring through the item you want to change the price of Select The Price Change Window is displayed Enter the price you want to charge in the ‘New Price’ field From the drop down box select the reason for the Price Change Select OK to change the price This will always change the price of the last product in the transaction and does not change the price permanently (there is a setting that can do this so this may be switched on) You may have product countdown configured, this is a number displayed by the product that advises the user how many are in stock – it will only display if the figure is positive 75 Terminal Reports Current Financial Some of these reports will only appear if the feature is configured. Report Name Current Financial Group/Dept Product Sales Sales Commission Charge Sheet Status Mix and Match Information Number and Value of Transactions Nett Sales Tender Type breakdown Number of No Sales Number and Value of Voids Loyalty Point Issued VAT Analysis Group Value and Volume Department Value and Volume Product Value and Volume Overall total Personnel Names Band Rates Transaction Count Sale Value Commission Value Overall total Sale Value per User Overall total Commission Value per User Overall total Sale and Commission Value for all Users List of Open Tables Volume and Value Overall Volume and Value Mix and Match offers used Number of times fired Discount Given 76 Archive/Central – Sales These Reports will only have data once the End of Day procedure has been done. Because they are period defined reports, once the report has been selected you will need to choose a start date and/or a finish date for the report. Certain reports may also ask for Terminals to be defined by a tick box, the default is set to all terminals. Report Name Daily Sales Weekly Sales By Day Consolidated Weekly Sales Sales By Period Information Number and Value of Transactions Nett Sales Tender Type breakdown Number of No Sales Number and Value of Voids Loyalty Point Issued VAT Analysis By Day for a 1 week period Number and Value of Transactions Nett Sales Tender Type breakdown Number of No Sales Number and Value of Voids Loyalty Point Issued VAT Analysis 1 week period total values Number and Value of Transactions Nett Sales Tender Type breakdown Number of No Sales Number and Value of Voids Loyalty Point Issued VAT Analysis User defined period totals Number and Value of Transactions Nett Sales Tender Type breakdown Number of No Sales Number and Value of Voids Loyalty Point Issued 77 Sales Commission Operator Sales Group/Dept Product Sales Report Hourly Report Mix and Match VAT Analysis User defined period User Sale Value User Commission earned Overall Sale Value Overall Commission Value User Defined Period By Operator Number and Value of Transactions Nett Sales Tender Type breakdown Number of No Sales Number and Value of Voids Loyalty Point Issued VAT Analysis User Defined Period Period Totals Group Value and Volume Department Value and Volume User defined period totals Product Value and Volume Overall total Graphical representation of hourly sales by product count Graphical representation of hourly sales by sales value Graphical representation of hourly sales by transaction count User defined period totals Mix and Match offers used Number of times fired Discount Given 78 End of Day Each till must be declared at the end of the day/shift. Select Cash Declaration This is configurable and may not be switched on – it allows you to reconcile your cash and drawer figure on each till at end of day. The amount declared is the total amount of cash, cheques, cards and ‘other’ tender types in the till and includes floats entered. 79 Enter either the number of notes in the count box OR the value of the notes in the value box, in the non cash section enters the value against the tender type; you may also enter the number as well but this is not mandatory. The cash and declaration totals will be automatically calculated. Select Or Select The Select Date box is displayed Select the date that the current transactions are to be date stamped with and press OK (when viewing reports the data the data will report under this date) 80 The end of day confirmation selection will appear Select Yes to confirm the date and to transfer the data; if no is selected the declaration is forgotten and the current financials remain in place Declarations are configurable so they may use one of the examples above or none at all 81 Sales Review Sales Review enables you to view either Central/Archive Sales or Current Local Sales from the Back Office, drill down into the transaction and reprint receipts. The default when launching the software will be Central/Archive (all sales up until the last end of day), once you have changed the criteria to be local (for the machine you are on) this will be the default until you exit and load the software again Central/Archive Sales Select Select The Sales Transaction review screen will be shown Note: the screen may show data if a search has been done and the software has not been closed 82 To find a transaction from a past date Select The search criteria screen is displayed To be in Central/Archive Sales the End of Day process must have been done, the date chosen at end of day will be the date the sales will appear in reports Leave the default as Central/Archive Sales Select the Operator (if known) if not keep as All Operators 83 Select the Transaction Type or types you want to find Select the date or the date range of the transactions you want to view, if you want you can narrow this down by time by using the start and end time selections Chose the Terminals of the transactions you want to view, if you want to see Terminal 1 select Range of Machines and From 1 To 1 The terminal is the till it was cashed off from Select the minimum and maximum value of the transactions you want to view, if you want to find all transactions leave the default as it is Select 84 The Sales Transactions Review screen will be shown with the relevant data using the criteria above we will see all sales and refund transactions on all machines by all operators between 16/1 and 23/1 Highlight the transaction you want to view in more detail Select The transaction detail will be shown 85 To Print a Copy Receipt Select To exit from the detail view Select To Print an A4 copy of the receipt Select 86 To void the transaction Select Voiding the Transaction will remove it from the database – this functionality may be disabled To Print the Search result List from the Receipt Printer From the Search Result Screen Select This will display the list of transactions 87 To print this Select The continue button will exit back to the results screen To Print a Copy Of a Selection Of Receipts These will print from the receipt printer From the search results page Select You will be asked to confirm that you want to print all of the receipts If you do Press Yes if not Press No To Export to HTML Select To Export to Excel: Select To Change the Current Criteria: Select 88 Serial Tracking Serial tracking is used to log details of products sold and to whom e.g. serial numbers of guns Set up a product for serial tracking In the product record on the ‘Profile’ and ‘Options’ tab Tick On the ‘Settings’ tab Set the minimum and maximum number of characters the serial number can have Selling a Product with serial tracking On the terminal Select the product to be sold The serial tracking number screen is shown Enter the serial number using the keyboard on the screen Select the Enter key If the reason menus are switched on you will see a reason screen – select the appropriate reason – to add a new reason see the ‘Reasons’ section of the manual 89 When the Sub total button is pressed you will be asked for the customer details so they can be stored in the database Enter the customer details If the customer already exists in the database you can use the ‘Customer Database’ button to find the customer Select the Accept button and the data will be stored Once the transaction has been completed you can look up the information by using ‘Serial Tracking’ 90 Looking up Serial Tracking transactions From the Back Office Select Select The serial tracking screen is displayed By default all transactions are displayed but you can narrow down the list by date range, sort by date, name, PLU, description, serial number and receipt number or use the open search for a specific transaction 91 Mail Merge Wizard Mail merge wizard is a tool to export data held in the Account and / or Customer database to a csv file. To Export Data Select Select The mail merge wizard Step 1 page is opened Select the data group you want to capture the data from Select Next Step Step 2 is displayed 92 Tick the selection criteria you want to chose from Select Next Step The mail merge confirmation selection screen is displayed 93 Select The Customer mail merge screen is displayed The search criteria you selected will be available Narrow down your customer criteria if relevant Select A message will appear advising the number of records found matching the criteria If you want to proceed with the export press Yes, if not press no If Yes is selected the following screen is displayed 94 Select the path you wish to save the document to Enter the name of the document Select OK The Mail Merge complete message will be displayed Select OK The document can now be found in the location you chose to save it in 95 Commission This is a feature that enables ‘Users’ to earn commission on sales made. Commission is set against a user in ‘bands’, these bands are set in £ There are a maximum of 10 bands that can be set Setting Up Personnel Select Select The Commission Personnel/Rates screen will appear Select The Commission Name screen will be displayed Enter the name of the user 96 Press Enter twice The name of the user will be added to the list Deleting Personnel Select Select The Commission Personnel/Rates screen will appear Highlight the name of the user you want to delete by clicking on it Select 97 Editing Personnel Select Select The Commission Personnel/Rates screen will appear Highlight the name of the user you want to edit by clicking on it Select The Commission Name screen is displayed Edit the required information Press Enter 98 Saving Changes To save any additions or any changes made from the Commission/Personnel Rates screen Select If you do not want to save the changes made Select Setting Up Rates Rates are set for all personnel and all sales you cannot set up a rate for a particular product or user Select Select The Commission Personnel/Rates screen will appear 99 Select The rates page is displayed Enter in the band numbers the amounts and commission rates you want to implement In this example a sale up to £10.00 will attract 10% and between £10.00 and £100.00 attracts 20% Selling with Commission Set Select the products to be sold Select The Commission Selection screen is displayed 100 Select the Person the commission is to be attributed to In Reports and Current Sales you can view the Sales Commission Report For a summary of this Report please see the Reports section 101 Clock In/Out This is a feature that enables Staff hours to be tracked; the staff member should ‘clock in’ at the beginning of their shift and ‘clock out’ at the end of their shift. To Clock In Log on to the POS Select This will register the Operator and the time the clock in function was selected; this is the start of their shift To Clock Out Select This will register the operator and the time the clock out function was selected; this is the end of their shift In crystal reports you can run an operator hours report which shows the clock in/out times and the hours and minutes worked 102 Labels There are two ways of printing shelf edge or product labels (barcodes) either from the product record (single product) or from database (multiple products). Printing from the Product Record Select Select In the Labels section Select the button for the type of label required or Once you have selected the type of label you want to print the following screen will be shown 103 Or The PLU and Description is carried through from the product record so this is the information that will print on the labels Select the Quantity of labels required Printing from the Database This is for printing labels for a whole department Select Select Select Select 104 The generate labels screen will be shown Click on the Department you want to print labels for Select the type of label you want to print Select the number of labels required If you do not want labels for products marked as ‘on-stop’ tick the box Select 105 The following message will be displayed If correct Press Yes You will then see the following Once you have selected all of your departments and number of labels select The following screen will be displayed Select the label type from the list on the left To preview the labels select Preview To Print the labels select Print Exit and Clear will take you back to the Database options screen 106 Credit Notes Credit Notes are a form of refund by effectively putting the person in ‘credit’ and issuing a receipt for the credit amount Issuing a Credit Note Refund the items that you wish to issue a credit note for Select Select The Credit Issue details screen is displayed Enter the original receipt number Enter Comments as required Select Complete the transaction 107 Using/Redeeming a Credit Note Ring through the items on the transaction Select Select The Credit Redeem Details page will be shown Enter the Credit Note Number The credit note number can be found on the credit note issue receipt or you can use the as a search function, make sure you verify the details of the note you are redeeming Select Complete the transaction A credit note can be used as a Part Payment 108 Stock In/Out To use the stock facility the products/PLUs must be set up, this manual assumes the product exists in the database and units of sale have been created. You can enter the stock details when creating the item; the process does not have to be done separately. Setting up a Stock item Select Select Find the product record you want to set as a stock item 109 In the Case QTY enter the number of sale units in the case you purchase e.g.in a box of 36 Mars Bars there are 36 items, in a 70cl bottle of Vodka selling at 25ml shots there are 28 In the case cost enter the cost price of the case The Unit cost will be calculated automatically In the Quantity field for each unit of sale and price level you have set up; enter the number taken from stock each time one is sold e.g. if I have a unit of sale called double for vodka the quantity out of stock would be 2 In the Inc.Price field enter the price you sell the product for (if it is not already there) The Profit, Margin and Ex.Price will be worked out automatically Make sure you have the correct VAT Rate applied Remember once you have set up your item for stock when you sell it will start deducting from stock levels and the system will allow you to run in a negative stock so you will need to do a count to ensure your figures are accurate 110 To set up a recipe item A recipe item is used when selling a product that is made up of more than 1 item e.g. Lager Shandy so the Stock takes are accurate we must tell the system how much Lager and how much Lemonade is in the product. You must have your products Lager and Lemonade set up as above Add Carlsberg Shandy as a PLU Select Select Tick Select The recipe page is displayed Select This enables the product selection box using the want to add as part of the recipe and press 111 select the first product you In this example I have told the system I am taking Half of Carlsberg from stock – it has calculated the cost Select Find the second product you want to add, repeat this process until all constituent items have been added If you cannot select the size you want to add to the recipe it is because it is not priced in the sales price levels section of the product record Once you have saved the PLU the following message will be displayed 112 Select Yes Updating the main recipe cost price means that the system will work out the cost price based on the items and quantities you have added to the recipe item The Margin and Profit fields on the front of the product record will be updated 113 Stock Orders Stock orders can be used to record incoming stock which has not yet been received/orders placed with suppliers. This is not a mandatory part of the Stock In process as ‘Goods In’ can be created as deliveries are received. These orders can be faxed or sent electronically to Suppliers in some cases. To create a new Order manually Select Select A blank Stock Orders screen is displayed From the drop down box in the ‘Order Ref’ field select ‘Create New Order’ From the ‘Supplier’ drop down box select the supplier you are ordering the products from Select 114 A new screen will appear In the PLU field enter the PLU field of the first product you want to add to the list and enter, if you do not know the full PLU press the product search box will appear and the In the Search for field enter a minimum of 1 character of the product you are searching for the search will find any product with that character in e.g. if you enter ‘o’ as the search it will find ‘Orange’, ‘Fosters’ and ‘Coke Bottle’ as they all contain the letter ‘o’. Select ‘Accept’ to confirm the product You can also use the Supplier Code to find the item you are looking for Enter the number of cases you want to order in the ‘Order Quantity’ field Select 115 The product is displayed on the Order page with the quantity and cost If the cost is 0.00 there is no cost price set against the product record If you want to keep this as an Open Order that can be added to and quantities changed select Once all products and Quantities for this supplier are added and the order is complete select Once the Finalised option is selected the order figure is updated and in the product record the order amount will be increased The Order Number Allocation message will appear Select OK 116 Setting a Product to use min and max criteria Minimum and Maximum are levels set in the system for reordering purposes e.g. if my min level is 5 and my max level is 10 and I have 7 in stock my reorder figure will be 3 Find the product record of the product you want to set min and max levels for Select Stock/History This will default to the Stock Levels page In the minimum Stock field enter the minimum stock holding you want for this product In the maximum stock field enter the maximum stock holding you want for this product The Quantities are based on UNITS not CASES 117 To Book an Order into Stock Select Select The order will not appear in the Select Orders list until it has been ‘Finalised’ The Select Orders screen will appear Highlight the Order from the list Confirm that you wish to extract the Order to Goods Inwards Confirm that you wish to extract the Order to Goods Inwards The Goods in Number allocation message is shown 118 Select OK to confirm the number The Goods In screen is displayed Enter the Supplier Reference number in the field if required Select the Product Listing tab 119 If the delivery was correct: Select Select The accept goods in message will be shown If the product and amounts were received say Yes, if not say No, assuming you select Yes, you will be asked if you want to print a goods in document 120 The Goods in page will be displayed again but the Order you have just booked in will not be there If the delivery Qty or Cost was incorrect: When the Goods In page is displayed select the Product Listing tab Double click the product which was not delivered correctly From here you can change The Case Qty In = number of cases delivered Case Qty = if the case size was different from the standard Case Cost = if the case cost is more or less than in the product record Once you have made the required changes Select 121 The product listing page is displayed with the changes reflected If you do not want to save the changes made Select Select The accept goods in message will be shown If the product and amounts were received say Yes, if not say No, assuming you select Yes, you will be asked if you want to print a goods in document The Goods in page will be displayed again but the Order you have just booked in will not be there Deleting an Item From the Product Listing page highlight the product to be deleted Select The product will be deleted from the order Adding an Item From the Product Listing page Select The following search box is displayed 122 Use the PLU or Description field to search for the product you want to add to the delivery, once the product has been selected the Case Qty and Case Cost will be read through from the product record In the Case Qty In field select the number of cases delivered Select The product listing page is displayed with the new product on the delivery Edit an Item The edit item button gives the same option as double clicking a product From here you can change The Case Qty In = number of cases delivered Case Qty = if the case size was different from the standard Case Cost = if the case cost is more or less than in the product record 123 Goods In Goods In is used to record delivered stock from Suppliers. This is a mandatory part of the Stock In process, for the system to be able to calculate stock levels, reorder values and discrepancies it must know how many of each product has been delivered. If using in conjunction with Orders please refer to the Stock Orders section of the manual. Creating Goods In Select Select The Goods In Listing page is displayed – this shows any outstanding deliveries to be accepted in Select A blank Goods In page is displayed 124 Select the Supplier from the Supplier drop down box Enter the supplier ref if required (this may be the delivery note number) Select the date of delivery Add any comments in the comments box Select the Product Listing page this will be blank Select The following search box is displayed Use the PLU or Description field to search for the product you want to add to the delivery, once the product has been selected the Case Qty and Case Cost will be read through from the product record In the Case Qty In field select the number of cases delivered Select The product listing page is displayed with the new product on the delivery Repeat the process until all products from the supplier have been added to the listing page 125 Select The accept goods in message will be shown The Goods In number allocation message will be shown If the product and amounts were received say Yes, if not say No, assuming you select Yes, you will be asked if you want to print a goods in document If you select Yes the document will print if No is selected the Goods In Listing page will be shown 126 Goods In Page The Goods In page can be viewed by choosing criteria to display The default display is Non Completed Only; however you can change this by using the radio buttons From the radio buttons you can narrow down the selection to: Completed Only = shows only completed Goods In All Inwards = shows Non Completed and Completed You can sort the list by: Reference Number Date (received) Supplier 127 Stock Taking Stock Taking is the procedure which allows you to manage your Stock. Doing a Stock Take Select Select The Stock Take screen will appear Select the Departments you want to include in your count 128 If you have created a new Department and it is not showing in the Department Selection list press the initialise button, this will read through any new departments Select The Stock Take List page is displayed – this lists all of the products in the selected departments to be counted Once you have created the list you can then print a Count Sheet, to do this select To input your results in the count column enter the totals To print a Discrepancy report select 129 At this point you can change the count declaration once the Button has been selected and you have said Yes to The stock take figures are saved and the product records updated accordingly. 130 Stock Adjustments Stock Adjustments are used to correct the Stock holding quantity when it has not been affected through Sales or Deliveries. To create a new adjustment Select Select The Stock Adjustments screen is displayed Select 131 The product listing screen is displayed In the Reference field enter the reference number or comment for the adjustment being done Select The Stock Adjustment Item number screen is displayed 132 Enter the PLU or description or use the search if you do not know the full PLU or description The unit cost is read through from the product record so it s important to keep this updated If the stock level is increasing enter the number in the Quantity In field If the Stock Level has decreased enter the number leaving stock in the Quantity Out field Select OK The product will appear in the Stock Adjustments screen To add more items to the adjustment Select Repeat the process until you have all the adjustments you want to make recorded Select 133 A confirmation screen will appear If you are sure and want to proceed press Yes if not press No If yes is selected the following screen will appear Select OK You will be asked if you would like to print the document for your records answer Yes or No You will be returned to the Stock Adjustments screen Stock Adjustments Screen The Stock Adjustments page can be viewed by choosing criteria to display The default display is Non Updated Only; however you can change this by using the radio buttons From the radio buttons you can narrow down the selection to: Updated Only = shows only Updated Adjustments All Adjustments = shows Non Updated and Updated You can sort the list by: Adjustment ID Date The buttons down the side of the page will change depending on the status of the highlighted entry, if the entry is pending (Non - updated) you will see: and 134 If the entry is Updated you will see: and Edit an Adjustment: Highlight the adjustment to be edited Select You can either add an item to the adjustment by selecting Or you can edit an item on the adjustment by highlighting the item and selecting Or by double clicking on the item line From here you can Change the cost price Change the number In Change the number Out You can only edit an adjustment if it is pending Delete an Adjustment Highlight the adjustment to be deleted Select The delete confirmation message will be shown If you want to delete the adjustment press OK, if not press No. 135 View an Adjustment Highlight the adjustment you want to view Select The Stock Adjustments page will be shown You can print the document at any time when you see this icon 136 Customer Back Office Customers Customer is a module to manage customers; it can be used with or without loyalty and is also used in conjunction with orders Creating a New Customer Select Select A blank Customer Details page is displayed Enter the customer code The customer code is a unique ID associated with the customer – decide on a coding system before you start to create customers 137 The customer code has a maximum of 20 characters and can be alphanumeric Select Enter If the Customer exists you will be taken to that record if not you will be asked if you want to create a new one Select Yes The customer details page is enabled Enter the full name in the name field The customer name is the only mandatory information for creating a customer; you can fill in address and telephone number details as required 138 Adding a Customer to a Group Select Identify the customer by using the customer code or name From the drop down list next to Group select the Group you want the customer to belong to To add a new Group see the Groups section of the manual or you can add a new group from the customer record by selecting the ‘Set Groups’ button Attaching a Picture Identify the customer Select Select This will open up the following screen Double click on the picture you want to attach 139 Allocating a Swipe Card Identify the customer In the Card Info field enter the card number Entering Birthdays and Anniversaries Identify the customer Select The following fields are displayed Enter the required information Putting a Customer ‘On Stop’ Identify the customer Select Tick Putting a customer on stop will prevent the customer being identified on the terminal therefore no sales or orders may be attributed to the person while this status is on Adding Comments Identify the customer Select The comments field is a free entry field to add notes you may require The comments may be viewed in Sales Mode 140 View Deposit History Select Select The Deposit page is shown From this page you can Add a New deposit Refund a Deposit Print a list of Deposits Reprint a Deposit Receipt For more information please see Deposits section of the manual 141 Transaction Overview Select On this page you will see the overview 142 Customer Groups Adding a New Group Select Select The customer groups page is displayed Enter the Group Code Group Code is a unique ID for the group you are creating – it is an alphanumeric field and can have a maximum of 20 characters 143 If the code already exists you will be taken to the record if not you will be asked if you want to create a new one Select Yes Enter the full title of the Group in the title field Select Deleting a Group Select Select The customer groups page is displayed 144 Enter the Group Code or use the drop down box to select the Group you want to delete Select You will be asked to confirm that you want to delete the selected Group Select Yes Deleting a Group automatically removes it from the Customer record – you do not get any warning about this 145 Customer Orders Create a New Order: Select Select You will be asked to confirm the creation of a new order Select Yes The Customer Stock Order Screen is displayed Identify the customer Select 146 The following page is displayed Select The product search box will appear Enter the PLU or description 147 Select the quantity Enter any discount to be applied in either amount or % Enter any comments in the free text field Select The customer order screen is displayed with the selected product line entered Repeat the process until all the required products are on the order To save the order Select This will save the order for collection at a later date. Add to an Existing Order: Select The customer orders search screen is displayed From the drop down list select the order you want to Add to The order page is recalled Select 148 The product search box will appear Enter the PLU or description Select the quantity Enter any discount to be applied in either amount or % Enter any comments in the free text field Select The customer order screen is displayed with the selected product line entered 149 You will see the order summary box has updated Repeat the process until all the required products are on the order To save the order Select This will save the order for collection at a later date. Remove an Item from an Order Recall the order Highlight the item to be removed Select Repeat the process until all the required products are removed from the order To save the order Select This will save the order for collection at a later date. 150 Amending a Product on an Order Recall the order Highlight the product to be changed Select The product order details will be shown Change the required information When editing a product you can change: Unit of Sale Unit Cost Quantity Discount Comment Save the order To Print the Order Recall the Order Select To Print a Mini Statement Recall the Order Select Select 151 Deleting an Order Recall the order Select You will be asked to confirm the deletion of the order Select Yes You cannot delete an order with a deposit attached; you must refund the deposit first 152 
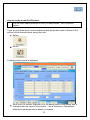
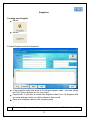
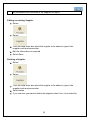
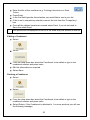
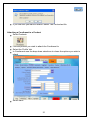
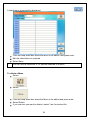
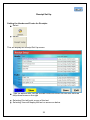
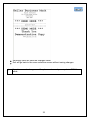
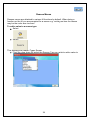
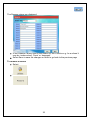
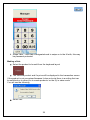
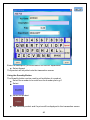
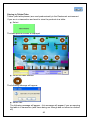
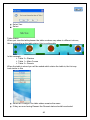
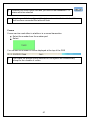
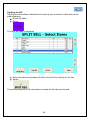
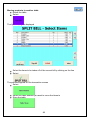
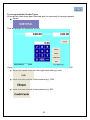
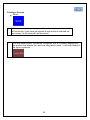
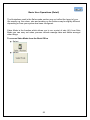
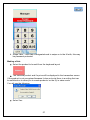
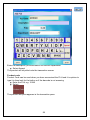
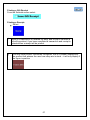
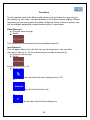
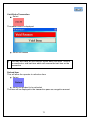
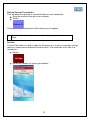
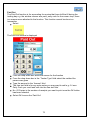
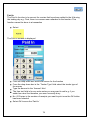
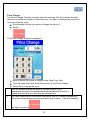
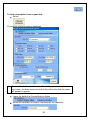
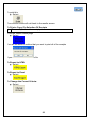
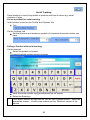
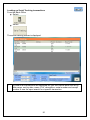
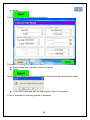
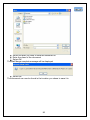
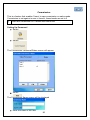
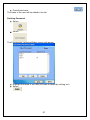
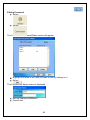
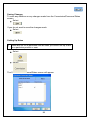
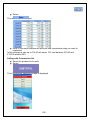
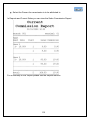
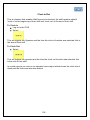
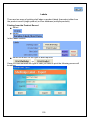
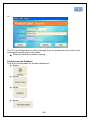
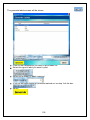
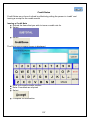
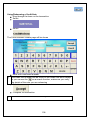
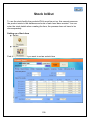
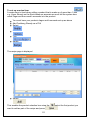
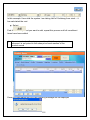
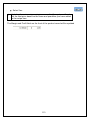
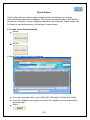
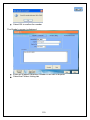
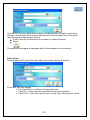
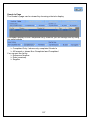
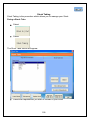
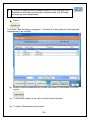
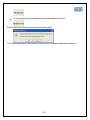
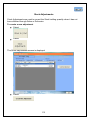
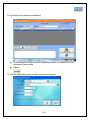
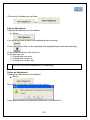
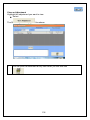
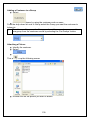
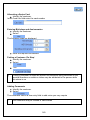
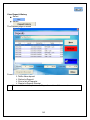
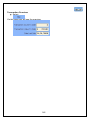
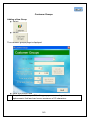
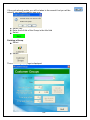
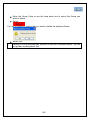
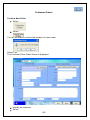
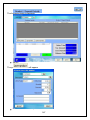
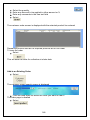
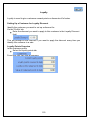
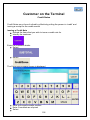
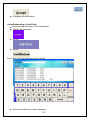
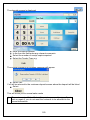
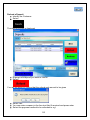
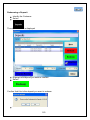
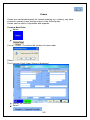
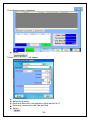
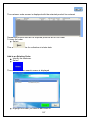
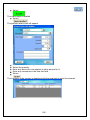
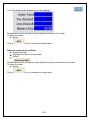
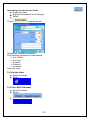
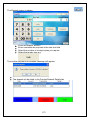
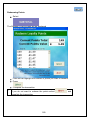
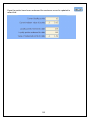
Loyalty Loyalty is used to give customers reward points or discounts off of sales. Setting Up a Customer for Loyalty Discount Identify the customer you want to set up a discount for On the ‘Profile’ tab Enter the discount you want to apply to this customer in the Loyalty Discount field This will prompt on the terminal if you want to apply the discount every time you identify the customer in a sale Loyalty Points Overview In the customer profile Select the loyalty points tab From here you can view a summary 153 Comments Comments are used to add text to the bottom of receipts for Customers; there are 2 different types; Customers with loyalty and Customers without loyalty. Adding Text Select The Loyalty Receipts Comments screen will be shown The text lines are limited to 3 and 30 characters per line Enter the text for the relevant customer type 154 Listing Listing runs a crystal report to list the customers for a criteria selection Run a Report Select Select The criteria selection screen is displayed View will show the report on screen with the option to print Print will ask if you want to print the document Close will take you back to the main menu The report shows the following information 155 Customer on the Terminal Credit Notes Credit Notes are a form of refund by effectively putting the person in ‘credit’ and issuing a receipt for the credit amount Issuing a Credit Note Refund the items that you wish to issue a credit note for Identify the customer Enter the customer details Select Select The Credit Issue details screen is displayed Enter the original receipt number Enter Comments as required Select 156 Complete the transaction Using/Redeeming a Credit Note Ring through the items on the transaction Identify the customer Select Select The Credit Note Search page will be shown Select the credit note to be redeemed 157 Select Complete the transaction If the Credit Note you have selected is not attached to the identified customer the following message will appear A credit note can be used as a Part Payment 158 Deposits Deposits are more commonly used to take an amount of money prior to an event or goods being received Taking a Deposit Identify the Customer Select The deposit screen is displayed Select 159 The deposits screen is displayed Enter the deposit amount In the free text field enter any relevant comments Select the number of receipt copies required Select the Tender Type e.g. The confirm payment to be taken message will appear Select Yes You will be returned to the customer deposit screen where the deposit will be listed Select This will return you to normal sales mode The customer is still identified at this point – you need to sign off and back on again if you do not want the customer to be attached to the current transaction 160 Refund a Deposit Identify the Customer Select The deposit screen is displayed Highlight the deposit you want to refund Select You will be asked to confirm that the refund and amount to be given Select Yes You can enter a reason in the free text field if required and press enter Select the payment method to be refunded to e.g. 161 In the deposits screen the deposit will be listed as refunded Select This will return you to normal sales mode The customer is still identified at this point – you need to sign off and back on again if you do not want the customer to be attached to the current transaction You cannot refund or redeem a used deposit Print a Deposit List: Select 162 Redeeming a Deposit Identify the Customer Select The deposit screen is displayed Highlight the deposit you want to redeem Select Confirm that this is the deposit you want to redeem Select Yes 163 You will be asked if you want to redeem any other deposits on this transaction If you do press Yes, if not press No The Deposit will appear as a -ve on the transaction pane Complete the transaction You can redeem a deposit before starting the transaction or at the end 164 Orders Orders are used predominantly for forward ordering e.g. a bakery may have customers coming in and placing orders for the following day. Orders can be used in conjunction with deposits. Create a New Order Select Select You will be asked to confirm the creation of a new order Select Yes The Customer Stock Order Screen is displayed Identify the customer Select 165 The following page is displayed Select The product search box will appear Enter the PLU or description Select the quantity Enter any discount to be applied in either amount or % Enter any comments in the free text field Select 166 The customer order screen is displayed with the selected product line entered Repeat the process until all the required products are on the order To save the order Select This will save the order for collection at a later date. Add to an Existing Order Identify the customer Select The customer orders search screen is displayed Highlight the order you want to add items to 167 Select The order page is recalled Select The product search box will appear Enter the PLU or description Select the quantity Enter any discount to be applied in either amount or % Enter any comments in the free text field Select The customer order screen is displayed with the selected product line entered 168 You will see the order summary box has updated Repeat the process until all the required products are on the order To save the order Select This will save the order for collection at a later date. Remove an Item from an Order Recall the order Highlight the item to be removed Select Repeat the process until all the required products are removed from the order To save the order Select This will save the order for collection at a later date. 169 Amending a Product on an Order Recall the order Highlight the product to be changed Select The product order details will be shown Change the required information When editing a product you can change: Unit of Sale Unit Cost Quantity Discount Comment Save the order To Print the Order Recall the Order Select To Print a Mini Statement Recall the Order Select Select 170 Deleting an Order Recall the order Select You will be asked to confirm the deletion of the order Select Yes You cannot delete an order with a deposit attached; you must refund the deposit first 171 Adding a Deposit to an Order Select the order you want to add a deposit to On the Product/Deposit Details tab Select The calendar will appear Select the date that the order will be collected Select 172 The Deposit screen is shown Enter the deposit amount Enter comments as required in the free text field Select the number of receipt copies you require Select the tender type e.g. The confirm payment to be taken message will appear Select Yes The deposit will be listed in the Product/Deposit Details tab 173 When you add a deposit to the order the order summary will be updated to reflect it To save the order Select This will save the order for collection at a later date. This can be done when the order is being taken or after it has been taken; there is no limit to the number of deposits you can attach to an order Refunding a Deposit from an Order Recall the Order that you want to refund the deposit from On the Product/Deposit Details tab Highlight the deposit you want to refund back to the customer Select If you have more than one deposit on the order you will see the following message Yes will refund both deposits; No will refund the highlighted deposit Select No 174 The confirm refund amount message will be shown The refunded deposit screen is shown In the Free Text field enter comments/reasons for refund as required Select enter Select the tender type the refund will be given in e.g. The refunded deposit will be listed The summary box will be updated 175 To save the order Select This will save the order for collection at a later date. Finalising an Order Select You can also recall the order by identifying the customer first The customer order screen will be displayed From the drop down box select the order to be finalised / collected Verify the details of the order are correct Select Once you have selected finalise you cannot Void or Reverse the transaction 176 You will be asked to confirm you want to finalise the order Select Yes The order product and deposit details (if applicable) will be displayed in the transaction pane with the outstanding amount to be paid (+) or monies owing to customer (-) Complete the transaction Before the tender type has been chosen you can add products to the transaction 177 On Stop A customer may be set to a status of ‘On Stop’ if they are overdue with account payments for example. What happens on the till? Once the customer has been identified you will see the following message Select OK You will be taken back to the transaction screen You cannot associate a customer with a transaction until the status of ‘On Stop’ has been removed 178 Loyalty Making a Sale with Loyalty Ring through the items to be sold Identify the Customer This will display the customer profile page on the Loyalty point tab you can see an overview of the points Accept the customer You will be asked if you want to apply the customer discount to this transaction Select Yes or No depending if you want to apply the discount 179 Redeeming Points Select The Redeem Points screen will be displayed From the list highlight the number of points you want to redeem Press Complete the transaction If you do not want to redeem the points select complete the transaction 180 and Once the points have been redeemed the customer record is updated to reflect this 181 FAQs and Top Tips POS Buttons disappearing every time you click on them? The Ctrl button is being held down at the same time – if the user should not be able to edit screens un tick the ‘Allow Screen Changes’ box in their operator profile Cannot give discount on certain products? In the product record on the profile tab the ‘max discount’ box should be filled in with the maximum amount of discount that can be applied to that product if left at 0 then no discount can be applied When running reports there are products missing? In the product record on the profile tab make sure the product is linked to a department, the department is linked to a group and that there is a supplier linked to the product Do not turn off the till from the mains or the rocker switch (unless otherwise advised) without closing the software. 182