1
Library•Solution
Reference Manual
Circulation
Version 3.3.5
July 2005
The Library Corporation
Research Park, Inwood, West Virginia 25428-9733
Click here to learn how to navigate through the manual
Click here to view quick reference guide
Contents
Index
This portion of the Library•Solution Reference Manual describes the features in the Circulation
Program.
The Library Corporation’s (TLC’s) expert and friendly support staff and librarians are available via
toll-free telephone to answer all of your questions. Our strong commitment to service is backed by
prompt responsiveness to your concerns.
This Manual is copyrighted and may only be reproduced by TLC customers for their use.
For further information about The Library Corporation’s products and services, visit our website at
www.TLCDelivers.com, call TLC support toll-free toll free at 800-852-4911, or email
support @TLCDelivers.com.
Copyright The Library Corporation 2001. All rights reserved.
Revised July 2005
Library•Solution Circulation
CIRC-ii
Contents
Index
Contents
Introduction . . . . . . . . . . . . . . . . . . . . . . . . . . . . . . . . . . . . . . . . . . . . . . .
How to use this manual . . . . . . . . . . . . . . . . . . . . . . . . . . . . . . . . . . . . . . .
Navigating in this Reference Manual . . . . . . . . . . . . . . . . . . . . . . . . . . . . . . . .
1. Getting Started . . . . . . . . . . . . . . . . . . . . . . . . . . . . . . . . . . . . . . . . . .
1.1 How to start the Circulation Program . . . . . . . . . . . . . . . . . . . . . . . . . . . .
1
1
2
5
5
1.2 Quick Reference . . . . . . . . . . . . . . . . . . . . . . . . . . . . . . . . . . . . . . 6
2. Main Circulation Tabs . . . . . . . . . . . . . . . . . . . . . . . . . . . . . . . . . . . . . . 13
2.1 Patron Transactions Tab F2 . . . . . . . . . . . . . . . . . . . . . . . . . . . . . . . . 13
Patron Transactions Subtabs . . . . . . . . . . . . . . . . . . . . . . . . . . . . . . . 18
2.1.1 Items Out . . . . . . . . . . . . . . . . . . . . . . . . . . . . . . . . . . . . . . . 18
2.1.2 Charges . . . . . . . . . . . . . . . . . . . . . . . . . . . . . . . . . . . . . . . 20
2.1.3 Holds . . . . . . . . . . . . . . . . . . . . . . . . . . . . . . . . . . . . . . . . . 25
2.1.4 Patron Record . . . . .
2.1.4.1 Basic Info. . . . .
2.1.4.2 Patron Fields . . .
2.1.4.3 Address . . . . . .
2.1.4.4 Misc. Info. . . . .
2.1.4.5 Configuration . . .
2.1.4.6 Loan History . . .
2.1.4.7 Outreach Services
.
.
.
.
.
.
.
.
.
.
.
.
.
.
.
.
.
.
.
.
.
.
.
.
.
.
.
.
.
.
.
.
.
.
.
.
.
.
.
.
.
.
.
.
.
.
.
.
.
.
.
.
.
.
.
.
.
.
.
.
.
.
.
.
.
.
.
.
.
.
.
.
.
.
.
.
.
.
.
.
.
.
.
.
.
.
.
.
.
.
.
.
.
.
.
.
.
.
.
.
.
.
.
.
.
.
.
.
.
.
.
.
.
.
.
.
.
.
.
.
.
.
.
.
.
.
.
.
.
.
.
.
.
.
.
.
.
.
.
.
.
.
.
.
.
.
.
.
.
.
.
.
.
.
.
.
.
.
.
.
.
.
.
.
.
.
.
.
.
.
.
.
.
.
.
.
.
.
.
.
.
.
.
.
.
.
.
.
.
.
.
.
.
.
.
.
.
.
.
.
.
.
.
.
.
.
.
.
.
.
.
.
.
.
.
.
.
.
.
.
.
.
.
.
.
.
.
.
.
.
.
.
.
.
.
.
.
.
.
.
.
.
.
.
.
.
.
.
29
29
30
31
33
35
36
37
2.1.5 Reserves . . . . . . . . . . . . . . . . . . . . . . . . . . . . . . . . . . . . . . . 39
2.2 Check In / In House Use Tab F3 . . . . . . . . . . . . . . . . . . . . . . . . . . . . . . 41
Library•Solution Circulation
Contents
CIRC-iii
Contents
Index
2.3 Item/Title Information Tab F4 . . . . . . . . . . . . . . . . . . . . . . . . . . . . . . . 47
2.3.1 Circulation Subtab . . . . . . . . . . . . . . . . . . . . . . . . . . . . . . . . . . 50
2.3.2 Bibliographic Subtab . . . . . . . . . . . . . . . . . . . . . . . . . . . . . . . . . 51
2.3.3 Vendor Subtab . . . . . . . . . . . . . . . . . . . . . . . . . . . . . . . . . . . . 53
2.3.4 Item Fields Subtab
2.4 Messages Button . . . .
3. Setup Menu Options . . . .
3.1 Types and Codes . . .
.
.
.
.
.
.
.
.
.
.
.
.
.
.
.
.
.
.
.
.
.
.
.
.
.
.
.
.
.
.
.
.
.
.
.
.
.
.
.
.
.
.
.
.
.
.
.
.
.
.
.
.
.
.
.
.
.
.
.
.
.
.
.
.
.
.
.
.
.
.
.
.
.
.
.
.
.
.
.
.
.
.
.
.
.
.
.
.
.
.
.
.
.
.
.
.
.
.
.
.
.
.
.
.
.
.
.
.
.
.
.
.
.
.
.
.
.
.
.
.
.
.
.
.
.
.
.
.
.
.
.
.
.
.
.
.
57
58
61
61
3.1.1 Charge Types . . . . . . . . . . . . . . . . . . . . . . . . . . . . . . . . . . . . 62
3.1.2 Patron Types . . . . . . . . . . . . . . . . . . . . . . . . . . . . . . . . . . . . . 63
3.1.3 Patron Fields . . . . . . . . . . . . . . . . . . . . . . . . . . . . . . . . . . . . . 69
3.1.4 Item Fields . . . . . . . . . . . . . . . . . . . . . . . . . . . . . . . . . . . . . . 71
3.1.5 Outreach Fields . . . . . . . . . . . . . . . . . . . . . . . . . . . . . . . . . . . 73
3.1.6 Department Codes . . . . . . . . . . . . . . . . . . . . . . . . . . . . . . . . . . 76
3.1.7 Course Codes . . . . . . . . . . . . . . . . . . . . . . . . . . . . . . . . . . . . 78
3.1.8 Uncataloged Collections . . . . . . . . . . . . . . . . . . . . . . . . . . . . . . . 80
3.2 Branch Setup . . . . . . . . . . . . . . . . . . . . . . . . . . . . . . . . . . . . . . . 81
3.2.1 Security Subtab . . . . . . . . . . . . . . . . . . . . . . . . . . . . . . . . . . . 82
3.2.2 Defaults Subtab . . . . . . . . . . . . . . . . . . . . . . . . . . . . . . . . . . . 83
3.2.3 Fines/Overdue Subtab . . . . . . . . . . . . . . . . . . . . . . . . . . . . . . . . 87
3.2.4 Misc. Subtab . . . . . . . . . . . . . . . . . . . . . . . . . . . . . . . . . . . . . 91
3.2.5 Notice Text . . . . . . . . . . . . . . . . . . . . . . . . . . . . . . . . . . . . . . 94
3.2.6 Notifications. . . . . . . . . . . . . . . . . . . . . . . . . . . . . . . . . . . . . . 95
3.3 Calendar Configuration . . . . . . . . . . . . . . . . . . . . . . . . . . . . . . . . . . 96
3.3.1 Weekly Calendar . . . . . . . . . . . . . . . . . . . . . . . . . . . . . . . . . . . 96
Library•Solution Circulation
Contents
CIRC-iv
Contents
Index
3.3.2 Daily Calendar . . . . . . . . . . . . . . . . . . . . . . . . . . . . . . . . . . . . 98
3.4 Local Configuration . . . . . . . . . . . . . . . . . . . . . . . . . . . . . . . . . . . . 100
3.4.1 Printing Setup . . . . . . . . . . . . . . . . . . . . . . . . . . . . . . . . . . . . 100
3.4.2 Station Options . . . . . . . . . . . . . . . . . . . . . . . . . . . . . . . . . . . 103
3.4.3 Cash Drawer Setup . . . . . . . . . . . . . . . . . . . . . . . . . . . . . . . . . 105
3.5 Security Setup . . . . . . . . . . . . . . . . . . . . . . . . . . . . . . . . . . . . . . 107
3.5.1 General Subtab . . . . . . . . . . . . . . . . . . . . . . . . . . . . . . . . . . . 109
3.5.2 Basic Functionality Subtab . . . . . . . . . . . . . . . . . . . . . . . . . . . . . 111
3.5.3 Menu Function Subtab . . . . . . . . . . . . . . . . . . . . . . . . . . . . . . . 113
3.5.4 Patron Screen Subtab . . . . . . . . . . . . . . . . . . . . . . . . . . . . . . . 114
3.5.5 Bibliographic Page Subtab . . . . . . . . . . . . . . . . . . . . . . . . . . . . . 115
3.5.6 Debt Collection Setup . . . . . . . . . . . . . . . . . . . . . . . . . . . . . . . . 116
3.5.7 Circulation Page Subtab . . . . . . . . . . . . . . . . . . . . . . . . . . . . . . 120
3.6 Outreach User PAC Setup . . . . . . . . . . . . . . . . . . . . . . . . . . . . . . . . 121
3.7 Holds Routing Setup . . . . . . . . . . . . . . . . . . . . . . . . . . . . . . . . . . .
4. Messaging . . . . . . . . . . . . . . . . . . . . . . . . . . . . . . . . . . . . . . . . . . . . .
4.1 Check Messages . . . . . . . . . . . . . . . . . . . . . . . . . . . . . . . . . . . . .
5. Utilities Menu Options . . . . . . . . . . . . . . . . . . . . . . . . . . . . . . . . . . . . . . .
5.1 Re-Login . . . . . . . . . . . . . . . . . . . . . . . . . . . . . . . . . . . . . . . .
122
125
125
127
127
5.2 Item Transfers . . . . . . . . . . . . . . . . . . . . . . . . . . . . . . . . . . . . . . 128
5.2.1 Single Reassignment . . . . . . . . . . . . . . . . . . . . . . . . . . . . . . . . 128
5.2.2 Batch Reassignment . . . . . . . . . . . . . . . . . . . . . . . . . . . . . . . . 130
5.3 Recall Items . . . . . . . . . . . . . . . . . . . . . . . . . . . . . . . . . . . . . . . 133
5.4 Item Repair History . . . . . . . . . . . . . . . . . . . . . . . . . . . . . . . . . . . . 135
5.5 Holds Shelf . . . . . . . . . . . . . . . . . . . . . . . . . . . . . . . . . . . . . . . . 137
Library•Solution Circulation
Contents
CIRC-v
Contents
Index
5.6 Branch Statistics . . . . . . . . . . . . . . . . . . . . . . . . . . . . . . . . . . . . . 140
5.7 Loan/Payment History Purge . . . . . . . . . . . . . . . . . . . . . . . . . . . . . . . 141
5.8 Lost Items Charges Purge . . . . . . . . . . . . . . . . . . . . . . . . . . . . . . . . 143
5.9 Check In/Out Notes . . . . . . . . . . . . . . . . . . . . . . . . . . . . . . . . . . . . 144
5.10 Reset Form . . . . . . . . . . . . . . . . . . . . . . . . . . . . . . . . . . . . . . . 145
5.11 Delete Patron Records. . . . . . . . . . . . . . . . . . . . . . . . . . . . . . . . . . 146
6. Reserves Tools Menu Options . . . . . . . . . . . . . . . . . . . . . . . . . . . . . . . . . . . 149
6.1 View Reserves . . . . . . . . . . . . . . . . . . . . . . . . . . . . . . . . . . . . . . 149
6.2 Remove Reserve Items . . . . . . . . . . . . . . . . . . . . . . . . . . . . . . . . . . 151
7. Help Menu Options . . . . . . . . . . . . . . . . . . . . . . . . . . . . . . . . . . . . . . . . . 153
7.1 Contents . . . . . . . . . . . . . . . . . . . . . . . . . . . . . . . . . . . . . . . . . 153
7.2 About
. . . . . . . . . . . . . . . . . . . . . . . . . . . . . . . . . . . . . . . . . 154
8. Circulation Utilities Programs . . . . . . . . . . . . . . . . . . . . . . . . . . . . . . . . . . . 155
8.1 L.S Circulation Generate Overdues . . . . . . . . . . . . . . . . . . . . . . . . . . . 155
8.2 L.S Circulation Server Down . . . . . . . . . . . . . . . . . . . . . . . . . . . . . . . 157
8.2.1 Menu Selections. . . . . . . . . . . . . . . . . . . . . . . . . . . . . . . . . . . 158
8.2.1.1 File. . . . . . . . . . . . . . . . . . . . . . . . . . . . . . . . . . . . . . . 158
8.2.1.2 Utilities. . . . . . . . . . . . . . . . . . . . . . . . . . . . . . . . . . . . . 159
8.2.2 Using the Server Down Circulation Utility . . . . . . . . . . . . . . . . . . . . . . 161
8.2.3 Check Out / Check In items . . . . . . . . . . . . . . . . . . . . . . . . . . . . . 163
8.2.4 SDC Log and Error Files . . . . . . . . . . . . . . . . . . . . . . . . . . . . . . 166
8.2.5 Description of SDC Transaction File: TRANSACTIONS.DBF. . . . . . . . . . . . 167
8.3 L.S Inventory . . . . . . . . . . . . . . . . . . . . . . . . . . . . . . . . . . . . . . . 170
8.3.1 Helpful Hints . . . . . . . . . . . . . . . . . . . . . . . . . . . . . . . . . . . . 171
8.3.2 Inventory Procedures . . . . . . . . . . . . . . . . . . . . . . . . . . . . . . . . 174
8.3.2.1 Step-by-Step Guide to the Inventory Process . . . . . . . . . . . . . . . . 174
Library•Solution Circulation
Contents
CIRC-vi
Contents
8.3.2.2 Data Collection . . . . . . . . . . . .
8.3.2.3 Setting Up the Percon Scanner . . . .
8.3.2.4 Offloading Data from Percon Scanner
8.3.2.5 Collection Processing . . . . . . . . .
8.3.2.6 Identify Missing Items . . . . . . . . .
8.3.2.7 Delete Old Tasks . . . . . . . . . . .
8.3.2.8 Inventory Reports . . . . . . . . . . .
.
.
.
.
.
.
.
.
.
.
.
.
.
.
.
.
.
.
.
.
.
Index
.
.
.
.
.
.
.
.
.
.
.
.
.
.
.
.
.
.
.
.
.
.
.
.
.
.
.
.
.
.
.
.
.
.
.
.
.
.
.
.
.
.
.
.
.
.
.
.
.
.
.
.
.
.
.
.
.
.
.
.
.
.
.
.
.
.
.
.
.
.
.
.
.
.
.
.
.
.
.
.
.
.
.
.
.
.
.
.
.
.
.
.
.
.
.
.
.
.
.
.
.
.
.
.
.
.
.
.
.
.
.
.
.
.
.
.
.
.
.
179
181
182
184
186
188
189
8.3.3 Reference Information about How Inventory Works . . . . . . . . . . . . . . . . 191
8.4 L.S Outreach Manager . . . . . . . . . . . . . . . . . . . . . . . . . . . . . . . . . . 194
8.4.1 Getting Started . . . . . . . . . . . . . . . . . . . . . . . . . . . . . . . . . . . 195
8.4.2 Outreach Services Process Flow . . . . . . . . . . . . . . . . . . . . . . . . . . 196
8.4.3 Using the Outreach Services Display . . . . . . . . . . . . . . . . . . . . . . . . 197
8.5 L.S Route Configuration for Bookings . . . . . . . . . . . . . . . . . . . . . . . . . . 199
8.6 Vendor Editor . . . . . . . . . . . . . . . . . . . . . . . . . . . . . . . . . . . . . . . 201
8.7 Debt Collection Module . . . . . . . . . . . . . . . . . . . . . . . . . . . . . . . . . . 202
Appendix . . . . . . . . . . . . . . . . . . . . . . . . . . . . . . . . . . . . . . . . . . . . . . . 205
1.0 Quick Reference . . . . . . . . . . . . . . . . . . . . . . . . . . . . . . . . . . . . . . . 205
Authority Control
To apply authority control to uncontrolled authors . . . . . . . . . . . . . . . . . . . . 205
Blocks
To override an Enter Override Password block and allow the transaction . . . . . . . . 206
To exit the Enter Override Password block and deny the transaction. . . . . . . . . . . 206
To review or remove block conditions . . . . . . . . . . . . . . . . . . . . . . . . . . 206
Library•Solution Circulation
Contents
CIRC-vii
Contents
Index
Branch Setup
To complete the Branch Setup . . . . . . . . . . . . . . . . . . . . . . . . . . . . . . 207
Calendar
To set up the Daily Calendar . . . . . . . . . . . . . . . . . . . . . . . . . . . . . . . 208
To set up the Weekly Calendar . . . . . . . . . . . . . . . . . . . . . . . . . . . . . . 209
Cash Drawer
To configure the Cash Drawer . . . . . . . . . . . . . . . . . . . . . . . . . . . . . . 210
Charge Types
To set up new Charge Types . . . . . . . . . . . . . . . . . . . . . . . . . . . . . . . 211
Check In Items
To check in items . . . . . . . . . . . . . . . . . . . . . . . . . . . . . . . . . . . . . 212
To override checkin date/time . . . . . . . . . . . . . . . . . . . . . . . . . . . . . . . 217
To suppress checkin messages . . . . . . . . . . . . . . . . . . . . . . . . . . . . . . 217
Check Out
To check out items to a borrower . . . . . . . . . . . . . . . . . . . . . . . . . . . . . 219
To check out multiple uncataloged items . . . . . . . . . . . . . . . . . . . . . . . . . 220
To override the due date (and time) . . . . . . . . . . . . . . . . . . . . . . . . . . . . 221
To inquire about a checked out item . . . . . . . . . . . . . . . . . . . . . . . . . . . 223
Circulation Rules
To set up or modify Circulation Rules
Course Codes
. . . . . . . . . . . . . . . . . . . . . . . . . . 224
To set up Course Codes . . . . . . . . . . . . . . . . . . . . . . . . . . . . . . . . . 225
Delete Records
To delete item or title record. . . . . . . . . . . . . . . . . . . . . . . . . . . . . . . . 226
Library•Solution Circulation
Contents
CIRC-viii
Contents
Index
Department Codes
To set up Department Codes . . . . . . . . . . . . . . . . . . . . . . . . . . . . . . . 228
Fines
To calculate fine (before checkin) . . . . . . . . . . . . . . . . . . . . . . . . . . . . . 229
To change the Overdue Fine amnesty period . . . . . . . . . . . . . . . . . . . . . . . 229
To view and handle Charges . . . . . . . . . . . . . . . . . . . . . . . . . . . . . . . 230
Holds
To place hold request for title or item . . . . . . . . . . . . . . . . . . . . . . . . . . . 232
To access the Holds Queue . . . . . . . . . . . . . . . . . . . . . . . . . . . . . . . . 233
To edit, delete, or cancel holds via Patron Transactions tab . . . . . . . . . . . . . . . 234
To view and work with Holds Shelf items . . . . . . . . . . . . . . . . . . . . . . . . . 235
To limit a hold . . . . . . . . . . . . . . . . . . . . . . . . . . . . . . . . . . . . . . . 236
To sort items in the Arrived Holds Shelf list . . . . . . . . . . . . . . . . . . . . . . . . 237
Item Fields
To set up Item Fields . . . . . . . . . . . . . . . . . . . . . . . . . . . . . . . . . . . 238
To view or enter Item Field data. . . . . . . . . . . . . . . . . . . . . . . . . . . . . . 239
Item/Title Records
To access item/title records on Item/Title Information tab. . . . . . . . . . . . . . . . . 240
To search for an item or title. . . . . . . . . . . . . . . . . . . . . . . . . . . . . . . . 240
Notices
To generate overdue notice data . . . . . . . . . . . . . . . . . . . . . . . . . . . . . 243
To run and print notices or reports . . . . . . . . . . . . . . . . . . . . . . . . . . . . 244
Outreach Fields
To get started Using Outreach Services in Circulation . . . . . . . . . . . . . . . . . . 246
To Start Outreach Manager . . . . . . . . . . . . . . . . . . . . . . . . . . . . . . . . 246
Library•Solution Circulation
Contents
CIRC-ix
Contents
Index
To set up Outreach Fields . . . . . . . . . . . . . . . . . . . . . . . . . . . . . . . . . 247
To Change a Displayed Field to a Different Selection. . . . . . . . . . . . . . . . . . . 248
Outreach PAC Server
To Set, or change, the Outreach PAC Server address . . . . . . . . . . . . . . . . . . 249
PAC
To Save a Search . . . . . . . . . . . . . . . . . . . . . . . . . . . . . . . . . . . . . 250
Patron Delete Utility
To run and use the Patron Delete Utility . . . . . . . . . . . . . . . . . . . . . . . . . 251
Patron Fields
To set up Patron Fields . . . . . . . . . . . . . . . . . . . . . . . . . . . . . . . . . . 253
Patron Records
To access a patron record . . . . . . . . . . . . . . . . . . . . . . . . . . . . . . . . . . 254
To enter or edit a patron address . . . . . . . . . . . . . . . . . . . . . . . . . . . . . 255
To add a new patron record . . . . . . . . . . . . . . . . . . . . . . . . . . . . . . . . 257
To enter or edit Basic Info in a patron record . . . . . . . . . . . . . . . . . . . . . . . 257
To change the Patron Search Configuration . . . . . . . . . . . . . . . . . . . . . . . 258
Patron Types
To add or modify Patron Types . . . . . . . . . . . . . . . . . . . . . . . . . . . . . . 259
Printing Setup
To configure the local printer . . . . . . . . . . . . . . . . . . . . . . . . . . . . . . . 260
Re-Login
To re-login to Circulation . . . . . . . . . . . . . . . . . . . . . . . . . . . . . . . . . 262
Recalls
To recall an item through the Utilities menu . . . . . . . . . . . . . . . . . . . . . . . . 262
To find out if an item has been recalled . . . . . . . . . . . . . . . . . . . . . . . . . . 262
Library•Solution Circulation
Contents
CIRC-x
Contents
Index
Renewals
To renew an item or items. . . . . . . . . . . . . . . . . . . . . . . . . . . . . . . . . 263
Repair History
To add repair notes . . . . . . . . . . . . . . . . . . . . . . . . . . . . . . . . . . . . 264
Reserves
To place items on reserve . . . . . . . . . . . . . . . . . . . . . . . . . . . . . . . . . 265
To edit a reserve . . . . . . . . . . . . . . . . . . . . . . . . . . . . . . . . . . . . . 266
To remove items from reserve . . . . . . . . . . . . . . . . . . . . . . . . . . . . . . 267
Rotating Items
To create a Rotating Items . . . . . . . . . . . . . . . . . . . . . . . . . . . . . . . . 268
Security Setup
To complete Circulation Security Setup for any user qualified to access Circulation
(Circulation Users and Circulation Administrators) . . . . . . . . . . . . . . . . . . . . 269
Station Options
To set Station Options. . . . . . . . . . . . . . . . . . . . . . . . . . . . . . . . . . . 270
Titles
To add a new title . . . . . . . . . . . . . . . . . . . . . . . . . . . . . . . . . . . . . 272
To change the Title Search Configuration. . . . . . . . . . . . . . . . . . . . . . . . . 273
Transfers
To transfer items . . . . . . . . . . . . . . . . . . . . . . . . . . . . . . . . . . . . . 275
Uncataloged Collection Codes
To set up Uncataloged Collection codes . . . . . . . . . . . . . . . . . . . . . . . . . 276
Vendors
To link to (or remove link from) a Vendor . . . . . . . . . . . . . . . . . . . . . . . . . 277
2.0 Rotating Collections . . . . . . . . . . . . . . . . . . . . . . . . . . . . . . . . . . . . . . 278
Index . . . . . . . . . . . . . . . . . . . . . . . . . . . . . . . . . . . . . . . . . . . . . . . . . 285
Library•Solution Circulation
Contents
CIRC-xi
Contents
Index
Introduction
How to use this manual
This manual is divided into the following sections to help you locate what you need quickly and easily:
• Getting Started (Chapter 1)
– How to start the Circulation program
– Quick Reference
• Main Circulation Tabs (Chapter 2)
– Describes the main features on the Patron Transaction, Check In / In House Use, and
Item/Title Information tabs
• Setup Menu Options (Chapter 3)
– Describes many configurable features of the system
• Messaging (Chapter 4)
– Explains how to check messages
• Utilities Menu options (Chapter 5)
– Describes internal utility programs for Items Transfer, Recall, Repair, and Holds
• Reserves Tools Menu Options (Chapter 6)
– Describes how to place items on reserve.
• Help Menu Options (Chapter 7)
– Explains the Contents of online Help and how to use it.
Library•Solution Circulation Introduction
CIRC-1
Contents
Index
• Circulation Utilities (Chapter 8)
– Describes external Circulation utilities programs for generating notices, performing inventory,
outreach, vendors, and server down activities.
To make this manual as compact and informative as possible, we have included links to more detailed
information sources in most sections. Many of the elements in this program are interrelated, and we
encourage you to familiarize yourself with the relevant functional descriptions found in the following
chapters before you begin using the program.
Navigating in this Reference Manual
This manual has been formatted to utilize the navigational features available in Adobe Acrobat Reader
(Version 5 or later).
Use the Fit Page or Fit in Window feature on the Adobe Acrobat View drop-down menu to see the
entire page on your screen.
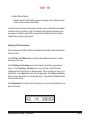
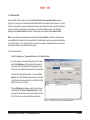
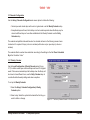
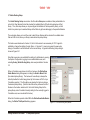
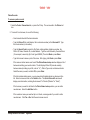
Use the Next Page or Previous Page arrows to move forwards or backwards one page in the text
(Figure 1). Use the First Page or Last Page arrows to move to the front or back of the manual.
Underlined portions of the text are links to related information. Click on a link with your mouse to go to
the destination. Use the Back button to return to the last page viewed. The Contents and Index links
at the top of every page will take you to the appropriate section. Page numbers in the Index are linked
to their referents in the text.
Click the Bookmarks tab in the panel to the left of the page to view and use navigational links from any
place in the document.
Figure 1. The Adobe Acrobat Reader navigation bar.
Library•Solution Circulation
Introduction
CIRC-2
Contents
Index
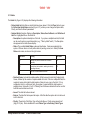
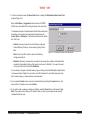
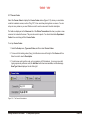
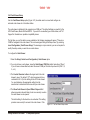
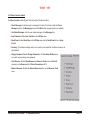
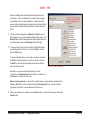
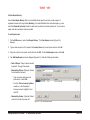
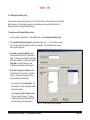
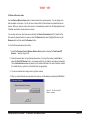
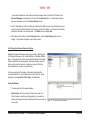
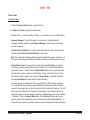
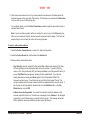
Use the Search feature on the Adobe Acrobat Reader Edit
drop-down menu (Figure 2) to search for specific words in
the manual.
Screen Sizing Option
If you are using a screen resolution larger than 640 x 400,
you can stretch the Circulation window by dragging a
corner or edge to fill the screen area. The screen will
resize to fill the available space and lists (like Items Out on
the F2 tab) will have more space to display titles, etc.
Figure 2. The Adobe Acrobat search menu
Library•Solution Circulation
Introduction
CIRC-3
Contents
Index
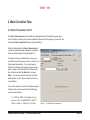
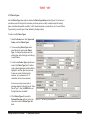
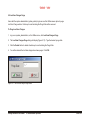
1. Getting Started
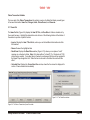
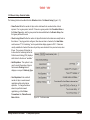
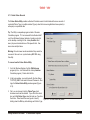
1.1 How to start the Circulation Program
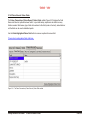
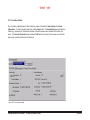
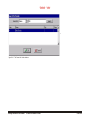
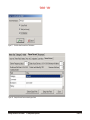
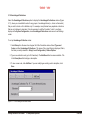
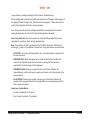
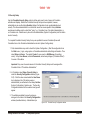
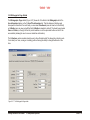
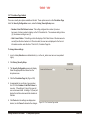
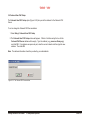
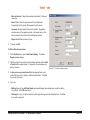
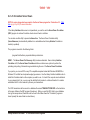
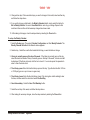
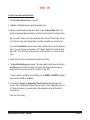
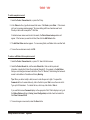
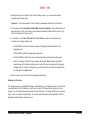
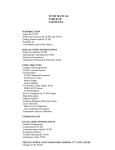
When you start Circulation, the Database Login window (Figure 1-1) will first require you to enter your
User Name and Password. Click OK.
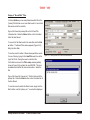
User Names and Passwords are established in the L·S System Configuration Users Setup. If you do
not know the passwords entered by TLC staff during your system installation, call TLC Support.
Note: The default user name used in the Login Window is circ. If you want to be able to modify the
Circulation Security Setup, login as circ_admin. See section 3.5 for more information.
Inside Circulation, if a user with a different level of security needs to login to Circulation, go to the
Utilities menu and select Re-Login. The user will not need to close and restart Circulation.
In Circulation v3.3 dialogs that request a user "action" such as "click
yes" or "click no," Cancel, OK, etc., the user can now initiate the action
with a single keystroke. If one of the letters on the button label is
underlined, press the matching letter on the keyboard to initiate the
action.
Figure 1-1. The Database Login window
Library•Solution Circulation
1. Getting Started
CIRC-5
Contents
Index
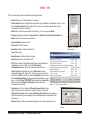
1.2 Quick Reference
Click on a link to view information on a topic.
Authority Control
• To apply authority control to uncontrolled authors
Blocks
• To override an Enter Override Password block and allow the transaction
• To exit the Enter Override Password block and deny the transaction
• To review or remove block conditions
Branch Setup
• To complete the Branch Setup
Calendar
• To set up the Daily Calendar
• To set up the Weekly Calendar
Cash Drawer
• To configure the Cash Drawer
Charge Types
• To set up new Charge Types
Library•Solution Circulation
1. Getting Started
CIRC-6
Contents
Index
Check In Items
• To check in items
• To override checkin date/time
• To suppress checkin messages
Check Out
•
•
•
•
•
To check out items to a borrower
To check in Items with special Item status
To check out multiple uncataloged items
To override the due date (and time)
To inquire about a checked out item
Circulation Rules
• To set up or modify Circulation Rules
Course Codes
• To set up Course Codes
Delete Records
• To delete item or title record
Department Codes
• To set up Department Codes
Fines
• To calculate fine (before checkin)
• To change the Overdue Fine amnesty period
Library•Solution Circulation
1. Getting Started
CIRC-7
Contents
Index
• To view and handle Charges
Help
• To view Help menu options
Holds
•
•
•
•
•
•
To access the Holds Queue
To edit, delete, or cancel holds via Patron Transactions tab
To limit a hold
To place hold request for title or item
To view and work with Holds Shelf items
To sort items in the Arrived Holds Shelf list
Item Fields
• To set up Item Fields
• To view or enter Item Field data
Item/Title Records
• To access item/title records on Item/Title Information tab
• To search for an item or title
Notices
• To generate overdue notice data
• To run and print notices or reports
Outreach Fields
• To get started Using Outreach Services in Circulation
Library•Solution Circulation
1. Getting Started
CIRC-8
Contents
Index
• To Start Outreach Manager
• To set up Outreach Fields
• To Change a Displayed Field to a Different Selection
Outreach PAC Server
• To Set, or change, the Outreach PAC Server address
PAC
• To Save a Search
Patron Delete Utility
• To run and use the Patron Delete Utility
Patron Fields
• To set up Patron Fields
Patron Records
•
•
•
•
•
To enter or edit a patron address
To access a patron record
To add a new patron record
To change the Patron Search Configuration
To enter or edit Basic Info in a patron record
Patron Types
• To add or modify Patron Types
Printing Setup
• To configure the local printer
Library•Solution Circulation
1. Getting Started
CIRC-9
Contents
Index
Re-Login
• To re-login to Circulation
Recalls
• To recall an item through the Utilities menu
• To find out if an item has been recalled
Renewals
• To renew an item or items
Repair History
• To add repair notes
Reserves
•
•
•
•
To edit a reserve
To place items on reserve
To remove items from reserve
To view or edit reserves
Rotating Collections
• To create a Rotating Collection
Security Setup
• To complete Circulation Security Setup for any user qualified to access Circulation (Circulation
Users and Circulation Administrators)
Station Options
• To set Station Options
Library•Solution Circulation
1. Getting Started
CIRC-10
Contents
Index
Titles
• To add a new title
• To change the Title Search Configuration
Transfers
• To transfer items
Uncataloged Collection Codes
• To set up Uncataloged Collection codes
Vendors
• To link to (or remove link from) a Vendor
Library•Solution Circulation
1. Getting Started
CIRC-11
Contents
Library•Solution Circulation
1. Getting Started
Index
CIRC-12
Contents
Index
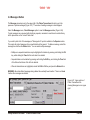
2. Main Circulation Tabs
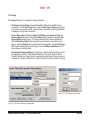
2.1 Patron Transactions Tab F2
The Patron Transactions tab is the default menu displayed when the Circulation program opens.
Once Circulation is running and you have navigated to other parts of the program, you can reach it by
clicking the Patron Transactions tab or pressing the F2 key.
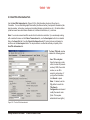
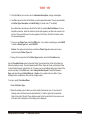
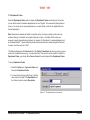
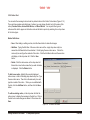
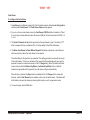
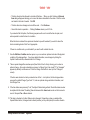
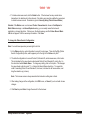
When Circulation starts, the Patron Transactions tab
contains no specific borrower information, and portions
of the window are empty or truncated (Figure 2-1).
To begin any borrower-related activity or inquiry, you
must first access the borrower's record. To do this, scan
the borrower barcode label. You can also type the
Patron ID (usually barcode number), borrower name or
part of a name, or the Alternate ID in the Patron entry
box on the tab and click the Read button (or press
Enter). You can also search for borrower records by
street address, city, ZIP, phone number, first name, or
e-mail address.
You can also search for records in Circulation using the
following codes (not case-sensitive) that Cataloging
uses in its search dialog:
\L - LCCN; \B - ISBN (in Circulation v3.3 you
must use a 10 or 13 digit ISBN); \N - ISSN; \T Title; \H - Author; \J - Subject; \S - LC Class;
Library•Solution Circulation
Figure 2-1. The initial Patron Transactions tab
2. Main Circulation Tabs
CIRC-13
Contents
Index
\W - Dewey; \G - GPO; \M - Music; \E - Series; \O - Barcode; \C - Local Call Number; \D - Control
Number; \P- Borrower ID; \A - Alternate ID; \N - Borrower Name; \M - Borrower Address; \Z - Zip
Code; \T - Phone Number; \E - E-mail Address.
To use these, the operator must type the backslash and the appropriate code, followed immediately by
the search term (e.g., entering \hclancy will return a list of titles whose author is Clancy).
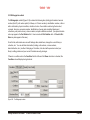
Note: The search entry boxes for Patron and Item searches on the F2, F3, F4 tabs, and the search or
lookup entry boxes in Item Transfers, Recall Item, and Item Repair History, now contain a drop-down
arrow to display a history list of the ten most recent search arguments, allowing the user to easily
repeat a previous search.
For the main Circulation Tabs (F2, F3,
F4) the history list will be retained from
session to session. In Item Transfers,
Recall Item, and Item Repair History the
list is only retained during the current
session. To reuse one of the previous
search terms locate and click the term on
the history list, and the entry box will be
populated with that term. Then press
Enter or click the appropriate button to
initiate the search.
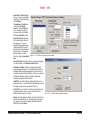
Administrators control security for this
option for each individual user, in
Circulation, under Setup | Security
Setup. On the Patron Screen tab for the
selected User Name, checking or
un-checking the check box labeled “Do
Not Save Searches” toggles the option off
or on for both borrower and title searches.
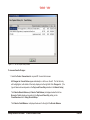
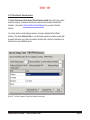
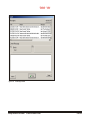
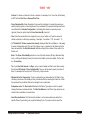
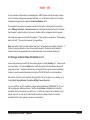
Figure 2-2. The Patron Lookup by Name window
Library•Solution Circulation
2. Main Circulation Tabs
CIRC-14
Contents
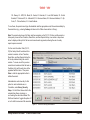
Index
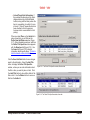
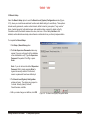
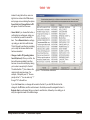
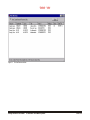
If you entered the borrower's name or part of it, a Patron Lookup by Name window will appear (Figure
2-2), displaying the Patron ID, Patron Name, Patron Type, and Branch at the top. Highlight the
name you want and click one of the following option buttons on the lower part of the window:
• OK - Loads the borrower information for the name selected.
• Cancel - Cancels the selection process and returns you to the Patron Transactions tab.
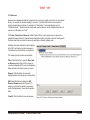
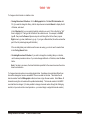
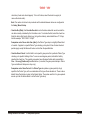
• Add New - Displays the Add New Patron window (Figure 2-3), where you can enter a Patron
ID, Last Name, First Name, Patron Type (from drop-down menu), and Expiration Date. (Click OK
to save your new entry.)
• Details - Displays the Quick Patron Info for Verification Purposes window (Figure 2-4). (Click
OK to close it.)
• Local Branch - Displays only names found at the local library. (Click All Branches to return to
the full list of names.)
Figure 2-3. The Add New Patron window
Library•Solution Circulation
2. Main Circulation Tabs
Figure 2-4. The Quick Patron Info for Verification Purposes
window
CIRC-15
Contents
Index
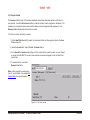
After the borrower is found, summary information about the borrower is displayed on the tab (Figure
2-5).
Figure 2-5. The Patron Transactions tab for a selected patron
Library•Solution Circulation
2. Main Circulation Tabs
CIRC-16
Contents
Index
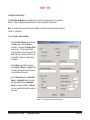
The top section of the window contains the following features:
• Patron: Entry box for Patron Name or ID number
• Patron Search button: Configuration option button (only available to administrator users). Click
to reach Patron Search window (Figure 2-6), where you can set the search order for text
entered in the Patron box (above)
•
•
•
•
•
•
•
•
•
•
Read button: Click to launch search for borrower. (You can also press Enter.)
Comment: Displays contents of Comment field on Patron Record | Basic Information tab.
Name: Name of borrower in current record
Account Balance: Amount owed
Patron ID: Patron ID number
Figure 2-6. The Patron
Search window
Items Out: Number of items checked out
Type: Patron type
Items Overdue: Number of items overdue
Enter Item: Entry box for item title or ID
Cfg. button: Search Configuration option button (only available to
administrator users). Click to reach the Title Search
Configuration window, where you can set the search order
• Check Out button: Searches for entry in Enter Item box and
displays title lookup list (Figure 2-7). From here you can: select a
title and click OK to check it out; click the New Item button to reach
the On-the-Fly-Item Entry window and enter information for a new
item, or click the Show "NO ITEMS" button and then the New Title
button to reach the On-the-Fly-Item Entry window and enter
Figure 2-7. The Title Lookup window
information for a new title.
• Calendar icon: Click to display the Please Choose a Date window
(Figure 2-8), where you can enter a new date to use for checkouts.
• Stats-only Check out: Click to display Stats Only Check-Out window, where you
select the collection type and quantity of non-cataloged/non-barcoded items to be
checked out.
• Blocks: Displays blocks on borrower privileges, such as fines, expired card, etc.
Figure 2-8. The Please Choose a Date
window
Library•Solution Circulation
2. Main Circulation Tabs
CIRC-17
Contents
Index
Patron Transaction Subtabs
The lower part of the Patron Transactions tab contains a series of subtabs that display several types
of borrower information: Items Out, Charges, Holds, Patron Record, and Reserves.
2.1.1 Items Out
The Items Out tab (Figure 2-9) displays the Item ID, Title, and Due Date of all items checked out by
the current borrower. Highlight the desired item and click one of the following buttons at the bottom of
the window to perform a specific function:
• Inquire: Displays the Item / Title Info tab, where you can find additional information about the
title selected
• Renew: Renews the highlighted item
• Recall Item: Displays the Recall Item window (Figure 2-10), where you can place a "recall"
message on a checked out item. Note: Only items with an "in-transit" (T) or "checked out" (CO)
status may be recalled. If a recalled item is checked in as damaged, the item will be assigned to
the Repair Shop designation first. When the item is returned to circulation the recall will take
effect.
• Calculate Fine: Displays the Current Item Fine window, where the fine amount is displayed for
an item if it were checked in immediately
Figure 2-10. The Recall Item window
Figure 2-9. The Patron Transactions | Items Out subtab
Library•Solution Circulation
2. Main Circulation Tabs
CIRC-18
Contents
Index
• Print List: Prints the currently displayed Items Out list for a selected borrower. Use Print List if
you have been performing other activities, such as checkin, which might have changed the status
of the items currently displayed.
To perform Items Out activities for selected borrower:
1. Select the Patron Transactions tab, or press F2.
2. In the Patron text box, access the borrower by scanning the borrower barcode label, or typing
the Patron ID, Alternate ID, or name. Items Out is the first subtab displayed on the lower part of
the screen.
3. When the borrower's information is displayed, select the Items Out tab. Then select an item from
the list of items out. To select, click the item line to highlight it, or you can press the Down or Up
Arrow to move the highlight to an item. Use Page Up or Page Down to see other items out.
If you want to Renew, Recall Item, or Calculate Fine for more than one item, you can select
multiple items if they are above or below each other on the list. Drag the mouse down the list to
highlight multiple items.
4. Then click any of the special activity buttons on the lower part of the Items Out tab:
Inquire
Renew
Library•Solution Circulation
Recall Item
2. Main Circulation Tabs
Calculate Fine
Refresh List
CIRC-19
Contents
Index
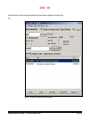
2.1.2 Charges
The Charges tab (Figure 2-11) displays the following information:
• All Charges for Current Patron: Shows the Branch For, Title, and amount Due for each
overdue item. Click the New Charge button to open the Add Charge to Patron window (Figure
2-12), where you can add a comment, code, and charge. Information about the highlighted item
is displayed on the right side of the window.
• Tender / Waive options: Displays the Patron's Total Balance plus Amount to Tender and
Amount to Waive entry boxes. Click the Fine History button (if available) to display the Fine
Payment History window (Figure 2-13), showing a descriptive list of past and present fines.
Click the Balloon Pay / Waive button to apply the amount tendered or waived to the current
balance. Select the Receipt button to print a receipt for the transaction. Use the Print Charges
button to print an itemized list of current charges. Select the Modify Credit Balance button to
change charge or credit information.
• Individual Item Charges and History: The right panel on this tab reflects information about the
item highlighted on the left. This information includes Item Title, Item ID, Due Date, Branch,
Comment (optional), and Charge Type in the upper portion and the Original Charge, the amount
Tendered so far, the amount Waived so far, and the Charge Left in the lower portion of the panel.
Figure 2-12. The Add Charge to Patron window
Figure 2-11. The Patron Transactions | Charges subtab
Library•Solution Circulation
2. Main Circulation Tabs
CIRC-20
Contents
Index
Figure 2-13. The Fine Payment History window
To view and handle Charges:
1. Select the Patron Transactions tab or press F2. Access the borrower.
All Charges for Current Patron appear individually in a list box on the left. The first list entry
will be highlighted, with details of that entry displayed on the right half of the Charges tab. (The
type of balance shown depends on the Pay Local Fines Only selection in the Branch Setup.)
The Patron's Branch Balance (or Patron's Total Balance) is displayed under the list box .
Branch or Total is displayed according to the Pay Local Fines Only setting on the
Fines/Overdues tab in Setup | Branch Setup.
The Patron's Credit Balance is displayed below and to the right of the Branch Balance.
Library•Solution Circulation
2. Main Circulation Tabs
CIRC-21
Contents
Index
2. Click the Balloon Pay/Waive button. A Payment Transactions dialog will display. If you are
waiving, enter the password if requested. You can accept payment or waive payment on total
charges due (either at this library or for any library, depending on the configuration). In the Cash
Tendered or Circulation Charges to be Waived field, type the amount, type the decimal if the
amount is not a whole dollar, cents, if any (dollar sign not necessary), for example: 5.25
Tip: The total amount to be paid and/or waived must equal the amount in the Circulation
Charges to be Paid. If you want to waive part or all of a fee, be sure to reduce the total in the
Cash Tendered box by that amount.
For the operator to accept full payment: type the amount to be paid in the Cash Tendered
entry box, and/or the amount to be waived in the Circulation Charges to be Waived entry box.
and click Finish. If the patron wants to pay less than the full amount, the user can click and
overtype the amount already in Circulation Charges to be Paid, then type the same amount in
the Cash Tendered entry box, and then click the Finish button.
3. Make a payment or waive a single charge: Select a charge from the All Charges for Current
Patron list on the left. On the right, detailed information will appear for the selected (highlighted)
charge. You can change or add the Comment or change the Charge Type (Chg Type) code for
a selected charge. To save, select Update. To accept payment or waive payment on a single
charge, click the Individual Pay / Waive. Enter the amount to be paid or waived. If you are
waiving, enter the password if requested.
4. New Charge: To add a new charge to the borrower's account, select the New Charge button.
Enter a Comment (a title or description of situation). Enter a Charge Type Code (select from
the drop-down list). The default code is "OT" for other/miscellaneous charge. Enter Amount.
Select OK to save.
5. Print Charges: Click this button to print the current borrower's charges to the locally configured
printer.
6. Modify Credit Balance: Click this button to display the Payment Transaction dialog. Make
adjustments to the Credit Balance as necessary.
Library•Solution Circulation
2. Main Circulation Tabs
CIRC-22
Contents
Index
7. Receipt / Print Setup: If the Payment Receipts option in the Printer Configuration setup has
been turned on, one copy of a receipt will be printed automatically. Whether that option is
enabled or not, you can always print a receipt by selecting the Receipt button on the lower
portion of the Charges tab.
8. Fine History: If the button is visible, try clicking it to view the history. If fine data is available for
this borrower, it appears in the Fine Payment History window. To see an example display, click
here.
Dealing with Lost Item Charges
When an item is marked lost, but checked in at a later date, Circulation Check in will include a series of
steps that will identify outstanding charges, related charges, and fees already paid, and will adjust the
borrower’s account to reflect the credits.
When the lost item is checked in, and there are existing charges pending payment, an Outstanding
Charges window (Figure 2-14) will display the current pending charges. The staffers can selectively
elect to waive these charges by checking the items on the list. Click OK to continue.
If the borrower made previous payments for the lost item, a Lost Item Charge Payments window
(Figure 2-15) will display a list of all payments made. Staff should select the entries that are to be
refunded and click OK. The check in will continue normally. Review the Charges tab for that borrower
to be certain that the fines/fees were removed from the borrower record.
Library•Solution Circulation
2. Main Circulation Tabs
CIRC-23
Contents
Index
Figure 2-14. The Outstanding
Charges window
Figure 2-15. The Lost Item
Charge Payments window
Library•Solution Circulation
2. Main Circulation Tabs
CIRC-24
Contents
Index
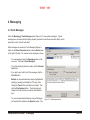
2.1.3 Holds
The Holds tab (Figure 2-16) displays the following information:
• Patron Holds list: Lists titles on which holds have been placed. Click the Place button to open
the Define New Holds Basics window (Figure 2-17), where you can change the Expires date,
Priority, and Send to Branch parameters.
• Selected Hold information: Displays a Description, Status, Send to Branch, and Definition of
Hold for a highlighted title on the holds list.
– Description: An optional description of the hold. If you place a multiple item hold, this field
can be used to enter an overall description (e.g., "Titles by Mark Twain"). The Description
also appears in the Holds Queue display.
– Status: The possible Holds Status codes are listed below. Codes are supplied by the
system. When an item is on hold (with a status of pending, arrived, or in transit), the Item
Status code varies, as shown in the right column.
Hold Status
Meaning
Item Status
PE
Pending hold (item still checked out to another
borrower)
CO
AR
Arrived (item just checked in, awaiting checkout by
requesting borrower)
HD
T
Hold item in transit between brahcnes
T
– Position/Copies: Includes the relative position of this borrower's hold in the Pending Holds
Queue, followed by the number of copies available for holds. If this is a multiple-title hold, the
number of copies will include the total number of items of every copy in the hold. If it is a
multiple-item hold (i.e. a title-level hold), the number of copies will be the total number of
available items. Items with a "Lost" or "Missing" Item Status are subtracted from the count for
both title-level and item-level holds.
– Issued: The date the hold was issued.
– Expires: The date this hold request will expire. After this date the system will not continue to
look for this hold.
– Priority: The priority of the Patron Type in the Holds Queue. Priority values range from 1
(high) to 10 (low). this is established for each Patron Type in the Setup | Patron Types
Library•Solution Circulation
2. Main Circulation Tabs
CIRC-25
Contents
Index
and Codes | Patron Type
setup. You can change the
priority for a hold by editing
on the Patron
Transactions | Holds tab
or through the Holds
Queue. On the Holds tab,
if you change the priority,
be sure to save by clicking
the Save Hold Info button.
– Send to Branch: specifies
the branch where the hold
is being sent. You can
specify that a pending item
(holds stats PE) be sent to
another library for pickup by
the borrower. Change the
library number or name.
Save by clicking Save Hold Figure 2-16. The Patron Transactions | Holds subtab
Info.
– Save Hold Info: Use this button to save any changes
you have made in the Selected Holds fields.
– Definition of Hold: This box contains information
about the selected hold. For a multiple title hold, the
individual titles are linked together by vertical lines. If
a hold has been limited by Branch or Item, you will see
the Branch Number and/or the Item ID (barcode
number) displayed under the title.
– Add Title: Use this button to add another title to an
existing hold (i.e., another title that the borrower would
be happy to get just as well as the first one).
– Limit Title: You can limit a hold to items circulated by
a particular library, and you can limit the hold to a
particular item (copy or volume).
Figure 2-17. The Define New Hold Basics window
– Delete: Use this button to delete an item or title from a
selected multiple title hold. A message will ask you if
you are sure you wish to deleted the selected hold.
Click OK or press Enter.
Library•Solution Circulation
2. Main Circulation Tabs
CIRC-26
Contents
Index
– Arrived/Transit Hold Information: If
the selected title has arrived, the title is
displayed below the Add/Limit/Delete
buttons, along with the library where the
item is now waiting or to which it is now
in transit. ("Arrived" means the item has
been checked in from the previous
borrower and is now available for hold
pickup.)
When you select Place on the Holds tab to
place a new hold, you will first see the
Define New Hold Basics window (Figure
2-17). Enter information and save, and then
the Define Title Specifics window appears
with the Branches tab (Figure 2-18). Use
the Items tab (Figure 2-19) to display
information about specific items. (To limit a
hold to a branch or item, click here.)
Click the Save Hold Info button to save changes
made to the information. Select the Add Title
button to display the Define Title Specifics
window , where you can enter information about
the title or item you want to place on hold. Click
the Limit Title button to place further limits of the
title on hold. Use the Delete button to remove a
title from the Holds list.
Figure 2-18. The Define Title Specifics window, Branches tab
Figure 2-19. The Define Title Specifics window, Items tab
Library•Solution Circulation
2. Main Circulation Tabs
CIRC-27
Contents
Index
Fill Holds for Current Branch as Pickup Location
A holdings code setting allows Circulation administrators to specify that holds to be picked up at a
particular library should be filled by that library's copies in that holdings code before any holds placed
for pickup at other libraries are filled with copies from that library.
This setting is available in the Library•Solution System Configuration: Setup | Holdings Codes:
FillLocalHoldsFirst (field). To find details on the setup, see the System Configuration Reference
Manual.
The available settings for each holdings code are 0 (zero), meaning do not fill local holds first (default
setting) or 1 (one), do fill local holds first. If the option is turned on (value 1), then Circulation makes a
determination about any possible holds when an item is checked in:
• If Circulation finds that there are PE (pending) holds, it determines the library of the “active”
holdings code for the item (this is not necessarily the owning holdings code).
• If the “FillLocalHoldsFirst” flag is turned on (value 1) for the active holdings code, the system
searches the holds queue for the first PE hold that is to be picked up at the item’s active library.
If such a PE request exists, Circulation then fills that hold request, regardless of whether there
are other PE holds to be picked up at other libraries ahead of this hold in the queue.
• If there are no PE holds in the queue to be picked up at the active library for the item, Circulation
checks to see if there is a PE hold to be picked up at the current Circulation location (the library
where the item is being checked in). If so, it fills the first such request (again, this is regardless
of its position in the queue).
• If there are no PE holds in the queue to be filled at the current library location, then Circulation
fills the first PE hold in the queue (regardless of which pickup location is specified).
On the other hand, if the “FillLocalHoldsFirst” field for a given holdings code is not turned on (value 0),
then the holds queue in Circulation operates normally: “first come/first served.”
See Holds Quick Reference topics for more information about holds procedures.
Library•Solution Circulation
2. Main Circulation Tabs
CIRC-28
Contents
Index
2.1.4 Patron Record
The Patron Transactions | Patron Record subtab contains additional tabs that display Basic
Information, Patron Fields, Addresses, Miscellaneous Information, Loan History, and Outreach
Services.
2.1.4.1 Patron Record: Basic Info.
The Basic Info subtab (Figure 2-20) includes the following information panels:
• Patron ID: Includes Patron ID, Alternate ID, Patron Type, Expires (card expiration date), and Hot
Status. Click the Print Patron Info button to print a copy of this information.
• Name: Includes Last Name, First Name, Middle Name, Suffix.
• General Information: Includes Salutation, E-mail address, Date of Birth, PIN, Gender, and
Comment.
• Responsible Party: Name of the person responsible for this borrower's checkouts, outstanding
fines or fees, etc. To set a responsible party for the current borrower, click in the entry box, type
a name, and select the Set button. Choose a name from the borrower hit list and click OK.
Click the Save button to save changes you make.
Figure 2-20. The Patron Transactions | Patron Record | Basic Info. subtab
Library•Solution Circulation
2. Main Circulation Tabs
CIRC-29
Contents
Index
2.1.4.2 Patron Record: Patron Fields
The Patron Transactions | Patron Record | Patron Fields subtab (Figure 2-21) displays the Field
Name and Value for optional borrower fields. In your initial setup, supervisors can define as many
fields as needed: field names, type of data to be entered in the field (codes or free text), and whether or
not the fields can be used in statistical reports.
Use the Delete Highlighted Patron Field button to remove an optional borrower field.
To learn how to setup patron fields, click here.
Figure 2-21. The Patron Transactions | Patron Record | Patron Fields subtab
Library•Solution Circulation
2. Main Circulation Tabs
CIRC-30
Contents
Index
2.1.4.3 Patron Record: Address
The Patron Transactions | Patron Record | Address subtab (Figure 2-22) contains the following:
• Select Address panel: Choose the Primary or Secondary Address to display on the right.
• Copy Address: To copy the address, click the Copy Address button to display the Copy
Address window (Figure 2-23), where you can copy the address from one borrower's record to
another.
• Address Information panel: Contains two lines for the street address plus City, State, Zip,
Comment, and Phone Number(s). Click the Organization button to display the Lookup
Organization Name window (Figure 2-24), where you can search for and add a link to an
organization, or add a new organization to the list. (When a borrower is linked to an
organization, the "organization" name is printed between the borrower’s name and the first street
line of the name and address block on notices, labels, letters, etc.). Use the Remove
Organization button to remove a link between a borrower and an organization. Click Address
Correction Requested box if you want to be alerted to check the address of this borrower. This
will cause a message in blue, Address, to be displayed prominently on the F2 tab any time you
search for this borrower. The message will remind staff to update the borrower's address and
other contact information.
Use the Save button to save your
changes.
Figure 2-22. The Patron Transactions | Patron Record | Address subtab
Library•Solution Circulation
2. Main Circulation Tabs
CIRC-31
Contents
Index
Figure 2-23. The Copy Address window
Figure 2-24. The Lookup Organiztion Name window
Library•Solution Circulation
2. Main Circulation Tabs
CIRC-32
Contents
Index
2.1.4.4 Patron Record: Misc. Info.
The Patron Transactions | Patron Record | Misc Info tab (Figure 2-25) contains the following
information.
• Issued: Date borrower's card was issued
• Issuing Branch: The library (number and name) where the borrower's card was issued. To
change the issuing Branch, click the arrow beside the drop-down box and select another library.
A message will ask you to confirm the change.
•
•
•
•
Last Active: Date and time of borrower's last activity
Last Branch: Library name where borrower's last activity in the system occurred.
Last Edited: Date and time when Patron Record was last edited by staff.
Last Updated: Date and Time when Patron Record was last updated automatically by the
system.
• Last Patron ID: If borrower's barcode number was changed, this is the previous barcode number
used.
Figure 2-25. The Patron Transactions | Patron Record | Misc. Info. tab
Library•Solution Circulation
2. Main Circulation Tabs
CIRC-33
Contents
Index
• ID Last Changed: Date and time the borrower's barcode number was last changed.
• Total Check-Outs: Total number of items checked out by this borrower.
• Total This Period: Number of items checked out by this borrower in this defined "year-to-date"
period.
• Total Fines Waived: Total amount of overdue fines and other charges waived for this borrower.
• Items Claimed Returned: Number of items the system considered still checked out, but which
the borrower claimed had already been returned.
• Items Claimed Never Out: Number of items the system considered checked out to this
borrower, but which the borrower claimed had never been checked out.
• Items Lost button: Click this button to view a list of all the items the borrower has lost.
• Accounts Responsible For: Barcode numbers and names of borrowers for whom this borrower
is the responsible party.
Library•Solution Circulation
2. Main Circulation Tabs
CIRC-34
Contents
Index
2.1.4.5 Patron Record: Configuration
The Patron Transactions | Patron Record | Configuration subtab (Figure 2-26) includes the
following:
• User Settings area: only a user looged on as system_admin will see these dro-down lists:
– Online Editor Rights: The following options will display on the drop-down list. Select the
desired option and click Save.
None
Allow Holdings Edit
Allow Reading Program Edit
Allow Both
– Debt Collections: From
the drop-down list,
select CAN SUBMIT or
EXCLUDE and then
click Save. You can
enable Debt Collections
by selecting Security
Setup from the Setup
menu, choose a user,
click the Basic
Functionality tab, and
check the box beside
Debt Collection. The
user will need to re-login
to enable the security
change.
Figure 2-26. The Patron Transactions | Patron Record | Configuration subtab
Library•Solution Circulation
2. Main Circulation Tabs
CIRC-35
Contents
Index
• Statistics area: allows qualified staff to turn on (or off) the following options in the individual
borrower record: Record Loan History Statistics and Record Fine History Statistics. These
check boxes control whether or not loan and fine history can be collected for a selected
borrower. (Borrowers should give permission before qualified staff select these options.)
Some Circulation staff will not be able to view these boxes on the Configuration tab at all. Some
users can view but not edit the settings. The rights to view or edit the information are given in the
Security Setup: Patron Screen selections for the field named Patron Stats. (Note: To allow loan and
fine history data to be collected at all, the Turn on Loan History and Turn on Fines History boxes
must be checked on the Setup | Branch Setup | Defaults tab.)2.1.4.6 Patron Record: Loan History
The Patron Transactions | Patron Record | Loan History subtab (Figure 2-27) allows qualified staff
to view and edit the loan history of a selected borrower. Staff should obtain permission from borrowers
before enabling this feature. (Click the Record Loan History Statistics option on the Patron Record
Configuration tab.)
(Note: To allow loan history data to be
collected at all, the Turn on Loan History
box must be checked on the Setup |
Branch Setup | Defaults tab.)
Some Circulation users will not be able to
view the settings at all. Some users can
view but not edit the settings. The rights to
view or edit the information are given in the
Security Setup: Patron Screen selections
for the field named Loan History.
A Circulation user with sufficient security
can remove selected items from a
borrower’s history. When you right-click
over an item in the list, the Remove Title
Figure 2-27. The Patron Transactions | Patron Record | Loan History subtab
option appears. To remove the item, click
the button. The Delete All button (lower
right) can be used to delete all of a borrower's loan history.
Library•Solution Circulation
2. Main Circulation Tabs
CIRC-36
Contents
Index
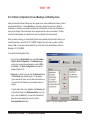
2.1.4.7 Patron Record: Outreach Services
The Patron Transactions | Patron Record Outreach Services subtab (Figure 2-28) can be used to
set delivery frequency, set minimum and maximum number of items, and view profile edit history
information. (See section 8.4 Library.Solution Outreach Manager for an overview of Outreach
Services.)
You can also view the currently displayed selections, or change a displayed field to a different
selection, of the optional Outreach Fields. In your initial setup, supervisors can define as many fields
as needed: field names, type of data to be entered in the field (codes or free text), and whether or not
the fields can be used in statistical reports.
Figure 2-28. The Patron Transactions | Patron Record Outreach Services subtab
Library•Solution Circulation
2. Main Circulation Tabs
CIRC-37
Contents
Index
The borrower's search preferences can be saved for future searches, and those saved searches are
available to be included in any borrower record if they are saved as "global" searches.
The following fields are available:
• Delivery Frequency (days): This number indicates how often this Outreach borrower receives
delivery of his requested items. Use the Up/Down arrow keys to change the value to the desired
number of days. The valid range is 1 to 999. (Tip: Single-click the arrow to increase or
decrease the setting value by one. Repeat the single click to change the setting, one digit at a
time, to the desired value. You can also set the value by clicking in the box, pressing the delete
key until the value equals zero, and then typing the desired value.
• Minimum # of Items: This number indicates the minimum number of titles that the borrower
wishes to receive for each delivery period. Use the Up/Down arrow keys to change the value to
the desired minimum number of titles. The valid range is 1 to 999.
• Maximum # of Items: This number indicates the maximum number of titles that the borrower
wishes to receive for each delivery period. Use the Up/Down arrow keys to change the value to
the desired maximum number of titles. The valid range is 1 to 999.
•
•
•
•
•
Date of Last Delivery: Displays the date of the last delivery to this borrower.
Profile Last Edit Date: Displays the date the Borrower's profile was last edited.
Profile Last Edited By: Displays the User Name of the last person to edit the borrower's profile.
Additional Data: Displays the current selections of the optional Outreach Fields.
Select Global Prefs: Opens the Outreach Saved Searches window. To add one of the
displayed searches to the current borrower's Saved Searches list on the PAC, select the search
Title on the display, and click the Set button. That search will now be available on the borrower's
PAC display as a Saved Search.
• Setup New Prefs: Opens a web browser and takes you to the configured PAC. You can
perform searches, and then save those search settings to be used in future searches for this
borrower. The saved searches can be added to other borrower records by using the Setup
Global Prefs button as described above. Note: If you get a logon error when the browser
connects to the PAC, verify that the Patron has a PIN assigned.
Use the Save button to save your changes.
See section 3.1.2 Patron Types and the Quick Reference section on Outreach Fields for more
information.
Library•Solution Circulation
2. Main Circulation Tabs
CIRC-38
Contents
Index
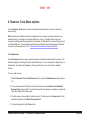
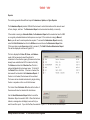
2.1.5 Reserves
Reserves are materials set aside for a special use by a borrower (usually an instructor in an academic
library), for example, for required reading for a course. Circulation staff can also use reserves to
specify special shelving locations, for example, for "New Books" or seasonal displays such as
"Halloween Books." Special checkout periods and overdue fines are usually assigned to the items. A
reserve is not the same as a "hold."
The Patron Transactions | Reserves subtab (Figure 2-29) is used to place items on reserve for a
selected borrower (instructor). Special checkout periods and other circulation rules can be assigned to
the items when they are placed on reserve by specifying a different holdings code.
Holdings codes also determine location displays
in the PAC and shelving location messages in
Circulation when reserve items are checked in.
The following function buttons are available:
Place: Click this button to open the Place Item
on Reserve window (Figure 2-30), where you
can select a Department, Course, and Expiration
Date, and search for items to place on reseve,
Remove: Click this button to remove the
highlighted items from the group of reserve items.
Edit: Select this button to display the Edit
Reserve Information window (Figure 2-31),
where you can select an existing reserve and
modify the Department, Course, and Expiration
Date.
View All: Click this button to view all reserves.
Library•Solution Circulation
Figure 2-29. The Patron Transactions | Reserves subtab
2. Main Circulation Tabs
CIRC-39
Contents
Index
Note: Department and Course choices must be setup in Setup | Types and Codes | Department
Codes OR Course Codes.
See section 6.0 Reserves Tools Menu for an overview of reserves procedures.
Figure 2-31. The Edit Reserve Information window
Figure 2-30. The Place Item on Reserve
window
Library•Solution Circulation
2. Main Circulation Tabs
CIRC-40
Contents
Index
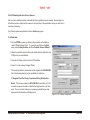
2.2 Check In / In House Use Tab F3
The Check In / In House Use Tab (Figure 2-32) is used to:
• Check in items that were checked out and have now been returned to the library.
• Check in new items to make them fully available to borrowers. (When new titles or items are
added in either Cataloging or Circulation, the system automatically assigns a modified Item
Status of T-In Processing. When you run new items through Check In, this clears the "T"
status so the items will be displayed as "available" in the PAC. If an item should be circulated by
another library, a check in message will remind you to move it.)
• Determine the current item status or library status of an
item. If the item happens to have a "T" item status, a
"Relocate Item" message will alert you to move items to
another library. If an item is already checked in and
should stay at this library, no special message is
displayed.
• View a list of items checked in recently. For information
on any item, select a checked in item from the list, and
then click the Item Inquire button on the lower left. For
more information on a borrower, click the Patron
Inquire button on the lower right.
• Record borrowers' in house usage of items which were
not checked out.
Figure 2-32. The Check In / In House Use Tab
Library•Solution Circulation
2. Main Circulation Tabs
CIRC-41
Contents
Index
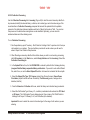
The following features are available on this tab:
• Item box: Enter information about the item to be checked in or recorded for in house use. Scan
the barcode label or type the item ID or the title.
• Configuration (Cfg.) option button: Click to reach Title Search Configuration window, where
you can set the search order. Note: this is the same configuration used on the Patron
Transactions (Check-Out) tab.
• Check In button: After you enter information about the item to be checked in or recorded for in
house use, click the Check In button or press Enter to display the Title Lookup window (Figure
2-33). From here you can highlight the desired item and click OK to check it in or use the New
Item or Show "NO ITEMS" buttons (if available) to add an item or title on-the-fly.
• Mode: Check In / In House Use: Use the Check In option button to check in items that were
checked out and returned. Use In House Use to record usage of items that have been used in
the library but not checked out.
• Override Check In Date / Time: When you are checking in items or recording in house usage,
you may wish to override the date and time.
• Special Status button: You may need to
check in an item with special
circumstances, such as damaged, lost,
borrower claimed never checked out the
item, or borrower claimed the item had
already been returned. Before you enter
information about the item to be checked in,
click the Special Status button and select
the Item Status code to be assigned. If the
item status was previously "Lost", the Adjust
Claims window will ask: Should the claims
counter be adjusted for this claim? '
Respond Yes or No as desired. For
additional information, see descriptions at
trhe end of this section.
• Item Barcode area: Displays brief
information about items recently checked in
or recorded for in house use. The following
information is displayed: Item ID (usually a
barcode number), title, date and time due,
and the borrower who last checked out the
item.
Library•Solution Circulation
Figure 2-33. The Title Lookup window
2. Main Circulation Tabs
CIRC-42
Contents
Index
• Item Inquire button: Displays the Item/Title Information tab with the Circulation subtab
information for the selected title.
• Patron Inquire button: Displays the Patron Transaction | Patron Record | Basic Info. sub
tab.
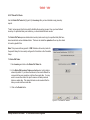
Messages
During checkout, if the item is already checked out to a borrower, an Are You Sure You Want To Do
This? message will display asking: “Do you want to check-in item from existing borrower and
check-out to new patron?” Clicking Yes will result in the item being checked in from the previous
borrower and checked out to the current borrower. If this is the same borrower, clicking Yes will result
in a renewal.
Handling Lost or Missing Hold or In-Transit Items
When a hold is placed against a title, and Circulation believes
there are copies available on the shelf, Circulation will pick an
available item to fill the hold. Depending on the "On the Shelf
Hold to HD Status" setting on the Defaults tab under the Setup
menu, Branch Setup option, and the present library of the item,
the item will either be placed in a Hold (HD) or In-Transit (T)
status. Based on normal library usage, when the operator
attempts to retrieve the item to place it on the Holds Shelf, it may
not be found.
To Replace the Lost or Missing Item on the Hold Request:
1. The operator should check-in the requested item which could
not be located, using a Special Status check-in, and selecting
one of the modified Lost or Missing statuses.
2. The Hold Replacement form will display (Figure 2-34).
Figure 2-34. The Hold Replacement form
Library•Solution Circulation
2. Main Circulation Tabs
CIRC-43
Contents
Index
3. The form will display two choices: System Selects Item To Fill Hold and, User Selects Item to
Fill Hold. Select the desired option and click OK.
4. If the item is Lost or Checked out, Circulation will ask if the user wants to proceed. In this situation,
if overdue fines are applicable, the system will ask if the user wants to charge them.
Handling Lost or Missing Arrived Holds
This process can also be used if a borrower asks for an arrived hold and it cannot be found. The
operator can use the Special Status check-in and place the item in the Missing (MS) status.
The same options will be available to the user to either select another copy to fill the hold, let the
system select the copy, or revert that hold to a PE (pending) status to be filled when another copy
becomes available.
Dealing with lost item charges
When the previously Lost item is checked in, and there are existing charges pending payment, an
Outstanding Charges dialog will display the current pending charges (Figure 2-36). The staffers can
selectively elect to waive these charges by checking the item(s) on the list and then clicking OK to
continue.
If the borrower made previous payments for the lost item, a Lost Item Charge Payments dialog will
display a list of all payments made (Figure 2-37). Staff should select the entries that are to be
refunded and click OK.
The check in will continue as normal. Review the Charges tab for that borrower to be certain that the
fines/fees were removed from the borrower record.
• If Option 1 is selected, the system will pick another copy to fill the hold. It will display a message
advising the operator which copy to select, or will send another message to another library to fill
the hold.
Library•Solution Circulation
2. Main Circulation Tabs
CIRC-44
Contents
Index
• If Option 2 is selected, the operator will scan the selected copy's barcode into the box provided.
Circulation will ensure this copy can fill the hold.
Circulation will report errors as appropriate, and will not allow the following items to be used:
– The wrong title
– An item that is on Hold for another borrower
– An item in an In-Transit (T) status to fill another hold
– An item involved in a Booking (BK) status
Figure 2-36. Outstanding Charges window
Library•Solution Circulation
2. Main Circulation Tabs
Figure 2-37. The Lost Item Charge Payments window
CIRC-45
Contents
Index
Holds routing Among libraries
In Circulation Version 2.1.1 and higher, when an item is checked in that is on hold for a borrower at
another library, Circulation will forward the arrived hold item directly to the pickup library requiring the
hold and thus eliminate the extra step of sending it to the home library first. Sometimes when you
check in an item, the system will display a special message in a "Relocate Item" window.
This occurs if the item should be shelved with reserves, or if it is on hold and should be shelved locally
on the Arrived holds shelf or transferred to another library for pickup. The Relocate Item window says,
"Please move item as described" and includes the title, the call number, and a description of the item
status. If the item is a reserve, the department, the course, and the name of the instructor are also
shown. Appropriate instructions will tell you to move the item to the proper pickup library. A Print
button is available to print a hard copy of the Relocate Item message.
If the checked in item is on hold, a holds slip with the borrower's name and telephone number can be
printed automatically. To set up printing, select Printing Setup on the Setup menu: Local
Configuration.
If a borrower has been notified of an arrived hold via e-mail, the holds message or printed holds slip will
include the message "E-mail Notification" to notify the operator that this borrower has been notified of
the arrived hold via e-mail. In this case, there is no need to print the holds slip.
To ensure that action is taken, the Relocate Item messages are also recorded in the Messaging
window, which you can access on the Circulation menu.
You can turn off the display of some messages by selecting the Suppress Messages check box.
Library•Solution Circulation
2. Main Circulation Tabs
CIRC-46
Contents
Index
2.3 Item/Title Information Tab
Use the Item/Title Information tab (Figure 2-35) to find information about any title or item in
Circulation. You can find bibliographic information (like title and author), item-specific information (like
barcode number, call number, owning and circulating libraries and collections, etc.), Circulation status
(what borrowers have which items checked out, holds and shelf status, etc.), and more.
Note: You can also access item/title records from the other two main tabs. If you are already working
with a selected borrower on the Patron Transactions tab, use the Item Inquire button for a selected
title on the Items Out tab. From the Check In/In House Use tab F3, select an item just checked in,
and then use the Item Inquire button. The inquire buttons on either tab will take you quickly to the
Item/Title Information tab.
The Item / Title Info. window
contains the following panes:
• Item / Title entry box:
Scan the barcode or enter
a title, the Item ID (barcode
number), ISBN, the control
number, or use \C to
search by call number. If
you type the information,
click Search or press
Enter. If desired, use the
Cfg. button to reach the
Title Search
Configuration window and
modify the search order.
(Note: This requires
administrator level rights.)
Figure 2-35. The Item/Title Information tab
Library•Solution Circulation
2. Main Circulation Tabs
CIRC-47
Contents
Index
• Title Information: Includes the following fields and features:
– Title: The title, up to 40 characters.
– Control Number: The unique number for a title record. If the title has been catalogued in the
Cataloging module, the Control Number displayed in Circulation is from field 001 in the
MARC record. The control number consists of three spaces and / or lowercase letters,
followed by eight numerals. (Note: Bibliographic records created after the year 2000 may
have 2 letters and 10 numbers. On-the-Fly entries always have 3 letters and 8 numers.)
For titles you add to Circulation on-the-fly, the system will assign control numbers
automatically. It also creates MARC records with these control numbers in the Local
Database accessible through the Cataloging module. Supervisors may wish to set the same
control number prefix (three leters, like "otf") in each library's Branch Configuration, or they
may assign a separate prefix for each library in the system. Different prefixes may help
catalogers track which library added which titles.
The bibliographic portion of this section will be grayed or not grayed, depending on whether
Cataloging "owns" the record. If the screen says "Circulation Record" in red, you can edit it if
security allows.
Note: The numeric portion of the automatic control number (eight digits) is not configurable.
There is a single numeric sequence which applies system-wide. The first number used by
any library in the system for the first title added to the system on-the-fly is 00000001, with the
appropriate assigned prefix.
– Author: The author's name, up to 50 characters. If entering data, type the last name first,
like this: Twain, Mark.
– ISBN: Enter the ISBN (International Standard Book Number), if known. Type the 10
characters without the hypens supplied in the printed number.
– ISSN: If the title is a serial, this field contains the ISSN (International Standard Serial
Number). If you are entering a new title record in the On-the-Fly Item Entry window, type all
eight digits of the ISSN. The hyphen between the first and last four digits will be supplied
automatically.
Library•Solution Circulation
2. Main Circulation Tabs
CIRC-48
Contents
Index
– Type Mono / Serial: Monograph is displayed as the default type of record. To change the
default, click the radio button beside Monograph or Serial.
– Format: Contains a code to describe the physical format of the item. The code for book is
displayed as the default format. To change the default for a Circulation on-the-fly record,
click the drop-down menu to display the list of available material types.
– Year: The year published. If this item is a serial (like an almanac or a magazine issue), enter
(or look for) the date this piece was published in the "Serial Year" field in Item Information
instead.
– Language: The code for English is displayed as the default. If you are entering a new record
or adding an on-the-fly record, you can change the default. Click the drop-down arrow to
display the list box of individual languages and codes.
– Items: The number of items (copies or volumes) associated with this title. For item
information, click the down arrow next to the Item ID field in the Item Information area. A list
of barcode numbers associated with the title will be displayed. Select a barcode number.
Then click one of the Circulation tabs below: Circulation or Bibliographic.
– Save button: To save changes or entries in an on-the-fly record, click the Save button.
– Delete button: Click this button to delete a Circulation on-the-fly record.
– Slip button: If a printer is attached to this station, you can print all information for this title
and all items by selecting the Slip button.
– Holds button: To review, change, or cancel holds for this item, click the button. The Holds
Queue window will be displayed.
• Item Information: This portion of the Item/Title Information tab includes information about each
item (copy or volume) of the selected title. This area is divided into four subtabs which provide
item-specific information: Circulation , Bibliographic, Vendor, and Item Fields tabs.
Library•Solution Circulation
2. Main Circulation Tabs
CIRC-49
Contents
Index
2.3.1 Circulation Subtab
The Circulation subtab (Figure 2-38) includes two areas of information: Item Activity and Current
Information. To add a new item (barcode), click the New button. The Item Activity area includes Item
Status (e.g., checked out), the barcode number of the last borrower who checked out this item, and
more. The Current Information area includes a Find button for access to the borrower record for the
person who currently has the item checked out.
Figure 2-38. the circulation subtab
Library•Solution Circulation
2. Main Circulation Tabs
CIRC-50
Contents
Index
2.3.2 Bibliographic subtab
The Bibliographic subtab (Figure 2-39) contains the following item (holdings) information: barcode
number (Item ID), call number prefix (for Dewey or LC class numbers), classification number, cutter or
author information, physical condition, checkbox to show the condition note during the checkout,
comment, item price, accession number, identification of owning and circulating libraries and
collections, year (serial volume), volume number, and part subdivision numbers. (An optional checkin
note may appear in the Part Subdivs field. Users cannot edit Part Subdivs data. A Check In/Out
Note may also appear in this area.)
From this tab, authorized users can edit holdings data, delete items, change the current library or
collection, etc. You can edit item information (holdings, call numbers, volume numbers,
branch/collection, etc.) in either Cataloging or Circulation, but check with supervisors about your
library's editing policies and your current Circulation security privileges.
If there is a condition note in the Condition field for a title and the Show check box is checked, the
Condition note will display during checkout.
Figure 2-39. The Bibliographic subtab
Library•Solution Circulation
2. Main Circulation Tabs
CIRC-51
Contents
Index
To change an item's branch or collection code:
• Owning Branch and Collection: On the Bibliographic tab of the Item/Title Information tab
F4, if you want to change the library, click the drop-down arrow beside Branch to display the list
of libraries, and select.
In the Collection field, you can quickly locate the collection you want. Click in the field, or "tab"
there to highlight it. Then type the first letter of the collection code. For example, to find REF,
type R - then press the Down or Up arrow keys to scroll through the list from there (or press
Right arrow to go down, Left arrow to go up). If you type a different letter, this will reveal another
part of the list (codes beginning with that letter).
If the circulating library and collection are the same as owning, you do not need to reenter them
in the Circ'ing Branch fields.
• Circulating Branch and Collection: If you wish to change the circulating library or collection,
use the same procedure as above. If you make changes in Branch or Collection, select the Save
button.
Note: If an item is on reserve, the branch/collection specified for the reserve becomes the active
branch and collection.
To change a barcode number on an existing physical item: Sometimes a barcode label affixed to an
item will be damaged or become unreadable. Place a new label on the item. Then delete the old
barcode number from the Bibliographic subtab, and scan or type the new number. Select Save. All
transactions using the old number will be updated automatically. The barcode number in the MARC
record will also be changed. (It is also possible to change a barcode number through the Cataloging
module, but you must use the correct procedure -- you cannot simply overtype the barcode number. )
Library•Solution Circulation
2. Main Circulation Tabs
CIRC-52
Contents
Index
2.3.3 Vendor Subtab
The Vendor subtab (Figure 2-40) contains available vendor information and options to link items to
new vendors. Use the Link to Vendor button to identify an item's vendor (supplier or distributor). For
example, you can specify which vendor sold the library a piece of equipment like a projector. Use
Remove Link to disassociate an item from a vendor.
To link to (or remove link from) a Vendor:
1. On the Item/Title Info tab (F4) search for and select a title, and then select an item in the Item
ID drop-down list.
2. Select the Vendor tab. Select the Link To Vendor button.
3. In the Search for Vendor window (Figure 2-41), search for the vendor by name or code. Select
a vendor and click OK. The vendor's code number and name will appear on the left side of the
Vendor tab.
4. To remove the link, select the
Remove Link button.
Note: Vendor records are setup using
the L.S. Vendor Editor. See section 8.6
Vendor Editor for more information.
Figure 2-40. The Vendor subtab
Library•Solution Circulation
2. Main Circulation Tabs
CIRC-53
Contents
Index
figure 2-41. The Search for Vendor window
Library•Solution Circulation
2. Main Circulation Tabs
CIRC-54
Contents
Index
Display of "Bound With" Titles
In Library•Solution you can easily determine which title is the
"primary" title that has one or more titles bound to it, and which
titles are bound to the main title.
Figure 2-42 shows the primary title on the F4 Item/Title
Information tab. Notice the Bnd w/ button on the Circulation
tab of the Item Record.
To see a list of the titles bound to the main title, click the Bnd
w/ button. The Bound Titles window appears (Figure 2-43),
listing the other titles.
To see the record for either of these subsequent titles, search
for one of them by typing it in the Item/Title search box at the
top of the F4 tab. During the search, notice that the
CircCollection column in the Title Lookup window (partially
shown in Figure 2-44) contains the word BOUND. This is an
immediate clue that this title is bound to another. Select the
title.
Figure 2-42. Primary title on the F4 Item/Title Information tab
Figure 2-45 shows the "second cat..." title that is bound to the
primary title. Notice the Bnd to button on the Circulation tab of
the Item Record.
To view the record to which this title is bound, simply click the
Bnd to button, and the "primary cat..." record will be displayed.
Figure 2-43. Bound Titles window
Library•Solution Circulation
2. Main Circulation Tabs
CIRC-55
Contents
Index
Figure 2-44. Title Lookup window
Figure 2-45. The "second cat..." title that is bound to the primary title
Library•Solution Circulation
2. Main Circulation Tabs
CIRC-56
Contents
Index
2.3.4 Item Fields Subtab
Use the Item Fields subtab (Figure 2-46) to enter special information you want to have associated with
selected items.
To view or enter Item Field data:
1. On the Item/Title Info tab (F4) search for and select a title, and then select an item in the Item
ID drop-down list.
2. Select the Item Fields tab. If any Item Fields have been set up, the fields are listed under Field
on the left. If codes or data have been entered for a field for this item, this will be displayed in the
Value column.
3. To enter data, select a field. Then
click in the Value area. If codes
have been defined for this field, a
drop-down list will appear. Select a
value.
In the example shown in Figure 2-46, the
Value for the Item Field "Bulb type" for
the selected title/item (a projector) is
"500W."
To learn how to set up Item Fields, click
here.
To learn how to delete item or title
records, click here.
Figure 2-46. The Item Fields subtab
Library•Solution Circulation
2. Main Circulation Tabs
CIRC-57
Contents
Index
2.4 Messages Button
The Messages (envelope icon) in the upper right of the Patron Transactions tab alerts you to the
presence of system messages (Figure 2-47). The number of waiting messages is also displayed.
Select the Messages menu, Check Messages option to view the Messages window (Figure 2-48).
Typical messages are concerned with inter-library requests, reminders to send items to another library,
and to place items on the "arrived" holds shelf.
If you wish to print a list of the messages, a "Messages List" report is available in the Reports module.
This report will print all messages from a specified date to the present. To delete a message, select the
message line and then the Delete button. You can select multiple messages:
• Multiple non-sequential selections may be highlighted for deletion by pressing and holding the Ctrl
key, while clicking the Time field for each item to be deleted.
• Sequential items can be deleted by pressing and holding the Shift key, and clicking the Time field
of the first and last items of the list to be deleted.
• When all desired items are highlighted, releast the Shift or Ctrl key and press the Detete button.
WARNING: Be certain that all messages being deleted have actually been handled. There is no Undo
function after messages are deleted.
Figure 2-47. Upper portion of
Patron Transactions tab
showing Messages icon in upper
right
Library•Solution Circulation
2. Main Circulation Tabs
CIRC-58
Contents
Index
Figure 2-48. The Messages window
Library•Solution Circulation
2. Main Circulation Tabs
CIRC-59
Contents
Library•Solution Circulation
2. Main Circulation Tabs
Index
CIRC-60
Contents
Index
3. Setup Menu options
Use options on the Setup menu to control various types and codes, such as Patron Types, the
circulation "rules" (checkout periods, overdue fines, etc.), Charge Types to control payments, and
(optional) user-defined fields in borrower records. You can also assign or change local library
passwords, define some library-specific Circulation options such as the calendar for open and closed
days and hours, overdue notice intervals, prefixes for on-the-fly record control numbers, user security,
and much more.
Important! Before the Library·Solution system is installed, TLC sets most Setup options for your
library system, based on the specifications submitted by the library during the implementation process.
Before you check out items for the first time, you may wish to review the setups.
Note: Some aspects of Circulation operations are controlled by the Library·Solution System
Configuration, outside of the Circulation Setup. Use the System Configuration to add new holdings
codes, change PAC or Circulation displays of libraries and collections, and set up system Users
(access security). Any user who needs access to certain Circulation Setup options, such as Security
Setup and Branch setup, must be assigned the Circulation Role of "Circulation Administrator." More
detailed Circulation privileges are set in Circulation's Setup | Security Setup section.
3.1 Types and Codes
Use the Types and Codes submenu of Setup to define system-wide codes for Charge Types, Patron
Types, and user-defined Patron Fields. You must also use the Patron Type Setup to define or modify
the circulation "rules" for each Patron Type checking out each type of item (as defined by holdings
codes). If you want to use the course reserves features, you will also need to set up Department and
Course codes in Setup | Types and Codes.
Library•Solution Circulation
3. Setup Menu options
CIRC-61
Contents
Index
3.1.1 Charge Types
Select the Charge Types option to display the Charge (Payment Type) Codes window (Figure 3-1),
where you can establish codes for the types of payments your library can accept as Charges. Establish
a different type for each kind of charge you wish to track in reports.
Default Charge Type codes: In the initial setup, five (5) system-supplied codes are included as
defaults. These are described as "System Code (Read Only)." You cannot edit or delete the following
codes:
•
•
•
•
•
OT: Other Charge
D: Damaged
L: Lost
OV: Overdue Items
RF: Rental Fee
Figure 3-1. The Charge (Patron Type) Codes window
To set up new Charge Types:
1. Select Setup from the menu bar at the upper left of the Circulation window. Select Types and
Codes, and then Charge Types.
2. To view a list of default and other existing Charge Type codes, click the down arrow beside the
Charge Type list box. Select a code to view its Description.
3. To add a code, type the code in the Charge Type text box. Press Tab or click in the Description
text box, and type a meaning for the code. Then click the Add New button.
4. When you have finished adding or editing, click Done.
Library•Solution Circulation
3. Setup Menu options
CIRC-62
Contents
Index
3.1.2 Patron Types
Use the Patron Type setup option to display the Patron Type Setup window (Figure 3-2), where you
can define codes for the types of borrowers your library serves, modify or delete setups for existing
types, and define the specific circulation "rules" (checkout policies, overdue fines, etc.) for each Patron
Type checking out each type of item (defined by holdings codes).
To add or modify Patron Types:
1. Select the Setup menu, then Types and
Codes, and then Patron Types.
2. To view existing Patron Type codes,
select the down arrow beside Patron
Type. To change the entries about an
existing type, select that type, and then go
to step 5 below.
3. To add a new Patron Type, type the new
code in the Patron Type field. If another
code is already displayed, click the field to
highlight it, and then type the new code.
Codes can consist of letters and/or
numbers, up to a maximum of 10
characters (but do not use spaces).
As soon as you type a new code, a
message appears to the right in red: "New
Patron Type." Also, the NEW button on
the right becomes "available."
4. If this Patron Type will be used for
Outreach Services patrons, click in the
check box under the Patron Type field
label.
Library•Solution Circulation
Figure 3-2. The Patron Type Setup window
3. Setup Menu options
CIRC-63
Contents
Index
5. Press the Tab key to move the cursor to Informative Description, and type a description.
6. Use Tab to move from field to field. Enter any other needed information. The only required fields
are Patron Type, Description, and Hold Priority (if in doubt, enter "5" as default).
Some fields have check boxes to the left of the field, for example, Max Fine Balance. To use a
field with a check box, select the check box (check mark appears), and then enter a value in the
text box. Please note that even if a value appears in the text box, the field is not active unless
the check mark appears.
7. To save a new Patron Type, select the NEW button. If you modify an existing type, select SAVE.
To delete a Patron Type code, select DELETE.
Caution: The system will not permit you to delete a Patron Type when there are borrower
records using that Patron Type code.
8. Now go to the lower portion of the Patron Types window, and set the Circulation rules
Use the Circulation Rules section to link each Patron Type with each type of item in the library (as
defined by holdings codes). The rules determine which Patron Types can check out what type of item
for what checkout period, overdue fines, etc. To review your current settings easily, print a report of the
current rules setup. On the Start menu, select Library.Solution Reports. Select the File menu,
Open, and select the report Rules Matrix.rpt. (Caution: If your system has many Patron Types,
Holdings Codes, and Branches, this could be a lengthy report.)
To set up or modify Circulation Rules:
1. Select that Patron Type.
2. Select the holdings code for which you wish to modify the checkout rules. To view the list of
holdings codes, click the down arrow beside the field, or click the right or left arrow buttons
further to the right of the field. These buttons access the first code in the list, the previous, next,
or the last code. A description of the holdings code is displayed.
Library•Solution Circulation
3. Setup Menu options
CIRC-64
Contents
Index
3. Press the Tab key to move to the rule field to be changed, or click the field you want. Make any
necessary changes. Refer to the field guidelines described below.
4. Important! Before you select another holdings code to view or edit, save the changes you have
made by selecting the Save Rules button.
5. If you wish to copy the set of rules (for the Patron Type checking out this Holdings Code) to
another Holdings Code, select the Copy button. Select the next Holdings Code, and then
select Paste. Then select Save Rules.
6. After you have finished making all changes, select Done.
Circulation Rules fields
• Holdings Code: When TLC builds your library's initial Library·Solution database, your holdings
codes are loaded into the initial Circulation Rules setup, along with rules based on your
specifications. You may want to review the initial setup before you check out items to borrowers
for the first time. If you need to add new holdings codes, use the Library·Solution System
Configuration. Call TLC Library·Solution Support for help.
• Due Date Intervals in: Days, Hours, or Minutes: Select the unit of time to be used in
calculating the check out period, renewal check out period, and "finable units."
• Check Out (check box): If an item with this holdings code can be checked out by a borrower of
the selected type, select this check box.
• Check Out Limit: Use this field to enter the maximum number of items of this Holdings Code
that this Patron Type can have checked out at any time. When the borrower attempts to borrow
an item of this type which would cause the total number of this type the borrower has checked
out to exceed the limit, a checkout block will occur. To set a checkout limit, activate the field by
selecting the check box, and then enter a value.
If borrower is not allowed to check out this type of item at all, enter 0. If there is no limit on the
number of items of this Holdings Code allowed to be checked out, do not select the check box.
Library•Solution Circulation
3. Setup Menu options
CIRC-65
Contents
Index
Note: It is a good idea to enter a default checkout period, fines, etc. anyway. These checkout
policies will then be used if authorized staff decide to override a checkout block and allow the
loan.
Comparison note: Check Out Limit in the Patron Type setup is an overall limit on the number
of items allowed to the Patron Type, with no regard to the types of items (holdings codes)
checked out.
• Check Out Period: Enter the checkout period in days, hours, or minutes, depending on the Due
Date Interval selection above. Please note that the due date (or time) will fall only on open days
(or hours or minutes). The library's calendar of open/closed days or hours is controlled by the
Calendar Configuration.
• Check Out Due Time: When the Due Date Interval is in days, activate the field by selecting the
check box. Set the recommended default time: 11:59 p.m.
Caution: For checkout periods of hours or minutes (any period less than one day), for example,
a 1-hour loan (60 minutes), do NOT activate Due time (or Renewal Due time).
• Renewal (check box): If an item with this holdings code can be renewed by a borrower of the
selected type, select this check box.
• Renewal Limit: Renewal Limit is a limit on the number of times an item of this type can be
renewed by this Patron Type. (This is NOT a limit on how many items can be renewed.) To set a
limit on the number of times an item can be renewed, activate the field by selecting the check
box. If the item should not be renewed at all, enter 0. If there is no limit on the number of
renewals, do not check the check box. Note: Items with pending holds cannot be renewed
without entering an override password.
• Renewal Period: Enter the checkout period allowed for a renewal. Enter in days, hours, or
minutes, depending on the Due Date Interval selection above. (Note: The renewal due date or
time is calculated from the date or time renewed, not from the date or time the item was originally
due.)
• Renewal Due Time: When the Due Date Interval is in days, activate the field by selecting the
check box. Set the recommended default time: 11:59 p.m.
Library•Solution Circulation
3. Setup Menu options
CIRC-66
Contents
Index
Caution: For check out intervals of hours or minutes, for example, for a 1-hour loan (60 minutes),
do NOT activate Due Time or Renewal Due Time.
• Fines Calculated By: Select the method to be used for calculation of overdue fines when you
want the library's open or closed days/hours to be considered. (The open/closed days and hours
are defined in the Calendar Configuration. Calculating fines based on open days only is
optional.) Select an option from the Fines Calculated By choice list.
• Fine: Enter the overdue fine to be charged for every day or finable unit. Type the amount in
dollars and cents (no dollar sign necessary). Examples: One dollar = 1.00 ; ten cents = .10
• [:="Finable Unit" of time: overdue fine interval]: displayed after the word Fine as: ...for every
[number of designated units]. The unit of time (days, hours, or minutes) of the finable unit is the
same as selected in the Due Date Interval field above. Specify the number of time units in the
finable unit.
Note: If the Fines Calculated By selection is one of the daily choices (All Days, Business Days
Only, or All Days No Nearby Closed), then the custom finable unit is not available. The fine will
be ...for each day.
Tip: If your Due Date Interval is in Days, and you need a finable unit that is more than one day,
then choose All Periods in Fines Calculated By. Then you will be able to specify a number of
days. For example, the fine may be $1.00 for every 3 days overdue.
• Maximum Fine Per Transaction: To set a maximum fine per transaction (for this Patron Type
checking out an item of this Holdings Code), activate the field by selecting the check box. Enter
the maximum fine (in dollars) that can be charged for an overdue item.
Comparison note: The Fine Limit established in the Patron Type setup is a limit on unpaid
charges that causes a checkout block. The Max Fine Balance in the Patron Type setup may be
relevant in the calculation of overdue fines.
• Send Overdue Notices: This field controls whether or not overdue notices are printed for a
specific Patron Type checking out a specific Holdings Code. To produce notices, select the
Library•Solution Circulation
3. Setup Menu options
CIRC-67
Contents
Index
check box (check mark should appear). To turn off notices, select the check box again (to
remove the check mark).
Note: The number of notices to be produced and the interval between notices are configured in
the Setup | Branch Setup.
• Override Due [Date]: Use Override Due date to set a fixed due date which would override the
due date normally calculated by the Circulation rules. To activate the field, select the check box.
Enter the date in this format: dd/mm/yyyy (do type the slashes), and a default time of 11:59 pm,
like this example: "03/01/1999 11:59 pm"
Comparison note: Due no later than [date] in the Patron Type setup is a slightly different kind
of override. It applies to a specific Patron Type checking out any kind of item. Normal checkout
periods apply, except that items will be due no later than the specified date.
• Override Grace Period: Use this field to set a specific grace period for a particular Patron Type
checking out a specific Holdings Code. To use an override grace period, activate the field by
selecting the check box. The override grace period uses the same finable units as specified in
Fine ... for every [finable unit] described above. (In contrast, the grace period setups in Patron
Type and in Branch Setup are in days only.)
Comparison note: Grace Period in the Patron Type setup allows a grace period (in days)
specific to the Patron Type, with no consideration of the type of item checked out. There is also a
default Grace Period (also in days) in the Branch Setup. The system uses this if no grace periods
are set up in the Circulation Rules or in the Patron Type setup.
Library•Solution Circulation
3. Setup Menu options
CIRC-68
Contents
Index
3.1.3 Patron Fields
Select the Patron Fields option to display the Patron Fields, Codes, and Descriptions window
(Figure 3-3), where you can define special information fields to be entered in Patron Records. You can
set up as many fields as necessary. Define field names, type of data to be entered in the field (whether
codes or free text), and whether or not the data is to be used in statistical reports. The fields are
displayed in the Patron Record tab (Patron Transactions) on the subtab labeled Patron Fields.
Note: If your library's borrower data was converted into Library·Solution format from another system,
such as BiblioFile Circulation, the borrower fields in Circulation may have the same names as the fields
in your other system. If you used codes in those fields, for example, in the Census field, you will need
to reenter the codes in your initial Circulation setup.
To set up Patron Fields:
1. Select the Setup menu, Types and Codes, and then Patron Fields.
2. The entry window is divided into two parts. On the upper
half is the Field Name, and just under that the setup for
the type of data to be entered in the field (codes or free
text). On the lower half are the codes (if any) for that field.
The first field is displayed by default. To view the Field
Name of any Patron field previously entered, use the first
four buttons on the upper toolbar to look for the First (first
field), Prior, Next, or Last field.
When a Field Name is displayed, view the codes (if any)
for that field in the Value and Description fields on the
lower part of the window. Use the lower toolbar to find the
First, Prior, Next, or Last codes for the selected field.
Figure 3-3. The Patron Fields, Codes, and Descriptions window
Library•Solution Circulation
3. Setup Menu options
CIRC-69
Contents
Index
3. To insert a new field, select the New Code button to display the Define New Patron User Field
window (Figure 3-4).
Enter a Field Name. (Suggestion: Enter name in all UPPER
CASE, since case affects the sorting of names in the saved list.)
To determine the type of entries allowed for this field and how the
information can be used, select appropriate check boxes for
Coded, Strict, or Statistics. If no boxes are checked, the entries
are "Free" text.
– Coded: User may choose from a list of library configured
codes AND may "make up" a new code by typing it in the
field.
– Strict: User may ONLY select codes from the library
Figure 3-4. The Define New Patron User Field window
configured codes list.
– Statistics: Whenever a checkout is recorded for a borrower the contents of this field will be
recorded in the statistics table so that reports can be run for this field. If you want to report
out on any Patron Field, select For Statistics.
If you make any changes in the field name or type of coding, select the Post (check mark) button
on the upper toolbar. Note: You can enter up to 250 characters for each field name and code,
but for easier viewing, a lower number is recommended.
4. If you selected Coded, insert a code for a selected field by selecting the Insert button on the
lower toolbar. To delete a code, select Delete.
5. If you add a code or make any change or deletion, select the Post button on the lower toolbar.
Note: The system will not allow you to delete a field or code if any borrower record currently
includes the field or code.
Library•Solution Circulation
3. Setup Menu options
CIRC-70
Contents
Index
3.1.4 Item Fields
Select the Item Fields option to display the Item Fields, Codes, and Descriptions window (Figure
3-5), where you can define special information fields to be associated with selected items. The fields
can be used for any kind of item data, like the name of a donor, a fund, information about a piece of
equipment (like the light bulb type for a projector), etc. You can set up as many fields as necessary:
define field names and the type of data to be entered in the field (codes or free text).
The fields are displayed on the Item/Title Info tab (F4), under Item Information, on the Item Fields
tab for a selected item (barcode number).
To set up Item Fields:
1. Select the Setup menu, Types and
Codes, and then Item Fields.
2. The entry window is divided into two
parts. On the upper half is the Field
Name, and just under that the setup for
the type of data to be entered in the
field (codes or free text). On the lower
half are the codes (if any) set up for that
field.
When you open the setup window, the
first Item Field is displayed by default.
To view other Field Names, use the
first four buttons on the upper toolbar to
look for the First (first field), Prior, Next,
or Last field
When a Field Name is displayed, view
the codes (if any) for that field in the
Value and Description columns on the
Library•Solution Circulation
Figure 3-5. The Item Fields, Codes, and Descriptions window
3. Setup Menu options
CIRC-71
Contents
Index
lower part of the window. Use the lower toolbar to find the First, Prior, Next, or Last codes for the
selected field.
3. To insert a new field, select the New Code button.
In the Define New Item User Field box, enter a New Field Name.
To determine the type of entries allowed for this field and how the information can be used, select
appropriate check boxes for Coded or Strict. If no boxes are checked, the entries are "Free"
text.
– Coded: User may choose from a list of library configured codes AND may "make up" a new
code by typing it in the field.
– Strict: User may ONLY select codes from the library configured codes list.
If you make any changes in the field name or type of coding, select the Post (check mark) button
on the upper toolbar.
Note: You can enter up to 250 characters for each field name and code, but for easier viewing, a
lower number is recommended.
4. To insert a code for a selected field, select the Insert button on the lower toolbar. To delete a
code, select Delete.
5. If you add a code or make any change or deletion, select the Post button on the lower toolbar.
Note: The system will not allow you to delete a field or code if any item currently includes the
field and a code.
Library•Solution Circulation
3. Setup Menu options
CIRC-72
Contents
Index
3.1.5 Outreach Fields
Select the Outreach Fields option to reach the Outreach Fields, Codes, and Descriptions window
(Figure 3-6), where you can define special information fields to be entered in Patron Records. You can
set up as many fields as necessary. Define field names, type of data to be entered in the field (whether
codes or free text), and whether or not the data is to be used in statistical reports. The fields are
displayed in the Patron Record tab (Patron Transactions) on the subtab labeled Outreach Services.
To set up Outreach Fields:
1. Select the Setup menu, Types and
Codes, and then Outreach Fields.
2. The entry window is divided into two
parts. On the upper half is the Field
Name, and just under that the setup for
the type of data to be entered in the field
(codes or free text). On the lower half
are the codes (if any) for that field.
The first field is displayed by default. To
view the Field Name of any Outreach
field previously entered, use the first
four buttons on the upper toolbar to look
for the First (first field), Prior, Next, or
Last field
When a Field Name is displayed, view
the codes (if any) for that field in the
Value and Description fields on the
lower part of the window. Use the lower
toolbar to find the First, Prior, Next, or
Last codes for the selected field.
Library•Solution Circulation
Figure 3-6. The Outreach Fields, Codes, and Descriptions window
3. Setup Menu options
CIRC-73
Contents
Index
3. To insert a new field, select the New Code button. The Define New Outreach User Field
window will be displayed (Figure 3-7). In the New Field Name box, enter a Field Name.
(Suggestion: Enter name in all UPPER CASE, since case affects the sorting of names in the
saved list.) See Figure 3-8 for examples of typical outreach fields.
To determine the type of entries allowed for this field and how the information can be used, select
appropriate check boxes for Coded, Strict, or Statistics. If no boxes are checked, the entries
are "Free" text.
– Coded: User may choose from a list of library configured codes AND may "make up" a new
code by typing it in the field.
– Strict: User may ONLY select codes from the library configured codes list.
– Statistics: Whenever a checkout is recorded for a borrower the contents of this field will be
recorded in the statistics table so that reports can be run for this field.
Note: You can enter up to 250 characters for each field name and code, but for easier
viewing, a lower number is recommended.
4. To insert a code for a selected field, select the Insert button on the lower toolbar. To delete a
code, select Delete.
5. If you add a code or make any change or deletion, select the Post button on the lower toolbar.
Note: The system will not allow you to delete a field or code if any borrower record currently
includes the field or code.
For more information on Outreach Services, see Section 3.6 Outreach User PAC Setup and
Section 8.4 Outreach Manager.
Library•Solution Circulation
3. Setup Menu options
CIRC-74
Contents
Index
Figure 3-7. The Define New Outreach User Field window
Figure 3-8. Sample Outreach Services tab with typical fields
Library•Solution Circulation
3. Setup Menu options
CIRC-75
Contents
Index
3.1.6 Department Codes
Select the Department Codes option to display the Department Codes window (Figure 3-9), where
you can define codes for academic departments, such as "English," to be used when placing items on
reserve. You can set up as many departments as you need. Define a code for the department and a
free text description.
Note: Reserves are materials set aside for a special use by a borrower (usually an instructor in an
academic library), for example, for required reading for a course. Circulation staff can also use
reserves to specify special shelving locations, for example, for "New Books" or seasonal displays such
as "Halloween Books." Special checkout periods and overdue fines are usually assigned to the items.
A reserve is not the same as a "hold."
The fields are displayed on the Reserves tab of the Patron Transactions tab when you place or view a
reserve for a selected borrower (e.g., a course instructor). They are also used in reports. In addition to
Department Codes, you should define Course Codes to be used along with the Department Codes.
To set up Department Codes:
1. Select the Setup menu, Types and Codes, and
then select Department Codes.
2. To view a list of existing codes (if any), click the
down arrow to the right of the Department edit
box. Select a code to view its Description.
Figure 3-9. The Departmentment Codes window
Library•Solution Circulation
3. Setup Menu options
CIRC-76
Contents
Index
3. To add a new code, type the code, up to a maximum of 20 characters. As soon as you start
typing a previously unknown code, the Add New button becomes available, and the message
New Type Code is displayed in red at the right.
4. After typing the code, press the Tab key to move to Description, or click in that field. Enter a
description for the department, up to 250 characters (a brief description is recommended).
5. If you edited the Description of a current code, select Save. If you added a new code and
description, select Add New to save it. If you wish to delete a code, select Delete. To exit the
setup after saving, or to exit without saving changes, select Done.
Library•Solution Circulation
3. Setup Menu options
CIRC-77
Contents
Index
3.1.7 Course Codes
Select the Course Codes to display the Course Codes window (Figure 3-10), where you can define
codes for academic courses, such as "Eng 100," to be used when placing items on reserve. You can
set up as many codes as you need. Define a code for each course and a free text description.
The fields are displayed on the Reserves tab of the Patron Transactions tab when you place or view
a reserve for a selected borrower. They are also used in reports. You should also define Department
Codes to be used along with the Course Codes.
To set up Course Codes:
1. Select the Setup menu, Types and Codes, and then select Course Codes.
2. To view a list of existing codes (if any), click the down arrow to the right of the Course edit box.
Select a code to view its Description.
3. To add a new code, type the code, up to a maximum of 20 characters. As soon as you start
typing a previously unknown code, the Add New button becomes available, and the message
New Type Code is displayed in red at the right.
Figure 3-10. The Course Codes window
Library•Solution Circulation
3. Setup Menu options
CIRC-78
Contents
Index
4. After typing the code, press the Tab key to move to Description, or click in that field. Enter a
description for the Course, up to 250 characters (a brief description is recommended).
5. If you edited the Description of a current code, select Save. If you added a new code and
description, select Add New to save it. If you wish to delete a code, select Delete. To exit the
setup after saving, or to exit without saving changes, select Done.
Library•Solution Circulation
3. Setup Menu options
CIRC-79
Contents
Index
3.1.8 Uncataloged Collections
Select the Uncataloged Collections option to display the Uncataloged Collections window (Figure
3-11), where you can establish codes for any groups of uncataloged items (i.e., items not barcoded)
that you wish to check out for statistics only. For example, many libraries have paperback collections
that are not cataloged or barcoded. It is not necessary to add the Circulation "rules" or configure
displays in the System Configuration, since Uncataloged Collections codes are not real holdings
codes.
To set up Uncataloged Collection codes:
1. Select Setup from the menu bar at upper left of the Circulation window. Select Types and
Codes and then Uncataloged Collections. The name of the current library is displayed, that is,
the library currently selected in: Setup | Local Configuration | Station Options.
2. Type a new collection code (up to 20 characters). The Add New button becomes available. Tab
to the Description field and type a description.
3. To save a new code, click Add New. If you are modifying an existing code's description, click
Save.
Figure 3-11. The Uncataloged Collections window
Library•Solution Circulation
3. Setup Menu options
CIRC-80
Contents
Index
3.2 Branch Setup
Select the Branch Setup option to reach the Branch Level (System) Configuration window (Figure
3-12), where you can define several basic functions and default settings for each library. These options
include security passwords, overdue notice intervals, default values for grace period, "long overdue"
items, checkin lag period, holds and borrower card expiration dates, a prompt to delete on-the-fly
Circulation records, the default maximum fine value, and more. When Library•Solution is first
installed, certain defaults are already entered based on information from your library's implementation.
To complete the Branch Setup:
1. Click Setup | Branch Setup option.
2. The Enter Supervisor Password window may
appear (if you are not logged in to the database
as an administrator user). Type the Supervisor
Password if requested. Click Try, or press
Enter.
Note: If you do not know the default Supervisor
Password, first try simply pressing Enter to
bypass the security window. If this works, it
means no passwords have been defined yet.
3. The Branch Level (System) Configuration
window will open. The options are grouped on
four tabs: Security (below), Defaults,
Fines/Overdues, and Misc.
4. After you make changes or additions, click OK.
Library•Solution Circulation
3. Setup Menu options
Figure 3-12. The Branch Level(System) Configuration window
CIRC-81
Contents
Index
Note to supervisors: If you wish to define the setup for another library by working at this
station, go to Setup | Local Configuration | Station Options. Change the library. Caution! After
making configuration changes, be sure to change the Station Options setting back to this library!
3.2.1 Branch Setup: Security Subtab
Enter your own passwords in the Override and Supervisor password boxes (Figure 3-12). Your staff
will use these to override blocks and to gain supervisor access to certain secured functions (like the
Branch Setup). Enter up to 8 characters (letters, numbers, and/or punctuation marks are allowed, but
begin with a letter). If you do not wish to use passwords, leave the fields blank. (Then, any time the
system requests a password, users could click OK or press Enter to exit the password request
window.)
Library•Solution Circulation
3. Setup Menu options
CIRC-82
Contents
Index
3.2.2 Branch Setup: Defaults Subtab
The following fields can be edited from the Defaults subtab of the Branch Setup (Figure 3-13):
• Grace Period: Enter the number of days an item is allowed to be overdue before a fine is
imposed. For no grace period, enter 0. If there is no grace period in the Circulation Rules or
the Patron Type setup, and if a grace period has been established in the Branch Setup, then
that grace period will be used.
• Check-In Lag Period: Define the number of days after checkin before items are usually back on
the shelves. If any lag period is configured, then when an item is checked in, the Item Status
code becomes "S" for "reshelving," and a special status display appears in PAC. If items are
usually available for checkout the same day as they were checked in from previous loans, enter
0 here. The purpose of this option is
to allow time for reshelving before the
Public Access Catalog (PAC) displays
shelf status for the item as "available."
• Hold Expiration: This option is to be
used to control the number of days a
hold remains Pending before it
displays on a report of Holds by Type.
• Card Expiration: Enter a default
number of days a new borrower's
registration will be active before
expiration. To change the date or
extend a specific borrower's
registration, go to the Patron
Transactions tab, Patron Record,
Basic Info tab.
Library•Solution Circulation
Figure 3-13. The Defaults subtab
3. Setup Menu options
CIRC-83
Contents
Index
• Card Exp[iration] Warning: Enter the number of days to be used in a message warning to
Circulation staff that a borrower's card is almost expired.
• OTF Prefix: Enter a three-letter prefix to be used for control numbers of Item/Title records that
Circulation staff add to Circulation on-the-fly.
• Delete OTF on Check-in: Check this box if you want Circulation staff to see a special message
during Check In, whenever they check in an item that was added to Circulation on-the-fly. The
message will ask if you want to delete the item and title from the database. (This option makes it
easy to delete items that Circulation staff added for a single checkout.)
• Force OTF Validation: Check this box if you want all records added to Circulation on-the-fly to
require ISBN/ISSN validation.
• On Shelf Holds to HD Status: This check box determines the default Item Status and Hold
Status codes that will be automatically assigned to an item owned (or circulated) by your library
when the title is placed on hold, and when there are copies "available" on the shelf at your
library. When such a hold is placed through the Circulation module, the system picks a copy to
fill the request, but the status codes that are assigned will be different, depending on the setting
in this Branch Setup check box. (See Note on PAC Holds below. The current version of PAC
disregards this setting.)
When this check box is checked (the initial default), such items will be assigned an "HD" (on
hold) Item Status and an "AR" (hold has arrived) Hold Status. (This assumes the item is located
on the "arrived" holds shelf, when in fact it is actually probably still in its regular shelving location.)
TLC recommends the unchecked option. When the check box is NOT checked, the items are
given an in-transit Item Status (status code "T") and a Holds Status of pending ("PE").
Then when you are placing a hold in Circulation (on an item at your library, when the item is
available), a message will appear on the screen listing the item, barcode, and call number and
reminding you to go to the shelves to retrieve the item, and then check it in at this library. When
it is checked in, it will receive an arrived ("AR") hold status.
Library•Solution Circulation
3. Setup Menu options
CIRC-84
Contents
Index
There are two important advantages to using the unchecked setup option: an arrived Holds slip
will be printed for the item, and in case the item was not found on the shelf, other action can be
taken without having to cancel an "AR" arrived hold.
If a shelved title level hold item is checked out to another borrower and you attempt a Special
Status check in of the item, this message will display: "Were you looking for this item because a
system message requested it to fill a hold?" If you click Yes the system will attempt to find
another copy of the item to fill the hold or change the hold's status to PE. Also a message will be
generated advising you to retrieve another copy and check it in.
If you check out an item with an HD status to a borrower other than the person who held the title,
an Arrived Hold Override form will display. Select the original borrower from the list and click the
Change Status to PE button. The Hold Replacement form will display. Select the "System
Selects Item fo Fill Hold" option and click OK. You will be advised to retrieve the second copy of
the item and check it in. This can now be checked out to the original borrower.
• Do not store ID of Last Patron to have an item: This check box allows your library to record
(or not record) the Patron ID (barcode number) of the last borrower to check out an item (after it
is checked in). This information would appear on the Item/Title Info F4 tab, on the Circulation
tab on the lower left, in the Last Patron ID field.
By default, this Branch Setup check box is not checked. This means that the last borrower ID
WILL be recorded. If you do not want this information to be recorded for your library, click the
setup check box to insert a check.
• Show 'NO ITEMS' on Title Hit List: If enabled and the Local Titles Only option in checked in
Station Options, users can still see ALL titles in the database but the "NO ITEMS" display will
appear beside titles belonging to other libraries.
• Turn on Local History: If Loan History is configured for this library checking this box will cause
the Loan History box to be checked when a NEW borrower record is added. Existing borrower
records (added before checking this box) are NOT affected by this action.
Library•Solution Circulation
3. Setup Menu options
CIRC-85
Contents
Index
• Turn on Fine History: If Fine History is configured for this library checking this box will cause
the Fine History box to be checked when a NEW borrower record is added. Existing borrower
records (added before checking this box) are NOT affected by this action.
• Loan History Clearing: This Branch Level setting works in conjunction with the Patron Record
| Configuration tab, Record Loan History Statistics setting. If Loan History Clearing is
selected and you uncheck the Record Loan History Statistics setting, you will be warned that
"All loan history for this borrower will be deleted. Is that what you want to happen?" If Loan
History Clearing is not checked, the warning will not display and the deletion will occur.
Library•Solution Circulation
3. Setup Menu options
CIRC-86
Contents
Index
3.2.3 Branch Setup: Fines/Overdue Subtab
The following information can be edited in the Fines/Overdue subtab (Figure 3-14)
• Pay Local Fines Only: Each library can choose to accept only the fines/charges that are due at
the library, or accept charges due at any/all libraries. By default, the option in Branch Setup is
checked, meaning this library can accept only the charges due to this library. To allow this library
to accept charges due to any library, click the check box in Branch Setup to remove the check
mark.
Note: The Circulating Branch of an item (not the Owning Branch) controls where the charges
are due. You can view the Circulating library for a specific item on the Item Information
(Bibliographic tab) area on the F4 Item/Title Information tab.
Figure 3-14. The Fines/Overdue subtab
Library•Solution Circulation
3. Setup Menu options
CIRC-87
Contents
Index
• Default Lost Fine: In the Branch Setup window, enter a default dollar value to be charged for
lost items for which no price is entered in the item record. The maximum fine that ever can be
charged for an individual transaction is the value of the item, so if there is no price in the item
record, the program uses the Default Lost Fine for that maximum.
Note: If the value in this field is zero ($0.00), this means no fine could ever be charged if there is
no price in the item record. Thus, you should set this figure high enough to accommodate the
largest fine anticipated by the library. Then use the Circulation Rules area of the Patron Type
setup to set individual maximum fines that are less than the Default Lost Fine amount.
• Number of notices: Enter the maximum number of overdue notices to be produced for an
overdue item. Type a number between 0 (meaning no notices will be printed) and 30 (meaning a
maximum of 30 notices).
• Days between notices: Enter the number of days between each notice.
• Notice and Charge fields: Use this combination of fields if you want to specify that borrowers
should be charged a fee for a specific overdue notice (first, final, etc.) or charged each time a
notice is sent. The Notice field will automatically include the same value that you entered in the
Number of Notices field. For example, if you entered 4 in Number of Notices, the list beside
Notice will include 4 entries (1, 2, 3, 4). If you want a charge to be applied with a certain notice
number, select the number in the Notice box. Then type the amount in the Charge box. Repeat
for each notice for which you want a fee to be charged.
For example, if you select 2 in the Notice box and type 1.00 in the Charge box, and then select 4
in the Notice box and type 2.00 in the Charge box, borrowers will be charged a fee of $1.00 for
the second notice and $2.00 when the fourth overdue notice is sent. (The charges are applied
when the Generate Overdues program is run.)
• Charge New Card Fee: Click the check box (to insert a check mark) beside this field when you
want borrowers to be charged when new cards are issued or borrower barcode numbers are
changed. If the box is checked, type the amount of the charge. A red information message
appears under these fields in the Branch Setup, for example "You will be prompted to apply the
New Card Fee when adding a new borrower or changing at Patron ID."
Library•Solution Circulation
3. Setup Menu options
CIRC-88
Contents
Index
If this option is turned on, when Circulation staff add a new borrower or change a borrower's
barcode (Patron ID), a message box appears, asking "Charge New Card Fee?" Staff can select
Yes or No. If Yes is selected, the set fee is added to the borrower's Charges tab total.
• Long Overdues - Days: Use the check box and the entry box beside it to set up a borrower
block message. To turn on this feature, click the check box on the left (so a check mark
appears), and then type a number in the box on the right. This is the number of days an item
must be overdue before it is considered to be Long Overdue and will thus produce the borrower
block.
The block will be displayed in the Blocks area of the F2 Patron Transactions tab if the
currently selected borrower has an item overdue for the designated number of days. (The
overdue item must be owned or circulated by the local library, that is, the library currently
selected in the Local Configuration: Station Options of Setup.)
If this check box is NOT checked, the check boxes and entry boxes in the Automated
Processes area below it will not be available.
• Long Overdue to Lost - Days: Use this option in the Automated Processes area of the tab if
you want a long overdue item to be assigned a "Lost" Status automatically. Click the check box
to the left of the field (to insert a check mark). In the text box to the right, type the additional
number of days after an item is considered "Long Overdue" when the item's Item Status should
be changed from Overdue (Item Status code "OD") to Lost ("L").
Example: In the example setup in Figure 3-14, any item that is more than 30 days overdue will
be considered "Long Overdue," and the "Long Overdue" block will be displayed when the
borrower is searched on the F2 tab. The Long Overdue to Lost - Days box includes the value
"30," so this means that 30 days after the "Long Overdue" designation (that is, when the items is
a total of 60 days overdue), the item will automatically be moved to the Lost status.
The system runs the automatic change-to-Lost process once every night. This will also charge
the appropriate fees/fines (depending on the configuration settings in the fields below) and
discharge the item from the borrower's list of overdues.
Library•Solution Circulation
3. Setup Menu options
CIRC-89
Contents
Index
• Charge OD Fine on Lost: Select this check box if you want the borrower to be charged the
overdue fine due on an item when the system automatically changes it to the Lost status from
"Long Overdue." (The fine will equal the amount that would be due if the item had been returned
and checked in "overdue" on the date the item is shifted to the automatic Lost status.)
• Lost Processing Fee: If you want the borrower to be charged an additional fee when an item is
automatically changed to Lost status, enter the fee amount in the Lost Processing Fee entry
box.
• Apply Long Overdue Blocks: You can apply blocks by selecting one of the following options:
– For items Circulated at ALL Locations (default)
– ONLY for items circulated at this location
• Repair Holdings Code: This setting is concerned with designating a preferred holdings code
where repairs will be "sent" (this becomes the "Active" holdings code for items checked in with
the Special Status of "Damaged"). If a repair holdings code has been selected, when an item is
checked in via the Circulation F3 tab, and the Special Status of "Damaged" is selected, the
process will remind the Circulation operator to move the item to the repair location. After
installation, a Circulation library administrator can easily add or change a holdings code in the
Repair Holdings Code box found in the Branch Setup. During check in the operator has the
option of adding a Condition Note to the item describing the damage detected. This note is
available when either the first or second choice (above) is selected.
Library•Solution Circulation
3. Setup Menu options
CIRC-90
Contents
Index
3.2.4 Branch Setup: Misc. Subtab
The following information can be edited on the Misc. subtab (Figure 3-17)
• Fiscal Month, Fiscal Day, and Host Branch: These fields are currently inactive and will be
used in a future release.
• Collection Rotation: Rotating Collections allows individual items to move in a preset pattern,
based on the options set up for it. Using Rotating Collections, you decide the items to be
included, the sequence and timing of the library rotation, how many times the item travels
through the rotation, and the number of days that an item will stay in the indicated Circulating
Collection. Enter the number of days that any combination of should stay in the Circulating
collection indicated. For more information on Rotating Collections, click here.
• Deletion of NR and RH items: Enter the number of days an item with NR (Not Rotating), or RH
(Returning Home) status should remain on the daily rotating collection report, before being
deleted.
• Repair HoldingsCode: This setting
is concerned with designating a
preferred holdings code where
repairs will be "sent" (this becomes
the "Circulating" holdings code for
items checked in with the Special
Status of "Damaged"). If a repair
library has been selected, when an
item is checked in via the
Circulation F3 tab, and the Special
Status of "Damaged" is selected,
the process will remind the
Circulation operator to move the
item to the repair library. After
installation, a Circulation library
administrator can easily add or
Library•Solution Circulation
Figure 3-17. The Misc. subtab
3. Setup Menu options
CIRC-91
Contents
Index
change a library in the Repair Holdings Code box found in the Branch Setup.
When a holdingscode is selected in this field, Items checked in as "Damaged" will be assigned to
the displayed "Repair Holdings Code". These Items will be assigned a 'T' status and cannot be
used to fill pending holds until the item is checked back in.
From the drop-down list select the holdingscode that items to be repaired should be sent to
(picking the blank entry will clear this field and treat damaged items as recalls).
• Resp. Party Block Rule: From the drop-down list, select which Responsible Party action is
appropriate for your library. Each option is described below.
Note: These settings are ONLY concerned with the "Hot Status' block field. Other blocks to
borrowing (e.g., Items out, Fine Balance, Overdue Items, Long overdue Items) are not checked.
– NO ACTION - No blocks on the Responsible Party or any family members, except those for
the record accessed.
– WARNINGS ONLY: Blocks are applied only to the record with the block condition, but
whenever the responsible party record is accessed, a warning that "this borrower is
responsible for blocked borrowers" will be displayed.
– UPWARD BLOCKS: Whenever any child record has a Hot Status of Blocked, the
responsible party, and the child record in question are blocked, but no other member of the
group is blocked.
– ALL BLOCKED: Whenever any member of the group has a Hot Status of Blocked, all
members of the group are blocked from borrowing (without an override password) until the
block in question is cleared.
• Apply Long Overdue Blocks:
– For items Circulated at ALL Locations
– Only for items Circulated by This Location
Library•Solution Circulation
3. Setup Menu options
CIRC-92
Contents
Index
Depending on which option is selected, borrowers will be blocked from borrowing items if they have
any "long overdue" items. After installation, Circulation administrators at a library can easily change
this setting in the Branch Setup on the Miscellaneous tab.
Library•Solution Circulation
3. Setup Menu options
CIRC-93
Contents
Index
3.2.5. Notice Text
You can enter the message to be included on printed notices in the Notice Text window (Figure 3-15.)
There are three system-controlled types of notices (you can change the text, but not the name of the
notice) Overdue Notice, Arrived Hold Notice, and Recall Notice. You may add other types of
notices and the text to appear on that notice and use that text in reports by selecting from a drop down
list of notice types.
Button Definitions:
• Save: After adding or editing a notice, click the Save button to retain the changes.
• Add New: Typing the first letter of the new notice name in the empty drop-down entry box
causes the Add New button to be activated. Finish typing the new notice name. Click in the
main entry box and type the contents of the notice. Click the Add New button and the new item
will display on the drop-down list. Click the Save
button.
• Delete: Click the notice name on the drop-down list.
Ensure the correct notice name that you wish to delete
is displayed. Click the Delete button.
To Add a new notice, highlight the currently displayed
notice name, or click in the empty drop-down entry box. Type
the new notice name. Then click in the main entry box and
type the content of the notice. When you are satisfied with
the text, click the Add New button, and then click the Save
button.
To edit an existing notice, on the drop-down list click the
notice name to display the message in the text box. Click in
the text box to make changes as desired. When done click
Save.
Figure 3-15. The Notice Text window
Library•Solution Circulation
3. Setup Menu options
CIRC-94
Contents
Index
3.2.6 Notifications
Circulation staff can set up the defaults for how different automatic notifications are sent to borrowers
by telephone and email (Figure 3-16). The available notices are “Friendly Warning,” “Overdue,” “Final
Overdue,” “Arrived Holds,” “Cancelled Holds,” and “Expired Holds." The options for each notice are
“Email” (code E in the setup) and “Telephone” (code P). If valid email addresses and telephone
numbers appear in borrower records, the setup will use these with the automated email and telephone
(Talking Tech Itiva) systems, if currently installed. These default settings may be overriden on an
individual borrower basis. To override the default settings, use the Notifications subtab of Patron
Transactions | Patron Record F2.
Figure 3-16. The Notifications window
Library•Solution Circulation
3. Setup Menu options
CIRC-95
Contents
Index
3.3 Calendar Configuration
Use the Setup | Calendar Configuration sub-menu options to define the following:
• Normal open and closed days and hours in a typical week: use the Weekly Calendar setup.
• Exceptional days and hours, like holidays or school vacation periods when the library may be
closed on different days or hours than established in the Weekly Calendar: use the Daily
Calendar setup.
The calendar setup affects date and time due for checked out items in the following manner: items
checked out for a period of days (or hours or minutes) will be due only on open days (or hours or
minutes).
The calendar affects overdue fines calculation according to the settings in the field Fines Calculated
By in the Circulation "rules."
3.3.1 Weekly Calendar
Use the Local Configuration | Weekly Calendar setup (Figure
3-17) to define normal open and closed days and hours for a typical
week. If there are occasional days like holidays when the library will
be closed or have different hours, use the Daily Calendar setup to
override the default weekly settings and enter exceptions.
To set up the Weekly Calendar:
1. Select the Setup | Calendar Configuration | Weekly
Calendar option.
2. Select a day: Select the option button beside the first day you
want to define or change.
Figure 3-17. The Weekly Calendar Defaults for This Branch window
Library•Solution Circulation
3. Setup Menu options
CIRC-96
Contents
Index
3. Library is normally open on this day of the week: If the library is normally open on this day,
select the check box beside "Library is normally open on this day of the week"; a check mark will
be displayed. If the library is closed, click the box to clear it. You can also press the spacebar to
enter or clear the check mark.
4. Time library opens: Enter the time the library opens on this day. Type the time like this: 9:00 am
or 10:00 pm (type am or pm in lower or upper case).
5. Time library closes: Enter the time the library closes. If the closing time is after midnight, enter
the time, and then select the check box beside The Next Day.
6. Save this weekday: Select the Save This Weekday button.
7. Select the next day of the week, and follow the steps above.
8. After making all necessary changes, close the setup window by selecting the Close button.
Additional information: To set up holidays or other exceptional days, use the Daily Calendar setup.
Library•Solution Circulation
3. Setup Menu options
CIRC-97
Contents
Index
3.3.2 Daily Calendar
The Local Configuration | Daily Calendar setup (Figure 3-18) displays a calendar for each month of
the year. Use the calendar to define exceptional closed days or different hours for a normally open day.
These settings will override the calendar for a normal work week defined in the Weekly Calendar.
You should initially define settings for the current year and next year, but you can also define several
years into the future if you wish. (You can access any year in the past or future.) Near the end of each
year, review the settings for the next year, to be sure due dates in the new year will be calculated
correctly.
To set up the Daily Calendar:
1. Select the Setup | Calendar Configuration |
Daily Calendar option.
2. Select a month/year: Use the Next Month or
Previous Month buttons to display the month
of the year you want.
3. Select a day: To change the default for a
particular day, click on the day, or use the
arrow keys to move among the days. The
selected day will be highlighted. A Default or
Overridden message at upper right will show
whether the settings already established for
the selected day have been overridden or if
they are the Weekly Calendar defaults. To
change Overridden settings quickly to the
default, select Set to Weekly Default.
Figure 3-18. The Calendar for Current Branch window
4. Library is open on this day: If the library is
open on this day, a check mark will appear in
the check box beside this option. If the library
should be set to closed, click on the check
Library•Solution Circulation
3. Setup Menu options
CIRC-98
Contents
Index
box to clear it. You can also press the spacebar to enter or clear the check mark. If closed, the
text boxes beside Library Opens and Library Closes (below) will not be available for entry.
5. Time library opens: Enter the time the library opens on this day.
6. Time library closes: Enter the time the library closes. If the closing time is after midnight, enter the
time, and then select the check box beside The Next Day.
7. Save the changes for a day: After changing the setting for a day, select the Save Date Info
button.
8. Change other days: If there are other days you want to change in this month, select another day,
and follow the steps above.
9. If you want to change a date back to the Weekly Calendar default, simply select the button for
Set to Weekly Defaults. Be sure to Save Date Info for each day you change. Repeat in this
month and other months until all necessary changes have been made.
10. After making all changes, close the setup window by selecting the Close button.
Additional information: To review or change settings for a normal work week, use the Weekly
Calendar setup.
Library•Solution Circulation
3. Setup Menu options
CIRC-99
Contents
Index
3.4 Local Configuration
Use the Local Configuration options on the Setup menu to select the printer to be accessed by this
station, establish what types of slips will be printed, or to identify the library where this station is
located.
3.4.1 Printing Setup
Use the Printing Setup option (Figure 3-19) to identify the printer available to a local station for printing
slips. Select which types of slips (date due, holds notification, inquiries, receipts, etc.) you wish to print
from this station. You can also set the number of line feeds to print after each slip, and you can run a
printing test.
To configure the local printer:
1. Select the Setup | Local Configuration | Printing Setup
option.
2. In the Slips Printer field, select a printer that has been
configured for the workstation. Click the drop-down arrow to
view a list of configured printers in Windows, and select the
printer.
3. In the Printer type field, click the drop-down list to choose
either Single Sheet or Continuous Feed. For slips printers or
dot matrix printers that use a continuous feed of paper, select
Continuous Feed. For a single sheet printer, for example, a
laser printer, choose Single Sheet. The Single Sheet
selection ensures that a form feed command will be issued
after each print job to clear the sheet from the printer.
Figure 3-19. The Printer Configuration window
Library•Solution Circulation
3. Setup Menu options
CIRC-100
Contents
Index
4. Click the check box beside each type of slip you wish to print at this station:
Check Out Slips (date due slips): When this is selected, checkout slips are printed when items
are checked out. If you selected Continuous Feed for the Printer Type, and you want to print a
separate slip for each checked out item, also select the Separate Check Out Slips check box.
(The separate slip option is not available when Single Sheet is selected; this setting
automatically prints a separate sheet for each checked out item.)
Payment Receipts: To print a receipt automatically for any payment received, select this check
box. Please note that even if this option is turned off, you can still print a receipt or multiple
receipts on demand. To do this, use the Receipt button on the Charges tab.
Patron Inquiry Slips: If you want to allow Circulation staff to print information about a selected
borrower (i.e., a Patron Info Slip), select this check box (so a check mark appears). To print a
Patron Info Slip, staff will search for the borrower on the F2 tab, select the Patron Record: Basic
Info tab, and then click the Print Patron Info button.
Holds Slips: When this is selected, a slip is printed automatically when you check in an item
that is on hold. The slip includes information about an "arrived" hold, including borrower name
and phone number.
5. Number of line feeds after a slip: Enter the number of blank lines you want the printer to feed
after printing each slip. The default is 4 lines.
6. To set up the slips printer’s auto cutter escape sequence, enter the escape sequence into the
Automatic Cutter Sequence edit box and then press OK to save. ( If you do not have a printer
with a cutter attached to your station, leave this box empty.) The Automatic Cutter Sequence
should be available in the User's Manual from the printer.
7. If you want to test the print setup, click the Print Test button before you leave this window.
8. To save changes, click OK, or press Enter. To exit without saving, select Cancel.
Library•Solution Circulation
3. Setup Menu options
CIRC-101
Contents
Index
Default Printer with Windows Terminal Services
When using Windows Terminal Services to run Circulation remotely, the Default Printer setting is
used to direct receipts to the local receipts printer. Set the Windows Default printer on your station to
the receipts printer. Then go to Setup | Local Configuration | Printing Setup. Check the box for
“Use Windows Default Printer” and click on the ok button. Your receipts will print to that printer without
having to manually select a printer when you access Circulation via Windows Terminal Services.
Library•Solution Circulation
3. Setup Menu options
CIRC-102
Contents
Index
3.4.2 Station Options
Use the Station Options window (Figure 3-20) to identify station-specific settings: the library where
this station is located, a setting pertaining to override due dates, options to limit borrower and title
search results to the local library or all libraries, and more.
To set Station Options:
1. Select Setup | Local Configuration | Station Options.
2. Click the drop-down arrow to the right of the Branch where this station is [Branch Name] field.
Select the library where this station is located. (Once the library has been identified correctly on
this station, there should be no need to change it.)
3. The Station Settings area includes two fields with
check boxes
Override Due Date Stays On: Click this check box if
you want an override due date to remain turned on
during Checkout, even when multiple borrowers are
checking out materials.
Color Comment Field: Click this box to display a
check mark, if you want Patron Record Comments
displayed in red text on the F2 tab. (Add a Comment
to a selected borrower's record on the Patron Record |
Basic Info. tab.)
4. The Station Level Searches area includes three check
boxes, detailed below, that allow you to limit borrower
or title search results to borrowers or items at this
library, or view all borrowers or titles/items at all
libraries. You can choose to view your library's barcode Figure 3-20. The Station Options window
items first in the items list on the F4 display.
Library•Solution Circulation
3. Setup Menu options
CIRC-103
Contents
Index
Local Patrons Only: Supervisors at each station can configure the default for the borrower
search hit list to include local borrowers only (meaning this library is their "home" library) or all
borrowers. This option is unchecked by default, meaning all borrowers will be displayed. (The
All Branches or Local Branch buttons will still be available in the borrower search hit lists to
allow expanding or limiting the display.)
Local Titles Only: Supervisors at each station can choose to configure the title/item search hit
list to include detailed item information for the local library only, or all libraries.
If enabled (check box is checked), Local Titles Only is a security feature designed to prevent
libraries from editing other libraries' holdings. Users can still see ALL titles in the database (but
the optional "NO ITEMS" display will appear beside titles belonging to other libraries) and can
add on-the-fly copies of their own to those titles. When the Local Titles Only option is selected,
the title/item search hit list includes titles at all libraries, but if the local library does not own them,
"NO ITEMS" will appear in the Circ.Coll. column.
Local Barcodes First: Check this box if you want your library's items (barcode numbers) for a
selected title to be listed first in the drop-down list beside the Item ID field. (This field is not
available, if the Local Titles Only check box is checked.)
5. To save Station Options changes, select OK, or press Enter. To exit without saving, select Exit.
Library•Solution Circulation
3. Setup Menu options
CIRC-104
Contents
Index
3.4.3 Cash Drawer Setup
Use the Cash Drawer Setup option (Figure 3-21) to enable users to connect and configure an
automatic cash drawer to a Circulation station.
The cash drawer is attached to the computer via a COM port. The default settings are specific for the
APG Cash Drawer, Model 484 SerialPRO II. If you wish to use another type of cash drawer, call TLC
Support for information on possible compatibility issues.
The first time you run Circulation on any workstation, the following message will appear: "There is no
COM Port assigned to the cash drawer. This can be assigned through the Setup menu" (by selecting
Local Configuration | Cash Drawer Setup). The message is only a reminder; you are not required to
modify the setup unless you want to use a cash drawer.
To configure the Cash Drawer:
1. Select the Setup | Select Local Configuration | Cash Drawer option.
2. If you do not have a cash drawer, leave the Cash Drawer COM Port default selection at "None."
If you do have a drawer attached, select the correct COM port from the drop-down list (COM 1, 2,
3, or 4).
3. The Control Character in Hex is the signal sent to the cash
drawer to open. The default ("07" which corresponds to key
combination Ctrl + G) is the setting for the APG cash drawer.
You must determine the appropriate setting from the
manufacturer's instructions that come with your cash drawer.
4. The Allow Cash Drawer to Open Without Payment field
allows supervisors at each library to set more security on when
the cash drawer can be opened.
The initial setting for the check box is unchecked. This setting
provides more security for access to the cash drawer. If the
Library•Solution Circulation
3. Setup Menu options
Figure 3-21. The Cash Drawer Setup window
CIRC-105
Contents
Index
box is unchecked, this means that the cash drawer will open only if a payment is made (for a
selected borrower on the F2 Charges tab). When Circulation staff enter an amount and select
the Balloon Pay/Waive or Individual Pay/Waive button on that tab (whatever is appropriate to
this payment), the cash drawer will open automatically.
When the box is checked, the Open button is available on the F2 Charges tab for a selected
borrower, and the Cash Drawer item is available on the main Circulation menu. Circulation staff
at this station can open the drawer by selecting either option, even if no payment is made.
5. To save changes, click the OK button.
Library•Solution Circulation
3. Setup Menu options
CIRC-106
Contents
Index
3.5 Security Setup
Use the Circulation Security Setup option to define each user's level of access to Circulation
activities and displays. Before the Circulation Security Setup can be completed, however,
administrators can use the Library•Solution System Configuration to set up administrative level
security. This allows administrators to control which users can access specific LibraryCSolution
modules and activities and to control their "roles," e.g., Circulation User, Circulation Administrator, or
no Circulation role. Defaults are in place for both administrative (System Configuration) and Circulation
levels of security.
To complete Circulation Security Setup for any user qualified to access Circulation (those with
Circulation User or the Circulation Administrator role set in System Configuration):
1. First, administrators may wish to check the System Configuration. (Start the configuration from
the Start menu.) Login, using system or Circulation administrator default login information. Then
select Setup and Users. Then select Create (for new users) or Edit/Remove (for existing
users). Set up User Names, individual Passwords, and access privileges ("Circulation Roles")
for users of Circulation.
Important! Any user who needs access to Circulation Security Setup must be assigned the
Circulation Role of "Circulation Administrator."
2. In Circulation, select Setup | Security Setup to
reach the Security Configuration window (Figure
3-22). Click the down arrow beside the User Name
box to display a list of Circulation users or
administrators (as authorized in the Library·Solution
System Configuration). Select a user. The Security
Configuration window for the selected user type will
appear.
3. The activities available for security setup are
arranged on five tabs in the Security Configuration
window (described below). Administrators (as
Figure 3-22. The initial Security Configuration window
Library•Solution Circulation
3. Setup Menu options
CIRC-107
Contents
Index
authorized in the System Configuration) can view or change setups for any user.
4. After reviewing or changing options on the five tabs, save by selecting the Post button, or cancel
the changes by selecting Cancel.
5. To make any changes effective, you must re-login. Select Re-Login on the Utilities menu in
Circulation.
Library•Solution Circulation
3. Setup Menu options
CIRC-108
Contents
Index
3.5.1 General Subtab
The General subtab (Figure 3-23) includes the following fields and options:
• Security Level: Choose one of these options from the drop-down menu:
No Special Clearance: Default. User must know either the Override or Supervisor password to
perform normally protected activities, such as waiving fines, overriding due dates, etc.
Automatic Override: User has automatic override clearance and will not be prompted to enter
the Override password to complete activities which normally require a password, such as waiving
fines. In operations which would normally require a password (like overriding a block condition),
the system would simply ask the user to confirm the completion of the activity: "Do you really
want to do this?" The user would simply
choose "Yes" or "No." User will still be
required to enter Supervisor password for
those activities requiring that password, such
as Branch Setup.
Supervisor: User has full supervisor level
access to all functions and will not be
prompted to enter any passwords to perform
controlled activities. As with the Automatic
Override level, the system may sometimes
display a message asking the user to
confirm the completion of the activity: "Do
you really want to do this?" Choose "Yes" or
"No."
Note: Only users with Supervisor Security
Level can access the Patron Cfg. and the
Item Cfg. buttons used in borrower or item
searches. The buttons are unavailable to
Figure 3-23. The General subtab
Library•Solution Circulation
3. Setup Menu options
CIRC-109
Contents
Index
users with No Special Clearance or Automatic Override.
• Can Search Names: If option is turned off, the Patron Search Name field is not available on
the Patron Search Configuration; users will not be able to asearch for borrowers by name.
• Top Patron View: Name and Comment: Controls whether or not a user can view Patron
Name or Comment fields on the upper part of the Patron Transactions tab F2.
• Patron Screen Tabs: Controls whether or not user can view tabs on the Patron Transactions
tab F2: Items Out, Charges, Holds, Patron Edit (Patron Record tabs), Reserves.
• Show: Check In Patron Info: View names of borrowers on the Check In/In House Use tab F3.
If the option is turned off, borrower names are not visible, and the Patron Inquire button on the
F3 tab is unavailable. Patron names that may already be in the list of items just checked in are
not cleared.
• Title Buttons: These options control whether or not user can access the four buttons located in
center right of the Item/Title Information tab F4: Save Title (bibliographic data) Edits, Delete
Title (bibliographic data), Print Title/Item Inquiry Slips, access the Holds Queue.
Library•Solution Circulation
3. Setup Menu options
CIRC-110
Contents
Index
3.5.2 Basic Functionality Subtab
The Basic Functionality subtab (Figure 3-24) fields control the following activities:
• Check Out: Check out items. If access not allowed, the Enter Item box on F2 tab is not visible.
• Check In: Check in items. If access not allowed, and if Check In button is selected on F3 tab,
the Item box on F3 tab is not visible.
• Renew: Renew items. If access not allowed, the Renew button is unavailable (grayed) on F2
Items Out tab for the selected borrower.
• Stats-Only Check Out: Check out uncataloged, unbarcoded items for "statistics only" using
Stats-Only button. If access not allowed, the button is not visible on F2 tab.
• Inhouse Use: Gather inhouse use data. If you do not want the In House Use button to appear
on Circulation F3 tab, leave this check box unchecked.
• Place Holds: Place holds. If access not allowed, the Place button on Holds tab is not visible.
• View Only Default Branches When Placing
Holds: When checked, only default libraries
available for placing holds.
• Edit Payment Information: Add, edit, or
delete charges on the Charges tab. If the
option is off, the user cannot edit or add any
payment information for the selected
borrower, e.g., the user cannot take payments
for fines.
• Patron Inquiries: When checked, the user
can perform borrower inquiries from Find
buttons on the Item/Title Information tab F4
on the Circulation tab. The Find buttons lets
you find the last borrower and current
Figure 3-24. The Basic Functionality subtab
Library•Solution Circulation
3. Setup Menu options
CIRC-111
Contents
Index
borrower checkouts. If access is not allowed, the Find buttons are not visible.
• Title/Item Inquiries: When checked, the user can perform title/item inquiries from the Item
Inquiry buttons on Patron Transactions tab F2 and Check In/In House Use tab F3.
• OTF Title / Item: Add items/titles in Circulation in any of the activities which allow you to search
for an item/title. If the option is turned off, the user cannot add any new titles or items or edit any
existing title data including editing bibliographic data for titles which were added on-the-fly to
Circulation.
Note: Access to editing the holdings/item information fields on the Bibliographic tab of
Circulation F4 tab is controlled by the options on the Security | Bibliographic Page.
• OTF Patron: When checked, the user can add borrower records in Circulation on the Patron
Transactions tab F2.
• Debt Collection: View and work with the Setup menu and Circulation menu items concerning
the optional Debt Collection Module. If this check box is not checked, these menu items will be
hidden from the currently logged in user. Note: Only the "system_admin" user can actually
access the Setup | Debt Collection Module setup screens.
Library•Solution Circulation
3. Setup Menu options
CIRC-112
Contents
Index
3.5.3 Menu Function Subtab
The Menu Function subtab (Figure 3-25) controls the following functions:
• Check Messages: Controls access to messages. If turned off (no check mark), the Check
Messages option in the Messaging menu and the Mail button at upper right are not available.
• Can Delete Messages: Lets the user delete messages on the Message form.
• Item Transfers: Enables Item Transfers on the Utilities menu.
• Recall Item: Enables Recall Item on the Utilities menu and the Recall Item button on Items
Out tab.
• Inventory: [The feature enabling users to run Inventory from inside the Circulation module is not
yet available.]
• Change Password: Enables Change Password on the Circulation Utilities menu,
so current user can change own password.
• View Reserves: Enables View Reserves on Reserves Tools menu and View All
(reserves) on the Reserves tab of Patron Transactions tab F2.
• Remove Reserves: Enables the Remove Reserves option on the Reserves Tools
menu.
Figure 3-25. The Menu Functions subtab
Library•Solution Circulation
3. Setup Menu options
CIRC-113
Contents
Index
3.5.4 Patron Screen Subtab
The Patron Screen subtab (Figure 3-26) shows all of the fields in the Basic Info tab of the Patron
Record on the F2 Patron Transactions tab. On the lower part of this tab you can control access to the
other Patron Record tabs: Address, Patron Fields, Misc. Info, Configuration, and Loan History.
For each field or tab, you can select: Disallowed (user cannot view or edit field); Viewable (user can
view but not edit the field); or, Editable (user can view and edit the field).
Delete: This check box refers to deleting borrower records. If this check box is checked, the Circulation
user is allowed to delete borrower records.
Note on Name field: If Disallowed is selected, the Patron Name fields are removed from the Patron
Record | Basic Information tab and from the Circulation tab of the F4 tab (Item/Title Information),
which normally displays the name of the borrower who currently has an item checked out. If Viewable
is selected, these fields are displayed but
cannot be edited.
Figure 3-26. The Patron Screen subtab
Library•Solution Circulation
3. Setup Menu options
CIRC-114
Contents
Index
3.5.5 Bibliographic Page Subtab
The Bibliographic Page subtab (Figure 3-27) shows all of the fields in the Bibliographic tab of the
Item Information display on the F4 Item/Title Information tab. This tab displays all holdings and
item-specific information. For each field, you can select: Disallowed (user can view but not edit field);
or, Editable (user can view and edit the field). Editable is selected by default The check boxes beside
Save and Delete (on the right of the tab) control whether or not the equivalent buttons on the F4 tab
are available (allowing the user to save or delete item information).
The Collections section contains check boxes to allow Circulation staff to change the collection code
for an item (to or from, owning or circulating), without having the ability to change the Branch of the
item.
Figure 3-27. The Bibliographic Page subtab
Library•Solution Circulation
3. Setup Menu options
CIRC-115
Contents
Index
3.5.6 Debt Collection Setup
The Debt Collection Module can be configured to run for the entire library system or for specified
libraries. Certain configuration parameters must be set up independently of the module.
Note: To use this module you will first need to establish a contract with Unique Management Services
(UMS), Inc. (See below.)
To access System or Branch Setup:
1. Select the Debt Collection menu item from
the Setup menu on Library•Solution
Circulation. Then select the System Setup
submenu item. This will open the Debt
Collection System Setup form (Figure 3-28).
Note: This menu item is accessible only to
users with Circ_admin or System_admin
user rights.
2. Set the Mode (upper left hand corner) to
either System or Branch. In System mode,
the module will monitor borrower balances
over all libraries in the system.
3. Set the Scheduling option to Automatic or
Manual. In Automatic mode, the module
will automatically issue the Submission
Report on a regular schedule. In Manual
mode, an operator will transmit the report as
necessary.
Figure 3-28. The Debt Collection System Setup window
Library•Solution Circulation
3. Setup Menu options
CIRC-116
Contents
Index
4. Use the Exclude Patron Types option to select those Patron Types the library has determined
should never be submitted to UMS. (Multiple borrower types can be selected by holding down
the Ctrl key and clicking on the desired Patron Type in the list box.)
5. If you have selected the System Mode, provide information on the following:
– Reporting Branch Email Address - The e-mail address for the institution that will be
sending the reports. (This is essentially the From address on the email.)
– Reporting Branch - Select the Main Branch when operating in System Mode.
– Administrator Email Address - The address where a copy of the report can be sent if a
library administrator wishes to see it. (This box can be left blank.)
– Collection Agency Email Address - Contains the email address of UMS. Do not change
this unless requested by UMS. (The edit box is disabled to ensure accidental changes are
not made. The Unlock button to the right can be clicked to enable the edit box.)
– Patron Unique ID - The information selected for this ID will be Unique Management
System's borrower reference when communicating with the library about a borrower account.
The options are: None, Alternate ID, PIN, and Patron Field. If, for example, you choose the
PIN option, any references from Unique Management System concerning a borrower, would
use the Patron's PIN number to identify the borrower to you. Your library should determine
which option is best for local practices.
Select the option button associated with your library's choice of where it stores the borrower's
unique identification number. The option buttons correspond to the field where the value is
stored. If the value is in a Patron Field, the drop-down list to the right of this option button is
enabled, and you should select the appropriate Patron Field.
Note: If "None" is selected, the only identifier sent to the collection agency is the internal,
system generated number (this is always included in communications sent to the collection
agency) which is not searchable in Library•Solution Circulation.
Library•Solution Circulation
3. Setup Menu options
CIRC-117
Contents
Index
– Collection Parameters - Includes the configurable parameters for the module.
Past Due Period contains the number of days a borrower has had a charge before it will be
submitted to UMS.
Minimum Debt Balance contains the minimum balance a borrower must accrue before
notice is sent to UMS.
The Collection Fee parameter includes separate fields for the flat fee assessed for the
borrower and for the percentage of the balance that the borrower is charged. These values
can be applied in any combination. The percentage box cannot exceed 100%. Enter 0 (zero)
if the charge is not applicable.
The Cut-Off Date edit box establishes a limit for charges incurred.
Charges incurred before this date will not be considered when determining if the Minimum
Debt Balance has been reached, but WILL be added to the balance owed that is submitted to
the collection agency.
6. Click the Save button when you have made your changes. (The Close button closes the form
with no changes saved.) Error messages will be displayed if the Reporting Branch Email
Address or Collection Agency Email Address boxes are left blank or if any data fields in the
Collection Parameters section are blank or contain entries that are out of the following ranges:
– Past Due Period: 0 - 999
– Minimum Debt Balance: 0 - $9999.99
– Collection Fee (flat fee): 0 - $9999.99
– Collection Fee (percentage): 0 - 100%
– Cut-off Date: Must have date - no blanks allowed.
7. If the module is placed in Branch Mode, each participating library must configure debt collection
setup for their own library. The Branch Setup sub-menu item will be enabled under the Debt
Library•Solution Circulation
3. Setup Menu options
CIRC-118
Contents
Index
Collection Setup item on the Setup menu. Selecting this item will open the Debt Collection
Branch Setup form. This menu item requires Supervisor rights to access it.
Checking the Branch Participates box on this form, indicates that the library will participate
in debt collection. The other edit boxes and buttons control the same functions as in system
setup, except they apply only to the specific library.
Contacting Unique Management Services
Unique Management Services can be contacted at the following:
• Toll-free Telephone: 800-879-5453
• Electronic Mail: [email protected]
• World Wide Web: http://www.unique-mgmt.com/aboutus/index.html
• U.S. Mail or Courier Service: Unique Managment Services Inc., 119 East Maple St.,
Jeffersonville, IN. 47130
See section 8.7 Debt Collection Module for additional information.
Library•Solution Circulation
3. Setup Menu options
CIRC-119
Contents
Index
3.5.7 Circulation Page Subtab
There are currently two options available on this tab. These options are set on the Circulation Page
tab of the Security Configuration screen, under the Setup | Security Setup menu.
• Number of Last Out Patrons to view: This setting configures the number of previous
borrowers of an item number to display on the F4 Circulation tab. The maximum setting is three
(3), the minimum setting is zero (0).
• Hide Current Patron: This setting controls the display of the Patron Name of the borrower who
currently has the item checked out. When checked, the user name is displayed in the Current
Information section under the Item / Title Info F4, Circulation Page tab.
To change these settings:
1. Log into Library•Solution as an Administrator (i.e., as the circ_admin user name or an equivalent
logon).
2. Click Setup | Security Setup.
3. The Security Configuration screen will display.
Select the appropriate User Name from the
drop-down menu.
4. Click the Circulation Page tab (Figure 3-29).
5. As appropriate for your library, type a number
from 0-3 in the Number of Last Out Patrons to
view box. If the setting is 0 (zero), this user will
see no borrowers listed. A setting of 3 (three) will
display the last three borrowers that checked out
this item.
6. Click Post when the settings are displayed as
desired, or click Cancel to abandon the changes.
Library•Solution Circulation
Figure 3-29. The Circulation Page subtab
3. Setup Menu options
CIRC-120
Contents
Index
3.6 Outreach User PAC Setup
The Outreach User PAC Setup option (Figure 3-30) lets you set the address for the Outreach PAC
Server.
To set or change the Outreach PAC Server address:
1. Select Setup | Outreach User PAC Setup.
2. The Outreach User PAC Setup window will appear. If this is a first-time setup, the box for the
Outreach PAC Server address will be empty. Type the address (e.g., pacserver.library.org)
and click OK. If an address was previously set, clear the current contents and then type the new
address. Then click OK.
Note: The address information should be provided by your administrator.
Figure 3-30. The Outreach PAC Server window
Library•Solution Circulation
3. Setup Menu options
CIRC-121
Contents
Index
3.7 Holds Routing Setup
The Holds Routing Setup command on the Circulation Setup menu enables a library administrator to
set a list of other libraries that will be checked for available titles to fill holds to be picked up at that
library. Thus, this setup allows you to preconfigure the limitation of hold requests by library, so that
holds to be picked up at a selected library will be filled only by items belonging to the specified libraries.
The setup also allows you to set the order in which those libraries will be checked for available items
that can fulfill a hold, when your library is selected as the pickup library.
This feature was introduced in Version 3.2, but in that version it was necessary for TLC Support to
establish or change the settings for each library. In Version 3.3, users can access the new setup
dialog in Circulation to set the defaults for the current library. A typical Hold Routing Setup dialog is
shown in Figure 3-31.
Note that a supervisor can establish the settings for all libraries by running
the System Configuration, logging in as an administrative user, and
selecting Setup | Holds Routing Setup, also newly available in Version
3.3.
When a Circulation user places a hold for a borrower, the Define New
Holds Basics dialog first appears, including the Send to Branch field
(the desired pickup library). The borrower’s home library is always the
default (whether the hold is being placed by the borrower in PAC or by a
Circulation operator). The Circulation user placing the hold can change
the desired pickup library. (Note that two factors may influence the list of
libraries in the location selection list: the Holds Routing Setup for the
pickup library and a Circulation Security setting for the currently logged in
Circulation user; see more about this below.)
When the Circulation operator clicks OK in the Define New Holds Basics
dialog, the Define Title Specifics dialog appears.
Figure 3-31. The Holds Routing Setup window
Library•Solution Circulation
3. Setup Menu options
CIRC-122
Contents
Index
If you also want to limit the display of supply libraries when a selected Circulation user is logged in,
select Security Setup on the Circulation Setup menu, select the user, and click the Basic
Functionality tab. Check the box beside View Only Default Branches When Placing Holds and
post the change. (This feature was also introduced in Version 3.2.)
If this field is checked, when this user selects Place on the Holds tab for the selected borrower, the
Send To Branch list on the Define New Holds Basics dialog is set to the current library, and the list of
available pickup libraries is limited to those selected in the Holds Routing Setup. Then, on the Define
Title Specifics dialog on the Branches tab, only the selected libraries are displayed, each with Yes in
the Limit To field.
Note: If the title to be placed on hold is not owned by any of the limited libraries, the hold cannot be
filled and Circulation displays an information message to the operator placing the hold (Figure 3-32),
unless a new copy is eventually added to one of those locations.
At this point you can Cancel out of the hold, check the ownership on the F4 tab, or choose another
pickup library. If you are restricted by the Security check box from viewing more pickups, ask a your
supervisor to login so you can see more pickup libraries.
To edit the Holds Routing Setup in Circulation for the current branch:
1. Login to Circulation as a user with administrative rights (for example, the circ_admin user).
2. On the main Circulation menu, select
Setup and then Holds Routing Setup.
The Holds Routing Setup dialog
appears, like the example shown in
Figure 3-33.
The defaults in the Holds Routing
Setup may be identified by a note in red
text at the top of the form as a "generic" Figure 3-32. Information message
setup: Routing has not been configured.
Library•Solution Circulation
3. Setup Menu options
CIRC-123
Contents
Index
Holds for available items will be filled without regard to library
order below. That is, all libraries are included in the routing list,
so in effect there are no library limitations. The generic setup
ensures a faster holds placement process, since a library-limited
hold requires Circulation to take extra steps to locate an item to
fulfill it.
3. The current library appears in the Branch To Set Up box (the
field is grayed, so you cannot select a different library here). The
Branch List on the left includes libraries in the system that have
not already been moved to the Routing List (on the right).
4. To move a library from one list to the other, highlight the library
and click the right or left arrow. To move all libraries, use the
right or left All arrows.
To select multiple libraries, you can click on a library, hold down
the Ctrl key and select others, or select one library, hold down
the Shift key, and use the keyboard down arrow to select the
next branch(es) in the list.
Figure 3-33. Holds Routing Setup
Note that you would usually include the library you are
configuring in the Routing List as the first library, but there is no
requirement to include it or to list it first.
Generic routing setup tip: To reset a library-limited setup to a generic setup, simply click the
left-facing All button to remove all libraries from the Routing List column, and then click the
right-facing All button to move all libraries into that column.
5. When your selections are complete, click the Save button, or exit without saving by clicking the
Cancel button.
Library•Solution Circulation
3. Setup Menu options
CIRC-124
Contents
Index
4. Messaging
4.1 Check Messages
Select the Messaging | Check Messages option (Figure 4-1) to view system messages. Typical
messages are concerned with inter-library requests, reminders to send items to another library, and to
place items on the "arrived" holds shelf.
When messages are received, a "New Messages" display is
visible on the Patron Transactions tab (under the Blocks area
on the right of the tab). The number of new messages is shown.
• To view messages, select the Messaging option on the
menu bar. Then select Check Messages.
• To sort the display by Barcode number, click the Barcode
Sort button
• If you wish to print a list of all of the messages, click the
Print All button.
Multiple non-sequential selections may be highlighted for
printing by pressing and holding the CTRL key, while
clicking the Time field for each item to be deleted. Then
click the Print Selected button. The button label will
change from Print All when you click the first individual
item.
You can also print selected items by using a "Messages
List" report that is available in the Reports module. This
Library•Solution Circulation
4. Messaging
Figure 4-1. The Messages window
CIRC-125
Contents
Index
report will print all messages from a specified date to the present.
• To delete a message, click the Time field of the message line and then press the Delete button.
Multiple non-sequential selections may be highlighted for deletion by pressing and holding the
CTRL key, while clicking the Time field for each item to be deleted.
Sequential items can be deleted by pressing and holding the SHIFT key, and clicking the Time
field of the first and last items of the list of items to be deleted.
When all desired items are highlighted, release the SHIFT or CTRL key and press the Delete
button.
Library•Solution Circulation
4. Messaging
CIRC-126
Contents
Index
5. Utilities Menu Options
5.1 Re-Login
Use the Utilities | Re-Login option to login a different user to Circulation. This allows a user with a
different level of security to login to Circulation, without having to close and restart the program.
Note: If you have changed the Security Setup access setup for any user, that user must re-login to
Circulation to make the changes effective.
To re-login to Circulation:
1. Select Utilities | Re-Login. The Database Login window will be displayed (Figure 5-1).
2. Enter a different User Name and Password.
3. Click OK.
Figure 5-1. The Database Login window
Library•Solution Circulation
5. Utilities Menu Options
CIRC-127
Contents
Index
5.2 Item Transfers
Use the Item Transfers option to reach the Item Reassignment window (Figure 5-2), where you can
transfer items to another location for circulation.
5.2.1 Single Reassignment
The Single Reassignment subtab (Figure 5-2) is used to transfer single items to another location for
circulation, when you do not wish to change the ownership of the item.
To transfer items:
1. Select Utilities | Item Transfers to display the Item
Reassignment window.
2. On the Single Assignment tab, select an option in the
Reassign specified items to area:
• Owning library/collection: to transfer items back to the original
location.
• Specified library: to transfer items to a selected library.
• Specified branch/collection: to transfer items to a specified
library and collection.
3. In the New Location area, click the down arrow to select a
library and a collection, if relevant.
Note: You cannot use this utility to place items on reserve.
4. Specify item: In the edit box in the center of the window, scan
the barcode number of an item to be transferred.
Figure 5-2. The Single Reassignment subtab
Library•Solution Circulation
5. Utilities Menu Options
CIRC-128
Contents
Index
You can also type the title, the barcode number, or the control number of the item to be
reassigned. If you type data, press Enter or click the Reassign button. To configure an item/title
search, click the Cfg. button.
5. Continue entering other items to be transferred.
The Item Transfers process changes the Item Status code of an item to "T" (in transit).
6. When you are finished, click Quit. Place the items in a designated location for transport to other
branch(es).
7. When items are received at the other library, check in each item. This action changes the Item
Status code "T" to the appropriate code.
Library•Solution Circulation
5. Utilities Menu Options
CIRC-129
Contents
Index
5.2.2 Batch Reassignment
Use the Batch Reassignment subtab (Figure 5-3) to transfer whole collections of items to another
location for circulation. Batch Reassignment operates on the premise that ALL items in a specified
holdings code are to be relocated to a different specified holdings code (usually a different location).
To use the Batch Reassignment feature:
1. Create a location/collection (holdings code) for each
location which will be using the items that are being
relocated. For example: create a new holdings code, for
each location, that has a short description of TRAV (for
"traveling collection").
2. Select the items that you will put into the new TRAV
holdings code.
3. In Circulation, assign that holdings code to those items,
using the Circulating | Brnch/Coll drop-down lists, on
the Bibliographic sub-tab, of the Item / Title Info F4 tab.
This can be done at each location, for a separate set of
materials. You can also just start with one group at a
single location, with the intent of moving that group of
materials through all participating locations over a period
of time.
4. When it is time to move the group of items to the next
location, follow the instructions in the To Batch Transfer
Items section later in this section.
Note: This process does NOT change the individual
items' status. (Only the circulating holdings code is
changed.) The advantage of this is that when the items
are received at the new location, they do not have to be
checked in; just place them on the shelf. The drawback
Library•Solution Circulation
5. Utilities Menu Options
Figure 5-3. The Batch Reassignment window
CIRC-130
Contents
Index
to this is that, during the time the items are between locations, they will still appear in the PAC as
"available" so there could be some borrower confusion if the items are not delivered quickly to the
new location.
The following table is an example of moving several groups of items, in tandem, through multiple
locations.
Location
Name
Jan. 1, 2004
April 1, 2004
1
Main Library
55
35
2
Small library
60
55
3
Green Memorial
35
60
All of the items' locations are defined by circulating holdings codes with the short description of
"TRAV".
• On the first Monday of every quarter, each library gathers up all of the materials on its "TRAV"
shelf, and places them in boxes for transport.
Note: Items that are currently not in "available" status will have their circulating holdings code
changed. When they are eventually checked in, the operator will be directed to send them on to
the appropriate location.
• Then the operator changes the circulating holdings code of all of the items in the TRAV collection
at that location. (Use the instructions below.)
TIP: To facilitate proper handling of the materials in this rotating collection, the ENTIRE contents of the
TRAV collection shelves should be removed before the Batch Transfer, and more importantly,
BEFORE items from another location are shelved on those shelves. Otherwise, you will not know
which items will need to be moved to the next location.
Library•Solution Circulation
5. Utilities Menu Options
CIRC-131
Contents
Index
To Batch Transfer items:
1. Select Utilities | Item Transfers to display the Item Reassignment window (Figure 5-3).
2. On the Batch Reassignment tab, choose the library and collection the items will be transferred
from:
– Select a library on the From Branch drop down list.
– Select a code from the COLL drop down list.
3. On the Batch Reassignment tab, choose the library and collection the items will be transferred to:
– Select a library on the To Branch drop down list.
– Select a code from the COLL drop down list.
4. Enter the Reassignment Date. This date controls which items should be transferred. Items which
were assigned the current Circulated by collection, up to and including the entered date, will be
reassigned. Other items, if any, in that collection will be left in place.
5. Click in the Return Items to Owning Branch check box if you wish to have the selected items
transferred back to the Owned by location. If checked, the To Branch option will not be available.
Note: Before performing this action, you should run the report: Items in Circulated by Holdings
code To Be Returned to Owning Holdingscode.
6. Click the Reassign Button.
7. Continue entering other Branch and Collection codes to be transferred, as needed.
8. When you are finished, click Close.
9. Place the items in a designated location for transport to other branch(es).
10. When the items are received at the new location, place them on the shelf.
Library•Solution Circulation
5. Utilities Menu Options
CIRC-132
Contents
Index
5.3 Recall Items
Use the Recall Item window (Figure 5-4) to flag a checked out item so a
specified message will be displayed when it is checked in. For example,
the item may need to be repaired when it is returned from the current loan.
Hint: If an item has been recalled and is checked in, the recall item stops
all other checkin processes, so the item gets a T status immediately and
will not fill a hold or be transferred to another location until it is checked in
again.
Note: Only items with an "in-transit" (T) or "checked out" (CO) status may
be recalled. If a recalled item is checked in as damaged, the item will be
assigned to the Repair Shop designation first. When the item is returned
to circulation the recall will take effect.
Figure 5-4. The Recall Item window
There are two ways to access the Recall Items window:
Go to Utilities | Recall Items, described below, or use the Recall Item button on the Patron
Transactions | Items Out tab. The latter method is the easier when you have just checked out the
relevant item to a borrower.
To recall an item through the Utilities menu:
1. Select the Utilities | Recall Item option to display the Recall Item window.
2. In the text box, scan or type the Item ID (barcode number) of the item, or type the title or first
word(s) of the title. Then click Pick Item or press Enter and select the title or item you want.
The Recall Item window will then display the Item ID.
3. In the Reason for Recall box, type the message to be displayed when the item is checked in. If
you need to correct the message before saving, select the Clear Box.
Library•Solution Circulation
5. Utilities Menu Options
CIRC-133
Contents
Index
4. To complete the recall, select Save and Exit or Exit without Saving. If an item is on the shelf
(not checked out), a message will be displayed: "Item is available and cannot be recalled."
5. When the item is checked in, the recall message will be displayed in the Item Has Been
Recalled window. To exit the window, click OK.
To find out if an item has been recalled:
• Follow the first two steps above. If the item has been recalled, the Date of Recall box will display
that date. If the item has not been recalled, the Date of Recall box will be blank or may display
"Was not previously recalled."
Library•Solution Circulation
5. Utilities Menu Options
CIRC-134
Contents
Index
5.4 Item Repair History
Use the Item Repair History utility to record details about repairs to an item, usually a piece of
equipment loaned out through Library•Booking. If a vendor/distributor has made the repairs, you can
select the Repaired by Vendor check box and select a vendor from the drop-down list. You can add a
repair note about an item as often as needed.
To add repair notes:
1. On the Utilities menu, select Item Repair History. The View Repairs window (Figure 5-5)
displays.
2. Type an item keyword or ID number in the Lookup Item entry box and press enter or click Go!
3. Select an entry from the search results list and click OK. On the View Repairs window click Add.
4. The Add New Repair window is displayed (Figure 5-6). Enter the following information:
• Date of Repair: Today's date is entered
by default. Change if necessary.
• Repaired by Patron: (Optional): Search
for and select a borrower.
– Type a borrower last name and
press enter, or click Pick.
– From the Patron Lookup by Name
results set, click the desired
borrower name to highlight it, and
click OK.
• Repaired by Vendor: (Optional): Select
a vendor from the drop-down list.
Figure 5-5. The View Repairs window
Library•Solution Circulation
5. Utilities Menu Options
CIRC-135
Contents
Index
• Back-in-Service: Today's date is entered by default. Change if
necessary.
• Result: Select from the drop-down list: Fixed; Replaced;
Temporarily Out-of-service; Permanently Out-of-service.
• Comment: Enter an optional free-text comment. Suggestion:
mention name of the repairing vendor or borrower here, so this
can be viewed in the future in the View Repairs window.
• Repair Cost: Enter an amount, if any.
5. To save, click OK.
To Edit or Delete repair notes:
1. On the Utilities menu, select Item Repair History. The View
Repairs window displays.
2. Click the entry that you wish to edit or delete, and then click the Edit
or Delete button as appropriate. A Supervisor Override password
may be required.
Figure 5-6. The Add New Repair window
3. An Are you sure you want to do this? message will ask you to
confirm that you want to delete or edit the selected item. Click Yes
if you wish to proceed.
4. If you are:
• Editing the entry, the Add New Repair window will display the selected entry, ready for editing
of any fields. Click OK when done.
• Deleting the entry, you will be asked to confirm again that you wish to delete the item. Click Yes
if you wish to proceed.
Library•Solution Circulation
5. Utilities Menu Options
CIRC-136
Contents
Index
5.5 Holds Shelf
Use the Holds Shelf utility to manage the "arrived" holds shelf. View a list of arrived holds, cancel an
arrived hold, or change the status of an arrived hold to "PE" (Pending) and assign it to another
borrower. You can also override an arrived hold during Check Out.
Holds and Item ID (barcode) linked: In Circulation V3.2 and higher, items on hold (HD status) and
items in-transit (T) to fill a hold are linked to a specific item (barcode). For title holds, the Item ID
column of the Arrived Holds Shelf form will now display a barcode instead of ANY COPY. If a copy is
checked out to a borrower, and that copy was on hold for another borrower, a new Arrived Hold slip will
be printed for the borrower whose copy was checked out, and that slip will reflect a new Item ID This
slip should be placed on the holds shelf with the appropriate copy of the title.
Filling Holds with local copies: In Circulation v3.3, a new Library•Solution System Configuration
option (Fill Local Holds First) allows administrators to specify that holds to be picked up at a particular
library will be filled by that library's copies BEFORE any holds placed by other borrowers are filled with
copies from that library. In previous versions, holds were satisfied based solely on a hold’s position in
the Holds Queue. See the Library•SolutionSystem Configuration Reference Manual for more
information.
To view and work with Holds Shelf items:
1. Select the Utilities | Holds Shelf to display the Arrived Holds Shelf window (Figure 5-7). A list
of all titles currently on the "arrived" holds shelf appears in the window. The list includes Title,
Item ID (barcode number), Patron name, number of Days on Shelf, and number of PE (pending)
holds.
2. To remove or reassign an item to another borrower, select the item by clicking it in the Title
column. Then select a button on the lower part of the window to Cancel Hold or Change Status
to PE. The buttons have the same security features as for other checkout overrides, and access
depends on the current user’s security rights.
Library•Solution Circulation
5. Utilities Menu Options
CIRC-137
Contents
Index
Instead of using the buttons, users can
right-click on an item in the Title column,
and a popup menu containing the options
Cancel Hold and Change Status to PE
will appear. Select from the menu.
• Cancel Hold: If you choose this button, a
confirmation box will appear, asking you
to confirm that you want to cancel the
item. Then a Relocate Item box will pop
up, asking you what to do with the item.
This is followed by another box reminding
you to notify the borrower that the hold
has been cancelled.
• Change a hold to PE (pending) status
from AR (arrived): When you do this, the
item will become available for another
borrower. A new form will display, asking
you to enter a new priority for the hold.
The default will be "1" plus whatever the
Figure 5-7. The Arrived Holds Shelf window
original priority may have been. For
example, if the priority was "5," the new
priority will be "6." You can enter only "1"
through "10" in the edit box.
If you click Cancel here, no change will be made to the hold. If you click OK, the hold will be
changed to the PE status, and the next borrower in the holds queue will be assigned the item. A
Relocate Item box will appear telling you where to send the item, followed by a box telling you to
notify the original borrower of the status change.
Library•Solution Circulation
5. Utilities Menu Options
CIRC-138
Contents
Index
To sort items in the Arrived Holds Shelf list:
1. The default sorting of items in the list is descending order by [number of] Days on Shelf. Users
can reorder the list by clicking another column heading. Click once for ascending order, and click
again for descending order. For example, to see the list arranged alphabetically by title, click the
Titles column once.
2. To exit the list, click the Close button.
To Print the Arrived Holds shelf list, Click the Print Shelf button after selecting the desired "sort by"
column heading.
Library•Solution Circulation
5. Utilities Menu Options
CIRC-139
Contents
Index
5.6 Branch Statistics
Use the Utilities | Branch Statistics option to display the Branch Statistics window (Figure 5-8),
where you can view current statistics for your branch on:
•
•
•
•
•
Number of Arrived Holds
Number of Items Checked Out
Number of Items Lost
Number of Patrons
Number of Titles
Note: The query that generates this information reviews all data for your library and can take several
minutes.
Figure 5-8. The Branch Statistics window
Library•Solution Circulation
5. Utilities Menu Options
CIRC-140
Contents
Index
5.7 Loan/Payment History Purge
Use this option to purge Loan History and / or Fine History entries. Entries older than the Purge Date
will be removed. For Loan History purges you can selectively remove entries by Branch or All
Branches, and also by Agency (Borrower) Type.
To purge Loan and Payment History entries:
1. Log on as system_administrator. On the Utilities menu, click Loan/Payment History Purge.
2. The Loan/Payment History Purge dialog will display (Figure 5-9). You can choose to purge
both Fine and Loan History entries, or either one separately. Only the fields for the checked
option(s) will accept input.
3. If you wish to purge Fine History entries,
click the check box to the left of Fine History
Purge. A check mark will display and the date
field is now available. In the entry box type the
Purge Date. (All items dated up to and
including the entered date will be purged.)
4. If you wish to purge Loan History entries,
click the check box to the left of Loan History
Purge. A check mark will display and the
associated fields will accept input.
• In the entry box type the Purge Date. (All
items dated up to and including the entered
date will be purged.)
• On the Agency Types to Purge list select
the types you wish to purge. (To select
multiple entries, press and hold the CTRL
key while clicking each desired entry.)
Library•Solution Circulation
Figure 5-9. The Loan Payment History Purge window
5. Utilities Menu Options
CIRC-141
Contents
Index
• On the Branches to Purge list click the Branches or All Branches option button as desired. (If
you select Branches, you can select multiple entries by pressing and holding the CTRL key while
clicking each desired entry.)
Note: The Branches to Purge options are available only to users logged as System_Admin.
5. When you are satisfied with the selections made, click the Purge button.
6. You will be advised the history has been purged. Click OK.
Library•Solution Circulation
5. Utilities Menu Options
CIRC-142
Contents
Index
5.8 Lost Item Charges Purge
Users with the system administrator (system_admin) login can use this Utilities menu option to purge
Lost Item Charge entries. Entries up to and including the Purge Date will be removed.
To Purge Lost Item Charges
1. Log on as system_administrator, on the Utilities menu, click Lost Item Charges Purge.
2. The Lost Item Charges Purge dialog will display (Figure 5-10). Type the desired purge date.
3. Click the Delete button to delete all entries up to and including the Purge Date.
4. You will be advised the lost item charges have been purged. Click OK.
Figure 5-10. The Lost Items Charges Purge window
Library•Solution Circulation
5. Utilities Menu Options
CIRC-143
Contents
Index
5.9 Check In/Out Notes
The Check In/Out Note Editor window (Figure 5-11) enables Circulation
users to add, edit, or delete these notes, without having to use Cataloging.
You can search for a specific item (barcode). The title, barcode, library and
collection descriptions, and the current note (if any) are displayed. Add, edit,
or delete the note. Users can also choose whether or not the notes should
be displayed during checkin and checkout. In the same Circulation dialog,
change the setting in the “Show Note” field check box. By default the box is
checked, meaning to display the note.
To Add or Edit Check In / Out Notes:
1. On the Utilities menu, select Check In / Out Notes. A blank Check In /
Out Note Editor dialog will be displayed (Figure 5-11).
2. Type a title search term in the entry box and click the Search button.
3. The Search by Title screen will display the search results.
4. Select the desired title from the list and click OK.
Figure 5-11. The Check In/Out Notes Editor
5. The Title, Item ID, Branch, and Collection information will display in the dialog. If a note currently
exists for this title, the Check In / Out Note field will display the current note.
6. In the Check In/Out Note: entry box, type the new note, or revise the current note as desired.
7. By default the Show during Check In/Out check box is checked. The note will be displayed
during Check In/Out. Note: To disable the display of this message, click the check box to remove
the check mark.
8. When done click the Save button. You will be advised the note has been saved. Click OK.
9. The Note Editor will redisplay if you wish to add another note. Click Cancel to exit.
Library•Solution Circulation
5. Utilities Menu Options
CIRC-144
Contents
Index
5.10 Reset Form
If you are using a screen resolution larger than 640 x 400, you can stretch the Circulation window by
dragging a corner or edge to fill the screen area. The screen will resize to fill the available space and
lists (like Items Out on the F2 tab) will have more space to display titles, etc. The Reset Form option
will return the screen to its default size.
Library•Solution Circulation
5. Utilities Menu Options
CIRC-145
Contents
Index
5.11. Delete Patron Records
The Patron Delete Utility enables authorized Circulation users to batch delete all borrower records of
a selected Patron Type (or multiple selected Types), when the borrower registrations have expired (or
will expire) on a specified date.
Tip: The Utility is a separate program outside of the main
Circulation program. TLC recommends that authorized staff
run it from Windows Explorer (instead of creating a shortcut
on the desktop or adding it to the Library•Solution Start
menu) to prevent accidental use of this powerful tool. See
more notes and tips below.
Warning: Once borrower records are deleted they cannot be
recovered. Be sure to run system backup BEFORE using
this utility.
To run and use the Patron Delete Utility:
1. Go to the Windows Explorer, find the PatDelete.exe
program (in the ...\circ folder with the Library•Solution
Circulation program). Double-click the file.
2. In the Login window, you must login with the User Name
"SYSTEM_ADMIN" and enter the correct Password. After
login, the Patron Delete Utility window appears (Figure
5-12).
3. First, you can choose to limit by Patron Type which
borrower records will be deleted. If you click in the check
box next to By Patron Type, select at least one Type from
the list box. Select more than one type at a time by
Figure 5-12. The Patron Delete Utility window
holding down the Ctrl key while clicking each Patron Type
Library•Solution Circulation
5. Utilities Menu Options
CIRC-146
Contents
Index
you want. (If the box is cleared, the deletion process will not consider Patron Types.)
4. Next, under Date Control click the desired option button and enter an expiration date in the date
entry box.
The choices are:
• Delete Patrons with Expiration Date on or Before [date]
• Delete Patrons Based on Date of Last Activity [date]
Note: As a safety precaution, the default Expiration Date is 01/01/1900, in case a user runs the
program and clicks the Delete button accidentally.
5. In the Branch Selection area, you can choose to delete borrower records for a selected Branch, or
select System Wide (meaning borrower records with the selected Patron Types at all libraries).
If you choose By Branch, select a library by clicking on the down arrow and selecting a library from
the list. (Note: Branch refers to the Issuing Branch field in each borrower’s record.)
If you choose System Wide, a beep will sound, and a red warning message appears next to the
System Wide button: "Warning: This setting deletes [borrower records] from all branches."
6. Under Blocked Deletion click the check box to enable the "Do Not Delete When Block Status is
Set" option. When this box is checked, any borrower with blocked status will not be deleted.
However if the box is not checked the borrower will be deleted.
7. After selecting the options you want, click the Delete button. A message window displays
information about what will be deleted, for example: "This will DELETE all borrowers of type(s):
'XXX' with Expiration Dates on or before: [date]. FOR THE ENTIRE SYSTEM [or for specified
Branch]. The error log will be overwritten if any errors are detected."
If you want to cancel the deletion process now, click the Cancel button on the lower portion of the
Deletion Information box. This will redisplay the main form, and no borrower records will be
deleted. If you click OK, the program will begin deleting borrower records.
Library•Solution Circulation
5. Utilities Menu Options
CIRC-147
Contents
Index
8. When all the borrower records marked for deletion have been run through the program, a message
appears, for example: "16 patrons were deleted." To close the message box, click OK.
If some eligible borrower records were not deleted, the message may look like this example: "472
patrons were deleted. 56 patrons were not deleted. Do you wish to view the error log?" Click Yes
to view the log. The log text, displayed in Notepad, includes borrower IDs (barcodes), borrower
names, and a message: "Patron cannot have items out or active.
Notes and tips:
• Borrower records will not be deleted if borrowers have books checked out, pending or arrived
holds, or outstanding fines, or if they have been marked as "responsible" for other borrowers.
When the "Do Not Delete When Block Status is Set" box is checked, any borrower with blocked
status will not be deleted. However, if the box is not checked, the borrower will be deleted.
• To clear borrowers who are responsible for other borrowers, run the program twice. This
statement assumes that the borrower records to be deleted and borrower records responsible for
them have all expired, that the borrower records of both groups are of the selected Patron Types
in the deletion utility, and that there are no pending transactions on either group. The first run of
the delete utility removes the dependent borrower records, and the second run removes the
"responsible" borrowers.
• The View Log button is available in the Patron Delete Utility program, but the button is not
available until the program has deleted borrower records for the first time. After it is run for the
first time, the log will be overwritten with a new list of borrowers it could not delete. If it doesn’t
find any borrower records to delete, the log will stay the same. The log is overwritten each time
the delete utility runs and locates borrower records it cannot delete.
Library•Solution Circulation
5. Utilities Menu Options
CIRC-148
Contents
Index
6. Reserves Tools Menu options
Use the Reserves Tools option to review information about all reserves or to remove items from
reserve easily.
Note: Reserves are materials set aside for a special use by a borrower (usually an instructor in an
academic library), for example, for required reading for a course. Circulation staff can also use
reserves to specify special shelving locations, for example, for "New Books" or seasonal displays such
as "Halloween Books." Special checkout periods and overdue fines are usually assigned to the items.
A reserve is not the same as a "hold." To learn how to place items on reserve, click here.
6.1 View Reserves
Use View Reserves option to see a complete summary of information about all items on reserve. Full
details are displayed, including item status and date/time due. You can rearrange the display by any of
the elements, for example, by Course, by clicking on that column. You can also edit a selected
reserve.
To view or edit reserves:
1. Select the Reserves Tools | View Reserves option to open the View Reserves window (Figure
6-1).
2. To view the reserves for this library only, click the check box beside Show Current Branch's
Reserves Only (at upper left). To reorder the elements in the display, for example, to arrange the
list by title, simply click on that column.
3. To edit a reserve, double-click the Instructor column. This takes you to the Reserves tab of that
instructor (borrower) on the Patron Transactions tab.
4. To close the display, click the Close button.
Library•Solution Circulation
6. Reserves Tools Menu options
CIRC-149
Contents
Index
Figure 6-1. The View Reserves window
Library•Solution Circulation
6. Reserves Tools Menu options
CIRC-150
Contents
Index
6.2 Remove Reserve Items
Use the Remove Reserve Items option to remove items from reserve quickly. You can simply scan
barcode labels on the items. You do not have to search first for the borrower who placed the item on
reserve. When you remove an item from reserve, it automatically reverts to the Circulating Branch and
Collection used before it was placed on reserve.
You can also remove an item from reserve through the Patron Transactions tab F2. Search for the
borrower who placed the item on reserve, select the Reserves tab, select (highlight) the item on the
Reserves tab, and then select the Remove button.
To use the Remove Reserve Items utility:
1. Select the Reserves Tools | Remove Reserve Items option to display the Take Items Off
Reserve ... window (Figure 6-2).
2. Scan the barcode label, or type the barcode number. If you type the number, press Enter or
select the Take Off Reserve button. A message will inform you that the removal was successful.
Then a Relocate Item window will remind you to reshelve the item in its correct location, transfer
it to another library, or place it on the holds shelf, as appropriate.
3. To remove another item, simply scan or type the number.
4. When you have finished removing items from reserve, exit the dialog by selecting the OK button.
Figure 6-2. The Take Items Off
Reserve... window
Library•Solution Circulation
6. Reserves Tools Menu options
CIRC-151
Contents
Library•Solution Circulation
CIRC-152
6. Reserves Tools Menu options
Index
Contents
Index
7. Help Menu Options
7.1 Contents
Use the Help Menu | Contents option to display the table of contents for Circulation Help (Figure 7-1).
Click on an underlined item to jump to the relevant topic, or use the Index feature at the top of the page
to search for key words in Help.
Figure 7-1. The Help Menu | Contents window
Library•Solution Circulation
7. Help Menu Options
CIRC-153
Contents
Index
7.2 About
Select the Help | About option to display the About Circulation window (Figure 7-2), where you can
view the Program Version and Database Version of Circulation.
Figure 7-2. The About Circulation window
Library•Solution Circulation
7. Help Menu Options
CIRC-154
Contents
Index
8. Circulation Utilities Programs
The following Circulation utilities are available from the Start | Library•Solution | Circulation Utilities menu:
•
•
•
•
•
•
•
L.S Circulation Generate Overdues
L.S. Circulation Server Down
L.S Inventory
L.S. Outreach Manager
L.S Route Config
L.S Vendor Editor
Debt Collection Module
8.1 L.S Circulation Generate Overdues
Use the Library·Solution Generate Overdues utility to produce data that can be used in notices and reports.
Briefly, producing overdue notices based on the configured overdue notice intervals for your library is a multiple step process in
which you:
• Use the Library·Solution Generate Overdues module to compile overdue notice data.
• Use the Library·Solution Reports module to run and print the notices.
To generate overdue notice data:
1. Go to the Windows Start menu and select Library·Solution and then L·S Generate Overdues.
2. On the Database Login window, type the password. Click OK, or press Enter.
Library•Solution Circulation
8. Circulation Utilities Programs
CIRC-155
Contents
Index
3. In the L.S Compile Overdue Notice Data window (Figure 8-1), select the library (or click the Process All Locations check
box for all libraries). To see the library list, click the down arrow in the Branch text box.
4. Effective Date: The system date is displayed by default in the Effective Date entry box. To change to an earlier date, type the
desired effective date, or click the drop-down arrow to view a calendar to choose the date. Please read the following
information before entering a date.
Generate Overdues uses the Effective Date setting when determining which overdue items should have a notice generated.
Overdue notice intervals are determined by the Notice Interval in Branch Setup (or the override interval in Setup Types and
Codes). If an overdue interval of seven (7) days is setup, the Generate Overdues program will check to see if the Due Date
is seven or more days prior to the Effective Date before generating a first overdue notice for the item. If a notice was
previously generated, the program will check to see if the Last Notice Date is seven or more days prior to the Effective Date
before generating a follow up notice (assuming the library has configured the system to send more than one overdue notice).
Example: The Effective Date is used when a library wishes to process overdue notice data "as if" it were a different date than
the current computer date. If your library always runs Generate Overdues on Tuesdays with a 7 day notice interval, it is
important to keep the interval intact when the library is not open on a specific Tuesday (perhaps it was closed for a holiday or
snow day). When the staff returns on Wednesday (or even Thursday), the person running Generate Overdues will be able to
enter Tuesday's date as the override date and the program will process the overdues "as if" it were Tuesday.
5. If necessary, modify the Message to Patron to be printed on the notices.
Note: The message size is limited to 250 characters.
6. To begin compiling notice data, click the Start button. A "please wait"
message tells you that the process may take some time. Remember, you
can use the Windows Alt+Tab key combination to return to another
application to continue working, if you wish.
7. After the data has been compiled, the wait message disappears. To exit
Generate Overdues, select the Cancel button.
8. Run and print notices: Now you will need to run the notices and then print
them. To do this, go to the Start menu and select Library·Solution | L·S
Reports.
Caution: Run and print notices as soon as you have generated the notice
data. If you should happen to compile the notice data again before printing
the notices that were compiled the previous time, the first batch of notices
would be lost. (Each time you compile, the count of the number of notices in
each item record is incremented.)
Figure 8-1. The L.S Compile Overdue Notice Data
window
Library•Solution Circulation
8. Circulation Utilities Programs
CIRC-156
Contents
Index
8.2 L.S Circulation Server Down
NOTE: A major change has been made to the Server Down program for Circulation v3.3. Click
here (or go to p. 281) for more information.
If the Library•Solution data server is not operational, you can the use the Server Down Circulation
(SDC) program to continue Circulation check out and check in activities.
You can also use this utility to process In House Use. The Server Down Circulation utility
(ServerDown.exe) is automatically installed on a workstation when Library•Solution Circulation is
loaded (or updated).
The program is saved into the following folder:
\program files\the library corporation\library.solution\circ.
NEW!! - The Server Down Circ Recovery utility has been eliminated. New in Library•Solution
Circulation v3.3, the Server Down Circulation interface contains menu options to perform the
uploading and posting of transactions generated during the use of the Server Down Circulation.
If you prefer, you can run SDC on any PC-compatible computer loaded with Windows 95/98/2000 or
Windows NT and that has a keyboard wedge type scanner. Use the Library.Solution Installation disc to
install the Circulation client on the computer you wish to use. It is best if the computer can be attached
to your network, but if not, you can copy the data file that it creates to a disk and transfer it to another
workstation that IS on the network to process your transactions.
The SDC transactions will be saved to a database file named TRANSACTIONS.DBF on the hard drive
in the same folder as the SDC program (See above). When you post the SDC data to your database
two log files are produced; these files can be found in the folder where the "Circulation" program is
stored (usually the same folder as noted above).
Library•Solution Circulation
8. Circulation Utilities Programs
CIRC-157
Contents
Index
Important! Since SDC was designed for use when there is a problem with the server, you should
become familiar with the procedure before an emergency situation occurs. With it, your staff will be
able to continue checking materials in and out of the library with no delay.
8.2.1 Menu Selections
The toolbar on the main screen includes File and Utilities options.
8.2.1.1 File
To Edit the Server Down Circulation Settings:
1. Click File | Settings.
2. The Settings screen will display (Figure 8-2). Make chages as appropriate to the
following fields:
• Server IP - The Internet Protocol (IP) address of the Circulation Server
• Server Port - The Port number of the Circulation Server
• Instance - The Oracle Instance (SID)
• Branch Number - As assigned by library administrators
• Station Prefix - As assigned by library administrators
• Use Alternate IDs - If your library makes use of Alternate IDs, click the gray
check box to select it. A check mark will display.
• Print Check Out Slips - If you wish to print slips to your configured printer,
click the gray box to select. A check mark will display.
Figure 8-2. The Server Down Circulation Settings
window
Library•Solution Circulation
8. Circulation Utilities Programs
CIRC-158
Contents
Index
8.2.1.2 Utilities
The Utilities menu on the Server Down Circulation main screen displays two options: Sync
Transactions and Import Scanner File.
• Sync Transactions: This option allows each Server Down Circulation station to Upload its
transactions to the server before the administrator "finalizes" the transactions.
Sync Transactions and Finalize Transactions create log files and error log files (sync.log,
sync.err, finalize.log, finalize.err) when they are executed . To view these files use a text editor
(NotePad, WordPad etc.) to open them. The files are normally found in: C:\Program Files\The
Library Corporation\Library.Solution\Circ.
• Import Scanner File: This option allows for importation of a file of scanned records created by
the Percon Scanner.
To Sync Transactions
1. Click File | Utilities and then click Sync Transactions to reach the SDC Utilities menu.
2. The Sync Transactions dialog will display with the Upload Transaction option selected by
default. Click Sync to upload the transactions. A Sync Complete notice will display advising the
"Transactions have been synced to the database". Click OK.
3. Administrators will have the option to Finalize Transactions. See the next section for instructions.
To Finalize Transactions
1. Log on as circ_admin.
2. Click File | Utilities and then click Sync Transactions.
3. The Sync Transactions dialog will display. If all transactions have been uploaded from all
stations, click Finalize Transactions.
Library•Solution Circulation
8. Circulation Utilities Programs
CIRC-159
Contents
Index
4. A Sync Confirmation message will ask "Have transactions from every station been synced up to
the database?." Click Yes to continue or No to return to the SDC main screen.
5. A Sync Complete message will advise "Transactions have been synced to the database." Click
OK. If errors are encountered the following error message will display instead. Click OK.
6. The main Server Down Circulation screen will return. Exit or proceed as desired.
To Import a Scanner File
Important! - Before you begin: The Import Scanner File utility program will use the Branch #, Station
Prefix, and User information as displayed on the main SDC screen to automatically populate that
information in the imported scanner file records. Be sure the desired information is in place in
those three fields of the main screen BEFORE selecting the scanner file to import.
1. Click File | Utilities and then click Import Scanner File.
2. An Open dialog will display. Navigate to the file you want to Import. Type the file name, or click
the file name and it will display in the Open entry box. Click Open when the desired file name is
displayed.
3. An Import Finished message will advise "Importing of scanner file to the database is complete."
Click OK.
Library•Solution Circulation
8. Circulation Utilities Programs
CIRC-160
Contents
Index
8.2.2 Using the Server Down Circulation Utility
If the Library•Solution data server (or your network connection to that server) is not operational, you
can the use the Server Down Circulation (SDC) program to continue Circulation check out and check
in activities. SDC can also be used on a bookmobile.
The program is saved into the following folder:
\program files\the library corporation\library.solution\circ
Using Server Down Circulation
• Menu Options
– File Menu - Edit Database and Station options.
– Utilities Menu - Upload station transactions to the
server, and Post those transactions to the
database, after the server is back up.
To Run SDC: Do This first
When a problem with the Library•Solution system data
server occurs, follow the steps below to run SDC:
1. Boot a Circulation station or any computer that has SDC
loaded, and a keyboard wedge scanner attached.
2. IMPORTANT! Check the date and time set on the
station. Confirm that every station running SDC is set to
the same date and time.
3. Click Start | Library.Solution | Circulation Utilities |
L.S Server Down Circ to start the program.
Library•Solution Circulation
Figure 8-3. The Server Down Circulation window
8. Circulation Utilities Programs
CIRC-161
Contents
Index
4. The first time you use this program, click the File menu and choose Settings. Enter the IP
address of your Library•Solution dataserver and Instance Name of your database (check with TLC
Support if you do not know the instance name). (Note: Do NOT change the default setting for the
Server Port.) Set the other setup options to suit your needs. The L.S Server Down Circulation
window is shown in Figure F8-3.
5. The L.S Server Down Circ window will open. (For more information about the Transaction area
and Check In see: Server Down Circulation:Check Out / Check In Items)
6. Setup: Enter data in the two fields on the upper left of the window, as described below. (Note:
these fields are automatically filled in based on the Settings choices made earlier, but can be
overridden for a specific session.)
Use the TAB key or SHIFT + TAB to move forward or back through the fields (or use the mouse).
Then see the following sections for details on each type of transaction: Check Out, Check In, In
House Use, and Inventory.
• Branch #: Enter the Library•Solution Branch number for this library (up to 4 digits).
• Station Prefix: Enter a number which should be unique for each station, for example, ST1 for
check out station #1.
• User: If you normally use a generic Circ user login, leave this field empty. If you normally use a
specific user name, enter that in this field.
Library•Solution Circulation
8. Circulation Utilities Programs
CIRC-162
Contents
Index
8.2.3 Check Out / Check In Items
Checking Out Items
1. Enter the Branch number, User name, and Station Prefix.
2. Select transaction: In the Transaction area , select Check Out. When Check Out is selected,
the Promised Due Date check box under For Checkout Transactions is enabled.
3. Borrower ID: In the Borrower ID field, type or scan the patron’s ID number (barcode number).
Since the Library•Solution server is unavailable, you will not have access to patron records by
name or access to items by title. You must enter patron and item transactions by barcode number.
If you scanned the barcode label, an automatic carriage return at the end of the scan will move the
cursor to the Item ID field.
Important! If this is your first transaction, be sure to enter a due date! If you have just entered the
Borrower ID for a new borrower, check the due date to be sure it should be the same as used for
the previous borrower’s transactions. See the next step.
4.
Promised Due Date: To enter a due date, click the check box to the left of Promised Due Date (if
the check mark is not present). This makes the date entry field available. (See notes below)
Enter a due date for the next item(s) to be checked out. Type the date in this format: mm/dd/yyyy
(will accept 4 digit year). Example: For May 7, 2005, type: 05/07/2005.
Note: If you do not check the box and enter a Promised Due Date, the system will calculate the
due date based on the rules setup for the Patron type and collection code when the server down
data is posted to the database later. It will use the date and time of the actual checkout and
calculate the due date from that date/time.
Warning: If the uploading of the server down data is delayed a long time, some items may be
overdue as soon as they are posted.
Library•Solution Circulation
8. Circulation Utilities Programs
CIRC-163
Contents
5.
Index
Item ID: Scan or type the barcode number of the item to be checked out. If you typed the number,
press Enter or select the OK button. If you scanned the label, an automatic carriage return at the
end of the scan will save that transaction.
Repeat for all items being checked out to this borrower. If necessary, you can change the
Promised Due Date if the borrower is checking out different types of material with different check
out periods, or you can leave the Promised Due Date box unchecked and let the system calculate
the due date when the data is posted.
6. To switch to another borrower, press Esc. This moves the cursor to the Patron ID box and
highlights (blue) the current ID. Scan the next borrower’s barcode label, or type the number.
Checking In Items
1.
Enter the Branch number and Station prefix.
2. Select transaction: In the Transaction area on the lower left, select Check In. When Check In is
selected, the cursor moves to the Item ID field.
3. Item ID: Scan or type the barcode number of the item to be checked in. If you typed the number,
press Enter or select the OK button. If you scanned the label, an automatic carriage return at the
end of the scan will save that transaction. Repeat for all items being checked in.
About overdue items: If items are overdue, the system will not recognize this condition until these
transactions are loaded to the server. (The effective checkin date/time will be that recorded in the
server down data file when the item was actually checked in.) Overdue fines will not be lost. They are
calculated when the file is uploaded to Circulation, and fine amounts are then added to the Charges tab
of the relevant borrower records.
Library•Solution Circulation
8. Circulation Utilities Programs
CIRC-164
Contents
Index
In House Use / Inventory
You can use Server Down Circulation (SDC) to gather In House Use data or to perform Inventory.
However, it is usually recommended that these transactions be recorded using a portable
scanner/storage unit.
To perform In House Use or Inventory, follow the Check In instructions above, but in step 2 select In
House Use or Inventory instead of Check In.
Warning: If you are using SDC for gathering inventory data, DO NOT mix other types of SDC activities
in the same output file. You should upload all of your checkout, checkin, and in-house use data to the
server (or rename the UPLOAD.SD output file to something else) and then start a fresh UPLOAD.SD
file for Inventory transactions.
Library•Solution Circulation
8. Circulation Utilities Programs
CIRC-165
Contents
Index
8.2.4 SDC Log and Error Files
During the time that Server Down Circulation is used certain files are created to capture those
transactions and related information. When normal Circulation functionality is restored, the transaction
information contained in those files must be recovered and inserted in the Circulation database.
Here are some important details about the Server Down Log, Error, and Transaction files. The files are
normally found in: C:\Program Files\The Library Corporation\Library.Solution\Circ.
SDC Log and Error Files
• Sync Transactions and Finalize Transactions each generate a log file (SYNC.LOG,
FINALIZE.LOG) and an error log file when they are executed. These files are saved in the same
location as noted above.
• If errors are reported in the log, you should view the appropriate error log (SYNC.ERR,
FINALIZE.ERR).
Library•Solution Circulation
8. Circulation Utilities Programs
CIRC-166
Contents
Index
8.2.5. Description of SDC Transaction File: TRANSACTIONS.DBF
The Server Down Circulation transactions are saved into a text file named TRANSACTIONS.DBF.
Here is a field description of this text file, fields left to right:
The first group of characters (between 17 and 20 characters) contains date and time of transaction, the
character X followed by a transaction type code (see below), and branch number up to 4 digits (no
spaces between elements).
Transaction type (1 letter):
O = Check Out [uppercase letter O, not zero 0]
I = Check In [uppercase letter "eye" not letter "el" or number one]
H = In House Use
V = Inventory
Station prefix (3 characters)
Item ID (left justified)
Patron ID (left justified): Data present only if Check Out transaction.
Due Date (8 characters formatted: mm/dd/yyyy): Date is present only if Check Out transaction.
Here is an example of an UPLOAD*.SD file; this contains a few transactions of each type:
19990304135759XO3 ST9 31001000045602 21001000032456 04/01/1999
19990304135800XO3 ST9 31001000094837 21001000032456 04/01/1999
19990304135800XO3 ST9 31001000095544 21001000889965 04/01/1999
19990304135814XI3 ST9 31001000095433
19990304135817XI3 ST9 31001000095221
19990304135818XI3 ST9 31001000043321
19990304135835XH3 ST9 33001000099934
Library•Solution Circulation
8. Circulation Utilities Programs
CIRC-167
Contents
Index
19990304135822XH3 ST9 33001000099114
19990304135836XH3 ST9 31004493822007
19990304135843XV3 ST9 34001000067890
19990304135844XV3 ST9 34003100058487
19990304135845XV3 ST9 34001100084727
Library•Solution Circulation
8. Circulation Utilities Programs
CIRC-168
Contents
Library•Solution Circulation
8. Circulation Utilities Programs
Index
CIRC-169
Contents
Library•Solution Circulation
8. Circulation Utilities Programs
Index
CIRC-170
Contents
Index
8.3 L.S Inventory
Inventory is a module of the Library•Solution integrated library system. Its primary purpose is to
identify items that are MISSING (i.e., not on the shelf when the system believes they are). It also
helps you maintain items on the shelf in proper sequence according to collection and call number.
User interface includes three main activity tabs: Collection Processing, Identify Missing Items,
and Delete Old Tasks. Clearly labeled fields and on-screen instructions help you step through
the inventory process.
Iinventory scheduling: Inventory is date-controlled, so you can run inventory as often as you like,
for example, weekly for best-sellers or the video collection. This allows your staff to perform a
continuous inventory, scheduled at your convenience. Gather data on all items in a collection, or
just a few shelves within a limited call number range - no need to close the library for weeks at a
time while inventory is taking place. The process handles items checked out or misshelved within
the area being inventoried.
Data collection and download: Use a portable barcode scanner to scan items on the shelves.
Then offload the data, start Inventory, and run the processes. Print reports as needed.
Maintain shelf order: The Inventory module helps you maintain items on the shelf in proper
sequence according to call number. If you select an option on the Collection Processing tab,
the program checks the shelving order of the items scanned and creates an error log for
misshelved items. The error report, which includes other detected errors, can be printed through
the Library•Solution Reports module. Your staff can use the report to locate the items and
shelve them correctly.
Identify missing items: Inventory identifies items missing from the shelves and codes them with
the Circulation item status code of "MS" for missing. You can print optional missing items reports
to use in collection management and analysis.
Library•Solution Circulation
8. Circulation Utilities Programs
CIRC-171
Contents
Index
8.3.1 Hints for Successful Inventory
Here are a few tips about workflow and organizing inventory activities. If you prefer to read a detailed
list of steps in the inventory procedure, see section 8.3.2.1 Step-by-Step Guide to the Inventory
Process.
You should inventory items in only one collection at a time, but if you have multiple data collection
devices you can have staff working in multiple areas of the library.
If you have time, shelf read the area you plan to inventory, even though the Inventory process
allows you to identify items that are shelved out of order.
Keep a manual log of the inventory date, the library and collection, and the beginning and
ending call numbers for each session of collecting data (that is, for each instance of barcode
scanning that will produce a file to be offloaded from the barcode scanner). As an alternative,
you can mark the report "Shelf Order for Holdings Code" which provides you with the correct call
number data (see more information about this report below). You will need to enter this
information later on both of the activity tabs in Inventory: Collection Processing and Identify
Missing Items. After running each process in Inventory, also make a note of the date you ran
Collection Processing and the date for Identify Missing Items.
How to enter call numbers in the manual log and in the From and To boxes under the Collection
Processing tab and the Identify Missing Items tab:
Before you begin an inventory, you will need to run the "Shelf Order for Holdings Code" report to
get the proper data for entry. The first column in the report is Type; this refers to the Type of call
number. In both, Collection Processing and Identifying Missing items, you are required to select
a type under Call Number Type. Refer to the Type Column in the report. The letters correspond
to Call Number Type. D=Dewey, L=LC, and X=Neither (non-standard).
To determine the call number for entry in the From: box, look at the first number under the
column "Shelf Order field" and type this into the From: box.
Library•Solution Circulation
8. Circulation Utilities Programs
CIRC-172
Contents
Index
To find the call number for entry in the To: box, look at the last number under the column "Shelf
Order field" and type this into the To: box.
The system attempts to verify the call number type (Dewey, LC, or other), so do not take
shortcuts. For example, for the beginning range of Deweys, enter "000 A" not simply "0A".
For nonstandard call numbers like "FIC Abcd" the system literally checks call numbers with the
exact sequence of characters and spaces you specify. Thus, if some of your fiction items use
prefix "FIC" and others with an "F" are intershelved, it is not recommended that you run the
shelf-checking process.
Before you begin scanning items on the shelf, check the shelf position of the first item on the
shelf to be sure it is shelved correctly (check the items shelved before and after it). If this item is
out of place, the results of the shelving sequence error checking could be skewed.
Offload inventory data from the scanner and run Collection Processing every day when you are
actively performing inventory. This will ensure that the report of misshelved items is produced in a
timely manner and that the inventory dates in the item records will be accurately recorded.
Checking shelf order is optional: The Check Shelf Order check box is available on the
Collection Processing tab. This process checks for errors in the call number sequence. Other
errors, like "Out of range," "Wrong Collection," Not in the database," etc., are always detected, so
it is recommended that you print the report immediately so you can correct shelving errors as
soon as possible.
When should you run Identify Missing Items? Before you run Identify Missing Items, you may
want to wait until you have finished scanning a whole collection, unless it is a large one.
However, be sure to offload scanner data, run Collection Processing, and print the "Inventory
Shelving Sequence Errors" report every day during the inventory. For example, you might scan
the first third of a medium sized collection on Monday and then download and run Collection
Processing at the end of the day. Then do the second third of the collection on Wednesday and
the final third on Friday. On Monday of the following week, run Identify Missing Items, entering
the starting date of the previous Monday.
Library•Solution Circulation
8. Circulation Utilities Programs
CIRC-173
Contents
Index
WARNING! You will have a problem if you run Identify Missing Items on a whole collection or
call number range you have not completed scanning and running through Collection
Processing: MANY items would be marked missing which are not actually missing! There is no
recovery from this situation, except to finish scanning all the items in that collection or call
number range, and then run Collection Processing and Identify Missing Items again.
Library•Solution Circulation
8. Circulation Utilities Programs
CIRC-174
Contents
Index
8.3.2 Inventory Procedures
8.3.2.1 Step-by-Step Guide to the Inventory Process
This section lists in a single sequence all the steps in the inventory process. The steps include
instructions for the running updates, as well as running the reports listing "Lost" or "Missing" items. For
details on each step, refer to the following sections.
Steps in the Inventory process:
1. From the Library·Solution menu, select L.S Reports.
2. Log on and run the report "Inventory - Shelf Order for Holdings Code." This report produces a list
of unique call numbers in a selected holdings code by call number type (LC, Dewey and
Non-standard) for a particular branch/collection. The numbers appear in call number order. Print
this report before you begin to scan barcodes of items on the shelf. The report provides an over
view of all call number types and call numbers in the particular holdings code group you are
working.
3. Data Collection: Start scanning the barcodes of items in the holdings code group you have
chosen. (Later in the inventory procedure, you will need to know the first call number of the
group you scanned and the date you scanned it. Because of this, you should keep a manual log
of this information.)
4. You can scan as many barcodes as you want in a single session. However, if you plan to report
the shelving errors (see step 13), you need to limit your scanning to roughly 500 items. If you
scan more than 500 items, the "Inventory Shelving Errors" report will take MUCH longer to run.
5. Once you have scanned the last barcode in the collection (or the last barcode before you reach
500 items), record the last call number you scanned in your manual log. Later in the inventory
procedure, you will need to know this call number.
Library•Solution Circulation
8. Circulation Utilities Programs
CIRC-175
Contents
Index
6. (Applies ONLY to Percon Portable Scanners) To offload the scanner data to your workstation,
connect the scanner to the computer and then go to the Start menu, choose Library.Solution,
Circulation Utilities, and then select Portable Scanner Offload. A window will open, and you
should see the following messages:
– Communications port opened
– Waiting for "upload.inv."
Follow the instructions on the scanner to offload the data. When the offload is complete, the
window will automatically close.
Important note: Every time you run the Portable Scanner Offload process, the upload.inv file
is downloaded. Thus, it will overwrite any previous version of the file that might exist on your
hard drive. This file is located in the C:\Program \ The Library
Corporation\Library.Solution\Circ directory.
Tips: If you do not want the upload.inv file to be overwritten, follow the instructions in step 7.
7. To prevent the upload.inv file from being overwritten: From the Library•Solution menu, select
L.S. Inventory. You will need to log on to the program. On the Collection Processing tab, click
on the Select Upload File button. The Open window should have the Circ Folder in the Look In
box. Single click on upload.inv to highlight it. Then right-click, and select Rename. Type in a
new name for the file. (It can be the current date without punctuation, the call number range, or
any name that will make sense to you.) Leave the extension as .inv so the file will show in the
window, and press Enter. Then click on the file you just named to have it appear in the File
Name box at the bottom of the window. Click Open. The file name should now appear next to
the Select Upload File: box.
8. If you used a scanner to do the inventory, make sure the Scanner File is selected under Upload
File Type.
9. In the Section of library being inventoried, select the correct branch and coll(ection) for the
barcodes you have just scanned and offloaded.
10. Select the Call Number Type of the call numbers in the selected collection. (This information
needs to be what is listed on the "Shelf Order for Holdings Code" report from Step 1. Refer to
Library•Solution Circulation
8. Circulation Utilities Programs
CIRC-176
Contents
Index
the "Type" Column, which is the first column in the report: D=Dewey, L=LC, and X=Neither
[non-standard].)
11. Type the first call number scanned in the From: box. You will need to type the call number
exactly the way it appears in the Shelf Order field column in the "Shelf Order by Holdings
Code" report from step 2. (This should match your manual log information.)
12. Type the last call number scanned in the To: box. Use the same instructions as in Step 11.
13. If you want to produce a report listing call number order errors in the section for which you are
running inventory, select the Check shelf order check box. (If you do not select the check box,
items out of sequence will be ignored, but items belonging in a different collection or different
part of the collection will still be noted.)
14. Click Process Inventory Data.
15. When the process is completed, you may exit the Inventory program. From the
Library·Solution menu, select L.S Reports. Log on and run the "Inventory Jobs List" report.
This report gives the Holdings Code, the date the job was run, the beginning call number, the
ending call number, and a "Job number." Run the "Inventory Shelving Sequence Errors" report.
You will be prompted to enter the Job number. This report displays all items that are in the
wrong collection, items from a different call number range, and barcodes that do not exist in the
database. If you checked the "Check shelf order" option (in step 13 above), it will display items
not shelved in their correct sequence.
16. Once you have completed running the entire collection through the Inventory process (Steps
1-14), go back into the Inventory program and click the Identify Missing Items tab.
17. On the Identify Missing Items tab, in the Beginning Date of Inventory box, enter the date
you first started scanning the collection. (Refer to your manual log for the date.) You may
enter the year as two digits; Library·Solution will automatically change it to a four-digit year.
18. In the Section of library being inventoried, select the correct library and coll(ection).
19. If you are running the "Identify Missing Items" process on the whole collection, under
Collection Options, click on Whole Collection. Click Run, and skip Step 20.
Library•Solution Circulation
8. Circulation Utilities Programs
CIRC-177
Contents
Index
20. If you are running the "Identify Missing Items" process on part of a collection, click on Selected
Call Number Range, and enter the beginning and ending call number of the barcodes you
scanned, referring to your manual log. Click Run.
21. When processing is completed, return to the Library·Solution Reports program, and run the
"Inventory - Identify Missing Items Log" report. It will prompt you to enter the date/time you ran
the inventory process, as well as the Holdings Code. The report will display missing items for
that holdings code, with missing items arranged by location and collection. This is a log file only.
It displays only items marked missing during the last run of "Identify Missing Items," as well as
items that were In-Transit or Checked-Out when scanned during the inventory process.
22. If you are interested in a statistical count of all the items in an entire collection by Circulation
Item Status, run the "Inventory Status Analysis" report.
23. Hint: If you wish to delete your old inventory scanner files for the collection you just finished,
and before starting to inventory another collection, return to the Library·Solution Inventory
program. Under the Collection Processing tab, click on Select Upload File. The Open
window will display a list of files and programs, and you should see the old inventory files you
worked with earlier. You may delete these. To delete a file, highlight the file, click the
right-mouse button, and click Delete. Repeat for each file you wish to remove. (You only need
to retain inventory files (*.inv), while you are running inventory for that collection. You do not
need to keep them after the whole collection is complete.)
24. After removing the old inventory files (optional), you can go to the Delete Old Tasks tab.
("Tasks" are temporary files that are built to facilitate the inventory process. Once you have
finished inventory of a particular library and collection, you should delete the task records. This
is NOT the same as deleting inventory data files, described in step 23.)
Library•Solution Circulation
8. Circulation Utilities Programs
CIRC-178
Contents
Index
On the Delete Old Tasks window, the date window for deleting old tasks "on or before" defaults
to the current date. Enter a different date in the past if you wish. Note that this process will ONLY
delete the inventory task records for the library location where you just ran the inventory process
(that is, the library set for this station in Circulation | Setup | Local Configuration | Station
Options).
25. Repeat Steps 1-24 for each holdings code in a library/collection.
Library•Solution Circulation
8. Circulation Utilities Programs
CIRC-179
Contents
Index
8.3.2.2 Data Collection
An important step in inventory is to gather information about items on the shelves of the library, using a
portable barcode scanner, such as the recommended Percon scanner.
To collect inventory data:
1. To begin, select a library, collection, and the beginning call number of the section to be
inventoried.
Before you begin, check the shelf position of the first item in the range (check the call number of
the items before and after it on the shelf), to be sure it is shelved correctly. It is not necessary to
read the call numbers on the rest of the items being scanned. The inventory process will check
the shelf order and identify misshelved items.
Record the library, collection, and beginning call number information in a manual log, since you
will need it in later steps: Collection Processing and Identify Missing Items. (After you have
completed scanning items for the day, also enter the ending call number in your log.)
2. Use a portable barcode scanner to scan the barcode numbers of items on the shelves of the
selected collection, in the selected range of call numbers.
Note: The capacity of any scanner (how many books can be inventoried at a time) depends on
the available storage RAM in the scanner; Percon scanners can easily hold between 4000 and
5000 scanned barcodes. If you want to know the shelving errors, you will need to keep your limit
to around 500 items, or else the report will take a long time to run.
3. After scanning an area of the shelves, offload the data to the hard drive of the workstation where
you wish to run inventory processes. (See section 8.3.2.4 for details.)
4. After offloading the data, start the Library·Solution Inventory module and select the Collection
Processing tab.
Library•Solution Circulation
8. Circulation Utilities Programs
CIRC-180
Contents
Index
Note: Libraries can also gather inventory data by using TLC's Windows version of the Server
Down Circulation (SDC) program on a workstation. However, since it is impractical to bring
books to the computer for scanning, you could use a laptop computer equipped with a barcode
scanner and work near the shelves.
Library•Solution Circulation
8. Circulation Utilities Programs
CIRC-181
Contents
Index
8.3.2.3 Setting Up the Percon Scanner
Note: Skip this section if the TLC installers have already set up your portable scanner for you, or if you
are using some other type of scanner.
To set up the Percon scanner:
1. Create a shortcut (in the Library.Solution group on the Start menu, or on the desktop of your
workstation where you will offload data) to run PTFER.EXE from the \Circ directory.
Your shortcut should look like this:
C:\Program Files\The Library Corporation\Library.Solution\Circ\PTFER.EXE
Name the shortcut: Offload Scanner Data.
Note: If you do not have PTFER.EXE in the Circ folder indicated above, call TLC Support.
2. Click on the shortcut with the RIGHT mouse button and select Properties from the drop-down
menu.
Choose the Shortcut tab and then modify the shortcut command line to look like the following:
"C:\Program Files\The Library Corporation\Library.Solution\Circ\PTFER.EXE" upload.inv -2rx
Note: "Upload.inv" is the name of the output file from the offloading process, and "2rx" means:
"use COM2 serial port, Receive the data, eXit from the PTFER program when the offload is
complete." If you have attached your Percon scanner to a different COM port, substitute the
appropriate number in the string.
Library•Solution Circulation
8. Circulation Utilities Programs
CIRC-182
Contents
Index
To prevent overwriting, see the tips explained in step #7 in Step-by-Step Guide to the Inventory
Process (section 8.3.2.1).
If the data offload was successful, the data is automatically cleared from the scanner.
5. After offloading the data file, start L·S Inventory (on the Start menu, select Library·Solution,
then L·S Inventory). In the Inventory window, select the Collection Processing tab.
Library•Solution Circulation
CIRC-183
8. Circulation Utilities Programs
Contents
Index
8.3.2.4 Offloading Data from Percon Scanner
After you have collected inventory data with the Percon portable barcode scanner, the next step is to
offload the inventory data from the scanner to the hard drive of the workstation where you want to run
Inventory processing.
The offload is performed outside the Library·Solution programs.
To offload data:
1. Run the PTFER program by clicking on the shortcut on the desktop
called "Offload Scanner Data." (You can also run this from the Start
menu: select Library.Solution, and then Portable Scanner Offload.)
2. Attach the portable scanner to the serial cable (which is attached to the
COM port of your workstation).
3. Press the F4 button on the scanner to Offload Data.
4. Press F1 on the scanner to Begin Offload.
The inventory data from the scanner will be copied to the UPLOAD.INV
file in the following directory on the workstation’s hard drive:
C:\Program Files\The Library Corporation\Library.Solution\Circ.
Notes: This process creates the UPLOAD.INV file each time, so it will
overwrite any previous version of this file that might exist on your hard
drive. Thus, you should make sure you have processed the previous
scanner-load of data before offloading more.
Figure 8-6. The Collection Processing tab
Library•Solution Circulation
8. Circulation Utilities Programs
CIRC-184
Contents
Index
8.3.2.5 Collection Processing
Use the Collection Processing tab in Inventory (Figure 8-6) to load the current inventory data file to
be processed, identify the relevant library, collection, call number type, and call number range of the
inventoried items. Collection Processing compares the barcode file uploaded from the portable
scanner to Circulation item data and updates each item's "date of last inventory" field. You must run
this process on the data before missing items can be identified. Optionally, you can check for
misshelved items and other shelving errors.
To run Collection Processing:
1. Run the preliminary report "Inventory - Shelf Order for Holdings Code" to produce a list of unique
call numbers in your system. The report will also provide call number values you will need to
enter in Steps 5 and 6 later in this procedure.
2. After offloading an inventory data file to the station where you wish to run Inventory processing,
start L·S Inventory (on the Start menu, select Library·Solution and then Inventory). Select the
Collection Processing tab.
3. In the Upload File text box, the file UPLOAD.INV is entered by default in the following directory:
\program files\the library corporation\library.solution\circ. If you want to work with a different
file, enter it here, or use the Select Upload File button to browse for and select the file and path.
4. Select the Upload File Type: TLC Scanner (output from Percon Scanner); Server Down
Circulation (output from Server Down Circulation); Text Barcode (generic, carriage return
delimited, text file)
5. From the Branch and Collection list boxes, select the library and collection being inventoried.
6. Select the Call Number Type: Dewey, LC, or neither (nonstandard call numbers like: FIC Abcd
or JE Seuss). The Call Number Type is displayed under Type column of the "Shelf Order for
Holdings Code" report. D=Dewey, L=LC, and X=Neither (non-standard).
Important! Be sure to select the correct call number type for the range of call numbers you are
entering.
Library•Solution Circulation
8. Circulation Utilities Programs
CIRC-185
Contents
Index
7. Enter the beginning and ending call numbers of the collection that was inventoried. These call
numbers appear on the "Inventory - Shelf Order for Holdingscode" report. The call number you
need to use is displayed on the Shelf Order Field Column.
8. Check Shelf Order: This OPTIONAL process checks shelf order and reports on misshelved
items and other errors, for example, items shelved outside the range of specified call numbers,
like oversize items. If you want to run shelf order, click the Check Shelf Order check box.
9. Click the Process Inventory Data button.
10. When the process has been completed, you can print a report listing misshelved items and
other errors, as instructed on the lower right of the tab. In the Library·Solution Reports module,
select the report "Inventory Shelving Errors."
11. To continue the inventory process, select the Identify Missing Items tab.
Note: Click the Process Inventory Data button
Additional information: When to Run Identify Missing Items: Be careful not to run Identify
Missing Items on a complete collection or a specified call number range until after you have scanned
all the items and run Collection Processing on all those items!
Library•Solution Circulation
8. Circulation Utilities Programs
CIRC-186
Contents
Index
8.3.2.6 Identify Missing Items
Use the Identify Missing Items tab (Figure 8-7) in Inventory to identify items "missing" from the
shelves. The program identifies any items within the specified collection and call number range that
were neither inventoried nor checked in since the beginning date of the inventory. Then it marks those
items with a status of "MS" (Circulation Item Status code for Missing).
If the process finds any items that are marked "Lost," "Checked Out," or "Missing," the Item Status
Codes will not be changed, but the items will be included in the missing items error report: "Inventory Identify Missing Items Log."
WARNING! You will have a problem if you run Identify Missing Items on a
whole collection or call number range you have not completed scanning and
running through Collection Processing: MANY items will be marked "MS"
missing which are not actually missing! There is no recovery from this situation,
except to finish scanning all the items in that collection or call number range, and
then run Collection Processing and Identify Missing Items again.
To identify missing items:
1. After you run Collection Processing, select the Identify Missing Items
tab.
2. In the Beginning Date of Inventory box, enter the beginning date of the
inventory. If you are working with more than one input file, enter the date of
inventory for the first file. Enter the date in this format: mm/dd/yyyy (the
system supplies the slashes < / >).
3. Under Section of Library to Process, select the Branch and Collection
from the choice lists. Then select the Call Number Type: Dewey, LC, or
neither (nonstandard call numbers like: FIC Abcd or JE Seuss). You can
obtain the correct type by checking the "Shelf Order for Holdings Code"
report and finding the letter listed under the Type column (first column).
D=Dewey, L=LC, and X=Neither (non-standard)
Library•Solution Circulation
8. Circulation Utilities Programs
Figure 8-7. The Identify Missing Items tab
CIRC-187
Contents
Index
Important! Be sure to select the correct call number type for the range of call numbers you are
entering.
4. If you are running "Identify Missing Items" on the whole collection, click Whole Collection.
Otherwise, click on Selected Call Number Range. In the From and To boxes, enter the
beginning and ending call numbers. You can get these numbers from the "Inventory - Shelf Order
for Holdings Code" report, under the "Shelf Order field" column.
5. Click the Run button.
6. After the process has been completed, you can print a report of missing items, as instructed on
the lower right of the tab. In the Library·Solution Reports module, select the report " Inventory Missing Items Log." Several other reports offer more specific missing and lost item tabulation.
Library•Solution Circulation
8. Circulation Utilities Programs
CIRC-188
Contents
Index
8.3.2.7 Delete Old Tasks
Use the Delete Old Tasks tab (Figure 8-8) in Inventory after you have finished running inventory
reports.
"Tasks" are temporary files that are built to facilitate the inventory process. Once you have finished
inventory of a particular library and collection, you should delete the task records.
The Delete Old Tasks process deletes older inventory task records (up to a specified date) that have
been inserted into various database tables. This does not delete the upload.inv file or any other kinds
of inventory-specific files.
Note: This process is library-specific: it ONLY deletes old inventory tasks for
the specific library that is currently configured for this station in the Circulation
Setup.
To Delete Old Tasks:
1. Run Inventory and click on the Delete Old Tasks tab.
2. In the Delete Old Inventory Tasks on or before box, today's date is
entered by default. If you leave the date as is, the records that will be
removed will be ones created on or before the current date. You may
want to use another date in the past to remove old tasks produced
before a certain date. This retains the task records created after the
date you enter and the current date.
3. Click on the Delete button.
Figure 8-8. The Delete Old Tasks tab
Library•Solution Circulation
8. Circulation Utilities Programs
CIRC-189
Contents
Index
8.3.2.8 Inventory Reports
Several reports are available and necessary for successful inventory processing. Before you do
Inventory processing, you should run the following preliminary report:
• "Inventory -- Shelf Order for Holdingscode": This will produce a list of all unique call numbers for
a particular location/collection (holdings code), as well as list the call numbers in the format in
which the system will "see" them. Print this report before you begin scanning. When you begin
to scan the collection, you may want to note on the "Shelf Order by Holdingscode" report the call
number at which you began scanning, as well as the barcode number, and then note the call
number and barcode where you stopped scanning. You will enter call number information from
this report into the call number From and To boxes on the Collection Processing tab, before
you begin processing inventory data.
As a result of Inventory processing, a number of reports are available in the Library·Solution Reports
module:
• "Inventory Jobs List":
Run this report whether or not the Check shelf order box in Collection
Processing was checked, since the report will still print items that were found that were not
supposed to be in the section scanned. This report lists the Holdings Code, the date, the
beginning call number, and the ending call number with a Job number. You will need to enter
this job number when you run the "Inventory Shelving Errors" report. You should run this
"Inventory Jobs List" before you run the "Inventory Shelving Errors" report.
• "Inventory Shelving Sequence Errors": Important Note: Run the "Inventory Jobs List" before
you run the shelving errors report. The "Inventory Shelving Errors" report is available for all
inventory jobs, but if you did not select the Check shelf order check box in Collection
Processing, this report will only display the items that should not have been shelved in the
section scanned. When you start the report, you will need to enter the "job number" from the
Inventory Jobs List report (above).
An item shelved out of sequence is identified in the report by a "locator" item, that is, the call
number of the item just before it that is shelved correctly. (The locator item is identified in the
shelving report as "Item Following"; the misshelved item is listed just below it as "Misshelved." A
Library•Solution Circulation
8. Circulation Utilities Programs
CIRC-190
Contents
Index
description of the shelving problem follows, like "Range," which means this item was not
supposed to be in the section scanned.) Take the list to the shelves immediately and move
misshelved items to the correct locations, before someone moves or checks out the locator
items.
The following reports are available as a result of running the process on the Inventory Identify Missing
Items tab:
• "Inventory Missing Items Log": You will need to enter the last date/time you ran the process, as
well as the holdings code. This report displays missing items for the site where you just ran
inventory with the holdings code arranged by location and collection. This is a log file only. It
displays only items marked "missing" during the last run of "Identify Missing Items." It also lists
items scanned during the inventory process with a status of In-Transit or Checked Out. This
report contains items marked missing in the most recent inventory process.
• "Missing Items in a HoldingsCode": This report lists all items marked "missing" in a collection,
regardless of when the items were so marked
• "Lost Items by Location": The listing shows items marked as lost for one location (library).
• "Inventory Status Analysis": This report gives statistical counts of all items in the entire collection
by Circulation Item Status, sorted by the status and the date the status was applied.
Library•Solution Circulation
8. Circulation Utilities Programs
CIRC-191
Contents
Index
8.3.3 Reference Information about How Inventory Works
System administrators may want more information about how inventory works. For items inventoried in
the specified library/collection and call number range, the process goes through the following series of
steps:
In Collection Processing:
The user inputs a file of barcode numbers (upload.inv) collected by scanning items on the shelf, and
then identifies the library, collection, call number type, and the range of call numbers inventoried.
In the processing of each item, the item record that matches each barcode number is updated with the
date the item was scanned for inventory purposes. (The input file contains the actual date that each
item was scanned; this is not necessarily the beginning date of the current inventory, which the user
must enter later in the process of identifying missing items.)
If the user elects the Check Shelf Order option, the program checks the shelving order of the items
scanned and creates an error log for items that are misshelved.
The user opens the Library·Solution Reports module, and runs the "Inventory Job List" to obtain a list
of the Holdings Code, the date, the beginning call number, the ending call number, and a Job number.
The user will be prompted for the Job number when running the "Inventory Shelving Errors," which can
be printed to report missing items.
In Identify Missing Items:
The user enters the beginning date of inventory, the library, collection, call number type, and the range
of call numbers inventoried.
The program identifies any items within the specified call number range that were neither inventoried
nor checked in since the beginning date of the inventory. Then it marks those items with a status of
"MS" (Circulation Item Status code for Missing).
Library•Solution Circulation
8. Circulation Utilities Programs
CIRC-192
Contents
Index
You should print the "Identify Missing Items" report through the Reports module immediately after
running the Identify Missing Items step.
This report will list missing items and also alert you to any items found that need special attention. For
example, if the process found any items that were already marked "Lost," "Checked Out," or "Missing,"
the items will be included in the report.
The user can print other reports related to missing and lost Items. The Inventory Missing Items Log
displays missing items for the site where you just ran inventory with the holdings code arranged by
location and collection. The user may also run "Missing Items in a Holdings Code," "Lost Items by
Branch," and "Inventory Status Analysis" (listing statistical counts of all items in the entire collection by
circulation status).
HOW does the program determine that an item is "missing"?
The program first checks to see whether or not the item is supposed to be on the shelf; this is
determined by checking the current Circulation Item Status for each item.
Possible item statuses are:
I = On the shelf
CO = Checked out
S = Being reshelved
T = In transit between libraries
HD = Item is an "arrived" hold (item waiting for borrower to check it out)
L = Lost item (status assigned to individual item by staff)
MS = Missing: this status (without any modifier code) is assigned only by the Inventory process
If the item’s status is anything other than "on the shelf," the Inventory process will consider the item to
be accounted for, and it will be ignored in the rest of the Inventory process.
Library•Solution Circulation
8. Circulation Utilities Programs
CIRC-193
Contents
Index
Next, if the program "thinks" the item is on the shelf, it next checks to see if the item was inventoried or
checked in since the beginning date of the current inventory, by doing the following:
• If the current inventory date (the actual date the item was scanned) is later than or equal to the
date last inventoried, the system assumes the item is accounted for.
• Next, if the "beginning date" of the inventory is earlier than the date the item was inventoried, the
program compares the date last checked in to the beginning date.
• If the date last checked in is later than or equal to the beginning date, the Inventory process will
consider the item to be accounted for, and it will be ignored in the rest of the process.
• If these conditions are NOT met for any item, the program will change the item’s Item Status
Code to "MS" for Missing and add the items to the "Inventory Missing Items" report.
Then the Library·Solution PAC will display the shelf status as "Not Available" (or whatever local
message a library has configured).
Library•Solution Circulation
8. Circulation Utilities Programs
CIRC-194
Contents
Index
8.4 L.S Outreach Manager
Outreach Services is a part of Library·Solution used to manage services for borrowers who cannot
visit the library, and/or who do not have computer access to the library catalog themselves.
The Outreach Services program allows the Circulation staff to:
• Keep track of an individual borrower's loan history and preferences.
• View and edit the borrower's Outreach settings, such as delivery frequency, last profile edit
information, and customizable fields to gather data as desired.
• Display the date when the borrower expects his/her next delivery.
• Set the borrower's selections to a "delivered" status.
• Display what items the borrower currently has checked out, or what items the borrower has on
hold to be delivered.
The Outreach Services staff uses the Library•Solution PAC to:
• Save search settings, creating shortcuts that can be used for performing repetitious searches.
• Place holds on items selected for the Outreach borrower.
Library•Solution Circulation
8. Circulation Utilities Programs
CIRC-195
Contents
Index
8.4.1 Getting Started
To Get Started Using Outreach Services In Circulation:
You need to perform the following steps before you begin using Outreach Services.
1. Establish a Patron Type in Circulation, for Outreach Services Patrons - A current Patron
Type can be modified to allow Outreach Services, or a new Patron Type can be established. You
may have as many Patron Types designated as Outreach Types as you need.
2. Configure the Outreach User PAC. - This requires the address of the PAC that will be used for
Outreach Patrons. Go to Setup | Outreach User PAC Setup and enter the IP or URL of your
PAC.
3. Establish Outreach Fields - Outreach Fields displayed on the Patron Record: Outreach
Services tab, are customizable. These fields can be used to display information as desired. For
example, you can create notes to alert the staff and/or delivery person of special circumstances
affecting the delivery, or of other needs that must be accommodated. Go to Setup | Types and
Codes | Outreach Fields to establish new fields that can be used in all Outreach borrower
records. Click here for more information.
4. Ensure that Outreach Services Patron Records have a PIN assigned to the Patron. - The
PIN is used as the password to access the PAC, when the Setup New Prefs button is pressed
on the Patron Record, Outreach Services tab. When the browser connects to the PAC, a
logon error will display if there is not a PIN established for the patron.
Library•Solution Circulation
8. Circulation Utilities Programs
CIRC-196
Contents
Index
To Start Outreach Manager
1. Select Start | Library.Solution | Circulation Utilities | L.S Outreach Manager.
2. A database log-in screen will prompt you for your User Name and Password. Fill in the log in
information and click OK.
3. The Outreach Services screen will appear.
8.4.2 Outreach Services Process Flow
Typical Outreach Process
1. An Outreach Patron Type record has been established via the Setup menu, Types and Codes |
Patron Type option. Select the Outreach Services field (so that it is checkmarked). Enter a
borrower record and assign a Patron Type that has Outreach privileges turned on. In the
borrower record, record the preferences for delivery period, minimum / maximum number of titles
to be delivered each period, and associate specific PAC saved searches with the patron.
2. Titles related to the borrower's preferences are located and placed on Hold, via PAC saved
searches.
Note: Once Outreach borrowers have been established, and PAC searches are starting to be
saved, and made available to Outreach, the list of Saved Searches will build in the Outreach
Saved Searches display. These searches are available to be added to other Outreach Patrons
Saved Searches list.
3. As titles are placed on hold for the Outreach borrower, the Status on the Outreach Services
screen will display Partially Processed. When the number of held titles for this borrower
matches or exceeds the "minimum" number of titles indicated in the Request Count column, the
status will change to Processed.
Library•Solution Circulation
8. Circulation Utilities Programs
CIRC-197
Contents
Index
To view the borrower's current Holds, select the borrower name from the list of Patrons in the
Outreach Manager module (Figure 8-9) and click the Review button. A web browser window
will open and connect you to the Patron Review screen.
4. On the "Next Delivery" date, the library should select the Patron name on the Outreach Services
screen, to view the list of held titles in the lower portion of the display. In Circulation, these titles
should be Checked Out to the borrower. The Status will now display Due.
5. After delivery of the titles, click the Delivered button, and the Next Delivery date will now
display. The process now starts over at step 2 above.
8.4.3 Using the Outreach Services Display
Display the Outreach Services screen (Figure 8-9) by selecting the
L.S Outreach Manager on the Library•Solution | Circulation Utilities
menu. The upper portion of the screen displays the list of Outreach
Patrons with active or pending loans, their current status, the next
delivery date, and the minimum / maximum number of titles the
borrower desires to receive on each delivery.
In the lower portion of the display, information about each title
currently checked out, by the selected borrower on the list, will be
displayed, including Item ID, Title, Status, and Due date.
Using the Display
1. The main portion of the screen displays:
• Patron Name: In the top portion of the window, click on a
Patron Name to view the currently pending, or checked out
items by that borrower which will display in the lower portion of
Figure 8-9. The Outreach Services window
the window.
Library•Solution Circulation
8. Circulation Utilities Programs
CIRC-198
Contents
Index
• Status:
– Partially Processed - Borrower has a title on hold, but has not accumulated the designated
minimum number of titles.
– Processed - Borrower's number of holds have met or exceeded the minimum number of
desired hold titles.
– Due - Borrower's titles have been delivered, and await the Next Delivery date displayed.
• Next Delivery: Date of the next delivery to the selected borrower.
• Request Count: Indicates the configured minimum / maximum number of titles configured for
the selected borrower.
2. On the right side of the display, there are four buttons:
• Review: Pressing the Review button will open a web browser and take you to the
pre-configured PAC address. Use the Circulation Patron Record information to login. The
browser will display a review of the borrower's current PAC account information, including Holds
and Saved Searches.
• Delivered: Pressing the Delivered button updates the borrower record to show that the
requested items were delivered to the borrower. The Next Delivery date display is updated to
indicate the next delivery date scheduled for the borrower. The delivery frequency can be set
from 1 to 999 days.
• Refresh: The screen will be updated to reflect transactions that have occurred to the user's
account since the record was accessed.
• About: Displays the Outreach Services Module version information.
Library•Solution Circulation
8. Circulation Utilities Programs
CIRC-199
Contents
Index
8.5 L.S Route Configuration (for Used Bookings and Rotating Items)
Library systems with multiple locations may have regular courier routes established for delivery of items
among member libraries. In Library·Solution you can easily configure these routes for delivery of
booked items. Libraries can be added or removed from a defined route, and the order of libraries in a
route can be changed. New route names can be assigned and old routes can be deleted. The daily
schedule for delivery/pickup for a selected route can be configured by the route calendar.
When you place a booking, you should specify that the courier method should be used for delivery of a
selected booked item. Select the "SYS_COURIER" Shipping Type code when you place or edit the
booking. Note: If your primary delivery method is by courier, then set the default delivery method in
Bookings to SYS_COURIER.
To use the Route Configuration Utility:
1. From the Library·Solution Start menu, select Circulation
Utilities | Route Configuration. In the Database Login
window, type a user name and password, and click OK (or
press Enter). The Route Configuration window will be
displayed (Figure 8-10).
2. New route: To add a new route, click the New Route button.
The New Route entry window (Figure 8-11) will appear.
Type a name for the route; use only letters and numbers, up
to a maximum of 20 characters (no punctuation marks, no
spaces).
To add a library to the route, highlight it in the Branches list
on the left and drag it to the Stations and Order box on the
right, or click the Add button. To view a list of libraries that
have not yet been assigned to any route, click the
Unassigned Branches button.
Library•Solution Circulation
8. Circulation Utilities Programs
Figure 8-10. The Route Configuration window
CIRC-200
Contents
Index
Continue adding all the libraries on this delivery route. To
change the route order, in the righthand window click and
hold on a library name and drag it to the desired location
in the list.
Tips: If a booking delivery route begins and ends at the
same library, be sure to place that library at the top and
bottom of the route list. For other types of route
configurations, call TLC Support for guidelines.
Figure 8-11. The New Route window
3. Edit route: To edit an existing route, select it from the
drop down Routes box at the upper left. The Stations
and Order box on the right lists the libraries included in the selected route. To change the route
order, click and hold a library and drag it up or down. To remove a library from the route, highlight
it and click the Remove button, or simply drag it back to the Branches box. To add a library,
highlight it in the Branches list and drag it to the Stations and Order box, or click the Add
button.
4. Delete route: To delete an existing route completely, select it from the drop down Routes box at
the upper left, and then click the Delete Route button.
Caution! The following message will be displayed. "Deleting a route can cause serious harm to
future Bookings. Are you sure you want to delete this route?" Select Yes or No.
5. Calendar: (Only applicable for use with Bookings) To define the day(s) of the week that a
selected route is scheduled to be run, select the Calendar button at lower left. Double-click on
the dates that ARE delivery dates.
Library•Solution Circulation
8. Circulation Utilities Programs
CIRC-201
Contents
Index
8.6 Vendor Editor
The Vendor Editor allows you to enter and maintain information about vendors from whom your
organization has purchased equipment or other types of items. In Circulation, you can link the vendor
to selected items, or enter the vendor in the item's repair history. Most libraries use these features to
track the vendor and repair conditions of equipment, such as videocassette recorders, loaned out in
bookings. In the Library•Serial module, use vendor information to record subscription information and
to print letters for claims or returns.
Note: The Vendor Editor is a separate program from the Library·Booking, Library•Serial, and
Circulation modules, and it can be used by all three modules. Run the Vendor Editor from your
Library·Solution | Circulation Utilities menu.
To use the Vendor Editor:
1. On the Start menu, select Library·Solution | Circulation Utilities
| Vendor Editor. Login with your User Name and Password. The
Vendor Editor window will be displayed (Figure 8-12).
2. To view existing vendors, click the right or left arrows in the Code:
entry line. You can search for vendors by name or code by using
the Search | Find by Name or Find by Code options on the drow
down menu.
If you edit an existing vendor, click the Save button to save the
changes. To delete a vendor, use the File | Delete Vendor option.
3. To add a new Vendor, use the File | New Vendor option and enter
the Distributor Code and Distributor Name in the New Vendor
window. Click OK to save the information.
4. To exit the Vendor Editor, click the File | Close option.
Library•Solution Circulation
8. Circulation Utilities Programs
Figure 8-12. the Vendor Editor window
CIRC-202
Contents
Index
8.7 Debt Collection Module
TLC partners with Unique Management Services, Inc. (UMS), of Jeffersonville, IN, to implement an
automated debt collection system which helps our customers recover overdue materials and fines.
The debt collection system monitors the fines and other charges accumulated by borrowers and, when
specified thresholds are exceeded, the borrower's information is provided to UMS.
• The thresholds are based on a minimum monetary amount and time period.
• Collection fees can be applied when a borrower’s information is submitted to UMS.
• The collection fee can include a fixed amount, a percentage of the balance owed, or a
combination of the two.
• Patron Types and specific borrowers can be excluded from submission.
The debt collection module can be configured to run for the entire library system or for specific libraries
in an automatic or manual mode of operation.
If you have elected to use the Debt Collection module, use the Debt Collection Setup and the
Security Setup options on the Setup menu to establish system and library configurations, and to set
security features for the Debt Collection module. See section 3.5.6 for setup information. If you have
questions contact TLC Support for additional information.
Note: To use this module you will first need to establish a contract with Unique Management Services,
Inc. You can contact Unique Manages Services at the following:
• Toll-free Telephone: 800-879-5453
• Electronic Mail: [email protected]
• World Wide Web: http://www.unique-mgmt.com/aboutus/index.html
• U.S. Mail or Courier Service: Unique Managment Services Inc., 119 East Maple St.,
Jeffersonville, IN. 47130
Library•Solution Circulation
8. Circulation Utilities Programs
CIRC-203
Contents
Index
Reports
The module generates three different reports: Submission, Update, and Sync Reports.
The Submission Report provides UMS with the borrower's contact information and the amount owed
in fines, charges, and fees. The Submission Report can be issued automatically or manually.
If the module is running in Automatic Mode, the Submission Report will be created and sent to UMS
on a regularly scheduled basis and will require no user input. If the module is running in Manual
Mode, you will need to send reports when required. To access the Submission Report manually,
select the Debt Collection item from the Utilities menu and choose the Submission Report item.
(This menu item requires Supervisor rights to access it.) The Debt Collection Submission Report
form will be displayed as shown in Figure 8-13.
This form displays the Patron ID, Name, and Balance
owed of all borrowers who meet the criteria for
submission to the collection agency (Borrowers who have
already been submitted are NOT included on this list).
The Balance includes the Collection Fee. The list is
ordered alphabetically by borrower name. To the left of
the Patron ID is a check box. If the box is checked, the
borrower will be included in the Submission Report. If
the box is not checked, the borrower will be excluded.
The boxes can be checked/un-checked by single clicking
the box or anywhere on the row for that borrower.
The Select All and De-Select All buttons at the bottom of
the screen will select or de-select all check boxes.
Use the Send Submission Report button to send the
Submission Report via email to UMS. When this button is
clicked, a message box will display to ensure that you
want to send the report. If you click the Yes, the email will Figure 8-13. The Debt Collection Submission Report
Library•Solution Circulation
8. Circulation Utilities Programs
CIRC-204
Contents
Index
be transmitted. A message box will inform you that the email has been sent. Click OK button on the
second message box. (The Close button closes the form without sending the report.)
The Update Report gives UMS information on changes to the borrower's account, including amounts
paid, waived, and added as well as replacement costs waived when materials are returned. The
Update Report is issued automatically on a scheduled basis.
The Update Reports are handled in an Automatic mode, independently of the mode used by the
operating system. The Update Reports require no user input.
The Sync Report lists all borrowers whose information has been submitted to UMS and their present
balance. This information is used by UMS to ensure their that records are in sync with the library's
records. The Sync Report is issued manually when requested by UMS. All three reports are
transmitted via e-mail
From time to time, UMS may request a Sync Report. To send it, select the Debt Collection item from
the Utilities menu and choose the Sync Report option. This menu item requires Supervisor rights to
access it. A message box will display to verify that you want to send the report. If you click Yes, the
email will be transmitted. A second message box will display, informing you that the report has been
sent.
Library•Solution Circulation
CIRC-205
8. Circulation Utilities Programs
Contents
Library•Solution Circulation
CIRC-206
8. Circulation Utilities Programs
Index
Contents
Index
Appendix
1.0 Quick Reference
Authority Control
Authors that are added to on-the-fly Circulation records are not authority-controlled by default in most
Library•Solution databases. They cannot be searched in the PAC or cataloging. (If you are not sure
what authority control option was selected for your library when the initial database was built,
administrators should contact TLC Support.
To apply authority control on uncontrolled authors:
1. Catalogers can frequently run a Library·Solution report to create a list of Circulation on-the-fly
records. Run the Reports module from the Library·Solution Start menu, and select the
following report: Titles-Items in a control number range.rpt
When you enter the beginning and ending control numbers to be included in the report, be sure
to type the control number prefix specified for your Circulation on-the-fly records. The default
value is "otf"; follow this with a beginning (or ending) number. Onscreen instructions explain how
to find all "otf" records.
2. Print the report if desired, or view the list onscreen.
3. Run the Cataloging module. Search for each title or control number. Correct the author's name,
if necessary (in the 1XX field). If you are not sure what form of the name is correct, do an
Authority Record type search by Author, to locate and view the authority record.
4. Save each bibliographic record. As part of the save process, the author entry is authority
controlled unless Saved Controlled on the Verify menu is checked.
Library•Solution Circulation
Appendix
CIRC-207
Contents
Index
Blocks
To override an Enter Override Password block and allow the transaction:
1. Follow the instructions in the Enter Override Password window: type the Override or Supervisor
password. (Whenever the Override password is required, you may use the Supervisor password
instead. The reverse is not true.)
2. Select the Try button, or press Enter.
To exit the Enter Override Password block and deny the transaction:
If you do not wish to override the block, select Cancel in the Enter Override Password window.
To review or remove block conditions:
If block messages are presented in a Check Out Unsuccessful window, you can review block
conditions and possibly remove them before attempting to check out or renew items.
1. In the Check Out Unsuccessful window, click OK, or press Enter to exit the window.
2. To get more information, click the message in the Blocks display on the Patron Transactions
tab. The relevant tab or dialog box will open, so you can view information or take appropriate
action to remove the block condition. For example, if you click the Fine Balance block message,
the borrower's Charges tab opens, detailing the outstanding fines/fees.
3. If possible, make the appropriate changes (extend the card expiration date, change the Patron
Status code, accept or waive charges, etc.). Save the change.
4. Try the checkout or other transaction again.
Library•Solution Circulation
Appendix
CIRC-208
Contents
Index
Branch Setup
To complete the Branch Setup:
1. Click Setup on the title bar at upper left of the Circulation window.
2. On the Setup menu, click Branch Setup.
3. The Enter Supervisor Password window may appear (if you are not logged in to the database
as an administrator user). Type the Supervisor Password if requested. Click Try, or press
Enter.
Note: If you do not know the default Supervisor Password, first try simply pressing Enter to
bypass the security window. If this works, it means no passwords have been defined yet.
4. The Branch Level (System) Configuration window will open. The options are grouped on four
tabs: Security, Defaults, Fines/Overdues, and Misc.
5. After you make changes or additions, click OK.
Note to supervisors: If you wish to define the setup for another library by working at this
station, go to Setup | Local Configuration | Station Options. Change the library. Caution!
After making configuration changes, be sure to change the Station Options setting back to this
library!
Library•Solution Circulation
Appendix
CIRC-209
Contents
Index
Calendar
The calendar setup affects date and time due for checked out items in the following manner: items
checked out for a period of days (or hours or minutes) will be due only on open days (or hours or
minutes). The calendar also affects overdue fines calculation according to the settings in the field
Fines Calculated By in the Circulation "rules."
To set up the Daily Calendar:
1. Select the Setup menu. Then select Calendar Configuration and Daily Calendar. The
Calendar for Current Branch window appears.
2. Select a month/year: Use the Next Month or Previous Month buttons to display the month of
the year you want.
3. Select a day: To change the default for a particular day, click on the day, or use the arrow keys to
move among the days. The selected day will be highlighted. Default or Overridden at upper
right will show whether the settings already established for the selected day have been
overridden or if they are the Weekly Calendar defaults. To change Overridden settings quickly
to the default, select Set to Weekly Default.
4. Library is open on this day: If the library is open on this day, a check mark will appear in the
check box beside this option. If the library should be set to closed, click on the check box to clear
it. You can also press the spacebar to enter or clear the check mark. If closed, the text boxes
beside Library Opens and Library Closes (below) will not be available for entry.
5. Time library opens: Enter the time the library opens on this day.
6. Time library closes: Enter the time the library closes. If the closing time is after midnight, enter
the time, and then select the check box beside The Next Day.
7. Save the changes for a day: After changing the setting for a day, select the Save Date Info
button.
Library•Solution Circulation
Appendix
CIRC-210
Contents
Index
8. Change other days: If there are other days you want to change in this month, select another day,
and follow the steps above.
9. If you want to change a date back to the Weekly Calendar default, simply select the button for
Set to Weekly Defaults. Be sure to Save Date Info for each day you change. Repeat in this
month and other months until all necessary changes have been made.
10. After making all changes, close the setup window by selecting the Close button.
To set up the Weekly Calendar:
1. Select the Setup menu. Then select Calendar Configuration, and then Weekly Calendar. The
Weekly Calendar Defaults for this Branch window appears.
2. Select a day. Select the round button beside the first day you want to define or change.
3. Library is normally open on this day of the week: If the library is normally open on this day,
select the check box beside "Library is normally open on this day of the week"; a check mark will
be displayed. If the library is closed, click the box to clear it. You can also press the spacebar to
enter or clear the check mark.
4. Time library opens: Enter the time the library opens on this day. Type the time like this: 9:00 am
or 10:00 pm (type am or pm in lower or upper case).
5. Time library closes: Enter the time the library closes. If the closing time is after midnight, enter
the time, and then select the check box beside The Next Day.
6. Save this weekday: Select the Save This Weekday button.
7. Select the next day of the week, and follow the steps above.
8. After making all necessary changes, close the setup window by selecting the Close button.
Library•Solution Circulation
Appendix
CIRC-211
Contents
Index
Cash Drawer
To configure the Cash Drawer:
1. Select Setup on the title bar at upper left of the Circulation window. Select Local Configuration,
and then select Cash Drawer. The Cash Drawer Setup window appears.
2. If you do not have a cash drawer, leave the Cash Drawer COM Port default selection at "None."
If you do have a drawer attached, select the correct COM port from the drop-down list (COM 1, 2,
3, or 4).
3. The Control Character in Hex is the signal sent to the cash drawer to open. The default ("07"
which corresponds to key combination Ctrl + G) is the setting for the APG cash drawer.
4. The Allow Cash Drawer to Open Without Payment field allows supervisors at each library to
set more security on when the cash drawer can be opened.
The initial setting for the check box is unchecked. This setting provides more security for access
to the cash drawer. If the box is unchecked, this means that the cash drawer will open only if a
payment is made (for a selected borrower on the F2 Charges tab). When Circulation staff enter
an amount and select the Balloon Pay/Waive or Individual Pay/Waive button on that tab
(whatever is appropriate to this payment), the cash drawer will open automatically.
When the box is checked, the Open button is available on the F2 Charges tab for a selected
borrower, and the Cash Drawer item is available on the main Circulation menu. Circulation staff
at this station can open the drawer by selecting either option, even if no payment is made.
5. To save changes, click the OK button.
Library•Solution Circulation
Appendix
CIRC-212
Contents
Index
Charge Types
To set up new Charge Types:
1. Select Setup from the menu bar at the upper left of the Circulation window. Select Types and
Codes, and then Charge Types.
2. To view a list of default and other existing Charge Type codes, click the down arrow beside the
Charge Type list box. Select a code to view its Description.
3. To add a code, type the code in the Charge Type text box. Press Tab or click in the Description
text box, and type a meaning for the code. Then click the Add New button.
4. When you have finished adding or editing, click Done.
See also Fines
Library•Solution Circulation
Appendix
CIRC-213
Contents
Index
Check In Items
To check in items:
1. Click the Check In/In House Use tab, or press the F3 key.
2. For Mode, click Check In (usually the default mode).
3. Optional: Before you continue checking in the item, you can select one or more of these options:
• Suppress Messages: To turn off the display of overdue fines, or "already checked in"
messages, select the check box beside Suppress Messages. Select the type of message(s)
you wish to suppress.
• Override Check In Date/Time: If you wish to enter a different check in date or time, select the
check box beside Override Check In Date/Time. Enter the date.
Note: The override check in date and time boxes will be invisible if the option is not turned on. If
it is turned on, the background in these boxes will be red to alert you that the override is in effect.
• Special Status check in: You can check in an item with a special Item Status, for example:
lost, missing, borrower claimed the item was never checked out, or borrower claimed the item
was already returned. To do this, select the Special Status button before you enter information
about the item to check in. When you click this button, the text on the button turns red. (Click
the left mouse button to check in only one item with Special Status, or right-click the button to
have the Special Status mode stay active for multiple checkins.)
If a hold is placed for an available item (either through the PAC or CIRC) that item is put into a
"T" (in-transit) ststus and a message is generated directing staff to retrieve the item and either
forward it to the pickup location or check it in and place it on the holds shelf for pickup. If the staff
person cannot locate the item to fill the hold, she should return to a Circ station and inform the
system that the item could not be located by checking in that itemwith a special status of "Missing
-- Staff action." Click on the Special Status button on the Check In (F3) screen and type the
barcode number of the requested item in the item search box and click the Check In button. If
the item has been checked out by another borrower since the message was created, the program
Library•Solution Circulation
Appendix
CIRC-214
Contents
Index
will ask, "Were you looking for this item because a system message requested it to fill a hold?"
and you should answer by clicking the Yes button (or simply type the "y" key). You will then see
a message like the following: "This item was checked out after it was selected for a hold. The
hold has been redirected to another branch or changed to a pending status" with an OK button to
clear the screen. Or, if the item is simply missing and no one else has checked it out, you will be
given the option of marking the item with a status of "MS" and the system will then either select
another item to fill that hold, or reset the hold's status to "PE" (pending) so that it will be in the
queue for the next available copy. If the requested item is the only one in the system that could
have filled the hold, and you have just marked it missing, then the system will present you with
some options for notifying the borrower.
If you check out an item with an HD status to a borrower other than the person who held the title,
an Arrived Hold Override form will display. Select the original borrower from the list and click the
Change Status to PE button. The Hold Replacement form will display. Select the "System
Selects Item fo Fill Hold" option and click OK. You will be advised to retrieve the second copy of
the item and check it in. This can now be checked out to the original borrower.
4. To continue with the check in, in the Item text box, scan the barcode number or type the Item ID
number. You can also search by title. Click the Check In button, or press Enter.
5. If you searched by title, in the Title Lookup window, select the title you want to check in.
6. If there are multiple items for this title, the Items Associated with Title window will be displayed.
Select the correct item and click OK, or press Enter.
7. During check in: Several kinds of messages may be displayed during the checkin process:
• Special Status window: If you selected the Special Status button, the Special Item Handling
window opens. Select the Item Status you want to assign to the checked-in item.
• Lost Item Charges: If an item was Checked in as Lost, and later the item is found and is
checked in the Outstanding Charges dialog will open. If the borrower made previous payments
for the lost item, a Lost Item Charge Payments dialog will display a list of all payments made.
Library•Solution Circulation
Appendix
CIRC-215
Contents
Index
• Overdue: If the item was overdue, this message will appear: "There is an overdue fine on this
item for <Patron name / ID>. Would you like to charge it? Click Yes to charge the fine, No to
check in the item with no fine, or Cancel to not check in the item at all.
• To Override Arrived Holds: When attempting to check in an item with Special Status (in
response to a system message directing you to retrieve an item for a hold, but the item is not on
the shelf) and that item has been checked out to another borrower (someone had to do an
override to create this situation), you will see a Check-In Clarification message, "Were you
looking for this item because a system message requested it to fill a hold?" Answer Yes to this
message -- the system has already selected another copy to fill the original hold request, or
changed the request to a "Pending" status so it will be filled with the next available copy.
• Delete OTF (on-the-fly) item? A special option can be configured in the Branch Setup, so that
a message will appear when you are checking in Circulation on-the-fly records. The message is:
"Do you want to delete this item from the system?" If you answer Yes, and if this is the last item
for this title, another message asks "Do you want to delete the title record?" Select Yes or No.
• If you attempt to checkout an item that has an "HD" ststus (the system has that item on the holds
shelf ready to be picked up by another borrower), you will see an Arrived Hold Override form.
To keep the original requestor in the holds queue, select the row associated with that borrower,
click on the Change Status button, and choose Change Status to PE button. You will have the
option of selecting another copy to fill the original request, or letting the system do that for you. If
you are checking out the "HD" item to another family member who is picking up the item on
behalf of the original requestor, select the original requestor in the list of "HD" holds, and choose
the Cancel Hold button to remove that person from the holds queue.
• Relocate Item message: This window appears when items are "arrived" holds, or if they have a
"T" Item Status (in-transit) and may need to be transferred to another location. If an item needs
to be sent to a different library, the Relocate Item window includes a Print button to allow the
user to print a copy of the Relocation Item message. The slip can be inserted in the item to
accompany it to the specified location.
8. A display of items just checked in appears on the lower part of the Check In tab. The list
includes: Item ID (usually barcode number), title, date and time the item was due, and borrower
name. The list includes the last fifty (50) items checked in during today's work session. You can
perform item or borrower inquiries by selecting the Item Inquire or Patron Inquire buttons.
Library•Solution Circulation
Appendix
CIRC-216
Contents
Index
To check in items with special Item Status:
1. Click the Check In/In House Use tab, or press F3.
2. For Mode, click Check In (already selected as the default mode).
3. Before you enter information about the item to check in, select the Special Status button. The
method of selecting will determine whether or not the button stays turned ON for multiple checkins.
Tip: If you want to check in only one item with special status, click the left mouse button. The text
on the button turns red, and the Special Status mode will be cleared after you check in the item.
If you want the Special Status mode to remain in effect for multiple checkins, click the right mouse
button. (If you rest the mouse over the button, a "hint" appears: "Right-click to lock Special Status
button ON.") To turn off the lock, left-click the button, or click the Check In or In House Use mode
button.
4. Search for the title or item to be checked in and select the correct item.
5. The Special Item Handling window appears. The codes available in the list depend on the item's
Item Status code at the time of the checkin. For example, different Special Status codes are
displayed if the item was overdue (code "OD") instead of on hold ("HD").
To select a condition, click that line, and click OK (or press the DOWN or UP ARROW to highlight a
status, and then click OK or press Enter).
6. If you selected I: Damaged, the Damaged Item Check In Selection dialog will display three
choices. Click the desired option button and then click Continue. Note: Damaged items will go to
a 'T' status until checked in. Any pending holds on the damaged item will not be filled until it is
checked back in.
Select one of the following:
Library•Solution Circulation
Appendix
CIRC-217
Contents
Index
• This item should not be allowed to circulate at this time - When you click Continue a Relocate
Item dialog will appear advising you to move the item as described in the notice. Print the notice
and insert in the book if needed. Click OK
• This item has minor damage and can still be used - Click Continue.
• Cancel this check in operation - Clicking Continue returns you to F3 tab.
If you selected the first option, the following sequence will occur to send the item to repair, and
when repaired to return the item to circulation.
When the item is returned from repair and checked in you will be asked if you wish to return the
item to circulating status. Click Yes if appropriate.
If there is a condition note, you will asked if you want to edit or delete the note.
7. Now the Edit Item Condition window opens, so you can enter an optional note about the physical
condition of the damaged item. If you have added information, save changes by clicking the
Update Condition button, otherwise click Don't Change.
8. Then a special charges/fine window opens (New Patron Fine for Item), allowing you to enter an
optional charge. Also enter a descriptive comment, a Charge Type Code (code "D" for "damaged"
appears by default), and the amount. Click the Charge Fine button to save (or Don't Charge to
cancel).
If the item was checked out and you selected one of the L: Lost options, the fine charge window
opens with a default Charge Type Code "L"; enter an optional charge and other information, and
click Charge Fine.
9. If the item status was previously "Lost", the Adjust Claims dialog will ask: Should the claims counter
be adjusted for this claim? Selecting Yes will decrement the Items Lost counter on the borrower's
record. Respond Yes or No as desired.
10. The item is checked in, its Item Status code is changed. Depending on how you selected the
Special Status button, it changes back to black (inactive), or stays red (active) for another checkin.
Library•Solution Circulation
Appendix
CIRC-218
Contents
Index
To override checkin date/time:
1. Select the Check In/In House Use tab, or press the F3 key.
2. For Mode, select Check In or In House Use.
3. If you wish to enter a different check in date or time, select the check box beside Override
Check In Date/Time. The override date and time boxes will become available. The background
in these boxes is red to alert you that the override is in effect.
4. Enter the date in this format: mm/dd/yyyy. For example, for March 23, 1997, type: 03/23/1997
(slashes are supplied by the system).
5. If time is relevant, type the time, using 2 digits for 1-9, like: 09:30. The default is "AM"; to
change, type "pm" or "PM". [The override time feature is not yet available.] The override date
and time are effective on all transactions until you select this option again to clear the check box.
If the check box is cleared, no override is used even if a date/time are present.
6. In the Item text box, scan the barcode number or type the number. You can also search by title.
Click the Check In button, or press Enter.
To suppress checkin messages:
1. Select the Check In/In House Use tab, or press the F3 key.
2. For Mode, select Check In or In House Use.
3. If you wish to suppress check in messages, select the check box beside Suppress Messages.
4. The Suppressed Messages check boxes appear. Select the check box beside one or more
choices: Fines or Already In. Your selections remain in effect on future checkins, until you clear
a check box or clear the overall Suppress Messages check box.
5. Begin to check in items. In the Item text box, scan the barcode number or type the number. You
can also search by title. Click the Check In button, or press Enter.
Library•Solution Circulation
Appendix
CIRC-219
Contents
Index
These types of messages can be suppressed:
• Fines: Notification that an overdue fine was charged to the borrower.
• Already In: Item was already checked in and should be shelved in this library.
The following types of check in messages cannot be suppressed:
• Relocate Item messages: Item is an "arrived" hold or has a "T" Item Status (in transit) and
needs to be transferred to another library.
• Recall messages: If items have been recalled, the recall message will be displayed when the
items are checked in.
• Item was previously "lost": If an item with a "lost" Item Status happens to be checked in, a
message will alert you of the previous lost status.
• Item has multiple parts: If an item with "multiple parts" is checked in, a message will alert you
to check for those parts.
Note: Only items with an "in-transit" (T) or "checked out" (CO) status can be recalled. If a recalled item
is checked in as damaged, the item will be assigned to the Repair Shop designation first. when the
item is returned to circulation the recall will take effect.
Library•Solution Circulation
Appendix
CIRC-220
Contents
Index
Check Out
New in Circulation v3.3: If there is a condition note in the Condition field for a title on the Item / Tile
Info <F4> Bibliographic tab, and the Show check box is checked, the Condition note will display during
checkout.
To check out items to a borrower:
1. Select the Patron Transactions tab, or press F2.
2. In the Patron text box, scan the borrower barcode label, or type the Patron ID, Alternate ID, or
name.
After a borrower has been found or if you have entered a new borrower record, information about
the borrower appears on the upper part of the window. The blinking cursor will wait at the Enter
Item text box, ready for you to check out an item.
Note: If a Patron ID (barcode) is entered to the Enter Item (Check Out) field and the Check Out
button is clicked, Circulation will load that Patron's record.
3. Change due date/time (optional): If you need to override the default due date or time, click the
"calendar" button [Change Due Date button], before you enter information about the item or title
to be checked out.
4. Statistics-Only Check Outs (optional): If you would like to check out a number of uncataloged,
unbarcoded items, select the Stats-only Check Out button. The Statistics-Only Check Out
box will appear. Select a collection, enter the number of items, and select the Check Out button,
or press Enter.
5. Normal checkout: In the Enter Item box, scan or type the Item ID (barcode number) of the item,
or type the control number, the title, or first word(s) of the title. If you type the barcode number or
control number, you must type the whole number, including any prefix characters or leading
spaces in the control number (no truncation).
Then click Check Out or press Enter.
Library•Solution Circulation
Appendix
CIRC-221
Contents
Index
6. If you scanned or typed the Item ID (barcode number), the item will be checked out immediately,
unless there are blocks on the borrower.
Note: If the item is already checked out to another borrower a message will display asking if you
want to check-in item from existing patron and check-out to new patron. Clicking Yes will result
in a "renewal."
7. Blocks: If there are blocks on this borrower, a block message may appear in a window labeled
Enter Override Password. Type the password, and click Try or press Enter.
Other types of blocks, such as an expired card, appear in a simple message window. Click OK
or press Enter to exit the window, and then see the Blocks area of the Patron Transactions tab
for more information.
The check out might be blocked if the item happens to be an "arrived" hold for another borrower.
Staff with the proper security can override the hold and check it out to this borrower.
Rental charge: If the item being checked out is in a holdings code that has an optional rental
charge configured, a message box will display, asking if you wish to charge the rental fee.
Choose Yes to charge, No to check out the item with no charge, or Cancel to cancel the
checkout. The rental fee will appear on the borrower’s Charges tab.
8. If the check out was successful, the checked out item(s) for this borrower will be displayed in the
Items Out tab on the lower portion of the Patron Transactions tab.
9. If a printer has been configured for date due slips, a slip will be printed when the item is checked
out.
To check out multiple uncataloged items:
1. Go to the Patron Transactions tab, find the borrower who wishes to check out items, and then
select the Stats-only Check Out button. The Statistics-Only Check Out window will be
displayed.
Library•Solution Circulation
Appendix
CIRC-222
Contents
Index
2. Select a collection code from the list on the left. In the Quantity box, type the number of items to
be checked out.
3. Select Check Out or press Enter. The items will be included in Circulation Statistics, but
individual items are not tracked for overdues, etc.
To override the due date (and time):
1. Select the Patron Transactions tab, or press F2. Either before or after you enter information in
the Patron field, but before you search for the item/title to be checked out, click the [Change Due
Date] button. This is the Calendar button located to the right of the Check Out button.
2. The Enter Override Password block window may appear (depending on your "Security Level"
setup in Security). If the Override password opens, it asks you to "Enter password to override
due date for next check out." Type the password. (If no passwords have been set up in the
Branch Setup, simply press Enter.) If the override window does not appear, go to step 3 below.
3. The Please Choose a Date (change due date) window will be displayed.
• Date: Type the override due date, like this: mmddyyyy. For example, for February 7, 1998,
type: 02/07/1998. (Do not type the slash characters /.) Click OK, or press Enter.
• Change due time (optional): To change the due time in addition to the date, click the check box
before Time. Enter a time, including "am" or "pm" (upper or lowercase).
• Leave override date/time turned on (optional): If you want the override due date to remain in
effect for more than one check out, click in the check box beside the message: "Leave on until
turned off." If you do not check this box, the override due date will affect only the next checkout.
As soon as you have entered and saved the override due date, you will see this message
displayed above the Check Out button: Date Overridden.
• To turn off the override due date: Click the calendar button again, or click anywhere in the
Date Overridden message. (Remember, if you did not check the "Leave on..." box, the override
due date will affect only one checkout.)
Note: The Station Options field Override Due Date Stays On allows the override due date to
remain on, for checkouts at this station, even if another borrower is selected on the F2 tab.
4. Continue with the checkout by entering item or title information.
Library•Solution Circulation
Appendix
CIRC-223
Contents
Index
To Override Arrived Holds:
During check out, an item might be blocked from check out if it is an "arrived" hold for another
borrower. The block automatically displays one of the message boxes below. Several options are
available.
• If the operator intentionally, or mistakenly, uses a copy to satisfy a hold for a title that is on hold
for another borrower, the transaction will be permitted. The barcode information will be adjusted
in the database to reflect the transaction. A new Arrived Hold slip will be generated for the
borrower whose copy was taken, reflecting an available item (barcode).
• If the operator is overriding an item level hold, the "override" form title in Library•Solution
Circulation displays "Item being checked out is an Item Specific Arrived Hold for the borrower
listed below," and only one borrower will be listed on the form.
• For title level holds the "override" form title will still display "Item being checked out is an Arrived
Hold for one of the borrowers listed below," and the list will include all borrowers at that library
who have an Arrived Hold for that title.
• If a shelved title level hold item is checked out to another borrower and you attempt a Special
Status check in of the item, a Check-In Clarification message will display saying : "Were you
looking for this item because a system message requested it to fill a hold?" If you click Yes the
system will attempt to find another copy of the item to fill the hold or change the hold's status to
PE. Also a message will be generated advising you to retrieve another copy and check it in.
• If you check out an item with an HD status to a borrower other than the person who held the title,
an Arrived Hold Override form will display. Select the original borrower from the list and click the
Change Status to PE button. The Hold Replacement form will display. Select the "System
Selects Item fo Fill Hold" option and click OK. You will be advised to retrieve the second copy of
the item and check it in. This can now be checked out to the original borrower.
Follow the instruction in the message boxes during this process, which provide more information about
the current hold and possible actions.
Library•Solution Circulation
Appendix
CIRC-224
Contents
Index
When overriding an arrived hold item and checking it out to a different borrower, you can choose to
cancel the hold, change the status to pending ("PE"), or cancel the attempted checkout.
The operator may need to enter the Supervisor password, depending on their current Circulation
security rights.
To inquire about a checked out item:
1. Click the Patron Transactions tab, or press the F2 key. Access the borrower.
2. When the borrower's information is displayed, click the Items Out tab. (Usually, the tab is
already open.)
3. Select the item for which you want to see more information. Then click the Inquire button. This
takes you to the complete Item/Title Record, displayed on the Item/Title Information tab. You
can also press the F9 key and search for the item.
Library•Solution Circulation
Appendix
CIRC-225
Contents
Index
Circulation Rules
To set up or modify Circulation Rules:
1. To set up or change the Circulation Rules for a Patron Type, select Setup | Types and Codes,
and that Patron Type.
2. Select the holdings code for which you wish to modify the checkout rules. To view the list of
holdings codes, click the down arrow beside the field, or click the right or left arrow buttons
further to the right of the field. These buttons access the first code in the list, the previous, next,
or the last code. A description of the holdings code is displayed.
3. Press the Tab key to move to the rule field to be changed, or click the field you want. Make any
necessary changes.
4. Important! Before you select another holdings code to view or edit, save the changes you have
made by selecting the Save Rules button.
5. If you wish to copy the set of rules (for the Patron Type checking out this Holdings Code) to
another Holdings Code, select the Copy button. Select the next Holdings Code, and then select
Paste. Then select Save Rules.
6. After you have finished making all changes, select Done.
Library•Solution Circulation
Appendix
CIRC-226
Contents
Index
Course Codes
To set up Course Codes for Reserve Items
1. Select the Setup menu, Types and Codes, and then select Course Codes. The Course
Codes dialog appears.
2. To view a list of existing codes (if any), click the down arrow to the right of the Course edit box.
Select a code to view its Description.
3. To add a new code, type the code, up to a maximum of 20 characters. As soon as you start
typing a previously unknown code, the Add New button becomes available, and the message
New Type Code is displayed in red at the right.
4. After typing the code, press the Tab key to move to Description, or click in that field. Enter a
description for the Course, up to 250 characters (a brief description is recommended).
5. If you edited the Description of a current code, select Save. If you added a new code and
description, select Add New to save it. If you wish to delete a code, select Delete.
To exit the setup after saving, or to exit without saving changes, select Done.
Library•Solution Circulation
Appendix
CIRC-227
Contents
Index
Delete Records
Here are some important guidelines about deletions:
• You can delete any title record by deleting the MARC record in the Cataloging module.
• You can delete item records (barcoded items) for any title, in either Circulation or Cataloging
(except for serial items checked in through the Library•Serial module).
• As a safeguard, the system will not allow deletions from within any module if items are checked
out or if an item is an "arrived" hold (ready for check out by the borrower who placed the hold).
• In the Circulation module, the only records the system allows you to delete completely (meaning
delete title and item information) are on-the-fly ("OTF") records. These are identified by the
message in red text at the upper right of the F4 tab: This is a Circulation Record.
Delete OTF on Check In? The Branch Setup (Defaults tab) includes an optional field: "Delete
OTF on Check-in." If this check box is checked, a prompt appears during Check In that allows
you to delete on-the-fly items and titles automatically.
• In non-on-the-fly records, information in the bibliographic information fields on the F4 tab is
displayed in gray. The only action you can take in Circulation would be to delete item records or
change barcode numbers or holdings information. Otherwise, the bibliographic information in
those records must be edited in the Cataloging module.
• If you attempt to delete in Circulation any items that were checked in and barcoded through the
Library•Serial module, the following message appears: "You must delete this holding through
the Library•Serial module by 'Returning' it."
• Caution: Records deleted in Circulation cannot be recovered. They are NOT saved to the
deleted records file configured in the Cataloging Utilities (if a deleted records file is configured,
then records deleted through Cataloging are saved to that file) ) or to the system-wide deleted
records archive.
To delete item or title record:
1. Select the Item/Title Information tab, or press F4.
2. Scan the barcode label, or type the title, the Item ID (barcode number), or the control number.
Click Search or press Enter. Select the title from the Title Lookup window, and click OK or
press Enter. Title Information fields are displayed on the upper part of the screen, and Item
Information appears on the lower area.
Library•Solution Circulation
Appendix
CIRC-228
Contents
Index
3. To delete item (barcode) record: In the Items Information area, click the drop-down arrow
beside the Item ID text box to display a list of barcode numbers. Select a barcode number.
Then click the Bibliographic tab. Click the Delete button at lower right. A message will ask you
to confirm the deletion. Click Yes to delete.
4. To delete title record (the complete record, including all copies and volumes): In the Title
Information area, click the Delete button. (This button is available only if the record is one that
was added to Circulation "on-the-fly.") If the button is not available, you will need to go to the
Cataloging module to delete the record. A message will ask you to confirm the deletion: "You are
about to delete edited title and ALL its items. Is that what you want to do?" Click Yes to delete.
Library•Solution Circulation
Appendix
CIRC-229
Contents
Index
Department Codes
To set up Department Codes for Reserve Items:
1. Select the Setup menu, Types and Codes, and then select Department Codes. The
Department Codes window appears.
2. To view a list of existing codes (if any), click the down arrow to the right of the Department edit
box. Select a code to view its Description.
3. To add a new code, type the code, up to a maximum of 20 characters. As soon as you start
typing a previously unknown code, the Add New button becomes available, and the message
New Type Code is displayed in red at the right.
4. After typing the code, press the Tab key to move to Description, or click in that field. Enter a
description for the department, up to 250 characters (a brief description is recommended).
5. If you edited the Description of a current code, select Save. If you added a new code and
description, select Add New to save it. If you wish to delete a code, select Delete.
To exit the setup after saving, or to exit without saving changes, select Done.
Library•Solution Circulation
Appendix
CIRC-230
Contents
Index
Fines
To calculate fine (before checkin):
1. Click the Patron Transactions tab, or press the F2 key. Access the borrower. When the
borrower's information is displayed, click the Items Out tab. (Usually, the tab is already open.)
2. Select the item for which you wish to calculate the possible fine. You can calculate the total fines
for multiple items, if the items are listed together in the list. To select items, drag the mouse
down the list to highlight the ones you want.
3. Click the Calculate Fine button on the lower part of the Items Out tab. If you selected only one
item, a message window reports that if you check in the item immediately, the amount of the fine
would be "$[stated amount]." If you selected more than one item, the message is: "[Number] of
the [total number] of items you selected would result in an additional fine for this borrower. The
total fine would be $[amount]."
To change the Overdue Fine Amnesty Period:
1. Under the Setup menu, click on Types and Codes. Then select Patron Types.
2. Click the arrow beside Patron Type to see a list of current borrower types.
3. Click on the first borrower type for which you will change Max. Fine Balance. The borrower type
will be highlighted.
4. Select the check box beside Max. Fine Balance. A check mark will appear in the box.
5. Click in the textbox at far right. Press the Backspace key to clear the current value. If the value
you set is not $0, press the number 0.
6. Click Save on the right side of the screen.
7. Click Done on the right side of the screen.
Library•Solution Circulation
Appendix
CIRC-231
Contents
Index
8. Repeat steps 1-7, for each Patron Type that you want to be included in the "no fines" collection
setup.
Reset values after amnesty period: When the amnesty period is over, you will need to reset the
Max. Fine Balance back to the original values. Follow the steps as above, except you will type the
original value in step 6 instead of 0.
To view and handle Charges:
1. Select the Patron Transactions tab or press F2. Access the borrower. When the borrower's
information is displayed, select the Charges tab.
All Charges for Current Patron appear in a list box on the left. When you first access a
borrower's Charges tab, the cursor rests in the Patron's Branch Balance (or Patron's Total
Balance) box on the lower left, with the total amount the borrower owes is already entered and is
highlighted. (The type of balance shown depends on the Pay Local Fines Only selection in the
Branch Setup.)
This allows the operator to accept full payment by simply clicking on the Balloon/Pay Waive
button (without entering any amount at all). If the borrower wants to pay less than the full amount,
the user can overtype the amount already in the box, and then click the button.
2. You can accept payment or waive payment on total charges due (either at this library or for any
library, depending on the configuration). In the Amount to Enter or Amount to Waive field, type
the amount, type the decimal if the amount is not a whole dollar, cents, if any (dollar sign not
necessary), for example: 5.25
Then click the Balloon Pay/Waive button. If you are waiving, enter the password if requested.
Tip: If you want to waive part or all of a fee, be sure to reduce the total in the Amount to Tender
box by that amount.
3. Payment or waive a single charge: Select a charge from the All Charges list on the left. On the
right, detailed information will appear for the selected (highlighted) charge. You can change or
Library•Solution Circulation
Appendix
CIRC-232
Contents
Index
add the Comment or change the Charge Type code for a selected charge. To save, select
Update.
To accept payment or waive payment on a single charge, drag the mouse from right to left (or
double-click) in either the Tender or Waive field. Enter the amount to be paid or waived. Then
select Individual Pay/Waive. If you are waiving, enter the password if requested.
4. New Charge: To add a new charge to the borrower's account, select the New Charge button.
Library•Solution Circulation
Appendix
CIRC-233
Contents
Index
Holds
To place hold request for title or item:
1. Select the Patron Transactions tab, or press the F2 key. Access the borrower. When the
borrower's information is displayed, select the Holds tab.
2. Select the Place button. The Define New Hold Basics window appears.
3. In the Define New Hold Basics window, change the defaults (if necessary) for Hold Expiration
Date and Holds Priority for this borrower. If you would like for the arrived hold item (item with
Holds Status AR) to be sent to a different library than the one displayed for pickup, click the down
arrow in the list box to the right of Send to Branch, and select a library. Click OK. The Define
Title Specifics window appears.
4. In the Define Title Specifics window, in the Select Title text box, enter information about the
title or item you want to place on hold. Click the Pick button or press Enter.
5. Select the title you want from the Title Lookup Window.
6. The system checks to see if the borrower is allowed to check out items of the selected title
(based on the Patron Type and the circulation "rules" for the Holdings Codes of the items).
If borrower is not qualified to check out any of the items, a Holds Advisory message warns:
"There are not any items for this title that can be circulated to this borrower type." Click OK to exit
the message. For more information, you can then view the "Allowed" column on the Holds
Branches and Items tabs. Select Exit to leave the Define Title Specifics window without
continuing with the hold.
If borrower is qualified to check out only some of the items, a Holds Advisory message warns:
"Some copies of this title are not allowed to be circulated to this borrower type." Click OK. View
the "allowed" columns for more information. Save the hold anyway if you want to continue. When
an eligible item becomes available or if it is already on the shelf, it will satisfy the hold.
Library•Solution Circulation
Appendix
CIRC-234
Contents
Index
7. The selected title and its control number will be displayed on the upper portion of the Define Title
Specifics window. If the title is available on the shelf in this library (even if the borrower is not
qualified to check it out), a message will be displayed: "Selection criteria presently includes items
which are available [on the shelf]. Place the hold anyway?" Do one of the following:
• Select No. If borrower is qualified to check out items of this title, suggest going to the shelf and
find the available item for checkout.
• Select Yes. The system will display a Relocate Item window to remind you to retrieve the item
from the shelf and place it on the "arrived" hold shelf for this borrower. If multiple items are
available, the system will select one. The message is also retained and can be viewed later in
the Messaging menu.
8. Limit hold to library or item: If you would like to limit the hold to items at a specified library or
limit to a particular item (barcode number), use the Branch or Item limiting tabs at the bottom of
the Define Title Specifics window. (The Item limiting tab includes individual call numbers.)
Whether or not you limit the hold, click Save on the Define Title Specifics window.
9. If you then make any changes in the Selected Holds fields, click the Save Hold Info button.
The hold(s) placed for this borrower will be listed in the Patron Holds box on the left side of the
Holds tab.
To access the Holds Queue:
1. Select the Item/Title Information tab, or press F4. In the Item/Title entry field, scan a barcode
label, or type the title or barcode number of the item of interest.
2. Select the Holds button (on the right center of the tab). The Holds Queue window will be
displayed. Select a borrower (click the borrower line to highlight it). The information about that
borrower/hold is displayed in the center of the window, with several command buttons below it.
Messages displayed in red will alert you if the title is part of a multiple title hold or if the hold has
been limited by library or item. If the hold has not been limited, the message is: "This hold was
set to include any item of this title, regardless of branch."
Library•Solution Circulation
Appendix
CIRC-235
Contents
Index
3. To change the borrower's priority on a hold, enter a new priority number (1 = highest priority, 10
= lowest priority) in the text box beside the Set New Priority button, and then click the button.
The position of this borrower in the queue display will be changed. If you do not need to make
any other changes, you can exit the window by clicking the Close button.
4. To edit a hold, select the borrower from the list. Then click the Edit This Hold button. This will
take you directly to the Holds tab on the Patron Transactions tab.
5. To cancel a hold, select a borrower from the list on the Queue, and then click the Cancel This
Hold button. A message will ask if you are sure you wish to delete the selected hold. Click OK
or press Enter.
6. To exit the Queue, click the Close button.
To edit, delete, or cancel holds via Patron Transactions tab:
1. Select the Patron Transactions tab or press F2. Access the borrower, and select the Holds
tab. Select the title or item on hold that you wish to edit or cancel. View the Item/Title Info F4
information by double-clicking the title on the Holds list.
2. In the Selected Hold area in the center of the Holds tab, information is grouped in several
areas. Select the field or option you wish to change. If the data in certain fields is displayed in
gray, you cannot edit those fields. If you make changes, select the Save Hold Info button.
3. To cancel a hold: Select the hold from the Patron Holds area on the left, and then select the
Cancel button on the lower left. (You cannot use the Delete button to cancel a hold; it is used
only to delete one item of a multiple title hold.) A message will ask you to confirm that you wish
to cancel.
4. Multiple title holds: If the hold is a multiple title hold, you can delete one or more (but not all) of
the individual titles or items. Select the hold from the Patron Holds area on the left, select the
item in the Definition of Hold area on the right, and then select the Delete button. If you try to
delete the last remaining item, a message warns that you cannot delete the last item. Instead,
use the Cancel button to cancel the complete hold. (See step 3 above.)
Library•Solution Circulation
Appendix
CIRC-236
Contents
Index
To view and work with Holds Shelf items:
1. On the Utilities menu select Holds Shelf. A list of all titles currently on the "arrived" holds shelf
appears in the Arrived Holds Shelf window. The list includes Title, Item ID (barcode number),
Patron name, number of Days on Shelf, and number of PE (pending) holds.
2. To remove or reassign an item to another borrower, select the item by clicking it in the Title
column. Then select a button on the lower part of the window to Cancel Hold or Change Status
to PE. The buttons have the same security features as for other checkout overrides, and access
depends on the current user’s security rights.
Instead of using the buttons, users can right-click on an item in the Title column, and a popup
menu containing the options Cancel Hold and Change Status to PE will appear. Select from
the menu.
Cancel an arrived hold: If you choose this button, a confirmation box will appear, asking you to
confirm that you want to cancel the item. Then a Relocate Item box will pop up, telling you what
to do with the item. This is followed by another box reminding you to notify the borrower that the
hold has been cancelled.
Change a hold to PE (pending) status from AR (arrived): When you do this, the item will
become available for another borrower. A new form will display, asking you to enter a new priority
for the hold. The default will be "1" plus whatever the original priority may have been. For
example, if the priority was "5," the new priority will be "6." You can enter only "1" through "10" in
the edit box.
If you click Cancel here, no change will be made to the hold. If you click OK, the hold will be
changed to the PE status, and the next borrower in the holds queue will be assigned the item. A
Relocate Item box will appear telling you where to send the item, followed by a box telling you to
notify the original borrower of the status change.
Library•Solution Circulation
Appendix
CIRC-237
Contents
Index
To limit a hold:
1. Follow the initial steps for placing a title or item on hold.
2. When the title you want is displayed at the top of the Define Title Specifics window, click the
Branches or the Items tab on the lower portion of the screen.
Branch limiting: To limit the hold to items circulated by a particular library, click the Branches
tab. Then click the Toggle Branch button (or double-click on "Limit to" on the line where the
desired library is listed). This will change the "Yes" or "No" display in "Limit to."
Item limiting: To limit the hold to a particular item (copy or volume), click the Items tab. All
items for this title are listed, including the call number for each item. Then click the Toggle Item
button (or double-click on "Limit to" on the line where the desired item is listed). This will change
the "Yes" or "No" display in "Limit to."
Hint: Use item limiting only when it is necessary to find a particular item, for example, if a
borrower needs to see volume 3 of a multi-volume work.
Notes on limiting: The "Available" column on both tabs indicates item shelf status availability:
"Yes" or "No. If a hold has been limited, the specific library or item ID is shown in the Definition
of Hold box on the right of the Holds tab. If you view the Holds Queue, a message (in red in
center of window) will state whether or not the hold has been limited.
To clear all limits: Click on the Clear All Limits button.
3. Whether or not you limit the hold, click Save on the Define Title Specifics window.
If a hold has been limited, this information will also be displayed on the Holds Queue for the
title/item.
Note: Another way to limit is to edit the hold after it has been saved. To do this, go to the
selected borrower's Holds, select the title or "description," and then click the Limit Title button.
Library•Solution Circulation
Appendix
CIRC-238
Contents
Index
To sort items in the Arrived Holds Shelf list:
The default sorting of items in the list is descending order by [number of] Days on Shelf. Users can
reorder the list by another category by clicking on that column. Click once for ascending order, and
click again for descending order. For example, to see the list arranged alphabetically by title, click the
Titles column once.
Library•Solution Circulation
Appendix
CIRC-239
Contents
Index
Item Fields
To set up Item Fields:
1. Select the Setup menu, Types and Codes, and then Item Fields.
2. The entry window is divided into two parts. On the upper half is the Field Name, and just under
that the setup for the type of data to be entered in the field (codes or free text). On the lower half
are the codes (if any) set up for that field.
When you open the setup window, the first Item Field is displayed by default. To view other Field
Names, use the first four buttons on the upper toolbar to look for the First (first field), Prior, Next,
or Last field
When a Field Name is displayed, view the codes (if any) for that field in the Value and
Description columns on the lower part of the window. Use the lower toolbar to find the First,
Prior, Next, or Last codes for the selected field.
3. To insert a new field, select the New Code button. In the Define New Item User Field box,
enter a New Field Name. To determine the type of entries allowed for this field and how the
information can be used, select appropriate check boxes for Coded or Strict.
If you make any changes in the field name or type of coding, select the Post (check mark) button
on the upper toolbar.
Note: You can enter up to 250 characters for each field name and code, but for easier viewing, a
lower number is recommended. Since capitalization matters for sorting, field names should be
entered consistently, i.e. either all capitals or all mixed case.
4. To insert a code for a selected field, select the Insert button on the lower toolbar. To delete a
code, select Delete.
5. If you add a code or make any change or deletion, select the Post button on the lower toolbar.
Library•Solution Circulation
Appendix
CIRC-240
Contents
Index
Note: The system will not allow you to delete a field or code if any item currently includes the
field and a code.
To view or enter Item Field data:
1. On the Item/Title Info tab F4 search for and select a title, and then select an item in the Item ID
drop-down list.
2. Select the Item Fields tab. If any Item Fields have been set up, the fields are listed under Field
on the left. If codes or data have been entered for a field for this item, this will be displayed in the
Value column.
3. To enter data, select a field. Then click in the Value area. If codes have been defined for this
field, a drop-down list will appear. Select a value.
Library•Solution Circulation
Appendix
CIRC-241
Contents
Index
Item/Title Records
To access item/title records on Item/Title Information tab:
1. On the main Circulation window, click the Item/Title Information tab, or press F4.
2. Scan the barcode label, or type a title, the Item ID (barcode number), ISBN, OR the control
number. Type the director code prefix \c followed by the call number to search by call number.
If you type the information, click Search or press Enter.
Important - 13 digit ISBN: In Circulation v3.3 ISBN searches must be entered as either a 10 or
13 digit ISBN. Searches with any other amount of characters entered will fail.
If the title you want is not found in the Title Lookup window, click the New Title button to add a
new title "on-the-fly."
3. The Item/Title Information tab is divided into two main sections: Title Information at the top
and Items Information on the lower portion of the tab. If the Title Information fields are
available for editing, and you make changes, click the Save button.
4. Holds information: To review, change, or cancel holds for this title, select the Holds queue
button.
5. Select an item: For more information about an item for this title, click the drop-down arrow beside
the Item ID text box to display a list of barcode numbers. Select a barcode number. The Item
Information area on the lower part of the window includes four information sub-tabs: Circulation,
Bibliographic, Vendor, and Item Fields (item-specific fields).
To search for an item or title:
1. On the main Circulation window, click one of the three main tabs.
2. In the appropriate text box (Enter Item, Item, or Item/Title, depending on the particular data
entry screen), do one of the following:
Library•Solution Circulation
Appendix
CIRC-242
Contents
Index
• Scan the barcode label with the barcode reader.
• Type the barcode number of the item or the control number. Type the whole number, including
any leading spaces or prefix characters of the control number (no truncation). Click Search, or
press Enter.
• Type the title or first word(s) of the title. Click Search, or press Enter.
• Type the ISBN. Click Search, or press Enter. Note: In Circulation v3.3 you must use a 10- or
13-digit ISBN.
• Type the MARC record control number (exactly as found in field 001). Click Search, or press
Enter.
To search by call number, first type the Local Call Number Director Code prefix \c, in the entry
box, and then immediately following the prefix type the call number in the entry box, typing at
least up to the cutter portion. Click Read, or press Enter.
3. Search results:
Note: On any title lookup results screen press the Details button to view a full display of the item
information.
The display of search results will vary, depending on what is found:
• Not found: If the title or item is not found, a message appears: "No title starting with those
characters was found [or: No item or record was found]. Would you like to add one?" Click Yes
or No.
• Same or similar title: If the title or similar titles are found, they are listed in the Title Lookup
window. The window lists the title, the "Circ.Coll." code (holdings code for circulating or owning
Branch and Collection), and the Material Type (book, projected media, etc.).
• If more that one copy of the title is found in different collections, or if the title is found in more
than one library, "MULTI" is displayed. )
Library•Solution Circulation
Appendix
CIRC-243
Contents
Index
• Title search results will display the actual holdings code (instead of MULTI) whenever there are
multiple copies all in the same holdings code.
• If the title is "bound with" another, "BOUND" appears.
• No items at Local Branch: The Title Lookup results display all titles that match the search, but
if the Local Titles Only option is selected in Local Configuration | Station Options, and the
local library does not own or circulate any of the items, "NO ITEMS" appears.
Select a title from the list, or scroll down or up the list to locate other similar titles.
• No matching titles found: If the title you want is not listed in the Title Lookup window, you can
add a new title from this window by clicking the New Title button. (You can add a new item to an
existing title by clicking the New Item button.)
• Only one item found: If there is only one item (copy or volume) for a selected title, the title
information is displayed immediately, or the current transaction, such as checkout, is completed.
• Multiple items found (in searches on F2 and F3 tabs): If there are multiple items for this title,
select it in the Title Lookup window to display a window listing Items Associated with Title.
This window includes Item ID (barcode number), Call Number, Circ. Coll. (holdings code for
circulating library/collection, volume and copy numbers, and Item Status. Select the item of
interest.
4. Continue with the current transaction.
Library•Solution Circulation
Appendix
CIRC-244
Contents
Index
Notices
Printed Overdue Notices require two steps:
1. Generate Overdues, and
2. Run an overdue notices report. (There are several formats available.)
If your system is configured to deliver some overdue notices by e-mail or by telephone, you should still
plan to run an overdue notice report (because some borrowers may not have e-mail addresses or
phone numbers.)
To generate overdue notice data:
1. Go to the Windows Start menu and select Library·Solution | Circulation Utilities, Generate
Overdues.
2. On the Database Login window, type the password. Click OK, or press Enter.
3. On the L·S Compile Overdue Notice Data window, select the library or select the Process All
Locations checkbox to generate overdues for all libraries. To see the library list, click the down
arrow in the Branch text box.
4. If necessary, modify the Message to Patron to be printed on the notices. Note: The message
size is limited to 250 characters.
5. To begin compiling notice data, click the Start button. A "please wait" message tells you that the
process may take some time. Remember, you can use the Windows Alt+Tab key combination to
return to another application to continue working, if you wish.
6. After the data has been compiled, the wait message disappears and a Process Complete
window displays, indicating the number of notices created. Click OK to clear this message.
7. Run and print notices: Now you will need to run the notices and then print them. To do this, go to
the Start menu and select Library·Solution | Reports and select the overdue notice report in the
proper envelope format.
Library•Solution Circulation
Appendix
CIRC-245
Contents
Index
Caution: Run and print notices as soon as you have generated the notice data. If you should
happen to compile again before printing the notices that were compiled last time, the first batch of
notices would be lost. (Each time you compile, the setup counter of the number of notices is
incremented.)
To run and print notices or reports:
1. Go to the Start menu and select Library·Solution, and then L·S Reports.
Note: If you are producing overdue notices, be sure to generate the notice data first by using the
L·S Generate Overdues utility.
2. The ReportSmith RS_RunTime window will open. Select the File menu and then Open, or click
the open folder button on the tool bar.
Tip: If this is the first time you have tried to access reports on this station, use the Windows
directory aids in the File: Open dialog to go to the Reports directory. (Click the down arrow
beside Look In, or click the Up One Level folder icon.) Select the following directory:
\program files\the library corporation\library.solution\reports
Note: All of the following instructions refer to options in the ReportSmith RS_RunTime module.
3. On the Open Report window, select the filename for the report you wish to run and print. For
example, for overdue notices, select the "notices.rpt" file. To select, double-click the filename, or
click once and then press Enter or click the Open button.
4. Logon: If this is the first report in this work session, type the password in the Get Connection
Data dialog. Click OK or press Enter. Note: Passwords are case-sensitive.
5. Date range: You may need to enter a starting date and time and an ending date and time.
6. Select library: If this is a library-specific report, or if you are running overdue notices, select a
library in the Branch window. Click OK or press Enter.
Library•Solution Circulation
Appendix
CIRC-246
Contents
Index
7. The formatted report or overdue notices will be run and displayed. It may take a few moments to
run some reports. (In overdue notices, if there were no notices due to be printed, the following
message may appear: "No rows were found.")
8. Printing: To print the report or notices, on the ReportSmith RS_RunTime window, select the
File menu and then Print. This opens the Windows Print window. Be sure to select a local or
network printer appropriate for printing notices and reports. If you select the Print button in the
tool bar instead of Print from the File menu, the reports/notices will print to the default printer.
Note: The notices will print on 8 1/2 x 11" sheets, one sheet per borrower. If a borrower has more
items overdue than will print on one sheet, the items will overflow to a second sheet.
9. Save as: You can optionally save the reports file in another format or with another filename. Use
the File menu, Save as command.
10. When you have finished printing, close the report window.
To exit RS_RunTime, select File, Exit.
Library•Solution Circulation
Appendix
CIRC-247
Contents
Index
Outreach Fields
To get started Using Outreach Services in Circulation:
After Outreach Services have been installed in your Circulation system, you need to perform the
following steps before you begin using Outreach Services.
1. Establish a Patron Type in Circulation, for Outreach Services Patrons. - A current Patron
Type can be modified to allow Outreach Services, or a new Patron Type can be established.
You may have as many Patron Types designated as Outreach Types as you need.
2. Configure the Outreach User PAC. - This requires the address of the PAC that will be used for
Outreach Patrons. Go to Setup | Outreach User PAC Setup and enter the IP or URL to your
PAC. (Note: Do not enter http://)
3. Establish Outreach Fields. - Outreach Fields displayed on the Patron Record | Outreach
Services tab are customizable. These fields can be used to display information as desired. For
example, you can create notes to alert the staff and/or delivery person of special circumstances
affecting the delivery, or of other needs that must be accommodated. Go to Setup | Types and
Codes | Outreach Fields to establish new fields that can be used in all Outreach borrower
records.
4. Ensure that Outreach Services Patron Records have a PIN assigned to the Patron. - The
PIN is used as the password to access the PAC, when the Setup New Prefs button is pressed
on the Patron Record, Outreaches Services tab. When the browser connects to the PAC, a
logon error will display if there is not a PIN established for the borrower.
To Start Outreach Manager:
1. Click the Windows Start button and select the Library.Solution | Circulation Utilities | L.S.
Outreach Manager option.
2. A database log in screen will prompt you for your User Name and Password. Fill in the log in
information and click OK.
Library•Solution Circulation
Appendix
CIRC-248
Contents
Index
3. The Outreach Services screen will appear.
To set up Outreach Fields in Circulation:
1. In Circulation, select the Setup menu, Types and Codes, and then Outreach Fields.
2. The entry window is divided into two parts. On the upper half is the Field Name, and just under
that the setup for the type of data to be entered in the field (codes or free text). On the lower half
are the codes (if any) for that field.
The first field is displayed by default. To view the Field Name of any user field previously
entered, use the first four buttons on the upper toolbar to look for the First (first field), Prior, Next,
or Last field
When a Field Name is displayed, view the codes (if any) for that field in the Value and
Description fields on the lower part of the window. Use the lower toolbar to find the First, Prior,
Next, or Last codes for the selected field.
3. To insert a new field, select the New Code button. In the Define New Outreach User Field box,
enter a Field Name. (Suggestion: Enter name in all UPPER CASE, since case affects the
sorting of names in the saved list.)
To determine the type of entries allowed for this field and how the information can be used, select
appropriate check boxes for Coded, Strict, or Statistics. If you make any changes in the field
name or type of coding, select the Post (check mark) button on the upper toolbar.
Note: You can enter up to 250 characters for each field name and code, but for easier viewing, a
lower number is recommended.
4. To insert a code for a selected field, select the Insert button on the lower toolbar. To delete a
code, select Delete.
5. If you add a code or make any change or deletion, select the Post button on the lower toolbar.
Library•Solution Circulation
Appendix
CIRC-249
Contents
Index
Note: The system will not allow you to delete a field or code if any borrower record currently
includes the field or code.
To Change a Displayed Field to a Different Selection:
1. Select the Patron Transactions tab, or press F2. Open the desired Patron Record.
2. Select the Patron Record tab, and then select the Outreach Services tab.
3. In the Additional Data display, the names of the currently configured Outreach Fields appear in
the Field column on the left, and the selected values in the Value column on the right. To display
a Value, click in the Value column to the right of the desired field.
If the field can contain only codes, the Value column will be highlighted, as shown in the example
below. To display the possible values in a coded field, click the down arrow on the right, and
select a code. (If no codes are visible, none have been established in the Patron Fields setup.)
In fields that do not require codes, simply type the text.
4. To see other configured Outreach Fields up or down in the list, use the scroll bar on the right.
5. After making the desired changes, click the Save button.
Library•Solution Circulation
Appendix
CIRC-250
Contents
Index
Outreach PAC Server
To set, or change, the Outreach PAC Server address:
1. Click Setup on the title bar at upper left of the Circulation window.
2. On the Setup menu, click Outreach User PAC Setup.
3. The Outreach User PAC Setup window will appear. If this is a first-time setup, the box for the
Outreach PAC Server address will be empty. Type either the IP or URL (without the http://) and
click OK. If an address was previously set, clear the current contents and then type the new
address. Then click OK.
Note: The Outreach PAC Server is the same as your library's PAC, e.g., catalog.library.org. If
you are unsure of the address, the information should be provided by your administrator.
Library•Solution Circulation
Appendix
CIRC-251
Contents
Index
PAC
To Save a Search for Outreach borrowers
1. In Outreach Services, click the Setup New Prefs button on the Outreach Services subtab,
under the Patron Transactions, Patron Record tabs.
2. A web browser will open and connect you to the PAC. You will be automatically logged on, and
the current Patron Information will be displayed.
3. Press the Search button.
4. Perform a search using the desired options and term(s).
5. When the results set is returned, press the Save Search button. The Search Saver window will
open.
6. Click in the Search Name/Title box, and type a name for the saved search, as you want it to
appear on your list. The Borrower ID/Alternate ID should already be filled in with the necessary
information from the Patron Record.
7. Click in the Description box, and type a brief description of the search.
8. Verify that the Make Available in Outreach box is checked. If not, click in the box and a
checkmark should appear. Press the Save button. You will be advised if the save is successful.
Click Close Window.
9. Press the Patron Review button. Scroll down the borrower information screen to view the
Saved Searches list.
Note: This Saved Search will now be made available on the Outreach Saved Searches list,
when it is viewed by staff.
Library•Solution Circulation
Appendix
CIRC-252
Contents
Index
Patron Delete Utility
WARNING: Once borrower records are deleted, they cannot be recovered. Be sure to run a system
backup BEFORE using this utility.
To run and use the Patron Delete Utility:
1. Go to the Windows Explorer and find the PatDelete.exe program (in the ...\circ folder with the
Library•Solution Circulation program). Double-click the file.
2. In the Login window, you must login with the User Name "SYSTEM_ADMIN" and enter the
correct Password. After login, the Patron Delete Utility window appears.
3. First, you can choose to limit by Patron Type which borrower records will be deleted. If you click
in the check box next to By Patron Type, select at least one Type from the list box. Select more
than one type at a time by holding down the Ctrl key while clicking on each Patron Type you
want. (If the box is cleared, the deletion process will not consider Patron Types.)
4. Next, under Date Control click the desired option button and enter an expiration date in the date
entry box.
The choices are:
– Delete Patrons with Expiration Date on or Before [date]
– Delete Patrons Based on Date of Last Activity [date]
Note: As a safety precaution, the default Expiration Date is 01/01/1900, in case a user runs the
program and clicks the Delete button accidentally.
5. In the Branch Selection area, you can choose to delete borrower records for a selected Branch,
or select System Wide (meaning borrower records with the selected Patron Types at all
libraries). If you choose By Branch, select a library by clicking on the down arrow and selecting
a library from the list. (Note: Branch refers to the Issuing Branch field in each borrower’s
record.) If you choose System Wide, a beep will sound, and a red warning message appears
Library•Solution Circulation
Appendix
CIRC-253
Contents
Index
next to the System Wide button: "Warning: This setting deletes [borrower records] from all
branches."
6. Under Blocked Deletion click the check box to enable the "Do Not Delete When Block Status is
Set" option. When this box is checked, any borrower with blocked status will not be deleted.
However, if the box is not checked the blocked borrowers will be deleted.
7. After selecting the options you want, click the Delete button. A message window displays
information about what will be deleted, for example: "This will DELETE all patrons of type(s):
'XXX' with Expiration Dates on or before: [date]. FOR THE ENTIRE SYSTEM [or for specified
Branch]. The error log will be overwritten if any errors are detected."
If you want to cancel the deletion process now, click the Cancel button on the lower portion of the
Deletion Information box. This will redisplay the main form, and no borrower records will be
deleted. If you click OK instead of Cancel, the program will begin deleting borrower records.
8. When all the borrower records marked for deletion have been run through the program, a
message appears, for example: "16 patrons were deleted." To close the message box, click OK.
If some eligible borrower records were not deleted, the message may look like this example: "472
borrowers were deleted. 56 borrowers were not deleted. Do you wish to view the error log?"
Click Yes to view the log. The log text, displayed in Notepad, includes borrower IDs (barcodes),
borrower names, and a message: "Patron cannot have items out or active."
Library•Solution Circulation
Appendix
CIRC-254
Contents
Index
Patron Fields
To set up Patron Fields:
1. Select the Setup menu, Types and Codes, and then Patron Fields.
2. The entry window is divided into two parts. On the upper half is the Field Name, and just under
that the setup for the type of data to be entered in the field (codes or free text). On the lower half
are the codes (if any) for that field. The first field is displayed by default. To view the Field Name
of any user field previously entered, use the first four buttons on the upper toolbar to look for the
First (first field), Prior, Next, or Last field
When a Field Name is displayed, view the codes (if any) for that field in the Value and
Description fields on the lower part of the window. Use the lower toolbar to find the First, Prior,
Next, or Last codes for the selected field.
3. To insert a new field, select the New Code button. In the Define New Patron User Field box,
shown below, enter a Field Name. (Suggestion: Enter name in all UPPER CASE, since case
affects the sorting of names in the saved list.)
To determine the type of entries allowed for this field and how the information can be used, select
appropriate check boxes for Coded, Strict, or Statistics.
If you make any changes in the field name or type of coding, select the Post (check mark) button
on the upper toolbar.
Note: You can enter up to 250 characters for each field name and code, but for easier viewing, a
lower number is recommended.
4. To insert a code for a selected field, select the Insert button on the lower toolbar. To delete a
code, select Delete.
5. If you add a code or make any change or deletion, select the Post button on the lower toolbar.
Note: The system will not allow you to delete a field or code if any borrower record currently
includes the field or code.
Library•Solution Circulation
Appendix
CIRC-255
Contents
Index
Patron Records
To access a patron record:
1. Select the Patron Transactions tab, or press the F2 key. The cursor waits in the Patron text
box.
2. To search for a borrower, do one of the following:
– Scan barcode label with the barcode reader.
– Type the Patron ID (in most libraries, this is a barcode number) or the Alternate ID. Type
the whole number (no truncation).
– Type the Search Code to search by Zip Code, mailing address, telephone number, city,
Patron ID, Name, Alternate ID, or email address. Type the code followed by the search term.
(For example, to search by Zip Code: type \zNNNN.) Then click Read or press Enter.
– Type the borrower's name or part of the name. After typing, click Read or press Enter.
If the name or similar names were found: The Patron Name Lookup window displays a list of
borrowers matching your search criteria. The list displays Patron ID (barcode number),
borrower name (including any suffix, such as "Jr."), Patron Type code, and borrower status.
Select the name you want, and click OK, or press Enter.
If the list includes similar names, you can view extra information about any borrower in the
list. Select a name and click on the Details button. The Quick Patron Info window will
display more information, including the borrower's "hot" status ("Blocked" or "Good").
If the borrower you want is not listed in the Patron Name Lookup window, you can add a
new borrower. Select the Add New button.
If the number or name you searched by is not found, a message asks if you wish to add a
new borrower. Click Yes or No. Add the new borrower record.
Library•Solution Circulation
Appendix
CIRC-256
Contents
Index
3. After a borrower has been found or if you have entered a new borrower, information about the
borrower appears on the upper part of the window. The blinking cursor will wait at the Enter Item
text box, ready for you to check out an item.
You could also select one of the Patron Transactions subtabs to perform some other activity or
edit the Patron Record.
Note: If you do not take any action within one minute, the cursor moves to the Patron entry box.
After one more minute of inactivity, the borrower will be cleared from the display. This "time-out"
ensures that you do not check out an item to the wrong borrower.
To enter or edit a patron address:
1. Select the Patron Transactions tab, or press F2. Search for the patron.
2. Select the Patron Record tab, and then select the Address tab.
3. Enter or edit any desired information.
– City, State, Zip: Use the "speed fill" button beside City or Zip to make entering City, State,
ZIP and (optionally) County information faster and more accurate. Type part of the city
name, or ALL of the postal code (ZIP), and then press Enter (or click the speed-fill button). A
pop-up City Wizard window appears, showing the other related fields. If your city has
already been entered, simply press Enter again to fill in all the address fields in the
borrower's record at once. If your library has set up a Patron Field named "County," the
county information in this borrower's record will also be updated when the record is saved. If
this city has not yet been added to the wizard list, click the Add New button in the City
Wizard window, and click OK.
– Address Correction Requested: If you want to be alerted to check the address of this
borrower, select this check box. This will cause a message in blue, Address, to be displayed
prominently on the F2 tab any time you search for this borrower. The message will remind
staff to update the borrower's address and other contact information.
Library•Solution Circulation
Appendix
CIRC-257
Contents
Index
– Organization: A borrower record can be linked to an "organization" (or any kind of name or
label you want to be printed on notices, labels, letters, etc.). When a borrower is linked to an
organization, the "organization" name is printed between the borrower’s name and the first
street line of the name and address block on notices, labels, letters, etc. Click the "speed fill"
button to the right of Organization to look up and select an organization for this borrower
record or to add a new organization to the list. To remove the link between a borrower and
an organization, select the "remove organization" button.
– Copy Address: Use this button Figure A-1, (lower left of the Address tab) to copy the
address from one borrower's record to another. Click the button to display the Copy Address
window (Figure A-1). After making changes, click the Save button in this dialog.
4. To save changes or entries, be sure to click the Save button before you leave this tab, or your
changes will be lost.
Figure A-1. The Copy Address window
Library•Solution Circulation
Appendix
CIRC-258
Contents
Index
To add a new patron record:
1. Select the Patron Transactions tab, or press the F2 key.
2. In the Patron text box, type the borrower's last name. Click Read or press Enter. If the name is
not found, a message window appears: "No name starting with those characters was found.
Would you like to add a new patron?" Click Yes.
If similar borrower names were found in the search, the Patron Name Lookup window will
appear. If the borrower you want is not listed, then click the Add Patron button.
3. The Add New Patron window appears. To move among fields, use Tab or click on another field.
4. To save the new borrower record, click OK.
To enter or edit Basic Info in a patron record:
1. Select the Patron Transactions tab, or press F2. Search for the borrower.
2. Select the Patron Record tab, and then select Basic Info. Enter or edit any relevant
information, including the Patron ID and optional Alternate ID. For example, in the Hot Status
field you could change a borrower's status from "Good" to "Blocked," thus blocking the borrower's
access to all activities in Circulation and Library·Booking.
Tips: When you add or modify a date, be sure to enter the year as 4 digits. To expand the
Comment edit box for easier data entry, click in the field or press Tab to move the cursor into it.
Type up to 250 characters. To contract the box, click in any other fields or Tab out.
If you want the borrower Comment display on the upper part of the F2 tab to display in red, go to
the Station Options settings (in Setup | Local Configuration) and click check box beside the
field Color Comment Field.
3. To save changes or new records, select the Save button.
Library•Solution Circulation
Appendix
CIRC-259
Contents
Index
4. To delete a borrower record, click the Delete button. If the borrower has any current active
transactions, the deletion will not be allowed. (Circulation users must be qualified by supervisors
to delete borrower records. Permission is given in Security Setup | Patron Screen Delete.)
Shortcut: If the Blocks area on a borrower's Patron Transactions tab shows a Card Expired or
Block Status message or an Almost Expired warning, you can easily renew the borrower's
registration or change the status. Click once on the block message, and the Patron Record: Basic
Info tab will appear. Edit the necessary information. Click Save.
To change the Patron Search Configuration:
Note: You must have supervisory access rights to do this.
1. In the Patron entry box, enter information to search for a borrower. Then click the Cfg. [Patron
Search Configuration] button, which appears just to the right of the Patron entry field.
2. The default configuration is to search Patron ID, Alternate ID, and borrower name, in that order.
This is indicated by the green check marks beside Patron ID and Alternate ID, and by the ü in
the check box beside Search Name. To change any setting, click on that option. This changes
the green check mark into a red "x", or it clears the Search Name check box. To reverse the
order of searching Patron ID and Alternate ID, click one, hold down the left mouse button, and
drag the selection up (or down).
Note: The borrower name is always searched last and when nothing else is found.
3. After making changes in the configuration, click OK to save, or Cancel if you do not wish to save
changes.
4. Click Read or press Enter to begin the search for the borrower.
Library•Solution Circulation
Appendix
CIRC-260
Contents
Index
Patron Types
To add or modify Patron Types:
1. Select the Setup menu, then Types and Codes, and then Patron Types.
2. To view existing Patron Type codes, select the down arrow beside Patron Type. To change the
entries about an existing type, select that type, and then go to step 5 below.
3. To add a new Patron Type, type the new code in the Patron Type field. If another code is
already displayed, click the field to highlight it, and then type the new code. Codes can consist of
letters and/or numbers, up to a maximum of 10 characters (but do not use spaces). As soon as
you type a new code, a message appears to the right in red: "New Patron Type." Also, the NEW
button on the right becomes "available."
4. If this Patron Type will be used for Outreach Services borrowers, click in the checkbox under
the Patron Type field label.
5. Press the Tab key to move the cursor to Informative Description, and type a description.
6. Use Tab to move from field to field. Enter any other needed information. The only required fields
are Patron Type, Description, and Hold Priority (if in doubt, enter "5" as default). Some fields
have check boxes to the left of the field, for example, Max Fine Balance. To use a field with a
check box, select the check box (check mark appears), and then enter a value in the text box.
Please note that even if a value appears in the text box, the field is not active unless the check
mark appears.
7. To save a new Patron Type, select the NEW button. If you modify an existing type, select SAVE.
To delete a Patron Type code, select DELETE.
Caution: The system will not permit you to delete a Patron Type when there are borrower
records using that Patron Type code.
8. You can now set the circulation rules for this Patron Type. Circulation rules are set in the lower
portion of the window.
Library•Solution Circulation
Appendix
CIRC-261
Contents
Index
Printing Setup
To configure the local printer:
1. Select Setup on the title bar at upper left of the Circulation window. Select Local Configuration.
Select Printing Setup.
2. In the Slips Printer field, select a printer that has been configured for the workstation. Click the
drop-down arrow to view a list of configured printers, and select the printer.
3. In the Printer type field, click the drop-down list to choose either Single Sheet or Continuous
Feed. For slips printers or dot matrix printers that use a continuous feed of paper, select
Continuous Feed. For a single sheet printer, for example, a laser printer, choose Single Sheet.
The Single Sheet selection ensures that a form feed command will be issued after each print job
to clear the sheet from the printer.
4. Click the check box beside each type of slip you wish to print at this station:
– Check Out Slips (date due slips): When this is selected, checkout slips are printed when
items are checked out. If you selected Continuous Feed for the Printer Type, and you want
to print a separate slip for each checked out item, also select the Separate Check Out Slips
check box. (The separate slip option is not available when Single Sheet is selected; this
setting automatically prints a separate sheet for each checked out item.)
– Payment Receipts: To print a receipt automatically for any payment received, select this
check box. Please note that even if this option is turned off, you can still print a receipt or
multiple receipts on demand. To do this, use the Receipt button on the Charges tab.
– Patron Inquiry Slips: If you want to allow Circulation staff to print information about a
selected borrower, select this check box (so a check mark appears). To print a borrower slip,
staff will search for the borrower on the F2 tab, select the Patron Record | Basic Info tab,
and then click the Print Patron Info button.
– Holds Slips: When this is selected, a slip is printed automatically when you check in an item
that is on hold. The slip includes information about an "arrived" hold, including borrower name
and phone number.
Library•Solution Circulation
Appendix
CIRC-262
Contents
Index
5. Number of line feeds after a slip: Enter the number of blank lines you want the printer to feed
after printing each slip. The default is 4 lines.
6. If you want to test the print setup, click the Print Test button before you leave this window.
7. To save changes, click OK, or press Enter. To exit without saving, select Cancel.
Library•Solution Circulation
Appendix
CIRC-263
Contents
Index
Re-Login
To re-login to Circulation:
1. On the Utilities menu, select Re-Login. The Database Login window will be displayed.
2. Enter a different User Name and Password.
3. Click OK.
Recalls
To "trap" a previously checked out item when it is checked in, use the Recall feature.
To recall an item through the Utilities menu:
1. Select the Utilities menu, and then select Recall Item
2. In the text box, scan or type the Item ID (barcode number) of the item, or type the title or first
word(s) of the title. Then click Pick Item or press Enter. Select the title or item you want. The
Recall Item window will then display the Item ID.
3. In the Reason for Recall box, type the message to be displayed when the item is checked in. If
you need to correct the message before saving, select the Clear Box.
4. To complete the recall, select Save and Exit or Exit without Saving. If an item is on the shelf
(not checked out), a message will be displayed: "Item is available and cannot be recalled."
5. When the item is checked in, the recall message will be displayed in the Item Has Been
Recalled window. To exit the window, click OK.
To find out if an item has been recalled:
Follow the first two steps above. If the item has been recalled, the Date of Recall box will display that
date. If the item has not been recalled, the Date of Recall box will be blank or may display "Was not
previously recalled.
Library•Solution Circulation
Appendix
CIRC-264
Contents
Index
Renewals
To renew an item or items:
1. Click the Patron Transactions tab, or press the F2 key. Access the borrower. When the
borrower's information is displayed, click the Items Out tab. (Usually, the tab is already open.)
2. Select the item you wish to renew. You can renew more than one item at the same time, if the
items are above or below each other on the list. To renew multiple items, drag the mouse down
the list to highlight the ones you want. If there is a rental fee associated with an item, aA
message asking if you wish to charge the rental fee will now be asked during renewal. (The
Rental Charge Renewal fields must be set by administrators in the System Configuration
Holdings Code Setup.) Then click the Renew button on the lower part of the Items Out tab.
3. Special conditions: Any of the following item or borrower conditions may affect a renewal. Take
appropriate action if necessary.
– Overdue items: If you attempt to renew an overdue item that will have an overdue fine
charged, a message window will appear, giving you the option to continue with the renewal or
to cancel the renewal.
– Items on hold: If you attempt to renew an item that is on hold for another borrower, a
message window will appear: "There are holds on this item." You can allow the renewal by
entering the supervisor password. Follow the instructions in the message window.
– Blocks: If there are blocks on this borrower, a block message may appear in a window
labeled Enter Override Password. Type the password, and click Try or press Enter.
Other types of blocks, such as an expired card warning, appear in an information window.
Click OK or press Enter to exit the window, and then click the relevant message in the
Blocks area of the Patron Transactions tab. If possible, you can remove the block by
taking appropriate action, such as waiving charges or extending the card expiration date.
Library•Solution Circulation
Appendix
CIRC-265
Contents
Index
Repair History
To add repair notes:
1. On the Utilities menu, select Item Repair History. Search for a title or item in the Lookup Item
field.
2. When an item is selected, click Add. The Add New Repair window is displayed. Enter the
following information:
– Date of Repair: Today's date is entered by default. Change if necessary.
– Repaired by Patron: Optional: Search for and select a borrower.
– Repaired by Vendor: Optional: Select a vendor from the drop-down list.
– Back-in-Service: Today's date is entered by default. Change if necessary.
– Result: Select from the drop-down list: Fixed; Replaced; Temporarily Out-of-service;
Permanently Out-of-service.
– Comment: Enter an optional free-text comment. Suggestion: mention name of the repairing
vendor or borrower here, so this can be viewed in the future in the View Repairs window.
– Repair Cost: Enter an amount, if any.
3. To save, click OK.
Library•Solution Circulation
Appendix
CIRC-266
Contents
Index
Reserves
To place items on reserve:
1. Click the Patron Transactions tab or press F2. Access the borrower (usually an instructor) who
wishes to place the items on reserve.
2. When the borrower's information is displayed, click the Reserves tab. The Reserves tab
expands to reveal a larger display. (To reduce the Reserves tab display and return to the
normal Patron Transactions tab, you can simply press F2, click on the Patron Transactions
tab, or click any other tab.)
3. Click the Place button on the lower part of the Reserves tab.
4. The Place Item on Reserve window appears. Enter the following information:
– Department: Click the down arrow beside the Department field. Select a Department code.
– Course: Click the down arrow beside the Course field. Select a Course code.
– Expiration date: Enter a date that you want the reserve for this group of items to expire.
Today's date is entered as a default.
– Find Item: In the Find Item text box, enter information about the item you want to place on
reserve. Search by title or item number or by scanning the barcode label for an item in hand.
If you type the information, select the Find Item button or press Enter to begin the search.
You must select a specific item to be placed on reserve (you cannot place title-level
reserves).
After you select an item, item information will be displayed (title, Item ID, call number, copy
and volume information).
– Selecting Branch and Collection: Select the Branch and Collection codes that you want to
control the checkout policies, PAC displays, and Circulation checkin messages (display of
shelving location) for this item. (Remember, library/collection codes are based on
interpretations of the holdings codes. To add new holdings codes for reserve shelving
Library•Solution Circulation
Appendix
CIRC-267
Contents
Index
locations or edit existing code setups, run the Library.Solution System Configuration and
select Setup | Holdings Codes.)
By default, the current library name will be displayed in the Owning Branch field. To select
another library, click the down arrow to display the list, and select. (The current library is the
one selected in Setup | Local Configuration | Station Options.) In the Collection field, the
first collection code (alphabetically) for the selected library will be displayed.
Hint: You can quickly locate the collection you want by typing the first letter of the collection
code. For example, to find "REF," type "R"-- then press the Down or Up arrow keys to scroll
through the list from there (or press Right arrow to go down, Left arrow to go up). If you type a
different letter, this reveals another part of the list (codes beginning with that letter).
5. Save: To save the reserve, click the Add button.
6. Add another item to a Department/Course group: Click on (highlight) the
Department/Course line or any item already on reserve in that group. Select the Place button.
The Department, Course, and expiration date already specified will be displayed. Find an item,
and then select the Branch and Collection codes. Select Add to save.
7. Add another Department/Course group of reserves: Click on the name of the borrower
(instructor) in the Reserves display. Select the Add button. Follow the instructions in step 4
above.
To edit a reserve via the F2 tab:
1. Click the Patron Transactions tab or press F2. Access the borrower who placed the items on
reserve.
2. When the borrower's information is displayed, click the Reserves tab. To view all details about
the reserves, you may need to double-click the yellow folder icons.
3. To edit Department Code, Course Code, or expiration date of a group of items on reserves,
highlight that line and then select the Edit button. The Edit Reserve Information window is
Library•Solution Circulation
Appendix
CIRC-268
Contents
Index
displayed. Edit the Department or Course code, or adjust the expiration date. To save, select
the Update button.
4. To change the checkout rules for an item on reserve, select the item, and then the Edit button. (If
you select a title, a message reminds you to select a Department/Course line or an item line
instead.) The Edit Reserve Item window is displayed. Change the Branch or Collection codes
if necessary. To save, select the Update button.
To view or edit reserves via the Reserves Tools menu:
1. On the Circulation menu select Reserves Tools, and then select View Reserves. The View
Reserves window will be opened.
2. To view the reserves for this library only, click the check box beside Show Current Branch's
Reserves Only (at upper left). To reorder the elements in the display, for example, to arrange the
list by title, simply click on that column.
3. To edit a reserve, double-click the Instructor column. This takes you to the Reserves tab of that
instructor (borrower) on the Patron Transactions tab.
4. To close the display, click the Close button.
To remove items from reserve:
1. On the Circulation menu select Reserves Tools, and then select Remove Reserve Items.
2. Scan the barcode label, or type the barcode number. If you type the number, press Enter or
select the Take Off Reserve button. A message will inform you that the removal was successful.
Then a Relocate Item window will remind you to reshelve the item in its correct location, transfer
it to another library, or place it on the holds shelf, as appropriate.
3. To remove another item, simply scan or type the number.
4. When you have finished removing items from reserve, exit the dialog by selecting the OK button.
Library•Solution Circulation
Appendix
CIRC-269
Contents
Index
Rotating Items
To create a Rotating Items
1. Create the following Item Fields in Circulation.
GRID - The "grid" is the set of libraries the item(s) will rotate through.
BEGIN - This setting is the library number of the library which will get the item first, beginning the
rotation.
LOOPS - The number of times the times the item is to rotate through the grid.
2. In the Route Configuration Utility (Library.Solution | Circulation Utilities | L.S Route
Config), create Routes for each grid, defining the sequence of rotation among the libraries in the
grid.
3. Using L.S System Configuration, create the new circulation holdings codes (for each location)
that have been designated for the rotating collection.
Important: The "short description" in the Holdings code must be the same for all locations.
4. In Circulation, set the Rotating Collections Period. This sets the number of days that items, in
ANY grid, will stay in the indicated Circulation Collection.
5. In Circulation, on the Item / Title Info F4 tab, Item Fields sub-tab, call up each item to be
included in the rotating collection and:
– Set the BEGIN item field to the library number of the beginning library/collection in the
appropriate grid.
– Set the GRID item field to the appropriate grid name.
– Set the LOOPS item field to the number of times the item should rotate through the grid.
Library•Solution Circulation
Appendix
CIRC-270
Contents
Index
– Set the "circulating" collection to the holdings code you have created for the rotating
collection
6. When complete, send each copy to the appropriate branch(es).
Security Setup
To complete Circulation Security Setup for any user qualified to access Circulation (Circulation
Users and Circulation Administrators):
1. First, administrators may wish to check the System Configuration. (Start the configuration from
the Start menu.) Login, using system or Circulation administrator default login information. Then
select Setup and Users. Then select Create (for new users) or Edit/Remove (for existing
users). Set up User Names, individual Passwords, and access privileges ("Circulation Roles") for
users of Circulation.
Important! Any user who needs access to Circulation Security Setup must be assigned the
Circulation Role of "Circulation Administrator."
2. In Circulation, select Setup from the menu, and then select Security Setup. On the Security
Configuration display, click the down arrow beside the User Name box, shown in the example
below, to display a list of Circulation users or administrators (as authorized in the L·S System
Configuration). Select a user.
3. The activities available for security setup are arranged on five tabs in the Security
Configuration window. Administrators (as authorized in the System Configuration) can view or
change setups for any user. For details about the setups, click on the subtabs: General, Basic
Functionality, Menu Function, Patron Screen, Bibliographic Page
4. After reviewing or changing options on the five tabs, save by selecting the Post button, or cancel
the changes by selecting Cancel.
5. To make any changes effective, you must re-login. Select Re-Login on the Utilities menu in
Circulation.
Library•Solution Circulation
Appendix
CIRC-271
Contents
Index
Station options
To set Station Options:
1. Select Setup on the title bar at upper left of the Circulation window. Select Local Configuration,
and then select Station Options.
2. Click the drop-down arrow to the right of the Branch where this station is located field. Select the
library where this station is located. (Once the library has been identified correctly on this station,
there should be no need to change it.)
3. The Station Settings area includes two fields with check boxes
– Override Due Date Stays On: Click this check box if you want an override due date to
remain turned on during Check Out, even when multiple borrowers are checking out
materials.
– Color Comment Field: Click this box to display a check mark, if you want Patron Record
Comments displayed in red text on the F2 tab. (Add a Comment to a selected borrower's
record on the Patron Record: Basic Info. tab.)
4. The Station Level Searches area includes three check boxes, detailed below, that allow you to
limit borrower or title search results to borrowers or items at this library, or view all borrowers or
titles/items at all libraries. You can choose to view your library's barcode items first in the items
list on the F4 display.
Local Patrons Only: Supervisors at each station can configure the default for the borrower
search hit list: to include local borrowers only (meaning this library is their "home" library) or all
borrowers. This option is unchecked by default, meaning all borrowers will be displayed. (The
All Branches or Local Branch buttons will still be available in the borrower search hit lists to
allow expanding or limiting the display.)
Local Titles Only: Supervisors at each station can choose to configure the title/item search hit
list to include detailed item information for the local library only, or all libraries.
Library•Solution Circulation
Appendix
CIRC-272
Contents
Index
If enabled (check box is checked), Local Titles Only is a security feature designed to prevent
libraries from editing other libraries' holdings. Users can still see ALL titles in the database (but
the "NO ITEMS" display will appear beside titles belonging to other libraries) and can add
on-the-fly copies of their own to those titles.
Local Barcodes First: Check this box if you want your branch's items (barcode numbers) for a
selected title to be listed first in the drop-down list beside the Item ID field. (This field is not
available, if the Local Titles Only check box is checked.)
5. To save Station Options changes, select OK, or press Enter. To exit without saving, select Exit.
Library•Solution Circulation
Appendix
CIRC-273
Contents
Index
Titles
To add a new title:
1. Go to any of the three main tabs where you can search for items/titles. For example, you can
add an item on the Patron Transactions tab, during checkout.
2. Search by typing the title or first few words of the title. You will see one of two types of displays:
– If similar titles are found, they will be listed in the Title Lookup window. You can add a new
title from this window by clicking the New Title button.
– If the first few characters you typed were not found in the title search, a message appears:
"No title starting with those characters was found. Would you like to add one?"
3. Click Yes, or press Enter. If you do not wish to add a title, click No or press Esc. If you selected
Yes or New Title, the On-The-Fly Item Entry window appears. To view a list of possible
material formats, select: Material Types.
4. Item Information: After entering all title information (bibliographic information) on the upper part
of the window, enter information about an item. The only required fields are Owning Branch and
Barcode number (Item ID).
Selecting Branch and Collection: By default, the current library name will be displayed in the
Owning Branch field. (The current library is the one selected in Setup | Local Configuration |
Station Options.) In the Collection field, the first collection code (alphabetically) for this library
will be displayed. You can quickly locate the collection you want by typing the first letter of the
collection code. For example, to find "REF," type "R" - then press the Down or Up arrow keys to
scroll through the list from there (or press Right arrow to go down, Left arrow to go up). If you
type a different letter, this reveals another part of the list (codes beginning with that letter).
5. After entering or selecting all needed information, save the record.
Note: Different Save buttons may appear, depending first on whether a new item is owned by
your library (as set in Setup | Local Configuration | Station Setup) and on whether the new title
Library•Solution Circulation
Appendix
CIRC-274
Contents
Index
or item was added while you were working on the F2, F3, or F4 tabs. To cancel the add, click
Cancel instead. The following message will be displayed at the upper right corner identifying
this as an on-the-fly record: Circulation Record.
To add a new item to an existing title:
1. On any of the three main tabs where you can search for items/titles, search by typing the title you
want, or the first few words of the title. Similar titles will be listed in the Title Lookup window.
Highlight the title you want (do NOT press Enter), and then click the New Item button. The
On-The-Fly Item Entry window will be displayed with the title information (bibliographic) already
displayed on the upper part of the window.
Tip: If you search on the F4 tab and find the relevant title, you can easily add a new item
(barcode), by clicking on the New button on Circulation tab (lower left). This displays the
on-the-fly form.
2. Add item information (barcode number, etc.) to the On-The-Fly Item Entry form in the Item
Information area.
3. To save the new item record, click the appropriate Save button. To cancel the add, click Cancel
instead.
To change the Title Search Configuration:
Note: Yo must have supervisory access righrs to do this.
1. Before you enter information to search for an item or title, click the Cfg. [Title Search
Configuration] button, which appears just to the right of the item/title entry field.
2. The default configuration is to search Item ID, Control Number, ISBN, and then Title, in that
order. This is indicated by the green check marks beside Item ID, Control Number, and ISBN,
and by the ü in the check box beside Search Title.
To change any setting, click that option. This changes the green check mark into a red "x."
Library•Solution Circulation
Appendix
CIRC-275
Contents
Index
To change the order of searching Item ID, Control Number, or ISBN, click one, hold down the left
mouse button, and drag the selection up (or down).
Note: The title is always searched last and when nothing else is found. For example, if you enter
an Item ID that is not found in the database, a display of all titles will be shown in the Title
Lookup window.
3. After making changes, click OK to save, or Cancel if you do not wish to save changes.
Library•Solution Circulation
Appendix
CIRC-276
Contents
Index
Transfers
To transfer items:
1. Select Utilities on the title bar at upper left of the Circulation window, or press the key
combination ALT + U.
2. Select Item Transfers. The Item Reassignment window will be displayed.
3. On the Single Assignment tab, select an option in the Reassign specified items to area:
– Owning branch/collection: to transfer items back to the original location.
– Specified branch: to transfer items to a selected library.
– Specified branch/collection: to transfer items to a specified library and collection.
4. In the New Location area, click the down arrow to select a library and a collection, if relevant.
Note: You cannot use this utility to place items on reserve.
5. Specify item: In the edit box in the center of the window, scan the barcode number of an item to
be transferred. You can also type the title, the barcode number, or the control number of the
item to be reassigned. If you type data, press Enter or click the Reassign button. To configure
an item/title search, click the Cfg. button. [The Item Transfers option "Upload File" of barcode
numbers has not yet been implemented.]
6. Continue entering other items to be transferred. The Item Transfers process changes the Item
Status code of an item to "T" (in transit).
7. When you are finished, click Quit. Place the items in a designated location for transport to other
branch(es).
8. When items are received at the other library, check in each item. This action changes the Item
Status code "T" to the appropriate code.
Library•Solution Circulation
Appendix
CIRC-277
Contents
Index
Uncataloged Collection Codes
Use the Uncataloged Collections command to establish codes for any groups of items you wish to
check out for statistics only. For example, many libraries have paperback collections that are not
cataloged or barcoded. It is not necessary to add the Circulation "rules" or configure displays in the
System Configuration, since Uncataloged Collections codes are not real holdings codes.
To set up Uncataloged Collection codes:
1. Select Setup from the menu bar at upper left of the Circulation window. Select Types and
Codes and then Uncataloged Collections. The Uncataloged Collections setup window
appears. The name of the current library is displayed, that is, the library currently selected in:
Setup | Local Configuration | Station Options.
2. Type a new collection code (up to 20 characters). The Add New button becomes available. Tab
to the Description field and type a description.
3. To save a new code, click Add New. If you are modifying an existing code's description, click
Save.
Library•Solution Circulation
Appendix
CIRC-278
Contents
Index
Vendors
To link an item to (or remove link from) a Vendor:
1. On the Item/Title Info tab (F4) search for and select a title, and then select an item in the Item ID
drop-down list.
2. Select the Vendor tab. Select the Link To Vendor button.
3. In the Search for Vendor window, shown below, search for the vendor by name or code. Select
a vendor and click OK. The vendor's code number and name will appear on the left side of the
Vendor tab.
4. To remove the link, select the Remove Link button.
Library•Solution Circulation
Appendix
CIRC-279
Contents
Index
2.0 Rotating Collections and Item Transfers
Introduction
There are two methods available for moving items among libraries: Rotating Collections and Item
Transfers: Batch Reassignment. The two methods are very different from each other. You should
carefully read about each method before choosing the one that best meets your library's needs.
The Rotating Collections method allows individual items to move in a preset pattern, based on the
options set up for it. The Batch Reassignment function is used to move the entire contents of a
collection, on demand, from one library to another. The first method is described below, the second
method is described in chapter 5, section 5.2.2 of this manual.
Using Rotating Collections, you decide the items to be included, the sequence and timing of the library
rotation, how many times the item travels through the rotation, and the number of days that an item will
stay in the indicated Circulating Collection.
You must also decide on a unique holdings code for Rotating Collection items. The holdings code
must consist of your standard prefix, and the designated Rotating Collection code. For example:
ACPLTRAV, where ACPL is the prefix, and TRAV is the code for the rotating collection.
Once these details are defined in Library•Circulation, the circulation record of each item to be included
in the rotating collection, must be edited to reflect those settings. Then the items are distributed to the
appropriate branch(es) to begin circulating.
Once the collection has begun rotation, an on-demand report can be regularly generated, listing the
items that need to be gathered and rotated to other libraries. You can determine how often this needs
to be done based on your staffing needs, and volume of circulation.
Library•Solution Circulation
Appendix
CIRC-280
Contents
Index
Rotating Items
The Rotating Collections function of Library•Circulation allows you to organize the process of
circulating shared items throughout your library libraries.
Before you set up Rotating Items you need to decide:
• Which libraries will be grouped together for item rotation (GRIDS)
• The library rotation sequence (ROUTE) within the grid
• How many grids you will use, and a naming convention for the grids
• The number of days that each item will remain at each library (Rotating Collections Period)
• The items that you wish to rotate
• Be sure that EVERY library in a grid has a collection whose short description matches a short
description in all other libraries in the grid.
To Create Rotating Items
1. Create the following Item Fields in Circulation.
– GRID - The "grid" is the set of libraries the item(s) will rotate through.
– BEGIN - This setting is the library number of the library which will get the item first, beginning
the rotation.
– LOOPS - The number of times the times the item is to rotate through the grid.
2. In the Route Configuration Utility (Library.Solution | Circulation Utilities | L.S Route
Config.), create Routes for each grid, defining the sequence of rotation among the libraries in
the grid.
Library•Solution Circulation
Appendix
CIRC-281
Contents
Index
3. Rotating Items can be "placed in" any existing holdings code, or you may create a special
holdings code for these items.
Important: The "short description" in the Holdings code must be the same for all locations.
4. In Circulation, set the Setup\Branch Setup\Misc. Collection Rotation. This sets the number of
days that items, in ANY grid, will stay in the indicated Circulation Collection at this location. (Do
this for All locations that are in a grid.)
5. In Circulation, on the Item / Title Info F4 tab, Item Fields sub-tab, call up each item to be
included in the rotating collection and:
– Set the BEGIN item field to the library number of the beginning library/collection in the
appropriate grid.
– Set the GRID item field to the appropriate grid name.
– Set the LOOPS item field to the number of times the item should rotate through the grid.
– Set the "circulating" collection to the holdings code desired. Note: Rotating Items ONLY
works through the Circulation holdings code, so even if the item is already set to the proper
holdings code as "Owning" holdings code, you will still need to check the "Circulating" check
box and click on the Save button,
6. When complete, send each copy to the appropriate branch(es).
Rotating the Collection
The rotation process is accomplished through a scheduled job on your database server. If this job was
not established by the TLC installer, you will have to contact TLC Support to set up the job for your
system. You must decide when and how often this job should run. You might want the job to run every
night, or only run weekly, during the night. Your choice should be based on the availability of staff to
physically handle the items needing to move.
Library•Solution Circulation
Appendix
CIRC-282
Contents
Index
The job examines all items which are associated with a GRID, that are currently active (they actually
have a Circulating Holdingscode associated with them), to see if the item has been in its Circulating
Holdingscode longer than the configured Collections Rotation period.
The items which are ready to be moved are recorded in the log file, which is printed by running the
report, Rotating Collections - Items to be moved. Run this report the day after the job is scheduled.
Use this report to gather the items to be moved to another location, and prepare them for transport.
Some items may appear on the report with notations of "Item needs to be reviewed" or "Item beginning
branch not valid". These must be reviewed for proper settings.
Note: Items with a Current Circulation Status other than 'T' will probably not be located on the shelf. If
the item is currently checked out, when it is eventually checked in, the operator will be alerted to
forward the item to the appropriate location (determined earlier by the scheduled rotation job).
3.0 Changes to Server Down Circulation in v3.3
A major change has been made to the Server Down program for Library•Solution v3.3. Those who are
now using Version 3.3 of Library•Solution have a different program than those libraries that are still
using older versions. The graphic interface has not changed, but the program now uses a database
structure to store transaction data instead of using the UPLOAD.SD text file to store transactions.
Server Down Circulation is now started by clicking an SDC shortcut you place on your desktop, or by
clicking Start | Library.Solution | Circulation Utilities | Server Down Circ.
You can run SDC on any PC-compatible computer loaded with Windows 95/98/2000/NT or XP,. and
that has a keyboard wedge type scanner. Use the Library•Solution Installation disc to install the
Circulation client on the computer you wish to use. It is best if the computer can be attached to your
network, but if not, you can copy the data file that it creates to a disk and transfer it to another
workstation that IS on the network to process your transactions.
Library•Solution Circulation
Appendix
CIRC-283
Contents
Index
In Circulation version 3.3 the Server Down Circ Recovery utility has been eliminated. The Server
Down Circulation interface now contains menu options to perform the uploading and posting of
transactions generated during the use of the Server Down Circulation.
This change means that you must use the Library?Solution client installation disc to load the SDC utility
on your bookmobile, or other remote processing computers. If your remote computer(s) can not be
connected to the network for processing transactions directly, you will need to read the instructions for
transferring data to a networked computer in the Bookmobile instructions below.
The SDC transactions are saved to a database file named TRANSACTIONS.DBF on the hard drive of
the workstation you are using for SDC in the same folder as the SDC program (See above). When you
post the SDC data to your database two log files are produced; these files can be found in the folder
where the SDC program is stored.
Bookmobile Operations in Circulation v3.3
Bookmobile stops' checkouts will be identified by the logged in user name in the database. When the
bookmobile is unable to keep its published schedule for any reason, it may be necessary to adjust the
due dates on all items still checked out from the bookmobile, for the stops that were affected by the
interruption of the schedule.
The program BMDateChg.exe that is installed in the Circ folder on every Circulation station since
v3.0.0.01 can be used to adjust the due dates for bookmobile items for selected "stops" that were due
on a specific date when the bookmobile did not keep its regular schedule. You can adjust the dates for
multiple "stops", providing that the date and interval period for all selected stops is the same.
This process extends the loans to the next expected stop date and avoids charging patrons overdue
fines for those items. This method can also be used in tracking checkout/checkin statistical
information by logged in user name, and does NOT ONLY apply to using Server Down on a
bookmobile, but also works equally well when running Circulation wirelessly on the bookmobile. In
either case, the library must create new user names (with Circ_user rights), and then be sure to login to
Circulation (or set the user name in Server Down) using the appropriate user name for EACH STOP on
the bookmobile route. If stops are added you will need to add new user names.
Library•Solution Circulation
Appendix
CIRC-284
Contents
Index
If your library is using the full Circulation module on your bookmobile (running with a wireless
connection or other “live” connection to the database), then all you need to do is create different login
names for each "stop" on the bookmobile route. The operator must login appropriately at each stop.
This will allow the database to know from which "stop" every item was checked out.
Important! Since SDC was designed for use when there is a problem with the server, you should
become familiar with the procedure before an emergency situation occurs. With it, your staff will be
able to continue checking materials in and out of the library with no delay.
Server Down Circulation process
1. When you use the Server Down Circulation utility, you normally perform the following steps
• Warning - Check the date and time set on the station. Confirm that every station running SDC is
set to the same date and time.
• Start and set up Server Down Circulation. To start SDC click the desktop shortcut or click Start
Library.Solution | Circulation Utilities | Server Down Circulation.
• Check Out Items
2. When your server is restored, or for any other reason that you have been using SDC to record
transactions and are now ready to upload the transactions, do the following:
• All stations upload their transactions to the server using the Utilities menu, Sync Transactions
option. The next step MUST be performed for the transactions to be posted to the database.
• When all stations have uploaded their transactions an Administrative user initiates the Finalize
Transactions process which posts the transactions to the database.
Library•Solution Circulation
Appendix
CIRC-285
Contents
Index
Index
Bibliographic page subtab 115
Bibliographic subtab 51
Branch Setup 81
Branch Statistics 140
Calendar Configuration 96
Cash Drawer Setup105
Charge Types 62
Charges 20
Check In / In House Use tab 41
Check Messages 125
Circulation page subtab 120
Circulation subtab 50
Circulation Utilities programs 155
Course Codes 78
Daily Calendar 98
Debt Collection Module 202
Defaults subtab 83
Department Codes 76
Fines/Overdue subtab 87
Generate Overdues 155
Help menu options 153
Holds 25
Library•Solution Circulation
Holds Shelf 137
Item Fields 57
Item Repair History 135
Items Out 18
Item / Title Information tab 47
Item Transfers 128
Local Configuration 100
Messages button 58
Messaging 125
Outreach Fields 73
Outreach Manager 194
Outreach Services 37
Outreach User PAC setup 121
Patron Addresses 31
Patron Fields 30, 69
Patron Loan History 36
Patron Records 29
Patron Screen subtab 114
Patron Transactions subtabs 18
Patron Transactions tab 18
Patron Types 63
Portable Scanner Offload 182
Index
Printing Setup 100
Quick Reference 284
Re-login 127
Recall Items 133
Remove Reserve Items 151
Reserves 39
Reserves Tools Menu options
149
Rotating Collections 278
Security Setup 82
Secutity subtab 82
Server Down Circulation 157
Setup Menu options 61
Starting Circulation 5
Station Options 103
Types and Codes 61
Uncataloged Collections 80
Utilities menu options 127
Vendor Editor 201
Vendor subtab 53
View Reserves 149
Weekly Calendar 96
CIRC-287
Contents
Index
Quick Reference
Authority Control
To apply authority control to uncontrolled authors
205
Blocks
To override an Enter Override Password block and allow the transaction
To exit the Enter Override Password block and deny the transaction 206
To review or remove block conditions
206
Branch Setup
To complete the Branch Setup
207
Calendar
To set up Daily Calendar 208
To set up the Weekly Calendar 209
Cash Drawer
To configure the Cash Drawer
210
Charge Types
To set up new Charge Items 211
Check In Items
212
To check in items
To override checkin date/time
217
To suppress checkin messages 217
Check Out
To check out items to a borrower 219
To check out multiple uncataloged items 220
To override the due date (and time)
221
To inquire about a checked out item
223
Circulation Rules
224
To set up or modify Circulation Rules
Course Codes
To set up Course Codes 225
Delete Records
To delete item or title record 226
Department Codes
To set up Department Codes 228
Library•Solution Circulation
Index
206
CIRC-288
Contents
Fines
To calculate fine (before checkin) 229
To change the Overdue Fine amnesty period
229
To view and handle Charges 230
Holds
To place hold request for title or item
232
To access the Holds Queue 233
To edit, delete, or cancel holds via Patron Transactions tab
To view and work with Holds Shelf items 235
To limit a hold 236
To sort items in the Arrived Holds Shelf list
237
Item Fields
To set up Item Fields
238
To view or enter Item Field data 239
Item/Title Records
To access item/title records on Item/Title Information tab
To search for an item or title 240
Notices
To generate overdue notice data 243
To run and print notices or reports 244
Outreach Fields
To get started Using Outreach Services in Circulation 246
To Start Outreach Manager 246
To set up Outreach Fields 247
To Change a Displayed Field to a Different Selection
248
Outreach PAC Server
To Set, or change, the Outreach PAC Server address 249
PAC
To Save a Search 250
Patron Delete Utility
To run and use the Patron Delete Utility 251
Patron Fields
To set up Patron Fields 253
Library•Solution Circulation
Index
Index
234
240
CIRC-289
Contents
Patron Records
To access a patron record 254
To enter or edit a patron address 255
To add a new patron record 257
To enter or edit Basic Info in a patron record
To change the Patron Search Configuration
Patron Types
To add or modify Patron Types 259
Printing Setup
To configure the local printer 260
Re-Login
Index
257
258
To re-login to Circulation 262
Recalls
To recall an item through the Utilities menu
262
To find out if an item has been recalled 262
Renewals
To renew an item or items 263
Repair History
To add repair notes 264
Reserves
To place items on reserve 265
To edit a reserve 266
To remove items from reserve 267
To view or edit reserves 267
Rotating Collections
To create a Rotating Collection 268
Security Setup
To complete Circulation Security Setup for any user qualified to access Circulation (Circulation
Users and Circulation Administrators) 269
Station Options
To set Station Options 270
Library•Solution Circulation
Index
CIRC-290
Contents
Titles
To add a new title
272
To change the Title Search Configuration
Transfers
To transfer items
275
Uncataloged Collection Codes
To set up Uncataloged Collection codes 276
Vendors
To link to (or remove link from) a Vendor 277
Library•Solution Circulation
Index
Index
273
CIRC-291