1
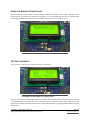
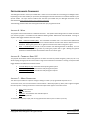
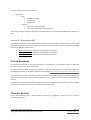
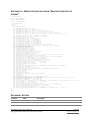
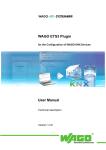
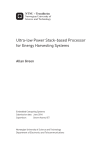
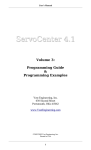
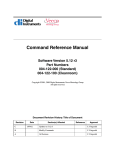
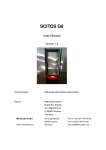
ROBUGTIX CONTROLLER USER’S MANUAL
HOW TO SETUP THE ROBUGTIX CONTROLLER
Insert the XBee module into the corresponding slot as shown in the image below. For maximum wireless
communication distance, extend the antenna into a straight vertical position.
The wireless XBee module should be inserted as shown
Insert either 4 alkaline 1.5V AAA batteries or 4 NiMH 1.2V AAA batteries into the battery slot on the back side
of the controller. Alternatively, you may also power the Robugtix Controller using the provided USB cable by
directly connecting it to your computer or any 5V USB power supply.
That’s it! You’re all set!
To start using the controller, turn on the power switch.
Note: the power switch will only control the power coming from the batteries and not the USB cable. When
using the USB cable, the Robugtix Controller will remain powered until you unplug the cable. This feature allows
the user to upload a new program with the USB cable while keeping the batteries switched off.
Robugtix Controller User’s Manual
Copyright © 2013, Robugtix Ltd. All rights reserved.
page 1/5
www.robugtix.com
USING THE ROBUGTIX CONTROLLER
After turning on the power switch, a startup message “RoBUGtix” will appear on the screen. During this brief
startup period, the controller will calibrate the joysticks, so it is recommended to not move any of them until
the message “RoBUGtix” disappears and the controller enters the main user interface screen.
The Robugtix Controller startup screen.
THE USER INTERFACE
The first menu you will see after the startup screen is shown here.
The Robugtix Controller Main User Interface Screen
There are four joysticks in the Robugtix Controller, labeled A, B, C and D (the letters of each joystick are indicated
on the Robugtix Controller PCB) which can be used to control the movements of the robot. Additionally, each
joystick has a clickable pushbutton which can be used for selecting options or toggling between different modes
of operation.
Robugtix Controller User’s Manual
Copyright © 2013, Robugtix Ltd. All rights reserved.
page 2/5
www.robugtix.com
PREPROGRAMMED COMMANDS
The Robugtix Controller comes pre-loaded with a useful set of commands for controlling your Robugtix robot.
Depending on the robot model you purchased, the Robugtix Controller will feature commands tailored to your
specific model. The open source firmware that has been pre-loaded into your Robugtix Controller can be
downloaded at http://www.robugtix.com/robugtix-controller/
The following part describes what each joystick has been pre-programmed to do.
JOYSTICK A - WALK
This joystick controls walk motions in different directions. The speed of the walking motion is based on how far
you move the joystick. Pre-loaded are two different walking modes: Differential and Crab Mode. Clicking on
Joystick A will toggle between these two modes.
•
•
Walk – Differential Mode (Wd): This somewhat resembles how a car would move (differential
drive). Moving the joystick forward or backward would command the robot to walk forward or
backward. Moving the joystick left or right will command it to walk turning left or right.
Walk – Crab Mode (Wc): just like a crab, the robot’s main walking direction is sideways. You can
achieve this sideways walking motion by moving the joystick left or right. Moving the joystick
forward or backward would command the robot to turn left or right.
JOYSTICK B – TRANSLATE BODY XYZ
This joystick will shift the robot’s body position on either one of three possible imaginary planes, XY, XZ or YZ,
while keeping the leg tips at the same location using inverse kinematics calculations. Clicking on Joystick B will
toggle between the different translation modes.
•
•
•
Translate Body XY (Txy): translates the body along the XY plane.
Translate Body XZ (Txz): translates the body along the XZ plane.
Translate Body YZ (Tyz): translates the body along the YZ plane.
JOYSTICK C – MENU NAVIGATION
The menu system makes it simple to change a setting or select a pre-programmed sequence to run.
To enter the menu, click once on button C to select “Menu”. Move the joystick up, down, left or right to navigate
the menu system. Clicking will select or execute the option that appears on the LCD screen.
•
•
•
•
Right: enter sub-menu
Left: exit sub-menu
Up/Down: scroll between the available options
Click: select/execute
To exit the menu system, simply click on any joystick other than C (click on either A, B or D).
Robugtix Controller User’s Manual
Copyright © 2013, Robugtix Ltd. All rights reserved.
page 3/5
www.robugtix.com
The menu system is structured as follows:
Main Menu
o Gait
o
Metachronal Mode
Tripod Mode
Ripple Mode
Sequence
Sequence 1: Greetings Demo
Sequence 2: Smooth Gait Transition Demo
Note: while running a sequence, the joysticks and buttons will be temporarily deactivated until the sequence is
over.
JOYSTICK D – ROTATE BODY XYZ
This joystick will rotate the robot’s body position along either of three possible pairs of axes, ZX, YX or ZY, while
keeping the leg tips at the same location using inverse kinematics calculations. Clicking on Joystick D will toggle
between the different rotation axes.
•
•
•
Rotate Body ZX (Rzx): rotates the body along the Z and X axes.
Rotate Body YX (Ryx): rotates the body along the Y and Z axes.
Rotate Body ZY (Rzy): rotates the body along the Z and Y axes.
CUSTOM PROGRAMS
If you’re familiar with AVR or open source Arduino C/C++ programming, you will have the ability to command
the robot to move in lots more creative ways.
For reference and as a good starting point to modify or create your own sequences, the open source library for
the Robugtix Controller is available for download on the website http://www.robugtix.com/robugtix-controller/
This library features a set of wrapper functions that simplifies the sending of 8-bit serial command codes as
described in the document “Serial Command Reference for iitsii” which is also available for download at our
website.
Appendix A is a complete list of available wrapper functions in the Robugtix Controller library. These are building
blocks that can enable you to create more creative and complex things.
TECHNICAL SUPPORT
If you need additional help or have questions, comments or suggestions, please send us an email at
[email protected].
Robugtix Controller User’s Manual
Copyright © 2013, Robugtix Ltd. All rights reserved.
page 4/5
www.robugtix.com
APPENDIX A – WRAPPER FUNCTIONS FROM “ROBUGTIX CONTROLLER
LIBRARY”
//RobugtixCommand.h
#ifndef ROBUGTIXCOMMAND_H
#define ROBUGTIXCOMMAND_H
#include "RobugtixCommon.h"
class RobugtixCommand {
private:
public:
SoftwareSerial* _serial;
void
void
void
void
void
void
sendCommand(int
sendCommand(int
sendCommand(int
sendCommand(int
sendCommand(int
sendCommand(int
opCode0,
opCode0,
opCode0,
opCode0,
opCode0,
opCode0,
int
int
int
int
int
int
opCode1);
opCode1, int
opCode1, int
opCode1, int
opCode1, int
opCode1, int
void
void
void
void
void
void
void
void
void
void
void
void
void
void
void
void
void
void
void
void
void
void
void
void
void
void
void
void
void
void
void
void
void
void
void
void
void
void
void
void
void
void
void
void
void
void
void
void
void
void
void
void
void
void
void
setBodyPositionLimits(int axis, int minimum, int maximum);
setBodyRotationLimits(int axis, int minimum, int maximum);
setBodyMotionProfile(int profile);
translateBodyToX(int pos, int durationMillis);
translateBodyToY(int pos, int durationMillis);
translateBodyToZ(int pos, int durationMillis);
rotateBodyToX(int angleDeg, int durationMillis);
rotateBodyToY(int angleDeg, int durationMillis);
rotateBodyToZ(int angleDeg, int durationMillis);
translateBodyToXYZ(int posX, int posY, int posZ, int durationMillis);
rotateBodyToXYZ(int angleDegX, int angleDegY, int angleDegZ, int durationMillis);
realTimeTranslateBodyToX(int pos);
realTimeTranslateBodyToY(int pos);
realTimeTranslateBodyToZ(int pos);
realTimeRotateBodyToX(int angleDeg);
realTimeRotateBodyToY(int angleDeg);
realTimeRotateBodyToZ(int angleDeg);
setLegMotionProfile(int legNumber, int profile);
setLegAutoLock(int legNumber, int autoLock);
stepHeight(int legNumber, int height);
lineMoveLegToXYZ(int legNumber, float posX, float posY, float posZ, int durationMillis);
lineMoveLegToFootstep(int legNumber, int durationMillis);
oneStepLegToXYZ(int legNumber, float posX, float posY, float posZ, int durationMillis);
oneStepLegToFootstep(int legNumber, int durationMillis);
moveNeck(int angle, int durationMillis); //for iitsii only
moveTailHorizontal(int angle, int durationMillis); //for T8 only
moveTailVertical(int angle, int durationMillis); //for T8 only
realTimeMoveTailHorizontal(int angle);
//for T8 only
realTimeMoveTailVertical(int angle);
//for T8 only
legLock(int legNumber, int lockStatus);
centerAllServos();
defineStanceFootsteps(int stanceNumber, int legPairNumber, int footOffsetX, int footOffsetY);
changeStance(int stanceNumber);
changeGaitMode(int gaitMode, int gaitCycles);
setWalkingSpeedProperties(int maxWalkingSpeed, int maxWalkDistancePerGaitCycle);
legUpRatio(int legUpPercentage);
walkX(float xSpeed);
walkY(float ySpeed);
walkTurnZ(int zTurnSpeed);
combinedWalk(int xSpeed, int ySpeed, int zTurnSpeed);
stopWalking();
lowerAllLegs();
walkInPlace(int numberOfCycles, int durationMillisPerCycle);
clearSong(int songNumber);
//for iitsii only
recordMusicalNote(int songNumber, int channelNumber, int noteFrequencyID, int noteLength );//for iitsii only
setTempo(int beatsPerMinute); //for iitsii only
playSong(int songNumber);
//for iitsii only
led(int ledNumber, int redBrightness, int greenBrightness, int blueBrightness, int durationMillis);//for iitsii only
led(int brightness, int durationMillis);
//for T8 only
ultrasonicPing();
//for iitsii only
ultrasonicRepeatingPing(int delayMillisBetweenPings);
//for iitsii only
deltaServoCalibrationOffset(int servoNumber, int deltaPulse);
//for T8 only
zeroServoCalibrationOffset(int servoNumber);
//for T8 only
saveServoCalibrationChangesToMemory();
//for T8 only
manualControlBodyMove(int tXmmPerSecond, int tYmmPerSecond, int rZmmPerSecond); //for T8 only
data0);
data0, int
data0, int
data0, int
data0, int
data1);
data1, int data2);
data1, int data2, int data3);
data1, int data2, int data3, int data4);
};
#endif
DOCUMENT HISTORY
Release
Date
Description
1.0
1.2
2013-09-09
2013-09-28
First Release
Updated Appendix A to include commands for T8 spider robot
Robugtix Controller User’s Manual
Copyright © 2013, Robugtix Ltd. All rights reserved.
page 5/5
www.robugtix.com