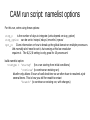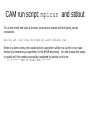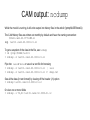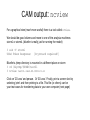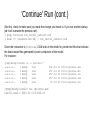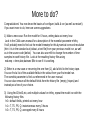
1
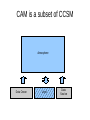
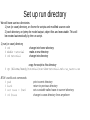
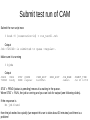
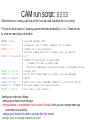
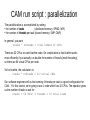
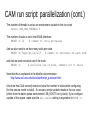
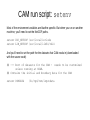
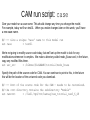
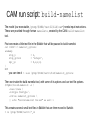
CAM Tutorial
configure, build & run
Dani Coleman
[email protected]
July 27 2009
CAM is a subset of CCSM
Atmosphere
Data Ocean
Land
Data
Sea Ice
Documentation of CAM
Scientific description:
http://www.ccsm.ucar.edu/models/atm-cam/docs/description/
User's guide:
http://www.ccsm.ucar.edu/models/atm-cam/docs/usersguide/
Download code:
http://www.ccsm.ucar.edu/models/atm-cam/docs
CCSM information:
http://www.ccsm.ucar.edu/
NCAR supercomputer: bluefire
IBM clustered Symmetric MultiProcessing (SMP) system based on the Power6 chip
Nodes: Each of the 128 nodes contains 32 processors.
Disk storage:
5 GB home directory; backed up and not subject to scrubbing.
250 GB /ptmp directory; not backed up and is subject to scrubbing
Parallelization:
Shared memory (SMP)
= OpenMP (OMP)
Distributed memory (SPMD)
= Message Passing Interface (MPI)
CAM usually uses a combination of the two, called 'hybrid' mode.
All of this information (and more) available online:
http://www.cisl.ucar.edu/docs/bluefire/be_quickstart.html
Log in to bluefire and change shell
Log on to bluefire (cryptocard)
% ssh bluefire
Token_Response: <enter the number from your crypto card here>
Set shell. This tutorial is written using t-c-shell (tcsh). Feel free to use whatever you
want. You can find out which shell you're running by typing
% shell
If you want to change to tcsh shell, follow these instructions:
% rsh bems
Follow the prompts to change your shell to tcsh.
The change may take up to 60 minutes to propagate. Meanwhile, invoke the tcsh
for this session by typing
% tcsh
Run script: configure
There are 3 steps to running CAM:
configure – create the files that will allow us to compile & run
build
– compile the source code and make an executable
run
– execute the model
The CAM distribution includes tools for these steps, but it isn't as easy as installing
the latest version of Firefox!
Configure
●
just a perl script in the code distribution
models/atm/cam/bld/configure.
set options that are required for compiling
● resolution (4x5 degree)
● dynamical core (finite volume)
● version of the physics we want to use (cam3_5_1)
● which directory holds code modifications
If you change any of these things, you must reconfigure!
●
creates the files necessary for us to compile CAM
(Makefile, Filepath, etc) in the model build directory.
Run script: build and run
Build
This is the verb for compile-source-code-and-create-the-executable. All of this
work is done for us by a UNIX tool called 'gmake'. Using the files created by configure,
gmake knows where to find source code, how the source code files depend on each
other and what compiling options are required.
Run
To run the model, we give it a list of input options that don't have to be built into the
executable (for example: how long to run, which fields we want on the output datasets)
and invoke the parallel-run tool used on bluefire.
These basic steps: configure, build & run, are set up in a csh script that comes with
the model distribution.
Your Turn
The rest of the tutorial is for you to do at your own pace. We start by submitting the run
script and then examining it while the run is going.
Set up run directory
We will have use two directories
1) run (or case) directory, on /home for scripts and modified source code
2) work directory on /ptmp for model output, object files and executable. This will
be created automatically by the run script.
1) run (or case) directory
% cd
% mkdir tutorial
% cd tutorial
change into home directory
make a new directory
change into directory
copy the script to this directory
% cp /blhome/bundy/tutorial/run-ibm-tutorial.csh run_test01.csh
BTW: useful unix commands
% pwd
% back
% set case = $cwd
% cd $case
print current directory
return to previous directory
set a variable called case to current directory
change to case directory from anywhere
Submit test run of CAM
Submit the run script now
% bsub -U [reservation-id] < run_test01.csh
Output
Job <726040> is submitted to queue <regular>.
Make sure it is running
% bjobs
Output
JOBID
726040
USER
bundy
STAT
PEND
QUEUE
regular
FROM_HOST
be1005en
EXEC_HOST
JOB_NAME
camrun
SUBMIT_TIME
Jul 23 12:56
STAT = PEND (status is pending) means it is waiting in the queue.
When STAT = RUN, the job is running and you can look for output (see following slides).
If the response is
No job found
then the job exited too quickly (we expect this run to take about 30 minutes) and there is a
problem!
CAM run script: BSUB
While that job is running, we'll look at the run script and see what the run is doing.
First you'll see a bunch of queuing system directives denoted by #BSUB. These are set
to what we need today, on bluefire.
#BSUB -a poe
#BSUB -x
#BSUB -n 16
#BSUB -R
#BSUB
#BSUB
#BSUB
#BSUB
#BSUB
#BSUB
-o
-e
-q
-W
-P
-J
# use LSF openmp elim
# exclusive use of node, comment out to share
# number of total processes
# must be compatible with ntasks & npr_yz (below)
"span[ptile=16]"
# number of processes on each node
#
= number of CPUs on each node
#
(must be compatible with procs/node & nthreads, below)
out.%J
# output file
out.%J
# error file (when same as output, o/e are merged)
regular
# queue
0:20
# wall clock limit (HH:MM) Default is six hours (6:00)
37591047 # Project number for this tutorial
test01
# job name ( your choice )
Settings are coded as follows:
• settings you should never change
• settings related to parallelization (processes & threads) that you can change when you
know what you're doing
• settings you'll need to be able to change after this tutorial
settings you can change anytime you want
CAM run script : parallelization
The parallelization is accomplished by setting
● the number of tasks
(distributed memory, SPMD, MPI)
● the number of threads per task (shared memory, SMP, OMP)
In general, you want
ntasks * nthreads = total number of CPUs
There are 32 CPUs on each bluefire node. On complication is that bluefire works
most efficiently if you actually run double the number of threads (multi-threading),
so there are 64 virtual CPUs per node.
So for bluefire, the calculation is:
ntasks * nthreads = 64 virtual CPUs
Our software engineers tell us that running 4 threads per task is a good configuration for
CAM. For this tutorial, we're going to use 1 node which has 32 CPUs. The equation gives
us the number of tasks to ask for:
ntasks = 64 CPUs/ 4 threads = 16 total tasks
CAM run script: parallelization (cont.)
The number of threads is set as an environment variable in the run script
setenv OMP_NUM_THREADS 4
The number of tasks is set in the BSUB directives
#BSUB -n 16
# number of total processes
And we also need to set how many tasks per node
#BSUB -R "span[ptile=16]"
# number of processes on each node
and that we want exclusive use of the node
#BSUB -x
# exclusive use of node, comment out to share
Note that this is explained in the bluefire documentation
http://www.cisl.ucar.edu/docs/bluefire/be_quickstart.html
Also note that CAM currently needs to know the number of tasks when configuring
(for the sea-ice model to build). So we set a script variable ntasks in the run script
(either from the batch queue environment LSB_HOSTS or by hand). If you configure
outside of the queue, make sure the set ntasks setting is equivalent to BSUB -n.
CAM run script: setenv
Most of the environment variables are bluefire specific. But when you run on another
machine, you'll need to set the NetCDF paths.
setenv INC_NETCDF /usr/local/include
setenv LIB_NETCDF /usr/local/lib64/r4i4
And you'll need to set the path the the datasets that CAM reads in (downloaded
with the source code)
## --- Root of datasets for the CAM - needs to be customized
unless running at NCAR.
## Contains the initial and boundary data for the CAM
setenv CSMDATA
/fs/cgd/csm/inputdata
CAM run script: case
Give your model run a case name. This should change any time you change the model.
For example, today we'll run test01. When you make changes later on this week, you'll have
a new case name.
## --- Give a unique 'case' name to this model run
set case
= test01
We're not going to modify source code today, but we'll set up the model to look for any
modifications whenever it compiles. We make a directory called mods_$case and, in the future,
copy any modified files there.
set usr_src
= /blhome/$LOGNAME/tutorial/mods_$case
Specify the path of the source code for CAM. You can continue to point to this, in the future
this will be the location of the un-tarred code you download.
## --- Root of the source code for the CAM - needs to be customized.
## the root directory contains the subdirectory "models"
set camroot
= /fis01/cgd/ccr/hannay/cam_tutorial_cam3_6_48
CAM run script: directories
We don't have room to build and run the model on /home, so we use the
/ptmp/$user directories.
## --- Set paths to needed directories
## $wrkdir is a working directory under which the model will be built and run.
set wrkdir
= /ptmp/$LOGNAME
## $blddir is the directory where model will be compiled
set blddir
= $wrkdir/$case/bld
.
## $rundir is the directory where the model will be run.
set rundir
= $wrkdir/$case
## $cfgdir is the directory containing the CAM configuration scripts.
set cfgdir
= $camroot/models/atm/cam/bld
The script makes these directories if they don't already exist
mkdir -p $rundir
|| echo "cannot create $rundir" && exit 1
mkdir -p $blddir
|| echo "cannot create $blddir" && exit 1
mkdir -p $usr_src
|| echo "cannot create $usr_src" && exit 1
CAM run script: configure,gmake
As discussed previously, we set some script variables to pass to configure:
set dycore
= fv
set resolution
= 4x5
set runtype
= startup
## dycore is the dynamical core: sld, eul, or fv.
## resolution for fv: 1.9x2.5, 2x2.5, 4x5, or 10x1
## run type: startup, continue, or branch.
The script looks to see if an executable exists. If it does, we assume this has already been done and
skip the configure step. If the executable doesn't exist, call configure.
## If an executable doesn t exist, build one.
if ( ! -x $blddir/cam ) then
cd $blddir
|| echo "cd $blddir failed" && exit 1
$cfgdir/configure -verbose \
-dyn $dycore \
-res $resolution \
-usr_src $usr_src \ <-- user modifications directory
-phys cam3_5_1 \
<-- specify the version of physics to use
-ntasks $ntasks \
-nthreads $OMP_NUM_THREADS \
|| echo "configure failed" && exit 1
After configure, the model is compiled
gmake -j8 >&! MAKE.out || echo "CAM build failed
CAM run script: check config & make
Since the model should have already run, check the files configure and gmake have created.
change to the build directory
% cd /ptmp/$USER/test01/bld
If the directory doesn't exist and your job is no longer in the queue, there is a problem- get help!
% ls
There may be a few or a lot of files, depending on where the model is in the building process.
First, configure creates text files (feel free to look at them using less, more or an editor)
Makefile
instructions on how to build (compile) for gmake
Filepath
text file list of which directories to search for source code
config_cache.xml
cache of settings used by configure. Can be used to copy the case
misc.h, preproc.h
fortran files (archaic)
config_cache_cice.xml Similar files for the sea ice model
CICE_cppdefs
The Gmake creates
Srcfiles
a list of all the source code files found under Filepath
Depends
a list of how the files depend on each other
object (o.) and module (.mod) files for each of the source code files
cam*
the executable
CAM run script: build-namelist
The model (our executable, /ptmp/$USER/test01/bld/cam*) needs input instructions.
These are provided through fortran namelists, created by the CAM build-namelist
tool.
First we create a little text file in the $blddir that will be passed to build-namelist
cat <<EOF >! namelist_options
&camexp
stop_n
= 2,
stop_option
= 'nsteps',
npr_yz
= 8,2,2,8,
/
EOF
you can view it % less /ptmp/$USER/test01/bld/namelist_options
Then we invoke the build-namelist tool, with some of its options and our text file options.
$cfgdir/build-namelist -s \
-case $case \
-runtype $runtype \
-infile namelist_options \
|| echo "build-namelist failed" && exit 1
This creates several small text files in $blddir that are then moved to $wrkdir.
% ls /ptmp/$USER/test01/*_in
CAM run script: namelist options
For this run, we're using these options:
stop_n
is the number of days to integrate (units depend on stop_option)
stop_option can be set to 'nsteps','ndays','nmonths','nyears'
npr_yz
Gives information on how to break up the global domain on multiple processors
We normally don't need to set it, but running at this low resolution
requires it. The 8,2,2,8 setting is only good for 16 processors!
build-namelist option:
-runtype = 'startup' (for a run starting from initial conditions)
'continue' (to continue an existing run)
bluefire only allows 6 hours of wall clock time so we often have to resubmit a job
several times. This is how you tell the model to restart.
'branch' (to continue an existing run, with changes)
CAM run script: mpirun and stdout
To run the model with tasks & threads, we must use mpirun with the hybrid_launch
instructions:
mpirun.lsf /usr/local/bin/hybrid_launch $blddir/cam
When it is done running, the standard (text) output/error will be in a log file in your case
directory (or wherever you specified it in the BSUB directives). You can browse this output
or quickly tell if the model successfully completed by looking for this line
0: ******* END OF MODEL RUN *******
CAM output: ncdump
While the model is running, it will write output into history files in the wrkdir (/ptmp/$USER/test01)
The CAM history files are written out monthly by default and have the naming convention:
$CASE.cam2.h0.YYYY-MM.nc
e.g. test01.cam2.h0.0000-01.nc
To get a snapshot of the data in the file, use ncdump
% cd /ptmp/$USER/test01
% ncdump -h test01.cam2.h0.0000-01.nc
Pipe into less or more or save in a text file for browsing
% ncdump -h test01.cam2.h0.0000-01.nc | less
% ncdump -h test01.cam2.h0.0000-01.nc >! dump.txt
See all the data (in text format!) by leaving off the header (-h) option
% ncdump test01.cam2.h0.0000-01.nc
Or view one or more fields
% ncdump -v TS,PS test01.cam2.h0.0000-01.nc
CAM output: ncview
For a graphical view (much more useful) there is a tool called ncview.
We should be good citizens and move to one of the analysis machines:
storm1 or storm4. (bluefire is really just for running the model)
% ssh -Y storm1
UCAS Token Response:
[Crytocard required!]
Bluefire's /ptmp directory is mounted in a different place on storm
% cd /biptmp/$USER/test01
% ncview test01.cam2.h0.0000-01.nc
Click on '2D vars' and peruse. Or '3D vars'. Finally, print a screen shot by
selecting 'print' and then printing to a file. This file (or others) can be
your test cases for transferring data to your own computer (next page)
Copying data from bluefire
Use ftp server.
1. Copy data from bluefire/storm to ftp server
-- on bluefire -ftp ftp.cgd.ucar.edu
login:anonymous password: email
cd incoming
put [filename]
2. Copy data from ftp server to local machine
-- local machine -ftp ftp.cgd.ucar.edu
login:anonymous password: email
cd incoming
get [filename]
Note: On my Windows Vista machine, I found an ftp program by going to the start menu
and searching for 'ftp'. It found 'ftp.exe.' I clicked on that and it opened an ftp window
ftp>
From there, you need to open a connection:
ftp> open ftp.cgd.ucar.edu
'Continue' Run
In order to do this, the model must have completed 1 year.
The first step was running the model for 1 year. Now let's restart it, to run for another year.
(The standard atmosphere model diagnostic package requires over 14 months of data, in
order to get full DJF & JJA seasons).
Change to your case directory
% cd $USER/tutorial
Make a new script
% cp run_test01.csh run_test01_restart.csh
Edit the restart run script (in emacs, vi or your editor of choice)
% emacs -nw run_test01_restart.csh
(Note the argument to emacs -nw = no window is an easy way to run inside your shell
window, instead of popping up a new one)
Look through the script for the text startup. Change it to continue.
'Continue' Run (cont.)
(But first, check to make sure you made the change you meant to. If you run another startup
job it will overwrite the previous run).
% grep continue run_test01_restart.csh
% bsub -U [reservation-id] < run_test01_restart.csh
Given the instruction to 'continue', CAM looks in the wrkdir for pointer text files that indicate
the latest restart files generated by each component of the model.
For instance:
/ptmp/bundy/test02> ls -l rpointer.*
-rw-r--r-1 bundy
ncar
-rw-r--r-1 bundy
ncar
-rw-r--r-1 bundy
ncar
-rw-r--r-1 bundy
ncar
-rw-r--r-1 bundy
ncar
/ptmp/bundy/test02> cat rpointer.atm
test02.cam2.r.0000-01-01-03600.nc
302
257
257
257
33
Jul
Jul
Jul
Jul
Jul
23
23
23
23
23
13:04
13:04
13:04
13:04
13:04
rpointer.atm
rpointer.drv
rpointer.ice
rpointer.lnd
rpointer.ocn
More to do?
Congratulations! You now know the basics of configure, build & run (as well as restart!).
If you want more to do, here are some suggestions:
1) Make a new case. Run the model for 6 hours, writing data out every hour.
Look in the CAM users manual for a description of the namelist parameter nhtfrq.
You'll probably need to find out the model timestep for this dynamical core and resolution
(hint: it is in the standard out (stdout, a text file) from your previous model run, as well
as in the source code (deltat). You can also use mfilt to change the number of time
samples in each history file. Look at the resulting history files using
ncdump -v time,date,datesec $file to see if it is working.
2) Either in a new case or rerunning the one from (1), add a field to the history tape.
You can find a list of the available fields in the stdout from your first model run.
The namelist parameter is fincl as referenced in the user manual.
You can also remove all the default fields from the history file (empty_htapes) and
instead put a few of your choice.
3) Using fincl2,fincl3,etc, and multiple values for nhtfrq, repeat the model run with the
following history files
h0 = default fields, printed out every hour
h1 = T, TS, PS, Q, instantaneous every 3 hours
h2 = T, TS, PS, Q, averaged every 6 hours
More to do? (cont.)
4) Look through the namelist parameters in the users manual (or search the source code
for 'namelist' and look in the files for newer parameters) for other things to change.
5) And of course, you can always look at the data, using ncview or your favorite
analysis package. (Remember to be a good citizen and use storm instead of bluefire).
6) Or look at the source code for an idea of how the model runs. The main
physics interface is models/atm/cam/src/physics/cam/physpkg.F90, or take a step back
to see how each timestep is controlled (dynamics, physics, coupling, etc.) in
models/atm/cam/src/dynamics/fv/stepon.F90