1
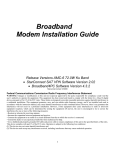
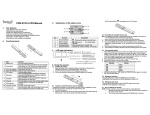
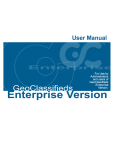
The University of Sheffield Students’ Union Committee Details System Documentation Installation Guide User Manual Maintenance Guide 1 2 Contents System requirements.......................................................................................................... 5 How to install ...................................................................................................................... 6 Features .............................................................................................................................. 8 How to use .......................................................................................................................... 9 Maintenance guide ........................................................................................................... 16 Glossary of terms .............................................................................................................. 19 3 4 System Requirements • • Computer with internet connection Server with PHP, MySQL support o Please be aware, that in case your server does not support JSon, the system will not be able to work correctly. o If your version of PHP does not support JSon, please follow this installation guide on how to install it and set it up. http://www.php.net/manual/en/json.setup.php • • Web browser (Chrome is highly recommended, Internet Explorer 7 or higher) with JavaScript support enabled At least 10 MB of free server space 5 How to install In case you do not know what these types of data mean, please consult the Glossary of terms. Before you begin the installation process, please make sure your computer is connected t the internet. Insert the installation disc into your CD/DVD‐ROM and open the “The University of Sheffield Students’ Union Societies Manager” folder on the disc. Now copy the whole content of this folder to your desired place on your server eq. using /www/yourlocation folder will result in the system being accessible with the address www.yourserver.ac.uk/yourlocation Once the content has been copied, follow these steps to set up the system: 1. Set up database connection Open file application/config/database.php with text editor and scroll down to the bottom of the file. Now change these settings on lines 44 ‐ 47 $db['default']['hostname'] = ''; $db['default']['username'] = ''; $db['default']['password'] = ''; $db['default']['database'] = ''; so that you fill in required data in the quotes on the right hand side accordingly eq. $db['default']['hostname'] = 'yourhostname'; $db['default']['username'] = 'yourusername'; $db['default']['password'] = 'yourpassword'; $db['default']['database'] = 'yourdatabase'; Save the file. 6 2. Set up the user table connection Open the following file with text editor application/models/model.php and change these settings on lines 21 ‐ 24 $this->user_table = ''; $this->user_id_column = ''; $this->user_username_column = ''; $this->user_password_column = ''; so that you fill in required data in the quotes on the right hand side accordingly eq. $this->user_table = 'users'; $this->user_id_column = 'id'; $this->user_username_column = 'username'; $this->user_password_column = 'password'; Save the file. If the user table stores users’ passwords as encrypted strings, please open the file application/models/User.php and uncomment (remove two forward slashes from the beginning of the line) line number 59. Make sure you are using correct encryption method (MD5 is set by default). Save the file. 3. Install database tables Open your browser and type the address of the system followed by forward slash ( / ) and the installation file (install.php) eq. (using the example above) www.yourserver.ac.uk/yourlocation/index.php/install Type in the default super administrator username and click the “Install now” button. 7 4. Delete install file Delete this file application/controllers/install.php The installation is now complete. Features This system covers all the features that were discussed, covered and agreed on the requirements document. These include: • • • • • • • • Login The three user views (administrator, super administrator and general user) Inventory that can be exported to Excel Customisable forms Search and sort features for displayed records General user • Filter records according to their category • Sort records by any accessible column in the table header • Search for strings contained in the records’ details Administrator In addition to General user features • Export displayed records to CSV file • Compose email to different societies’ members • Create a new society • View notifications about missing data in records Super administrator In addition to Administrator features • Add new admin • Delete an existing society • Manage society positions o create new o set/unset mandatory o remove • Manage society categories o create new o remove 8 How to use All relevant locations every feature has been circled in red in each screenshot. Login To start using the application, the user – super administrator must first login. The default login details for super administrator are to be specified during the installation process. Main page When the user logs in, they will see the list of their societies currently stored in the system. The view can be modified, using different filtering features, to suit the needs of the viewing administrator. The administrator can see all the societies currently stored in the system. The menu on the top provides advanced features. In addition to all the privileges the administrator has, the super administrator also has a management button, which will take them to a section where they can tweak the application using a simple tabs layout with options. The View all button is used at any point in time to see all the basic society information at anytime. i.e. Name, Category, Group, Email, Website and date created. The View newly created button is used at any point in time to see all the recent basic society information at anytime. 9 Searching and Sorting Features The user can filter the information in the system to what they are looking for using the search feature. The society records shown at any time can also be sorted alphabetically (ascending and descending) for every column. Top menu Top menu will provide the administrators with buttons for various functions. Exporting to .csv file To export displayed records to .csv file, press the corresponding button in the top menu. 10 Composing email This function enables fully customisable mailing lists for the different societies to be created. There are predefined default mailing lists that cannot be removed. These are the lists of all members of all societies and lists of all members occupying a mandatory position. Creating a new society This button initiates the creation of a new society. The name of the society and the president’s username are created with this button. 11 Notification System This gives the admin and super admin updates on recent activity per society that occurs in the system. It shows any missing data in every society. Delete society As well as a society can be created, it can be deleted in the super administrator’s view. Start the delete process by clicking on a society you want to delete and then click on Delete this society button in the top menu. Confirm your action. 12 Super admin management This button provides the super admin access to the tabs that enable the addition of new administrators and management of society positions, categories and the risk assessment form. Creating a new (super)administrator To create a new administrator/super administrator, simply click corresponding button in the management view. Insert their username and specify (by ticking a checkbox) whether they are super administrator or administrator. Managing categories In the Categories tab, the super administrator can create new categories, change the existing ones or remove categories. Managing positions In this tab, the super administrator can create new positions and set these to be mandatory. All mandatory positions must be occupied by a society member. 13 Creating custom risk assessment form templates The super administrator can create custom templates for risk assessment form. To do it, whilst inside the Super admin management section, click on the Risk assessment option. A page will show which allows the super administrator add new fields into the form. You add new fields by pressing Add field button. These fields include: • Check boxes o • Combo boxes o • Drop –down list which enables users select a value inside it. Tables o • Element that can be ticked. Table with header for column names and rows Text boxes o Text field enabling a user insert a text The super administrator can add as many of these fields as they like. When the super administrator is done editing, do not forget to press save button at the bottom for any change to take effect. After saving the template, the added fields will be displayed in a more neat way so that the super admin can easily check the template is correct and possibly remove some existing fields. This option is enabled for every existing field, so to remove, press remove. 14 Logout This button is used to sign the user out of the system. In the unlikely event that the application causes problems, please consult the server’s administrator or contact the development team on [email protected] or [email protected] or [email protected] 15 Maintenance Guide This section describes the system’s design along with details about how to expand it. The system is based on the CodeIgniter framework http://codeigniter.com/user_guide/ and it uses the MVC architecture. Models The files managing data manipulation in the database are stored in the model folder in the main application folder. Every existing model that the system is using (Positions, User, Society, Category, Activities, Assessment, Inventory, Mailing_list) inherits from the “model.php” file which provides predefined functions for easy querying and data manipulation. This is achieved inside loadClasses() function in model.php. Inside this file, there are also variables storing the user table name and id, username and password columns. These settings are necessary to maintain the connection to the user table and therefore are crucial for correct user login functions. Every model, as their names already specify, is used to manipulate different tables in the database and used only for the purpose specific for its logic. Views The view files contain HTML and JavaScript code to generate a page using PHP data as variables passed from operating controller. These view files are distributed over the view folder itself and society and manage subfolders. Society subfolder corresponds to views displaying the society data and options for members. Manage subfolder corresponds to views displaying the options for super admin in Super admin management section. Controllers Controllers, as connection between models and views, incorporate the main application logic. All existing controllers are, as explained in the CodeIgniter’s specifications, inherited from the default controller provided by the framework itself. Expanding of the system In the need of expanding the system, it is necessary to keep the described design unchanged and only create new views, models and controllers. It is highly recommended that each new model is inherited from the super class model located in the model.php file. Also, newly created controllers need to be inherited from CodeIgniter’s default controller class. Client/server‐side communication The communication between the server and client’s browser is done in two ways: • • Simple form post and PHP script for generating dynamic web‐pages Ajax using JSon library 16 o Ajax feature has its own controller in MVC architecture which allows manipulating data in the database. This is done in four main functions getData() • Reads and returns data from the database. add() • Data are be added to the database using this function. remove() • All remove operations being applied to data are achieved with this function. edit() • Simulates update queries on data changing in the database. Error handling There are four types of error messages in CodeIgniter divided into four php files: • • • • error_404.php error_db.php error_general.php error_php.php The file error_404.php contains the template for the info page appearing when a requested page could not be found and therefore 404 error is displayed. For the purpose of keeping the database table names and their column names hidden from the general users, in case an error message should be displayed the script in corresponding file redirects the page to non existing 404_error page causing 404 error to be displayed. 17 Database design 18 Glossary of terms • Database A set of tables with records where data is stored. • Login/Logout Function that enables registered users to access the data. • Record An item (society) displayed in the main page view. • General user Member of a society who can only view societies they are a member of and manage data if their position is mandatory. • Administrator User who has more privileges than the General user does. Administrator can manage any data in any society, send emails to societies, export records to csv file, create new societies and see notifications about not completed societies. • Super Administrator User with absolute privileges. This type of user has their own section where thay can create new administrators, change forms’ templates and manage society positions and categories. • CSV file File format is a set of file formats used to store tabular data in which numbers and text are stored in plain textual form that can be read in a text editor. 19 For Step 1 of Installation guide • yourhostname The hostname of your database server. • yourusername The username used to connect to the database. • yourpassword The password used to connect to the database. • yourdatabase The name of the database you want to connect to. [CodeIgniter application/config/database.php file] For Step 2 of Installation guide • users Table in the database where all users (general users, administrators, super administrators) are stored. • id Column in users table which contains unique identifiers of users. • username Column in users table which contains users’ usernames. These are used for logging into the system. • password Column in users table which contains users’ secret passwords. • Text editor A text editor is a type of program used for editing plain text files. [http://en.wikipedia.org/wiki/Text_editor] 20