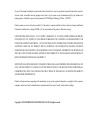
1
M0330 Edition 10.1 Issued on December 2011 IP Camera User Manual For INC-M Series No part of this manual, including the products and software described in it, may be reproduced, transmitted, transcribed, stored in a retrieval system, or translated into any language in any form or by any means, except documentation kept by the purchasers for backup purposes, without the express written permission of ILDVR Digital Technology USA Inc. (“ILDVR”) Product warranty or service will not be extended if: (1) the product is repaired, modified, or altered, unless such repair, modification of alteration is authorized in writing by ILDVR; or (2) the serial number of the product is defaced or missing. ILDVR PROVIDES THIS MANUAL “AS IS” WITHOUT WARRANTY OF ANY KIND, EITHER EXPRESS OR IMPLIED, INCLUDING BUT NOT LIMITED TO THE IMPLIED WARRANTIES OR CONDITIONS OF MERCHANTABILITY OR FITNESS FOR A PARTICULAR PURPOSE. IN NO EVENT SHALL ILDVR, ITS DIRECTORS, OFFICERS, EMPLOYEES OR AGENTS BE LIABLE FOR ANY INDIRECT, SPECIAL, INCIDENTAL, OR CONSEQUENTIAL DAMAGES (INCLUDING DAMAGES FOR LOSS OF PROFITS, LOSS OF BUSINESS, LOSS OF USE OR DATA, INTERRUPTION OF BUSINESS AND THE LIKE), EVEN IF ILDVR HAS BEEN ADVISED OR THE POSSIBILITY OF SUCH DAMAGES ARISING FROM ANY DEFECT OR ERROR IN THIS MANUAL OR PRODUCT. SPECIFICATIONS AND INFORMATION CONTAINED IN THIS MANUAL ARE FURNISHED FOR INFORMATIONAL USE ONLY, AND ARE SUBJECT TO CHANGE AT ANY TIME WITHOUT NOTICE, AND SHOULD NOT BE CONSTRUED AS A COMMITMENT BY ILDVR. INACCURACIES THAT MAY APPEAR IN THIS MANUAL, INCLUDING THE PRODUCTS AND SOFTWARE DESCRIBED IN IT. Products and corporate names appearing in this manual may or may not be registered trademarks or copyrights of their respective companies, and are used only for identification or explanation and to the owners’ benefit, without intent to infringe. Copyright © 2011 ILDVR DIGITAL TECHNOLOGY USA INC all rights reserved. To contact us: Headquarter: www.ildvr.com Branches Europe: www.ildvr.eu Russia: www.ildvrcom.ru, China: www.ildvr.net ILDVR Global Distribution & Service Danmark: www.ildvr.dk Germany: www.ildvr.de Hungary www.ildvr.hu Italy: www.ildvr.it Netherland: www.ildvr.nl Russia: www.il-dvr.ru www.ildvr-video.ru Ukraine: www.ildvr.com.ua USA: www.ildvr-usa.com Tech-support: [email protected] Directory Introduction……………………………………………………………………………………………………………………………………..………1 1 Physical Interface Description……………………….……………………………….………………………………….………………………………..2 1.1 1.2 Box Camera……………………………………………………………………………….…………..………………………………………………2 Bullet Camera……………………………………………………………….…………..………………………………………………………………4 2 Hardware Installation…………………….……………………………….……………………………………………………………………………….5 2.1 2.2 2.3 Prepare Audio Connector……………………………………………………………………………………………………….……………………….5 Box Camera Installation………………………………………………………………………………………….………………………...6 Bullet Camera Installation……………………………………………………………………………………….…………..………………………….7 3 Software Installation…………………….……………………………………………………………….……………………………………….………..8 3.1 3.2 3.3 3.4 3.5 3.6 3.7 3.8 Search and Modify IP Address……………………………………………………………………………………………………….……………………….8 Connect to HVR Server and Live Center………………………………………………………………………………………….………………………...9 Camera System Configuration……………………………………………………………………………………….…………..………………………….10 Continuous Record Setup……………………………………………………………………………………………….…………..……………………….13 Motion Detect Alarm Record Setup………………………………………………………………………………………….……………………………….13 Sensor Trigger Alarm Record Setup…………………………………………………………………………………….……………………………….14 PTZ Operation…………………………………………………………………………………….………………………………………………………17 Display on TV-wall…………………………………………………………………………………….………………………………………………………19 4 Advanced Operation ……….……………………………………………………………….……………………………………….………..20 4.1 4.2 4.3 4.4 4.5 SD Card Local Record Setup……………………………………..……………………………….…………………………………………………20 Audio Chat to IP Camera………………….…………………………………………………..……………………………………….……………22 Mobile Phone Access Viewing………….……………………………………………………………………………….………………………………..23 Manually Trigger Alarm Out………………………………………………………………………….……………………………………………23 IE Web Client Operation……………………………………………………………………………….……………………………………………24 ______________________________________________________________________________________________________________________________________________________________ INC-M Series Megapixel IP Camera User Manual Introduction ILDVR INC-M series megapixel IP camera integrates the traditional camera and network video technology. It adopts video and audio data collection, compression, transmission and storage together. It can be used alone with SD card record or used in a network environment. It can connect to network directly without any auxiliary device. ILDVR IP cameras use H.264 video compression technology and G.711 audio compression technology, which maximally guarantee the audio and video quality. Key features: • • • • • • • • • • • • • Advanced H.264 compression with high compression ratio. Support both variable bit rate and variable frame rate. Real time stream full frame 1080P video 25fps@PAL/30fps@NTSC. Compressed video and audio are synchronous. You can select either mixed stream or only video stream. Support SD card local record, up to 64GB. Alarm Function includes sensor alarm, Motion Detection, video tampering, network offline, IP address conflict, Storage exception etc. Multi-level user management leads to high system safety. Support dynamic DNS (DDNS) Support Email Alarm Notification Remote management, maintenance and upgrade the firmware. Support bi-direction voice talk or one-way voice broadcast. Built-in web server, support IE browser preview and record. Multi-purpose design. Weatherproof , vandal-proof and multiple power supply: DC12V/AC24V/POE (48V) Wide range of product lines to meet your varied requirements. Default settings Default IP address is 192.168.1.200, subnet mask 255.255.255.0, gateway 192.168.1.1 User ID is “admin”, password is “admin”, video port is “5000” and web port is “80” Typical network connection diagram: ______________________________________________________________________________________________________________________________________________________________ INC-M Series Megapixel IP Camera User Manual [1] 1 1.1 Physical Interface Description Box Camera ______________________________________________________________________________________________________________________________________________________________ INC-M Series Megapixel IP Camera User Manual [2] Camera interface description for INC-M2010/M2010P/M2010W DC12V: ETHERNET: AUDIO OUT: AUDIO IN: SD CARD: VIDEO OUT: ALARM: RS485: USB: RESET: ANT: POWER: DC AUTO IRIS: Power input, DC12V/1A Ethernet port Audio Output Audio Input SD card slot Video Output Alarm input and output, 1A and 1B connect to alarm output, IN connects to alarm input, G connects to signal ground RS485 Control interface, left side connects to RS485 -, right side connects to RS485 + USB interface Reset button, restore to factory settings, and please use this button with caution Wireless antenna interface Power Indicator Light Auto Iris Lens interface, supports DC lens ______________________________________________________________________________________________________________________________________________________________ INC-M Series Megapixel IP Camera User Manual [3] 1.2 Bullet Camera Camera interface description for INC-M2030/M2030W DC 12V: LAN: Audio in: Audio out: RESET: (Yellow) ALARM IN: (Red) ALARM OUTA: (Orange) ALARM OUTB: (Purple) RS485 +: (Green) RS485 -: (Blue) Power input, DC12V/3A Ethernet port; Audio Input Audio Output Reset button, restore to factory settings, please use this button with caution; on/off alarm input on/off alarm output A on/off alarm output B RS485 control interface + RS485 control interface – ______________________________________________________________________________________________________________________________________________________________ INC-M Series Megapixel IP Camera User Manual [4] 2. Hardware Installation 2.1 Prepare Audio Connector The IP cameras use standard 3.5mm Stereo Jack connector but the audio type is mono audio, please refer to the right picture to make your audio connector. ______________________________________________________________________________________________________________________________________________________________ INC-M Series Megapixel IP Camera User Manual [5] 2.2 Box Camera Installation Box camera can be fixed in both wall and ceiling, customers can choose different ways to install the camera according to their specific needs. The following section introduces the ceiling mounting, and the wall mounting follows the same way Step 1: Fix the mounting bracket to the ceiling. Note: If it is wall, you need to fix the expand bolt (note: the mounting hole of the expand bolt should align with the bracket) before fixing the bracket, as step 1 in Figure 2.2.1. If the wall surface is wooden, the step 1 in Figure 2.2.1 can be ignored and you can use the self-tapping screw to fix the bracket directly. Please note that the wall on which the camera is fixed should be able to bear at least three times the weight of the bracket and the camera. Figure 2.2.1 Fix camer mounting bracket Step 2: Screw the camera’s mounting holes to the mounting bracket, and then adjust the camera to the desired monitoring location and finally tighten the knob on bracket to secure the camera to the ceiling. ______________________________________________________________________________________________________________________________________________________________ INC-M Series Megapixel IP Camera User Manual [6] Figure 2.2.2 Fix the Camera Figure 2.2.3 Mount and adjust Lens Step 3: Mount the camera lens: connect the VIDEO OUT interface of the camera to the debugging monitor, and adjust lens focus until you have obtained the clearest video images on the monitor, and then lock the lens. If required, loosen the knob on the mounting bracket and adjust the camera lens to the desired monitoring scene, and finally tighten the knob on bracket. 2.3 Bullet Camera Installation Please choose heavy-duty metal bracket such as ILDVR B02 bracket for bullet camera installation. You can easy adjust the B02 bracket to adapt veried installation environments. See the picture in next page. ______________________________________________________________________________________________________________________________________________________________ INC-M Series Megapixel IP Camera User Manual [7] Ceiling pendant pount 3. Software Installation 3.1 Search and Modify IP Address Wall mount Before using IP camera, please make sure whether the default IP address of the camera fit your local network environment. If not, please click the “Search INC-M series IP” in HVR Server or Live Center program folder. You can see an interface is shown as below. In this interface, you can view device IP address, port number, subnet mask, MAC address and serial number, etc. Please input admin user name and password to modify IP address and port number. Please connect the IP camera and the PC in same network segment. ______________________________________________________________________________________________________________________________________________________________ INC-M Series Megapixel IP Camera User Manual [8] Input password 3.2 Connect to HVR Server and Live Center In the main interface of HVR Server, click Tools icon to expand the Tool Panel, click Add/del IP camera button to bring up “IP Camera Device List” interface. In Live Center the operation is similar but the first step is to enter Local Setup interface. For your attention: ______________________________________________________________________________________________________________________________________________________________ INC-M Series Megapixel IP Camera User Manual [9] All IP cameras must be registered in the software then it could be recorded. If you couldn’t record video, please update the license file IPEncrypt.dat for HVR Server and Live Center software. You can find the update license file in software CD or download from ILDVR web site 3 Select INC-M series for Device Type. 1 2 3.3 Camera System Configuration The following operations need admin user rights to login IP camera. Please refer to above step. Right click IP Camera window to pop up right-click menu. Choose “IPcam_NetDVR_Setup” to bring up “IP Camera Setup” interface. In Live Center, entrance is “Remote Setup” then choose Server alias In “Server” page, you change IP address, port number and reset the password of admin ID etc. If you install SD card in the camera, please format it in IE web ______________________________________________________________________________________________________________________________________________________________ INC-M Series Megapixel IP Camera User Manual [10] client page, otherwise it cannot be used. The device serial number is necessary for register license. ______________________________________________________________________________________________________________________________________________________________ INC-M Series Megapixel IP Camera User Manual [11] In “Channel” page you can modify video parameters and OSD information. If you need mask privacy area, please check-on the Privacy then draw a rectangle area on the image. That is the mask area. If you have SD card to record, please check-on “Enable Rec” then setup recording schedule. ______________________________________________________________________________________________________________________________________________________________ INC-M Series Megapixel IP Camera User Manual [12] 3.4 Continuous Record Setup Continuous Record means always record the video, the operation is simple. You get video connection, get video record. You just enter Camera Setup page Group Setup, choose camera group and cameras, click the icon “Continuous Record” then slide the mouse to set time table. The operation in Live Center is similar. 3.5 Motion Detect Alarm Record Setup Motion Detect Record is a little bit complicated than Continuous Record because HVR system need additional signal to analyze the video stream type. So you must configure 2 places. One place is Motion Record setup in HVR system “Camera Setup” page, similar to Continuous Record setup. Another place is Motion page as below, For your attention Unlike other series IP camera, INC-M series IP camera don’t have “Upload to center” option setting. ______________________________________________________________________________________________________________________________________________________________ INC-M Series Megapixel IP Camera User Manual [13] Don’t forget to set time table 3.6 Sensor Trigger Alarm Record Setup ______________________________________________________________________________________________________________________________________________________________ INC-M Series Megapixel IP Camera User Manual [14] Sensor Record is a kind of external alarm-in trigger record. It is more complicated than Motion Record because motion detect signal is embedded in video stream, but sensor alarm signal is a kind of external signal. You must configure 3 places to execute Sensor Record. The first place is Alarm in Record setup in HVR system “Camera Setup” page, similar to Motion Record setup. The second place is Alarm Check time table in HVR system “Alarm in & Relay out” page as below picture Here is the time table to check receiving alarm signal The third place is Sensor Setting page in IE web client as below. For your attention: Unlike other series IP camera, INC-M series IP camera don’t have “Upload to center” option setting. ______________________________________________________________________________________________________________________________________________________________ INC-M Series Megapixel IP Camera User Manual [15] 1. Enable alarm detect and choose4 sensor type 2. Here is the time table 3. Here is the time table to upload alarm signal ______________________________________________________________________________________________________________________________________________________________ INC-M Series Megapixel IP Camera User Manual [16] 3.7 PTZ Operation You can mount INC-M camera on external PTZ driver by RS485 connection to make it working as an IP Speed Dome. Please setup preset position, auto-spot plan and preset tour in this page. No like analog PTZ which saves preset in camera system, the IP PTZ saves preset in local computer, so if you use another PC to control same IP PTZ, you should do same setting again in that PC. Comparing analog PTZ and IP PTZ, the setup procedure is very different, but the operations of call preset are exactly same. 3.Give a name to the position (name preset number) 2.Choose preset number 4.Click Add button to save preset 5.Set home position for auto going back after setting time 1.Press direction button and zoom/focus/iris to move the camera to aim position ______________________________________________________________________________________________________________________________________________________________ INC-M Series Megapixel IP Camera User Manual [17] Auto Plan: Auto Plan means HVR software automatically call the preset position by a scheduled time table. When the system time reach, the IP speed dome will auto move to preset position. You can save up to 64 moments and one preset could be used multiple times. Tour Group: Tour Group means you can put different preset position in a sequential group, each preset position could be defined a staying time (stay there without moving). When you execute a Tour, the IP camera will continuously move according to the sequence and time table saved in the group. You can save up to 8 groups. In main interface of HVR Server or Live Center, click “Preset Operation” button to bring up preset menu then choose call preset or tour preset. Click here ______________________________________________________________________________________________________________________________________________________________ INC-M Series Megapixel IP Camera User Manual [18] 3.8 Display on TV-wall For large surveillance system the TV-wall is important and necessary. IP camera cannot be integrated into traditional matrix system. ILDVR free software IP Matrix offers innovative TV-wall solution. All ILDVR software support IP matrix operation, one computer running HVR Server / Live Center / CMS supports up to 6 IP Matrix TV-client. One computer running IP Matrix software supports 4 monitor outputs, each monitor can display up to 16 windows (cameras). That means one IP Matrix can display max. 64 cameras simultaneously In IP matrix, each video window can be put multiple cameras by switch viewing. ______________________________________________________________________________________________________________________________________________________________ INC-M Series Megapixel IP Camera User Manual [19] 4. 4.1 Advanced Operations SD Card Local Record Setup If you install SD card into IP camera to record video locally, you must login by IE to finish setup. Please follow these operation steps in next page. ______________________________________________________________________________________________________________________________________________________________ INC-M Series Megapixel IP Camera User Manual [20] a. Format SD card in “Device Setting” page. b. Set record schedule in “Record Setting” page. c. If you want motion record, please go to “Motion Detection” page to setup schedule d. If you install external sensor, please go to “Sensor Setting” page to setup schedule. ______________________________________________________________________________________________________________________________________________________________ INC-M Series Megapixel IP Camera User Manual [21] 4.2 Audio Chat to IP Camera From right-click menu choose “Audio Chat to IP Device” to initialize a remote talk between PC to IP camera. This feature needs microphone (audio pickup) and speaker (earphone) to support in both ends. If no audio device can be detected, the “End Talk” dialog might pop up but you can have audio. Use built-in microphone in INC-M2010/2010P/2010W ______________________________________________________________________________________________________________________________________________________________ INC-M Series Megapixel IP Camera User Manual [22] 1 4.3 2 Mobile Phone Access Viewing After you connect IP Camera to HVR Server, you can use your mobile phone to login HVR Server to view the real time image. HVR Server support most mainstream mobile phone in the market. The operation system includes iPhone, Android, Blackberry, Windows Mobile and Symbian. For Blackberry, Windows Mobile and Symbian mobile phone, user can directly login to HVR Server to download client software and install. For iPhone, Android mobile phone user should go to online app store to download client software. Please refer to HVR user manual for more details 4.4 Manually Trigger Alarm-out Manual trigger alarm out (relay out) can be widely used to integrate other electrical device such as open a door, turn of light, etc. ______________________________________________________________________________________________________________________________________________________________ INC-M Series Megapixel IP Camera User Manual [23] 1 Open alarm panel 3 Sensor record status 2 Click alarm number key 4.5 IE Web Client Operation All IP cameras have built in web server. You can use Internet Explorer directly login to IP camera by input camera’s IP address or domain name. At first time connecting to IP camera, you will be prompted to install ActiveX Control (Add-on). Refer to following illustration ______________________________________________________________________________________________________________________________________________________________ INC-M Series Megapixel IP Camera User Manual [24] 1 3 4 2 Main interface of IE web client ______________________________________________________________________________________________________________________________________________________________ INC-M Series Megapixel IP Camera User Manual [25] Most of the configuration jobs could be done in ILDVR software interface, but some advanced operation must be finished through IE interface. Such as Sensor Alarm setting, User Management and Restore system to factory default settings. The following picture is a sample configuration page inIE web client. ______________________________________________________________________________________________________________________________________________________________ INC-M Series Megapixel IP Camera User Manual [26] Change video standard PAL=50Hz NTSC=60Hz ______________________________________________________________________________________________________________________________________________________________ INC-M Series Megapixel IP Camera User Manual [27] The following illustration shows the terms of different image resolutions. ______________________________________________________________________________________________________________________________________________________________ INC-M Series Megapixel IP Camera User Manual [28] Technical Support Information Please fill in this form in order to get prompt technical service in case of emergency! Item Description IP Device Model Name IP Device serial number Firmware Version Purchasing date Dealer’s Contact info Company name: Technical Engineer: Tel: Fax: Email: