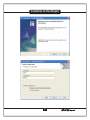
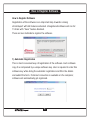
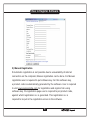
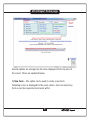
1
User Manual
eForm Exper t is the software designed for preparing Income Tax
Return for eFiling of ITR 1, 2, 3, 4, 5, 6, 7 & 8.
Suggested Tax Computation.
Inbuilt calculation for Section 234A, 234B & 234C.
User friendly Input screens with field level validation.
Automatic calculation based on user input.
Validates & Prepares Electronic Return in XML format at one click.
In-built validation, as per XML Schema of depar tment.
Prepares Hard Copy Return.
Suppor ts unlimited companies.
Auto update facility to accommodate any
changes from time to time.
OTHER SOFTWARES
EasyPAY
AssetExpert
Payroll Management Software
Effective Asset Management
EasyTDS
Service Tax
TDS Management Software
Management Software
SUPPORT HELP LINE :
022-66278600 (10 Lines)
Email : [email protected]
1 & 2 Manohar Bldg., K. V. Chitale Marg, Dadar (West),
Mumbai - 400 028. Tel.: +91-22-66278600 (10 Lines)
Email: [email protected] l
Website: www.sensysindia.com
Table of Contents
1.Installation ............................................................................ 1
a. Installation of eFormExpert .......................................... 1
b. Installation of Adobe PDF ............................................. 4
c. Installation of Java Runtime Environment (JRE) .......... 4
2. How to Register ................................................................... 5
3. How to run eFormExpert ...................................................... 7
4. eFormExpert Home Page ..................................................... 8
5. Various Menu Options .......................................................... 9
6. How to fill up Income Tax Forms ........................................... 12
7. How to Navigate .................................................................. 14
8. How to Save Form ............................................................... 15
9. How to Validate Form .......................................................... 15
10. How to Prepare Electronic Return ..................................... 16
11. How to Prepare Paper Return ............................................ 17
12. Other utilities ..................................................................... 17
13. Auto Update ....................................................................... 19
Installation of eFormExpert
Installation Steps For eFormExpert
1) Insert eFormExpert CD in to CD Drive
2) Choose setup.exe from the CD drive and double click to run it.
3) Follow instructions on the screen and choose “Next” when prompted.
1
Installation of eFormExpert
2
Installation of eFormExpert
4) Click on Install when finished.
5) Click on Finish when Prompted.
3
Installation Of Adobe PDF & JRE
Installation Of Adobe PDF Reader
Installation of Adobe PDF Reader is required to view forms in PDF format.
For installation of PDF Reader, run Adobe Reader 8.10.exe from
eFormExpert CD. Follow instructions on the screen to install Adobe
PDF reader. Alternatively you can install latest version of Adobe PDF
reader from www.adobe.com. It is freely downloadable from this website.
Installation of Java Runtime Environment 6 (JRE 6)
Installation of Java runtime environment is only required if you wish to file
income tax return online using Digital signatures. For installation of JRE 6,
run Java 6.exe from eFormExpert CD. Follow instructions on the screen to
install the Java 6 setup. Alternatively you can install latest version of JRE
from www.java.com. It is freely downloadable from this website.
4
How to Register Software
How to Register Software
Registration of the software is an important step towards running
eFormExpert with full features activated. Unregistered software will run for
15 trials with “Save” feature disabled.
There are two methods to register the software
1) Automatic Registration
This is most convenient way of registration of the software. Each software
copy if accompanied by a unique software key. User is required to enter this
software key while doing the automatic registration and fill in the details
and submit the form. If internet connection is available on the computer,
software will automatically get registered.
5
How to Register Software
2) Manual Registration
If Automatic registration is not possible due to unavailability of internet
connection on the computer, Manual registration can be done. For Manual
registration user is required to put software key. For this software key,
a product code is automatically generated by the software. User is required
to visit www.sensysindia.com for registration and register him using
software key. On registration page user is required to put product code,
against which registration no. is generated. This registration no. is
required to be put in the registration screen in the software.
6
How to run eFormExpert
How to run eFormExpert
Installation of eFormExpert will install the software on your computer and will
create a shortcut on the desktop of your computer. Clicking on this shortcut
will run eFormExpert.
Select the appropriate Assessment Year and click on “Select” to
start the eFormExpert application.
7
eFormExpert Home page
Several options are arranged on the menu displayed on the top area of
the screen. These are explained below.
1) New Form – This option can be used to create a new form.
Following screen is displayed for the users choice. User can select any
form as per the requirement and work with it.
8
Various Menu Options
2) Open Form – This option is used to open existing forms which have been
saved earlier. This option launches open file dialog box, where user can select
the required file for opening.
3) How to File – This option explains several methods which can be used for
filing your returns. For Information purpose
4) Where to File – This option takes you to income tax website where
electronic returns can be filed.
5) Which form is applicable – This option explains which form is applicable
for different types of assessee.
6) MICR Code List – This option lists MICR Code of various banks.
This MICR code is required to be filled up in the form if refund is opted for,
to be deposited direct to bank.
9
Various Menu Options
7) BSR Code List – This option lists BSR code of various banks and their
branches. BSR code is required to be filled up in details of advance & self
assessment taxes paid.
8) Excel template – This option can be used get the excel template for filling
data in excel worksheets. This option can be used to forward excel template to
clients for filling up the data.
10
Various Menu Options
9) Print Challans – This option can be used for printing various challans.
Details can be filled up manually, or data can be retrieved from already filled
of assessee files. Once data has been entered, challans can be printed.
This utility can be used for filling challans details on income tax website also.
10) Convert Previous Year File – This option can be used to convert previous
year income tax return files to current year format. Assessee details are
automatically pulled from previous assessment year files saving great amount
of time.
11) Frequently Asked Questions – It contains answer to various frequently
asked questions.
11
How to fill up Income Tax Form
How to fill up Income Tax Form
Choosing “New Form” or “Open Form” leads to below screen. ITR file is opened
for manipulation and filling up of income tax return data. This screen closely
resembles excel with various additional options. Below are the sheets, which are
predesigned with built in validations. User chooses each sheet one by one and
fills up the required data. These sheets are designed as per the income tax forms
notified by income tax department each year.
There are two types of sheets in the form
1) Predefined Format sheet : Rows and Columns in these sheets are predefined.
e.g. General Information Sheet has predefined input and can not be exteneded or
modified in any form.
2) Multiple Row sheet : In these sheets, no. of rows can be extended depending
on the users requirement. Add Row, Delete Row, and Copy Row options can be
used for this purpose.
12
How to fill up Income Tax Form
Each sheet has various fields which may be open for editing or locked.
All locked fields are always displayed in grey color and fields which are in
white background color are open for users editing. Editable fields can be of
different data types
1) Alphanumeric Fields : These fields are of alphanumeric type and any kind
of data can be feeded in upto maximum defined length. Maximum length varies
from field to field and is predefined. eFormExpert will not let user input more
than defined length.
2) Numeric Fields : These fields are of numeric type. User is required to input
numeric data upto predefined length. Maximum length varies from field to field
and is predefined. eFormExpert will not let user input more than defined length.
3) Date Fields : These fields are of date type. User is required to input date in
these fields. Doble clicking these fields opens up date selector for easy input
of data. Date must be put in DD/MM/YYYY format in these fields.
4) Dropdown fields : These fields have predefined options for selection.
These options are displayed in dropdown for users input.
Clicking on any field displays its type and maximum allowed length for
each field.
It may be noted that few alphanumeric fields have minimum length & maximum
length defined and few of them have only maximum length. Fields which have
13
User Navigation
minimum length defined are those fields which must have at least
minimum length characters as input from user. Fields which do not specify
minimum length have no restriction on minimum character length.
Automatically Calculated fields
There are various automatically calculated fields in the form which are
automatically recalculated in case of change in users data input. These fields
are always displayed in grey color indicating locked fields, Hence can not
be manipulated. Formula for recalculation is inbuilt.
User Navigation :
1) Across Sheet : User can use Up Arrow, Down Arrow, Left Arrow, Right Arrow
to navigate in a sheet. Enter has different characteristics depending on type of
current sheet. Generally it moves to immediate down position in Predefined
format sheet. And it moves to immediate right field in case of Multiple Row sheet
till the end of current row.
2) Across workbook :
a. Tab : User can click on the tab which is displayed at the
bottom of the form for movement between in the sheets.
b. User can navigate using CTRL + Page Down & CTRL + Page Up
Keyboard keys to navigate between sheets.
c. User can also take help of Sheet List option provided at right top corner of
the form. This option displays list of sheets. User can select desired sheet.
14
How to Save ITR form
d. Apart from this User is also provided with “Back” button.
This button can be used by the user for moving to immediate
previous used sheet.
e. Links : Various hyperlinks are available at appropriate places.
This links jump to related sheet based on user selection.
These links are displayed on blue color for easy identification.
Saving of ITR form is as easy as clicking on the “Save” button which is
available at bottom left corner of the screen. Behaviour of save button may
vary as following
1) Saving for first time : Clicking on Save prompts for save dialog box.
User can select appropriate folder and file name for saving the file.
File is saved in xls extension. These files, if required, can be opened in
excel also and any kind of data manipulation can be done.
2) Saving for second time and onwards : Clicking on Save simply saves
the file under the existing file name. No prompt is displayed.
How to Validate :
ITR forms are required to be validated before they should be printed for
submission or electronic return is generated. For validation, users can click on
Validate button available at mid-right bottom corner of the screen. Clicking on
this button validates all the sheets available in the form. Hence user is not
required to validate each sheet individually. During the validation operation,
15
How to prepare electronic return
if any data errors are found they are displayed to the user using two ways
1) Errors are highlighted in dark green color :
Each erroneous field is highlighted in dark green color.
User can easily identify these fields and move
their mouse cursor over these errors to get
error information. Fields can be modified immediately.
On modification, green color of field will disappear.
2) Errors List : Error list is provided to the users review. User can go through
these errors one by one and modify the field as per the error instruction.
When all the errors are sorted out, error list
will disappear and no field will have green
background color. Now ITR form is ready f
or revalidation. This process should be
repeated until no error is found.
How to Prepare Electronic Return
Once the data is filled up in the form and
validation has been done, ITR form is ready
for creation of electronic return. User can click
on “Prepare Electronic Return” button on right bottom of screen for creation
of electronic return.
Preparing electronic return is three stage process
1) Validation of Form : Form is revalidated for errors. If any error is found,
process of creation of electronic return is terminated at this stage.
16
How to prepare paper return
2) Preparation of electronic return : Electronic return is created based on the
user input in forms and schema provided by Income tax department.
When above two stages are completed, electronic return is ready for submission.
These two steps are done automatically and no user interference is required.
Before the 2nd stage is started, user is asked for ITR file name. Electronic return
is stored under this file name in C:\SensysTax Folder. E.g. if File name provided
by the user is XYZ, electronic return will be available at C:\SensysTax\xyz.xml
How to prepare paper return
Paper return can be printed using this button. When user clicks on this button,
two options are provided to the user
1) Print Form : Prints the Form in PDF format.
2) Print Acknowledgment : Prints the Acknowledgment of non e-return.
Other Utilities
Various other utilities are provided to the user in Help Menu available at right top
corner of the screen. These are listed as below
1) Show Sheet help : This option displays sheet specific help.
2) Show Field help : This option activates/ deactivates field help.
3) BSR Code List : This option launches BSR Code list screen
4) MICR Code List : This option launches MICR Code list screen
5) Auto Fit Row Height : If this option is checked, maximum row height is
determined automatically and row height to set this value automatically.
17
Other Utilities
6) Marked Not Applicable : There are various situations where user wants to
marked certain part of ITR form as Not Applicable. This can be achieved
using this option. User can simply selected the required area and use
this option. Using this option marks selected portion of the screen in yellow
color which indicates that it is NA Area.
7) Remove NA Mark : If NA marking is not required, it can be remove using this
option.
8) Import for Previous AY : This option can be used, if general information is to
be imported from any previous year file.
9) Add Multiple Rows : This option is available if current sheet is a multiple row
sheet. Add Row button available to the user adds one row at a time.
If Users wants to add multiple rows at a time, this option can be checked.
18
Auto Update
CALC
Clicking on Calc launches Windows Calculator.
Cell Calculator
Each numeric cell has calculator attached to it. This calculator can be
activated by pressing k from keyboard.
Auto Update
eFormExpert software has unique Auto Update feature. If new updates are
available on Sensys website, software automatically displays this information
to the user. User can click on Auto Update option available on home page of
the software. Auto Update downloads required files from internet and updates
the software automatically. On successful Auto Update, version no. of the
software will change to a new version. This can be verified from the home
page of the software.
19