1
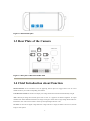
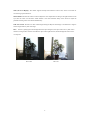
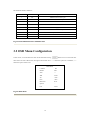
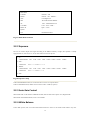
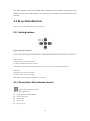
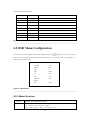
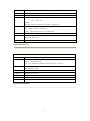
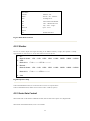
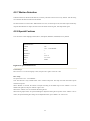
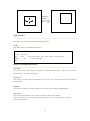
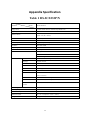
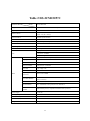
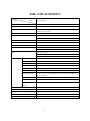
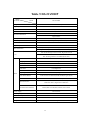
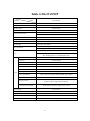
Color Zoom Camera USER’S MANUAL Version 2.0.0 1 Thank you for purchasing our product. If there is any question or request, please do not hesitate to contact dealer. This manual is applicable to DS-2CZ232P/N, DS-2CM232P/N, DS-2CZ252P/N, DS-2CM252P/N, DS-2CZ282P, and DS-CZ292P series color zoom cameras. This manual may contain several technically incorrect places or printing errors, and the content is subject to change without notice. The updates will be added into the new version of this manual. We will readily improve or update the products or procedures described in the manual. 2 Safety Instruction These instructions are intended to ensure that user can use the product correctly to avoid danger or property loss. The precaution measure is divided into “Warnings” and “Cautions” Warnings: Serious injury or death may cause if any of the warnings is neglected. Cautions: Injury or equipment damage may cause if any of the cautions is neglected. Warnings Follow these safeguards Cautions Follow these precautions to prevent serious injury or to prevent potential injury or death. material damage. Warnings 1. In the use of the product, you must be strict compliance with the electrical safety regulations of the nation and region. 2. Input voltage should meet both the SELV(Safety Extra Low Voltage) and the Limited Power Source with AC 24V or DC 12V according to the IEC60950-1 standard. Please refer to technical specifications for detail information. 3. Do not connect several devices to one power adapter as adapter overload may cause over-heat or fire hazard. 4. Please make sure that the plug is firmly connected on the power socket. 5. When the product is mounted on wall or ceiling, the device shall be firmly fixed. 6. If smoke, odor or noise rise from the device, turn off the power at once and unplug the power cable, and then please contact the service center. 7. If the product does not work properly, please contact your dealer or the nearest service center. Never attempt to disassemble the camera yourself. (We shall not assume any responsibility for problems caused by unauthorized repair or maintenance.) 3 Cautions: 1. Make sure the power supply voltage is correct before using the camera. 2. Do not drop the camera or subject it to physical shock. 3. Do not touch CCD (Charge Coupled Device) modules with fingers. If cleaning is necessary, use clean cloth with a bit of ethanol and wipe it gently. If the camera will not be used for an extended period, please turn on the lens cap to protect the CCD from dirt. 4. Do not aim the camera at the sun or extra bright places. A blooming or smear may occur otherwise (which is not a malfunction however), and affecting the endurance of CCD at the same time. 5. The CCD may be burned out by a laser beam, so when any laser equipment is on using, make sure that the surface of CCD will not be exposed to the laser beam. 6. Do not place the camera in extremely hot, cold(the operating temperature shall be-10℃~+60℃ ), dusty or damp locations, and do not expose it to high electromagnetism radiation. 7. To avoid heat accumulation, good ventilation is required for operating environment. 8. Keep the camera away from liquid while on using. 9. While on a delivery, the camera shall be packed in its original packing, or packing of the same texture. 10. Regular part replacement: a few parts (e.g. electrolytic capacitor) of the equipment shall be replaced regularly according to their average enduring time. The average time varies because of differences between operating environment and using history, so regular checking is recommended for all the users. Please contact with your dealer for more details. 4 Table of Contents C H A P T E R 1 ................................................................................................................................ 1 INTRODUCTION.................................................................................................................................. 1 1.1 PRODUCT FEATURES ............................................................................................................................. 2 1.2 SIDE PLATE OF THE CAMERA ........................................................................................................... 2 1.3 REAR PLATE OF THE CAMERA ......................................................................................................... 3 1.4 CHIEF INTRODUCTION ABOUT FUNCTION ........................................................................................ 3 C H A P T E R 2 ................................................................................................................................ 5 INSTALLATION .................................................................................................................................... 5 2.1 LENS ............................................................................................................................................... 6 2.2 REAR PLATE DEFINITION ................................................................................................................. 6 2.3 POWER SUPPLY................................................................................................................................ 6 C H A P T E R 3 ................................................................................................................................ 7 MENU DESCRIPTION OF 232 SERIES ................................................................................................... 7 3.1 KEYS INTRODUCTION ...................................................................................................................... 8 3.1.1 Setting buttons ........................................................................................................................ 8 3.1.2 Zoom/Focus Wire Remote Control .......................................................................................... 8 3.1.3 Alarm in, GND, Alarm output, Alarm output Com ................................................................... 9 3.1.4 Power supply ........................................................................................................................... 9 3.1.5 Interface Definition .................................................................................................................. 9 3.2 OSD MENU CONFIGURATION ........................................................................................................ 10 3.2.1 Menu Structure ..................................................................................................................... 11 3.2.2 Exposure ................................................................................................................................ 12 3.2.3 Auto Gain Control .................................................................................................................. 12 3.2.4 White Balance ....................................................................................................................... 12 3.2.5 Auto Focus ............................................................................................................................. 13 3.2.6 Day / Night ............................................................................................................................ 13 3.2.7 Motion Detection .................................................................................................................. 14 3.2.8 Special Functions ................................................................................................................... 14 3.2.9 Exit ......................................................................................................................................... 16 C H A P T E R 4 .............................................................................................................................. 17 MENU DESCRIPTION OF 252 SERIES ................................................................................................. 17 4.1 KEYS INTRODUCTION .................................................................................................................... 18 4.1.1 Setting buttons ...................................................................................................................... 18 4.1.2 Zoom/Focus Wire Remote Control ........................................................................................ 18 4.1.3 Alarm in, GND, Alarm output, Alarm output Com ................................................................. 19 4.1.4 Power supply ......................................................................................................................... 19 4.1.5 Interface Definition ................................................................................................................ 19 5 4.2 OSD MENU CONFIGURATION ........................................................................................................ 20 4.2.1 Menu Structure ..................................................................................................................... 20 4.2.2 Shutter ................................................................................................................................... 22 4.2.3 Auto Gain Control .................................................................................................................. 22 4.2.4 White Balance ....................................................................................................................... 23 4.2.5 Auto Focus ............................................................................................................................. 23 4.2.6 Day / Night ............................................................................................................................ 24 4.2.7 Motion Detection .................................................................................................................. 25 4.2.8 Special Fuctions ..................................................................................................................... 25 4.2.9 Exit ......................................................................................................................................... 27 APPENDIX SPECIFICATION ................................................................................................................ 28 TABLE 1 DS-2CZ232P/N .................................................................................................................... 28 TABLE 2 DS-2CM232P/N ................................................................................................................... 29 TABLE 3 DS-2CZ252P/N .................................................................................................................... 30 TABLE 4 DS-2CM252P/N ................................................................................................................... 31 TABLE 5 DS-2CZ282P ........................................................................................................................ 32 TABLE 6 DS-2CZ292P ........................................................................................................................ 33 6 C HAPTE R 1 Introduction 1 1.1 Product Features DS-2CZ232P(DS-2CM232P),DS-2CZ252P(DS-2CM252P)series are high performance cameras which adopt 1/4" SONY Interline Transfer Super HAD CCD and advanced print circuit board design technology, and possess of high resolution, lower distortion, and lower noise features. They are extremely suitable for surveillance system and image process system. Features: • Digital signal process camera (DSP), 480TVL; • DS-2CZ232P and DS-2CM232P series hold 22X optics variable focus and auto focus functions; • DS-2CZ252P and DS-2CM252P series hold 23X Optics variable focus and auto focus functions; • DS-2CZ232P and DS-2CM232P series with Iris F1.6, f=3.9-85.8mm; • DS-2CZ252P and DS-2CM252P series with Iris F1.6, f=3.84-88.4mm; • Support automatic electron shutter, auto iris/ manual iris, automatic/manual white balance; • High S/N ratio, support color black/white auto switch function; • High color rendition; • Support back light compensation, automatic electron gain; • Support motion detection; •Support RS-485/wire remote control; • Support OSD menu and parameters configuration; • Support internal synchronization; • Support PAL standard; • DC12V±10% power supply; 1.2 Side Plate of the Camera Figure 1.1 DS-2CZ232P side plate 2 Figure 1.2 DS-252P side plate 1.3 Rear Plate of the Camera Figure 1.3 Rear plate of DS-232P and DS-252P 1.4 Chief Introduction about Function Motion Detection: In the surveillance area, the appearing motion object will trigger alarm. User can select suitable sensitivity level with corresponding environment. Color B/W auto switch: The camera will display color image and become monochrome automatically at night. AGC: When object being shot look dim, please turn on AGC. It is propitious to enhance brightness. To output standard video under different illumination, the range of auto gain control must be large enough. When under low illumination, AGC will increase camera’s sensitivity, and output bright and clear video. S/N ratio: It is the ratio of Signal voltage and noise voltage. The ratio is larger, the effect of noise is less, and the image is more spotless. 3 OSD (On Screen Display): The camera supports friendly menu interface on the screen, and it’s convenient for user selecting expected function. White Balance: Because the camera could not adjust the color temperature according to the light alteration as the eyes, that will cause color deviation. White balance is the white rendition ability of the camera to adjust the problem according to the environment automatically. ICR Auto Switch: The filter will filter infrared light during the daytime and change to normal filter at night to ensure a high sensitivity and clear image. BLC: If there is glaring light in the background of the object being shot, the object will look very dim. In this situation, turning on BLC function will make the object look bright and clear, but the background scene will be overexposure. BLC OFF BLC ON 4 C HAPTE R 2 Installation 5 Before mounting, please make sure that the device in the package is in good condition and all the assembly parts are complete. 2.1 Lens The lens of the automatic focus camera were installed inside of the camera, 232 series cameras with f=3.9-85.8mm, 252 series cameras with f=3.84-88.4mm. 2.2 Rear Plate Definition Fig. 2.1 Rear plate definition of DS-2CZ232P and DS-2C252P 2.3 Power Supply Before electrify the camera, please check the power supply. The power supply of the camera should be DC12V±10%. Please refer to the specification for the details. 6 C HAPTE R 3 Menu Description of 232 series 7 The menu functions of the DS-2CZ232P/N will be introduced in this chapter. The first part is the instruction of keys and menu structure, the second part is to introduce the menu functions of all the items. 3.1 Keys Introduction In this section, it will introduce the keys on the rear plate. 3.1.1 Setting buttons Fig 3.1 The keys of camera There are two work modes for the setting buttons: Common and Menu modes. Each of them has its own function. Common mode: T/W button: Tele/ wide zoom operation. N/F button: Manual variable zoom, near/ far. Menu button: Menu mode switch. Pressing MENU key for 2 seconds, it will enter menu setting mode. Menu mode: T/W button: Move the cursor up/down. N/F button: Move the cursor left/right. Menu button: Select options, and confirm the current value. 3.1.2 Zoom/Focus Wire Remote Control “ ” RS-485, support PELCO-D protocol. Default setting requirements: Signal transmission speed:2400bit/s Protocol: PELCO-D Data bit: 8bit Stop bit: 1bit Parity bit: None 8 3.1.3 Alarm in, GND, Alarm output, Alarm output Com “ ” When motion detection module detects moving objects, it will trigger alarm signal. 3.1.4 Power supply “ ” Before connecting power supply adapter to camera, please check the anode and cathode. 3.1.5 Interface Definition DS-2CZ232P interface definition: Zoom (Wire Control Port) Z“ ” COM (Wire Control Port) C“ ” Focus (Wire Control Port) F“ ” Alarm Input/GND IN/GND“ ” Alarm Output/COM OUT/COM “ ” 485+/- D+/D- “ ” Common GND GND “ ” Fig 3.2 DS-2CZ232P interface definition table Note: Z/F working voltage is: +3V to +12V, - 3V to -12V. Alarm output: Open Collector: Drive load is DC24V 45mA Max. 9 DS-2CM232P interface definition: Pin number Name Voltage 1 Rx CMOS 5V,series receive pin 2 Tx CMOS 5V,series send pin 3 GND Series GND 4 DC IN 12VDC±10% 5 GND Power supply GND 6 CVBS OUT 1.0V±0.2V Video Output 7 GND Composite Video GND 8 NC 9 GND Fig 3.3 DS-2CM232P interface definition table 3.2 OSD Menu Configuration In this section, it will introduce the menu of DS-2CZ232P. Pressing button for two seconds will enter main menu. The left is Menu items; the right is Menu items value. “…” means this option has a submenu, “---” means this option cannot be set. Main Menu CAM ID 001 Shutter Auto AGC --- WB Auto1 AF Auto… D/N Auto… Motion D Close Special … Exit Abort Fig 3.4 Main Menu 10 3.2.1 Menu Structure 1. CAM ID OFF/001~254,Edit camera ID number 2. Exposure Auto:Auto mode, Auto Iris,AGC , AES 1/50 AI…:Auto Iris, AGC, AES (1/50~1/10000) AE…:AES,AGC(Low、High、Close),AI(F1.6~F5.6) Manual…:Shutter, IRIS,AGC can be set by manual. 3. AGC Low/High/Close, if the exposure mode is Auto or AI, AGC will not be set ,it display “---” 4. WB ATW1/ATW2/Auto/Manual… 5. AF Auto…:To enter submenu and set the focus mode, sensitivity and the least focus distance --(1cm、50cm、1m) Manual One focus: triggered by button once, then turn to manual mode. 6. Color/ B/W Auto…:Color and B/W auto switch mode Color… B/W… 7. Motion D Close/Open…:To enter submenu and set motion detection sensitivity and areas 8. Special Press Menu button enter special function submenu(CN/EN,BLC,RS-485,POS/NEG, ZSpeed, Definition, Line Control 9. Exit ) Abort/Save/Default Fig 3.5 Main Menu set (Special) 1. CN/EN EN 2. BLC Close: Turn off BLC Default…: Default BLC mode User…:user self-definition, the BLC areas position and size can be set 3. RS-485 485 communication parameter,to enter submenu to set RS-485 communication protocols, Baud and RS-485 address 4. POS/NEG +/- 5. ZSpeed Zoom speed:1~4 class 6. Define Definition ,1~5 class 7. Back Fig 3.6 Special Menu set 11 Main Menu CAM ID OFF/001—254 Shutter Auto/AI…/AE…/Manual… AGC Low/High/Close WB ATW1/ATW2/Auto/Manual… AF Auto…/Manual/One Focus Color/B/W Color…/Auto…/B/W… Motion D Open…/Close Special … Exit Default/Abort/Save Fig 3.7 Main Menu structure 3.2.2 Exposure The iris can control output video signal according to the different intensity of light. (This product is already equipped with iris.) The “F”(F1.6~F5.6) value of the iris can be set by user. 1. AI… Manual shutter 1/50、1/120、1/250、1/500、1/1000、1/2000、1/4000、1/10000 2. AES… Manual Iris F1.6-----------1 /F5.6-----------1 3. Manual... Manual shutter Manual Iris 1/50、1/120、1/250、1/500、1/1000、1/2000、1/4000、1/10000 F1.6-----------1/F5.6----------1 4. Auto Fig 3.8 Exposure setup Under AES and Manual mode, Iris can be set from F1.6 to F5.6 in exposure menu. Under AI and Manual mode, shutter can be set from 1/50s to 1/10Ks (8 options). 3.2.3 Auto Gain Control When enable AGC in the situation of Manual and AES, there are three AGC options: Low, High and Off. When under AI and Manual modes, AGC is not available. 3.2.4 White Balance In the “WB” options, user can set the white balance function to ensure it can render normal white in any color 12 temperature. If selecting the ATW mode, the camera will continue monitoring the color temperature according to the surrounding light and adjust WB based on the color temperature. Including ATW1, ATW2, Auto, and Manual modes. WB Setup RED Blue Back ATW1/ATW2/Auto/Manual… User/3200K/6300K (+1F)--------|---------(-53 ) -|------------------ Fig 3.9 white balance setup ATW1: Camera recover color automatically based on TTL algorithm, temperature range is approximate from 2500K to 9300K. ATW2: Camera recover color automatically based on TTL algorithm, temperature range is approximate from 2000K to 10000K. ATC: Adjust under steady color temperature environment. After selecting ATC, the white balance will take effect to the current scene, and adjust the temperature to 6500K. Manual: Adjust red and blue values to setup white balance. 3.2.5 Auto Focus In the options of AF, user can select the Focus modes including Auto, Manual, One focus. Auto: it can accomplish continuous surveillance without manual adjustment. Manual: User can manual focus. One focus: Press the button to focus once, then it will be the same as manual mode. AF Setup Mode Sense Near Lim Back Normal/Interval High/Mid/Low 50cm/1m/1cm Figure 3.10 AF Setup 3.2.6 Day / Night Optional D/N modes: Auto D/N, Day, Night mode. Note: The Auto mode requires meeting any of the following conditions: (a). The exposure mode should be Auto or AI. 13 (b). If the exposure mode is manual or AE, the AGC should be set as High. 3.2.7 Motion Detection In Motion Detection, the Motion D functions, sensitivity and motion areas can be set by manual. After the setup, user can detect the motion situation of the intruder. The motion D has two work modes: When Motion D is Close, if alarm input occurs, the alarm output will directly respond. When Motion D is Open, the camera will auto detect monitoring area, and output alarm signal. 3.2.8 Special Functions User can set the CN/EN language, RS-485, BLC, Zoom Speed, Definition, POS/NEG and Line control. Special Function CN/EN BLC RS-485 EN User…/Close/Default… … +/1/ 2/ 3/ 4 1/ 2/ 3/ 4/ 5 Mode1/Mode2 POS/NEG ZSpeed Define Line Back Fig 3.11 Special Function sets CN/EN Setup: Move cursor to “CN / EN” through up / down, and press left / right to select CN or EN. BLC Setup: The options have User…/Close/Default… Note: This function is only available when “Auto” selected in Exposure. The setup will retain when other options selected in Exposure. When “Default” is selected, the camera will adjust according to the default region. Press “MENU” to see the default back light area, and press “MENU” again to exit. When select “USER”, user can customize the back light area. When entering adjust status, use up/down/left/right to adjust the back light area position. Press “MENU” once to release, use up/down/left/right to change to area adjustment status, press “MENU” for 2 min to exit. 14 Right,Up Button Figure 3.12 BLC When select “Off”, camera will not take back light compensation. RS-485 Press MENU button to enter RS485 setup interface: RS485 Protocol Baud Address Back PELCO-D 2400 (1200, 2400, 4800, 9600, 19200, 38400, 115200 optional) 001 (000 to 254 optional) Figure 3.13 RS-485 Setup Interface POS/ NEG Move cursor to “POS / NEG”, and press left / right to select POS or NEG. Selecting “+”, the video will be normal, while selecting “-”, the video will be negative. Zoom Speed Move cursor to “Z Speed”, and press left/right to select from “1/2/3/4”. 1 means the slowest speed, and 4 means the fastest speed. Definition Move cursor to “Definition”, and press left/right to select High, Middle, 低中, and low to adjust the image definition. Line Control Move cursor to “Wire Remote Control”, and press left/right to select “Mode1/Mode2”. Mode1 is: When Vz-Vc=12V, wide-angle direction zooming. When Vz-Vc=-12V, tele direction zooming; Mode 2 is on the opposite. 15 3.2.9 Exit Exit option is used for quit setting Menu, and return to normal work mode. Abort: Neglect all modifications, and resume the original setup. Save: Save all modifications. Default: Neglect all modifications, resume the default factory setup. 16 C HAPTE R 4 Menu Description of 252 series 17 The menu functions of the DS-2CZ232P will be introduced in this chapter. The first part is the instruction of keys and menu structure, the second part is to introduce the menu functions of all the items. 4.1 Keys Introduction In this section, it will introduce the keys on the rear plate. 4.1.1 Setting buttons Fig 4.1 The keys of camera There are two work modes for the setting buttons: Common and Menu modes. Each of them has its own function. Common mode: T/W button: Tele/ wide zoom operation. N/F button: Manual variable zoom, near/ far. Menu button: Menu mode switch. Pressing MENU key for 2 seconds, it will enter menu setting mode. Menu mode: T/W button: Move the cursor up/down. N/F button: Move the cursor left/right. Menu button: Select options, and confirm the current value. 4.1.2 Zoom/Focus Wire Remote Control “ ” RS-485, support PELCO-D protocol. Default setting requirements: Signal transmission speed:2400bit/s Protocol: PELCO-D Data bit: 8bit Stop bit: 1bit Parity bit: None 18 4.1.3 Alarm in, GND, Alarm output, Alarm output Com “ ” When motion detection module detects moving objects, it will trigger alarm signal. 4.1.4 Power supply “ ” Before connecting power supply adapter to camera, please check the anode and cathode. 4.1.5 Interface Definition DS-2CZ252P interface definition: Zoom (Wire Control Port) Z“ ” COM (Wire Control Port) C“ ” Focus (Line Control Port) F“ ” Alarm Input/GND IN/GND“ ” Alarm Output/COM OUT/COM “ ” 485+/- D+/D- “ ” Common GND GND “ ” Fig 4.2 DS-2CZ252P interface definition table Note: Z/F working voltage is: +3V to +12V, -3V to -12V. Alarm output: Open Collector: Drive load is DC24V 45mA Max. 19 DS-2CM252P interface definition Pin number Name Voltage 1 Rx CMOS 5V,series receive pin 2 Tx CMOS 5V,series send pin 3 GND Series GND 4 DC IN 12VDC±10% 5 GND Power supply GND 6 CVBS OUT 1.0V±0.2V Video Output 7 GND Composite Video GND 8 NC 9 GND Fig 4.3 DS-2CM252P interface definition table 4.2 OSD Menu Configuration In this section, it will introduce the menu of DS-2CZ252P. Pressing button for two seconds will enter main menu. The left is Menu items; the right is Menu items value. “…” means this option has a submenu, “---” means this option cannot be set. Main Menu CAM ID 001 Shutter Auto AGC --- WB Auto1 AF Auto… D/N Auto… Motion D Close Special … Exit Abort Figure 4.4 Main Menu 4.2.1 Menu Structure 1. CAM ID OFF/001~254,Edit camera ID number 2. Shutter Auto:Auto mode, Auto Iris,AGC , AES 1/50 AI…:Auto Iris, AGC, AES (1/50~1/10000) AE…:AES,AGC(Low、High、Close),AI(F1.6~F5.6) 20 Manual…:Shutter, IRIS, AGC can be set by manual. 3. AGC Low/High/Close, if the exposure mode is Auto or AI, AGC will not be set ,it display “---” 4. WB ATW1/ATW2/Auto/Manual… 5. AF Auto…:To enter submenu and set the focus mode, sensitivity and the least focus distance --- (1cm、50cm、1m) Manual One focus: triggered by button once, then turn to manual mode. 6. D/N Auto…: Day and night auto switch mode Day…: Enter sub menu to set saturation Night…: Enter sub menu to set color synchronization 7. Motion D Close/Open…:To enter submenu and set motion detection sensitivity and areas 8. Special Press Menu button enter special function submenu ( CN/EN,BLC,RS-485,POS/NEG, ZSpeed, Definition, Line 9. Exit ) Abort/Save/Default Fig 4.5 Main menu set (Special) 1. CN/EN EN 2. BLC Close: Turn off BLC Default…: Default BLC mode User…:user self-definition, the BLC areas position and size can be set 3. RS-485 485 communication parameter to enter submenu to set RS-485 communication protocols, Baud and RS-485 address 4. POS/NEG +/- 5. ZSpeed Zoom speed:1~4 class 6. Define Definition ,1~5 class 7. Line Mode1/Mode2 8. Back Fig 4.6 Special Menu set 21 Main Menu CAM ID OFF/001—254 Shutter Auto/AI…/AE…/Manual… AGC Low/High/Close WB ATW1/ATW2/Auto/Manual… AF Auto…/Manual/One Focus D/N Day…/Auto…/Night… Motion D Open…/Close Special … Exit Default/Abort/Save Fig 4.7 Main Menu structure 4.2.2 Shutter The iris can control output video signal according to the different intensity of light. (This product is already equipped with iris.) The “F”(F1.6~F5.6) value of the iris can be set by user. 1、AI… Manual shutter 1/50、1/120、1/250、1/500、1/1000、1/2000、1/4000、1/10000 2、AES… Manual Iris F1.6-----------1 /F5.6-----------1 3、Manual... Manual shutter 1/50、1/120、1/250、1/500、1/1000、1/2000、1/4000、1/10000 Manual Iris F1.6-----------1/F5.6----------1 4、Auto Fig 4.8 Exposure setup Under AES and Manual mode, Iris can be set from F1.6 to F5.6 in exposure menu. Under AI and Manual mode, shutter can be set from 1/50s to 1/10Ks (8 options). 4.2.3 Auto Gain Control When enable AGC in the situation of Manual and AES, there are three AGC options: Low, High and Off. When under AI and Manual modes, AGC is not available. 22 4.2.4 White Balance In the white balance options, user can set the white balance function to ensure it can render normal white in any color temperature. If selecting the ATW mode, the camera will continue monitoring the color temperature according to the surrounding light and adjust WB based on the color temperature. Including ATW1, ATW2, Auto, and Manual modes. WB ATW1/ATW2/Auto/Manual… Fig 4.9 white balance setup ATW1: Camera recover color automatically based on TTL algorithm, temperature range is approximate from 2500K to 9300K. ATW2: Camera recover color automatically based on TTL algorithm, temperature range is approximate from 2000K to 10000K. ATC: Adjust under steady color temperature environment. After selecting ATC, the white balance will take effect to the current scene, and adjust the temperature to 6500K. Manual: Adjust red and blue values to setup white balance. Setup User/3200K/6300K RED (+1F)--------|---------- Blue (-53 ) -|------------------ Back Figure 4.10 MWB setup 4.2.5 Auto Focus In the options of AF, user can select the Focus modes including Auto, Manual, One focus. Auto: it can accomplish continuous surveillance without manual adjustment. Manual: User can manual focus. One focus: Press the button to focus once, then it will be the same as manual mode. AF Mode Sense Near Lim Normal/Interval High/Mid/Low 50cm/1m/1cm Back Figure 4.11 Auto Focus Setup 23 4.2.6 Day / Night Optional day to night modes: Auto day switch to night, day mode, night mode. Auto day switch to night: Camera will switch between color and B/W according to the environment illumination. Under low illumination condition, IR filter will move away and switch to B/W mode to improve the sensitivity. Day Mode: IR filter will move into, the image back to normal status. Night Mode: IR filter will move away, the image will change to black and white status to improve sensitivity. Night Setup Burst Off/On Back Figure 4.12 Night setup Burst: Off: Do not output chroma signal and black and white composite video signal On: Output chroma signal. Day Setup Chroma High/Mid/Low Back Fig 4.13 Day setup Chroma: Adjust chroma parameters, has low/mid/high options. Auto D/N Value (2)------l----- C/BW 2s/3s/5s/10s/15s/20s/25s/30s BW/C 2s/3s/5s/10s/15s/20s/25s/30s Back Figure 4.14 Auto D/N setup Value: The threshold for day mode change to night mode. C/BW: The delay time for color change to black and white mode. BW/C: The delay time for black and white mode change to color mode. 24 4.2.7 Motion Detection In Motion Detection, the Motion D functions, sensitivity and motion areas can be set by manual. After the setup, user can detect the motion situation of the intruder. The motion D has two work modes: When Motion D is Close, if alarm input occurs, the alarm output will directly respond. When Motion D is Open, the camera will auto detect monitoring area, and output alarm signal. 4.2.8 Special Fuctions User can set the CN/EN language, RS-485, BLC, ZoomSpeed, Definition ,POS/NEG, Line by manual. Special Function CN/EN EN BLC User…/Close/Default… RS-485 … POS/NEG +/- ZSpeed 1/ 2/ 3/ 4 Define 1/ 2/ 3/ 4/ 5 Line Mode1 Back Figure 4.15 Special Function sets CN/EN Setup: Move cursor to “CN / EN” through up / down, and press left / right to select CN or EN. BLC Setup: The options have User…/Close/Default… Note: This function is only available when “Auto” selected in Exposure. The setup will retain when other options selected in Exposure. When “Default” is selected, the camera will adjust according to the default region. Press “MENU” to see the default back light area, and press “MENU” again to exit. When select “USER”, user can customize the back light area. When entering adjust status, use up/down/left/right to adjust the back light area position. Press “MENU” once to release, use up/down/left/right to change to area adjustment status, press “MENU” for 2 min to exit. 25 Right Up Button Figure 4.16 BLC When select “Off”, camera will not take back light compensation. RS-485 Press MENU button to enter RS485 setup interface: RS485 Protocol PELCO-D Baud 2400 Address (1200、2400、4800、9600、19200、38400、115200 optional) 001 (000---254 optional) Back Figure 4.17 RS-485 Setup Interface POS/ NEG Move cursor to “POS / NEG”, and press left / right to select POS or NEG. Selecting “+”, the video will be normal, while selecting “-”, the video will be negative. Zoom Speed Move cursor to “Z Speed”, and press left/right to select from “1/2/3/4”. 1 means the slowest speed, and 4 means the fastest speed. Definition Move cursor to “Definition”, and press left/right to select from 5 levels to adjust the image definition. Line Control Move cursor to “Wire Remote Control”, and press left/right to select “Mode1/Mode2”. Mode1 is: When Vz-Vc=12V, wide-angle direction zooming. When Vz-Vc=-12V, tele direction zooming; Mode 2 is on the opposite. 26 4.2.9 Exit Exit option is used for quit setting Menu, and return to normal work mode. Abort: Neglect all modifications, and resume the original setup. Save: Save all modifications. 27 Appendix Specification Table 1 DS-2CZ232P/N Parameter Model DS-2CZ232P/N Image Sensor 1/4 inch SONY Interline Transfer Super HAD CCD Signal System PAL/NTSC PAL: 752 (H) × 582 (V) Effective Pixels NTSC: 768 (H) × 494 (V) Synchronization Internal Synchronization Horizontal Resolution 480 TVL Video Output 1Vp-p Composite Output (75Ω/BNC) S/N Ratio More than 50dB Day & Night (Electronic) Auto / Color / B&W Min. Illumination 0.1Lux @ F1.6 Lens 22X Optical Zoom F1.6, f=3.9 ~ 85.8mm Min. Working Distance: 10-1000mm(Wide-Tele) Menu Camera ID On / Off (001-254, fixed position) Language English, Chinese Iris Auto / Manual Electronic Shutter 1/50(1/60)s to 1/100,000s Auto Gain Low / High / Off Auto Focus Auto / Manual / Once Auto White Balance ATW1 / ATW2 /Auto / Manual( Pre-set 3200K, Pre-set 5600K, R / G Gain Correction) Motion Detection On / Off (Zone, Sensitivity) Special Function BLC, POS/NEG, Zoom Speed (4 levels), Definition Communication RS-485, PELCO-D, Baud Rate, Address, PTZ Control Interface Power Supply 12VDC, ±10% Working Temperature -10℃ ~ 60℃ Power Consumption 4.5W Dimension (mm) 64 × 61 × 112.5(2.53” × 2.42” × 4.46”) Weight 375g (0.82lbs) 28 Table 2 DS-2CM232P/N Parameter Model DS-2CM232P/N Image Sensor 1/4 inch SONY Interline Transfer Super HAD CCD Signal System PAL/NTSC PAL: 752 (H) × 582 (V) Effective Pixels NTSC: 768 (H) × 494 (V) Synchronization Internal Synchronization Horizontal Resolution 480 TVL Video Output 1Vp-p Composite Output (75Ω/BNC) S/N Ratio More than 50dB Day & Night (Electronic) Auto / Color / B&W Min. Illumination 0.1Lux @ F1.6 22X Optical Zoom Lens F1.6, f=3.9 ~ 85.8mm Min. Working Distance:10-1000mm(Wide-Tele) Menu Camera ID On / Off (001-254, fixed position) Language English, Chinese Iris Auto / Manual Electronic Shutter 1/50(1/60)s to 1/100,000s Auto Gain Low / High / Off Auto Focus Auto / Manual / Once Day & Night (Electronic) Auto White Balance Auto / Color / B&W ATW1 / ATW2 /Auto / Manual( Pre-set 3200K, Pre-set 5600K, R / G Gain Correction) Motion Detection On / Off (Zone, sensitivity) Special Function BLC, POS/NEG, Zoom speed(4 levels), Definition Communication Interface HIKVISION protocol, compatible of SONY VISCA protocol Power Supply 9-12V DC Working Temperature -10℃ ~ 60℃ Power Consumption 4W Max Dimension (mm) 50 × 55.6 × 86 Weight 235g 29 Table 3 DS-2CZ252P/N Parameter Model DS-2CZ252P/N Image Sensor 1/4 inch SONY Interline Transfer Super HAD CCD Signal System PAL/NTSC Effective Pixels PAL: 752 (H) × 582 (V) NTSC: 768 (H) × 494 (V) Synchronization Internal Synchronization Horizontal Resolution Color: 480 TVL B / W: 520 TVL Video Output 1Vp-p Composite Output (75Ω/BNC) S/N Ratio More than 50dB Day & Night IR Cut Filter Auto Switch Min. Illumination Color: 0.2Lux @ F1.6 B / W: 0.02Lux @ F1.6 Lens 23X Optical Zoom F1.6, f=3.84 ~ 88.4mm Min. Working Distance:10-1200mm(Wide-Tele) Menu Camera ID On / Off (001-254, fixed position) Language English, Chinese Iris Auto / Manual Electronic Shutter 1/50 (1/60s) to 1/100,000s Auto Gain Low / High / Off Auto Focus Auto / Manual / Once Auto White Balance ATW1 / ATW2 /Auto / Manual( Pre-set 3200K, Pre-set 5600K, R / G Gain Correction) Motion Detection On / Off (Zone, Sensitivity) Special Function BLC, POS/NEG, Zoom Speed (4 levels), Definition Communication RS-485, PELCO-D, Baud Rate, Address, PTZ Control (Optional Mode) Interface Power Supply 12VDC, ±10% Working Temperature -10℃ ~ 60℃ Power Consumption 4.5W Dimension (mm) 68.7 × 66.1 × 125 (2.7” × 2.6” × 4.9”) Weight 550g (1.21lbs) 30 Table 4 DS-2CM252P/N Parameter Model DS-2CM252P/N Image Sensor 1/4 inch SONY Interline Transfer Super HAD CCD Signal System PAL/NTSC Effective Pixels PAL: 752 (H) × 582 (V) NTSC: 768 (H) × 494 (V) Synchronization Internal Synchronization Horizontal Resolution Color: 480 TVL B / W: 520 TVL Video Output 1Vp-p Composite Output (75Ω/BNC) S/N Ratio More than 50dB Day & Night IR Cut Filter Auto Switch Min. Illumination Color: 0.2Lux @ F1.6 B / W: 0.02Lux @ F1.6 Lens 23X Optical Zoom F1.6, f=3.84 ~ 88.4mm Min. Working Distance:10-1200mm(Wide-Tele) Menu Camera ID On / Off (001-254, fixed position) Language English, Chinese Iris Auto / Manual Electronic Shutter 1/50(1/60)s to 1/100,000s Auto Gain Low / High / Off Auto Focus Auto / Manual / Once Auto White Balance ATW1 / ATW2 /Auto / Manual( Pre-set 3200K, Pre-set 5600K, R / G Gain Correction) Motion Detection On / Off (Zone, Sensitivity) Special Function BLC, POS/NEG, Zoom Speed (4 levels), Definition Communication HIKVISION protocol, compatible of SONY VISCA protocol Interface Power Supply 12VDC, ±10% Working Temperature -10℃ ~ 60℃ Power Consumption 4W Dimension (mm) 61.2 × 50 × 88.3 Weight 370g MAX 31 Table 5 DS-2CZ282P Parameter Model DS-2CZ282P Image Sensor 1/4"SONY Interline Transfer Super HAD CCD Signal System PAL Effective Pixels 752(H)×582(V) Synchronous Internal Synchronization Day:540TVL Horizontal Resolution Night:600TVL Privacy 16 areas (area/position adjustable) Video Output 1.0Vp-p Composite Output(75Ω/BNC) S/N Ratio More than 52dB Day & Night Min. Illumination IR Cut Filter Auto Switch Day: 0.2Lux @ F1.4, 0.008Lux @ F1.4 (sensitivity×256) Night: 0.02Lux @ F1.4, 0.0008Lux @ F1.4 (sensitivity×256) Total Zoom 480X,Optical Zoom:30X, Digital Zoom:16X Lens F1.4, f=3.5 - 105mm Min. Working Distance:10-1500mm(Wide-Tele) Camera ID On/Off (OSD, 001-254, on the top right corner) Language Chinese /English Iris Auto/Manual Electronic Shutter 1/50S-1/10,000S Auto Gain Low/High/Close Auto Focus Auto/Manual/One focus Day/Night Auto/Day/Night Menu Auto White Balance ATW1/ATW2/AC/Manual(3200K,6300K,R/G gain adjust) Motion Detection Special Function Communication Interface OFF/ON(area, sensitivity) Optical Zoom, BLC,Y-Value, C-Value, POS/NEG, ZSpeed (4 Class), Definition, Mirror, Digital Noise Reduction RS-485,PELCO-P/D, Baud, Address, PTZ Control Power Supply DC12V±10% Working Temperature -10℃--60℃ Power Consumption 4.5W MAX Dimension (mm) 124×66×68.5 Weight 450g 32 Table 6 DS-2CZ292P Parameter Model DS-2CZ292P Image Sensor 1/4"SONY Interline Transfer Super HAD CCD Signal System PAL Effective Pixels 752(H)×582(V) Synchronous Internal Synchronization Day:540TVL Horizontal Resolution Night:600TVL Privacy 16 areas(area/position adjustable) Video Output 1.0Vp-p Composite Output(75Ω/BNC) S/N Ratio More than 52dB Day & Night Min. Illumination IR Cut Filter Auto Switch Day:0.2Lux @ F1.6,0.008Lux @ F1.6(sensitivity×256) Night :0.02Lux @ F1.6,0.0008Lux @ F1.6 (sensitivity×256) Total Zoom:576X,Optical Zoom:36X, Digital Zoom:16X Lens F1.6, f=3.4 - 122.4mm Min. Working Distance: 10-1500mm(Wide-Tele) Camera ID On/Off (OSD, 001-254, on the top right corner) Language Chinese /English Iris Menu Auto/Manual Electronic Shutter 1/50S-1/10,000S Auto Gain Low/High/Close Auto Focus Auto/Manual/One focus Day/Night Auto/Day/Night Auto White Balance ATW1/ATW2/AC/Manual(3200K,6300K,R/G gain adjust) Motion Detection Special Function Communication Interface OFF/ON(area, sensitivity) Optical Zoom, BLC,Y-Value, C-Value, POS/NEG, ZSpeed(4 Class), Definition, Mirror, Digital Noise Reduction RS-485,PELCO-D, Baud, Address, PTZ Control Power Supply DC12V±10% Working Temperature -10℃--60℃ Power Consumption 4.5W MAX Dimension (mm) 124×66×68.5 Weight 450g 33