1
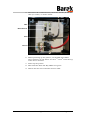
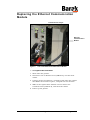
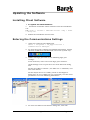
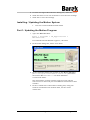
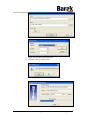
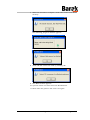
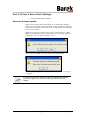
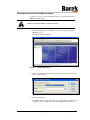
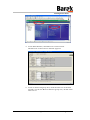
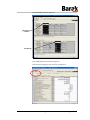
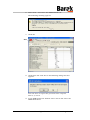
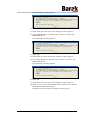
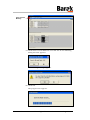
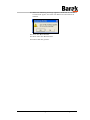
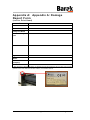
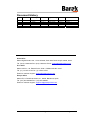
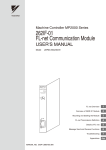
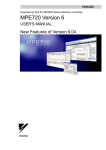
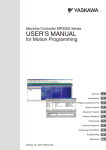
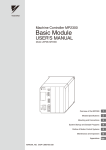
Replacing the Controller &
Ethernet Communication
Modules
Technical Note – 10100122 Rev. A
10100122 - A
© Matan Digital Printers Ltd
Page 1 of 19
Safety Procedures
Before reading this Technical Note, please refer to the section
on Safety Procedures in the Barak User's Manual.
About the Technical Note
The Technical Note describes the procedure for changing a
Controller on the Barak printer.
Replacing a Controller
Location of upper two retaining
screws (at rear of Driver)
Location of lower two retaining
screws (at rear of Driver)
Figure 1:
¾
The Controller
To replace the Controller:
1. Shut down the printer.
2. Disconnect the COMMUNICATION (10BASE-T), the PORT, the
M I/II and the CPU I/O cables.
3. Carefully remove the four Philips screws that hold the
CONTROLLER in place, and remove it.
4. Take the new CONTROLLER and attach it to the printer using
the four Philips screws.
10100122 - A
© Matan Digital Printers Ltd
Page 1 of 19
5. Reconnect the COMMUNICATION, the PORT, the M I/II and the
CPU I/O cables, as shown below.
LEDs
Microswitches
M I/II
CPU I/O
6. Before powering up the printer, set the INIT and CNFG
micro switches to ON. These are the 3rd and 4th from the top
of the micro switches.
7. Power up the printer.
8. Wait until the Run and Rdy LEDs turn green.
9. Switch the two micro switches back to OFF.
10100114 - A
© Matan Digital Printers Ltd.
Page 2 of 19
Replacing the Ethernet Communication
Module
Push down the tongue
Ethernet
Communication
Module
Figure 2:
¾
View of the Ethernet Communication Module
To replace the Controller:
1. Shut down the printer.
2. Disconnect the COMMUNICATION (10BASE-T), and the PORT
cables.
3. Using a slotted screwdriver, carefully push down the tongue
that holds the module in place, and pull out the module.
4. Slide in the replacement module and reconnect the
COMMUNICATION (10BASE-T), and the PORT cables.
5. Power up the printer.
10100114 - A
© Matan Digital Printers Ltd.
Page 3 of 19
Updating the Software
Installing Client Software
¾
To update the Client Software:
1. Install the Controller Client software from the installation
CD:
CD > Tools > Yaskawa > MPLoader-Client > Eng > Disk1
> Setup.exe
2. Follow the installation instructions.
Entering the Communications Settings
1. Open the COMMUNICATION MANAGER:
Start > Programs > YE_Applications >
Communication Manager.
2. To open the main COMMUNICATION MANAGER window, double
click the COMMUNICATION MANAGER icon in the system tray:
3. Define new logic port and set the following logic port
settings:
In the main list, select one of the logic ports number.
Click Settings icon to open the LOGIC PORT SETTINGS dialog
box.
Set the PORT KIND TO SERIAL", the TIME OUT to 10000ms, and
then click DETAIL.
Set the Physical Port to COM2, (check in the Engineer
dialog box, in case COM2 has not responded,) and the other
parameters as in the following illustration.
4. To close the SERIAL PORT SETTING dialog box, click OK.
10100114 - A
© Matan Digital Printers Ltd.
Page 4 of 19
5. To close the logical PORT SETTING dialog box, click OK.
6. Click the SAVE icon in the ICON BAR to save the new settings.
7. Click YES to save the settings.
Installing / Updating the Motion System
•
Use the CONTROLLER MOTION PROGRAM.
Part 1: Updating the Motion Program
1. Open the MPL700Client:
Start > Programs > YE_Applications >
MPL700Client.
If a USER PRIVILEGES WARNING appears, click YES.
2. In the main dialog box, select LOAD DATA:
3. In the OPEN FILE dialog box, browse to the Matan FE folder
(i.e. C:\Program Files\Matan Barak FE ) and select
the motion file MOTIONx.x.YMW from DRIVERS >
CONTROLLER folder.
The appropriate version number appears in the release
notes. You can also ask your local Matan technician for this
number.
4. In the CONFIRM THE CONFIGURATION dialog box, using the
CHANGE command in the TARGET field, set the serial
connection.
10100114 - A
© Matan Digital Printers Ltd.
Page 5 of 19
5. Click OK and then click TRANSFER.
6. Stop the CPU by clicking YES.
The upload process starts.
10100114 - A
© Matan Digital Printers Ltd.
Page 6 of 19
7. When the transfer is complete, click OK to write to the flash
memory.
The following progress window appears.
8. Click OK and restart the CPU by clicking OK.
9. The MAIN SCREEN appears.
10. Quit the client and shut down the Workstation.
11. Shut down the printer and turn it on again.
10100114 - A
© Matan Digital Printers Ltd.
Page 7 of 19
Part 2: Driver’s Servo Pack Settings
•
Automatic Software Update
Automatic Software Update
When the CONTROLLER is switched on, it checks the DRIVER
SERVO PACK settings version number. If the version is different
from that stored on the CONTROLLER, it will update the settings
to the new version.
When any action is carried out in the CONTROLLER (i.e., INIT,
MEDIA FORWARD/BACKWARD and TENSION), a message appears
asking the user to either update or not.
The action can take up to a minute to be performed.
After the update, you must shut down the printer and turn it
on again.
If you did not succeed to load the drivers automatically the first time,
you may try again. If you are unsuccessful, proceed to the next
chapter.
10100114 - A
© Matan Digital Printers Ltd.
Page 8 of 19
Development Environment Manual Update
In order to carry out the following steps, you must install the
MPE720 application.
Make sure that the Barak Front End is closed.
1. With the application installed, on your desktop, click the
MPE720 icon.
The MAIN SCREEN appears.
Figure 3:
MPE720 Main Screen
2. Click COMMUNICATION SETTINGS and from the COMMUNICATION
PORT, select SERIAL.
3. Click CONNECTION.
The MAIN SCREEN appears with a green flashing arrow at the
top tight corner, indicating that the application is online.
10100114 - A
© Matan Digital Printers Ltd.
Page 9 of 19
Flashing Green Arrow
4. In the MAIN SCREEN, click MODULE CONFIGURATION.
The MODULE CONFIGURATION window appears.
5. In the CONTROLLER group box, click the title bar of the first
module, and in the MODULE DETAILS group box, double-click
title bar #3.
10100114 - A
© Matan Digital Printers Ltd.
Page 10 of 19
The following window appears.
Title Bar of the
st
1 Module
Title Bar #3
The SVB DEFINITION window appears.
This window displays the driver’s parameters.
10100114 - A
© Matan Digital Printers Ltd.
Page 11 of 19
6. Select AXIS 1 and select the SERVOPACK tab.
The following warning appears.
7. Click OK.
Save
8. Click SAVE and click YES in the following dialog box that
appears.
You now have to repeat the previous three steps for
AXIS 2, 3, and 4.
9. In the SVB DEFINITION window select AXIS 2 and select the
SERVOPACK tab.
10100114 - A
© Matan Digital Printers Ltd.
Page 12 of 19
The following warning appears.
10. Click OK
11. Click SAVE and click YES in the dialog box that appears.
12. In the SVB DEFINITION window select AXIS 3 and open the
SERVOPACK tab.
The following warning appears.
13. Click OK
14. Click SAVE and click YES in the dialog box that appears.
15. In the SVB DEFINITION window select AXIS 4 and select the
SERVOPACK tab.
The following warning appears.
16. Click OK
17. Click SAVE and click YES in the dialog box that appears.
18. Click CLOSE to close the SVB DEFINITION window, but not the
ENGINEERING MANAGER window.
The MODULE CONFIGURATION window remains open.
10100114 - A
© Matan Digital Printers Ltd.
Page 13 of 19
Save to Flash
Memory
19. Click SAVE TO FLASH MEMORY and click YES in the following
dialog box that appears.
The following message appears.
20. Click YES.
The progress bar appears.
10100114 - A
© Matan Digital Printers Ltd.
Page 14 of 19
21. When the following message appears, click YES to run the
CONTROLLER again, and close the MODULE CONFIGURATION
window.
22. Close the MAIN SCREEN.
23. Shut down the Workstation.
24. Power OFF the printer.
10100114 - A
© Matan Digital Printers Ltd.
Page 15 of 19
Appendix A: Appendix A: Damage
Report Form
(not for Print Head)
Customer’s Name:
Address:
Barak5 Printer S/N*
Faulty Part Name
Details of faulty
part:
Remarks:
Signed:
Name:
Position in
Company:
Date:
* The Printer’s Serial Number is displayed on the label located at the rear of the
printer near the left end of the rollers, as shown below.
10100114 - A
© Matan Digital Printers Ltd.
Page 16 of 19
Document History
Rev
ECO #
Written by
Date
Approved by
Date
Remarks
A
10000049
F. Taylor
F. Taylor
25-07-10
07-03-11
Ronen Shalil
07-03-11
Cataloging
Editing
Head Office
Matan Digital Printers Ltd., 14 Amal Street, Park Afek, Rosh Ha'ayin 48092, Israel.
Tel: (+972) 3 9002720 Fax: (972) 3 9002721 Email: [email protected]
U.S. Office
Matan USA Inc., 90, Earhart Drive, Suite 4, Williamsville NY 14221.
Tel: (+1) 716 631 3770 Fax: (1) 716 631 3576
Email for customer support: [email protected]
Europe Office
Matan EU, C/ Rosalia de Castro, 21, 08025, Barcelona, Spain.
Tel: (+34) 902 932825 Fax: (+34) 902 932826
Email for customer support: [email protected]
10100114 - A
© Matan Digital Printers Ltd.
Page 17 of 19