1
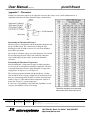
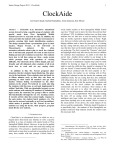
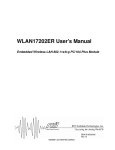
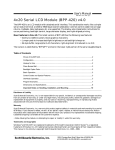
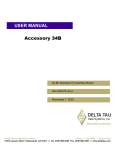
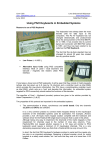
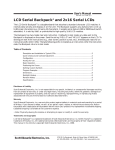
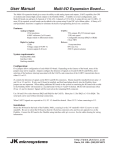
User Manual
picoIO Board
P/N: 94-0032
Introduction
The picoIO expansion board adds digital inputs, digital outputs and analog inputs to the picoFlash single board
computer. The picoIO stacks on top of the picoFlash without the need for cabling. A 9-pin connector is provided
on the picoIO that brings out the picoFlash Serial Debug Port so that it can be used with a standard 9-pin ribbon
cable. A library of C and Quickbasic functions is supplied to facilitate your applications development.
Specifications:
Digital Inputs
32 total, 4 with 10 k ohm pull up resistors
TTL compatible
Digital Outputs
20 total
TTL compatible, 25mA source and sink
Analog Inputs
12 bits, 11 channels
Input range 0 to 5.000 volts
Resolution 1.22mV
Each channel op-amp buffered and low-pass filtered
Precise input impedance of 100.7 k ohms
Accuracy by design of 1%, typical accuracy of .1%
11th channel can be configured for on-board temperature measurement
Sample rate of better than 100 kHz achievable
Software Drivers
Unified A/D and digital I/O driver for C/C++ and Quickbasic
Matrix Keypad driver
Alphanumeric LCD driver
System Requirements
picoFlash SBC
Stacking Standoffs
Configuration
The only hardware configuration required is analog input 11. JP1, in the upper right hand corner of the board,
can be used to connect analog input 11 to the output of an on-board thermistor. Set the jumper to the right (1-2)
for a thermistor temperature measurement and to the left (2-3) for use as a voltage input.
-. PLFURV\VWHPV
1403 Fifth St., Davis, Ca. 95616 (530) 297-6073
http://www.jkmicro.com
User Manual
P/N: 94-0032
picoIO Board
Installation
The picoIO mounts over the picoFlash board with 4 stacking standoffs. Three header connectors mounted on the
bottom of the picoIO make electrical connection to the picoFlash.
To install the picoIO, first remove the 4 screws from the picoFlash that hold the short standoffs in place. Set the
screws aside and replace them with the stacking standoffs. When you are done, the short standoffs should be on
the bottom of the board and the tall stacking standoffs should be on top. Connect any cables to the picoFlash and
gently mate the picoIO to the top of it. All four holes on top of the picoIO should line up with the four stacking
standoffs. Use the four screws to secure the picoIO to the picoFlash.
The maximum current that can be supplied from a single digital output is 25 milliamperes and the total
current from all of the outputs must not exceed 330mA. The digital outputs do not supply enough current
to drive a solenoid, a motor or an incandescent lamp. If you need more current, use a Driver16 board
between the picoIO and your load. See the document “Switching Inductive Loads” on the
JK microsystems web site before connecting any inductive load to a JK microsystems controller.
The voltage applied to the digital and analog inputs must never go more negative than 0 volts nor more
positive than +5 volts. Voltages applied outside this range may damage the picoIO or picoFlash and
void the warranty.
-. PLFURV\VWHPV
1403 Fifth St., Davis, Ca. 95616 (530) 297-6073
http://www.jkmicro.com
User Manual
picoIO Board
P/N: 94-0032
Software Overview
The following software drivers and applications are supplied with the picoIO board:
PIO_DRVR.ASM, PIO_DRVR.OBJ, PIO_DRVR.H
PIO_DRVR.ASM is the assembly language source code for the picoIO board driver. The supplied
object file (PIO_DRVR.OBJ) can be linked with a large memory model C/C++, Quickbasic or
Powerbasic program. PIO_DRVR.H contains the C function prototypes. Care must be taken to ensure
that the memory model of the driver matches the memory model of the application. The driver memory
model is specified near the top of the PIO_DRVR.ASM code with the 'largemodel' constant. The driver
must be reassembled after changing the memory model. If Borland C and its IDE are used, it is
recommended to attach the assembly language source file to the project rather than object code. When
the project is built, the driver will automatically be assembled and linked with the other modules. See
the JK microsystems application note "Getting Started with the Borland IDE" for more information
about adding project nodes and memory models.
C_PIO.EXE, C_PIO.C and C_PIO.IDE
C_PIO is a C program that demonstrates the functions of the picoIO and how to use them via the
PIO_DRVR.ASM driver. The source is supplied as C_PIO.C and C_PIO.IDE.
PIO.BAS and PIO.EXE
PIO.BAS is a Quickbasic program that demonstrates the functions of the picoIO and how to use them
via the PIO_DRVR.OBJ driver. The source code is supplied as PIO.BAS.
PICOIO.EXE, PICOIO.C, PICOIO.IDE and PICOIO.PDF
PICOIO.EXE is a C program that demonstrates the remote TCP/IP communications abilities of the
picoFlash and picoIO along with an example of a keypad and LCD local user interface. A local user can
read the A/D and digital inputs from a LCD and change the digital outputs from a hex keypad. Remote
users can telnet into the picoFlash and monitor all of the I/O.
See the document PICOIO.PDF for more information.
LCD_PIO.COM
LCD_PIO.COM is a DOS TSR driver that uses the digital I/Os on J8 to communicate with an
alphanumeric LCD. See Appendix A for cabling and programming information.
KEY_PIO.COM
KEY_PIO.COM is a DOS TSR driver that uses the digital I/Os on J8 to communicate with a 4x4 or
smaller matrix keypad. See Appendix B for cabling and programming information.
-. PLFURV\VWHPV
1403 Fifth St., Davis, Ca. 95616 (530) 297-6073
http://www.jkmicro.com
User Manual
picoIO Board
P/N: 94-0032
Driver Functions Overview
The picoIO driver contains routines callable from C or Quickbasic. This library allows easy access to the various
functions of the picoIO board. Although the C and BASIC routines have common names, the C routines are
functions (returning values when required) and the BASIC routines are subroutines (results are returned in
variables passed to the subroutine). Functionally they are identical.
All values passed and returned from the library functions are 16 bits wide. Many functions do not use all 16 bits,
but the complete word is required. When the complete word is not used, data fills the low order bits and the high
order bits are unused and ignored. In the following descriptions, C function syntax is shown first and BASIC
syntax, where different, is shown in brackets ( [ ] ).
Driver Functions
int GetVersion( ) [ GetVersion( data ) ]
Returns the version number of the driver.
Least significant digit is minor revision.
Most significant digits are major revision.
void InitIO( )
Initializes the picoIO board.
Must be performed once before any function except GetVersion is called.
void SetIOPt( value )
Sets the specified output channel.
value refers to a channel and ranges from 0 to 19.
Channels 0-3 not available if keypad driver used, Channels 4-10 not available if LCD driver used.
void ClrIOPt( value )
Clears the specified output channel.
value refers to a channel and ranges from 0 to 19.
Channels 0-3 not available if keypad driver used, Channels 4-10 not available if LCD driver used.
int GetIOPt( value ) [ GetIOPt( data ) ]
Returns the input state from the specified input channel, 0 = OFF, non-zero = ON (logic high)
value refers to a channel and ranges from 0 to 31, Channels 28-31 not available if keypad driver used.
int GetAD( value ) [GetAD ( data ) ]
Returns the input value from the specified AD channel, return value ranges from 0 to 4095
value refers to a channel and ranges from 0 to 10.
-. PLFURV\VWHPV
1403 Fifth St., Davis, Ca. 95616 (530) 297-6073
http://www.jkmicro.com
User Manual
picoIO Board
P/N: 94-0032
Connectors
Interface connectors use Molex C-Grid style housings and pins or equivalent.
Connector
J1, J2, J4
J6, J7, J8
All
All
Description
2x5 0.1” Housing
2x13 0.1” Housing
Pins
Crimping Tool
Molex Part No.
22-55-2101
22-55-2261
16-02-0096
11-010208
JKmicro Part No.
28-0030
28-0031
28-0033
Not stocked
Connector Pinouts
J1
1
AD0
1
AD1
1
AD2
3
4.096V
5V
J7
GND
GND
GND
IN0
IN1
IN4
IN5
IN6
IN7
IN8
IN9
IN10
IN11
1
3
5
7
9
AD 0-5
1
2
AD3
1
4
AD4
1
6
AD5
8
GND
10
GND
J2
1
AD6
1
AD7
1
AD8
3
4.096V
5V
1
3
5
7
9
11
13
15
17
19
21
23
25
DIGITAL 3
2
5V
4
5V
7
6
3.3V
8
IN2
10
IN3
12
IN12
14
IN13
16
IN14
18
IN15
20
IN16
22
IN17
24
IN18
26
IN19
J8
GND
GND
GND
GND
8
J5-8
11
OUT0
11
OUT1
11
OUT2
11
OUT3
4,11
IN28
4,11
IN29
4,11
IN30
4,11
IN31
1
3
5
7
9
1
3
5
7
9
11
13
15
17
19
21
23
25
2
4
6
8
10
2
4
6
8
10
12
14
16
18
20
22
24
26
AD 6-10
1
AD9
1,2
AD10
N/C
GND
GND
DIGITAL 1
5V
5V
7
3.3V
7
3.3V
9
CONT
12
OUT4
12
OUT5
12
OUT6
12
OUT7
12
OUT8
12
OUT9
12
OUT10
OUT11
J4
4
DCD
5
TXD
5
RXD
N/C
GND
1
3
5
7
9
DEBUG I/O
2
N/C
4
4
CTS
4
6
RTS
6
8
TTLTX
6
10
TTLRX
J6
GND
GND
10
CLK
10
STB/
10
CLR/
IN20
IN21
IN22
IN23
IN24
IN25
IN26
IN27
1
3
5
7
9
11
13
15
17
19
21
23
25
2
4
6
8
10
12
14
16
18
20
22
24
26
DIGITAL 2
5V
5V
7
3.3V
10
DATA
10
SO
OUT12
OUT13
OUT14
OUT15
OUT16
OUT17
OUT18
OUT19
Notes:
1.
2.
3.
4.
5.
6.
7.
8.
9.
10.
11.
12.
Analog input, 0 – 5.00 volts DC.
Jumper selectable, analog input or thermistor.
4.096 volts +/- 0.1% buffered reference, do not draw more than 2mA.
Pulled up to +5 volts with 10k resistor.
picoFlash debug port RS-232 signals.
picoFlash serial port 0 TTL signals, polarity opposite from RS-232.
3.3 volts from picoFlash, do not draw more than 200mA.
Reserved for possible input expansion.
LCD contrast voltage.
Reserved for possible output expansion.
Not available for general use if hex keypad installed.
Not available for general use if LCD installed.
-. PLFURV\VWHPV
1403 Fifth St., Davis, Ca. 95616 (530) 297-6073
http://www.jkmicro.com
User Manual
picoIO Board
P/N: 94-0032
Appendix A - LCD Interface
Electrical Interface
Connect the LCD to the picoIO as shown below.
The following chart details the cable pinout and signal names used for connecting an LCD to the picoIO. The
signal names are given for information only and are not needed for normal operation of the LCD.
LCD Pin
1
2
3
4
5
6
7
8
9
10
11
12
13
14
picoIO J8 Pin
1
2
10
12
14
16
N/C
N/C
N/C
N/C
18
20
22
24
LCD Signal
Gnd
+5 Volts
Contrast
RS
R/W
E
1
D0
1
D1
1
D2
1
D3
D4
D5
D6
D7
picoIO Signal
Gnd
+5 Volts
Cont
OUT4
OUT5
OUT6
N/C
N/C
N/C
N/C
OUT7
OUT8
OUT9
OUT10
Notes:
1.
The LCD is always operated in 4-bit mode to conserve I/O pins. In 4-bit mode, D0-D3 are not used and are not
connected.
-. PLFURV\VWHPV
1403 Fifth St., Davis, Ca. 95616 (530) 297-6073
http://www.jkmicro.com
User Manual
picoIO Board
P/N: 94-0032
Driver Software
LCD_PIO.COM is a terminate and stay resident (TSR) driver program which redirects data sent to LPT1 to an
LCD device connected to J8 of the picoIO. The driver is designed to work with standard alpha-numeric displays
using a 14-pin interface and the Hitachi HD44780A controller chip. The LCD used must be capable of operating
in 4-bit mode.
Upload the program LCD_PIO.COM to the picoFlash and execute it. LCD_PIO may be placed in the
STARTUP.BAT file so that it loads each time the board is reset.
Data is written to the LCD(s) by sending data to LPT1. This can be done at the BIOS level through int 17h or
through the DOS LPT1 handler. Instruction codes are sent by first sending a 160 decimal (A0 hex) code to the
display. The handler will not send the 160 code to the display but will issue the following byte to the display as
an instruction code. Note that when performing the Function Set instruction, the display must always be set to
4-bit data length.
The following Quickbasic code will initialize the display and then show and update the time on it.
start:
open "o",1,"lpt1"
print #1,chr$(160);chr$(40);
print #1,chr$(160);chr$(12);
print #1,chr$(160);chr$(6);
print #1,chr$(160);chr$(1);
'4 bits, 2 lines, 5x7 matrix
'display on, cursor and blink off
'increment cursor, no display shift
'clear and home display
timeloop:
print #1,chr$(160);chr$(3);time$;
if inkey$="" then goto timeloop
end
'home cursor and print time
See www.jkmicro.com/tutorials/lcdprogramming.html for more information.
-. PLFURV\VWHPV
1403 Fifth St., Davis, Ca. 95616 (530) 297-6073
http://www.jkmicro.com
User Manual
picoIO Board
P/N: 94-0032
Appendix B - Hex Keypad Interface
Electrical Interface
Connect the Hex Keypad to the picoIO as shown below.
Driver Software
Upload the program KEY_PIO.COM to the picoFlash and execute it. Key presses from the hex keypad should
appear as console input. KEY_PIO.COM may be placed in the STARTUP.BAT file so that it loads each time
the board is reset.
-. PLFURV\VWHPV
1403 Fifth St., Davis, Ca. 95616 (530) 297-6073
http://www.jkmicro.com
User Manual
picoIO Board
P/N: 94-0032
Appendix C – Thermistor
Channel 10 of the analog inputs can be jumpered to measure the voltage across a 100 k ohm thermistor. A
simplified circuit diagram of the thermistor input is shown below.
Determining the Thermistor Resistance
The first step is to determine the current through the thermistor and
the 82.5 k ohm resistor. We can do that by reading the A/D,
dividing that value by 1000 to convert it to volts, then dividing it
by 82,500 to get current.
Next we have to find the voltage across the thermistor. We can find
this by subtracting the A/D voltage from 4.096. By taking this
value and dividing it by the current, we have the thermistor
resistance.
Determining the Thermistor Temperature
Since the thermistor’s temperature response is highly non-linear,
we can’t just do an interpolation to find the temperature. The chart
at the right shows the resistance of the thermistor to temperatures
ranging from –40 degrees C. to 125 degrees C.
The two demo programs included with the picoIO use a lookup
table to find the nearest 5 degree temperature of the thermistor and
then use a linear interpolation formula to estimate the temperature
within .1 degree C. This method returns temperature accurate to
better than 1 degree C. at room temperature.
It is the user’s responsiblility to determine this algorithm’s overall
accuracy and suitability for his or her design.
Thermistor resistance chart abstracted
from muRata NTC Thermistor manual.
Revision
Date
Author
Changes
A
05 Aug 04
JDS/ED
First Issue
\\Server1\D\_Parts\94-0032\Manual\picoIO_man.doc
-. PLFURV\VWHPV
1403 Fifth St., Davis, Ca. 95616 (530) 297-6073
http://www.jkmicro.com