1
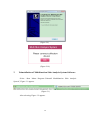
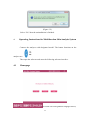
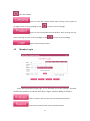
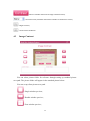
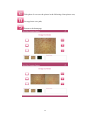
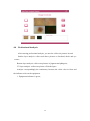
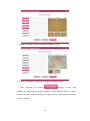
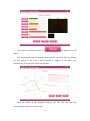
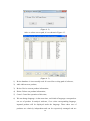
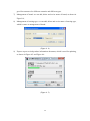
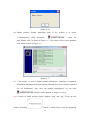
Multifunction skin analysis system User’s Manual 1 Table of Contents 1 Product Characteristics .................................................................................... 4 1.1 Instrument Characteristics ......................................................................... 4 1.2 Instrument Specification .............................................................................. 4 2 Software Installation ........................................................................................ 5 3 Uninstallation of Multifunction Skin Analysis System Software ...................... 10 4 Operating Instructions for Multifunction Skin Analysis System ..................... 11 4.1 Homepage ................................................................................................ 11 4.2 Member Login ........................................................................................... 12 4.3 Image Contrast ........................................................................................... 13 4.4 Professional Analysis ................................................................................... 15 4.5 Product Management ................................................................................... 19 2 Declaration Thank you for selecting our multifunction skin analyzer made by our company. Please be sure to read carefully the user’s manual accompanying with the analyzer before installation and usage. Because it is impossible for us to control the misunderstanding that might be caused by reading this manual by users, our company shall not be liable for any accidental loss that might be caused during using this manual, nor for claims lodged by any third party caused by using this analyzer. The information contained in this manual shall be subject to the current product status. We shall continuously develop and provide new functions. Relevant information is subject to update without prior notice. Although we compile this manual with serious and rigorous attitude, however, errors and omissions are unavoidable. Please understand it. We welcome heartily your criticism and corrections. If you find any problems during using this instrument, please call our service hotline immediately. Thank you for your support and cooperation! 3 1 Product Characteristics Our multifunction skin analyzer is a high-tech professional instrument that analyzes skin condition scientifically and objectively according to skin morphology theory. It can analyze the skin of users comprehensively by adopting integrated graphics and image analysis technology and optical principle to provide basis for skin beauty and treatment. 1.1 Instrument Characteristics Imaging system: USA 1/3.25 inch CMOS; Hardware: 5 mega pixel; Maximum resolution:1600*1200; Magnification factor: 50 times; Operating temperature: 10-40 ℃; Operating humidity: below 80%; Power supply: USB 5V; USB 2.0 port, plug and play, no need driving 1.2 Instrument Specification High definition, good color reducibility and high color purity without color cast; Photo-taking push-button function: freezing frame picture, restoring picture for browsing and photo-taking; Skin surface layer test; Skin bottom layer test; Skin UV test; Switchover button can freely switch among the above three functions; Self-owned lighting facilities, no need relying on the light of the external environment when using it; 4 With indicator light indicating current functions; With dust cover. 2 Software Installation Put the CD equipped with the instrument in the CD-ROM. There are two pieces of software in it. They are respectively: multifunction skin analysis system and product management tool for multifunction skin analysis system. Run the “Multifunction Skin Analysis System.exe” under the root directory of CD, as shown in Figure 2.1. Prompt: In case of Windows XP/2000 system, after clicking “setup.exe”, a dialog box will pop up, reminding you of installing “Net Framework3.5”. Click “Yes”, then you will enter into Microsoft official website to download and install “Net Framework V3.5 Service Pack” or download from the internet by yourself “Net Framework3.5”. In case of Win7/Vista system, you can install directly. 5 (Figure 2.1) Click “Next”, Figure 2.2 appears. (Figure 2.2) Click “Browse”, select the path of the installation folder to be stored and then click “Next”, Figure 2.3 appears. 6 (Figure 2.3) Begin to install, as shown in Figure 2.4, Figure 2.5 and Figure 2.6. (Figure 2.4) 7 (Figure 2.5) (Figure 2.6) If Figure 2.7 appears, then you can select “Cancel” or “Repair”. 8 (Figure 2.7) Wait for installation completion prompt. Figure 2.8 appears. (Figure 2.8) Software installation is finished. You can run the program directly, as shown in Figure 2.9. You must insert the skin analyzer with corresponding model. Otherwise, the software can not be used normally. The system will show the prompt as shown in Figure 2.10. 9 (Figure 2.9) (Figure 2.10) 3 Uninstallation of Multifunction Skin Analysis System Software Select “Start Menu—Program--Uninstall Multifunction Skin Analysis System”, Figure 3.1 appears. (Figure 3.1) After selecting, Figure 3.2 appears. 10 (Figure 3.2) Select “Yes” then the uninstallation is finished. 4 Operating Instructions for Multifunction Skin Analysis System Connect the analyzer with designated model. The button functions on the analyzer are: Then open the software and enter the following software interface: 4.1 Homepage : Can switch over among different language versions; 11 : Close the software; : Click it to enter into Company profile. After entering, click any place of the page to return to the homepage or click to return to the homepage; : Click it to enter into product brief introduction. After entering, click any place of the page to return to the homepage or click to return to the homepage; : Enter into test analysis process. 4.2 Member Login After entering member login page, if it is first time to use the software, you need to add a new member. As shown in the above figure, member adding is finished. : Select a member, then you can enter into professional analysis; : View the test records of the current selected member; 12 : Select a member and access to image contrast function; : Can select name, birth date and member number as conditions to search; : Begin to search; : Cancel search conditions. 4.3 Image Contrast You can select picture folder for reference through setting up standard picture save path. The picture folder will appear in the standard picture below: You can set up client picture save path. : Single-window preview; : Double-window preview; : Four-window preview; 13 : Take photo. It can save the picture in the following client picture area; : Set up picture save path; : Return to the homepage; 14 4.4 Professional Analysis After entering professional analysis, you need to collect six pictures in total. Surface layer analysis: collect such three pictures as forehead, cheek and eye corner; Bottom layer analysis: collect two pictures of pigment and phlogosis; UV layer analysis: collect one picture of blocked pore. Analyze correspondingly the consistency between the circle color in front and the indicator color on the equipment. 1. Equipment indicator is green; 15 2. Switch over button, then the equipment indicator is red; 3. Switch over button to change the equipment indicator to blue; After collecting six pictures, changes to blue. After clicking, the following bar diagram appears. Green indicates that the result is normal and yellow indicates that there is slight problem. Red indicates that there is serious problem. 16 If you want to see detailed result, click , the figure below will appear; The integrated proposal is arranged according to the test result. Serious problems are first shown in red color. Expert proposal is inputted in the dialog box automatically. You can input remark information. Click the words on the octagonal diagram, you can click and enter the corresponding single item analysis page; 17 Click “Next”, you can view circularly seven single-item analysis pages except for 3D, as shown below: Click “3D”, you can roll over and view the following functions with mouse. Click , you can see detailed prompts. 18 4.5 Product Management Click applicable product, then you can enter into product management page. It can support six brands and six series at maximum.They all can be managed through product management tool. Three kinds of languages correspond to three series of products. They all are added and managed through management tool. Shopping cart: Can change quantity and delete products. Click “Save” on this page, then this product record can be saved in the analysis record of the member this 19 time. Click “Print”, you can print out the page with products. 20 User manual of product management tool for multi-functional skin analyzing system 21 Table of Contents 1 Introductions ............................................................................................................... 3 2 Software Installation ................................................................................................. 3 3 Uninstallation of Multifunction Skin Analysis System Software ............................... 6 4 Instructions for Product Management Tool .............................................................. 7 22 1 Introductions The software is auxiliary tool of multi-functional skin analyzing system and is used for managing and updating products. We can add, delete and revise three kinds of language products and revise brand and nursing type and others through the software. At the same time, we can export and update pack, carry out quick and easy product information updates, so that company and headquarter can very conveniently manage and train. 2 Software Installation Put the CD equipped with the instrument in the CD-ROM. There are two pieces of software in it. They are respectively: multifunction skin analysis system and product management tool for multifunction skin analysis system. Under the premise firstly installing multi-functional skin analyzing system, we can use the software. Run the “Multifunction Skin Analysis System Management Tool.exe” under the root directory of CD, as shown in Figure 2.1. (Figure 2.1) Click “Next”, Figure 2.2 appears. 23 (Figure 2.2) Click “Browse”, select the path of the installation folder to be stored and then click “Next”, Figure 2.3 appears. (Figure 2.3) Begin to install, as shown in Figure 2.4, Figure 2.5 and Figure 2.6. 24 (Figure 2.4) (Figure 2.5) 25 (Figure 2.6) After installation is completed, we can directly run software, as shown in Figure 2.7. (Figure 2.7) 3 Uninstallation of Multifunction Skin Analysis System Software Select “Start Menu—Procedure—Uninstall Multifunction Skin Analysis System Management Tool” Figure 3.1 appears. 26 (Figure 3.1) After selecting, Figure 3.2 appears. (Figure 3.2) Select “Yes” then the uninstallation is finished. 4 Instructions for Product Management Tool Default installation path for analysis software is as below: “C:\Program Files\magic2mirror”. If analysis software is installed to default path, we can directly open the product management tool and start to use. However, if we revise installation directory of software, we need to manually find installation path for analysis software, as shown in figure 4.1. (Figure 4 .1) Then we select correct installation path of software, as shown in Figure 4 .2. 27 (Figure 4 .2) After we select correct path, it is as shown in Figure 4 .3. (Figure 4 .3) 1) Revise database: it is not usually used. It is used for revising path of software; 2) Add: Add one new product; 3) Revise: Revise current product information; 4) Delete: Delete one product information; 5) Cancel: Cancel the operation of this time; 6) We can change language. At the same time, each kind of language corresponds to one set of product. In analysis software, if we select corresponding language, inputted product will be displayed under the language. These three sets of products are relatively independent and can be respectively managed and are 28 good for customers for different countries and different types. 7) Management of brand: we can add, delete and revise name of brand, as shown in Figure2.4; 8) Management of nursing type: we can add, delete and revise name of nursing type, which is same as management of brand. (Figure 4 .4) 9) Export: export revised product information document, which is used for updating, as shown in Figure 4.5 and Figure 4.6. (Figure 4 .5) 29 (Figure 4 .6) 10) Update product: default installation path of the product is as below “C:\management” finds documents “ ” under the path .Double click, as shown in Figure 4 .7. We need to select correct database path, which is same as Figure 4 .2. (Figure 4 .7) 11) Click install, we start to update product information. Updating is completed. So products of this time have been correctly imported. have been correctly imported. For our headquarter, after carry out product management, we can issue . Product can be updated so long as we run it. Note: Format of added product picture supports “png” and “jpg”. There are two pictures including , which is small picture used for displaying 30 product and size is “120*89” and the other one with size of “436*424”. It is required to be based on size and format. Then adding effect of product picture will be the best. 31