1
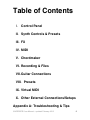
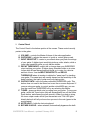
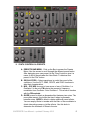
Welcome
to the SHREDDER – Synth for Guitar user
manual!
SHREDDER is the first professional iOS synthesizer designed specifically for
guitar. In addition to the awesome FM/Subtractive fully programmable hybrid
synth engine, SHREDDER also allows you to use your guitar to control other iOS
virtual MIDI compatible applications or even your hardware MIDI devices.
For video demonstrations and tutorials, visit our YouTube channel:
http://www.youtube.com/yonacsoftware
Check our Twitter feed and website for information on app updates, new apps,
and updates to this manual.
http://www.twitter.com/yonacsoftware
http://www.yonac.com
© 2012 Yonac Inc
Table of Contents
I.
Control Panel
II. Synth Controls & Presets
III. FX
IV. MIDI
V. Chordmaker
VI. Recording & Files
VII. Guitar Connections
VIII. Presets
IX. Virtual MIDI
X. Other External Connections/Setups
Appendix A: Troubleshooting & Tips
SHREDDER User Manual – updated February 2012
2
I. Control Panel
The Control Panel is the bottom portion of the screen. These controls mostly
pertain to the guitar.
A. VOLUME – controls the Master Volume of the entire application.
B. GUITAR MIX – adjusts the amount of synth vs. actual guitar sound.
C. INPUT SENSITIVITY - reacts to your attack when you pluck the strings
of your guitar. A higher input sensitivity picks up softer attacks, while a
lower input sensitivity picks up only harder attacks.
D. DECAY THRESHOLD - adjust this to change how soon SHREDDER
stops tracking your guitar. A higher decay threshold holds on to notes
longer while a lower decay threshold holds on to notes for a shorter
amount of time. Use the INPUT SENSITIVITY and DECAY
THRESHOLD faders in tandem to obtain the "sweet spot" for tracking
your guitar. The sweet spot will usually depend on the sensitivity of the
audio interface, the type of guitar and your playing style.
E. GUITAR SYNTH - turns the guitar-controlled SHREDDER synth. This
button does not need to be turned on to use the on-screen keyboard. If
you are using your guitar to control another virtual MIDI app, you can
turn the sound from SHREDDER off by un-selecting this button.
F. TUNER - gives you which note is coming from your guitar. To tune your
guitar, select the Tuner button (this will automatically turn off the Guitar
Synth button, and silence the synth sounds). When you pluck a string,
the tuner output reader will tell you the nearest note. The LED lights
directly below it will tell you how close you are to the note (green is the
most precise).
G. NOTE HOLD – holds the last note played.
H. BYPASS IN HOLD – when selected, automatically bypasses the builtSHREDDER User Manual – updated February 2012
3
in synthesizer after NOTE HOLD toggle is turned on.
I. AUDIO IN/OUT READER - lets you know what connections
SHREDDER is picking up. An LED light will light up next to the input or
output it is reading. Audio In can be either Mic (the iPad's built-in
microphone), Jack/Mic (a device connected to the iPad's audio jack), or
USB (a device connected to the iPad's dock connector port). Audio Out
can be Phones (the iPad's audio jack), USB (the iPad's dock connector
port), or SPKR (the iPad's built-in speaker). RESET INPUT - resets the
guitar-to-MIDI system used when tracking your guitar. The synth and
G2M systems will be disabled for ~2 seconds. Use this button if you
encounter tracking issues.
J. MUTE – this is the master mute button for all output.
K. TRANSPOSER - use the left or right arrows to transpose your guitar
input in half-step increments. For example, if you are playing the E
note, and have the Transposer on "1," the output will be the F note. If
you have the Transposer on "-1," the output will be the D# note.
L. MIDI OUT – turn this on to send MIDI messages to other virtual MIDI
compatible iOS applications or when using SHREDDER to control
hardware MIDI devices. Make sure the devices/apps you wish to
control are selected on the MIDI settings screen.
M. RUN IN BACKGROUND - is used with other virtual MIDI compatible
apps. If you are using MIDI Out, Run in Background is automatically
turned on. If you want to have your guitar control sounds from other
Virtual MIDI apps while you are not currently on SHREDDER's screen,
select the Run in Background button. You may want to make sure this
button is turned off when you are not using SHREDDER to conserve
battery power.
N. PANIC - MIDI Panic button, resets MIDI output and cancels all synth
notes.
O. SHOW KB - brings up the on-screen keyboard and hides the Control
Panel.
SHREDDER User Manual – updated February 2012
4
II. SYNTH CONTROLS & PRESETS
A. PRESETS BAR MENU - Click on the Bar to access the Presets
Menu. Use the arrows to scroll through the different preset banks.
After designing your own preset, hit the "Save" button to give it a
name. It will be saved under the User Bank. To delete a user
preset, hit the "Del" button.
B. OSCILLATORS – Select waveforms to sculpt the sound of the
oscillators. Use the OCT, SEMI, CENTS, and SYNC functions to
alter their characteristics.
C. MIX – OSC MIX chooses to have more or less of Oscillator 1 or
Oscillator 2 in the mix. FM selects the amount of frequency
modulation from Oscillator 2 into Oscillator 1. This works in tandem
with the FM controls.
D. GLIDE is used to obtain a glissando effect between two notes. The
more glide amount, the longer the time it takes to glissando
between notes. NOISE is used to obtain additional sound effects.
You can employ Noise in tandem with the filter or filter modulator to
obtain interesting sweep or jet-like effects. Use this knob to
determine the loudness of Noise in the mix.
SHREDDER User Manual – updated February 2012
5
E. VCF
1. CUTOFF – This specifies the master cutoff frequency of the
filter envelope.
2. RESO - This affects the richness of the resulting tone. Lower
values correspond to a pure, but slightly amplified tone, while
higher values correspond to a more nasal, ringing sound.
3. PASS – Choose between Low Pass, Band Pass, or High Pass
filter modes.
4. ENV CURVE – Specifies the peak that the filter reaches at the
end of the attack stage.
5. TRACK – Turns filter tracking on or off.
6. ATTK – The time allotted for the attack stage.
7. DCY – The time allotted to the decay stage.
8. SUST – The level at which the signal remains after completing
the attack and decay stages. So long as the note is engaged,
the level will remain at this.
9. REL - The time allotted to the release state when the note is
released.
F. AMP - The Amp settings influence the amplitude behavior of the
generated signal. The attack, decay, sustain, and release (ADSR)
settings determine the amplitude curve when a note is just
engaged.
1. ATTK - The time allotted to the attack stage. The signal's
amplitude will peak at the end of this stage. Increasing the
attack length creates a volume-swell effect.
2. DCY - The time allotted to the decay stage. After the attack
period is over, the signal will be reduced to the level specified by
the SUSTAIN LEVEL.
3. SUST - The level at which the signal remains after completing
the attack and decay stages. So long as the note is engaged,
the level will remain at this.
4. REL - When the note is disengaged, the amount of time that it
takes for the signal to reach zero.
G. LFOs – Select waveforms to affect the “shape” of the modulation
from the Low Frequency Oscillators. Select different parameters
(OSC1, OSC2, VCF, AMP, FM, or RING) and use the knobs to
adjust the modulation (RATE, PHASE, AMNT).
H. OSCILLOSCOPE – Real-time depiction of actual sound wave.
I. FM Controls– Enables creation and control of the sound using
Frequency Modulation synthesis. Works in tandem with the FM
knob under MIX.
1. MIX – Controls the amount of FM mixed with the oscillator
signal.
2. PHASE – Changes the phase of the modulator.
3. RING – Controls amount of ring modulation.
SHREDDER User Manual – updated February 2012
6
4. ENV CURVE – Peak of FM envelope curve.
5. ADSR – Dedicated envelope for FM modulation.
III.
FX – the FX page contains guitar pedals you can use to alter your
sound. These effects settings also are saved when you create a user
preset.
A. FUZZ GOBLIN – virtual distortion effect modeled after classic fuzz
boxes.
B. GHOUL VIBRATIONS – modulation effect that allows you to
choose between whirling chorus or shimmering vibrato effects
C. ECHO-PLASM – a delay/reverb pedal modeled after classic analog
effects
IV.
MIDI
A. MIDI DESTINATIONS – Displays a list of currently available Virtual
MIDI In ports or physical MIDI In ports.
B. SERVER MODE - When set on "Selective" position, MIDI
messages are sent only to the destinations selected on the
SHREDDER "MIDI DESTINATIONS" list. When set on "Global"
position, SHREDDER works similarly to a hardware MIDI interface,
sending MIDI signals to all available destinations. Global mode is
recommended for use with 3rd party MIDI port managers such as
MidiBridge.
C. MIDI OUT CH – Select up to 16 MIDI Out channels simultaneously.
D. MIDI IN CH – Select a MIDI In channel when using an external or
virtual MIDI controller.
E. MIDI IN CC MAP – Create a control code map for use with 3rd
party MIDI controllers.
V.
CHORDMAKER – SHREDDER’s Chordmaker allows you to play
polyphonic chords when you play just one note on your guitar. Up to 4
notes can be played for each root note. The Chord Map is fully
editable, and you can save your changes as a user preset.
A. ON BUTTON – Turns Chordmaker polyphony on or off.
B. CHORD PRESETS – Contains factory presets plus user-created
presets below.
C. CHORD MAP: ROOT – Use this column to select the key.
D. CHORD MAP: INTERVALS – These columns show exactly what
notes will be played when you strike the “root note.” You can select
and deselect any of these notes.
E. CHORD MAP: CHORD – Use this column to choose a specific
chord for the “root note.”
VI.
RECORDING & FILES
SHREDDER User Manual – updated February 2012
7
A. RECORD - Use the red-circle button to begin recording. When done
recording, press the same button to stop. To save your recording,
use the SAVE button.
B. FILES - Use the FILES button to access your saved recordings.
PLAY plays your recording from the files screen. LOAD loads your
selected file to the main screen for playback. DEL deletes your
recording. SHARE – allows you to share the selected file via Audio
Copy, Email, WiFi, or SoundCloud. Also allows you to Audio Paste
files into SHREDDER.
VII.
PRESETS – SHREDDER iPhone and SHREDDER iPad presets are
compatible. To Share via Email: Email a preset (one per email). Open
the email in the mail app on your device and choose “Open with
SHREDDER.” The app will automatically launch and install the preset
in the user bank. To Share via WiFi: You can export or import via
WiFi. If you import, completely exit the app by closing it on the device’s
task bar. Then relaunch the app. Your preset will be installed.
VIII.
GUITAR CONNECTIONS - There are 3 basic ways to connect your
guitar to SHREDDER. USB connection is the preferred connection, as
it produces the least amount of feedback.
A. USB - a connection that goes in the iPad's docking port (such as
Apogee Jam, Griffin GuitarConnect PRO, or Sonoma GuitarJack 2)
B. Jack/Mic - a connection that goes in the iPad's microphone jack
(such as iRig). Jack/Mic connections are subject to latent feedback
due to headphone input crosstalk. Excess feedback will interfere
with a clear guitar signal and introduce alien overtones. If you're
having tracking issues, such as "ghost notes", decrease the volume
on your iPad or on SHREDDER Control Panel as much as possible,
and amplify your audio output by using an amp, amplified speakers
or a headphone with volume control/active electronics. It also helps
to increase the GATE RELEASE and INPUT SENSITIVITY knobs
(in the MAX direction) on the SHREDDER Control Panel to
compensate for crosstalk.
C. Mic - uses the iPad's built in microphone (headphones must be
used with this connection)
IX.
VIRTUAL MIDI - With SHREDDER, you can use your guitar to control
other virtual MIDI compatible apps.
• Open the Virtual MIDI compatible app you wish to control, and
make sure that the app's audio is running in the background.
Configure the app if necessary to allow Virtual MIDI input.
• Now return to SHREDDER and go to the MIDI screen. Select
the Virtual MIDI compatible app you just opened from the MIDI
Destinations list. Also on the same screen, make sure the
appropriate MIDI Out channel is selected.
SHREDDER User Manual – updated February 2012
8
•
•
X.
In the SHREDDER Control Panel, turn on the "MIDI Out" button
to start controlling the Virtual Midi compatible app.
If you want to keep using your guitar for control and go to other
apps, make sure the "RUN IN BACKGROUND" button on the
Control Panel is selected.
OTHER EXTERNAL CONNECTIONS / SETUPS
A. EXTERNAL MIDI CONTROLLER - Through a USB connection to
the iPhone's docking port, you can use an external MIDI keyboard,
guitar, etc. to control the SHREDDER synth.
B. HARDWARE MIDI CONTROL - If you have the correct
cables/interface, you can set up SHREDDER to control hardware
MIDI devices. EXAMPLE: Control a hardware synth.
• Use a connection like iRig MIDI to connect the iPhone's USB
port to the MIDI IN port of your hardware synth.
• Then use a connection like iRig to connect the iPhone's mic
jack to the guitar. Connect your headphones to the hardware
synth.
• Select the MIDI connection for the list on the MIDI screen
SHREDDER User Manual – updated February 2012
9
APPENDIX A: TROUBLESHOOTING & TIPS
Example 1: There is no sound.
• Exit the app completely by closing it on the iOS taskbar.
• You may also want to reboot your device to reset the operating system's sound
drivers.
• Make sure your instrument is properly connected to the iOS device, and that
your connection is recognized.
• Make sure 1.) the Guitar Mix knob is in a position to let synth signal pass, 2.)
the GUITAR SYNTH button is turned on and the MUTE button is turned off, and
3.) that the master volume is not at 0. If your instrument is correctly plugged in,
the virtual-LED amplitude display will react to a plucked note.
• Also follow the tips for guitar connectivity and usage in the section below.
Example 2: SHREDDER doesn't seem to track my playing correctly.
• Reset the guitar analyzer by pressing the GATE RESET button on the Control
Panel.
• Make sure that the GATE ATTACK and GATE RELEASE knobs are set to
optimally track your current rig and playing. You can do this by making a change
and then playing a note to gauge the app's response.
• If you're using a guitar adapter that goes in the headphone jack, decrease
the output volume on your iPad. This is done to reduce the natural crosstalk
feedback that occurs due to the design of the device headphone jack. Crosstalk
feedback becomes malicious at higher volumes and interferes with your guitar
signal. Also, make sure you are following the manufacturer's instructions for use
and correct types of cables.
• Make sure your adapter is compatible with your device. After ensuring
compatibility, if the USB device isn't recognized, reboot your phone.
Also follow these tips for best results:
• If your guitar adapter has a gain setting, make sure it is set in a neutral range.
High gain will typically distort the guitar signal or overload the input, while low
gain will result in a too quiet signal.
• Do not use modulation (chorus, phaser, flanger, etc) or delay/reverb effects
before SHREDDER in an FX chain.
• If using single coil pickups, you may want to put the pickup selector in one of
the hum-cancelling positions.
• Make sure that the volume on your guitar is turned up all the way. You may
want to put the guitar's tone knobs on the fully "open" position as well.
• Make sure your guitar is in tune and is intoned.
• Excessive fret buzz may interfere with correct G2M conversion.
• Try to articulate guitar notes clearly.
• Note that synth patches with a slow attack (for example, string-like presets or
SHREDDER User Manual – updated February 2012
10
some pads) may feel like they have latency. This is due to the nature of the
sound specified by the preset. If you need fast response, reduce the attack length
in the synth amp, filter and FM envelopes.
Virtual MIDI Issues
• Make sure the 3rd party app you wish to control using SHREDDER is virtual
MIDI enabled, and is an audio background compatible app.
• If using SHREDDER MIDI interface in selective mode, make sure the other
app's MIDI in port is visible and selected on the MIDI DESTINATIONS table. Also
make sure that SHREDDER's MIDI OUT channel(s) match with the MIDI IN
channel selected in the other app.
• SHREDDER is purposely designed to consume the least amount of system
resources when being used as a MIDI interface. However, some other apps may
place a big demand on the resources, causing symptoms such as "jittery" audio
output or introducing latency to the MIDI signal path.
SHREDDER User Manual – updated February 2012
11