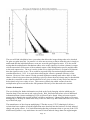
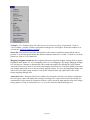
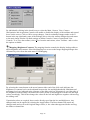
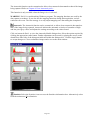
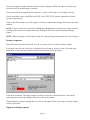
1
User Manual
Version 3.3
2 April 2010.
Page 1
Page 2
CHAPTER 1 : INSTALLATION
5 WHAT'S IN THE BOX
CCD 6200 CAMERA INITIALISATION AND CONTROL
5 6 CHAPTER 2 : OPERATING THE SOFTWARE
18 GETTING STARTED: WINDOWS 7 ISSUE CONCERNING ADLINK DRIVERS.
QUICK TOUR OF THE PIXCEL SOFTWARE WINDOW
USING THE 'PULL DOWN' MENU BAR
USING THE SOFTWARE TOOLBAR
CAMERA CONTROL TABS
USING THE VIEW AND NAVIGATION TOOLBAR
USING THE STATUS BAR
VIEWING AREA
18 19 19 20 25 25 26 27 IMAGE VIEW
27 PLOT VIEW
29 HISTOGRAM VIEW
31 PIXEL VALUES VIEW
32 USER VALUES VIEW
33 CHAPTER 3 : OPERATING THE CAMERA
35 SEQUENCE MODE
35 CHAPTER 4 : CONTROLS REFERENCE
36 'PULL DOWN' MENU BAR
FILE MENU
EDIT MENU
VIEW MENU
ACQUIRE MENU
ANALYSE MENU DISABLED
HARDWARE MENU DISABLED
HELP MENU
SOFTWARE TOOLBAR
VIEW & NAVIGATION TOOLBAR
36 36 38 38 41 41 41 42 42 47 CHAPTER 5 : TUTORIALS
49 CONTROLLING HOW YOUR IMAGE APPEARS
IMAGE VIEW
MAPPING (BRIGHTNESS/CONTRAST)
ZOOM IN/OUT
SELECTING ANOTHER IMAGE FROM THE SEQUENCE
STATISTICS
TOOLBAR CONFIGURATION
COPYING TO THE CLIPBOARD
PRINTING
PROPERTIES
LOADING FILES
SAVING TO DISK
EXPORTING AN IMAGE TO DIB, TIFF, FITS, PRISMA OR GRAMS FORMAT
49 49 49 50 51 52 52 53 53 53 54 56 56 Page 3
SAVING A SEQUENCE
OPEN AN EXISTING SEQUENCE
VIEWING AND MODIFYING THE CURRENT SELECTIONS
58 58 59 CHAPTER 6 : MISCELLANEOUS
61 GLOSSARY
61 APPENDIX A : TECHNICAL SUPPORT & WARRANTY
63 HARDWARE WARRANTY
SOFTWARE WARRANTY AND TECHNICAL SUPPORT HOTLINE
63 63 APPENDIX B : MAINTENANCE
64 MAINTENANCE
64 APPENDIX C : GUIDELINES FOR USING LIQUID NITROGEN SAFELY
65 EXTREME COLD
ASPHYXIATION
FIRE
DAMAGE
STORAGE AND TRANSFERRING
65 65 65 65 66 APPENDIX D: OPERATING HIGH-PERFORMANCE LIQUID NITROGEN DEWARS.
68 FILLING THE DEWAR WITH LIQUID NITROGEN
68 APPENDIX E: MAINTAINING HIGH-PERFORMANCE LIQUID NITROGEN DEWARS.
69 RE-PUMPING THE DEWAR
EQUIPMENT REQUIRED
CLEANING THE OUTSIDE OF THE DEWAR
69 69 71 Page 4
Chapter 1 : Installation
PixCellent Imaging systems are designed to provide precision, high quality digital images using an
intuitive software environment within the Windows operating system.
What's in the box
When you unpack your system you will find the following items:
Camera Head
Incorporates the light sensitive charge coupled device (CCD) with or without
cooling, full set of camera.
Power Supply Unit
The PSU supplies the power for the camera head via a 15-pin D-connector/cable
assembly. The PSU connects to line power from 110-240 volts, 50/60 Hz. A slider
next to the line connector socket allows the input voltage to be selected. It is
normally set to 240 volts.
Cables
Cables are provided to connect the camera head to the interface box, the interface
box to the computer interface card (referred to as the ADLINK card), a USB cable
that connects to the camera head, a USB 3-metre extension cable, a power cable that
connects the power supply to the camera head and a line cord for the PSU.
Interface Link Card and Interface Adapter box
The interface link between the computer motherboard/bus, and the Camera is an
ADLINK 7300A RevB PCI-Express interface card. Do not remove the interface(s)
card from the protective bag until required for installation. The interface card is
routed via an adapter box that allws external clocks to control the camera.
PixCel Software
There is a CD containing the installation software needed for the AdLink card, the
driver software for the FTDI USB interface to the camera, the code for the lucky
console software that controls the camera and the PixCel software which provides
you with the graphical interface to the camera for control, acquisition, display and
storage of images.
Documentation
A hardware manual appropriate to your particular imaging system together with a
PixCel software manual. Please retain the packing material where possible in the
unlikely event you need to return any of the items for repair.
Page 5
CCD 6200 Camera Initialisation and Control
Introduction
The CCD 6200 camera series drive electron multiplying CCDs (EMCCDs). The camera electronics
is based on an ARM microprocessor which handles all communications between the electronics and
the initialisation program as well as many internal housekeeping functions. That microprocessor in
turn controls a Kodak KSC-1000 sequencer chip which has many registers that need to be set up. In
addition, there are numerous integrated circuits within the electronics and also need to be set up to
perform properly. This note describes how the program that sets up the CCD 6200 camera
electronics actually works.
The LuckyCamera and LuckyPixcel directories and all sub-directories on the software CD that
accompanies the system should be copied to the C: drive.
ADLINK Card Installation
The CCD 6200 camera uses a parallel interface to accept the data from the host computer once the
camera system is installed and initialised (see below). Computer system supplied with the CCD
6200 camera will normally have the AdLink software installed. Otherwise this software should be
installed before putting the interface card into the host computer. The AdLink driver software is
provided on the CD that accompanies the system. Follow the instructions and remember that the
card that is used is the ADLINK PCI-7300A Rev B. Once the software is installed the card can be
inserted into an appropriate PCI-express slot. Before using the AdLink card you have to run the
programs/AdLink/PCIS DASK/PCI configuration utility. Again select the ADLINK PCI-7300A
Rev B card from the drop-down list. Into the upper of the two boxes that are now shown white,
labelled "DI”, enter "150000”. Then click "apply" and then "OK”. After this the computer will
need to be restarted in order to enable this. If you forget to do this then PixCel will tell you if you
try to run it that you need to setup the AdLink card.
USB COM Port Selection
The CCD 6200 camera series electronics are connected to the host computer via a USB interface
plus a parallel data interface. The parallel interface works completely independently of the camera
setup and so will not be discussed further here. The USB port uses an interface cable made by
FTDI and, before it can be used, the appropriate drivers need to be installed. The CD that
accompanies the system will have an executable that should be run to install the drivers on the
computer. The USB port is selected automatically when the special USB camera interface cable is
attached to the computer. Normally the computers that are used have been setup in advance so that
the Com Port that is used by the USB cable is set to Port 3. If, however, a computer is to be used
for which Com Port 3 has been used in the past for a different kind of hardware (including, for
example a different camera USB interface cable) then the use of a new cable will cause a different
Com Port value to be selected automatically.
When running the LuckyConsole.exe program it is possible to add the qualifier COMPort = <n> in
order to enable Com Port <n> to be used. It is also possible to force the computer to assign the
default value of COMPort = 3 as follows. Right click on "My Computer" and select
Properties/Hardware/Device Manager which shows all the hardware on the computer. Click on the
"+" beside the "Ports (COM & LPT)" line. This will cause the various COM ports to be displayed.
Click on the one that shows "USB serial port" and check that under the "General" tab it shows that
the driver is by FTDI. Now click on the "Port Settings/Advanced". This brings up a screen that
allows different Com Port numbers to be selected. What it may also tell you is that a number of
Page 6
other COM port settings are already in use. In fact, this list is the sum total of all the COM port
settings that have been used historically on that machine and many may well be no longer be used.
On the screen that showed the list of devices you can also see the COM ports that are actually in
use. Provided the COMPort = 3 setting is not in use by another peripheral you can now select that
for the camera USB cable. If it is in use then you can go back to that other device, reassign its
COMPort setting to another on used one and then restore the one you need for the CCD 6200
camera.
Using the Correct Initialisation File, Lucky Console.ini
The CCD 6200 camera electronics provide all the clocking voltages and waveforms to drive the
installed EMCCD. Each EMCCD give the best performance with customised voltage settings and it
is important that the correct initialisation file which contains all the information about voltages and
waveform timings is available to the initialisation program when it started. The normal location for
the initialisation file is in the same directory as the luckyconsole.exe file,
C:\LuckyCamera\LuckyConsole\Debug\. Other locations may be used but in that case it is
important to add the correct path information to the command line used to invoke
Luckyconsole.exe.
Running Luckyconsole.exe
The normal location for the executable entitled luckyconsole.exe is in the directory:
C:\LuckyCamera\LuckyConsole\Debug\Luckyconsole.exe
The camera is initialised by using the DOS window that may be accessed under Windows
XP/Start/Run or under Windows 7, by revealing the "Run" window by typing the Windows key and
"R". Then the program is run simply by typing:
C:\LuckyCamera\LuckyConsole\Debug\Luckyconsole.exe
Then the program is run using all the standard defaults which, for most purposes, is exactly what is
wanted. Running this program brings up a DOS window which displays as below if the command
"?" is typed. It shows all the standard default settings for the program.
If you want to add additional parameters in this command line to all the right those which are the
defaults or are contained in the initialisation file you wish to use then they may be added as follows:
C:\LuckyCamera\LuckyConsole\Debug\luckyconsole.exe CCD=E2V.CCD201 KeyboardUI=setup
framesize=2560,1070 pixelclock=5.6 COMPort=3
The above line runs the same program that forces the CCD to be the E2V CCD201, forces the user
interface mode to be "setup" which allows full control of all voltages and timings, chooses to use a
double overscan format to read out the CCD (such a format can be very helpful since it places the
image area towards the right of the screen and the overscan area both on the left and to the right of
the image. This allows a clear distinction between what is happening in the image area and the
serial output register area to be separated. Allowing the CCD to read out with additional vertical
transfers also allows a good examination of any parallel transfer problems that might exist in the
setup your using). In addition it selects the lower readout speed of 5.6 MHz. Note that using an
initialisation file at a frequency that is different from the one intended for that file is very likely to
produce no image or an image that is very badly distorted since the initialisation file contains all the
timings of the electronics appropriate for the particular readout speed. Finally, in the above line the
USB port is forced to be COM3. These options are described in more detail below.
Page 7
Page 8
Pressing the ESC key causes the program to terminate but leaves the camera running normally, but
at a safe setting for the gain voltage (nominally 30 V).
Many of these default settings are self-explanatory.
At present, two types of CCD are supported by default, both from E2V Technologies Limited.
These are the CCD97 (552 x 528 pixels) and the CCD 201 which has 1072 x 1040 pixels. The
controller is able to read out whatever format is requested although the user must understand what
this does in terms of reading out the charge from the detector in completely (if smaller values are
used, for example).
The initialisation file is, by default, held in the same folder as the executable LuckyConsole.exe:
C:\LuckyCamera\LuckyConsole\Debug. If it is desired to use a different location for the file
LuckyConsole.ini in this needs to be included in the command line at start-up with the statement
INIFile = <file path and name>
There are three different levels of keyboard interaction that are possible with the program. In one
mode (KeyboadUI = none), no interaction is possible at all. In the 2nd mode (KeyboadUI = user)
(the default setting) the only voltage waveform that may be changed by the keyboard is that of the
high-voltage (electron multiplying gain setting). It is also possible to check the temperature of the
CCD and the cooler in the camera. For advanced use then the 3rd mode (KeyboadUI = setup)
enables every voltage and clock timing setting to be adjusted.
It is very important to appreciate that it is possible to set the voltages to levels which would
significantly damage the CCD. That damage is not covered under warranty provided by the
manufacturer so only individuals who have been properly trained and are fully knowledgeable of
the effects of such changes should attempt to make them.
User Mode Operation
In this mode there is only one control available to the user and that is the high-voltage setting that
controls the overall gain of the CCD detector. It is very important that this HV Clock setting should
be changed only when the user has the ability to view the data being taken by the camera in image
form. The reason for this is that the operation of an electron multiplying CCD in a seriously
saturated mode when high gain is being used causes premature ageing of the detector which is not
covered by the warranty on the system. Generally running at gains of up to a few thousand will not
cause problems unless very high signal levels are being used. It is good practice to reduce the gain
to a low level when the camera is not being used in order to minimise the risk if, for example, room
lights are turned on for an extended period. The saturated frame or running for a short period in
saturated mode will not cause a problem but the ageing effects are long-term cumulative and so it is
important to take care of the CCD to ensure it does have the very long lifetime of which it is
capable.
The operation of the high-voltage clock is triggered by using either the right or left arrow key on the
keyboard. When this is done it shows the digital level that has been sent to the electronics followed
by the output voltage that the on-board analogue to digital converter (ADC) returns. When the
camera is first initialised this is always set to a low safe value, nominally 30 volts. Pressing the
right arrow increases this level in small steps, pressing the right arrow at the same time as the CTRL
key increases the step size by a factor of 10 and pressing the right arrow at the same time as the
ALT key increases the step size by a factor of 100.
Adjusting the high-voltage in this way gives the user continuous control of the gain setting. Once a
particular gain setting is reached it can be saved by pressing the F<n> key. This asks the user to
Page 9
enter a gain value to be associated with the value <n>. That gain value can be recovered by
pressing the key <n> at any time. The user can see a list of all the gain settings entered by pressing
the key "g" or "G". These gain values are stored in the initialisation file and so they are available
later for reuse by the user. It is important to appreciate that the gain values are only correct when
the camera is working at its proper cold stable temperature of -120 centigrade. At higher
temperatures the gain for a particular voltage setting is reduced and therefore the gain values in the
table cannot be relied upon.
Camera systems are normally supplied with the gain table populated. The user should, however,
check that the gain values are in fact correct from time to time. With a lot of use, particularly at
relatively high light levels, there is a lower level of ageing in the performance of the CCD which
requires the gain is to be recalibrated occasionally. However normally this should not arise and the
system should work stably and reliably from many years without re-calibration.
The only other functionality that is available to the user from the keyboard is to press the key "T".
This returns the temperatures of both the CCD itself and of the outside of the liquid nitrogen
cylinder (for liquid nitrogen cooled cameras) or the thermoelectric head cooler. It is important for
the camera to be allowed to cool down to the correct level if it is to work properly. The gain that is
produced by a given HV Clock setting increases as the temperature of the CCD decreases. For this
reason the temperature is thermostatically controlled at -120 centigrade in the liquid nitrogen cooled
cameras and correct operation will be achieved only after that temperature is reached.
To give some idea of the sort of high voltage settings that will be encountered then again setting of
2000 will usually require an HV Clock level of between 43 volts and 46.5 volts.
Once the Lucky Console program is stopped (by pressing the ESC key) this high-voltage setting is
reset down to 30 V which provides unity gain. At this level the gain is approximately 15 electrons
detected per ADC level. At this HV Clock level the camera can be considered to be safe against
excess illumination. It is also worth noting that if the camera is operating at a relatively high gain
and the user omits to refill the liquid nitrogen cylinder so that the detector warms up in the
consequence of this is to automatically reduce the gain substantially so that it is no longer a major
risk to the CCD.
Setup Mode Operation
In this mode every analog bias voltage, every clock voltage and every waveform timing including
clock frequency can be adjusted. In addition it is possible to enable or disable temperature control
and to adjust the temperature set point. A list of the available commands can be displayed by
typing "?".
At start-up, the list of all the voltages and waveform timings is displayed. The voltages and
waveforms etc are accessible in different blocks which may be selected by using the PgUp or PgDn
keys. Then, within each block the voltages are accessible by using the up and down arrow keys in a
circular buffer. The voltages may be increased or decreased as before using the right or left arrow
keys either on their own, in conjunction with the CTRL or ALT keys. The individual clock
waveforms are set in a separate block. Each waveform consists of switching between high and low
levels. These values are programmed in the Kodak sequencer chip and you should not make any
attempt to change these without having a good knowledge of the way that that devices programmed
and the meanings of the various timing values. Most of them correspond to the ability to change be
offset and duration of the pulses in units of 1/64th of the clock period (so units of 1.042
nanoseconds at 15 MHz clock rate and 0.521 ns when operating at 30 MHz clock rate.
If the new configuration is created which the user wishes to save then pressing the "S" key causes a
copy of the settings to be saved. The name of the saved file is displayed and that file is saved into
Page 10
the same directory that the original LuckyConsole.ini was stored. The file is saved includes the
computer time and date at which it was saved and by which it may be referenced in future. Even if
the camera was operating with a higher HV Clock voltage, this file will always be saved with the
HV Clock level of about 30 volts for camera safety. The operating selected HV Clock level will not
be reduced to 30 V until the lucky console screen is closed.
Please refer to the printout all of the screen that is shown by entering "?" In the lucky console
window. The various lines referred to different aspects of the control. The group of parameters
from "start" to “COMPort” are parameters that can be entered optionally on the commandline that
brings up the lucky console program. In each case the default value is listed beside the parameter in
square brackets []. In particular, it is possible to change the number of pixels per line, lines per
frame and many other readout parameters.
Listing the various parameters like may be entered allows the following facilities:
CCD is either set to E2V.CCD97 or E2V.CCD201 (default) that generally forces a particular frame
size unless:
FrameSize is given in order to override these values which are normally (552, 528) or (1072, 1040)
respectively.
Start: default is yes, if = no, then camera does not start producing data until it is enabled with the
"x" key on the keyboard. See below for additional keyboard single stroke commands.
HRead sets the number of pixels per line which is equal to the frame width.
VRead said the number of lines per frame
The VStore, VBlank and VFlush parameters are needed in order to read out the CCD in more
complicated, more restricted format. This will be covered later.
WaitForTrig is set to "no" by default. If it is set to =yes then the CCD camera waits until an
external trigger signal together with a 15 MHz clock is provided. This enables multi-camera
systems to be started out precisely the same instant. The data produced by each camera has
associated with it a frame number. This can be reset to zero prior to triggering by entering on the
commandline
CountReset=yes or no as required.
Internal electronic functions are accessed through control of the DumpGate, AFEClocks, NIMO,
AFEClamping, CLPOBStart, CLPOBEnd, CLPDMStrat, CLPDMEnd functions which generally
should not be accessed unless you REALLY REALLY know what you're doing!
The microcode in the camera has the capacity to add a delay to each of the readout times of the
frames by setting:
FrameDelay= <seconds>
And it is also possible to add an additional delay to each line in units of pixel clocks (66.667 ns per
clock cycle for a 15 MHz clock).
The initialisation file used by lucky console is normally named LuckyConsole.ini and located in the
same directory as LuckyConsole.exe. When the program is started that is initialisation file and
location that is loaded by default. The user can change this by using the commandline entry:
Page 11
INIFile= <path>
By default, lucky console starts in user mode which only allows control of the high-voltage council
interactively. Two other settings are possible: "none" which disables all keyboard input and "setup"
which allows access to all facilities and adjustments. It is important to appreciate that in "setup"
mode it is possible to set the camera into a mode where it simply will not work and, in extreme
conditions, can damage the CCD. It is extremely important not to attempt to use "setup" mode
unless you really know what you are doing and are aware of the potential dangers to the detector
chip itself.
Keyboard Commands
The single letter keyboard commands are unchanged between lowercase and upper case. These are:
H/h
print to help screen displayed above.
X/x
start/stop the camera system
T/t
show that temperatures of the camera head. The two temperatures are the CCD detector
temperature which is nominally set to -120 centigrade, and the temperature of the sensor attached to
the liquid nitrogen dewar and which should be typically -190 centigrade. If the 2nd temperature
rises it is the first sign that the liquid nitrogen in the dewar is beginning to run out and needs to be
refilled.
K/k show Kodak internal camera sequencer chip status
G/g
printout the current gain settings which are set by the F<n> keys and implemented by the
<n> keys where n=0 to 9
F/f
it is possible to set the readout of the camera to produce much smaller frames. This can be
reset to read out full frame by pressing this key.
0-9
selects the gain setting. These values are preset to the notional "gain off" high-voltage value
of approximately 30.0 V.
Left/right
decrement or incremental value being changed by one or 10
+Ctrl
decrement/increment value by 2, 10 or 100
+Alt
decrement/increment value by 5, 100, 1000 or 10,000
Up/Down
change the page (Clock DACs, Bias DACs, HV Clock control, Pixelclock, Heater
Output, Temp control, Grab control)
ESC exit
Grab Parameters
The normal readout of the camera is to use the full image area and produce a full frame image. The
size of these images is 528 rows of 552 pixels each of the CCD97 and 1040 rows of 1072 pixels
each for the CCD201. If it is desired to read out a small region of the CCD that is on the image area
closest to the store regions then it is possible to do smaller transfers provided the source of light on
to the CCD does not eliminate outside the region of interest. In order to maximise the frame rate
then careful attention has to be given to the number of rows transferred, flushed etc. The easiest
way to set these numbers is by using the FrameYSize parameter to satisfy you. This also places the
proper values in the various locations required to achieve this. The parameters VRead, VStore,
VBlank and VFlush are available for users who need to set to unusual combinations.
In the Horizontal direction (read-out register direction), the FrameXSize parameter allows this to be
changed. Only values that are integral sub-multiples of the full-frame value (552 for CCD97, 1072
for the CCD201) should be used..
Page 12
Frame Rates Achievable with a CCD97
Using a camera system with 15 MHz clock, and setting FrameYSize to the following values gives
frame rates as follows:
Frame Y Size
528
264
132
66
33
16
8
4
2
1
Frame Rate (Hertz)
44.76
84.51
173.34
352.26
674.7
1433.0
2655.0
5042.0
9288.0
14600.0
Frame rate achievable with the CCD201
Using a camera system with a 25 MHz clock and setting FrameYSize to the following values gives
frame rates as follows:
Frame Y Size
1040
750
500
250
125
64
32
16
8
4
2
1
Frame Rate (Hertz)
19.78
26.7
38. 2
77.1
147.6
263.0
436.5
670.9
902.1
1079.0
1216
1300
It is important to appreciate that a very high frame rates produce a very large numbers of data files.
At present, Windows machines cannot store at very high frame rates. Future versions of the PixCel
software package will have an option that packs together the data files taken into much larger files
in a noiselessly compressed format so that the camera may be run at very high rates indeed.
It is also important to remember that should you happen to have an application that requires large
numbers of small files then there are other formats and approaches to readout that may make sense.
Please discuss these with your camera supplier.
Multi-Camera Synchronisation
Under normal operation each camera is separately initialised via its USB interface using the lucky
console camera setup program. However if it is wished to have each camera working at precisely
the same instant, with frame readout precisely timed against one another then it is important to use a
separate ADDLINK interface box on one of the data cables which has the ability to generate the
correct clock frequency and also provide a synchronisation pulse. There is a separate leaflet that
describes this interface card and operation. The cameras should only be operated at clock rate
Page 13
specified for the particular system in use. Using a different clock frequency will mean that the
alignment of the various timings and pulses within the camera is wrong and lead to either poor
quality data or no data at all in extreme circumstances. No damage will occur but it will not be a
profitable experience!
Effects of Power-off and Reinitialisation On Apparent Dark Current
The electron multiplying CCD camera is operating at low temperature and with bias levels that are
designed to minimise both dark current and clock induced charge levels. The former is the signal
that is continually generated in the CCD because it has a finite temperature. At temperatures of 120 centigrade these are extremely low indeed, typically only a few electrons per pixel per hour.
Clock induced charge is the signal that is generated in the CCD every time it is read out. Again
these levels are extremely low and together these detectors will work on exceptionally faint signal
levels, fainter than is possible with any other detector system including electron multiplying CCD
cameras from other manufacturers.
However there is one condition under which problems can occur. If the camera is switched off and
switched on again it needs to be reinitialise and act of reinitialisation causes a moderate amount of
electronic charge to be dumped on the surface of the detector. Once it is initialised the signal is
progressively read out and after a short period which may be several minutes in extreme cases, the
background signal levels return to their original values. It only becomes important if the user
expects to get from a nonworking situation to working at the lowest light levels in a very short
period of time.
In addition to the effects of dumping charge on the CCD it is also important to recognise that if the
CCD is no longer clocked (as happens when the power is turned off) the temperature of the CCD
will drop by as much as 20°C. The power dissipation in the chip is significant and raises the
temperature somewhat. However the camera is designed to work at a specific temperature and
therefore after power on it is important that the camera is given some time to stabilise at the
working temperature which is nominally -120°C. Running the camera at a temperature that is
different from that at which it has been optimised will cause the image quality and general
performance to be significantly poorer than usual. However running it at the wrong temperature or
not letting it warm up properly will not cause any harm to the camera or to the CCD chip itself.
Page 14
Measuring the Gain of an Electron Multiplying CCD
An L3CCD is able to provide a large internal gain by passing electrons through a multiplication
register, an extension of the serial register. As electrons pass through this register, a high voltage on
one of the pins can cause avalanche multiplication. The probability of creating an extra electron at
each stage is small (1-2%), but many such stages can lead to a large overall gain, which can
typically be adjusted between 1-10000. There are typically several hundred stages (552 for the E2V
CCD97 giving an overall gain of (1+p/100)552,i.e. 3709 if p=1.5). The final signal is then much
greater than the readout noise. We find that the probability distribution for the electron output (x) is
given approximately by:
P(x) = g-n x n-1 e-x/g / (n-1)!
where the mean gain, g = (1+m/100)r, m is the multiplication factor, r is the multiplication register
length (usually large) and n is the number of electrons entering the multiplication register.
The most obvious method of calibrating the gain is to set the camera to unity gain (such as by
setting the HV Clock level to 30 volts), measuring the signal produced by a standard light source
and then measuring it again when the gain is set to a higher level. However when working at
relatively high gains that are needed to permit genuine photon counting operation this is difficult
since it is usually necessary to use at least 2 or 3 stepped illumination levels in order to give good
signal-to-noise for the measurement. However the probability distribution given above does allow
us directly to calibrate the gain of an electron multiplying CCD camera system directly without
knowing anything about the input light level. It is important, however, always to remember that
this method only works if you have work at an illumination level that is well below that which can
produce more than one photon per pixel per frame.
What we do is that we combine a large number of frames where we are certain that we only have
individual photons per pixel and generate the histogram of the data event numbers from the set of
frames. What we find is that we have an event distribution in the form of the upper curve in this
image below. Here we plot the natural logarithm of the histogram of event data numbers against
data number. You can show by manipulating the equation above that the gain of the system in data
numbers per recorded photon is equal to the inverse of the slope of the best fit straight line to the
straight line selection of the histogram below. The true gain may be obtained by multiplying this
value by the 15 electrons per day to number fundamental gain that the electronics has in the absence
of any electron multiplying gain.
The lower of the two curves is shown here for completeness. All CCDs, including electron
multiplying CCDs, give a very low signal level simply as a consequence of transferring the charge
across the device. This signal level is described as clock induced charge. The clock induced charge
in the CCD 6200 camera system when cooled by liquid nitrogen to temperatures of around -120°C
is extremely low indeed, essentially zero in the parallel transfer direction. This is achieved partly
by cooling but particularly by paying close attention to the device clocking levels used. We find
that the clock induced charge with the CCD 6200 system is entirely dominated by clock induced
charge in the serial output register and in particular in the multiplication part of that register. The
consequence is that most of the clock induced charge electrons are generated partway along the
multiplication register and so they are not subject to such a high level of gain on average as those
photons from the image area which are multiplied through the entire length of the multiplication
register. This means that the histogram of clock induced charge events is somewhat steeper as can
be seen in the lower of the two curves. The top curve is taken from a sequence of images with a
significant detected photon level whereas the bottom curve is taken for images that are virtually
completely dark. Even at this very low light level it is clear that the degree of confusion between
genuine photons (in the top curve) and clock induced charge events (in the lower curve) is very
small indeed. This allows extremely low signal levels to be used routinely with these cameras.
Page 15
The user will find it helpful to have a procedure that allows the images being taken to be checked
for gain at regular intervals. In practice it is often not necessary to know what this gain is simply to
understand that the individual photon events are seen with good signal-to-noise. It is also worth
noting that the multiplication mechanism adds a noise to the signal level so that a photon is output
with an uncertain level because of the stochastic nature of the multiplication process and this adds
to the total output noise. The way it works is that if in a single pixel there is a signal of N photons
then the signal-to-noise is not √ N as would be expected from conventional photon statistical
considerations but is √ N/2. It is equivalent to halving the effective quantum efficiency of the
detector. However if the camera is being operated in photon counting mode where there is little
chance of their being more than one photon per pixel per frame then each image may be thresholded
so that the events that are above the threshold level are given a value of unity and events that are
below that level given a value of zero. This removes entirely the added variance from the
multiplication process and allows the full quantum efficiency of the detected to be restored.
Further Information
The user looking for further information can look at the Lucky Imaging website which may be
found at: http://www.ast.cam.ac.uk/~optics/Lucky_Web_Site/index.htm where a lot of additional
information about electron multiplying CCDs in general can be found. Many relevant research
papers can be found in the section entitled "references and theses". Many of the basics of electron
multiplying CCDs may be found most easily in the two theses (by Bob Tubbs and Nick Law) at the
top of that web page.
The manufacturer of the electron multiplying CCDs that we use, E2V Technologies Ltd has a
website that has a number of helpful application notes that look into the business of clock induced
charge and ageing effects. It is worth mentioning that the performance that we get out of the CCD
6200-based systems is very much better in terms of clock induced charge than one might imagine
Page 16
from reading the E2V technologies datasheet on the matter. This is because we set the camera to
work properly only at very low signal levels and relatively high gain. By not requiring the camera
to work at higher signal levels we are able to minimise the clocking levels and that has a substantial
effect on the clock induced charge levels.
Users who really want to find out more about how the camera works and perhaps to make changes
to the initialisation file will need to look at the Kodak datasheet for the KSC-1000 sequencer and
understand precisely how it works with the camera system. Generally that will only be possible
with some understanding of the detailed internal electronic design.
Page 17
Chapter 2 : Operating the software
Getting started: Windows 7 issue concerning AdLink drivers.
From Windows locate C:/LuckyPixcel/pixcel.exe and double click on it. Under Windows XP you
may find it convenient to create a shorcut to PixCel.exe on the desktop. Under Windows 7, right
click on PixCel.exe and select "pin to taskbar" to create a shortcut on the taskbar (at the boittom of
the screen). If you are using Windows 7 there may be a problem with the AdLink drivers that stop
the system from running. These are currently still being developed by AdLink. The workaround is
to right click on the executable file PixCel.exe and select "Properties". One of the tabs that comes
up is called "Compatibility". Click on this and click on the box entitled "Run this program in
compatibility mode for:" and choose the default we should be "Windows XP (Service Pack 3)".
Then click "OK". The program should now run properly.
The following is some of the terminology used in this manual and is designed to help you get the
best from your software.
NOTE : Important tips or notes for special attention when using the software.
WARNING!!! : Attention should be paid to the information contained here. Information regarding
misuse or carelessness is advised.
Keyboard combinations : A plus sign (+) used between key names indicates those keys must be
pressed at the same time. For example 'Press Alt+F' means you press both the 'Alt' key and the 'F'
key at the same time.
Using the mouse : 'click' - press and release the left mouse button, 'double click' - press and release
button twice in quick succession, 'click and drag' - press button, hold whilst moving the mouse, then
release.
Menu commands : These are referred to in the form Menu name/Menu command. For example
'Select File/New' this can either be executed by: Using the mouse to select first the 'File' menu and
then the 'New' function from the menu, or Pressing the 'Alt' key and the underlined character in the
name at the same time. ie: Alt+F, followed by n.
Page 18
Quick tour of the PixCel software window
After starting the software a window appears on your screen looking like this.
NOTE: The Software toolbar is a flexible dockable toolbar. It can be picked up and moved left,
right, top or bottom, docked or left floating for your convenience. The Camera control tabs and
View & navigation toolbar are also left or right dockable or can be floating. This window can be
maximized (using the standard Windows functions, found in the top right hand corner of the screen)
by clicking on the 'underline' in the top right hand corner of the menu to reduce application to the
Windows bottom menu bar; click on the double screen to allow greater detail of the image to be
observed, or click on the X to exit the application and return to the main Windows screen.
Using the 'Pull down' menu bar
The Main menu bar is located at the top left hand side of the screen. This is a static menu bar
incorporating the standard Windows functions. The menu comprises a range of facilities which
when clicked activates a 'pull down' list of further options. See Controls reference for a more
detailed account of each facility. A tick mark where appropriate, indicates the option is initialised.
File Click on File or use Alt+f to access: New, Open, Save, Save As, Import, Export, Configure,
Print, Print Preview, Print Setup, Recent files and Exit.
Page 19
Edit Click on Edit or use Alt+e to access: Undo, Cut, Copy, Paste, Delete and Select all.
View Click on View or use Alt+v to access: Toolbars, Status bar, Mapping, Autoscale Prefs,
Statistics, Lookup tables , Image, Plot, Histogram, Pixel values, User values, Rectangular
Selection, Sequence images, Black Level Image and Flatfield image.
Acquire Click on Acquire or use Alt+q to access: Live Grab, Sequence Grab, Black Reference, Flat
Field Reference.
Analyse Click on Analyse or use Alt+a to access: Image analysis, Dark subtraction and Shade
correction.
Hardware Click on Hardware or use Alt+w to access: Status, Initialise, Reoptimise.
Help Click on Help or use Alt+H to access: About PixCel..., Contents , System Info...
Using the Software toolbar
The Toolbar is located along the top left hand side of the screen. This is a dockable toolbar allowing
it to be moved left, right, top or bottom, docked or left floating. It can also be 'switched off' and
removed from the screen by accessing View/Toolbars.. option in the main menu. The toolbar
comprises of a range of icons which are explained below in detail from left to right:
New file Select the New file icon to clear the image area to start a new image. Alternatively
select from the main menu File/New or Ctrl+N.
Open file Select the Open file icon to open an existing image file held on disk. Alternatively
select from the main menu File/Open or Ctrl+O.
When the Open dialogue box appears, select the image from the File name list and choose the OK
button. If the image is not listed, then a search of the folders can be actioned by selecting the
Page 20
appropriate directory, file type and/or file name. Either double click the item or highlight the option
and click the Open button to select.
NOTE: only a .apf or .opf files or Imager 1, 2 or GCI files which have been saved using the ‘Save
file’ option can be opened with this method. All other files can be opened by using the Import
facility.
Save file To Save an image in the software internal file format, select the Save file icon.
Alternatively select from the main menu File/Save or Ctrl+S.
If saving for the first time, the Save As dialogue box, will appear allowing the user to select a
directory in which to save the file, type a file name, and select a file type. Within a sequence the
images can be saved as 'All' for the sequence as a whole, 'Current frame' for the image currently in
view on the screen, or a particular frame or frames within a sequence. Select and check against the
corresponding requirement and enter the frame numbers if appropriate. If the image has been
previously saved, all new changes will automatically be saved to the original file name and location,
and the original file data will be overwritten.
NOTE: The saved file is in ‘PixCel’ format i.e. .apf or .opf, which contains additional information
about how the image was collected.
Cut The Cut feature is functional only when using the Object Linking and Embedding (OLE)
feature. (Advanced future applications only)
Copy The Copy feature allows the image view or a 'rectangular' selection to be copied and
placed on the Windows clipboard for retrieval by another package ie: Word, Excel, Paintshop Pro
etc. To create a 'rectangular' selection, click in the image view with the left hand mouse button,
depress the Control keyboard button simultaneously and drag a 'rectangular' area. Select the Copy
icon to copy the selected area or image and to paste it onto the clipboard. Alternatively select from
the main menu Edit/Copy or Ctrl+C.
Page 21
Paste Select the Paste icon to paste the selected area from the clipboard to the area or into a
document or image of your choice. Alternatively select from the main menu Edit/Paste or Ctrl+V.
Toolbars Select the Toolbars icon to access the Toolbar configuration dialogue box.
By individually clicking in the check boxes to select the Main, Camera, View, Camera
Init/Optimise and Acquisition Controls will enable or disable the display of the toolbars and control
boxes on the screen. Click on OK to accept changes, Cancel to abandon changes made or the X
button in the top right hand corner of the dialogue box to close the toolbar dialogue box and return
to the main image window. Default settings are Main Controls, Camera Controls and View
Controls. To re-view the toolbars, select View from the main menu, select Toolbars.. and re-select
the options available.
Mapping (Brightness/Contrast) The mapping function controls the display look up tables to
adjust brightness and contrast. Select the Mapping icon to access the Image mapping dialogue box.
Alternatively select from the main menu View/Mapping.
By selecting the centre button or the arrow buttons either end of the slide scale indicator, the
brightness or contrast levels can be adjusted between the low and high thresholds. Minimum and
maximum levels are indicated at the extremes of the slide scale bar. Alternatively, on either side of
the brightness/contrast image, the dotted line can be picked up and dragged to set the low and high
values accordingly. This in turn changes the values in the low and high boxes together with moving
the sliding scale.
Page 22
If particular values are required, these can be directly typed into the low and high boxes. Any
changes made can be applied by selecting the Apply button. The Reset button will cancel any
changes made and revert to the original image values, i.e. the values that appeared before moving
the sliders or dotted line.
The Autoscale function can be customised to allow closer autoscale data match to that of the image
being captured. Refer to Chapter 4 View/Autoscale Prefs....
This function is only available when the Image view is selected.
WARNING!!! PixCel is a multi-tasking Windows program. The mapping functions are used by the
data capture procedures. If you also use the mapping functions during data acquisition, serious
confusion can occur. The best strategy is to only adjust mapping once data taking has completed.
Autoscale Preferences: The Autoscale function can be customised, to allow closer autoscale
data match to that of the image being captured. Autoscale initiates the automatic selection of a
number of high and low pixel grey values and adjusts the settings according to the values found.
Click on Autoscale Prefs. to view the Autoscale Model dialogue box. Select the option required by
clicking the appropriate radio button. Further adjustment can be made by placing the cursor on the
dotted lines either side of the histogram indicated within the dialogue box. Click the Apply button
to accept changes or Close to abandon changes and revert to the main window.
Statistics Select the Statistics icon to access the Statistics information box. Alternatively select
from the main menu View/Statistics.
Page 23
The statistics information box indicates values appropriate to the region of the image area selected,
even when the region box is not visible. These include measurement on the data contained in the
area of interest as well as the description of the area selected (size, position and area, in number of
pixels). The calculated data values include: Maximum, Area, Minimum, Std dev, Skew, Kurtosis,
Median, Upper quartile, Mode, Lower quartile, Mean, % Even. This is a non editable feature,
although it can be copied to the clipboard using Ctrl+C.
It also offers additional plotting and processing operations.
NOTE: the region used by the statistics box is independent of the visible screen zoom and may be
shown by pressing the 'rectangle selection' icon even if the region box is not visible.
Rectangle selection The current rectangle selection is the area indicated by clicking this icon
or by holding the shift key down, clicking and dragging with the left hand mouse button between
two points with the Image view window. The box created is the rectangle selection. It may also be
changed by entering relevant details within the Properties dialogue box. Click on the Rectangle
selection icon to enable or disable the display of the rectangle selection.
Line selection The Line selection is a straight line on the image, indicated by clicking the left
hand mouse button and dragging between two specific points with the Image view window. It may
also be changed by entering relevant details within the Properties dialogue box. Click on the Line
selection icon to enable or disable the display of the line selection.
Print Select the Print icon to access the Print dialogue box. Alternatively select from the main
menu File/ Print or Ctrl+P. The standard Windows 95 printer dialogue box will appear which will
allow the user to indicate which printer to use, which pages to print, and how many copies.
Selecting the Properties button within the Print dialogue box will allow the further selection of the
size and orientation of the paper, resolution and intensity of graphics, choice of fonts and device
quality options. Select OK to accept changes or Cancel to abandon and return to the image window.
About Select the About icon for access to the HTML pages containing information about the
PixCel software.
Page 24
Live Grab Select the Live Grab button to take an image with settings as indicated on the
Camera control tab. Images are taken and displayed continuously until the Stop button is pressed.
Sequence Grab Select the Sequence Grab button to take a sequence of images as
previously set in the Sequence control tab and the Camera control tab.
Camera control tabs
The Camera control tab is not used now. The Sequence control tabs contain information regarding
the camera data taking and data archiving settings. Click on the tab to view the option required.
Using the View and navigation toolbar
The View and navigation toolbar is located at the bottom of the screen. It is a dockable toolbar
which can be moved left or right, left floating, or can be 'switched off' and removed from the screen
by using the View/Toolbars... option. The toolbar comprises a range of icons which are explained
below in detail from left to right.
Image Click on the Image icon to display the image in the main window.
Plot Click on the Plot icon to view a line graph of the values under the current line selection.
Histogram Click on the Histogram icon to view the grey level values under the current
rectangle selection as a histogram.
Pixel Values Click on the Pixel Values icon to show the grey level values of the current
rectangle selection in a spreadsheet format.
User values Click on the User values icon to view the current control parameters.
First Frame Click on the First Frame icon to go to the first frame in a sequence.
Previous Frame Click on the Previous Frame icon to go to the previous frame in a sequence.
Frame # The Frame # box indicates the number of frames in a sequence
and the number of the frame being viewed at the time e.g. Frame # 1 of 2 indicates you are viewing
image one in a sequence of two. To view a particular image enter the image number in the Frame #
box and press the enter key.
Start Playback Click on the Start Playback icon to start the review of all the images in a
sequence. Playback stops when the last frame has been viewed unless toggle looping has been
enabled.
Page 25
Stop Playback Click on the Stop Playback icon to stop the review.
Toggle looping Toggle looping is a review mode that starts at the first image again when the
last has been reached etc. Click on the Toggle looping icon to select the looping of image
sequences.
Next Frame Click on the Next Frame icon to view the next frame in a sequence.
Last Frame Click on the Last Frame icon to view the last frame in a sequence.
Playback speed Click on the Playback speed icon to access the Set Playback Speed dialogue
box.
Use the slide controls to vary the sequence playback speed and click Apply to apply the changes
and Close to close the dialogue box and return to the main image window.
Using the Status bar
The Status bar is located to the bottom of the screen. It is a static toolbar and cannot be moved
within the screen although it can be switched off from the View main menu. The left side provides
information about the state of the program. The boxes left to right provide information on the
camera acquisition status together with cursor position information. It comprises a number of areas
that are explained below in detail from left to right.
Camera Status: Indicates the mode in which the camera is operating e.g. Ready to
grab an image, Re-optimise for optimisation, or Waiting when waiting for a trigger.
Sequence indicates sequence number within a sequence that has been grabbed
Camera number: Each camera has a code marked on the data stream. This is shown
here as 0-15
Frame number: The camera free runs from start-up, and this shows the frame number
since start-up
Page 26
Frame time Shows the time from the start of acquisition of each frame in a
sequence.
Pixel Grey level of pixel under the cursor.
X position Y position X and Y position of the image pixel location of the
cursor on the image.
CCD CCD operating temperature is indicated in this box, in degrees C.
Sink Heat sink temperature is indicated in this box, in degrees C.
Viewing area
Using the View and navigation toolbar the following different types of view are available:
Image view
Plot view
Histogram view
Pixel values view
User values view
By placing the cursor over the icons displayed in this toolbar the description will be shown in the
status bar information box located at the bottom left hand side of the screen. To use the function
click on the icon. Alternatively, for Plot, Histogram, Pixel and User values, click on View to make
your selection or use the Alt+V keys and select.
Image view
Page 27
The image view is the main image display window. Within this display window the images in the
captured sequence can be viewed. The image is viewed by clicking the image icon on the view and
navigation toolbar or View/Image view from the main menu.
If the image displayed is larger than the window, use the window scrollbars located on the right
hand and lower side of the main window to see the rest of the image.
The Status bar shows the current cursor position and pixel intensity when the cursor is moved
within the image.
To view an area of interest, press and hold the shift key then drag the mouse with the left button
pressed to draw a rectangle around the desired area (zoom in). This is used to make the 'rectangular'
selection required, and then the image is re-displayed so that the selection now fills the available
viewing area. Use the mouse with the Ctrl key to select an area that the current view should fit into
(zoom out). This is used to make a new 'rectangular' selection and the image display is updated
accordingly. To revert to the original full image, click the right hand mouse button to activate the
zoom in/out box. Select x1 to revert back to the original sized image or choose another option from
the list shown. A wide range of zoom factors are available.
Clicking on View/ Statistics in the main menu, or the statistics icon on the software toolbar, will
bring the statistics dialogue box into view. This will give statistical information for pixels in the
current rectangle selection.
NOTE: Should you want to get statistical data on a small region of the image this region may be
selected as above. Using the right mouse button to zoom in or out to view another part of the image
leaves the region selected for statistical analysis unchanged, until another rectangular selection is
Page 28
made as above. Click on the X button to close the statistics dialogue box and return to the image
window.
Within the image view, press the left hand mouse button and drag to produce a line which tracks the
mouse. When the mouse is released the position of the ends of the line will define the 'line' selection
and the line is removed from the display. The co-ordinates of the line are used for the plot view.
By clicking the right hand mouse button, an option box will allow access to: Zooming in and out,
Properties, Copy to the clipboard, Print and Export.
Zooming in/out is accessed by clicking in the image area with the right hand mouse button. Move
the mouse to place the cursor on the chosen option e.g. 1:1, etc and size to fit. Clicking on the
chosen option will change the image and close the zoom in/out option box. To close the zoom
in/out option box without selecting an option, click within the image window again.
Properties can be viewed, in image view only, by clicking with the right hand mouse button in the
image area and clicking on properties. The properties dialogue box provides information on the
sequence title, when the image was created and the image size details. The line selection and
rectangular selection are accessible for checking or changing. Tick boxes allow vertical or
horizontal line selections to be made. Data may be typed as required.
Select View/Mapping from the main menu or use the mapping icon on the software toolbar to
adjust contrast and brightness. Click on the X button to close the mapping dialogue box and return
to the image window.
NOTE: the autoscale check box can be customised to give a better result with certain image types.
Refer to Chapter 4 View/Autoscale prefs...
Lookup tables (LUT) can be selected from the View menu. A choice of Grey scale, Pseudo colour,
Red ramp, Green ramp, Blue ramp, Invert, Equalise, Logarithmic or Square root, can all be made by
moving the cursor to the required option and clicking. A tick mark indicates which lookup table is
in use.
Use the First/Last/Next/Previous/Frame #/Play and Stop buttons on the view & navigation toolbar
to move from one image to another in the sequence.
Use the Edit/Copy option from the main menu, Ctrl+C, or the copy icon to copy the 'rectangular'
selection to the clipboard. The image can be pasted (Edit, Paste or Paste Special) into another
application e.g. Word, Excel or another package. The copy function is also available by clicking
with the right hand mouse button in the image window and choosing copy from the zoom in/out
option box. When the copy option is clicked the image is transferred to the clipboard.
Select File/Print from the main menu, Ctrl+P, or the print icon to print the whole image. The image
can be previewed before printing by using the Print Preview menu option. The page can also be
changed from landscape to portrait, letter to A4 etc. using the page setup option from the same
menu. The print function is also available by clicking with the right hand mouse button in the image
window and choosing print from the zoom in/out option box. At this point the print dialogue box
will appear.
Plot view
Page 29
A pixel plot is a graphical representation of the grey level (pixel intensity) against the pixels of the
Line selection. Data from the Pixel values can be cut and pasted into most Windows compliant
software for further analysis and display.
To display a Plot of the image, select the plot icon. The icon will activate and appear depressed.
Alternatively, click on View/Plot from the main menu. The main window will show a line graph
with values corresponding to the grey level pixel fluctuation along the current line selection (see
Using the Software Toolbar). Place the cursor on the plot line and the corresponding value will be
displayed. To revert to the selected image click on the Image icon.
Use Edit/Copy, Ctrl+C, or click on the copy icon, to copy the graphical plot and values that make
up the plot to the clipboard as a CSV (Comma Separated Value) and as a picture. This can be pasted
(Edit/Paste Special) into Excel, Word or another package for further analysis.
Use the First/Last/Next/Previous/Frame # controls on the view and navigation toolbar to move from
one image to another in the sequence. The plot is updated with the pixels from the new image under
the line selection.
Select File/Print from the main menu, or Ctrl+P, or the print icon to print the whole plot. The plot
can be previewed before printing by using the Print Preview menu option. The page can also be
changed from landscape to portrait, letter to A4 etc. using the Page Setup option from the same
menu. The print function is also available by clicking with the right hand mouse button in the image
window and choosing print from the zoom in/out option box. At this point the print dialogue box
will appear.
Data from a plot can be dragged from PixCel into a Microsoft Excel spreadsheet. Start both PixCel
and Excel. Arrange the PixCel and Excel windows beside one another. Load a sequence into
PixCel, select the plot view and press and hold the left mouse button in PixCel. Move the cursor to
Page 30
the Excel window and release the cursor. The data has now been copied across. This saves time
compared with using PixCel's Edit/Copy and Excel's Edit/Paste special controls.
Plot is also very useful for focusing. Draw a line across an element within the image that should
have sharp contrast (sharp transition when in focus), select plot mode, then use live grab. The best
focus is typically when the plot has the steepest transition in the plot mode.
Mapping controls are not available in this view.
Histogram view
A histogram is a graphical representation of the frequency of occurrence of each grey level (pixel
intensity) within the rectangle selection. It can be calculated on the whole or just part of the image.
Data from the histogram can be cut and pasted into most Windows compliant software, for further
analysis and display.
To display a Histogram of the image, select the histogram icon. The icon will activate and appear
depressed. Alternatively, click on View/Histogram from the main menu. The main window will
show a bar graph histogram of the current rectangle selection (see Using the Software Toolbar).
Place the cursor within the histogram and the corresponding value will be displayed. To revert to
the selected image click on the Image icon.
Use the First/Last/Next/Previous/Frame # controls on the view and navigation toolbar to move from
one image to another in the sequence. The histogram is updated with the data from the new image
under the rectangle selection.
Page 31
Click the right hand mouse button and an option box will appear allowing the selection of either a
bar or line histogram. A tick mark indicates the option currently chosen.
Use Edit/Copy, Ctrl+C, or click on the copy icon, to copy the graphical plot and values that make
up the plot to the clipboard as a CSV (Comma Separated Value) and as a picture. This can be pasted
(Edit/Paste Special) into Excel, Word or another package for further analysis. The values pasted in
the output have as the first two numbers the grey level of the first bin of the histogram and the
quantisation factor (the number of consecutive data numbers that are used to make a single point in
the histogram).
Select File/Print from the main menu, Ctrl+P, or the print icon to print the histogram. The histogram
can be previewed before printing by using the Print Preview menu option. The page can also be
changed from landscape to portrait, Letter to A4 etc. using the Page Setup option from the same
menu.
Data from a plot can be dragged from PixCel into a Microsoft Excel spreadsheet. Start both PixCel
and Excel. Arrange the PixCel and Excel windows beside one another. Load a sequence into
PixCel, select the histogram view and press and hold the left mouse button in PixCel. Move the
cursor to the Excel window and release the cursor. The data has now been copied across. This saves
time compared with using PixCel's Edit/Copy and Excel's Edit/Paste special controls.
Mapping is not available in this view.
Pixel values view
Page 32
Pixel values is a 'spreadsheet' type representation of the data in the image. It shows the pixel values
at each X and Y location. Data from the pixel values can be cut and pasted into most Windows
compliant software for further analysis and display.
To display the pixel values of the image, select the pixel value icon. The icon will activate and
appear depressed. Alternatively, View/Pixel value from the main menu. The main window will
show a spreadsheet of the current rectangle selection (see Using the Software toolbar). The extreme
pixel values of the image are highlighted in the table as red for the maximum and blue for the
minimum values. To revert to the selected image click on the image icon.
Use the First/Last/Next/Previous/Frame # controls on the view and navigation toolbar to move from
one image to another in the sequence. The spreadsheet is updated with the data from the new image
under the rectangle selection.
Use Edit/Copy, Ctrl+C, or click on the copy icon, to copy the spreadsheet as a CSV (Comma
Separated Value). This can be pasted (Edit/Paste Special) into Excel, Word or another package for
further analysis.
Select File/Print from the main menu, Ctrl+P, or the print icon to print the spreadsheet. The
spreadsheet can be previewed before printing by using the Print Preview menu option. The page can
also be changed from landscape to portrait, Letter to A4 etc. using the Page Setup option from the
same menu.
NOTE: only the pixels in view are printed. It is advisable to select the area of specific interest
before copying or printing, as the amount of information in a full screen grab being copied to the
clipboard will cause an extended delay in copying or printing. Also avoid selecting much larger
areas than you need. Programs such as Excel do not handle large data sets efficiently.
Data from a spreadsheet can be dragged from PixCel into a Microsoft Excel spreadsheet. Start both
PixCel and Excel. Arrange the PixCel and Excel windows beside one another. Load a sequence into
PixCel, select the pixel values view and press and hold the left mouse button in PixCel. Move the
cursor to the Excel window and release the cursor. The data has now been copied across. This saves
time compared with using PixCel's Edit/Copy and Excel's Edit/Paste special controls.
User values view
Page 33
User values are the parameters used to acquire the image or sequence of images and includes the
camera control monitored voltages. This is a non-editable feature.
To display the User values, click on the user values icon. The button will appear depressed.
Alternatively, select View/User values from the main menu. Use the window scrollbars located on
the right hand side and bottom of the main window to pan and scroll.
The editable values that were used when a sequence was captured are also displayed. They include
all the camera, sequence and focusing parameters as well as the state of the electronics.
Page 34
Chapter 3 : Operating the Camera
The camera operation is started outside PixCel. See Chapter 1 that describes the camera
initialisation procedure. Because the camera operates at high speed, relatively few parameters are
accessible to user control.
Sequence mode
Readout Enter the number of frames required by either entering the number in the box or using the
up/down arrows to select the number. Enter the LuckyCam multiplier between frames as required.
This allows very long sequences to be taken, far too large to be held in computer memory. This
shows that for a LuckyCam multiplier setting of N, only 1 image in N is shown on the screen,
though all are actually saved in the archive.
Saving Saving in Sequence allows the frames to be saved to disk either image by image or by
acquiring a succession of images then saving as a sequence of individual images. Saving a sequence
at this time will record the pixel data only. The camera setup and calibration details remain in the
original .fits file and should be saved separately before overwriting the memory by acquiring new
images, closing the software or selecting File/New or the New icon.
Page 35
Chapter 4 : Controls Reference
This chapter explains in detail the controls, their application and action. PixCel™ is a Microsoft
Windows application. It uses a standard Windows installation program and can be un-installed
using the standard Windows procedure.
'Pull down' Menu bar
The Main menu bar is found at the top left hand side of the screen and comprises File, Edit, View,
Acquire, Analyse, Hardware and Help. By using the mouse to click on the word or by using the
keyboard i.e. Alt+F key together to obtain the File option on the menu, further options are available
from a drop down box. Further selection can be made by choosing either with the mouse cursor or
using the keyboard.
File menu
New Select the New file icon to clear the image area to start a new image. Alternatively select from
the main menu File/New or Ctrl+N.
Open... Select the Open file icon to open an existing image file held on disk. Alternatively select
from the main menu File/Open or Ctrl+O.
When the Open dialogue box appears, select the image from the File name list and choose the OK
button. If the image is not listed, then a search of the directories can be actioned by selecting the
appropriate directory, file type and/or file name. Either double click the item or highlight the option
and click the Open button to select.
NOTE: only a .apf or .opf files which have been saved using the ‘Save file’ option can be opened
with this method. Some other file formats can be opened by using the Import facility.
Page 36
Save To Save an image in the software internal file format, select the Save file icon. Alternatively
select from the main menu File/Save or Ctrl+S. If the image has been previously saved, all new
changes will automatically be saved to the original file name and location, and the original file data
will be overwritten.
NOTE: The saved file is in a particular PixCel format ie: .APF or .OPF, which contains additional
information about how the image was collected.
Save As... Use Save As.. when saving for the first time or to change the internal file format or
directory. The Save As dialogue box, will appear allowing the user to select a directory in which to
save the file, type a file name, and select a file type. Within a sequence the images can be saved as
'All' for the sequence as a whole, 'Current frame' for the image currently in view on the screen, or a
particular frame or frames within a sequence. Select and check against the corresponding
requirement and enter the frame numbers if appropriate.
Import... To import a previously saved image i.e. Imager1, Imager2, or GCI images click on
File/Import. The Open dialogue box will appear. Enter details of the saved image i.e. folder, file
name, type of file. When found, the file can be opened by either clicking on the file to highlight it
then clicking on the Open button or double clicking the file name, which will open the file selected
and the first image will be displayed in the Image window.
Export... To save the current selected image as 8-bit DIB (Windows Bitmap), Imager2, 8-bit TIFF,
16-bit TIFF or 16-bit FITS, Prisma, Grams. Click on File/Export. Select a folder and enter a
filename. Check either 8-bit DIB, Imager2, 8-bit TIFF or 16-bit TIFF, FITS, Prisma or Grams
options. Click on the Save button to save the image or Cancel to abandon.
Configure Disabled
Print To print the current view, click on File/Print. The shortcut action is to press Ctrl+P. Selection
of the printer, print range and number of copies are available from the Print dialogue box. After
selection is made click on the OK button to print or the Cancel button to cancel the option. You
may use the standard Windows facilities to select the page layout. In particular changing from
portrait to landscape layout can be helpful.
Print Preview Print preview is used to view the document and how it will be positioned. To access
Print Preview, click on File/Print Preview. The image or sequence of images is displayed as it will
be printed. You can then select the following options:
Print to access the Print dialogue box to print the page(s) (Ctrl+P).
Next page to move to the next page if multiple pages.
Previous page to move to the previous page if multiple pages.
Two pages to view two pages together on the screen.
Zoom In to zoom in for finer detail. (Alternatively, by clicking within the page, the
zoom in and out modes can be accessed automatically. The cursor will change to a
magnifying glass to indicate the zoom mode)
Zoom Out Zoom out to view whole page. (Alternatively, by clicking within the page,
the zoom in and out modes can be accessed automatically. The cursor will change to
a magnifying glass to indicate the zoom mode)
Page 37
Close to close Print Preview and return to the main image window.
Print Setup Print Setup gives you access to the Printer setup dialogue box and allows selection of
the Printer type, type of paper and orientation. Click on File/Print Setup.. to access the Print setup
dialogue box. Selection of the printers available to you in your computer configuration is available
by clicking on the down arrow button. To view the Properties available to the selected printer, click
on the Properties button and edit as required. To revert to the Print Setup dialogue box click on the
OK button, or to abandon any changes made in this action and revert to the Print Setup dialogue
box, click on the Cancel button.
Recent file List This area lists the recent files by name which have been opened, saved and/or
changed. They are listed 1, 2, 3 etc showing the most recent as 1. This feature allows quick access
to the most recently opened files.
Exit To Exit the program, click on File/Exit. The option will automatically prompt you to save the
image if not previously saved. Click on Yes to save the image, or No to Exit the program or Cancel
to revert to the main image window.
Edit menu
Copy Click on Edit/Copy (Ctrl+C) or the Copy icon to copy the current rectangle selection to the
clipboard for retrieval in another package e.g. Word, Excel etc.
Select all Use Edit/Select all to set the current rectangle selection to the whole image.
View menu
Page 38
Toolbars... The Toolbars allow one click access via icons to a variety of operations. Click on
View/Toolbars.. and the Toolbar configuration dialogue box will appear. Select the toolbars to be
viewed (see Using the Software toolbar).
Status bar The Status bar provides information on the camera acquisition status and the cursor
position. A tick mark against Status bar indicates that the Status bar is visible. To hide or reveal the
Status bar, click on View/Status bar.
Mapping (brightness/contrast) The mapping function controls the display lookup tables to adjust
brightness and contrast. To access Mapping, click on View/Mapping. The Image Mapping dialogue
box will appear. Changes or adjustments can be made and applied by clicking the Apply button.
Autoscale preferences can be accessed by checking the Autoscale box. The Reset button will cancel
any changes made and revert to the previously applied settings. To close the Mapping dialogue box
and revert to the main image window, click on the X button in the top right hand corner of the
Image mapping dialogue box.
Autoscale Prefs... Autoscale Preferences enables the automatic selection of a number of high and
low pixel grey values and adjusts the settings according to the values found. It has the facility for
customisation of the autoscale checkbox to allow a closer autoscale data match to that of the image
being captured. Click on Autoscale Prefs.. to view the Autoscale Model dialogue box.
Page 39
Click OK to accept changes or Cancel to abandon changes and revert to the main window.
Statistics Statistics provides statistical information about the image. Click on View/Statistics to
view the statistics dialogue box or the statistics icon on the software toolbar. The figures are not
editable in this table, but can be copied individually to the clipboard. To close the statistics dialogue
box and return to the main window click on the X button in the top right hand corner of the
Statistics dialogue box.
Lookup Tables Lookup tables (LUT) can be selected by clicking View/Lookup tables.
First select the Image icon on the software toolbar to show the current image, then select the lookup
table you wish to use.
Page 40
Image, Plot, Histogram, Pixel values, User values The User can switch from one screen to
another by clicking on View, and either image, plot, histogram, pixel values or user values. A tick
mark will indicate which mode is chosen and the main image window will change accordingly.
Also, the appropriate button on the View controls toolbar will depress on the bottom left corner of
the display area.
Sequence Images Views the images captured from the sequence camera controls.
Black Level Image When acquiring images from a CCD, there will be an unwanted background
signal called the dark current. A Black Reference image is taken and used to correct the
experimental data.
Select View/Black level image to show the black level image. You can use the standard viewing
techniques e.g. image, plot, histogram, statistics, mapping etc. with the black level image. This
black level image will act as a reference for all images taken within this particular sequence. The
black level image is acquired as normal using the Acquire facility in the Main menu toolbar.
NOTE: this function is disabled until black level images are taken using Acquire.
Flatfield image The Flatfield image function corrects for non-uniform illumination or sensitivity.
Select View/Flatfield image to display the image. You can use the standard viewing techniques e.g.
plot, image, histogram, statistics, mapping etc. with the flatfield image. This flatfield image will be
applied to all images taken within this particular sequence. The flatfield reference image is acquired
using the Acquire facility in the Main menu toolbar.
NOTE: this function is disabled until flatfield images are taken using Acquire.
Acquire menu
Live Grab Select Live Grab to take an image with settings as indicated on the Camera control tab.
This facility also available from the Live Grab button along the Software toolbar.
Sequence Grab :Select Sequence Grab to take a sequence of images as previously set in the
Sequence control tab and the Camera control tab. This facility is also available from the Sequence
Grab button on the software toolbar.
Black Reference Disabled
Flatfield Reference Disabled
Analyse menu Disabled
Hardware menu Disabled
Page 41
Help menu
About PixCel... : About PixCel gives information regarding physical memory and disk space
available together with PixCel version number. Click on Help/About PixCel.. the About PixCel
dialogue box will appear stating information. Click the OK button or the exit icon in top right hand
corner of the box to return to the main window.
Contents : Contents holds the on line Help to assist you with the PixCel package. Click on
Help/Contents to access a version of this manual in electronic form.
System Info... : Gives standard Microsoft Windows system information.
Software toolbar
New file Select the New file icon to clear the image area to start a new image. Alternatively
select from the main menu File/New or Ctrl+N.
Open file Select the Open file icon to open an existing image file held on disk. Alternatively
select from the main menu File/Open or Ctrl+O.
When the Open dialogue box appears, select the image from the File name list and choose the OK
button. If the image is not listed, then a search of the directories can be actioned by selecting the
appropriate directory, file type and/or file name. Either double click the item or highlight the option
and click the Open button to select.
NOTE: only .APF or .OPF files can be opened with this method. All other files can be opened by
using the Import facility.
Page 42
Save file To Save an image in the software internal file format, select the Save file icon.
Alternatively select from the main menu File/Save or Ctrl+S.
If saving for the first time, the Save As dialogue box, will appear allowing the user to select a
directory in which to save the file, type a file name, and select a file type. Within a sequence the
images can be saved as 'All' for the sequence as a whole, 'Current frame' for the image currently in
view on the screen, or a particular frame or frames within a sequence. Select and check against the
corresponding requirement and enter the frame numbers if appropriate. If the image has been
previously saved, all new changes will automatically be saved to the original file name and location,
and the original file data will be overwritten.
NOTE: The saved file in the ‘PixCel’ format ie: .apf or .opf, which contains additional information
about how the image was collected.
Cut The Cut feature is functional only when using the Object Linking and Embedding (OLE)
feature. (Advanced future applications only)
Copy The Copy feature allows the image view or a 'rectangular' selection to be copied and
placed on the Windows clipboard for retrieval by another package i.e. Word, Excel, Paintshop Pro
etc. To create a 'rectangular' selection, click in the image view with the left hand mouse button,
depress the Control keyboard button simultaneously and drag a 'rectangular' area. Select the Copy
icon to copy the selected area or image and to paste it onto the clipboard. Alternatively select from
the main menu Edit/Copy or Ctrl+C.
Paste Select the Paste icon to paste the selected area from the clipboard to the area or into a
document or image of your choice. Alternatively select from the main menu Edit/Paste or Ctrl+V.
Toolbars Select the Toolbars icon to access the Toolbar configuration dialogue box.
Page 43
By individually clicking in the check boxes to select the Main, Camera, View, Camera
Init/Optimise and Acquisition Controls will enable or disable the display of the toolbars and control
boxes on the screen. Click on OK to accept changes, Cancel to abandon changes made or the X
button in the top right hand corner of the dialogue box to close the toolbar dialogue box and return
to the main image window. Default settings are Main Controls, Camera Controls and View
Controls. To re-view the toolbars, select View from the main menu, select Toolbars.. and re-select
the options available.
Mapping (Brightness/Contrast) The mapping function controls the display look up tables to
adjust brightness and contrast. Select the Mapping icon to access the Image mapping dialogue box.
Alternatively select from the main menu View/Mapping.
By selecting the centre button or the arrow buttons either end of the slide scale indicator, the
brightness or contrast levels can be adjusted between the low and high thresholds. Minimum and
maximum levels are indicated at the extremes of the slide scale bar. Alternatively, on either side of
the brightness/contrast image, the dotted line can be picked up and dragged to set the low and high
values accordingly. This in turn changes the values in the low and high boxes together with moving
the sliding scale.
If particular values are required, these can be directly typed into the low and high boxes. Any
changes made can be applied by selecting the Apply button. The Reset button will cancel any
changes made and revert to the original image values, ie: the values that appeared before moving
the sliders or dotted line.
Page 44
The Autoscale function can be customised to allow closer autoscale data match to that of the image
being captured. Refer to Chapter 4 View/ Autoscale prefs....
This function is only available when the Image view is selected.
WARNING: PixCel is a multi-tasking Windows program. The mapping functions are used by the
data capture procedures. If you also use the mapping functions during data acquisition, serious
confusion can occur. The best strategy is to only adjust mapping once data taking has completed.
Autoscale: The Autoscale function can be customised, to allow closer autoscale data match to
that of the image being captured. Autoscale initiates the automatic selection of a number of high
and low pixel grey values and adjusts the settings according to the values found.
Click on Autoscale Prefs.. to view the Autoscale Model dialogue box. Select the option required by
clicking the appropriate radio button. Further adjustment can be made by placing the cursor on the
dotted lines either side of the histogram indicated within the dialogue box. Click the Apply button
to accept changes or Close to abandon changes and revert to the main window.
Statistics Select the Statistics icon to access the Statistics information box. Alternatively select
from the main menu View/Statistics.
Page 45
The statistics information box indicates values appropriate to the region of the image area selected,
even when the region box is not visible. These include measurement on the data contained in the
area of interest as well as the description of the area selected (size, position and area, in number of
pixels). The calculated data values include: Maximum, Area, Minimum, Std dev, Skew, Kurtosis,
Median, Upper quartile, Mode, Lower quartile, Mean, % Even. This is a non editable feature,
although it can be copied to the clipboard.
NOTE: the region used by the statistics box is independent of the visible screen zoom and may be
shown by pressing the 'rectangle selection' icon even if the region box is not visible.
Rectangle selection The rectangle is the area indicated by clicking this icon or by holding the
shift key down, clicking and dragging with the left hand mouse button between two points with the
Image view window. The box created is the rectangle selection. It may also be changed by entering
relevant details within the Properties dialogue box. Click on the Rectangle selection icon to enable
or disable the display of the rectangle selection.
Line selection The Line selection is a straight line on the image, indicated by clicking the left
hand mouse button and dragging between two specific points with the Image view window. It may
also be changed by entering relevant details within the Properties dialogue box. Click on the Line
selection icon to enable or disable the display of the line selection.
Print Select the Print icon to access the Print dialogue box. Alternatively select from the main
menu File/ Print or Ctrl+P. The standard Windows 95 printer dialogue box will appear which will
allow the user to indicate which printer to use, which pages to print, and how many copies.
Selecting the Properties button within the Print dialogue box will allow the further selection of the
size and orientation of the paper, resolution and intensity of graphics, choice of fonts and device
quality options. Select OK to accept changes or Cancel to abandon and return to the image window.
Help Select the Help icon for access to the HTML pages containing information about the
PixCel software.
Live Grab Select the Live Grab button to take an image with settings as indicated on the
Camera control tab. Images are taken and displayed continuously until the Stop button is pressed.
Page 46
Sequence Grab Select the Sequence Grab button to take a sequence of images as
previously set in the Sequence control tab and the Camera control tab.
View & navigation toolbar
Image : Click on the Image icon to display the image in the main window.
Plot : Click on the Plot icon to view a line graph of the values under the current line selection.
Histogram : Click on the Histogram icon to show the grey level values under the current
rectangle selection as a histogram..
Pixel values : Click on the Pixel Values icon to show the grey level values of the current
rectangle selection in a spreadsheet format.
User values : Click on the User values icon to view the current control parameters.
First Frame : Click on the First Frame icon to go the first frame in a sequence.
Previous Frame : Click on the Previous Frame icon to go the previous frame in a sequence.
Frame # : The frame # box indicates the number of frames in a sequence
and the number of the frame being viewed at the time e.g. Frame # 1 of 2 indicates you are viewing
image one in a sequence of two. To view a particular image enter the image number in the frame #
box and press the enter key.
Start Playback : Click on the Start Playback icon to start the review of all the images in a
sequence. Playback stops when the last frame has been viewed unless toggle looping has been
enabled.
Stop Playback : Click on the Stop Playback icon to stop the review.
Toggle looping : Toggle looping is a review mode that starts at the first image again when the
last has been reached etc. Click on the Toggle looping icon to select looping of sequences.
Next Frame : Click on the Next Frame icon to view the next frame in a sequence.
Last Frame : Click on the Last Frame icon to view the last frame in a sequence.
Playback speed : Use the slide controls to vary the sequence playback speed and click
Page 47
Apply to apply the changes and Close to close the dialogue box and return to the main image
window.
Status bar
The Status bar is located to the bottom of the screen. It is a static toolbar and cannot be moved
within the screen although it can be switched off from the View main menu. The left side provides
information about the state of the program. The boxes left to right provide information on the
camera acquisition status together with cursor position information. It comprises a number of areas
that are explained below in detail from left to right.
Camera Status: Indicates the mode in which the camera is operating e.g. Ready to
grab an image, Re-optimise for optimisation, or Waiting when waiting for a trigger.
Sequence indicates sequence number within a sequence that has been grabbed
Camera number: Each camera has a code marked on the data stream. This is shown
here as 0-15
Frame number: The camera free runs from start-up, and this shows the frame number
since start-up
Frame time Shows the time from the start of acquisition of each frame in a
sequence.
Pixel Grey level of pixel under the cursor.
X position Y position X and Y position of the image pixel location of the
cursor on the image.
CCD CCD operating temperature is indicated in this box, in degrees C.
Sink Heat sink temperature is indicated in this box, in degrees C.
Page 48
Chapter 5 : Tutorials
Controlling how your image appears
Images are saved as a sequence or as a single image in either .APF, .OPF, 8-bit TIFF, 16-bit TIFF,
FITS, DIB, Prisma, Imager2, Spectacle or Grams file formats. Once a sequence has been loaded
from disk or grabbed by the camera, one image from the sequence is displayed in the main window.
The image can be controlled using brightness/contrast control, lookup tables and analysed by
zooming into and out of a particular area, or viewed as a statistical evaluation, plot, histogram, or as
pixel values. There are several ways of controlling how each grey level of the image acquired is
displayed on your monitor. The image acquired can have over a million grey levels but the display
has only 256 colours or grey levels.
The following parameters allow you to adjust the display of your data to allow you to see the details
you want without affecting the actual data.
Image View
Select the Image view from the View menu or use the Image icon on the view and navigation
toolbar. The image can be accessed for viewing at any time throughout the use of the PixCel
software by this method. For images larger than the display window, use the window scrollbars
located at the bottom and right hand side of the image and to pan and scroll within the image. These
are not available on images that fit inside the display area. The Status bar shows current cursor
position and pixel intensity.
Mapping (Brightness/Contrast)
Select Mapping from the View menu or use the Mapping icon on the main control toolbar to display
the image mapping dialogue. This function is only available in Image View.
The slide controls alter the brightness and contrast. Drag the button and you will notice the changes
in the histogram above and the pixel numbers changing in the low and high boxes. Gradual changes
Page 49
can be made by clicking on the left and right arrow buttons. Again changes can be seen in the low
and high boxes. Alternatively, figures can be entered into the low and high boxes.
Within the brightness/contrast window the dotted vertical lines representing the maximum and
minimum display grey levels can be picked up by pressing and holding the left hand mouse button
and moving the required distance. The changes in figures appear in the low and high boxes and
appropriate adjustment is made to the slide controls.
Click on the Apply button to apply the changes or the Reset button to cancel the changes made and
revert to the previous parameters.
Click on Autoscale to set the maximum and minimum display values automatically. Sometimes the
automatically selected values do not give you the best display of your image. If this is the case, you
can select the grey level distribution which best matches your image. Click OK to accept the
changes or Cancel to abandon the changes and revert to the Mapping dialogue box.
To close the Mapping dialogue box and return to the main window click on the X button in the top
right hand corner of the box.
Zoom in/out
Page 50
Click the right hand mouse button to access the Zoom in/out menu.
To return to the original image format click the right hand mouse button and choose x1 from the
Zoom in/out menu. CLick outsode of the option box to close it and return to the main window.
Use the Shift key together with dragging the mouse to select the area to fill the main window (zoom
in). This defines the rectangle selection for plots and histograms as well.
use the Ctrl key together with dragging the mouse to select an area that the main window should fit
into (zoom out). This defines the rectangle selection for plots and histograms etc.
The Properties dialogue box contains details of the image. Copy to clipboard, Print and Export short
cut options are also available from this option box.
Selecting another image from the Sequence
Use the First/Last/Next/Previous/Frame #/Play and Stop buttons on the view and navigation toolbar
to move from one image to another in the sequence. Alternatively, enter the frame number in the
Frame # white box if a particular frame is required. Press the play button to play a movie of all the
images in a sequence.
Page 51
Statistics
This feature provides information about the image defined by the current rectangle selection i.e.
Maximum, Area, Minimum, Std dev, Skew, Kurtosis, Median, Upper Quartile, Mode, Lower
Quartile, Mean, % Even, X, Y, Width, and Height.
Select the Statistics icon to access the Statistics dialogue box. Alternatively select View/Statistics
from the main menu.
To close the Statistics dialogue box and return to the main window click on the exit button in the
top right hand corner of the box.
Toolbar configuration
Select the Toolbars icon to access the Toolbar configuration dialogue box. Individually clicking in
the check boxes to select the Main, Camera, View, Camera Init/Optimise and Acquisition Controls
will enable or disable the display of the toolbars and control boxes on the screen.
Click on OK to accept the changes or Cancel to abandon the changes made or the X button in the
top right hand corner of the dialogue box to close the toolbar dialogue box and return to the main
image window. Default settings are Main Controls, Camera Controls and View Controls. To review
the toolbars, select View from the main menu, select Toolbars and reselect the options available.
This feature is available in all views.
Page 52
Copying to the clipboard
Use the Edit/Copy option from the menu, Ctrl+C, or the Copy icon to copy the rectangle selection
to the clipboard. The information copied depends on which view is selected.
This selection can be pasted into another package e.g.Word or Excel.
The Copy function is also available by clicking the right hand mouse button in the image and
selecting Copy to Clipboard from the Zoom in/out option box.
Printing
Select File/Print from the menu, Ctrl+P to access the Print dialogue box
This will allow the selection of desired printer, print properties, print range and quantity of copies.
Click on OK to accept the changes or Cancel to abandon the changes.
Alternatively, click on the Print icon to print the rectangular selection of the image.
The image can be previewed before printing by using the Print Preview menu option in the File
main menu. The page can also be changed from landscape to portrait, letter to A4 etc. using the
Page Setup option from the same menu.
Properties
Page 53
The Properties dialogue box provides details about the name of the sequence, the date it was
created, pixel locations of the line selection and rectangle selection, together with the image width,
height and depth.
The Properties dialogue box is activated by clicking with the right mouse button in the main image
window and selecting Properties from the Zoom in/out options box.
The current line and rectangle selection parameters can be edited by entering information in the
white boxes. The current line selection can be centred horizontally or vertically by clicking in the
appropriate box.
A pull down menu in the Current Rectangle Selection area of the properties box allows you to set
some useful regions quickly, such as the central 64 x 64 pixels of the image.
Click on OK to accept the changes or Cancel to abandon the changes and revert to the main
window.
Alternatively, to close the Properties dialogue box and return to the main window, click on the X
button in the top right hand corner of the box.
Loading Files
To load a file go to Main menu, click on File/Open. The Open dialogue box will appear.
Page 54
The Open dialogue box allows you to open a PixCel format file (*.APF or *.OPF) from a particular
drive and folder.
The Import option allows Imager2 and GCI images to be imported into PixCel. The Import option
allows Imager2 and GCI images to be imported into PixCel. Click on Import to open the Import
dialogue box.
Page 55
Saving to disk
To save changes made to an image file go to Main menu and click on File/Save or press Ctrl+S.
The image or sequence of images will be saved and will overwrite the previously saved sequence.
To save a sequence in a different location or with a different name, click on File/Save As.
The Save As dialogue box will appear prompting you to enter a new drive, folder, file name and
which images in the sequence to save.
Click on Save to save your image or the Cancel button to abandon the changes and revert to the
main image window.
Exporting an image to DIB, TIFF, FITS, Prisma or Grams format
Page 56
To save the current selected image as 8-bit DIB (Windows Bitmap), 8-bit TIFF or 16-bit TIFF,
FITS, Imager2, Prisma, Spectacle or Grams format, go to the Main menu and click on File/Export
to view the Export As dialogue box.
NOTE: These images may not be imported or opened by PixCel. If you want to view the image in
the future with PixCel you must save a copy using the File/Save facility.
Select a folder to save into and enter a filename.
Page 57
Choose the required frames from the Frames selection options. NOTE: the frame selection entry
becomes red if an invalid range is selected.
Choose the print area using the Pixel selection i.e. whole of the image or a rectangle selection.
Check or uncheck either 8-bit DIB, 8-bit TIFF, 16-bit TIFF, FITS, Prisma, Spectacle or Grams
options as appropriate.
Click on the Save button to save the image or Cancel to abandon the settings and return to the main
window.
NOTE: Export can also be accessed by clicking the right hand mouse button in the Image window
to bring up the Zoom in/out option box or by clicking on File in the main menu and selecting
Export...
NOTE: When exporting an 8-bit image format, the exported image has the same grey level range as
Saving a sequence
Select File/Save from the main menu, Ctrl+S, or use the Save icon on the software toolbar.
If saving for the first time, the Save As dialogue box will appear. Select or enter a file name and
destination on disk and enter details together with the frame selection details.
Click the Save button. The image sequence will be saved to the selected location. Click on the
cancel button to cancel the changes and revert to the main window.
If subsequently saving by clicking the save icon or selecting File/Save, the image saved previously
will be overwritten.
Open an existing sequence
Page 58
Select File/Open from the main menu, Ctrl+O, or use the Open icon on the software toolbar. The
Open dialogue box will appear. Select a file/image from the required location, then press the Open
button to open the file/image or Cancel button to revert to the main window.
Viewing and modifying the current selections
Select the Plot view from the View menu or use the
icon on the view controls toolbar
The plot is made from the pixels that are under the line selection.
Use the First/Last/Next/Previous/Frame#/Play and Stop buttons on the view and navigation toolbar
to move from one image to another in the sequence. The plot is updated with the pixels from the
new image under the line selection.
Use the Copy option from the Edit menu or the Copy icon to copy the plot to the clipboard as a
Windows Metafile and as Comma Separated Values (CSV text format). Alternatively, click the
right hand mouse button to access a menu where the option of Copy to clipboard is also available.
Select Print from the file menu, the Print icon, or via the zoom in/out option box to print the plot.
The plot can be previewed before printing by using the Print Preview menu option. The page can
also be changed from landscape to portrait, letter to A4 etc, using the Page Setup option from the
same menu.
Mapping controls are disabled in this view.
Select the Histogram view from the View menu or use the
toolbar
icon on the view controls
The histogram view is made from the pixels that are contained by the rectangle selection.
Use the First/Last/Next/Previous/Frame#/Play and Stop buttons on the view and navigation toolbar
to move from one image to another in the sequence. The histogram view is updated with the pixels
from the new image that are contained by the rectangle selection.
Use the Copy option from the Edit menu, or the Copy icon to copy the plot to the clipboard as a
Windows Metafile or as Comma Separated Values (CSV text format). Alternatively, click the right
hand mouse button to access a menu where the option of Copy to clipboard is also available.
Page 59
Select Print from the file menu, the Print icon or via the zoom in/out option box to print the plot.
The histogram can be pre-viewed before printing by using the Print Preview menu option. The page
can also be changed from landscape to portrait, letter to A4 etc, using the Page Setup option from
the same menu.
Statistics and Mapping controls are disabled in this view.
Select the Pixel Value view from the View menu or use the
toolbar
icon on the view controls
The pixel view is made from the pixels that are contained by the rectangle selection. It is shown in
the form of a table.
Use the First/Last/Next/Previous/Frame #/Play and Stop buttons on the view and navigation toolbar
to move from one image to another in the sequence. The pixel view is updated with the pixels from
the new image that are contained by the rectangle selection. The minimum pixel value(s) are
highlighted in blue and the maximum in red.
Use the Copy option from the Edit menu or the Copy icon to copy the pixel values to the clipboard
as Comma Separated Values (CSV text format). Alternatively, click the right hand mouse button to
access a menu where the option of Copy to clipboard is also available.
Select Print from the file menu, the Print icon or via the zoom in/out option box to print the plot.
The pixel values can be previewed before printing by using the Print Preview menu option. The
page can also be changed from landscape to portrait, letter to A4 etc, using the Page Setup option
from the same menu.
NOTE: only the pixels in view are printed.
It is advisable to select the minimum area of specific interest and capture the rectangle before
copying or printing as the amount of information in a full screen grab being copied to the clipboard
will cause extended delay in copying or printing.
Statistics and Mapping controls are disabled in this view.
Select the User Value view from the View menu or use the
toolbar
icon on the view controls
Parameters used to capture a sequence are displayed using this feature. They include all the camera,
sequence and focusing parameters
Page 60
Chapter 6 : Miscellaneous
Glossary
Binning Charge from each pixel is added (in both vertical and horizontal directions) to its
neighbouring pixel. This can be done many times in each direction before reading out the charge
from the CCD. The binning is a noiseless addition that occurs at the expense of image resolution.
Clocking A function of moving the charge within the CCD.
Parallel – Process of clocking the parallel clock to move the image towards the
output register. This direction is usually the vertical direction on the PixCel image
display.
Serial – Moves the charge in the output register towards the output transistor. This
direction is usually the horizontal direction on the PixCel image display.
Line selection The currently selected line on the image. (See Chapter 2 Operating the software,
line selection).
Rectangle selection The current rectangle selection on the image. (See Chapter 2 Operating the
software, rectangle selection).
CSV Comma Separated Values (CSV) is a text format for exporting data to many other software
packages such as Excel.
Histogram A Histogram is a graphical representation of grey level (pixel intensity) against
frequency (number of occurrences of grey levels).
Main menu toolbar The Main menu toolbar allows access to all the features of the software.
Mapping Control of the brightness and contrast of the displayed image.
Pixel values A spreadsheet representation of data in the image.
Plot A plot is a graphical representation of the grey level (pixel intensity) along the current line
selection.
Readout rate The readout rate is the rate at which the camera controller reads each pixel of the
CCD.
Software toolbar The Software toolbar is located at the top of the screen containing a range of
icons to manipulate the image.
Status bar The status bar is located at the bottom of the screen and holds information regarding the
acquiring of the image.
User values User Values are the parameters used to acquire the sequence of images and includes
the camera control monitored voltages.
Page 61
View & navigation toolbar The View and navigation toolbar is located at the bottom of the screen.
It is used for quick selection of the type of display (histogram, line plot etc.) and locating frames
within an image sequence.
Page 62
Appendix A : Technical support & warranty
Your imaging system comes with a 1 year hardware parts and labour warranty and three months
software warranty, complete with free use of the technical support hotline, from the date of first use
of the system. The warranty period (hardware and software) including the hotline service may be
extended by contacting either PixCellent Imaging or your local distributor.
Hardware warranty
In the unlikely event of malfunction during the warranty period directly attributable to faulty
materials and/or workmanship, PerkinElmer Life Sciences will either replace or repair, at our
discretion, the faulty item. We shall have no obligation under this warranty if the product has been
misused, carelessly handled, defaced or repaired without prior authorisation from PixCellent
Imaging. The product should be returned to PixCellent Imaging, Cambridge, England or an
authorised local distributor, only after a Return Authorisation Number has been obtained from the
technical support hotline. Proof of purchase must be provided and the product should be returned in
its original or adequate packaging. Shipping charges are to be prepaid or the purchaser assumes the
risk of loss or damage in transit. PixCellent Imaging will make the final determination as to the
existence and the cause of any alleged defect.
Software warranty and technical support hotline
The technical support hotline will provide software upgrades and advice about PixCellent Imaging
systems free of charge during the warranty period, including extended warranty. By utilising the
Hotline (using either the telephone, fax or e-mail) you have the opportunity to optimise the
operation of your system for your particular application. If a question cannot be answered
immediately, due to the complexity of the enquiry for instance, further assistance will be provided
with 24 hours of the enquiry being logged.
When contacting the technical support hotline remember to have your system serial number at hand.
This can be found on the system hardware, the software disks and available on-line in Help.
NOTE : The technical support hotline is an advisory service, not a consultancy, and PixCellent
Imaging reserve the right to limit advice to users at its discretion.
Page 63
Appendix B : Maintenance
Maintenance
The only routine maintenance required for the camera head, is to ensure the optical path is kept
clean. Under normal circumstances this will involve removing any dust on the window of the
camera head with a good quality 'cotton-bud' moistened with a non-aggressive solvent such as
Isopropyl alcohol.
On some heads, access to the CCD window is through the shutter on the front of the camera head.
The easiest way to open the shutter is by setting a long exposure time, say 1000 seconds, and
grabbing an image. When cleaning is complete the exposure can be aborted by clicking on the Stop
button. No damage will be caused to the CCD by this over-exposure.
The camera head for cooled systems can lead the front window to be fractionally cooler than
ambient air temperature. Under conditions of extreme humidity, condensation can form on the front
window. This must be dried carefully. Moisture must not be allowed onto the shutter blades which
will be damaged if operated damp.
WARNING: Three things to be careful of when carrying out this exercise.
Only clean the front window of the camera head. Do not touch any of the CCD contacts
around the edge of the device (for uncooled cameras only).
Take care not to knock or move the shutter blades as this may cause the shutter to
malfunction.
Do not get the Isopropyl alcohol or any other liquid onto the shutter blades. They are very
delicate and the liquid will cause the blades to stick together.
Any problems or queries should be directed to your local distributor or the PixCellent Imaging
Telephone no: +44 1223 362668, Facsimile no: +44 1223 362668 or Email on [email protected].
Page 64
Appendix C : Guidelines for Using Liquid
Nitrogen Safely
This section offers some general guidelines for using liquid nitrogen safely. However, to conform
to local safety regulations, you must contact your local Health and Safety Officer for any additional
precautions that you may need to take. The main hazards associated with liquid nitrogen systems
are outlined below:
Extreme Cold
Liquid nitrogen and surfaces cooled by it are extremely cold indeed and cause skin damage similar
to burning if touched. Flesh can freeze and stick to cold services. This is a particular problem if the
skin is in any way damp because this dampness frezes the skin to the cold surface.
Always wear protective clothing -- goggles for eye protection, loose fitting gloves which can easily
be removed if liquid is split inside them and sensible shoes or boots, with trousers that cover the
tops of the shoes to prevent liquid from running inside them.
Asphyxiation
If any spillage occurs, a large volume of nitrogen gas may accumulate, displacing oxygen from the
room and making it impossible to breathe. This is potentially lethal. No sensation of suffocation
is experienced during nitrogen asphyxiation with drowsiness and mild euphoria being the only
symptoms. Liquid nitrogen must be stored and handled in the well ventilated area. Should spillage
occur precautions must be taken to ensure that the gas can disperse and be area affected should be
evacuated until this has occurred.
Fire
Although nitrogen does not support combustion, at the temperature of liquid nitrogen there is a
danger of oxygen condensing from the atmosphere onto cold surfaces. Oxygen may also condense
out of the air so that with the liquid nitrogen it forms a mixture containing up to 50% oxygen. In
either case there is a danger of spontaneous combustion when either liquid comes into contact with
any combustible material.
Damage
Cold liquid can cause damage to various materials including the installation of electrical cables and
plastic flooring.
Page 65
Storage and Transferring
Liquid nitrogen is generally stored in evacuated containers, but its relatively high latent heat permits
short-term storage in formed plastic vessels.
Vessels containing liquid nitrogen should be covered but not sealed. Covering prevents moisture
condensing out of the air to form ice which may cause a blockage and result in pressure build-up.
The gas to liquid volume ratio is approximately 680: 1, therefore to allow the nitrogen gas to escape
safely, all containment vessels must be fitted with exhaust valves. Otherwise pressure build-up will
be rapid and may cause the containment vessels to fracture explosively. All pressurised containers
in which liquid nitrogen is stored must be inspected regularly. Contact your local Health and
Safety Officer for further information about this.
Liquid nitrogen may be transferred from one container to another by pouring or by the use of silicon
rubber troops. Liquid nitrogen can cause flexible tubes to become brittle leading to fracture of the
tube and then spillage of liquid nitrogen.
Pouring nitrogen into the dewar directly is more likely to lead to spillage. The nitrogen fill port of
our high-performance liquid nitrogen dewar is fairly wide and with a reasonable size of funnel it is
possible to fill the dewar efficiently by pouring. It is also possible to fill the dewar using an
electrically operated pump or a self pressurising container. Self pressurising containers generate
about one atmosphere of differential pressure and it is this pressure that forces the liquid nitrogen
out. Never used compressed air to force liquid nitrogen out of the containment vessels.
Whatever means you used to fill the dewar, always remember that flexible plastic pipes will become
very cold and (for plastic or rubber tubes) very brittle during transfer. Avoid inserting an openended tube into the liquid as there is a tendency for the liquid to squirt out under self generated
pressure unless the warm end is blocked until the other is entirely cold.
After the dewar has been first filled and while it is the process of cooling down from room
temperature considerable boiling off of the nitrogen will occur. As the SINK temperature reaches
about 110K the boil-off rate increases rapidly for a short time and then reduces considerably. This
behaviour is quite normal although it can be rather surprisingly when seen for the first time.
When the dewar is first filled, the consumption of liquid nitrogen will be higher while the related
shields and support in some are cooled down. Therefore it is a good idea to top of the dewar with
liquid nitrogen after 2-3 hours. Subsequent re-filling of the dewar would not need topping up in
this way.
The dewar can be completely filled with liquid nitrogen when it is used fixed in an upwards or
downwards looking orientation. In any other orientation, the capacity of the dewar will be reduced
depending on the angle at which it is to be used. In any intermediate position, the dewar can never
be fully filled with liquid nitrogen. This will therefore reduce the time period that the dewar is able
to keep the CCD cold.
In the downwards looking orientation with a nitrogen fill tube at the top, the high-performance
dewar should last for approximately 30 hours between refills of nitrogen, assuming that the vacuum
inside the dewar is in good condition.
When a dewar is to be used in an upwards looking orientation then the nitrogen needs to be
introduced into the liquid nitrogen cylinder inside the dewar using a fill tube. Before it is first used
in this orientation it is necessary to install the supplied fill tube inside the dewar by threading it into
Page 66
the tapped location visible from the top of liquid nitrogen dewar. The liquid nitrogen fill tube must
be inserted through this installed tube so that that the dewar is filled fully.
If the dewar is to be used in all orientations then the liquid nitrogen insert tube will need to be
reduced in length to allow the dewar to be half filled in any orientation.
Page 67
Appendix D: Operating High-performance
Liquid Nitrogen Dewars.
The main parts of a sideways looking high-performance dewar are shown in figure 2. At the top is
the liquid nitrogen fill port and on one side is the entrance aperture through which the image is
projected onto the CCD. The layout of the unit is such that the CCD would normally be behind an
electronic shutter which is operated by the digital driver electronics unit automatically and fully
controlled by the system software. At the rear of the unit is the evacuation valve and the camera
port electrical connector mounted on a separate box that stands off the rear of the dewar. In the case
of a downwards looking dewar the entrance aperture is in the centre at the bottom of the dewar, on
the axis of the dewar but at the opposite end from the liquid nitrogen fill port.
The outer vacuum case of the dewar is made of aluminium alloy. Internally there are radiation
shields made of super installation to surround the nitrogen reservoir. This is designed to minimise
the heat load onto the nitrogen reservoir and extends the hold time of the system before it needs to
be re-filled with liquid nitrogen.
The system is fitted with a vacuum/pressure relief valve next to the evacuation valve. Inside the
dewar and attached to the liquid nitrogen cylinder is a small charcoal adbsorption pump which helps
to maintain the vacuum in the main dewar for extended periods of time.
The following tasks need to be performed to keep the dewar operating efficiently:
•
•
•
Filling the dewar with liquid nitrogen.
Re-pumping the dewar to create a better or new vacuum.
Cleaning the outside of the dewar.
The procedure to follow for each of these tasks is described in the next few sections.
Filling the Dewar with Liquid Nitrogen
The dewar is normally supplied under vacuum and so the unit should not need to be pumped before
being used. If, however, the vacuum has been released it is important that the dewar should be
evacuated before any attempt is made to cool it. To begin using the dewar it must be filled with
liquid nitrogen.
Note: for optimum performance, the imaging system should be powered on and the CCD initialise
using the supplied software before liquid nitrogen is added to the dewar. This minimises
unnecessary trapped charge being deposited on the surface of the CCD leading to the appearance of
raised dark current.
Page 68
Appendix E: Maintaining High-performance
Liquid Nitrogen Dewars.
Re-Pumping the Dewar
The symptoms that indicate the dewar needs to be re-pumped are:
•
•
•
The liquid nitrogen temperature indicated by the software as being the SINK temperature
should normally be approximately -190C. The CCD temperature is usually much higher,
approximately -120C. If the vacuum starts to degrade then the CCD temperature will be
seen no longer to reach as low a level as it normally does because of the greater losses
associated with the poor vacuum.
The length of time for which a single fill of liquid nitrogen lasts before the dewar needs to
be re-filled will be noticed to progressively decrease.
Condensation forms on the outside of the dewar or the dewar feels cold and clammy to the
touch. Should condensation occur, and it can occur particularly on the front window of the
dewar, then this may be an indication that the vacuum needs to be improved. Remember,
however, that no matter how good a liquid nitrogen dewar is, under conditions of high
humidity, condensation will occur. It is inevitable that one of the coldest parts of any liquid
nitrogen dewar will be the window that protects the CCD from the outside world. As a
result of high humidity conditions obtaining then it is quite likely that problems will arise
because of condensation on the window. If this is a serious problem for example because
the unit is being used on a telescope in a cold, damp, climate then it is sometimes helpful to
arrange that dry nitrogen gas (possibly from the boil-off from the nitrogen inside the liquid
nitrogen dewar) is directed with a small tube onto the front window of the dewar.
In practice most dewars will need to be re-pumped occasionally, depending on usage.
Equipment Required
A vacuum pumping system such as a turbo molecular pumping system or a vapour diffusion
pumping system. Each should be able to achieve a vacuum of 2x10 -7 mbars or better. You really
need to have a vacuum pumping system with associated vacuum gauges and gauge heads. Suitable
vacuum piping and vacuum connectors must also be provided.
Warning: never use an ion pump or a sputter-ion pump as they can cause
irreparable damage to static sensitive CCDs.
The dewar contains a sorb pump whose function is to remove the remaining gas molecules once the
dewar has been pumped and the valve closed. It operates by adbsorbing free gas molecules when
cold. If the dewar is cold when being pumped with an external vacuum pump, air in the space
above the diffusion pump and oil from the diffusion pump may be drawn into the dewar. This oil
will contaminate the sorb pump and the face of the CCD and will be almost impossible to remove,
leaving the dewar and the CCD chip within it irreparably damaged. The liquid nitrogen filled
dewar is a much more powerful pump than the diffusion pump so pumping the dewar when cold
may actually be worse than not pumping the dewar at all.
Page 69
If air is accidentally let into the dewar, even briefly, then the dewar must be allowed to warm up to
room temperature for 24 hours before opening the valve. Open the valve very slowly once it is
properly warm. If the valve is open while the dewar is still even slightly below ambient
temperature then moisture will condense out from the air into the vacuum vessel. Any water in the
vacuum vessel will take a very long time to pump out. What is worse, condensation that forms on
the surface of the CCD can cause corrosion to the exposed aluminised tracks causing permanent
damage to the CCD.
Warning: damage caused to the CCD as a result of condensation being allowed
to form on the device following careless and inappropriate release of the vacuum
valve, allowing air into the dewar while the dewar is cold, is not covered by the
guarantee provided by PixCellent Imaging Limited.
The vacuum release valve on the dewar is a component which is critical to the retention of the
vacuum. It must be kept scrupulously clean it all times. Any dust or dirt around the vacuum inlet
or around any of the vacuum surfaces, should be carefully remove prior to any pumping operation.
The vacuum valve should never be opened if there is any possibility that there is any residual dirt in
the outlet.
Some pumping systems have gauges included and generally these are suitable for determining the
vacuum levels within the dewar. For example, a Penning vacuum gauge could be situated close to
the throat of the pump. In this case a factor of 10 allowance must be made to compensate for the
pumping restrictions caused by pipe lengths and valves between the pump throat and the dewar. In
this case a typical of pumping arrangement could give the following results:
Pump throat indicated vacuum = 2 x 10⁻⁶ mbar
Actual dewar vacuum = 2 x 10⁻⁴ mbar
Here Is the Procedure to Follow:
•
•
•
•
•
•
•
•
•
•
•
Switch off the electronics unit.
Remove all cables from the dewar.
Drain off any excess liquid nitrogen still inside the dewar and set the dewar aside to reach
room temperature for at least 24 hours.
Connect the dewar to the vacuum pumping system via the valve adapter.
Evacuate all the pipes leading through to the dewar vacuum valve to approximately 1 x 10 -3
mbar.
Carefully open the vacuum valve fully to allow the remaining air in the dewar to be pumped
out.
Begin pumping.
If you are using a diffusion pumping system, rough pump the dewar until the diffusion
threshold is reached (approximately 1 x 10 -1 mbar) then switch over to the high vacuum
pumping. Refer to the instruction supplied in the pump manufacturers documentation for
details on how to do this.
If you are using a turbo pumping system, the system will normally automatically change
from rough to high vacuum pumping. Refer to the instructions supplied by the pump
manufacturers for details on how to do this.
Continue pumping until the pressure is approximately 1 x 10⁻⁴ mbars within the dewar (1 x
10 -5 mbars indicated on the pump vacuum gauge). It is worth noting that because there is a
charcoal sorb pump within the dewar it might take a surprisingly long time to pump to this
level if there has been a substantial amount of gas and particularly water vapour absorbed by
the charcoal sorb pump.
Slowly close the vacuum valve so as to allow any vacuum instability to clear.
Page 70
•
Turn off the pumping system and disconnected it from the dewar, following the instructions
supplied by the manufacturer of the vacuum pump system.
If the dewar only holds a vacuum for a very short time period immediately after pumping, it is
likely that dirt is preventing the valve "O"-rings sealing correctly. In this case it may be necessary
to dis-assemble the vacuum valve in order to clean it out properly. This should only be done by an
experienced engineer and may require the unit to be returned to PixCellent Imaging Limited for
repair.
The vacuum within the dewar will, in time, degrade because of air slowly seeping into the dewar
around the various seals and also because of the release of air which was trapped in the dewar at
manufacture but slowly escapes into the vacuum vessel throughout its life. This process is known
as out-gassing. This happens particularly every time the dewar goes through a hot/cold cycle.
Therefore if the dewar can be kept cold, the vacuum will hold much longer than if it is cycled
frequently. These effects are more prevalent in a new dewar. After the dewar has been pumped a
few times, the requirement for routine vacuum pumping will be reduced.
The dewar should be kept evacuated whenever possible. This encourages out-gassing. The dewar
is then more easily pumped down even if it is let up briefly to atmospheric pressure.
Cleaning the outside of the Dewar
During operation, the outside of the dewar should be kept as clean is possible and regularly dusted
down with dry clean cloth.
The window on the front of the dewar should in particular be kept very clean. Any dirt settling on it
will obstruct the light falling on the CCD. Lens cleaning tissue should be used to wipe the window.
Stubborn deposits on the window can be removed by wiping the window with the lens cloth
moistened with a non-aggressive alcohol solvent such as isopropyl alcohol.
Page 71